Excel for Microsoft 365 Word for Microsoft 365 Outlook for Microsoft 365 PowerPoint for Microsoft 365 Excel 2021 Word 2021 Outlook 2021 PowerPoint 2021 Excel 2019 Word 2019 Outlook 2019 PowerPoint 2019 Excel 2016 Word 2016 Outlook 2016 PowerPoint 2016 Excel 2013 Word 2013 Outlook 2013 PowerPoint 2013 Excel 2010 Word 2010 Outlook 2010 PowerPoint 2010 More…Less
You can zoom in to get a close-up view of your file or zoom out to see more of the page at a reduced size. You can also save a particular zoom setting.
Quickly zoom in or out
-
On the status bar of your Office app, click the zoom slider.
-
Slide to the percentage zoom setting that you want. Click — or + to zoom in gradual increments.
Note: In Outlook, the zoom slider zooms only the content in the Reading Pane.
Click the headings below for more information.
Note: This procedure isn’t available in Excel for the web. As a workaround, consider opening the file in Excel Desktop to change the setting.
You can choose how much of a document, presentation, or worksheet you view on the screen.
In Word
Do one of the following:
-
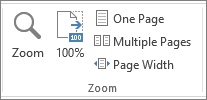
On the View tab, in the Zoom group, click Zoom 100%. This returns the view to 100% zoom.
-
On the View tab, in the Zoom group, click One Page, Multiple Pages, or Page Width.
-
On the View tab, in the Zoom group, click Zoom, and then enter a percentage or choose any other settings that you want.
In PowerPoint
Do one of the following:

-
On the View tab, in the Zoom group, click Fit to Window, which changes the current slide to the size of your PowerPoint window.
Note: There also is a Fit to Window button near the zoom slider on the status bar.
-
On the View tab, in the Zoom group, click Zoom, and then enter a percentage or choose any other settings that you want.
In Excel
Do one of the following:
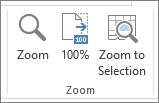
-
On the View tab, in the Zoom group, click Zoom 100%.
-
On the View tab, in the Zoom group, click Zoom to Selection, which maximizes the view of cells that you’ve selected.
-
On the View tab, in the Zoom group, click Zoom, and then enter a percentage or choose any other settings that you want.
In Outlook
In the main Outlook window, the zoom slider is the only way to zoom in or out. When you are reading or editing a message, zoom from the ribbon:
-
In an open message, on the Message tab, in the Zoom group, click Zoom.
-
In the Zoom dialog box, enter a percentage or choose any other settings that you want.
Notes:
-
Word doesn’t save zoom settings in documents. Instead, it opens a document at the last zoom level you used.
-
Excel for the web doesn’t support saving the zoom level, because the View tab doesn’t have a Zoom group, so you must use the status bar to change the zoom level. As a workaround, consider opening the file in Excel Desktop to save the zoom level using the following procedure.
-
Open the presentation or worksheet that you want to save with a particular zoom setting.
-
On the View tab, in the Zoom group, click Zoom.
-
Choose the setting that you want.
-
Click Save.
Keyboard shortcut: Ctrl+S
-
In Word, Outlook, PowerPoint or Excel, on the status bar, click the zoom slider
.
-
Slide to the percentage zoom setting that you want. Click the — or + buttons to zoom in gradual increments.
Note: In Outlook, the zoom slider zooms only the content in the Reading Pane.
You can choose how much of a document, presentation, or worksheet you view on the screen.
In Word
Do one of the following:
-
On the View tab, in the Zoom group, click Zoom 100%. This returns the view to 100% zoom.
-
On the View tab, in the Zoom group, click One Page, Two Pages, or Page Width.
-
On the View tab, in the Zoom group, click Zoom, and then enter a percentage or choose any other settings that you want.
In Microsoft PowerPoint
Do one of the following:
-
On the View tab, in the Zoom group, click Fit to Window, which changes the current slide to the size of your PowerPoint window.
Note: There also is a Fit to Window button near the zoom slider on the status bar.
-
On the View tab, in the Zoom group, click Zoom, and then enter a percentage or choose any other settings that you want.
In Excel
Do one of the following:
-
On the View tab, in the Zoom group, click Zoom 100%.
-
On the View tab, in the Zoom group, click Zoom to Selection, which maximizes the view of cells that you’ve selected.
-
On the View tab, in the Zoom group, click Zoom, and then enter a percentage or choose any other settings that you want.
In Outlook
In the main Outlook window, the zoom slider is the only way to zoom in or out. When you are reading or editing a message, zoom from the ribbon:
-
In an open message, on the Message tab, in the Zoom group, click Zoom.
-
In the Zoom dialog box, enter a percentage or choose any other settings that you want.
In Word
To save a particular zoom setting with your document or template so that it always opens with that zoom setting, you must make a change in the document or template first. That can be as simple as adding and deleting one character (or a single space).
-
Open the document or template that you want to save with a particular zoom setting.
-
On the View tab, in the Zoom group, click Zoom.
-
Choose the setting that you want.
-
Add and delete a single character in the document or template.
-
Click Save.
Keyboard shortcut: Ctrl+S
In PowerPoint or Excel
-
Open the presentation or worksheet that you want to save with a particular zoom setting.
-
On the View tab, in the Zoom group, click Zoom.
-
Choose the setting that you want.
-
Click Save.
Keyboard shortcut: Ctrl+S
Need more help?
Want more options?
Explore subscription benefits, browse training courses, learn how to secure your device, and more.
Communities help you ask and answer questions, give feedback, and hear from experts with rich knowledge.
In this course, we’ll talk about how to zoom in and out in Word. As we go over, there are different ways to use the zoom function, where Microsoft Word lets you zoom in and out of a document. Meanwhile, this is the continuation of the previous tutorial on how to use find and replace tools in a word document and the spelling and grammar checker in MS Word.
Table of contents
- Zoom in and Zoom Out in MS Word
- What is Zoom In and Zoom Out Operation in MS Word?
- Where is Zoom In and Zoom Out in MS Word?
- How to Zoom in MS Word using Keyboard
- Example on How to Zoom in MS Word
- Zooming of a Document Using using (+) and (-) Buttons
- What is the Maximum Zoom in MS Word?
- A Few Useful Word Shortcuts
- Summary
What is Zoom In and Zoom Out Operation in MS Word?
The Zoom operation in MS Word just changes the size of the font on the screen but doesn’t change anything else about the document. Microsoft Word lets you zoom in and out of a document.
When we use the zoom-in function, the text gets bigger, but when we use the zoom-out function, the text gets smaller.
Where is Zoom In and Zoom Out in MS Word?
The Zoom In and Zoom Out buttons in MS Word are in the lower-right corner of the application window, where you can find the Zoom slider. To reduce the level of magnification, click and drag the slider to the left, toward the minus sign (-).
The level of zoom is shown as a percentage to the right of the zoom slider. To make the picture bigger, click and drag the slider to the right, or towards the plus sign (+). You can also click the “+” or “-” next to the Zoom slider to make the image bigger or smaller.
How to Zoom in MS Word using Keyboard
| To do this | Press |
|---|---|
| Undo the previous action. | Ctrl+Z |
| Redo the previous action, if possible. | Ctrl+Y |
| Adjust the zoom magnification. | Alt+W, Q, then use the Tab key in the Zoom dialog box to go to the value you want. |
| Split the document window. | Ctrl+Alt+S |
Example on How to Zoom in MS Word
Here is a simple example of how to zoom in and out in MS Word.
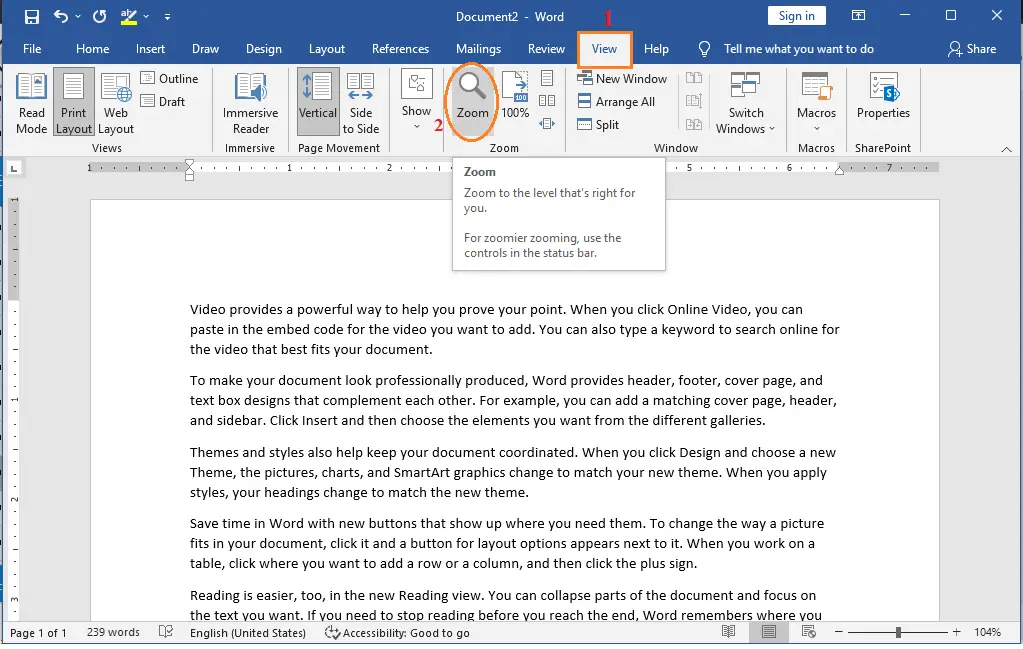
- Step 1 − Click the View tab, and then, as shown below, click the Zoom button.
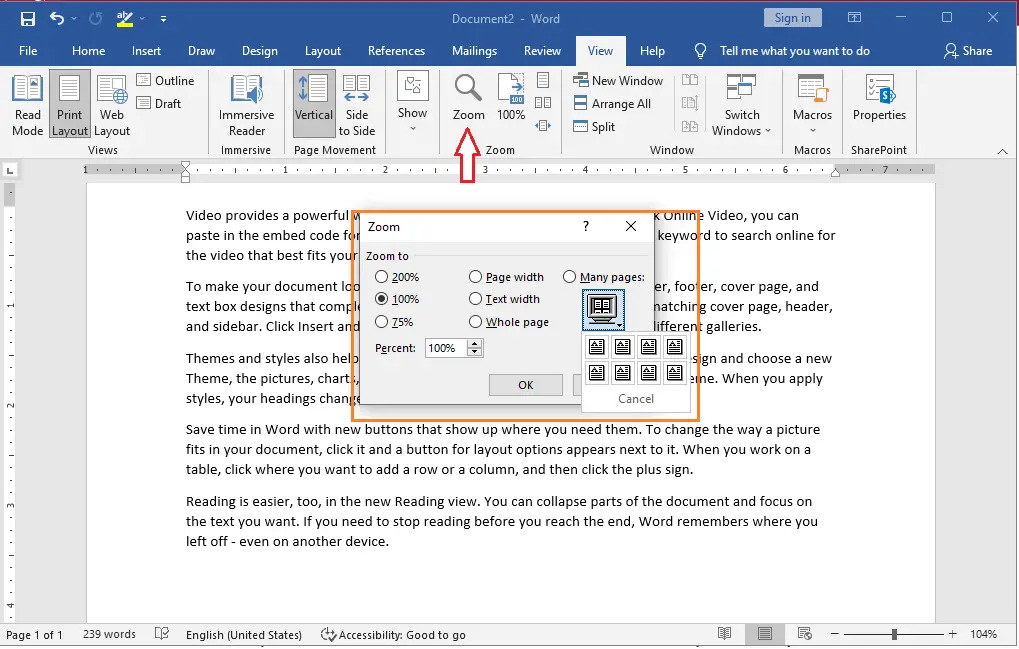
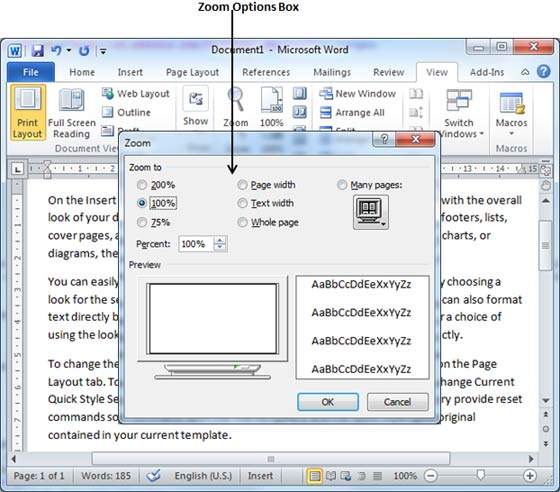
- Step 2 −When you click the Zoom button, a box like the one below will appear.
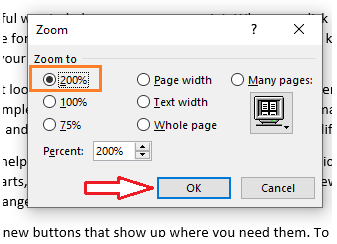
This will bring up the zoom options box, where you can choose a number to change the size of the document on the screen. It will be set to 100% by default. You can choose 200 percent to make the font bigger or 75 percent to make it smaller.
You can click the down arrow next to “Many pages” and choose to show more than one page.
- Step 3 − After you choose an option, click OK to make the changes to the document.
- Step 4 − Try out the different options, like Page Width and Text Width.
Instructions on How to Zoom a Document in Word
The following are the list of instructions on how to Zoom a document in word.
- Using the Zoom slider in the Status Bar, you can zoom in or out on a Word document by clicking and dragging the slider bar to the left or right.
- Alternatively, Click the “+” or “-” next to the Zoom slider to make the image bigger or smaller.
- To use the “Zoom button group” to zoom a document, go to the “View” tab in the Ribbon and then look in the “Zoom button group”.
- Click the “100%” button in the “Zoom” button group on the “View” tab of the Ribbon to set the document’s zoom to 100%.
- Click one of the same-named buttons in the “Zoom button group” on the “View” tab of the Ribbon to quickly switch between “One Page,” “Multiple Pages,” and “Page Width.”
- Then, choose the zoom level you want by selecting an option from the “Zoom to” list or typing a number into the “Percent” box.
- To choose to show more than one page at once, click the “Many pages” icon below the option button and then choose how many pages to show.
- Then, in the “Zoom” dialog box, click “OK” to save and use the changes you made.
Zooming of a Document Using using (+) and (-) Buttons
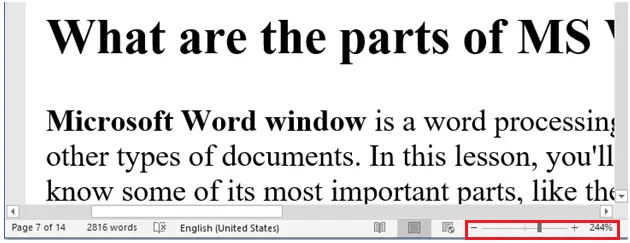
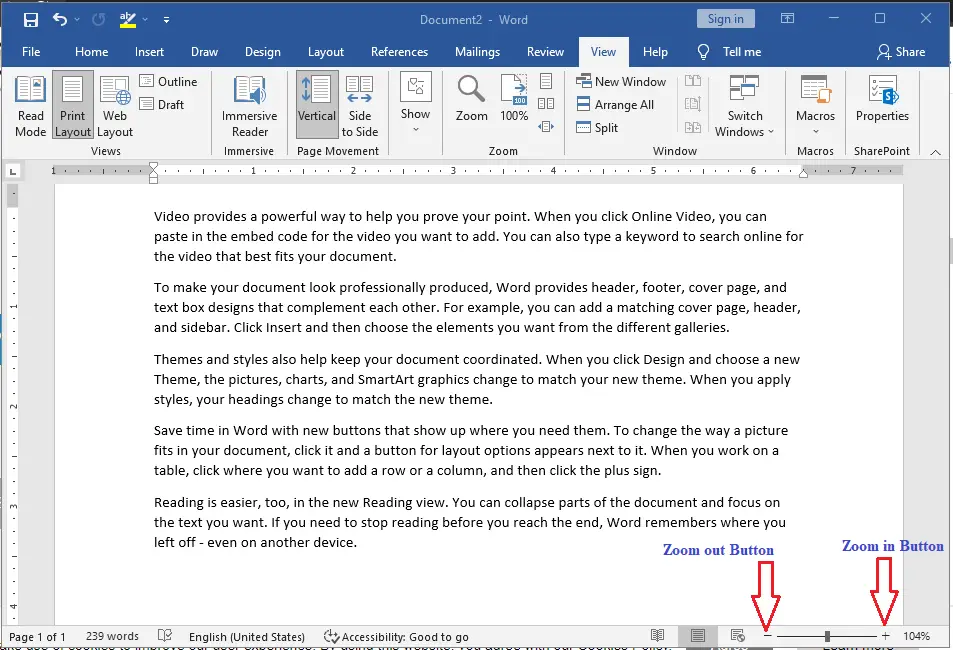
The following image shows two buttons Zoom-out which is the (-) button and Zoom-in which is the (+) button.
- When you click the Zoom-out button, the size of your document will decrease by 10% each time you click the button. Similarly, if you click the Zoom-in button, your document size will increase by 10% each time you click it.
- You can see the difference by trying this simple operation with different numbers. The above screenshot shows how the document looks when it is zoomed in by 104%.
What is the Maximum Zoom in MS Word?
What is the Maximum Zoom in MS Word?
The maximum percentage of zoom in a Microsoft Word document is 500 percent. The minimum percentage of zoom available for MS Word documents is 10%. Zoom in to see the file in greater detail, then zoom out to see more of the page at a reduced size.
A Few Useful Word Shortcuts
There are also a few useful ways to zoom in and out depending on your device. You can use the pinch-to-zoom feature if your device has a touch screen or touchpad. You can zoom in and out with this feature by putting two fingers on the screen and “pinch” to zoom out or “spread” to zoom in.
Lastly, if you have a mouse with a scroll wheel, you can zoom in or out by holding the “Ctrl” button and moving the wheel up or down.
Summary
In summary, we’ve talked about the ways to use zoom in and zoom out in MS Word as well as what those terms mean. In addition, we knew where the controls were located. We also gain insight into the importance of zoom control in manipulating a document. Furthermore, we also picked up some skills on what the short cuts are in zooming documents.
We hope this tutorial helps you as you plan to create a document in MS Word.
PREVIOUS
Download Article
Download Article
Need to zoom in on part of your Word document to get a closer look? We’ll show you how to use the Zoom slider and touch gestures in Microsoft Word to zoom in and out on any document.
-
1
Open your project in Word. You can click File > Open within Word or you can right-click the document file and select Open With > Word.
-
2
Drag the zoom slider left or right. It’s in the lower right corner of the Word window. Slide it right to zoom in and slide it left to zoom out. The numbers to the right of the slider represent your zoomed-in or zoomed-out amount.
- You can also click the + or — buttons next to the slider to change the zoom level by increments.[1]
- Return this slider to 100% to return to normal view.
Advertisement
- You can also click the + or — buttons next to the slider to change the zoom level by increments.[1]
-
3
Click the View tab to see more zoom options. Click Zoom to get a dialog box and you can set the zoom to a certain percentage (the percentage shown depends on your screen size and the size of your Word window).
- You can also press and hold Ctrl and scroll on your mouse wheel to zoom in and out.
- If you have a touchpad, you can pinch your fingers on the touchpad to zoom. Separate your fingers on the touchpad to zoom out.[2]
Advertisement
Ask a Question
200 characters left
Include your email address to get a message when this question is answered.
Submit
Advertisement
Thanks for submitting a tip for review!
References
About This Article
Article SummaryX
1. Open your project in Word.
2. Drag the zoom slider left or right.
3. Click the Zoom tab to see more zoom options.
Did this summary help you?
Thanks to all authors for creating a page that has been read 68,158 times.
Is this article up to date?
Microsoft Word, the world’s leading word processor software, is used by millions of people around the world on a daily basis. And its popularity is not unwarranted. Its functionality – accessible to even the least tech-savvy members of the digital age – alongside its sleek design and myriad well-designed in-built features, make it almost everyone’s number one go-to when they look to create a text document.
Now, whether you are the reader or the writer of a word document, chances are you’ll need to be able to alter the size of the document readily and easily, in order to better engage with its content. In other words, you’re going to want to know how to zoom in and out in Microsoft Word.
Well, look no further. This article is designed to help you find the most relevant method of zooming Microsoft Word and to do so in just a few simple steps. Read below for three different methods of zooming in Microsoft Word.
Table of Contents
- Zoom In and Out in Microsoft Word via the in-built slider
- Zoom In and Out in Microsoft Word via the View tab
- Zoom In and Out in Microsoft Word using your trackpad
- Frequently asked questions
- Does adjusting the zoom in one document affect others?
- Related Posts
Zoom In and Out in Microsoft Word via the in-built slider
- Open Microsoft Word on your device, and open the document you wish to read/edit (or create a new one, for test purposes)
- Locate the part of the document which you wish to zoom in or out on
- In the bottom-right of the page, you should see a small slider, with a ‘+’ (plus) sign to the right and a ‘-’ (minus) sign to the left. It should be at the default zoom setting of 100%
- Using your mouse (or touch, depending on device) slide this zoom slider toward either side, depending on whether you wish to enlarge or shrink the size of your document (alternatively you can manually click on the ‘+’ or ‘-’ buttons, to do the same job)
- You will find that your page size zooms in or out in increments of 10%. Take your time and determine the most appropriate percentage for the particular document, and for your needs. Remember, the default zoom setting is 100% – manually return it to this if you wish to reset the document’s zoom level.
Zoom In and Out in Microsoft Word via the View tab
- Open Microsoft Word on your device, and open the document you wish to read/edit (or create a new one, for test purposes)
- Locate the part of the document which you wish to zoom in or out on
- Along the top of the page, you will find the Microsoft Word toolbar, locate and scroll along to (or click on) the View tab
- In the center of the View toolbar, you will find the section for altering the Zoom of your page.
- There are several one-click options, such as ‘one-page’ (which zooms out to show you each page in full), ‘multiple pages’ (which zooms even further out to show you multiple pages of your document at once), or ‘page width’ (which zooms in until the full page width occupies the majority of your screen. Finally, there is the ‘100%’ option which, if selected, returns your view to the default 100% zoom setting, as is standard across all Word documents
- For greater control, however, this time click on ‘Zoom’, which is symbolized by a magnifying glass
- This brings up a pop-up settings window, giving you the full range of zoom options. You can choose to alter the percentage of the zoom manually, by clicking the up or down arrows on the percentage box until you reach the zoom which meets your requirements.
- Alternatively, there are several preset options, which you can toggle by clicking the white circles next to them: ‘200%’, ‘100%’ (default), ‘75%’, ‘Page Width’ (see above), ‘Text Width’ (a further zoom even than page width, zooming in on your text until its width occupies the majority of your view), ‘Whole Page’ (see ‘one-page’ above), or ‘Many pages’ (see ‘multiple pages’ above, but note that in this advanced zoom settings screen, you can alter the exact number of pages displayed in your screen by clicking on the computer icon below ‘Many pages’)
- Once you are satisfied with your new zoom settings in Microsoft Word, click ‘OK’
Zoom In and Out in Microsoft Word using your trackpad
- Open Microsoft Word on your device, and open the document you wish to read/edit (or create a new one, for test purposes)
- Locate the part of the document which you wish to zoom in or out on
- Placing two fingers on your trackpad/touchpad, move them apart (to zoom in) or together (to zoom out). In essence, what you are doing here is using touch, rather than a mouse or trackpad click, to adjust the zoom of the Microsoft Word built-in slider
- To reset the zoom to default, repeat step 3 until the slider in the bottom-right of the screen reads 100%
And there you have it! By following any of the three suggested means of zooming in and out in Microsoft Word, you can ensure that your future interactions with this most popular word processing application always meets your reading, writing, and editing visual requirements.
Frequently asked questions
Does adjusting the zoom in one document affect others?
In short, yes. Adjusting the zoom in one document applies this level of zoom as a default across your other Microsoft Word documents. If you were to quit Microsoft Word and then open it back up, you will find that whichever level or mode of zoom you last employed, has been retained and is applied to this new document. This is handy, if you prefer a specific zoom level (‘page width’ for example), but is also easily adjustable per document, just by following the steps listed above.
In this chapter, we will discuss how to zoom in and zoom out in Word 2010. Microsoft Word provides a functionality to apply zoom-in and zoom-out operations on a document. When we apply the zoom-in operation, it enlarges the size of text whereas applying the zoom-out operation reduces the size of text.
A zoom operation just changes the size of the font on-screen without impacting any other attribute of the document. You can apply the zoom operation in various ways as explained in this chapter.
Zoom-in & Zoom-out using view tab
Here is the simple procedure to apply the zoom-in or the zoom-out operations using the View tab −
Step 1 − Click the View tab and then click the Zoom button as shown below.
Step 2 − When you click the Zoom button, a Zoom dialog box will appear as shown below. This will display the zoom options box to select a value to reduce or increase the size of the document on-screen. By default, it will be 100%; you can select 200% to increase the size of the font or 75% to reduce the size of the font.
You can click the Many pages down arrow and select to display multiple pages.
Step 3 − Once you are done with selecting an option, click OK to apply the changes on the document.
Step 4 − Try different options available, for example Page Width and Text Width.
Zoom-in & Zoom-out using (+) and (-) Buttons
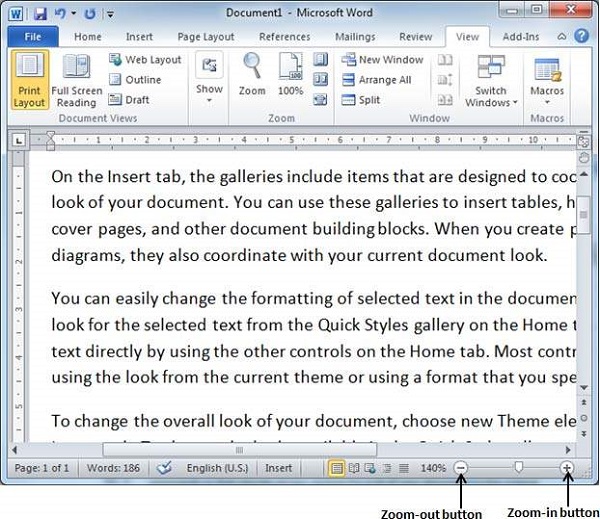
The following screenshot shows two buttons Zoom-out which is the (-) button and Zoom-in which is the (+) button.
Step 1 − Click the Zoom-out button, you will find that your document size will decrease by 10% each time you click the button. Similar way, if you click on Zoom-in button your document size will increase by 10% each time you click the button.
Step 2 − Try this simple operation with different values to see the difference. The above screenshot shows 140% zoom-in view of the document.


 .
.


