Уровень сложности
Средний
Время на прочтение
9 мин
Количество просмотров 14K
Работая в IoT-сфере и плотно взаимодействуя с одним из основных элементов данной концепции технологий – сетевым сервером, столкнулся вот с какой проблемой (задачей): необходимо отправлять много запросов для работы с умными устройствами на сетевой сервер. На сервере был реализован REST API с оболочкой Swagger UI, где из графической оболочки можно было отправлять только разовые запросы. Анализ сторонних клиентов, типа Postman или Insomnia показал, что простого визуального способа поместить в скрипт массив из необходимого перечня идентификаторов устройств (или любых других элементов сервера), для обращения к ним – не нашлось.
Так как большая часть работы с выгрузками и данными была в Excel, то решено было вспомнить навыки, полученные на учебе в университете, и написать скрипт на VBA, который бы мою задачку решал.
Необходимо было:
-
получать информацию по устройствам с различными параметрами фильтрации (GET);
-
применять изменения в конфигурации по устройствам: имя, профиль устройства, сетевые лицензии и пр. (PUT);
-
отправлять данные для конфигурации и взаимодействия с устройствами (POST).
И сегодня я расскажу вам про то, как с помощью Excel, пары формул и самописных функций на VBA можно реализовать алгоритм, отправляющий любое необходимое количество REST-API запросов с использованием авторизации Bearer Token.
Данная статья будет полезная тем, кто воспользуется данным решением под Windows, но еще больше она будет полезна тем людям, которые хотят использовать данное решение на MacOS (с Excel x64) . Как вы уже догадались, ниже будут рассмотрены два варианта реализации под разные системы, так как с MacOS есть нюанс.
Часть 1. Реализация решения под Windows
GET
Начнем с самого простого: GET – запросов. В данном примере необходимо получить ответ (информацию) от сервера по заданному списку устройств.
Для реализации GET – запросов нам дано:
1) Ссылка, в которой указываются параметры запроса.
https://dx-api.thingpark.io/core/latest/api/devices?deviceEUI=
2) Заголовки запроса + Токен авторизации (Bearer Token)
—header ‘Accept: application/json’ —header ‘Authorization: Bearer
eyJhbGciOiJSUzI1NiIsInR5cCI6IkpXVCJ9.eyJzY29wZSI6WyJTVUJTQ1JJQkVSOjY3MDAiXSwiZXhwIjozNzc0MTY0MzE4LCJqdGkiOiI5OTNiOTk1Ny03NGY1LTQ5MDgtYjg4Ni0xYjk5NTVkZDQwZTEiLCJjbGllbnRfaWQiOiJkZXYxLWFwaS9lcnRoLnRlY2guZGVzayt2bGFkaXNsYXYuZ2F0Y2Vua29AZ21haWwuY29tIn0.dqybsMdVXXpQV8_ykufNZoQpSPZrVA67uieOJan-qs8W7rAImyy0552buniHXPWy6ilvdwJKPCdIKE__LghP6A
3) Параметр, указываемый в ссылке (в данном примере это идентификаторы устройств – DevEUI):
1ABCDEFF00AABBCC
0016ACC4DCF15A23
D88039FFFE954DF4
0000000000001103
0000000000001104
Имея такие данные на входе, делаем в Excel лист-шаблон, который заполняем в соответствии с тем, что имеем:
-
столбец А уходит вот значения параметров
-
столбец F уходит под ссылку-родителя
-
столбец H уходит под заголовки, где в ячейке H1 единоразово для текущего листа указывается токен:
=СЦЕП("--header 'Accept: application/json' --header 'Authorization: Bearer ";$H$1;"'")
-
столбец I уходит под URL (ссылки-дети, на основе ссылки-родителя)
=СЦЕПИТЬ($F$1;A2)
-
столбец J уходит под результат (ответ от сервера)
Далее, нам необходимо реализовать подпрограмму(макрос) отправки GET-запросов. Состоит она из четырех частей:
-
цикла, который считает количество строк для работы по листу, пробегая по столбцу А с 2 по первую пустую ячейку, чтобы у цикла был конец.
-
функции, для работы с REST API (используется стандартная, библиотека Msxml2.XMLHTTP.6.0, встроенная в Windows., поэтому сложностей с реализацией не возникает. Для MacOS есть альтернатива)
-
временной задержки, в случае если нужно отправлять запросы не сразу, после получения ответа, а задав время ожидания
-
таймером, который показывает время выполнения всего макроса после завершения
Код:
Sub GET_Request()

Dim i As Integer
Dim j As Integer
Dim objHTTP As Object
Dim Json As String
Dim result As String
Dim URL As String
Dim Token As String
a = Timer

    i = 1
        Do While Not IsEmpty(Cells(i, 1))
        i = i + 1
        Loop
    i = i - 1
    'MsgBox i

    For j = 2 To i
        Json = Range("D" & j)
        URL = Range("I" & j)
        Token = Range("H1")

        Set objHTTP = CreateObject("Msxml2.XMLHTTP.6.0")
            objHTTP.Open "GET", URL, False
            objHTTP.setRequestHeader "Content-type", "application/json"
            objHTTP.setRequestHeader "Accept", "application/json"
            objHTTP.setRequestHeader "Authorization", "Bearer " + Token
            objHTTP.Send (Json)
            result = objHTTP.responseText
            Range("J" & j).Value = result
        Set objHTTP = Nothing
        'Application.Wait (Now + TimeValue("0:00:01"))
    Next j

MsgBox Timer - a

End Sub
Привязываем подпрограмму к кнопкам для удобства и выполним скрипт. Получается:
Таким образом, скрипт проходит по столбцу I, забирая из значения каждой ячейки URL, для тех строк, где в столбце А есть значения (которые и подставляются в URL). Для удобства также сделаны кнопки очистки полей и подсветка запросов условным форматированием, в случае успешного ответа на запрос.
PUT
Чуть-чуть усложним задачу и перейдем к PUT-запросам. В данном примере необходимо изменить профиль устройства, чтобы сервер по-другому с ним взаимодействовал.
К исходным данным для GET – запроса добавляется тело запроса с ключем-значением (п4). Итого дано:
1) Ссылка, в которой указываются параметры запроса.
https://dx-api.thingpark.io/core/latest/api/devices/
2) Заголовки запроса + Токен авторизации (Bearer Token)
—header ‘Content-Type: application/json’ —header ‘Accept: application/json’ —header ‘Authorization: Bearer
eyJhbGciOiJSUzI1NiIsInR5cCI6IkpXVCJ9.eyJzY29wZSI6WyJTVUJTQ1JJQkVSOjY3MDAiXSwiZXhwIjozNzc0MTY0MzE4LCJqdGkiOiI5OTNiOTk1Ny03NGY1LTQ5MDgtYjg4Ni0xYjk5NTVkZDQwZTEiLCJjbGllbnRfaWQiOiJkZXYxLWFwaS9lcnRoLnRlY2guZGVzayt2bGFkaXNsYXYuZ2F0Y2Vua29AZ21haWwuY29tIn0.dqybsMdVXXpQV8_ykufNZoQpSPZrVA67uieOJan-qs8W7rAImyy0552buniHXPWy6ilvdwJKPCdIKE__LghP6A
3) Параметр, указываемый в ссылке (в данном примере это внутренние идентификаторы устройств – hRef):
17272
18199
17242
17245
17248
4) Тело запроса, с ключом и значением:
{«deviceProfileId»:»LORA/GenericA.1.0.3a_ETSI»}
Немного дополняем новый PUT-лист в Excel по сравнению с GET (остальное без изменений):
-
новый столбец B теперь отвечает за ключ deviceProfileId (ячейка B1), а все значения ниже за его возможные значения)
-
столбец D отвечает за формирование итогового тела сообщения в формате JSON.
=СЦЕПИТЬ("'{""";$B$1;""":""";B2;"""";"}'")
Немного поменяем макрос и вынесем его в отдельную подпрограмму:
Код:
Sub PUT_Request()

Dim i As Integer
Dim j As Integer
Dim objHTTP As Object
Dim Json As String
Dim result As String
Dim URL As String
Dim Token As String
a = Timer

    i = 1
        Do While Not IsEmpty(Cells(i, 1))
        i = i + 1
        Loop
    i = i - 1
    'MsgBox i

    For j = 2 To i
        Json = Range("D" & j)
        URL = Range("I" & j)
        Token = Range("H1")

        Set objHTTP = CreateObject("Msxml2.XMLHTTP.6.0")
            objHTTP.Open "PUT", URL, False
            objHTTP.setRequestHeader "Content-type", "application/json"
            objHTTP.setRequestHeader "Accept", "application/json"
            objHTTP.setRequestHeader "Authorization", "Bearer " + Token
            objHTTP.Send (Json)
            result = objHTTP.responseText
            Range("J" & j).Value = result
        Set objHTTP = Nothing
        'Application.Wait (Now + TimeValue("0:00:01"))
    Next j

MsgBox Timer - a

End Sub
Привяжем макрос к кнопке и выполним.
Логика абсолютно аналогична GET запросу.
POST
Для POST запросов все аналогично PUT. Только немного меняется код в части типа запроса. В данном примере на устройство отправляется команда-конфигурация с указанием тела посылки (payload_hex) и порта (fport) для конкретного устройства.
Код:
Sub PUT_Request()

Dim i As Integer
Dim j As Integer
Dim objHTTP As Object
Dim Json As String
Dim result As String
Dim URL As String
Dim Token As String
a = Timer

    i = 1
        Do While Not IsEmpty(Cells(i, 1))
        i = i + 1
        Loop
    i = i - 1
    'MsgBox i

    For j = 2 To i
        Json = Range("D" & j)
        URL = Range("I" & j)
        Token = Range("H1")

        Set objHTTP = CreateObject("Msxml2.XMLHTTP.6.0")
            objHTTP.Open "PUT", URL, False
            objHTTP.setRequestHeader "Content-type", "application/json"
            objHTTP.setRequestHeader "Accept", "application/json"
            objHTTP.setRequestHeader "Authorization", "Bearer " + Token
            objHTTP.Send (Json)
            result = objHTTP.responseText
            Range("J" & j).Value = result
        Set objHTTP = Nothing
        'Application.Wait (Now + TimeValue("0:00:01"))
    Next j

MsgBox Timer - a

End Sub
Получившаяся таблица выглядит следующим образом:
На этом часть для Windows заканчивается. Здесь все оказалось довольно просто: стандартная библиотека, простенький алгоритм перебора значений в цикле.
Часть 2. Реализация решения под MacOS и Excel 64-bit
В виду того, что работал я на двух машинах под управлением разных ОС, хотелось, чтобы решение было универсальным. В итоге, собрав по крупицам информацию по интернет-форумам с данной тематикой у меня вышло следующее решение. Принцип работы его остается схожим, а изменения были внесены в часть, где использовалась стандартная библиотека WindowsMsxml2.XMLHTTP.6.0, которой в MacOS не было по понятным причинам.
Чтобы обойти данное ограничение, был выбран единственный рабочий подход через cUrl, exec и функции. Данное решение точно работает под версией MacOS 10.14 и Excel 16.51. Функция ниже, в том или ином виде, встречается на различных форумах, однако на текущих версиях софта – не работает. В итоге, после небольших правок получили рабочий вариант:
Была отлажена функция вызова ExecShell:
Код:
Option Explicit
Private Declare PtrSafe Function popen Lib "/usr/lib/libc.dylib" (ByVal Command As String, ByVal Mode As String) As LongPtr
Private Declare PtrSafe Function pclose Lib "/usr/lib/libc.dylib" (ByVal file As LongPtr) As Long
Private Declare PtrSafe Function fread Lib "/usr/lib/libc.dylib" (ByVal outStr As String, ByVal size As LongPtr, ByVal items As LongPtr, ByVal stream As LongPtr) As Long
Private Declare PtrSafe Function feof Lib "/usr/lib/libc.dylib" (ByVal file As LongPtr) As LongPtr

Function execShell(Command As String, Optional ByRef exitCode As Long) As String
    Dim file As LongPtr
    file = popen(Command, "r")

    If file = 0 Then
        Exit Function
    End If

    While feof(file) = 0
        Dim chunk As String
        Dim read As Long
        chunk = Space(500)
        read = fread(chunk, 1, Len(chunk) - 1, file)
        If read > 0 Then
            chunk = Left$(chunk, read)
            execShell = execShell & chunk
        End If
    Wend

    exitCode = pclose(file)

End Function
И написаны отдельные функции для работы с различным методами GET / PUT / POST, которые на входе принимают URL и параметры):
Код:
Function HTTPGet(sUrl As String, sQuery As String) As String

    Dim sCmd As String
    Dim sResult As String
    Dim lExitCode As Long

    sCmd = "curl -X GET " & sQuery & "" & " " & sUrl
    sResult = execShell(sCmd, lExitCode)
    HTTPGet = sResult

End Function

Function HTTPPost(sUrl As String, sQuery1 As String, sQuery2 As String) As String

    Dim sCmd As String
    Dim sResult As String
    Dim lExitCode As Long

    sCmd = "curl -X POST " & sQuery1 & "" & " -d " & sQuery2 & "" & " " & sUrl
    sResult = execShell(sCmd, lExitCode)
    HTTPPost = sResult

End Function

Function HTTPPut(sUrl As String, sQuery1 As String, sQuery2 As String) As String

    Dim sCmd As String
    Dim sResult As String
    Dim lExitCode As Long

    sCmd = "curl -X PUT " & sQuery1 & "" & " -d " & sQuery2 & "" & " " & sUrl
    sResult = execShell(sCmd, lExitCode)
    HTTPPut = sResult

End Function
Так как мы заменяем библиотеку Msxml2.XMLHTTP.6.0 – поменялась реализация макросов в этой части: мы заменили Msxml2 на написанные выше функции и получили следующее:
Код:
'GET-запросы
Sub SendGETRequest()

Dim i As Integer
Dim j As Integer
Dim result As String
Dim URL As String
Dim Auth As String

a = Timer

    'Подсчет заполненных ячеек первого столбца
    i = 1
        Do While Not IsEmpty(Cells(i, 1))
        i = i + 1
        Loop
    i = i - 1

    'Цикл, который отправляет запрос от 2 до последнего элемента
    For j = 2 To i
        URL = Range("I" & j)
        Auth = Range("H" & j)
        result = HTTPGet(URL, Auth)
        Range("J" & j).Value = result
        'Application.Wait (Now + TimeValue("0:00:01"))
    Next j

MsgBox Timer - a

End Sub


'PUT-запросы
Sub SendPUTRequest()

Dim i As Integer
Dim j As Integer
Dim result As String
Dim URL As String
Dim Auth As String
Dim Message As String


a = Timer

    'Подсчет заполненных ячеек первого столбца
    i = 1
        Do While Not IsEmpty(Cells(i, 1))
        i = i + 1
        Loop
    i = i - 1

    'Цикл, который отправляет запрос от 2 до последнего элемента
    For j = 2 To i
        Message = Range("D" & j)
        URL = Range("I" & j)
        Auth = Range("H" & j)
        result = HTTPPut(URL, Auth, Message)
        Range("J" & j).Value = result
        'Application.Wait (Now + TimeValue("0:00:01"))
    Next j

MsgBox Timer - a

End Sub


'POST-запросы
Sub SendPOSTRequest()

Dim i As Integer
Dim j As Integer
Dim result As String
Dim URL As String
Dim Auth As String
Dim Message As String

a = Timer

    'Подсчет заполненных ячеек первого столбца
    i = 1
        Do While Not IsEmpty(Cells(i, 1))
        i = i + 1
        Loop
    i = i - 1

    'Цикл, который отправляет запрос от 2 до последнего элемента
    For j = 2 To i
        Message = Range("D" & j)
        URL = Range("I" & j)
        Auth = Range("H" & j)
        result = HTTPPost(URL, Auth, Message)
        Range("J" & j).Value = result
        'Application.Wait (Now + TimeValue("0:00:01"))
    Next j

MsgBox Timer – a
Итог
В итоге, у меня получилось аналогичное windows по работе и функционалу решение для MacOS c использованием Excel 64-bit.
На просторах интернета я не нашел какого-то сборного и единого описания, только фрагменты кода и подходов, которые в большинстве случаев не работали полностью или частично. Поэтому решил объединить все в рабочее решение и выложить на хабр для истории.
На текущий момент я все еще не встретил иного решения, которое бы позволяло в пару кликов копипастить тысячи идентификаторов и параметров из excel и массово их отправлять на сервер. Надеюсь, кому-то пригодится 
Если такие сторонние решения есть, а я не в курсе, и все можно было сделать проще, быстрее и изящнее – делитесь опытом в комментариях.
Примечание:
Файл-пример, который можно потыкать, пока жив сервер и «бессрочный» токен:
https://disk.yandex.ru/d/y7EVtn8afM4QPg
Открытое описание API, если кому-то будет любопытно
Power Query умеет подключаться не только к web страничкам, но и к API, не требующим авторизации. Если API позволяет анонимным пользователям забирать данные, Power Query подойдёт идеально.
Подключимся к API застройщика, чтобы отслеживать актуальную стоимость квартиры. Находим нужную квартиру на сайте застройщика: https://beta.pik.ru/flat/801472.
«https://api.pik.ru/v1/flat?id=» — URL адрес, по которому застройщик предоставляет информацию, а «801472» – идентификатор квартиры.
Информация на сайте показана красиво, но разбросана по разным вкладкам.
Мы же хотим получить лаконичную табличку в Excel:
| Адрес |
| Стоимость |
| Скидка |
| Заселение до |
| Площадь |
| Комнаты |
| Этаж |
| Ссылка |
GET-запрос к API ПИК на Power Query
Для разнообразия воспользуюсь Power Query в Excel. Создаем пустой запрос:
В строке формул пишем:
Json.Document(Web.Contents("https://api.pik.ru/v1/flat?id=801472"))В результате получаем строку с вложенными составными элементами, которые также могут содержать вложенные элементы:
Называем запрос «getData_oneFlat» и вставляем пустой шаг после шага Источник (чтобы открыть меню — щелкаем правой кнопкой мышки на шаг Источник):
С помощью функции Record.FromList формируем строку с нужными данными, используя шаг Источник. В строке формул пишем:
Record.FromList(
{Источник[block][address], Источник[price], Источник[discount], Источник[bulk][date_till], Источник[area], Источник[rooms], Источник[floor], Источник[url], Источник[pdf]},
type [ Адрес = text, Стоимость = number, Скидка = number, Заселение до = text, Площадь = number, Комнаты = number, Этаж = number, Ссылка = text, PDF = text])
Давайте разбираться как работает функция Record.FromList:
- Первый аргумент функции отвечает за содержимое полей – это список:
{Источник[block][address], Источник[price]} - Источник[price] – возвращает содержимое поля price
- Источник[block][address] – возвращает содержимое поля address из Record вложенной в поле block
- Второй аргумент отвечает за названия и тип полей – это строка:
type [Адрес = text, Стоимость = number]
Результат — строка нужных нам значений:
Преобразуем строку в таблицу:
Выгрузим результат на лист Excel и посмотрим что получилось:
Такой формат нас устроит, теперь мы видим всю информацию по квартире в удобной таблице.
Несколько GET-запросов с помощью функции
Теперь попробуем забрать сразу несколько квартир и разместить их в одной табличке.
Для этого убираем последний шаг и создаём функцию getData от параметра flat (номер квартиры), заменяя сам номер на «flat»:
(flat as text)=>
let
   Источник = Json.Document(Web.Contents("https://api.pik.ru/v1/flat?id="& flat )),
   create_table = Record.FromList(
{Источник[block][address],
Источник[price],
Источник[discount],
Источник[bulk][date_till],
Источник[area],
Источник[rooms],
Источник[floor],
Источник[url],
Источник[pdf]
},
type [
Адрес = text,
Стоимость = number,
Скидка = number,
Заселение до = text,
Площадь = number,
Комнаты = number,
Этаж = number,
Ссылка = text,
PDF = text
])
in
   create_table
Теперь наша функция будет получать данные по той квартире, которую мы укажем в параметре.
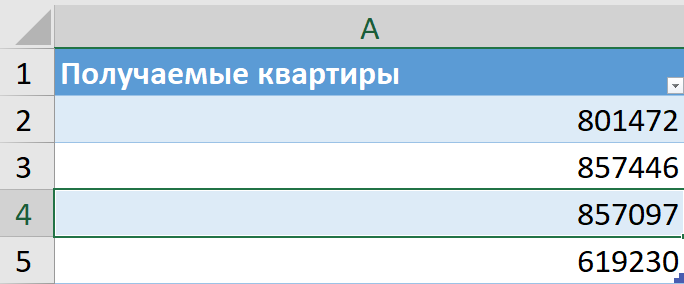
Составляем на листе Excel список интересных нам квартир:
Загружаем список квартир в Power Query, выставляем столбцу текстовый тип. Затем добавляем новый столбец с вызовом нашей функции от каждой квартиры в списке, получается такой код:
let
   Источник = Excel.CurrentWorkbook(){[Name="Таблица2"]}[Content],
   #"Измененный тип" = Table.TransformColumnTypes(Источник,{{"Получаемые квартиры", type text}}),
   #"Вызвана настраиваемая функция" = Table.AddColumn(#"Измененный тип", "getData", each getData([Получаемые квартиры]))
in
   #"Вызвана настраиваемая функция"
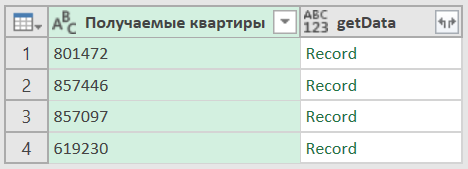
Таблица в Power Query выглядит так:
Нажимаем на стрелочки справа от «getData» и разворачиваем нужные столбцы, а затем выгружаем всё на лист Excel. Теперь у нас есть табличка со стоимостью, скидками, площадью и датами заселения для всех интересных нам объектов:
Заключение
Пример вызова API сайта компании ПИК показывает как Power Query может быть полезен в бытовых задачах. Используйте PQ если вам нужно быть в курсе изменений данных, будь то стоимость квартиры или цена товара в интернет-магазине.
Если компания предоставляет данные по открытому API, вы всегда можете использовать магию Power Query и вывести эти данные себе в Excel-файл. Можно сравнить несколько товаров/категорий или вообще написать алгоритм, который будет отображать только самые интересные товары.
The instructions provided in this article are sufficient for creating an automated integration. But please note that we are not responsible for the outcome if you use the instructions incorrectly, specify incorrect settings, or if there are changes in the app’s API. If you need help with the setup, we can offer this premium integration at an additional fee.
An API is a ‘bridge‘ through which one app obtains/sends information from/to another app. This means that you can load miscellaneous data from your source app to your Excel workbook using the REST API. Moreover, you can even schedule data loads via the API to Excel sheet without any VBA coding! Read our guide to learn how you can do this.
How to use API in Excel – options you have
Basically, you have three options to link API to Excel:
- Power Query: You can query data from APIs using Excel’s built-in tool.
- Coupler.io: This third-party importer will let you automate data exports via APIs to Excel on a custom schedule.
- VBA: This is a code-based option that is suitable for tech-savvy Excel users.
Let’s check out each option in action so that you can make the best choice for your needs. For this, we asked Richard, a cryptocurrency enthusiast, to help us.
Richard wants to analyze the growth tendency of the top crypto coins. To do this, he needs to load data from CryptoCompare using their JSON API.
For testing, Richard will use the following API URL that will load data about the price for five cryptocoins: Bitcoin, Ethereum, Terra, Binance Coin, and Tether.
https://min-api.cryptocompare.com/data/pricemulti?fsyms=BTC,ETH,LUNA,BNB,USDT&tsyms=USD,EUR&api_key={enter-api-key}
Note: This API requires authorization, so Richard has already generated a free API key.
So, let’s start with the option that allows you to schedule exports via API to Excel.
How to regularly pull API data into Excel
For scheduled exports of data from API to Microsoft Excel, Richard will use Coupler.io. It’s a solution that allows you to connect to multiple sources and load data from them to Excel, Google Sheets, or BigQuery. You can export data on demand and automate import on a custom schedule, such as every day or every hour.
For Richard’s case, we’ll use the JSON integration with Excel. Let’s see how it works.
Excel API example with Coupler.io
Sign up to Coupler.io with your Microsoft account. Click Add new importer – this is a boilerplate to set up your connection to API. Choose JSON as a source application and Microsoft Excel as the destination application. Then complete the following steps to load data from API to Excel sheet.
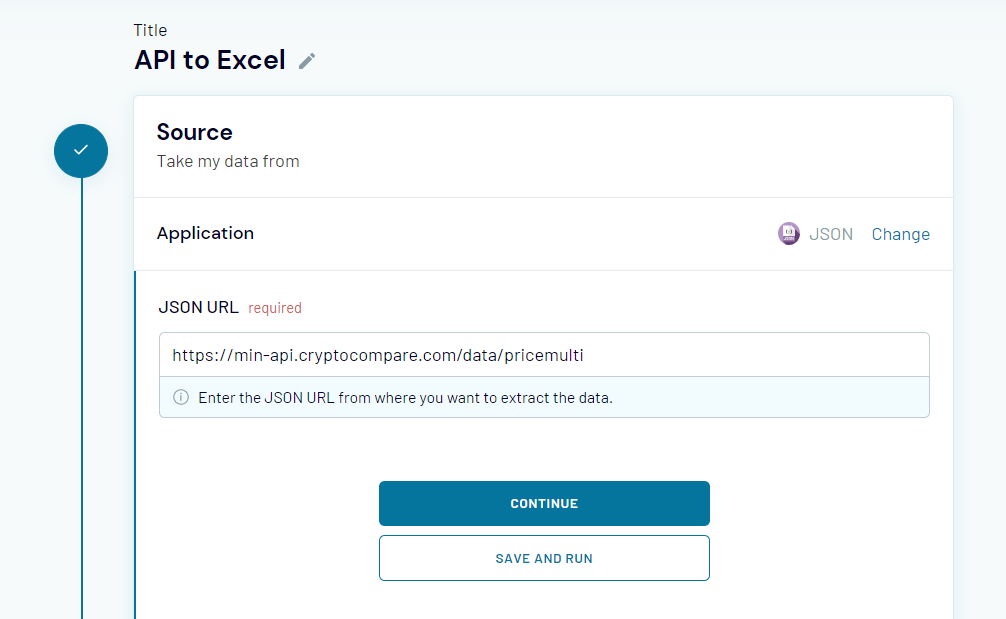
Source
- Insert the API URL to the JSON URL field. Click Continue.
https://min-api.cryptocompare.com/data/pricemulti
Note: You’ve noticed that this API URL differs from the one mentioned in the beginning. It lacks attached query strings because Coupler.io provides separate fields to specify request headers and URL query parameters. So, Richard will use those to demonstrate how they work.
- Request headers – here, you can apply specific headers to your request, such as Authorization, as Richard did.
authorization: Apikey {enter-api-key}
- URL query parameters – this field is for query parameters for your requests to the API. In Richard’s case, he specified the following strings:
fsyms: BTC,ETH,LUNA,BNB,USDT
tsyms: USD,EUR
Other fields, Request body, Columns, and Path are optional. You can learn more about them in the Coupler.io Help Center.
Note: You can find information about the parameters used in those fields in the API documentation of your application. Pay attention to the information about API authentication and details of API endpoints – these are usually located in separate sections.
Now you’re ready to Jump to the Destination Settings.
Destination
- Select a workbook on OneDrive and a worksheet where the data will be loaded. You can select an existing Excel worksheet or create a new one. Click Continue.
Note: Optionally, you can change the first cell for your imported data range, change the import mode, and add a column that contains the date and time of the last update.
Clicking on Save and Run loads the data from API to Excel right away. But Richard needs to automate this export on a recurring basis, so he needs to complete another step.
How to get data from API in Excel recurrently
You can configure the schedule for your JSON importer during the initial setup or at any other time. For this, you need to toggle on the Automatic data refresh and configure the frequency:
- Interval – from every month to every 15 minutes.
- Days of week – select the days you want to have the importer run.
- Time preferences – select the time when you want to have your data importer from the API.
- Schedule time zone – do not forget to specify the time zone for your dataflow.
That’s it! Let’s check out the results of the records pulled from API to Excel sheet?
The imported data does not look very neat. Nevertheless, you can create a separate sheet where the data will be transformed to the format you want and link Excel sheets. Therefore, every time Coupler.io refreshes your data, it will be automatically refreshed on the linked sheet.
Connect API to Excel with Power Query
Power Query is a data transformation engine within Excel. As well, it allows you to query data from different sources including REST APIs. Here is what you need to do to link API to Excel.
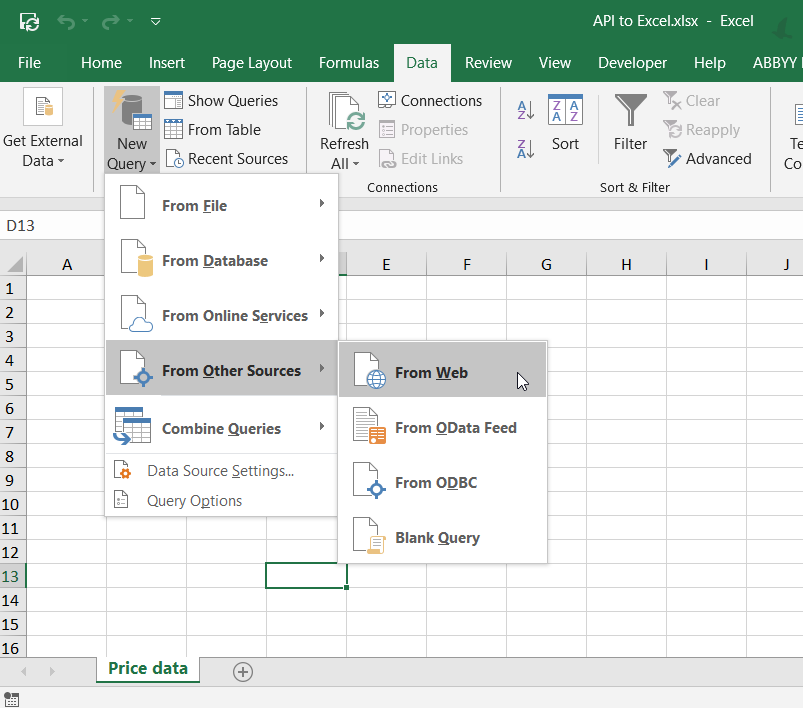
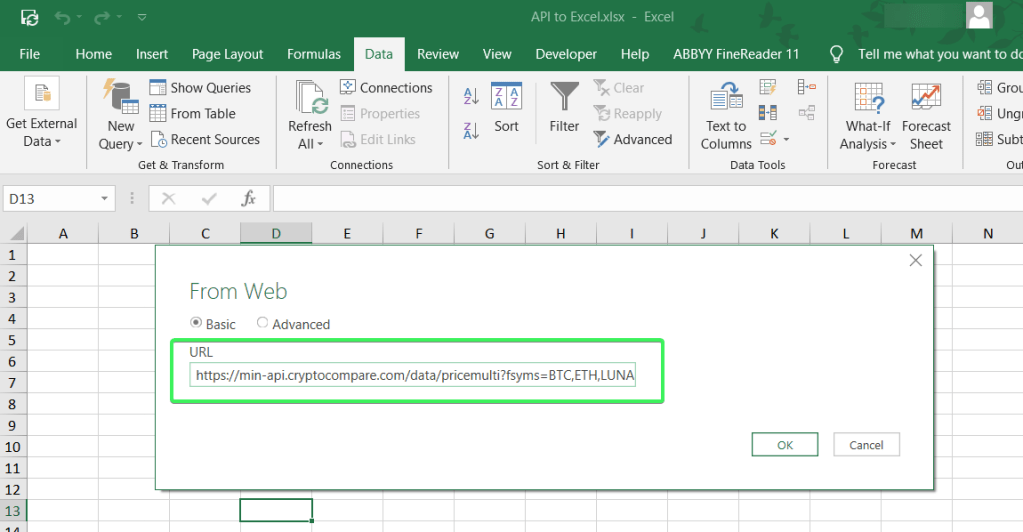
- In your Excel workbook, go to Data => New Query => From Other Sources => From Web.
- Insert the API URL and click OK.
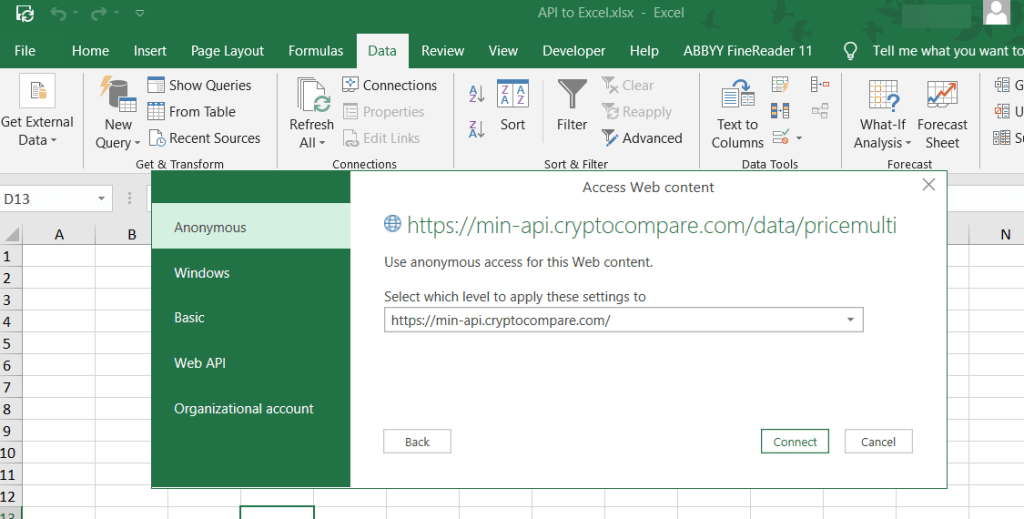
- Choose the web content access. For this example, we can go with Anonymous. Click Connect.
- The Power Query editor will open where you can preview the data loaded from API. Go to the Convert tab and click Into Table.
- This will convert the data from API to a table, and you’ll be able to transform it before loading it to the Excel workbook, for example, transposing rows to columns or vice versa.
- You see that values in the Value column are hidden. The reason is that you need to select which columns to display. For this, click on the Expand button and select the columns. Click OK.
- Now you see two columns: Value.USD and Value.EUR. When all the necessary transformations are done, click Close & Load.
There you go!
You can also check out the details of your connection.
Can you link API to Excel on a schedule with PowerQuery?
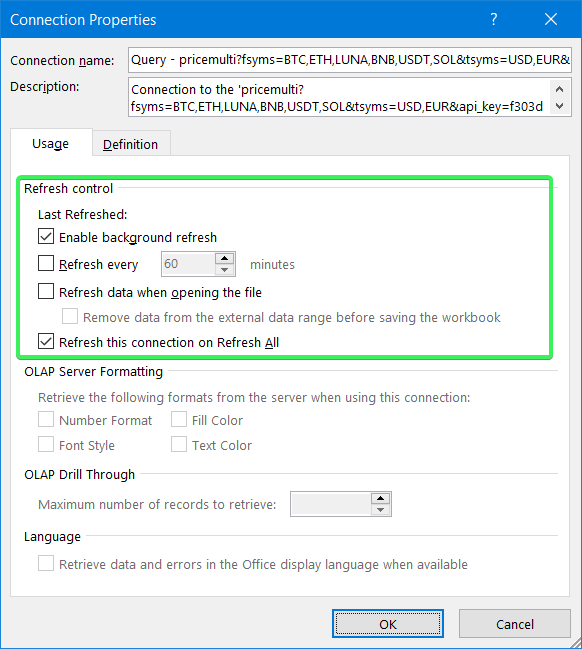
You can refresh data from the API on demand or set up a frequency for the automatic refresh. For this, go to Data => Connections => Properties… and configure the Refresh control.
The Power Query setup looks somewhat intricate because the main purpose of this tool is to transform data. So, it’s better to use Power Query in combination with Coupler.io – your data will go to Excel on a schedule where you can transform it with Power Query as you wish.
How to connect API to Excel using VBA
The answer is very simple – you need to learn VBA and implement your coding knowledge. 🙂 The benefit of a code-based solution is that you can make it custom. This is achievable if you’re proficient in coding and specifically VBA. Alternatively, you can find some templates on GitHub or somewhere else and tweak them. But it is unlikely that you will find a code sample that will cover all your needs.
Which way to connect API to Excel sheet is the best one?
The built-in PowerQuery functionality seems to be the actionable option to link API to Excel. It allows you to grab data and transform it on the go. However, the main drawback of PowerQuery is that it’s only available for the Excel desktop app. If this is not an issue for you, you can go with it.
The no-code way is the choice of many, including Richard. For his needs with low data volume and infrequent data refresh, he can use the Coupler.io Personal plan. In addition to the option of connecting API to Excel sheet, you can benefit from many ready-to-use integrations, as well as other destination apps – Google Sheets and BigQuery. You can try out Coupler.io for free with a 14-day trial.
Who’s going to choose the VBA script to connect API to Excel? This is the way for tech-savvy Excel experts who prefer to create custom functions and integrations for their liking. If you are one of those, then it’s probably your way as well.
-
A content manager at Coupler.io whose key responsibility is to ensure that the readers love our content on the blog. With 5 years of experience as a wordsmith in SaaS, I know how to make texts resonate with readers’ queries✍🏼
Back to Blog
Focus on your business
goals while we take care of your data!
Try Coupler.io
This tutorial is for you if you’re an Excel user who would like to learn how to extend your spreadsheets with data from APIs. You might be one of the people who spend most of their workdays in Excel and do calculations and visualizations but still work manually to import or even just copy and paste data from external sources.
If data is available from an API, however, there are various ways in which can consume it directly from Excel, saving you time and preventing errors.
That is, unfortunately, just as long you are using a Windows PC. The integrations presented in this article do not work in Excel for Mac or the web-based version of the Office apps.
BASF provides the Periodic Table of Elements API, which enables you to query the periodic table and retrieve all kinds of information about chemical elements.
We assume you came here from the Introduction to APIs. If not, please check out that document to learn the basics of APIs before continuing.
The Periodic Table of Elements API follows the CRUD/RESTful paradigm but implements only a subset. Specifically, the periodic table is read-only and allows HTTP GET requests exclusively. It is also limited to one resource called «element».
The base URL for the API is https://dev.api.basf.com/chemical/. Every endpoint starts with this URL.
For the elements, there are two endpoints. The first is a collection endpoint that allows you to either retrieve the full periodic table or request a subset of elements through filter parameters. It is called a collection endpoint because it always returns a collection data structure containing multiple items. The second is an individual resource endpoint that allows you to retrieve a single element.
Both endpoints return JSON-formatted responses.
All BASF APIs require authentication. The Periodic Table of Elements API uses an app-only context with an API key. If you haven’t done so, please read the introduction, terminology, and app-only context sections of the Authentication and Authorization guide. You can skip the part on the app and user context and OAuth as it is not required for this API.
To use authentication, you need to create an account and an application. The process gives you a Client ID, which you can then use as your API key. If you do not have an API key, follow the steps outlined in the Get Started guide. Make sure you select the API product BASF Periodic Table while creating your app.
In Excel for Windows, there are three options for getting external data from an API, which we’ll investigate throughout this article.
The first option is the built-in WEBSERVICE() function. Retrieving data from a URL is a single step. However, extracting the information is rather cumbersome as Excel doesn’t understand JSON responses and you have to use string processing functions. Also, as the function only supports the URL as a parameter, this works only with APIs that allow you to provide authentication information as part of the URL. The BASF Periodic Table of Elements API fits the criteria, as it uses a query string for authentication. For other APIs that require custom headers, though, you’re out of luck.
The second option is using VBA, Visual Basic for Applications, to write a Macro in Basic code to consume an API and fill the sheet programmatically. It is the most powerful and flexible option and should work with all kinds of APIs, but it requires you to have some basic programming knowledge.
The third option is the Power Query builder that allows you to gather and combine data from different sources, including APIs. If you have already used the Power Query builder, for example, to access a database directly, this is the sensible way to do it. It’s also a good choice if you do not want to work with code and the WEBSERVICE() option is too limited.
We’ll use an individual resource endpoint with the WEBSERVICE() function as well as the VBA macro, and we’ll demonstrate the collection endpoint with the Power Query builder.
Before we introduce the WEBSERVICE() function, let’s look at functions in Excel in general. They allow you to fill a table cell with computed data. To enter a function into a cell, you start with the equals sign (=), followed by the function name, a left parenthesis [(], your arguments (if needed), and a right parenthesis [)] to end. If there is more than one argument, you separate them with semicolons (;). A common function that you may have used is SUM(), which adds the data from a number of other cells and returns the result. It takes a range of cells as its argument.
The WEBSERVICE() function also takes one argument, a URL. Then, Excel issues an HTTP GET request to fetch whatever is available at that URL, and puts it into the cell as its result. If we want to do an API requests, since the function only allows a single argument, we have to encode the full API request into the URL. As mentioned before, this rules out APIs that require other HTTP methods (such as POST) or custom headers, e.g., for authorization. With the Periodic Table API, however, we put the API key in the URL and only need the GET method.
Open a new Excel workbook, and enter the following line into a cell, replacing the string APIKEY with the previously generated key:
=WEBSERVICE("https://dev.api.basf.com/chemical/elements/He?x-api-key=APIKEY")
Once you hit Enter or click on another cell, you should see a JSON structure describing the Helium element appear in your cell.
As mentioned before, every API endpoint starts with the base URL. For the Periodic Table API, that is https://dev.api.basf.com/chemical/. Then, the path to a resource or collection endpoint follows. In our example, we retrieved a single element, hence, we used a resource endpoint. Typically, the path to a resource starts with the pluralized resource name, followed by a slash (/) and finally an identifier. If you look at the URL above, you can identify elements/He as this path. The question mark (?) separates the parameter section, and you can see the x-api-key parameter that authenticates the request.
We can separate the base URL and the API key from the URL and build the URL dynamically through string concatenation. That is useful if you have multiple requests in the same Excel sheet and, let’s say, you want to share this sheet with another person who then provides a different API key. The other person then only has to enter their API key in one designated cell instead of modifying your API requests.
As next step, we’ll create a sheet that allows users to modify the base URL and API key in one place. We’ll also apply string processing functions to parse a single field from the JSON response. You can follow along these steps. If something is unclear or doesn’t work for you, you can compare your sheet with the screenshots as well as the full Excel workbook that we’ll provide as download further below.
Here we go:
- Type «Base URL» in A1 and the base URL https://dev.api.basf.com/chemical/ in B1.
- Type «API Key» in A2 and paste your API key from the developer portal in B2.
- Type «Element» as a header in A4 and some elements below it. As an example, we’ll put «H» in A5 and «N» in A6.
- Type «API URL» as a header in B4. To build the URL, concatenate the following elements: a reference to the field containing the base URL, «elements/», a reference to the field containing the element name, «?x-api-key=», and a reference to the field containing the API key. You need to use absolute references to base URL and API key and a relative reference to the element name. Your function call should look like this: =CONCAT($B$1;»elements/»;A5;»?x-api-key=»;$B$2)
- Type «API Response» as a header in C4. Make the webservice call using the URL you built in the previous step by typing =WEBSERVICE(B5) in C5. You should see a JSON API response appear in the cell.
- Type «Atomic Mass» as a header in D4. As there is no JSON parser in Excel, we copy a substring from the API response between the atomic_mass field and the subsequent field, covalent_radius. The whole function looks like this: =MID(C5;SEARCH(«atomic_mass»;C5)+13;SEARCH(«covalent_radius»;C5)-SEARCH(«atomic_mass»;C5)-16) You should now see only the atomic mass as a number in the cell.
- Select the cells B5 to D5, grab the right bottom corner, and drag them down to the B6 to D6. You should see the API URL, API response and atomic mass for the second element appear.
- To get the atomic mass for more elements, add a new element symbol in column A and copy or drag down the three other columns.
Please note that Excel function names are localized along with the Excel user interface. If your Excel installation is in German, replace the names based on this list:
- CONCAT – TEXTKETTE
- MID – TEIL
- SEARCH – SUCHEN
You can get a working Excel workbook in the PeriodicTableWebservice.xlsx file (TODO: add download).
Visual Basic for Applications, or VBA for short, is a powerful programming language that you can use to automate Microsoft Office applications, including Excel. VBA is closely related to, but not fully compatible with, other versions of the Basic language (such as Visual Basic .NET).
If you not worked with VBA before but have programming skills in a different language, you have to learn a new syntax, but should be able to understand the structure of the macro we build in this section.
Our goal is to retrieve various attributes of specific chemical elements (but not the entire periodic table). The sheet layout uses one row per element. The user should enter the element names into the first column of the sheet (A). Then, upon running the macro, it should go through the list of rows and fill the other columns with details. For example, the atomic mass in the second column (B) and the covalent radius in the third column (C).
Open Excel with a new, empty sheet. Then, press the combination Alt and F11 on your keyboard to launch the Visual Basic editor.
On the left side of the editor, you can see the project structure. There’s an entry for your sheet. Double-click on this entry to open the code view where you can enter Basic code that is specific to that sheet.
We start by creating two global string variables, one for the base URL and the API key. It helps us separate them from the code itself so we can swap them if necessary.
Dim baseUrl, apiKey As String
It’s not possible to assign a value to these variables yet. We’ll do that later.
As mentioned under the objective above, we need to retrieve specific elements that the user enters into the sheet, not the full periodic table. For this purpose, we use the API endpoint for specific elements and have to make multiple requests. Hence it is useful to develop an abstraction and put the logic for the API request into a function.
In VBA, you can define functions with the Function keyword. They have parameters with types and a return type. Here is the definition of our getElement() function:
Function getElement(id As String) As Object
Next, we create a script control. That is actually a workaround because there is no native JSON parser available and we don’t want to install a third-party module. The script control can execute JScript, which is a version of JavaScript, and thus understand JSON.
Dim scriptControl As Object
Set scriptControl = CreateObject("MSScriptControl.ScriptControl")
scriptControl.Language = "JScript"
Then, we can make an HTTP request to the API endpoint. VBA makes HTTP requests through the XMLHTTP object. While building the request, we use string concatenation to build the API URL and include the base URL and API key from the variables we defined earlier.
With CreateObject("MSXML2.XMLHTTP")
    .Open "GET", baseUrl + "elements/" + id + "?x-api-key=" + apiKey, False
    .send
Once we have a response, we can parse it with the script control and assign the result to the function name, which is VBA’s way of specifying the returned value for a function:
    Set getElement = scriptControl.Eval("(" + .responsetext + ")")
    .abort
After that, all is left is closing the With-block and the function. The VBA editor might have already generated this code for you automatically.
End With
End Function
Macros are public VBA subroutines. Let’s call ours getPeriodicElementData():
Public Sub getPeriodicElementData()
Inside the subroutine, we first assign some values to our global variables. Add these lines and replace APIKEY with your API key from the developer portal:
baseUrl = [https://dev.api.basf.com/chemical/](https://dev.api.basf.com/chemical/)
apiKey = "APIKEY"
Then, as we want to go through our sheet row by row to get element data, we set up a counter variable:
Dim row As Integer
row = 1
Our algorithm goes through all rows until it stops at an empty row. We can achieve this with a Do-Until-loop:
Do Until IsEmpty(Cells(row, 1))
Inside the loop, we call our getElement() function we created in the previous section. By using a With-block, we can access the attributes of the elements directly and write them in the cells. Our sample code reads two attributes, atomic mass and covalent radius, which go in the row of the current element and the second or third column respectively.
    With getElement(Cells(row, 1))
        Cells(row, 2) = .atomic_mass
        Cells(row, 3) = .covalent_radius
    End With
If you want, you can extend this code with more properties from the element object and put them in additional columns. Tip: Use the WEBSERVICE() function to get the full JSON structure so you can see the available properties.
Afterwards, make sure to increase the row variable, otherwise you have an infinite loop:
row = row + 1
Finally, we close the loop and the subroutine. The VBA editor might have already generated this code for you automatically.
Loop
End Sub
Before we can run the macro, we should add a couple of element symbols in the first column (A) so that the macro has something to do. As an example, use the elements H, S and O. Use one row for each, so that H is in the first, S in the second and O in the third row.
During development, you can run your macro directly from the VBA editor, using either the play button in the toolbar, the Run menu, or the F5 key on your keyboard.
The macro should run and automatically fill the other columns for your three rows.
To re-run your macro later when you’ve closed the VBA editor, follow these steps:
- Open the View ribbon.
- Click on Macros.
- Select the macro and click Run to execute.
The Power Query builder provides access to a variety of data sources. It even enables the combination of data from multiple sources. In this tutorial, though, we’ll just show you the basics to make an API call and display the results in your Excel sheet. We use the collection endpoint to retrieve the complete periodic table.
To get started, go to the Data ribbon, click the Get Data button, choose From Other Sources, and From Web.
In the popup window, enter the URL for the API. You can configure advanced settings such as HTTP headers for your request, but the BASF Periodic Table API doesn’t need any. You have to provide the full URL to the collection endpoint and add the query parameter for authentication directly into the URL. In the following sample, replace APIKEY with the Client ID of your application
https://dev.api.basf.com/chemical/elements?x-api-key=APIKEY
Once you confirm with OK, the Power Query Builder opens and shows the API response. At first, you just see the container element items. Right-click on it and select Drill Down.
Note the list of applied steps on the right side of the window. It shows you everything you did in the query builder and you can undo any step by clicking the X next to it.
Now you see a list of records and you can click on each to see the different attributes of each element. The next step is converting this list into a table and you do this by clicking the To Table button.
A popup with additional options may appear which you can simply confirm with OK. After that, you see the list as a table but it still has just one column that we need to expand into multiple columns so you can see each attribute of the element in its own column. To do so, click the expand icon (<>) in the column header.
In the popup, select the fields that you like or keep all fields intact. You can uncheck «Use original column name as prefix» as the prefix doesn’t provide any value when you’re just working with one data source.
Once you see the data you want in the query builder, your final step is transferring the table into the Excel sheet. You do this with the Close&Load button.
You’re done! Your excel sheet contains the periodic table of elements now.
Congratulations on making it through the tutorial! We hope it deepened your understanding of APIs and how to consume them with Excel. Feel free to contact developer@basf.com with feedback and questions.
Excel is probably one of the most used tools in this world, so the demand for integrations with extremely complex spreadsheets is a recurring scenario. APIs allow easy access to information in systems, which is becoming more and more standard in the market, with that in mind, some demands of connecting to systems via API in Excel are necessary and very useful, so I decided to share a little how I created this integration. Let’s learn how to query Rest APIs using VBA and convert the result to JSON for use in the spreadsheet.
This article hopes you will know the basics of Excel and VBA, as well as what is an API and how it works . Our goal will be to consult a Public Pokemon API and list the result in the tab results .
Creating a blank worksheet
First let’s create a blank sheet with macro enabled, inside it I’ll create a tab called results .
Creating the macro to query the API
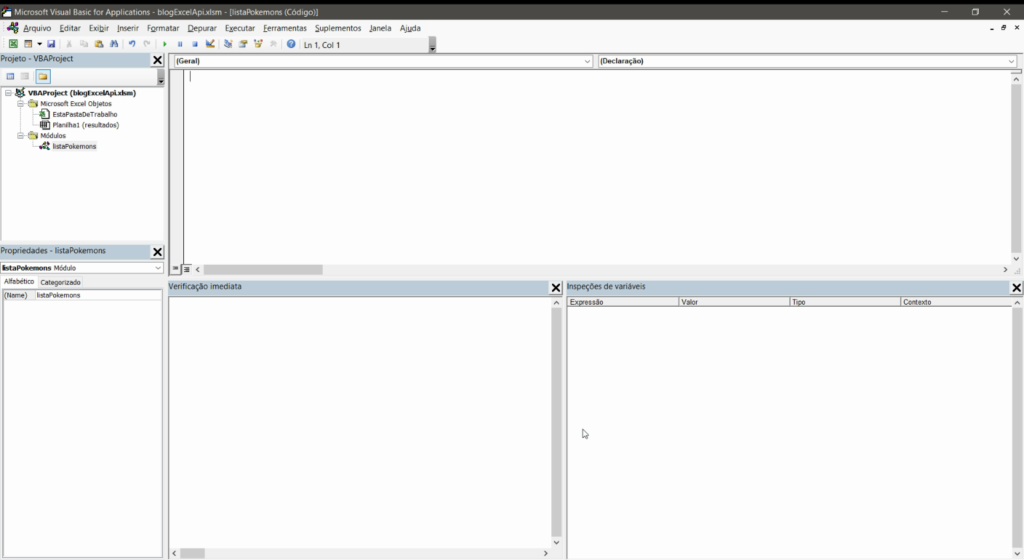
by shortcut alt + f11 let’s open the Excel macro editor, and create a module called list pokemons .
Importing the VBA-JSON library
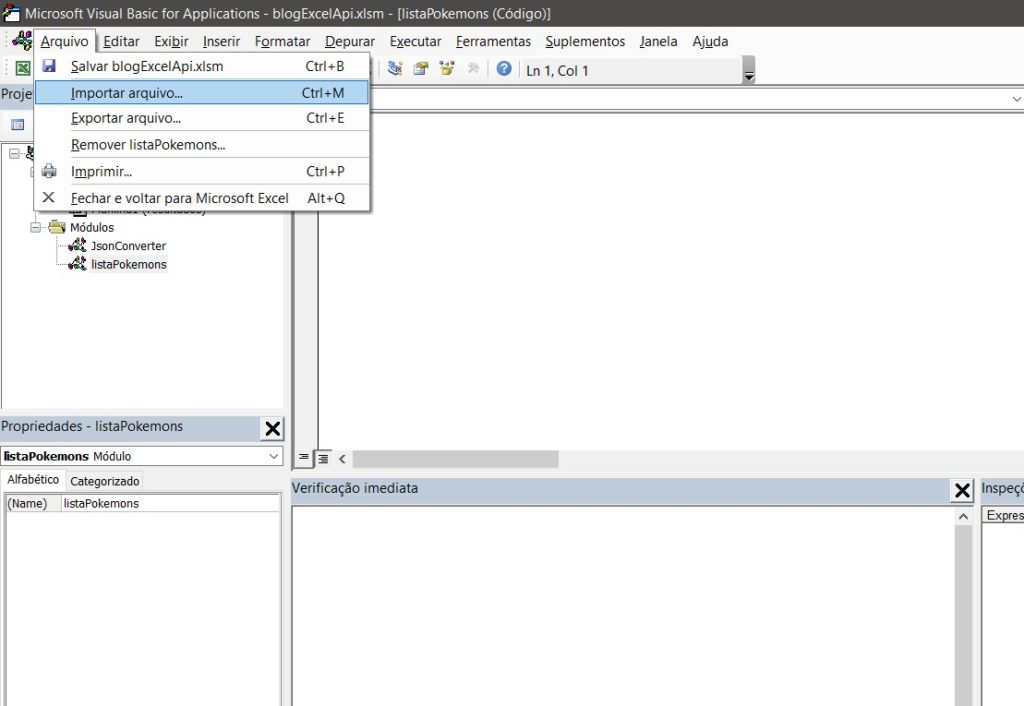
As the API we’re going to query returns a JSON as an answer we will need to import the library VBA JSON , it will take care of all the boring work of translating the JSON and returning as an array and object. Installation is very simple, just download the latest version here and in the macro editor go to File > Import File > JsonConverter.bas .
Enabling Microsoft Scripting Runtime
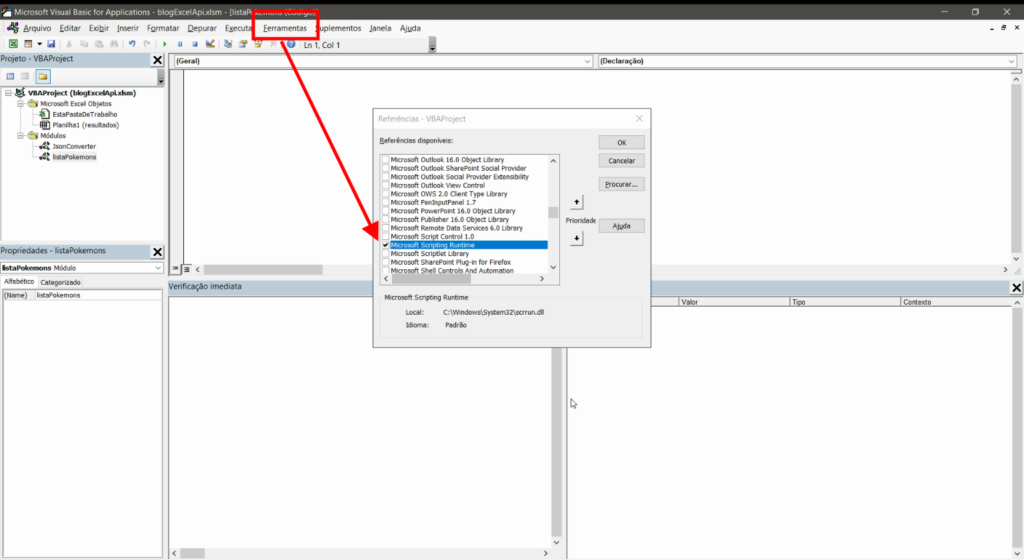
We also need to enable Microsoft Scripting Runtime, to do this just browse Tools > References and search and enable in the list the Microsoft Scripting Runtime .
Creating the VBA macro to query the REST API
Below is the complete code for our request, it might sound scary, but don’t worry, I’ll explain what each part is doing:
Sub listPokemons()
Dim json As String
Dim jsonObject As Object, item As Object
Dim i As Long
Dim ws As Worksheet
Dim objHTTP As Object

'We selected our results sheet
Set ws = Worksheets("results")

'We create our request object and send
Set objHTTP = CreateObject("WinHttp.WinHttpRequest.5.1")
URL = "https://pokeapi.co/api/v2/pokemon"
objHTTP.Open "GET", URL, False
objHTTP.Send
strResult = objHTTP.responseText
json = strResult

Set objectJson = JsonConverter.ParseJson(json)

'We create the header cells
ws.Cells(1, 1) = "name"
ws.Cells(1, 2) = "link"

'We loop the results property of the API response
i = 2 'We will start the counter on line 2
For Each pokemon InJsonObject("results")
    ws.Cells(i, 1) = pokemon("name")
    ws.Cells(i, 2) = pokemon("url")
    i = i + 1
next

End Sub
First we define all the variables that we will use in our scripts, including the VBA JSON library import that we previously imported into our project.
Dim json As String
Dim jsonObject As Object, item As Object
Dim i As Long
Dim ws As Worksheet
Dim xmlhttp As Object
Set xmlhttp = CreateObject("MSXML2.serverXMLHTTP")
Dim objHTTP As Object
Then we select the spreadsheet we want to display the results of the API query, in our case Worksheets("results") and then we create an object that will allow us to make the request to the API. https://pokeapi.co/api/v2/pokemon . We’ll take the answer and put it in the variable json , for now it is nothing more than a text.
'We selected our results sheet
Set ws = Worksheets("results")

'We create our request object and send
Set objHTTP = CreateObject("WinHttp.WinHttpRequest.5.1")
URL = "https://pokeapi.co/api/v2/pokemon"
objHTTP.Open "GET", URL, False
objHTTP.Send
strResult = objHTTP.responseText
json = strResult
Here where the magic happens, the function parsejson from the VBA JSON library converts the text of our variable json for an accessible object in our script. We are now able to access all properties programmatically in our code.
Set objectJson = JsonConverter.ParseJson(json)
Now that we have the result of our API accessible, we create in the first row of the spreadsheet the header containing the columns Name and link .
'We create the header cells
ws.Cells(1, 1) = "name"
ws.Cells(1, 2) = "link"
Now before analyzing the script we need to understand the result of the API. If you open the link https://pokeapi.co/api/v2/pokemon in your browser you will see the following result:
{
  "count": 964,
  "next": "https://pokeapi.co/api/v2/pokemon?offset=20&limit=20",
  "previous": null,
  "results": [
    {
      "name": "bulbasaur",
      "url": "https://pokeapi.co/api/v2/pokemon/1/"
    },
    {
      "name": "ivysaur",
      "url": "https://pokeapi.co/api/v2/pokemon/2/"
    },
    {
      "name": "venusaur",
      "url": "https://pokeapi.co/api/v2/pokemon/3/"
    },
    {
      "name": "charmander",
      "url": "https://pokeapi.co/api/v2/pokemon/4/"
    },
    {
      "name": "charmeleon",
      "url": "https://pokeapi.co/api/v2/pokemon/5/"
    },
    {
      "name": "charizard",
      "url": "https://pokeapi.co/api/v2/pokemon/6/"
    },
    {
      "name": "squirtle",
      "url": "https://pokeapi.co/api/v2/pokemon/7/"
    },
    {
      "name": "wartortle",
      "url": "https://pokeapi.co/api/v2/pokemon/8/"
    },
    {
      "name": "blastoise",
      "url": "https://pokeapi.co/api/v2/pokemon/9/"
    },
    {
      "name": "caterpie",
      "url": "https://pokeapi.co/api/v2/pokemon/10/"
    },
    {
      "name": "metapod",
      "url": "https://pokeapi.co/api/v2/pokemon/11/"
    },
    {
      "name": "butterfree",
      "url": "https://pokeapi.co/api/v2/pokemon/12/"
    },
    {
      "name": "weedle",
      "url": "https://pokeapi.co/api/v2/pokemon/13/"
    },
    {
      "name": "kakuna",
      "url": "https://pokeapi.co/api/v2/pokemon/14/"
    },
    {
      "name": "beedrill",
      "url": "https://pokeapi.co/api/v2/pokemon/15/"
    },
    {
      "name": "pidgey",
      "url": "https://pokeapi.co/api/v2/pokemon/16/"
    },
    {
      "name": "pidgeotto",
      "url": "https://pokeapi.co/api/v2/pokemon/17/"
    },
    {
      "name": "pidgeot",
      "url": "https://pokeapi.co/api/v2/pokemon/18/"
    },
    {
      "name": "rattata",
      "url": "https://pokeapi.co/api/v2/pokemon/19/"
    },
    {
      "name": "raticate",
      "url": "https://pokeapi.co/api/v2/pokemon/20/"
    }
  ]
}
We are interested in the property. results , an array containing a list of pokemons with their names and links to more details. We will access this matrix at jsonobject("results") and we will loop to display each pokemon result in a new row of our table.
'We loop the results property of the API response
i = 2 'We will start the counter on line 2
For Each pokemon InJsonObject("results")
    ws.Cells(i, 1) = pokemon("name")
    ws.Cells(i, 2) = pokemon("url")
    i = i + 1
next
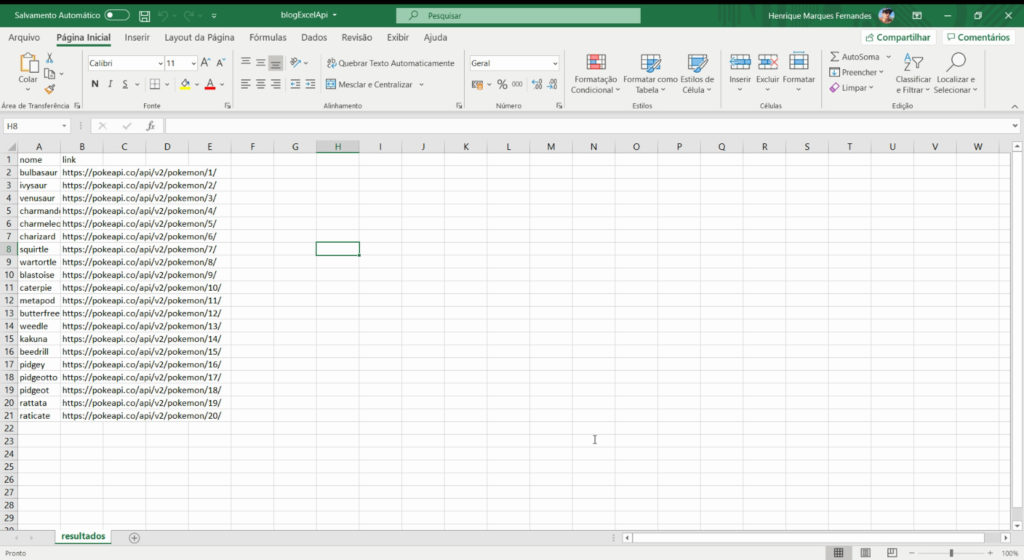
If everything goes as expected, by pressing f5 to run our macro, in your spreadsheet you should see the following result:
Conclusion
This was a very simple example of a query, with the object of HT TP it is possible to perform all types of requests, GET, POST, UPDATE, … The interesting thing is to understand how the request is made and how you can display the result, thanks to the VBA JSON library, which already drastically reduces the work required. Now you just need to adapt this flow and script to your needs.
3.7
6
votos
Nota do Artigo


