
Export SQL Data to Excel from Microsoft SQL Server
Let’s go over three ways to export an SQL Query to an Excel File Using MSSQL
Despite the pushback from Database aficionados, sometimes it makes sense to export data from SQL to an Excel file. It really depends on who is the audience of the information. Not everyone is great with SQL Analysis. Few people require access to the database.
And lots of times the boss just needs to see the information in Excel.
So, if Excel is the Output required this article is here to help you Export SQL Queries to Excel.
Here are three ways to Export a SQL query to Excel format. The last one can be kind of tricky. I’ll provide a condensed version followed by a detailed version with screenshots.
Three quick ways to Export SQL Data to Excel:
Choose the Summarized Version and then scroll to further down to use the SQL Export Version to Excel that works best for you.
Method Number 1 – Copy Grid results and Paste into Excel
Under Query, Make sure results to Grid are selected.
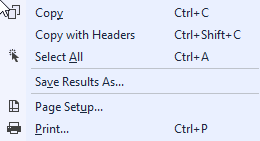
After Running your query, right-click the top right corner of the grid.
Copy With Headers.
Paste into an Excel File
Possible Issues:
I’ve seen formatting issues with this strategy. For Example, there are situations where the spreadsheet drops preceding zeroes after the copy-paste.
I’ve also noticed lengthy fields, (think of a really long free text field) end up running into the next line.
For the reasons above, I prefer this next method for a clean Excel file.
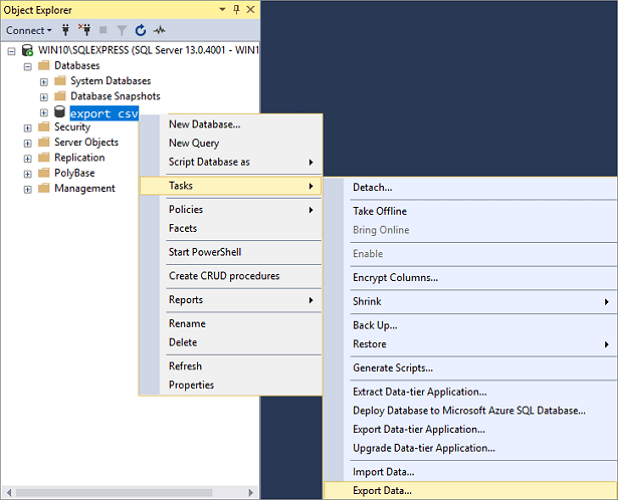
Method Number 2: Export the Query Results as a Task
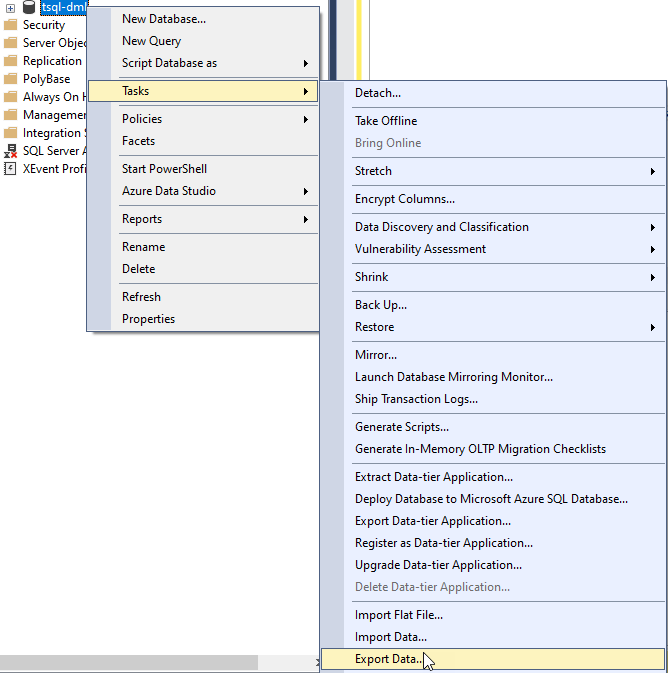
In the object explorer window, find the database you want to export from.
Right Click the Database, Click Tasks, and Export Data
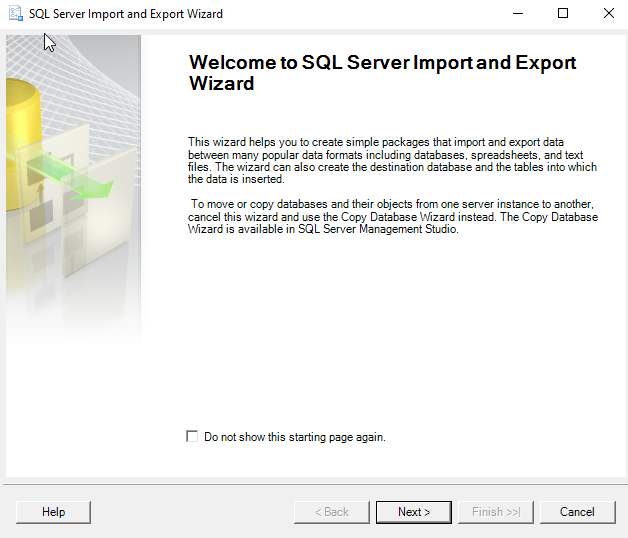
The Wizard walks you through the rest of the steps but I have included screenshots below.
Method Number 3 – Use Good Old fashioned TSQL to send the data to an excel file
For those who value speed above all use the following script format.
INSERT INTO OPENROWSET(‘Microsoft.ACE.OLEDB.12.0′,’Excel 12.0; Database=C:SQL2019ReportsUsernames.xlsx;’,’SELECT * FROM [Sheet1$]’) SELECT DisplayName FROM dbo.Users Where Reputation > 2000
Possible Issues – Configuring this might not be your type of fun and getting this straight deserves its own article.
Step by Step instructions with screenshots
Method Number 1 – Copy Grid results and paste into Excel
After ensuring results to grid turned on, Execute your query, right-click the top left-hand corner of the results grid.
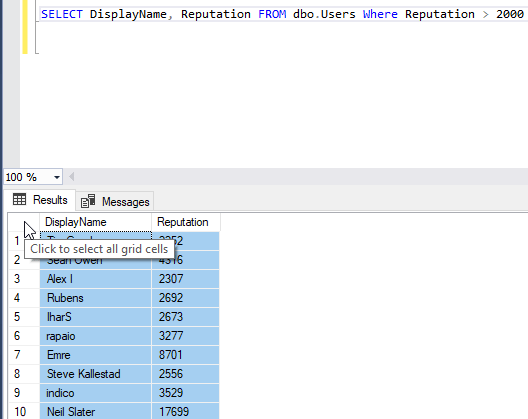
Choose Copy with Headers and then you are ready to paste in Excel with Ctrl + C
Method 2 – Export Via the Export Wizard
Right-click on the database you want to export from. Then Select tasks and “Export Data”.
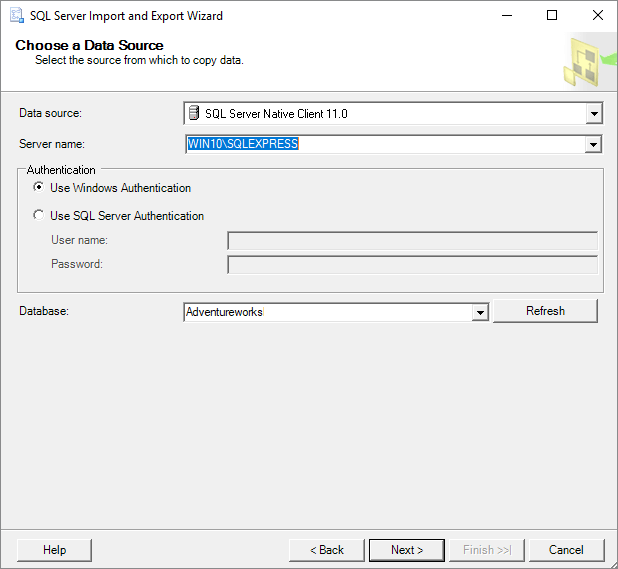
The SQL Server Wizard will startup. Click Next through the prompts.
Select the appropriate Native client, your server name, and database and choose “Next”.
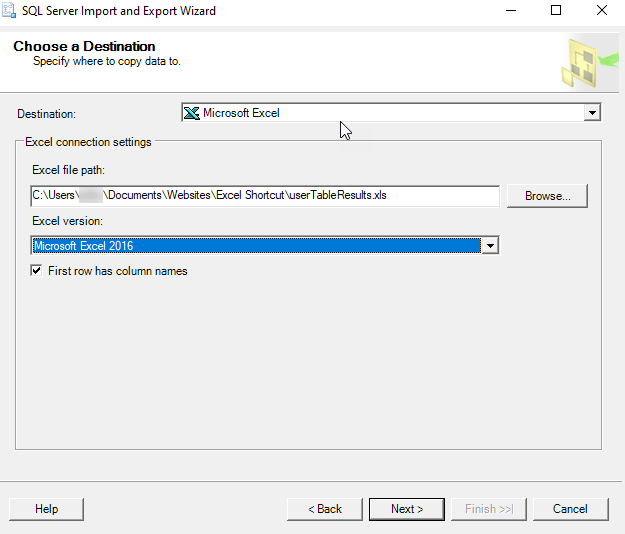
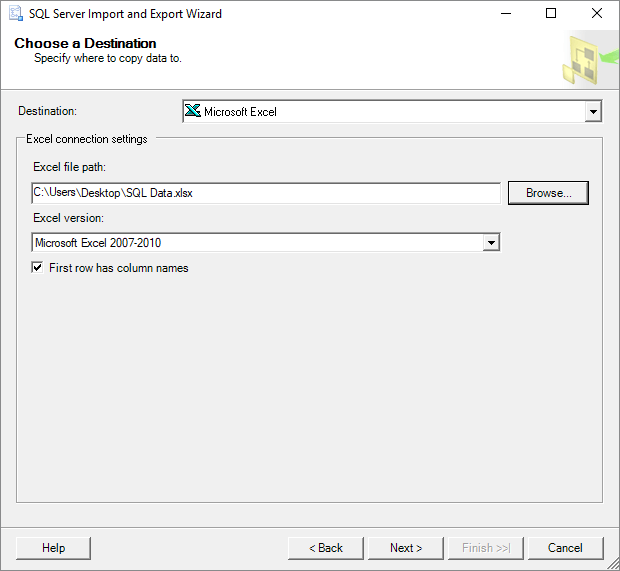
Next, Select Microsoft Excel and the file path where you want to import the data. The .xls file that you name will be created by this process.
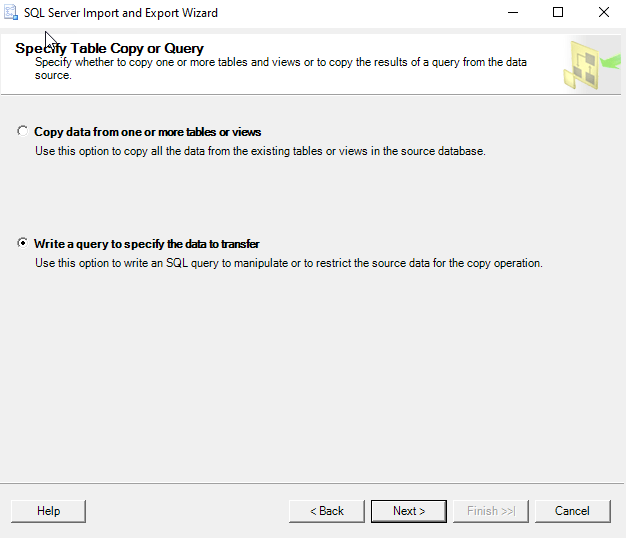
Now you can choose to export a whole table or a query. For the purpose of this exercise, we are creating a query.
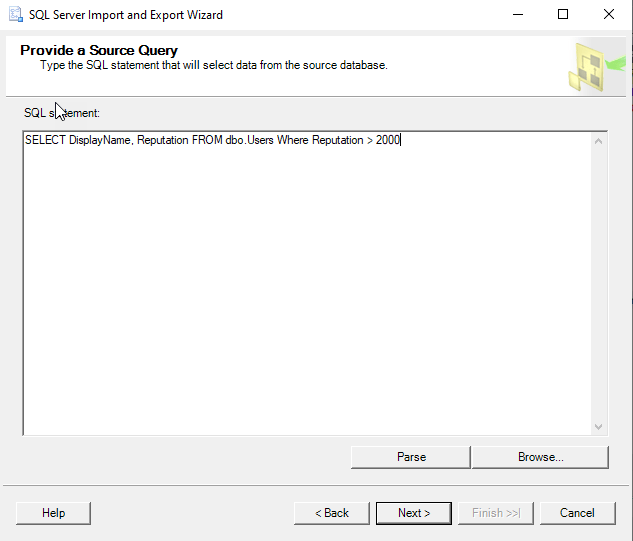
Paste the query into the SQL Statement field. Make sure every output field has a unique name.
Click Next on the “Select Source Tables and Views” screen.

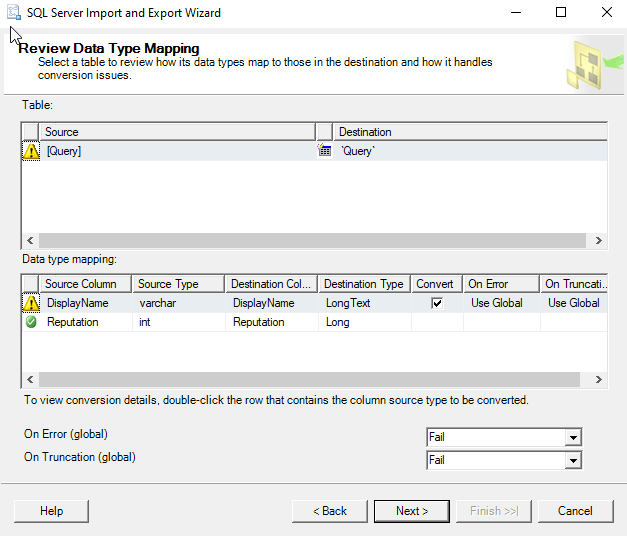
I use the default settings on the “conversion issues and data type mapping screen”
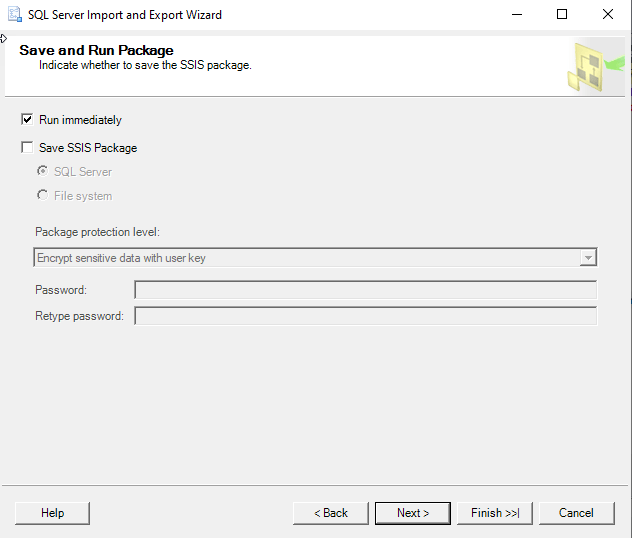
Now you can choose to Run immediately or Save an SSIS Package for later reuse.
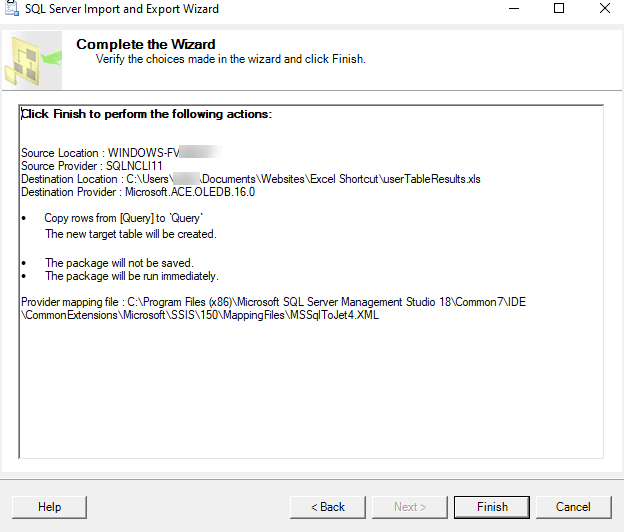
Double Check your settings and click finish.
Make sure there were no errors in the Export.
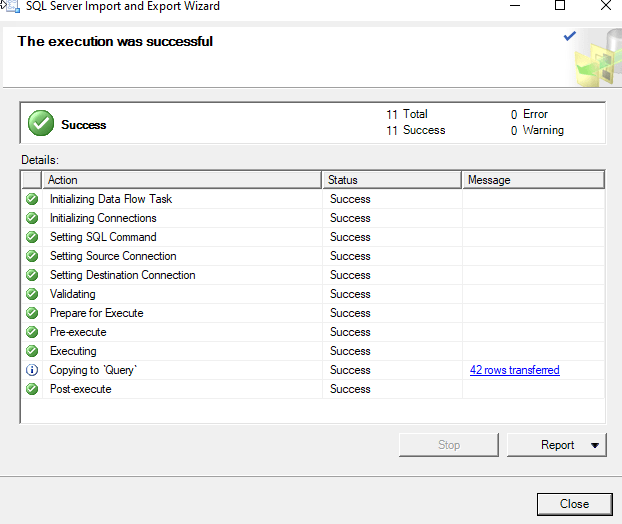
Now Go to the directory you choose earlier and make sure you have a sweet-looking Excel File at that location!
Method Number 3 – Use TSQL to send the data to an excel file
This method is the quickest once you get it set up but the configuration is the tricky part. Permissions can be a limiting factor.
Also with the script below, you have to make sure the file exists before you run the query for it to import properly.
First, create a blank excel file at the directory of your choosing.
C:SQL2019ReportsUsernames.xlsx
Then run this script below.
INSERT INTO OPENROWSET(‘Microsoft.ACE.OLEDB.12.0’,’Excel 12.0;
Database=C:SQL2019ReportsUsernames.xlsx;’,’SELECT * FROM [Sheet1$]’)
SELECT DisplayName FROM dbo.Users Where Reputation > 2000

Configuring this can be tricky and dependent on your level of permissions. Make sure you have the correct Linked Server/Provider installed (‘Microsoft.ACE.OLEDB.12.0’) And check your Database user settings to this server .

«Hello, I am new to SQL. We use SQL query in SQL 2016 Server. And then we are exporting the output to excel. Could you please guide me on how to make the process automated for exporting data from SQL to Excel. Since I don’t want to do the task manually any longer. «
If you come across the same problem as mentioned above and want to find a way to export SQL Server data to Excel, don’t fret. This page covers two possible ways to help you export data from SQL Server automatically.
Two Ways to Export Data from SQL Server to Excel
You can use the SQL Server Import and Export Wizard and Data Connection Wizard in Excel to export data from SQL Server to Excel. See the details below.
Solution 1. Use the SQL Server Import and Export Wizard
1. Open SQL Server Management Studio and connect to the database.
2. Go to «Object Explorer», find the server database you want to export to Excel. Right-click on it and choose «Tasks» > «Export Data» to export table data in SQL. Then, the SQL Server Import and Export Wizard welcome window pop up.
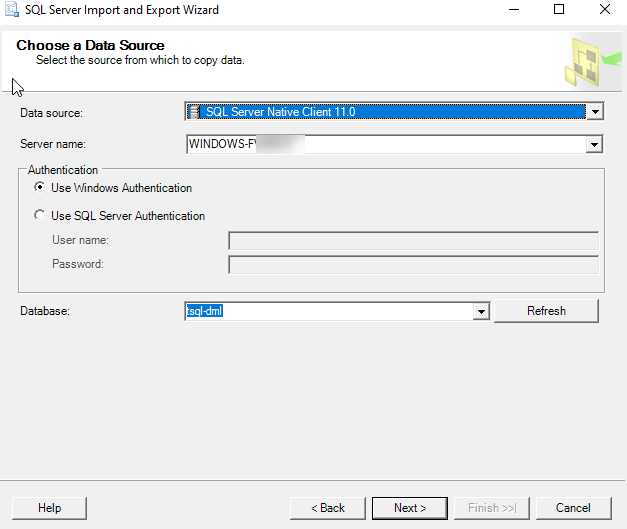
3. Now, you need to click on the Data source drop-down button to choose the data source you want to copy. Here, select «SQL Server Native Client 11.0». In the Server name drop-down box, select a SQL Server instance. In the Authentication section, choose authentication for the data source connection and from the Database drop-down box, select a database from which data will be copied. After everything is set, press the «Next» button.
4. On the «Choose a Destination» window, in the Destination box, choose Microsoft Excel item for exporting data from SQL Server to Excel. Choose the Excel file path and version as you need. Then, click the «Next» button to continue.
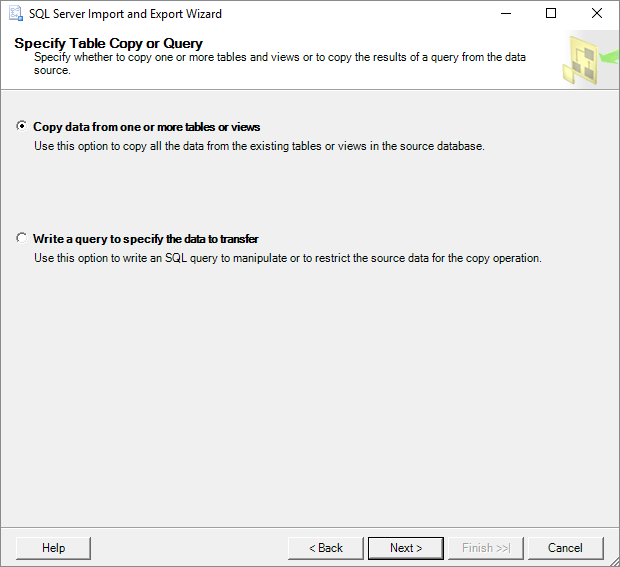
5. On the Specify Table Copy or Query screen, you can choose «Copy data from one or more tables or views». Then, click «Next» to go on.
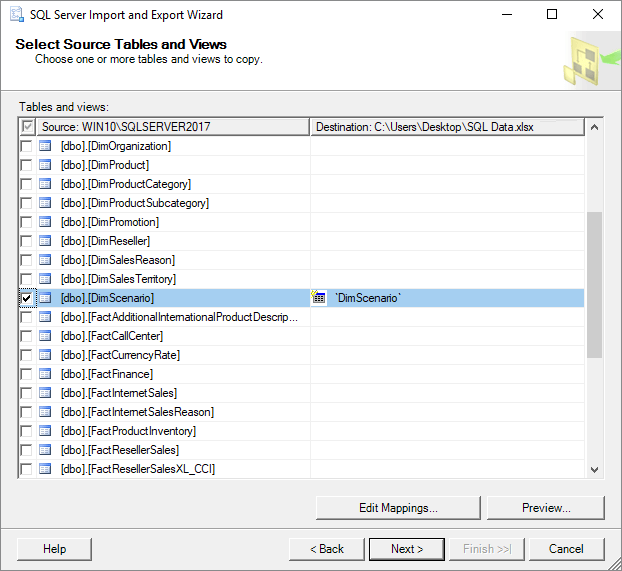
6. In the «Select Source Table and Views» window, you can choose one or more tables and views from which you want to export SQL Server data to an Excel. Click the «Preview» button to preview which data will be generated to an Excel file. Click the «Next» button to move on.
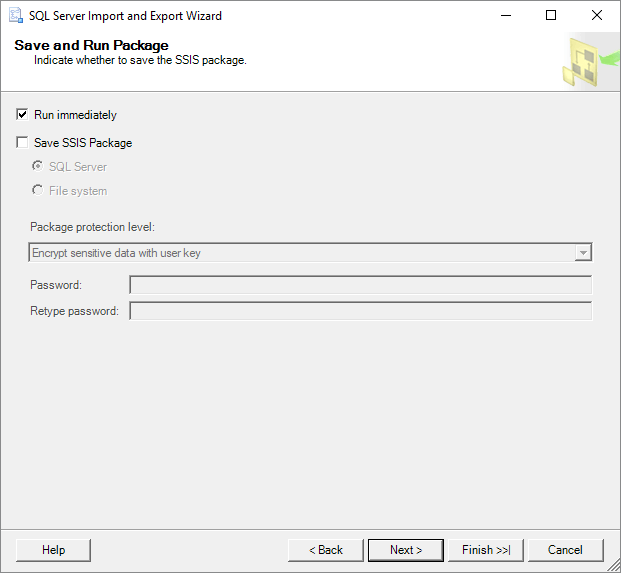
7. Here, on the «Save and Run Package» window, check the «Run immediately» and click the «Next» button.
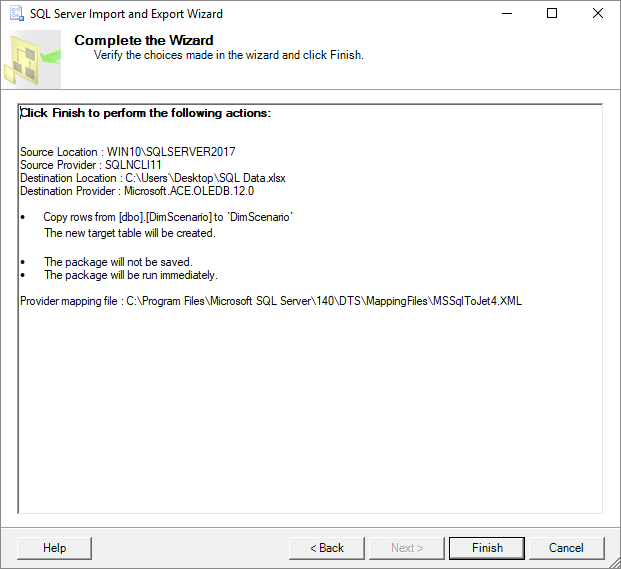
8. On the «Complete» Wizard window, you can check all the settings set during of exporting process. If everything is right, click «Finish» to start exporting SQL database to Excel.
9. You can view the exporting process in this step. When it completes, click on «Report» drop-down button.
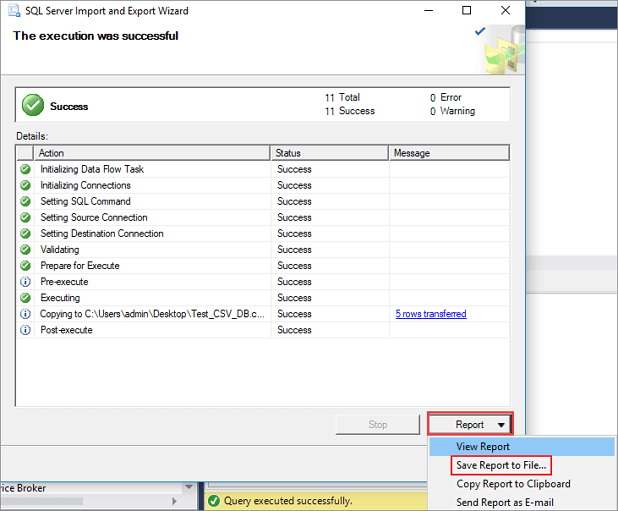
10. You can choose «Save Report to File…» (including Excel, Notepad) to save the report. Here, you need to choose Excel as the target file format.
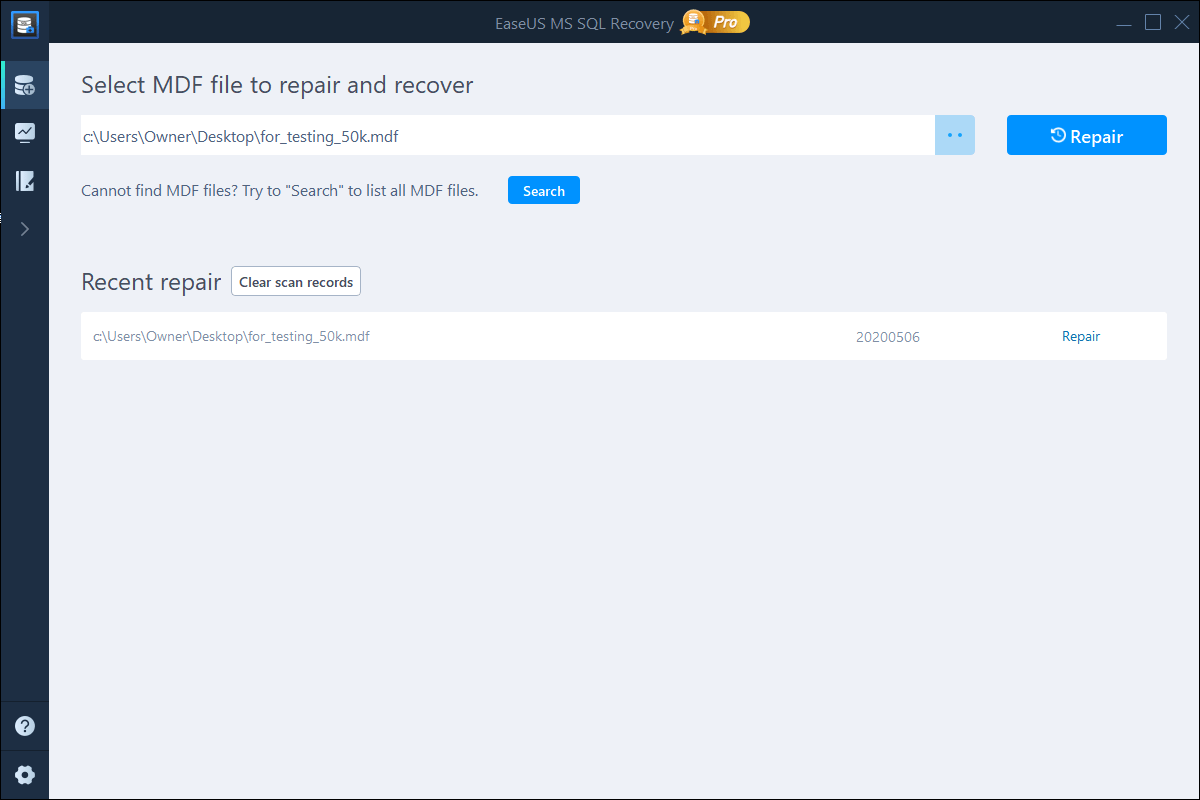
How to Repair SQL Server Database
SQL Server Management Studio (SSMS) offers the Import and Export Wizard feature to export data from one data source to another data source. Namely, you can apply this function to export SQL to Excel. For exporting SQL Server database to CSV, link to check the details.
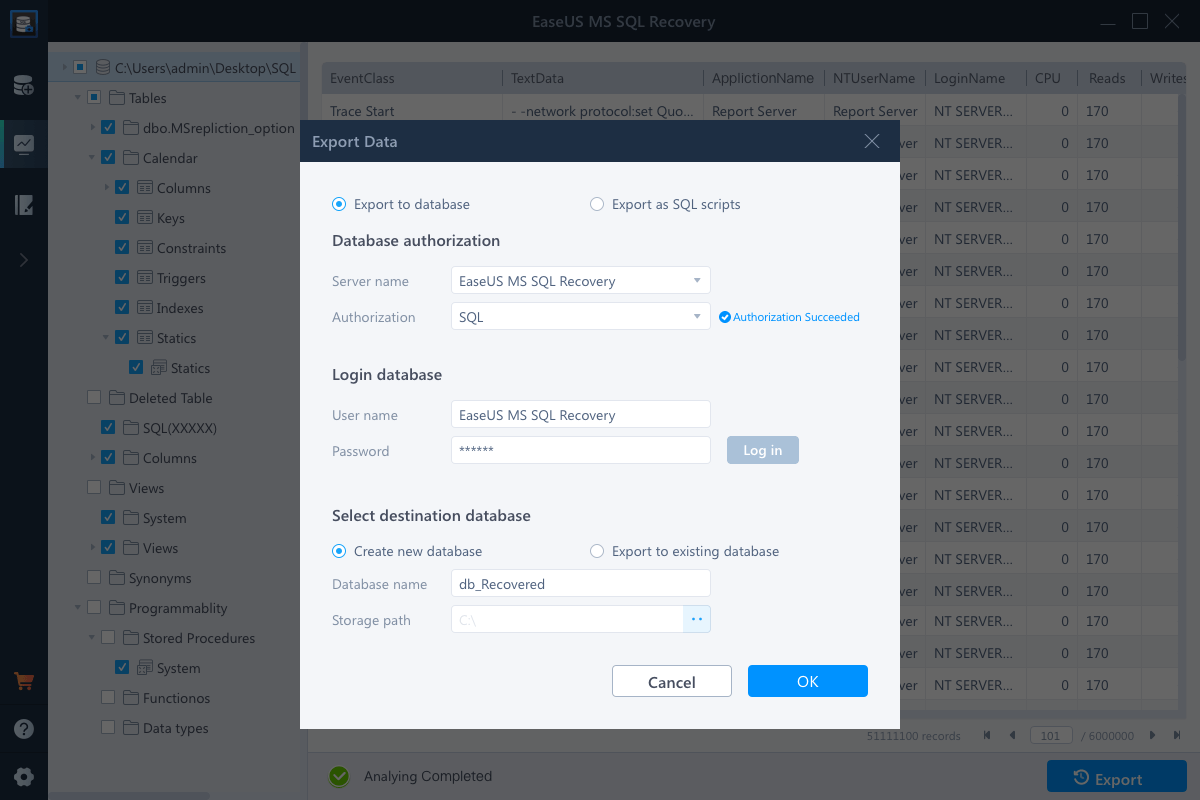
Step 1. Close the SQL Service in Task Manager or SQL Server Manager Console.
Step 2. Run EaseUS MS SQL Recovery, click «Browse» (the two dots) or «Search» to choose the location where you saved your corrupted database. Afterward, Click «Repair» to start analyzing the specified database.
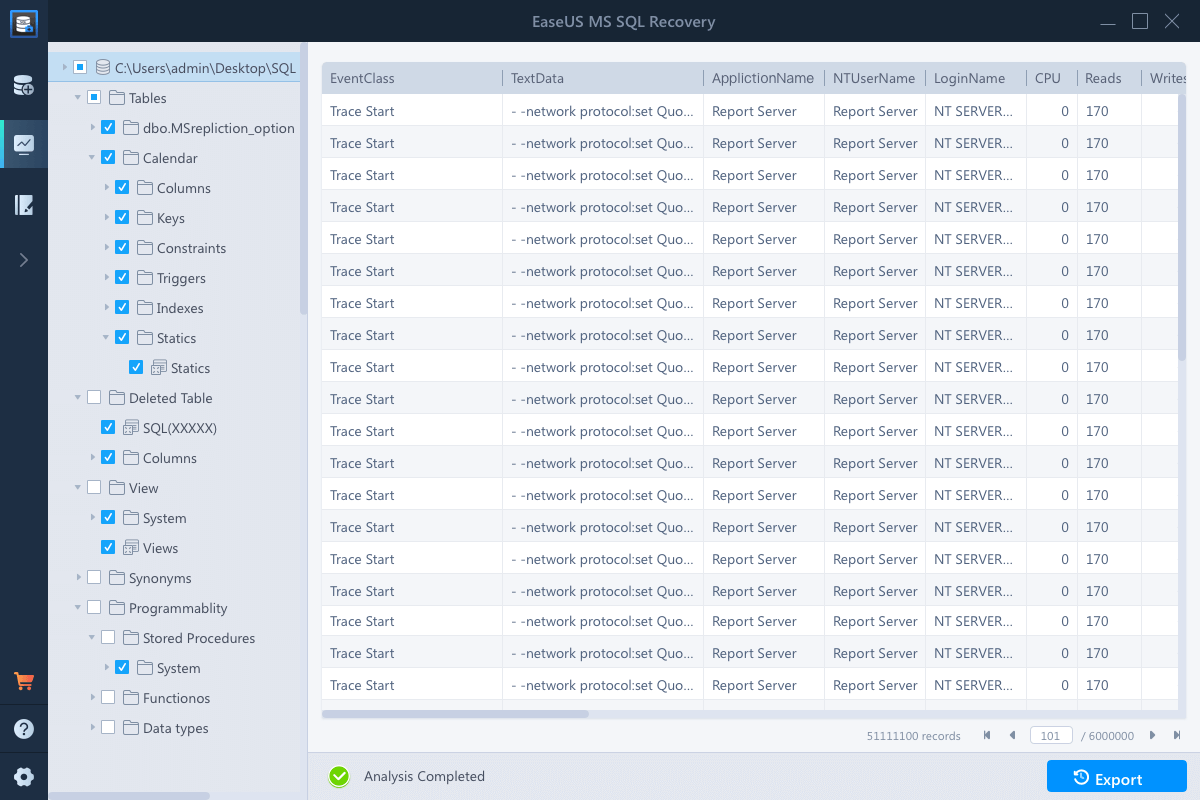
Step 3. When it has done, choose the files you want to repair and click «Export».
Step 4. Turn on the SQL service, you can choose to export the repaired files to database to export it as SQL scripts.
Solution 2. Using the Data Connection Wizard in Excel
Another way to export data from SQL Server to Excel file is to use the Data Connection Wizard dialog in Excel.
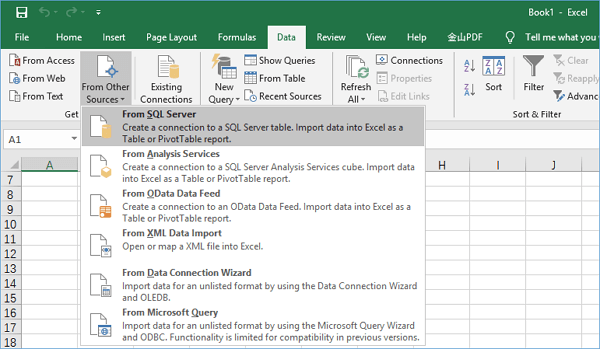
1. Launch Excel, open an Excel file in which you want to export SQL Server data. On the toolbar, click the «Data» tab > select «From Other Sources» > choose «From SQL Server».
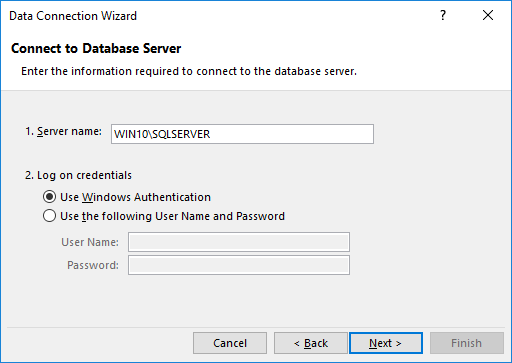
2. The «Data Connection Wizard» window will pop up. Enter the name of the SQL Server instance from which data need to export. In the «Log on credentials» section, choose «Use Windows Authentication» mode for the data source connection and click the «Next» button.
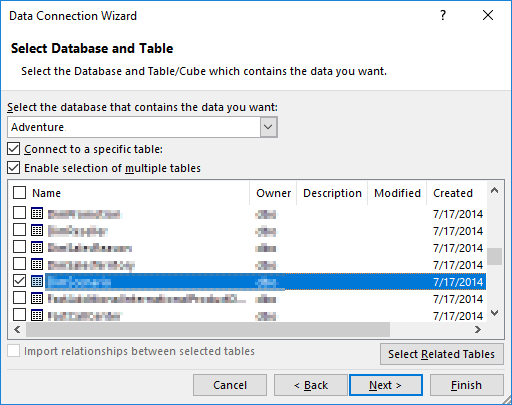
3. Choose the database from which the data will be exported. And click the «Next» button to proceed. On the next window, leave everything as it is and press the «Finish» button.
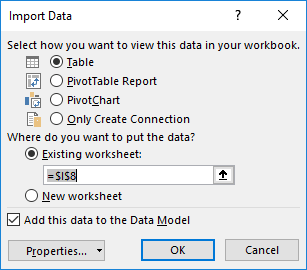
4. In the Import Data dialog, choose «Table» and «Existing worksheet» as the screenshot shows. Press the «OK» button. After this, the SQL Server data will be exported to Excel file.
For anyone coming here looking for how to do this in C#, I have tried the following method and had success in dotnet core 2.0.3 and entity framework core 2.0.3
First create your model class.
public class User
{
    public string Name { get; set; }
    public int Address { get; set; }
    public int ZIP { get; set; }
    public string Gender { get; set; }
}
Then install EPPlus Nuget package. (I used version 4.0.5, probably will work for other versions as well.)
Install-Package EPPlus -Version 4.0.5
The create ExcelExportHelper class, which will contain the logic to convert dataset to Excel rows. This class do not have dependencies with your model class or dataset.
public class ExcelExportHelper
    {
        public static string ExcelContentType
        {
            get
            { return "application/vnd.openxmlformats-officedocument.spreadsheetml.sheet"; }
        }

        public static DataTable ListToDataTable<T>(List<T> data)
        {
            PropertyDescriptorCollection properties = TypeDescriptor.GetProperties(typeof(T));
            DataTable dataTable = new DataTable();

            for (int i = 0; i < properties.Count; i++)
            {
                PropertyDescriptor property = properties[i];
                dataTable.Columns.Add(property.Name, Nullable.GetUnderlyingType(property.PropertyType) ?? property.PropertyType);
            }

            object[] values = new object[properties.Count];
            foreach (T item in data)
            {
                for (int i = 0; i < values.Length; i++)
                {
                    values[i] = properties[i].GetValue(item);
                }

                dataTable.Rows.Add(values);
            }
            return dataTable;
        }

        public static byte[] ExportExcel(DataTable dataTable, string heading = "", bool showSrNo = false, params string[] columnsToTake)
        {

            byte[] result = null;
            using (ExcelPackage package = new ExcelPackage())
            {
                ExcelWorksheet workSheet = package.Workbook.Worksheets.Add(String.Format("{0} Data", heading));
                int startRowFrom = String.IsNullOrEmpty(heading) ? 1 : 3;

                if (showSrNo)
                {
                    DataColumn dataColumn = dataTable.Columns.Add("#", typeof(int));
                    dataColumn.SetOrdinal(0);
                    int index = 1;
                    foreach (DataRow item in dataTable.Rows)
                    {
                        item[0] = index;
                        index++;
                    }
                }


                // add the content into the Excel file
                workSheet.Cells["A" + startRowFrom].LoadFromDataTable(dataTable, true);

                // autofit width of cells with small content
                int columnIndex = 1;
                foreach (DataColumn column in dataTable.Columns)
                {
                    int maxLength;
                    ExcelRange columnCells = workSheet.Cells[workSheet.Dimension.Start.Row, columnIndex, workSheet.Dimension.End.Row, columnIndex];
                    try
                    {
                        maxLength = columnCells.Max(cell => cell.Value.ToString().Count());
                    }
                    catch (Exception) //nishanc
                    {
                        maxLength = columnCells.Max(cell => (cell.Value +"").ToString().Length);
                    }

                    //workSheet.Column(columnIndex).AutoFit();
                    if (maxLength < 150)
                    {
                        //workSheet.Column(columnIndex).AutoFit();
                    }


                    columnIndex++;
                }

                // format header - bold, yellow on black
                using (ExcelRange r = workSheet.Cells[startRowFrom, 1, startRowFrom, dataTable.Columns.Count])
                {
                    r.Style.Font.Color.SetColor(System.Drawing.Color.White);
                    r.Style.Font.Bold = true;
                    r.Style.Fill.PatternType = OfficeOpenXml.Style.ExcelFillStyle.Solid;
                    r.Style.Fill.BackgroundColor.SetColor(Color.Brown);
                }

                // format cells - add borders
                using (ExcelRange r = workSheet.Cells[startRowFrom + 1, 1, startRowFrom + dataTable.Rows.Count, dataTable.Columns.Count])
                {
                    r.Style.Border.Top.Style = ExcelBorderStyle.Thin;
                    r.Style.Border.Bottom.Style = ExcelBorderStyle.Thin;
                    r.Style.Border.Left.Style = ExcelBorderStyle.Thin;
                    r.Style.Border.Right.Style = ExcelBorderStyle.Thin;

                    r.Style.Border.Top.Color.SetColor(System.Drawing.Color.Black);
                    r.Style.Border.Bottom.Color.SetColor(System.Drawing.Color.Black);
                    r.Style.Border.Left.Color.SetColor(System.Drawing.Color.Black);
                    r.Style.Border.Right.Color.SetColor(System.Drawing.Color.Black);
                }

                // removed ignored columns
                for (int i = dataTable.Columns.Count - 1; i >= 0; i--)
                {
                    if (i == 0 && showSrNo)
                    {
                        continue;
                    }
                    if (!columnsToTake.Contains(dataTable.Columns[i].ColumnName))
                    {
                        workSheet.DeleteColumn(i + 1);
                    }
                }

                if (!String.IsNullOrEmpty(heading))
                {
                    workSheet.Cells["A1"].Value = heading;
                   // workSheet.Cells["A1"].Style.Font.Size = 20;

                    workSheet.InsertColumn(1, 1);
                    workSheet.InsertRow(1, 1);
                    workSheet.Column(1).Width = 10;
                }

                result = package.GetAsByteArray();
            }

            return result;
        }

        public static byte[] ExportExcel<T>(List<T> data, string Heading = "", bool showSlno = false, params string[] ColumnsToTake)
        {
            return ExportExcel(ListToDataTable<T>(data), Heading, showSlno, ColumnsToTake);
        }
    }
Now add this method where you want to generate the excel file, probably for a method in the controller. You can pass parameters for your stored procedure as well. Note that the return type of the method is FileContentResult. Whatever query you execute, important thing is you must have the results in a List.
[HttpPost]
public async Task<FileContentResult> Create([Bind("Id,StartDate,EndDate")] GetReport getReport)
{
    DateTime startDate = getReport.StartDate;
    DateTime endDate = getReport.EndDate;

    // call the stored procedure and store dataset in a List.
    List<User> users = _context.Reports.FromSql("exec dbo.SP_GetEmpReport @start={0}, @end={1}", startDate, endDate).ToList();
    //set custome column names
    string[] columns = { "Name", "Address", "ZIP", "Gender"};
    byte[] filecontent = ExcelExportHelper.ExportExcel(users, "Users", true, columns);
    // set file name.
    return File(filecontent, ExcelExportHelper.ExcelContentType, "Report.xlsx");
}
More details can be found here

Table of Contents
- Introduction
- Description
- Base Excel export
- Base Access export
- Base XML export
- Summary
- See also
- Source code
Introduction

This article will demonstrate how to export a table within
SQL-Server database to Microsoft Excel, Microsoft Access or a standard XML file utilizing
Transact-SQL
OPENROWSET. Using this method means no dealing with reading table data from a database into a client container such as a DataTable as an intermediate step to saving the table data to Microsoft Excel, Microsoft Access or an XML file where the intermediate
step can be simple or complex dependent on the chosen logic which could be using Open XML, Excel automation, a third party library or using a
StreamWriter. What follows are static code samples and dynamic code samples to build upon for your solution.
All base code resides in a class project while execution is performed in a windows form project. This by no means that this code is solely for windows form projects as the code to export data can run in any C# project type be it WPF, web solution etc.
Description
↑Back to top
Before writing code there is configuration to be performed, otherwise the following error will be raised when executing the code presented:
The requested operation could not be performed because OLE DB provider «Microsoft.ACE.OLEDB.12.0» for linked server «(null)» does not support the required transaction interface.
The configuration can be done in SQL-Server Management Studio (SSMS)
as demonstrated here, or SQL Operations Studio (SOS) for example.
Open SSMS, open Object Explorer, open to the following tree node.

Right click on the node above and select properties.

Select and check the following properties.

Select the Database node, right-click, select Refresh for validation. This concludes setting up SQL-Server for exporting data from tables in databases.
Setting up to run the code samples, unzip the attached Visual Studio solution, find CreateDatabase.sql, run this script in SSMS following by running the script SQL_Scripts.sql to create and populating a table. Both scripts are located in the root folder of
the attached solution.
All code samples are executed from a Windows form project as presented below:

Before getting into the code for exporting there are several classes that need to be discussed. In the main class for performing export operations, there is a base class, BaseSqlServerConnections which is responsible for centralizing properties for connecting
to the intended database. There are two properties, IsKarenMachine and IsKarensDatabaseServer. Both properties are only needed for these code samples. They are responsible for determining if you the reader have changed the server and catalog from the defaults
if they are not changed your connection will fail.
BaseSqlServerConnection inherits
BaseExceptionsHandler which provides properties which are used in each method of the main data class
SqlServerOperations to assist dealing with runtime exceptions.
On each build of the main project several commands run which are setup under project properties, Build Events in Pre-Build which will delete any Excel, Access or XML file. Each code sample copies a fresh Excel or Access file from a folder one level below the
application folder to use for the current code sample.
Pre-build command

Base Excel export
↑Back to top
The following utilizes a SqlClient connection and command to export, in this case the SQL-Server Customers table in the catalog ExcelExporting on the server KARENS-PC (remember to change this to your server name or to .SQLEXPRESS or localdb).
Inspecting the CommandText for the command object note the only variable is the Database set to the file name passed in. The actual table name and fields are static.
public
bool
ExportAllCustomersToExcel(string
pFileName, ref
int
pRowsExported)
{
using
(SqlConnection cn = new
SqlConnection { ConnectionString = ConnectionString })
{
using
(SqlCommand cmd = new
SqlCommand { Connection = cn })
{
cmd.CommandText =
$"INSERT INTO OPENROWSET('Microsoft.ACE.OLEDB.12.0', 'Excel 12.0;Database={pFileName}',"
+
"'SELECT * from [Customers$]') "
+
"SELECT CustomerIdentifier,CompanyName,ContactName,ContactTitle,"
+
"[Address],City,Region,PostalCode,Country,Phone "
+
"FROM Customers";
cn.Open();
try
{
pRowsExported = cmd.ExecuteNonQuery();
return
pRowsExported > 0;
}
catch
(Exception e)
{
mHasException =
true;
mLastException = e;
}
}
}
return
IsSuccessFul;
}
The data provider in the above example is exactly the same as for the code sample for exporting to Microsoft Access as shown in the partial code sample.
cmd.CommandText = $"INSERT INTO OPENROWSET('Microsoft.ACE.OLEDB.12.0','{pFileName}';'Admin';'',"
+
For the base SQL INSERT INTO, this is a standard SQL command up to OPENROWSET. OPENROWSET is the critical aspect of the entire command in combination with the initial setup at the start of this document.
Within OPENROWSET the provided is indicated along with extended properties for Excel which is not required for working with Microsoft Access.
In the second SELECT statement list field names, this could also be SELECT * too which is fine if all fields are to be exported yet it’s better to list each field and consider wrapping each field with brackets e.g. CustomerName bracketed would be [CustomerName].
This is to safeguard against fields with spaces in their name such as Customer Name which would cause an exception when executing the intended statement so wrapping all fields in brackets is a safety net.
The line, pRowsExported = cmd.ExecuteNonQuery executes the command to export and on success returns how many rows were exported.
Base Access export
↑Back to top
In this case, the code below is almost the same as the Excel export.
For the first two arguments to OPENROWSET the provider is exactly the same as the Excel OPENROWSET but with Microsoft Access the extended property is not required. Database is missing, instead, the file name is next followed by specifying ‘Admin’ which indicates
this is an admin. This could be an issue with a customer running this operation where their machine may be locked down by company security policies.
Fields are dynamic rather than hardcoded as with the Excel code sample. Excel can also have dynamic field names.
The WHERE condition is similar to another Excel method included in the attached solution which permits some or all records to be exported.
public
bool
ExportAllCustomersToAccess(string
pFileName, string
pCountry, ref
int
pRowsExported)
{
string
fields = "CompanyName,ContactName,ContactTitle,Phone";
using
(SqlConnection cn = new
SqlConnection { ConnectionString = ConnectionString })
{
using
(SqlCommand cmd = new
SqlCommand { Connection = cn })
{
/*
* If using .mdb use Microsoft.Jet.OLEDB.4.0 rather than Microsoft.ACE.OLEDB.12.0 as the provider name
*/
cmd.CommandText = $"INSERT INTO OPENROWSET('Microsoft.ACE.OLEDB.12.0','{pFileName}';'Admin';'',"
+
$"'SELECT {fields} FROM Customers') "
+
$" SELECT {fields} "
+
" FROM Customers";
if
(pCountry != "*")
{
cmd.CommandText = cmd.CommandText +
" WHERE Country = @Country";
cmd.Parameters.AddWithValue("@Country", pCountry);
}
try
{
cn.Open();
pRowsExported = cmd.ExecuteNonQuery();
return
pRowsExported > 0;
}
catch
(Exception e)
{
mHasException =
true;
mLastException = e;
}
}
}
return
IsSuccessFul;
}
Base XML export
↑Back to top
The main focus on exporting to XML is working with
FOR XML clause in a SELECT statement. If there is a large data set to export the common method of reading data into a DataSet then writing to XML may truncate the data which does not happen when using XmlReader in tanget with an instance of XmlDocument
as shown below.
public
bool
WriteCustomerTableToXmlFile(string
pFileName)
{
// Using SQL here or in a stored procedure write data to xml
// table is stored in this variable TempTable
using
(SqlConnection cn = new
SqlConnection() { ConnectionString = ConnectionString })
{
using
(SqlCommand cmd = new
SqlCommand() { Connection = cn })
{
// replace sql to match the temp table structure
string
selectStatement = @"
SELECT ( SELECT Cust.CustomerIdentifier ,
Cust.CompanyName ,
Cust.ContactName ,
Cust.ContactTitle
FROM dbo.Customers AS Cust
FOR
XML PATH('Customer') ,
TYPE
)
FOR XML PATH('') ,
ROOT('Customers');";
cmd.CommandText = selectStatement;
try
{
cn.Open();
XmlReader reader = cmd.ExecuteXmlReader();
var doc =
new
XmlDocument();
doc.Load(reader);
doc.Save(pFileName);
}
catch
(Exception e)
{
mHasException =
true;
mLastException = e;
}
}
}
return
IsSuccessFul;
}
Summary
↑Back to top
In this article you have learned the basics for exporting SQL-Server table data to Microsoft Excel, Microsoft Access and XML along with using base classes to handle data connections and a base class for handling runtime exceptions.
From here consider using stored procedures for exporting data to Microsoft Excel, Microsoft Access and XML if dealing with large datasets.
See also
Import and Export Excel Files into Varbinary (Max) in SQL Server
Source code
The full source code is provided in the following Github repository.