
Провайдеры данных
Для работы с Excel 2003 (.Xls) можно использовать провайдер Microsoft Jet OLE DB 4.0.
SELECT * FROM OPENROWSET(
	'Microsoft.Jet.OLEDB.4.0',
	'Excel 12.0;Database=d:tmpTimeSheets.xlsx;HDR=YES;IMEX=1',
	'SELECT * FROM [Sheet1$]');
Для работы с Excel 2007 (.Xlsx) — Microsoft ACE OLEDB 12.0.
SELECT * FROM OPENROWSET (
    'Microsoft.ACE.OLEDB.12.0',
    'Excel 12.0;Database=d:tmpTimeSheets.xlsx;HDR=YES;IMEX=1',
    'SELECT * FROM [Sheet1$]');
В Windows 10 открыть настройки источников данных ODBC можно написав «Источники данных ODBC» или через Панель управления Администрирование.
Extended Properties
HDR=YES|NO. HDR=YES означает, что первую строку листа, следует рассматривать как заголовки колонок. Т.о. значение из первой строки можно использовать как имена полей в sql запросах (любых: select, insert, update, delete).IMEX=1|3. 1 — открыть соединение для чтения. 3 — для записи.
Создание Linked Server в Sql Server для доступа к Excel
EXEC sp_addLinkedServer
    @server= N'XLSX_2010',
    @srvproduct = N'Excel',
    @provider = N'Microsoft.ACE.OLEDB.12.0',
    @datasrc = N'd:tmpTimeSheets.xlsx',
    @provstr = N'Excel 12.0; HDR=Yes';
GO
После создания связанного сервера можно будет просмотреть имена доступных листов.
Затем, чтобы обратиться к сервису:
SELECT * FROM OPENQUERY (XLSX_2010, 'Select * from [Sheet1$]')
или
SELECT * FROM [XLSX_2010]...[Лист1$]
Обращение к лиcтам, диапазонам, полям
Для обращения к листу из SQL запроса нужно использовать имя листа, например: [Sheet1$] или [Лист1$]. Обращение к диапазону: [Sheet1$A16:F16].
Вставка данных в произвольное место
Примеры указания диапазона при вставке строк (insert)
- [table1$B4:E20]
- [table1$S4:U]
- [table1$F:G]
При вставке должны выполняться следующие условия:
- Первая строчка указанного диапазона дожна входить в диапазон ячеек с данными. Чтобы создать на листе диапазон с данными достаточно в углах некоторого прямоугольного диапазона (в левом верхнем и правом нижнем) вписать значение (C4:I7 на скриншоте). Т.е. сама первая строчка указанного в
insertдиапазона данные содержать не обязана, достаточно, чтобы она просто входила в такой диапазон. Иначе возникнет ошибка"This table contains cells that are outside the range of cells defined in this spreadsheet" - Хвост диапазона должен содержать пустые строки (хотя бы одну).
Пример: Дан лист, где заполнены только 2 ячейки: C4, I7. После выполнения команды INSERT INTO [table1$E6:G] VALUES(2, 'FF','2014-01-03') результат будет как на скриншоте. Поясним: строка E6:G6 является первой строкой диапазона для вставки. Она входит в заполненный диапазон C4:I7. Поэтому данные были вставлены на следующей пустой строке — 8. Из этого примера становится ясно, что через OleDb нельзя работать с несколькими независимыми диапазонами на одном листе, используя вставку (update будет работать).

Ошибки
System.Data.OleDb.OleDbException (0x80004005): Operation must use an updateable query. Соединение открыто для чтение, при этом происходит попытка внести изменения (выполнить insert, update или delete). Решение: открыть соединение для записи, установив свойство провайдера в строке соединения IMEX=3 (см. выше).System.Data.OleDb.OleDbException (0x80004005): "This table contains cells that are outside the range of cells defined in this spreadsheet". Такая ошибка возникает при подпытке обновить (update) или вставить (insert) значения в диапазоне, в котором отсутствуют данные на листе.- Если нужно произвести запись в определенные ячейки инструкцией update, то
Ссылки
- https://www.codeproject.com/Tips/705470/Read-and-Write-Excel-Documents-Using-OLEDB
- https://stackoverflow.com/questions/36987636/cannot-create-an-instance-of-ole-db-provider-microsoft-jet-oledb-4-0-for-linked
- https://stackoverflow.com/questions/26267224/the-ole-db-provider-microsoft-ace-oledb-12-0-for-linked-server-null
- http://www.ashishblog.com/importexport-excel-xlsx-or-xls-file-into-sql-server/
- https://yoursandmyideas.com/2011/02/05/how-to-read-or-write-excel-file-using-ace-oledb-data-provider/
- https://stackoverflow.com/questions/46373895/how-to-open-a-huge-excel-file-efficiently Несколько способов открыть большой Excel файл, в т.ч. с помощью OleDb.
Microsoft SQL Server 2005 Standard Edition Microsoft SQL Server 2005 Enterprise Edition Microsoft SQL Server 2005 Developer Edition Microsoft SQL Server 2005 Workgroup Edition Еще…Меньше
Аннотация
Microsoft SQL Server поддерживает подключения к другим источникам данных OLE DB (как постоянные, так и прямые). При наличии постоянного подключения сервер называется связанным. Прямое подключение устанавливается для отправки одного запроса (распределенного запроса).
Одним из типов источников данных OLE DB, которые можно запрашивать через SQL Server подобным образом, являются книги Microsoft Excel. В этой статье описан синтаксис, который необходимо использовать при настройке источника данных Excel в качестве связанного сервера, а также синтаксис распределенного запроса к источнику данных Excel.
Дополнительная информация
Запрос источника данных Excel на связанном сервере
Вы можете использовать SQL Server Management Studio или Enterprise Manager, хранимую в системе процедуру, SQL-DMO (Объекты распределенного управления) или SMO (Управляющие объекты SQL Server) для настройки источника данных Excel в качестве связанного сервера SQL Server. (Объекты SMO поддерживаются только в Microsoft SQL Server 2005.) В каждом случае необходимо задать следующие четыре свойства:
-
Имя, которое необходимо использовать для связанного сервера.
-
Поставщик OLE DB, который будет использоваться для подключения.
-
Источник данных или полное имя пути и файла для рабочей книги Excel.
-
Строка провайдера, которая идентифицирует цель как рабочую книгу Excel. По умолчанию поставщик Jet ожидает базу данных Access.
Хранимая в системе процедура sp_addlinkedserver также требует свойство @srvproduct, которое может быть любым строковым значением.
Заметка Если вы используете SQL Server 2005, то для свойства Имя продукта в SQL Server Management Studio или для свойства @srvproduct в хранимой процедуре для источника данных Excel необходимо указать значение, которое не должно быть пустым.
Использование SQL Server Management Studio или Enterprise Manager для настройки источника данных Excel в качестве связанного сервера
SQL Server Management Studio (SQL Server 2005)
-
В SQL Server Management Studio разверните Серверные объекты в Обозреватель объектов.
-
Щелкните правой кнопкой мыши Связанные серверы, а затем щелкните Новый связанный сервер.
-
В левой панели выберите страницу Общие, а затем выполните следующие шаги:
-
В первом текстовом поле введите любое имя для связанного сервера.
-
Выберите опцию Другой источник данных.
-
В списке Поставщик выберите Microsoft Jet 4.0 OLE DB Provider.
-
В поле Имя продукта введите Excel для имени источника данных OLE DB.
-
В поле Источник данных введите полный путь и имя файла Excel.
-
В поле Строка поставщика введите Excel 8.0 для рабочей книги Excel 2002, Excel 2000 или Excel 97.
-
Нажмите OK, чтобы создать новый связанный сервер.
-
Примечание В SQL Server Management Studio невозможно развернуть имя нового связанного сервера для просмотра списка объектов, содержащихся на сервере.
Enterprise Manager (SQL Server 2000)
-
В менеджере Enterprise Manager щелкните, чтобы развернуть папку Безопасность.
-
Щелкните правой кнопкой мыши Связанные серверы, а затем щелкните Новый связанный сервер.
-
На вкладке Общие выполните следующие действия:
-
В первом текстовом поле введите любое имя для связанного сервера.
-
В поле Тип сервера нажмите Другой источник данных.
-
В списке Имя поставщика нажмите кнопку Microsoft Jet 4.0 OLE DB Provider.
-
В поле Источник данных введите полный путь и имя файла Excel.
-
В поле Строка поставщика введите Excel 8.0 для рабочей книги Excel 2002, Excel 2000 или Excel 97.
-
Нажмите OK, чтобы создать новый связанный сервер.
-
-
Щелкните имя связанного сервера, чтобы развернуть список объектов, которые он содержит.
-
Под новым именем связанного сервера нажмите Таблицы. В правой области появятся книги и именованные диапазоны.
Использование хранимой процедуры для настройки источника данных Excel в качестве связанного сервера
Вы также можете использовать хранимую в системе процедуру sp_addlinkedserver для настройки источника данных Excel в качестве связанного сервера:
DECLARE @RC int
DECLARE @server nvarchar(128)
DECLARE @srvproduct nvarchar(128)
DECLARE @provider nvarchar(128)
DECLARE @datasrc nvarchar(4000)
DECLARE @location nvarchar(4000)
DECLARE @provstr nvarchar(4000)
DECLARE @catalog nvarchar(128)
-- Set parameter values
SET @server = 'XLTEST_SP'
SET @srvproduct = 'Excel'
SET @provider = 'Microsoft.Jet.OLEDB.4.0'
SET @datasrc = 'c:book1.xls'
SET @provstr = 'Excel 8.0'
EXEC @RC = [master].[dbo].[sp_addlinkedserver] @server, @srvproduct, @provider,
@datasrc, @location, @provstr, @catalog
Как уже отмечалось выше, для данной хранимой процедуры требуется дополнительное произвольное значение строки для аргумента @srvproduct, которое отображается в виде «Имени продукта» в конфигурации Enterprise Manager и SQL Server Management Studio. Аргументы @location и @catalog не используются.
Использование SQL-DMO для настройки источника данных Excel в качестве связанного сервера
Объекты распределенного управления SQL можно использовать для настройки источника данных Excel в качестве связанного сервера программно с использованием Microsoft Visual Basic или другого языка программирования. Необходимо указать те же четыре аргумента, которые требуются при настройке через Enterprise Manager и SQL Server Management Studio.
Private Sub Command1_Click()
    Dim s As SQLDMO.SQLServer
    Dim ls As SQLDMO.LinkedServer
    Set s = New SQLDMO.SQLServer
    s.Connect "(local)", "sa", "password"
    Set ls = New SQLDMO.LinkedServer
    With ls
        .Name = "XLTEST_DMO"
        .ProviderName = "Microsoft.Jet.OLEDB.4.0"
        .DataSource = "c:book1.xls"
        .ProviderString = "Excel 8.0"
    End With
    s.LinkedServers.Add ls
    s.Close
End Sub
Использование SMO для настройки источника данных Excel в качестве связанного сервера
В SQL Server 2005 можно использовать управляющие объекты SQL Server (SMO) для программной настройки источника данных Excel в качестве связанного сервера. Для этого применяется Microsoft Visual Basic .NET или другой язык программирования. Необходимо указать те же аргументы, которые требуются при настройке через SQL Server Management Studio. Объектная модель SMO расширяет и заменяет объектную модель SQL-DMO. Так как модель SMO совместима с SQL Server 7.0, SQL Server 2000 и SQL Server 2005, ее также можно использовать для настройки SQL Server 2000.
Imports Microsoft.SqlServer.Management.Smo
Imports Microsoft.SqlServer.Management.CommonPublic Class Form1
Private Sub Button1_Click(ByVal sender As System.Object, ByVal e As System.EventArgs) Handles Button1.Click
Dim s As Server
Dim conn As ServerConnection
Dim ls As LinkedServerconn = New ServerConnection("ServerNameInstanceName", "YourUesrName", "YourPassword")
s = New Server(conn)
Try
ls = New LinkedServer(s, "XLTEST_DMO")
With ls
.ProviderName = "Microsoft.Jet.OLEDB.4.0"
.ProductName = "Excel"
.DataSource = "c:book1.xls"
.ProviderString = "Excel 8.0"
End With
ls.Create()
MessageBox.Show("New linked Server has been created.")
Catch ex As SmoException
MessageBox.Show(ex.Message)
Finally
ls = Nothing
If s.ConnectionContext.IsOpen = True Then
s.ConnectionContext.Disconnect()
End If
End TryEnd Sub
End Class
Запрос источника данных Excel на связанном сервере
После настройки источника данных Excel в качестве связанного сервера, вы можете легко запросить его данные из Query Analyzer или другого клиентского приложения. Например, чтобы получить строки данных, которые хранятся на листе Sheet1 файла Excel, используйте через SQL-DMO следующий код для настроенного связанного сервера:
SELECT * FROM XLTEST_DMO...Sheet1$
Кроме того, можно использовать OPENQUERY для «транзитного» запроса связанного сервера Excel:
SELECT * FROM OPENQUERY(XLTEST_DMO, 'SELECT * FROM [Sheet1$]')
Первый аргумент, который требуется OPENQUERY, — это имя связанного сервера. Чтобы указать имена листов, используйте разделители, как показано выше.
Кроме того, можно получить список всех таблиц, доступных на связанном сервере Excel, с помощью следующего запроса:
EXECUTE SP_TABLES_EX 'XLTEST_DMO'
Запрос источника данных Excel с помощью распределенных запросов
Можно использовать распределенные запросы SQL Server и функцию OPENDATASOURCE или OPENROWSET для специальных запросов к редко обращающимся источникам данных Excel.
Заметка Если вы используете SQL Server 2005, убедитесь, что вы включили опцию Ad Hoc Distributed Queries, используя Настройка контактной зоны SQL Server, как в следующем примере:
SELECT * FROM OPENDATASOURCE('Microsoft.Jet.OLEDB.4.0',
   'Data Source=c:book1.xls;Extended Properties=Excel 8.0')...Sheet1$
Обратите внимание на необычный синтаксис второго аргумента OPENROWSET («Строка поставщика»):
SELECT * FROM OPENROWSET('Microsoft.Jet.OLEDB.4.0',
   'Excel 8.0;Database=c:book1.xls', Sheet1$)
Синтаксис, привычный для разработчиков ADO, выглядит следующим образом:
SELECT * FROM OPENROWSET('Microsoft.Jet.OLEDB.4.0',
   'Data Source=c:book1.xls;Extended Properties=Excel 8.0', Sheet1$)
Этот синтаксис вызывает следующую ошибку поставщика Jet:
Невозможно найти устанавливаемый ISAM.
Примечание Эта ошибка также возникает, если вместо ИсточникДанных ввести Источник данных. Например, следующий аргумент является неправильным:
SELECT * FROM OPENROWSET('Microsoft.Jet.OLEDB.4.0', 'DataSource=c:book1.xls;Extended Properties=Excel 8.0', Sheet1$)
Ссылки
Так как для связанных серверов SQL Server и распределенных запросов используется поставщик OLE DB, учитывайте общие рекомендации и предупреждения, которые относятся к применению ADO с Excel.
Дополнительные сведения см. в следующей статье базы знаний Майкрософт:
257819 Как использовать ADO с данными из Visual Basic или VBA в Excel.
Для получения дополнительной информации об управляющих объектах SQL Server (SMO) посетите следующий веб-сайт MSDN:
http://msdn2.microsoft.com/ru-ru/library/ms162169(ide).aspxДля получения дополнительной информации о том, как включить опцию Ad Hoc Distributed Queries, посетите следующий веб-сайт MSDN:
http://msdn2.microsoft.com/ru-ru/library/ms189978(ide).aspx
Нужна дополнительная помощь?
Table of Contents
- Introduction
- Building the Sample
- Source code
- Description
- Common operations:
- Microsoft PIA
- OleDb option for exporting
- Extended properties
- Using OpenXML
- Exception Handling
- Location of excel operations
- Conclusions
- Special Note
- See also
Introduction
When creating data-centric business applications customers may require their data readily available in one or more formats such as Microsoft Excel or a requirement to import data from one or more formats where one may be Microsoft
Excel. This articles intent is to provide not only options for fulfilling these requirements but also do comparisons between various paths for interacting with Microsoft Excel.
All code runs in a Windows desktop project yet all classes to interact with Excel are in class projects with no dependencies on Windows forms
Building the Sample
- Requires SQL-Server Express edition or higher
- NuGet packages have been removed from the solution as the total space is large. Use NuGet «restore packages» if you don’t have restore packages set by default. If you have a slow computer downloading the required packages may take five or more minutes.
- Scripts to create and populate data is located under ExcelOperations project in the folder SqlScripts. Before running the script check the location of the database to ensure the script runs correctly. As is, the location is the
default location for SQL-Server installation. - Some code makes use of C# 7 but with a little modification will work with earlier versions of C#
- Source code.
Source code
Description
This article explores working with Excel using automation, Open XML and OleDb for common tasks such as exporting from a DataGridView and much more. There will be farther in this startup series.
Most of the code can be executed in the Windows form project while there are bits of code which are not and when you come across code not presented/callable from the form there will be sample code in method headers on how to
call the method e.g. there are two examples (in ExcelOperations class) for exporting to delimited text files, they are self-contained so simply call them while in Operations class in ExcelOperations class/OleDbWork there is a method ReadPeopleNoHeaderRow which
has sample calls to the method in the method header.
There are examples for working with automation, Open XML and OleDb. Run each one and note time to execute. Every time Open XML will be faster than the other two while OleDb is a close second on some calls. But speed is not everything,
for example, we want a list of sheet names. Using OleDb the sheet names are in A-Z order while the other two methods are in ordinal position. Suppose you need to create a new Excel file, this is not possible with OleDb and similar OleDb has no methods for
formatting data. Knowing this one might use Excel automation and when doing so with a large data set the application may become unresponsive which means accept this or use a backgrounder worker component or use async techniques to overcome a non-responsive
application (async is shown in one code sample).

There are 14 file formats for Excel were this article will work with one, .xlsx which is the default XML-based file format for Excel 2007 and higher versions while .xls is for Excel 97 through Excel 2003.
The reason the focus is on Excel 2007 file format is this is the industry standard. Excel prior versions are still used yet less and less
as time goes by.
Common operations:
- Exporting a DataGridView bound to a DataTable or a List on a form with no formatting for column headers or cells.
- Exporting a DataGridView bound to a DataTable List on a form with formatting for columns and/or cells.
- Export a DataGridView without the DataSource property set. With or without formatting of cells and/or columns.
- Export from a container such as a DataTable or List with or without a column or cell formatting.
- Export from a database table(s) with or without a column or cell formatting.
- Export from a text file or XML file with or without a column or cell formatting.
- Import one or more WorkSheets into a database, text file, XML or similar container.
Note Not all of these operations are covered in this article yet the ones which are will provide insight into how to do those task which are not presented. Also there are several code samples not presented in
the main form application, these demos will have in the method headers how to use the method.
Exporting data to Excel without formatting for many the choice is to work with Excel automation or through OleDb manage data provider.
Considerations for working with Excel automation.
Several objects are needed to get started, Excel.Application, Excel.WorkBook and Excel.WorkSheet. First the Excel.Application object is created followed by a ExcelWorkBook which form the base for creating an Excel object in memory.
Next an Excel.WorkSheet is created with the option of providing a sheet name. If no sheet name is provided the sheet name will be the default, Sheet1. Once the Worksheet has been added to the Excel.Application by way of the Excel.WorkBook data can now be inserted
into the sole WorkSheet.
Many a developer will jump onto their favorite search engine and come up with a code sample such as the one shown below in figure 1. At first glance, this looks great so the developer drops the code into their project and then
realizes that there is no save method, easy enough to fix by adding the Save method. The first issue is how a developer thinks about exception handling, in this case, a try-catch statement is used which displays a message that something failed. Usually when
there is a runtime exception with code as shown below all objects created to interact with Excel will usually (and it’s most of the time) stick around in memory unknown to the client who may make several attempts to use the cool export feature and on each
failure leaves more un-freed objects in memory and may very well require them to restart the machine to clear memory left around from failed export operations.
The next issue is the operation is performed within a form. These operations should be within a class dedicated to this and similar operations but not with data operations such as reading data from a database to populate a DataGridView.
Data operations belong in their own class. The form then calls methods in these classes to read data (and perform add/edit/delete operations) from a database then in the call methods in the Excel class to export to Excel. One way around these issues is to
move away from Excel automation as shown in figure 1A which uses a language extension method. The language extension converts data in a DataGridView to a DataTable were the DataGridView may have been populated by its DataSource or populated by adding rows
manually. The extension method provides an option to include or exclude column headers. Once the DataTable is returned from the extension method it’s passed to a method for a third-party library known as SpreadSheetLight which is free and installable via NuGet
inside Visual Studio. A single method call is used to export/import the DataTable into a new Excel file including options to name the WorkSheet. The benefit of this method is it is fairly universal, not tied to any set of data while the downsides are; requires
a third party library, the data inserted into Excel are all strings (which is the same for when using Excel automation). If we exclude the cells will all be strings and focus on having to use a third-party library the alternate is to create a method that a
DataTable is passed which uses either OpenXML to export data to Excel which in this case will require a considerable code base, no different if OleDb were to be used to export/import data into Excel. No matters which direction is taken there are advantages
and disadvantages. The last option is to go with a third party library paid for or free, two of them are EPPlus and GemBox. Using a paid library makes since only when you need efficient and flexible methods that you don’t have to maintain or that your methods
created in house are not performing as expected and time is critical to completing the application.
Microsoft PIA
Primary Interop Assembly which are based on Component Object Model (COM). When you call a COM object of Office from managed code, a Runtime Callable Wrapper (RCW) is automatically created. The RCW marshals calls between the .NET
application and the COM object. The RCW keeps a reference count on the COM object. If all references have not been released on the RCW, the COM object of Office does not quit and may cause the Office application not to quit after your automation has finished
or not finished because of an exception.
Figure 1
using
Excel = Microsoft.Office.Interop.Excel;
private
void
btnExportExcel_Click(object
sender, EventArgs e)
{
try
{
Microsoft.Office.Interop.Excel.Application excel =
new
Microsoft.Office.Interop.Excel.Application();
excel.Visible =
true;
Microsoft.Office.Interop.Excel.Workbook workbook = excel.Workbooks.Add(System.Reflection.Missing.Value);
Microsoft.Office.Interop.Excel.Worksheet sheet1 = (Microsoft.Office.Interop.Excel.Worksheet)workbook.Sheets[1];
int
StartCol = 1;
int
StartRow = 1;
int
j = 0, i = 0;
//Write Headers
for
(j = 0; j < dgvSource.Columns.Count; j++)
{
Microsoft.Office.Interop.Excel.Range myRange = (Microsoft.Office.Interop.Excel.Range)sheet1.Cells[StartRow, StartCol +

 j];
myRange.Value2 = dgvSource.Columns[j].HeaderText;
}
StartRow++;
//Write datagridview content
for
(i = 0; i < dgvSource.Rows.Count; i++)
{
for
(j = 0; j < dgvSource.Columns.Count; j++)
{
try
{
Microsoft.Office.Interop.Excel.Range myRange = (Microsoft.Office.Interop.Excel.Range)sheet1.Cells[StartRow + i,

 StartCol + j];
myRange.Value2 = dgvSource[j, i].Value ==
null
? "" : dgvSource[j, i].Value;
}
catch
{
;
}
}
}
}
catch
(Exception ex)
{
MessageBox.Show(ex.ToString());
}
}
This alternate method to export data from a DataGridView full source can be found here. The main parts are as follows. A language extension method to convert a DataGridView contents to a DataTable where all values will be strings.
Full source for the following code.
Figure 1A
using
System;
using
System.Data;
using
System.IO;
using
System.Linq;
using
System.Windows.Forms;
namespace
UtilityLibrary
{
public
static
classDataGridViewExtensionMethods
{
/// <summary>
/// Given a DataGridView populates without a data source,
/// create a DataTable, populate from rows/cells from the
/// DataGridView with an option to include/exclude column names.
/// </summary>
/// <param name="pDataGridView"></param>
/// <param name="pColumnNames"></param>
/// <returns></returns>
/// <remarks>
/// There is no attempt made to figure out data types coming
/// from data in the DataGridView
/// </remarks>
public
static
DataTable GetDataTable(this
DataGridView pDataGridView, bool
pColumnNames = true)
{
DataTable dt =
new
DataTable();
foreach
(DataGridViewColumn column in
pDataGridView.Columns)
{
if
(column.Visible)
{
if
(pColumnNames)
{
dt.Columns.Add(new
DataColumn() { ColumnName = column.Name });
}
else
{
dt.Columns.Add();
}
}
}
object[] cellValues =
new
object[pDataGridView.Columns.Count];
foreach
(DataGridViewRow row in
pDataGridView.Rows)
{
if
(!row.IsNewRow)
{
for
(int
i = 0; i < row.Cells.Count; i++)
{
cellValues[i] = row.Cells[i].Value;
}
dt.Rows.Add(cellValues);
}
}
return
dt;
}
/// <summary>
/// Generates comma delimited rows into a string array.
/// </summary>
/// <param name="sender"></param>
/// <returns></returns>
/// <remarks></remarks>
public
static
string[] CommaDelimitedRows(this
DataGridView sender)
{
return
(
from row
in
sender.Rows.Cast<DataGridViewRow>()
where !((DataGridViewRow)row).IsNewRow
let RowItem =
string.Join(",", Array.ConvertAll(((DataGridViewRow)row).Cells.Cast<DataGridViewCell>().ToArray(), (DataGridViewCell
c) => ((c.Value == null) ?
"" : c.Value.ToString())))
select RowItem).ToArray();
}
public
static
voidExportToCommandDelimitedFile(this
DataGridView pSender, string
pFileName)
{
File.WriteAllLines(Path.Combine(AppDomain.CurrentDomain.BaseDirectory, pFileName), pSender.CommaDelimitedRows());
}
public
static
voidExpandColumns(this
DataGridView sender)
{
foreach
(DataGridViewColumn col in
sender.Columns)
{
col.AutoSizeMode = DataGridViewAutoSizeColumnMode.AllCells;
}
}
}
}
With the DataTable returned from the extension above the following class provides exporting capabilities
using
System;
using
System.Data;
using
SpreadsheetLight;
using
DocumentFormat.OpenXml.Spreadsheet;
using
SysDraw = System.Drawing;
using
System.IO;
namespace
SpreadSheetLightLibrary
{
public
class
ExcelOperations
{
/// <summary>
/// True if last operation had a runtime exception
/// </summary>
/// <returns></returns>
public
bool
HasException { get;
set; }
/// <summary>
/// Exception of last operation ran that throw an exception
/// </summary>
/// <returns></returns>
public
Exception Exception { get;
set; }
/// <summary>
/// Wraps Exception message
/// </summary>
/// <returns></returns>
public
string
ExceptionMessage
{
get
{
if
(HasException)
{
return
Exception.Message;
}
else
{
return
"None";
}
}
}
/// <summary>
/// Export DataTable to a new Excel file
/// </summary>
/// <param name="pFileName">Path and Excel file name</param>
/// <param name="pSheetName">Sheet name to place data</param>
/// <param name="pDataTable">DataTable to import into pSheetName</param>
/// <param name="pColumnHeaders">Include or exclude columns</param>
/// <returns></returns>
public
bool
SimpleExport(string
pFileName, string
pSheetName, DataTable pDataTable, bool
pColumnHeaders)
{
try
{
if
(File.Exists(pFileName))
{
File.Delete(pFileName);
}
using
(SLDocument doc = new
SLDocument())
{
doc.SelectWorksheet(pSheetName);
if
(pSheetName != "Sheet1")
{
doc.AddWorksheet(pSheetName);
doc.DeleteWorksheet("Sheet1");
}
// start at row 1, column A
// SLConvert.ToColumnIndex("A") is kind of overkill but it exposes you to the convert class
doc.ImportDataTable(1, SLConvert.ToColumnIndex("A"),
pDataTable, pColumnHeaders);
if
(pColumnHeaders)
{
var headerSyle = doc.CreateStyle();
headerSyle.Font.FontColor = SysDraw.Color.White;
headerSyle.Font.Strike =
false;
headerSyle.Fill.SetPattern(PatternValues.Solid, SysDraw.Color.Green, SysDraw.Color.White);
headerSyle.Font.Underline = UnderlineValues.None;
headerSyle.Font.Bold =
true;
headerSyle.Font.Italic =
false;
doc.SetCellStyle(1, 1, 1, pDataTable.Columns.Count, headerSyle);
}
doc.AutoFitColumn(1, pDataTable.Columns.Count);
doc.SaveAs(pFileName);
}
return
true;
}
catch
(Exception ex)
{
HasException =
true;
Exception = ex;
return
false;
}
}
/// <summary>
/// This represents the bare amount of code to import
/// a DataTable into a new Excel file. Please note if
/// there are dates they need to be format using a style.
///
/// For an example of date styling/formatting
/// Class project ExcelBackend, Operations class method ImportDataTable2
/// where I setup a style for a date as mm-dd-yyyy
///
/// Formatting is beyond this code sample as this code sample is meant
/// to be a generic method to take a DataGridView into a DataTable then
/// use the DataTable to import into a WorkSheet. I could had done dates
/// and other types but that is more specific to your data and as mentioned
/// the link above is my code sample that shows formatting/styling.
///
/// </summary>
/// <param name="pFileName"></param>
/// <param name="pSheetName"></param>
/// <param name="pDataTable"></param>
/// <param name="pColumnHeaders"></param>
public
void
SimpleExportRaw(string
pFileName, string
pSheetName, DataTable pDataTable, bool
pColumnHeaders)
{
using
(SLDocument doc = new
SLDocument())
{
doc.SelectWorksheet(pSheetName);
if
(pSheetName != "Sheet1")
{
doc.AddWorksheet(pSheetName);
doc.DeleteWorksheet("Sheet1");
}
doc.ImportDataTable(1, SLConvert.ToColumnIndex("A"),
pDataTable, pColumnHeaders);
doc.SaveAs(pFileName);
}
}
}
}
The key to exporting in this case, one sole method to perform the export. As mentioned earlier you could discard the idea of using a third party library and instead write this code yourself yet if not an expert with OpenXML there
really is no clear reason to go in this direction as we want easy to use methods without worrying about maintaining said code.
How to handle exceptions properly to ensure all objects are released? The key is persistence when designing and coding, in this case a method to export data to Excel using automation.
Start off by populating a DataGridView with perhaps 200 rows with a nominal column count. Run the operation, did all work properly, if so do the same operation with and without allowing users to add new rows to the DataGridView,
in the sample above this would throw an exception if there is a new row in the DataGridView. A fix is to check for the new row while iterating the DataGridView.
If a runtime exception is thrown best to open Task Manager and kill any instances of Excel that are shown in the process window.
Tip: Place a StatusStrip on the form, add a label on the status strip with images as shown in figure 2, use the image shown below from the sample project or whatever images work for you, images are easier to
see the text which is why images were used here. Add a Timer component and create the Tick event for the timer. In the Tick event add code as shown below (can be found in the source code for this article) and add the method IsExcelInMemory. Now when coding
and testing Excel operations when you see the square image Excel is not in memory while the Excel image indicates Excel is still in memory. Excel is notorious for staying in memory even if no runtime exception was thrown. The number one reason because a run
time exception being thrown for Excel to stay in memory is when you have a line of code where you have more than two dots to access a method or property e.g. Excel.WorkBook.WorkSheet.Range where there should be one object for Excel, one for the WorkBook then
one for the Sheet so when we access the Sheet there is only one dot in the code. When there are more than two dots the underlying COM objects will not release properly and tend to hang around in memory.
In each code sample for this article that demonstrates Excel automation, there are zero lines of code that have more than one dot in a method call to Excel for this very reason.
Another way to determine issues is to use an event in the class which does Excel operations. The following is an excerpt from the code provided with this article.
public
class
ExaminerEventArgs : EventArgs
{
public
ExaminerEventArgs(string
message)
{
StatusMessage = message;
}
public
string
StatusMessage { get;
set; }
}
public
EventHandler<ExaminerEventArgs> ProgressUpdated;
private
void
OnProgressUpdated(string
message)
{
ProgressUpdated?.Invoke(this,
new
ExaminerEventArgs(message));
}
Then at key areas in your code call OnProgressUpdate in the class which in turn (in this case) displays your text in a ListBox. We could instead write to a text file yet for development purposes immediate results are better.
xlWorkBooks = xlApp.Workbooks;
xlWorkBook = xlWorkBooks.Open(fileName);
OnProgressUpdated("Opened");
#region Timer logic
private
bool
IsExcelInMemory()
{
return
Process.GetProcesses().Any(p => p.ProcessName.Contains("EXCEL"));
}
private
void
timer1_Tick(object
sender, EventArgs e)
{
if
(IsExcelInMemory())
{
toolStripStatusLabel1.Image = Properties.Resources.ExcelInMemory;
}
else
{
toolStripStatusLabel1.Image = Properties.Resources.ExcelNotInMemory;
}
toolStripStatusLabel1.Invalidate();
}
#endregion
Figure 2 (top image shows Excel is not in memory while the second indicates Excel is still in memory)

Coupling up the status image and event for displaying where we are at in code can greatly assist with debugging issues with Excel automation code in tangent with not using more than two dots in a call to Excel.
Another way to reduce the chances of objects staying in memory to avoid exceptions is to wrap the code which may have issues with a try-catch-finally. The first step is to create a list of objects, each time a new object is
used to interact with Excel is created we add this object to the list. Then if an exception is thrown release the objects created prior to the exception. Chances are this will clutter your code to the point that it may become unmaintainable so the next option
is to discard the try-catch-finally and fully test your code but leave the list of objects part.
In the following example a list of objects is created, each time an Excel object is created it’s added to the list. Once the Excel operations are completed the objects are disposed. There is one exception to using the list of
objects in the code sample presented below which is locating the intended WorkSheet to read via a for-next if the current sheet in the iteration is not the sheet we want to read then dispose of this object immediately. This is done, in this case by using a
C# 7 feature, local function and if not using C# 7 the method ReleaseComObject would be moved outside the method with a private scope.
public
void
ReadCells(string
pFileName, string
pSheetName)
{
void
ReleaseComObject(object
pComObject)
{
try
{
Marshal.ReleaseComObject(pComObject);
pComObject =
null;
}
catch
(Exception)
{
pComObject =
null;
}
}
var annihilationList =
new
List<object>();
var proceed =
false;
Excel.Application xlApp =
null;
Excel.Workbooks xlWorkBooks =
null;
Excel.Workbook xlWorkBook =
null;
Excel.Worksheet xlWorkSheet =
null;
Excel.Sheets xlWorkSheets =
null;
Excel.Range xlCells =
null;
xlApp =
new
Excel.Application();
annihilationList.Add(xlApp);
xlApp.DisplayAlerts =
false;
xlWorkBooks = xlApp.Workbooks;
annihilationList.Add(xlWorkBooks);
xlWorkBook = xlWorkBooks.Open(pFileName);
annihilationList.Add(xlWorkBook);
xlApp.Visible =
false;
xlWorkSheets = xlWorkBook.Sheets;
annihilationList.Add(xlWorkSheets);
for
(var intSheet = 1; intSheet <= xlWorkSheets.Count; intSheet++)
{
try
{
xlWorkSheet = (Excel.Worksheet)xlWorkSheets[intSheet];
if
(xlWorkSheet.Name == pSheetName)
{
proceed =
true;
break;
}
else
{
ReleaseComObject(xlWorkSheet);
}
}
catch
(Exception ex)
{
HasErrors =
true;
ExceptionInfo.UnKnownException =
true;
ExceptionInfo.Message = $"Error finding sheet: '{ex.Message}'";
ExceptionInfo.FileNotFound =
false;
ExceptionInfo.SheetNotFound =
false;
proceed =
false;
annihilationList.Add(xlWorkSheet);
}
}
if
(!proceed)
{
var firstSheet = (Excel.Worksheet)xlWorkSheets[1];
xlWorkSheet = xlWorkSheets.Add(firstSheet);
xlWorkSheet.Name = pSheetName;
annihilationList.Add(firstSheet);
annihilationList.Add(xlWorkSheet);
xlWorkSheet.Name = pSheetName;
proceed =
true;
ExceptionInfo.CreatedSheet =
true;
}
else
{
if
(!annihilationList.Contains(xlWorkSheet))
{
annihilationList.Add(xlWorkSheet);
}
}
if
(proceed)
{
if
(!annihilationList.Contains(xlWorkSheet))
{
annihilationList.Add(xlWorkSheet);
}
foreach
(var key in
ReturnDictionary.Keys.ToArray())
{
try
{
xlCells = xlWorkSheet.Range[key];
ReturnDictionary[key] = xlCells.Value;
annihilationList.Add(xlCells);
}
catch
(Exception e)
{
HasErrors =
true;
ExceptionInfo.Message = $"Error reading cell [{key}]: '{e.Message}'";
ExceptionInfo.FileNotFound =
false;
ExceptionInfo.SheetNotFound =
false;
annihilationList.Add(xlCells);
xlWorkBook.Close();
xlApp.UserControl =
true;
xlApp.Quit();
annihilationList.Add(xlCells);
return;
}
}
}
else
{
/*
* Send information back to caller why we failed
*/
HasErrors =
true;
ExceptionInfo.SheetNotFound =
true;
ExceptionInfo.FileNotFound =
false;
}
// this is debatable, should we save the file after adding a non-existing sheet?
if
(ExceptionInfo.CreatedSheet)
{
xlWorkSheet?.SaveAs(pFileName);
}
xlWorkBook.Close();
xlApp.UserControl =
true;
xlApp.Quit();
ReleaseObjects(annihilationList);
}
public
voidReadCells(string
pFileName, string
pSheetName)
{
void
ReleaseComObject(object
pComObject)
{
try
{
Marshal.ReleaseComObject(pComObject);
pComObject =
null;
}
catch
(Exception)
{
pComObject =
null;
}
}
var annihilationList =
new
List<object>();
var proceed =
false;
Excel.Application xlApp =
null;
Excel.Workbooks xlWorkBooks =
null;
Excel.Workbook xlWorkBook =
null;
Excel.Worksheet xlWorkSheet =
null;
Excel.Sheets xlWorkSheets =
null;
Excel.Range xlCells =
null;
xlApp =
new
Excel.Application();
annihilationList.Add(xlApp);
xlApp.DisplayAlerts =
false;
xlWorkBooks = xlApp.Workbooks;
annihilationList.Add(xlWorkBooks);
xlWorkBook = xlWorkBooks.Open(pFileName);
annihilationList.Add(xlWorkBook);
xlApp.Visible =
false;
xlWorkSheets = xlWorkBook.Sheets;
annihilationList.Add(xlWorkSheets);
for
(var intSheet = 1; intSheet <= xlWorkSheets.Count; intSheet++)
{
try
{
xlWorkSheet = (Excel.Worksheet)xlWorkSheets[intSheet];
if
(xlWorkSheet.Name == pSheetName)
{
proceed =
true;
break;
}
else
{
ReleaseComObject(xlWorkSheet);
}
}
catch
(Exception ex)
{
HasErrors =
true;
ExceptionInfo.UnKnownException =
true;
ExceptionInfo.Message = $"Error finding sheet: '{ex.Message}'";
ExceptionInfo.FileNotFound =
false;
ExceptionInfo.SheetNotFound =
false;
proceed =
false;
annihilationList.Add(xlWorkSheet);
}
}
if
(!proceed)
{
var firstSheet = (Excel.Worksheet)xlWorkSheets[1];
xlWorkSheet = xlWorkSheets.Add(firstSheet);
xlWorkSheet.Name = pSheetName;
annihilationList.Add(firstSheet);
annihilationList.Add(xlWorkSheet);
xlWorkSheet.Name = pSheetName;
proceed =
true;
ExceptionInfo.CreatedSheet =
true;
}
else
{
if
(!annihilationList.Contains(xlWorkSheet))
{
annihilationList.Add(xlWorkSheet);
}
}
if
(proceed)
{
if
(!annihilationList.Contains(xlWorkSheet))
{
annihilationList.Add(xlWorkSheet);
}
foreach
(var key in
ReturnDictionary.Keys.ToArray())
{
try
{
xlCells = xlWorkSheet.Range[key];
ReturnDictionary[key] = xlCells.Value;
annihilationList.Add(xlCells);
}
catch
(Exception e)
{
HasErrors =
true;
ExceptionInfo.Message = $"Error reading cell [{key}]: '{e.Message}'";
ExceptionInfo.FileNotFound =
false;
ExceptionInfo.SheetNotFound =
false;
annihilationList.Add(xlCells);
xlWorkBook.Close();
xlApp.UserControl =
true;
xlApp.Quit();
annihilationList.Add(xlCells);
return;
}
}
}
else
{
/*
* Send information back to caller why we failed
*/
HasErrors =
true;
ExceptionInfo.SheetNotFound =
true;
ExceptionInfo.FileNotFound =
false;
}
// this is debatable, should we save the file after adding a non-existing sheet?
if
(ExceptionInfo.CreatedSheet)
{
xlWorkSheet?.SaveAs(pFileName);
}
xlWorkBook.Close();
xlApp.UserControl =
true;
xlApp.Quit();
ReleaseObjects(annihilationList);
}
The last line, ReleaseObjects in this case resides in a base class which the method above implements. During the releasing of objects care is taken to ensure no runtime exception is thrown. If objects do not release as expected
you can set a break-point in ReleaseObjects method, inspect the list, see if something does not seem correct, by not seem correct, you may inspect these objects and one or more may be null which means a debug session is in order to examine how the objects
were created.
public
void
ReleaseObjects(List<object> pAnnihilationList)
{
for
(var indexer = 0; indexer < pAnnihilationList.Count; indexer++)
{
try
{
if
(pAnnihilationList[indexer] != null)
{
Marshal.ReleaseComObject(pAnnihilationList[indexer]);
pAnnihilationList[indexer] =
null;
}
}
catch
(Exception)
{
pAnnihilationList[indexer] =
null;
}
}
}
Keeping with disposal of objects, a quick search on the web for “kill Excel…” is all over the web. There will be suggestions such as
private
void
KillSpecificExcelFileProcess(string
excelFileName)
{
var processes = from p
in
Process.GetProcessesByName("EXCEL")
select p;
foreach
(var process in
processes)
{
if
(process.MainWindowTitle == "Microsoft Excel - "
+ excelFileName)
process.Kill();
}
}
Which look great and most of the time work yet the problem lies in a poor understanding of how to put objects together and dispose of them. By having proper understanding of how each object is created, used and disposed of the
only time for code presented above is while in the process of writing your code and a mistake is made causing Excel to stay in memory.
Here is a brute force method to release objects.
GC.Collect();
GC.WaitForPendingFinalizers();
GC.Collect();
GC.WaitForPendingFinalizers();
Again this is only needed when the developer created objects incorrectly. The number one reason is the developer interacted with Excel, changed objects and properties together passing two dots in the call to get at a property
in very common.
The number one reason for not releasing objects correctly as mentioned is from not understanding how to create and use objects but where does this originate from? Old code samples on the web where developers perhaps wrote code
in a code module within Excel, the code worked so it was ported to a Visual Studio project. While in Excel modules Excel took care of releasing objects internally and the developers who ported code from Excel to a project did not understand this or that most
of the time (but not all of the time) objects were released upon closing the project as the GC (Garbage Collector) disposed of these objects. Yet some object will never release as expected when a) violating the two-dot rule or when the construction of a command
is done incorrectly.
The following example works as expected and releases objects but note there is very little that might cause objects not to release.
public
void
ExportToDelimited_1()
{
Excel.Application xlApp =
new
Excel.Application();
Excel.Workbook xlWorkBook =
null;
string
exportFileName = null;
xlApp.Visible =
false;
xlWorkBook = xlApp.Workbooks.Open(Path.Combine(
AppDomain.CurrentDomain.BaseDirectory,
"People.xlsx"));
exportFileName = Path.Combine(AppDomain.CurrentDomain.BaseDirectory,
"People.csv");
xlWorkBook.SaveAs(exportFileName, Excel.XlFileFormat.xlCSV);
xlWorkBook =
null;
xlApp.Quit();
}
We got away with releasing all object yet as mentioned earlier this can lead to a false sense of security that objects were released. Better to always release objects as shown below in a modified version of the last code sample.
Note more objects were used which is how we take full control of the executing code.
public
void
ExportToDelimited_2()
{
void
ReleaseComObject(object
pComObject)
{
try
{
Marshal.ReleaseComObject(pComObject);
pComObject =
null;
}
catch
(Exception)
{
pComObject =
null;
}
}
Excel.Application xlApp =
null;
Excel.Workbooks xlWorkBooks =
null;
Excel.Workbook xlWorkBook =
null;
Excel.Worksheet xlWorkSheet =
null;
xlApp =
new
Excel.Application();
xlApp.DisplayAlerts =
false;
xlWorkBooks = xlApp.Workbooks;
xlWorkBook = xlWorkBooks.Open(Path.Combine(
AppDomain.CurrentDomain.BaseDirectory,
"People.xlsx"));
xlWorkSheet = (Excel.Worksheet)xlWorkBook.ActiveSheet;
xlWorkBook.SaveAs(Path.Combine(AppDomain.CurrentDomain.BaseDirectory,
"People.csv"),
FileFormat: Excel.XlFileFormat.xlCSVWindows);
xlWorkBook.Close();
xlApp.UserControl =
true;
xlApp.Quit();
ReleaseComObject(xlWorkSheet);
ReleaseComObject(xlWorkBook);
ReleaseComObject(xlWorkBooks);
ReleaseComObject(xlApp);
}
When working with Excel automation be proactive, consider that whenever working with Excel automation that an object may not be released so take it upon yourself to fully test the code and release objects one by one.
OleDb option for exporting
Keeping with exporting a DataGridView bound or unbound with no formatting, a consideration should be with using OleDb. The main issue with interacting with Excel using OleDb is getting the connection string correct. There are
several pieces to a connection string.
The main parts we are interested are as follows.
Provider which is either Microsoft.Jet.OLEDB.4.0 for .xls file format or Microsoft.ACE.OLEDB.12.0 for .xlsx file format. Either is consider the OleDb data provider to interact with Microsoft Excel.
Extended properties
- HDR: It represents Header of the fields in the excel table. Default is YES. If you don’t have fieldnames in the header of your worksheet, you can specify HDR=NO which will take the columns of the tables that
it finds as F1,F2 etc. where Fn represents a column e.g. F1 is column A, F2 is column B. If when displaying data in a DataGridView for example where the first row is data and we don’t specify column names then we will see Fn for column names. Since when reading
data A SELECT statement of SELECT * with three columns of data the DataGridView would show F1 F2 and F3 but if we were to write SELCT F1 As FirstName, F2 As LastName, F3 As Country then as with any SQL SELECT statement the alias names for the column will display
and when interacting with these columns the aliases would be used except for the ORDER BY or WHERE clauses. In a section below a read operation is performed which shows how to read data that has unexpected data types, not mixed but simply not what we where
expecting.
- IMEX: This attribute works in tangent with MaxScanRows attribute when dealing with mixed data. Mixed data refers to the following. In the first eight rows of a WorkSheet in a column, all data is of one type vs
eight rows of data where there may be strings in three rows, numeric to four rows and one row with a date, this is mixed data. Excel attempts to figure out what type of data is in a column and rows which is known as a range. If there is mixed data in the first
eight rows what you get back may not be what you expected. For instance, if there are 100 rows of data which is mixed data and you expected dates you might get all rows typed as strings or even a numeric. If you were to get back data as numbers, more specifically
a double there is a method DateTime.FromOADate which returns a DateTime equivalent to the specified OLE Automation Date. IMEX can be set to allow read-only access or read-write access. The suggested setting for most operations is IMEX=1.
What is common for a connection string is as follows (note ,xls file format is shown yet the same holds true for .xlsx)
string
connectionstring = "Provider=Microsoft.Jet.OLEDB.4.0; Data Source=c:\testexcel.xls; Extended Properties"Excel 8.0;HDR=YES"";
If you need to experiment with a connection string to get it right rather than using string concatenation directly in your code a class can be setup as follows.
namespace
ExcelOperations.OleDbWork
{
public
enum
ExcelHeader
{
Yes,
No
}
public
class
SmartConnection
{
public
string
ConnectionString(string
pFileName, int
pImex = 1, ExcelHeader pHeader = ExcelHeader.No)
{
OleDbConnectionStringBuilder builder =
new
OleDbConnectionStringBuilder();
if
(System.IO.Path.GetExtension(pFileName)?.ToUpper() ==
".XLS")
{
builder.Provider =
"Microsoft.Jet.OLEDB.4.0";
builder.Add("Extended Properties", $"Excel
8.0;IMEX={pImex};HDR={pHeader.ToString()};");
}
else
{
builder.Provider =
"Microsoft.ACE.OLEDB.12.0";
builder.Add("Extended Properties", $"Excel
12.0;IMEX={pImex};HDR={pHeader.ToString()};");
}
builder.DataSource = pFileName;
return
builder.ConnectionString;
}
}
}
To create a new connection, create a new instance of SmartConnection class. Call ConnectionString with the file name to read, IMEX setting followed by Yes or No for setting up the connection for first row as data or first row
as column names. The file name is as setup the only required argument to be passed to the method unless IMEX or header arguments need to be overridden. This way there is string concatenation in the method which creates the connection.
Note in the method ConnectionString there is a class used, OleDbConnectionStringBuilder which makes life easy to setup the connection. Not only can a connection be created but also broken apart later for examination or to change
the connection.
Getting back to exporting data, there are no methods for creating an Excel file with OleDb data provider. The best course here is to have a blank Excel file ready to use. This file might be stored in a folder below the application
folder when needed copy the file to where you need the user of the application to access the file. Once the file has been copied (and renamed if needed) you can open the Excel file and import data from a DataTable or a List of a concrete class.
Another method to have a new file is to include a third-party library for the sole purpose of creating a new Excel file. There are several out there, one is called SpreadSheetLight
(there are code samples in the code samples provided with this article) which is a free library installable via NuGet Package manager. If you are the type that enjoys writing code rather than uses a library see
the following article which explains how to create an Excel file using OpenXml.
In the code samples provided here is part of the process to import a DataTable into an Excel file. The full code is setup and ready to run to test this method out.
public
void
ExportDataTableToExcel(string
pFileName, DataTable pDataTable)
{
mHasException =
false;
/*
* Create field names for the create table (worksheet)
*/
var columnsPartsForCreateSheet = pDataTable.Columns.OfType<DataColumn>()
.Select(col => $"{col.ColumnName.Replace("Column",
"")} CHAR(255)")
.ToArray();
/*
* Turn column name and type into a delimited string for the actual create statement
* below.
*/
var columnsForCreateSheet =
string.Join(",", columnsPartsForCreateSheet);
/*
* Full SQL INSERT statement
*/
var createStatement = $"CREATE TABLE {pDataTable.TableName} ({columnsForCreateSheet})";
/*
* Column names for the INSERT SQL staetment.
*/
var columnsPartsForInsert = pDataTable.Columns.OfType<DataColumn>()
.Select(col => col.ColumnName.Replace("Column",""))
.ToArray();
/*
* Create named parameters for the insert statement. Note that OleDb
* does not 'use' named parameters so we could had used a question mark
* for each parameter name as OleDb parameters are done in ordinal position
* which the parameters are anyways. The idea is for developers to get
* use to named parameters as when moving to SQL-Server named parameters
* allow parameters to be set out of order
*/
var paramsForInsert = pDataTable.Columns.OfType<DataColumn>()
.Select(col =>
"@" + col.ColumnName.Replace("Column",""))
.ToArray();
/*
* Insert statement for populating rows in the WorkSheet.
*/
var insertStatement =
$"INSERT INTO {pDataTable.TableName} ({string.Join(",",
columnsPartsForInsert)}) + "+
$"VALUES ({string.Join(",",
paramsForInsert)})";
try
{
var con =
new
SmartConnection();
/*
* IMPORTANT: In the connection string, second parameter must be IMEX = 0 for this to work.
*/
using
(var cn = new
OleDbConnection(con.ConnectionString(pFileName,0, ExcelHeader.Yes)))
{
using
(var cmd = new
OleDbCommand { Connection = cn })
{
cmd.CommandText = createStatement;
cn.Open();
/*
* Create the WorkSheet
*/
cmd.ExecuteNonQuery();
/*
* Change our commandText for the INSERT
*/
cmd.CommandText = insertStatement;
/*
* Create parameters once rather than creating them for each
* iteration of an insert, clearing or re-creating the parameters.
*/
foreach
(var pName in
paramsForInsert)
{
cmd.Parameters.Add(pName, OleDbType.VarWChar);
}
/*
* Insert row into the WorkSheet.
*/
for
(int
rowIndex = 0; rowIndex < pDataTable.Rows.Count ; rowIndex++)
{
for
(int
colIndex = 0; colIndex < pDataTable.Columns.Count ; colIndex++)
{
/*
* Set each parameter's value
*/
cmd.Parameters[colIndex]
.Value = pDataTable.Rows[rowIndex]
.Field<string>(pDataTable.Columns.IndexOf(pDataTable.Columns[colIndex]));
}
cmd.ExecuteNonQuery();
}
}
}
}
catch
(Exception e)
{
mHasException =
true;
mLastException = e;
}
}
/// <summary>
/// Get WorkSheet names for a specific Excel file
/// </summary>
/// <param name="pFileName"></param>
/// <returns></returns>
public
List<string> SheetNames(string
pFileName)
{
mHasException =
false;
var names =
new
List<string>();
var con =
new
SmartConnection();
try
{
using
(var cn = new
OleDbConnection(con.ConnectionString(pFileName)))
{
cn.Open();
var dt = cn.GetSchema("Tables",
new
string[] { null,
null,
null,
"Table" });
foreach
(DataRow row in
dt.Rows)
{
names.Add(row.Field<string>("Table_Name").Replace("$",
""));
}
}
}
catch
(Exception ex)
{
mHasException =
true;
mLastException = ex;
}
return
names.Distinct().ToList();
}
The above shows one method to handle writing data to a WorkSheet, there are many other methods which can be used, this is one to help getting into writing data to a WorkSheet.
In the section above for setting up a connection for columns aliasing and unexpected data types there may be cases where the data types are different than expected. Suppose the operation calls for reading a WorkSheet into a list.
A connection is opened, a command object is setup, ExecuteReader is invoked off the command and while iterating the data a run time exception is thrown indicating the type you are asking for is incorrect and does not make sense so you try a different type
and this fails too. One way around this is to keep existing code, add code to read the data into a DataTable then iterate the columns and see what the data types are reported back as. For instance, you attempted to get column A as a Integer and failed. We
iterate the columns and see that what was returned as a Double, this now tells us to read column A as a Double. Column D was thought to be a Date but by iterating the columns what is reported is a string. This means a conversion is in order.
Here we have a reader to read by iterating results from the command object and also using the reader to populate a DataTable. The DataTable code can be removed once the data types are known. They have been left in for you the
reader to see this process in action by adding the DataTable and not disturbing the reader code for iterating data.
public
void
ReadPeopleNoHeaderRow(string
pFileName, string
pSheetName)
{
mHasException =
false;
List<Person> peopleList =
new
List<Person>();
var con =
new
SmartConnection();
var dt =
new
DataTable();
try
{
using
(var cn = new
OleDbConnection { ConnectionString = con.ConnectionString(pFileName, 1, ExcelHeader.No) })
{
var selectStatement =
"SELECT F1 AS Identifer, F2 AS FirstName, F3 As LastName, "
+
"F4 AS Gender, F5 As BirthDate "
+
$"FROM [{pSheetName}$]";
using
(var cmd = new
OleDbCommand { Connection = cn, CommandText = selectStatement })
{
cn.Open();
var reader = cmd.ExecuteReader();
dt.Load(reader);
reader.Close();
reader = cmd.ExecuteReader();
while
(reader != null
&& reader.Read())
{
peopleList.Add(new
Person()
{
Id = Convert.ToInt32(reader.GetDouble(0)),
FirstName = reader.GetString(1),
LastName = reader.GetString(2),
Gender = Convert.ToInt32(reader.GetDouble(3)),
BirthDay = Convert.ToDateTime(reader.GetString(4))
});
}
reader.Close();
}
}
}
catch
(Exception ex)
{
mHasException =
true;
mLastException = ex;
}
foreach
(DataColumn col in
dt.Columns)
{
Console.WriteLine(col.DataType.ToString());
}
}
The following shows a clean example of reading data from a WorkSheet into a List. The class is different from above but the same process.
public
List<Customer> ReadCustomers(string
pFileName)
{
mHasException =
false;
var selectStatement =
"SELECT CompanyName, ContactName,ContactTitle FROM [Customers$]";
List<Customer> customers =
new
List<Customer>();
var con =
new
SmartConnection();
try
{
using
(var cn = new
OleDbConnection { ConnectionString = con.ConnectionString(pFileName,1, ExcelHeader.Yes) })
{
using
(var cmd = new
OleDbCommand { Connection = cn, CommandText = selectStatement })
{
cn.Open();
var reader = cmd.ExecuteReader();
while
(reader != null
&& reader.Read())
{
customers.Add(new
Customer()
{
CompanyName = reader.GetString(0),
ContactName = reader.GetString(1),
ContactTitle = reader.GetString(2)
});
}
}
}
}
catch
(Exception ex)
{
mHasException =
true;
mLastException = ex;
}
return
customers;
}
Other operations that OleDb excels at (although in some cases OpenXML is a better choice) is transferring data from a database directly to Excel. See
the following code sample for transferring MS-Access to Excel. Going in the opposite direction, this time switching it up to transfer from SQL-Server to Excel see
the following code sample. There is a bit more work involved for this process which is explained in the code sample and to get started is best to do the steps in SQL-Server Management
Studio.
Using OpenXML
So far Excel automation and OleDb have been touched on, another option for working with Excel is using OpenXml. The downside to working with OpenXML is there are many more moving parts and with that, without fully understanding
how pieces need to fall into place the end result is typically an unusable file. Unlike Excel automation, OpenXML does not leave objects in memory if there is an exception thrown at runtime.
The following code sample creates a new Excel file, a WorkSheet and populates the sheet with a list of a class.
public
void
CreateExcelDocPopulateWithPeople(string
pFileName, string
pSheetName, List<Person> pList)
{
mHasException =
false;
try
{
using
(var document = SpreadsheetDocument.Create(pFileName, SpreadsheetDocumentType.Workbook))
{
WorkbookPart wbp = document.AddWorkbookPart();
wbp.Workbook =
new
Workbook();
var wsp = wbp.AddNewPart<WorksheetPart>();
wsp.Worksheet =
new
Worksheet();
var sheets = wbp.Workbook.AppendChild(new
Sheets());
var sheet =
new
Sheet()
{
Id = wbp.GetIdOfPart(wsp),
SheetId = 1,
Name =
"People"
};
// ReSharper disable once PossiblyMistakenUseOfParamsMethod
sheets?.Append(sheet);
wbp.Workbook.Save();
WorkbookStylesPart stylePart = wbp.AddNewPart<WorkbookStylesPart>();
stylePart.Stylesheet = CreateStylesheet();
stylePart.Stylesheet.Save();
var sheetData = wsp.Worksheet.AppendChild(new
SheetData());
var headerRow = sheetData.AppendChild(new
Row());
headerRow.AppendChild(new
Cell()
{
CellValue =
new
CellValue("Id"),
DataType = CellValues.String,
StyleIndex = 2
});
headerRow.AppendChild(new
Cell()
{
CellValue =
new
CellValue("First Name"),
DataType = CellValues.String,
StyleIndex = 2
});
headerRow.AppendChild(new
Cell()
{
CellValue =
new
CellValue("Last Name"),
DataType = CellValues.String,
StyleIndex = 2
});
headerRow.AppendChild(new
Cell()
{
CellValue =
new
CellValue("Gender"),
DataType = CellValues.String,
StyleIndex = 2
});
headerRow.AppendChild(new
Cell()
{
CellValue =
new
CellValue("Birthday"),
DataType = CellValues.String,
StyleIndex = 2
});
// insert people data
foreach
(var person in
pList)
{
var row =
new
Row();
row.Append(
ConstructCell(person.Id.ToString(), CellValues.Number),
ConstructCell(person.FirstName, CellValues.String),
ConstructCell(person.LastName, CellValues.String),
ConstructCell(person.Role, CellValues.String),
ConstructCell(person.BirthDay.ToString("MM/dd/yyyy"),
CellValues.String));
sheetData.AppendChild(row);
}
wsp.Worksheet.Save();
}
}
catch
(Exception ex)
{
mHasException =
true;
mLastException = ex;
}
}
private
Stylesheet CreateStylesheet()
{
Stylesheet styleSheet =
null;
// 0 is default
// 1 is header
var fonts =
new
Fonts(
new
Font(new
FontSize() { Val = 10 }),
new
Font(new
FontSize() { Val = 12 },new
Bold(),new
Color() { Rgb = "FFFFFF"
}));
var fills =
new
Fills(
new
Fill(new
PatternFill() { PatternType = PatternValues.None }),
// Index 0 - default
new
Fill(new
PatternFill() { PatternType = PatternValues.Gray125 }),
// Index 1 - default
new
Fill(new
PatternFill(new
ForegroundColor { Rgb = new
HexBinaryValue() { Value = "000000"
} })
{ PatternType = PatternValues.Solid })
// Index 2 - header
);
var borders =
new
Borders(
new
Border(),
new
Border(
new
LeftBorder(new
Color() { Auto = true
}) { Style = BorderStyleValues.None },
new
RightBorder(new
Color() { Auto = true
}) { Style = BorderStyleValues.None },
new
TopBorder(new
Color() { Auto = true
}) { Style = BorderStyleValues.Thin },
new
BottomBorder(new
Color() { Auto = true
}) { Style = BorderStyleValues.Thin },
new
DiagonalBorder())
);
var cellFormats =
new
CellFormats(
new
CellFormat(), // default
new
CellFormat { FontId = 0, FillId = 0, BorderId = 1, ApplyBorder =
true
}, // body
new
CellFormat { FontId = 1, FillId = 2, BorderId = 1, ApplyFill =
true
} // header
);
styleSheet =
new
Stylesheet(fonts, fills, borders, cellFormats);
return
styleSheet;
}
/// <summary>
/// Construct cell of specific type
/// </summary>
/// <param name="value"></param>
/// <param name="dataType"></param>
/// <returns></returns>
private
Cell ConstructCell(string
value, CellValues dataType)
{
return
new
Cell()
{
CellValue =
new
CellValue(value),
DataType =
new
EnumValue<CellValues>(dataType)
};
}
When working with OpenXML it’s best to take your time and learn how things fit together rather than attempting to code this in a project on a tight timeline.
In the code that comes with this article, there are several examples of working with OpenXML which will allow you to get a handle on coding with OpenXML.
Comparing Excel Automation, OleDb and OpenXML performance.
When working with a fair amount of data e.g. thousands of rows and a fair amount of columns Excel automation is the slowest followed by OleDb. OpenXML is lighting fast yet as mention above the downside is OpenXML is more difficult
to grasp for someone with zero experience with OpenXML. This is one reason developers will work with Excel automation yet the pitfalls here is ensuring all objects are released. OleDb has pitfalls also, no method to create a new Excel file or to format cells.
Which one should you use? This is dependent on the task, is there a lot of data, first look at OpenXML. Is there a good deal of formatting, consider time which is needed to work out styles in OpenXML. With the samples provided
they give you a decent start. Is the task simply to export to Excel without formatting and is not a huge data set then consider OleDb in tangent (if needed) with the new file idea mentioned above.
Another road block with OleDb is learning where to append data too while with OpenXML and Excel automation there are methods which will provide the last used row and last used column in a WorkSheet. The library mentioned above
SpreadSheetLight also provides last used row and column (this is because at its core it OpenXML).
Some developers who frequently work with Excel will sometimes use OleDb while other times Excel automation and perhaps other times OpenXML.
There is another method which is to create a anML template for an Excel file/WorkSheet and use
embedded expressions coupled with
XML literals. The only issue is this is only possible with VB.NET. Since C# does not support this the way around this issue is to create a VB.NET class project and call the VB.NET methods from the C# project.
Steps to write this up.
Create a new Excel file as Excel 2003 XML. Create your column headers and style the headers then save the file which you can open in NotePad and then copy into a method in a class as a XDocument.
Next, locate the worksheet node e.g.
<Worksheet
ss:Name="People">
The next element is the table element
<Table
ss:ExpandedColumnCount=<%= columnCount %> ss:ExpandedRowCount=<%= customers.Count + 1 %> x:FullColumns="1"
Note columnCount and customers.Count, these refer to the count of columns and rows in the data source. The DataSource could be a DataTable or a List of a class.
This is followed by locating the row element directly below the Table element. Here we setup the column names followed by the data source.

The last step is to save the xml as a .xml file. When a user double clicks on the xml file in Windows Explorer Excel is the default program which will open the xml file. Once in Excel do a save as Excel 2007 format and now you
have a proper Excel file. This may not be for everyone but the benefit of this method is working with huge data sets is extremely fast.
Exception Handling
When working with Excel no matter which path is taken there should be proper exception handling rather than simply writing code and expecting it to function. For instance, a user creates an Excel file from your application then
opens the Excel file outside of the application. Then they forget and run the process again and fails because the file is open and can’t be created. Another failure point is when working with Excel automation the customer gets an update to Office with updates
the version of Excel Interop library and causes a runtime exception because the newer software is incompatible with methods used to perform operations you coded into the application.
For a repeatable pattern consider creating a base exception class which your class performing Excel operations implements.
A basic exception class
using System;
using System.Data.SqlClient;
namespace ExceptionsLibrary
{
public class BaseExceptionsHandler
{
protected bool mHasException;
/// <summary>
/// Indicate the last operation thrown an
/// exception or not
/// </summary>
/// <returns></returns>
public bool HasException => mHasException;
protected Exception mLastException;
/// <summary>
/// Provides access to the last exception thrown
/// </summary>
/// <returns></returns>
public Exception LastException => mLastException;
/// <summary>
/// Indicates if there was a sql related exception
/// </summary>
public bool HasSqlException => mLastException is SqlException;
/// <summary>
/// If you don't need the entire exception as in
/// LastException this provides just the text of the exception
/// </summary>
/// <returns></returns>
public string LastExceptionMessage => mLastException.Message;
/// <summary>
/// Indicate for return of a function if there was an
/// exception thrown or not.
/// </summary>
/// <returns></returns>
public bool IsSuccessFul => !mHasException;
}
}
Setup for a class working with Excel
public
class
OpenXmlExamples : BaseExceptionsHandler
Using with Open XML
public
void
CreateNewFile(string
pFileName, string
pSheetName)
{
mHasException =
false;
try
{
using
(var doc = SpreadsheetDocument.Create(pFileName, SpreadsheetDocumentType.Workbook))
{
var wbp = doc.AddWorkbookPart();
wbp.Workbook =
new
Workbook();
var wsp = wbp.AddNewPart<WorksheetPart>();
wsp.Worksheet =
new
Worksheet(new
SheetData());
var sheets = wbp.Workbook.AppendChild(new
Sheets());
var sheet =
new
Sheet()
{
Id = wbp.GetIdOfPart(wsp),
SheetId = 1,
Name = pSheetName
};
sheets?.Append(sheet);
wbp.Workbook.Save();
}
}
catch
(Exception ex)
{
mHasException =
true;
mLastException = ex;
}
}
With OleDb
public
List<string> SheetNames(string
pFileName)
{
mHasException =
false;
var names =
new
List<string>();
var con =
new
SmartConnection();
try
{
using
(var cn = new
OleDbConnection(con.ConnectionString(pFileName)))
{
cn.Open();
var dt = cn.GetSchema("Tables",
new
string[] { null,
null,
null,
"Table" });
foreach
(DataRow row in
dt.Rows)
{
names.Add(row.Field<string>("Table_Name").Replace("$",
""));
}
}
}
catch
(Exception ex)
{
mHasException =
true;
mLastException = ex;
}
return
names.Distinct().ToList();
}
Keeping with the last example, if there is no exception a list of strings is returned and if there is an exception a empty list of strings is returned. We can see if there was an exception or not as follows
private
void
cmdGetSheetNamesAutomation_Click(object
sender, EventArgs e)
{
var example =
new
ExcelBaseExample();
var fileName = Path.Combine(AppDomain.CurrentDomain.BaseDirectory,
"Customers.xlsx");
var sheetNames = example.GetWorkSheetNames(fileName);
if
(!example.HasErrors)
{
sheetNames.Insert(0,
"Select sheet");
cboSheetNamesAutomation.DataSource = sheetNames;
}
else
{
// notifiy user
}
}
Location of excel operations
The best place for these operations is not within a form but instead within a class dedicated to working with Excel. This is no different than where should operations go for interacting with databases. We can decouple the Excel
operations into a class project so that if other projects need similar functionality all you need to do is add a reference to the class project with Excel operations.
Within the supplied code samples this is shown, Excel operations are in their own class project. The following screen shot is from the code sample which goes with this article. Note that specific operations are separated into
various class projects and are all used in MainApplication. Several of the class projects were brought in from other solutions and simply work as they were intended to be plug and play.
Conclusions
There is more than one way to work with Excel, which method is best all depends on your requirements. In this article I, have briefly touched on several methods to interact with Excel. In part two of this series formatting of cells will be discussed along with
working with ranges, references tables. Part three in this series will cover reporting which includes working with charts. Part four in the series will deal with working with mixed data types along with suggestions for importing and exporting data from unknown
sources.
Special Note
When trying out the demonstrations in the sample code, when the main application executes Excel files in the bindebug folder are removed and or removed with fresh copies. This means for any write operations done on the last
execution will be lost on the new execution. All files which are expected to be in the application folder are in a folder at solution level. All operations are within the FolderLibrary project and are called in FormShown event of the main form.
NuGet packages used in the solution, there are a great deal of packages which in short are required by Open XML. So don’t be alarmed by the list of packages.
To list all packages in the NuGet console
Get-Package | ft -AutoSize
See also
Excel patterns for properly releasing memory once finished with Excel operations (C#).
Excel get last row and column for sheet, column or range (C#).
Export Excel from SQL-Server (VB.NET and C#).
DataGridView unbound to Excel or Text file (C#).
Alternate methods for with Microsoft Excel in VB.NET projects.
Export MS-Access table to MS-Excel Worksheet (VB.NET and C#).
Read ranges in Excel using OleDb data provider (VB.NET).
Set row height and column width for all cells in an Excel sheet using automation (VB.NET with C# helpers).
Open XML SDK.
Open XML SDK on GitHub.
Excel Object Model Overview.
Linked servers allow SQL Server access to data from a remote data source. A remote data source can be another SQL Server instance or other data sources such MySQL, Access databases, Oracle, Excel workbooks, text files etc.
SQL Server connects to the remote data source via an OLE DB provider. There are variations of the OLE DB providers depending on data source that want to establish connection to. There are the Microsoft OLE DB Provider for Oracle, Microsoft OLE DB Provider for SQL Server, OLE DB Provider for Jet etc. providers:

Microsoft SQL Server supports connections to other OLE DB data sources on a persistent or an ad hoc basis. The persistent connection is known as a linked server. An ad hoc connection, that is made for the sake of a single query, is known as a distributed query.
A distributed query can be run without creating a linked server first, by using the Transact-SQL OPENROWSET and OPENDATASOURCE functions.
When executing a T-SQL statement against a linked server, the OLE DB provider (e.g. OLE DB Provider for Jet) for the linked server is loaded into the SQL Server memory address space, then SQL Server takes the T-SQL statement and calls the OLE DB interface. Then the OLE DB interface provides a connection to the remote data source (e.g. Excel file). The OLE DB provider then processes the result set and returns the results to the SQL Server client that made the initial call.
In this article we’ll show how to create a linked server to query Excel data from the Excel file (*.xlsx) using the Microsoft.ACE.OLEDB.12.0 OLE DB provider and also how can be done by using the OPENROWSET and OPENDATASOURCE functions.
Creating a linked server with the Microsoft.ACE.OLEDB.12.0 OLE DB provider
To import data from an Excel file (Excel 2007 (xlsx) and above) to SQL Server the Microsoft.ACE.OLEDB.12.0 OLE DB driver should be installed.
The Microsoft.ACE.OLEDB.12.0 OLE DB driver can be used on SQL Server 32-bit editions for Excel 2007 files, or later, or on SQL Server 64-bit editions for any Excel files.
There is one more provider; Microsoft. Jet. OLEDB.4.0 which can be used on SQL Server 32-bit editions for Excel 2003 files (or earlier).
A list of all currently available providers in SQL Server can be seen under the Providers folder:
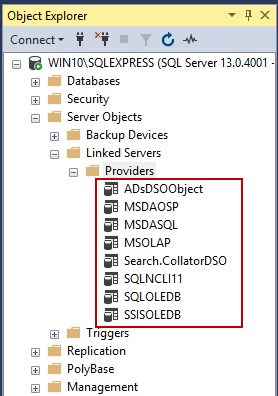
From this link you can download and install the Microsoft.ACE.OLEDB.12.0 OLE DB driver. Depending on which version of SQL Server (32-bit or 64-bit) use, there are two versions of the Microsoft.ACE.OLEDB.12.0 OLE DB driver that can be installed:
- AccessDatabaseEngine.exe is for the SQL Server 32-bit version
- AccessDatabaseEngine_X64.exe is for the SQL Server 64-bit version
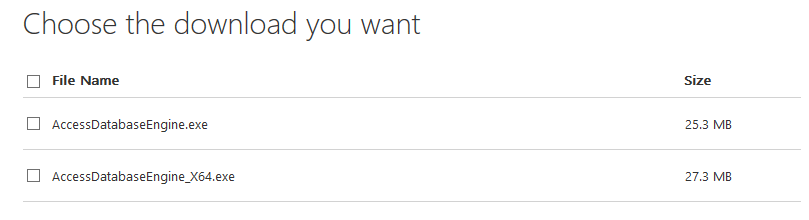
Note that if AccessDatabaseEngine_X64.exe was installed, and SQL Server 32-bit version is used. The error below may appear when creating a linked server for querying Excel data:
Failed to retrieve data for this request. (Microsoft.SqlServer.Management.Sdk.Sfc)
– – – – – – – – – – – – – – – –
ADDITIONAL INFORMATION:
An exception occurred while executing a Transact-SQL statement or batch. (Microsoft.SqlServer.ConnectionInfo)
– – – – – – – – – – – – – – – –
The OLE DB provider “Microsoft.ACE.OLEDB.12.0” has not been registered. (Microsoft SQL Server, Error: 7403)
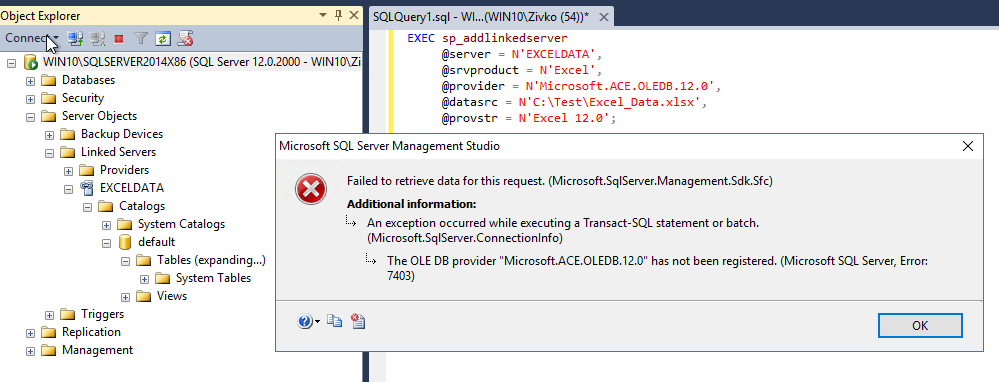
When the appropriate AccessDatabaseEngine executable file is installed, the Microsoft.ACE.OLEDB.12.0 OLE DB driver will appear in the list of the available drivers under the Providers folder:
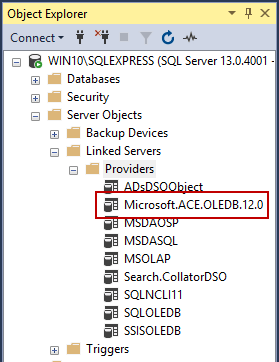
After installing appropriate AccessDatabaseEngine, a linked server can be created. To do that, right click on the Linked Servers folder and choose the New Linked Server command:
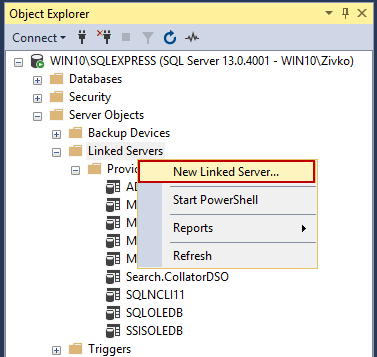
This will open the New Linked Server dialog:
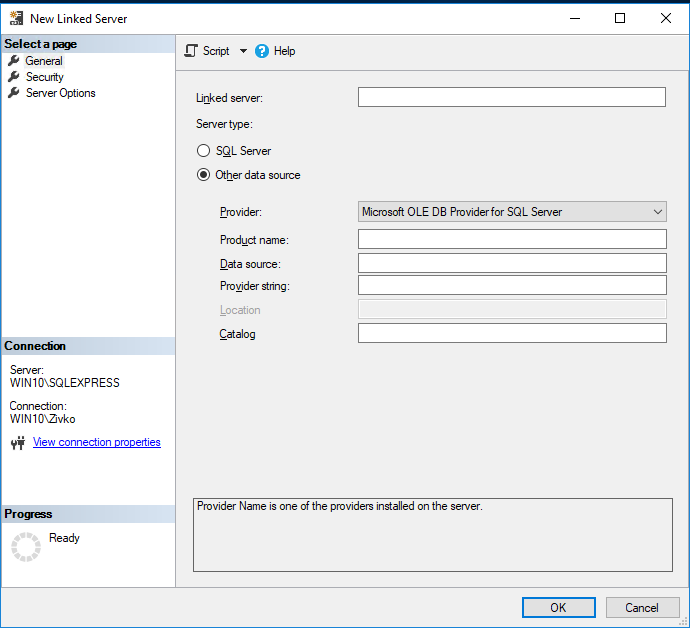
In this dialog, the name of a linked server and server type must be identified. In the Linked server box any name for the linked server can be entered (e.g. ExcelData).
If SQL Server is checked, then a linked server will be an SQL Server instance. More about creating a SQL Server linked server can be found on the How to create and configure a linked server in SQL Server Management Studio page. Since this article is about using the Excel data source, in the Server type section, choose the Other data source radio button and from the Providers combo box, choose the Microsoft Office 12.0 Access Database Engine OLE DB Provider item:
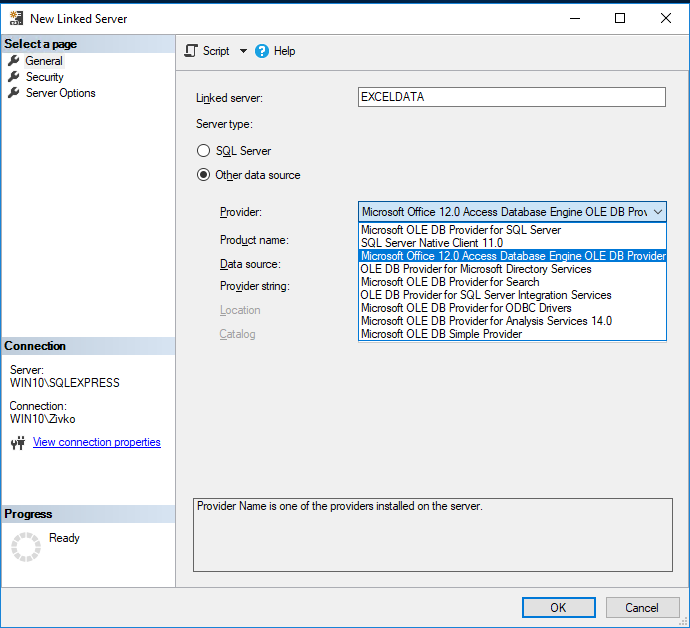
In the Product name box, put the name of the OLE DB data source to add as a linked server (e.g. Excel). In the Data source box the type the full path and file name of the Excel file (e.g. C:TestExcel_Data.xlsx).
For the Provider string field, enter Excel 12.0:
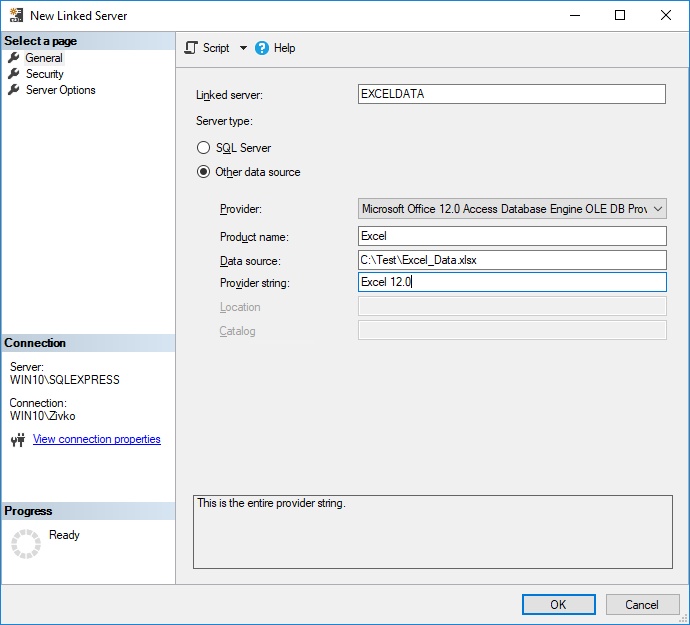
Note, if you are using the Excel 97-2003 (.xls) files, in the Provider string field should be enter “Excel 8.0”.
In case that the wrong name was entered in the Provider string field, the following error will appear:
The linked server has been created but failed a connection test. Do you want to keep the linked server?
– – – – – – – – – – – – – – – –
ADDITIONAL INFORMATION:
An exception occurred while executing a Transact-SQL statement or batch. (Microsoft.SqlServer.ConnectionInfo)
– – – – – – – – – – – – – – – –
Cannot initialize the data source object of OLE DB provider “Microsoft.ACE.OLEDB.12.0” for linked server “EXCELDATA”.
OLE DB provider “Microsoft.ACE.OLEDB.12.0” for linked server “EXCELDATA” returned message “Could not find installable ISAM.”. (Microsoft SQL Server, Error: 7303)
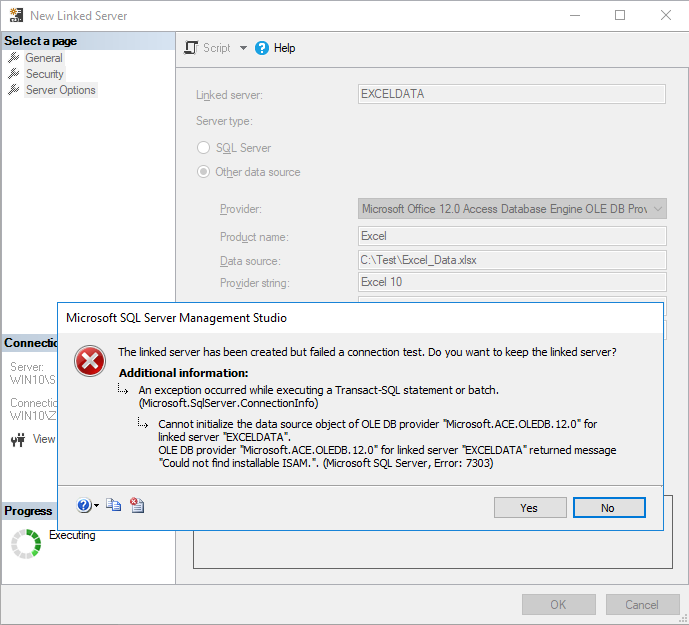
After entering the correct name in the Provider string field, press the OK button on the New Linked Server dialog to create the new linked server. During the process of creating a linked server the below error message may appear:
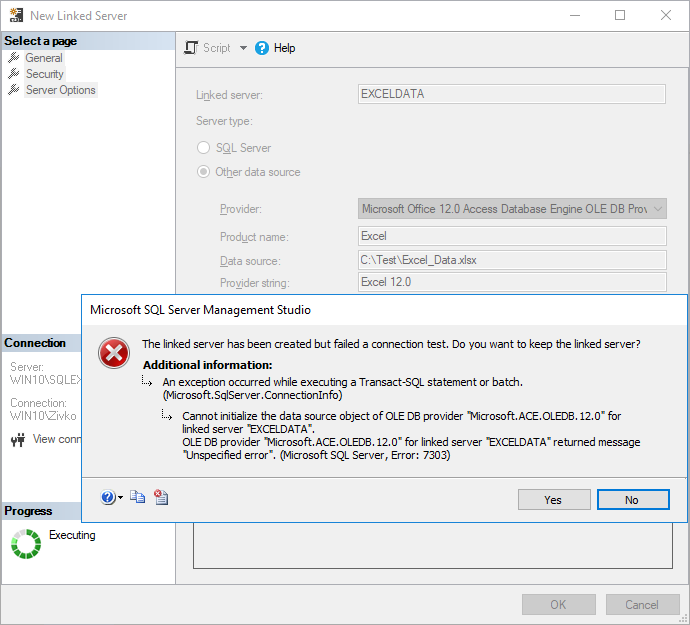
Press Yes to create the EXCELDATA linked server. The EXCELDATA linked server will appear under the Linked Server folder:
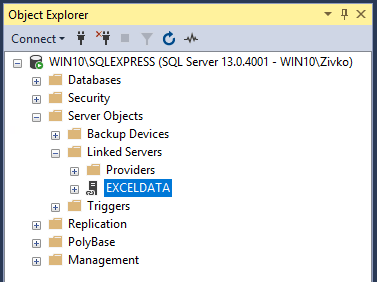
But when you look for data in the Tables folder of the default database the following error will appear:
Failed to retrieve data for this request. (Microsoft.SqlServer.Management.Sdk.Sfc)
– – – – – – – – – – – – – – – –
ADDITIONAL INFORMATION:
An exception occurred while executing a Transact-SQL statement or batch. (Microsoft.SqlServer.ConnectionInfo)
– – – – – – – – – – – – – – – –
Cannot initialize the data source object of OLE DB provider “Microsoft.ACE.OLEDB.12.0” for linked server “EXCELDATA”. (Microsoft SQL Server, Error: 7303)
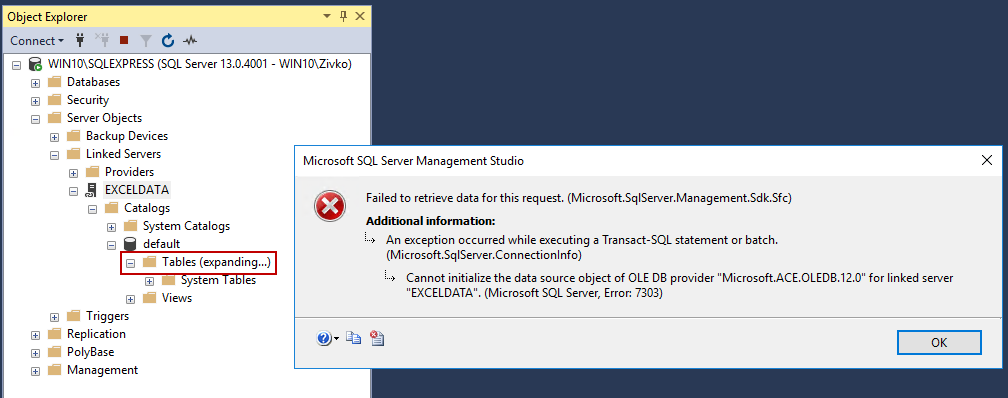
To resolve this error and the error above, close SQL Server Management Studio (SSMS) and run it again, but this time as an administrator:
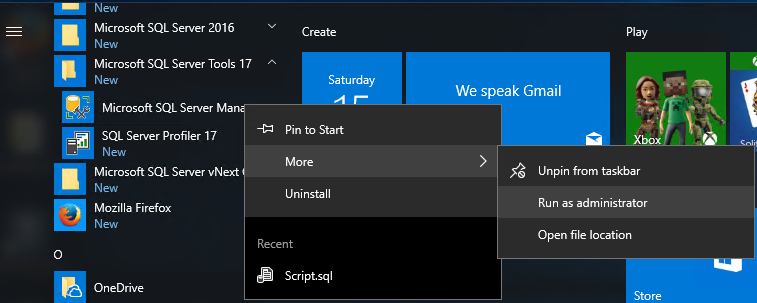
Now, when expanding the Tables folder, the Excel sheets will appear. Note that every sheet is shown as SQL Server table with a dollar sign ($) at the end:
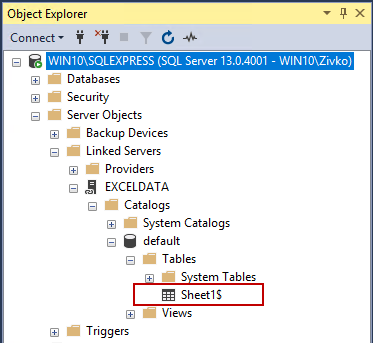
To create the a linked server by using T-SQL simply use the sp_addlinkedserver stored procedure paste and execute the following code into a query editor:
|
EXEC sp_addlinkedserver @server = N‘EXCELDATA’, @srvproduct = N‘Excel’, @provider = N‘Microsoft.ACE.OLEDB.12.0’, @datasrc = N‘C:TestExcel_Data.xlsx’, @provstr = N‘Excel 12.0’; |
More about creating a linked server using T-SQL can be found on the How to create, configure and drop a SQL Server linked server using Transact-SQL page.
Querying Excel data using the linked server
Now that the linked server is created, let’s query some Excel data!
The following SQL code will list all data from the Sheet1 in the Excel_Data.xlsx file for which we are created the linked server:
|
SELECT * FROM EXCELDATA...[Sheet1$] |
But, when execute this code the error message may appear:
Msg 7399, Level 16, State 1, Line 2
The OLE DB provider “Microsoft.ACE.OLEDB.12.0” for linked server “EXCELDATA” reported an error. Access denied.
Msg 7301, Level 16, State 2, Line 2
Cannot obtain the required interface (“IID_IDBCreateCommand”) from OLE DB provider “Microsoft.ACE.OLEDB.12.0” for linked server “EXCELDATA”.
This usually happens because of inadequate permissions.
One way to resolve this is, go to the SQL Server Configuration Manager:
From the SQL Server Configuration Manager dialog, select SQL Server for on which has created a linked server:
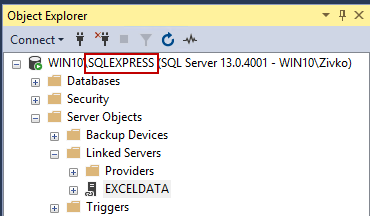
Right click, and from the context menu, click the Properties option:
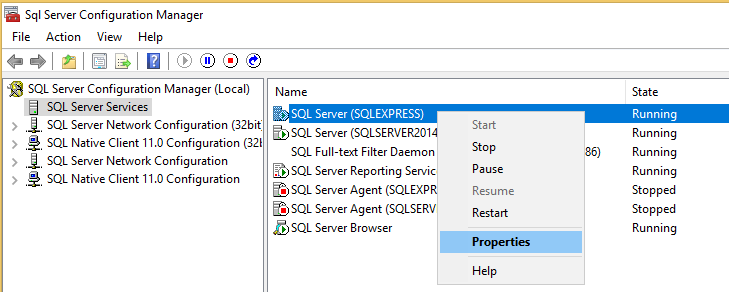
On the SQL Server Properties dialog under the Log on cart, choose the Built-in account radio button and from the combo box, select the Local System item:
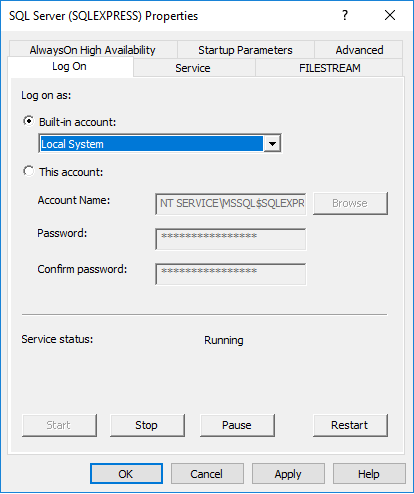
From the SQL Server Properties dialog click the Apply button and press the Yes button on the Confirm Account Change warning message box:
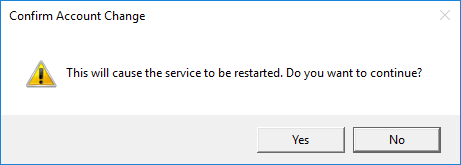
Now, open SQL Server Manage Studio as administrator and in a query editor execute the SQL code:
|
SELECT * FROM EXCELDATA...Sheet1$ |
The following result will appear:
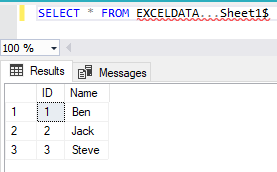
This will list all data from Sheet1 of the Excel_Data.xlsx file.
After all these settings, you are still getting the same error, maybe Microsoft Data Access Components (MDAC) do not be work properly. For more information, see this Microsoft article.
The following SQL code will insert data from Sheet1 to the SQL Server table ‘SQLTable’:
|
INSERT INTO dbo.SQLTable(ID,Name) SELECT ID, Name FROM EXCELDATA...Sheet1$ |
When query the SQLTable table, the following result will appear:
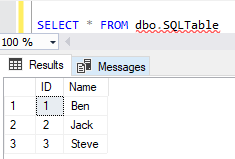
Querying Excel data using the distributed queries
To access data to an Excel file via SSMS without creating a linked server first use the Transact-SQL OPENROWSET and OPENDATASOURCE functions.
To establish connection and querying data from the Excel data source using OPENROWSET function type the following SQL code in query editor:
|
SELECT * FROM OPENROWSET(‘Microsoft.ACE.OLEDB.12.0’, ‘Excel 12.0;Database=C:TestExcel_Data.xlsx;’, ‘SELECT * FROM [Sheet1$]’) |
But, when executing the above code the following error may occur:
Msg 15281, Level 16, State 1, Line 8
SQL Server blocked access to STATEMENT ‘OpenRowset/OpenDatasource’ of component ‘Ad Hoc Distributed Queries’ because this component is turned off as part of the security configuration for this server. A system administrator can enable the use of ‘Ad Hoc Distributed Queries’ by using sp_configure. For more information about enabling ‘Ad Hoc Distributed Queries’, search for ‘Ad Hoc Distributed Queries’ in SQL Server Books Online.
To resolve this error the Ad Hoc Distributed Queries option should be enabled in order to open a connection to a remote server using the OPENROWSET or OPENDATASOURCE. This can be achieved by using the sp_configure procedure and execute the following SQL code in a query editor:
|
EXEC sp_configure ‘show advanced options’, 1 RECONFIGURE EXEC sp_configure ‘Ad Hoc Distributed Queries’, 1 |
If case that the above executed query show the following error:
Configuration option ‘show advanced options’ changed from 0 to 1. Run the RECONFIGURE statement to install.
Msg 5808, Level 16, State 1, Line 2
Ad hoc update to system catalogs is not supported.
Use the RECONFIGURE WITH OVERRIDE instead of RECONFIGURE:
|
EXEC sp_configure ‘show advanced options’, 1 RECONFIGURE WITH OVERRIDE EXEC sp_configure ‘Ad Hoc Distributed Queries’, 1 RECONFIGURE WITH OVERRIDE |
Now when executing the SQL code:
|
SELECT * FROM OPENROWSET(‘Microsoft.ACE.OLEDB.12.0’, ‘Excel 12.0;Database=C:TestExcel_Data.xlsx;’, ‘SELECT * FROM [Sheet1$]’) |
The following result in the Results grid will be shown:

The same result can be obtained used the OPENDATASOURCE function. Type the following code:
|
SELECT * FROM OPENDATASOURCE(‘Microsoft.ACE.OLEDB.12.0’, ‘Data Source=C:TestExcel_Data.xlsx;Extended Properties=Excel 12.0’)...[Sheet1$] |
Like linked servers, OPENROWSET and OPENDATASOURCE use OLE DB to connect to the remote data source; however, these functions do not encompass all the features included with linked servers, which is generally why linked servers are the preferred option.
Other articles in this series:
- How to create and configure a linked server in SQL Server Management Studio
- How to create, configure and drop a SQL Server linked server using Transact-SQL
- How to configure a Linked Server using the ODBC driver
- How to create a linked server to an Azure SQL database
See more
To boost your SQL Server development productivity, check out Free SQL Server Management Studio add-ins.
Useful links
- Querying remote data sources in SQL Server
- How to use Excel with SQL Server linked servers and distributed queries
- OPENDATASOURCE (Transact-SQL)
- OPENROWSET (Transact-SQL)
- Author
- Recent Posts

Marko aka “Zivko” is a senior software analyst from Nis, Serbia focusing on SQL Server and MySQL as well as client technologies like SSMS, Visual Studio, and VSCode. He has extensive experience with quality assurance, issue escalation/resolution, and product evangelism.
He is a prolific author of authoritative content related to SQL Server including a number of “platinum” articles (top 1% in terms of popularity and engagement). His writing covers a range of topics on MySQL and SQL Server including remote/linked servers, import/export, LocalDB, SSMS, and more.
In his part-time, Zivko likes basketball, foosball (table-soccer), and rock music.
See more about Marko at LinkedIn
View all posts by Marko Zivkovic
Does anyone know how to write to an excel file (.xls) via OLEDB in C#? I’m doing the following:
   OleDbCommand dbCmd = new OleDbCommand("CREATE TABLE [test$] (...)", connection);
   dbCmd.CommandTimeout = mTimeout;
   results = dbCmd.ExecuteNonQuery();
But I get an OleDbException thrown with message:
«Cannot modify the design of table
‘test$’. It is in a read-only
database.»
My connection seems fine and I can select data fine but I can’t seem to insert data into the excel file, does anyone know how I get read/write access to the excel file via OLEDB?
asked Sep 12, 2008 at 0:10
![]()
1
I was also looking for and answer but Zorantula’s solution didn’t work for me.
I found the solution on http://www.cnblogs.com/zwwon/archive/2009/01/09/1372262.html
I removed the ReadOnly=false parameter and the IMEX=1 extended property.
The IMEX=1 property opens the workbook in import mode, so structure-modifying commands (like CREATE TABLE or DROP TABLE) don’t work.
My working connection string is:
"Provider=Microsoft.Jet.OLEDB.4.0;Data Source=workbook.xls;Mode=ReadWrite;Extended Properties="Excel 8.0;HDR=Yes;";"
![]()
answered Apr 23, 2009 at 10:49
0
You need to add ReadOnly=False; to your connection string
Provider=Microsoft.Jet.OLEDB.4.0;Data Source=fifa_ng_db.xls;Mode=ReadWrite;ReadOnly=false;Extended Properties="Excel 8.0;HDR=Yes;IMEX=1";
![]()
answered Oct 8, 2008 at 18:38
![]()
ZorantulaZorantula
1721 silver badge2 bronze badges
2
I also had the same problem. Only remove the extended property IMEX=1. That will solve your problem. Your table will be created in your Excel file…
![]()
answered Aug 4, 2011 at 20:16
![]()
A couple questions:
- Does the user that executes your app (you?) have permission to write to the file?
- Is the file read-only?
- What is your connection string?
If you’re using ASP, you’ll need to add the IUSER_* user as in this example.
answered Sep 12, 2008 at 2:04
![]()
Michael HarenMichael Haren
105k40 gold badges165 silver badges205 bronze badges
- How do I check the permissions for writing to an excel file for my application (I’m using excel 2007)?
- The file is not read only, or protected (to my knowledge).
- My connection String is:
«Provider=Microsoft.Jet.OLEDB.4.0;Data
Source=fifa_ng_db.xls;Mode=ReadWrite;Extended
Properties=»Excel
8.0;HDR=Yes;IMEX=1″»
answered Sep 12, 2008 at 16:12
![]()
DanielbDanielb
1,5785 gold badges23 silver badges34 bronze badges
2
Further to Michael Haren’s answer. The account you will need to grant Modify permissions to the XLS file will likely be NETWORK SERVICE if this code is running in an ASP.NET application (it’s specified in the IIS Application Pool). To find out exactly what account your code is running as, you can do a simple:
Response.Write(Environment.UserDomainName + "\" + Environment.UserName);
answered Oct 8, 2008 at 18:49
![]()
Duncan SmartDuncan Smart
30.9k10 gold badges66 silver badges70 bronze badges
I was running under ASP.NET, and encountered both «Cannot modify the design…» and «Cannot locate ISAM…» error messages.
I found that I needed to:
a) Use the following connection string:
Provider=Microsoft.Jet.OLEDB.4.0;Mode=ReadWrite;Extended Properties='Excel 8.0;HDR=Yes;';Data Source=" + {path to file};
Note I too had issues with IMEX=1 and with the ReadOnly=false attributes in the connection string.
b) Grant EVERYONE full permissions to the folder in which the file was being written. Normally, ASP.NET runs under the NETWORK SERVICE account, and that already had permissions. However, the OleDb code is unmanaged, so it must run under some other security context. (I am currently too lazy to figure out which account, so I just used EVERYONE.)
![]()
answered Jun 10, 2009 at 16:11