
| title | description | author | ms.author | ms.date | ms.service | ms.subservice | ms.topic | monikerRange |
|---|---|---|---|---|---|---|---|---|
|
Import data from Excel to SQL Server or Azure SQL Database |
This article describes methods to import data from Excel to SQL Server or Azure SQL Database. Some use a single step, others require an intermediate text file. |
rwestMSFT |
randolphwest |
03/30/2023 |
sql |
data-movement |
conceptual |
=azuresqldb-current||>=sql-server-2016||>=sql-server-linux-2017||=azuresqldb-mi-current |
Import data from Excel to SQL Server or Azure SQL Database
[!INCLUDE SQL Server Azure SQL Database]
There are several ways to import data from Excel files to [!INCLUDE ssnoversion-md] or to Azure SQL Database. Some methods let you import data in a single step directly from Excel files; other methods require you to export your Excel data as text (CSV file) before you can import it.
This article summarizes the frequently used methods and provides links for more detailed information. A complete description of complex tools and services like SSIS or Azure Data Factory is beyond the scope of this article. To learn more about the solution that interests you, follow the provided links.
List of methods
There are several ways to import data from Excel. You may need to install SQL Server Management Studio (SSMS) to use some of these tools.
You can use the following tools to import data from Excel:
| Export to text first ([!INCLUDE ssnoversion-md] and SQL Database) | Directly from Excel ([!INCLUDE ssnoversion-md] on-premises only) |
|---|---|
| Import Flat File Wizard | SQL Server Import and Export Wizard |
| BULK INSERT statement | SQL Server Integration Services (SSIS) |
| BCP | OPENROWSET function |
| Copy Wizard (Azure Data Factory) | |
| Azure Data Factory |
If you want to import multiple worksheets from an Excel workbook, you typically have to run any of these tools once for each sheet.
[!IMPORTANT]
To learn more, see limitations and known issues for loading data to or from Excel files.
Import and Export Wizard
Import data directly from Excel files by using the [!INCLUDE ssnoversion-md] Import and Export Wizard. You also can save the settings as a SQL Server Integration Services (SSIS) package that you can customize and reuse later.
-
In [!INCLUDEssManStudioFull], connect to an instance of the [!INCLUDEssNoVersion] [!INCLUDEssDE].
-
Expand Databases.
-
Right-click a database.
-
Select Tasks.
-
Choose to Import Data or Export Data:
:::image type=»content» source=»../../integration-services/import-export-data/media/start-wizard-ssms.jpg» alt-text=»Start wizard SSMS»:::
This launches the wizard:
:::image type=»content» source=»media/excel-connection.png» alt-text=»Connect to an Excel data source»:::
To learn more, review:
- Start the SQL Server Import and Export Wizard
- Get started with this simple example of the Import and Export Wizard
Integration Services (SSIS)
If you’re familiar with SQL Server Integration Services (SSIS) and don’t want to run the [!INCLUDE ssnoversion-md] Import and Export Wizard, create an SSIS package that uses the Excel Source and the [!INCLUDE ssnoversion-md] Destination in the data flow.
To learn more, review:
- Excel Source
- SQL Server Destination
To start learning how to build SSIS packages, see the tutorial How to Create an ETL Package.
:::image type=»content» source=»media/excel-to-sql-data-flow.png» alt-text=»Components in the data flow»:::
OPENROWSET and linked servers
[!IMPORTANT]
In Azure SQL Database, you cannot import directly from Excel. You must first export the data to a text (CSV) file.
[!NOTE]
The ACE provider (formerly the Jet provider) that connects to Excel data sources is intended for interactive client-side use. If you use the ACE provider on [!INCLUDE ssnoversion-md], especially in automated processes or processes running in parallel, you may see unexpected results.
Distributed queries
Import data directly into [!INCLUDE ssnoversion-md] from Excel files by using the Transact-SQL OPENROWSET or OPENDATASOURCE function. This usage is called a distributed query.
[!IMPORTANT]
In Azure SQL Database, you cannot import directly from Excel. You must first export the data to a text (CSV) file.
Before you can run a distributed query, you have to enable the ad hoc distributed queries server configuration option, as shown in the following example. For more info, see ad hoc distributed queries Server Configuration Option.
sp_configure 'show advanced options', 1;
RECONFIGURE;
GO
sp_configure 'ad hoc distributed queries', 1;
RECONFIGURE;
GO
The following code sample uses OPENROWSET to import the data from the Excel Sheet1 worksheet into a new database table.
USE ImportFromExcel;
GO
SELECT * INTO Data_dq
FROM OPENROWSET('Microsoft.ACE.OLEDB.12.0',
    'Excel 12.0; Database=C:TempData.xlsx', [Sheet1$]);
GO
Here’s the same example with OPENDATASOURCE.
USE ImportFromExcel;
GO
SELECT * INTO Data_dq
FROM OPENDATASOURCE('Microsoft.ACE.OLEDB.12.0',
    'Data Source=C:TempData.xlsx;Extended Properties=Excel 12.0')...[Sheet1$];
GO
To append the imported data to an existing table instead of creating a new table, use the INSERT INTO ... SELECT ... FROM ... syntax instead of the SELECT ... INTO ... FROM ... syntax used in the preceding examples.
To query the Excel data without importing it, just use the standard SELECT ... FROM ... syntax.
For more info about distributed queries, see the following articles:
- Distributed Queries (Distributed queries are still supported in [!INCLUDE sssql19-md], but the documentation for this feature hasn’t been updated.)
- OPENROWSET
- OPENDATASOURCE
Linked servers
You can also configure a persistent connection from [!INCLUDE ssnoversion-md] to the Excel file as a linked server. The following example imports the data from the Data worksheet on the existing Excel linked server EXCELLINK into a new [!INCLUDE ssnoversion-md] database table named Data_ls.
USE ImportFromExcel;
GO
SELECT * INTO Data_ls FROM EXCELLINK...[Data$];
GO
You can create a linked server from SQL Server Management Studio (SSMS), or by running the system stored procedure sp_addlinkedserver, as shown in the following example.
DECLARE @RC INT;
DECLARE @server NVARCHAR(128);
DECLARE @srvproduct NVARCHAR(128);
DECLARE @provider NVARCHAR(128);
DECLARE @datasrc NVARCHAR(4000);
DECLARE @location NVARCHAR(4000);
DECLARE @provstr NVARCHAR(4000);
DECLARE @catalog NVARCHAR(128);

-- Set parameter values
SET @server = 'EXCELLINK';
SET @srvproduct = 'Excel';
SET @provider = 'Microsoft.ACE.OLEDB.12.0';
SET @datasrc = 'C:TempData.xlsx';
SET @provstr = 'Excel 12.0';

EXEC @RC = [master].[dbo].[sp_addlinkedserver] @server,
    @srvproduct,
    @provider,
    @datasrc,
    @location,
    @provstr,
    @catalog;
For more info about linked servers, see the following articles:
- Create Linked Servers
- OPENQUERY
For more examples and info about both linked servers and distributed queries, see the following article:
- How to use Excel with SQL Server linked servers and distributed queries
Prerequisite — Save Excel data as text
To use the rest of the methods described on this page — the BULK INSERT statement, the BCP tool, or Azure Data Factory — first you have to export your Excel data to a text file.
In Excel, select File | Save As and then select Text (Tab-delimited) (*.txt) or CSV (Comma-delimited) (*.csv) as the destination file type.
If you want to export multiple worksheets from the workbook, select each sheet, and then repeat this procedure. The Save as command exports only the active sheet.
[!TIP]
For best results with data importing tools, save sheets that contain only the column headers and the rows of data. If the saved data contains page titles, blank lines, notes, and so forth, you may see unexpected results later when you import the data.
The Import Flat File Wizard
Import data saved as text files by stepping through the pages of the Import Flat File Wizard.
As described previously in the Prerequisite section, you have to export your Excel data as text before you can use the Import Flat File Wizard to import it.
For more info about the Import Flat File Wizard, see Import Flat File to SQL Wizard.
BULK INSERT command
BULK INSERT is a Transact-SQL command that you can run from SQL Server Management Studio. The following example loads the data from the Data.csv comma-delimited file into an existing database table.
As described previously in the Prerequisite section, you have to export your Excel data as text before you can use BULK INSERT to import it. BULK INSERT can’t read Excel files directly. With the BULK INSERT command, you can import a CSV file that is stored locally or in Azure Blob storage.
USE ImportFromExcel;
GO
BULK INSERT Data_bi FROM 'C:Tempdata.csv'
   WITH (
      FIELDTERMINATOR = ',',
      ROWTERMINATOR = 'n'
);
GO
For more info and examples for [!INCLUDE ssnoversion-md] and SQL Database, see the following articles:
- Import Bulk Data by Using BULK INSERT or OPENROWSET(BULK…)
- BULK INSERT
BCP tool
BCP is a program that you run from the command prompt. The following example loads the data from the Data.csv comma-delimited file into the existing Data_bcp database table.
As described previously in the Prerequisite section, you have to export your Excel data as text before you can use BCP to import it. BCP can’t read Excel files directly. Use to import into [!INCLUDE ssnoversion-md] or SQL Database from a test (CSV) file saved to local storage.
[!IMPORTANT]
For a text (CSV) file stored in Azure Blob storage, use BULK INSERT or OPENROWSET. For an examples, see Example.
bcp.exe ImportFromExcel..Data_bcp in "C:Tempdata.csv" -T -c -t ,
For more info about BCP, see the following articles:
- Import and Export Bulk Data by Using the bcp Utility
- bcp Utility
- Prepare Data for Bulk Export or Import
Copy Wizard (ADF)
Import data saved as text files by stepping through the pages of the Azure Data Factory (ADF) Copy Wizard.
As described previously in the Prerequisite section, you have to export your Excel data as text before you can use Azure Data Factory to import it. Data Factory can’t read Excel files directly.
For more info about the Copy Wizard, see the following articles:
- Data Factory Copy Wizard
- Tutorial: Create a pipeline with Copy Activity using Data Factory Copy Wizard.
Azure Data Factory
If you’re familiar with Azure Data Factory and don’t want to run the Copy Wizard, create a pipeline with a Copy activity that copies from the text file to [!INCLUDE ssnoversion-md] or to Azure SQL Database.
As described previously in the Prerequisite section, you have to export your Excel data as text before you can use Azure Data Factory to import it. Data Factory can’t read Excel files directly.
For more info about using these Data Factory sources and sinks, see the following articles:
- File system
- SQL Server
- Azure SQL Database
To start learning how to copy data with Azure data factory, see the following articles:
- Move data by using Copy Activity
- Tutorial: Create a pipeline with Copy Activity using Azure portal
Common errors
Microsoft.ACE.OLEDB.12.0″ hasn’t been registered
This error occurs because the OLEDB provider isn’t installed. Install it from Microsoft Access Database Engine 2010 Redistributable. Be sure to install the 64-bit version if Windows and [!INCLUDE ssnoversion-md] are both 64-bit.
The full error is:
Msg 7403, Level 16, State 1, Line 3
The OLE DB provider "Microsoft.ACE.OLEDB.12.0" has not been registered.
Cannot create an instance of OLE DB provider «Microsoft.ACE.OLEDB.12.0» for linked server «(null)»
This indicates that the Microsoft OLEDB hasn’t been configured properly. Run the following Transact-SQL code to resolve this:
EXEC sp_MSset_oledb_prop N'Microsoft.ACE.OLEDB.12.0', N'AllowInProcess', 1;
EXEC sp_MSset_oledb_prop N'Microsoft.ACE.OLEDB.12.0', N'DynamicParameters', 1;
The full error is:
Msg 7302, Level 16, State 1, Line 3
Cannot create an instance of OLE DB provider "Microsoft.ACE.OLEDB.12.0" for linked server "(null)".
The 32-bit OLE DB provider «Microsoft.ACE.OLEDB.12.0» cannot be loaded in-process on a 64-bit SQL Server
This occurs when a 32-bit version of the OLD DB provider is installed with a 64-bit [!INCLUDE ssnoversion-md]. To resolve this issue, uninstall the 32-bit version and install the 64-bit version of the OLE DB provider instead.
The full error is:
Msg 7438, Level 16, State 1, Line 3
The 32-bit OLE DB provider "Microsoft.ACE.OLEDB.12.0" cannot be loaded in-process on a 64-bit SQL Server.
The OLE DB provider «Microsoft.ACE.OLEDB.12.0» for linked server «(null)» reported an error.
Cannot initialize the data source object of OLE DB provider «Microsoft.ACE.OLEDB.12.0» for linked server «(null)»
Both of these errors typically indicate a permissions issue between the [!INCLUDE ssnoversion-md] process and the file. Ensure that the account that is running the [!INCLUDE ssnoversion-md] service has full access permission to the file. We recommend against trying to import files from the desktop.
The full errors are:
Msg 7399, Level 16, State 1, Line 3
The OLE DB provider "Microsoft.ACE.OLEDB.12.0" for linked server "(null)" reported an error. The provider did not give any information about the error.
Msg 7303, Level 16, State 1, Line 3
Cannot initialize the data source object of OLE DB provider "Microsoft.ACE.OLEDB.12.0" for linked server "(null)".
Next steps
- Get started with this simple example of the Import and Export Wizard
- Import data from Excel or export data to Excel with SQL Server Integration Services (SSIS)
- bcp Utility
- Move data by using Copy Activity
![]() Для импорта данных Вам необходима консоль администратора MS SQL Server Managment Studio, которая является компонентой при установке экземпляра MS SQL Server.
Для импорта данных Вам необходима консоль администратора MS SQL Server Managment Studio, которая является компонентой при установке экземпляра MS SQL Server.
Рассмотрим самый простой способ загрузки — через средство экспорта/импорта данных из сторонних форматов. Наиболее распространенная необходимость — это загрузка из файла Excel (.xlsx, .xls).
Для того, чтобы загрузить данные в MS SQL Server из Excel необходимо:
- Открыть консоль MS SQL Server Managment Studio
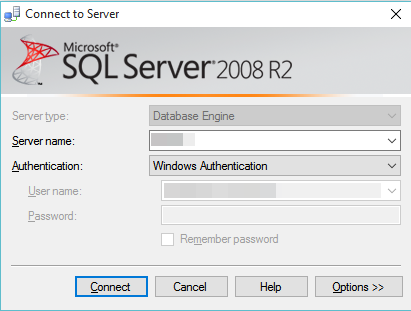
- Подключиться к серверу:
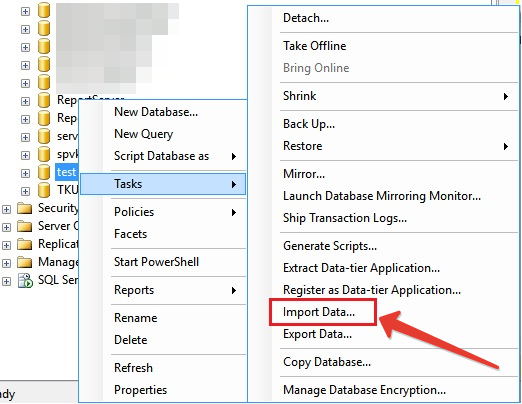
3. На БД, в которую будет производится загрузка данных, нажать правой кнопкой мыши и выбрать пункт Import Data
4. В появившемся окне SQL Server Import and Export Wizard нажать кнопку Next
5. В следующем окне необходимо в поле Data Source выбрать из списка значение Microsoft Excel, в поле Excel fale path указать путь к файлу Excel, в поле Excel version выбрать версию файла Excel (.xlsx — соответствует MS Excel 2007, .xls — более ранние версии Excel)
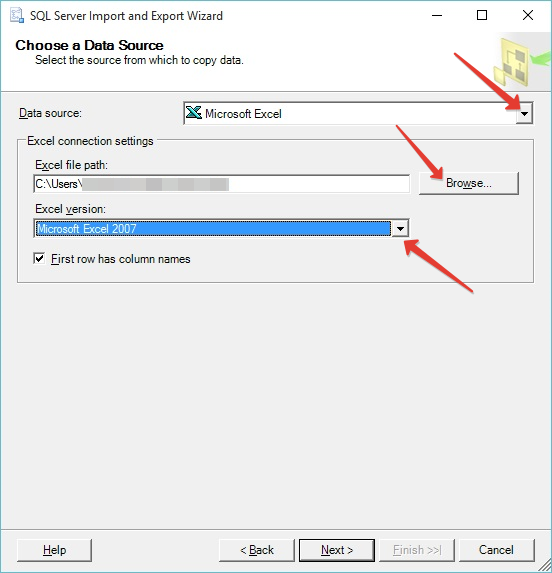
* Если в файле Excel таблица оформлена с шапкой (наименованием столбцов), то необходимо установить галку First row has column names.
Нажать на кнопку Next.
6. В следующем окне необходимо проверить доступа к экземпляру MS SQL Server и БД, в которую будут импортироваться данные
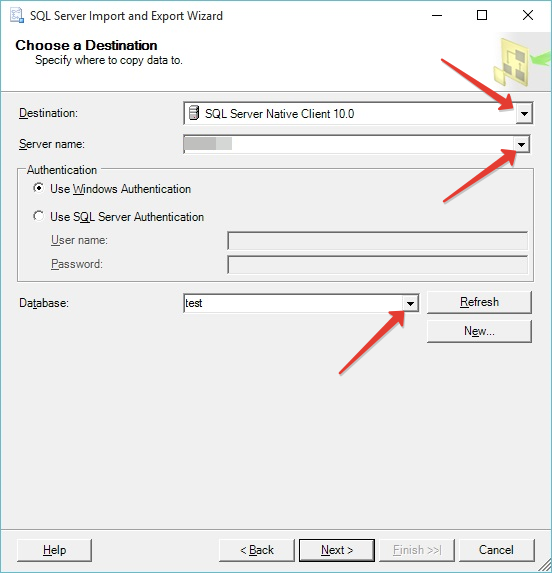
*Есть возможность создать новую БД с помощью кнопки New
Нажать на кнопку Next
7. В следующем окне необходимо выбрать пункт Copy data from one or more tables or views
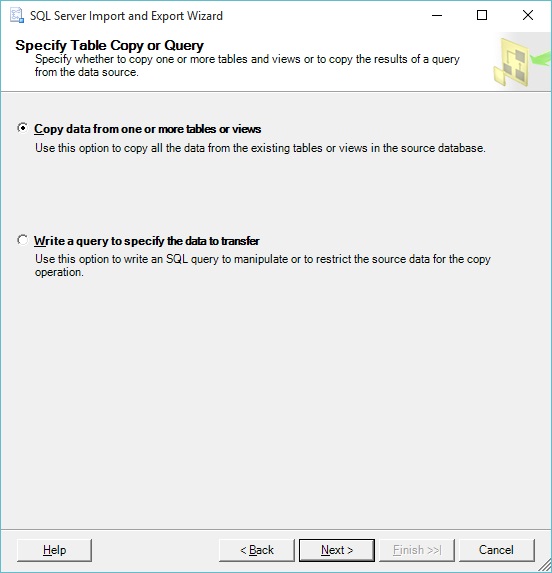
Нажмите кнопку Next
8. В следующем окне необходимо выбрать листы в файле Excel, которые вы хотите импортировать (загрузить). Например, Лист 1
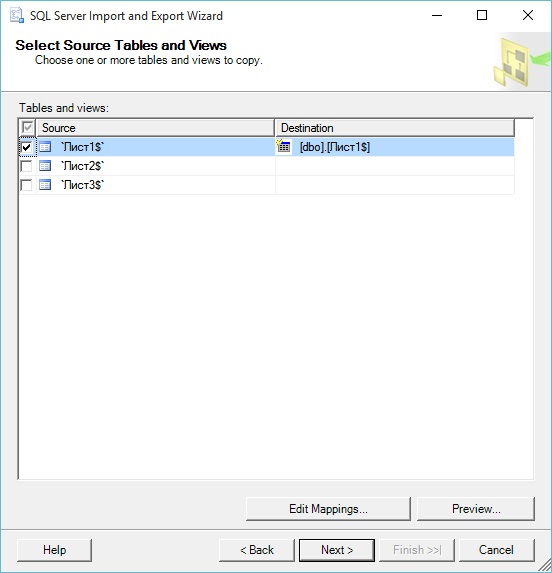
- Есть возможность предварительного просмотра результата загрузки (кнопка Preview)
Нажать на кнопку Next
9. В следующем окне нажмите кнопку Finish. В случае успешной обработки появится окно:

Нажмите на кнопку Close
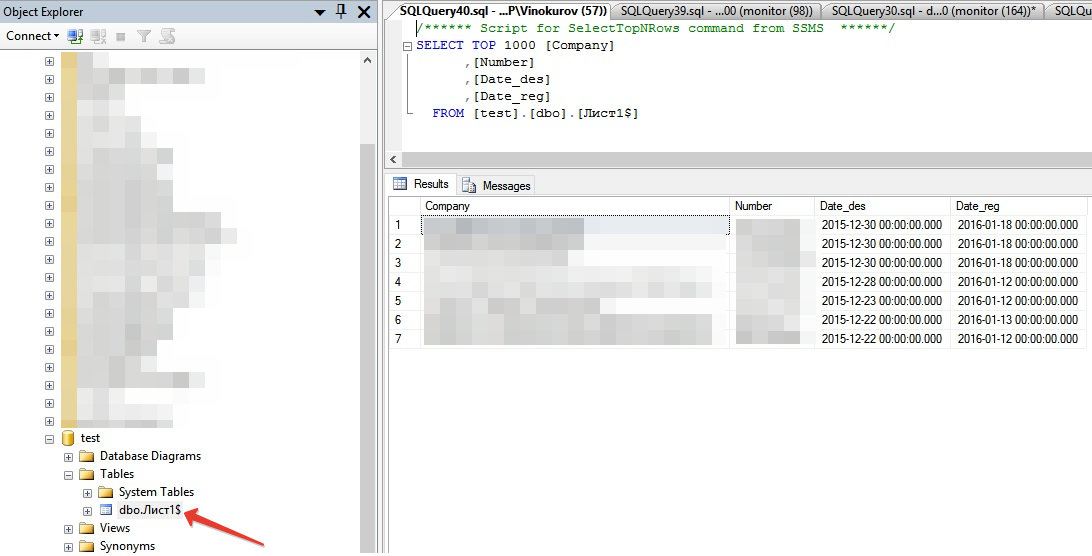
Теперь данные из таблицы Excel загружены в БД test MS SQL Server
Introduction
In this article, I am going to explain to you how to import Excel sheet data to SQL server database table with examples. Here we will be using SQL Server 2019 or you can use SQL Server 2008 or above. In my current project, I am using this concept for data migration.
This concept is used for transferring data from source (Excel sheet) to destination (SQL Server). We can import a bulk amount of excel data into SQL database without using any coding.
There are two ways to import data from excel to SQL Server database. First, if you want to import all excel file data with header names in a new table. Secondly, if you want to append excel data in exiting table data without header names.
Prerequisites
SQL Server 2019 or you can use SQL server 2008 or above version.
Read my previous articles, using the below links,
- How To Install SQL Server 2019
- How To Install SQL Server Management Studio 2019
- Getting Started With SQL Server 2019
Import All Excel Data With Header Names In a New Table
Step 1
Here, I have created a sample Excel data that contains employees detail data with six columns.
Step 2
Connect To SQL Server Management Studio 2019 (SSMS) and create a database
Open your SQL Server and use the following script to create the “chittadb” Database.
Create database chittadbNow, select the script query then press F5 or click on Execute button to execute the above script.
You should see a message, “Command(s) completed successfully.” Means your new database is created.
Database “Chittadb” created.
Step 3
Expand the database where you want to import the data. Here I want to import the data to “Chittadb” database. The database has no table now.
Right click your destination database ->Select Tasks -> Import Data
Step 4
An Import wizard pop up will open «Welcome to SQL Server Import and Export Wizard” and Click Next.
Step 5
- Now, Select Microsoft Excel as your data source from the dropdown list.
- Click the ‘Browse’ button to select the path to the Excel data file you want to import.
- Select the version of the excel file (2007-2010). Is usually fine for files with a .XLS extension, or use newer files with a .XLSX extension)
- Tick the ‘First Row has column names’ checkbox, if your excel file contains headers.
- Click next.
Step 6
On the ‘Choose a Destination’ Screen, select destination database” SQL Server Native Client 11.0” from the dropdown, select database “chittadb”, also you can use Windows Authentication or Use SQL Server Authentication; here I am using Windows Authentication and click Next.
Step 7
Select the Radio button “Copy data from one or more tables or views”.
This step will copy the data from the data source, click next and continue.
Step 8
We can specify the table name in the following wizard. So change the destination section name «[dbo].[Sheet1$]» as «[dbo].[Tbl_Employee]» and click Next.
If you want to preview your data, Click the preview button.
Step 9
Save and Run package. Check Run immediately from checkbox and Click Next or Finish button you can get Complete the Wizard page.
Step 10
Click finish.
Step 11
The execution was successful and Click Close button.
Step 12
Now, check database “Chittadb” and verify.
The following Output contains Id, EmpId, Name, Location, Gender and Designation as the column name and “Tbl_Employee” table also created under database “Chittadb”. Now all excel data is imported to “Tbl_Employee” table.
Conclusion
In this article, we learned how to Import Excel data into SQL Server 2019. Post your valuable feedback in the comments section. I hope this article will be useful.
I have developed an Excel VBA Macro for cutting and pasting any selection from Excel into SQL Server, creating a new table. The macro is great for quick and dirty table creations up to a few thousand rows and multiple columns (It can theoretically manage up to 200 columns). The macro attempts to automatically detect header names and assign the most appropriate datatype to each column (it handles varchar columns upto 1000 chars).
Recommended Setup procedure:
- Make sure Excel is enabled to run macros. (File->Options->Trust Center->Trust Center Settings->Macro Settings->Enable all macros..)
- Copy the VBA code below to the module associated with your personal workbook (So that the Macro will be available for all worksheets)
- Assign an appropriate keystroke to the macro ( I have assigned Ctrl Shift X)
- Save your personal workbook
Use of Macro
- Select the cells in Excel (including column headers if they exist) to be transferred to SQL
- Press the assigned keyword combination that you have assigned to run the macro
- Follow the prompts. (Default table name is ##Table)
- Paste the clipboard contents into a SSMS window and run the generated SQL code.
BriFri 238
VBA Code:
'------------------------------------------------------------------------------

Public Sub TransferToSQL()
' TransferToSQL Macro
'
' This macro prepares data for pasting into SQL Server and posts it to the clipboard for inserting into SSMS.
' It attempts to automatically detect header rows and does a basic analysis of the first 15 rows to determine
' the most appropriate datatype to use handling text entries up to 1000 chars.
'
'
' Use of Macro
'
' 1. Select the cells in Excel (including column headers if they exist) to be transferred to SQL
' 2. Press the assigned keyword combination that you have assigned to run the macro
' 3. Follow the prompts. (Default table name is ##Table)
' 4. Paste the clipboard contents into a SSMS window and run the generated SQL code.
'
' Max Number of Columns: 200
'
' Created by BriFri238 - https://stackoverflow.com/a/26219806/1898524
'
' Keyboard Shortcut: Ctrl+Shift+X
'
' ver   Date    Reason
' ===   ====    ======
' 1.7   07/2018 Added prompt for "Append to existing table?" so SELECT INTO is not used.
'               Added strInsertHeader to hold the list of columns which are used with the INSERT (field1, field2, ...)
'               to support IDENTITY_INSERT.
' 1.6   06/2012 Fixed bug that prevented auto exit if no selection made / auto exit if blank Tablename entered or 'cancel' button pressed
' 1.5   02/2012 made use of function fn_ColLetter to retrieve the Column Letter for a specified column
' 1.4   02/2012 Replaces any Tabs in text data to spaces to prevent Double quotes being output in final results
' 1.3   02/2012 Place the 'drop table if already exists' code into a separate batch to prevent errors when inserting new table with same name but different shape and > 100 rows
' 1.2   01/2012 If null dates encountered code to cast it as Null rather than '00-Jan-1900'
' 1.1   10/2011 Code to drop the table if already exists
' 1.0   03/2011 Created

    Dim intLastRow       As Long
    Dim intlastColumn    As Integer
    Dim intRow           As Long
    Dim intDataStartRow  As Long
    Dim intColumn        As Integer
    Dim strKeyWord       As String
    Dim intPos           As Integer
    Dim strDataTypeLevel(4) As String
    Dim strColumnHeader(200) As String
    Dim strDataType(200) As String
    Dim intRowCheck      As Integer
    Dim strFormula(20)   As String
    Dim intHasHeaderRow  As Integer
    Dim strCellRef       As String
    Dim intFormulaCount  As Integer
    Dim strSQLTableName  As String
    Dim strSQLTableName_Encap As String
    Dim intdataTypelevel As Integer
    Const strConstHeaderKeyword As String = "ID,URN,name,Title,Job,Company,Contact,Address,Post,Town,Email,Tele,phone,Area,Region,Business,Total,Month,Week,Year,"
    Const intConstMaxBatchSize As Integer = 100
    Const intConstNumberRowsToAnalyse As Integer = 100
    Dim strInsertHeader  As String
    Dim i                As Integer
    Dim bolAppendToSQLTable As Boolean    ' True if the table exists and you want to append to it.

    On Error GoTo ErrorHandler

    intHasHeaderRow = vbNo

    strDataTypeLevel(1) = "VARCHAR(1000)"
    strDataTypeLevel(2) = "FLOAT"
    strDataTypeLevel(3) = "INTEGER"
    strDataTypeLevel(4) = "DATETIME"

    ' Use current selection and paste to new temp worksheet

    Selection.Copy
    Workbooks.Add       ' add temp 'Working' Workbook
    ' Paste "Values Only" back into new temp workbook
    Range("A3").Select  ' Goto 3rd Row
    Selection.PasteSpecial Paste:=xlFormats, Operation:=xlNone, SkipBlanks:=False, Transpose:=False    ' Copy Format of Selection
    Selection.PasteSpecial Paste:=xlValues, Operation:=xlNone, SkipBlanks:=False, Transpose:=False  ' Copy Values of Selection
    ActiveCell.SpecialCells(xlLastCell).Select  ' Goto last cell
    intLastRow = ActiveCell.row
    intlastColumn = ActiveCell.Column


    ' Check to make sure that there are cells which are selected
    If intLastRow = 3 And intlastColumn = 1 Then
        Application.DisplayAlerts = False       ' Temporarily switch off Display Alerts
        ActiveWindow.Close                      ' Delete newly created worksheet
        Application.DisplayAlerts = True        ' Switch display alerts back on
        MsgBox "*** Please Make selection before running macro - Terminating ***", vbOKOnly, "Transfer Data to SQL Server"
        Exit Sub
    End If

    ' Prompt user for Name of SQL Server table
    strSQLTableName = InputBox("SQL Server Table Name?", "Transfer Excel Data To SQL", "##Table")

    ' if blank table name entered or 'Cancel' selected then exit
    If strSQLTableName = "" Then
        Application.DisplayAlerts = False       ' Temporarily switch off Display Alerts
        ActiveWindow.Close                      ' Delete newly created worksheet
        Application.DisplayAlerts = True        ' Switch display alerts back on
        Exit Sub
    End If

    Application.ScreenUpdating = False

    ' encapsulate tablename with square brackets if user has not already done so
    strSQLTableName_Encap = Replace(Replace(Replace("[" & Replace(strSQLTableName, ".", "].[") & "]", "[]", ""), "[[", "["), "]]", "]")

    ' Try to determine if the First Row is a header row or contains data and if a header load names of Columns
    Range("A3").Select
    For intColumn = 1 To intlastColumn
        ' first check to see if the first row contains any pure numbers or pure dates
        If IsNumeric(ActiveCell.Value) Or IsDate(ActiveCell.Value) Then
            intHasHeaderRow = vbNo
            intDataStartRow = 3
            Exit For
        Else
            strColumnHeader(intColumn) = ActiveCell.Value
            ActiveCell.Offset(1, 0).Range("A1").Select  ' go to the row below
            If IsNumeric(ActiveCell.Value) Or IsDate(ActiveCell.Value) Then
                intHasHeaderRow = vbYes
                intDataStartRow = 4
            End If
            ActiveCell.Offset(-1, 0).Range("A1").Select  ' go back up to the first row
            If intHasHeaderRow = vbNo Then     ' if still not determined if header exists: Look for header using keywords
                intPos = 1
                While intPos < Len(strConstHeaderKeyword) And intHasHeaderRow = vbNo
                    strKeyWord = Mid$(strConstHeaderKeyword, intPos, InStr(intPos, strConstHeaderKeyword, ",") - intPos)
                    If InStr(1, ActiveCell.Value, strKeyWord) > 0 Then
                        intHasHeaderRow = vbYes
                        intDataStartRow = 4
                    End If
                    intPos = InStr(intPos, strConstHeaderKeyword, ",") + 1
                Wend
            End If
        End If
        ActiveCell.Offset(0, 1).Range("A1").Select  ' Goto next column
    Next intColumn

    ' If auto header row detection has failed ask the user to manually select
    If intHasHeaderRow = vbNo Then
        intHasHeaderRow = MsgBox("Does current selection have a header row?", vbYesNo + vbQuestion, "Auto header row detection failure")
        If intHasHeaderRow = vbYes Then
            intDataStartRow = 4
        Else
            intDataStartRow = 3
        End If

    End If


    ' *** Determine the Data Type of each Column ***

    ' Go thru each Column to find Data types
    If intLastRow < intConstNumberRowsToAnalyse Then              ' Check the first intConstNumberRowsToAnalyse  rows or to end of selection whichever is less
        intRowCheck = intLastRow
    Else
        intRowCheck = intConstNumberRowsToAnalyse
    End If

    For intColumn = 1 To intlastColumn
        intdataTypelevel = 5

        For intRow = intDataStartRow To intRowCheck
            Application.GoTo Reference:="R" & CStr(intRow) & "C" & CStr(intColumn)
            If ActiveCell.Value = "" Then   ' ignore blank (null) values
            ElseIf IsDate(ActiveCell.Value) = True And Len(ActiveCell.Value) >= 8 Then
                If intdataTypelevel > 4 Then intdataTypelevel = 4
            ElseIf IsNumeric(ActiveCell.Value) = True And InStr(1, CStr(ActiveCell.Value), ".") = 0 And (Left(CStr(ActiveCell.Value), 1) <> "0" Or ActiveCell.Value = "0") And Len(ActiveCell.Value) < 10 Then
                If intdataTypelevel > 3 Then intdataTypelevel = 3
            ElseIf IsNumeric(ActiveCell.Value) = True And InStr(1, CStr(ActiveCell.Value), ".") >= 1 Then
                If intdataTypelevel > 2 Then intdataTypelevel = 2
            Else
                intdataTypelevel = 1
                Exit For
            End If
        Next intRow
        If intdataTypelevel = 5 Then intdataTypelevel = 1
        strDataType(intColumn) = strDataTypeLevel(intdataTypelevel)

        If intHasHeaderRow = vbYes Then
            ' Build a string of the column headings to be used by the INSERT (field1, field2, ...)
            strInsertHeader = strInsertHeader & ", [" & strColumnHeader(intColumn) & "]"
        End If
    Next intColumn
    If intHasHeaderRow = vbYes Then
        strInsertHeader = Mid(strInsertHeader, 3)    ' Remove prefix

        ' Ask user if they want to Append to an existing table or DROP and CREATE a new table.  BS 7/19/2018
        bolAppendToSQLTable = MsgBox("Do you want to APPEND to this table?", vbYesNo + vbQuestion, "Append to " & strSQLTableName) = vbYes
    End If

    ' *** Build up the SQL
    intFormulaCount = 1
    If intHasHeaderRow = vbYes Then     ' *** Header Row ***
        Application.GoTo Reference:="R4" & "C" & CStr(intlastColumn + 1)    ' Goto next column in first data row of selection
        strFormula(intFormulaCount) = "= ""SELECT "
        For intColumn = 1 To intlastColumn
            If strDataType(intColumn) = "DATETIME" Then         ' Code to take Excel Dates back to text
                strCellRef = "Text(" & fn_ColLetter(intColumn) & "4,""dd-mmm-yyyy hh:mm:ss"")"
            ElseIf strDataType(intColumn) = "VARCHAR(1000)" Then
                strCellRef = "SUBSTITUTE(" & fn_ColLetter(intColumn) & "4,""'"",""''"")"    ' Convert any single ' to double ''
            Else
                strCellRef = fn_ColLetter(intColumn) & "4"
            End If

            strFormula(intFormulaCount) = strFormula(intFormulaCount) & "CAST('""& " & strCellRef & " & ""' AS " & strDataType(intColumn) & ") AS [" & strColumnHeader(intColumn) & "]"
            If intColumn < intlastColumn Then
                strFormula(intFormulaCount) = strFormula(intFormulaCount) + ", "
            Else
                strFormula(intFormulaCount) = strFormula(intFormulaCount) + " UNION ALL """
            End If
            ' since each cell can only hold a maximum no. of chars if Formula string gets too big continue formula in adjacent cell
            If Len(strFormula(intFormulaCount)) > 700 And intColumn < intlastColumn Then
                strFormula(intFormulaCount) = strFormula(intFormulaCount) + """"
                intFormulaCount = intFormulaCount + 1
                strFormula(intFormulaCount) = "= """
            End If
        Next intColumn

        ' Assign the formula to the cell(s) just right of the selection
        For intColumn = 1 To intFormulaCount
            ActiveCell.Value = strFormula(intColumn)
            If intColumn < intFormulaCount Then ActiveCell.Offset(0, 1).Range("A1").Select  ' Goto next column
        Next intColumn

        ' Auto Fill the formula for the full length of the selection
        ActiveCell.Offset(0, -intFormulaCount + 1).Range("A1:" & fn_ColLetter(intFormulaCount) & "1").Select
        If intLastRow > 4 Then Selection.AutoFill Destination:=Range(fn_ColLetter(intlastColumn + 1) & "4:" & fn_ColLetter(intlastColumn + intFormulaCount) & CStr(intLastRow)), Type:=xlFillDefault

        ' Go to start row of data selection to add 'Select into' code

        If bolAppendToSQLTable = True Then
            ' When appending to an existing table, use this syntax
            ActiveCell.Value = "INSERT " & strSQLTableName_Encap & " ( " & strInsertHeader & " )" & " SELECT * FROM (" & ActiveCell.Value
            ActiveCell.Offset(-1, 0).Range("A1").Select  ' go to the row above
            ActiveCell.Value = "SET IDENTITY_INSERT " & strSQLTableName_Encap & " ON;"
            ActiveCell.Offset(-1, 0).Range("A1").Select  ' go to the row above
            ActiveCell.Value = "--BEGIN TRANSACTION;   COMMIT; SET IDENTITY_INSERT " & strSQLTableName_Encap & " OFF;"
        Else
            ' If creating a new table, use this syntax
            ActiveCell.Value = "SELECT * INTO " & strSQLTableName_Encap & " FROM (" & ActiveCell.Value

            ' Go to cells above data to insert code for deleting old table with the same name in separate SQL batch
            ActiveCell.Offset(-1, 0).Range("A1").Select  ' go to the row above
            ActiveCell.Value = "GO"
            ActiveCell.Offset(-1, 0).Range("A1").Select  ' go to the row above
            If Left(strSQLTableName, 1) = "#" Then      ' temp table
                ActiveCell.Value = "IF OBJECT_ID('tempdb.." & strSQLTableName & "') IS NOT NULL DROP TABLE " & strSQLTableName_Encap
            Else
                ActiveCell.Value = "IF OBJECT_ID('" & strSQLTableName & "') IS NOT NULL DROP TABLE " & strSQLTableName_Encap
            End If
        End If
        ' For Big selections (i.e. several 100 or 1000 rows) SQL Server takes a very long time to do a multiple union - Split up the table creation into many inserts
        intRow = intConstMaxBatchSize + 4   ' add 4 to make sure 1st batch = Max Batch Size
        While intRow < intLastRow
            Application.GoTo Reference:="R" & CStr(intRow - 1) & "C" & CStr(intlastColumn + intFormulaCount)  ' Goto Row before intRow and the last column in formula selection
            ActiveCell.Value = Replace(ActiveCell.Value, " UNION ALL ", " ) a")    ' Remove last 'UNION ALL'

            Application.GoTo Reference:="R" & CStr(intRow) & "C" & CStr(intlastColumn + 1)    ' Goto intRow and the first column in formula selection

            ' BS 7/19/2018:  Updated to include the list of fields so that IDENTITY_INSERT can be used.
            ActiveCell.Value = "INSERT " & strSQLTableName_Encap & " ( " & strInsertHeader & " )" & " SELECT * FROM (" & ActiveCell.Value
            ' ActiveCell.Value = "INSERT " & strSQLTableName_Encap & " SELECT * FROM (" & ActiveCell.Value

            intRow = intRow + intConstMaxBatchSize   ' increment intRow by intConstMaxBatchSize
        Wend

        ' Delete the last 'UNION AlL' replacing it with brackets to mark the end of the last insert
        Application.GoTo Reference:="R" & CStr(intLastRow) & "C" & CStr(intlastColumn + intFormulaCount)
        ActiveCell.Value = Replace(ActiveCell.Value, " UNION ALL ", " ) a")

        ' Select all the formula cells
        ActiveCell.Offset(-intLastRow + 2, 1 - intFormulaCount).Range("A1:" & fn_ColLetter(intFormulaCount + 1) & CStr(intLastRow - 1)).Select

    Else    ' *** No Header Row ***
        Application.GoTo Reference:="R3" & "C" & CStr(intlastColumn + 1)    ' Goto next column in first data row of selection
        strFormula(intFormulaCount) = "= ""SELECT "

        For intColumn = 1 To intlastColumn
            If strDataType(intColumn) = "DATETIME" Then
                strCellRef = "Text(" & fn_ColLetter(intColumn) & "3,""dd-mmm-yyyy hh:mm:ss"")"   ' Format Excel dates into a text Date format that SQL will pick up
            ElseIf strDataType(intColumn) = "VARCHAR(1000)" Then
                strCellRef = "SUBSTITUTE(" & fn_ColLetter(intColumn) & "3,""'"",""''"")"         ' Change all single ' to double ''
            Else
                strCellRef = fn_ColLetter(intColumn) & "3"
            End If

            ' Since no column headers: Name each column "Column001",Column002"..
            strFormula(intFormulaCount) = strFormula(intFormulaCount) & "CAST('""& " & strCellRef & " & ""' AS " & strDataType(intColumn) & ") AS [Column" & CStr(intColumn) & "]"
            If intColumn < intlastColumn Then
                strFormula(intFormulaCount) = strFormula(intFormulaCount) + ", "
            Else
                strFormula(intFormulaCount) = strFormula(intFormulaCount) + " UNION ALL """
            End If

            ' since each cell can only hold a maximum no. of chars if Formula string gets too big continue formula in adjacent cell
            If Len(strFormula(intFormulaCount)) > 700 And intColumn < intlastColumn Then
                strFormula(intFormulaCount) = strFormula(intFormulaCount) + """"
                intFormulaCount = intFormulaCount + 1
                strFormula(intFormulaCount) = "= """
            End If
        Next intColumn

        ' Assign the formula to the cell(s) just right of the selection
        For intColumn = 1 To intFormulaCount
            ActiveCell.Value = strFormula(intColumn)
            If intColumn < intFormulaCount Then ActiveCell.Offset(0, 1).Range("A1").Select  ' Goto next column
        Next intColumn

        ' Auto Fill the formula for the full length of the selection
        ActiveCell.Offset(0, -intFormulaCount + 1).Range("A1:" & fn_ColLetter(intFormulaCount) & "1").Select
        If intLastRow > 4 Then Selection.AutoFill Destination:=Range(fn_ColLetter(intlastColumn + 1) & "3:" & fn_ColLetter(intlastColumn + intFormulaCount) & CStr(intLastRow)), Type:=xlFillDefault

        ' Go to start row of data selection to add 'Select into' code
        ActiveCell.Value = "SELECT * INTO " & strSQLTableName_Encap & " FROM (" & ActiveCell.Value

        ' Go to cells above data to insert code for deleting old table with the same name in separate SQL batch
        ActiveCell.Offset(-1, 0).Range("A1").Select  ' go to the row above
        ActiveCell.Value = "GO"
        ActiveCell.Offset(-1, 0).Range("A1").Select  ' go to the row above
        If Left(strSQLTableName, 1) = "#" Then      ' temp table
            ActiveCell.Value = "IF OBJECT_ID('tempdb.." & strSQLTableName & "') IS NOT NULL DROP TABLE " & strSQLTableName_Encap
        Else
            ActiveCell.Value = "IF OBJECT_ID('" & strSQLTableName & "') IS NOT NULL DROP TABLE " & strSQLTableName_Encap
        End If

        ' For Big selections (i.e. serveral 100 or 1000 rows) SQL Server takes a very long time to do a multiple union - Split up the table creation into many inserts
        intRow = intConstMaxBatchSize + 3        ' add 3 to make sure 1st batch = Max Batch Size
        While intRow < intLastRow
            Application.GoTo Reference:="R" & CStr(intRow - 1) & "C" & CStr(intlastColumn + intFormulaCount)  ' Goto Row before intRow and the last column in formula selection
            ActiveCell.Value = Replace(ActiveCell.Value, " UNION ALL ", " ) a")    ' Remove last 'UNION ALL'

            Application.GoTo Reference:="R" & CStr(intRow) & "C" & CStr(intlastColumn + 1)    ' Goto intRow and the first column in formula selection
            ActiveCell.Value = "INSERT " & strSQLTableName_Encap & " SELECT * FROM (" & ActiveCell.Value
            intRow = intRow + intConstMaxBatchSize   ' increment intRow by intConstMaxBatchSize
        Wend

        ' Delete the last 'UNION AlL'
        Application.GoTo Reference:="R" & CStr(intLastRow) & "C" & CStr(intlastColumn + intFormulaCount)
        ActiveCell.Value = Replace(ActiveCell.Value, " UNION ALL ", " ) a")

        ' Select all the formula cells
        ActiveCell.Offset(-intLastRow + 1, 1 - intFormulaCount).Range("A1:" & fn_ColLetter(intFormulaCount + 1) & CStr(intLastRow)).Select
    End If


    ' Final Selection to clipboard and Cleaning of data
    Selection.Copy
    Selection.PasteSpecial Paste:=xlValues, Operation:=xlNone, SkipBlanks:=False, Transpose:=False              ' Repaste "Values Only" back into cells
    Selection.Replace What:="CAST('' AS", Replacement:="CAST(NULL AS", LookAt:=xlPart, SearchOrder:=xlByRows, MatchCase:=False  ' convert all blank cells to NULL
    Selection.Replace What:="'00-Jan-1900 00:00:00'", Replacement:="NULL", LookAt:=xlPart, SearchOrder:=xlByRows, MatchCase:=False  ' convert all blank Date cells to NULL
    Selection.Replace What:="'NULL'", Replacement:="NULL", LookAt:=xlPart, SearchOrder:=xlByRows, MatchCase:=False  ' convert all 'NULL' cells to NULL
    Selection.Replace What:=vbTab, Replacement:=" ", LookAt:=xlPart, SearchOrder:=xlByRows, MatchCase:=False        ' Replace all Tabs in cells to Space to prevent Double Quotes occuring in the final paste text
    Selection.Copy

    Application.GoTo Reference:="R1" & "C" & CStr(intlastColumn + 1), Scroll:=True    ' Goto next column in first data row of selection

    Application.ScreenUpdating = True

    If MsgBox("SQL Code has been added to clipboard - Please Paste into SSMS window." _
              & vbCrLf & vbCrLf & "Do you want to close this temporary sheet?", vbYesNo + vbQuestion, "Transfer to SQL") = vbYes Then

        Application.DisplayAlerts = False       ' Temporarily switch off Display Alerts
        ActiveWindow.Close                      ' Delete newly created worksheet
        Application.DisplayAlerts = True        ' Switch display alerts back on
    End If

Exit_Sub:
    Application.DisplayAlerts = True
    Application.ScreenUpdating = True
    Exit Sub

ErrorHandler:
    MsgBox "Error #" & Err.Number & " - " & Err.Description & vbCrLf & "in procedure TransferToSQL of basMisc"
    GoTo Exit_Sub
    Resume Next
    Resume

End Sub


Function fn_ColLetter(Col As Integer) As String

Dim strColLetter As String

If Col > 26 Then
    ' double letter columns
    strColLetter = Chr(Int((Col - 1) / 26) + 64) & _
        Chr(((Col - 1) Mod 26) + 65)
Else
    ' single letter columns
    strColLetter = Chr(Col + 64)
End If
fn_ColLetter = strColLetter
End Function
Table of Contents
- Introduction
- Building the Environment for Testing
- Creating an Excel File to test
- Installing the necessary components in Windows Server
- Enabling SQL Server Instance to Read File
- Querying and Importing the Spreadsheet
- Conclusion
- References
- See Also
- Other Languages
Introduction
We often have to perform data integration in SQL Server, with different data sources such as «.txt» files (tabular text or with separator character), «.csv» files or «.xls» (Excel) files.
It is always not possible to create a SSIS package to do this data import, a useful alternative is to use OPENROWSET method for importing data.
In this article, we will use data import from Excel files (.xls e .xlsx).
Building the Environment for Testing
So that we see the data import process steps from an Excel file to a table from database, we need:
- Create an Excel file to import sample;
- Configure Windows Server, installing the necessary components;
- Configure the necessary permissions to the SQL instance that we need to obtain data files.
Let’s prepare environment for data import!
Creating an Excel File to test
In this step, we will create an Excel file sample with just a few rows to demo.
Add a header row, to explicitly define the data: «ID», «Item Name» and «Date Created».
The data sequences is only to facilitate the visualization of the content that is being manipulated.
See this Excel file in the image below (click to enlarge)

Installing the necessary components in Windows Server
To get the data through a query inside SQL Server, use an OLE DB Data Provider.
Most files can now use the
Microsoft.ACE.OLEDB.12.0 Data Provider that can be obtained free through Data Connectivity Components.
This package will provide all ODBC and OLEDB drivers for data manipulation, as follow below:
| File Type (extension) | Extended Properties |
| Excel 97-2003 Workbook (.xls) | Excel 8.0 |
| Excel 2007-2010 Workbook (.xlsx) | Excel 12.0 XML |
| Excel 2007-2010 Macro-enabled workbook (.xlsm) | Excel 12.0 Macro |
| Excel 2007-2010 Non-XML binary workbook (.xlsb) | Excel 12.0 |
There are two versions of this package: «AccessDatabaseEngine.exe» for x86 platform and other «AccessDatabaseEngine_x64.exe» for x64 platform.
The minimum system requirements for this installation can be obtained in the same
download package page.
If you are installing the x86 package you must ensure that your user is allowed access to the Temporary directory of your Windows OS.
To know what your Temporary directory open the «Control Panel», click «Advanced System Settings» option. A window will open, select the «Advanced» tab and click the «Environment Variables» button.
A new window will open with your environment variables, including «TEMP» and «TMP» variables, indicating your Temporary directory.
See this windows in the image below (click to enlarge)

So if your operating system is Windows 32-bit (x86) is necessary to include read and write access to the user of your SQL Server instance.
It’s important to remember that the user of your SQL Server instance must be a local user or the default «Local System» account to grant this access.
See this window Service Properties in the image below

Enabling SQL Server Instance to Read File
The settings and permissions to execute a query external data has some details that should be performed to be able to get the data from an Excel files (.xls ou .xlsx) and also other formats.
The execution of distributed queries as OPENROWSET is only possible when the SQL Server instance has the
Ad Hoc Distributed Queries configuration enabled. By default, every SQL Server instance maintains this permission denied.
 Note Note |
|---|
|
The Advanced Settings should only be changed by an experienced professional or a certified professional in SQL Server. It’s important to note not use these commands in Production Databases without previous analysis. |
To enable this feature just use the sp_configure system stored procedure in your SQL instance to display its Advanced Settings in
show advanced options parameter and soon to follow, enable the Ad Hoc Distributed Queries setting to enabling the use of distributed queries.
USE [master]
GO
—CONFIGURING SQL INSTANCE TO ACCEPT ADVANCED OPTIONS
EXEC
sp_configure ‘show advanced options’, 1
RECONFIGURE
GO
—ENABLING USE OF DISTRIBUTED QUERIES
EXEC
sp_configure ‘Ad Hoc Distributed Queries’, 1
RECONFIGURE
GO
These changes in the Advanced settings only take effect after the execution of the RECONFIGURE command.
To get permission granted to use the Data Provider through sp_MSset_oledb_prop system stored procedure to link Microsoft.ACE.OLEDB.12.0 in
SQL Server using AllowInProcess parameter so we can use the resources of the Data Provider and also allow the use of dynamic parameters in queries through of
DynamicParameters parameter for our queries can use T-SQL clauses.
USE [master]
GO
—ADD DRIVERS IN SQL INSTANCE
EXEC
master.dbo.sp_MSset_oledb_prop
N’Microsoft.ACE.OLEDB.12.0′,
N’AllowInProcess’, 1
GO
EXEC
master.dbo.sp_MSset_oledb_prop
N’Microsoft.ACE.OLEDB.12.0′,
N’DynamicParameters’, 1
GO
See
this output SQL script in the image below

After setting up your SQL instance to use the
Microsoft.ACE.OLEDB.12.0 Data Provider and make the appropriate access permissions, we can implement the distributed queries of other data sources,
in this case to Excel files.
Querying and Importing the Spreadsheet
As this demo is for Excel files (.xls) we will perform a query using an OPENROWSET method with the Excel test file that was created earlier in this article.
We use some parameters for this method to be able to data query:
- Data Provider — In this case, using Microsoft.ACE.OLEDB.12.0
- BULK Options — File Version;Where it’s stored; Header (HDR); Import Mode (IMEX)
- Query —
T-SQL statement with or without clauses to data filter and process.
—CONSULTING A SPREADSHEET
SELECT
* FROM
OPENROWSET(‘Microsoft.ACE.OLEDB.12.0’,
‘Excel 12.0; Database=C:MicrosoftTest.xls; HDR=YES; IMEX=1’,
‘SELECT * FROM [Plan1$]’)
GO
See
this output SQL script in the image below

To data group and perform other tasks for data manipulation, the ideal is always load the data into the database. You can insert data into an existing table using the INSERT statement or you can create a table through of INTO command in SELECT statement.
—CONSULTING A SPREADSHEET
SELECT *
INTO
TB_EXAMPLE
FROM OPENROWSET(‘Microsoft.ACE.OLEDB.12.0’,
‘Excel 12.0; Database=C:MicrosoftTest.xls; HDR=YES; IMEX=1’,
‘SELECT * FROM [Plan1$]’)
GO
SELECT * FROM TB_EXAMPLE
GO
See
this output SQL script in the image below

It’s also important to check if the SQL Server Service user has access in Windows directory where Excel files
are stored.
Conclusion
Have the possibility to use an alternative resource for importing data with T-SQL command is very useful, especially when we have to manipulate files in proprietary formats, as for .xlsx files where it’s necessary to use the Data Provider appropriate to obtain
the data correctly and with ease use.
It’s important to watch out that only users that have actually need to manipulate these files can use these resources, while minimizing the vulnerability of their environment through a permission in your SQL Server.
References
- OPENROWSET (Transact-SQL)
- Import Bulk Data by Using BULK INSERT or OPENROWSET(BULK…) (SQL Server)
- OLE DB Providers Tested with SQL Server
- Excel Source
See Also
- Transact-SQL Portal
- Wiki: Portal of TechNet Wiki Portals
Other Languages
- Importando uma planilha Excel para um Banco de Dados SQL Server (pt-BR)
This article was awarded the silver medal in the TechNet
Guru of April 2014
Microsoft SQL Server позволяет встроенными средствами языка T-SQL в SQL запросе импортировать данные из файла Excel в базу данных. Сегодня я подробно расскажу, как это делается, какие условия необходимо выполнить, чтобы эта операция проходила успешно, расскажу про особенности импорта для самых распространённых случаев конфигураций SQL сервера и приведу конкретный порядок действий и практические примеры.

Начну я с того, что импортировать данные из Excel в Microsoft SQL Server можно с помощью «Распределенных запросов» и с помощью «Связанных серверов». Это, скорей всего, Вы уже знаете, так как я уже не раз писал об этом (ссылки на соответствующие материалы указаны чуть выше).
Обратиться к файлу Excel и импортировать данные в Microsoft SQL Server можно с помощью T-SQL инструкций OPENDATASOURCE, OPENROWSET или OPENQUERY.
Однако в вышеупомянутых статьях я упустил несколько важных моментов, одним из которых является то, что у всех конфигурация SQL сервера разная, за счет чего у многих возникают различные проблемы и появляются ошибки во время выполнения распределенных запросов и обращений к связанным серверам. Также я описывал способ загрузки данных из Excel, который на сегодняшний день уже устарел, поэтому сегодня я постараюсь дать Вам немного больше информации о том, как импортировать данные из файла Excel в Microsoft SQL Server на языке T-SQL.
Содержание
- Введение
- Импорт данных из Excel 2003 (файл xls) в Microsoft SQL Server x86
- Шаг 1 – Проверяем наличие провайдера Microsoft.Jet.OLEDB.4.0 на SQL Server
- Шаг 2 – Предоставление прав пользователю на временный каталог
- Шаг 3 – Включаем распределенные запросы на SQL Server
- Шаг 4 – Выполняем SQL запрос, обращение к файлу Excel
- Импорт данных из Excel 2007 и выше (файл xlsx) в Microsoft SQL Server x86
- Шаг 1 – Проверяем наличие провайдера Microsoft.ACE.OLEDB.12.0 на SQL Server
- Шаг 2 – Установка провайдера Microsoft.ACE.OLEDB.12.0 (32-bit)
- Шаг 3 – Предоставление прав пользователю на временный каталог
- Шаг 4 – Включаем распределенные запросы на SQL Server
- Шаг 5 – Настройка провайдера Microsoft.ACE.OLEDB.12.0
- Шаг 6 – Выполняем SQL запрос, обращение к файлу Excel
- Импорт данных из Excel (любые файлы) в Microsoft SQL Server x64
- Шаг 1 – Проверяем наличие провайдера Microsoft.ACE.OLEDB.12.0 на SQL Server
- Шаг 2 – Установка провайдера Microsoft.ACE.OLEDB.12.0 (64-bit)
- Шаг 3 – Включаем распределенные запросы на SQL Server
- Шаг 4 – Настройка провайдера Microsoft.ACE.OLEDB.12.0
- Шаг 5 – Выполняем SQL запрос, обращение к файлу Excel
- Подведение итогов
Введение
Итак, как я уже сказал, очень важную роль здесь играет конфигурация SQL сервера, в частности, какая версия сервера установлена, x86 или x64.
Если говорить о последних версиях Microsoft SQL Server 2016-2019, то они только x64 и устанавливаются на 64-разрядные версии Windows.
Исходя из этого я разделю статью на несколько частей, в каждой из которых я расскажу про особенности импорта данных из Excel для самых распространённых случаев конфигураций и приведу конкретный порядок действий.
Для того чтобы быстро узнать, какая версия SQL Server установлена у Вас на компьютере, можете выполнить простой SQL запрос
SELECT @@VERSION;
Обращение к файлу Excel и, соответственно, импорт данных в Microsoft SQL Server происходит с помощью специальных провайдеров (поставщиков). Для работы с Excel в Microsoft SQL Server обычно используются:
- Jet.OLEDB.4.0
- ACE.OLEDB.12.0
Во всех примерах ниже я буду посылать простой запрос SELECT на выборку данных из Excel файла, для того чтобы проверить доступ к данным в файле Excel. Чтобы осуществить импорт данных (загрузить данные в БД), Вы можете использовать любой удобный для Вас способ, например, конструкцию SELECT INTO или INSERT INTO.
Дополнительно рекомендовано закрывать файл Excel во время обращения к нему в распределенных запросах, а также указывать путь к файлу без пробелов (хотя современный SQL сервер умеет работать с пробелами).
Импорт данных из Excel 2003 (файл xls) в Microsoft SQL Server x86
Шаг 1 – Проверяем наличие провайдера Microsoft.Jet.OLEDB.4.0 на SQL Server
Первое, с чего нам нужно начать, это проверить, зарегистрирован ли провайдер Microsoft.Jet.OLEDB.4.0 на SQL Server, так как в данном случае необходимо использовать именно этот провайдер. Это можно сделать с помощью следующей SQL инструкции
EXEC sp_enum_oledb_providers;
В результирующем наборе данных должна присутствовать строка с Microsoft.Jet.OLEDB.4.0. Если такого провайдера нет, то скорей всего в системе нет установленного Excel 2003 и, соответственно, его нужно установить.
Шаг 2 – Предоставление прав пользователю на временный каталог
Особенностью распределённых запросов и работы со связанным серверами Excel в x86 версиях SQL Server является то, что независимо от имени какой учетной записи посылается SQL запрос к Excel, эта учетная запись должна иметь права на запись во временный каталог той учетной записи, под которой работает сама служба SQL Server.Так как поставщик OLE DB создает временный файл во время запроса во временном каталоге SQL Server, используя учетные данные пользователя, выполняющего запрос.
Таким образом, если служба SQL Server работает от имени или локальной, или сетевой службы, необходимо дать соответствующие права на временный каталог этих служб всем пользователям, которые будут посылать распределенные запросы и обращаться к связанному серверу Excel (если сервер работает от имени пользователя, который посылает SQL запросы, то такие права давать не требуется, они у него уже есть).
Это можно сделать с помощью встроенной утилиты командной строки icacls.
Например, для локальной службы команда будет выглядеть следующим образом.
icacls C:WindowsServiceProfilesLocalServiceAppDataLocalTemp /grant UserName:(R,W)
Для сетевой службы
icacls C:WindowsServiceProfilesNetworkServiceAppDataLocalTemp /grant UserName:(R,W)
Вместо UserName укажите имя пользователя, который посылает запрос.
Шаг 3 – Включаем распределенные запросы на SQL Server
По умолчанию возможность использования распределённых запросов, в частности функций OPENDATASOURCE и OPENROWSET, в Microsoft SQL Server запрещена, поэтому данную возможность нужно сначала включить.
Она включается с помощью системной хранимой процедуры sp_configure, которая отвечает за системные параметры сервера. Нам необходимо параметру Ad Hoc Distributed Queries присвоить значение 1, для этого выполняем следующую SQL инструкцию.
   sp_configure 'show advanced options', 1;
   RECONFIGURE;
   GO
   sp_configure 'Ad Hoc Distributed Queries', 1;
   RECONFIGURE;
   GO
Шаг 4 – Выполняем SQL запрос, обращение к файлу Excel
Ниже я приведу несколько вариантов обращения к файлу Excel (TestExcel.xls).
OPENROWSET
   SELECT * FROM OPENROWSET
   (
    'Microsoft.Jet.OLEDB.4.0',
    'Excel 8.0; Database=D:TestExcel.xls',
    'SELECT * FROM [Лист1$]'
   );
OPENDATASOURCE
   SELECT * FROM OPENDATASOURCE('Microsoft.Jet.OLEDB.4.0',
                                'Data Source=D:TestExcel.xls;
                                 Extended Properties=Excel 8.0')...[Лист1$];
Linked Server
   --Создание связанного сервера
   EXEC sp_addlinkedserver @server = 'TEST_EXCEL',
                           @srvproduct = 'Excel',
                           @provider = 'Microsoft.Jet.OLEDB.4.0',
                           @datasrc = 'D:TestExcel.xls',
                           @provstr = 'Excel 8.0;IMEX=1;HDR=YES;';

   --Настройки безопасности (авторизации)
   EXEC dbo.sp_addlinkedsrvlogin @rmtsrvname='TEST_EXCEL',
                                 @useself= 'False',
                                 @locallogin=NULL,
                                 @rmtuser=NULL,
                                 @rmtpassword=NULL;

   --Обращение к связанному серверу
   SELECT * FROM OPENQUERY (TEST_EXCEL, 'SELECT * FROM [Лист1$]');
   --или
   SELECT * FROM TEST_EXCEL...[Лист1$];
Импорт данных из Excel 2007 и выше (файл xlsx) в Microsoft SQL Server x86
Шаг 1 – Проверяем наличие провайдера Microsoft.ACE.OLEDB.12.0 на SQL Server
Точно так же, как и в предыдущем примере, сначала проверяем, установлен ли у нас необходимый нам провайдер, в данном случае нам нужен Microsoft.ACE.OLEDB.12.0.
EXEC sp_enum_oledb_providers;
Шаг 2 – Установка провайдера Microsoft.ACE.OLEDB.12.0 (32-bit)
Если провайдера нет, то его необходимо установить.
Вот ссылка на скачивание провайдера

https://www.microsoft.com/en-us/download/details.aspx?id=13255
Выберите и скачайте файл, соответствующий архитектуре x86 (т.е. в названии без x64).
Шаг 3 – Предоставление прав пользователю на временный каталог
В данном случае также даем права на временный каталог локальной или сетевой службы всем пользователям, которые будут посылать SQL запросы к файлу Excel.
Используем все ту же утилиту командной строки icacls.
Для локальной службы
icacls C:WindowsServiceProfilesLocalServiceAppDataLocalTemp /grant UserName:(R,W)
Для сетевой службы
icacls C:WindowsServiceProfilesNetworkServiceAppDataLocalTemp /grant UserName:(R,W)
Вместо UserName укажите имя пользователя, который посылает запрос.
Шаг 4 – Включаем распределенные запросы на SQL Server
Включаем возможность использования OPENDATASOURCE и OPENROWSET на Microsoft SQL Server, повторюсь, что по умолчанию данная возможность отключена.
   sp_configure 'show advanced options', 1;
   RECONFIGURE;
   GO
   sp_configure 'Ad Hoc Distributed Queries', 1;
   RECONFIGURE;
   GO
Шаг 5 – Настройка провайдера Microsoft.ACE.OLEDB.12.0
В данном случае дополнительно потребуется настроить провайдер Microsoft.ACE.OLEDB.12.0. Для этого включим следующие параметры провайдера (для отключения укажите 0 вместо 1).
   EXEC sp_MSset_oledb_prop N'Microsoft.ACE.OLEDB.12.0', N'AllowInProcess', 1
   GO
   EXEC sp_MSset_oledb_prop N'Microsoft.ACE.OLEDB.12.0', N'DynamicParameters', 1
   GO
Если не включать данные параметры, то, скорей всего, появится ошибка примерно следующего содержания
«Сообщение 7399, уровень 16, состояние 1, строка 25
Поставщик OLE DB «Microsoft.ACE.OLEDB.12.0» для связанного сервера «(null)» сообщил об ошибке. Поставщик не предоставил данных об ошибке.
Сообщение 7330, уровень 16, состояние 2, строка 25
Не удалось получить строку от поставщика OLE DB «Microsoft.ACE.OLEDB.12.0» для связанного сервера «(null)».»
Шаг 6 – Выполняем SQL запрос, обращение к файлу Excel
Примеры обращения к файлу Excel (TestExcel.xlsx).
OPENROWSET
   SELECT * FROM OPENROWSET
   (
    'Microsoft.ACE.OLEDB.12.0',
    'Excel 12.0;
     Database=D:TestExcel.xlsx',
     'SELECT * FROM [Лист1$]'
   );
OPENDATASOURCE
   SELECT * FROM OPENDATASOURCE('Microsoft.ACE.OLEDB.12.0',
                                'Data Source=D:TestExcel.xlsx;
                                 Extended Properties=Excel 12.0')...[Лист1$];
Linked Server
   --Создание связанного сервера
   EXEC sp_addlinkedserver @server = 'TEST_EXCEL',
                           @srvproduct = 'Excel',
                           @provider = 'Microsoft.ACE.OLEDB.12.0',
                           @datasrc = 'D:TestExcel.xlsx',
                           @provstr = 'Excel 12.0;IMEX=1;HDR=YES;';

   --Настройки безопасности (авторизации)
   EXEC dbo.sp_addlinkedsrvlogin @rmtsrvname='TEST_EXCEL',
                                 @useself= 'False',
                                 @locallogin=NULL,
                                 @rmtuser=NULL,
                                 @rmtpassword=NULL;

   --Обращение к связанному серверу
   SELECT * FROM OPENQUERY (TEST_EXCEL, 'SELECT * FROM [Лист1$]');
   --или
   SELECT * FROM TEST_EXCEL...[Лист1$];
Шаг 1 – Проверяем наличие провайдера Microsoft.ACE.OLEDB.12.0 на SQL Server
В данном случае мы также используем провайдер Microsoft.ACE.OLEDB.12.0, сначала проверяем, зарегистрирован ли он на сервере.
EXEC sp_enum_oledb_providers;
Шаг 2 – Установка провайдера Microsoft.ACE.OLEDB.12.0 (64-bit)
В случае, если провайдер не установлен, его необходимо скачать и установить.
https://www.microsoft.com/en-us/download/details.aspx?id=13255
Скачиваем файл x64.
Шаг 3 – Включаем распределенные запросы на SQL Server
Необходимость включения возможности использования распределенных запросов (OPENDATASOURCE и OPENROWSET) на Microsoft SQL Server x64 также есть, поэтому сначала включаем ее, выполнив точно такую же инструкцию.
   sp_configure 'show advanced options', 1;
   RECONFIGURE;
   GO
   sp_configure 'Ad Hoc Distributed Queries', 1;
   RECONFIGURE;

GO
Шаг 4 – Настройка провайдера Microsoft.ACE.OLEDB.12.0
В этом случае, скорей всего, настройка провайдера не потребуется, поэтому сначала сразу пробуем выполнить SQL запросы (обратиться к данным в Excel), и если возникает ошибка (все с тем же сообщением 7399 и 7330), то пробуем включить параметры AllowInProcess и DynamicParameters (для отключения укажите 0 вместо 1).
   EXEC sp_MSset_oledb_prop N'Microsoft.ACE.OLEDB.12.0', N'AllowInProcess', 1
   GO
   EXEC sp_MSset_oledb_prop N'Microsoft.ACE.OLEDB.12.0', N'DynamicParameters', 1
   GO
Шаг 5 – Выполняем SQL запрос, обращение к файлу Excel
Здесь используются точно такие же параметры в SQL запросах, что и в предыдущем примере. Для удобства продублирую их еще раз.
Примеры обращения к файлу Excel (TestExcel.xlsx).
OPENROWSET
   SELECT * FROM OPENROWSET
   (
    'Microsoft.ACE.OLEDB.12.0',
    'Excel 12.0;
     Database=D:TestExcel.xlsx',
    'SELECT * FROM [Лист1$]'
   );
OPENDATASOURCE
   SELECT * FROM OPENDATASOURCE('Microsoft.ACE.OLEDB.12.0',
                                'Data Source=D:TestExcel.xlsx;
                                 Extended Properties=Excel 12.0')...[Лист1$];
Linked Server
   --Создание связанного сервера
   EXEC sp_addlinkedserver @server = 'TEST_EXCEL',
                           @srvproduct = 'Excel',
                           @provider = 'Microsoft.ACE.OLEDB.12.0',
                           @datasrc = 'D:TestExcel.xlsx',
                           @provstr = 'Excel 12.0;IMEX=1;HDR=YES;';

   --Настройки безопасности (авторизации)
   EXEC dbo.sp_addlinkedsrvlogin @rmtsrvname='TEST_EXCEL',
                                 @useself= 'False',
                                 @locallogin=NULL,
                                 @rmtuser=NULL,
                                 @rmtpassword=NULL;

   --Обращение к связанному серверу
   SELECT * FROM OPENQUERY (TEST_EXCEL, 'SELECT * FROM [Лист1$]');
   --или
   SELECT * FROM TEST_EXCEL...[Лист1$];
Подведение итогов
Ну и в заключение я сгруппирую действия, которые необходимо выполнять в зависимости от выпуска SQL Server (x68 или x64) и версии файла Excel (xls или xlsx), в одну таблицу, для Вашего удобства.
| Действие / Настройка | Импорт Excel 2003 (файл xls) в SQL Server x86 | Импорт Excel 2007 (файл xlsx) в SQL Server x86 | Импорт Excel (любые файлы) в SQL Server x64 |
| Установка Excel 2003 | Да | Нет | Нет |
| Установка провайдера Microsoft.ACE.OLEDB.12.0 | Нет | Да (x86) | Да (x64) |
| Предоставление прав на временный каталог служб (если SQL сервер работает от имени служб) | Да | Да | Нет |
| Настройка провайдера Microsoft.ACE.OLEDB.12.0 | Нет | Да | Нет (по необходимости) |
| Параметры подключения в SQL запросах | Microsoft.Jet. OLEDB.4.0 и Excel 8.0 | Microsoft.ACE. OLEDB.12.0 и Excel 12.0 | Microsoft.ACE. OLEDB.12.0 и Excel 12.0 |
| Включение распределённых запросов на SQL Server | Да | Да | Да |
Заметка! Для комплексного изучения языка T-SQL рекомендую посмотреть мои видеокурсы по T-SQL, в которых используется последовательная методика обучения и рассматриваются все конструкции языка SQL и T-SQL.
На сегодня это все, удачи Вам в освоении языка T-SQL!