
|
05-18-2017, 06:49 AM |
|||
|
|||
|
Adding Yes, No Boxes in Word Document
|


|
05-18-2017, 07:52 AM |
|
A single checkbox would give you true/false.
__________________
|
|
05-18-2017, 11:16 AM |
|||
|
|||
|
To be honest, I am looking for a very simple solution to add the boxes to a word document for printing purposes only. For an example, Yes No and the boxes empty beneath for someone to check off with a pen. Thank you!
|
|
05-18-2017, 06:07 PM |
|
The checkbox content controls under the Developer tab will worik fine. So will various symbols.
|
April 2023 Community Newsletter
Welcome to our April 2023 Community Newsletter, where we’ll be highlighting the latest news, releases, upcoming events, and the great work of our members inside the Biz Apps communities. You can subscribe to the News & Announcements and stay up to date with the latest news from our ever-growing membership network who quickly discover that «Community is bigger on the inside».
LATEST NEWS
Microsoft Business Applications Launch Event — On Demand
Sign up below for an in-depth look into the latest updates from across Microsoft #PowerPlatform and #Dynamics365. Find out about new features, capabilities, and best practices for connecting data to deliver exceptional customer experiences, collaborating using AI-powered analytics, and driving productivity with automation. Guest speakers include Charles Lamanna, Emily He, Georg Glantschnig, Julie Strauss, Jeff Comstock, Lori Lamkin, Mike Morton, Ray Smith, and Walter Sun.
Watch Now: Business Applications Launch Event
Power Platform Connections — Episode Nine
Episode Nine of #PowerPlatform Connections premieres today at 12pm PST, as David Warner II and Hugo Bernier chat to Principal Program Manager Vesa Juvonen, alongside the great work of Troy Taylor, Geetha Sivasailam, Michael Megel, Nathalie Leenders, Ritesh Ranjan Choubey, Clay Wesener, Tristan DEHOVE, Dian Taylor, and Cat Schneider.
Click the link below to subscribe and get notified, with David and Hugo LIVE in the YouTube chat from 12pm PST. And remember to use the hashtag #PowerPlatformConnects on social to have your work featured on the show!
App in a Day — Free Workshop
Looking for a way to build a solution to quickly meet your business needs? Register below for a FREE «App in a Day» workshop to find out how to create custom business applications without writing code!
Microsoft Power Platform In a Day workshops
UPCOMING EVENTS
Directions Asia
Find out more about Directions 4 Partners Asia 2023, which will be taking place in Bangkok on 27-28th April 2023, featuring key speakers Mike Morton, Jannik Bausager and Dmitry Chadayev.
This event is for SMB focused Dynamics partners and their employees to receive product knowledge about Business Central, Power Platform and #DynamicsSales, and to be inspired and motivated by best practices, expert knowledge and innovative ideas.
If you want to meet industry experts, gain an advantage in the SMB-market, and acquire new knowledge about #MicrosoftDynamics Business Central, click the link below to buy your ticket today!
Click here to Register
Iberian Tech Summit
Come take a look at the Iberian Technology Summit which will be held at the Real Marina Hotel & Spa in Olhão, Portugal, between 28-30th April 2023.
The Iberian Technology Summit is the first of its kind with a clear goal to achieve — cross the borders of peninsula and help to empower the community of professionals, workers and businesses to grow stronger together.
Congrats to Kaila Bloomfield, Adam B., Ana Inés Urrutia de Souza and the team for putting together this great event. Click below to find out more details.
Click here to Register
Power Platform Conference 2023
We are so excited to see you for the Microsoft Power Platform Conference in Las Vegas October 3-5th, 2023! But first, let’s take a look back at some fun moments and the best community in tech from MPPC 2022 in Orlando Florida.
Featuring guest speakers such as Heather Cook, Julie Strauss, Nirav Shah, Ryan Cunningham, Sangya Singh, Stephen Siciliano, Hugo Bernier and many more, click the link below to register for the 2023 #MPPC23 today!
www.powerplatformconf.com
COMMUNITY HIGHLIGHTS
Check out our top Super and Community Users reaching new levels! These hardworking members are posting, answering questions, kudos, and providing top solutions in their communities.
Power Apps:
Super Users: @BCBuizer , @WarrenBelz,
Community Users: @mmollet, @Amik, @RJM07
Power Automate:
Super Users: @Expiscornovus , @grantjenkins, @abm
Community Users: @Nived_Nambiar
Power Virtual Agents:
Super Users: @Expiscornovus, @Pstork1,
Community Users: @nikviz, @DaniBaeyens
Power Pages:
Super Users: @ragavanrajan
Community Users: @OOlashyn, @gospa, @Fubar
LATEST PRODUCT BLOG ARTICLES
Power Apps Community Blog
Power Automate Community Blog
Power Virtual Agents Community Blog
Power Pages Community Blog
Check out ‘Using the Community’ for more helpful tips and information:
Power Apps, Power Automate, Power Virtual Agents, Power Pages
![]()
Download Article
![]()
Download Article
Want to add a check box or tick box to a list or form in Microsoft Word? It’s easy to do, and you can even make it checkable so you can click the box with your mouse. We’ll show you an easy way to add a clickable checkbox using Developer Mode in Microsoft Word.
Steps
-

1
Open a new file in Microsoft Word. Do so by opening the app shaped like a blue W. Then click on File in the menu bar at the top of the screen, and click on New Blank Document.
-
2
Click on File in the menu bar and then Options in the menu.
- On Mac, click on Word in the menu bar and then Preferences… in the menu.
Advertisement
-
3
Click on Customize Ribbon and then Main Tabs in the «Customize the Ribbon:» drop-down menu.»[1]
- On Mac, click on Ribbon & Toolbar in the «Authoring and Proofing Tools» section of the dialog box, then click on the Ribbon tab at the top of the dialog box.
-
4
Check «Developer» in the «Main Tabs» pane.
-
5
Click on Ok.
-
6
Click on Developer. It’s a tab in the upper-right part of the window.
-
7
Position the cursor where you’d like to insert the check box.
-
8
Click on Check Box. It’s in the menu bar at the top of the window.
-
9
Add additional check boxes and text as needed.
-
10
Lock the form. To do so, select the entire list, to be found in the Controls section on the Developer tab, then click on Group and Group.
- On Mac, click Protect Form in the Developer tab toolbar.


Advertisement
Add New Question
-
Question
What should I do if the check box is grayed out in my ribbon?

It is grayed out for me too. However, if you click on the one icon that isn’t — Legacy Tools — then you will find the exact same checkbox, which you should be able to select.
-
Question
How can I enlarge the size of a text box without enlarging the text?
In Word, just dragging the corner of the text box should be sufficient. If the text changes size accidentally, you can always highlight it and change it back to the desired size.
-
Question
How do you make a drop box in word?
Download LibreOffice. Follow the manual on how to add a list or list/add or list/multiselect box (or just look under «insert» in the menu). You can add a data source for the dropdown menu items from a database, a spreadsheet or within the file structure itself.
See more answers
Ask a Question
200 characters left
Include your email address to get a message when this question is answered.
Submit
Advertisement
Thanks for submitting a tip for review!
About This Article
Article SummaryX
1. Open a document.
2. Click File.
3. Select Customize Ribbon and then click Main Tabs.
4. Check the «Developer» box.
5. Click Save.
6. Click Developer.
7. Click where you want to insert the check box.
8. Click Check Box.
9. Add additional boxes and text.
10. Lock the form.
Did this summary help you?
Thanks to all authors for creating a page that has been read 1,240,770 times.
Is this article up to date?

Managing citations for research papers, theses, dissertations, and other nonfiction works can be overwhelming. However, you can ease the process by learning how to insert citations in Microsoft Word using the software’s citation and bibliography tools.
This tutorial covers six topics:
- How to select a citation style
- How to insert citations for new sources
- How to insert citations for existing sources
- How to edit sources
- How to use citation placeholders
- How to insert bibliographies, reference lists, or works cited lists
Important Note: At the time this tutorial was published, Microsoft Word did not offer the most up-to-date formatting for several of our primary style guides, including APA, Chicago, MLA, and Turabian. Therefore, I encourage you to review the available styles before using the citation and bibliography tools. We will cover the steps to customize citation and bibliography styles in a separate tutorial.
This tutorial is also available as a YouTube video showing all the steps in real time.
Watch more than 150 other writing-related software tutorials on my YouTube channel.
The images below are from Word in Microsoft 365. The steps are the same in Word 2021, Word 2019, and Word 2016. However, your interface may look slightly different in those older versions of the software.
How to Select a Citation Style in Microsoft Word
- Select the References tab in the ribbon.

- Select your citation style from the Style menu in the Citations & Bibliography group.

How to Insert Citations for New Sources in Microsoft Word
- Place your cursor where you want to insert the citation.

- Select the References tab in the ribbon (see figure 1).
- Select the Insert Citation button in the Citations & Bibliography group.

- Select Add New Source from the drop-down menu.

- Select the source type from the Type of Source menu in the Create Source dialog box.

- Enter the source information into the bibliography fields.

- (Optional Step) Select Show All Bibliography Fields if you need to add additional information.

- (Optional Step) Enter the source information into the additional fields.

- Select the OK button.

Your citation should appear in your text.

How to Insert Citations for Existing Sources in Microsoft Word
Once you enter a source, as shown in the section above, you can create additional citations for that source without reentering the information.
- Place your cursor where you want to insert the citation (see figure 3).
- Select the References tab in the ribbon (see figure 1).
- Select the Insert Citation button in the Citations & Bibliography group (see figure 4).
- Select the source from the drop-down menu.

Your citation should appear in your text (see figure 11).
How to Edit Sources in Microsoft Word
When you edit an existing source, you will also edit any existing citations for that source in your current document.
- Select the References tab in the ribbon (see figure 1).
- Select the Manage Sources button in the Citations & Bibliography group.

- Select the source you want to edit in the Master List or the Current List in the Source Manager dialog box.

Pro Tip: The Master List is stored in your computer and is accessible in all your documents. The Current List is part of your current file and is only accessible in that file. By default, Word stores new sources in the Master List and the Current List.
- Select the Edit button.

- Enter your edits in the Edit Source dialog box. (Select Show All Bibliography Fields, if necessary.)

- Select the OK button.

- Select Yes or No in the alert box stating that you will be updating the source in both the Master List and the Current List. (Strongly consider selecting Yes to update both lists if you plan to cite this source in future documents.)

- Select the Close button in the Source Manager dialog box.

How to Use Citation Placeholders in Microsoft Word
You can use placeholders if your source information is not available.
- Place your cursor where you want to insert the citation placeholder.
- Select the References tab in the ribbon (see figure 1).
- Select the Insert Citation button in the Citations & Bibliography group (see figure 4).
- Select Add New Placeholder from the drop-down menu.

- (Optional Step) Change the name of the placeholder in the Placeholder Name dialog box.

- Select the OK button.

Pro Tip: You can use the same placeholder in the future by selecting it from the Insert Citation drop-down menu (see figure 12).
- When you are ready to replace the placeholder with a source, complete the steps in How to Edit Sources above.
How to Insert Bibliographies, Reference Lists, or Works Cited Lists in Microsoft Word
These steps will only work if you inserted your sources using Word’s citation and bibliography tools.
- Place your cursor where you want to insert the bibliography, reference list, or works cited list.
- Select the References tab in the ribbon (see figure 1).
- Select the Bibliography button in the Citations & Bibliography group.

- Select Bibliography, References, or Works Cited from the drop-down menu.

Your bibliography, reference list, or works cited list should appear in your document.
Related Resources
How to Create Hanging Indents in Microsoft Word
How to Insert Footnotes and Endnotes in Microsoft Word
How to Convert Individual Footnotes to Endnotes in Microsoft Word (and Individual Endnotes to Footnotes)
How to Create a Cover Page in Microsoft Word (Built-In and Custom)
Updated August 22, 2022
I am generating reports in Word using R officer package. I want my reports to contain table of contents, list of figures and list of tables, but when I add them, there is a warning «This document contains fields that may refer to other files. Do you want to update the fields in this document?». So in every report I have to click ‘Yes’ and then save changes in the report so the window does no show up again.
My question is if it’s possible to do these three steps: opening the ready report, clicking ‘Yes’ when the window shows up and saving the changes in some sort of code?
I’ve been searching through the Internet, but haven’t found anything that would help me.
Microsoft website provides some articles that seem related to my problem, such as this one: https://learn.microsoft.com/en-us/visualstudio/vsto/how-to-programmatically-open-existing-documents?view=vs-2019, but I don’t really understand if they answer my question.
I will appreciate any suggestion on the software I should use to do this and/or sample codes.
Создание примечания
Шаг 1. Для того, чтобы сделать примечания, сначала нужно выделить фрагмент (предложение либо элемент), к которому будет применено примечание, либо поставить указатель в конце файла.

Шаг 2. Далее необходимо перейти во вкладку «Рецензирование», которая расположена на верхней панели.

Шаг 3. В открывшейся вкладке находим группу «Примечания» и нажимаем кнопку «Создать примечание». Примечание также может быть создано при помощи сочетания клавиш Ctrl+Alt+A. Это сочетание клавиш можно изменить в параметрах Word.
Находим группу «Примечания» и нажимаем кнопку «Создать примечание»
Шаг 4. В Word 2020 примечание вводится в появившемся поле, в Word 2013 и 2010 его также можно ввести в область проверки.

Как примечание пометить, как выполненное
В Microsoft Word пользователи не задумываются об отметке примечания как выполненного. Вот как это сделать:
- Знакомство с возможностями Word 2010 по подготовке макета документа
- Кликните правой кнопкой мыши в верхней части примечания. Высветится список допустимых действий. Здесь выбираем «Пометить примечание, как выполненное».
- После применения данного инструмента примечание становится неактивным, и учитывается как исполненное. Смотрите фото:
В этой статье мы рассмотрели важные особенности примечаний, а также способы их редактирования в рамках приложения Microsoft Word. Помимо примечаний, можно использовать и другие инструменты для создания дополнительных заметок в тексте, с отличающимся функционалом и видом: советуем к прочтению статью Сноски и ссылки на Справочнике.

Урок: Как в Ворде добавить сноски
Примечания в Word добавляются в отдельные выноски, которые отображаются на полях документа. Если это необходимо, примечания всегда можно скрыть, сделать невидимыми, а вот удалить их не так просто. Непосредственно в этой статье мы расскажем о том, как сделать примечания в Ворде.
Урок: Настройка полей в MS Word
Вставка примечаний в документ
1. Выделите фрагмент текста или элемент в документе, с которым нужно связать будущее примечание.

Совет: Если примечание будет относиться ко всему тексту, перейдите в конец документа, чтобы добавить его там.
2. Перейдите во вкладку “Рецензирование” и нажмите там кнопку “Создать примечание”, расположенную в группе “Примечания”.

3. Введите необходимый текст примечания в выноски или области проверки.

Совет: Если вы хотите ответить на уже существующее примечание, кликните по его выноске, а затем уже по кнопке “Создать примечание”. В появившейся выноске введите необходимый текст.

Изменение примечаний в документе
В случае, если примечания на отображаются в документе, перейдите во вкладку “Рецензирование” и нажмите на кнопку “Показать исправления”, расположенную в группе “Отслеживание”.
Урок: Как в Ворде включить режим правки
1. Кликните по выноске примечания, которое необходимо изменить.

2. Внесите необходимые изменения в примечание.

В случае, если выноски в документе скрыты или же отображается только часть примечания, изменить его можно в окне просмотра. Чтобы отобразить или скрыть это окно следует выполнить следующие действия:
1. Нажмите кнопку “Исправления” (ранее “Область проверки”), которая расположена в группе “Запись исправлений” (ранее “Отслеживание”).
Если необходимо переместить окно проверки в конец документа или нижнюю часть экрана, кликните по стрелке, расположенной около этой кнопки.
В выпадающем меню выберите “Горизонтальная область проверки”.

Если вы хотите ответить на примечание, кликните по его выноске, а затем нажмите на кнопку “Создать примечание”, расположенную на панели быстрого доступа в группе “Примечания” (вкладка “Рецензирование”).

Изменение или добавление имени пользователя в примечаниях
Если это необходимо, в примечаниях всегда можно изменить указанное имя пользователя или добавить новое.
Урок: Как в Word изменить имя автора документа
Чтобы это сделать, выполните следующие пункты:
1. Откройте вкладку “Рецензирование” и нажмите на стрелку возле кнопки “Исправления” (группа “Запись исправлений” или “Отслеживание” ранее).
2. Из выпадающего меню выберите пункт “Сменить пользователя”.
3. Выберите пункт “Личная настройка”.
4. В разделе “Личная настройка Office” введите или измените имя пользователя и его инициалы (в дальнейшем именно эта информация будет использоваться в примечаниях).
ВАЖНО: Имя и инициалы пользователя, введенные вами, изменятся для всех приложений пакета “Microsoft Office”.
Примечание: Если изменения в имени пользователя и его инициалах использовались только для его комментариев, то применены они будут только к тем комментариям, которые будут сделаны после внесения изменений в имени. Ранее добавленные комментарии не будут обновлены.
Удаление примечаний в документе
Если это необходимо, вы всегда можете удалить примечания, предварительно их приняв или отклонив. Для более детального ознакомления с данной темой рекомендуем вам прочесть нашу статью:
Урок: Как удалить примечания в Ворде
Теперь вы знаете, зачем в Word нужны примечания, как их добавлять и изменять, если это необходимо. Напомним, что, в зависимости от используемой вами версии программы, названия некоторых пунктов (параметров, инструментов) могут отличаться, но их содержание и местонахождение всегда примерно одинаков. Изучайте Microsoft Office, осваивая новые возможности этого программного продукта. Мы рады, что смогли помочь Вам в решении проблемы.Опишите, что у вас не получилось. Наши специалисты постараются ответить максимально быстро.
Изменение примечания и ответ
Ответы на примечания в разных версиях Word также немного отличаются:
- в Word 2007, 2010 и 2013 для того, чтобы ответить на примечание его нужно выделить, дальше снова перейти в раздел «Рецензирование» и нажать «Создать примечание». Либо использовать сочетание Ctrl+Alt+A;

- в Word 2020 нужно нажать правой кнопкой мыши на примечание и выбрать «Ответ на примечание», либо нажать на кнопку, расположенную в окне самого примечания.
Нажимаем на кнопку, расположенную в окне самого примечания

На заметку! Для изменения примечания нужно просто нажать на него и внести необходимые изменения.
Вставка сносок и концевых сносок — Word
Сноски появляются внизу страницы, а концевые сноски — в конце документа. Номер или символ в сноске или концевой сноске совпадает со ссылкой в документе.

- Щелкните в том месте, где вы хотите сделать ссылку на сноску или концевую сноску.
- На вкладке Ссылки
выберите
Вставить сноску
или
Вставить концевую сноску
. - Введите то, что вы хотите, в сноске или концевой сноске.
- Вернитесь на свое место в документе, дважды щелкнув число или символ в начале примечания.
.
Изменение имени пользователя (инициалов) в примечаниях
Шаг 1. Перейдите во вкладку «Рецензирование», группу «Отслеживание».

Шаг 2. Нажмите кнопку «Параметры исправлений» (в Word 2016) или «Исправления» (в Word 2013 и 2010) чтобы вызвать диалоговое окно.

Шаг 3. В открывшемся окне нажмите кнопку «Изменить имя пользователя» или «Сменить пользователя».

Шаг 4. В разделе «Личная настройка Microsoft office» введите нужные имя пользователя, после чего нажмите кнопку «ОК».

На заметку! Если вы хотите использовать их всегда, то установите соответствующий флажок на «Всегда использовать эти значения независимо от состояния входа в Office».
Как удалить примечания конкретного рецензента
В Word 2020 необходимо:
- Зайти в раздел «Рецензирование», подраздел «Отслеживание».

- Вызвать выпадающее меню «Показать исправления» и выбрать «Конкретные пользователи». Вызываем выпадающее меню «Показать исправления» и выбираем «Конкретные пользователи»
- Далее в списке выберите имя пользователя, примечания которого вам необходимо удалить.
- В Word 2013 и 2010 путь выглядит следующим образом: «Рецензирование»—«Отслеживание»—«Показать исправления»—«Рецензенты». В Word 2010-2013 путь удаления такой — «Рецензирование», «Отслеживание», «Показать исправления», «Рецензенты»

( 1 оценка, среднее 5 из 5 )
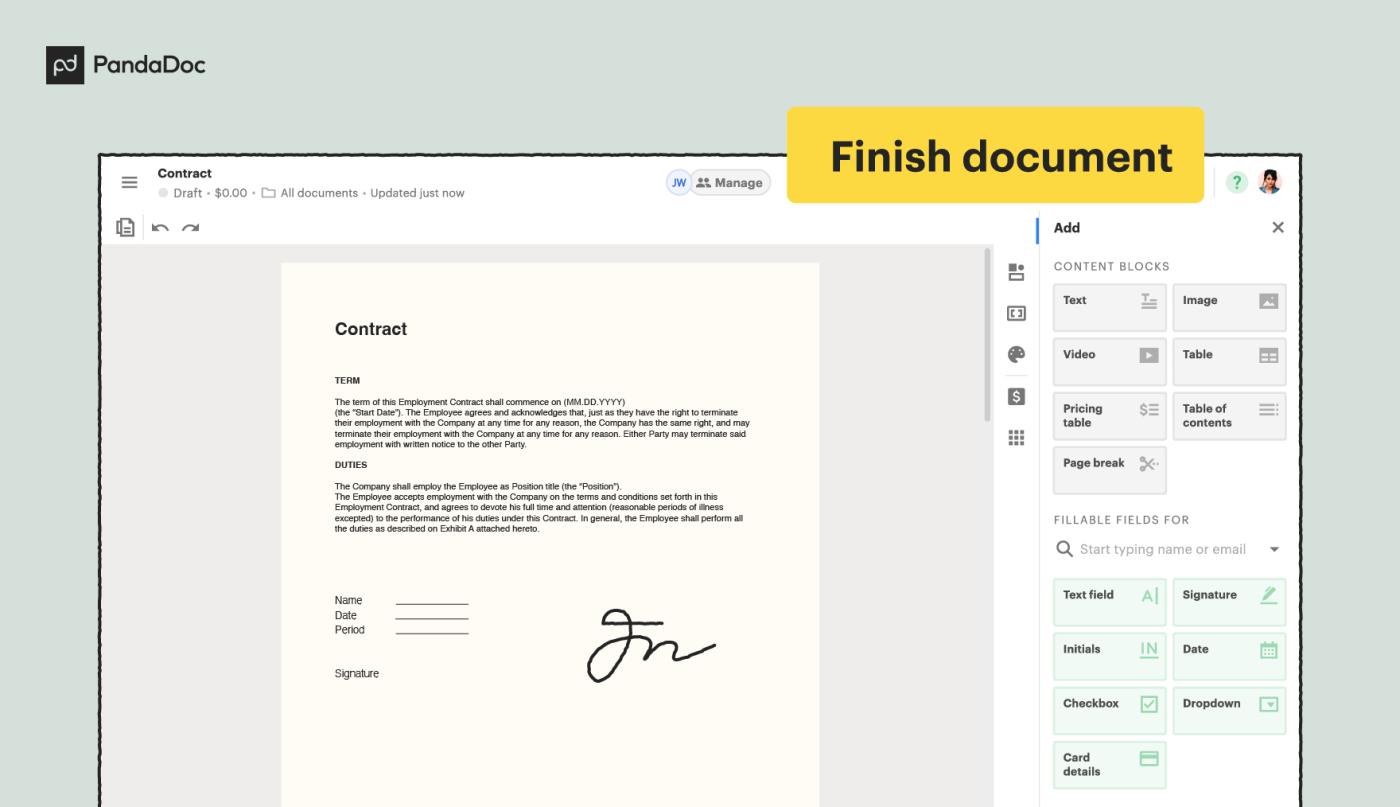
Due to Microsoft Word’s popularity, it comes as no surprise that many businesses use it as an all-around solution to write proposals, quotes, contracts, and other sales docs.
They want to quickly and easily add their signatures in Word itself, without the hassle of printing, hand-signing, or scanning.
The good news is that Microsoft came through, and adding a signature to a Word document is indeed doable.
The better news is that there are also many features in Word that make your life easier — like the option to automatically include more text beneath your signature (for example, your printed name and address).
In this article we will guide you:
- How to add a digital signature in Word
- How to add an electronic signature to Word documents
- How to add a signature line to a Word document
- and more insights on how to automate your document process.
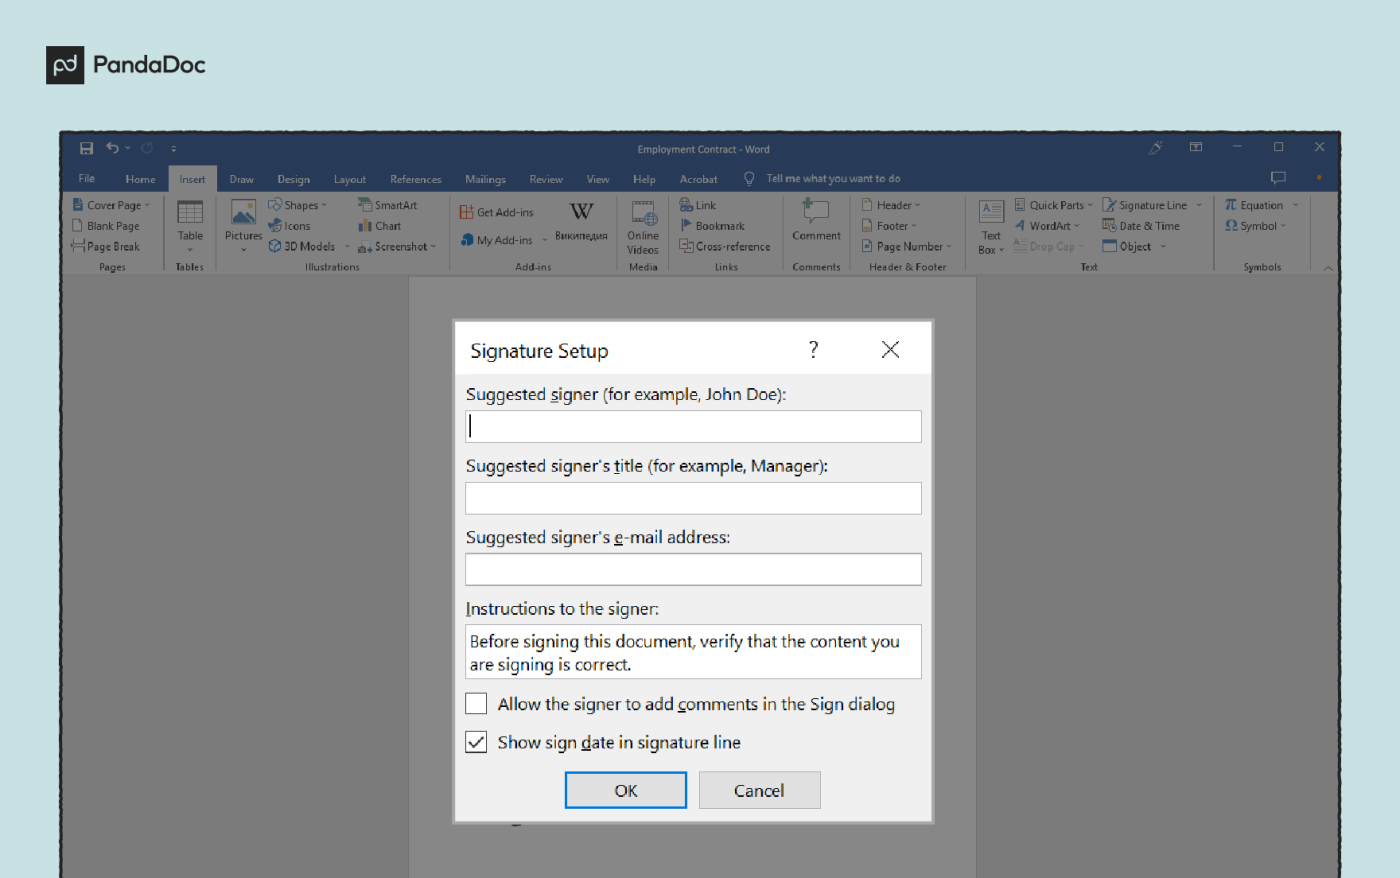
How to add a digital signature in Word
Adding a digital signature in Word is quite simple. To do so, you just need to follow these six steps:
1. Move your cursor to the area you want to sign inside the Word document.
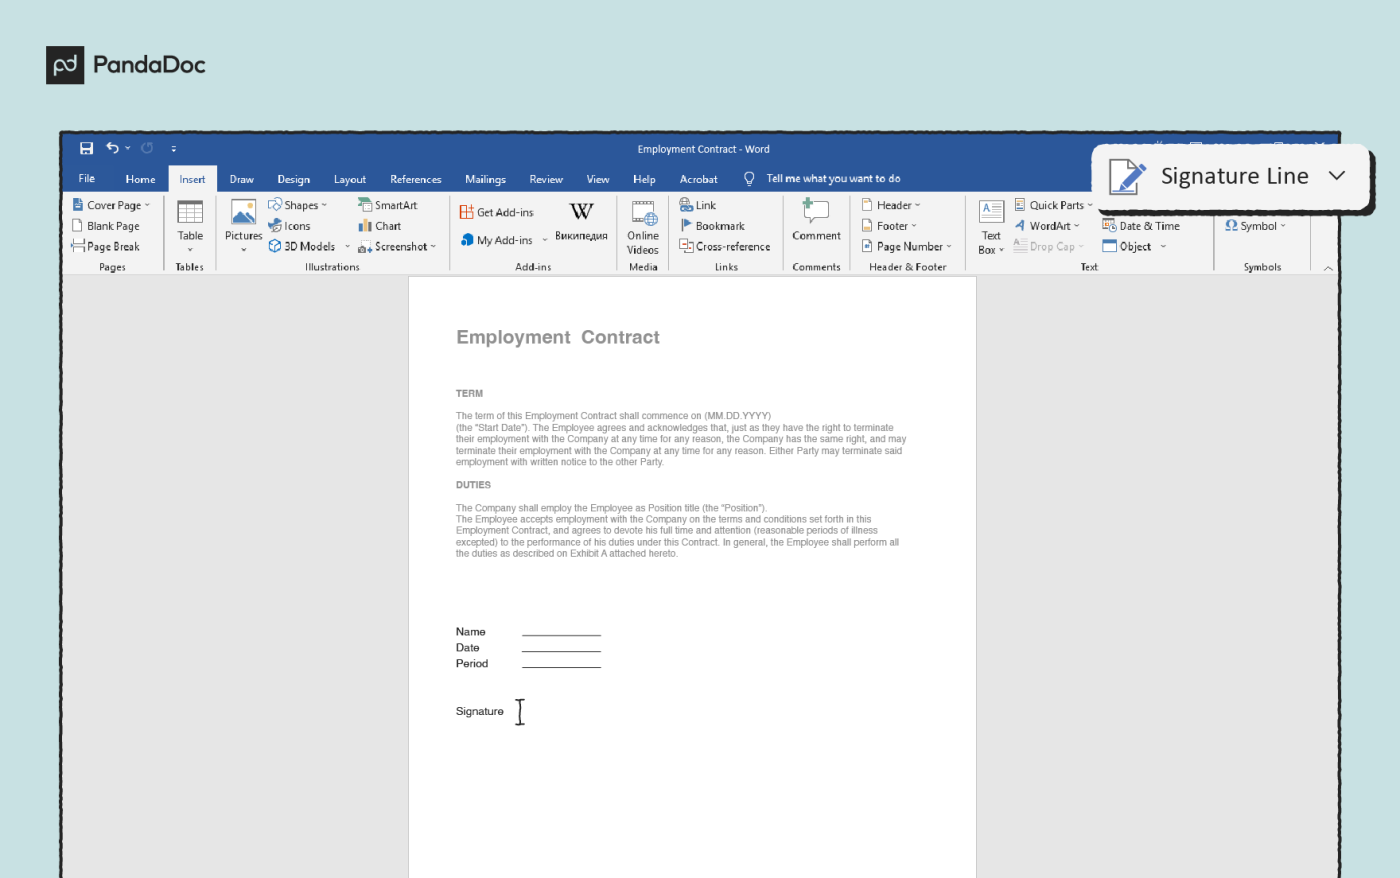
2. Select the Insert tab.
3. Select the Text group and open the Signature Line list.
4. Click Microsoft Office Signature Line and the Signature Setup dialogue box should appear.
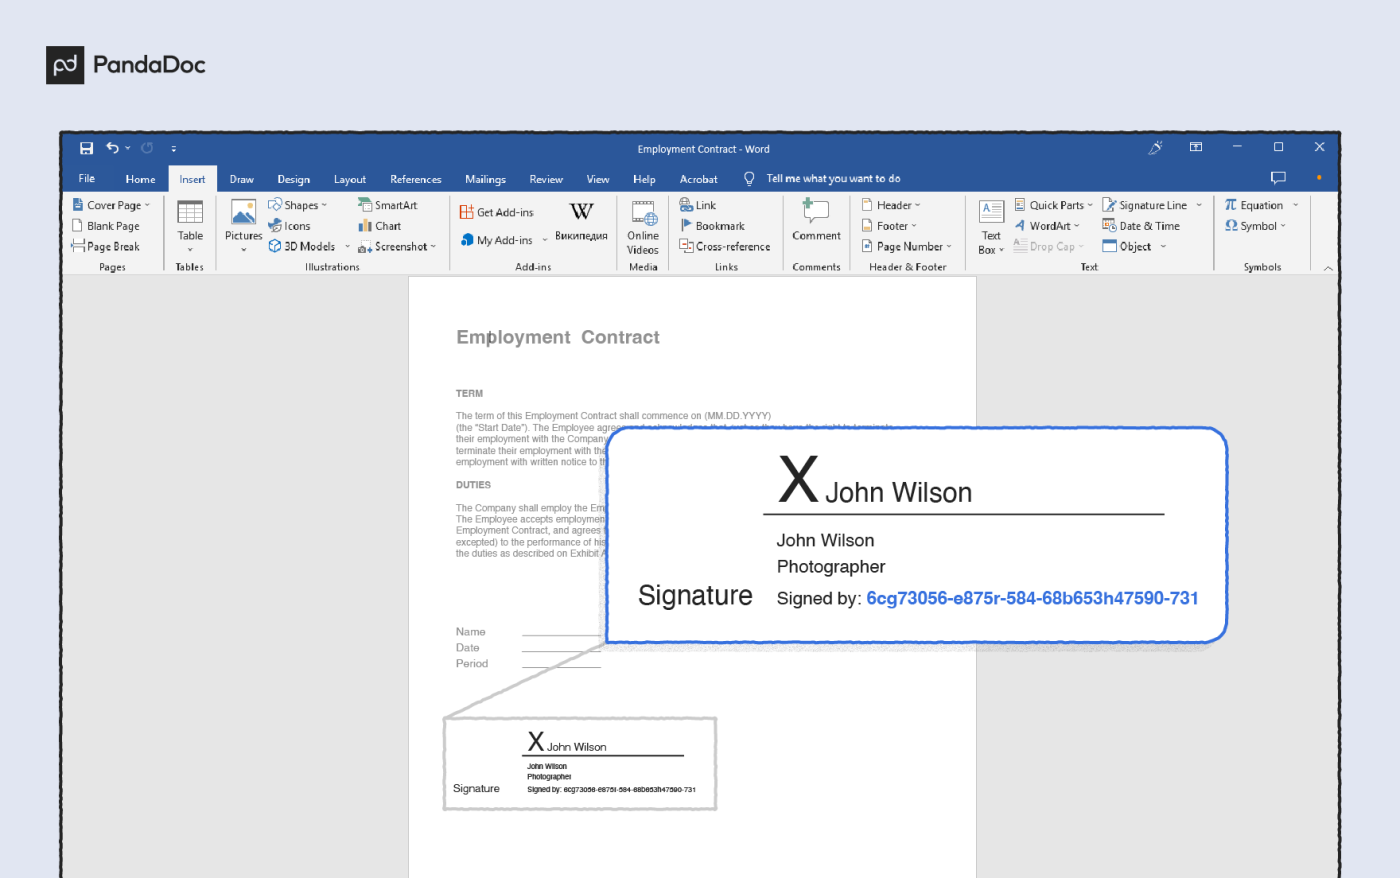
5. Input the appropriate data — signer’s name, title, email address, and any further instructions — and tick the boxes if required (if you are signing these will be your details). Click OK.
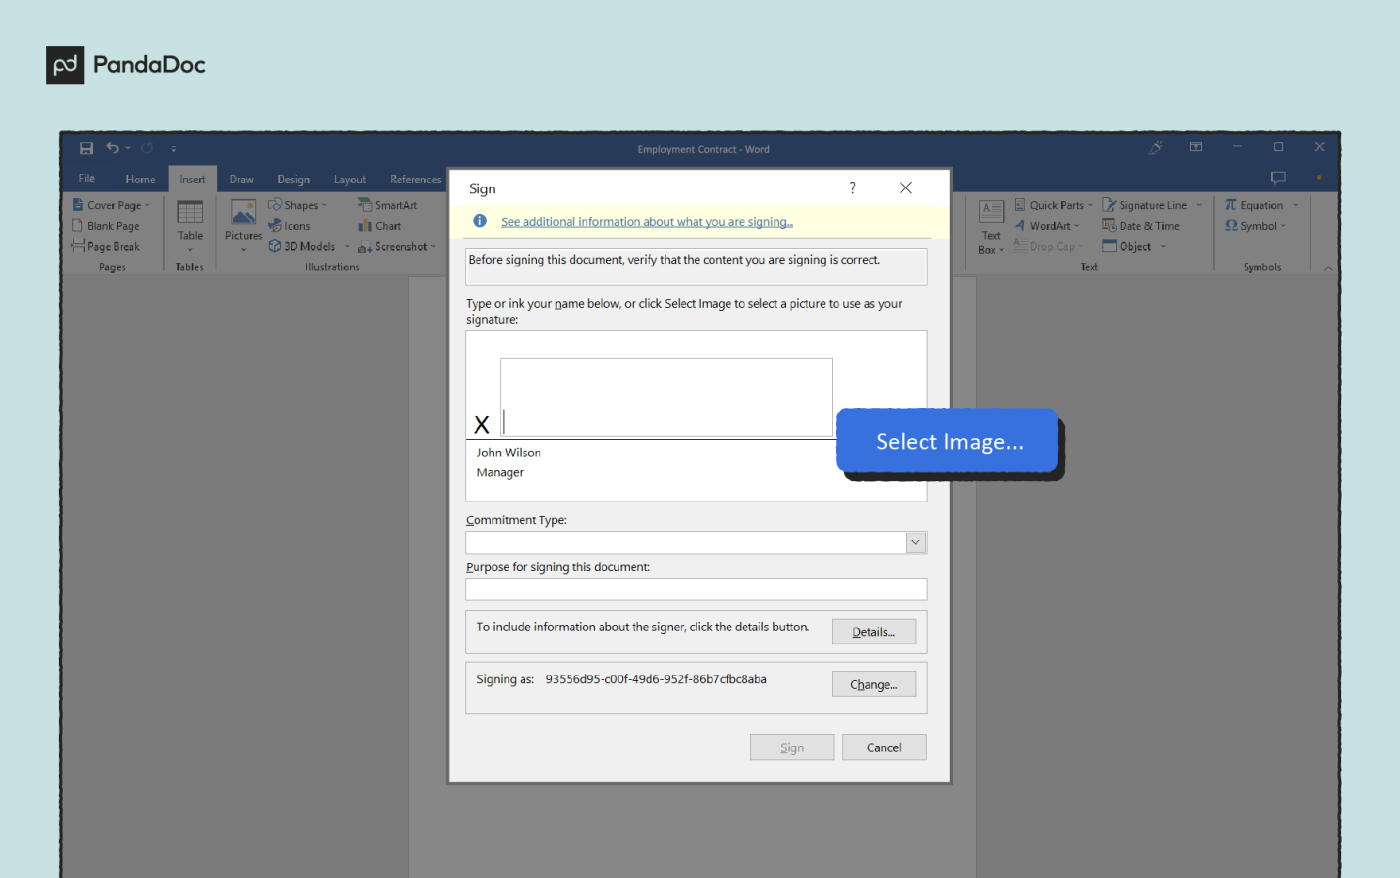
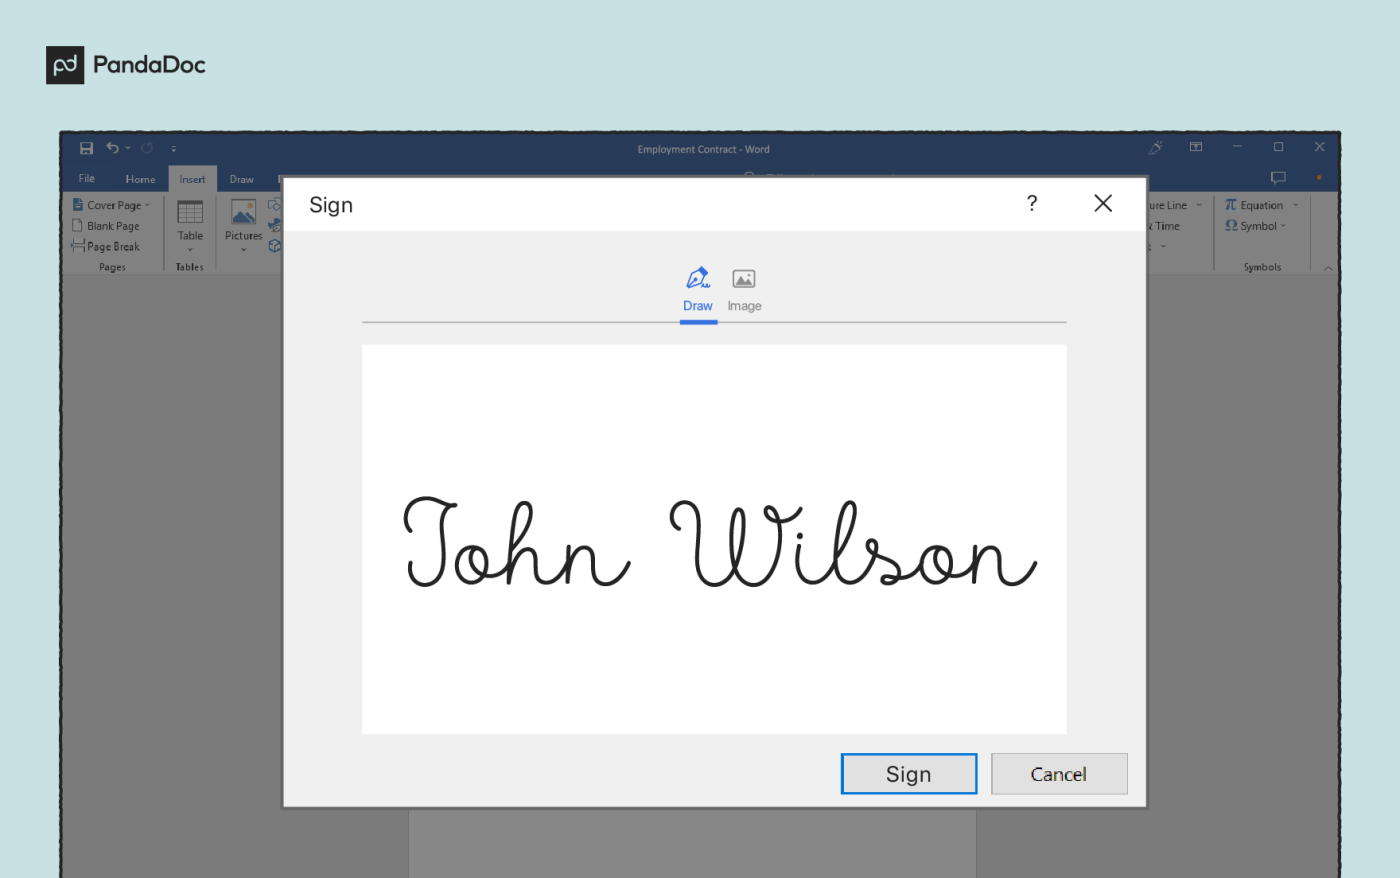
6. Right-click the signature generator field and type your name or upload an image of your signature.
Make sure though, that in order to use this, you need to first obtain a digital certificate and create a digital signature, since an electronic signature and a digital one aren’t the same thing.
Digital signatures are highly-secure, encrypted digital marks that require special software and a digital certificate from both the sender and the recipient. You have to purchase a certificate from the issuing authority.
An electronic signature, on the other hand, is simply a virtual mark added to a document — most commonly in the form of a signature image or hand-typed text.
Depending on the software with which the document is signed, electronic signatures can come with extra security features, such as certificates that include timestamps and the date of the signature.
Electronic signatures work very much like a hand-drawn signature, so in that regard they are also legally binding in many parts of the world (such as the USA, the UK, Canada, Ireland, among many other countries). Those that don’t accept them include North Korea, Nepal, Afghanistan, Fiji, etc.
Upload your Word document and sign with PandaDoc
You’ll be happy to know that we have a special place in our hearts for Microsoft Word at PandaDoc. Yes, really! You can now upload and sign Word documents with PandaDoc:
- We make security our top priority, and PandaDoc is fully HIPAA, ESIGN, and UETA compliant.
- With us, you always have insights and a bird’s eye view of what goes on where.
- Businesses saved 12 hours/week, saw a 28% increase in closing rates, and a 65% time decrease in document creation — all with the help of PandaDoc’s eSignature tool.
How to add an electronic signature to Word documents
Most people still want to add electronic signatures (as opposed to digital signatures) to their documents because of its security and accessibility. Once you’re set up, it only takes a few clicks.
Follow the steps below to create a signature image and add an electronic signature to your Microsoft Word documents:
1. Handwrite your signature in the middle of a blank piece of white paper.
2. Scan the signature and save it on your computer in one of the following file formats: .bmp, .gif, .png, .jpg.

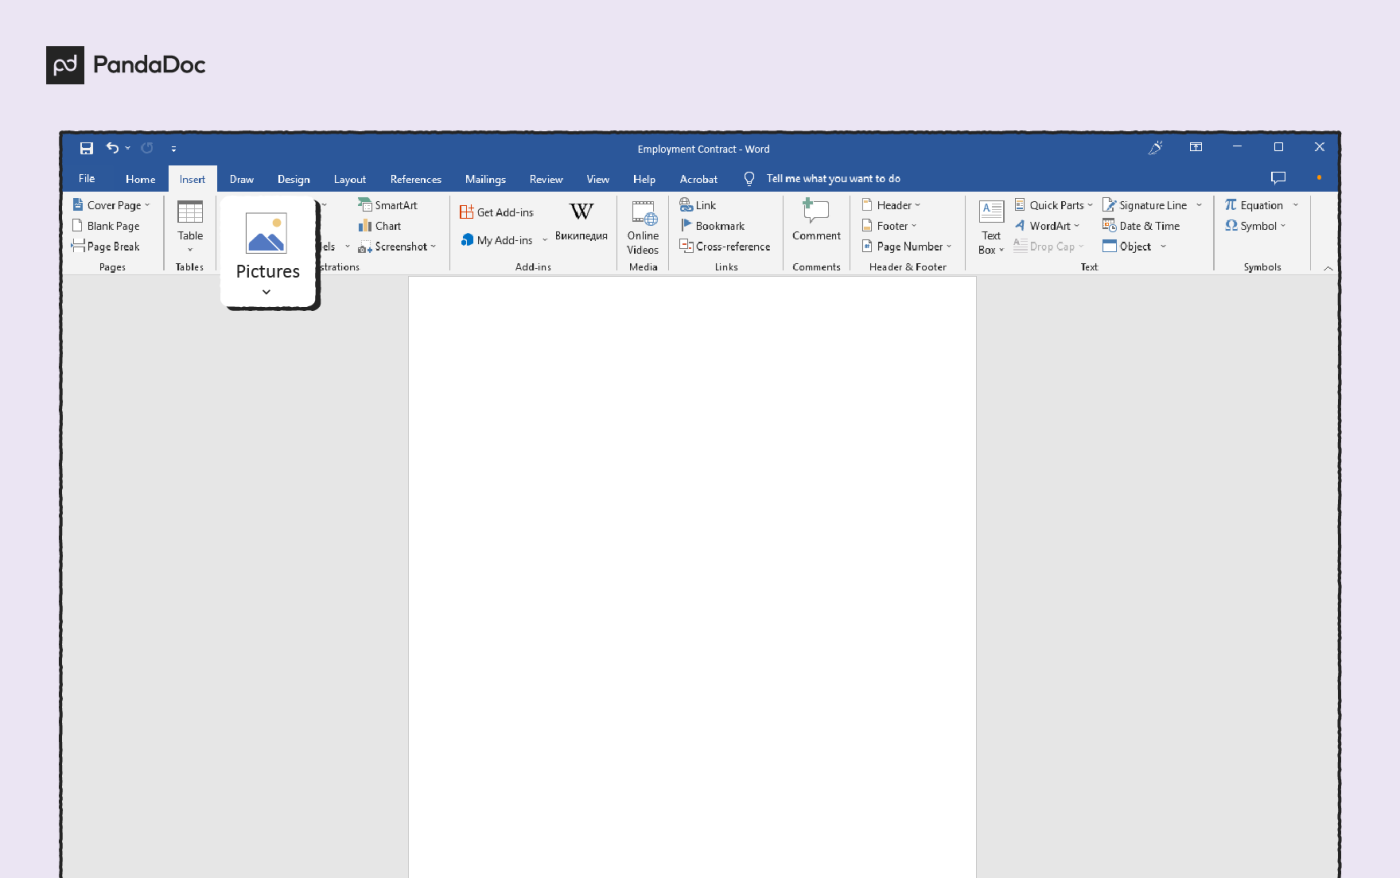
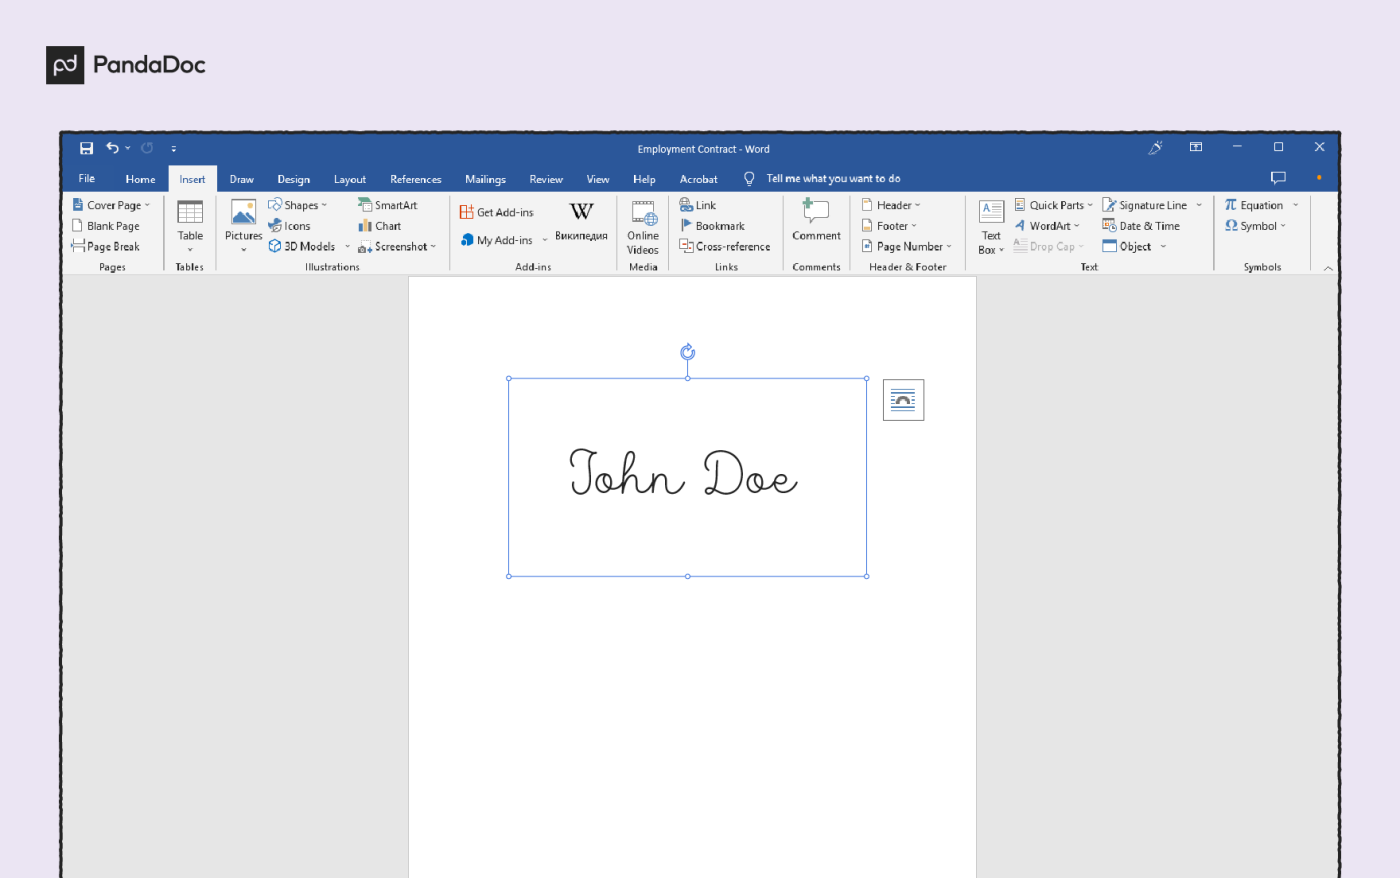
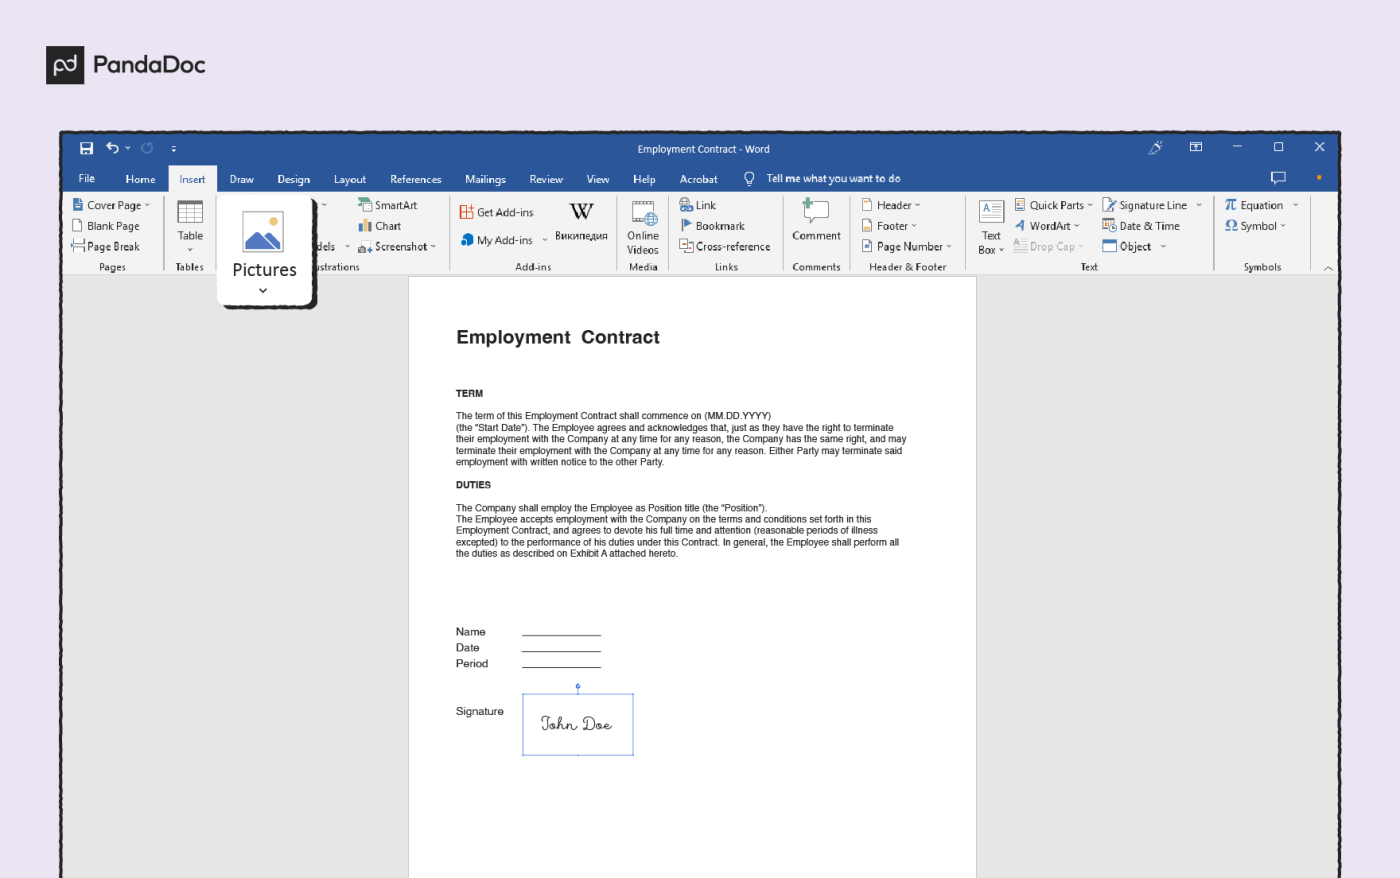
3. Open the image file in Microsoft Word by clicking the Insert tab and selecting Pictures.
4. Click on the image and edit it using the Picture Tools Format tab.
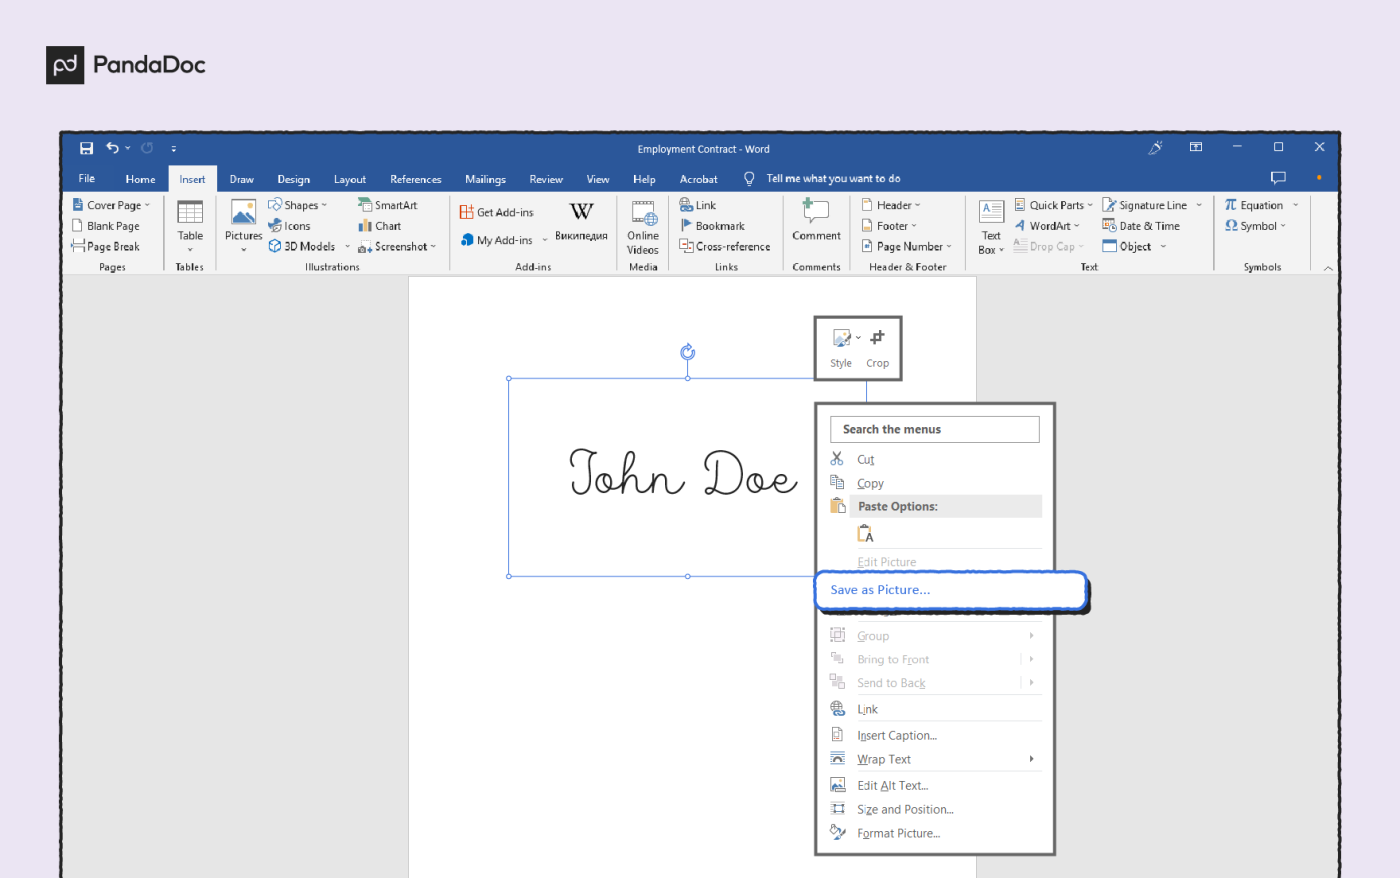
5. When you have finished editing the image, right-click the image and select Save as Picture.
6. Whenever you want to add an electronic signature, select Insert and Pictures and locate the edited image file, and then drag-and-drop it to the appropriate place in the document.
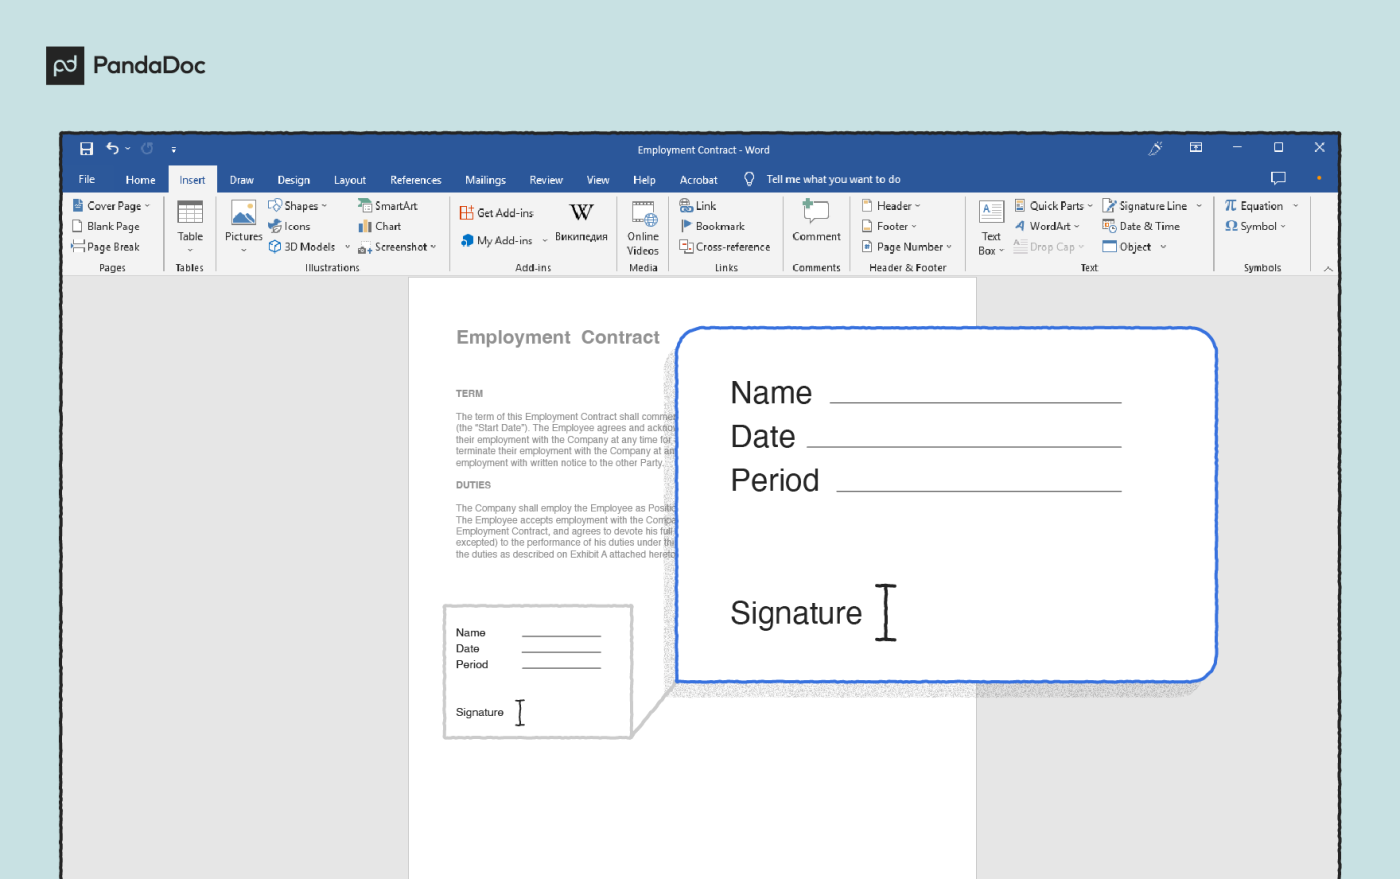
How to add a signature line to a Word document
There’s a very real possibility that your prospects might return a document empty-handed (without a signature) if they don’t see a signature line. In other words, it goes without saying that no signature is complete without a signature line.
To add a signature line to a document, follow these steps:
- Left-click the place in the document where you want the signature line to go.
- Select Signature Line from the Insert drop-down. A dialogue box should appear.
- Select the required options and click OK.
For the most part, you can use the above steps to insert a signature in Word using a Mac or PC. There may be a few slight changes in functionality here and there depending on the kind of device you use.
Why shifting to a dedicated solution is a good move
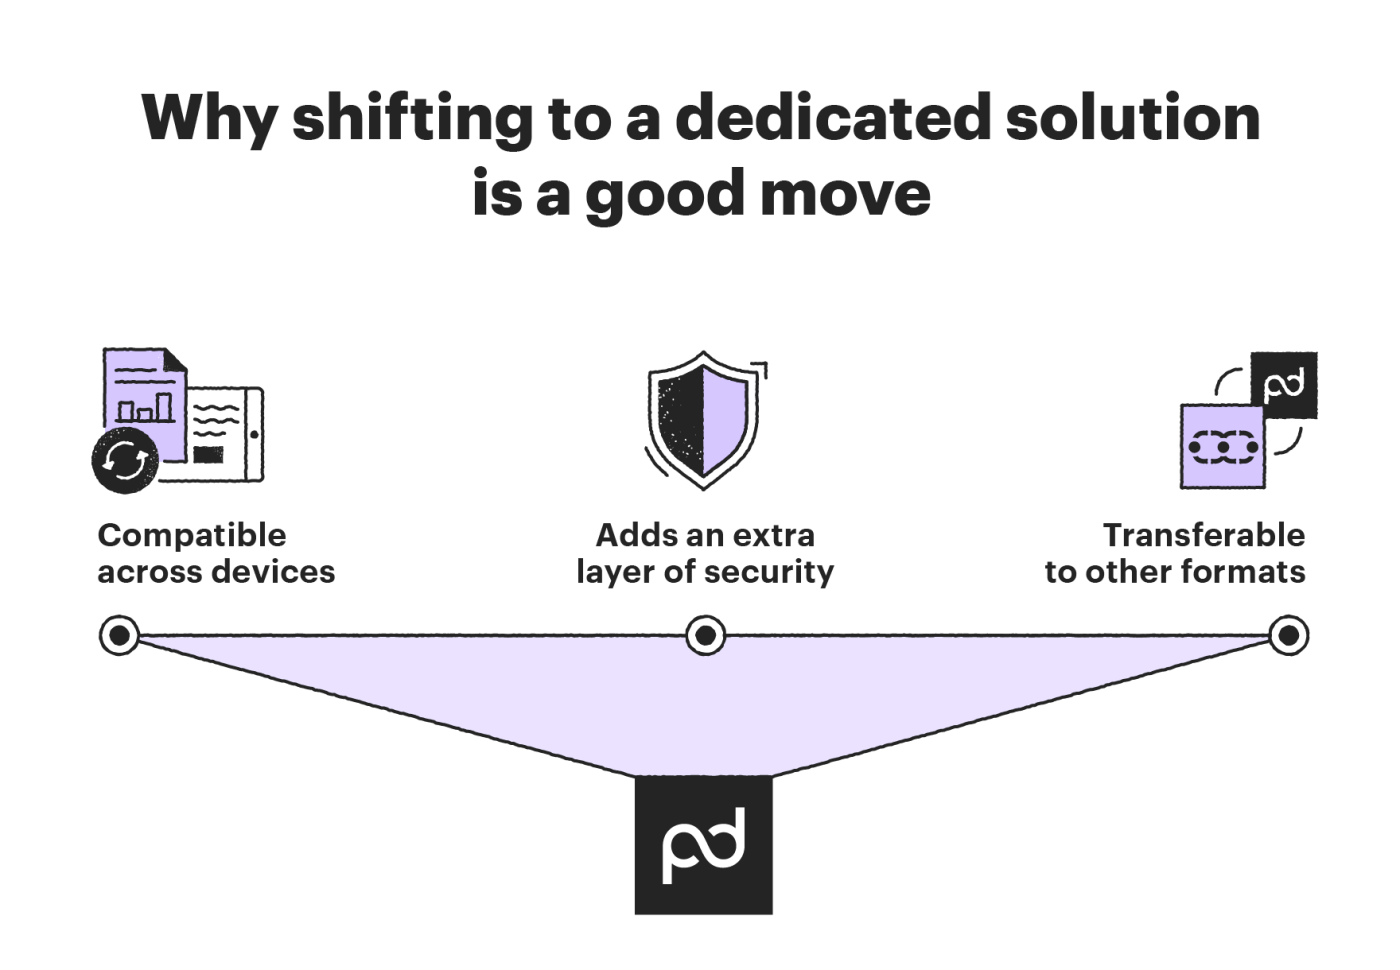
While the functionality provided by Word is solid, it doesn’t offer as many options as other tools, especially when you consider beating up the competition.
Third-party apps like PandaDoc and some of the other well-known softwares provide a host of features that can make your life easier when it comes to sending or receiving documents.
Compatible across devices
Microsoft Word has different signature creator functionality across different devices and device platforms (like Apple and Android).
Using an app that allows you to use the same piece of software with the same features across all your devices is a solid reason to consider third-party apps.
Adds an extra layer of security
Apps explicitly designed to sign documents have an added layer of protection, like the instant creation of a certificate whenever a document is signed, which also includes an added benefit of featuring the timestamp and the date of when the signature was completed.
Transferable to other formats
If you want to send a signed document as a PDF, as opposed to Microsoft Word, then you can download and send it in your format of choice. (Not trying to dunk on anyone here, but can Word do that?)
How to add a signature in Word with the PandaDoc Add-In
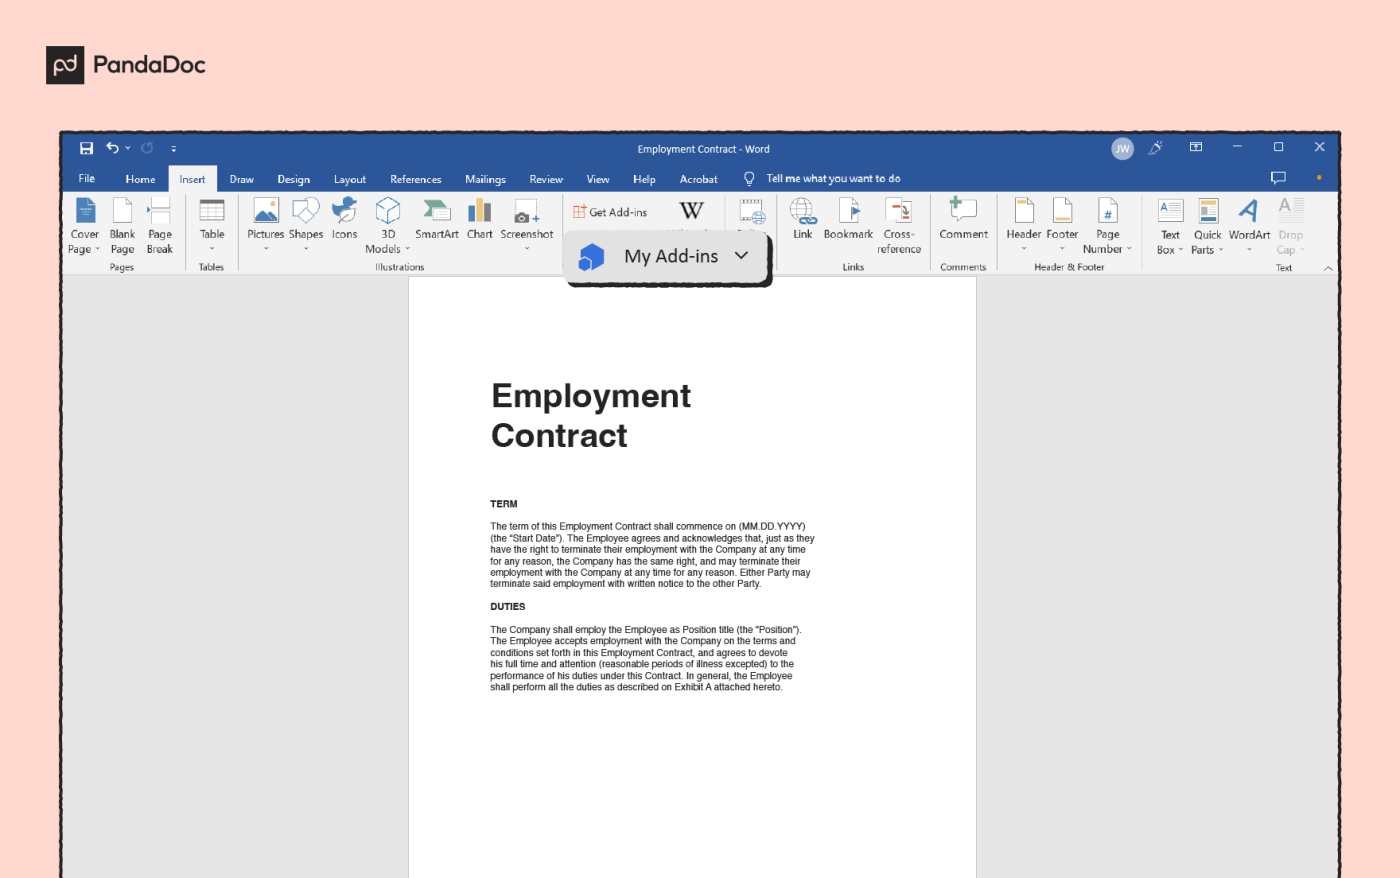
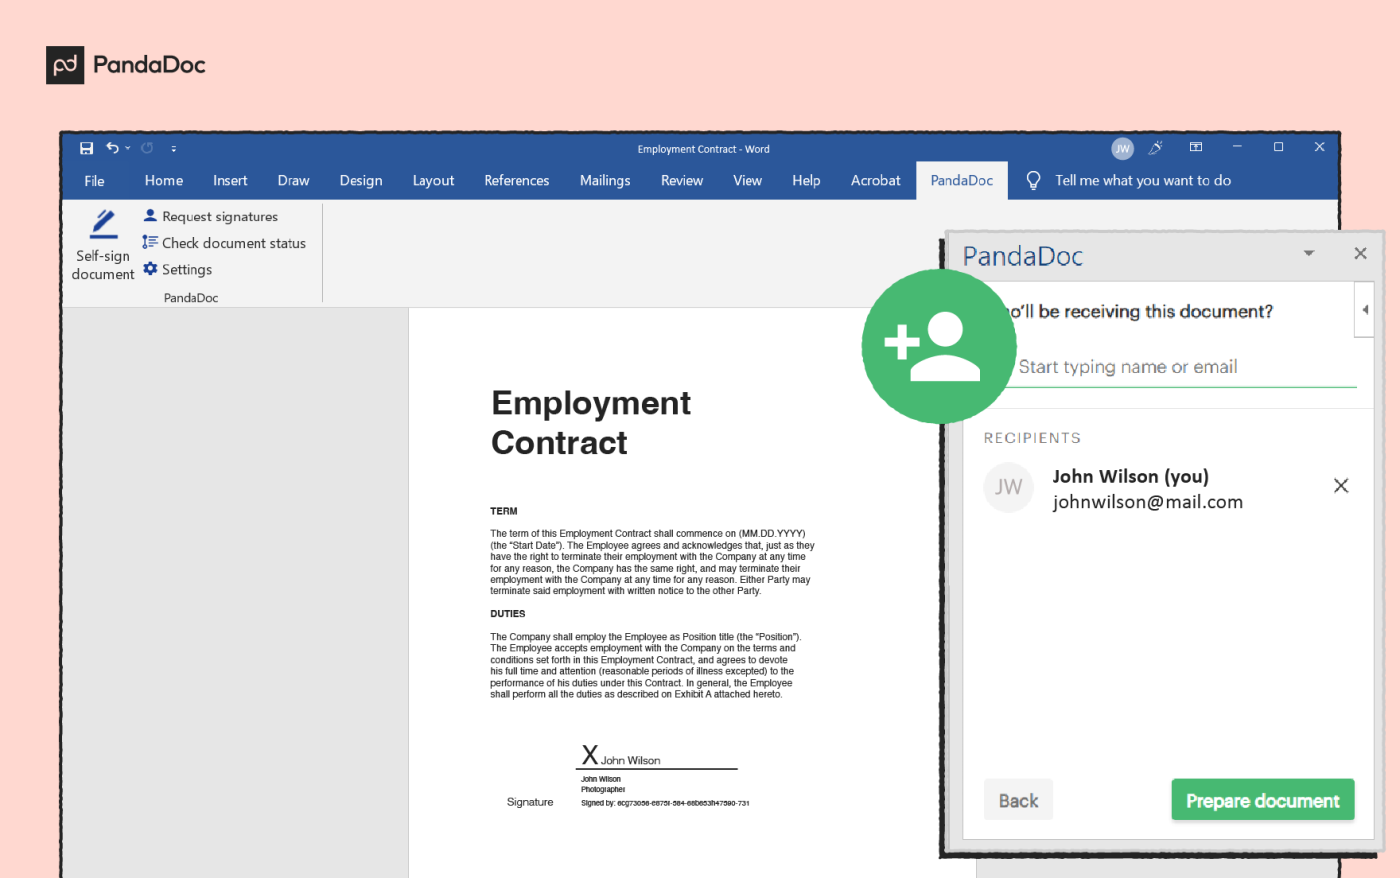
PandaDoc has integrated with Word and is available in the Microsoft Store, making eSign easier than ever before! With this integration, you are now able to securely send and sign documents directly from Word.
To use the PandaDoc integration, follow these steps:
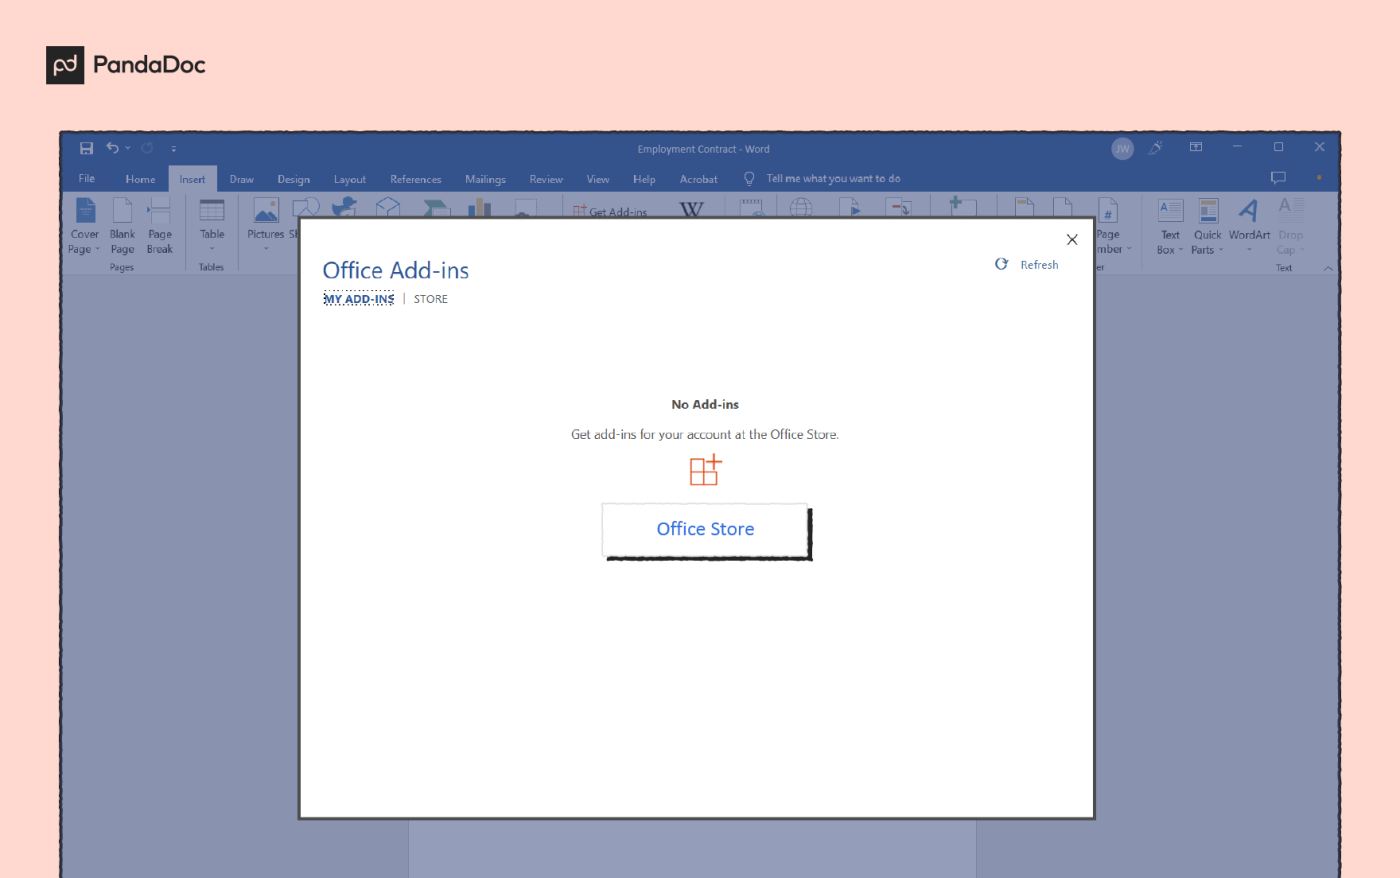
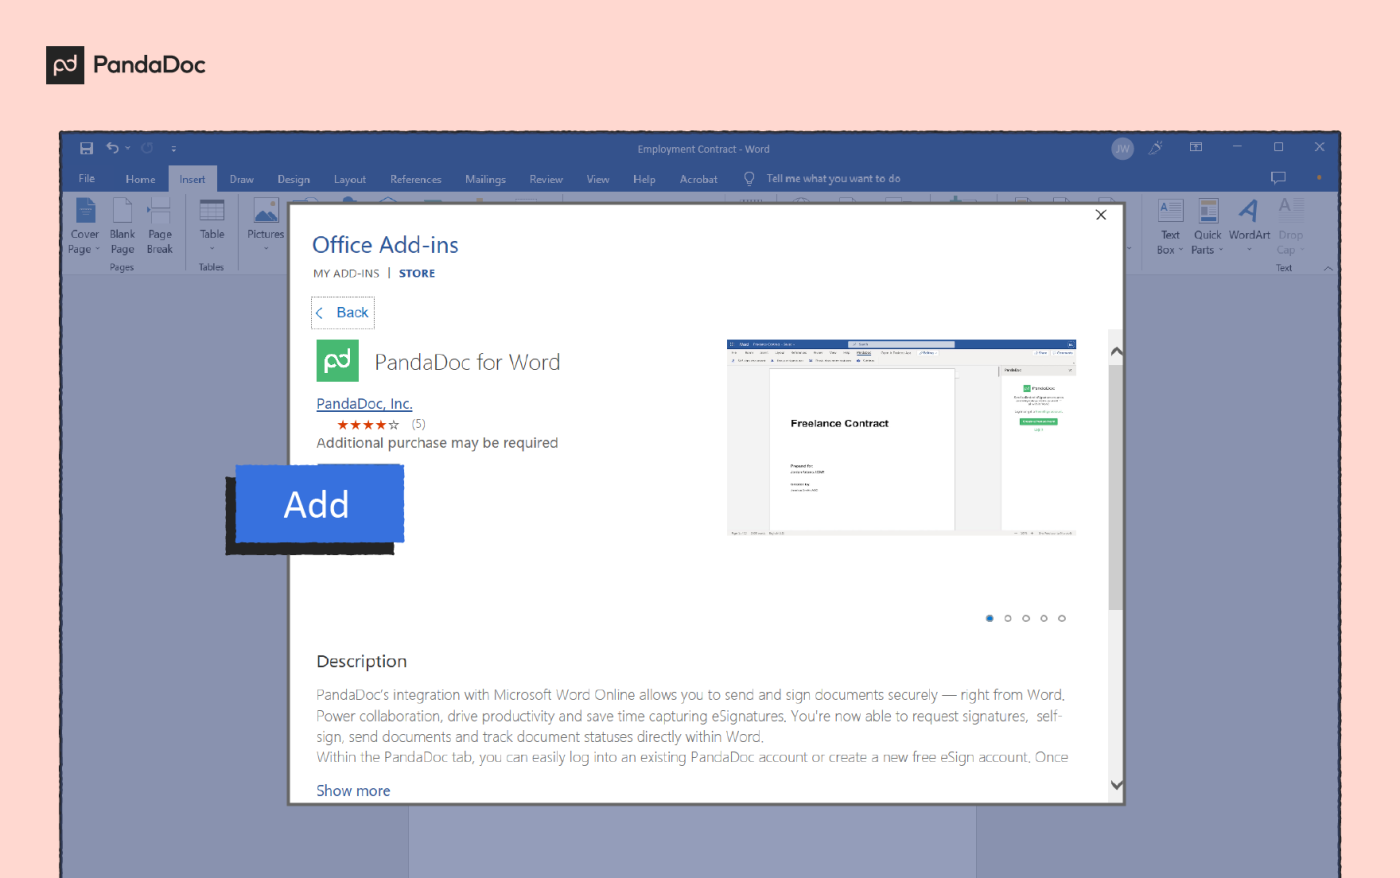
1. Install the add-in from Microsoft Marketplace or open any document, click Insert>Add-ins, find PandaDoc, and click Install.
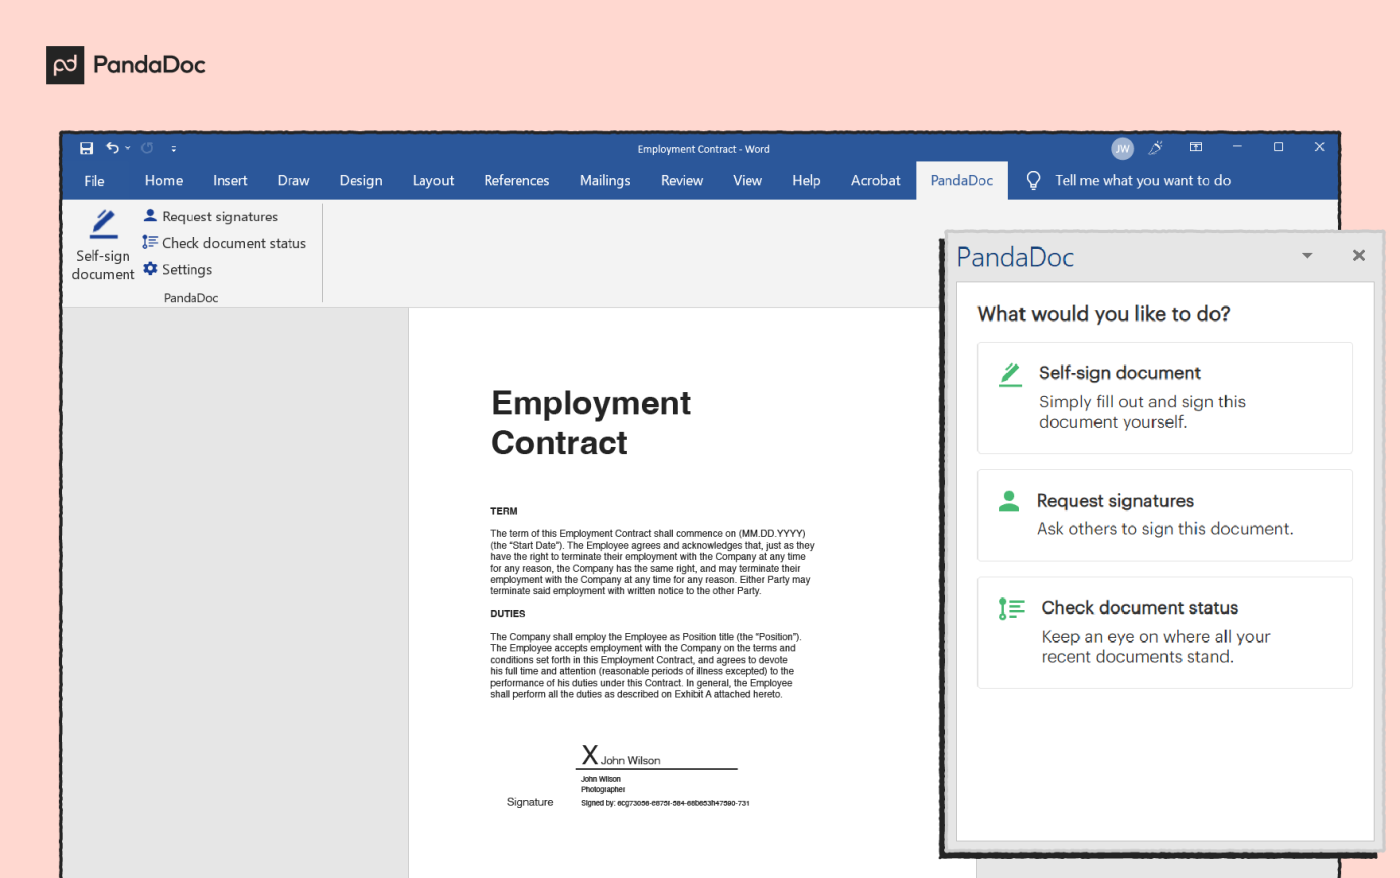
2. Click on any action beneath the PandaDoc tab. A panel will open to the right to either log into your account or create a new Free eSign account. Follow the instructions.
3. Once logged in, select the required action (self-sign document, request signatures, or check document status).
4. Add your signature or send this document for a signature request to other recipients.

5. When the document is signed by all parties, download a legally binding document right from Word that includes a signature certificate confirming the signature’s authenticity.
Step-by-step directions for using PandaDoc with Word Online can be found here.
How to add a signature to a Word document with the PandaDoc application
Here’s how to add an electronic signature to a Microsoft Word document using PandaDoc electronic signature software:
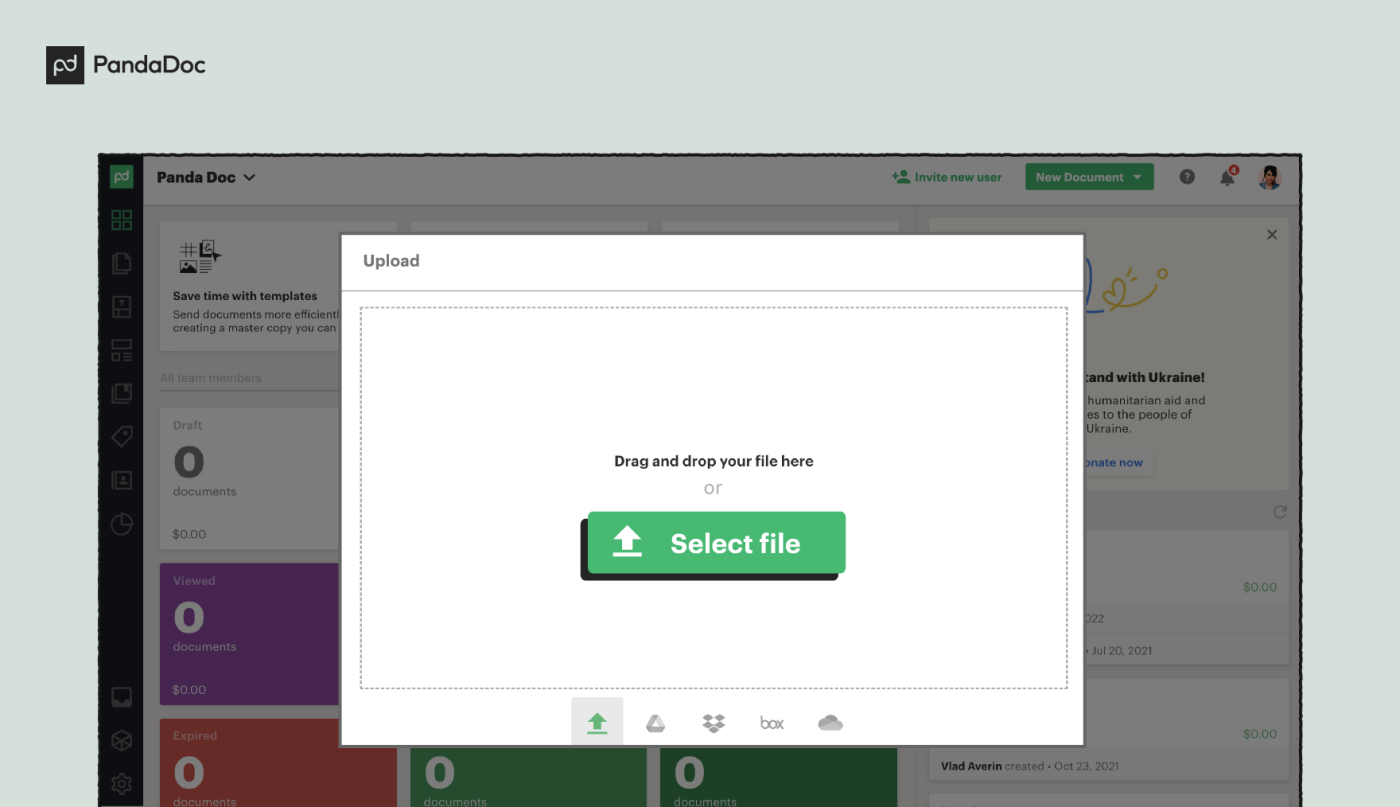
1. Log into PandaDoc and select the “New Document” button.

2. Click the “Upload” tab and either drag-and-drop the Word file or click “Select Files.”
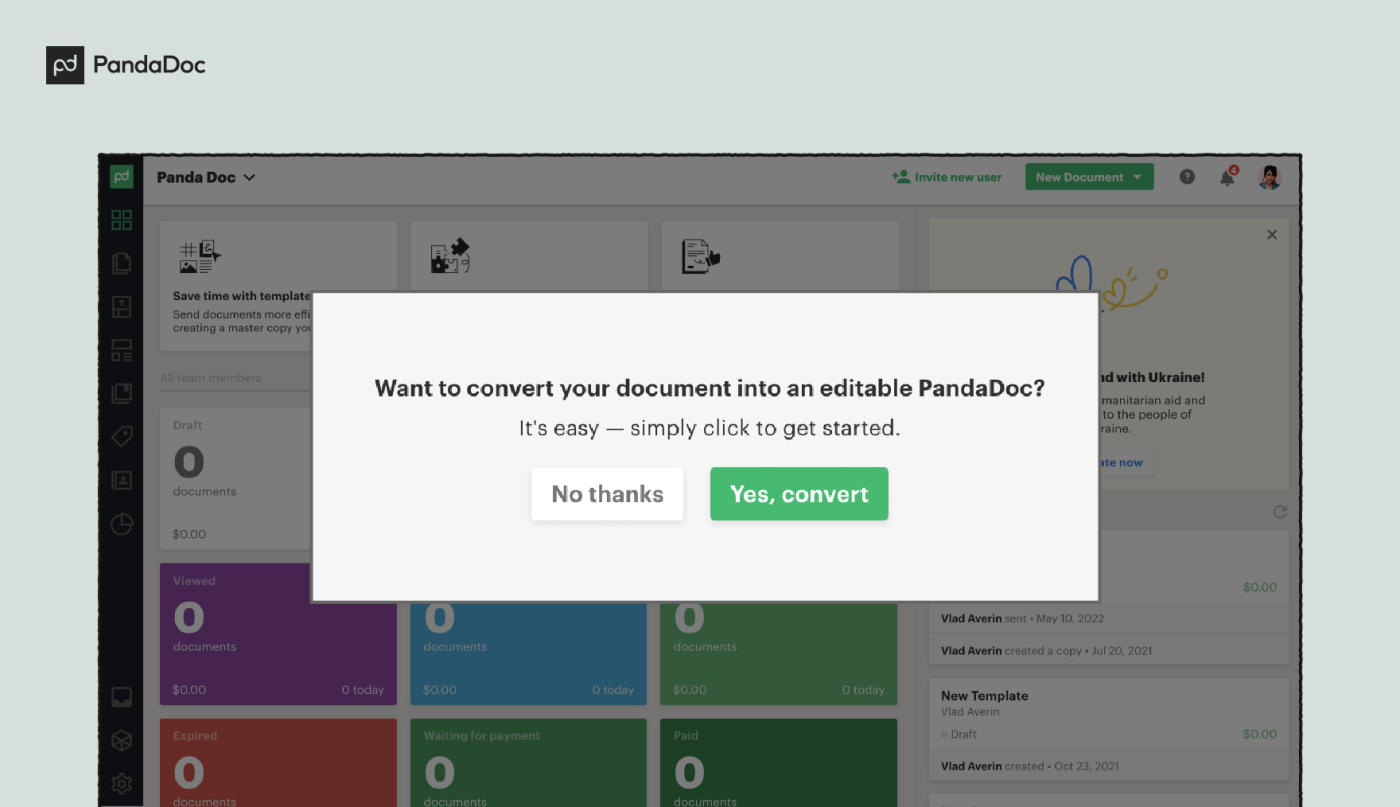
3. Select the “Display As Is” button. The document will convert into a native PandaDoc document if you select “Yes, convert” or appear as a non-editable document if you select “No, thanks.”
4. Click the Signature tab in the right-hand menu to drag and drop a signature field into the document.
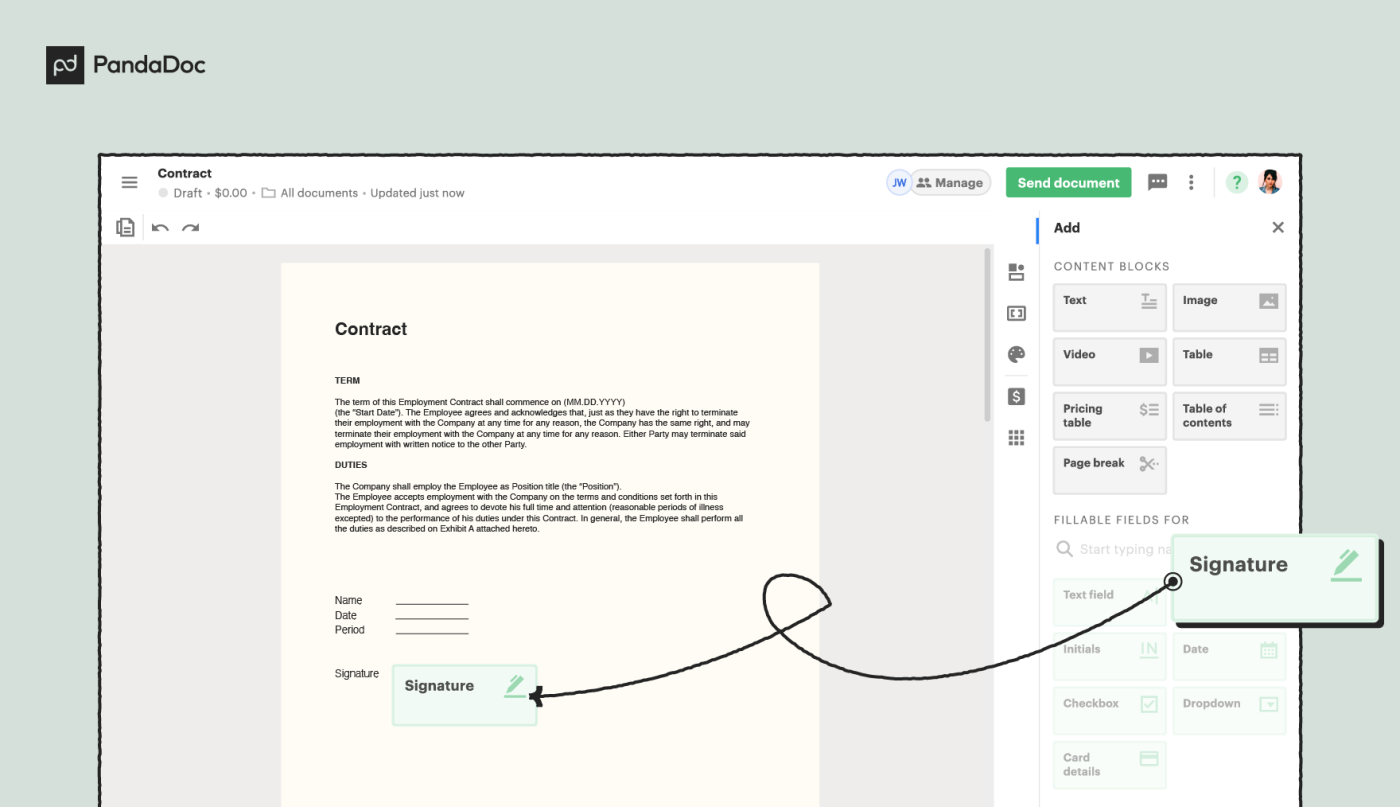
5. Select the signature box and assign yourself as a recipient or add a new contact.
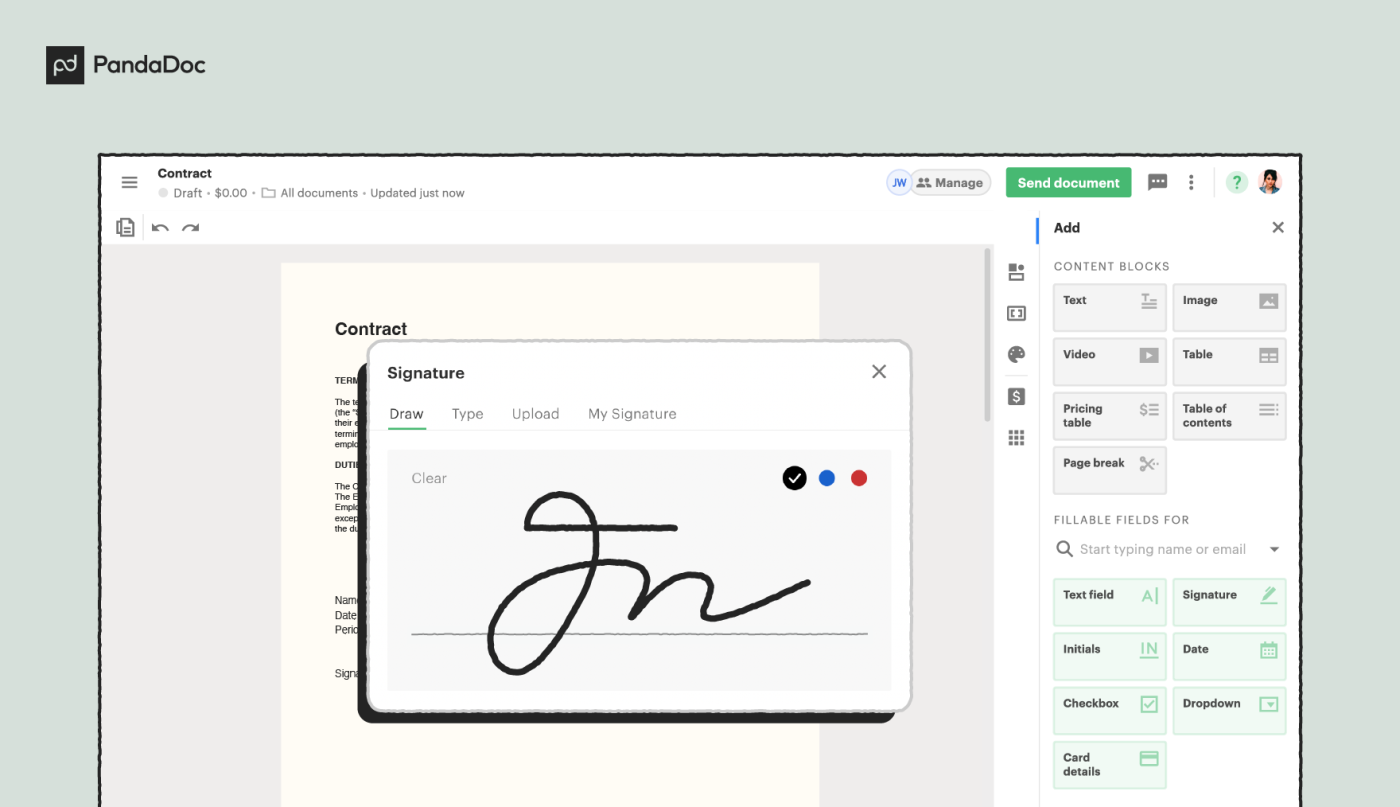
6. Make the signature by double-clicking on the box. You can upload an image, draw the signature, or enter it manually.

7. Finish the document and download the file in your preferred format.
In sum
Electronic signatures have changed the way that companies and individuals do business.
The big question is whether or not the built-in tools available with Word are sufficient for your needs.
If all you want to do is add simple images to the end of documents, or provide basic digital signature functionality, then these tools will likely work for you.
But if you need a more comprehensive set of features, then a “smart” signature app may be the way to go.
Not to toot our own horn, but tools like PandaDoc allow you to track and store signatures, while also providing an added layer of security and integrating with your existing tech stack.
That’s just one part of it — the insights you get will help you take your business to a new level.
Are you ready to take PandDoc for a spin?
Feature was added in File Management version 5.0.25
Using this action you can generate documents, based on a template, by using tokens. In order to use it, your template document needs to have plain text content controls inserted in the document.
To insert the content controls, you must go to File>Options>Customize Ribbon, check the Developer checkbox under the Main Tabs dropdown and click OK(save).

Next step is to edit the document and insert a content control by clicking Developer tab in menu > Plain Text Content Control under the Controls section.

Inside the content control you can write a placeholder(helptext) so you can see what should go there after tokenization (i.e.: User Name) and in the properties of the content control (with the newly added control selected, click Properties under the Controls section), inside the title, simply put the token that needs to be replaced after the document tokenization (i.e: [User:Username]).

The control’s content will be replaced with the token’s value if it has one or with the token itself if it doesn’t exist; you will still be able to see what token generated that content by hovering over the control or going into its properties.
You can set-up this action using the following parameters:
- Description: Something so you’d quickly know what this action is about;
- Error Message: The admins will also see the detailed error message. Leave empty to use the default message;
- Condition: This boolean expression is used to determine if this action will execute. Use it to enable or disable actions programatically. For example, you’d enable a ShowError action only if you’ve found an error let’s say when you parsed a response from a web service. A common example is [HasRole:Administrators|true] (which requires My Token to work) or [SomeField] == “Some Value”. This field supports My Tokens. See More examples;
- File Identifier: This parameter can either be a file id or a portal relative path, meaning if the path to file inside the site is Portals/0/SomeFolder/SomeDoc.docx the path you should provide as a parameter should be SomeFolder/SomeDoc.docx. This field supports My Tokens;
- Folder: Where to save the newly generated file. This field supports My Tokens;
- Pattern: You can provide a pattern to use in order to name the files. If you leave it empty, a GUID will be generated. This field supports My Tokens;
- Handle Duplicates: If there is a file with the same name, you can either overwrite the existing file or rename the one being added. By default the new file will be renamed;
- Output Token Name: A name for the token in which to save the generated file id;
Время прочтения: 6 мин.
Можно создать шаблон документа в Word, используя элементы управления содержимым (Content Control), и ограничить редактирование в нем. Но в документах бывает такое содержимое, которое необходимо добавлять или удалять. Например, добавить еще одну строку в таблицу, добавить пункт распоряжения и т.п. В таком случае будет удобнее создать собственную вкладку в Word, которая позволит изменять структуру документа при необходимости. В этой статье будет показано, как создавать Надстройку VSTO для документа Word.
Давайте рассмотрим небольшой пример программы, которая будет формировать шаблон документа. Документ выглядит следующим образом:

В Visual Studio создадим новый проект «ExampleRibbonWord» типа «Надстройка VSTO для Word 2013 и Word 2016»:

Нам необходимо создать ленту, на которой будут размещаться кнопки и выпадающие списки. Для этого щелкаем правой кнопкой мыши на названии проекта и добавляем элемент Лента (визуальный конструктор):


Вот такая лента у нас создалась:

Теперь в окне свойств элементов управления изменим названия нашей вкладки (Tab1) и группы (Group1).
tab1.Label=”Мои шаблоны”
group1.Label=”Создание шаблона”

Для начала давайте добавим на ленту кнопку (Button1), при нажатии на которую в документе Word будет создаваться шаблон. Свойства Label задаем= «Пример шаблона».

Теперь создадим событие Click для кнопки. Кнопка должна в документе Word сформировать указанный выше шаблон. В элементах управления содержимым мы разместим следующую информацию: дата распоряжения, номер распоряжения, название распоряжения, текст распоряжения, должность и ФИО. Пункты распоряжения мы разместим в таблице без границ. Каждый пункт распоряжения будет также размещаться в элементе управления. При нажатии на кнопку таблица должна сформироваться с одной строкой и двумя столбцами (номер пункта, текст пункта). В дальнейшем необходимо будет реализовать функционал, который позволит добавлять новые пункты в распоряжение.
Код:
public partial class Ribbon1
    {
        private void Ribbon1_Load(object sender, RibbonUIEventArgs e)
        {

        }

        //Создание текстового элемента управления
        //диапазон, тэг (по нему в дальнейшем можно получать содержимое), замещающий текст, когда элемент не заполнен, название
        private void AddContentControlText(Word.Range r, string tagRTC, string PlaceholderTextRTC, string titleRTC)
        {
            Word.Document currentDocument = Globals.ThisAddIn.Application.ActiveDocument;
            Document extendedDocument = Globals.Factory.GetVstoObject(currentDocument);
            RichTextContentControl rTC = extendedDocument.Controls.AddRichTextContentControl(r, tagRTC);
            rTC.PlaceholderText = PlaceholderTextRTC;
            rTC.Tag = tagRTC;
            rTC.LockContentControl = true;//элемент нельзя удалить
            rTC.Title = titleRTC;
        }

        //Создание элемента управления даты
        //диапазон, тэг (по нему в дальнейшем можно получать содержимое), замещающий текст, когда элемент не заполнен, стиль даты, название
        private void AddContentControlDate(Word.Range r, string tagDPC, string PlaceholderTextDPC, string styleDate, string titleDPC)
        {
            Word.Document currentDocument = Globals.ThisAddIn.Application.ActiveDocument;
            Document extendedDocument = Globals.Factory.GetVstoObject(currentDocument);
            DatePickerContentControl dPC = extendedDocument.Controls.AddDatePickerContentControl(r, tagDPC);
            dPC.PlaceholderText = PlaceholderTextDPC;
            dPC.Tag = tagDPC;
            dPC.LockContentControl = true;//элемент нельзя удалить
            dPC.DateDisplayFormat = styleDate;
            dPC.Title = titleDPC;
        }

        //создаем собственный стиль
        private void CreateMyStyle(Word.Document doc)
        {
            Word.Style style = doc.Styles.Add("MyStyleParagraph", Word.WdStyleType.wdStyleTypeParagraph);
            style.Font.Size = 12;
            style.Font.Name = "Times New Roman";
        }

        private void button1_Click(object sender, RibbonControlEventArgs e)
        {
            //при нажатии на кнопку появится диалоговое окно, которое спросит где создать шаблон в текущем открытом word или в новом.
            //при этом, если текущий документ будет не пустым, то шаблон создастся в новом документе
            Word.Document doc;
            DialogResult dialogResult = MessageBox.Show("Создать шаблон в новом документе?", "Создание шаблона", MessageBoxButtons.YesNo);
            if (dialogResult == DialogResult.Yes) doc = new Word.Document();
            else
            {
                doc = Globals.ThisAddIn.Application.ActiveDocument;
                if (doc.Characters.Count > 1)
                {
                    MessageBox.Show("Текущий документ не пустой! Шаблон будет создан в новом документе!");
                    doc = new Word.Document();
                }
            }

            //создаем стиль в текущем документе
            CreateMyStyle(doc);

            //создаем абзац
            doc.Paragraphs.Add();
            Word.Paragraph p = doc.Paragraphs.First;
            Word.Range r = p.Range;
            r.Font.Bold = 1;// шрифт жирный
            r.Text = "РАСПОРЯЖЕНИЕ";//текст абзаца
            r.ParagraphFormat.set_Style(doc.Styles["MyStyleParagraph"]); //стиль применяем

            //создаем абзац и вставляем в него 2 элемента управления
            //для каждого типа элемента управления создаем функцию с параметрами
            doc.Paragraphs.Add();
            p = doc.Paragraphs.Last;
            r = p.Range;
            r.ParagraphFormat.set_Style(doc.Styles["MyStyleParagraph"]);
            //дата распоряжения
            AddContentControlDate(r, "DateRaspr", "Дата распоряжения", "d MMMM yyyy г.", "Дата распоряжения");
            r = doc.Range(p.Range.End - 1, p.Range.End - 1);
            r.Text = " № ";
            //номер распоряжения
            AddContentControlText(r, "NumberRaspr", "Номер распоряжения", "Номер распоряжения");

            doc.Paragraphs.Add();
            p = doc.Paragraphs.Last;
            p.SpaceAfter = 18;
            r = p.Range;
            r.ParagraphFormat.set_Style(doc.Styles["MyStyleParagraph"]);
            r.Font.Bold = 1;
            p.Alignment = Word.WdParagraphAlignment.wdAlignParagraphCenter;//по центру размещаем
            //название распоряжения
            AddContentControlText(r, "NameRaspr", "Название распоряжения", "Название распоряжения");

            doc.Paragraphs.Add();
            p = doc.Paragraphs.Last;
            p.SpaceAfter = 18;
            r = p.Range;
            r.ParagraphFormat.set_Style(doc.Styles["MyStyleParagraph"]);
            p.Alignment = Word.WdParagraphAlignment.wdAlignParagraphCenter;
            //текст распоряжения
            AddContentControlText(r, "TextRaspr", "Текст распоряжения", "Текст распоряжения");

            doc.Paragraphs.Add();
            p = doc.Paragraphs.Last;
            r = p.Range;
            r.ParagraphFormat.set_Style(doc.Styles["MyStyleParagraph"]);
            //таблица для пунктов распоряжения
            Word.Table tbl = doc.Tables.Add(r, 1, 2);
            tbl.Columns[1].SetWidth(doc.Application.CentimetersToPoints(1), Word.WdRulerStyle.wdAdjustFirstColumn);
            tbl.Cell(1, 1).Range.Text = "1.";
            r = doc.Range(tbl.Cell(1, 2).Range.End - 1, tbl.Cell(1, 2).Range.End - 1);
            AddContentControlText(r, "TextPunkt", "Пункт распоряжения", "Пункт распоряжения");

            doc.Paragraphs.Add();
            p = doc.Paragraphs.Last;
            r = p.Range;
            //должность
            AddContentControlText(r, "Dolgnost", "Должность", "Должность");
            r = doc.Range(p.Range.End - 1, p.Range.End - 1);
            r.Paragraphs.TabStops.Add(350, Word.WdAlignmentTabAlignment.wdLeft);
            r.Text = "t";
            r = doc.Range(p.Range.End - 1, p.Range.End - 1);
            //ФИО
            AddContentControlText(r, "FIO", "ФИО", "ФИО");
        }
    }
Запускаем и получаем вот такой шаблон документа:

Для примера заполним дату распоряжения:

Дата заполнена:

В следующих статьях мы рассмотрим пример функционала для пользователя, чтобы он мог создавать новые пункты распоряжения или удалять ненужные.