
Access for Microsoft 365 Access 2021 Access 2019 Access 2016 Access 2013 Access 2010 More…Less
Use the Yes/No data type to store a Boolean value, such as True or False, On or Off, Yes or No, and any field that contains only one of two values. This data type often maps to a Check Box control on a form or report.
In this article
-
Add a Yes/No field in Datasheet view
-
Add a Yes/No field in Design view
-
Set or change Yes/No field properties
-
Delete a Yes/No field
-
Yes/No field property reference
Add a Yes/No field in Datasheet view
You can add a Yes/No field to a new or existing table in Datasheet View.
Add to an existing table
-
Open the table in Datasheet View.
-
If necessary, scroll horizontally to the first blank field.
-
Select Click to Add and then select Yes/No from the list.
-
Double-click the new header row, and then type a meaningful name for the new field.
-
Save your changes.
Add to a new table
-
On the Create tab, in the Tables group, click Table.
-
Click Save , and in the Save As dialog box, enter a name for the new table.
-
Select Click to Add and then select Yes/No from the list.
-
Double-click the new header row, and then type a meaningful name for the new field.
-
Save your changes.
Top of Page
Add a Yes/No field in Design view
You can add a Yes/No field to a new or existing table in Design View.
Add to an existing table
-
Open the table in Design View.
-
In the Field Name column, select the first blank row, and then type a name for the field.
-
Select the adjacent cell in the Data Type column, and then select Yes/No from the list.
-
Save your changes.
Add to a new table
-
On the Create tab, in the Tables group, click Table.
-
Click Save, and in the Save As dialog box, enter a name for the new table.
-
Right-click the document tab for the new table and click Design View.
-
In the Field Name column, select the first blank row, and then type a name for the field.
-
Select the adjacent cell in the Data Type column, and then select Yes/No from the list.
-
Save your changes.
Top of Page
Set or change Yes/No field properties
You can use Datasheet View to set a subset of field properties, such as Default Value or Name & Caption, but use Design View to set all available properties, including Format or Indexed.
-
Open the table in Design View.
-
On the General tab in the lower section of the table designer, under Field Properties, locate the property that you want to change.
-
Select the field next to the property name. Depending on the property, you can enter data, start the Expression Builder by clicking
 , or select an option from a list.
For information about how to use each field property, select the property and then press F1.
 , or select an option from a list.
Top of Page
Delete a Yes/No field
Important When you delete a Yes/No field that contains data, you lose that data permanently — you cannot undo the deletion. For that reason, you should back up your database before you delete any table fields or other database components.
Delete from Datasheet view
-
Open the table in Datasheet View.
-
Locate the Yes/No field, right-click the header row (the name), and then click Delete Field.
-
Click Yes to confirm the deletion.
Delete from Design view
-
Open the table in Design View.
-
Click the row selector (the blank square) next to the Text field, and then press DELETE, or right-click the row selector and then click Delete Rows.
-
Click Yes to confirm the deletion.
Top of Page
Yes/No field property reference
When you use Design View to add a Yes/No field to a table, you can set and change a number of properties for the field. This table shows the Yes/No field properties, describes what each one does, and explains the implications of setting or changing them.
|
Property |
Use |
|
Caption |
The label text that is displayed for this field by default in forms, reports, and queries. If this property is empty, the name of the field is used. Any text string is allowed. An effective caption is usually brief. |
|
Default Value |
Automatically assigns the specified value to this field when a new record is added. |
|
Format |
Determines the way that the field appears when it is displayed or printed in datasheets, or in forms or reports that are bound to the field. Select one of the following:
|
|
Indexed |
Specifies whether the field has an index. There are three available values:
Note: Do not change this property for a field that is used in a primary key. Although you can create an index on a single field by setting the Indexed field property, some kinds of indexes cannot be created in this manner. For example, you cannot create a multi-field index by setting this property. |
|
Text Align |
Specifies the default alignment of text within a control. |
|
Validation Rule |
Supplies an expression that must be true whenever you add or change the value in this field. Use in conjunction with the Validation Text property. |
|
Validation Text |
Enter a message to display when a value that is entered violates the expression in the Validation Rule property. |
Top of Page
Need more help?
|
05-18-2017, 06:49 AM |
|||
|
|||
|
Adding Yes, No Boxes in Word Document Hello all, I need help adding boxes into a word document. I am creating a form and need several columns of yes, no boxes in different area’s on a questionnaire. Please help!
|


|
05-18-2017, 07:52 AM |
|
A single checkbox would give you true/false.
__________________
|
|
05-18-2017, 11:16 AM |
|||
|
|||
|
To be honest, I am looking for a very simple solution to add the boxes to a word document for printing purposes only. For an example, Yes No and the boxes empty beneath for someone to check off with a pen. Thank you!
|
|
05-18-2017, 06:07 PM |
|
The checkbox content controls under the Developer tab will worik fine. So will various symbols.
|
![]()
Download Article
![]()
Download Article
Want to add a check box or tick box to a list or form in Microsoft Word? It’s easy to do, and you can even make it checkable so you can click the box with your mouse. We’ll show you an easy way to add a clickable checkbox using Developer Mode in Microsoft Word.
Steps
-
1
Open a new file in Microsoft Word. Do so by opening the app shaped like a blue W. Then click on File in the menu bar at the top of the screen, and click on New Blank Document.
-
2
Click on File in the menu bar and then Options in the menu.
- On Mac, click on Word in the menu bar and then Preferences… in the menu.
Advertisement
-
3
Click on Customize Ribbon and then Main Tabs in the «Customize the Ribbon:» drop-down menu.»[1]
- On Mac, click on Ribbon & Toolbar in the «Authoring and Proofing Tools» section of the dialog box, then click on the Ribbon tab at the top of the dialog box.
-
4
Check «Developer» in the «Main Tabs» pane.
-
5
Click on Ok.
-
6
Click on Developer. It’s a tab in the upper-right part of the window.
-
7
Position the cursor where you’d like to insert the check box.
-
8
Click on Check Box. It’s in the menu bar at the top of the window.
-
9
Add additional check boxes and text as needed.
-
10
Lock the form. To do so, select the entire list, to be found in the Controls section on the Developer tab, then click on Group and Group.
- On Mac, click Protect Form in the Developer tab toolbar.


Advertisement
Add New Question
-
Question
What should I do if the check box is grayed out in my ribbon?

It is grayed out for me too. However, if you click on the one icon that isn’t — Legacy Tools — then you will find the exact same checkbox, which you should be able to select.
-
Question
How can I enlarge the size of a text box without enlarging the text?
In Word, just dragging the corner of the text box should be sufficient. If the text changes size accidentally, you can always highlight it and change it back to the desired size.
-
Question
How do you make a drop box in word?
Download LibreOffice. Follow the manual on how to add a list or list/add or list/multiselect box (or just look under «insert» in the menu). You can add a data source for the dropdown menu items from a database, a spreadsheet or within the file structure itself.
See more answers
Ask a Question
200 characters left
Include your email address to get a message when this question is answered.
Submit
Advertisement
Thanks for submitting a tip for review!
About This Article
Article SummaryX
1. Open a document.
2. Click File.
3. Select Customize Ribbon and then click Main Tabs.
4. Check the «Developer» box.
5. Click Save.
6. Click Developer.
7. Click where you want to insert the check box.
8. Click Check Box.
9. Add additional boxes and text.
10. Lock the form.
Did this summary help you?
Thanks to all authors for creating a page that has been read 1,240,770 times.
Is this article up to date?
- Remove From My Forums
-
Question
-
User-1395830550 posted
I have showing a confirmation alert box through my javascript as following
function checked() {
if (ndhval.toLowerCase() != textbox1.toLowerCase()) {
var save = window.confirm(‘valid’)
if (save == true)
{
return true;
}
else
{
return false;
}
}
}the confirmation alert is showing with two btn OK and Cancel.
I want to show 3 button in my confirmation alert ‘Yes’ ‘No’ ‘Cancel’, as it shows in MS Word.
is it possible if yes then its possible? please someone help me.
thanks in advanced.
Answers
-
-
Marked as answer by
Thursday, October 7, 2021 12:00 AM
-
Marked as answer by
OfficeArticles.com debuted on May 26, 2005.
OfficeArticles.com provides examples of Formulas, Functions and Visual Basic procedures for illustration only,
without warranty either expressed or implied, including but not limited to the implied warranties of merchantability
and/or fitness for a particular purpose. The Formulas, Functions and Visual Basic procedures on this web site are provided
«as is» and we do not guarantee that they can be used in all situations.
Access®, Excel®, FrontPage®, Outlook®, PowerPoint®, Word® are registered trademarks of the Microsoft Corporation.
Privacy Policy | Cookies Policy
© 2005 — 2023 by MrExcel Publishing. All rights reserved.

If you want to know whether something is yes or no, you can simply provide Yes No Checklist. This type of form assists you in the way to obtain agreement answers. It is usually implemented in various areas like survey or recruitment. The checklist can help you find out if everything on the list and so. By checking if it is Yes or No, you won’t miss the essential information. Surely, you need to provide the description of things on the list and check “Yes” if you agree and “No” if you disagree.
Yes No Checklist is also useful for daily needs. Take for example if you want to hold a birthday party. The simple form like this can help you get more organized in planning the event. Write down the things you want to be there at the party and use the checklist to find out if those items have been ready. If all descriptions are checked “Yes”, so you know that the plan has got done perfectly. Otherwise, the “No” checklists, it is time to make immediate action to prepare the unavailable.
In using the checklist, you can take time checking each item yourself. Alternatively, you are able to invite people who help you plan the party, for example friends, and ask them about the completeness of each duty you deliver to each of them. Instead of printing the form in several copies and get your friends giving the check personally, it is better to ask them verbally and they will give the answers with the same way.
If you have time to make the checklist yourself, this job does not require much effort to do. You can use MS Word based template. Simply create a table consisting of four columns, titled with Number, Description, Yes and No. It surely depends on what kind of event you are intended to prepare. If it is a birthday party, you should not forget to put name, date and location.
Are you too busy taking care of other tasks? The template sample can be found easily on the internet. You just need to download one of them at no cost. You are also allowed making some modification to get the template suiting to your needs. You can add the columns, change the title or modify the description. Just be creative. Ask your friends to help checking if everything has been listed completely, so you won’t miss anything. Change the title of Yes No Checklist with Birthday Checklist or others, depending on the occasion.
Download
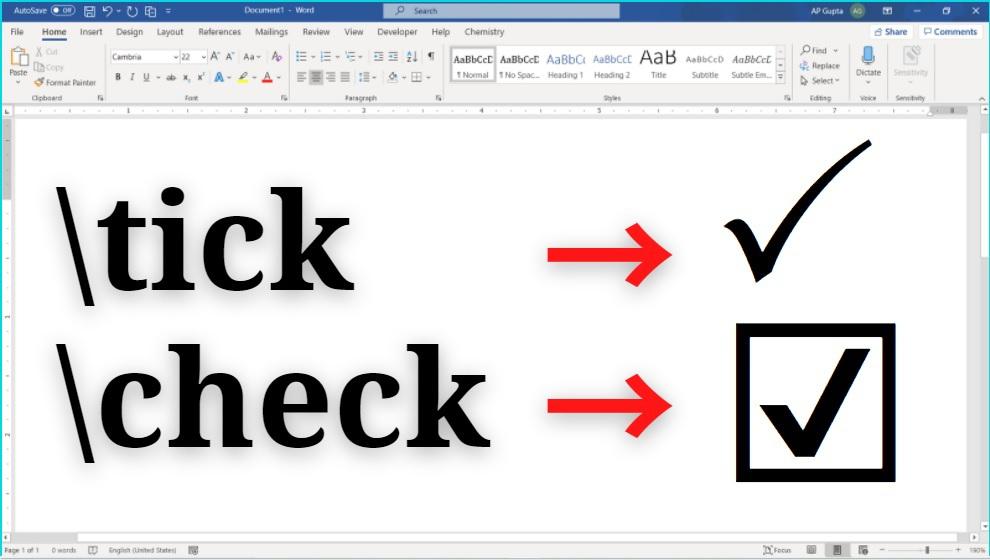
Tick symbol (🗸) also known as a check mark is a symbol for “Yes”. Sometimes tick in a box (☑) is preferred over tick symbol to denote yes or completion. In this blog we have covered, four different ways to insert tick and tick in box symbol in Microsoft Word.
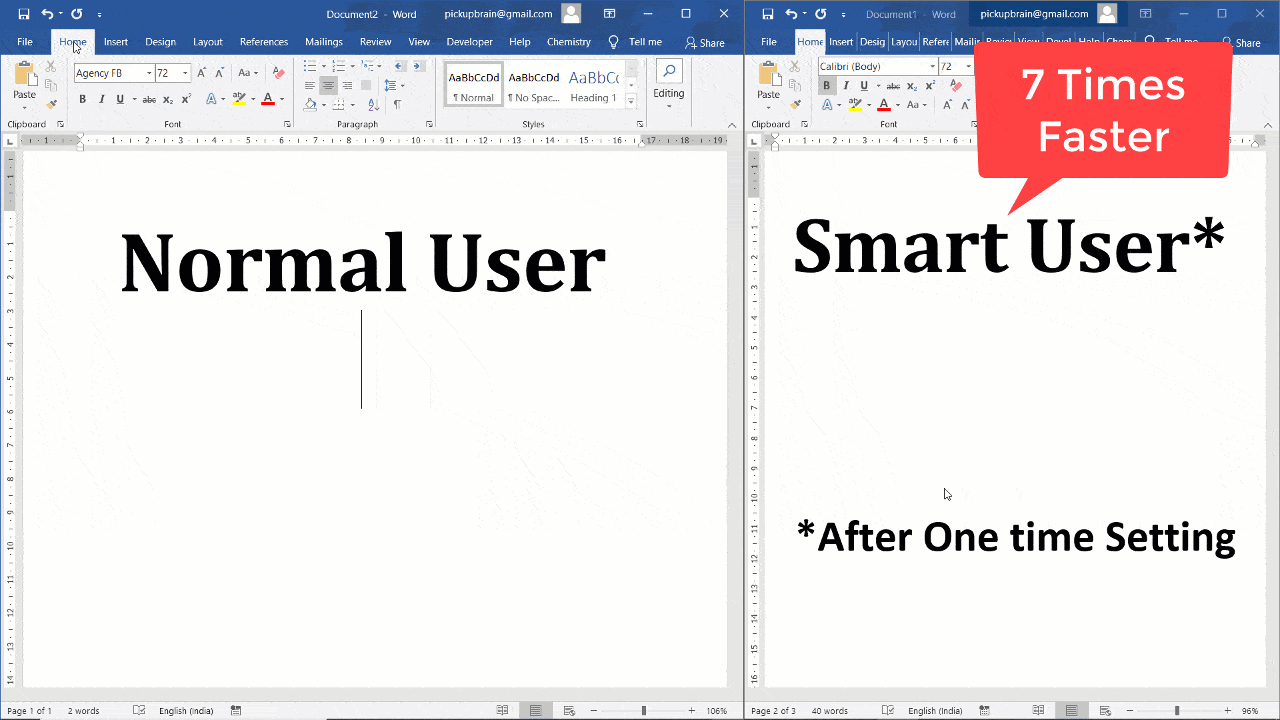
Place your cursor where you want to insert the symbol and use any of the following 4 methods. Method 4 is easiest and up to 7 times faster.
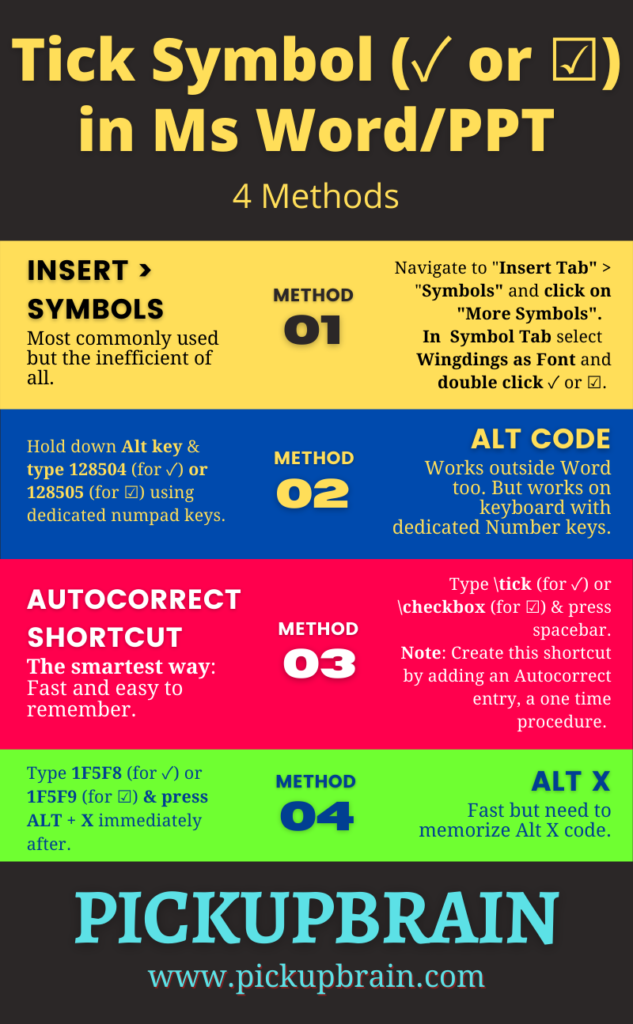
Method 1 – Insert > Symbols
- Navigating Insert Tab > Symbols and select More Symbols
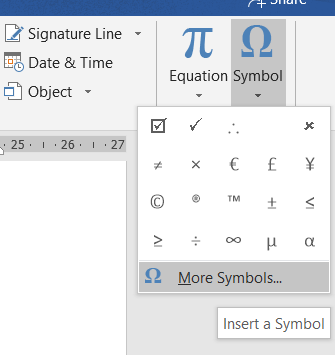
2. Select Symbol Tab > Wingdings Font, and double click on desired symbol i.e. 🗸 or ☑.
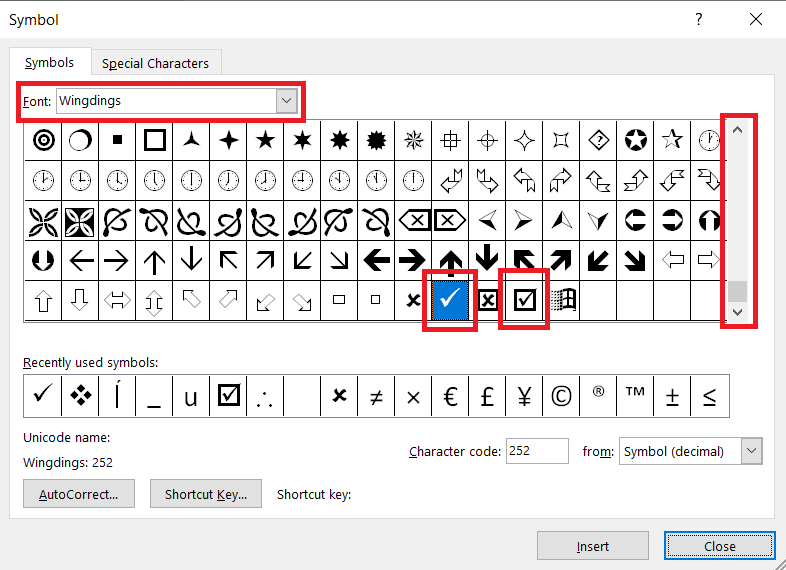
3. Select Close
Method 2 – Alt Code (Requires dedicated Number pad keys)
Ms Word Alt code for Tick (or Check) Mark and Tick in Box are:
| Tick Symbol or Check Mark (🗸) | Tick in Box (☑) |
|---|---|
| 128504 | 128505 |
To insert symbol, type corresponding Alt Code using Number pad (not using numerics key using above letters) while holding down Alt key.
Method 3 – Autocorrect (Fastest method for Tick Symbol Word)
- Create Autocorrect entry
- Locate Tick Symbol or Tick in Box symbol (as shown in Method 1) by navigating to Insert > Symbols > More Symbols and select symbol.
- Click Autocorrect Button to open new AutoCorrect Dialogue box.
- Type desired shortcut text (say tick or checkbox) in Replace.
- Click Add.
- Close Autocorrect and Symbol Window.
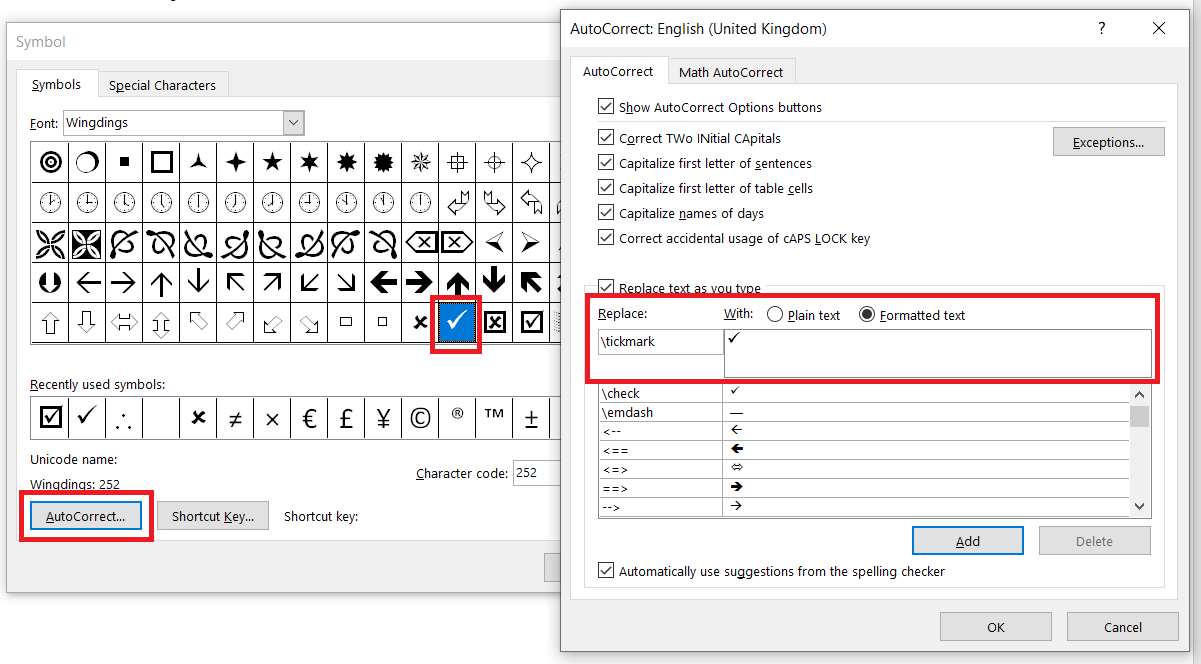
2. Type autocorrect text created in above step and press space (for e.g. tick) to convert into corresponding symbol.
Method 4 – Alt X
Alt X code for Tick (or Check) Mark & Tick in Box are
| Tick Symbol or Check Mark (🗸) | Tick in Box (☑) |
|---|---|
| 1F5F8 | 1F5F9 |
To insert thick (or check) mark, type 1F5F8 and press Alt + X immediately following it. Similarly, for inserting tick in box, type 1F5F8 and press Alt + X.
Summary
There are four different methods to insert tick symbol in Ms Word. Of all, Alt X and Alt Code method requires remembering 4-5 digit code. While, the Insert Symbol and Autocorrect method are straightforward and relatively easy to remember. Of all these, the smartest way to insert tick symbol or tick in box is Autocorrect method as it is fastest and easy to remember.
Related Posts
 The checklist is made to help you check about everything on the list and so that you do not miss a single thing that should be checked. Yes No Checklist helps you to check whether something is No or Yes. You only need to write the description of something on the list and mark the “Yes” box when it is Yes or mark “No” box when it is No.
Yes No Checklist can help you organize something such as birthday parties. You can write down anything you need to prepare for the birthday and use the checklist to make sure everything is ready. If you find No on your checklist, then you should immediately prepare it so the party will run well. The other application is for a questionnaire on something and you want people to answer it with Yes or No. People can easily check the “Yes” or “No” boxes or you can be the checker and people answer the question verbally.
The template is a word format that you can easily modify as you need. You can change the title of the Yes No Checklist or you can add more description of the checklist. For example, you can change the title with “Birthday Checklist”, put the name on it, and write complete information about the date, time, and location.
 Yes No Checklist (43.0 KiB, 8,990 hits)
Updated: 12/31/2022 by

Below is a listing of the more commonly used shortcut keys in Microsoft Word. See the computer shortcuts page if you are looking for a list of shortcut keys used in other programs. Please be aware that some shortcuts may not work in all versions of Microsoft Word.
Note
If the device you are using does not have function keys (F1-F12) on its keyboard, like a Chromebook, certain shortcuts are unavailable to you.
Note
Some Microsoft Word shortcut keys below may not work in Word 365, and most shortcut keys do not work in Word on a mobile device.
| Shortcut | Description |
|---|---|
| Ctrl+0 | Toggle 6pts of spacing above the paragraph. |
| Ctrl+A | Select all contents of the page. |
| Ctrl+B | Bold highlighted selection. |
| Ctrl+C | Copy selected text. |
| Ctrl+D | Open the font preferences window. |
| Ctrl+E | Align the line or selected text to the center of the screen. |
| Ctrl+F | Open find box. |
| Ctrl+I | Italic highlighted selection. |
| Ctrl+J | Align the selected text or line to justify the screen. |
| Ctrl+K | Insert a hyperlink. |
| Ctrl+L | Align the line or selected text to the left of the screen. |
| Ctrl+M | Indent the paragraph. |
| Ctrl+N | Open new, blank document window. |
| Ctrl+O | Open the dialog box or page for selecting a file to open. |
| Ctrl+P | Open the print window. |
| Ctrl+R | Align the line or selected text to the right of the screen. |
| Ctrl+S | Save the open document. Like Shift+F12. |
| Alt+F, A | Save the document under a different file name. |
| Alt+X | Show the Unicode code of a highlighted character. |
| Ctrl+T | Create a hanging indent. |
| Ctrl+U | Underline the selected text. |
| Ctrl+V | Paste. |
| Ctrl+W | Close the currently open document. |
| Ctrl+X | Cut selected text. |
| Ctrl+Y | Redo the last action performed. |
| Ctrl+Z | Undo last action. |
| Ctrl+Shift+A | Sets the selected text to all capital letters. |
| Ctrl+Shift+D | Adds double underline to the selected text. |
| Ctrl+Shift+E | Enable or disable revision tracking. |
| Ctrl+Shift+F | Open Font window to change the font. |
| Ctrl+Shift+L | Quickly create a bullet point. |
| Ctrl+Shift+> | Increase selected font +1pts up to 12pt and then increase font +2pts. |
| Ctrl+] | Increase selected font +1pts. |
| Ctrl+Shift+< | Decrease selected font -1pts if 12pt or lower; if above 12, decreases font by +2pt. |
| Ctrl+[ | Decrease selected font -1pts. |
| Ctrl+/+C | Insert a cent sign (¢). |
| Ctrl+'+<char> | Insert a character with an accent (acute) mark, where <char> is the character you want. For example, if you wanted an accented é you would use Ctrl+’+e as your shortcut key. To reverse the accent mark, use the opposite accent mark, often found on the tilde key. |
| Ctrl+Shift+* | View or hide non printing characters. |
| Ctrl+Left arrow | Move one word to the left. |
| Ctrl+Right arrow | Move one word to the right. |
| Ctrl+Up arrow | Move to the beginning of the line or paragraph. |
| Ctrl+Down arrow | Move to the end of the paragraph. |
| Ctrl+Del | Delete word to right of cursor. |
| Ctrl+Backspace | Delete word to left of cursor. |
| Ctrl+End | Move the cursor to the end of the document. |
| Ctrl+Home | Move the cursor to the beginning of the document. |
| Ctrl+Spacebar | Reset highlighted text to the default font. |
| Ctrl+Enter | Insert a page break. |
| Ctrl+1 | Single-space lines. |
| Ctrl+2 | Double-space lines. |
| Ctrl+5 | 1.5-line spacing. |
| Ctrl+= | Set selected text as subscript. |
| Ctrl+Pg Up | Move one page up in the document. |
| Ctrl+Pg Dn | Move one page down in the document. |
| Ctrl+Shift+= | Set selected text as superscript. |
| Ctrl+Alt+T | Insert trademark (TM) symbol. |
| Ctrl+Alt+1 | Changes text to heading 1. |
| Ctrl+Alt+2 | Changes text to heading 2. |
| Ctrl+Alt+3 | Changes text to heading 3. |
| Ctrl+Alt+F2 | Open new document. |
| Ctrl+F1 | Open the Task Pane. |
| Ctrl+F2 | Display the print preview. |
| Ctrl+Shift+> | Increase the font size of selected text by one point. |
| Ctrl+Shift+< | Decrease the font size of selected text by one point. |
| Ctrl+Shift+F6 | Switch to another open Microsoft Word document. |
| Ctrl+Shift+F12 | Print the document. |
| F1 | Open help. |
| F4 | Repeat the last action performed (Word 2000+). |
| F5 | Open the Find, Replace, and Go To window in Microsoft Word. |
| F7 | Spellcheck and grammar check selected text or document. |
| F12 | Save As. |
| Shift+F3 | Change the text in Microsoft Word from uppercase to lowercase or a capital letter at the beginning of every word. |
| Shift+F7 | Run a Thesaurus check on the selected word. |
| Shift+F12 | Save the open document. Like Ctrl+S. |
| Shift+Enter | Create a soft break instead of a new paragraph. |
| Shift+Insert | Paste. |
| Shift+Alt+D | Insert the current date. |
| Shift+Alt+T | Insert the current time. |
You can also utilize the mouse to perform many common actions. The following section contains examples of mouse shortcuts.
| Mouse shortcuts | Description |
|---|---|
| Click, hold, and drag | Selects text from where you click and hold to the point you drag and let go. |
| Double-click | If double-clicking a word, selects the complete word. |
| Double-click | Double-clicking the left, center, or right of a blank line makes the alignment of the text left, center, or right aligned. |
| Double-click | Double-clicking anywhere after text on a line sets a tab stop. |
| Triple-click | Selects the line or paragraph of the text where the mouse is triple-clicked. |
| Ctrl+Mouse wheel | Zooms in and out of document. |
I have setup a very, very basic vbscript to print several word documents.
The script is as follows — (I have left out most of the documents, as the lines are all the same, with only the dicument name being different)
Set objWord = CreateObject(«Word.Application»)
objWord.Visible = True
Set objDoc = objWord.Documents.Add()
objWord.PrintOut ,,,,,,,,,,,,»C:IT Ops Daily Check Sheet.doc»
objWord.PrintOut ,,,,,,,,,,,,»C:DCS Overnight And Midday Poll.doc»
objWord.Quit
An MS Word Window is opened, but I get a popup message for each document as follows —
«The Margins of section 1 are outside the printable area of the page. Do you want to continue? Yes / No»
Replying yes to each popup message will allow the documents to print, but is there any way of programatically preventing this popup box from appearing (other than changing the margins, of course)
Also once the vbscript has finished, the MS Word window stays open. Is objWord.Quit the write function? How can I get the MS Word window to close from the script.
Thanks for any help, in advance.