
Access for Microsoft 365 Access 2021 Access 2019 Access 2016 Access 2013 Access 2010 More…Less
Use the Yes/No data type to store a Boolean value, such as True or False, On or Off, Yes or No, and any field that contains only one of two values. This data type often maps to a Check Box control on a form or report.
In this article
-
Add a Yes/No field in Datasheet view
-
Add a Yes/No field in Design view
-
Set or change Yes/No field properties
-
Delete a Yes/No field
-
Yes/No field property reference
Add a Yes/No field in Datasheet view
You can add a Yes/No field to a new or existing table in Datasheet View.
Add to an existing table
-
Open the table in Datasheet View.
-
If necessary, scroll horizontally to the first blank field.
-
Select Click to Add and then select Yes/No from the list.
-
Double-click the new header row, and then type a meaningful name for the new field.
-
Save your changes.
Add to a new table
-
On the Create tab, in the Tables group, click Table.
-
Click Save , and in the Save As dialog box, enter a name for the new table.
-
Select Click to Add and then select Yes/No from the list.
-
Double-click the new header row, and then type a meaningful name for the new field.
-
Save your changes.
Top of Page
Add a Yes/No field in Design view
You can add a Yes/No field to a new or existing table in Design View.
Add to an existing table
-
Open the table in Design View.
-
In the Field Name column, select the first blank row, and then type a name for the field.
-
Select the adjacent cell in the Data Type column, and then select Yes/No from the list.
-
Save your changes.
Add to a new table
-
On the Create tab, in the Tables group, click Table.
-
Click Save, and in the Save As dialog box, enter a name for the new table.
-
Right-click the document tab for the new table and click Design View.
-
In the Field Name column, select the first blank row, and then type a name for the field.
-
Select the adjacent cell in the Data Type column, and then select Yes/No from the list.
-
Save your changes.
Top of Page
Set or change Yes/No field properties
You can use Datasheet View to set a subset of field properties, such as Default Value or Name & Caption, but use Design View to set all available properties, including Format or Indexed.
-
Open the table in Design View.
-
On the General tab in the lower section of the table designer, under Field Properties, locate the property that you want to change.
-
Select the field next to the property name. Depending on the property, you can enter data, start the Expression Builder by clicking
 , or select an option from a list.
For information about how to use each field property, select the property and then press F1.
 , or select an option from a list.
Top of Page
Delete a Yes/No field
Important When you delete a Yes/No field that contains data, you lose that data permanently — you cannot undo the deletion. For that reason, you should back up your database before you delete any table fields or other database components.
Delete from Datasheet view
-
Open the table in Datasheet View.
-
Locate the Yes/No field, right-click the header row (the name), and then click Delete Field.
-
Click Yes to confirm the deletion.
Delete from Design view
-
Open the table in Design View.
-
Click the row selector (the blank square) next to the Text field, and then press DELETE, or right-click the row selector and then click Delete Rows.
-
Click Yes to confirm the deletion.
Top of Page
Yes/No field property reference
When you use Design View to add a Yes/No field to a table, you can set and change a number of properties for the field. This table shows the Yes/No field properties, describes what each one does, and explains the implications of setting or changing them.
|
Property |
Use |
|
Caption |
The label text that is displayed for this field by default in forms, reports, and queries. If this property is empty, the name of the field is used. Any text string is allowed. An effective caption is usually brief. |
|
Default Value |
Automatically assigns the specified value to this field when a new record is added. |
|
Format |
Determines the way that the field appears when it is displayed or printed in datasheets, or in forms or reports that are bound to the field. Select one of the following:
|
|
Indexed |
Specifies whether the field has an index. There are three available values:
Note: Do not change this property for a field that is used in a primary key. Although you can create an index on a single field by setting the Indexed field property, some kinds of indexes cannot be created in this manner. For example, you cannot create a multi-field index by setting this property. |
|
Text Align |
Specifies the default alignment of text within a control. |
|
Validation Rule |
Supplies an expression that must be true whenever you add or change the value in this field. Use in conjunction with the Validation Text property. |
|
Validation Text |
Enter a message to display when a value that is entered violates the expression in the Validation Rule property. |
Top of Page
Need more help?
Want more options?
Explore subscription benefits, browse training courses, learn how to secure your device, and more.
Communities help you ask and answer questions, give feedback, and hear from experts with rich knowledge.
![]()
Download Article
![]()
Download Article
Want to add a check box or tick box to a list or form in Microsoft Word? It’s easy to do, and you can even make it checkable so you can click the box with your mouse. We’ll show you an easy way to add a clickable checkbox using Developer Mode in Microsoft Word.
Steps
-
1
Open a new file in Microsoft Word. Do so by opening the app shaped like a blue W. Then click on File in the menu bar at the top of the screen, and click on New Blank Document.
-
2
Click on File in the menu bar and then Options in the menu.
- On Mac, click on Word in the menu bar and then Preferences… in the menu.
Advertisement
-
3
Click on Customize Ribbon and then Main Tabs in the «Customize the Ribbon:» drop-down menu.»[1]
- On Mac, click on Ribbon & Toolbar in the «Authoring and Proofing Tools» section of the dialog box, then click on the Ribbon tab at the top of the dialog box.
-
4
Check «Developer» in the «Main Tabs» pane.
-
5
Click on Ok.
-
6
Click on Developer. It’s a tab in the upper-right part of the window.
-
7
Position the cursor where you’d like to insert the check box.
-
8
Click on Check Box. It’s in the menu bar at the top of the window.
-
9
Add additional check boxes and text as needed.
-
10
Lock the form. To do so, select the entire list, to be found in the Controls section on the Developer tab, then click on Group and Group.
- On Mac, click Protect Form in the Developer tab toolbar.


Advertisement
Add New Question
-
Question
What should I do if the check box is grayed out in my ribbon?

It is grayed out for me too. However, if you click on the one icon that isn’t — Legacy Tools — then you will find the exact same checkbox, which you should be able to select.
-
Question
How can I enlarge the size of a text box without enlarging the text?
In Word, just dragging the corner of the text box should be sufficient. If the text changes size accidentally, you can always highlight it and change it back to the desired size.
-
Question
How do you make a drop box in word?
Download LibreOffice. Follow the manual on how to add a list or list/add or list/multiselect box (or just look under «insert» in the menu). You can add a data source for the dropdown menu items from a database, a spreadsheet or within the file structure itself.
See more answers
Ask a Question
200 characters left
Include your email address to get a message when this question is answered.
Submit
Advertisement
Thanks for submitting a tip for review!
About This Article
Article SummaryX
1. Open a document.
2. Click File.
3. Select Customize Ribbon and then click Main Tabs.
4. Check the «Developer» box.
5. Click Save.
6. Click Developer.
7. Click where you want to insert the check box.
8. Click Check Box.
9. Add additional boxes and text.
10. Lock the form.
Did this summary help you?
Thanks to all authors for creating a page that has been read 1,240,770 times.
Is this article up to date?
Insert a check mark symbol
- In your file, place the cursor where you want to insert the symbol.
- Open the Symbol dialog box:
- In the Font box, select Wingdings.
- In the Character code box at the bottom, enter: 252.
- Select the check mark you want.
- Once the check mark has been inserted, you may change its size or color.
Contents
- 1 How do you insert a checkable box in Excel?
- 2 How do I create a checkable box in Excel?
- 3 How do I make a yes no box in Word?
- 4 Where is the Developer tab in Word?
- 5 How do I check a box in Word 2010?
- 6 Where is the Developer tab on Excel?
- 7 How do I create a yes no box in Excel?
- 8 What is the Developer tab in Excel?
- 9 How do I insert a tick box in Excel without the Developer tab?
- 10 How do I enable insert in Excel?
- 11 How do I insert a checkbox into sheets?
- 12 How do you use a check box?
- 13 Where is the Word Options dialog box in Word 2019?
- 14 How do I use developer tools in Word?
- 15 How do I use developer control in Word?
- 16 How do I add the Developer tab in Word 2007?
- 17 How do I add developer to excel?
- 18 How do I add the Developer tab in Excel 2020?
- 19 How do you make a yes or no sheet?
- 20 How does a Vlookup work?
How do you insert a checkable box in Excel?
To insert a checkbox in Excel, execute these steps: On the Developer tab, in the Controls group, click Insert, and select Check Box under Form Controls. To properly position the check box, hover your mouse over it and as soon as the cursor changes to a four-pointed arrow, drag the checkbox where you want it.
How do I create a checkable box in Excel?
How to Insert a Checkbox in Excel
- Go to Developer Tab –> Controls –> Insert –> Form Controls –> Check Box.
- Click anywhere in the worksheet, and it will insert a checkbox (as shown below).
- Now to need to link the checkbox to a cell in Excel.
How do I make a yes no box in Word?
On the Create tab, in the Tables group, click Table. Click Save , and in the Save As dialog box, enter a name for the new table. Select Click to Add and then select Yes/No from the list.
Where is the Developer tab in Word?
The Developer tab isn’t displayed by default, but you can add it to the ribbon.
- On the File tab, go to Options > Customize Ribbon.
- Under Customize the Ribbon and under Main Tabs, select the Developer check box.
How do I check a box in Word 2010?
Click in the document where you want the check box. Activate the Developer tab, then click on the check box in the Controls group. This will insert a check box that the user can tick and clear.
Where is the Developer tab on Excel?
The Developer tab isn’t displayed by default, but you can add it to the ribbon.
- On the File tab, go to Options > Customize Ribbon.
- Under Customize the Ribbon and under Main Tabs, select the Developer check box.
How do I create a yes no box in Excel?
In the “Data Validation” section, click “Data Validation.” Then, click the “Settings” tab. In the “Allow” drop-down menu, select “List.” Under “Source,” type “Yes,No” or any other comma-separated list to limit what can be entered in the cells.
What is the Developer tab in Excel?
Summary. The Developer tab is a feature included in Microsoft Excel, and it is usually hidden by default. The tab allows users to create VBA applications, design forms, create macros, import and export XML data, etc.
How do I insert a tick box in Excel without the Developer tab?
Click in the cell where you want to add the check box or option button control. Tip: You can only add one checkbox or option button at a time. To speed things up, after you add your first control, right-click it and select Copy > Paste.
How do I enable insert in Excel?
If the Insert Options button isn’t visible, then go to File > Options > Advanced > in the Cut, copy and paste group, check the Show Insert Options buttons option.
How do I insert a checkbox into sheets?
Insert checkboxes
- On your computer, open a spreadsheet in Google Sheets.
- Select the cells you want to have checkboxes.
- In the menu at the top, click Insert. Checkbox.
- To remove checkboxes, select the checkboxes you want to remove and press Delete.
How do you use a check box?
The > defines a checkbox. The checkbox is shown as a square box that is ticked (checked) when activated. Checkboxes are used to let a user select one or more options of a limited number of choices. Tip: Always add the tag for best accessibility practices!
Where is the Word Options dialog box in Word 2019?
To see general options for working with Word, click File > Options > General.
How do I use developer tools in Word?
Creating Fillable Forms Using Microsoft Word
- Enable Developer Tab. Open Microsoft Word, then go to the File Tab > Options > Customize Ribbon > check the Developer Tab in the right column > Click OK.
- Insert a Control.
- Edit Filler Text.
- Design Mode button again to exit the mode.
- Customize Content Controls.
How do I use developer control in Word?
Click File > Options > Customize Ribbon. In the list of tabs under Customize the Ribbon, select the Developer box and then click OK. Do one of the following: To add a control, click in the document where you want to add it, and then click the control you want to add on the Design tab.
How do I add the Developer tab in Word 2007?
Word 2007: Show the Developer tab
- Click the large Microsoft Office button (in the top left of the window).
- Click Word Options.
- Click Popular.
- Select the Show Developer tab in the Ribbon check box.
- Click OK.
How do I add developer to excel?
Here are the steps:
- Go to File –> Options.
- In the Excel Options dialogue box, click on Customize Ribbon in the left pane. It will show the Customize the Ribbon options on the right.
- On the right, within the Main Tabs pane, check the Developer option.
- Click OK.
How do I add the Developer tab in Excel 2020?
This is what you need to do:
- Right-click anywhere on the ribbon and choose Customize the Ribbon… in the pop-up menu of options:
- The Excel Options dialog window will show up with the Customize Ribbon option on the left selected.
- Under the list of Main Tabs on the right, select the Developer check box and click OK.
How do you make a yes or no sheet?
Step 1: Select the range of cells where you want to add the yes/no drop-down list. Step 2: Click on the Data option in the menu. Step 3: A drop-down list will appear. Click on the “Data validation”.
How does a Vlookup work?
The VLOOKUP function performs a vertical lookup by searching for a value in the first column of a table and returning the value in the same row in the index_number position.As a worksheet function, the VLOOKUP function can be entered as part of a formula in a cell of a worksheet.

First, you need to customize Word’s ribbon and enable the “Developer” tab to show the option to add check boxes. Then, select “Developer” and click the “Check Box Content Control” button to insert a check box into your document. You can also transform Word’s bullets into checkboxes.
When you create surveys or forms with Microsoft Word, check boxes make the options easier to read and answer. We’re covering two good options for doing just that. The first is ideal for documents that you want people to fill out digitally within the Word document itself. The second option is easier if you’re planning to print documents like to-do lists.
Option 1: Use Word’s Developer Tools to Add the Check Box Option for Forms
In order to create fillable forms that include checkboxes, you first need to enable the “Developer” tab on the Ribbon. With a Word document open, click the “File” drop-down menu and then choose the “Options” command. In the “Word Options” window, switch to the “Customize Ribbon” tab. On the right-hand “Customize the Ribbon” list, select “Main Tabs” on the dropdown menu.

On the list of available main tabs, select the “Developer” check box, and then click the “OK” button
Notice that the “Developer” tab is added to your Ribbon. Just position your cursor in the document where you want a check box, switch to the “Developer” tab, and then click the “Check Box Content Control” button.
You should see a check box appear wherever you placed your cursor. Here, we’ve gone ahead and placed a check box next to each answer and, as you can see, those check boxes are interactive. Click a box to mark it with an “X” (as we’ve done for answers 2, 3, and 4) or select the whole form box (as we’ve done for answer 4) to move the check box around, format it, and so on.
RELATED: How to Create a Fillable Form With Microsoft Word
Option 2: Change Bullets to Check Boxes for Printed Documents
If you’re creating a document to print out—like a to-do list or printed survey—and just want check boxes on it, you don’t have to mess around with adding Ribbon tabs and using forms. Instead, you can create a simple bullet list and then change the bullets from the default symbol to check boxes.
In your Word document, on the “Home” tab, click the small arrow to the right of the “Bullet List” button. On the dropdown menu, select the “Define new bullet” command.
In the “Define New Bullet” window, click the “Symbol” button.
In the “Symbol” window, click the “Font” dropdown and choose the “Wingdings 2” option.
You can scroll through the symbols to find the empty square symbol that looks like a check box, or you just type the number “163” into the “Character Code” box to automatically select it. Of course, if you see a symbol you like better—like the open circle (symbol 153)—feel free to choose that instead.
When you’ve selected your symbol, click the “OK” button to close the “Symbol” window, and then click the “OK” button to close the “Define New Bullet” window, too.
Back in your Word document, you can now type your bullet list. The check boxes appear instead of the regular bullet symbol.
And the next time you need the check box symbol, you don’t have to navigate through that whole set of windows. Just click that small arrow to the right of the “Bullet List” button again, and you’ll see the checkbox listed under the “Recently Used Bullets” section.
Again, this method is really only useful for documents you want to print out. The check box symbols are not interactive, so you can’t check them off inside a Word document.
If you’re also creating spreadsheets and presentations, you may want to learn how to insert checkboxes in Excel and add checkboxes to PowerPoint too.
RELATED: How to Add a Check Mark or Tick Mark in Word
READ NEXT
- › How to Add a Check Mark or Tick Mark in Word
- › How to Create a Basic Survey in Microsoft Word
- › How to Create a Fillable Form With Microsoft Word
- › How to Count Checkboxes in Microsoft Excel
- › How to Add a Drop-Down List to a Word Document
- › The Best Steam Deck Docks of 2023
- › Microsoft Outlook Is Adding a Splash of Personalization
- › How to Install Unsupported Versions of macOS on Your Mac

8 Ball Pool it’s an international game which has become very famous and is therefore … Read More

The webinars they are a very useful educational element. If you have seen one and … Read More

If you usually consult a page frequently, you may notice its updates or changes they … Read More

Both adults and young people love dinosaurs, along with other prehistoric animals. You can also … Read More

In this you learn article how to turn AutoComplete on WhatsApp for Android and iPhone … Read More

Thanks to the video game industry, countless people stay entertained as the days go by. … Read More

Candy crush, one of the games with the most fans and ratings that has existed … Read More

The Walmart chain of stores and supermarkets has branches in 28 countries currently and allows … Read More

ARK: Survival Evolved It took the world of videogames by surprise with its hyper-realism, as … Read More

There are applications that compile or gather for the entire lifetime that the application installed … Read More
|
05-18-2017, 06:49 AM |
|||
|
|||
|
Adding Yes, No Boxes in Word Document Hello all, I need help adding boxes into a word document. I am creating a form and need several columns of yes, no boxes in different area’s on a questionnaire. Please help!
|


|
05-18-2017, 07:52 AM |
|
A single checkbox would give you true/false.
__________________
|
|
05-18-2017, 11:16 AM |
|||
|
|||
|
To be honest, I am looking for a very simple solution to add the boxes to a word document for printing purposes only. For an example, Yes No and the boxes empty beneath for someone to check off with a pen. Thank you!
|
|
05-18-2017, 06:07 PM |
|
The checkbox content controls under the Developer tab will worik fine. So will various symbols.
|
Your Microsoft Word document can be transformed into a checklist by adding checkboxes. Keeping track of completed, actioned, and completed items. Word has many great features, including the ability to insert checklists, especially when creating surveys. So, do you want to add checkboxes in Word to create a checklist for your survey?
It’s your lucky day if you’re looking for such an article that will help you to do so. Here we have mentioned some great ways using which you can easily create or add checkboxes in MS Word to create a checklist. Let’s move forward with the guide and see if any of the methods mentioned below helped you or not.
Why Inserting Check Box in Documents Important?
Using a checkbox allows the user to select one, a few, or none of the options in a list of options. Thus, checking one checkbox does not uncheck the others, as each checkbox is independent of all the others. There are plenty of names for checkboxes, such as check box, tick box, and tick box.
However, in other words, checkboxes are graphical widgets that provide the user with a binary choice, i.e., two mutually exclusive options. In a yes/no question, for example, the user may have to choose between yes (checked) and no (not checked).
How to Insert a Checkbox in Word in Softcopy Document
Using the Developer tab in Word’s menu bar, you can insert a checkbox in a softcopy document (such as surveys and forms that you want respondents to fill out digitally). However, the menu bar has no default Developer tab, unlike File, Home, Insert, Design, etc.
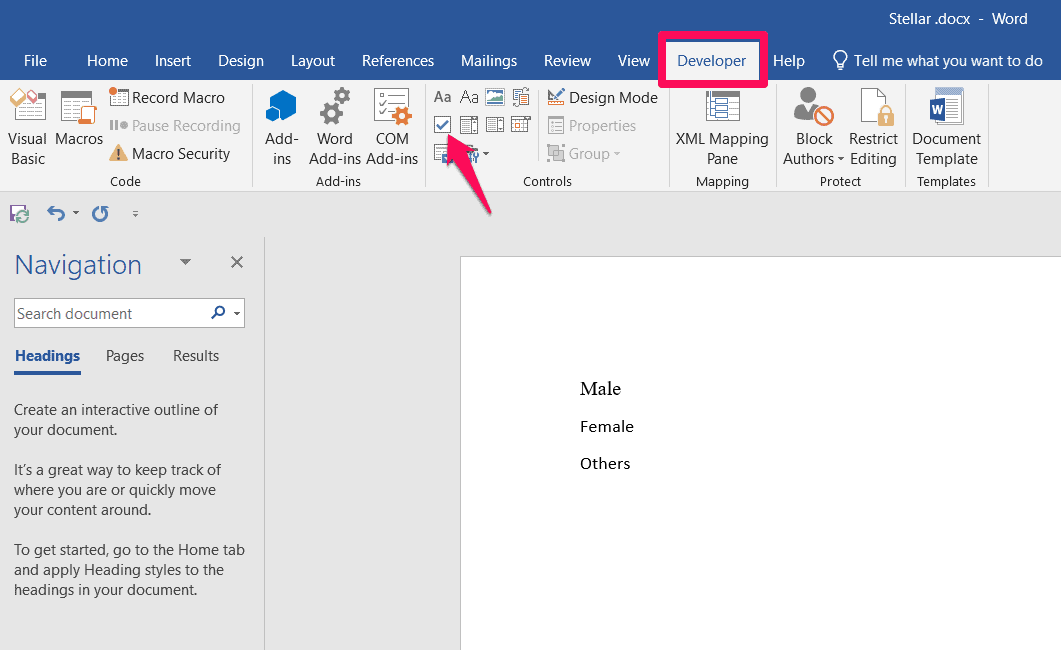
That’s why before moving to the main highlight of today’s article, i.e., create or add checkboxes in MS Word to create a checklist. We will first describe to you how to access the Developer’s tab. So, let’s check out the method to do so,
How to Show the Developer Tab in Word
So, as we have already mentioned earlier that there is no dedicated option using which you can access the developer tab directly. However, to access the Developer tab, you must have to follow these steps:
- First, click on File to reveal the Developer tab.

- The next step is to click Options.

- In the popup that appears, select Customize Ribbon.
- The Developer option can be found under the Main Tabs.
- Once you have clicked OK, you are done.


Well, you are now accessed the Developer’s tab. Therefore, now you are ready to know how to add checkboxes in Word to create a checklist. So, let’s check out the different methods to do so.
How to Create/Insert the Checkbox in your Word Document
Since you are now familiar with how to access the Developer’s tab, you are now able to insert the checkbox in your softcopy of documents such as .doc files. So, let’s check out the steps to do so:
- Firstly, place the cursor where the checkbox should appear.
- In the menu bar, click the Developer tab. In the list of options, you will find Add-ins, XML Mapping Pane, and some others (their names will not be visible until you hover over them).

- Now, make sure you select the one with a checkmark.
- That’s it. Now, it will insert your checkbox.


Can You Change the Icon of the Checked State of the Checkbox?
You can immediately interact with the checkbox after inserting it. The only problem is that when checked, an X appears by default, and you might not want this X, or we say cross sign. So now know how to turn the X into a checkmark.
- Put the cursor right next to the checkbox or select it.
- Access the Developer tab and select Properties.

- When you check or uncheck symbols, you will see the default symbols. You can change the Checked Symbol, and to do so, click on the change button.

- Select wingdings2 under font in the popup that appears. For checked checkboxes, you will see the common checkmark icons. Once you’ve selected one of the icons, click Ok, followed by Ok.


Remove the Bounding Box of the Checkmark
Whenever the checkbox is checked or unchecked or when the cursor is placed on it, the bounding box that appears can also be removed in order to make the checkbox look better and more user-friendly.
- Select the checkbox by placing the cursor over it.
- In the menu bar, select the Developer tab and click Properties.
- You can choose None from the dropdown menu right next to Show as.


How to Insert a Checkbox in Hardcopy Documents
Some documents, such as identification documents or authentication documents, frequently require hard copies. Physical copies may be the only option in such cases when digital copies aren’t sufficient. You do not have to fumble around with the Developer tab to insert a checkbox into printed documents. For this purpose, you may instead define a custom bullet point.
- On the menu bar, make sure the Home tab is selected.
- Then, to access the Bullets dropdown menu, click on it.
- Now, define a new bullet by clicking Define new bullet.

- In the popup window, select Symbol.
- Make sure Wingdings2 is selected as the font.

- You can select the checkmark icon and hit the Ok button followed by Ok.


Is There Any Way to Create a Shortcut to Add an Interactive Checkbox in Word
It’s unnecessary to go into the Developer tab whenever you want to add checkboxes in Word. Instead, you can create a shortcut to insert the checkbox on your Word document. So, here are some crucial steps that you need to follow in order to create a shortcut.
- It is important to make sure the checkbox is displayed as a bounding box. We have already mentioned in this article how to remove the bounding box. Therefore, if you don’t know about that, you can refer to that para above.
- Access the File tab located in the menu bar after selecting the checkbox.
- Select Options from the menu.
- In the popup that appears, click on Autocorrect Options under Proofing.

- The checkboxes should be filled in for several options. Ensure Replace text as you type is also checked.
- To insert checkboxes, type in the shortcut under Replace and click Add. You will need to click Ok followed by Ok.

- That’s it. Now, you do not have to perform the whole steps; instead, you directly start typing the Word that is entered in step number 6 and press the space bar.


Conclusion
A variety of forms can be created with Microsoft Word, including digital forms, surveys, to-do lists, and printable forms. There might be a need to include a checkbox so your respondents can choose certain options in these forms.
Well, that’s what we have already explained in this guide. Therefore, we hope that you now know how to insert checkbox in Word to create a checklist. But, in case you have any doubts or queries, comment below and let us know.
READ NEXT:
- What is Kahoot.it Game Pins 2023 and Best Kahoot Join Codes
- How To Make One Page Landscape In MS Word Document
- MS Office 2013 Professional Download Free Full Version
- Microsoft Office 2019 Professional Free Download Full Version
- Download LibreOffice 2023 Offline Installer for Windows 11