
Add or subtract days from a date
Suppose that a bill of yours is due on the second Friday of each month. You want to transfer funds to your checking account so that those funds arrive 15 calendar days before that date, so you’ll subtract 15 days from the due date. In the following example, you’ll see how to add and subtract dates by entering positive or negative numbers.
-
Enter your due dates in column A.
-
Enter the number of days to add or subtract in column B. You can enter a negative number to subtract days from your start date, and a positive number to add to your date.
-
In cell C2, enter =A2+B2, and copy down as needed.
Add or subtract months from a date with the EDATE function
You can use the EDATE function to quickly add or subtract months from a date.
The EDATE function requires two arguments: the start date and the number of months that you want to add or subtract. To subtract months, enter a negative number as the second argument. For example, =EDATE(«9/15/19»,-5) returns 4/15/19.
-
For this example, you can enter your starting dates in column A.
-
Enter the number of months to add or subtract in column B. To indicate if a month should be subtracted, you can enter a minus sign (-) before the number (e.g. -1).
-
Enter =EDATE(A2,B2) in cell C2, and copy down as needed.
Notes:
-
Depending on the format of the cells that contain the formulas that you entered, Excel might display the results as serial numbers. For example, 8-Feb-2019 might be displayed as 43504.
-
Excel stores dates as sequential serial numbers so that they can be used in calculations. By default, January 1, 1900 is serial number 1, and January 1, 2010 is serial number 40179 because it is 40,178 days after January 1, 1900.
-
If your results appear as serial numbers, select the cells in question and continue with the following steps:
-
Press Ctrl+1 to launch the Format Cells dialog, and click the Number tab.
-
Under Category, click Date, select the date format you want, and then click OK. The value in each of the cells should appear as a date instead of a serial number.
-
-
Add or subtract years from a date
In this example, we’re adding and subtracting years from a starting date with the following formula:
=DATE(YEAR(A2)+B2,MONTH(A2),DAY(A2))
How the formula works:
-
The YEAR function looks at the date in cell A2, and returns 2019. It then adds 3 years from cell B2, resulting in 2022.
-
The MONTH and DAY functions only return the original values from cell A2, but the DATE function requires them.
-
Finally, the DATE function then combines these three values into a date that’s 3 years in the future — 02/08/22.
Add or subtract a combination of days, months, and years to/from a date
In this example, we’re adding and subtracting years, months and days from a starting date with the following formula:
=DATE(YEAR(A2)+B2,MONTH(A2)+C2,DAY(A2)+D2)
How the formula works:
-
The YEAR function looks at the date in cell A2, and returns 2019. It then adds 1 year from cell B2, resulting in 2020.
-
The MONTH function returns 6, then adds 7 to it from cell C2. This gets interesting, because 6 + 7 = 13, which is 1-year and 1-month. In this case, the formula will recognize that and automatically add another year to the result, bumping it from 2020 to 2021.
-
The DAY function returns 8, and adds 15 to it. This will work similarly to the MONTH portion of the formula if you go over the number of days in a given month.
-
The DATE function then combines these three values into a date that is 1 year, 7 months, and 15 days in the future — 01/23/21.
Here are some ways you could use a formula or worksheet functions that work with dates to do things like, finding the impact to a project’s schedule if you add two weeks, or time needed to complete a task.
Let’s say your account has a 30-day billing cycle, and you want to have the funds in your account 15 days before the March 2013 billing date. Here’s how you would do that, using a formula or function to work with dates.
-
In cell A1, type 2/8/13.
-
In cell B1, type =A1-15.
-
In cell C1, type =A1+30.
-
In cell D1, type =C1-15.

Add months to a date
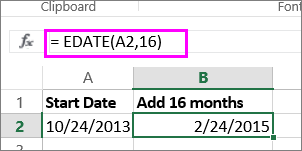
We’ll use the EDATE function and you’ll need the start date and the number of months you want to add. Here’s how to add 16 months to 10/24/13:
-
In cell A1, type 10/24/13.
-
In cell B1, type =EDATE(A1,16).
-
To format your results as dates, select cell B1. Click the arrow next to Number Format, > Short Date.
Subtract months from a date
We’ll use the same EDATE function to subtract months from a date.
Type a date in Cell A1 and in cell B1, type the formula =EDATE(4/15/2013,-5).
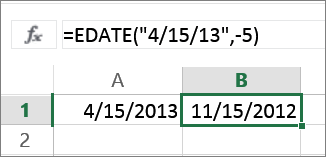
Here, we’re specifying the value of the start date entering a date enclosed in quotation marks.
You can also just refer to a cell that contains a date value or by using the formula =EDATE(A1,-5)for the same result.
More examples
To add years to or subtract years from a date
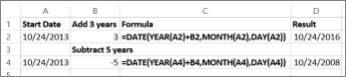
|
Start Date |
Years added or subtracted |
Formula |
Result |
|---|---|---|---|
|
10/24/2013 |
3 (add 3 years) |
=DATE(YEAR(A2)+B2,MONTH(A2),DAY(A2)) |
10/24/2016 |
|
10/24/2013 |
-5 (subtract 5 years) |
=DATE(YEAR(A4)+B4,MONTH(A4),DAY(A4)) |
10/24/2008 |
Reader, meet this Excel shorty. Today this Excel shorty will teach you how to extract the year from a date in Excel. If you have a date entered in a recognizable format in Excel, it should be easy to get the separate elements of the date i.e. day, month, and year. The individual elements may be required for analysis, usage in functions, or calculations.
The element of the date that we’re focusing on today is the year and how to extract it. To single out the year from a date, we will show you 3 easy ways using the YEAR function, TEXT function, and a custom date format.
We will also tell you which method results in a number format and which results in a text format. But first, we would need a case example to work on.
 1")
Example
Let’s have a look at the example we are using in this tutorial for extracting years from dates:
 2")
Our objective is to arrive at the founding year of a list of brands. As a reference, we have the founding dates in column C. Using the founding dates, we will extract the years.
Let’s get extracting!
Using YEAR Function
Resulting format: Number
Indicative from its name, the YEAR function can be used to extract the year from a date in Excel. The YEAR function returns the year from a date between 1900 and 9999. Sounds like a good fit? Let’s put it to the test:
=YEAR(C3)
Since the function was such a perfect fit, there’s very little for us to do. The YEAR function has been entered with the date in cell C3 and it has extracted and returned the year 1976. The function is suitable to result in a number format as can be noted in the results below being right-aligned. These are the results using the YEAR function to return the years from the list of dates:
 3")
Using TEXT Function
Resulting format: Text
The second method for extracting the year from a date is to use the TEXT function. The TEXT function converts a value into text format using formatting codes. Let’s try applying a year code with the TEXT function and see if it can extract the year from a date:
=TEXT(C3,"YYYY")
The value allotted to the TEXT function is the date in C3. The formatting code for year is «YYYY» (the code is not case-sensitive and you can also use the code «YY» for a two-digit year). The TEXT function takes the date in C3 and converts it to the provided text format, returning only the year. Here are the years returned from the dates in column C using the TEXT function:
 4")
The results from the TEXT function are right-aligned because of course, the TEXT function would return a text format.
Recommended Reading: How to Extract Month from Date
Using Custom Date Format
Resulting format: Number
Any readable date in Excel is already in a date format. So, to arrive at only the year, we need to customize the date format which can be done through the Format Cells settings. This method will overwrite the dates. If you want to keep the full dates, copy them to another column and format the copied dates. Our steps below to extract the year from a date using a custom date format also keeps the original dates:
- Copy the dates to the column where you want to extract the years.
 5")
- Select the copied dates and then select the dialog box launcher of the Home tab’s Number group to open the Format Cells dialog box. Alternatively, use the Ctrl + 1 keys to launch the dialog box.
 6")
- The Format Cells dialog box will open in the Number tab, showing the type of format of the selected cells:
 7")
- Select Custom from the Category. In the Type field, enter the format code for year i.e. yyyy (the code is not case-sensitive).
 8")
- When done, select the OK command button.
The years will be extracted from the dates with the custom date format. Select any cell and the Format bar will display «Custom«, confirming the custom format:
 9")
The resulting years from the dates will be in a number format and right-aligned.
That was all from your Excel shorty of the day. We hope to have given you a good idea of how easy it is to get years from dates in Excel. You’ll see more of shorty and his lengthy brothers as they try to help you along your regular Excellence. We’re signing off now, prepping for more trouble-sniping and Excel-tricking. Catch you then!
Содержание
- Add or subtract dates
- Add or subtract days from a date
- Add or subtract months from a date with the EDATE function
- Add or subtract years from a date
- Add or subtract a combination of days, months, and years to/from a date
- Add months to a date
- Subtract months from a date
- How to Extract Year From Date in Excel (3 Easy Ways)
- Example
- Using YEAR Function
- Using TEXT Function
- Using Custom Date Format
- Subscribe and be a part of our 15,000+ member family!
- How to Convert Date to Month and Year in Excel
- Understanding the Formatting Codes
- Months
- Years
- Delimiters
- Using the TEXT Function
- Using MONTH and YEAR functions
- The MONTH function
- The YEAR function
- Using the CONCAT function to Join the Month & Year
- Using Date Formats
- Subscribe and be a part of our 15,000+ member family!
Add or subtract dates
Suppose you want to adjust a project’s schedule date by adding two weeks to see what the new completion date will be, or you want to determine how long a single activity will take to complete in a list of project tasks. You can add or subtract a number of days to or from a date by using a simple formula, or you can use worksheet functions that are designed to work specifically with dates in Excel.
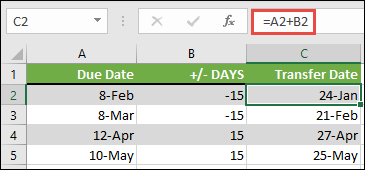
Add or subtract days from a date
Suppose that a bill of yours is due on the second Friday of each month. You want to transfer funds to your checking account so that those funds arrive 15 calendar days before that date, so you’ll subtract 15 days from the due date. In the following example, you’ll see how to add and subtract dates by entering positive or negative numbers.
Enter your due dates in column A.
Enter the number of days to add or subtract in column B. You can enter a negative number to subtract days from your start date, and a positive number to add to your date.
In cell C2, enter =A2+B2, and copy down as needed.
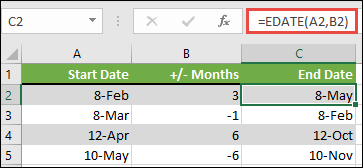
Add or subtract months from a date with the EDATE function
You can use the EDATE function to quickly add or subtract months from a date.
The EDATE function requires two arguments: the start date and the number of months that you want to add or subtract. To subtract months, enter a negative number as the second argument. For example, =EDATE(«9/15/19»,-5) returns 4 /15/19.
For this example, you can enter your starting dates in column A.
Enter the number of months to add or subtract in column B. To indicate if a month should be subtracted, you can enter a minus sign (-) before the number (e.g. -1).
Enter =EDATE(A2,B2) in cell C2, and copy down as needed.
Depending on the format of the cells that contain the formulas that you entered, Excel might display the results as serial numbers. For example, 8-Feb-2019 might be displayed as 43504.
Excel stores dates as sequential serial numbers so that they can be used in calculations. By default, January 1, 1900 is serial number 1, and January 1, 2010 is serial number 40179 because it is 40,178 days after January 1, 1900.
If your results appear as serial numbers, select the cells in question and continue with the following steps:
Press Ctrl+1 to launch the Format Cells dialog, and click the Number tab.
Under Category, click Date, select the date format you want, and then click OK. The value in each of the cells should appear as a date instead of a serial number.
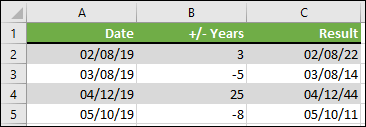
Add or subtract years from a date
In this example, we’re adding and subtracting years from a starting date with the following formula:
How the formula works:
The YEAR function looks at the date in cell A2, and returns 2019. It then adds 3 years from cell B2, resulting in 2022.
The MONTH and DAY functions only return the original values from cell A2, but the DATE function requires them.
Finally, the DATE function then combines these three values into a date that’s 3 years in the future — 02/08/22.
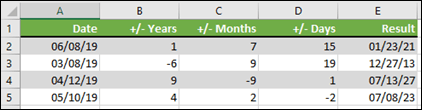
Add or subtract a combination of days, months, and years to/from a date
In this example, we’re adding and subtracting years, months and days from a starting date with the following formula:
How the formula works:
The YEAR function looks at the date in cell A2, and returns 2019. It then adds 1 year from cell B2, resulting in 2020.
The MONTH function returns 6, then adds 7 to it from cell C2. This gets interesting, because 6 + 7 = 13, which is 1-year and 1-month. In this case, the formula will recognize that and automatically add another year to the result, bumping it from 2020 to 2021.
The DAY function returns 8, and adds 15 to it. This will work similarly to the MONTH portion of the formula if you go over the number of days in a given month.
The DATE function then combines these three values into a date that is 1 year, 7 months, and 15 days in the future — 01/23/21.
Here are some ways you could use a formula or worksheet functions that work with dates to do things like, finding the impact to a project’s schedule if you add two weeks, or time needed to complete a task.
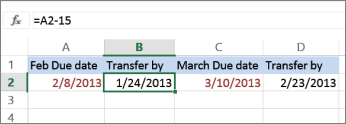
Let’s say your account has a 30-day billing cycle, and you want to have the funds in your account 15 days before the March 2013 billing date. Here’s how you would do that, using a formula or function to work with dates.
In cell A1, type 2/8/13.
In cell B1, type =A1-15.
In cell C1, type =A1+30.
In cell D1, type =C1-15.
Add months to a date
We’ll use the EDATE function and you’ll need the start date and the number of months you want to add. Here’s how to add 16 months to 10/24/13:
In cell A1, type 10/24/13.
In cell B1, type =EDATE(A1,16).
To format your results as dates, select cell B1. Click the arrow next to Number Format, > Short Date.
Subtract months from a date
We’ll use the same EDATE function to subtract months from a date.
Type a date in Cell A1 and in cell B1, type the formula =EDATE(4/15/2013,-5) .
Here, we’re specifying the value of the start date entering a date enclosed in quotation marks.
You can also just refer to a cell that contains a date value or by using the formula =EDATE(A1,-5)for the same result.
Источник
Reader, meet this Excel shorty. Today this Excel shorty will teach you how to extract the year from a date in Excel. If you have a date entered in a recognizable format in Excel, it should be easy to get the separate elements of the date i.e. day, month, and year. The individual elements may be required for analysis, usage in functions, or calculations.
The element of the date that we’re focusing on today is the year and how to extract it. To single out the year from a date, we will show you 3 easy ways using the YEAR function, TEXT function, and a custom date format.
We will also tell you which method results in a number format and which results in a text format. But first, we would need a case example to work on.

Table of Contents
Example
Let’s have a look at the example we are using in this tutorial for extracting years from dates:

Our objective is to arrive at the founding year of a list of brands. As a reference, we have the founding dates in column C. Using the founding dates, we will extract the years.
Let’s get extracting!
Using YEAR Function
Resulting format: Number
Indicative from its name, the YEAR function can be used to extract the year from a date in Excel. The YEAR function returns the year from a date between 1900 and 9999. Sounds like a good fit? Let’s put it to the test:
Since the function was such a perfect fit, there’s very little for us to do. The YEAR function has been entered with the date in cell C3 and it has extracted and returned the year 1976. The function is suitable to result in a number format as can be noted in the results below being right-aligned. These are the results using the YEAR function to return the years from the list of dates:

Using TEXT Function
Resulting format: Text
The second method for extracting the year from a date is to use the TEXT function. The TEXT function converts a value into text format using formatting codes. Let’s try applying a year code with the TEXT function and see if it can extract the year from a date:
The value allotted to the TEXT function is the date in C3. The formatting code for year is «YYYY» (the code is not case-sensitive and you can also use the code «YY» for a two-digit year). The TEXT function takes the date in C3 and converts it to the provided text format, returning only the year. Here are the years returned from the dates in column C using the TEXT function:

The results from the TEXT function are right-aligned because of course, the TEXT function would return a text format.
Using Custom Date Format
Resulting format: Number
Any readable date in Excel is already in a date format. So, to arrive at only the year, we need to customize the date format which can be done through the Format Cells settings. This method will overwrite the dates. If you want to keep the full dates, copy them to another column and format the copied dates. Our steps below to extract the year from a date using a custom date format also keeps the original dates:
- Copy the dates to the column where you want to extract the years.

- Select the copied dates and then select the dialog box launcher of the Home tab’s Number group to open the Format Cells dialog box. Alternatively, use the Ctrl + 1 keys to launch the dialog box.

- The Format Cells dialog box will open in the Number tab, showing the type of format of the selected cells:

- Select Custom from the Category. In the Type field, enter the format code for year i.e. yyyy (the code is not case-sensitive).

- When done, select the OK command button.
The years will be extracted from the dates with the custom date format. Select any cell and the Format bar will display «Custom«, confirming the custom format:

The resulting years from the dates will be in a number format and right-aligned.
That was all from your Excel shorty of the day. We hope to have given you a good idea of how easy it is to get years from dates in Excel. You’ll see more of shorty and his lengthy brothers as they try to help you along your regular Excellence. We’re signing off now, prepping for more trouble-sniping and Excel-tricking. Catch you then!
Subscribe and be a part of our 15,000+ member family!
Now subscribe to Excel Trick and get a free copy of our ebook «200+ Excel Shortcuts» (printable format) to catapult your productivity.
Источник
How to Convert Date to Month and Year in Excel
In this tutorial, you will find how to get the month and year from a date in Excel. For certain reports, comparative data, and monthly analysis, the dates may hold little to no relevance but if you have the data with full dates, you may want to make it more relevant by only having the months and years as part of the dataset. We will achieve this using date formats, the TEXT function, and the MONTH and YEAR functions (joining their individual results using the CONCAT function).
Some features and functions may require you to enter the format codes for the months and years. Details on that are below:

Table of Contents
Understanding the Formatting Codes
These formatting codes can be used to return the desired format of the month and year in a date. The codes will be required by some formulas and settings to return a specific format. Below are the codes and the formats that they return:
Months
- m – month in single-digit (e.g. June will be represented by 6).
- mm – month in double-digit (e.g. June will be represented by 06).
- mmm – month name in first three letters (e.g. June will be represented by Jun).
- mmmm – month name in full (e.g. June will be represented by June).
Years
- yy – year in double-digit (e.g. 2025 will be 25).
- yyyy – year in full four digits (e.g. 2025 will be 2025).
Delimiters
Delimiters are separators. You can choose what kind of delimiter you want as part of your custom date format. Here the examples of delimiters in dates:
- «/» Forward slash – e.g. 30/6/25
- «-» Hyphen – 30-6-25
- «.» Period – 30.6.25
- » » Space character – June 2025
- «,» Comma – June 30, 2025
These codes will help apply custom date formats and the TEXT function.
Using the TEXT Function
Firstly, we are going to use the TEXT function to convert the dates. The TEXT function converts a value to text in a specific number format. We will use the TEXT function to convert the dates into the specified month and year format.
Dates cannot be directly fed in the TEXT function therefore we need to supply it with a cell reference which means we need to keep the original data initially to feed the dates into the formula. Later you may copy and paste the values on themselves or over the original data and delete the extra column.
Use the following formula involving the TEXT function to extract the month and year from a date:
The TEXT function takes the date in cell B3 and converts it into the supplied format of «mmm/yy». The delimiter used to separate the month and year is a forward slash»/».

Use the fill handle to copy the formula to the rest of the column:

Using MONTH and YEAR functions
The MONTH and YEAR functions can be used individually to get the month and the year from a date. The MONTH function returns the month number from the given date in a single-digit representation. The YEAR function extracts the year from a given date. The functions can be used separately to return individual results and the results can then be combined using a function or a formula to combine the values including a delimiter. Let’s see how to use the functions to get the month and year from a date:
The MONTH function
The formula to get the month number from a date using the MONTH function:
The MONTH function takes a single argument as a cell reference of a date. It returns the number of the month from the referenced date.
Apply the formula above to a separate column:

The YEAR function
This is the formula we will use to extract the year from a date with the YEAR function:
Use a separate column to apply this formula. You only need one argument for the YEAR function to get the year from a date. The YEAR function takes the date in cell B3 and returns only the year in four digits:

Using the CONCAT function to Join the Month & Year
The CONCAT function joins a list or range of text strings. Using the CONCAT function, we will join the results of the MONTH and the YEAR functions with our preferred delimiter. For this kind of format 6/2025, our delimiter is a forward slash «/». Now let’s see the formula to join the month and year as a single value using the CONCAT function:
Enter this formula in a separate column. The month number is in cell C3 and the year in D3. The CONCAT function joins the two values using the supplied delimiter i.e. a forward slash «/» in this case:

The CONCAT function can also be replaced by the TEXTJOIN or CONCATENATE function or the ampersand «&» for joining the month and year values.
Using Date Formats
Now, this method probably requires the least effort on your part as we’ll be taking our pick from preset options in the Format Cells dialog. For the month and year format, there are only 3 options to choose from so if you don’t find what you want, you can head to the Custom section and edit the closest option. For now, here’s how to convert date to month and year using date formats:
Since this method is based on formatting the date, it will overwrite the original date format. For the purpose of this tutorial, we have pasted the original date format to another column and will edit that for comparison:

- Select the dates you want in the month and year format.
- Click on the dialog launcher of the Number section in the Home tab or press the Ctrl + 1 keys to go to the Format Cells dialog box.

- The Format Cells dialog box will show you the current format of the date:

- Search the Type: field for a month and year format. There are 3 such formats. Select the format of preference and then click on the OK command button.

The dates will be formatted to the chosen month and year format:

That was all on converting a date to month and year in Excel. Be sure to head back any time to this tutorial for your month and year Excel extractions. We’ll be back with more extractions and applications for your Excel complications. See you with solutions!
Subscribe and be a part of our 15,000+ member family!
Now subscribe to Excel Trick and get a free copy of our ebook «200+ Excel Shortcuts» (printable format) to catapult your productivity.
Источник
How to Use Excel > Excel Formula > How to Extract Day, Month and Year from Date in Excel
How to Extract Day, Month and Year from Date in Excel
Table of contents :
- Extract Day from Date in Excel
- Extract Month from Date in Excel
- Extract Year from Date in Excel

Excel provides three different functions to extract a day, month, and year from date. The following is an explanation of each function to extract each value.
Extract Day from Date in Excel
The formula
=DAY(A2)
The result

If you want to extract the day from the date, you can use the DAY function. The DAY function requires only one argument, fill it with valid excel date value.
The result, there are four days value and one error #VALUE!. An error occurred because 2/29/2006 is not a valid Excel date value. Why? Because 2006 is not a leap year, so there is no February 29th.
The DAY function result is a number between 1 and 31.
Extract Month from Date in Excel
The formula
=MONTH(A2)
The result

To extract month from the date you need the MONTH function. Like the DAY function, the MONTH function has only one argument, filled with a valid Excel date value.
There is a #VALUE error. The error appearance is the same place as the #VALUE error in DAY function result. The cause of the error is the same; the date value in cell A5 is not a valid Excel date value. This error will still appear in all excel functions related to the date.
The MONTH function result is a number between 1 and 12.
Extract Year from Date in Excel
The formula
=YEAR(A2)
The result

To extract the year from date, Excel provides the YEAR function. There is an argument that must be filled with a valid Excel date value.
The results of the DAY and MONTH functions are a number with a narrow range. Instead, the YEAR function is a wide range of numbers between 1900 and 9999.
For years less than 1900 or more than 9999, it will be considered an invalid excel date value. If used by an Excel function (related to the date function) returns a #VALUE! Error.
The DAY, MONTH and YEAR functions extract day, month and year from a date. To do the opposite, converting day, month and year in number to date value, you need the DATE function.
Related Function
Function used in this article
Sometimes we want to get Year information from date and time format to show the Year only in excel. For example convert 01/29/2019 06:51:03 to 2019, we can get Year information by Formula or Format Settings. The two ways are easy to learn, so you can select one you like to convert date and time format to Year only.
Table of Contents
- Convert Date & Time to Date by Formula
- Convert Date & Time to Date by Format Settings
- Related Functions
Convert Date & Time to Date by Formula
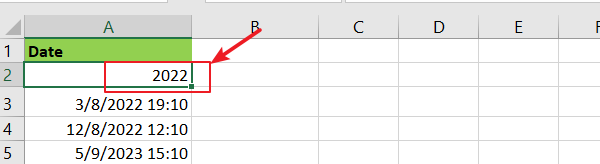
Prepare a table with date and time, the format is m/d/yyyy h:mm.
If we want to convert them to Year only, we can follow below steps:
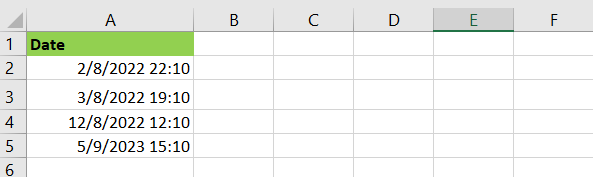
Step 1: In B2, enter the formula =YEAR(A2).
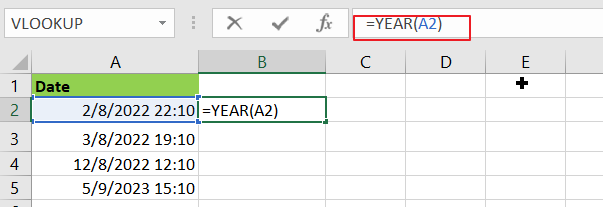
Step 2: Click Enter to get the result. Verify that format is changed to Year only properly, other part is cleared.
If there are other date and time listed under A2, user can drag the Fill Handle down to fill other cells.
Convert Date & Time to Date by Format Settings
Step 1: On A2, right click to load menu, select Format Cells.
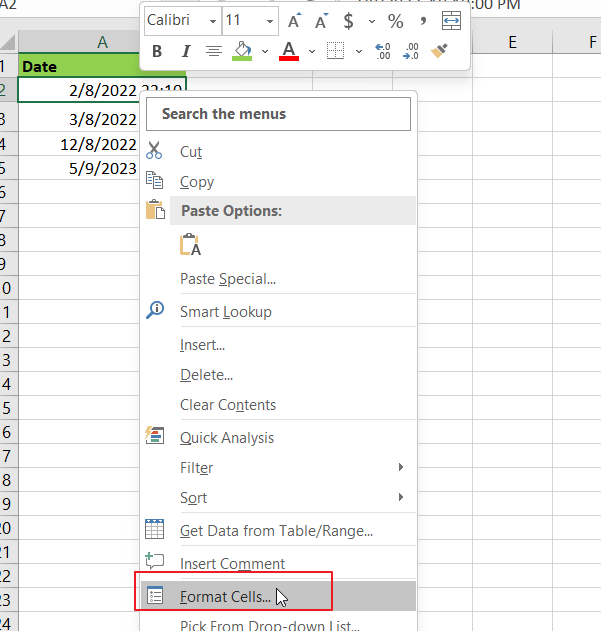
Step 2: In Format Cells window, under Number tab, in Category list, select Customer; then in Type textbox enter yyyy which is the Year format. Then proper Year like 2010 is displayed in Sample field.
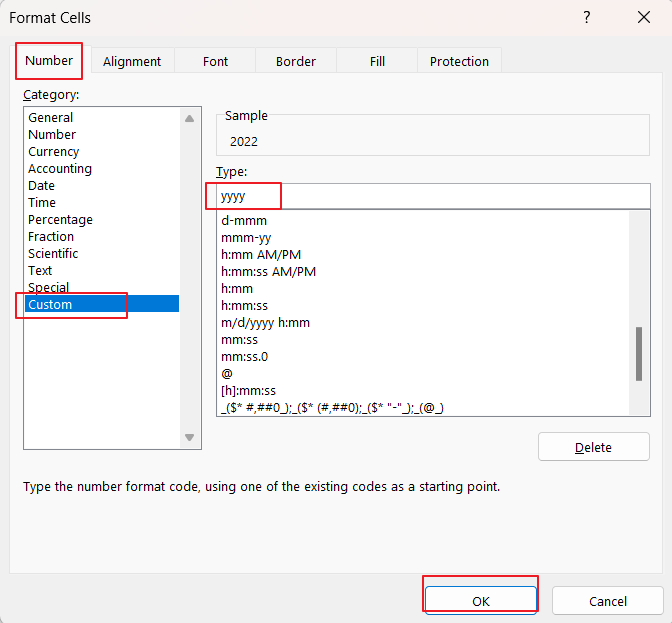
Step 3: Click OK. Verify that only year is show in cell.
- Excel YEAR function
The Excel YEAR function returns a four-digit year from a given date value, the year is returned as an integer ranging from 1900 to 9999. The syntax of the YEAR function is as below:=YEAR (serial_number)…