
Время на прочтение
5 мин
Количество просмотров 1.4K
Привет, Хабр! Меня зовут Дарья Чувашова, я — руководитель группы отделения SAP-разработки. В процессе моей проектной деятельности мне приходилось сталкиваться с задачами выгрузки документов в .doc формат и делать это нужно было быстро. При этом эти документы могли быть с совершенно разным форматированием, кучей таблиц, реквизитов и т. д. В SAP для выгрузки в форматы pdf и excel есть удобные инструменты, возможность работать с формулярами и графическими редакторами форм. Для работы с форматом.doc инструментов меньше. В этой статье я расскажу о быстром и самом простом способе выгрузить документ любой сложности.

Почему я решила написать этот «how‑to»? Как я упомянула, задачи по выгрузке файлов в.doc мне приходилось выполнять часто. В какой‑то момент я собрала все лайфхаки и советы по ускорению работы в один материал, а сейчас хочу поделиться им с хабровской аудиторией. Надеюсь, для коллег записи будут полезными. Описанный вариант решения имеет свои особенности, поэтому я постараюсь на примерах продемонстрировать некоторые «узкие» моменты.
Пошаговая инструкция решения вопроса
Шаг 1
В первую очередь нам нужно подготовить шаблон в MS Word в нужном формате. Важно заполнить все реквизиты тестовыми данными для примера, это значительно упростит нам жизнь в последующих действиях.
В качестве примера рассмотрим вот такой документ «Счёт‑фактура» в MS Word:

Шаблон необходимо заполнить тестовыми примерами, чтобы проверить, что при заполнении ничего не съезжает, и все реквизиты остаются на месте:

Шаг 2
Сохраним наш документ в формате XML: Файл — Сохранить как. Выбираем расширение .xml


Примечание: для большинства задач вполне достаточно формата.doc, он поддерживает ограничения редактирования, элементы управления и т. п.
Для того чтобы открыть данный файл, мне удобно использовать программу Altova XML Spy. Скорее всего нам потребуется проанализировать содержимое, а в данной программе выполнять анализ файла очень удобно за счёт подсветки синтаксиса. Вы, конечно, можете использовать любой другой редактор.
Открываем свой XML, видим примерно такую картину:

После применения команды PrettyPrinter:

Шаг 3
Переходим в SAP. В своём пакете разработки создадим Преобразование:

Выберем трансформацию XSLT:

Видим следующую картину:

Для того, чтобы наша трансформация верно работала, необходимо указать следующий код между тегами <xsl:template match=»/»> </xsl:template>:
<xsl:processing-instruction name="mso-application" progid="Word.Document">
      <xsl:text progid="Word.Document"/>
  </xsl:processing-instruction>
Теперь можно смело вставить весь XML‑код ниже из нашего документа:

Визуально просматриваю данный XML‑код, обнаруживаю, что часть тегов подсвечивается, как текст:

Вижу, что это произошло из‑за кавычек в наименовании компании (Company), смело их удаляю:

Теперь пытаемся активировать трансформацию. В 90% случаях активация пройдёт успешно.
Но если у вас появятся подобные ошибки,

Предлагаю стереть данные коды, так как они не имеют никакого смысла для генерации документа из SAP.

Удаляем:

После удаления всех кодов трансформация успешно активируется.
Шаг 4
Переходим в программу. Для вызова трансформации и выгрузки файла привожу для примера такой код:

Данный код максимально облегчён для простоты восприятия и предельной наглядности.
После запуска программы в папке C:TEMP сохранится файл точно в таком же виде, как наш подготовленный шаблон:

При открытии файла может возникнуть следующая ошибка:

Для того, чтобы от неё избавиться, переходим в трансформацию и ищем /word/settings.xml

Избавиться от ошибки мне помогло удаление всего блока <pkg:part … </pkg:part>. Это не повлияло на работоспособность, и файл стал открываться нормально. Без подсветки синтаксиса тяжело искать закрывающий тег, поэтому имеет смысл снова воспользоваться программой Altova XML Spy (в данной программе вы можете удалить лишний код, а затем вставить новую версию в нашу трансформацию).

Удаляем и активируем, проверяем, что ошибка ушла и с файлом всё в порядке.

Шаг 5
Переходим к выгрузке данных из контекста. Начнём с самого простого: выгрузим данные в поле «Продавец»:

Контекст представляет собой структуру c данными, например, вот такую:

Её мы заполняем и подаём в трансформацию как контекст. Далее копируем из файла, заполненного в качестве примера, текст из реквизита «Продавец» и ищем это место в нашей XML:

Вместо данного текста вставляем:

Не забываем указать нужную структуру контекста и сделать выборку данных. Для примера прописываю хардкодом наименование продавца:

Результат трансформации:

Остальные реквизиты заполняем аналогично.
Как видим, заполненный на Шаге 1 пример нам помогает выполнять быструю навигацию по XML и искать нужные места для доработки.
Отдельную сложность может представлять собой заполнение табличных данных. В структуре контекста имеем вложенную таблицу с данными T_INVOICE. Для вывода данных используем цикл for each. Начнём с 1 строки 1 столбца. Ищем поиском пример «Яблоки» и вставляем код, приведённый чуть ниже.
Теги описания таблицы довольно понятны: <w:tc> </w:tc> — стоблец, <w:tr </w:tr> — соответственно строка, ну и сам текст <w:t> </w:t>.
Если мы хотим каждую строку таблицы из контекста выводить в новую строку таблицы, то цикл ставим перед тегом строки и закрываем после окончания описания строки:

Конец цикла будет обозначен тут:

Так как таблица большая, окончание цикла будет через 400 строк, поэтому удобно воспользоваться опять же программой с подсветкой тегов, таким образом выводим все необходимые элементы таблицы.
Результат:

Видим, что строка автоматически добавилась. Так как нам не нужны старые данные из примера, удалим эти строки из таблицы. Ищем так же по тегам.

В идеале можно было бы в самом шаблоне оставить лишь одну строку для заполнения, тогда лишних действий по удалению колонок не пришлось бы делать. Но я хочу показать неидеальный случай.
Если необходимо вывести данные из таблицы контекста не в каждой строке таблицы, а текстом с переносом, то можем воспользоваться тегом переноса строки <w:br/>, например,

Получим вот такой результат:

Ещё немного полезных рекомендаций
Мы разобрали основные шаги, как сделать выгрузку любого реквизита и заполнить таблицу. При этом необязательно думать о размере шрифта или форматировании, достаточно изначально выстроить необходимые настройки и правки в исходном документе.
Что ещё записано в моих заметках?
Как поменять шрифт быстро, если он перестал подходить? Допустим, мы желаем заменить Arial на Calibri. Для этого в трансформации выполняем поиск Arial — «Заменить все» и вставляем название нового шрифта Calibri.
Для этого нужно в исходном файле на 1 шаге настроить защиту листа, тогда кодирующие эту операцию теги будут отражены в нашей трансформации.
Примеры исходного кода из статьи можно увидеть в репозитории github.
Данной информации должно быть достаточно, чтобы сделать выгрузку практически любого документа быстро и эффективно.
Как я разбирал docx с помощью XSLT
Задача обработки документов в формате docx, а также таблиц xlsx и презентаций pptx является весьма нетривиальной. В этой статье расскажу как научиться парсить, создавать и обрабатывать такие документы используя только XSLT и ZIP архиватор.
Зачем?
docx — самый популярный формат документов, поэтому задача отдавать информацию пользователю в этом формате всегда может возникнуть. Один из вариантов решения этой проблемы — использование готовой библиотеки, может не подходить по ряду причин:
- библиотеки может просто не существовать
- в проекте не нужен ещё один чёрный ящик
- ограничения библиотеки по платформам и т.п.
- проблемы с лицензированием
- скорость работы
Поэтому в этой статье будем использовать только самые базовые инструменты для работы с docx документом.
Структура docx
Для начала разоберёмся с тем, что собой представляет docx документ. docx это zip архив который физически содержит 2 типа файлов:
- xml файлы с расширениями
xmlиrels - медиа файлы (изображения и т.п.)
А логически — 3 вида элементов:
- Типы (Content Types) — список типов медиа файлов (например png) встречающихся в документе и типов частей документов (например документ, верхний колонтитул).
- Части (Parts) — отдельные части документа, для нашего документа это document.xml, сюда входят как xml документы так и медиа файлы.
- Связи (Relationships) идентифицируют части документа для ссылок (например связь между разделом документа и колонтитулом), а также тут определены внешние части (например гиперссылки).
Они подробно описаны в стандарте ECMA-376: Office Open XML File Formats, основная часть которого — PDF документ на 5000 страниц, и ещё 2000 страниц бонусного контента.
Минимальный docx
Простейший docx после распаковки выглядит следующим образом

Давайте посмотрим из чего он состоит.
[Content_Types].xml
Находится в корне документа и перечисляет MIME типы содержимого документа:
<Types xmlns="http://schemas.openxmlformats.org/package/2006/content-types">
    <Default Extension="rels" ContentType="application/vnd.openxmlformats-package.relationships+xml"/>
    <Default Extension="xml" ContentType="application/xml"/>
    <Override PartName="/word/document.xml"
              ContentType="application/vnd.openxmlformats-officedocument.wordprocessingml.document.main+xml"/>
</Types>
_rels/.rels
Главный список связей документа. В данном случае определена всего одна связь — сопоставление с идентификатором rId1 и файлом word/document.xml — основным телом документа.
<Relationships xmlns="http://schemas.openxmlformats.org/package/2006/relationships">
    <Relationship
        Id="rId1"
        Type="http://schemas.openxmlformats.org/officeDocument/2006/relationships/officeDocument"
        Target="word/document.xml"/>
</Relationships>
word/document.xml
Основное содержимое документа.
<w:document xmlns:wpc="http://schemas.microsoft.com/office/word/2010/wordprocessingCanvas"
            xmlns:mc="http://schemas.openxmlformats.org/markup-compatibility/2006"
            xmlns:o="urn:schemas-microsoft-com:office:office"
            xmlns:r="http://schemas.openxmlformats.org/officeDocument/2006/relationships"
            xmlns:m="http://schemas.openxmlformats.org/officeDocument/2006/math"
            xmlns:v="urn:schemas-microsoft-com:vml"
            xmlns:wp14="http://schemas.microsoft.com/office/word/2010/wordprocessingDrawing"
            xmlns:wp="http://schemas.openxmlformats.org/drawingml/2006/wordprocessingDrawing"
            xmlns:w10="urn:schemas-microsoft-com:office:word"
            xmlns:w="http://schemas.openxmlformats.org/wordprocessingml/2006/main"
            xmlns:w14="http://schemas.microsoft.com/office/word/2010/wordml"
            xmlns:wpg="http://schemas.microsoft.com/office/word/2010/wordprocessingGroup"
            xmlns:wpi="http://schemas.microsoft.com/office/word/2010/wordprocessingInk"
            xmlns:wne="http://schemas.microsoft.com/office/word/2006/wordml"
            xmlns:wps="http://schemas.microsoft.com/office/word/2010/wordprocessingShape"
            mc:Ignorable="w14 wp14">
    <w:body>
        <w:p w:rsidR="005F670F" w:rsidRDefault="005F79F5">
            <w:r>
                <w:t>Test</w:t>
            </w:r>
            <w:bookmarkStart w:id="0" w:name="_GoBack"/>
            <w:bookmarkEnd w:id="0"/>
        </w:p>
        <w:sectPr w:rsidR="005F670F">
            <w:pgSz w:w="12240" w:h="15840"/>
            <w:pgMar w:top="1440" w:right="1440" w:bottom="1440" w:left="1440"
                     w:header="720" w:footer="720" w:gutter="0"/>
            <w:cols w:space="720"/>
            <w:docGrid w:linePitch="360"/>
        </w:sectPr>
    </w:body>
</w:document>
Здесь:
<w:document>— сам документ<w:body>— тело документа<w:p>— параграф<w:r>— run (фрагмент) текста<w:t>— сам текст<w:sectPr>— описание страницы
Если открыть этот документ в текстовом редакторе, то увидим документ из одного слова Test.
word/_rels/document.xml.rels
Здесь содержится список связей части word/document.xml. Название файла связей создаётся из названия части документа к которой он относится и добавления к нему расширения rels. Папка с файлом связей называется _rels и находится на том же уровне, что и часть к которой он относится. Так как связей в word/document.xml никаких нет то и в файле пусто:
<Relationships xmlns="http://schemas.openxmlformats.org/package/2006/relationships">
</Relationships>
Даже если связей нет, этот файл должен существовать.
docx и Microsoft Word
docx созданный с помощью Microsoft Word, да в принципе и с помощью любого другого редактора имеет несколько дополнительных файлов.
Вот что в них содержится:
docProps/core.xml— основные метаданные документа согласно Open Packaging Conventions и Dublin Core [1], [2].docProps/app.xml— общая информация о документе: количество страниц, слов, символов, название приложения в котором был создан документ и т.п.word/settings.xml— настройки относящиеся к текущему документу.word/styles.xml— стили применимые к документу. Отделяют данные от представления.word/webSettings.xml— настройки отображения HTML частей документа и настройки того, как конвертировать документ в HTML.word/fontTable.xml— список шрифтов используемых в документе.word/theme1.xml— тема (состоит из цветовой схемы, шрифтов и форматирования).
В сложных документах частей может быть гораздо больше.
Реверс-инжиниринг docx
Итак, первоначальная задача — узнать как какой-либо фрагмент документа хранится в xml, чтобы потом создавать (или парсить) подобные документы самостоятельно. Для этого нам понадобятся:
- Архиватор zip
- Библиотека для форматирования XML (Word выдаёт XML без отступов, одной строкой)
- Средство для просмотра diff между файлами, я буду использовать git и TortoiseGit
Инструменты
- Под Windows: zip, unzip, libxml2, git, TortoiseGit
- Под Linux:
apt-get install zip unzip libxml2 libxml2-utils git
Также понадобятся скрипты для автоматического (раз)архивирования и форматирования XML.
Использование под Windows:
unpack file dir— распаковывает документfileв папкуdirи форматирует xmlpack dir file— запаковывает папкуdirв документfile
Использование под Linux аналогично, только ./unpack.sh вместо unpack, а pack становится ./pack.
Использование
Поиск изменений происходит следующим образом:
- Создаём пустой docx файл в редакторе.
- Распаковываем его с помощью
unpackв новую папку. - Коммитим новую папку.
- Добавляем в файл из п. 1. изучаемый элемент (гиперссылку, таблицу и т.д.).
- Распаковываем изменённый файл в уже существующую папку.
- Изучаем diff, убирая ненужные изменения (перестановки связей, порядок пространств имён и т.п.).
- Запаковываем папку и проверяем что получившийся файл открывается.
- Коммитим изменённую папку.
Пример 1. Выделение текста жирным
Посмотрим на практике, как найти тег который определяет форматирование текста жирным шрифтом.
- Создаём документ
bold.docxс обычным (не жирным) текстом Test. - Распаковываем его:
unpack bold.docx bold. - Коммитим результат.
- Выделяем текст Test жирным.
- Распаковываем
unpack bold.docx bold. - Изначально diff выглядел следующим образом:
Рассмотрим его подробно:
docProps/app.xml
@@ -1,9 +1,9 @@
-  <TotalTime>0</TotalTime>
+  <TotalTime>1</TotalTime>
Изменение времени нам не нужно.
docProps/core.xml
@@ -4,9 +4,9 @@
-  <cp:revision>1</cp:revision>
+  <cp:revision>2</cp:revision>
   <dcterms:created xsi:type="dcterms:W3CDTF">2017-02-07T19:37:00Z</dcterms:created>
-  <dcterms:modified xsi:type="dcterms:W3CDTF">2017-02-07T19:37:00Z</dcterms:modified>
+  <dcterms:modified xsi:type="dcterms:W3CDTF">2017-02-08T10:01:00Z</dcterms:modified>
Изменение версии документа и даты модификации нас также не интересует.
word/document.xml
«`diff
@@ -1,24 +1,26 @@
—
+
+
—
+
+
Test
—
+
«`
Изменения в w:rsidR не интересны — это внутренняя информация для Microsoft Word. Ключевое изменение тут
в параграфе с Test. Видимо элемент <w:b/> и делает текст жирным. Оставляем это изменение и отменяем остальные.
word/settings.xml
@@ -1,8 +1,9 @@
+  <w:proofState w:spelling="clean"/>
@@ -17,10 +18,11 @@
+    <w:rsid w:val="00F752CF"/>
Также не содержит ничего относящегося к жирному тексту. Отменяем.
7 Запаковываем папку с 1м изменением (добавлением <w:b/>) и проверяем что документ открывается и показывает то, что ожидалось.
8 Коммитим изменение.
Пример 2. Нижний колонтитул
Теперь разберём пример посложнее — добавление нижнего колонтитула.
Вот первоначальный коммит. Добавляем нижний колонтитул с текстом 123 и распаковываем документ. Такой diff получается первоначально:
Сразу же исключаем изменения в docProps/app.xml и docProps/core.xml — там тоже самое, что и в первом примере.
[Content_Types].xml
@@ -4,10 +4,13 @@
   <Default Extension="xml" ContentType="application/xml"/>
   <Override PartName="/word/document.xml" ContentType="application/vnd.openxmlformats-officedocument.wordprocessingml.document.main+xml"/>
+  <Override PartName="/word/footnotes.xml" ContentType="application/vnd.openxmlformats-officedocument.wordprocessingml.footnotes+xml"/>
+  <Override PartName="/word/endnotes.xml" ContentType="application/vnd.openxmlformats-officedocument.wordprocessingml.endnotes+xml"/>
+  <Override PartName="/word/footer1.xml" ContentType="application/vnd.openxmlformats-officedocument.wordprocessingml.footer+xml"/>
footer явно выглядит как то, что нам нужно, но что делать с footnotes и endnotes? Являются ли они обязательными при добавлении нижнего колонтитула или их создали заодно? Ответить на этот вопрос не всегда просто, вот основные пути:
- Посмотреть, связаны ли изменения друг с другом
- Экспериментировать
- Ну а если совсем не понятно что происходит:
Идём пока что дальше.
word/_rels/document.xml.rels
Изначально diff выглядит вот так:
«`diff
@@ -1,8 +1,11 @@
+
+
—
—
+
+
+
«`
Видно, что часть изменений связана с тем, что Word изменил порядок связей, уберём их:
«`diff
@@ -3,6 +3,9 @@
+
+
+
«`
Опять появляются footer, footnotes, endnotes. Все они связаны с основным документом, перейдём к нему:
word/document.xml
@@ -15,10 +15,11 @@
       </w:r>
       <w:bookmarkStart w:id="0" w:name="_GoBack"/>
       <w:bookmarkEnd w:id="0"/>
     </w:p>
     <w:sectPr w:rsidR="0076695C" w:rsidRPr="00290C70">
+      <w:footerReference w:type="default" r:id="rId6"/>
       <w:pgSz w:w="11906" w:h="16838"/>
       <w:pgMar w:top="1134" w:right="850" w:bottom="1134" w:left="1701" w:header="708" w:footer="708" w:gutter="0"/>
       <w:cols w:space="708"/>
       <w:docGrid w:linePitch="360"/>
     </w:sectPr>
Редкий случай когда есть только нужные изменения. Видна явная ссылка на footer из sectPr. А так как ссылок в документе на footnotes и endnotes нет, то можно предположить что они нам не понадобятся.
word/settings.xml
@@ -1,19 +1,30 @@
 <?xml version="1.0" encoding="UTF-8" standalone="yes"?>
 <w:settings xmlns:mc="http://schemas.openxmlformats.org/markup-compatibility/2006" xmlns:o="urn:schemas-microsoft-com:office:office" xmlns:r="http://schemas.openxmlformats.org/officeDocument/2006/relationships" xmlns:m="http://schemas.openxmlformats.org/officeDocument/2006/math" xmlns:v="urn:schemas-microsoft-com:vml" xmlns:w10="urn:schemas-microsoft-com:office:word" xmlns:w="http://schemas.openxmlformats.org/wordprocessingml/2006/main" xmlns:w14="http://schemas.microsoft.com/office/word/2010/wordml" xmlns:w15="http://schemas.microsoft.com/office/word/2012/wordml" xmlns:sl="http://schemas.openxmlformats.org/schemaLibrary/2006/main" mc:Ignorable="w14 w15">
   <w:zoom w:percent="100"/>
+  <w:proofState w:spelling="clean"/>
   <w:defaultTabStop w:val="708"/>
   <w:characterSpacingControl w:val="doNotCompress"/>
+  <w:footnotePr>
+    <w:footnote w:id="-1"/>
+    <w:footnote w:id="0"/>
+  </w:footnotePr>
+  <w:endnotePr>
+    <w:endnote w:id="-1"/>
+    <w:endnote w:id="0"/>
+  </w:endnotePr>
   <w:compat>
     <w:compatSetting w:name="compatibilityMode" w:uri="http://schemas.microsoft.com/office/word" w:val="15"/>
     <w:compatSetting w:name="overrideTableStyleFontSizeAndJustification" w:uri="http://schemas.microsoft.com/office/word" w:val="1"/>
     <w:compatSetting w:name="enableOpenTypeFeatures" w:uri="http://schemas.microsoft.com/office/word" w:val="1"/>
     <w:compatSetting w:name="doNotFlipMirrorIndents" w:uri="http://schemas.microsoft.com/office/word" w:val="1"/>
     <w:compatSetting w:name="differentiateMultirowTableHeaders" w:uri="http://schemas.microsoft.com/office/word" w:val="1"/>
   </w:compat>
   <w:rsids>
     <w:rsidRoot w:val="00290C70"/>
+    <w:rsid w:val="000A7B7B"/>
+    <w:rsid w:val="001B0DE6"/>
А вот и появились ссылки на footnotes, endnotes добавляющие их в документ.
word/styles.xml
«`diff
@@ -480,6 +480,50 @@
+
+
+
+
+
+
+
+
+
+
+
+
+
+
+
+
+
+
+
+
+
+
+
+
+
+
+
+
+
+
+
+
+
+
+
+
+
+
+
+
+
+
+
+
«`
Изменения в стилях нас интересуют только если мы ищем как поменять стиль. В данном случае это изменение можно убрать.
word/footer1.xml
Посмотрим теперь собственно на сам нижний колонтитул (часть пространств имён опущена для читабельности, но в документе они должны быть):
<w:ftr xmlns:w="http://schemas.openxmlformats.org/wordprocessingml/2006/main">
  <w:p w:rsidR="000A7B7B" w:rsidRDefault="000A7B7B">
    <w:pPr>
      <w:pStyle w:val="a6"/>
    </w:pPr>
    <w:r>
      <w:t>123</w:t>
    </w:r>
  </w:p>
</w:ftr>
Тут виден текст 123. Единственное, что надо исправить — убрать ссылку на <w:pStyle w:val="a6"/>.
В результате анализа всех изменений делаем следующие предположения:
- footnotes и endnotes не нужны
- В
[Content_Types].xmlнадо добавить footer - В
word/_rels/document.xml.relsнадо добавить ссылку на footer - В
word/document.xmlв тег<w:sectPr>надо добавить<w:footerReference>
Уменьшаем diff до этого набора изменений:
Затем запаковываем документ и открываем его.
Если всё сделано правильно, то документ откроется и в нём будет нижний колонтитул с текстом 123. А вот и итоговый коммит.
Таким образом процесс поиска изменений сводится к поиску минимального набора изменений, достаточного для достижения заданного результата.
Практика
Найдя интересующее нас изменение, логично перейти к следующему этапу, это может быть что-либо из:
- Создания docx
- Парсинг docx
- Преобразования docx
Тут нам потребуются знания XSLT и XPath.
Давайте напишем достаточно простое преобразование — замену или добавление нижнего колонтитула в существующий документ. Писать я буду на языке Caché ObjectScript, но даже если вы не знаете — не беда. В основном будем вызовать XSLT и архиватор. Ничего более. Итак, приступим.
Алгоритм
Алгоритм выглядит следующим образом:
- Распаковываем документ
- Добавляем наш нижний колонтитул
- Прописываем ссылку на него в
[Content_Types].xmlиword/_rels/document.xml.rels - В
word/document.xmlв тег<w:sectPr>добавляем тег<w:footerReference>или заменяем в нём ссылку на наш нижний колонтитул. - Запаковываем документ
Приступим.
Распаковка
В Caché ObjectScript есть возможность выполнять команды ОС с помощью функции $zf(-1, oscommand). Вызовем unzip для распаковки документа с помощью обёртки над $zf(-1):
/// Используя %3 (unzip) распаковать файл %1 в папку %2
Parameter UNZIP = "%3 %1 -d %2";

/// Распаковать архив source в папку targetDir
ClassMethod executeUnzip(source, targetDir) As %Status
{
    set timeout = 100
    set cmd = $$$FormatText(..#UNZIP, source, targetDir, ..getUnzip())
    return ..execute(cmd, timeout)
}
Создаём файл нижнего колонтитула
На вход поступает текст нижнего колонтитула, запишем его в файл in.xml:
В XSLT (файл — footer.xsl) будем создавать нижний колонтитул с текстом из тега xml (часть пространств имён опущена, вот полный список):
<xsl:stylesheet
  xmlns:xsl="http://www.w3.org/1999/XSL/Transform"
  xmlns="http://schemas.openxmlformats.org/package/2006/relationships" version="1.0">
    <xsl:output method="xml" omit-xml-declaration="no" indent="yes" standalone="yes"/>
    <xsl:template match="/">

        <w:ftr xmlns:w="http://schemas.openxmlformats.org/wordprocessingml/2006/main">
            <w:p>
                <w:r>
                    <w:rPr>
                        <w:lang w:val="en-US"/>
                    </w:rPr>
                    <w:t>
                        <xsl:value-of select="//xml/text()"/>
                    </w:t>
                </w:r>
            </w:p>
        </w:ftr>
    </xsl:template>
</xsl:stylesheet>
Теперь вызовем XSLT преобразователь:
do ##class(%XML.XSLT.Transformer).TransformFile("in.xml", "footer.xsl", footer0.xml")
В результате получится файл нижнего колонтитула footer0.xml:
<w:ftr xmlns:w="http://schemas.openxmlformats.org/wordprocessingml/2006/main">
    <w:p>
        <w:r>
            <w:rPr>
                <w:lang w:val="en-US"/>
            </w:rPr>
            <w:t>TEST</w:t>
        </w:r>
    </w:p>
</w:ftr>
Добавляем ссылку на колонтитул в список связей основного документа
Сссылки с идентификатором rId0 как правило не существует. Впрочем можно использовать XPath для получения идентификатора которого точно не существует.
Добавляем ссылку на footer0.xml c идентификатором rId0 в word/_rels/document.xml.rels:
«`xml
<xsl:template match="/*">
    <xsl:copy>
        <xsl:copy-of select="$new"/>
        <xsl:copy-of select="@* | node()"/>
    </xsl:copy>
</xsl:template>
</xsl:stylesheet>
</spoiler>

#### Прописываем ссылки в документе

Далее надо в каждый тег `<w:sectPr>` добавить тег `<w:footerReference>` или заменить в нём ссылку на наш нижний колонтитул. [Оказалось](https://msdn.microsoft.com/en-us/library/documentformat.openxml.wordprocessing.footerreference(v=office.14).aspx), что у каждого тега `<w:sectPr>` может быть 3 тега `<w:footerReference>` - для первой страницы, четных страниц и всего остального:
<spoiler title="XSLT">
```xml
<xsl:stylesheet xmlns:xsl="http://www.w3.org/1999/XSL/Transform"
xmlns:r="http://schemas.openxmlformats.org/officeDocument/2006/relationships"
xmlns:w="http://schemas.openxmlformats.org/wordprocessingml/2006/main"
version="1.0">
    <xsl:output method="xml" omit-xml-declaration="yes" indent="yes" />
    <xsl:template match="//@* | //node()">
        <xsl:copy>
            <xsl:apply-templates select="@*"/>
            <xsl:apply-templates select="node()"/>
        </xsl:copy>
    </xsl:template>
    <xsl:template match="//w:sectPr">
        <xsl:element name="{name()}" namespace="{namespace-uri()}">
            <xsl:copy-of select="./namespace::*"/>
            <xsl:apply-templates select="@*"/>
            <xsl:copy-of select="./*[local-name() != 'footerReference']"/>
            <w:footerReference w:type="default" r:id="rId0"/>
            <w:footerReference w:type="first" r:id="rId0"/>
            <w:footerReference w:type="even" r:id="rId0"/>
        </xsl:element>
    </xsl:template>
</xsl:stylesheet>
Добавляем колонтитул в [Content_Types].xml
Добавляем в [Content_Types].xml информацию о том, что /word/footer0.xml имеет тип application/vnd.openxmlformats-officedocument.wordprocessingml.footer+xml:
«`xml
<xsl:template match="/*">
    <xsl:copy>
        <xsl:copy-of select="@* | node()"/>
        <xsl:copy-of select="$new"/>
    </xsl:copy>
</xsl:template>
</xsl:stylesheet>
</spoiler>


#### В результате

Весь код [опубликован](https://github.com/intersystems-ru/Converter/blob/master/Converter/Footer.cls.xml). Работает он так:
```cos
do ##class(Converter.Footer).modifyFooter("in.docx", "out.docx", "TEST")
Где:
in.docx— исходный документout.docx— выходящий документTEST— текст, который добавляется в нижний колонтитул
Выводы
Используя только XSLT и ZIP можно успешно работать с документами docx, таблицами xlsx и презентациями pptx.
Открытые вопросы
- Изначально хотел использовать 7z вместо zip/unzip т..к. это одна утилита и она более распространена на Windows. Однако я столкнулся с такой проблемой, что документы запакованные 7z под Linux не открываются в Microsoft Office. Я попробовал достаточно много вариантов вызова, однако положительного результата добиться не удалось.
- Ищу XSD со схемами ECMA-376 версии 5 и комментариями. XSD версии 5 без комментариев доступен к загрузке на сайте ECMA, но без комментариев в нём сложно разобраться. XSD версии 2 с комментариями доступен к загрузке.
Ссылки
- ECMA-376
- Описание docx
- Подробная статья про docx
- Репозиторий со скриптами
- Репозиторий с преобразователем нижнего колонтитула
- Download source — 73.4 KB
Introduction (ramble)
Another boring day in my life. I often wonder why it has to be like this – I either have no obligations at all, or I’m packed with them. Most people tell me that it has to do with planning. They wear their favorite serious face and say: you, my son, just don’t know how to properly make your schedule. Time is the essence, do not use it improperly! You must divide your time in million little pieces, label each one of them, implement some kind of sorting, import everything into Microsoft Outlook, and stick to that plan. Then, and only then, you’ll be a man who is not a campaigner, but an organized, equally time pressured «snooze-dismiss» monkey individual.
My answer is way simpler, I often reply with just – hey, screw you! 
Because, really, I’ve always believed it’s not about planning, but about the way universe has been built. Think about it – everything important was created in just those few seconds after the Big Bang. All that followed was just plain simple boring processes of waiting for the fruits of planted seeds to grow; the stage setting for another big moment.
So, I hope you’ll agree that it is – as Derek Ager once wrote – like the life of a soldier… long periods of boredom, and short periods of terror. One can just hope that those «long periods of boredom» can be filled with small joys of doing something you like; something that’ll ease your wait for those important «short periods».
This article is just that, my way of getting along with boredom… if it helps someone else, or fills his spare time, my joy will only be greater.
Index
- Problem
- Brief solution description
- Producing the XSL transformation
- Defining the XML schema based on the report
- Binding data from the Word document to the appropriate fields in the XML schema
- Saving into WordML and the generation of XSLT
- Solving problems with multiple used elements
- Inserting images into the document
- Opening the document in read-only mode
- Preparing data and applying the transformation
- T-SQL and XML
- Binding XML to schema
- Applying the transformation on XML data
- XML->XSLT->HTML->Word, the easy way out
- Organization of resources used for the generation in the Visual Studio project
- FAQ
- Conclusion
- References
- History
Problem
I don’t know if you are in a club, but I’ve met numerous .NET developers who had much trouble with choosing the right tool to build reports. Apart from praise for the Access report building capabilities, you won’t hear many compliments for the reporting tools.
I guess we have all tried Crystal Reports embedded into Visual Studio .NET — they are OK, but are demanding. And often, small bugs, along with ridiculous option placements, will drive you nuts.
SQL Reporting Services are somewhat a new option that is praised all over the web by Microsoft evangelists. In practice, however, I’ve often stumbled on projects where the team is paralyzed with problems concerning configuration and specific aspects of report writing.
Finally, there are numerous custom reporting frameworks such as ActiveReports or DevExpress’ (I love these guys) Reporting Tools.
Specific maladies aside, the common problem with all the previously laid options is that they have a modest learning curve. I’m not talking about the time needed to acquire the knowledge for generating a list of employees from an «It’s easy to use our report suite»™ example. I’m talking about the time needed to acquire the knowledge for developing real-life reports which have three tables that properly expand and contract (along with its columns and rows) over pages.
Also, none of these options provide you with the solution for frequent user requirements – when a report is rendered, it should be possible to modify it a bit. The workaround is to use report exporting to popular formats that are known to most users, like Word.
As I’ve experienced, this is the point when the bulb shines above the head of the developer and the idea comes — why not generate reports in Word in the first place. In the majority of projects, clients are provided with the needed output reports in Word format, which they print and fill by hand. And if not… well, you have one of the best «report designers» in the world, as it was tweaked and improved over numerous versions.
So, how to do it?
Brief solution description
One big, big problem with Word documents before the 2003 version was their binary format. Word’s file format was not publicly available, and all utilities that could parse it were mostly developed by reverse-engineering, or by stealing using documentation available to Microsoft partners. You can guess that results weren’t too satisfying…
However, in 2003, Microsoft introduced XML formats for storing Office documents. Those formats were succeeded by Office Open XML formats in Office 2007 (which are default, instead of their binary counterparts), so you can safely bet that they are here to stay.
So, in order to generate a Word file now, you basically need to apply the appropriate XSLT (XSL Transform) onto the XML data used in a report. This process can be divided into several operational steps:
- Defining the XML schema based on the report
- Binding data from the Word document to the appropriate fields in XML schema
- Saving the Word document in WordML format and the generation of XSLT using the WML2XSLT tool
- Retrieving the needed data from a source (mostly a SQL Server database), it’s structuring into appropriate XML
- Applying XSLT onto XML data in order to generate the Word document, which then can be further manipulated (sending over wire, displaying to user, and similar)
The biggest problem is to produce valid XSLT; from five steps, three are taken to do that. The generation of XML is far easier, while the transformation is completely trivial.
Producing the XSL transformation
Defining the XML schema based on the report
In order to start making the report, it is required to define the necessary data. A picture talks more than a thousand words, an example talks almost an equal amount… so let’s look at the picture of the report that we’ll use as an example:
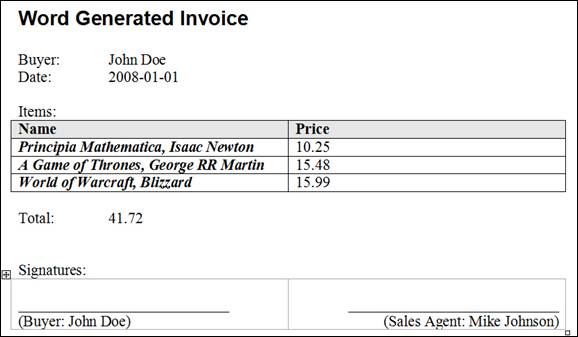
Figure 1 – Report that should be generated
It is obvious that we first have the buyer’s name, the document date follows. Then we have, from the developer point of view, an interesting table of invoice items… and so on. The structure of the XML which will hold this data is described using an XML schema. Visual Studio 2005 has nice support for visual design of schemas, which we will utilize – after starting the IDE, take option File –> New –> File (CTRL+N): this gives a list of possible document types from which we choose XML Schema.
An element from the Toolbox should then be dragged-and-dropped on the workspace and filled with content. This process is shown on the picture that follows:
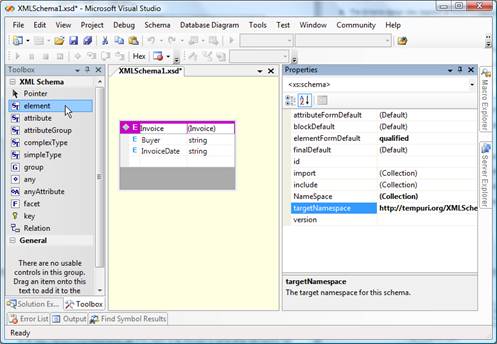
Figure 2 – Schema that defines the structure of data for the report
In order to be properly mapped, items on the invoice need to be described as child elements of the Invoice entity. Add -> New element from the context menu shown after right click gives the option to perform this action.
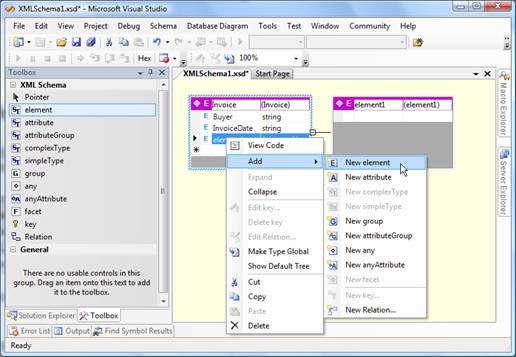
Figure 3 – Adding a child to the Invoice entity
Adding the rest of the elements, assigning types to variables, and setting the targetNamespace (in the Properties window) gets the job done.
Assigning types to variables is optional in most cases – if you use special formats for printing out documents (like dd.MM.yyyy) or monetary values ($10.99), it’s easier to leave everything in the schema in string type, and do the formatting and validation during the generation of XML with the data.
On the other hand, setting the targetNamespace shouldn’t be optional – the produced schema will get the default value http://tempuri.org/XMLSchema.xsd. We can put aside the rules of good practice that tells us not to use the http://tempuri.org/ namespace in production; but, if you don’t give unique names to your schemas, you’ll stumble into problems during import and usage – Word’s schema library can’t hold two different schemas with the same namespace. So, be sure to set the targetNamespace (the convention http://Organization/Project/SchemaName.xsd is used mostly) before you close the definition.
Figure 4 – Resulting XML schema
Binding data from the Word document to the appropriate fields in the XML schema
Schema importing is performed by using the XML Structure dialog. In the 2003 version of Office Word, this dialog is accessible through Task Pane (CTRL+F1); it should be chosen from the list shown when clicked on the triangle in the header (left from the small x). If schemas aren’t previously imported, and the Template and Add-Ins option is chosen, the picture that follows will faithfully resemble the resulting state of the screen.
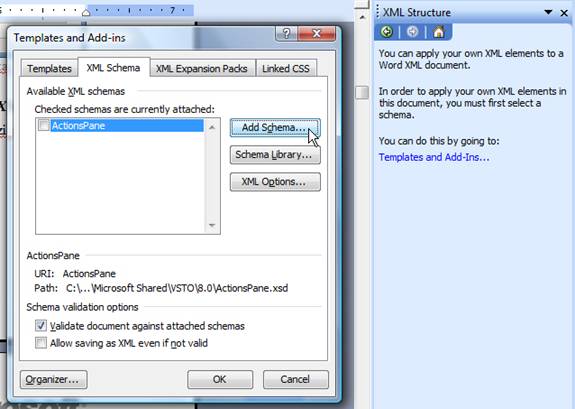
Figure 5 – Adding the new XML schema in the Word document
In the dialog shown after clicking on the Add Schema button, it is needed to point to the location of the defined XML schema. Its fields will be then shown in the XML Structure dialog, from where they are further bound to the document data. Before starting that sweet job, some additional options should be set:
- Check Ignore mixed content – This allows mixing data from the XML with data from the document. As documents are almost always made of fixed and variable parts, this avoids frequent signalization by Word that between the data defined in the XML schema there are «some others that don’t belong there».
- Check Show advanced XML error messages – Choosing developer-friendly messages over user-friendly ones.
- Check Allow saving as XML even if not valid – Most often, you just can’t «validly» mark data in the report document. For example, if some data from the XML is used twice in the document, Word will signal error in validation because according to the XML schema, that data appears only once. The same problem happens with order.
This is present to force valid entry of data in the Word document (another application of the technique that is being described). However, our current goal is diametrically opposite – we are not marking fields for entry, but for space in which data from the XML will be inserted, so it’s not needed to force a unique appearance and order.

Figure 6 – Dialog for setting XML data
After the schema is imported in to the document and the options set, it’s time to move onto binding the schema and the data. Initially, only the root element (in our case, Invoice) is available. After choosing it, Word will offer options for assigning the schema to the appropriate range in the document.
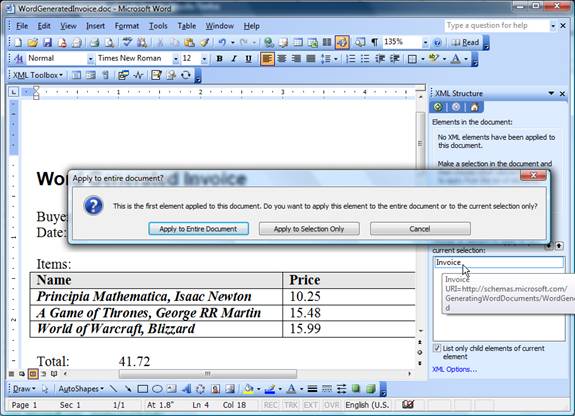
Figure 7 – Options for applying the schema on the appropriate range in the document
In this example, applying the schema to the entire document is a needed option (possible multi-schematic Word files aren’t interesting from the reporting point of view). Now, what is left is to mark the data – the selected text is bound to the schema either by choosing the field from the Task Pane, or by using the option Apply XML Element shown after a right click.

Figure 8 – Binding data from a Word document to fields of the XML schema
Two things are interesting here. First, to define child items, you need to select and map the whole row in the table to the InvoiceItems element, after which Name and Price will be available for bounding to the cell’s data. If the document contains a large number of items, there is no need to map every single row; mapping just the first row is fine, the rest can be deleted. The structure of report, not the content, is what matters at the moment.
Second, Word, for previously explained reasons, signals error for double usage of the Buyer element (look at the picture). It’ll cause problems later, during the generation of the XSLT, but we can omit that problem for now (if Allow saving as XML even if not valid is checked in the XML options).
Saving into WordML and the generation of XSLT
The marked document contains all the data needed for the generation of valid XSLT. The WML2XSLT tool accepts WordML as input, so it’s required to save the Word document in this format. You can do this by using the Save As option from the File menu – when the dialog is shown in Save as Type, choose XML document (*.xml). The option Apply transform is used in the opposite direction, Data only when XML data is fetched from the document, so both fields should be left unchecked.
The prepared WML file is processed using this statement in the Command Prompt (the following is valid assuming that everything is in the same directory):
WML2XSLT.exe "WordGeneratedInvoice.xml" –o "WordGeneratedInvoice.xslt"
In case you run into problems (FileNotFoundException) while using the WML2XSLT.exe packed with the article source, be sure to download the tool from the previously given link and perform the installation (as mobfigr noted in his comment).
Solving problems with multiple used elements
The generated XSL transform will almost always be satisfying. One exception is when an element from the XML with data is used multiple times. In the example we are developing, the Buyer element is used twice, and for its second appearance, the following will be generated (you need to open the XSLT in Notepad or Visual Studio .NET and search for the value ns1:Buyer):
<w:r> <w:t><xsl:text>(Buyer: </xsl:text></w:t></w:r>
<xsl:apply-templates select="ns1:Buyer[position() >= 2]" />
<w:r> <w:t><xsl:text>)</xsl:text></w:t></w:r>
It’s obvious we aren’t interested in the element Buyer on the second position, but the same one that is referenced earlier in the file. Because of that, the following correction should be made:
<w:r> <w:t><xsl:text>(Buyer: </xsl:text></w:t></w:r>
<xsl:apply-templates select="ns1:Buyer" />
<w:r> <w:t><xsl:text>)</xsl:text></w:t></w:r>
Inserting images into the document
Naturally, WordML has good support for images, but it is very poorly documented. So, in order to see how images are represented in WML format, we’ll perform a little experiment and save the marked Word document displayed below as XML:
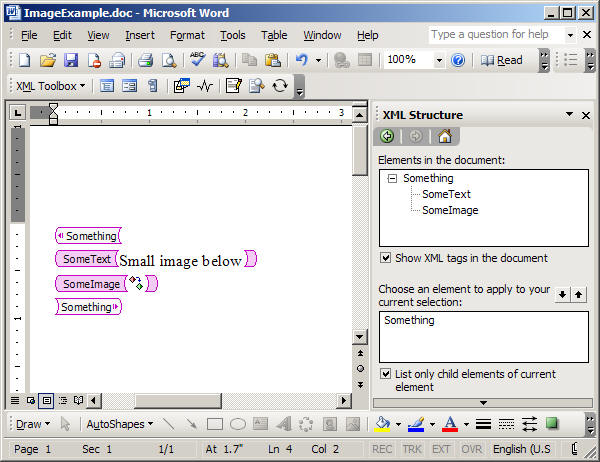
Figure 9 – Document with image
After processing the saved document using the WML2XML tool (with the WML2XML ExampleImage.xml -o ExampleImage.xslt command), and opening the generated XSLT file, we can scroll to the SomeImage tag and see the following:
<ns0:SomeImage>
  <xsl:for-each select="@ns0:*|@*[namespace-uri()='']">
    <xsl:attribute name="{name()}" namespace="{namespace-uri()}">
      <xsl:value-of select="." />
    </xsl:attribute>
  </xsl:for-each>
  <w:r>
    <w:pict>
      <v:shapetype id="_x0000_t75" coordsize="21600,21600" o:spt="75"
              o:preferrelative="t" path="m@4@5l@4@11@9@11@9@5xe" filled="f" stroked="f">
        <v:stroke joinstyle="miter" />
        <v:formulas>
          <v:f eqn="if lineDrawn pixelLineWidth 0" />
          <v:f eqn="sum @0 1 0" />
          <v:f eqn="sum 0 0 @1" />
          <v:f eqn="prod @2 1 2" />
          <v:f eqn="prod @3 21600 pixelWidth" />
          <v:f eqn="prod @3 21600 pixelHeight" />
          <v:f eqn="sum @0 0 1" />
          <v:f eqn="prod @6 1 2" />
          <v:f eqn="prod @7 21600 pixelWidth" />
          <v:f eqn="sum @8 21600 0" />
          <v:f eqn="prod @7 21600 pixelHeight" />
          <v:f eqn="sum @10 21600 0" />
        </v:formulas>
        <v:path o:extrusionok="f" gradientshapeok="t" o:connecttype="rect" />
        <o:lock v:ext="edit" aspectratio="t" />
      </v:shapetype>
      <w:binData w:name="wordml://01000001.gif">R0lGODlhEAAQAPIGAAAAAAAAsACwALAAALD/sP+wsP
   ///////yH5BAEAAAcALAAAAAAQABAAAAOW
eHd3h3d3d3h3d4d3cHd4d3eHd3cHWHAXgXF3d3gHVYNwZxZ4d3eAVTUDeHdhh3d3UFgDdocRcXd4
d1CAdncXaHZ3h3dgd3h3Z4d3d3d4d3eHB3d3eHd3h3d3QAh3d4d3d3d4QCSAd3d3eHcHhEQicHh3
d4d3B0QoYHeHd3d3eAcEhnd3d3h3d4cHdnd4d3eHd3d3eHeXADu=
</w:binData>
      <v:shape id="_x0000_i1025" type="#_x0000_t75" style="width:12pt;height:12pt">
        <v:imagedata src="wordml://01000001.gif" o:title="convert" />
      </v:shape>
    </w:pict>
  </w:r>
  <w:p>
    <w:r>
      <w:t>
        <xsl:value-of select="." />
      </w:t>
    </w:r>
  </w:p>
</ns0:SomeImage>
Obviously, the image is Base64 encoded into the XML file between the <w:binData> tags. After that, we have the <v:shape> tag which defines the placing of the image and references the encoded binary data by using <v:imagedata>. All this is preceded by <v:shapetype>, which is (luckily) optional and can be removed. Now, when we have some understanding of the format, we can perform a little clean up and properly place xsl:value-of select, so that binary data comes from our XML file:
<ns0:SomeImage>
  <xsl:for-each select="@ns0:*|@*[namespace-uri()='']">
    <xsl:attribute name="{name()}" namespace="{namespace-uri()}">
      <xsl:value-of select="." />
    </xsl:attribute>
  </xsl:for-each>
  <w:r>
    <w:pict>
      <w:binData w:name="wordml://01000001.gif"><xsl:value-of select="." /></w:binData>
      <v:shape id="_x0000_i1025" type="#_x0000_t75" style="width:12pt;height:12pt">
        <v:imagedata src="wordml://01000001.gif" o:title="convert" />
      </v:shape>
    </w:pict>
  </w:r>
</ns0:SomeImage>
It looks better, doesn’t it? All that is left is to supply the XML data in the proper format:
="1.0"="utf-8"
<Something xmlns="http://schemas.microsoft.com/GeneratingWordDocuments/ImageExample.xsd">
    <SomeText>Small image below</SomeText>
    <SomeImage>R0lGODlhE[-- binary data truncated --]3d3eHeXADu=</SomeImage>
</Something>
and we’ll have the document from Figure 9 in no time. One final word of warning — if your images aren’t always the same size, you’ll want to check the style attribute of the <v:shape> tag. And, after checking, you’ll probably want to move it out of the transformation into XML ;). Here is how to do that:
<w:pict>
  <w:binData w:name="wordml://01000001.gif">
      <xsl:value-of select="." />
  </w:binData>
    <v:shape id="_x0000_i1025" type="#_x0000_t75">
        <xsl:attribute name="style">
            <xsl:value-of select="@style"/>
        </xsl:attribute>
        <v:imagedata src="wordml://01000001.gif" o:title="convert" />
    </v:shape>
</w:pict>

="1.0"="utf-8"
<Something xmlns="http://schemas.microsoft.com/GeneratingWordDocuments/ImageExample.xsd">
    <SomeText>Small image below</SomeText>
    <SomeImage style="width:24pt;height:24pt">R0lGOD[-- binary data truncated --]3d3eADu=
    </SomeImage>
</Something>
Opening the document in read-only mode
To force opening the report in read-only mode when the report is displayed to the user, it’s needed to use the Tools -> Options -> Security -> Protect Document option during the document creation. Under Editing Restrictions, ‘No changes (Read only)’ should be chosen… after that, the only thing left to do is click onto ‘Yes, Start Enforcing Protection’ and enter the password for protection. Of course, further steps remain the same — the document is saved as WordML, processed through the WML2XSLT tool…
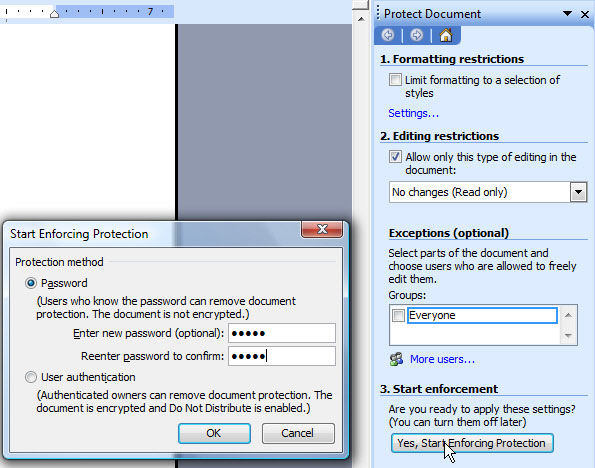
Figure 10 – Settings for the read-only mode
Do not expect too much from this «protection». In WordML format, it’s enforced by one line in the DocumentProperties element:
<w:docPr>
  <w:view w:val="print" />
  <w:zoom w:percent="85" />
  <w:doNotEmbedSystemFonts />
  <w:proofState w:spelling="clean" w:grammar="clean" />
  <w:attachedTemplate w:val="" />
  <u><w:documentProtection w:edit="read-only" w:enforcement="on"
                           w:unprotectPassword="4560CA9C" /></u>
  <w:defaultTabStop w:val="720" />
  <w:punctuationKerning />
  <w:characterSpacingControl w:val="DontCompress" />
  <w:optimizeForBrowser />
  <w:validateAgainstSchema />
  <w:saveInvalidXML />
  <w:ignoreMixedContent />
  <w:alwaysShowPlaceholderText w:val="off" />
  <w:compat>
    <w:breakWrappedTables />
    <w:snapToGridInCell />
    <w:wrapTextWithPunct />
    <w:useAsianBreakRules />
    <w:dontGrowAutofit />
  </w:compat>
  <w:showXMLTags w:val="off" />
</w:docPr>
This means that the read-only mode can be easily incorporated into XSLT for reports you’ve already done… but, it also means that anyone knowing WML format can easily workaround your «protection». So, use it wisely 
Preparing data and applying the transformation
T-SQL and XML
XML data that satisfies the previously defined schema and which we’ll use in the report can be generated in many ways. The most commonly used is the one that utilizes the SELECT... FOR XML command and data from SQL Server 2005 that directly translates into XML.
SELECT... FOR XML has two parameters:
- Work mode, chosen from
RAW,AUTO,EXPLICIT, and thePATHarray. In general, theAUTOmode will finish the job; when extra formatting is needed, thePATHmode is the choice. - Additional variables like
ROOT(add aroottag to XML),ELEMENTS(format output data as elements),TYPE(result is returned asXMLtype of SQL Server 2005), andXMLSCHEMA(write XML schema before data).
For example, if there is a c_City table with columns CityId and CityName, and XML with element City is needed, the following T-SQL is required:
SELECT CityId, CityName FROM c_City AS City
FOR XML AUTO

<City CityId="43" CityName="100 Mile House" />
<City CityId="53" CityName="Abbotsford" />
If it’s needed to write out data in elements, the ELEMENTS directive is added:
SELECT CityId, CityName FROM c_City AS City
FOR XML AUTO, ELEMENTS

<City>
  <CityId>43</CityId>
  <CityName>100 Mile House</CityName>
</City>
<City>
  <CityId>53</CityId>
  <CityName>Abbotsford</CityName>
</City>
As two elements exist on the first level, Root tag must be added so that the XML is syntactically valid:
SELECT CityId, CityName FROM c_City AS City
FOR XML AUTO, ELEMENTS, ROOT('Root')

<Root>
  <City>
    <CityId>43</CityId>
    <CityName>100 Mile House</CityName>
  </City>
  <City>
    <CityId>53</CityId>
    <CityName>Abbotsford</CityName>
  </City>
</Root>
Let’s assume that there is a c_PostalCode table with postal codes used in cities. If it’s required to make XML where postal codes will be child element of cities, the following SQL is in order:
SELECT CityId, CityName,
    (SELECT PostalCodeId, PostalCodeName FROM c_PostalCode
     WHERE CityId = City.CityId
     FOR XML AUTO, TYPE)
FROM c_City AS City
FOR XML AUTO, TYPE

<Root>
  <City CityId="43" CityName="100 Mile House">
    <c_PostalCode PostalCodeId="317701" PostalCodeName="V0K2Z0" />
    <c_PostalCode PostalCodeId="317702" PostalCodeName="V0K2E0" />
  </City>
  <City CityId="53" CityName="Abbotsford">
    <c_PostalCode PostalCodeId="317703" PostalCodeName="V3G2J3" />
  </City>
</Root>
If more output flexibility is required, it’s possible to format the XML in more detail using the PATH mode. For example, if it’s needed to hold CityId as an attribute, CityName as an element, and information about postal codes as child elements which PostalCodeId places in the NotNeeded sub element, use this T-SQL:
SELECT CityId AS '@CityId', CityName,
    (SELECT PostalCodeId AS 'NotNeeded/PostalCodeId', PostalCodeName
     FROM c_PostalCode
     WHERE CityId = City.CityId
     FOR XML path('PostalCode'), TYPE)
FROM c_City AS City
FOR XML PATH('CityRow'), type, root('Data')

<Data>
  <CityRow CityId="43">
    <CityName>100 Mile House</CityName>
    <PostalCode PostalCodeName="V0K2Z0">
      <NotNeeded>
        <PostalCodeId>317701</PostalCodeId>
      </NotNeeded>
    </PostalCode>
    <PostalCode PostalCodeName="V0K2E0">
      <NotNeeded>
        <PostalCodeId>317702</PostalCodeId>
      </NotNeeded>
    </PostalCode>
  </CityRow>
  <CityRow CityId="53">
    <CityName>Abbotsford</CityName>
    <PostalCode PostalCodeName="V3G2J3">
      <NotNeeded>
        <PostalCodeId>317703</PostalCodeId>
      </NotNeeded>
    </PostalCode>
  </CityRow>
</Data>
Binding XML to schema
For the XML data to be shown in Word, it’s necessary that the xmlns attribute of the root tag points to the appropriate schema. To be precise – in our example, to show the XML data in the generated Word document, it’s not enough to provide just the following output from SQL:
SELECT Buyer, InvoiceDate, ...
FROM Invoice
FOR XML PATH('Invoice'), ELEMENTS

<Invoice>
    <Buyer>John Doe</Buyer>
    <InvoiceDate>2008-01-01</InvoiceDate>
    ...
</Invoice>
It’s needed to set the xmlns attribute in such a manner to point to the targetNamespace of the WordGeneratedInvoice.xsd schema:
WITH XMLNAMESPACES(DEFAULT
   'http://schemas.microsoft.com/GeneratingWordDocuments/WordGeneratedInvoice.xsd')
SELECT Buyer, InvoiceDate, ...
FROM Invoice
FOR XML PATH('Invoice'), ELEMENTS

<Data xmlns="http://schemas.microsoft.com/GeneratingWordDocuments/WordGeneratedInvoice.xsd">
    <Buyer>John Doe</Buyer>
    <InvoiceDate>2008-01-01</InvoiceDate>
    ...
</Invoice>
A blank Word document is the most common result if the XML data is not bound to the schema over an xmlns attribute.
Applying the transformation on XML data
public static byte[] GetWord(XmlReader xmlData, XmlReader xslt)
{
    XslCompiledTransform xslt = new XslCompiledTransform();
    XsltArgumentList args = new XsltArgumentList();

    using (MemoryStream swResult = new MemoryStream())
    {
        xslt.Load(xslt);
        xslt.Transform(xmlData, args, swResult);

        return swResult.ToArray();
    }
}
It’s mentioned earlier that this step is trivial. The example justifies that, doesn’t it?
After the XML data and the XSL transformation are passed as XmlReader objects, an XslCompiledTransform is initialized through the Load method. All that is left is to call Transform to finish the job.
XML->XSLT->HTML->Word, the easy way out
In case you don’t need advanced capabilities that Word provides (page numbering, margins, and similar), you have a pretty handy option of hand-writing XSLT that transforms XML data to HTML and then just opens HTML in Word.
To illustrate the idea with an example – here is an XSLT that I use for a list report that just shows the contents of a CD DataTable with two columns, Title and Price:
='1.0'='UTF-8'
<xsl:stylesheet xmlns:xsl='http://www.w3.org/1999/XSL/Transform' version='1.0'
xmlns:fo='http://www.w3.org/1999/XSL/Format'
xmlns:fn='http://www.w3.org/2003/11/xpath-functions'
xmlns:xf='http://www.w3.org/2002/08/xquery-functions'>
    <xsl:template match='/'>
        <html>
            <body>
                <h2>Report Header</h2>
                <table border='0' width='100%'>
                    <tr bgcolor='Gray'>
                        <th align='left'>Title</th>
                        <th align='left'>Price</th>
                    </tr>
                    <xsl:for-each select='DocumentElement/Cd'>
                        <tr>
                            <td>
                                <xsl:value-of select='Title'/>
                            </td>
                            <td>
                                <xsl:value-of select='Price'/>
                            </td>
                        </tr>
                    </xsl:for-each>
                </table>
            </body>
        </html>
    </xsl:template>
</xsl:stylesheet>
The XML data which is transformed:
='1.0'='UTF-8'
<DocumentElement>
    <Cd>
        <Title>Mike</Title>
        <Price>20$</Price>
    </Cd>
    <Cd>
        <Title>Nike</Title>
        <Price>30$</Price>
    </Cd>
    <Cd>
        <Title>Reebok</Title>
        <Price>40$</Price>
    </Cd>
</DocumentElement>
When the xsl:template tag is matched (and it’ll be matched always because it points to root), its InnerText is evaluated. The xsl:for-each tag processes each of the DocumentElement/Cd nodes, and xsl:value-of gets the InnerText of the XPath selected element. In case you’re not too good with XSLT, I recommend this webpage: W3Schools. W3Schools, you rock!
Resulting HTML:
<html xmlns:fo="http://www.w3.org/1999/XSL/Format"
xmlns:fn="http://www.w3.org/2003/11/xpath-functions"
xmlns:xf="http://www.w3.org/2002/08/xquery-functions">
    <body>
        <h2>Something</h2>
        <table border="0" width="100%">
            <tr bgcolor="Gray">
                <th align="left">Title</th>
                <th align="left">Price</th>
            </tr>
            <tr>
                <td>Mike</td>
                <td>20$</td>
            </tr>
            <tr>
                <td>Nike</td>
                <td>30$</td>
            </tr>
            <tr>
                <td>Reebok</td>
                <td>40$</td>
            </tr>
        </table>
    </body>
</html>
Word, even in versions earlier than 2003, had no any problems with opening HTML; so, just save the result as .doc (instead of .HTML) and you’ll be done. In case you are sending the response over the Web, you can specify the type with:
Response.AddHeader("content-type", "application/msword");
Response.AddHeader("Content-Disposition", "attachment; filename=report.doc");
The true value of this option comes into light when you start thinking about generic reports. In the source code that accompanies this article, you’ll find a generic version of this example, the one that works with any DataTable. Be sure to check it.
Organization of resources used for the generation in the Visual Studio project
The source code I have attached to this article demonstrates one possible way of organizing the needed resources for the Word reports generation. Here is the project structure:
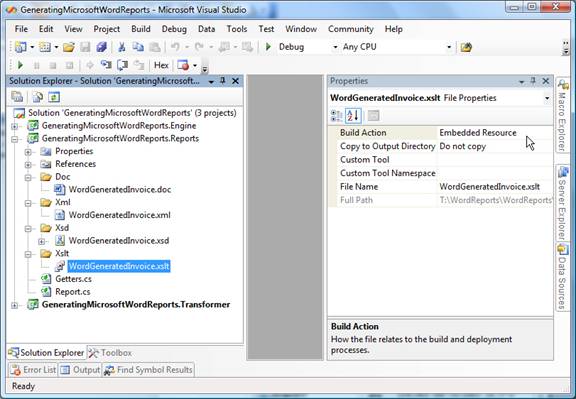
Figure 11 — XSL transform as part of the VS.NET project for generating Word reports
It is of utmost importance that Embedded Resource is set on the Build Action for all the resources that are used in the generation of the Word document (XML, XSD, XSLT). This enables their later fetching from the resource collection of the compiled DLL.
Reports are generated through a static Report class which represents the facade to embedded resources and the logic exploiting them:
public class Report
{
                    public static byte[] WordGeneratedInvoice()
    {


        string xmlData = Getters.GetTestXml("WordGeneratedInvoice");
        return Getters.GetWord(xmlData, "WordGeneratedInvoice");
    }


}
Adding new reports in this structure is easy:
- The new report for generation is added in the Doc directory.
- The XML schema which is created based on the report is added in the Xsd directory.
- After the schema is applied on the document, the saved WordML is used as the input in the WML2XSLT tool; the resulting XSLT is placed in the Xslt directory.
- A method is added in the
Reportclass which is responsible for fetching XML data, invoking the transformation, and returning the resulting Word document.
FAQ
Can I convert the generated WordML to PDF? How do I do it?
Check out my article Generate PDF using C#.
I applied the schema to the Word document and ended my work on it. After some time, I reopened the document, but in the XML structure dialog, the list of elements available for applying onto the document (the lower listbox) is empty.
This occurred because the path to the XSD file is changed. The location of the schema can be refreshed by using XML Options -> Schema Library -> choose the schema used in the document -> Schema Settings -> Browse…
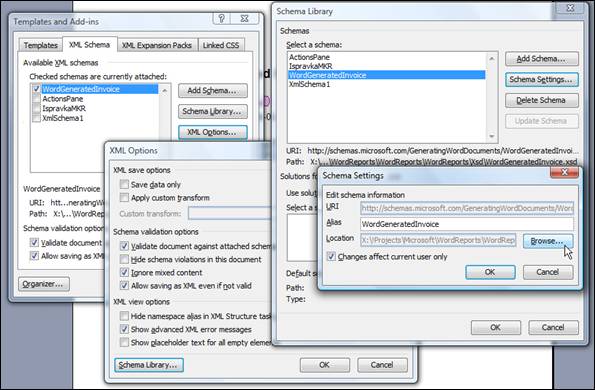
Figure 12 – Dialogs (ordered from left to right) that visually show the path to the Browse… option
I’ve changed the XML schema (XSD) after the changed request for the new report fields arrived. However, Word 2003 does not show new fields in the XML structure dialog, so I can’t bind them to the data in the new version of the report. Must I build the report from scratch?
This problem can be solved by installing the Office 2003 Service Pack 2. When SP2 is installed, Word 2003 will refresh the attached schema if the following steps are satisfied:
- Schema is changed, XSD file is saved
- All instances of Word 2003 are closed (not only the document which uses the mentioned schema!)
- Reopen the Word document that uses the schema
In some situations, the better way to solve this problem is to install the XML Toolbox for Microsoft Office Word 2003 – it adds the command Refresh Schema. The solution isn’t universal because the XML Toolbox doesn’t install properly always (the most common problems are security polices, the existence of .NET Framework 1.1…). So, my suggestion is to close all Office applications, download the .msi from the link, run it – if everything goes smoothly, you’ll see the Word XML toolbar (View -> Toolbars -> Word XML Toolbar); if not, you always have the first suggestion for schema refreshing.
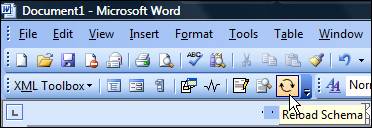
Figure 13 — XML Toolbox in Word 2003, with the Reload Schema option
I made the XSD, bound it to the Word document, made the XSLT, prepared the XML data, performed the transformation, and got – empty document
The most common cause of this problem is that XML doesn’t contain the schema binding (as a value of the xmlns attribute of the root tag). Read the Binding XML to schema chapter.
The easiest way to see the type of XML you should prepare is to get the properly schema and fields bounded Word document to be saved on the some temporary location as the XML (File -> Save as, Save as type: XML document), by checking the option Save data only. You can view the saved XML by opening it in Visual Studio .NET or Notepad…
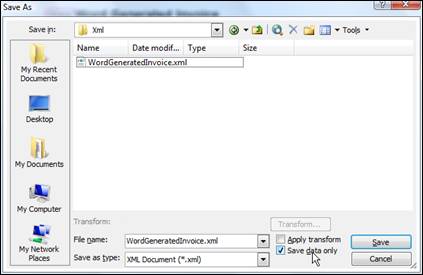
Figure 14 – Saving the XML data only from properly mapped Word document
Where are the XML options located in Office Word 2007? How different is report making between Word 2003 and 2007?
Honestly, I haven’t worked much in the 2007 version of Word, but still — I couldn’t find big differences. The only problem I’ve had is in finding the XML Structure dialog, as it was not accessible with the Task Pane. It seems that the XML Toolbox is installed by default with Office 2007, so you can solve this by its adding by using the toolbar’s (Ribbon’s) option, Customize…
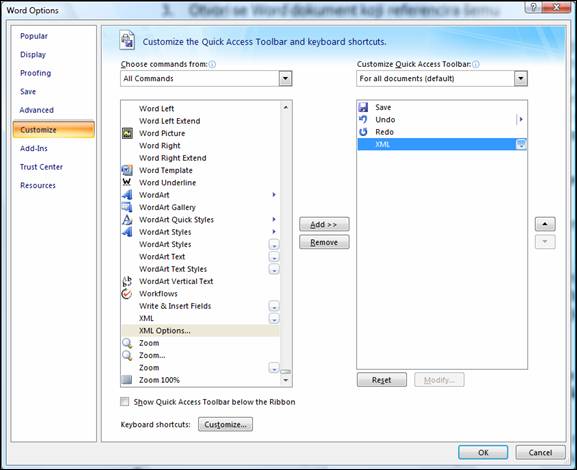
Figure 15 – Dialog shown after choosing the option Customize… in Word 2007
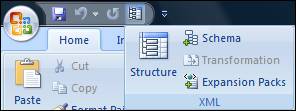
Figure 16 — XML Toolbox in Word 2007
Conclusion
It is worthy to note that the solution I recommended doesn’t use Visual Studio Tools for Office. I tried them out for document generation, and was very disappointed as they required a nasty deal of configuring both to develop and run.
Also, using XSLT to produce Word documents is far easier than juggling with the Microsoft Word Object Library COM DLL and its Word.Application class; not to mention that it is way faster and memory leak free. If you are using a COM DLL for generating Word files, I would advise you to start rewriting that part of your system right now, especially if you are generating documents on the server and then sending them to clients. Simply, Word was developed to be an interactive user application and not a «visible = false» puppet of another process.
Well, that’s it folks. You know the drill — please take your time to rate this article, and if you are (un)happy with it or just need some aid, post comments and I’ll be glad to respond/help in no time :).
References
In no particular order…
Books:
History
- February 17, 2008 — Added the multiple images example (this comment initiated it).
- November 4, 2007 — Added the image example (this comment initiated it).
- October 17, 2007 – Added the grouping example (this comment initiated it).
- September 13, 2007 – Added the read-only section, added one more example (this comment initiated it).
- August 31, 2007 – Initial version of the article.
If you liked this article, consider reading other articles by me. For republishing article on other websites, please contact me by leaving a comment.
I have done this with the older Word XML output. I did some study comparing the old Word XML with the new docx format. They are very, very similar. The fact that docx is a multi-file archive is not a problem for me, because I use Saxon XSLT running in java and I can use jar file URLs to open the word/document.xml file and from there get to all the other files with the document() XPath function.
I have found the trick to be to just cut to the chase, by extracting just what you need, essentially paragraphs, tables also convert pretty straight-forwardly to HTML tables. Use Style names and turn them into CSS. I demand that my source documents are built with Styles, and when it’s just formatting bold, italics, font size, stuff like that, then I will not try to preserve all that exactly. I care about content, and HTML formatting can be rather different.
So, this is all fairly doable with XSLT, especially the old Word XML.
However, with docx there is one major loss of a really useful feature: the wx namespace. Especially:
- w:listPr/wx:t/@wv:val — which gives you the section heading numbering strings for numbered sections
- wx:sub-section — which you can transform to
<div>elements to have nested sections instead of a flat list of headings and paragraphs.
I find particularly the reconstruction of the section numbers an immensely hard task if I want to do it correctly. The principles are described in Wordprocessing Numbering, Levels & Lists, the principle is not hard to understand. But it is pretty hard to implement, as you have to chase through levels of styles and w:basedOn parent styles, concrete number formats, abstract number formats, until you really gather the number format, and then you also must keep track of the counting of all the levels so that you have the numbers for each level that then you format.
I have done this sort of inheritance scheme in XSLT, it is even fun to do, but it is hard and would take me several days, time which I don’t have.
The recovery of the nesting levels (wx:sub-section) is also non-trivial, and you have to sort of break out of normal XSLT workflows to make that happen. I have done such things too, but it’s another few days I’d need to invest.
I often wonder when people say «oh, that wx namespace has been dropped, because the developers understand that it is redundant», yeah, but I doubt most of the people who say that so lightly have ever done these transformations.
I think docx is designed to be obtuse so that most of us foot-soldiers are intimidated and that the software companies like Microsoft and that Aspex Words, etc. stuff has a market share for bulky Windows-only dependent licensed software packages.
6262

Содержание:
- Для чего написана эта статья.
- Получение xml+xsd-файлов по
данным из VFP-таблицы. - Создание и настройка шаблона в MS Word 2007,
использующего xsd-схемы данных. - Построение XSLT-преобразования
для заполнения шаблона MS Word 2007 документа данными из xml-файла. - C#-код приложения для
заполнения шаблона MS Word 2007 документа данными
из xml-файла. - VFP-код приложения для
заполнения шаблона MS Word 2007 документа данными
из xml-файла. - Построение XSLT-преобразования
для извлечения xml-данных из таблицы в MS Word 2007 документе. - C#-код приложения для
извлечения xml-данных из таблицы в MS Word 2007 документе. - VFP-код приложения для
извлечения xml-данных из таблицы в MS Word 2007 документе. - XSLT-преобразование
таблицы данных из xml-формата
в html-представление. - Краткое описание кода примеров.
- Ссылки по теме.
Для чего написана эта статья.
Часто возникает необходимость экспорта VFP-таблицы
данных в виде таблицы в MS Word. Это можно сделать
многими способами, однако в данной заметки нами будет рассмотрен только один: с
использованием возможностей, появившихся в MS Word
2007. Если вы имеете установленную у Вас серию продуктов из MS Office
2007, Вы наверное обратили внимание на тип файла «Документ
Word (*.docx)«,
имеющийся в диалогах «Сохранить [как/Другие форматы]«,
расширение которого, как и структура содержащихся в нём данных, отличается от
прежнего doc-формата (документ
Word 97-2003). Этот типа принадлежит к т.н. типам файлов
Office 2007, известных как Office XML Open Format. См. также
статьи Алексея Федорова в разделе: Ссылки по теме.
Ниже приведена таблица новых форматов, поддерживаемых Word
из MS Office 2007 с краткими пояснениями к ним:
| Формат | Расширение | Описание |
|---|---|---|
| Документ | DOCX | Стандартный формат файлов Office Word 2007 на основе XML. Не сохраняет код VBA-макросов. |
| Документ с макросами | DOCM | Документ с включением макросов. |
| Шаблон документа | DOTX | Стандартный формат файлов шаблонов Office Word 2007. Не сохраняет код VBA-макросов. |
| Шаблон (код) | DOTM | Формат файлов шаблонов Office Word 2007, поддерживающий сохранение макросов. |
На самом деле, любой файл docx-формата представляет собой
zip-файл, содержащий в себе несколько подкаталогов, в которых имеются ряд
файлов с данными в xml(eXtensible Markup Language)-формате. В этом нетрудно
убедиться, если заменить расширение docx-файла на
zip и попробовать разархивировать полученный после
переименования zip-файл с помощью какой-нибудь
утилиты, способной это сделать, например используя WinRAR.exe, а в старших версиях OS Windows это можно
также осуществить и с помощью обычного «Проводника» OS
Windows.
Цель данной заметки заключается в том, чтобы на конкретном примере показать способ
преобразования xml-таблицы данных, в частности полученной
например из
dbf-файла, в docx-файл, используя
XSLT(eXtensible Stylesheet Language Transformations)-преобразования над xml-данными. Нами будет проделано
следующее:
- во-первых, на основе данных из dbf-файла
средствами VFP мы получим соответствующие
xml и xsd файлы. - во-вторых, подсоединив xsd-схему данных к
MS Word-документу, мы подготовим таблицу-шаблон
для заполнения его xml-данными. - в-третьих, опираясь на шаблон из пункта выше, мы модифицируем его так,
чтобы получилось XSLT-преобразование для
заполнения содержимого документа нашими исходными xml-данными
из первого пункта, а для выполнения необходимых преобразований при этом, мы будем использовать
XSLT-утилиты msxsl.exe или средств, входящих
в MSXML 4.0 Service Pack 2 (Microsoft XML Core Services),
которые можно свободно и бесплатно загрузить по ссылкам, приведённом мной в разделе:
Ссылки по теме.
В результате мы получим файл с xml-данными,
который может быть использован как данные для MS Word 2007
документа. - наконец, мы попробуем решить и обратную задачу: извлечь таблицу данных
из MS Word 2007 документа в xml-формате,
а полученные xml-данные преобразовать в
VFP-курсор.
Получение xml+xsd-файлов по
данным из VFP-таблицы.
В MS Visual FoxPro начиная с версии 7.0 задача
преобразования данных из dbf-формата в
xml+xsd никакой трудности не представляет и достаточно
лишь воспользоваться функцией CursorToXml() правильно
указав ей параметры. Так, в результате выполнения вот такого кода:
CLEAR
CLOSE TABLES ALL
SET DEFAULT TO (LEFT(SYS(16),
RATC(«»,
SYS(16))))
SELECT TOP 5 lastname, firstname,
birthdate, notes ;
FROM
(HOME(2) + ‘northwindemployees.dbf’)
ORDER BY lastname, firstname INTO CURSOR
employee
IF USED(’employee’)
SET SAFETY OFF
?CURSORTOXML(’employee’,
’employee’, 1, 512+8+48, 0, ’employee’)
SET SAFETY ON
ELSE
ERROR 101, ‘Not found file: ‘ +
LOWER(HOME(2) + ‘northwindemployees.dbf’)
ENDIF
CLOSE TABLES ALL
CLOSE DATABASES ALL
Получаем вот такой файл employee.XML:
<?xml
version
= «1.0«
encoding=«UTF-8«
standalone=«yes«?>
<VFPData
xmlns:xsi=«http://www.w3.org/2001/XMLSchema-instance«
xsi:noNamespaceSchemaLocation=«employee.XSD«>
<employee>
<lastname>Buchanan</lastname>
<firstname>Steven</firstname>
<birthdate>1955-03-04</birthdate>
<notes><![CDATA[Steven
Buchanan graduated from St. Andrews University, Scotland, with a BSC degree.
Upon joining the company as a sales representative, he spent 6 months in an
orientation program at the Seattle office and then returned to his permanent
post in London, where he was promoted to sales manager. Mr. Buchanan has
completed the courses «Successful Telemarketing» and «International Sales
Management.» He is fluent in French.]]></notes>
</employee>
<employee>
<lastname>Callahan</lastname>
<firstname>Laura</firstname>
<birthdate>1958-01-09</birthdate>
<notes><![CDATA[Laura
received a BA in psychology from the University of Washington. She has also
completed a course in business French. She reads and writes French.]]></notes>
</employee>
<employee>
<lastname>Davolio</lastname>
<firstname>Nancy</firstname>
<birthdate>1968-12-08</birthdate>
<notes><![CDATA[Education
includes a BA in psychology from Colorado State University. She also completed
«The Art of the Cold Call.» Nancy is a member of Toastmasters International.]]></notes>
</employee>
<employee>
<lastname>Dodsworth</lastname>
<firstname>Anne</firstname>
<birthdate>1969-07-02</birthdate>
<notes><![CDATA[Anne
has a BA degree in English from St. Lawrence College. She is fluent in French
and German.]]></notes>
</employee>
<employee>
<lastname>Fuller</lastname>
<firstname>Andrew</firstname>
<birthdate>1952-02-19</birthdate>
<notes><![CDATA[Andrew
received his BTS commercial and a Ph.D. in international marketing from the
University of Dallas. He is fluent in French and Italian and reads German. He
joined the company as a sales representative, was promoted to sales manager and
was then named vice president of sales. Andrew is a member of the Sales
Management Roundtable, the Seattle Chamber of Commerce, and the Pacific Rim
Importers Association.]]></notes>
</employee>
</VFPData>
а также файл employee.XSD:
<?xml
version
=
«1.0»
encoding=»UTF-8″
standalone=»yes»?>
<xsd:schema
id=»VFPData»
xmlns:xsd=»http://www.w3.org/2001/XMLSchema»
xmlns:msdata=»urn:schemas-microsoft-com:xml-msdata»>
<xsd:element
name=»VFPData»
msdata:IsDataSet=»true»>
<xsd:complexType>
<xsd:choice
maxOccurs=»unbounded»>
<xsd:element
name=»employee»
minOccurs=»0″
maxOccurs=»unbounded»>
<xsd:complexType>
<xsd:sequence>
<xsd:element
name=»lastname»>
<xsd:simpleType>
<xsd:restriction
base=»xsd:string»>
<xsd:maxLength
value=»20″/>
</xsd:restriction>
</xsd:simpleType>
</xsd:element>
<xsd:element
name=»firstname»>
<xsd:simpleType>
<xsd:restriction
base=»xsd:string»>
<xsd:maxLength
value=»10″/>
</xsd:restriction>
</xsd:simpleType>
</xsd:element>
<xsd:element
name=»birthdate»
type=»xsd:date»
minOccurs=»0″/>
<xsd:element
name=»notes»
minOccurs=»0″>
<xsd:simpleType>
<xsd:restriction
base=»xsd:string»>
<xsd:maxLength
value=»2147483647″/>
</xsd:restriction>
</xsd:simpleType>
</xsd:element>
</xsd:sequence>
</xsd:complexType>
</xsd:element>
</xsd:choice>
<xsd:anyAttribute
namespace=»http://www.w3.org/XML/1998/namespace»
processContents=»lax»/>
</xsd:complexType>
</xsd:element>
</xsd:schema>
содержащий схему для него. В полученную схему следует внести небольшие
изменения с тем, чтобы мы имели возможность делать вставку произвольного текста
в Word документ и этот текст не противоречил бы нашей
схеме. Для этого добавьте атрибут mixed со значением
true для первых двух элементов <xsl:complexType> так как показано/выделено в фрагменте файла
employee.XSD ниже:
<?xml
version
=
«1.0»
encoding=»UTF-8″
standalone=»yes»?>
<xsd:schema
id=»VFPData»
xmlns:xsd=»http://www.w3.org/2001/XMLSchema»
xmlns:msdata=»urn:schemas-microsoft-com:xml-msdata»>
<xsd:element
name=»VFPData»
msdata:IsDataSet=»true»>
<xsd:complexType
mixed=»true»>
<xsd:choice
mxOccurs=»unbounded»>
<xsd:element
nme=»employee»
minOccurs=»0″
maxOccurs=»unbounded»>
<xsd:complexType
mixed=»true»>
<xsd:sequence>
<xsd:element
name=»lastname»>
…
Создание и настройка шаблона в MS Word 2007,
использующего xsd-схемы данных.
Далее, создадим на основе данных этих двух файлов таблицу в
MS Word из MS Office 2007.
Ниже шаг за шагом и т.с. в картинках показано, как это можно сделать. Но прежде
всего, если у Вас на «Панели
быстрого доступа» отсутствует вкладка «Разработчик», то проделайте действия,
изображённые на Рис.1:

Рис.1
т.е. отметьте пункт «Показывать вкладку «Разработчик» на ленте» в диалоге
«Параметры Excel» и подтвердите изменения, нажав
кнопку «Ok» в правой нижней части окна этого диалога.
Следующим действием загрузим файл-схему employee.XSD
в MS Word 2007, для чего открыв новый
Word-документ, выполним следующее:

Рис.2
В возникшем при этом диалоге «Параметры схемы», определите поля:
URI и Псевдоним так, как показано на картинке ниже и подтвердите установку
схемы.

Рис.3
После удачной установки схемы в правой части окна у Вас должна появиться
панель «Структура XML» подобная также изображенная на картинке
ниже. Введите текст в качестве заголовка всего документа, выделите его весь мышкой и
примените к нему всю схему, ткнув мышкой в нижней части панели «Структура
XML» в текст
«VFPData {Schema Employee from VFP}» подобно тому, как это сделано на
картинке ниже:

Рис.4
В возникшем при этом диалоге «Применить ко всему документу?» подтвердите
выбором кнопки «Применить ко всему документу». После чего у Вас должно
получиться нечто похожее представленному на рисунке ниже:

Рис.5
Перемесив позицию курсора к началу конечного элемента
VFPData, нажмите мышкой на элемент employee в
нижней части панели «Структура XML«. Поле чего Вы
должны получить то, что показано на рисунке ниже:

Рис.6
Последовательно выбирая мышкой подчинённые элементы:
lastname, firstname, birthdate, notes у элемента
employee, в нижней части панели «Структура XML»
и после ввода очередного элемента, перемещая текущую позицию в документе к
началу конечного элемента employee, Вы должны получить
подобное тому, что изображено на картинке ниже:

Рис.7
Следующим шагом, мы должны создать таблицу таким образом, чтобы элемент
employee с вложенными в него элементами разместился бы
в первой строке создаваемой нами таблицы, а каждый из вложенных элементом попал
бы в отведённый ему столбец таблицы. Строку заголовков столбцов таблицы при этом,
следует поместить сразу после заголовка документа, но перед элементом
employee. Проделав это, Вы должны получить подобное
тому, что показано на картинке ниже:

Рис.8
К этому же результату можно придти, если сначала создать таблицу с
заголовками столбцов и одной пустой строкой в качестве её данных, а затем,
выделив всю строку данных в таблице, связать с ней групповой элемент
employee. Далее, последовательно смещаясь по столбцам,
связать с каждым из них элементы, принадлежащие групповому элементу
employee: lastname, firstname, birthdate
и birthdate.
Чтобы придать полученной таблице презентабельный вид, можно воспользоваться
одним из стилей таблиц, например таким:

Рис.9
Наконец, полученный результат сохраняем как MS Word 2007
документ:

Рис.10
Следующим шагом нам нужно извлечь xml-данные в
формате Open XML у полученного документа. Это можно
сделать
- либо сделав копию полученного документа с расширением .zip и далее воспользоваться возможностями одной из утилит работы с
zip-архивами данных, - либо, если у Вас имеется
установленный WinRAR.exe, то создать командный файл
getContentsUseWinRAR.cmd,
подобный следующему:
@echo off
mode con: cp select=1251 > _tmp.txt
"C:Program FilesWinRARWinRAR.exe" X -ad -ibck -o+ "Пример VFP-таблицы в виде MS Word 2007.docx"
del _tmp.txt
Файл: getContentsUseWinRAR.cmd
и выполнить его из того каталога, куда Вы только что сохранили файл «Пример
VFP-таблицы в виде MS Word 2007.docx». В данном случае, нас будет интересовать только файл
document.xml из
подкаталога word:

Рис.11
Вот каким он получился у меня:
<?xml
version=«1.0«
encoding=«UTF-8«
standalone=«yes«?>
<w:document
xmlns:ve=«http://schemas.openxmlformats.org/markup-compatibility/2006«
xmlns:o=«urn:schemas-microsoft-com:office:office«
xmlns:r=«http://schemas.openxmlformats.org/officeDocument/2006/relationships«
xmlns:m=«http://schemas.openxmlformats.org/officeDocument/2006/math«
xmlns:v=«urn:schemas-microsoft-com:vml«
xmlns:wp=«http://schemas.openxmlformats.org/drawingml/2006/wordprocessingDrawing«
xmlns:w10=«urn:schemas-microsoft-com:office:word«
xmlns:w=«http://schemas.openxmlformats.org/wordprocessingml/2006/main«
xmlns:wne=«http://schemas.microsoft.com/office/word/2006/wordml«>
<w:body>
<w:customXml
w:uri=«Schema_Employee«
w:element=«VFPData«>
<w:p
w:rsidR=«00883633«
w:rsidRPr=«00AF60CD«
w:rsidRDefault=«00883633«
w:rsidP=«00AF60CD«>
<w:pPr>
<w:jc
w:val=«center«/>
<w:rPr>
<w:rFonts
w:asciiTheme=«majorHAnsi«
w:hAnsiTheme=«majorHAnsi«/>
</w:rPr>
</w:pPr>
<w:r
w:rsidRPr=«00883633«>
<w:rPr>
<w:rFonts
w:asciiTheme=«majorHAnsi«
w:hAnsiTheme=«majorHAnsi«/>
</w:rPr>
<w:t>Пример</w:t>
</w:r>
<w:r
w:rsidR=«00AF60CD«>
<w:rPr>
<w:rFonts
w:asciiTheme=«majorHAnsi«
w:hAnsiTheme=«majorHAnsi«/>
</w:rPr>
<w:t
xml:space=«preserve«>
</w:t>
</w:r>
<w:r
w:rsidR=«00AF60CD«>
<w:rPr>
<w:rFonts
w:asciiTheme=«majorHAnsi«
w:hAnsiTheme=«majorHAnsi«/>
<w:lang
w:val=«en-US«/>
</w:rPr>
<w:t>VFP</w:t>
</w:r>
<w:r
w:rsidR=«00AF60CD«>
<w:rPr>
<w:rFonts
w:asciiTheme=«majorHAnsi«
w:hAnsiTheme=«majorHAnsi«/>
</w:rPr>
<w:t>—</w:t>
</w:r>
<w:r
w:rsidRPr=«00883633«>
<w:rPr>
<w:rFonts
w:asciiTheme=«majorHAnsi«
w:hAnsiTheme=«majorHAnsi«/>
</w:rPr>
<w:t
xml:space=«preserve«>таблицы в виде таблицы в </w:t>
</w:r>
<w:r
w:rsidR=«00AF60CD«>
<w:rPr>
<w:rFonts
w:asciiTheme=«majorHAnsi«
w:hAnsiTheme=«majorHAnsi«/>
<w:lang
w:val=«en-US«/>
</w:rPr>
<w:t>MS</w:t>
</w:r>
<w:r
w:rsidR=«00AF60CD«
w:rsidRPr=«00AF60CD«>
<w:rPr>
<w:rFonts
w:asciiTheme=«majorHAnsi«
w:hAnsiTheme=«majorHAnsi«/>
</w:rPr>
<w:t
xml:space=«preserve«>
</w:t>
</w:r>
<w:r
w:rsidR=«00AF60CD«>
<w:rPr>
<w:rFonts
w:asciiTheme=«majorHAnsi«
w:hAnsiTheme=«majorHAnsi«/>
<w:lang
w:val=«en-US«/>
</w:rPr>
<w:t>Word</w:t>
</w:r>
<w:r
w:rsidR=«00AF60CD«
w:rsidRPr=«00AF60CD«>
<w:rPr>
<w:rFonts
w:asciiTheme=«majorHAnsi«
w:hAnsiTheme=«majorHAnsi«/>
</w:rPr>
<w:t
xml:space=«preserve«>
2007</w:t>
</w:r>
<w:r
w:rsidR=«00AF60CD«>
<w:rPr>
<w:rFonts
w:asciiTheme=«majorHAnsi«
w:hAnsiTheme=«majorHAnsi«/>
</w:rPr>
<w:t>.</w:t>
</w:r>
</w:p>
<w:tbl>
<w:tblPr>
<w:tblStyle
w:val=«1-1«/>
<w:tblW
w:w=«0«
w:type=«auto«/>
<w:tblLook
w:val=«04A0«/>
</w:tblPr>
<w:tblGrid>
<w:gridCol
w:w=«2392«/>
<w:gridCol
w:w=«2393«/>
<w:gridCol
w:w=«2393«/>
<w:gridCol
w:w=«2393«/>
</w:tblGrid>
<w:tr
w:rsidR=«00174F3F«
w:rsidTr=«00174F3F«>
<w:trPr>
<w:cnfStyle
w:val=«100000000000«/>
</w:trPr>
<w:tc>
<w:tcPr>
<w:cnfStyle
w:val=«001000000000«/>
<w:tcW
w:w=«2392«
w:type=«dxa«/>
</w:tcPr>
<w:p
w:rsidR=«00174F3F«
w:rsidRPr=«007F26DB«
w:rsidRDefault=«007F26DB«
w:rsidP=«00174F3F«>
<w:r>
<w:t>Фамилия</w:t>
</w:r>
</w:p>
</w:tc>
<w:tc>
<w:tcPr>
<w:tcW
w:w=«2393«
w:type=«dxa«/>
</w:tcPr>
<w:p
w:rsidR=«00174F3F«
w:rsidRPr=«00174F3F«
w:rsidRDefault=«00174F3F«
w:rsidP=«00174F3F«>
<w:pPr>
<w:cnfStyle
w:val=«100000000000«/>
</w:pPr>
<w:r>
<w:t>Имя</w:t>
</w:r>
</w:p>
</w:tc>
<w:tc>
<w:tcPr>
<w:tcW
w:w=«2393«
w:type=«dxa«/>
</w:tcPr>
<w:p
w:rsidR=«00174F3F«
w:rsidRPr=«00174F3F«
w:rsidRDefault=«00174F3F«
w:rsidP=«00174F3F«>
<w:pPr>
<w:cnfStyle
w:val=«100000000000«/>
</w:pPr>
<w:r>
<w:t>День рождения</w:t>
</w:r>
</w:p>
</w:tc>
<w:tc>
<w:tcPr>
<w:tcW
w:w=«2393«
w:type=«dxa«/>
</w:tcPr>
<w:p
w:rsidR=«00174F3F«
w:rsidRPr=«00174F3F«
w:rsidRDefault=«00174F3F«
w:rsidP=«00174F3F«>
<w:pPr>
<w:cnfStyle
w:val=«100000000000«/>
</w:pPr>
<w:r>
<w:t>Комментарий</w:t>
</w:r>
</w:p>
</w:tc>
</w:tr>
<w:customXml
w:element=«employee«>
<w:tr
w:rsidR=«00174F3F«
w:rsidTr=«00174F3F«>
<w:trPr>
<w:cnfStyle
w:val=«000000100000«/>
</w:trPr>
<w:customXml
w:element=«lastname«>
<w:tc>
<w:tcPr>
<w:cnfStyle
w:val=«001000000000«/>
<w:tcW
w:w=«2392«
w:type=«dxa«/>
</w:tcPr>
<w:p
w:rsidR=«00174F3F«
w:rsidRDefault=«00174F3F«
w:rsidP=«00174F3F«>
<w:pPr>
<w:rPr>
<w:lang
w:val=«en-US«/>
</w:rPr>
</w:pPr>
</w:p>
</w:tc>
</w:customXml>
<w:customXml
w:element=«firstname«>
<w:tc>
<w:tcPr>
<w:tcW
w:w=«2393«
w:type=«dxa«/>
</w:tcPr>
<w:p
w:rsidR=«00174F3F«
w:rsidRDefault=«00174F3F«
w:rsidP=«00174F3F«>
<w:pPr>
<w:cnfStyle
w:val=«000000100000«/>
<w:rPr>
<w:lang
w:val=«en-US«/>
</w:rPr>
</w:pPr>
</w:p>
</w:tc>
</w:customXml>
<w:customXml
w:element=«birthdate«>
<w:tc>
<w:tcPr>
<w:tcW
w:w=«2393«
w:type=«dxa«/>
</w:tcPr>
<w:p
w:rsidR=«00174F3F«
w:rsidRDefault=«00174F3F«
w:rsidP=«00174F3F«>
<w:pPr>
<w:cnfStyle
w:val=«000000100000«/>
<w:rPr>
<w:lang
w:val=«en-US«/>
</w:rPr>
</w:pPr>
</w:p>
</w:tc>
</w:customXml>
<w:customXml
w:element=«notes«>
<w:tc>
<w:tcPr>
<w:tcW
w:w=«2393«
w:type=«dxa«/>
</w:tcPr>
<w:p
w:rsidR=«00174F3F«
w:rsidRDefault=«00174F3F«
w:rsidP=«00174F3F«>
<w:pPr>
<w:cnfStyle
w:val=«000000100000«/>
<w:rPr>
<w:lang
w:val=«en-US«/>
</w:rPr>
</w:pPr>
</w:p>
</w:tc>
</w:customXml>
</w:tr>
</w:customXml>
</w:tbl>
<w:p
w:rsidR=«00174F3F«
w:rsidRDefault=«006C46B9«
w:rsidP=«00174F3F«>
<w:pPr>
<w:rPr>
<w:lang
w:val=«en-US«/>
</w:rPr>
</w:pPr>
</w:p>
</w:customXml>
<w:p
w:rsidR=«00174F3F«
w:rsidRPr=«00883633«
w:rsidRDefault=«00174F3F«/>
<w:sectPr
w:rsidR=«00174F3F«
w:rsidRPr=«00883633«
w:rsidSect=«00EC3577«>
<w:pgSz
w:w=«11906«
w:h=«16838«/>
<w:pgMar
w:top=«1134«
w:right=«850«
w:bottom=«1134«
w:left=«1701«
w:header=«708«
w:footer=«708«
w:gutter=«0«/>
<w:cols
w:space=«708«/>
<w:docGrid
w:linePitch=«360«/>
</w:sectPr>
</w:body>
</w:document>
Файл: document.xml
Здесь мной выделены начальные/конечные теги элементов
w:customXml, относящиеся к соответствующим элементам XSD-схемы.
Обратите внимание, что содержимое MS Word-документа,
отвечающее определённому элементу схемы, располагается внутри соответствующего
w:customXml элемента. Так тег параграфа, включающего в
себя заголовок для всего документа, следует сразу за начальным элементом
<w:customXml w:uri=»Schema_Employee» w:element=»VFPData»>,
отвечающим корневому элементу XSD-схемы. Строка данных
таблицы, расположенная в элементе <w:tr>…</w:tr>,
следует сразу за групповым элементом <w:customXml
w:element=»employee»>, наконец любой столбец таблицы, содержащий данные
таблицы (т.е. любой элемент <w:tc>…</w:tc>),
располагается внутри соответствующего w:customXml-элемента,
отвечающего соответствующему элементу данных в XSD-схеме.
Экспериментируя с MS Word-документом при
подготовке шаблона документа, созданного на основе XSD-схемы,
я обнаружил, что это правило выполняется не всегда, а возможны случаи, когда
w:customXml-элемент оказывается «пустым» и в таких
случаях, он располагается в том месте MS Word-документа,
где должен бы быть расположен текст непосредственно, точнее элемент
<w:r>…<w:t>…</w:t></w:r>, как в фрагменте
xml-документа, приведённого ниже:
…
<w:customXml
w:element=«employee«>
<w:tr
w:rsidR=«00883633«
w:rsidRPr=«00883633«
w:rsidTr=«00883633«>
<w:trPr>
<w:cnfStyle
w:val=«000000100000«
/>
</w:trPr>
<w:tc>
<w:tcPr>
<w:cnfStyle
w:val=«001000000000«
/>
<w:tcW
w:w=«2392«
w:type=«dxa«
/>
</w:tcPr>
<w:p
w:rsidR=«00883633«
w:rsidRPr=«00883633«
w:rsidRDefault=«00883633«
w:rsidP=«00883633«>
<w:customXml
w:element=«lastname«
/>
</w:p>
</w:tc>
…
Здесь w:customXml-элемент, отвечающий полю данных
lastname, расположен не снаружи элемента
<w:tc>…</w:tc>, а внутри его, точнее внутри его
элемента <w:p>.
Выше шаблон документа (worddocument.htm)
был получен путём прямого редактирования из среды MS
Word 2007. Однако, можно написать XSLT-преобразование,
способное для заданной xsd-схемы динамически создать
подобный шаблон. У меня это получилось так:
<?xml
version=«1.0«
encoding=«UTF-8«
standalone=«yes«?>
<!— file: genXsltTableTemplate.xslt
—>
<xsl:stylesheet
version=«1.0«
xmlns:xsl=«http://www.w3.org/1999/XSL/Transform«
xmlns:xsi=«http://www.w3.org/2001/XMLSchema-instance«
xmlns:msxsl=«urn:schemas-microsoft-com:xslt«
xmlns:xsd=«http://www.w3.org/2001/XMLSchema«
xmlns:msdata=«urn:schemas-microsoft-com:xml-msdata«
xmlns:ve=«http://schemas.openxmlformats.org/markup-compatibility/2006«
xmlns:o=«urn:schemas-microsoft-com:office:office«
xmlns:r=«http://schemas.openxmlformats.org/officeDocument/2006/relationships«
xmlns:m=«http://schemas.openxmlformats.org/officeDocument/2006/math«
xmlns:v=«urn:schemas-microsoft-com:vml«
xmlns:wp=«http://schemas.openxmlformats.org/drawingml/2006/wordprocessingDrawing«
xmlns:w10=«urn:schemas-microsoft-com:office:word«
xmlns:w=«http://schemas.openxmlformats.org/wordprocessingml/2006/main«
xmlns:wne=«http://schemas.microsoft.com/office/word/2006/wordml«
exclude-result-prefixes=«xsi
msxsl xsd msdata«>
<
xsl:output
version=«1.0«
method=«xml«
encoding=«utf-8«
standalone=«yes«
/>
<
xsl:param
name=«prmSchemaUri«>
<xsl:text>Schema_Employee</xsl:text>
</xsl:param>
<xsl:param
name=«prmSchemaElement«>
<xsl:text>VFPData</xsl:text>
</xsl:param>
<xsl:param
name=«prmTblStyle«>
<xsl:text>1-1</xsl:text>
</xsl:param>
<xsl:param
name=«prmTblType«>
<xsl:text>auto</xsl:text>
</xsl:param>
<xsl:param
name=«prmTblLook«>
<xsl:text>04A0</xsl:text>
</xsl:param>
<xsl:param
name=«prmTblColTwipsMeasure«>
<xsl:text>2393</xsl:text>
</xsl:param>
<xsl:param
name=«prmTblRsid«>
<xsl:text>00174F3F</xsl:text>
</xsl:param>
<xsl:param
name=«prmTblRStyle«>
<xsl:text>100000000000</xsl:text>
</xsl:param>
<xsl:param
name=«prmTblCStyle«>
<xsl:text>001000000000</xsl:text>
</xsl:param>
<xsl:param
name=«prmTblCType«>
<xsl:text>dxa</xsl:text>
</xsl:param>
<xsl:param
name=«prmTblColumns«>
<tblColumns>
<tbl
SchemaUri=«Schema_Employee«>
<tblCol>
<header>Фамилия</header>
<width>2391</width>
<lang>en-US</lang>
</tblCol>
<tblCol>
<header>Имя</header>
<width>2392</width>
<lang>en-US</lang>
</tblCol>
<tblCol>
<header>День рождения</header>
<width>2393</width>
<lang>ru-RU</lang>
</tblCol>
<tblCol>
<header>Комментарий</header>
<width>2394</width>
<lang>en-US</lang>
</tblCol>
</tbl>
<!— …
—>
</tblColumns>
</xsl:param>
<
xsl:template
match=«/«>
<w:document
xmlns:ve=«http://schemas.openxmlformats.org/markup-compatibility/2006«
xmlns:o=«urn:schemas-microsoft-com:office:office«
xmlns:r=«http://schemas.openxmlformats.org/officeDocument/2006/relationships«
xmlns:m=«http://schemas.openxmlformats.org/officeDocument/2006/math«
xmlns:v=«urn:schemas-microsoft-com:vml«
xmlns:wp=«http://schemas.openxmlformats.org/drawingml/2006/wordprocessingDrawing«
xmlns:w10=«urn:schemas-microsoft-com:office:word«
xmlns:w=«http://schemas.openxmlformats.org/wordprocessingml/2006/main«
xmlns:wne=«http://schemas.microsoft.com/office/word/2006/wordml«>
<w:body>
<xsl:call-template
name=«genTable«>
<xsl:with-param
name=«prmSchemaUri«
select=«$prmSchemaUri«
/>
<xsl:with-param
name=«prmSchemaElement«
select=«$prmSchemaElement«
/>
<xsl:with-param
name=«prmTblStyle«
select=«$prmTblStyle«
/>
<xsl:with-param
name=«prmTblType«
select=«$prmTblType«
/>
<xsl:with-param
name=«prmTblLook«
select=«$prmTblLook«
/>
<xsl:with-param
name=«prmTblRStyle«
select=«$prmTblRStyle«
/>
<xsl:with-param
name=«prmTblCStyle«
select=«$prmTblCStyle«
/>
<xsl:with-param
name=«prmTblCType«
select=«$prmTblCType«
/>
</xsl:call-template>
<w:sectPr
w:rsidR=«00174F3F«
w:rsidRPr=«00883633«
w:rsidSect=«00EC3577«>
<w:pgSz
w:w=«11906«
w:h=«16838«/>
<w:pgMar
w:top=«1134«
w:right=«850«
w:bottom=«1134«
w:left=«1701«
w:header=«708«
w:footer=«708«
w:gutter=«0«/>
<w:cols
w:space=«708«/>
<w:docGrid
w:linePitch=«360«/>
</w:sectPr>
</w:body>
</w:document>
</xsl:template>
<
xsl:template
name=«genTable«>
<xsl:param
name=«prmSchemaUri«
/>
<xsl:param
name=«prmSchemaElement«
/>
<xsl:param
name=«prmTblStyle«
/>
<xsl:param
name=«prmTblType«
/>
<xsl:param
name=«prmTblLook«
/>
<xsl:param
name=«prmTblRStyle«
/>
<xsl:param
name=«prmTblCStyle«
/>
<xsl:param
name=«prmTblCType«
/>
<w:customXml
w:uri=«{$prmSchemaUri}«
w:element=«{$prmSchemaElement}«>
<w:p
w:rsidR=«{$prmTblRsid}«
w:rsidRDefault=«{$prmTblRsid}«/>
<w:tbl>
<w:tblPr>
<w:tblStyle
w:val=«{$prmTblStyle}«/>
<w:tblW
w:w=«0«
w:type=«{$prmTblType}«/>
<w:tblLook
w:val=«{$prmTblLook}«/>
</w:tblPr>
<w:tblGrid>
<!— Generate set of <w:gridCol …>
elements—>
<xsl:for-each
select=«/.//xsd:schema/xsd:element[@name=$prmSchemaElement]//xsd:sequence/*«>
<xsl:variable
name=«curPos«>
<xsl:value-of
select=«position()«/>
</xsl:variable>
<xsl:variable
name=«curTblCol«>
<xsl:copy-of
select=«msxsl:node-set($prmTblColumns)/./tblColumns/tbl[@SchemaUri=$prmSchemaUri]/tblCol[number($curPos)]«/>
</xsl:variable>
<!— <w:gridCol w:w=»{$prmTblColTwipsMeasure}»/>
—>
<w:gridCol
w:w=«{msxsl:node-set($curTblCol)/./tblCol/width}«/>
</xsl:for-each>
</w:tblGrid>
<w:tr
w:rsidR=«{$prmTblRsid}«
w:rsidTr=«{$prmTblRsid}«>
<w:trPr>
<w:cnfStyle
w:val=«{$prmTblRStyle}«/>
</w:trPr>
<!— Generate set of <w:tc>…<w:tc>
elements as columns header —>
<xsl:for-each
select=«/.//xsd:schema/xsd:element[@name=$prmSchemaElement]//xsd:sequence/*«>
<xsl:variable
name=«curPos«>
<xsl:value-of
select=«position()«
/>
</xsl:variable>
<xsl:variable
name=«curTblCol«>
<xsl:copy-of
select=«msxsl:node-set($prmTblColumns)/./tblColumns/tbl[@SchemaUri=$prmSchemaUri]/tblCol[number($curPos)]«
/>
</xsl:variable>
<xsl:variable
name=«curTblColWidth«>
<xsl:value-of
select=«msxsl:node-set($curTblCol)/./tblCol/width«
/>
</xsl:variable>
<w:tc>
<w:tcPr>
<!— <w:tcW w:w=»{$prmTblColTwipsMeasure}»
w:type=»{$prmTblCType}»/> —>
<w:tcW
w:w=«{$curTblColWidth}«
w:type=«{$prmTblCType}«/>
</w:tcPr>
<w:p
w:rsidR=«{$prmTblRsid}«
w:rsidRPr=«{$prmTblRsid}«
w:rsidRDefault=«{$prmTblRsid}«
w:rsidP=«{$prmTblRsid}«>
<w:pPr>
<w:cnfStyle
w:val=«{$prmTblCStyle}«/>
</w:pPr>
<w:r>
<w:t>
<!— <xsl:value-of select=»@name»/>
—>
<xsl:value-of
select=«msxsl:node-set($curTblCol)/./tblCol/header«/>
</w:t>
</w:r>
</w:p>
</w:tc>
</xsl:for-each>
</w:tr>
<!— Generate group element
<w:customXml…>…</w:customXml> —>
<w:customXml
w:element=«{/.//xsd:schema/xsd:element[@name=$prmSchemaElement]//xsd:element/@name}«>
<w:tr
w:rsidR=«{$prmTblRsid}«
w:rsidTr=«{$prmTblRsid}«>
<w:trPr>
<w:cnfStyle
w:val=«{$prmTblRStyle}«/>
</w:trPr>
<!— Generate set of
<w:customXml…><w:tc>…<w:tc></w:customXml> elements for columns data
—>
<xsl:for-each
select=«/.//xsd:schema/xsd:element[@name=$prmSchemaElement]//xsd:sequence/*«>
<xsl:variable
name=«curPos«>
<xsl:value-of
select=«position()«/>
</xsl:variable>
<xsl:variable
name=«curTblCol«>
<xsl:copy-of
select=«msxsl:node-set($prmTblColumns)/./tblColumns/tbl[@SchemaUri=$prmSchemaUri]/tblCol[number($curPos)]«/>
</xsl:variable>
<xsl:variable
name=«curTblColWidth«>
<xsl:value-of
select=«msxsl:node-set($curTblCol)/./tblCol/width«
/>
</xsl:variable>
<w:customXml
w:element=«{@name}«>
<w:tc>
<w:tcPr>
<!— <w:tcW
w:w=»{$prmTblColTwipsMeasure}» w:type=»{$prmTblCType}»/>
—>
<w:tcW
w:w=«{$curTblColWidth}«
w:type=«{$prmTblCType}«/>
</w:tcPr>
<w:p
w:rsidR=«{$prmTblRsid}«
w:rsidRDefault=«{$prmTblRsid}«
w:rsidP=«{$prmTblRsid}«>
<w:pPr>
<w:cnfStyle
w:val=«{$prmTblCStyle}«/>
<w:rPr>
<w:lang
w:val=«{msxsl:node-set($curTblCol)/./tblCol/lang}«/>
</w:rPr>
</w:pPr>
</w:p>
</w:tc>
</w:customXml>
</xsl:for-each>
</w:tr>
</w:customXml>
</w:tbl>
<w:p
w:rsidR=«{$prmTblRsid}«
w:rsidRDefault=«{$prmTblRsid}«/>
</w:customXml>
</xsl:template>
</
xsl:stylesheet>
Файл: genXsltTableTemplate.xslt
Здесь параметр prmTblColumns для каждой схемы
содержит список дополнительных параметров для колонок таблиц, Вы можете
расширить его по своему усмотрению добавив соответствующий код в шаблон
genTable. Применив этот шаблон к
xsd-схеме employee.xsd, используя командный
файл:
msxsl.exe employee.XSD ../XSLT/genXsltTableTemplate.xslt -o documentTableTemplate.xml -u '4.0'
Файл: documentTableTemplate.cmd
мы получим файл documentTableTemplate.xml,
представляющий из себя заготовку для MS Word 2007 шаблона таблицы, схема к которой была указана в качестве первого параметра у утилиты
msxsl.exe.
Далее нам потребуется возможность из папки, содержащей в себе подпапки с
файлами, создавать zip-архив (точнее
docx-файл). Если у Вас установлен
WinRAR.exe, то это можно сделать, поместив вот такую
последовательности DOS-команд:
@echo off
mode con: cp select=1251 > _tmp.txt
"C:Program FilesWinRARWinRAR.exe" a -r -ibck -o+ -y -ep1 "Пример VFP-таблицы в виде MS Word 2007.zip" "Пример VFP-таблицы в виде MS Word 2007*.*"
if not exist "Пример VFP-таблицы в виде MS Word 2007.docx" goto cont
del "Пример VFP-таблицы в виде MS Word 2007.docx"
:cont
rename "Пример VFP-таблицы в виде MS Word 2007.zip" "Пример VFP-таблицы в виде MS Word 2007.docx"
del _tmp.txt
Файл: fromContentsToDocxUseWinRAR.cmd
в командный файл fromContentsToDocxUseWinRAR.cmd
в подкаталог ../DOCX/.
Теперь переименовав полученный после выполнения
documentTableTemplate.cmd файл documentTableTemplate.xml
на document.xml (в подкаталоге
XML), подменив им
файл worddocument.xml (в подкаталоге
..DOCXПример VFP-таблицы в виде MS Word 2007),
получив соответствующий docx-файл (выполнением
fromContentsToDocxUseWinRAR.cmd) и открыв его в MS Word
2007, я наблюдаю следующую картинку:

Как видим, здесь всё в полом соответствии с нашими желаниями. Таким образом,
если у нас имеется несколько таблиц с разными xsd-схемами,
то мы вполне можем создавать docx-шаблон, содержащий
их программно, используя шаблон genTable из файла
genXsltTableTemplate.xslt. Только нужно иметь ввиду, что
- соответствующие xsd-схемы
должны быть предварительно зарегистрированы в библиотеке схем (см. под ключом
HKEY_CURRENT_USERSoftwareMicrosoftSchema Library.. системного реестра). - информация об используемых в документе xsd-схемах
в части документа wordsettings.xml в рамках содержащихся там элементов,
подобных: <w:attachedSchema w:val=»Schema_Employee»/>, должна быть
корректной. Т.е. с помощью подобных элементов должны быть перечислены все
xsd-схемы, используемые в документе.
Построение XSLT-преобразования
для заполнения шаблона MS Word 2007 документа данными из xml-файла.
Сколько-то разобравшись с содержимым файла document.xml,
каковы же будут наши дальнейшие действия? Наша цель на данном этапе: это на
основе приведённого выше document.xml, создать файл
xslt-преобразования, которое получив бы на входе
данные из файла employee.xml, возвратило бы в качестве
результата преобразований xml-документ, подобный файлу
document.xml, но уже не с пустой строкой в данных у
таблицы, а с заполненными всеми строками данных таблицы, взяв их из файла
employee.xml. Это можно сделать
- либо прямым редактирование файла docement.xml,
- либо создать дополнительное xslt-преобразование,
позволяющее преобразовать файл, подобный файлу
document.xml, в файл соответствующего ему xslt-преобразования.
Такая работа мной проделана и ниже xslt-файл (getXmlDocument.xslt),
представляющий результат этого дополнительного xslt-преобразования:
<?xml
version=«1.0«
encoding=«utf-8«
standalone=«yes«?>
<xsl:stylesheet
version=«1.0«
xmlns:xsl=«http://www.w3.org/1999/XSL/Transform«
xmlns:xsi=«http://www.w3.org/2001/XMLSchema-instance«
xmlns:msxsl=«urn:schemas-microsoft-com:xslt«
xmlns:msdata=«urn:schemas-microsoft-com:xml-msdata«
xmlns:ve=«http://schemas.openxmlformats.org/markup-compatibility/2006«
xmlns:o=«urn:schemas-microsoft-com:office:office«
xmlns:r=«http://schemas.openxmlformats.org/officeDocument/2006/relationships«
xmlns:m=«http://schemas.openxmlformats.org/officeDocument/2006/math«
xmlns:v=«urn:schemas-microsoft-com:vml«
xmlns:wp=«http://schemas.openxmlformats.org/drawingml/2006/wordprocessingDrawing«
xmlns:w10=«urn:schemas-microsoft-com:office:word«
xmlns:w=«http://schemas.openxmlformats.org/wordprocessingml/2006/main«
xmlns:wne=«http://schemas.microsoft.com/office/word/2006/wordml«
exclude-result-prefixes=«xsi
msxsl msdata«>
<
xsl:output
version=«1.0«
method=«xml«
encoding=«utf-8«
standalone=«yes«
/>
<
xsl:template
match=«/«>
<w:document
xmlns:ve=«http://schemas.openxmlformats.org/markup-compatibility/2006«
xmlns:o=«urn:schemas-microsoft-com:office:office«
xmlns:r=«http://schemas.openxmlformats.org/officeDocument/2006/relationships«
xmlns:m=«http://schemas.openxmlformats.org/officeDocument/2006/math«
xmlns:v=«urn:schemas-microsoft-com:vml«
xmlns:wp=«http://schemas.openxmlformats.org/drawingml/2006/wordprocessingDrawing«
xmlns:w10=«urn:schemas-microsoft-com:office:word«
xmlns:w=«http://schemas.openxmlformats.org/wordprocessingml/2006/main«
xmlns:wne=«http://schemas.microsoft.com/office/word/2006/wordml«>
<w:body>
<w:customXml
w:uri=«Schema_Employee«
w:element=«VFPData«>
<w:p
w:rsidR=«00883633«
w:rsidRPr=«00AF60CD«
w:rsidRDefault=«00883633«
w:rsidP=«00AF60CD«>
<w:pPr>
<w:jc
w:val=«center«></w:jc>
<w:rPr>
<w:rFonts
w:asciiTheme=«majorHAnsi«
w:hAnsiTheme=«majorHAnsi«></w:rFonts>
</w:rPr>
</w:pPr>
<w:r
w:rsidRPr=«00883633«>
<w:rPr>
<w:rFonts
w:asciiTheme=«majorHAnsi«
w:hAnsiTheme=«majorHAnsi«></w:rFonts>
</w:rPr>
<w:t>Пример</w:t>
</w:r>
<w:r
w:rsidR=«00AF60CD«>
<w:rPr>
<w:rFonts
w:asciiTheme=«majorHAnsi«
w:hAnsiTheme=«majorHAnsi«></w:rFonts>
</w:rPr>
<w:t
xml:space=«preserve«>
</w:t>
</w:r>
<w:r
w:rsidR=«00AF60CD«>
<w:rPr>
<w:rFonts
w:asciiTheme=«majorHAnsi«
w:hAnsiTheme=«majorHAnsi«></w:rFonts>
<w:lang
w:val=«en-US«></w:lang>
</w:rPr>
<w:t>VFP</w:t>
</w:r>
<w:r
w:rsidR=«00AF60CD«>
<w:rPr>
<w:rFonts
w:asciiTheme=«majorHAnsi«
w:hAnsiTheme=«majorHAnsi«></w:rFonts>
</w:rPr>
<w:t>—</w:t>
</w:r>
<w:r
w:rsidRPr=«00883633«>
<w:rPr>
<w:rFonts
w:asciiTheme=«majorHAnsi«
w:hAnsiTheme=«majorHAnsi«></w:rFonts>
</w:rPr>
<w:t
xml:space=«preserve«>таблицы
в виде таблицы в </w:t>
</w:r>
<w:r
w:rsidR=«00AF60CD«>
<w:rPr>
<w:rFonts
w:asciiTheme=«majorHAnsi«
w:hAnsiTheme=«majorHAnsi«></w:rFonts>
<w:lang
w:val=«en-US«></w:lang>
</w:rPr>
<w:t>MS</w:t>
</w:r>
<w:r
w:rsidR=«00AF60CD«
w:rsidRPr=«00AF60CD«>
<w:rPr>
<w:rFonts
w:asciiTheme=«majorHAnsi«
w:hAnsiTheme=«majorHAnsi«></w:rFonts>
</w:rPr>
<w:t
xml:space=«preserve«>
</w:t>
</w:r>
<w:r
w:rsidR=«00AF60CD«>
<w:rPr>
<w:rFonts
w:asciiTheme=«majorHAnsi«
w:hAnsiTheme=«majorHAnsi«></w:rFonts>
<w:lang
w:val=«en-US«></w:lang>
</w:rPr>
<w:t>Word</w:t>
</w:r>
<w:r
w:rsidR=«00AF60CD«
w:rsidRPr=«00AF60CD«>
<w:rPr>
<w:rFonts
w:asciiTheme=«majorHAnsi«
w:hAnsiTheme=«majorHAnsi«></w:rFonts>
</w:rPr>
<w:t
xml:space=«preserve«>
2007</w:t>
</w:r>
<w:r
w:rsidR=«00AF60CD«>
<w:rPr>
<w:rFonts
w:asciiTheme=«majorHAnsi«
w:hAnsiTheme=«majorHAnsi«></w:rFonts>
</w:rPr>
<w:t>.</w:t>
</w:r>
</w:p>
<w:tbl>
<w:tblPr>
<w:tblStyle
w:val=«1-1«></w:tblStyle>
<w:tblW
w:w=«0«
w:type=«auto«></w:tblW>
<w:tblLook
w:val=«04A0«></w:tblLook>
</w:tblPr>
<w:tblGrid>
<w:gridCol
w:w=«2392«></w:gridCol>
<w:gridCol
w:w=«2393«></w:gridCol>
<w:gridCol
w:w=«2393«></w:gridCol>
<w:gridCol
w:w=«2393«></w:gridCol>
</w:tblGrid>
<w:tr
w:rsidR=«00174F3F«
w:rsidTr=«00174F3F«>
<w:trPr>
<w:cnfStyle
w:val=«100000000000«></w:cnfStyle>
</w:trPr>
<w:tc>
<w:tcPr>
<w:cnfStyle
w:val=«001000000000«></w:cnfStyle>
<w:tcW
w:w=«2392«
w:type=«dxa«></w:tcW>
</w:tcPr>
<w:p
w:rsidR=«00174F3F«
w:rsidRPr=«00174F3F«
w:rsidRDefault=«00174F3F«
w:rsidP=«00174F3F«>
<w:proofErr
w:type=«spellStart«></w:proofErr>
<w:r>
<w:rPr>
<w:lang
w:val=«en-US«></w:lang>
</w:rPr>
<w:t>Фамилия</w:t>
</w:r>
<w:proofErr
w:type=«spellEnd«></w:proofErr>
</w:p>
</w:tc>
<w:tc>
<w:tcPr>
<w:tcW
w:w=«2393«
w:type=«dxa«></w:tcW>
</w:tcPr>
<w:p
w:rsidR=«00174F3F«
w:rsidRPr=«00174F3F«
w:rsidRDefault=«00174F3F«
w:rsidP=«00174F3F«>
<w:pPr>
<w:cnfStyle
w:val=«100000000000«></w:cnfStyle>
</w:pPr>
<w:r>
<w:t>Имя</w:t>
</w:r>
</w:p>
</w:tc>
<w:tc>
<w:tcPr>
<w:tcW
w:w=«2393«
w:type=«dxa«></w:tcW>
</w:tcPr>
<w:p
w:rsidR=«00174F3F«
w:rsidRPr=«00174F3F«
w:rsidRDefault=«00174F3F«
w:rsidP=«00174F3F«>
<w:pPr>
<w:cnfStyle
w:val=«100000000000«></w:cnfStyle>
</w:pPr>
<w:r>
<w:t>День
рождения</w:t>
</w:r>
</w:p>
</w:tc>
<w:tc>
<w:tcPr>
<w:tcW
w:w=«2393«
w:type=«dxa«></w:tcW>
</w:tcPr>
<w:p
w:rsidR=«00174F3F«
w:rsidRPr=«00174F3F«
w:rsidRDefault=«00174F3F«
w:rsidP=«00174F3F«>
<w:pPr>
<w:cnfStyle
w:val=«100000000000«></w:cnfStyle>
</w:pPr>
<w:r>
<w:t>Комментарий</w:t>
</w:r>
</w:p>
</w:tc>
</w:tr>
<xsl:for-each
select=«//VFPData/employee«>
<w:customXml
w:element=«employee«>
<w:tr
w:rsidR=«00174F3F«
w:rsidTr=«00174F3F«>
<w:trPr>
<w:cnfStyle
w:val=«000000100000«
/>
</w:trPr>
<w:customXml
w:element=«lastname«>
<w:tc>
<w:tcPr>
<w:cnfStyle
w:val=«001000000000«
/>
<w:tcW
w:w=«2392«
w:type=«dxa«
/>
</w:tcPr>
<w:p
w:rsidR=«00174F3F«
w:rsidRDefault=«00174F3F«
w:rsidP=«00174F3F«>
<w:pPr>
<w:rPr>
<w:lang
w:val=«en-US«
/>
</w:rPr>
</w:pPr>
<w:r>
<w:rPr>
<w:lang
w:val=«en-US«
/>
</w:rPr>
<w:t>
<xsl:value-of
select=«lastname«
/>
</w:t>
</w:r>
</w:p>
</w:tc>
</w:customXml>
<w:customXml
w:element=«firstname«>
<w:tc>
<w:tcPr>
<w:tcW
w:w=«2393«
w:type=«dxa«
/>
</w:tcPr>
<w:p
w:rsidR=«00174F3F«
w:rsidRDefault=«00174F3F«
w:rsidP=«00174F3F«>
<w:pPr>
<w:cnfStyle
w:val=«000000100000«
/>
<w:rPr>
<w:lang
w:val=«en-US«
/>
</w:rPr>
</w:pPr>
<w:r>
<w:rPr>
<w:lang
w:val=«en-US«
/>
</w:rPr>
<w:t>
<xsl:value-of
select=«firstname«
/>
</w:t>
</w:r>
</w:p>
</w:tc>
</w:customXml>
<w:customXml
w:element=«birthdate«>
<w:tc>
<w:tcPr>
<w:tcW
w:w=«2393«
w:type=«dxa«
/>
</w:tcPr>
<w:p
w:rsidR=«00174F3F«
w:rsidRDefault=«00174F3F«
w:rsidP=«00174F3F«>
<w:pPr>
<w:cnfStyle
w:val=«000000100000«
/>
<w:rPr>
<w:lang
w:val=«en-US«
/>
</w:rPr>
</w:pPr>
<w:r>
<w:rPr>
<w:lang
w:val=«ru-RU«
/>
</w:rPr>
<w:t>
<xsl:value-of
select=«msxsl:format-date(birthdate,
‘dd.MM.yyyy’)« />
</w:t>
</w:r>
</w:p>
</w:tc>
</w:customXml>
<w:customXml
w:element=«notes«>
<w:tc>
<w:tcPr>
<w:tcW
w:w=«2393«
w:type=«dxa«
/>
</w:tcPr>
<w:p
w:rsidR=«00174F3F«
w:rsidRDefault=«00174F3F«
w:rsidP=«00174F3F«>
<w:pPr>
<w:cnfStyle
w:val=«000000100000«
/>
<w:rPr>
<w:lang
w:val=«en-US«
/>
</w:rPr>
</w:pPr>
<w:r>
<w:rPr>
<w:lang
w:val=«en-US«
/>
</w:rPr>
<w:t>
<xsl:choose>
<xsl:when
test=«string-length(notes)<51«>
<xsl:value-of
select=«notes«/>
</xsl:when>
<xsl:otherwise>
<xsl:value-of
select=«concat(substring(notes,1,50),
substring-before(substring(notes,51), ‘ ‘), ‘ …’)«
/>
</xsl:otherwise>
</xsl:choose>
</w:t>
</w:r>
</w:p>
</w:tc>
</w:customXml>
</w:tr>
</w:customXml>
</xsl:for-each>
</w:tbl>
<w:p
w:rsidR=«00174F3F«
w:rsidRDefault=«00174F3F«
w:rsidP=«00174F3F«>
<w:pPr>
<w:rPr>
<w:lang
w:val=«en-US«></w:lang>
</w:rPr>
</w:pPr>
</w:p>
</w:customXml>
<w:p
w:rsidR=«00174F3F«
w:rsidRPr=«00883633«
w:rsidRDefault=«00174F3F«></w:p>
<w:sectPr
w:rsidR=«00174F3F«
w:rsidRPr=«00883633«
w:rsidSect=«00EC3577«>
<w:pgSz
w:w=«11906«
w:h=«16838«></w:pgSz>
<w:pgMar
w:top=«1134«
w:right=«850«
w:bottom=«1134«
w:left=«1701«
w:header=«708«
w:footer=«708«
w:gutter=«0«></w:pgMar>
<w:cols
w:space=«708«></w:cols>
<w:docGrid
w:linePitch=«360«></w:docGrid>
</w:sectPr>
</w:body>
</w:document>
</xsl:template>
</xsl:stylesheet>
Файл: getXmlDocument.xslt
т.е. именно в подобный xslt-файл следовало бы
превратить наш исходный файл-шаблон document.xml путём
его редактирования. Здесь добавленные элементы слегка оттенены фоном и пояснения
к добавлениям следующие:
- создан стандартный для xslt-преобразований
корневой элемент <xsl:stylesheet … >, которому
наряду с namespace-ами, обеспечивающими работу
xslt-преобразований, добавлены все
namespace-ы из элемента
<w:document …> нашего файла-шаблона document.xml - корневой элемент <w:document>…<w:document>
из document.xml погружён в
xslt-конструкцию <xsl:template match=»/»>…</xsl:template>
для обработки корневого элемента. - перед групповым элементом <w:customXml
w:element=»employee»> организован цикл по всем элементам
employee входных данных: <xsl:for-each
select=»//VFPData/employee»>…</xsl:for-each> файла
employee.xml - а в каждый элемент
<w:tc>…</w:tc> столбца, точнее в конец вложенного в него элемента
<w:p>, сделана вставка элемента
<w:r>…</w:r> во вложенный элемент <w:t>…</w:t>
которого, осуществляется вставка соответствующих значений элементов данных
из employee.xml, возможно с небольшими
преобразованиями, специфичными для конкретного элемента данных. Имея ввиду,
что xslt-вычисления будут происходить внутри цикла
<xsl:for-each select=»//VFPData/employee»>…
Код же этого дополнительного xslt-преобразования, в
результате применений которого к файлу-шаблону document.xml,
был получен вышеприведённый результат следующий:
<?xml
version=«1.0«
encoding=«utf-8«?>
<!— file: genXsltFromTemplate.xslt
—>
<xsl:stylesheet
version=«1.0«
xmlns:xsl=«http://www.w3.org/1999/XSL/Transform«
xmlns:xsi=«http://www.w3.org/2001/XMLSchema-instance«
xmlns:msxsl=«urn:schemas-microsoft-com:xslt«
xmlns:msdata=«urn:schemas-microsoft-com:xml-msdata«
xmlns:ve=«http://schemas.openxmlformats.org/markup-compatibility/2006«
xmlns:o=«urn:schemas-microsoft-com:office:office«
xmlns:r=«http://schemas.openxmlformats.org/officeDocument/2006/relationships«
xmlns:m=«http://schemas.openxmlformats.org/officeDocument/2006/math«
xmlns:v=«urn:schemas-microsoft-com:vml«
xmlns:wp=«http://schemas.openxmlformats.org/drawingml/2006/wordprocessingDrawing«
xmlns:w10=«urn:schemas-microsoft-com:office:word«
xmlns:w=«http://schemas.openxmlformats.org/wordprocessingml/2006/main«
xmlns:wne=«http://schemas.microsoft.com/office/word/2006/wordml«
exclude-result-prefixes=«xsi
msxsl msdata«> <xsl:output
version=«1.0«
method=«xml«
encoding=«utf-8«
omit-xml-declaration=«yes«
/> <!— Root element in xml-data
—>
<xsl:param
name=«prmRootElement«>
<xsl:text>VFPData</xsl:text>
</xsl:param>
<!— Current encoding to replace in
output xml-PI —>
<xsl:param
name=«prmEncoding«>
<xsl:text>utf-8</xsl:text>
</xsl:param>
<xsl:template
match=«/«>
<xsl:text
disable-output-escaping=«yes«><![CDATA[<?xml
version=»1.0″ encoding=»]]></xsl:text>
<xsl:value-of
select=«$prmEncoding«
/>
<xsl:text
disable-output-escaping=«yes«><![CDATA[»
standalone=»yes»?>]]>
</xsl:text>
<!— Generate open <xsl:stylesheet… &
<xsl:template… elements into output —>
<xsl:text
disable-output-escaping=«yes«><![CDATA[<xsl:stylesheet
version=»1.0″]]></xsl:text>
<xsl:text
disable-output-escaping=«yes«><![CDATA[
xmlns:xsl=»http://www.w3.org/1999/XSL/Transform»]]></xsl:text>
<xsl:text
disable-output-escaping=«yes«><![CDATA[
xmlns:xsi=»http://www.w3.org/2001/XMLSchema-instance»]]></xsl:text>
<xsl:text
disable-output-escaping=«yes«><![CDATA[
xmlns:msxsl=»urn:schemas-microsoft-com:xslt»]]></xsl:text>
<xsl:text
disable-output-escaping=«yes«><![CDATA[
xmlns:msdata=»urn:schemas-microsoft-com:xml-msdata»]]></xsl:text>
<xsl:text
disable-output-escaping=«yes«><![CDATA[
xmlns:ve=»http://schemas.openxmlformats.org/markup-compatibility/2006″]]></xsl:text>
<xsl:text
disable-output-escaping=«yes«><![CDATA[
xmlns:o=»urn:schemas-microsoft-com:office:office»]]></xsl:text>
<xsl:text
disable-output-escaping=«yes«><![CDATA[
xmlns:r=»http://schemas.openxmlformats.org/officeDocument/2006/relationships»]]></xsl:text>
<xsl:text
disable-output-escaping=«yes«><![CDATA[
xmlns:m=»http://schemas.openxmlformats.org/officeDocument/2006/math»]]></xsl:text>
<xsl:text
disable-output-escaping=«yes«><![CDATA[
xmlns:v=»urn:schemas-microsoft-com:vml»]]></xsl:text>
<xsl:text
disable-output-escaping=«yes«><![CDATA[
xmlns:wp=»http://schemas.openxmlformats.org/drawingml/2006/wordprocessingDrawing»]]></xsl:text>
<xsl:text
disable-output-escaping=«yes«><![CDATA[
xmlns:w10=»urn:schemas-microsoft-com:office:word»]]></xsl:text>
<xsl:text
disable-output-escaping=«yes«><![CDATA[
xmlns:w=»http://schemas.openxmlformats.org/wordprocessingml/2006/main»]]></xsl:text>
<xsl:text
disable-output-escaping=«yes«><![CDATA[
xmlns:wne=»http://schemas.microsoft.com/office/word/2006/wordml»]]></xsl:text>
<xsl:text
disable-output-escaping=«yes«><![CDATA[
exclude-result-prefixes=»xsi msxsl msdata»>]]></xsl:text>
<xsl:text
disable-output-escaping=«yes«><![CDATA[<xsl:output
version=»1.0″ method=»xml» encoding=»utf-8″ standalone=»yes» />]]></xsl:text>
<xsl:text
disable-output-escaping=«yes«><![CDATA[<xsl:template
match=»/»>]]></xsl:text>
<!— Open w:document element
—>
<w:document
xmlns:ve=«http://schemas.openxmlformats.org/markup-compatibility/2006«
xmlns:o=«urn:schemas-microsoft-com:office:office«
xmlns:r=«http://schemas.openxmlformats.org/officeDocument/2006/relationships«
xmlns:m=«http://schemas.openxmlformats.org/officeDocument/2006/math«
xmlns:v=«urn:schemas-microsoft-com:vml«
xmlns:wp=«http://schemas.openxmlformats.org/drawingml/2006/wordprocessingDrawing«
xmlns:w10=«urn:schemas-microsoft-com:office:word«
xmlns:w=«http://schemas.openxmlformats.org/wordprocessingml/2006/main«
xmlns:wne=«http://schemas.microsoft.com/office/word/2006/wordml«>
<!— … continue parsing for
children’s
of w:document element … —>
<xsl:apply-templates
select=«/./w:document/*«
/>
<!— Close w:document element
—>
</w:document>
<!— Generate close … </xsl:template>
& …</xsl:stylesheet> elements into output
—>
<xsl:text
disable-output-escaping=«yes«><![CDATA[</xsl:template>]]></xsl:text>
<xsl:text
disable-output-escaping=«yes«><![CDATA[</xsl:stylesheet>]]></xsl:text>
</xsl:template>
<!—
Parsing any current input…
—>
<xsl:template
match=«@*|node()«>
<!— Get current name from input
—>
<xsl:variable
name=«varName«>
<xsl:value-of
select=«name()«
/>
</xsl:variable>
<xsl:choose>
<xsl:when
test=«string-length($varName)>0«>
<xsl:choose>
<xsl:when
test=«$varName=’w:customXml’«>
<!— Parsing
<w:customXml…>…</w:customXml> —>
<xsl:call-template
name=«genCustomXml«>
<xsl:with-param
name=«prmElementName«
select=«@w:element«
/>
<xsl:with-param
name=«prmChildren«
select=«*«
/>
</xsl:call-template>
</xsl:when>
<xsl:otherwise>
<!— Parsing any other…
—>
<!— … copy current element into
output—>
<xsl:element
name=«{$varName}«>
<xsl:for-each
select=«@*«>
<xsl:attribute
name=«{name()}«>
<xsl:value-of
select=«.«
/>
</xsl:attribute>
</xsl:for-each>
<!— … continue parsing for child &
as child … —>
<xsl:apply-templates
select=«child::*«
/>
<xsl:value-of
select=«text()«
/>
</xsl:element>
</xsl:otherwise>
</xsl:choose>
</xsl:when>
<xsl:otherwise>
<xsl:apply-templates
select=«@*|node()«
/>
</xsl:otherwise>
</xsl:choose>
</xsl:template>
<!—
Generate w:customXml element
—>
<xsl:template
name=«genCustomXml«>
<xsl:param
name=«prmElementName«/>
<xsl:param
name=«prmChildren«/>
<!— Get current name of element from
input —>
<xsl:variable
name=«varName«>
<xsl:value-of
select=«name()«
/>
</xsl:variable>
<xsl:choose>
<xsl:when
test=«$prmElementName=$prmRootElement«>
<!— Case w:customXml element is root
—>
<!— … copy current element
(w:customXml) —>
<xsl:element
name=«{$varName}«>
<xsl:for-each
select=«@*«>
<xsl:attribute
name=«{name()}«>
<xsl:value-of
select=«.«
/>
</xsl:attribute>
</xsl:for-each>
<!— Continue parsing for child…
—>
<xsl:apply-templates
select=«msxsl:node-set($prmChildren)/.«
/>
</xsl:element>
</xsl:when>
<xsl:when
test=«count(msxsl:node-set($prmChildren)/.)=0«>
<!— Case w:customXml element with
empty childrens —>
<!— … copy current element
(w:customXml) —>
<xsl:element
name=«{$varName}«>
<xsl:for-each
select=«@*«>
<xsl:attribute
name=«{name()}«>
<xsl:value-of
select=«.«
/>
</xsl:attribute>
</xsl:for-each>
<!— Generate <w:r>…</w:r> as child
—>
<xsl:call-template
name=«genRunElement«>
<xsl:with-param
name=«prmElementName«
select=«$prmElementName«
/>
</xsl:call-template>
</xsl:element>
</xsl:when>
<xsl:when
test=«name(msxsl:node-set($prmChildren)/.)=’w:tc’«>
<!— Case w:customXml element with
<w:tc>…</w:tc> as first child —>
<!— … copy current element
(w:customXml) —>
<xsl:element
name=«{$varName}«>
<xsl:for-each
select=«@*«>
<xsl:attribute
name=«{name()}«>
<xsl:value-of
select=«.«
/>
</xsl:attribute>
</xsl:for-each>
<!— Generate <w:tc>…</w:tc> as child
—>
<w:tc>
<!— Scan all children elements in
current <w:tc>…</w:tc> in input —>
<xsl:for-each
select=«msxsl:node-set($prmChildren)/./*«>
<xsl:choose>
<!— … in case <w:p>…</w:p>
—>
<xsl:when
test=«name()=’w:p’«>
<!— Copy current element (w:p)
—>
<xsl:element
name=«{name()}«>
<xsl:for-each
select=«@*«>
<xsl:attribute
name=«{name()}«>
<xsl:value-of
select=«.«
/>
</xsl:attribute>
</xsl:for-each>
<!— … copy all current child
contents as child —>
<!—<xsl:apply-templates
select=»child::*» /> —>
<xsl:copy-of
select=«child::*«
/>
<!— … insert <w:t>…</w:t> as child
—>
<xsl:call-template
name=«genRunElement«>
<xsl:with-param
name=«prmElementName«
select=«$prmElementName«
/>
</xsl:call-template>
</xsl:element>
</xsl:when>
<!— … for any other case…
—>
<xsl:otherwise>
<!— Copy all current contents into
output —>
<!—<xsl:apply-templates select=»*» />
—>
<xsl:copy>
<xsl:copy-of
select=«*«
/>
</xsl:copy>
</xsl:otherwise>
</xsl:choose>
</xsl:for-each>
</w:tc>
</xsl:element>
</xsl:when>
<xsl:when
test=«name(msxsl:node-set($prmChildren)/.)=’w:tr’«>
<!— Case w:customXml element with
<w:tr>…</w:tr> as first child —>
<!— … generate <xsl:for-each …
—>
<xsl:text
disable-output-escaping=«yes«><![CDATA[<xsl:for-each
select=»//]]></xsl:text>
<xsl:value-of
select=«$prmRootElement«
/>
<xsl:text
disable-output-escaping=«yes«><![CDATA[/]]></xsl:text>
<xsl:value-of
select=«$prmElementName«
/>
<xsl:text
disable-output-escaping=«yes«><![CDATA[«>]]></xsl:text>
<!— … copy current element
(w:customXml) —>
<xsl:element
name=«{$varName}«>
<xsl:for-each
select=«@*«>
<xsl:attribute
name=«{name()}«>
<xsl:value-of
select=«.«
/>
</xsl:attribute>
</xsl:for-each>
<!— Select current <w:tr>…</w:tr> in
input —>
<xsl:for-each
select=«msxsl:node-set($prmChildren)/.«>
<!— Copy <w:tr>…</w:tr> into output
—>
<xsl:element
name=«{name()}«>
<xsl:for-each
select=«@*«>
<xsl:attribute
name=«{name()}«>
<xsl:value-of
select=«.«
/>
</xsl:attribute>
</xsl:for-each>
<!— Scan all children elements in
current <w:tr>…</w:tr> in input —>
<xsl:for-each
select=«msxsl:node-set($prmChildren)/./*«>
<xsl:choose>
<!— … in case not
<w:customXml>…</w:customXml> —>
<xsl:when
test=«name()!=’w:customXml’«>
<!— Copy all current contents into
output —>
<xsl:copy-of
select=«.«
/>
</xsl:when>
<!— … in case
<w:customXml>…</w:customXml> —>
<xsl:otherwise>
<!— Continue parsing …
—>
<xsl:apply-templates
select=«.«
/>
</xsl:otherwise>
</xsl:choose>
</xsl:for-each>
</xsl:element>
</xsl:for-each>
</xsl:element>
<!— … close </xsl:for-each>
—>
<xsl:text
disable-output-escaping=«yes«><![CDATA[</xsl:for-each>]]></xsl:text>
</xsl:when>
<xsl:otherwise>
<!— In any other case: insert your
code here …
<xsl:text disable-output-escaping=»yes»><![CDATA[<xsl:for-each
select=»//]]></xsl:text>
<xsl:value-of select=»$prmRootElement» />
<xsl:text disable-output-escaping=»yes»><![CDATA[/]]></xsl:text>
<xsl:value-of select=»$prmElementName» />
<xsl:text disable-output-escaping=»yes»><![CDATA[«>]]></xsl:text>
<xsl:apply-templates select=»msxsl:node-set($prmChildren)/./*» />
<xsl:text
disable-output-escaping=»yes»><![CDATA[</xsl:for-each>]]></xsl:text>
—>
</xsl:otherwise>
</xsl:choose>
</xsl:template>
<!—
Generate <w:r>… <w:r> element
—>
<xsl:template
name=«genRunElement«>
<xsl:param
name=«prmElementName«
/>
<w:r>
<w:rPr>
<!—<w:cnfStyle w:val=»000000100000″ />—>
<xsl:choose>
<xsl:when
test=«$prmElementName=’birthdate’«>
<w:lang
w:val=«ru-RU«
/>
</xsl:when>
<xsl:otherwise>
<w:lang
w:val=«en-US«
/>
</xsl:otherwise>
</xsl:choose>
</w:rPr>
<!— Generate <w:t>… <w:t> element
—>
<xsl:call-template
name=«genTextContent«>
<xsl:with-param
name=«prmElementName«
select=«$prmElementName«
/>
</xsl:call-template>
</w:r>
</xsl:template>
<!—
Generate <w:t>… <w:t> element
—>
<xsl:template
name=«genTextContent«>
<xsl:param
name=«prmElementName«
/>
<w:t>
<!— Generate output according to name
of element —>
<xsl:choose>
<xsl:when
test=«$prmElementName=’notes’«>
<!— … for long input string only
first 50 chars of string —>
<xsl:text
disable-output-escaping=«yes«><![CDATA[<xsl:choose>]]></xsl:text>
<xsl:text
disable-output-escaping=«yes«><![CDATA[<xsl:when
test=»string-length(notes)<51″>]]></xsl:text>
<xsl:text
disable-output-escaping=«yes«><![CDATA[<xsl:value-of
select=»notes»/>]]></xsl:text>
<xsl:text
disable-output-escaping=«yes«><![CDATA[</xsl:when>]]></xsl:text>
<xsl:text
disable-output-escaping=«yes«><![CDATA[<xsl:otherwise>]]></xsl:text>
<xsl:text
disable-output-escaping=«yes«><![CDATA[<xsl:value-of
select=»concat(substring(notes,1,50), substring-before(substring(notes,51), ‘
‘), ‘ …’)» />]]></xsl:text>
<xsl:text
disable-output-escaping=«yes«><![CDATA[</xsl:otherwise>]]></xsl:text>
<xsl:text
disable-output-escaping=«yes«><![CDATA[</xsl:choose>]]></xsl:text>
</xsl:when>
<xsl:when
test=«$prmElementName=’birthdate’«>
<!— … convert to russian date format
—>
<xsl:text
disable-output-escaping=«yes«><![CDATA[<xsl:value-of
select=»msxsl:format-date(birthdate, ‘dd.MM.yyyy’)» />]]></xsl:text>
</xsl:when>
<xsl:otherwise>
<!— … simple copy
—>
<xsl:text
disable-output-escaping=«yes«><![CDATA[<xsl:value-of
select=»]]></xsl:text>
<xsl:value-of
select=«$prmElementName«/>
<xsl:text
disable-output-escaping=«yes«><![CDATA[»
/>]]></xsl:text>
</xsl:otherwise>
</xsl:choose>
</w:t>
</xsl:template>
</xsl:stylesheet>
Файл: genXsltFromTemplate.xslt
Так вот, если теперь применить xslt-преобразование,
определенное в файле getXmlDocument.xslt, к данным из
файла employee.xml, а полученный при этом результат, в
качестве файла document.xml, заменить в шаблоне
документа «Пример VFP-таблицы в виде MS Word 2007.docx» (точнее,
подменить файл ..DOCXПример VFP-таблицы в виде MS Word 2007worddocument.xml на полученный
результат и
применить командный файл fromContentsToDocxUseWinRAR.cmd), то после
всех этих преобразований документ показан на картинке ниже:

Рис.12
Как видите, таблица с данными сформирована и наша цель достигнута! Здесь
чтобы показать/скрыть элементы схемы в документе, установите/снимите выделенный
красным кружком в панели «Структура XML»
соответствующий флажок. Обратите внимание, что MS Word
предупреждает о неверном формате даты в поле birthdate,
хотя предлагаемый им формат для даты в точности совпадает с тем, который
находиться в документе. Полагаю, что проблема в том, что предупреждение
возникает из-за того, что дата в документе противоречит не формату даты в
документе, а именно формату даты в XSD-схеме, т.е.
не в YYYY-MM-DD формате, как требуют того xml-данные.
Наконец, в столбце «Комментарий» данные урезаны до длины примерно в 50 символов,
т.е. в полном соответствии с тем, как мы преобразовали данные по полю
note в xslt-преобразовании
getXmlDocument.xslt.
Таким образом, окончательный вид нашей исходной VFP-таблички
employee в MS Word документе
подобен следующему:

Рис.13
C#-код приложения для
заполнения шаблона MS Word 2007 документа данными
из xml-файла.
Показанный на Рис.13 результат был получен с помощью вот такого
C#-кода консольного приложения в MS
VS .NET 2005 (SP1VS2005):
#define RUS_LANG
#define TMP_OUT
using System;
using System.Collections.Generic;
using System.Text;
using System.Xml;
using System.Xml.Xsl;
using System.IO;
using System.IO.Packaging;
using System.Diagnostics;
namespace xml2docx
{
class
xml2docx
{
const
string PATH_XML =
@»……..XML»;
const
string PATH_DOCX =
@»……..DOCX»;
const
string PATH_XSLT =
@»……..XSLT»;
const
string XML_DATA_FILE =
«employee.XML»;
const
string XSLT_FILE =
«genXsltFromTemplate.xslt»;
const
string URI_DOCUMENT_XML =
«/word/document.xml»;
const
string USE_ENCODING =
«utf-8»;
const
string XML_PI =
«<?xml version=»1.0″ encoding=»»
+ USE_ENCODING + «»
standalone=»yes»?>rn»;
#if RUS_LANG
const
string TEMPLATE_DOCX =
«Пример VFP-таблицы в виде MS Word 2007.docx»;
const
string ERR_DIR_NOTFOUND =
«Не найден каталог: «;
const
string ERR_FILE_NOTFOUND =
«Не найден файл: «;
const
string ERR_EMPTY_XML =
«Нет xml-данных для: «;
const
string ERR_EMPTY_XSLTRES =
«Результат xslt-преобразований пуст для: «;
const
string DOC_PROP_DESCRIPTION
= «Документ создан на основе шаблона и программно заполнен данными из xml-файла.»;
const
string DOC_PROP_SUBJECT =
«Использование Open XML формата в MS Word 2007»;
#else
const string TEMPLATE_DOCX = «Example VFP-table in MS Word 2007.docx»;
const string ERR_DIR_NOTFOUND = «Not found directory: «;
const string ERR_FILE_NOTFOUND = «Not found file: «;
const string ERR_EMPTY_XML = «Empty xml-data for: «;
const string ERR_EMPTY_XSLTRES = «Empty result of xslt-transformation for: «;
const string DOC_PROP_DESCRIPTION = «The document is created on the basis of
template and is filled by data from a xml-file from code program.»;
const string DOC_PROP_SUBJECT = «Use Open XML format in MS Word 2007»;
#endif
static
void Main(string[]
args)
{
bool bStartAppWord =
false;
try
{
///////////////////////////////////////////////////////////////////////
// Check existence of external files
if (!Directory.Exists(PATH_XML))
{
throw (new
DirectoryNotFoundException(ERR_DIR_NOTFOUND
+ PATH_XML));
}
if (!Directory.Exists(PATH_DOCX))
{
throw (new
DirectoryNotFoundException(ERR_DIR_NOTFOUND
+ PATH_DOCX));
}
if (!Directory.Exists(PATH_XSLT))
{
throw (new
DirectoryNotFoundException(ERR_DIR_NOTFOUND
+ PATH_XSLT));
}
string
FileXmlData = PATH_XML + XML_DATA_FILE;
if (!File.Exists(FileXmlData))
{
throw (new
FileNotFoundException(ERR_FILE_NOTFOUND
+ FileXmlData));
}
string
FileTemplateDocx = PATH_DOCX + TEMPLATE_DOCX;
if (!File.Exists(FileTemplateDocx))
{
throw (new
FileNotFoundException(ERR_FILE_NOTFOUND
+ FileTemplateDocx));
}
string
FileGenXsltFromTemplate = PATH_XSLT + XSLT_FILE;
if (!File.Exists(FileTemplateDocx))
{
throw (new
FileNotFoundException(ERR_FILE_NOTFOUND
+ FileGenXsltFromTemplate));
}///////////////////////////////////////////////////////////////////////
// Copy template to target folder
string
OutputFolder = Environment.GetFolderPath(Environment.SpecialFolder.Personal);
string
OutputFileDocx = OutputFolder + @»_»
+ TEMPLATE_DOCX;
File.Copy(FileTemplateDocx,
OutputFileDocx, true);
if (!File.Exists(OutputFileDocx))
{
throw (new
FileNotFoundException(ERR_FILE_NOTFOUND
+ OutputFileDocx));
}///////////////////////////////////////////////////////////////////////
// Load xml-data file and get name of
its root element
XmlDocument
xmlDocData = new
XmlDocument();
xmlDocData.Load(FileXmlData);
if
(xmlDocData.DocumentElement == null
|| xmlDocData.DocumentElement.ChildNodes.Count == 0)
{
throw (new
NullReferenceException(ERR_EMPTY_XML
+ FileXmlData));
}
string
rootElementName = xmlDocData.DocumentElement.Name;///////////////////////////////////////////////////////////////////////
// Get package copy of template and
prepare for its processing
Encoding enc =
Encoding.GetEncoding(USE_ENCODING);
string strXmlDoc
= System.String.Empty;
string docxTitle
= System.String.Empty;
Uri uriWordDocXml
= new
Uri(URI_DOCUMENT_XML,
UriKind.Relative);
using (Package
package = Package.Open(OutputFileDocx,
FileMode.Open))
{
///////////////////////////////////////////////////////////////////////
// Get PackagePart of template for
URI_DOCUMENT_XML(/word/document.xml)
PackagePart
packagePart = package.GetPart(uriWordDocXml);
// … and its stream in ReadWrite mode
using (Stream
ppStrmXmlDoc = packagePart.GetStream(FileMode.Open,
FileAccess.ReadWrite))
{
///////////////////////////////////////////////////////////////////////////////
// Prepare and execute the first
xslt-transformation
// with document.xml and by using
xslt-file FileGenXsltFromTemplate
XmlDocument
xmlDoc = new
XmlDocument();
xmlDoc.Load(ppStrmXmlDoc);
XsltArgumentList
xsltArgumentList = new
XsltArgumentList();
xsltArgumentList.AddParam(«prmRootElement»,
«»,
rootElementName);
xsltArgumentList.AddParam(«prmEncoding»,
«», USE_ENCODING);
XslCompiledTransform
xslXsltDocTrans = new
XslCompiledTransform();
xslXsltDocTrans.Load(FileGenXsltFromTemplate);
string strXsltDoc
= System.String.Empty;
using (MemoryStream
msXsltDoc = new
MemoryStream())
{
using (XmlTextWriter
xtwXsltDoc = new
XmlTextWriter(msXsltDoc,
enc))
{
xslXsltDocTrans.Transform(xmlDoc.CreateNavigator(), xsltArgumentList,
xtwXsltDoc);
strXsltDoc = enc.GetString(msXsltDoc.GetBuffer(), 0, (int)msXsltDoc.Length);
xtwXsltDoc.Close();
}
msXsltDoc.Close();
}
int nPos =
strXsltDoc.IndexOf(‘<‘);
if (nPos == (-1))
{
throw (new
NullReferenceException(ERR_EMPTY_XSLTRES
+ FileGenXsltFromTemplate));
}
strXsltDoc = strXsltDoc.Substring(nPos);
nPos = strXsltDoc.IndexOf(«<?xml»);
if (nPos == (-1))
{
strXsltDoc = XML_PI + strXsltDoc;
}///////////////////////////////////////////////////////////////////////////////
// Load result of first
xslt-transformation
XmlDocument
xmlDocXslt = new
XmlDocument();
xmlDocXslt.LoadXml(strXsltDoc);
#if TMP_OUT
xmlDocXslt.Save(«getXmlDocument.xslt»);
#endif
///////////////////////////////////////////////////////////////////////////////
// Prepare and execute the second
xslt-transformation
// with input xml-data-file and by
using first result of xslt-transformation
XslCompiledTransform
xslXmlDocTrans = new
XslCompiledTransform();
xslXmlDocTrans.Load(xmlDocXslt.CreateNavigator());
using (MemoryStream
msXmlDoc = new
MemoryStream())
{
using (XmlTextWriter
xtwXmlDoc = new
XmlTextWriter(msXmlDoc,
enc))
{
xslXmlDocTrans.Transform(xmlDocData.CreateNavigator(), xtwXmlDoc);
strXmlDoc = enc.GetString(msXmlDoc.GetBuffer(), 0, (int)msXmlDoc.Length);
xtwXmlDoc.Close();
}
msXmlDoc.Close();
}
nPos = strXmlDoc.IndexOf(‘<‘);
if (nPos == (-1))
{
throw (new
NullReferenceException(ERR_EMPTY_XSLTRES
+ FileXmlData));
}
strXmlDoc = strXmlDoc.Substring(nPos);
nPos = strXmlDoc.IndexOf(«<?xml»);
if (nPos == (-1))
{
strXmlDoc = XML_PI + strXmlDoc;
}///////////////////////////////////////////////////////////////////////////////
// Load result of second
xslt-transformation as xml-document
XmlDocument
xmlDocOut = new
XmlDocument();
xmlDocOut.LoadXml(strXmlDoc);
#if TMP_OUT
xmlDocOut.Save(«document.xml»);
#endif
/////////////////////////////////////////////////////////////////////////////////
// Replace PackagePart-stream with
result of second xslt-transformation
ppStrmXmlDoc.Seek(0, SeekOrigin.Begin);
xmlDocOut.Save(ppStrmXmlDoc);
ppStrmXmlDoc.Flush();
ppStrmXmlDoc.Close();////////////////////////////////////////////////////////////////////////////////////////
// Get the text of the first paragraph
of the document as title of the document
string ns_w =
xmlDocOut.DocumentElement.GetNamespaceOfPrefix(«w»);
XmlNamespaceManager
nsManager = new
XmlNamespaceManager(xmlDocOut.NameTable);
nsManager.AddNamespace(«w»,
ns_w);
XmlNode xnTitle =
xmlDocOut.DocumentElement.SelectSingleNode(«//w:customXml[@w:element='»
+ rootElementName + «‘]/w:p»,
nsManager);
if (xnTitle !=
null)
{
docxTitle = xnTitle.InnerText;
}
}
if
(docxTitle.Length > 0)
{
///////////////////////////////////////////////////////////////////////////////
// Replace title and some other
PackageProperties
package.PackageProperties.Title = docxTitle;
package.PackageProperties.Subject = DOC_PROP_SUBJECT;
package.PackageProperties.Description = DOC_PROP_DESCRIPTION;
}
package.Flush();
package.Close();
}
///////////////////////////////////////////////////////////////////////////////
// Open the new docx file in Word 2007
Process proc =
new
Process();
proc.EnableRaisingEvents = false;
proc.StartInfo.FileName = «winword»;
proc.StartInfo.Arguments = «»»
+ OutputFileDocx + «»»;
proc.Start();
bStartAppWord = true;
}
catch (Exception
ex)
{
Console.WriteLine(«***
Error: « + ex.ToString());
}
if (!bStartAppWord)
{
Console.WriteLine(«Press
any key to continue…»);
Console.ReadKey();
}
}
}
}
Файл: xml2docx.cs
Чтобы Вам самим создать подобное приложение в MS VS .NET
2005, проделайте следующее:
- создайте консольное C#-приложение,
- в
панели Solution Explorerв папку References
добавьте файл C:Program FilesReference AssembliesMicrosoftFrameworkv3.0WindowsBase.dll - переименуйте файл Program.cs на
xml2docx.cs - замените только что переименованный файл вышеприведённым.
Обратите внимание на значения констант: PATH_XML, PATH_DOCX, PATH_XSLT в коде.
Они указывают на папки, являющиеся родительскими по отношению в парки
Solution Вашего C#-приложения.
Соответственно родительскими должны быть созданы папки: DOCX,
XML и XSLT, в которые должны
быть помещены файлы:
- DOCX«Пример VFP-таблицы в виде MS Word 2007.docx»
— шаблон
документа; - XMLemployee.XML, employee.XSD — данные
VFP-таблицы в xml-формате; - XSLTgenXsltFromTemplate.xslt —
предварительное xslt-преобразование для получения
xslt-преобразования заполнения части
docx-документа (document.xml)
данными;
соответственно. А после успешного выполнения скомпилированного
приложения xml2docx.exe, в текущей папке будут созданы
файлы: document.xml, getXmlDocument.xslt, а
заполненный данными документ «_Пример VFP-таблицы в виде MS Word 2007.docx» будет помещён в папку: C:Documents and Settings<ИмяПользователя>Мои документы
VFP-код приложения для
заполнения шаблона MS Word 2007 документа данными
из xml-файла.
Используя технику, изложенную в статье Hosting the .NET Runtime in Visual FoxPro, by Rick Strahl 
 , приведённый
выше C#-код можно переписать и для использования
из-под MS Visual FoxPro 8.0 (или выше). И вот каким он
у меня получился:
#INCLUDE
«SolWestWindEx.h»
#INCLUDE
«FrameworkWrap.h»
#
DEFINE
RUS_LANG .T.
#DEFINE
TMP_OUT .T.
#DEFINE
CRLF
CHR(13)
+ CHR(10)
#DEFINE
SW_NORMAL 1
#
DEFINE
PATH_XML «….XML»
#DEFINE
PATH_DOCX «….DOCX»
#DEFINE
PATH_XSLT «….XSLT»
#DEFINE
XML_DATA_FILE «employee.XML»
#DEFINE
XSLT_FILE «genXsltFromTemplate.xslt»
#DEFINE
XSLT_FILE_FIRST_RESULT «getXmlDocument.xslt»
#DEFINE
XML_FILE_SECOND_RESULT «document.xml»
#DEFINE
URI_DOCUMENT_XML «/word/document.xml»
#DEFINE
USE_ENCODING «utf-8»
#DEFINE
XML_PI ‘<?xml version=»1.0″ encoding=»‘ +
USE_ENCODING + ‘» standalone=»yes»?>’ + CRLF
#DEFINE
MYDOC_FOLDER «MyDocuments»
#
IF
RUS_LANG
#DEFINE
TEMPLATE_DOCX «Пример VFP-таблицы в виде MS
Word 2007.docx»
#DEFINE
ERR_VFP_VERSION «Извините, данный код
предназначен для VFP 8.0 (или выше).»
#DEFINE
ERR_LABEL_OUTPUT «*** Возникла ошибка: «
#DEFINE
ERR_DIR_NOTFOUND «Не найден каталог: «
#DEFINE
ERR_FILE_NOTFOUND «Не найден файл: «
#DEFINE
ERR_EMPTY_XML «Нет xml-данных для: «
#DEFINE
ERR_EMPTY_XSLTRES «Результат
xslt-преобразований пуст для: «
#DEFINE
DOC_PROP_DESCRIPTION «Документ создан на
основе шаблона и программно заполнен данными из xml-файла.»
#DEFINE
DOC_PROP_SUBJECT «Использование Open XML
формата в MS Word 2007»
#DEFINE
MSG_SUCCESS_RESUT «Процесс успешно завершён!
Ожидание открытия полученного нового документа в MS Word 2007…»
#ELSE
#DEFINE
TEMPLATE_DOCX «Example VFP-table in MS
Word 2007.docx»
#DEFINE
ERR_VFP_VERSION «Sorry, this code for VFP 8.0
(or later).»
#DEFINE
ERR_LABEL_OUTPUT «*** Error appears: «
#DEFINE
ERR_DIR_NOTFOUND «Not found directory: «
#DEFINE
ERR_FILE_NOTFOUND «Not found file: «
#DEFINE
ERR_EMPTY_XML «Empty xml-data for: «
#DEFINE
ERR_EMPTY_XSLTRES «Empty result of
xslt-transformation for: «
#DEFINE
DOC_PROP_DESCRIPTION «The document is created
on the basis of template and is filled by data from a xml-file from code
program.»
#DEFINE
DOC_PROP_SUBJECT «Use Open XML format in MS
Word 2007»
#DEFINE
MSG_SUCCESS_RESUT «Process is successfully
completed! Waiting of opening of the received new document in MS Word 2007…»
#ENDIF
CLEAR
SET DEFAULT TO
(LEFT(SYS(16),
RAT(«»,
SYS(16))))
IF VERSION(5) < 800
? ERR_VFP_VERSION
RETURN
.F.
ENDIF
PRIVATE
poBridge
&& as DotNetBridge OF
FULLPATH(«DotNetBridge.prg»)
LOCAL loException
as Exception;
,lbError as
Boolean;
,bIsWordDoc as
Boolean
TRY
*///////////////////////////////////////////////////////////////////////
*// Check existence of external files
IF
!DIRECTORY(PATH_XML)
ERROR
101, ERR_DIR_NOTFOUND +
LOWER(FULLPATH(PATH_XML))
ENDIF
IF !DIRECTORY(PATH_DOCX)
ERROR
101, ERR_DIR_NOTFOUND +
LOWER(FULLPATH(PATH_DOCX))
ENDIF
IF !DIRECTORY(PATH_XSLT)
ERROR
101, ERR_DIR_NOTFOUND +
LOWER(FULLPATH(PATH_XSLT))
ENDIF
LOCAL lcFileXmlData
as String
lcFileXmlData =
LOWER(FULLPATH(PATH_XML
+ XML_DATA_FILE))
IF
!FILE(lcFileXmlData)
ERROR
101, ERR_FILE_NOTFOUND + lcFileXmlData
ENDIF
LOCAL lcFileTemplateDocx
as String
lcFileTemplateDocx =
LOWER(FULLPATH(PATH_DOCX))
+ TEMPLATE_DOCX
IF
!FILE(lcFileTemplateDocx)
ERROR
101, ERR_FILE_NOTFOUND + lcFileTemplateDocx
ENDIF
LOCAL lcFileGenXsltFromTemplate
as String
lcFileGenXsltFromTemplate =
LOWER(FULLPATH(PATH_XSLT))
+ XSLT_FILE
IF
!FILE(lcFileTemplateDocx)
ERROR
101, ERR_FILE_NOTFOUND +
lcFileGenXsltFromTemplate
ENDIF
*////////////////////////////////////////////////////////////////
*// Create DotNetBridge object
LOCAL
lcBridgeFileProc
as String
lcBridgeFileProc =
LOWER(FULLPATH(BRIDGE_PROC))
IF
!FILE(lcBridgeFileProc)
ERROR
101, lcBridgeFileProc
ENDIF
IF NOT (JUSTSTEM(lcBridgeFileProc)
$ LOWER(SET(«Procedure»)))
SET PROCEDURE TO
(lcBridgeFileProc)
ADDITIVE
ENDIF
poBridge =
CREATEOBJECT(BRIDGE_CLASS)
IF VARTYPE(poBridge)
# ‘O’
ERROR
‘Can not create ‘ + BRIDGE_CLASS + ‘ object.’
ENDIF
*////////////////////////////////////////////////////////////////
*// Set procedure to «FrameworkWrap.prg»
LOCAL
lcFrameworkWrapFileProc
as String
lcFrameworkWrapFileProc =
LOWER(FULLPATH(«FrameworkWrap.prg»))
IF
!FILE(lcFrameworkWrapFileProc)
ERROR
101, lcFrameworkWrapFileProc
ENDIF
IF NOT (JUSTSTEM(lcFrameworkWrapFileProc)
$ LOWER(SET(«Procedure»)))
SET PROCEDURE TO
(lcFrameworkWrapFileProc)
ADDITIVE
ENDIF
*////////////////////////////////////////////////////////////////
*// LoadAssembly ASSEMBLY_SYSTEM
IF
!poBridge.LoadAssembly(ASSEMBLY_SYSTEM)
ERROR
poBridge.cErrorMsg
ENDIF
*///////////////////////////////////////////////////////////////////////
*// Copy docx-template to target folder
LOCAL
loWSH
as
WScript.Shell
loWSH =
CREATEOBJECT(«WScript.Shell»)
LOCAL
lcOutputFolder
as String
lcOutputFolder =
loWSH.SpecialFolders(MYDOC_FOLDER)
LOCAL lcOutputFileDocx
as String
lcOutputFileDocx = lcOutputFolder +
«_» + TEMPLATE_DOCX
poBridge.InvokeStaticMethod(«System.IO.File», «Copy», lcFileTemplateDocx,
lcOutputFileDocx, .T.)
IF
!EMPTY(poBridge.cErrorMsg)
ERROR
poBridge.cErrorMsg
ENDIF
*//////////////////////////////////////////////////////////////////////////////
*// Creation some objects from ASSEMBLY_SYSTEM, necessary during processing
LOCAL
loEnc
as
Encoding
OF FULLPATH(«FrameworkWrap.prg»)
loEnc = CREATEOBJECT(«Encoding»,
USE_ENCODING)
LOCAL
lnUriKindRelative
as Integer
lnUriKindRelative =
poBridge.GetStaticProperty(«System.UriKind», «Relative»)
IF EMPTY(lnUriKindRelative)
ERROR
poBridge.cErrorMsg
ENDIF
LOCAL loUri
as
Uri
OF FULLPATH(«FrameworkWrap.prg»)
loUri = CREATEOBJECT(«Uri»,
URI_DOCUMENT_XML, lnUriKindRelative)
LOCAL
lnFileModeOpen
as Integer
lnFileModeOpen =
poBridge.GetStaticProperty(«System.IO.FileMode», «Open»)
IF EMPTY(lnFileModeOpen)
ERROR
poBridge.cErrorMsg
ENDIF
LOCAL lnFileAccessReadWrite
as Integer
lnFileAccessReadWrite =
poBridge.GetStaticProperty(«System.IO.FileAccess», «ReadWrite»)
IF EMPTY(lnFileAccessReadWrite)
ERROR
poBridge.cErrorMsg
ENDIF
LOCAL loMstrXsltDoc
as
MemoryStream
OF FULLPATH(«FrameworkWrap.prg»)
loMstrXsltDoc =
CREATEOBJECT(«MemoryStream»)
LOCAL
loMstrXmlDoc
as
MemoryStream
OF FULLPATH(«FrameworkWrap.prg»)
loMstrXmlDoc =
CREATEOBJECT(«MemoryStream»)
*////////////////////////////////////////////////////////////////
*// LoadAssembly ASSEMBLY_WINDOWSBASE
IF
!poBridge.LoadAssembly(ASSEMBLY_WINDOWSBASE)
ERROR
(poBridge.cErrorMsg)
ENDIF
*///////////////////////////////////////////////////////////////////////
*// Get package copy of template and prepare for its processing
LOCAL
loPackage
as
Package
OF FULLPATH(«FrameworkWrap.prg»)
loPackage =
CREATEOBJECT(«Package»,
lcOutputFileDocx)
*— Get PackagePart
of template for URI_DOCUMENT_XML(/word/document.xml)
LOCAL
loPackagePart
as
PackagePart
OF FULLPATH(«FrameworkWrap.prg»)
loPackagePart =
CREATEOBJECT(«PackagePart»;
,loPackage.GetPart(loUri.GetOwnerFwObject()))
*— … and its
stream in ReadWrite mode
LOCAL
loPpStrmXmlDoc
as
Stream
OF FULLPATH(«FrameworkWrap.prg»)
loPpStrmXmlDoc =
CREATEOBJECT(«Stream»;
,loPackagePart.GetStream(lnFileModeOpen, lnFileAccessReadWrite))
*////////////////////////////////////////////////////////////////
*// LoadAssembly ASSEMBLY_SYSTEM_XML
IF
!poBridge.LoadAssembly(ASSEMBLY_SYSTEM_XML)
ERROR
poBridge.cErrorMsg
ENDIF
*///////////////////////////////////////////////////////////////////////
*// Load xml-data file and get name of its root element
LOCAL
loXmlDocData
as
XmlDocument
OF FULLPATH(«FrameworkWrap.prg»)
loXmlDocData =
CREATEOBJECT(«XmlDocument»)
loXmlDocData.Load(lcFileXmlData)
LOCAL
loXmlDocDataDocumentElement
as
XmlElement
OF FULLPATH(«FrameworkWrap.prg»)
loXmlDocDataDocumentElement =
CREATEOBJECT(«XmlElement»,
loXmlDocData.DocumentElement)
LOCAL
lcRootElementName
as String
lcRootElementName =
loXmlDocDataDocumentElement.ElementName
*///////////////////////////////////////////////////////////////////////////////
*// Prepare and execute the first xslt-transformation
*// with document.xml and by using xslt-file FileGenXsltFromTemplate
LOCAL
lcStrXsltDoc
as String
LOCAL loXmlDoc
as
XmlDocument
OF FULLPATH(«FrameworkWrap.prg»)
loXmlDoc =
CREATEOBJECT(«XmlDocument»)
loXmlDoc.Load(loPpStrmXmlDoc.GetOwnerFwObject())
LOCAL
loXsltArgumentList
as
XsltArgumentList
OF FULLPATH(«FrameworkWrap.prg»)
loXsltArgumentList =
CREATEOBJECT(«XsltArgumentList»)
loXsltArgumentList.AddParam(«prmRootElement», «», lcRootElementName)
loXsltArgumentList.AddParam(«prmEncoding», «», USE_ENCODING)
LOCAL
loXtwXsltDoc
as
XmlTextWriter
OF FULLPATH(«FrameworkWrap.prg»)
loXtwXsltDoc =
CREATEOBJECT(«XmlTextWriter»;
,loMstrXsltDoc.GetOwnerFwObject(), loEnc.GetOwnerFwObject())
LOCAL
loXslXsltDocTrans
as
XslCompiledTransform
OF FULLPATH(«FrameworkWrap.prg»)
loXslXsltDocTrans =
CREATEOBJECT(«XslCompiledTransform»)
loXslXsltDocTrans.Load(lcFileGenXsltFromTemplate)
loXslXsltDocTrans.Transform(loXmlDoc.CreateNavigator();
,loXsltArgumentList.GetOwnerFwObject(), loXtwXsltDoc.GetOwnerFwObject())
lcStrXsltDoc = loEnc.GetString(loMstrXsltDoc.GetBuffer(), 0,
loMstrXsltDoc.Length)
LOCAL
lnPos
as Integer
lnPos =
ATC(«<«,
lcStrXsltDoc)
IF
lnPos = 0
ERROR
(ERR_EMPTY_XSLTRES +
lcFileGenXsltFromTemplate)
ENDIF
lcStrXsltDoc =
SUBSTRC(lcStrXsltDoc,
lnPos)
lnPos = ATC(«<?xml»,
lcStrXsltDoc)
IF
lnPos = 0
lcStrXsltDoc = XML_PI + lcStrXsltDoc
ENDIF
*///////////////////////////////////////////////////////////////////////////////
*// Load result of first xslt-transformation
LOCAL
loXmlDocXslt
as
XmlDocument
OF FULLPATH(«FrameworkWrap.prg»)
loXmlDocXslt =
CREATEOBJECT(«XmlDocument»)
loXmlDocXslt.LoadXml(lcStrXsltDoc)
#IF
TMP_OUT
loXmlDocXslt.Save(XSLT_FILE_FIRST_RESULT)
#ENDIF
*///////////////////////////////////////////////////////////////////////////////
*// Prepare and execute the second xslt-transformation
*// with input xml-data-file and by using first result of xslt-transformation
LOCAL
lcStrXmlDoc
as String
LOCAL loXslXmlDocTrans
as
XslCompiledTransform
OF FULLPATH(«FrameworkWrap.prg»)
loXslXmlDocTrans =
CREATEOBJECT(«XslCompiledTransform»)
loXslXmlDocTrans.Load(loXmlDocXslt.CreateNavigator())
LOCAL
loXtwXmlDoc
as
XmlTextWriter
OF FULLPATH(«FrameworkWrap.prg»)
loXtwXmlDoc =
CREATEOBJECT(«XmlTextWriter»;
,loMstrXmlDoc.GetOwnerFwObject(), loEnc.GetOwnerFwObject())
loXslXmlDocTrans.Transform(loXmlDocData.CreateNavigator(),
loXtwXmlDoc.GetOwnerFwObject())
lcStrXmlDoc = loEnc.GetString(loMstrXmlDoc.GetBuffer(), 0,
loMstrXmlDoc.Length)
lnPos = ATC(«<«,
lcStrXmlDoc)
IF
lnPos = 0
ERROR
(ERR_EMPTY_XSLTRES + lcFileXmlData)
ENDIF
lcStrXmlDoc =
SUBSTRC(lcStrXmlDoc,
lnPos)
lnPos = ATC(«<?xml»,
lcStrXmlDoc)
IF
lnPos = 0
lcStrXmlDoc = XML_PI + lcStrXmlDoc
ENDIF
*///////////////////////////////////////////////////////////////////////////////
*// Load result of second xslt-transformation as xml-document
LOCAL
loXmlDocOut
as
XmlDocument
OF FULLPATH(«FrameworkWrap.prg»)
loXmlDocOut =
CREATEOBJECT(«XmlDocument»)
loXmlDocOut.LoadXml(lcStrXmlDoc)
#IF
TMP_OUT
loXmlDocOut.Save(XML_FILE_SECOND_RESULT)
#ENDIF
*///////////////////////////////////////////////////////////////////////////////
*// Replace PackagePart-stream with result of second xslt-transformation
loPpStrmXmlDoc.Position
= 0
loXmlDocOut.Save(loPpStrmXmlDoc.GetOwnerFwObject())
loPpStrmXmlDoc.Flush()
loPpStrmXmlDoc.Close()
bIsWordDoc = .T.
CATCH TO loException
lbError = .T.
LOCAL
lcMsg
as String
lcMsg = «Error: » +
LTRIM(STR(loException.ErrorNo))
+ CRLF ;
+ «LineNo: » + LTRIM(STR(loException.LineNo))
+ CRLF ;
+ «Message: » + IIF(EMPTY(loException.Message),
‘Unknown error’, loException.Message)
? ERR_LABEL_OUTPUT
? lcMsg
FINALLY
loWSH =
NULL
IF TYPE(‘poBridge’) = ‘O’ AND !ISNULL(poBridge)
*— Remove all
objects, which keeping resources of memory
loXtwXmlDoc =
NULL
loXtwXsltDoc =
NULL
loPpStrmXmlDoc =
NULL
loMstrXsltDoc =
NULL
loMstrXmlDoc =
NULL
loPackage =
NULL
poBridge.Unload()
poBridge = NULL
ENDIF
ENDTRY
LOCAL
lbResult
as
Boolean
IF bIsWordDoc
*///////////////////////////////////////////////////////////////////////////////
*// Open the new docx file in Word 2007
WAIT
MSG_SUCCESS_RESUT
WINDOW NOWAIT TIMEOUT
10
DECLARE INTEGER
ShellExecute
IN
shell32.dll
;
INTEGER hwnd,
;
STRING
@lsOperation, ;
STRING
@lsFile, ;
STRING
@lsParameters, ;
STRING
@lsDirectory, ;
INTEGER
liShowCmd
DECLARE INTEGER
GetDesktopWindow
IN
user32.dll
LOCAL lnRetCode
as Integer
lnRetCode = 0
lnRetCode = ShellExecute(GetDesktopWindow(), «open», lcOutputFileDocx, «»,
«», SW_NORMAL)
CLEAR DLLS
IF lnRetCode > 32
lbResult = .T.
ELSE
ERROR «ShellExecute: errorcode = » +
LTRIM(STR(lnRetCode))
ENDIF
ENDIF
RETURN lbResult
Файл: xml2docx.prg из проекта FillDocxByUseFramework_20.pjx
При поверхностном сравнении кода приведённых выше файлов
xml2docx.prg и xml2docx.cs,
и если не принимать во внимание различия синтаксиса используемых языков, то может показаться, что
отличия в коде минимальны… Однако, посмотрев внимательнее, можно легко
заметить, что никакого прямого обращения к классам MS
Framework конечно же нет, а используются классы, определённый в файле
FrameworkWrap.prg и образующие т.н. «покрытия»
классов из MS Framework.
Давайте теперь бегло заглянем в подкаталоге CommonTools в файл FrameworkWrap.prg
и там мы увидим, что базовым для любого MS Framework-класса
является вот такой класс:
*////////////////////////////////////////////////////////
*// baseFwWrap — base for any wrap to MS Framework class
DEFINE CLASS baseFwWrap
as Session
oFwObj =
NULL
cClassName = «»
PROCEDURE Init
IF !this.IsBridgeObject()
ERROR
«Not found instance of » + BRIDGE_CLASS + »
object»
ENDIF
IF !this.IsClassObject()
ERROR
«Not define «+
this.Name
+ «.cClassName property»
ENDIF
ENDPROC
PROCEDURE IsBridgeObject
RETURN
(TYPE(‘poBridge’)
= ‘O’ AND !ISNULL(poBridge))
ENDPROC
PROCEDURE IsClassObject
RETURN
!EMPTY(this.cClassName)
ENDPROC
PROCEDURE IsFrameworkObject
RETURN
(VARTYPE(this.oFwObj)
= ‘O’)
ENDPROC
PROCEDURE ToString
IF
!this.IsBridgeObject()
ERROR
«Not found instance of » + BRIDGE_CLASS + »
object» ;
+ » in » + this.Name
+ ‘.toString()’
ENDIF
LOCAL lcRetVal
as String
lcRetVal = poBridge.InvokeMethod(this.oFwObj,
‘ToString’)
IF
!EMPTY(poBridge.cErrorMsg)
ERROR
(poBridge.cErrorMsg + » In » +
this.Name
+ ‘.ToString()’)
ENDIF
RETURN lcRetVal
ENDPROC
PROCEDURE GetOwnerFwObject
RETURN this.oFwObj
ENDPROC
PROCEDURE Destroy
this.oFwObj =
NULL
ENDPROC
*// Insert your code
here for implement any other PEMs for this class…
ENDDEFINE
Класс: baseFwWrap
Как видим, пока нет ничего интересного. В классе определены два свойства:
oFwObj и cClassName и судя
по названию метода GetOwnerFwObject(), возвращающего значение свойства
this.oFwObj, последнее и есть истинная ссылка на
экземпляр MS Framework-класса, которая разрушается в
событии Destroy() данного класса. Свойство
cClassName предназначено для хранения полного названия
Framework-класса. В классе имеется ряд самоочевидных предикатов,
контролирующих типы некоторых переменных/свойств, и один единственный сколько-то
интересный метод ToString(). В нём, после удачного
контроля на существование приватной переменной poBridge
(ссылки на экземпляр класса DotNetBridge, о чём ниже),
через последнюю вызывается метод InvokeMethod() для
объекта this.oFwObj и названия метода
ToString. Результат выполнения метода
poBridge.InvokeMethod() собственно и возвращается в
качестве результата выполнения метода ToString()
данного класса. По такой же схеме будут работать и любые другие методы/свойства
классов-покрытий из файла FrameworkWrap.prg, т.е.
после формирования значений ряда параметров, через ссылку
poBridge будет вызываться один из методов класса
DotNetBridge, в большинстве случаев, это будет одна из
разновидностей методов DotNetBridge.Invoke…().
Давайте на примерах кода нескольких классов, посмотрим как это реально делается.
Ну вот, посмотрим на код совершенно «стандартного» в этом смысле класса
System.Xml.Xsl.XsltArgumentList:
*///////////////////////////////////////////////////////////////
*// XsltArgumentList — wrap to System.Xml.Xsl.XsltArgumentList
DEFINE CLASS XsltArgumentList
as
baseFwWrap
cClassName = «System.Xml.Xsl.XsltArgumentList»
PROCEDURE Init
IF !DODEFAULT()
RETURN
.F.
ENDIF
this.oFwObj =
poBridge.CreateInstance(this.cClassName)
IF VARTYPE(this.oFwObj)
# ‘O’
ERROR
(poBridge.cErrorMsg + » In » +
this.Name
+ ‘.Init()’)
ENDIF
ENDPROC
PROCEDURE AddParam
LPARAMETERS
tcParamName, tcNamespaceUri, toParamValue
IF
!this.IsBridgeObject()
ERROR
«Not found instance of » + BRIDGE_CLASS + »
object» ;
+ » in » + this.Name
+ ‘.AddParam()’
ENDIF
poBridge.InvokeMethod(this.oFwObj,
‘AddParam’, tcParamName, tcNamespaceUri, toParamValue)
IF
!EMPTY(poBridge.cErrorMsg)
ERROR
(poBridge.cErrorMsg + » In » +
this.Name
+ ‘.AddParam()’)
ENDIF
ENDPROC
*// Insert your code
here for implement any other PEMs for this class…
ENDDEFINE
Класс: XsltArgumentList
Как видим, в событии Init():
- (в VFP событие Init() грубо говоря, подобно
конструктору класса в других языках, вызывается лишь однажды при создании
экземпляра объекта) делается явный вызов baseFwWrap.Init()
(через спец. VFP-функцию
DODEFAULT()), при неудаче, событие
Init() данного класса возвращает
.F., что в свою очередь для клиента означает, что
экземпляр объекта не создаётся и возникает ошибка создания объекта класса. - Далее, делается попытка через метод
poBridge.CreateInstance() создать экземпляр соответствующего
MS Framework-класса, поместив ссылку на него в свойство
this.oFwObj. Если при этом свойство не получило в
качестве значения экземпляр объекта (VARTYPE(this.oFwObj)
# ‘O’), то в свойстве poBridge.cErrorMsg
должны быть подробности о возникшей ошибке. В такой ситуации прекращаем
выполнение, выдав клиенту соответствующее сообщение об ошибке. Если ссылка
на экземпляр объекта получена, т.е. ошибок не возникло, то «ничего не
делаем». В этом случае, событие Init() вернёт
.T. и клиент получит ссылку на экземпляр объекта
данного класса.
В методе AddParam():
- Проверяется наличие переменной-ссылки poBridge,
при отсутствии выдаётся сообщение об ошибке и метод завершается. - При наличии переменной ссылки poBridge,
делается попытка обращения к её методу InvokeMetod()
для объекта из свойства класса this.oFwObj,
названия метода AddParam и с пришедшими на входе к
данному методу тремя параметрами. Если по завершению выполнения метода
свойство poBridge.cErrorMsg окажется не пустым,
т.е. возникла ошибка, то формируем соответствующее сообщение об ошибке
клиенту.
Если посмотреть описание класса System.Xml.Xsl.XsltArgumentList в
MSDN, то обнаружим, что мной реализована только
небольшая часть того, что может делать этот класс. Применительно к решаемой мной
задачи написанного оказалось достаточно, а если в решаемой Вами задачи потребуется
большая функциональность, то что же?… Ну допишите соответствующий код в
данный класс так, чтобы он удовлетворил все Ваши потребности…
Не следует думать, что всё так гладко, как это может показаться… Ну мол что
достаточно выполнить рутинную работу по наполнению методов/свойств
классов-покрытий, переадресовав вызовы на соответствующие
poBridge.Invoke…(), и таким образом поиметь
доступ из-под VFP к любому требуемому для Вашей задачи подмножеству
классов библиотеки MS Framework. Не всё так уж
безоблачно на этом пути… 
Например, взяв код у Rick Strahl по указанной выше
ссылке, и при попытке использовать его в задаче, изложенной в Как получить таблицу данных из xlsx-файла у приложения Excel из MS Office 2007 используя структуру данных формата Open XML? я быстро наткнулся на проблему
вызова перегруженных конструкторов/методов, имеющих одинаковое количество
параметров, но отличающихся их типами. Чтобы попытаться устранить эту проблемы,
пришлось несколько дополнить код, взятый с первоисточника. Т.е. обратите
внимание, что код, прилагаемый к этой статье, не будет работать, если попытаться
использовать dll-файлы от Rick
Strahl, а нужны именно dll-ки с небольшими
добавлениям из файла xlsxtbl.zip со страницы Примеры кода и утилиты.
Давайте на примере кода из файла FrameworkWrap.prg посмотрим, как можно использовать эти дополнительные
возможности, так в определении класса XmlTextWriter видим:
*////////////////////////////////////////////////////////////////////////
*// XmlTextWriter — wrap to System.Xml.XmlTextWriter
DEFINE CLASS XmlTextWriter
as
baseFwWrap
cClassName = «System.Xml.XmlTextWriter»
PROCEDURE Init
LPARAMETERS tuArg1, tuArg2
IF
!DODEFAULT()
RETURN
.F.
ENDIF
LOCAL
lnCntArgs
as Integer
lnCntArgs =
PCOUNT()
DO CASE
CASE
lnCntArgs = 1
this.oFwObj
= poBridge.CreateInstance(this.cClassName,
tuArg1)
CASE
lnCntArgs = 2
LOCAL
loConstr
as Object,
lcArg1Type
as String
lcArg1Type = tuArg1.ToString()
loConstr = poBridge.GetConstructor(this.cClassName,
lcArg1Type, «System.Text.Encoding»)
IF VARTYPE(loConstr)
# ‘O’
ERROR
(poBridge.cErrorMsg + » In » +
this.Name
+ ‘.Init()’)
ENDIF
this.oFwObj =
poBridge.CreateInstanceObject(loConstr, tuArg1, tuArg2)
OTHERWISE
ERROR
(«Error number of args.» + »
In » +
this.Name
+ ‘.Init()’)
ENDCASE
IF VARTYPE(this.oFwObj)
# ‘O’
ERROR
(poBridge.cErrorMsg + » In » +
this.Name
+ ‘.Init()’)
ENDIF
ENDPROC
PROCEDURE Flush
IF
!this.IsBridgeObject()
ERROR
«Not found instance of » + BRIDGE_CLASS + »
object» ;
+ » in » + this.Name
+ ‘.Flush()’
ENDIF
poBridge.InvokeMethod(this.oFwObj,
‘Flush’)
IF
!EMPTY(poBridge.cErrorMsg)
ERROR
(poBridge.cErrorMsg + » In » +
this.Name
+ ‘.Flush()’)
ENDIF
ENDPROC
PROCEDURE Close
IF !this.IsBridgeObject()
ERROR
«Not found instance of » + BRIDGE_CLASS + »
object» ;
+ » in » + this.Name
+ ‘.Close()’
ENDIF
poBridge.InvokeMethod(this.oFwObj,
‘Close’)
IF
!EMPTY(poBridge.cErrorMsg)
ERROR
(poBridge.cErrorMsg + » In » +
this.Name
+ ‘.Close()’)
ENDIF
ENDPROC
PROCEDURE Destroy
IF !this.IsBridgeObject()
ERROR
«Not found instance of » + BRIDGE_CLASS + »
object» ;
+ » in » + this.Name
+ ‘.Destroy()’
ENDIF
poBridge.InvokeMethod(this.oFwObj,
‘Close’)
DODEFAULT()
ENDPROC
*// Insert your code
here for implement any other PEMs for this class…
ENDDEFINE
Здесь в событии Init() (аналоге перегруженного
конструктора в обычных языках программирования) с помощью дописанных мной
методов: GetConstructor() и CreateInstanceObject()
в классе DotNetBridge
устраняется
проблема: какой именно конструктор у MS Framework-класса
System.Xml.XmlTextWriter необходимо вызвать, в
зависимости от типов входных параметров. Так, в выделенном цветом фона участке
кода, с помощью VFP-функции
PCOUNT(), предварительно определяется действительное
количество входных параметров, использованных при создании экземпляра класса и
далее, в зависимости от их количества, производится:
- либо прямое обращение к
poBridge.CreateInstance(), если на входе был один
параметр, т.е. отсутствовала неоднозначность по типам параметров, - либо производится предварительное получение типа первого параметра (в
переменную lcArg1Type), в
зависимости от этого, с помощью метода GetConstructor(), создаётся экземпляр объекта
System.Reflection.ConstructorInfo и только затем, с помощью
CreateInstanceObject(), создаётся экземпляр класса
для однозначно предопределённого конструктора, именно для этого случая
создания экземпляра объекта.
После таких пояснений, видимо понятным будет код класса
Uri:
*/////////////////////////////////////////////////////
*// Uri — wrap to System.Uri
DEFINE CLASS Uri
as
baseFwWrap
cClassName = «System.Uri»
PROCEDURE Init
LPARAMETERS tuUrl, tuArg2, tuArg3
IF
!DODEFAULT()
RETURN
.F.
ENDIF
LOCAL lnCntArgs
as Integer
lnCntArgs =
PCOUNT()
DO CASE
CASE lnCntArgs = 1
this.oFwObj
= poBridge.CreateInstance(this.oConstr,
tuUrl)
CASE
lnCntArgs = 2
LOCAL
lcTypeArg1
as String;
,lcTypeArg2 as
String;
,loConstr as Object
lcTypeArg1 =
VARTYPE(tuUrl)
lcTypeArg2 = VARTYPE(tuArg2)
DO CASE
CASE lcTypeArg1 = ‘C’ AND lcTypeArg2
= ‘L’
loConstr = poBridge.GetConstructor(this.cClassName,
«System.String», «System.Boolean»)
CASE
lcTypeArg1 = ‘C’ AND lcTypeArg2 = ‘N’
loConstr = poBridge.GetConstructor(this.cClassName,
«System.String», «System.UriKind»)
CASE
lcTypeArg1 = ‘O’ AND lcTypeArg2 = ‘C’
loConstr = poBridge.GetConstructor(this.cClassName,
«System.Uri», «System.String»)
CASE
lcTypeArg1 = ‘O’ AND lcTypeArg2 = ‘O’
loConstr = poBridge.GetConstructor(this.cClassName,
«System.Uri», «System.Uri»)
OTHERWISE
ERROR («Error type of args. In » +
this.Name
+ ‘.Init()’)
ENDCASE
IF VARTYPE(loConstr) # ‘O’
ERROR
(poBridge.cErrorMsg + » In » +
this.Name
+ ‘.Init()’)
ENDIF
this.oFwObj =
poBridge.CreateInstanceObject(loConstr, tuUrl, tuArg2)
CASE
lnCntArgs = 3
LOCAL
lcTypeArg1
as String;
,lcTypeArg2 as
String;
,lcTypeArg3 as
String
lcTypeArg1 =
VARTYPE(tuUrl)
lcTypeArg2 = VARTYPE(tuArg2)
lcTypeArg3 = VARTYPE(tuArg3)
IF
lcTypeArg1 = ‘O’ AND lcTypeArg2 = ‘C’ AND
lcTypeArg3 = ‘L’
LOCAL
loConstr
as Object
loConstr = poBridge.GetConstructor(this.cClassName,
«System.Uri», «System.String», «System.Boolean»)
IF VARTYPE(loConstr)
# ‘O’
ERROR
(poBridge.cErrorMsg + » In » +
this.Name
+ ‘.Init()’)
ENDIF
this.oFwObj =
poBridge.CreateInstanceObject(loConstr, tuUrl, tuArg2, tuArg3)
ELSE
ERROR («Error type of args. In » +
this.Name
+ ‘.Init()’)
ENDIF
ENDCASE
IF VARTYPE(this.oFwObj)
# ‘O’
ERROR
(poBridge.cErrorMsg + » In » +
this.Name
+ ‘.Init()’)
ENDIF
ENDPROC
PROCEDURE Destroy
DODEFAULT()
ENDPROC
*// Insert your code
here for implement any other PEMs for this class…
ENDDEFINE
Здесь выбор конструктора для MS Framework-класса
производится на основе анализа VFP-типов параметров, а
не типов Framework-классов для параметров, как это
было в примере выше.
Можно ещё в качестве примера использования мной дополненной функциональности
по вызову перегруженных методов привести сюда код класса PackagePart:
*/////////////////////////////////////////////////////
*// Package — wrap to System.IO.Packaging.PackagePart
DEFINE CLASS PackagePart
as
baseFwWrap
cClassName = «System.IO.Packaging.PackagePart»
oMethodGetStream2 =
NULL
PROCEDURE Init
LPARAMETERS toPackagePart
IF
!DODEFAULT()
RETURN
.F.
ENDIF
this.oFwObj = toPackagePart
IF VARTYPE(this.oFwObj)
# ‘O’
ERROR
(poBridge.cErrorMsg + » In » +
this.Name
+ ‘.Init()’)
ENDIF
ENDPROC
PROCEDURE GetStream
LPARAMETERS
tnFileMode, tnFileAccess
IF
!this.IsBridgeObject()
ERROR
«Not found instance of » + BRIDGE_CLASS + »
object» ;
+ » in » + this.Name
+ ‘.GetStream()’
ENDIF
LOCAL loRetVal
as Object;
,lnCntArgs as
Integer
lnCntArgs =
PCOUNT()
DO CASE
CASE lnCntArgs = 0
loRetVal = poBridge.InvokeMethod(this.oFwObj,
«GetStream»)
CASE
lnCntArgs = 1
loRetVal = poBridge.InvokeMethod(this.oFwObj,
«GetStream», tnFileMode)
CASE
lnCntArgs = 2
IF VARTYPE(this.oMethodGetStream2)
# ‘O’
this.oMethodGetStream2
= poBridge.GetMethod(this.oFwObj,
«GetStream»;
,»System.IO.FileMode», «System.IO.FileAccess»)
IF VARTYPE(this.oMethodGetStream2)
# ‘O’
ERROR
(poBridge.cErrorMsg + » In » +
this.Name
+ ‘.GetStream()’)
ENDIF
ENDIF
loRetVal =
poBridge.InvokeMethodObject(this.oFwObj,
this.oMethodGetStream2;
,tnFileMode, tnFileAccess)
OTHERWISE
ERROR («Error number of args.» + »
In » + this.Name
+ ‘.Init()’)
ENDCASE
IF VARTYPE(loRetVal) # ‘O’
ERROR
(poBridge.cErrorMsg + » In » +
this.Name
+ ‘.GetStream()’)
ENDIF
RETURN loRetVal
ENDPROC
PROCEDURE Destroy
this.oMethodGetStream2
= NULL
DODEFAULT()
ENDPROC
*// Insert your code
here for implement any other PEMs for this class…
ENDDEFINE
Здесь в методе GetStream(), в случае двух параметров, использованы методы: GetMethod()
и InvokeMethodObject() из класса
DotNetBridge для получения объекта класса System.Reflection.MethodInfo и вызова метода,
соответствующего типам параметров.
Всё ли гладко на этом пути? Да я бы не сказал так… Конечно, можно многое
сделать, но проблемы остаются. Например, я не смог вызвать метод
Stream.Seek() у объекта, полученного от
PackagePart.GetStream() как не старался…
Пришлось переустанавливать указатель потока через его свойство
Stream.Position. Мне не удалось также воспользоваться методом
Environment.GetFolderPath(Environment.SpecialFolder.Personal),
подозреваю, что для этого снова нужно править C#-код в
классе DotNetBredge… Но в целом, подход всё-таки
работает!
Построение XSLT-преобразования
для извлечения xml-данных из таблицы в MS Word 2007 документе.
Попробуем теперь решить обратную задачу: извлечь из MS
Word 2007 документа, содержащего таблицу с данными, сами эти табличные
данные в xml-формате. Для этого нам потребуется
XSLT-преобразование над данными в /word/document.xml,
позволившее бы нам это сделать. При этом надо иметь ввиду, что некоторые типы
данных, например тип даты, необходимо преобразовать из обычного представления
(того, что в документе) в
формат, удовлетворяющий требованиям xml. Для нашей
таблички данных я это проделал и вот какой код у меня при этом получился:
<?xml
version=«1.0«
encoding=«utf-8«?>
<!— File: genXmlFromDocument.xslt
—>
<xsl:stylesheet
version=«1.0«
xmlns:xsl=«http://www.w3.org/1999/XSL/Transform«
xmlns:xsi=«http://www.w3.org/2001/XMLSchema-instance«
xmlns:msxsl=«urn:schemas-microsoft-com:xslt«
xmlns:msdata=«urn:schemas-microsoft-com:xml-msdata«
xmlns:xsd=«http://www.w3.org/2001/XMLSchema«
xmlns:ve=«http://schemas.openxmlformats.org/markup-compatibility/2006«
xmlns:o=«urn:schemas-microsoft-com:office:office«
xmlns:r=«http://schemas.openxmlformats.org/officeDocument/2006/relationships«
xmlns:m=«http://schemas.openxmlformats.org/officeDocument/2006/math«
xmlns:v=«urn:schemas-microsoft-com:vml«
xmlns:wp=«http://schemas.openxmlformats.org/drawingml/2006/wordprocessingDrawing«
xmlns:w10=«urn:schemas-microsoft-com:office:word«
xmlns:w=«http://schemas.openxmlformats.org/wordprocessingml/2006/main«
xmlns:wne=«http://schemas.microsoft.com/office/word/2006/wordml«
exclude-result-prefixes=«xsi
msxsl msdata xsd ve o r m v wp w10 w wne«> <xsl:output
method=«xml«
version=«1.0«
encoding=«utf-8«
omit-xml-declaration=«yes«
/> <!— Current encoding to replace in output
xml-PI —>
<xsl:param
name=«prmEncoding«>
<xsl:text>utf-8</xsl:text>
</xsl:param>
<!—
Schema name —>
<xsl:param
name=«prmSchemaUri«>
<xsl:text>Schema_Employee</xsl:text>
</xsl:param>
<!—
xsd:schema as first child element in
output —>
<xsl:param
name=«prmDocXsd«
/> <!— Get attribute w:element form
request w:customXml element in input —>
<xsl:variable
name=«varRoot«>
<xsl:value-of
select=«/./w:document/w:body//w:customXml[@w:uri=$prmSchemaUri]/@w:element«/>
</xsl:variable> <xsl:template
match=«/«>
<xsl:text
disable-output-escaping=«yes«><![CDATA[<?xml
version=»1.0″ encoding=»]]></xsl:text>
<xsl:value-of
select=«$prmEncoding«
/>
<xsl:text
disable-output-escaping=«yes«><![CDATA[»
standalone=»yes»?>]]>
</xsl:text>
<xsl:choose>
<xsl:when
test=«$varRoot«>
<!— Generate root element into output
—>
<xsl:element
name=«{$varRoot}«>
<xsl:if
test=«$prmDocXsd«>
<!— Insert schema element into output
—>
<xsl:copy-of
select=«$prmDocXsd«/>
</xsl:if>
<!— … continue parsing for childrens
of request w:customXml element … —>
<xsl:apply-templates
select=«/./w:document/w:body//w:customXml[@w:uri=$prmSchemaUri]/*«
/>
</xsl:element>
</xsl:when>
<xsl:otherwise>
<!— Error: request element w:customXml
not found —>
<xsl:element
name=«{concat($prmSchemaUri,
‘_Not_Found’)}« />
</xsl:otherwise>
</xsl:choose>
</xsl:template>
<!—
Parsing any current input…
—>
<xsl:template
match=«@*|node()«>
<xsl:variable
name=«varName«>
<xsl:value-of
select=«name()«
/>
</xsl:variable>
<xsl:choose>
<xsl:when
test=«string-length($varName)>0«>
<xsl:choose>
<xsl:when
test=«$varName=’w:customXml’«>
<!— Parsing
<w:customXml…>…</w:customXml> —>
<xsl:variable
name=«varElementName«>
<xsl:value-of
select=«@w:element«
/>
</xsl:variable>
<xsl:variable
name=«varChildName«>
<xsl:value-of
select=«name(child::*[1])«/>
</xsl:variable>
<!— Open <{@w:element}…>…
—>
<xsl:element
name=«{$varElementName}«>
<xsl:choose>
<xsl:when
test=«$varElementName=$varRoot
or $varChildName=’w:tr’«>
<!— … for any group: continue
parsing for child & as child … —>
<xsl:apply-templates
select=«@*|node()«
/>
</xsl:when>
<xsl:otherwise>
<!— … get xml-value for current
w:customXml element —>
<xsl:call-template
name=«getXmlValue«>
<xsl:with-param
name=«prmElementName«
select=«$varElementName«
/>
<xsl:with-param
name=«prmValue«
select=«normalize-space(string(child::*))«
/>
</xsl:call-template>
</xsl:otherwise>
</xsl:choose>
<!— Close … </{@w:element}>
—>
</xsl:element>
</xsl:when>
<xsl:otherwise>
<xsl:apply-templates
select=«@*|node()«
/>
</xsl:otherwise>
</xsl:choose>
</xsl:when>
<xsl:otherwise>
<xsl:apply-templates
select=«@*|node()«
/>
</xsl:otherwise>
</xsl:choose>
</xsl:template>
<!—
Generate value of w:customXml element
—>
<xsl:template
name=«getXmlValue«>
<xsl:param
name=«prmElementName«
/>
<xsl:param
name=«prmValue«
/>
<xsl:choose>
<xsl:when
test=«$prmDocXsd«>
<!— Try get element type from xsd-schema…
—>
<xsl:variable
name=«varType«>
<xsl:choose>
<xsl:when
test=«msxsl:node-set($prmDocXsd)/.//xsd:element[@name=$prmElementName]/@type«>
<xsl:value-of
select=«msxsl:node-set($prmDocXsd)/.//xsd:element[@name=$prmElementName]/@type«/>
</xsl:when>
<xsl:when
test=«msxsl:node-set($prmDocXsd)/.//xsd:element[@name=$prmElementName]/xsd:simpleType/xsd:restriction/@base«>
<xsl:value-of
select=«msxsl:node-set($prmDocXsd)/.//xsd:element[@name=$prmElementName]/xsd:simpleType/xsd:restriction/@base«/>
</xsl:when>
<!— … insert your code here for any other
types… —>
<xsl:otherwise>
</xsl:otherwise>
</xsl:choose>
</xsl:variable>
<!— Convert current value according to
element type… —>
<xsl:choose>
<xsl:when
test=«$varType=’xsd:date’«>
<!— … for date value: convert element value
to xml-date format into ouptut —>
<xsl:value-of
select=«concat(substring-after(substring-after($prmValue,
‘.’), ‘.’), ‘-‘, substring-before(substring-after($prmValue, ‘.’), ‘.’), ‘-‘,
substring-before($prmValue, ‘.’))« />
</xsl:when>
<!— … insert your code here for any other
types… —>
<xsl:otherwise>
<!— … for otherwise case: simple copy
current value into ouptut —>
<xsl:value-of
select=«$prmValue«
/>
</xsl:otherwise>
</xsl:choose>
</xsl:when>
<xsl:otherwise>
<!— … for otherwise case: simple copy
current value into ouptut —>
<xsl:value-of
select=«$prmValue«
/>
</xsl:otherwise>
</xsl:choose>
</xsl:template>
</
xsl:stylesheet>
Файл: genXmlFromDocument.xslt
C#-код приложения для
извлечения xml-данных из таблицы в MS Word 2007 документе.
Чтобы применить приведённое выше XSLT-преобразование
из файла genXmlFromDocument.xslt
к содержанию нашего MS Word 2007 документа, потребуется ряд
действий. Код консольного C#-приложения,
выполняющего такие действия, мог бы быть следующим:
#define RUS_LANG
using System;
using System.Collections.Generic;
using System.Text;
using Microsoft.Win32;
using System.Xml;
using System.Xml.Xsl;
using System.IO;
using System.IO.Packaging;
namespace docx2xml
{
class
docx2xml
{
const
string PATH_DOCX =
@»……..DOCX»;
const
string PATH_XSLT =
@»……..XSLT»;
const
string PATH_XML =
@»……..XML»;
const
string XSLT_FILE =
«genXmlFromDocument.xslt»;
const
string XML_OUTPUT_FILE =
«documentData.xml»;
const
string URI_SETTINGS_XML =
«/word/settings.xml»;
const
string URI_DOCUMENT_XML =
«/word/document.xml»;
const
string KEY_SCHEMA_LIBRARY =
@»SoftwareMicrosoftSchema Library»;
const
string LOCATION_NAME_VALUE
= «Location»;
const
string USE_ENCODING =
«utf-8»;
const
string XML_PI =
«<?xml version=»1.0″ encoding=»»
+ USE_ENCODING + «»
standalone=»yes»?>rn»;
#if RUS_LANG
const
string TEMPLATE_DOCX =
«Пример VFP-таблицы в виде MS Word 2007.docx»;
const
string ERR_LABEL_OUTPUT =
«*** Возникла ошибка: «;
const
string ERR_DIR_NOTFOUND =
«Не найден каталог: «;
const
string ERR_FILE_NOTFOUND =
«Не найден файл: «;
const
string ERR_EMPTY_XML =
«Нет xml-данных для: «;
const
string ERR_EMPTY_XSLTRES =
«Результат xslt-преобразований пуст для: «;
const
string ERR_CALL_GENDOCX =
«Выполните xml2docx.ex для создания этого
документа.»;
const
string MSG_PRESS_ANY_KEY =
«Нажмите любую клавишу для продолжения…»;
const
string MSG_SUCCESS_RESUT =
«Процесс успешно завершён!»;
#else
const string TEMPLATE_DOCX = «Example VFP-table in MS Word 2007.docx»;
const string ERR_LABEL_OUTPUT = «*** Error appears: «;
const string ERR_DIR_NOTFOUND = «Not found directory: «;
const string ERR_FILE_NOTFOUND = «Not found file: «;
const string ERR_EMPTY_XML = «Empty xml-data for: «;
const string ERR_EMPTY_XSLTRES = «Empty result of xslt-transformation for: «;
const string ERR_CALL_GENDOCX = «Call xml2docx.ex to generating this
document.»;
const string MSG_PRESS_ANY_KEY = «Press any key to continue…»;
const string MSG_SUCCESS_RESUT = «Process was successfully completed!»;
#endif
static
void Main(string[]
args)
{
RegistryKey
rkDocxAsValue = null;
RegistryKey
rkDocxAttachedSchema = null;
RegistryKey
rkSchemaLibrary = null;
RegistryKey
rkCurrentUser = null;
bool bIsResult =
false;try
{
///////////////////////////////////////////////////////////////////////
// Check existence of external files
if (!Directory.Exists(PATH_XML))
{
throw (new
DirectoryNotFoundException(ERR_DIR_NOTFOUND
+ Path.GetFullPath(PATH_XML)));
}
if (!Directory.Exists(PATH_DOCX))
{
throw (new
DirectoryNotFoundException(ERR_DIR_NOTFOUND
+ Path.GetFullPath(PATH_DOCX)));
}
if (!Directory.Exists(PATH_XSLT))
{
throw (new
DirectoryNotFoundException(ERR_DIR_NOTFOUND
+ Path.GetFullPath(PATH_XSLT)));
} ///////////////////////////////////////////////////////////////////////
// Get docx-file from Docx folder
string DocxFolder
= Environment.GetFolderPath(Environment.SpecialFolder.Personal);
string FileDocx =
DocxFolder + @»_» +
TEMPLATE_DOCX;
if (!File.Exists(FileDocx))
{
throw (new
FileNotFoundException(ERR_FILE_NOTFOUND
+ FileDocx + «. « +
ERR_CALL_GENDOCX));
}
string FileXslt =
Path.GetFullPath(PATH_XSLT
+ XSLT_FILE);
if (!File.Exists(FileXslt))
{
throw (new
FileNotFoundException(ERR_FILE_NOTFOUND
+ FileXslt));
} Encoding enc =
Encoding.GetEncoding(USE_ENCODING);
Uri
uriWordSettingsXml = new
Uri(URI_SETTINGS_XML,
UriKind.Relative);
Uri
uriWordDocumentXml = new
Uri(URI_DOCUMENT_XML,
UriKind.Relative);
string strXmlDoc
= System.String.Empty;
using (Package
package = Package.Open(FileDocx,
FileMode.Open))
{
string
DocxAttachedSchema = System.String.Empty; ///////////////////////////////////////////////////////////////////////
// Get PackagePart of template for
URI_SETTINGS_XML(/word/settings.xml)
PackagePart
packagePart = package.GetPart(uriWordSettingsXml);
// … and its stream in Read mode
using (Stream
ppStrmSettingsXml = packagePart.GetStream(FileMode.Open,
FileAccess.Read))
{
///////////////////////////////////////////////////////////////////////
// Load stream as xml-document
XmlDocument
xmlDocSettings = new
XmlDocument();
xmlDocSettings.Load(ppStrmSettingsXml);
XmlElement xeRoot
= xmlDocSettings.DocumentElement;
string nsp_w =
xeRoot.GetNamespaceOfPrefix(«w»);
XmlNamespaceManager
nsMngr = new
XmlNamespaceManager(xmlDocSettings.NameTable);
if (nsp_w !=
null && nsp_w.Length
> 0)
{
nsMngr.AddNamespace(«w»,
nsp_w);
} ///////////////////////////////////////////////////////////////////////
// Get AttachedSchema name
XmlNode
xnAttachedSchema = xeRoot.SelectSingleNode(«w:attachedSchema»,
nsMngr);
if (xnAttachedSchema
!= null &&
xnAttachedSchema.Attributes.Count > 0)
{
XmlAttribute
xaVal = xnAttachedSchema.Attributes[«w:val»];
if (xaVal !=
null)
{
DocxAttachedSchema = xaVal.Value;
}
}
ppStrmSettingsXml.Close();
}
string
PathSchemaLocation = System.String.Empty;
if (DocxAttachedSchema.Length
> 0)
{
///////////////////////////////////////////////////////////////////////////////////////////
// Get Location for XSD-schema from
Microsoft Schema Library in system registry
rkCurrentUser = Registry.CurrentUser;
// Get RegistryKey: Microsoft Schema
Library
rkSchemaLibrary = rkCurrentUser.OpenSubKey(KEY_SCHEMA_LIBRARY,
false);
// Get RegistryKey: AttachedSchema by
name
rkDocxAttachedSchema = rkSchemaLibrary.OpenSubKey(DocxAttachedSchema,
false);
// Get RegistryKey: first child of
AttachedSchema
string[]
asSubKeys = rkDocxAttachedSchema.GetSubKeyNames();
rkDocxAsValue = rkDocxAttachedSchema.OpenSubKey(asSubKeys[0],
false);
// Get Location
PathSchemaLocation = (string)rkDocxAsValue.GetValue(LOCATION_NAME_VALUE); /////////////////////////////////////
// Close all RegistryKeys
rkDocxAsValue.Close();
rkDocxAsValue = null;
rkDocxAttachedSchema.Close();
rkDocxAttachedSchema = null;
rkSchemaLibrary.Close();
rkSchemaLibrary = null;
rkCurrentUser.Close();
rkCurrentUser = null;
} ///////////////////////////////////////////////////////////////////////////////////////
// Get PackagePart of template for
URI_DOCUMENT_XML(/word/document.xml)
packagePart = package.GetPart(uriWordDocumentXml);
// … and its stream in Read mode
using (Stream
ppStrmDocumentXml = packagePart.GetStream(FileMode.Open,
FileAccess.Read))
{
///////////////////////////////////////////////////////////////////////
// Load stream as xml-document
XmlDocument
xmlDocumentXml = new
XmlDocument();
xmlDocumentXml.Load(ppStrmDocumentXml);
///////////////////////////////////////////////////////////////////////////////////////
// Load XSD-schema from file SchemaLocation
(as info from system registry)
XmlDocument
xmlDocXsd = null;
if (File.Exists(PathSchemaLocation))
{
xmlDocXsd = new
XmlDocument();
xmlDocXsd.Load(PathSchemaLocation);
}
///////////////////////////////////////////////////////////////////////////////
// Prepare and execute the xslt-transformation
// with document.xml and by using xslt-file
FileXslt
XslCompiledTransform
xsltXmlTransform = new
XslCompiledTransform();
XsltArgumentList
xsltArgList = new
XsltArgumentList();
xsltArgList.AddParam(«prmEncoding»,
«», USE_ENCODING);
if (DocxAttachedSchema.Length
> 0)
{
xsltArgList.AddParam(«prmSchemaUri»,
«»,
DocxAttachedSchema);
}
if (xmlDocXsd !=
null &&
xmlDocXsd.DocumentElement != null)
{
xsltArgList.AddParam(«prmDocXsd»,
«»,
xmlDocXsd.DocumentElement.CreateNavigator());
}
xsltXmlTransform.Load(FileXslt);
using (MemoryStream
msXmlDoc = new
MemoryStream())
{
using (XmlTextWriter
xtwXmlDoc = new
XmlTextWriter(msXmlDoc,
enc))
{
xsltXmlTransform.Transform(xmlDocumentXml.CreateNavigator(), xsltArgList,
xtwXmlDoc);
strXmlDoc = enc.GetString(msXmlDoc.GetBuffer(), 0, (int)msXmlDoc.Length);
xtwXmlDoc.Close();
}
msXmlDoc.Close();
}
int nPos =
strXmlDoc.IndexOf(‘<‘);
if (nPos == (-1))
{
throw (new
NullReferenceException(ERR_EMPTY_XSLTRES
+ FileXslt));
}
strXmlDoc = strXmlDoc.Substring(nPos);
nPos = strXmlDoc.IndexOf(«<?xml»);
if (nPos == (-1))
{
strXmlDoc = XML_PI + strXmlDoc;
}
ppStrmDocumentXml.Close();
}
package.Close();
} //////////////////////////////////////
// Save result
string
xmlOutputFile = Path.GetFullPath(PATH_XML
+ XML_OUTPUT_FILE);
if (strXmlDoc.Length
> 0)
{
if (File.Exists(xmlOutputFile))
{
File.Delete(xmlOutputFile);
}
XmlDocument
xmlDocOut = new
XmlDocument();
xmlDocOut.LoadXml(strXmlDoc);
xmlDocOut.Save(xmlOutputFile);
bIsResult = File.Exists(xmlOutputFile);
}
else
{
throw (new
FileNotFoundException(ERR_EMPTY_XML
+ xmlOutputFile));
}
}
catch (Exception
ex)
{
Console.WriteLine(ERR_LABEL_OUTPUT
+ ex.ToString());
} /////////////////////////////////////
// Close all RegistryKeys
if (rkDocxAsValue
!= null)
{
rkDocxAsValue.Close();
rkDocxAsValue = null;
}
if (rkDocxAttachedSchema
!= null)
{
rkDocxAttachedSchema.Close();
rkDocxAttachedSchema = null;
}
if (rkSchemaLibrary
!= null)
{
rkSchemaLibrary.Close();
rkSchemaLibrary = null;
}
if (rkCurrentUser
!= null)
{
rkCurrentUser.Close();
rkCurrentUser = null;
}
if (bIsResult)
{
Console.WriteLine(MSG_SUCCESS_RESUT);
}
Console.WriteLine(MSG_PRESS_ANY_KEY);
Console.ReadKey();
}
}
}
Файл: docx2xml.cs
Здесь из части /word/settings.xml MS Word 2007 документа
выбирается значение атрибута w:val у элемента
w:attachedSchema, содержащее название
xsd-схемы в библиотеке схем для содержания данного документа
(в переменную DocxAttachedSchema). Далее,
в библиотеке схем под ключом HKEY_CURRENT_USERSoftwareMicrosoftSchema Library в системном реестре
по названию схемы (у подключа: Schema_Employee
в нашем случае) у значения Location определяется
место расположения файла xsd-схемы на локальном диске
(в переменную PathSchemaLocation). Затем выбирается
часть документа /word/document.xml, над которой
совершается xslt-преобразование из файла
genXmlFromDocument.xslt для получения
xml-данных содержания документа, а в качестве первого
дочернего элемента к корневому элементу добавляется корневой элемент из
xsd-файла-схемы, передаваемой как параметр
prmDocXsd, тем самым формируется так называемая
inline-схема внутри нашего xml-файла
результата. Наконец, если всё вышеописанное было выполнено без ошибок, то
формируется файл результата с названием: XML_OUTPUT_FILE(documentData.xml)
в подкаталоге XML.
Выполнив код из docx2xml.cs для нашего MS
Word 2007 документа в подкаталоге XML мной был
получен следующий результат:
<?xml
version=«1.0«
encoding=«utf-8«
standalone=«yes«?>
<VFPData>
<xsd:schema
id=«VFPData«
xmlns:xsd=«http://www.w3.org/2001/XMLSchema«
xmlns:msdata=«urn:schemas-microsoft-com:xml-msdata«>
<xsd:element
name=«VFPData«
msdata:IsDataSet=«true«>
<xsd:complexType
mixed=«true«>
<xsd:choice
maxOccurs=«unbounded«>
<xsd:element
name=«employee«
minOccurs=«0«
maxOccurs=«unbounded«>
<xsd:complexType
mixed=«true«>
<xsd:sequence>
<xsd:element
name=«lastname«>
<xsd:simpleType>
<xsd:restriction
base=«xsd:string«>
<xsd:maxLength
value=«20«
/>
</xsd:restriction>
</xsd:simpleType>
</xsd:element>
<xsd:element
name=«firstname«>
<xsd:simpleType>
<xsd:restriction
base=«xsd:string«>
<xsd:maxLength
value=«10«
/>
</xsd:restriction>
</xsd:simpleType>
</xsd:element>
<xsd:element
name=«birthdate«
type=«xsd:date«
minOccurs=«0«
/>
<xsd:element
name=«notes«
minOccurs=«0«>
<xsd:simpleType>
<xsd:restriction
base=«xsd:string«>
<xsd:maxLength
value=«2147483647«
/>
</xsd:restriction>
</xsd:simpleType>
</xsd:element>
</xsd:sequence>
</xsd:complexType>
</xsd:element>
</xsd:choice>
<xsd:anyAttribute
namespace=«http://www.w3.org/XML/1998/namespace«
processContents=«lax«
/>
</xsd:complexType>
</xsd:element>
</xsd:schema>
<employee>
<lastname>Buchanan</lastname>
<firstname>Steven</firstname>
<birthdate>1955-03-04</birthdate>
<notes>Steven
Buchanan graduated from St. Andrews University, …</notes>
</employee>
<employee>
<lastname>Callahan</lastname>
<firstname>Laura</firstname>
<birthdate>1958-01-09</birthdate>
<notes>Laura
received a BA in psychology from the University …</notes>
</employee>
<employee>
<lastname>Davolio</lastname>
<firstname>Nancy</firstname>
<birthdate>1968-12-08</birthdate>
<notes>Education
includes a BA in psychology from Colorado …</notes>
</employee>
<employee>
<lastname>Dodsworth</lastname>
<firstname>Anne</firstname>
<birthdate>1969-07-02</birthdate>
<notes>Anne
has a BA degree in English from St. Lawrence College. …</notes>
</employee>
<employee>
<lastname>Fuller</lastname>
<firstname>Andrew</firstname>
<birthdate>1952-02-19</birthdate>
<notes>Andrew
received his BTS commercial and a Ph.D. in international …</notes>
</employee>
</VFPData>
Файл: documentData.xml
В подкаталог XML примеров кода я также поместил
VFP-код CreateVfpCursorFromXml.prg,
результат выполнения которого показан на рисунке ниже:

Рис.14
Как видим, наша цель оказалась достигнутой! Нами получены данные
исходного MS Word 2007 документа в виде таблицы в
xml-формате, причём используя VFP-класс
XMLAdapter, такие xml-данные
легко преобразуются в соответствующий VFP-курсор.
VFP-код приложения для
извлечения xml-данных из таблицы в MS Word 2007 документе.
Приведённый выше код из файла docx2xml.cs может быть переписан и для выполнения из-под
VFP. У меня это получилось так:
#DEFINE
PATH_COMMON_TOOLS «….CommonTools»
#INCLUDE
«….CommonToolsSolWestWindEx.h»
#INCLUDE
«….CommonToolsFrameworkWrap.h»
#
DEFINE
RUS_LANG .T.
#DEFINE
TMP_OUT .T.
#DEFINE
CRLF
CHR(13)
+ CHR(10)
#DEFINE
SW_NORMAL 1
#DEFINE
PATH_XML «….XML»
#DEFINE
PATH_DOCX «….DOCX»
#DEFINE
PATH_XSLT «….XSLT»
#DEFINE
XSLT_FILE «genXmlFromDocument.xslt»
#DEFINE
XML_OUTPUT_FILE «documentData.xml»
#DEFINE
XSLT_FILE_FIRST_RESULT «getXmlDocument.xslt»
#DEFINE
XML_FILE_SECOND_RESULT «document.xml»
#DEFINE
URI_SETTINGS_XML «/word/settings.xml»
#DEFINE
URI_DOCUMENT_XML «/word/document.xml»
#DEFINE
KEY_SCHEMA_LIBRARY «SoftwareMicrosoftSchema
Library»
#DEFINE
LOCATION_NAME_VALUE «Location»
#DEFINE
USE_ENCODING «utf-8»
#DEFINE
XML_PI ‘<?xml version=»1.0″ encoding=»‘ +
USE_ENCODING + ‘» standalone=»yes»?>’ + CRLF
#DEFINE
MYDOC_FOLDER «MyDocuments»
#IF
RUS_LANG
#DEFINE
TEMPLATE_DOCX «Пример VFP-таблицы в виде MS
Word 2007.docx»
#DEFINE
ERR_VFP_VERSION «Извините, данный код
предназначен для VFP 8.0 (или выше).»
#DEFINE
ERR_LABEL_OUTPUT «*** Возникла ошибка: «
#DEFINE
ERR_DIR_NOTFOUND «Не найден каталог: «
#DEFINE
ERR_FILE_NOTFOUND «Не найден файл: «
#DEFINE
ERR_EMPTY_XML «Нет xml-данных для: «
#DEFINE
ERR_EMPTY_XSLTRES «Результат
xslt-преобразований пуст для: «
#DEFINE
MSG_SUCCESS_RESUT «Процесс успешно завершён!»
#ELSE
#DEFINE
TEMPLATE_DOCX «Example VFP-table in MS
Word 2007.docx»
#DEFINE
ERR_VFP_VERSION «Sorry, this code for VFP 8.0
(or later).»
#DEFINE
ERR_LABEL_OUTPUT «*** Error appears: «
#DEFINE
ERR_DIR_NOTFOUND «Not found directory: «
#DEFINE
ERR_FILE_NOTFOUND «Not found file: «
#DEFINE
ERR_EMPTY_XML «Empty xml-data for: «
#DEFINE
ERR_EMPTY_XSLTRES «Empty result of
xslt-transformation for: «
#DEFINE
MSG_SUCCESS_RESUT «Process is successfully
completed!»
#ENDIF
CLEAR
SET DEFAULT TO
(LEFT(SYS(16),
RAT(«»,
SYS(16))))
IF VERSION(5) < 800
? ERR_VFP_VERSION
RETURN
.F.
ENDIF
PRIVATE
poBridge
&& as DotNetBridge OF
….CommonToolsDotNetBridge.prg && FULLPATH(PATH_COMMON_TOOLS +
«DotNetBridge.prg»)
LOCAL loException
as Exception;
,lbError as
Boolean;
,lbResult as
Boolean
TRY
*///////////////////////////////////////////////////////////////////////
*// Check existence of external files
IF
!DIRECTORY(PATH_COMMON_TOOLS)
ERROR
(ERR_DIR_NOTFOUND +
LOWER(FULLPATH(PATH_COMMON_TOOLS)))
ENDIF
IF !DIRECTORY(PATH_XML)
ERROR
(ERR_DIR_NOTFOUND +
LOWER(FULLPATH(PATH_XML)))
ENDIF
IF !DIRECTORY(PATH_DOCX)
ERROR
(ERR_DIR_NOTFOUND +
LOWER(FULLPATH(PATH_DOCX)))
ENDIF
IF !DIRECTORY(PATH_XSLT)
ERROR
(ERR_DIR_NOTFOUND +
LOWER(FULLPATH(PATH_XSLT)))
ENDIF
LOCAL lcFileXslt
as String
lcFileXslt =
LOWER(FULLPATH(PATH_XSLT))
+ XSLT_FILE
IF
!FILE(lcFileXslt)
ERROR
101, lcFileXslt
ENDIF *///////////////////////////////////////////////////////////////////////
*// Get docx-file from My Documents folder
LOCAL
loWSH
as
WScript.Shell
loWSH =
CREATEOBJECT(«WScript.Shell»)
LOCAL
lcDocxFolder
as String
lcDocxFolder =
loWSH.SpecialFolders(MYDOC_FOLDER)
LOCAL
lcFileDocx
as String
lcFileDocx = lcDocxFolder + «_» +
TEMPLATE_DOCX
IF
!FILE(lcFileDocx)
ERROR
101, lcFileDocx
ENDIF *////////////////////////////////////////////////////////////////
*// Create DotNetBridge object
LOCAL
lcBridgeFileProc
as String
lcBridgeFileProc =
LOWER(FULLPATH(PATH_COMMON_TOOLS
+ BRIDGE_PROC))
IF
!FILE(lcBridgeFileProc)
ERROR
101, lcBridgeFileProc
ENDIF
IF NOT (JUSTSTEM(lcBridgeFileProc)
$ LOWER(SET(«Procedure»)))
SET PROCEDURE TO
(lcBridgeFileProc)
ADDITIVE
ENDIF
poBridge =
CREATEOBJECT(BRIDGE_CLASS)
IF VARTYPE(poBridge)
# ‘O’
ERROR
‘Can not create ‘ + BRIDGE_CLASS + ‘ object.’
ENDIF *////////////////////////////////////////////////////////////////
*// Set procedure to «FrameworkWrap.prg»
LOCAL
lcFrameworkWrapFileProc
as String
lcFrameworkWrapFileProc =
LOWER(FULLPATH(PATH_COMMON_TOOLS
+ «FrameworkWrap.prg»))
IF
!FILE(lcFrameworkWrapFileProc)
ERROR
101, lcFrameworkWrapFileProc
ENDIF
IF NOT (JUSTSTEM(lcFrameworkWrapFileProc)
$ LOWER(SET(«Procedure»)))
SET PROCEDURE TO
(lcFrameworkWrapFileProc)
ADDITIVE
ENDIF *////////////////////////////////////////////////////////////////
*// LoadAssembly ASSEMBLY_SYSTEM
IF
!poBridge.LoadAssembly(ASSEMBLY_SYSTEM)
ERROR
poBridge.cErrorMsg
ENDIF *//////////////////////////////////////////////////////////////////////////////
*// Creation some objects from ASSEMBLY_SYSTEM, necessary during processing
LOCAL
loEnc
as
Encoding
OF
….CommonToolsFrameworkWrap.prg
&& FULLPATH(PATH_COMMON_TOOLS
+ «FrameworkWrap.prg»)
loEnc =
CREATEOBJECT(«Encoding»,
USE_ENCODING)
LOCAL
lnUriKindRelative
as Integer
lnUriKindRelative =
poBridge.GetStaticProperty(«System.UriKind», «Relative»)
IF EMPTY(lnUriKindRelative)
ERROR
poBridge.cErrorMsg
ENDIF
LOCAL loUriWordSettingsXml
as
Uri
OF
….CommonToolsFrameworkWrap.prg
&& FULLPATH(PATH_COMMON_TOOLS
+ «FrameworkWrap.prg»)
loUriWordSettingsXml =
CREATEOBJECT(«Uri»,
URI_SETTINGS_XML, lnUriKindRelative)
LOCAL
loUriWordDocumentXml
as
Uri
OF
….CommonToolsFrameworkWrap.prg
&& FULLPATH(PATH_COMMON_TOOLS
+ «FrameworkWrap.prg»)
loUriWordDocumentXml =
CREATEOBJECT(«Uri»,
URI_DOCUMENT_XML, lnUriKindRelative)
LOCAL
lnFileModeOpen
as Integer
lnFileModeOpen =
poBridge.GetStaticProperty(«System.IO.FileMode», «Open»)
IF EMPTY(lnFileModeOpen)
ERROR
poBridge.cErrorMsg
ENDIF
LOCAL lnFileAccessRead
as Integer
lnFileAccessRead =
poBridge.GetStaticProperty(«System.IO.FileAccess», «Read»)
IF EMPTY(lnFileAccessRead)
ERROR
poBridge.cErrorMsg
ENDIF
LOCAL loMstrXmlDoc
as
MemoryStream
OF
….CommonToolsFrameworkWrap.prg
&& FULLPATH(PATH_COMMON_TOOLS
+ «FrameworkWrap.prg»)
loMstrXmlDoc =
CREATEOBJECT(«MemoryStream») *////////////////////////////////////////////////////////////////
*// LoadAssembly ASSEMBLY_WINDOWSBASE
IF
!poBridge.LoadAssembly(ASSEMBLY_WINDOWSBASE)
lcErrMsg = loBridge.cErrorMsg
ERROR
(lcErrMsg)
ENDIF *///////////////////////////////////////////////////////////////////////
*// Get package of FileDocx and prepare for its processing
LOCAL
loPackage
as
Package
OF
….CommonToolsFrameworkWrap.prg
&& FULLPATH(PATH_COMMON_TOOLS
+ «FrameworkWrap.prg»)
loPackage =
CREATEOBJECT(«Package»,
lcFileDocx)
*— Get PackagePart
of FileDocx for URI_SETTINGS_XML(/word/settings.xml)
LOCAL
loPackagePartSettings
as
PackagePart
OF
….CommonToolsFrameworkWrap.prg
&& FULLPATH(PATH_COMMON_TOOLS
+ «FrameworkWrap.prg»)
loPackagePartSettings =
CREATEOBJECT(«PackagePart»;
,loPackage.GetPart(loUriWordSettingsXml.GetOwnerFwObject()))
*— … and its
stream in Read mode
LOCAL
loPpStrmSettingsXml
as
Stream
OF
….CommonToolsFrameworkWrap.prg
&& FULLPATH(PATH_COMMON_TOOLS
+ «FrameworkWrap.prg»)
loPpStrmSettingsXml =
CREATEOBJECT(«Stream»;
,loPackagePartSettings.GetStream(lnFileModeOpen, lnFileAccessRead))
*— Get PackagePart
of FileDocx for URI_DOCUMENT_XML(/word/document.xml)
LOCAL
loPackagePartDocument
as
PackagePart
OF
….CommonToolsFrameworkWrap.prg
&& FULLPATH(PATH_COMMON_TOOLS
+ «FrameworkWrap.prg»)
loPackagePartDocument =
CREATEOBJECT(«PackagePart»;
,loPackage.GetPart(loUriWordDocumentXml.GetOwnerFwObject()))
*— … and its
stream in Read mode
LOCAL
loPpStrmDocumentXml
as
Stream
OF
….CommonToolsFrameworkWrap.prg
&& FULLPATH(PATH_COMMON_TOOLS
+ «FrameworkWrap.prg»)
loPpStrmDocumentXml =
CREATEOBJECT(«Stream»;
,loPackagePartDocument.GetStream(lnFileModeOpen, lnFileAccessRead)) *////////////////////////////////////////////////////////////////
*// LoadAssembly ASSEMBLY_SYSTEM_XML
IF
!poBridge.LoadAssembly(ASSEMBLY_SYSTEM_XML)
ERROR
poBridge.cErrorMsg
ENDIF *///////////////////////////////////////////////////////////////////////
*// Load stream SettingsXml as xml document
LOCAL
loXmlDocSettings
as
XmlDocument
OF
….CommonToolsFrameworkWrap.prg
&& FULLPATH(PATH_COMMON_TOOLS
+ «FrameworkWrap.prg»)
loXmlDocSettings =
CREATEOBJECT(«XmlDocument»)
loXmlDocSettings.Load(loPpStrmSettingsXml.GetOwnerFwObject())
LOCAL
loXmlDocSettingsRoot
as
XmlElement
OF
….CommonToolsFrameworkWrap.prg
&& FULLPATH(PATH_COMMON_TOOLS
+ «FrameworkWrap.prg»)
loXmlDocSettingsRoot =
CREATEOBJECT(«XmlElement»,
loXmlDocSettings.DocumentElement)
LOCAL
lcNsp_w
as String
lcNsp_w =
loXmlDocSettingsRoot.GetNamespaceOfPrefix(«w»)
LOCAL
loNsMngr
as
XmlNamespaceManager
OF
….CommonToolsFrameworkWrap.prg
&& FULLPATH(PATH_COMMON_TOOLS
+ «FrameworkWrap.prg»)
loNsMngr =
CREATEOBJECT(«XmlNamespaceManager»,
loXmlDocSettings.NameTable)
loNsMngr.AddNamespace(«w», lcNsp_w) *///////////////////////////////////////////////////////////////////////
*// Get AttachedSchema name
LOCAL
loXnAttachedSchema
as
XmlNode
OF
….CommonToolsFrameworkWrap.prg
&& FULLPATH(PATH_COMMON_TOOLS
+ «FrameworkWrap.prg»)
loXnAttachedSchema =
CREATEOBJECT(«XmlNode»;
,loXmlDocSettingsRoot.SelectSingleNode(«w:attachedSchema/@w:val»,
loNsMngr.getOwnerFwObject()))
LOCAL
lcDocxAttachedSchema
as String
lcDocxAttachedSchema =
loXnAttachedSchema.Value *///////////////////////////////////////////////////////////////////////////////
*// Get Location for XSD-schema from Microsoft Schema Library in system
registry
LOCAL
lcPathSchemaLocation
as String
LOCAL loRkCurrentUser
as
RegistryKey
OF
….CommonToolsFrameworkWrap.prg
&& FULLPATH(PATH_COMMON_TOOLS
+ «FrameworkWrap.prg»)
loRkCurrentUser =
CREATEOBJECT(«RegistryKey»;
,poBridge.GetStaticProperty(«Microsoft.Win32.Registry», «CurrentUser»))
LOCAL
loRkSchemaLibrary
as
RegistryKey
OF
….CommonToolsFrameworkWrap.prg
&& FULLPATH(PATH_COMMON_TOOLS
+ «FrameworkWrap.prg»)
loRkSchemaLibrary =
CREATEOBJECT(«RegistryKey»,
loRkCurrentUser.OpenSubKey(KEY_SCHEMA_LIBRARY))
LOCAL
loRkDocxAttachedSchema
as
RegistryKey
OF
….CommonToolsFrameworkWrap.prg
&& FULLPATH(PATH_COMMON_TOOLS
+ «FrameworkWrap.prg»)
loRkDocxAttachedSchema =
CREATEOBJECT(«RegistryKey»,
loRkSchemaLibrary.OpenSubKey(lcDocxAttachedSchema + «»))
lcPathSchemaLocation = loRkDocxAttachedSchema.GetValue(LOCATION_NAME_VALUE) *///////////////////////////////////////////////////////////////////////////////
*// Load xsd-schema and get its root element
LOCAL
loXmlDocXsd
as
XmlDocument
OF
….CommonToolsFrameworkWrap.prg
&& FULLPATH(PATH_COMMON_TOOLS
+ «FrameworkWrap.prg»)
loXmlDocXsd =
CREATEOBJECT(«XmlDocument»)
loXmlDocXsd.Load(lcPathSchemaLocation)
LOCAL
loXmlDocXsdDocumentElement
as
XmlElement
OF
….CommonToolsFrameworkWrap.prg
&& FULLPATH(PATH_COMMON_TOOLS
+ «FrameworkWrap.prg»)
loXmlDocXsdDocumentElement =
CREATEOBJECT(«XmlElement»,
loXmlDocXsd.DocumentElement) *///////////////////////////////////////////////////////////////////////////////
*// Prepare and execute the xslt-transformation
*// with document.xml and by using xslt-file genXmlFromDocument.xslt
LOCAL
lcStrXmlDoc
as String
LOCAL loXmlDoc
as
XmlDocument
OF
….CommonToolsFrameworkWrap.prg
&& FULLPATH(PATH_COMMON_TOOLS
+ «FrameworkWrap.prg»)
loXmlDoc =
CREATEOBJECT(«XmlDocument»)
loXmlDoc.Load(loPpStrmDocumentXml.GetOwnerFwObject())
LOCAL
loXsltArgumentList
as
XsltArgumentList
OF
….CommonToolsFrameworkWrap.prg
&& FULLPATH(PATH_COMMON_TOOLS
+ «FrameworkWrap.prg»)
loXsltArgumentList =
CREATEOBJECT(«XsltArgumentList»)
loXsltArgumentList.AddParam(«prmEncoding», «», USE_ENCODING)
IF
!EMPTY(lcDocxAttachedSchema)
loXsltArgumentList.AddParam(«prmSchemaUri», «», lcDocxAttachedSchema)
ENDIF
IF VARTYPE(loXmlDocXsdDocumentElement)
= ‘O’
loXsltArgumentList.AddParam(«prmDocXsd», «»,
loXmlDocXsdDocumentElement.CreateNavigator())
ENDIF
LOCAL loXtwXmlDoc
as
XmlTextWriter
OF
….CommonToolsFrameworkWrap.prg
&& FULLPATH(PATH_COMMON_TOOLS
+ «FrameworkWrap.prg»)
loXtwXmlDoc =
CREATEOBJECT(«XmlTextWriter»;
,loMstrXmlDoc.GetOwnerFwObject(), loEnc.GetOwnerFwObject())
LOCAL
loXslXmlDocTrans
as
XslCompiledTransform
OF
….CommonToolsFrameworkWrap.prg
&& FULLPATH(PATH_COMMON_TOOLS
+ «FrameworkWrap.prg»)
loXslXmlDocTrans =
CREATEOBJECT(«XslCompiledTransform»)
loXslXmlDocTrans.Load(lcFileXslt)
loXslXmlDocTrans.Transform(loXmlDoc.CreateNavigator();
,loXsltArgumentList.GetOwnerFwObject(), loXtwXmlDoc.GetOwnerFwObject())
lcStrXmlDoc = loEnc.GetString(loMstrXmlDoc.GetBuffer(), 0,
loMstrXmlDoc.Length)
LOCAL
lnPos
as Integer
lnPos =
ATC(«<«,
lcStrXmlDoc)
IF
lnPos = 0
ERROR
(ERR_EMPTY_XSLTRES +
lcFileGenXsltFromTemplate)
ENDIF
lcStrXmlDoc =
SUBSTRC(lcStrXmlDoc,
lnPos)
lnPos = ATC(«<?xml»,
lcStrXmlDoc)
IF
lnPos = 0
lcStrXmlDoc = XML_PI + lcStrXmlDoc
ENDIF *///////////////////////////////////////////////////////////////////////////////
*// Load & save result of xslt-transformation
LOCAL
loXmlDocXml
as
XmlDocument
OF
….CommonToolsFrameworkWrap.prg
&& FULLPATH(PATH_COMMON_TOOLS
+ «FrameworkWrap.prg»)
loXmlDocXml =
CREATEOBJECT(«XmlDocument»)
loXmlDocXml.LoadXml(lcStrXmlDoc)
loXmlDocXml.Save(FULLPATH(PATH_XML)
+ XML_OUTPUT_FILE)
lbResult = .T.
? MSG_SUCCESS_RESUT
CATCH TO loException
lbError = .T.
LOCAL
lcMsg
as String
lcMsg = «Error: » +
LTRIM(STR(loException.ErrorNo))
+ CRLF ;
+ «LineNo: » + LTRIM(STR(loException.LineNo))
+ CRLF ;
+ «Message: » + IIF(EMPTY(loException.Message),
‘Unknown error’, loException.Message)
? ERR_LABEL_OUTPUT
? lcMsg
FINALLY
loWSH =
NULL
IF TYPE(‘poBridge’) = ‘O’ AND !ISNULL(poBridge)
*— Remove all
objects, which keeping resources of memory
loRkDocxAttachedSchema =
NULL
loRkSchemaLibrary =
NULL
loRkCurrentUser =
NULL
loPpStrmSettingsXml =
NULL
loPpStrmDocumentXml =
NULL
loMstrXmlDoc =
NULL
loXtwXmlDoc =
NULL
loPackage =
NULL
poBridge.Unload()
poBridge = NULL
ENDIF
ENDTRY
RETURN lbResult
Файл: docx2xml.prg из проекта DocxToXmlByUseFramework_20.pjx
Не стал я здесь упрощать код для улучшения восприятия… как надеюсь
восприятие от этого не пострадало. Обратите внимание: разрушение объектов,
удерживающих ресурсы, производится явно в блоке FINALLY.
Это потому, что в противном случае, мы не управляем последовательностью
уничтожения объектов, а такая последовательность может быть важна. Например,
уничтожение любых объектов-покрытий MS Framework-классов
должно выполняться до уничтожений переменной ссылки poBridge,
т.к. в событиях Destroy() соответствующих классов
именно используя её происходит освобождение соответствующих ресурсов.
XSLT-преобразование
таблицы данных из xml-формата
в html-представление.
В заключении коснёмся ещё одной темы: преобразование xml-данных
в html-представление, т.к. MS Word
2007 способен воспринимать такие данные. Если предположить, что на входе
у нас всегда будет «плоская таблица» с данными в xml-формате
(возможно в качестве первого элемента, имеющие элемент xsd-схемы),
то XSLT-преобразование таких данных в
html-формат могло бы выглядеть так:
<?xml
version=«1.0«
encoding=«utf-8«?>
<!— file: XmlTableToHtm.xslt
—>
<xsl:stylesheet
version=«1.0«
xmlns=«http://www.w3.org/TR/html4«
xmlns:xsi=«http://www.w3.org/2001/XMLSchema-instance«
xmlns:xsd=«http://www.w3.org/2001/XMLSchema«
xmlns:xs=«http://www.w3.org/2001/XMLSchema«
xmlns:msxsl=«urn:schemas-microsoft-com:xslt«
xmlns:xsl=«http://www.w3.org/1999/XSL/Transform«
exclude-result-prefixes=«xsi
xsd xs msxsl xsl«>
<
xsl:output
method=«html«
version=«4.0«
encoding=«utf-8«
indent=«no«
doctype-public=«-//W3C//DTD
HTML 4.0 Transitional//EN«
/>
<
xsl:variable
name=«prmTableLoc«>
<xsl:text>таблица</xsl:text>
</xsl:variable>
<!—
Test: is the first data element as
element of xsd-schema —>
<xsl:variable
name=«varIsSchema«>
<xsl:choose>
<xsl:when
test=«local-name(/./*/*[1])=’schema’«>
<xsl:text>true</xsl:text>
</xsl:when>
<xsl:otherwise>
<xsl:text>false</xsl:text>
</xsl:otherwise>
</xsl:choose>
</xsl:variable>
<
xsl:variable
name=«varFirstDataElement«>
<xsl:choose>
<xsl:when
test=«$varIsSchema=’true’«>
<xsl:text>2</xsl:text>
</xsl:when>
<xsl:otherwise>
<xsl:text>1</xsl:text>
</xsl:otherwise>
</xsl:choose>
</xsl:variable>
<!—
Get name of first data element as
table name —>
<xsl:variable
name=«varTable«>
<xsl:value-of
select=«local-name(/./*/*[number($varFirstDataElement)])«
/>
</xsl:variable>
<!—
Get xsd-schema if exist
—>
<xsl:variable
name=«varSchema«>
<xsl:if
test=«$varIsSchema=’true’«>
<xsl:copy-of
select=«/./*/*[1]«
/>
</xsl:if>
</xsl:variable>
<!—
Parsing from root …
—>
<xsl:template
match=«/«>
<html>
<head>
<xsl:text
disable-output-escaping=«yes«><![CDATA[<meta
http-equiv=»Content-Type» content=»text/html; charset=utf-8″>]]></xsl:text>
<title>
<xsl:value-of
select=«$varTable«
/>
<xsl:text>
— </xsl:text>
<xsl:value-of
select=«$prmTableLoc«
/>
</title>
<style
type=«text/css«>
body
{font-family: Verdana, Arial, Helvetica, sans-serif;
font-size: 8.5pt;}
h4
{font-family: Verdana, Arial, Helvetica, sans-serif;
color: darkblue;
font-size: 9.0pt;}
th
{font-family: Verdana, Arial, Helvetica, sans-serif;
font-size: 8.5pt;
color: darkblue;
background-color: WhiteSmoke;}
td
{font-family: Verdana, Arial, Helvetica, sans-serif;
font-size: 8.5pt;}
.even
{font-family: Verdana, Arial, Helvetica, sans-serif;
font-size: 8.5pt;
background-color: Azure;}
</style>
</head>
<body>
<h4
align=«center«>
<xsl:value-of
select=«$varTable«
/>
<xsl:text>
— </xsl:text>
<xsl:value-of
select=«$prmTableLoc«
/>
</h4>
<table
align=«center«
border=«1«
cellspacing=«0«
cellpadding=«2«>
<!— For each elements with
name=$varTable —>
<xsl:for-each
select=«/./*/*[local-name()=$varTable]«>
<xsl:if
test=«position()=1«>
<!— In case first position: generate
table row with columns headers —>
<tr>
<!— For each column…
—>
<xsl:for-each
select=«*«>
<th>
<!— Select name of element
—>
<xsl:value-of
select=«local-name()«
/>
</th>
</xsl:for-each>
</tr>
</xsl:if>
<!— Define class to current row
—>
<xsl:variable
name=«varClass«>
<xsl:if
test=«position()
mod 2«>
<xsl:text>even</xsl:text>
</xsl:if>
</xsl:variable>
<!— Generate table row with data…
—>
<tr>
<!— For each column…
—>
<xsl:for-each
select=«*«>
<!— Generate column value
—>
<xsl:call-template
name=«getColValue«>
<xsl:with-param
name=«prmClass«
select=«$varClass«
/>
<xsl:with-param
name=«prmValue«
select=«.«
/>
</xsl:call-template>
</xsl:for-each>
</tr>
</xsl:for-each>
</table>
</body>
</html>
</xsl:template>
<!—
Generate column value
(<td>…</td>) —>
<xsl:template
name=«getColValue«>
<xsl:param
name=«prmClass«
/>
<xsl:param
name=«prmValue«
/>
<td>
<xsl:attribute
name=«vAlign«>
<xsl:text>top</xsl:text>
</xsl:attribute>
<xsl:if
test=«string-length($prmClass)>0«>
<!— Add class attribute if need…
—>
<xsl:attribute
name=«class«>
<xsl:value-of
select=«$prmClass«
/>
</xsl:attribute>
</xsl:if>
<!— Get name of current element
—>
<xsl:variable
name=«varName«>
<xsl:value-of
select=«local-name()«
/>
</xsl:variable>
<!— Try get type of current element
—>
<xsl:variable
name=«varType«>
<xsl:choose>
<xsl:when
test=«$varIsSchema=’true’«>
<!— … try get type from xsd-schema
—>
<xsl:choose>
<xsl:when
test=«msxsl:node-set($varSchema)/.//*[local-name()=’element’
and @name=$varName]/@type«>
<xsl:value-of
select=«msxsl:node-set($varSchema)/.//*[local-name()=’element’
and @name=$varName]/@type«
/>
</xsl:when>
<xsl:when
test=«msxsl:node-set($varSchema)/.//*[local-name()=’element’
and
@name=$varName]/*[local-name()=’simpleType’]/*[local-name()=’restriction’]/@base«>
<xsl:value-of
select=«msxsl:node-set($varSchema)/.//*[local-name()=’element’
and
@name=$varName]/*[local-name()=’simpleType’]/*[local-name()=’restriction’]/@base«
/>
</xsl:when>
<!— … insert your code here for any
other types… —>
<xsl:otherwise>
</xsl:otherwise>
</xsl:choose>
</xsl:when>
<xsl:otherwise>
<!— … otherwise try get type
according to name of current element —>
<xsl:choose>
<xsl:when
test=«$varName=’birthdate’«>
<xsl:text>date</xsl:text>
</xsl:when>
<!— … insert your code here for any
other types… —>
<xsl:otherwise>
</xsl:otherwise>
</xsl:choose>
</xsl:otherwise>
</xsl:choose>
</xsl:variable>
<!— Remove prefix from element type
—>
<xsl:variable
name=«varTypeValue«>
<xsl:choose>
<xsl:when
test=«contains($varType,
‘:’)«>
<xsl:value-of
select=«substring-after($varType,
‘:’)«/>
</xsl:when>
<xsl:otherwise>
<xsl:value-of
select=«$varType«/>
</xsl:otherwise>
</xsl:choose>
</xsl:variable>
<xsl:if
test=«$varTypeValue=’decimal’
or $varTypeValue=’int’ or $varTypeValue=’date’«>
<!— Add align attribute if need…
—>
<xsl:attribute
name=«align«>
<xsl:text>right</xsl:text>
</xsl:attribute>
</xsl:if>
<!— Convert value according to type of
current element —>
<xsl:choose>
<xsl:when
test=«$varTypeValue=’date’«>
<!— … convert to russian date format
—>
<xsl:value-of
select=«msxsl:format-date($prmValue,
‘dd.MM.yyyy’)« />
</xsl:when>
<!— … insert your code here for any
other types… —>
<xsl:otherwise>
<!— … otherwise: simple copy of
current value —>
<xsl:value-of
disable-output-escaping=«yes«
select=«$prmValue«
/>
</xsl:otherwise>
</xsl:choose>
</td>
</xsl:template>
</
xsl:stylesheet>
Файл: XmlTableToHtm.xslt
Чтобы попробовать применить это преобразование к данных из только что
полученного нами файла documentData.xml,
можно использовать утилиту командной строки msxsl.exe,
которую можно свободно и бесплатно загрузить по ссылке, приведённой в разделе Ссылки по теме.
Для этого создадим в подкаталоге XML командный файл:
msxsl.exe documentData.xml ../XSLT/XmlTableToHtm.xslt -o documentData.htm -u '4.0'
Файл: documentDataToHtm.cmd
Здесь над данными из файла documentData.xml
текущего каталога применяется преобразование XmlTableToHtm.xslt
из подкаталога XSLT, а результат сохраняется в виде файла
documentData.htm текущего
каталога, при этом используется MSXML версии 4.0.
После выполнения командного файла documentDataToHtm.cmd
просмотр в Internet Explorer полученного файла
documentData.htm у меня даёт вот такую картинку:

Рис.15
XSLT-преобразование над xml-данными
можно выполнить и средствами MS Word 2007, причём
полученный результат иметь в виде текущего документа. Это можно сделать либо из
командой строки, либо создав ярлык вот с такой командой:
"%PROGRAMFILES%Microsoft OfficeOffice12WINWORD.EXE" /p..XSLTXmlTableToHtm.xslt employee.XML
Команда в ярлыке: ShowByUseEmployeeToHtml

Свойства ярлыка ShowByUseEmployeeToHtml
Здесь преобразование ..XSLTXmlTableToHtm.xslt применяется над данными из файла
employee.XML текущего каталога. Двойной клик
мышки на этом ярлыке у меня приводит к открытию MS Word
2007 и отображению в нём вот такой картинки:

Рис.16
Выполнить заданное XSLT-преобразование над
xml-данными средствами MS Word
2007 можно и из самой оболочки Word-а, для
этого следует открыть xml-данные т.с. «в чистом виде»
(файл: ..XMLdocumentData.xml в нашем случае),
а затем, через кнопку «Обзор…» в панели справа «XML
документ» открыть и файл ..XSLTXmlTableToHtm.xslt.
Примерно так, как показано на рисунке ниже:

Рис.17
Если всё Вами проделано удачно, а как надеюсь, что это действительно так :-),
то в конечном счёте у Вас должно получиться примерно то, что получилось и у меня:

Рис.18
XML-файл может содержать инструкцию типа:
<?xml-stylesheet
type=»text/xsl»
href=»..XSLTXmlTableToHtmForIE.xslt»?>
в которой атрибут href указывает на файл
xslt-преобразования, которое следует применить к
данным xml-файла во время отображения его в
Internet Explorer. Однако, имеется небольшая проблема
с версией XML-процессора, который будет при этом
использован. Например, у меня на компьютере это версия 3.0 (можно посмотреть под
ключом: HKEY_CLASSES_ROOTMsxml2.DOMDocumentCurVer в
системном реестре.) Функциональные возможности версии 3.0 по отношению к версии
4.0, для которой написан файл XmlTableToHtm.xslt
несколько ограничены. Например, отсутствует функция msxsl:format-date(),
позволяющая преобразовать значение даты в требуемый формат. Поэтому
специально для демонстрации этой возможность в каталог XSLT
я подложил слегка подправленный файл XmlTableToHtmForIE.xslt,
где вместо функции msxsl:format-date() использовано
явное формирование даты, путём разбора значения даты в формате
xml на её составляющие: год, месяц, день и последующим формированием
строки в требуемом для отображения формате, а посмотреть результат можно открыв
файл documentDataForIE.xml в
Internet Explorer.
К сожалению xml-формат, в котором мы можем получить
данные из базы данных, достаточно разнообразен, чтобы утверждать, что
преобразование XmlTableToHtm.xslt способно
обработать данные любой «плоской таблицы», представленной в
xml-формате. Так, чтобы продемонстрировать наличие «других» форматов
(отличных от того, в котором находится файл documentData.xml), в файле
getXmlFromADODB.js мной написан код на JavaScript,
позволяющий сделать выборку с MS SQL Server через
SQLOLEDB Provider с помощью SQL-команды:
«SELECT TOP 5 lastname, firstname, birthdate, notes FROM employees ORDER BY lastname, firstname» из базы данных
Northwind, а результат при этом, сохраняемый в файл documentDataSql.xml
с помощью команды oRs.Save(«documentDataSql.xml», adPersistXML), у меня получился следующим:
<xml
xmlns:s=‘uuid:BDC6E3F0-6DA3-11d1-A2A3-00AA00C14882‘
xmlns:dt=‘uuid:C2F41010-65B3-11d1-A29F-00AA00C14882‘
xmlns:rs=‘urn:schemas-microsoft-com:rowset‘
xmlns:z=‘#RowsetSchema‘>
<s:Schema
id=‘RowsetSchema‘>
<s:ElementType
name=‘row‘
content=‘eltOnly‘>
<s:AttributeType
name=‘lastname‘
rs:number=‘1‘
rs:writeunknown=‘true‘>
<s:datatype
dt:type=‘string‘
dt:maxLength=‘20‘
rs:maybenull=‘false‘/>
</s:AttributeType>
<s:AttributeType
name=‘firstname‘
rs:number=‘2‘
rs:writeunknown=‘true‘>
<s:datatype
dt:type=‘string‘
dt:maxLength=‘10‘
rs:maybenull=‘false‘/>
</s:AttributeType>
<s:AttributeType
name=‘birthdate‘
rs:number=‘3‘
rs:nullable=‘true‘
rs:writeunknown=‘true‘>
<s:datatype
dt:type=‘dateTime‘
rs:dbtype=‘timestamp‘
dt:maxLength=‘16‘
rs:scale=‘3‘
rs:precision=‘23‘
rs:fixedlength=‘true‘/>
</s:AttributeType>
<s:AttributeType
name=‘notes‘
rs:number=‘4‘
rs:nullable=‘true‘
rs:writeunknown=‘true‘>
<s:datatype
dt:type=‘string‘
dt:maxLength=‘1073741823‘
rs:long=‘true‘/>
</s:AttributeType>
<s:extends
type=‘rs:rowbase‘/>
</s:ElementType>
</s:Schema>
<rs:data>
<z:row
lastname=‘Buchanan‘
firstname=‘Steven‘
birthdate=‘1955-03-04T00:00:00‘
notes=‘Steven
Buchanan graduated from St. Andrews University, Scotland, with a BSC degree in
1976. Upon joining the company as a sales representative in 1992, he spent 6
months in an orientation program at the Seattle office and then returned to his
permanent post in London. He was promoted to sales manager in March 1993. Mr.
Buchanan has completed the courses "Successful
Telemarketing"
and "International
Sales Management."
He is fluent in French.‘/>
<z:row
lastname=‘Callahan‘
firstname=‘Laura‘
birthdate=‘1958-01-09T00:00:00‘
notes=‘Laura
received a BA in psychology from the University of Washington. She has also
completed a course in business French. She reads and writes French.‘/>
<z:row
lastname=‘Davolio‘
firstname=‘Nancy‘
birthdate=‘1948-12-08T00:00:00‘
notes=‘Education
includes a BA in psychology from Colorado State University in 1970. She also
completed "The
Art of the Cold Call."
Nancy is a member of Toastmasters International.‘/>
<z:row
lastname=‘Dodsworth‘
firstname=‘Anne‘
birthdate=‘1966-01-27T00:00:00‘
notes=‘Anne
has a BA degree in English from St. Lawrence College. She is fluent in French
and German.‘/>
<z:row
lastname=‘Fuller‘
firstname=‘Andrew‘
birthdate=‘1952-02-19T00:00:00‘
notes=‘Andrew
received his BTS commercial in 1974 and a Ph.D. in international marketing from
the University of Dallas in 1981. He is fluent in French and Italian and reads
German. He joined the company as a sales representative, was promoted to sales
manager in January 1992 and to vice president of sales in March 1993. Andrew is
a member of the Sales Management Roundtable, the Seattle Chamber of Commerce,
and the Pacific Rim Importers Association.‘/>
</rs:data>
</xml>
Файл: documentDataSql.xml
Взгляните как он устроен и сравните его с содержимым файла documentData.xml.
Как надеюсь, разница заметна? Очевидно, что ранее приведённое здесь
xslt-преобразование
XmlTableToHtm.xslt не отработает корректно для
данных такого формата. Что же, придётся подправить… и после внесения
соответствующих изменений у меня получился во такой результат:
<?xml
version=«1.0«
encoding=«utf-8«?>
<!— file: XmlTableToHtmForADODB.xslt
—>
<xsl:stylesheet
version=«1.0«
xmlns=«http://www.w3.org/TR/html4«
xmlns:s=‘uuid:BDC6E3F0-6DA3-11d1-A2A3-00AA00C14882‘
xmlns:dt=‘uuid:C2F41010-65B3-11d1-A29F-00AA00C14882‘
xmlns:rs=‘urn:schemas-microsoft-com:rowset‘
xmlns:z=‘#RowsetSchema‘
xmlns:msxsl=«urn:schemas-microsoft-com:xslt«
xmlns:xsl=«http://www.w3.org/1999/XSL/Transform«
exclude-result-prefixes=«s
dt rs z msxsl xsl«> <xsl:output
method=«html«
version=«4.0«
encoding=«utf-8«
indent=«no«
doctype-public=«-//W3C//DTD
HTML 4.0 Transitional//EN«
/> <xsl:variable
name=«varSchema«>
<xsl:copy-of
select=«/./*/*[local-name()=’Schema’]«
/>
</xsl:variable> <xsl:template
match=«/«>
<html>
<head>
<xsl:text
disable-output-escaping=«yes«><![CDATA[<meta
http-equiv=»Content-Type» content=»text/html; charset=utf-8″>]]></xsl:text>
<style
type=«text/css«>
body
{font-family: Verdana, Arial, Helvetica, sans-serif;
font-size: 8.5pt;}
h4
{font-family: Verdana, Arial, Helvetica, sans-serif;
color: darkblue;
font-size: 9.0pt;}
th
{font-family: Verdana, Arial, Helvetica, sans-serif;
font-size: 8.5pt;
color: darkblue;
background-color: WhiteSmoke;}
td
{font-family: Verdana, Arial, Helvetica, sans-serif;
font-size: 8.5pt;}
.even
{font-family: Verdana, Arial, Helvetica, sans-serif;
font-size: 8.5pt;
background-color: Azure;}
</style>
</head>
<body>
<table
align=«center«
border=«1«
cellspacing=«0«
cellpadding=«2«>
<!— For each
row-element —>
<xsl:for-each
select=«/./*/*[local-name()=’data’]/*[local-name()=’row’]«>
<xsl:if
test=«position()=1«>
<!— In case first position: generate
table row with columns headers —>
<tr>
<!— For each column…
—>
<xsl:for-each
select=«@*«>
<th>
<!— Select name of
attribute
—>
<xsl:value-of
select=«local-name()«
/>
</th>
</xsl:for-each>
</tr>
</xsl:if>
<!— Define class to current row
—>
<xsl:variable
name=«varClass«>
<xsl:if
test=«position()
mod 2«>
<xsl:text>even</xsl:text>
</xsl:if>
</xsl:variable>
<!— Generate table row with data…
—>
<tr>
<!— For each column…
—>
<xsl:for-each
select=«@*«>
<!— Generate column value
—>
<xsl:call-template
name=«getColValue«>
<xsl:with-param
name=«prmClass«
select=«$varClass«
/>
<xsl:with-param
name=«prmValue«
select=«.«
/>
</xsl:call-template>
</xsl:for-each>
</tr>
</xsl:for-each>
</table>
</body>
</html>
</xsl:template>
<!—
Generate column value
(<td>…</td>) —>
<xsl:template
name=«getColValue«>
<xsl:param
name=«prmClass«
/>
<xsl:param
name=«prmValue«
/>
<td>
<xsl:attribute
name=«vAlign«>
<xsl:text>top</xsl:text>
</xsl:attribute>
<xsl:if
test=«string-length($prmClass)>0«>
<!— Add class attribute if need…
—>
<xsl:attribute
name=«class«>
<xsl:value-of
select=«$prmClass«
/>
</xsl:attribute>
</xsl:if>
<!— Get name of current
attribute
—>
<xsl:variable
name=«varName«>
<xsl:value-of
select=«local-name()«
/>
</xsl:variable>
<!— Try get type of current
value
—>
<xsl:variable
name=«varType«>
<!— … try get type from schema
—>
<xsl:choose>
<xsl:when
test=«msxsl:node-set($varSchema)/.//*[local-name()=’AttributeType’
and @name=$varName]/*[local-name()=’datatype’]/@dt:type«>
<xsl:value-of
select=«msxsl:node-set($varSchema)/.//*[local-name()=’AttributeType’
and @name=$varName]/*[local-name()=’datatype’]/@dt:type«
/>
</xsl:when>
<!— … insert your code here for any
other types… —>
<xsl:otherwise>
</xsl:otherwise>
</xsl:choose>
</xsl:variable>
<xsl:if
test=«$varType=’decimal’
or $varType=’int’ or $varType=’dateTime’«>
<!— Add align attribute if need…
—>
<xsl:attribute
name=«align«>
<xsl:text>right</xsl:text>
</xsl:attribute>
</xsl:if>
<!— Convert value according to type of
current value —>
<xsl:choose>
<xsl:when
test=«$varType=’dateTime’«>
<!— … convert to russian date format
—>
<xsl:value-of
select=«msxsl:format-date($prmValue,
‘dd.MM.yyyy’)« />
</xsl:when>
<!— … insert your code here for any
other types… —>
<xsl:otherwise>
<!— … otherwise: simple copy of
current value —>
<xsl:value-of
disable-output-escaping=«yes«
select=«$prmValue«
/>
</xsl:otherwise>
</xsl:choose>
</td>
</xsl:template>
</
xsl:stylesheet>
Файл: XmlTableToHtmForADODB.xslt
Запуск преобразования
можно осуществить воспользовавшись командным файлом
documentDataToHtmForADODB.cmd,
а результат можно посмотреть в созданном при этом файле:
documentDataForADODB.htm.
На другой подход решения подобной задачи, можно посмотреть в сообщении К
использованию dbf2docx , где в тексте документа используются «элементы
управления содержимым» в MS Word Office 2007/2010, в то время как xml-данные встраиваются в документ в виде CustomXmlPart-части.
Код преобразования шаблона документа, содержащего одну таблицу с одной строкой
данных в xml-формате, преобразующего такой шаблон в
документ, содержащий множество строк, взятых из xml-файла
данных, написан на C# в MS VS .NET
2010(SP1) с использованием
Open XML
SDK 2.0 for Microsoft Office .
Краткое описание кода примеров.
Код примеров, xml-данные и xsd-схемы
к ним помещены мной в файл docxtbl.zip на странице Примеры кода и утилиты.
Ниже краткое описание содержания подкаталогов в файле docxtbl.zip:
- VFP_CreateXmlXsd — VFP-код для генерации xml+xsd данных
в подкаталог XML - XML — employee.XML — исходные данные для MS Word 2007
документа, employee.XSD — соответствующая схема, используемая при создании
шаблона «Пример VFP-таблицы в виде MS Word 2007.docx» из подкаталога DOCX.
Здесь также расположены файлы: documentData.xml, documentData.htm, documentDataForADODB.htm, documentDataForIE.xml, documentDataSql.xml, documentDataToHtm.cmd, documentDataToHtmForADODB.cmd, getXmlFromADODB.js
и ярлык ShowByUseEmployeeToHtml - XSLT — содержит файлы:
genXmlFromDocument.xslt, genXsltFromTemplate.xslt, XmlTableToHtm.xslt, XmlTableToHtmForADODB.xslt, XmlTableToHtmForIE.xslt - DOCX — шаблон MS Word 2007 документа («Пример
VFP-таблицы в виде MS Word 2007.docx»), использующего схему из
XMLemployee.XSD. Здесь также расположены файлы: getContentsUseWinRAR.cmd, fromContentsToDocxUseWinRAR.cmd - solVS_NET2005_Framework_20 —
C#-код приложений xml2docx
и docx2xml - VFP_FillDocx — VFP-код для
наполнения шаблона DOCX»Пример VFP-таблицы в виде MS Word 2007.docx»
данными из XMLemployee.XML - VFP_DocxToXml —
VFP-код для извлечения xml-данных
(в XMLdocumentData.xml)
из файла MS Word 2007 документа (DOCX«Пример
VFP-таблицы в виде MS Word 2007.docx») - CommonTools —
VFP-код для поддержки обращений из-под VFP к
MS Framework 2.0 библиотекам классов - bin — ClrHost.dll, DotNetBridge.dll — см. назначение и
код на стр. Примеры кода и утилиты в
xlsxtbl.zip
Ссылки по теме.
- Краткое введение в XML.
- Office 2007 Open XML Format, Алексей Федоров.
- Microsoft Office 2007 Open XML. Часть 2, Алексей Федоров.
- Форматы Ecma Office Open XML: вопросы и ответы.
- Работа с XML.
- OpenXML Developer
- Hosting the .NET Runtime in Visual FoxPro, by Rick Strahl
- Building Word 2007 Documents Using Office Open XML Formats, by Erika Ehrli, Brian Jones
- Walkthrough: Word 2007 XML Format, by Erika Ehrli
- Introducing the Office (2007) Open XML File Formats, by Frank Rice
- How to: Manipulate Office Open XML Formats Documents, by Frank Rice
- Manipulating Word 2007 Files with the Open XML Object Model (Part 1 of 3), by Frank Rice
- How To Use Compressed (Zipped) Folders in Windows XP
- Convert an InfoPath 2007 form into a Word 2007 document using XSLT and C#, by S.Y.M. Wong-A-Ton
- Command Line Transformation Utility (msxsl.exe).
- MSXML 4.0 Service Pack 2 (Microsoft XML Core Services).
- Технология XSLT, Алексей Валиков
- Как получить таблицу данных из xlsx-файла у приложения Excel из MS Office 2007 используя структуру данных формата Open XML?
- Как получить dbf-таблицы из xls-файла при наличии групп в данных?.
- К
использованию dbf2docx - Open XML
SDK 2.0 for Microsoft Office - Примеры кода и утилиты — см. код и данные к этой статье в docxtbl.zip

![]()
- Download source code — 603 KB
Contents
- Introduction
- Introduction to XSLT
- Report generation
- SQL -> XML
- XML -> XML schema
- XML schema -> WordML (WordML template creation based on an XML schema)
- WordML -> XSLT (WordML template to XSLT transformation)
- Applying XSLT transformation to XML data
- Conclusion
Introduction
There are many tools which allow creating documents based on data stored in a database: Crystal Reports, Fast Reports etc. Most of them do not allow a user to edit a template. The task I’ve tried to solve is to create a tool based on XML/XSLT, which allows a user to create a template from scratch, namely:
- Construct a SQL query in order to obtain XML and XML schema from SQL server.
- Construct a WordML template.
- Generate document, which could be virtually represented as a WordML template filled with data obtained from a SQL Server.
The advantage of the “XML/XSLT” approach is that a user has the opportunity to create trees with rather complex topology. Word has been chosen as a tool for constructing the WordML template due to its universal usage and ability to display XML structure. The idea to realize the generator based on XML/XSLT appeared after reading the article Generating Word Reports/Documents. I strongly advise you to read this article.
Introduction to XSLT/XSL
With XSL, you can freely modify any source text (XML) and produce different output from the same source file. An XSL processor parses an XML source and tries to find a matching template rule. If it does, instructions inside the matching template are evaluated. Parts of the XML document to which the template should be applied are determined by location paths. The required syntax is specified in the XPath specification. Simple cases look very similar to file system addressing. Processing always starts with the template match =»/». This matches the root node (the node, its only element child, is the document element, in our case «root»). Many style sheets do not contain this element explicitly. When this template is not explicitly given, the implicit template is used (it contains the only instruction). This instruction means: process all children of the current node, including text nodes. When a template for the node exists, there is no default processing invoked. If you want to include descendants of the node, you have to explicitly request their templates.
Report generation
Report generation could be virtually divided into four steps.
- Create a SQL query in order to obtain XML data and XML schema,
- Construct a WordML template,
- Transform a WordML template into XSLT transformation,
- Generate a report by means of applying XSLT transformation to XML data.
SQL — > XML
SQL query is an initial point for all transformations. It determines the data which should be requested from the server. I utilize a MSSQL 2005 (Yukon) server, which provides the opportunity to the requested data in XML format. The typical SQL query looks like the fallowing:
WITH XMLNAMESPACES(DEFAULT
    'http://wrg/kpd_types.xsd')
SELECT *
FROM kpd_types
FOR XML PATH('kpd_types'), ROOT('root')
The response from the server:
<root xmlns="http://wrg/kpd_types.xsd">
<kpd_types>
    <oid>1</oid>
    <category>cargo</category>
    <label>paper</label>
</kpd_types>
<kpd_types>
    <oid>2</oid>
    <category>cargo</category>
    <label>food</label>
</kpd_types>
<kpd_types>
    <oid>3</oid>
    <category>cargo</category>
    <label>metal</label>
</kpd_types>
</root>
XML->XML schema
What is an XML schema? The XML schema is a description of the XML structure. In short, it contains n enumeration of all the elements and attributes presented in an XML document. We will need it when we start to construct our WordML template. The set of elements we could place inside the WordML document will be determined by the XML schema.
Let’s consider the DataSet class. It has two useful methods: ReadXml() and WriteXmlSchema(). When the ReadXml() method is called, the XML structure is built automatically behind the scene. We can read or store it by means of the WriteXmlSchema() method.
XmlDataDocument doc = new XmlDataDocument();
XmlReader xmlData;
xmlData = XmlReader.Create(new StringReader(xml));
doc.DataSet.ReadXml(xmlData);
doc.DataSet.WriteXmlSchema(WordReportGenerator._path + "//" +
                           _xmlSchemaFileName + ".xsd");
XML schema -> WordML
When we have the XML schema, we are ready to create a template for our report. First of all, we have to attach it to a Word document.
object schema = _xmlSchemaName;
object alias = _xmlSchemaAlias;
object schemafilename = _path + _xmlSchemaFileName + ".xsd";
App.ActiveDocument.XMLSchemaReferences.Add(ref schema,
                   ref alias, ref schemafilename, true);
Then, do some tuning: make XML tags and the task pane visible, and allow saving the document without validation.
App.ActiveWindow.View.ShowXMLMarkup =true;
App.TaskPanes[Word.WdTaskPanes.wdTaskPaneXMLStructure].Visible =true;
App.ActiveDocument.XMLSchemaReferences.AllowSaveAsXMLWithoutValidation = true;
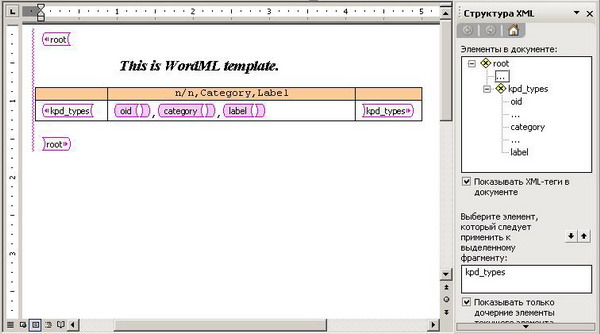
WordML ->XSLT
Let’s consider how a template transformation into XSLT occurs. The initial WordML template could be represented in an abbreviated form as:
="1.0"="UTF-8"="yes"
="Word.Document"
<w:wordDocument
xmlns:w="http://schemas.microsoft.com/office/word/2003/wordml"
xmlns:wx="http://schemas.microsoft.com/office/word/2003/auxHint"
xmlns:o="urn:schemas-microsoft-com:office:office"
xmlns:ns0="http://wrg/kpd_types.xsd">
…
<w:body><wx:sect>
…
<ns0:root>
    <ns0:kpd_types>
    <w:p>
        <ns0:oid/>
        <w:r><w:t>,</w:t></w:r>
        <ns0:category/>
        <w:r><w:t>,</w:t></w:r>
        <ns0:label/>
    </w:p>
    </ns0:kpd_types>
</ns0:root>
…
</wx:sect></w:body>
</w:wordDocument>
Where the tags between <ns0:root>…</ns0:root> are per se the form for filling with XML data. The XSTL transformation provides the mechanism for such a filling. Let’s see how it looks like.
<xsl:stylesheet version="1.0"
xmlns:xsl="http://www.w3.org/1999/XSL/Transform"
xmlns:w="http://schemas.microsoft.com/office/word/2003/wordml"
xmlns:ns0="http://wrg/kpd_types.xsd">

<xsl:output method="xml" encoding="UTF-8" standalone="yes"/>

<xsl:template match="/">
<xsl:processing-instruction name="mso-application">
<xsl:text>progid="Word.Document"</xsl:text>
</xsl:processing-instruction>

<w:wordDocument
xmlns:w="http://schemas.microsoft.com/office/word/2003/wordml"
xmlns:wx="http://schemas.microsoft.com/office/word/2003/auxHint"
xmlns:o="urn:schemas-microsoft-com:office:office"
xmlns:ns0="http://wrg/kpd_types.xsd">
…
<w:body><wx:sect>
…
<xsl:apply-templates select="ns0:root" />
…
</wx:sect></w:body>
…
</w:wordDocument>
</xsl:template>

<xsl:template match="/ns0:root">
<ns0:root>
    <xsl:apply-templates select="ns0:kpd_types" />
</ns0:root>
</xsl:template>

<xsl:template match="/ns0:root/ns0:kpd_types">
<ns0:kpd_types>
<w:p>
    <xsl:apply-templates select="ns0:category"/>
        <w:r><w:t><xsl:text>,</xsl:text></w:t></w:r>
    <xsl:apply-templates select="ns0:label"/>
        <w:r><w:t><xsl:text>,</xsl:text></w:t></w:r>
    <xsl:apply-templates select="ns0:oid" />
</w:p>
</ns0:kpd_types>
</xsl:template>

<xsl:template match="/ns0:root/ns0:kpd_types/ns0:label">
<ns0:label>
    <w:r><w:t><xsl:value-of select="." /></w:t></w:r>
</ns0:label>
</xsl:template>

<xsl:template match="/ns0:root/ns0:kpd_types/ns0:oid">
<ns0:oid>
    <w:r><w:t><xsl:value-of select="." /></w:t></w:r>
</ns0:oid>
</xsl:template>

<xsl:template match="/ns0:root/ns0:kpd_types/ns0:category">
<ns0:category>
    <w:r><w:t><xsl:value-of select="." /></w:t></w:r>
</ns0:category>
</xsl:template>

</xsl:stylesheet>
Applying XSLT transformation to XML data
Let’s get as a source XML, the following set of data:
<root xmlns="http://wrg/kpd_types.xsd">
<kpd_types>
    <oid>1</oid>
    <category>cargo</category>
    <label>paper</label>
</kpd_types>
<kpd_types>
    <oid>2</oid>
    <category>cargo</category>
    <label>food</label>
</kpd_types>
<kpd_types>
    <oid>3</oid>
    <category>cargo</category>
    <label>metal</label>
</kpd_types>
</root>
Applying the XSLT transformation to this XML, we get the final document:
="1.0"="utf-8"="yes"
="Word.Document"
<w:wordDocument
  xmlns:w="http://schemas.microsoft.com/office/word/2003/wordml"
  xmlns:wx="http://schemas.microsoft.com/office/word/2003/auxHint"
  xmlns:o="urn:schemas-microsoft-com:office:office"
  xmlns:ns0="http://wrg/kpd_types.xsd">
  …
<w:body><wx:sect>
…
<ns0:root>
    <ns0:kpd_types>
    <w:p>
        <ns0:category><w:r><w:t>cargo</w:t></w:r></ns0:category><w:r><w:t>,</w:t></w:r>
        <ns0:label><w:r><w:t>paper</w:t></w:r></ns0:label><w:r><w:t>,</w:t></w:r>
        <ns0:oid><w:r><w:t>1</w:t></w:r></ns0:oid>
    </w:p>
    </ns0:kpd_types>
    <ns0:kpd_types>
    <w:p>
        <ns0:category><w:r><w:t>cargo</w:t></w:r></ns0:category><w:r><w:t>,</w:t></w:r>
        <ns0:label><w:r><w:t>food</w:t></w:r></ns0:label><w:r><w:t>,</w:t></w:r>
        <ns0:oid><w:r><w:t>2</w:t></w:r></ns0:oid>
    </w:p>
    </ns0:kpd_types>
    <ns0:kpd_types>
    <w:p>
        <ns0:category><w:r><w:t>cargo</w:t></w:r></ns0:category><w:r><w:t>,</w:t></w:r>
        <ns0:label><w:r><w:t>metal</w:t></w:r></ns0:label><w:r><w:t>,</w:t></w:r>
        <ns0:oid><w:r><w:t>3</w:t></w:r></ns0:oid>
    </w:p>
    </ns0:kpd_types>
</ns0:root>
…
</wx:sect></w:body>
…
</w:wordDocument>
Conclusion
Thus, we get the Word document filled with data from the database. I have to mention that I have utilised SqlWrapper — a very suitable Data Access Layer. I will be glad to answer all your questions.
Задача обработки документов в формате docx, а также таблиц xlsx и презентаций pptx является весьма нетривиальной. В этой статье расскажу как научиться парсить, создавать и обрабатывать такие документы используя только XSLT и ZIP архиватор.
Зачем?
docx — самый популярный формат документов, поэтому задача отдавать информацию пользователю в этом формате всегда может возникнуть. Один из вариантов решения этой проблемы — использование готовой библиотеки, может не подходить по ряду причин:
- библиотеки может просто не существовать
- в проекте не нужен ещё один чёрный ящик
- ограничения библиотеки по платформам и т.п.
- проблемы с лицензированием
- скорость работы
Поэтому в этой статье будем использовать только самые базовые инструменты для работы с docx документом.
Структура docx
Для начала разоберёмся с тем, что собой представляет docx документ. docx это zip архив который физически содержит 2 типа файлов:
- xml файлы с расширениями
xmlиrels - медиа файлы (изображения и т.п.)
А логически — 3 вида элементов:
- Типы (Content Types) — список типов медиа файлов (например png) встречающихся в документе и типов частей документов (например документ, верхний колонтитул).
- Части (Parts) — отдельные части документа, для нашего документа это document.xml, сюда входят как xml документы так и медиа файлы.
- Связи (Relationships) идентифицируют части документа для ссылок (например связь между разделом документа и колонтитулом), а также тут определены внешние части (например гиперссылки).
Они подробно описаны в стандарте ECMA-376: Office Open XML File Formats, основная часть которого — PDF документ на 5000 страниц, и ещё 2000 страниц бонусного контента.
Минимальный docx
Простейший docx после распаковки выглядит следующим образом

Давайте посмотрим из чего он состоит.
[Content_Types].xml
Находится в корне документа и перечисляет MIME типы содержимого документа:
<Types xmlns="http://schemas.openxmlformats.org/package/2006/content-types">
    <Default Extension="rels" ContentType="application/vnd.openxmlformats-package.relationships+xml"/>
    <Default Extension="xml" ContentType="application/xml"/>
    <Override PartName="/word/document.xml"
              ContentType="application/vnd.openxmlformats-officedocument.wordprocessingml.document.main+xml"/>
</Types>
_rels/.rels
Главный список связей документа. В данном случае определена всего одна связь — сопоставление с идентификатором rId1 и файлом word/document.xml — основным телом документа.
<Relationships xmlns="http://schemas.openxmlformats.org/package/2006/relationships">
    <Relationship
        Id="rId1"
        Type="http://schemas.openxmlformats.org/officeDocument/2006/relationships/officeDocument"
        Target="word/document.xml"/>
</Relationships>
word/document.xml
Основное содержимое документа.
word/document.xml
<w:document xmlns:wpc="http://schemas.microsoft.com/office/word/2010/wordprocessingCanvas"
            xmlns:mc="http://schemas.openxmlformats.org/markup-compatibility/2006"
            xmlns:o="urn:schemas-microsoft-com:office:office"
            xmlns:r="http://schemas.openxmlformats.org/officeDocument/2006/relationships"
            xmlns:m="http://schemas.openxmlformats.org/officeDocument/2006/math"
            xmlns:v="urn:schemas-microsoft-com:vml"
            xmlns:wp14="http://schemas.microsoft.com/office/word/2010/wordprocessingDrawing"
            xmlns:wp="http://schemas.openxmlformats.org/drawingml/2006/wordprocessingDrawing"
            xmlns:w10="urn:schemas-microsoft-com:office:word"
            xmlns:w="http://schemas.openxmlformats.org/wordprocessingml/2006/main"
            xmlns:w14="http://schemas.microsoft.com/office/word/2010/wordml"
            xmlns:wpg="http://schemas.microsoft.com/office/word/2010/wordprocessingGroup"
            xmlns:wpi="http://schemas.microsoft.com/office/word/2010/wordprocessingInk"
            xmlns:wne="http://schemas.microsoft.com/office/word/2006/wordml"
            xmlns:wps="http://schemas.microsoft.com/office/word/2010/wordprocessingShape"
            mc:Ignorable="w14 wp14">
    <w:body>
        <w:p w:rsidR="005F670F" w:rsidRDefault="005F79F5">
            <w:r>
                <w:t>Test</w:t>
            </w:r>
            <w:bookmarkStart w:id="0" w:name="_GoBack"/>
            <w:bookmarkEnd w:id="0"/>
        </w:p>
        <w:sectPr w:rsidR="005F670F">
            <w:pgSz w:w="12240" w:h="15840"/>
            <w:pgMar w:top="1440" w:right="1440" w:bottom="1440" w:left="1440"
                     w:header="720" w:footer="720" w:gutter="0"/>
            <w:cols w:space="720"/>
            <w:docGrid w:linePitch="360"/>
        </w:sectPr>
    </w:body>
</w:document>
Здесь:
<w:document>— сам документ<w:body>— тело документа<w:p>— параграф<w:r>— run (фрагмент) текста<w:t>— сам текст<w:sectPr>— описание страницы
Если открыть этот документ в текстовом редакторе, то увидим документ из одного слова Test.
word/_rels/document.xml.rels
Здесь содержится список связей части word/document.xml. Название файла связей создаётся из названия части документа к которой он относится и добавления к нему расширения rels. Папка с файлом связей называется _rels и находится на том же уровне, что и часть к которой он относится. Так как связей в word/document.xml никаких нет то и в файле пусто:
<Relationships xmlns="http://schemas.openxmlformats.org/package/2006/relationships">
</Relationships>
Даже если связей нет, этот файл должен существовать.
docx и Microsoft Word
docx созданный с помощью Microsoft Word, да в принципе и с помощью любого другого редактора имеет несколько дополнительных файлов.

Вот что в них содержится:
docProps/core.xml— основные метаданные документа согласно Open Packaging Conventions и Dublin Core [1], [2].docProps/app.xml— общая информация о документе: количество страниц, слов, символов, название приложения в котором был создан документ и т.п.word/settings.xml— настройки относящиеся к текущему документу.word/styles.xml— стили применимые к документу. Отделяют данные от представления.word/webSettings.xml— настройки отображения HTML частей документа и настройки того, как конвертировать документ в HTML.word/fontTable.xml— список шрифтов используемых в документе.word/theme1.xml— тема (состоит из цветовой схемы, шрифтов и форматирования).
В сложных документах частей может быть гораздо больше.
Реверс-инжиниринг docx
Итак, первоначальная задача — узнать как какой-либо фрагмент документа хранится в xml, чтобы потом создавать (или парсить) подобные документы самостоятельно. Для этого нам понадобятся:
- Архиватор zip
- Библиотека для форматирования XML (Word выдаёт XML без отступов, одной строкой)
- Средство для просмотра diff между файлами, я буду использовать git и TortoiseGit
Инструменты
- Под Windows: zip, unzip, libxml2, git, TortoiseGit
- Под Linux:
apt-get install zip unzip libxml2 libxml2-utils git
Также понадобятся скрипты для автоматического (раз)архивирования и форматирования XML.
Использование под Windows:
unpack file dir— распаковывает документfileв папкуdirи форматирует xmlpack dir file— запаковывает папкуdirв документfile
Использование под Linux аналогично, только ./unpack.sh вместо unpack, а pack становится ./pack.
Использование
Поиск изменений происходит следующим образом:
- Создаём пустой docx файл в редакторе.
- Распаковываем его с помощью
unpackв новую папку. - Коммитим новую папку.
- Добавляем в файл из п. 1. изучаемый элемент (гиперссылку, таблицу и т.д.).
- Распаковываем изменённый файл в уже существующую папку.
- Изучаем diff, убирая ненужные изменения (перестановки связей, порядок пространств имён и т.п.).
- Запаковываем папку и проверяем что получившийся файл открывается.
- Коммитим изменённую папку.
Пример 1. Выделение текста жирным
Посмотрим на практике, как найти тег который определяет форматирование текста жирным шрифтом.
- Создаём документ
bold.docxс обычным (не жирным) текстом Test. - Распаковываем его:
unpack bold.docx bold. - Коммитим результат.
- Выделяем текст Test жирным.
- Распаковываем
unpack bold.docx bold. - Изначально diff выглядел следующим образом:

Рассмотрим его подробно:
docProps/app.xml
@@ -1,9 +1,9 @@
-  <TotalTime>0</TotalTime>
+  <TotalTime>1</TotalTime>
Изменение времени нам не нужно.
docProps/core.xml
@@ -4,9 +4,9 @@
-  <cp:revision>1</cp:revision>
+  <cp:revision>2</cp:revision>
   <dcterms:created xsi:type="dcterms:W3CDTF">2017-02-07T19:37:00Z</dcterms:created>
-  <dcterms:modified xsi:type="dcterms:W3CDTF">2017-02-07T19:37:00Z</dcterms:modified>
+  <dcterms:modified xsi:type="dcterms:W3CDTF">2017-02-08T10:01:00Z</dcterms:modified>
Изменение версии документа и даты модификации нас также не интересует.
word/document.xml
diff
@@ -1,24 +1,26 @@
    <w:body>
-    <w:p w:rsidR="0076695C" w:rsidRPr="00290C70" w:rsidRDefault="00290C70">
+    <w:p w:rsidR="0076695C" w:rsidRPr="00F752CF" w:rsidRDefault="00290C70">
       <w:pPr>
         <w:rPr>
+          <w:b/>
           <w:lang w:val="en-US"/>
         </w:rPr>
       </w:pPr>
-      <w:r>
+      <w:r w:rsidRPr="00F752CF">
         <w:rPr>
+          <w:b/>
           <w:lang w:val="en-US"/>
         </w:rPr>
         <w:t>Test</w:t>
       </w:r>
       <w:bookmarkStart w:id="0" w:name="_GoBack"/>
       <w:bookmarkEnd w:id="0"/>
     </w:p>
-    <w:sectPr w:rsidR="0076695C" w:rsidRPr="00290C70">
+    <w:sectPr w:rsidR="0076695C" w:rsidRPr="00F752CF">
Изменения в w:rsidR не интересны — это внутренняя информация для Microsoft Word. Ключевое изменение тут
         <w:rPr>
+          <w:b/>
в параграфе с Test. Видимо элемент <w:b/> и делает текст жирным. Оставляем это изменение и отменяем остальные.
word/settings.xml
@@ -1,8 +1,9 @@
+  <w:proofState w:spelling="clean"/>
@@ -17,10 +18,11 @@
+    <w:rsid w:val="00F752CF"/>
Также не содержит ничего относящегося к жирному тексту. Отменяем.
7 Запаковываем папку с 1м изменением (добавлением <w:b/>) и проверяем что документ открывается и показывает то, что ожидалось.
8 Коммитим изменение.
Пример 2. Нижний колонтитул
Теперь разберём пример посложнее — добавление нижнего колонтитула.
Вот первоначальный коммит. Добавляем нижний колонтитул с текстом 123 и распаковываем документ. Такой diff получается первоначально:

Сразу же исключаем изменения в docProps/app.xml и docProps/core.xml — там тоже самое, что и в первом примере.
[Content_Types].xml
@@ -4,10 +4,13 @@
   <Default Extension="xml" ContentType="application/xml"/>
   <Override PartName="/word/document.xml" ContentType="application/vnd.openxmlformats-officedocument.wordprocessingml.document.main+xml"/>
+  <Override PartName="/word/footnotes.xml" ContentType="application/vnd.openxmlformats-officedocument.wordprocessingml.footnotes+xml"/>
+  <Override PartName="/word/endnotes.xml" ContentType="application/vnd.openxmlformats-officedocument.wordprocessingml.endnotes+xml"/>
+  <Override PartName="/word/footer1.xml" ContentType="application/vnd.openxmlformats-officedocument.wordprocessingml.footer+xml"/>
footer явно выглядит как то, что нам нужно, но что делать с footnotes и endnotes? Являются ли они обязательными при добавлении нижнего колонтитула или их создали заодно? Ответить на этот вопрос не всегда просто, вот основные пути:
- Посмотреть, связаны ли изменения друг с другом
- Экспериментировать
- Ну а если совсем не понятно что происходит:

Идём пока что дальше.
word/_rels/document.xml.rels
Изначально diff выглядит вот так:
diff
@@ -1,8 +1,11 @@
 <?xml version="1.0" encoding="UTF-8" standalone="yes"?>
 <Relationships xmlns="http://schemas.openxmlformats.org/package/2006/relationships">
+  <Relationship Id="rId5" Type="http://schemas.openxmlformats.org/officeDocument/2006/relationships/theme" Target="theme/theme1.xml"/>
   <Relationship Id="rId3" Type="http://schemas.openxmlformats.org/officeDocument/2006/relationships/webSettings" Target="webSettings.xml"/>
+  <Relationship Id="rId4" Type="http://schemas.openxmlformats.org/officeDocument/2006/relationships/fontTable" Target="fontTable.xml"/>
   <Relationship Id="rId2" Type="http://schemas.openxmlformats.org/officeDocument/2006/relationships/settings" Target="settings.xml"/>
   <Relationship Id="rId1" Type="http://schemas.openxmlformats.org/officeDocument/2006/relationships/styles" Target="styles.xml"/>
-  <Relationship Id="rId5" Type="http://schemas.openxmlformats.org/officeDocument/2006/relationships/theme" Target="theme/theme1.xml"/>
-  <Relationship Id="rId4" Type="http://schemas.openxmlformats.org/officeDocument/2006/relationships/fontTable" Target="fontTable.xml"/>
+  <Relationship Id="rId6" Type="http://schemas.openxmlformats.org/officeDocument/2006/relationships/footer" Target="footer1.xml"/>
+  <Relationship Id="rId7" Type="http://schemas.openxmlformats.org/officeDocument/2006/relationships/endnotes" Target="endnotes.xml"/>
+  <Relationship Id="rId8" Type="http://schemas.openxmlformats.org/officeDocument/2006/relationships/footnotes" Target="footnotes.xml"/>
 </Relationships>
Видно, что часть изменений связана с тем, что Word изменил порядок связей, уберём их:
@@ -3,6 +3,9 @@
+  <Relationship Id="rId6" Type="http://schemas.openxmlformats.org/officeDocument/2006/relationships/footer" Target="footer1.xml"/>
+  <Relationship Id="rId7" Type="http://schemas.openxmlformats.org/officeDocument/2006/relationships/endnotes" Target="endnotes.xml"/>
+  <Relationship Id="rId8" Type="http://schemas.openxmlformats.org/officeDocument/2006/relationships/footnotes" Target="footnotes.xml"/>
Опять появляются footer, footnotes, endnotes. Все они связаны с основным документом, перейдём к нему:
word/document.xml
@@ -15,10 +15,11 @@
       </w:r>
       <w:bookmarkStart w:id="0" w:name="_GoBack"/>
       <w:bookmarkEnd w:id="0"/>
     </w:p>
     <w:sectPr w:rsidR="0076695C" w:rsidRPr="00290C70">
+      <w:footerReference w:type="default" r:id="rId6"/>
       <w:pgSz w:w="11906" w:h="16838"/>
       <w:pgMar w:top="1134" w:right="850" w:bottom="1134" w:left="1701" w:header="708" w:footer="708" w:gutter="0"/>
       <w:cols w:space="708"/>
       <w:docGrid w:linePitch="360"/>
     </w:sectPr>
Редкий случай когда есть только нужные изменения. Видна явная ссылка на footer из sectPr. А так как ссылок в документе на footnotes и endnotes нет, то можно предположить что они нам не понадобятся.
word/settings.xml
diff
@@ -1,19 +1,30 @@
 <?xml version="1.0" encoding="UTF-8" standalone="yes"?>
 <w:settings xmlns:mc="http://schemas.openxmlformats.org/markup-compatibility/2006" xmlns:o="urn:schemas-microsoft-com:office:office" xmlns:r="http://schemas.openxmlformats.org/officeDocument/2006/relationships" xmlns:m="http://schemas.openxmlformats.org/officeDocument/2006/math" xmlns:v="urn:schemas-microsoft-com:vml" xmlns:w10="urn:schemas-microsoft-com:office:word" xmlns:w="http://schemas.openxmlformats.org/wordprocessingml/2006/main" xmlns:w14="http://schemas.microsoft.com/office/word/2010/wordml" xmlns:w15="http://schemas.microsoft.com/office/word/2012/wordml" xmlns:sl="http://schemas.openxmlformats.org/schemaLibrary/2006/main" mc:Ignorable="w14 w15">
   <w:zoom w:percent="100"/>
+  <w:proofState w:spelling="clean"/>
   <w:defaultTabStop w:val="708"/>
   <w:characterSpacingControl w:val="doNotCompress"/>
+  <w:footnotePr>
+    <w:footnote w:id="-1"/>
+    <w:footnote w:id="0"/>
+  </w:footnotePr>
+  <w:endnotePr>
+    <w:endnote w:id="-1"/>
+    <w:endnote w:id="0"/>
+  </w:endnotePr>
   <w:compat>
     <w:compatSetting w:name="compatibilityMode" w:uri="http://schemas.microsoft.com/office/word" w:val="15"/>
     <w:compatSetting w:name="overrideTableStyleFontSizeAndJustification" w:uri="http://schemas.microsoft.com/office/word" w:val="1"/>
     <w:compatSetting w:name="enableOpenTypeFeatures" w:uri="http://schemas.microsoft.com/office/word" w:val="1"/>
     <w:compatSetting w:name="doNotFlipMirrorIndents" w:uri="http://schemas.microsoft.com/office/word" w:val="1"/>
     <w:compatSetting w:name="differentiateMultirowTableHeaders" w:uri="http://schemas.microsoft.com/office/word" w:val="1"/>
   </w:compat>
   <w:rsids>
     <w:rsidRoot w:val="00290C70"/>
+    <w:rsid w:val="000A7B7B"/>
+    <w:rsid w:val="001B0DE6"/>
А вот и появились ссылки на footnotes, endnotes добавляющие их в документ.
word/styles.xml
diff
@@ -480,6 +480,50 @@
       <w:rFonts w:ascii="Times New Roman" w:hAnsi="Times New Roman"/>
       <w:b/>
       <w:sz w:val="28"/>
     </w:rPr>
   </w:style>
+  <w:style w:type="paragraph" w:styleId="a4">
+    <w:name w:val="header"/>
+    <w:basedOn w:val="a"/>
+    <w:link w:val="a5"/>
+    <w:uiPriority w:val="99"/>
+    <w:unhideWhenUsed/>
+    <w:rsid w:val="000A7B7B"/>
+    <w:pPr>
+      <w:tabs>
+        <w:tab w:val="center" w:pos="4677"/>
+        <w:tab w:val="right" w:pos="9355"/>
+      </w:tabs>
+      <w:spacing w:after="0" w:line="240" w:lineRule="auto"/>
+    </w:pPr>
+  </w:style>
+  <w:style w:type="character" w:customStyle="1" w:styleId="a5">
+    <w:name w:val="Верхний колонтитул Знак"/>
+    <w:basedOn w:val="a0"/>
+    <w:link w:val="a4"/>
+    <w:uiPriority w:val="99"/>
+    <w:rsid w:val="000A7B7B"/>
+  </w:style>
+  <w:style w:type="paragraph" w:styleId="a6">
+    <w:name w:val="footer"/>
+    <w:basedOn w:val="a"/>
+    <w:link w:val="a7"/>
+    <w:uiPriority w:val="99"/>
+    <w:unhideWhenUsed/>
+    <w:rsid w:val="000A7B7B"/>
+    <w:pPr>
+      <w:tabs>
+        <w:tab w:val="center" w:pos="4677"/>
+        <w:tab w:val="right" w:pos="9355"/>
+      </w:tabs>
+      <w:spacing w:after="0" w:line="240" w:lineRule="auto"/>
+    </w:pPr>
+  </w:style>
+  <w:style w:type="character" w:customStyle="1" w:styleId="a7">
+    <w:name w:val="Нижний колонтитул Знак"/>
+    <w:basedOn w:val="a0"/>
+    <w:link w:val="a6"/>
+    <w:uiPriority w:val="99"/>
+    <w:rsid w:val="000A7B7B"/>
+  </w:style>
 </w:styles>
Изменения в стилях нас интересуют только если мы ищем как поменять стиль. В данном случае это изменение можно убрать.
Посмотрим теперь собственно на сам нижний колонтитул (часть пространств имён опущена для читабельности, но в документе они должны быть):
<w:ftr xmlns:w="http://schemas.openxmlformats.org/wordprocessingml/2006/main">
  <w:p w:rsidR="000A7B7B" w:rsidRDefault="000A7B7B">
    <w:pPr>
      <w:pStyle w:val="a6"/>
    </w:pPr>
    <w:r>
      <w:t>123</w:t>
    </w:r>
  </w:p>
</w:ftr>
Тут виден текст 123. Единственное, что надо исправить — убрать ссылку на <w:pStyle w:val="a6"/>.
В результате анализа всех изменений делаем следующие предположения:
- footnotes и endnotes не нужны
- В
[Content_Types].xmlнадо добавить footer - В
word/_rels/document.xml.relsнадо добавить ссылку на footer - В
word/document.xmlв тег<w:sectPr>надо добавить<w:footerReference>
Уменьшаем diff до этого набора изменений:

Затем запаковываем документ и открываем его.
Если всё сделано правильно, то документ откроется и в нём будет нижний колонтитул с текстом 123. А вот и итоговый коммит.
Таким образом процесс поиска изменений сводится к поиску минимального набора изменений, достаточного для достижения заданного результата.
Практика
Найдя интересующее нас изменение, логично перейти к следующему этапу, это может быть что-либо из:
- Создания docx
- Парсинг docx
- Преобразования docx
Тут нам потребуются знания XSLT и XPath.
Давайте напишем достаточно простое преобразование — замену или добавление нижнего колонтитула в существующий документ. Писать я буду на языке Caché ObjectScript, но даже если вы не знаете — не беда. В основном будем вызовать XSLT и архиватор. Ничего более. Итак, приступим.
Алгоритм
Алгоритм выглядит следующим образом:
- Распаковываем документ
- Добавляем наш нижний колонтитул
- Прописываем ссылку на него в
[Content_Types].xmlиword/_rels/document.xml.rels - В
word/document.xmlв тег<w:sectPr>добавляем тег<w:footerReference>или заменяем в нём ссылку на наш нижний колонтитул. - Запаковываем документ
Приступим.
Распаковка
В Caché ObjectScript есть возможность выполнять команды ОС с помощью функции $zf(-1, oscommand). Вызовем unzip для распаковки документа с помощью обёртки над $zf(-1):
/// Используя %3 (unzip) распаковать файл %1 в папку %2
Parameter UNZIP = "%3 %1 -d %2";

/// Распаковать архив source в папку targetDir
ClassMethod executeUnzip(source, targetDir) As %Status
{
    set timeout = 100
    set cmd = $$$FormatText(..#UNZIP, source, targetDir, ..getUnzip())
    return ..execute(cmd, timeout)
}
Создаём файл нижнего колонтитула
На вход поступает текст нижнего колонтитула, запишем его в файл in.xml:
<xml>TEST</xml>В XSLT (файл — footer.xsl) будем создавать нижний колонтитул с текстом из тега xml (часть пространств имён опущена, вот полный список):
<xsl:stylesheet
  xmlns:xsl="http://www.w3.org/1999/XSL/Transform"
  xmlns="http://schemas.openxmlformats.org/package/2006/relationships" version="1.0">
    <xsl:output method="xml" omit-xml-declaration="no" indent="yes" standalone="yes"/>
    <xsl:template match="/">

        <w:ftr xmlns:w="http://schemas.openxmlformats.org/wordprocessingml/2006/main">
            <w:p>
                <w:r>
                    <w:rPr>
                        <w:lang w:val="en-US"/>
                    </w:rPr>
                    <w:t>
                        <xsl:value-of select="//xml/text()"/>
                    </w:t>
                </w:r>
            </w:p>
        </w:ftr>
    </xsl:template>
</xsl:stylesheet>
Теперь вызовем XSLT преобразователь:
do ##class(%XML.XSLT.Transformer).TransformFile("in.xml", "footer.xsl", footer0.xml") В результате получится файл нижнего колонтитула footer0.xml:
<w:ftr xmlns:w="http://schemas.openxmlformats.org/wordprocessingml/2006/main">
    <w:p>
        <w:r>
            <w:rPr>
                <w:lang w:val="en-US"/>
            </w:rPr>
            <w:t>TEST</w:t>
        </w:r>
    </w:p>
</w:ftr>
Добавляем ссылку на колонтитул в список связей основного документа
Сссылки с идентификатором rId0 как правило не существует. Впрочем можно использовать XPath для получения идентификатора которого точно не существует.
Добавляем ссылку на footer0.xml c идентификатором rId0 в word/_rels/document.xml.rels:
XSLT
<xsl:stylesheet  xmlns:xsl="http://www.w3.org/1999/XSL/Transform"  xmlns="http://schemas.openxmlformats.org/package/2006/relationships"  version="1.0">
    <xsl:output method="xml" omit-xml-declaration="yes" indent="no"  />
    <xsl:param name="new">
        <Relationship
           Id="rId0"
           Type="http://schemas.openxmlformats.org/officeDocument/2006/relationships/footer"
           Target="footer0.xml"/>
    </xsl:param>

    <xsl:template match="/*">
        <xsl:copy>
            <xsl:copy-of select="$new"/>
            <xsl:copy-of select="@* | node()"/>
        </xsl:copy>
    </xsl:template>
</xsl:stylesheet>
Прописываем ссылки в документе
Далее надо в каждый тег <w:sectPr> добавить тег <w:footerReference> или заменить в нём ссылку на наш нижний колонтитул. Оказалось, что у каждого тега <w:sectPr> может быть 3 тега <w:footerReference> — для первой страницы, четных страниц и всего остального:
XSLT
<xsl:stylesheet xmlns:xsl="http://www.w3.org/1999/XSL/Transform"
xmlns:r="http://schemas.openxmlformats.org/officeDocument/2006/relationships"
xmlns:w="http://schemas.openxmlformats.org/wordprocessingml/2006/main"
version="1.0">
    <xsl:output method="xml" omit-xml-declaration="yes" indent="yes" />
    <xsl:template match="//@* | //node()">
        <xsl:copy>
            <xsl:apply-templates select="@*"/>
            <xsl:apply-templates select="node()"/>
        </xsl:copy>
    </xsl:template>
    <xsl:template match="//w:sectPr">
        <xsl:element name="{name()}" namespace="{namespace-uri()}">
            <xsl:copy-of select="./namespace::*"/>
            <xsl:apply-templates select="@*"/>
            <xsl:copy-of select="./*[local-name() != 'footerReference']"/>
            <w:footerReference w:type="default" r:id="rId0"/>
            <w:footerReference w:type="first" r:id="rId0"/>
            <w:footerReference w:type="even" r:id="rId0"/>
        </xsl:element>
    </xsl:template>
</xsl:stylesheet>
Добавляем колонтитул в [Content_Types].xml
Добавляем в [Content_Types].xml информацию о том, что /word/footer0.xml имеет тип application/vnd.openxmlformats-officedocument.wordprocessingml.footer+xml:
XSLT
<xsl:stylesheet  xmlns:xsl="http://www.w3.org/1999/XSL/Transform"  xmlns="http://schemas.openxmlformats.org/package/2006/content-types"  version="1.0">
    <xsl:output method="xml" omit-xml-declaration="yes" indent="no"  />
    <xsl:param name="new">
        <Override
         PartName="/word/footer0.xml"
         ContentType="application/vnd.openxmlformats-officedocument.wordprocessingml.footer+xml"/>
    </xsl:param>

    <xsl:template match="/*">
        <xsl:copy>
            <xsl:copy-of select="@* | node()"/>
            <xsl:copy-of select="$new"/>
        </xsl:copy>
    </xsl:template>
</xsl:stylesheet>
В результате
Весь код опубликован. Работает он так:
do ##class(Converter.Footer).modifyFooter("in.docx", "out.docx", "TEST")Где:
in.docx— исходный документout.docx— выходящий документTEST— текст, который добавляется в нижний колонтитул
Выводы
Используя только XSLT и ZIP можно успешно работать с документами docx, таблицами xlsx и презентациями pptx.
Открытые вопросы
- Изначально хотел использовать 7z вместо zip/unzip т… к. это одна утилита и она более распространена на Windows. Однако я столкнулся с такой проблемой, что документы запакованные 7z под Linux не открываются в Microsoft Office. Я попробовал достаточно много вариантов вызова, однако положительного результата добиться не удалось.
- Ищу XSD со схемами ECMA-376 версии 5 и комментариями. XSD версии 5 без комментариев доступен к загрузке на сайте ECMA, но без комментариев в нём сложно разобраться. XSD версии 2 с комментариями доступен к загрузке.
Ссылки
- ECMA-376
- Описание docx
- Подробная статья про docx
Автор: InterSystems
Источник