
XSLT – is a language for transforming XML. In this article we take XML document with empty table then fill it and pass it to EXCEL. Technically, it is serialization.
Advantages: speed, flexibility.
XML – put it simply, is a syntax, which we use to mark data. In our case tables for Excel marked with Excel XML processor.
As it says in Wikipeida:
XSL (Extensible Stylesheet Language) is a family of languages used to transform and render XML documents, split into: XSLT (XSL Transformations), XSL-FO (XSL Formatting Objects), XPath (XML Path Language).
XPath (XML Path Language), a non-XML language for addressing the components (elements, attributes, and so on) of an XML document. XPath is widely used in other core-XML specifications and in programming libraries for accessing XML-encoded data.
Simple transformations, or ST, is a proprietary SAP programming language that describes the transformation of ABAP data to XML (serialization) and from XML to ABAP data (deserialization).
Comparision: !=, <=, <, =, >, >=. Logical operators: not(), or, and.
Content
1 Basic
2 Nested loops
3 Set row position
4 Dynamic columns
5 Rows merging
6 if–then-else
7 Formulas
8 External method call
9 Templates
10 Two tables associated by the key.
11 “select” with filter for structure
12 Advices
13 Annex 1. Classic Dynpro output
14 Annex 2. WebDynpro output
15 links
Basic
1) Lets create table in Excel:

Save it like “Tables XML 2003 (*.xml)“. it is important.
We open this file and copy everything except first lines:
<?xml version="1.0"?>
<?mso-application progid="Excel.Sheet"?>
2) In SAP GUI we create XSLT: right mouse click at package
Create->Other(1)->Transformation->XSLT
<xsl:transform version="1.0"
  xmlns:xsl="http://www.w3.org/1999/XSL/Transform"
  xmlns:sap="http://www.sap.com/sapxsl"
>

  <xsl:strip-space elements="*"/>

  <xsl:template match="/">
		  HERE WE INSERT OUR COPY OF EXCEL FILE
  </xsl:template>

</xsl:transform>
3) Find this:
<Worksheet ss:Name="Лист1">
   <Table ss:ExpandedRowCount="2" >
In Table tag just remove rows limit attribute: ss:ExpandedRowCount=”2″
4) Find required ROW and place it inside loop:
<xsl:for-each select="//TAB1/*">   - TAB1 is a SOURCE parameter for CALL TRANSFORMATION
   here <ROW></ROW> which we want to repeat after header.
</xsl:for-each>
We pass DATA as an internal table from ABAP:
"itab
DATA: lt_t TYPE TABLE OF ls_t.
...
CALL TRANSFORMATION ('ZCH_NESTED_ITABS')
        SOURCE
          tab1 = lt_t
        RESULT XML
          l_ostream.
Note: Dictionary objects is not required.
5) In our ROW we insert CELL with DATA tag and out tab1 – abap table:
<Cell>
<Data ss:Type="Number">
  <xsl:value-of select="INDEX"/>     - index is a field in out TAB1 internal table
</Data>
</Cell>
Note: field names must be in UPPER CASE.
6) See Output of XSLT in Annex 1,2.
Nested loops
For example: we have two itabs: T1 and nested T2. In nested T2 we must not use “//”.
         <xsl:for-each select="//T1/*">
            <xsl:for-each select="T2/*"> - here without // becouse of T1/T2
              <Row>
                <Cell>
                  <Data ss:Type="Number"><xsl:value-of select="INDEX"/></Data>
                </Cell>
              </Row>
            </xsl:for-each>
          </xsl:for-each>
Set row position
<xsl:for-each select="//DATA/*">
   <xsl:variable name="ops_row" select="2 + position()"/>    - that is how we create varibles
   <Row ss:Index="{$ops_row}">     <!-- {} - attribute value template -->
Dynamic columns
<Table>        <!-- without ss:ExpandedColumnCount -->
  <Column/>    <!-- Column tag set Style for columns, we loopt it first -->
  <xsl:for-each select="//T2/*">
    <Column/>
  </xsl:for-each>
<Row>                      <!-- one row with T2 columns -->
  <Cell>
  </Cell>
  <xsl:for-each select="//T2/*">
    <Cell>
    </Cell>
  </xsl:for-each>
</Row>
       <!-- dynamic rows and dynamic columns -->
<xsl:for-each select="//T1/*">  <!-- loop at rows -->
  <Row>
    <xsl:for-each select="//T2/*"> <!-- loop at columns -->
      <Cell ss:Index="{1 + position()}">  </Cell>
    </xsl:for-each>
  </Row>
</xsl:for-each>
Rows merging
We will look at the case with two levels merging. We have itab T1(num) <- nested T2(org) <- nested T3(plans).

<xsl:for-each select="//T1/*">
  <xsl:variable name="t1_num" select="NUM"/>  <!-- inner loop T2 hide fields of T1 -->
    <xsl:variable name="t1_count" select="COUNT"/>
  <xsl:for-each select="T2/*">
    <xsl:variable name="t2_count" select="COUNT"/>
    <xsl:variable name="t2_pos" select="position()"/>
    <xsl:variable name="t2_org" select="ORG"/>
  <xsl:for-each select="T3/*">
    <Row>
      <xsl:if test="($t2_pos=1) and (position()=1)"> <!-- top cell with merge and skip below ones-->
        <Cell ss:MergeDown="{$t1_count - 1}"><Data ss:Type="String"><xsl:value-of select="$t1_num"/></Data></Cell>
      </xsl:if>
      <xsl:if test="position()=1"> <!-- for cell after skipped ones we must specify ss:Index-->
        <Cell ss:MergeDown="{$t2_count - 1}" ss:Index="2"><Data ss:Type="String"><xsl:value-of select="$t2_org"/></Data></Cell>
      </xsl:if>
    <Cell ss:Index="3"><xsl:value-of select="PLANS"/></Cell>
  </Row>
</xsl:for-each>
</xsl:for-each>
</xsl:for-each>
In XSLT it is impossible to accumulate or change variable, that is why we need to calculate rows number in advance with ABAP like this:
    LOOP AT T1 ASSIGNING <T1>.
      LOOP AT <T1>-T2 ASSIGNING <T2>.
        <T2>-count = lines( <T2>-T3 ).    "for T2 just all nested lines
        IF <T2>-count <> 0.
          <T1>-count = <T1>-count + <T2>-count.   "for T1 we sum all T2 tables, empty = 1 line.
        ELSE.
          <T1>-count = <T1>-count + 1.
        ENDIF.
      ENDLOOP.
     ENDLOOP.
Note: helpful function count(//T1/*) – return rows count for T1 table.
if–then-else
If field has numeric value 1. If-then here:
<xsl:if test="INDEX=1">
</xsl:if>
If-else:
    <xsl:choose>
          <xsl:when test="SYMB='+'">
            <Cell ss:StyleID="s26"><Data ss:Type="String"><xsl:value-of select="SYMB"/></Data></Cell>
          </xsl:when>
          <xsl:otherwise>
            <Cell ss:StyleID="s18"><Data ss:Type="String"></Data></Cell>
          </xsl:otherwise>
     </xsl:choose>
Formulas
<Cell ss:StyleID="s133" ss:Formula="=SUM(R[-{$t1_count}]C:R[-1]C)">
   <Data ss:Type="Number"></Data></Cell>
Here we sym sells up at a distance of $t1_count to curret cell. [] is a Relative Notation for Excel cells.
R for Rows, and C for Columns.
RC[-1] refers to the cell one column to the left: R without a number means same row.
External method call
Static method of a global class call:
<sap:call-external class="ZMYCLASS" method="GET_XML">
                  <sap:callvalue param="IV_STR" select="string(position())"/>  <!-- export parameter -->
                  <sap:callvariable name="fromclass" param="RET_VAL"/>         <!-- return $fromclass
</sap:call-external>
<xsl:value-of select="$fromclass"/>
To call method of object instance, it is required to get instance from one of the static class method.
method SIMP.
  CREATE OBJECT EX_OBJ.
endmethod.
<sap:call-external class=”ZCAL” method=”SIMP”>    “calling static method
  <sap:callvariable param=”EX_OBJ” name=”plant”/>  ” Hold the objec
</sap:call-external>

<sap:call-external name=”plant” method=”ZPERIOD”> “calling instacne method
  <sap:callvalue param=”IM_MHDHB”  select=”string(Order/MHDHB)”/>
  <sap:callvalue param=”IM_IPRKZ”  select=”string(Order/IPRKZ)”/>
  <sap:callvariable param=”EX_MHDHB” name=”period”/>
</sap:call-external>
Templates
Element xsl:apply-templates is an alternative way for doing xsl:for-each. This element useful if the structure of a subnode is not defined, appropriate template selected at runtime. In example we have node-set PLANETS, for wich we want to make loop.
<xsl:template match="PLANETS">
  <HTML>
    <xsl:apply-templates/>
  </HTML>
</xsl:tempiate>

<xsl:template match="PLANET">
    <P>
      <xsl:value-of select="NAME"/>
    </P>
</xsl:tempiate>
Two tables associated by the key
If we have two tables T1 (key LV_ID), T2 (key LV_ID_F) for output, then we can use followind approach based on filter:
<xsl:for-each select="//T1/*">
  <xsl:variable name="id" select="LV_ID"/>
  <xsl:for-each select="//T2/*[LV_ID_F=$id]">
  </xsl:for-each>
</xsl:for-each>
“select” with filter for structure
Let us say we have table T_LGART with fields PERNR, ID_FK, BETRG. We need to select BETRG from line with PERNR=$pernr and ID_FK=$id.
<xsl:value-of select="//T_LGART/*[PERNR=$pernr and ID_FK=$id]/*[name()='BETRG']"/>Advices
- Keep track for changes in XSLT if you forget your last change and meet failure it will be really fail.
- Pretty Printer work bad, it is better to structure yourself.
- When you have many types of rows in template it will be good to cut them all and past in xslt one by one.
- Overall steps: we create two xml template minimal and rich; it will be good to have comment with every column; one row with dynamic columns; one by one rows surround by loops; surround rows by loops one by one; cells fillings; cell merging; formulas; separate cell filings.
Annex 1. Classic Dynpro output
 DATA lt_data_xml      TYPE swxmlcont.
    DATA l_ostream        TYPE REF TO if_ixml_ostream.
    DATA(l_xml) = cl_ixml=>create( ).
    DATA(l_stream_factory) = l_xml->create_stream_factory( ).
    l_ostream = l_stream_factory->create_ostream_itable( table = lt_data_xml[] ).

    CALL TRANSFORMATION ZXLST_TRANSFORMATION
        SOURCE
          data1 = lt_t "internal table lt_t transfered by name data1. Be careful with this names.
        RESULT XML
          l_ostream.

    DATA workdir  TYPE string.
    cl_gui_frontend_services=>get_sapgui_workdir( CHANGING sapworkdir = workdir ).

    cl_gui_cfw=>flush( ).
    CONCATENATE workdir '' 'ZXSLT_TRANSFORMATION' sy-datum sy-uzeit '.xml' INTO DATA(filename).
*  "remove special characters
    REPLACE ALL OCCURRENCES OF '*' IN filename WITH space.

    CALL METHOD cl_gui_frontend_services=>gui_download
      EXPORTING
        filename         = filename
        filetype         = 'BIN'
      CHANGING
        data_tab         = lt_data_xml[]
      EXCEPTIONS
        file_write_error = 1
        OTHERS           = 99.

    CONCATENATE '"' filename '"' INTO filename.

    CALL METHOD cl_gui_frontend_services=>execute
      EXPORTING
        application = 'Excel'
        parameter   = filename
        operation   = 'OPEN'
      EXCEPTIONS
        OTHERS = 1.
Annex 2. WebDynpro output
DATA lv_result  TYPE xstring.
  CALL TRANSFORMATION ZXSLT_TRANSFORMATION
      SOURCE
        data      = lt_t
      RESULT XML lv_result
    .

  CHECK lv_result IS NOT INITIAL.

  CALL METHOD cl_wd_runtime_services=>attach_file_to_response
    EXPORTING
      i_filename  = 'a.xml'
      i_content   = lv_result
      i_mime_type = 'application/msexcel'
      i_inplace   = abap_true.
URL sources:
https://blogs.sap.com/2007/08/07/calling-instance-object-method-of-abap-class-into-xslt-mapping-by-using-sap-call-external/
https://help.sap.com/saphelp_erp60_sp/helpdata/de/dd/ae463c36a30319e10000000a114084/frameset.htm
https://help.sap.com/erp2005_ehp_04/helpdata/en/a8/824c3c66177414e10000000a114084/frameset.htm
https://bettersolutions.com/excel/formulas/cell-references-a1-r1c1-notation.htm
New guy here so bear with me. Ive got a basic XSL file that will read my xml data. Im trying to put xml into Excel. Heres my issue. With a small XML file it seems to convert it easly, BUT with this XML file that had several nodes ( I think they are called), when I call up the data, its not right. I want to only show info from the check portion of XML and then show it in Excel in a way that shows the 6 or 7 columns that I want, then show the data. Heres what I have so far:
XML:
<bdiData>
  <documentControlInfo>
    <documentInfo>
      <docDescription>Checks for Company X</docDescription>
      <docID>
        <ID>123456789</ID>
      </docID>
      <docModifier>My Company</docModifier>
      <docCreateDate>2010-08-23</docCreateDate>
      <docCreateTime>07:08:54-0700</docCreateTime>
      <standardVersion>1.0</standardVersion>
      <testIndicator>0</testIndicator>
      <resendIndicator>0</resendIndicator>
    </documentInfo>
    <sourceInfo>
      <sourceName>My Banking Name</sourceName>
      <sourceID>
        <idOther>ShortBankName</idOther>
      </sourceID>
    </sourceInfo>
    <destinationInfo>
      <destinationName>My Company</destinationName>
      <destinationID>
        <idOther>MYCO</idOther>
      </destinationID>
    </destinationInfo>
  </documentControlInfo>
  <checkItemCollection>
    <collectionInfo>
      <description>Items</description>
      <ID>654811650</ID>
      <Classification>
        <classification>Items</classification>
      </Classification>
    </collectionInfo>
    <checkItemBatch>
      <checkItemBatchInfo>
        <description>Paid Checks</description>
        <ID>1239668334710</ID>
        <Classification>
          <classification>Paid Checks</classification>
        </Classification>
      </checkItemBatchInfo>
      <checkItem>
        <checkItemType>check</checkItemType>
        <checkAmount>2960</checkAmount>
        <postingInfo>
          <date>2009-06-12</date>
          <RT>87654321</RT>
          <accountNumber>123465798</accountNumber>
          <seqNum>007725552898</seqNum>
          <trancode>001152</trancode>
          <amount>2960</amount>
          <serialNumber>55225410</serialNumber>
        </postingInfo>
XSL File:
<xsl:stylesheet version="1.0"
    xmlns="urn:schemas-microsoft-com:office:spreadsheet"
    xmlns:xsl="http://www.w3.org/1999/XSL/Transform"
 xmlns:msxsl="urn:schemas-microsoft-com:xslt"
 xmlns:user="urn:my-scripts"
 xmlns:o="urn:schemas-microsoft-com:office:office"
 xmlns:x="urn:schemas-microsoft-com:office:excel"
 xmlns:ss="urn:schemas-microsoft-com:office:spreadsheet" >

  <xsl:template match="/">
    <Workbook xmlns="urn:schemas-microsoft-com:office:spreadsheet"
      xmlns:o="urn:schemas-microsoft-com:office:office"
      xmlns:x="urn:schemas-microsoft-com:office:excel"
      xmlns:ss="urn:schemas-microsoft-com:office:spreadsheet"
      xmlns:html="http://www.w3.org/TR/REC-html40">
      <xsl:apply-templates/>
    </Workbook>
  </xsl:template>


  <xsl:template match="/*">
    <Worksheet>
      <xsl:attribute name="ss:Name">
        <xsl:value-of select="local-name(/*/*)"/>
      </xsl:attribute>
      <Table x:FullColumns="1" x:FullRows="1">
        <Row>

          <xsl:for-each select="*[position() = 2]/*/checkItem/postingInfo/*">

            <Cell>
              <Data ss:Type="String">
                <xsl:value-of select="local-name()"/>
              </Data>
            </Cell>
          </xsl:for-each>
        </Row>
        <xsl:apply-templates/>
      </Table>
    </Worksheet>
  </xsl:template>


  <xsl:template match="/*/checkItem/postingInfo/*">
    <Row>
      <xsl:apply-templates/>
    </Row>
  </xsl:template>


  <xsl:template match="/*/checkItem/postingInfo/*">
    <Cell>
      <Data ss:Type="String">
        <xsl:value-of select="."/>
      </Data>
    </Cell>
  </xsl:template>


</xsl:stylesheet>
Does anyone have any Idea how I can get to JUSt the check portion f the XML file and have it format in an eay way??
Thanks
GabrielVA
![]()
skaffman
397k96 gold badges815 silver badges768 bronze badges
asked Aug 20, 2010 at 20:15
![]()
1
I think you need this stylesheet:
<xsl:stylesheet version="1.0"
xmlns:xsl="http://www.w3.org/1999/XSL/Transform"
xmlns="urn:schemas-microsoft-com:office:spreadsheet"
xmlns:ss="urn:schemas-microsoft-com:office:spreadsheet"
xmlns:x="urn:schemas-microsoft-com:office:excel">
    <xsl:template match="/">
        <xsl:processing-instruction name="mso-application">progid="Excel.Sheet"</xsl:processing-instruction>
        <Workbook>
            <xsl:apply-templates/>
        </Workbook>
    </xsl:template>
    <xsl:template match="/*">
        <Worksheet ss:Name="{*/*/*[local-name()='docDescription']}">
            <Table x:FullColumns="1" x:FullRows="1">
                <Row>
                    <xsl:for-each select="*/*/*[local-name()='checkItem'][1]//*[not(*)]">
                        <Cell>
                            <Data ss:Type="String">
                                <xsl:value-of select="local-name()"/>
                            </Data>
                        </Cell>
                    </xsl:for-each>
                </Row>
                <xsl:apply-templates select="*/*/*[local-name()='checkItem']"/>
            </Table>
        </Worksheet>
    </xsl:template>
    <xsl:template match="*[local-name()='checkItem']" priority="1">
        <Row>
            <xsl:apply-templates select=".//*[not(*)]"/>
        </Row>
    </xsl:template>
    <xsl:template match="*[not(*)]">
        <Cell>
            <Data ss:Type="String">
                <xsl:value-of select="."/>
            </Data>
        </Cell>
    </xsl:template>
</xsl:stylesheet>
With this input (proper well formed):
<bdiData>
    <documentControlInfo>
        <documentInfo>
            <docDescription>Checks for Company X</docDescription>
            <docID>
                <ID>123456789</ID>
            </docID>
            <docModifier>My Company</docModifier>
            <docCreateDate>2010-08-23</docCreateDate>
            <docCreateTime>07:08:54-0700</docCreateTime>
            <standardVersion>1.0</standardVersion>
            <testIndicator>0</testIndicator>
            <resendIndicator>0</resendIndicator>
        </documentInfo>
        <sourceInfo>
            <sourceName>My Banking Name</sourceName>
            <sourceID>
                <idOther>ShortBankName</idOther>
            </sourceID>
        </sourceInfo>
        <destinationInfo>
            <destinationName>My Company</destinationName>
            <destinationID>
                <idOther>MYCO</idOther>
            </destinationID>
        </destinationInfo>
    </documentControlInfo>
    <checkItemCollection>
        <collectionInfo>
            <description>Items</description>
            <ID>654811650</ID>
            <Classification>
                <classification>Items</classification>
            </Classification>
        </collectionInfo>
        <checkItemBatch>
            <checkItemBatchInfo>
                <description>Paid Checks</description>
                <ID>1239668334710</ID>
                <Classification>
                    <classification>Paid Checks</classification>
                </Classification>
            </checkItemBatchInfo>
            <checkItem>
                <checkItemType>check</checkItemType>
                <checkAmount>2960</checkAmount>
                <postingInfo>
                    <date>2009-06-12</date>
                    <RT>87654321</RT>
                    <accountNumber>123465798</accountNumber>
                    <seqNum>007725552898</seqNum>
                    <trancode>001152</trancode>
                    <amount>2960</amount>
                    <serialNumber>55225410</serialNumber>
                </postingInfo>
            </checkItem>
        </checkItemBatch>
    </checkItemCollection>
</bdiData>
Output:
<?mso-application progid="Excel.Sheet"?>
<Workbook xmlns="urn:schemas-microsoft-com:office:spreadsheet" xmlns:ss="urn:schemas-microsoft-com:office:spreadsheet" xmlns:x="urn:schemas-microsoft-com:office:excel">
    <Worksheet ss:Name="Checks for Company X">
        <Table x:FullColumns="1" x:FullRows="1">
            <Row>
                <Cell>
                    <Data ss:Type="String">checkItemType</Data>
                </Cell>
                <Cell>
                    <Data ss:Type="String">checkAmount</Data>
                </Cell>
                <Cell>
                    <Data ss:Type="String">date</Data>
                </Cell>
                <Cell>
                    <Data ss:Type="String">RT</Data>
                </Cell>
                <Cell>
                    <Data ss:Type="String">accountNumber</Data>
                </Cell>
                <Cell>
                    <Data ss:Type="String">seqNum</Data>
                </Cell>
                <Cell>
                    <Data ss:Type="String">trancode</Data>
                </Cell>
                <Cell>
                    <Data ss:Type="String">amount</Data>
                </Cell>
                <Cell>
                    <Data ss:Type="String">serialNumber</Data>
                </Cell>
            </Row>
            <Row>
                <Cell>
                    <Data ss:Type="String">check</Data>
                </Cell>
                <Cell>
                    <Data ss:Type="String">2960</Data>
                </Cell>
                <Cell>
                    <Data ss:Type="String">2009-06-12</Data>
                </Cell>
                <Cell>
                    <Data ss:Type="String">87654321</Data>
                </Cell>
                <Cell>
                    <Data ss:Type="String">123465798</Data>
                </Cell>
                <Cell>
                    <Data ss:Type="String">007725552898</Data>
                </Cell>
                <Cell>
                    <Data ss:Type="String">001152</Data>
                </Cell>
                <Cell>
                    <Data ss:Type="String">2960</Data>
                </Cell>
                <Cell>
                    <Data ss:Type="String">55225410</Data>
                </Cell>
            </Row>
        </Table>
    </Worksheet>
</Workbook>
Wich is properly open by Excel.
Note: those fn:local-name() are there because your input sample is unreliable.
answered Aug 20, 2010 at 23:39
Editor’s note: Once again it is an honor and a privilege to present an in-depth guest article written by Beverly Voth.
This is a follow-up to the User-Friendly Excel Exports series by Kevin Frank, but using an XML export along with various XSLT to give you .csv or .xls (for Excel). The first demo is a quick export (to CSV – comma-separated values) using an XSLT to help explain the relationship with FileMaker Pro XML export. How an XSLT style sheet reads that data to transform it into another text format (.csv or .xls) is also explained throughout the article and in comments within the XSLT. The demos will get increasingly more complex, but ultimately more “user-friendly”.
Demo file: Excel-Exports-using-XML-and-XSLT.zip
We’ll use the demo files from Kevin with revisions to use the XSLT from these demos. Open this or any database and select Export Records from the File menu and choose XML as the type. Name it “raw_sample.xml”. In the next dialog, “Specify XML and XSL Options”, use FMPXMLRESULT as the Grammar and uncheck the “Use XSL style sheet”. You can view the file in any text editor or in any browser. Some browsers require you to view the source. Some browsers will “pretty-print” (indent) the XML document with a default style sheet. The XML is valid even if it is not indented for human viewing.
Demo 1 – XML to simple CSV
For our demos, the export as XML from FileMaker Pro, we will use the grammar called FMPXMLRESULT. There is another grammar, FMPDSORESULT, and just for comparison, you might test Export to see what that looks like. Excel cannot directly open either format and auto-magically be a spreadsheet. You may find the FMPXMLRESULT grammar is somewhat similar in structure to the xml that Excel uses. The link to the full grammar is here:
FileMaker Help FMPXMLRESULT Grammar, https://fmhelp.filemaker.com/help/16/fmp/en/#page/FMP_Help/xml-format.html

Using the basic outline above, notice how there is a FIELD that corresponds to every COL in every row (in the same relative position). A ROW will be repeated for every record that you export. The Export order (as in your dialog) will be the same order (or position) that appears in the XML document. Pay close attention to the “Apply current layout’s data formatting to exported data”. This should be checked for best results:

While Excel may have a similar header row & data row(s), it cannot open the FMPXMLRESULT as a raw export. So we apply an XSLT in the export dialog:

When you click the “Specify” button next to the File radio selection, you use the standard OS navigation to find the file. Ignore the HTTP request option for these demos. These style sheets will automatically download with the different types of demos (details on this below). You can also download them separately to your desktop to be used and viewed anywhere.
xml2CSV.xsl
The XSLT is XML with special commands/tags and functions. The full file can be downloaded from the linked demo database and viewed in the browser or text editor:

Notice the xsl:output attribute method=”text”. The XSLT style sheets that will be creating CSV “text” will use this method. When we get to an XLS (Excel) style sheet for use with the export, we will be using method=”xml”. There are actually three methods that can be used with the transformation, including the two just mentioned as well as method=”html”. These are all a text-format but will produce different results. Keep that in mind if you are creating your own XSLT.
This XSLT loops through the METADATA/FIELDs for the column header and for the ROWs/COLs for all the records and columns (in an inner loop). Every column gets double-quoted regardless of field type. We could test for the TYPE in the corresponding METADATA/FIELD and apply double-quotes for all types except numbers. But we are trying to simplify here to move on to the more complex later.
A tip about the XSLT “command/tags” used. You can learn more about XSL/XSLT and XPath functions and commands here: W3Schools XSLT Introduction. Somewhat like FileMaker Pro functions and scripting, you can have logic and loops and text functions act upon the XML source. XPath is used to get the “location” in the source XML. Relative and absolute paths may be used in the demos provided here. The comments inline inside each of the XSLT will also help you understand what command/tag and/or function is used and why. https://www.w3schools.com/
Demo 2 – XML to simple CSV with static headers
Demo 1, of course, is no better than the standard export as Comma-separated values (or .mer with the header row). You do get all the field names (including related table names). This does NOT solve our problem with “custom header”. We can revise the XSLT to contain static values instead of a loop call to the FIELDs in METADATA.
xml2CSV_headers.xsl
(Only this part changes — download the full file from the example database):

Keep in mind that every time there is a new export with different fields or export order, this static text needs to change in the XSLT. There are ways to pass a field with these values, but again we are trying to move to more complex demos. Also remember to choose this new style sheet in the export dialog:

Demo 3 – XML to .csv Using Repeating Field for Custom Header
Are you excited? We will export a new field (text) with repeating values for this demo. Yes! You heard that correctly. Repeating and Related fields will export with a single COL, followed by DATA for every repeat or related child record.

And include this field in your export order:

In the demo on the Donations layout, I’ve included a Popover Button “Custom Headers”. When this is clicked, the Popover will allow you to set the values for your custom values in this field.

When exported to the raw XML the METADATA/FIELD will show this field as:
Each ROW will show one COL, but many DATA elements:

Why use a repeating field here instead of other field types or related fields? The Repeating fields exported as XML will give you one DATA for every repeat (as shown on the layout), even empty ones:
![]()
Related fields exported as XML will give you only as many children DATA as there are records in the portal. Empty portals (or any empty related single field) will return empty:
![]()
or Included in the demo download is a file called “related_export_sample.xml”. This shows an example from a simple ORDERS database with related Customers and related Items (for the order). This Sample shows what is returned in the raw XML export if any related field (parent or child) has no DATA.
We can leverage the METADATA/FIELD attribute MAXREPEAT to set some variables and use a test to only process the non-empty repeats. To make it simple we will just use one of those wonderful functions to count the number of fields we exported and presume that one has the MAXREPEAT. And we will presume that you followed the above instructions by placing this global repeating field at the bottom of the export order.
xml2CSV_custom.xsl
Even XSLT has variables that can be used throughout for processing. We set some of these for the first demo as the “constants” for carriage return and double-quote characters. Those variables were “global” to be used anywhere in the XSLT. The “fld_count” relies on starting to read the XML source, so occurs after the xsl:template match=”/” in the XSLT.  Like FileMaker Pro variables, a little “context” may be needed. Any variable set inside a ROW loop, for example, will change for every record it finds. Notice that variable names in XSLT are case-sensitive (unlike FileMaker variables) and are called with the “$” prefix. This demo has more things in common with the first demo (dynamic loops to get the column header values). The second demo may be less complex, but requires more manual entry. Some notable differences:
select="count(//fmp:FIELD)"
- A variable is set based on the number of columns we are exporting.
- This will be used other places to limit the number of columns in the header row and limit the columns in each row. We do not want this “header column” to be used in itself or as a column of data.

- This actually replaces our less complex for-each loop of the FIELD elements in the first demo.
- The absolute path to the first ROW (the bracketed “1”) is because we only need these values once. The global field will actually be duplicated in every ROW and we cannot prevent that. But we can limit what we use.
- The next part of the path: COL[$fld_count], uses that variable we set above. We only want the column that matches the number of fields we exported. The function last() would also have worked here, as it is the last column/field in the export order. For example, this would then be: COL[last()].
- Now we will limit the number of DATA elements returned to less than the number of columns. Hopefully you entered the same number of values in the repeating field as the columns headers you desired. DATA[position() & lt ; $fld_count] means to give me every DATA element in that COL in the first ROW, but only if its position is less than the number of columns. Because “<” is a reserved character in XML & XSLT, we use the encoded version for the comparison (see the screenshot and XSLT file).
- All of the above is XPath and understanding it better is what makes it easier to create XSLT.
“User-friendly” for the export means more work for the developer at the beginning. Once the XSLT is created, it should be able to be used with any table export as long as the final field is the repeating field. The rest is all dynamically determined by processing the XML with the XSLT upon export.
Demo 4 – XML to .xls (EXCEL) Using Stylesheet Markup Language
Microsoft Office has a set of schema (grammar) documents that define how an XML can be imported into it. We’ll concentrate on the Spreadsheet ML for this demo.
Wikipedia – Office XML, https://en.wikipedia.org/wiki/Microsoft_Office_XML_formats
Here is a simple example; see the links at the end of this article for more information on this markup language:

Do you see some of the similarities with the FMPXMLRESULT grammar? We have a way to specify the Data Type (such as String, Number, Date), but will only be using String for simplicity. We can use this as a basis in our XSLT to export to this format. The document can only be saved as the text extension “.xls” as the “.xlsx” is a compressed format not possible with this method. There are row limits with .xls:
References: http://www.excel-exercise.com/xls-xlsx-file/ & https://answers.microsoft.com/en-us/msoffice/forum/msoffice_excel-mso_mac-mso_mac2011/what-is-the-real-difference-between-a-xls-vs-xlsx/c7a9d641-d6cf-485d-81d8-1bee60bb17d0?auth=1
xml2Excel.xsl

The most notable changes:
- The filename has the .xls extension even though this is an XML type of export
- The xsl:output method=”xml” and has the media-type attribute
- An xsl:processing-instruction is used to set the file to be of type Excel
- The necessary Excel tags are used, including the namespace declarations
- This export uses two rows for the header to show the difference with the loop and the static values. Choose your preference and comment out or delete the other.
This is the most basic of Excel documents and should open directly in Excel. The file may need to be opened by choosing Open with Excel File menu. The file may then be saved as .xslx as desired.
This particular demo is more like Demo 1 & Demo 2. The first header row uses the field names and the second header row use static values. The main purpose of this demo is to show how this Excel markup language in the XSLT differs from using an export that become CSV.
Demo 5 – XML to Excel with Custom Header (on export)
So, why would we use the Excel Markup Language (XML) to make these kinds of exports? One answer has several parts: Styling, Freeze Panes, multiple worksheets, formulas and more. These are all possible with more complex XSLT (and even with values exported from FileMaker). Our export could be grouped (via the XSLT) to show summaries by Organization or Payment Type, for example. This demo will just use the Styling (for the header row) and Freeze Panes (to keep the header row at the top as you scroll the remaining rows). We will also add back the export of the repeating field for our header columns.
xml2Excel_custom.xsl
This XSLT is a revision of Demo 4 (a simple Excel export) and some of the tricks in Demo 3, such as the dynamic header only (using the global field). This demo also has added styles. The Excel ML has some tags we can add, called STYLES and STYLE (one for each style needed including a default). If you ever create an Excel spreadsheet, Save As with an “XML” Format, and open in a text editor, you will see these automatically defined and assigned to rows or cells.

Styles are defined after the “Workbook” root element, but before the “Worksheet” element in the XSLT. Each Style has an “ss:ID” attribute and an “ss:Name” attribute. These should be unique within the Styles group. A Style with ss:ID=”Default” ss:Name=”Normal” is used for every row & cell without a specific ss:Style. Within each Style are other options, such as ss:Color as a Hex color value or Font ss:Size & ss:Bold=”1″. http://htmlcolorcodes.com/
While we did not format the Amount & Date columns for this demo, these styles could be defined and then dynamically applied to cells based on the FileMaker Pro XML source FIELD TYPE attributes. Compare the CSV exports where we had the columns as double-quoted strings, but they still get right justified when opened in Excel. Excel formatting can get quite complex.
These defined styles have been used in the header row:
Row ss:StyleID=”hdr”
and in the cells in the first and last columns (Date and Amount):
Cell ss:StyleID=”colRt”
We used another XSLT/XPath method similar to the FileMaker Pro Case() function. In XSLT this uses: xsl:choose, xsl:when, & xsl:otherwise. Each xsl:when is similar to xsl:if and needs a “true test”. This demo is testing for the first and last columns (Date and amount):
xsl:when test=”position()=1″
xsl:when test=”position()=last()”
…and columns failing either test get the Cell with no ss:StyleID. This is the ‘default’ defined in the xsl:otherwise. Details are in the downloadable XSLT for this demo.

An added bonus is the Freeze Panes option in Excel ML. This is defined in the WorksheetOptions section of the XSLT, occurring just before the close of the Worksheet tag. These options apply to each worksheet in a workbook, so can be different for each one.

The Freeze Panes is set up manually in Excel, by clicking in a row just below the header (or other row you want to “stick”). Then select “Freeze Panes” under the “Windows” menu. If you have a wide spreadsheet and want to freeze a column (or two), that can also be done (with or without the header pane).
Download and study this XSLT. It’s still very simplified showing what can be done with styling and the Freeze Pane feature of Excel! The Donations layout of the demo has a selection drop-down to run the exports (with XSLT) or just download the XSLT or other sample XML.

The “Custom Headers” button is the Popover to add/edit the custom headers. The “Select an XML Report” is a drop down to choose a report or raw assets document export. Once selected, click the “Donation XML Export” button.
Also view the Script used by this final button, “export to xml” to see some tricks with variables to make the export dynamic based on the report selection. Comments in this script and within the XSLT can provide more information that may not be directly noted in this article.
Tips and Troubleshooting
- The FMPDSORESULT grammar can be used for Export (as XML) from FileMaker Pro. XSLT can also be used to transform it into the .csv and .xls needed for Excel. The XPath would be different for getting the desired values. While FMPDSORESULT is still an available grammar for export, you may see this at the top of the document in a comment: This grammar has been deprecated – use FMPXMLRESULT instead
The biggest reason to use FMPXMLRESULT grammar, is that it is the only grammar that can be used for Import (XML) into FileMaker Pro. It may be better to learn its format for more generic and dynamic XSLT creation. - If you get an error dialog (when using XSLT with XML for Export or Import) it may not be large enough to get all the details, but pay attention to text with “Line: xx”. This will give you a clue where the error may be in your XSLT. Make a screenshot of the error message before dismissing for further investigation.
- Use an XML editor that allows you to create and test your XSLT outside FileMaker Pro.
- A method used in this demo for “storing” the downloadable XSLT and other sample XML is to place them as TEXT objects on the Layout. Once they are pasted there (in Layout Mode), they are sized smaller and named in the Inspector. These kinds of objects can be accessed with the FileMaker Pro function, “GetLayoutObjectAttribute()“. Here we are also applying Base64 to encode and decode. This method allows us to store the text into a variable but as a container.
- See the script “export to xml” in the demo file for how these “layout objects” are used.
- If you have FileMaker Pro 16, you can use Export Field Contents script step, the TextEncode() function & Insert Text (into a variable) script step for some of this storage and output.
- In FileMaker Pro 16, you can use a Card Window instead of the popover used for this demo. This would allow you to enter the values for the custom headers.
- Do you like a blank first column? Add a global field and make it’s “header” also blank. This will show in every ROW with the empty value. Test for COL[1] as needed to use the default Style.
- In addition, related field records (one field) would work, as the XSLT & XPath is the same. Just be careful to have the correct (non-blank) number of related records for the header text labels. These need to be in the proper sort order as well to match each header with each column. (This is a use case where the Repeating field is actually good for temporary storage, as global, and a part of this kind of export.)
- Formulas are not defined in any of these demos, but they are possible for row total, column subtotals and totals. More advanced XSLT can even group by any of the columns to make subheaders or even separate worksheets within a workbook. Column and row “spans” are even possible if desired.
- These references on the Excel ML may help with more details:
XML Spreadsheet Reference, http://msdn.microsoft.com/en-us/library/aa140066(office.10,loband).aspx
Dive into SpreadsheetML (parts 1 & 2), http://msdn.microsoft.com/en-us/library/bb226687(office.11).aspx,
http://msdn.microsoft.com/en-us/library/bb226693(office.11).aspx - See these articles for more on the Export Field Contents script step:
An In-Depth Look at “Export Field Contents”, https://filemakerhacks.com/2012/09/23/export-field-contents-as-utf-8/
Export Field Contents (Update for FM 16), https://filemakerhacks.com/2017/05/09/export-field-contents-update-for-fm-16/ - Error dialog when importing raw XML export from FileMaker Pro into Excel:

TIP: use this “feature” to view your TEXT output of XML or XSLT. You will get a row for every “return” in the XML/XSLT document when viewed this way!
В Microsoft Excel можно легко импортировать данные XML, созданные в других базах данных и приложениях, сопоставить XML-элементы из схемы XML с ячейками листа и экспортировать обработанные данные XML для взаимодействия с другими базами данных и приложениями. Эти функциональные возможности позволяют использовать Office Excel как генератор файлов данных XML со знакомым пользовательским интерфейсом.
В этой статье
-
Причины использования XML в Excel
-
Данные XML и файлы схемы
-
Ключевые сценарии XML и Excel
-
-
Основной процесс использования данных XML в Excel
-
Работа с картами XML
-
Использование области задач источника XML
-
Типы элементов и их значки
-
Работа с ячейками с точечным сопоставлением
-
Работа с повторяющимися ячейками в XML-таблицах
-
Обеспечение безопасности карт XML
-
Импорт данных XML
-
Работа с полученной схемой
-
Экспорт данных XML
-
Использование файла Excel формата Office Open XML с поддержкой макросов
-
Причины использования XML в Excel
XML является технологией, разработанной для управления структурированными данными и отображения этих данных в виде удобочитаемого текстового файла. Язык XML соответствует отраслевым стандартам и может быть обработан многими базами данных и приложениями. С помощью XML многие разработчики могут создавать собственные настроенные теги, структуры данных и схемы. В целом XML существенно облегчает определение, передачу, проверку и интерпретацию данных в различных базах данных, приложениях и организациях.
Данные XML и файлы схемы
Excel работает преимущественно с двумя типами XML-файлов:
-
файлами данных XML (XML), которые содержат настраиваемые теги и структурированные данные;
-
Файлы схемы (XSD), которые содержат теги схемы, в которых действуют правила, например тип данных и проверка.
В стандарте XML также определяются файлы преобразования XSLT, которые используются для применения стилей и преобразования данных XML в другие форматы. Вы можете использовать эти преобразования перед импортом XML-файлов в Excel и после экспорта XML-файлов из Excel. Если XSLT-файлы связаны с XML-файлами данных, импортированными в Excel, вы можете применить форматирование перед добавлением данных на лист, только открыв XML-файл в Excel с помощью команды Открыть. Прежде чем нажать кнопку Открыть, выберите тип файлов XML (*.XML), чтобы просмотреть XML-файлы в папке.
Ключевые сценарии XML и Excel
С помощью XML и Excel вы можете управлять книгами и данными такими способами, которые ранее были невозможны или представляли трудности. Используя карты XML, вы можете легко добавлять, идентифицировать и извлекать определенные фрагменты бизнес-данных из документов Excel. Например, счет-фактура, содержащий имя и адрес покупателя, или отчет с финансовыми показателями за предыдущий квартал больше не будут статичными отчетами. Эти сведения можно с легкостью импортировать из баз данных и приложений, изменять, а также экспортировать в те или иные базы данных и приложения.
Вот ключевые сценарии, для работы с которыми предназначены возможности XML:
-
расширение функциональных возможностей существующих шаблонов Excel путем сопоставления XML-элементов с существующими ячейками. Это облегчает удаление и добавление данных XML в шаблонах, не изменяя сами шаблоны;
-
использование данных XML в качестве входных данных для существующих моделей вычислений путем сопоставления XML-элементов с существующими листами;
-
импорт файлов данных XML в новую книгу;
-
импорт данных XML из веб-службы на лист Excel;
-
экспорт данных в сопоставленных ячейках в файлы данных XML независимо от других данных в книге.
К началу страницы
Основной процесс использования данных XML в Excel
На следующей схеме показано, как взаимодействуют различные файлы и операции при использовании XML в Excel. Фактически этот процесс состоит из пяти этапов.
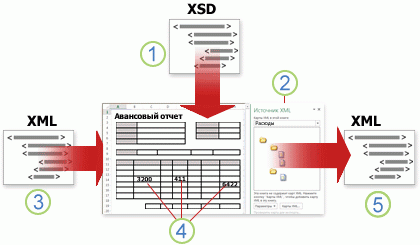
 добавление файла схемы XML (XSD) в книгу
 сопоставление элементов схемы XML с отдельными ячейками или XML-таблицами
 импорт файла данных XML (.xml) и привязку XML-элементов к ячейкам
 ввода данных, перемещения соедини ячеек и Excel функциональных возможностей, сохранения структуры и определений XML
 экспорт измененных данных из картографовых ячеек в файл данных XML
Работа с картами XML
Вы можете создать или открыть книгу в Excel, прикрепить файл схемы XML (XSD) к книге, а затем с помощью области задач Источник XML соедиировать XML-элементы схемы с отдельными ячейками или таблицами. Выполнив такое сопоставление, вы можете импортировать и экспортировать данные XML в ячейки таблицы и из них соответственно.
При добавлении файла схемы XML (XSD) в книгу создается карта XML. Как правило, карты XML используются для создания сопоставленных ячеек и управления взаимосвязью между такими ячейками и отдельными элементами схемы XML. Кроме того, эти карты используются для привязки содержимого сопоставленных ячеек к элементам схемы при импорте или экспорте файлов данных XML (XML).
Вы можете создавать сопоставленные ячейки двух видов: ячейки с точечным сопоставлением и повторяющиеся ячейки (отображаемые в виде XML-таблиц). Для более гибкой разработки книги вы можете перемещать сопоставленные ячейки в любое место на листе и в любой последовательности, даже отличающейся от последовательности, заданной в схеме XML. Вы также можете выбрать, какие элементы следует сопоставлять.
Важно знать такие правила использования карт XML:
-
книга может содержать одну или несколько карт XML;
-
одновременно можно сопоставить только один элемент с одним расположением в книге;
-
каждая карта XML независима от других, даже если несколько карт XML в одной книге относятся к одной и той же схеме;
-
карта XML может содержать только один корневой элемент. При добавлении схемы, определяющей более одного корневого элемента, появится запрос на выбор корневого элемента, который будет использоваться в новой карте XML.
Использование области задач источника XML
Используйте область задач Источник XML для управления картами XML. Чтобы ее открыть, на вкладке Разработчик в группе XML нажмите Источник. На следующей схеме показаны основные функциональные возможности этой области задач.
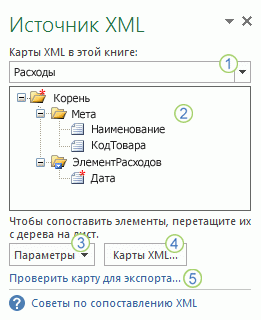
1. Отображение карт XML, добавленных в книгу.
2. Отображение иерархического списка XML-элементов в текущей карте XML.
3. Установка параметров при работе с областью задач Источник XML и данными XML (например, параметров, отвечающих за предварительный просмотр данных и управление заголовками).
4. Открытие диалогового окна Карты XML, которое служит для добавления, удаления или переименования карт XML.
5. Проверка возможности экспорта данных XML через текущую карту XML.
К началу страницы
Типы элементов и их значки
В следующей таблице приведены все типы XML-элементов, с которыми может работать Excel, и значки, используемые для представления каждого типа элементов.
|
Тип элемента |
Значок |
|---|---|
|
Родительский элемент |
|
|
Обязательный родительский элемент |
|
|
Повторяющийся родительский элемент |
|
|
Обязательный повторяющийся родительский элемент |
|
|
Дочерний элемент |
|
|
Обязательный дочерний элемент |
|
|
Повторяющийся дочерний элемент |
|
|
Обязательный повторяющийся дочерний элемент |
|
|
Атрибут |
|
|
Обязательный атрибут |
|
|
Простое содержимое в сложной структуре |
|
|
Обязательное простое содержимое в сложной структуре |
|


К началу страницы
Работа с ячейками с точечным сопоставлением
Ячейка с точечным сопоставлением — это ячейка, сопоставленная с неповторяющимся XML-элементом. Такую ячейку вы можете создать, переместив неповторяющийся XML-элемент из области задач Источник XML в отдельную ячейку листа.
Название перемещаемого на лист неповторяющегося XML-элемента вы можете назначить заголовком сверху или слева от ячейки с точечным сопоставлением при помощи смарт-тега. В качестве заголовка также можно использовать текущее значение ячейки.
Кроме того, в ячейке с точечным сопоставлением вы можете использовать формулу, если ячейка сопоставлена с XML-элементом, который имеет тип данных определения схемы XML (XSD), интерпретируемый Excel как число, дата или время.
К началу страницы
Работа с повторяющимися ячейками в XML-таблицах
По внешнему виду и функциональным возможностям XML-таблицы подобны таблицам Excel. XML-таблицы являются таблицами Excel, сопоставленными с одним или несколькими повторяющимися XML-элементами. Каждый столбец XML-таблицы соответствует XML-элементу.
XML-таблица создается в следующих случаях:
-
при использовании команды Импорт (в группе XML на вкладке Разработчик) для импорта файла данных XML;
-
Используйте команду Открыть из Excel, чтобы открыть файл данных XML, а затем выберите В качестве XML-таблицы в диалоговом окне Открыть XML.
-
при использовании команды Из импорта данных XML (кнопка команды Из других источников в группе Внешние данные на вкладке Данные) для импорта файла данных XML и дальнейшего выбора параметров XML-таблица на существующем листе или Новый лист в диалоговом окне Импорт данных;
-
при перетаскивании на лист одного или нескольких повторяющихся элементов из области задач Источник XML.
При создании XML-таблицы названия XML-элементов автоматически используются в качестве названий столбцов. Вы можете изменить эти названия. Но при экспорте данных из сопоставленных ячеек автоматически будут использоваться исходные названия XML-элементов.
При работе с XML-таблицами полезны два параметра, доступные с помощью кнопки Параметры в области задач Источник XML.
-
Автоматически объединять элементы при сопоставлении.
Если установлен соответствующий флажок, в Excel создается одна XML-таблица из нескольких полей, перенесенных на лист. Этот параметр работает, пока поля перемещаются в одну строку в виде последовательного ряда. Если флажок снят, каждый элемент отображается в виде отдельной XML-таблицы. -
Данные с заголовками.
Если установлен соответствующий флажок, существующие данные заголовков используются в качестве названий столбцов для повторяющихся элементов, сопоставляемых на листе. Если флажок снят, названия XML-элементов используются в качестве названий столбцов.
С помощью XML-таблиц вы можете импортировать, экспортировать, сортировать, фильтровать и печатать данные, основанные на источнике данных XML. Но существуют некоторые ограничения относительно расположение XML-таблиц на листе.
-
XML-таблицы основаны на строках, то есть вырастают из строки с заглавной строкой вниз. Добавить новые записи над существующими строками невозможно.
-
Невозможно транспонировать XML-таблицу так, чтобы новые записи добавлялись справа.
Вы можете использовать формулы в столбцах, сопоставленных с XML-элементами, которые имеют тип данных определения схемы XML (XSD), интерпретируемый Excel как число, дата или время. В XML-таблице, как и в таблице Excel, формулы копируются вниз по столбцу по мере добавления новых строк.
Обеспечение безопасности карт XML
Карта XML и содержащиеся в ней сведения об источнике данных сохраняются в книге Excel, а не на определенном листе. Злоумышленник может просмотреть эти данные карты с помощью макроса VBA (Microsoft Visual Basic для приложений). Более того, если книга сохранена в файле Excel формата Open XML с поддержкой макросов, данные карты можно просмотреть с помощью Блокнота или другого текстового редактора.
Если вы хотите по-прежнему использовать сведения о карте, но при этом скрыть конфиденциальные данные, вы можете удалить из книги определение источника данных схемы XML, не прекращая экспорт данных XML. Для этого снимите флажок Сохранять определение источника данных в книге в диалоговом окне Свойства карты XML, которое можно открыть, выбрав Свойства карты в группе XML на вкладке Разработчик.
Если удалить лист до удаления карты, сведения карты об источниках данных и, возможно, другие конфиденциальные сведения останутся в книге. При обновлении книги для удаления конфиденциальных сведений обязательно удалите карту XML до удаления листа, чтобы окончательно удалить данные карты из книги.
К началу страницы
Импорт данных XML
Вы можете импортировать данные XML в имеющуюся в книге карту XML. При этом данные из файла привязываются к карте XML, хранящейся в этой книге. Это означает, что каждый элемент данных в файле данных XML имеет соответствующий элемент в схеме XML, который был сопоставлен из файла схемы XML или из полученной схемы. Каждая карта XML может содержать только одну привязку данных XML, которая при этом связана со всеми сопоставлениями, созданными на основе единой карты XML.
В диалоговом окне Свойства карты XML (на вкладке Разработчик в группе XML выберите пункт Свойства карты) расположены три параметра, используемые по умолчанию, с помощью которых вы можете управлять привязкой данных XML:
-
<c0>Проверять данные на соответствие схеме при импорте и экспорте</c0>. Указывает, следует ли Excel проверять данные по карте XML при импорте. Установите флажок, если нужно, чтобы импортируемые данные XML соответствовали схеме XML.
-
<c0>Заменять существующие данные новыми</c0>. Указывает, следует ли заменять данные при импорте. Установите флажок, если необходимо заменять текущие данные новыми (например, если в новом файле данных XML содержатся обновленные данные).
-
<c0>Добавлять новые данные в существующие XML-таблицы</c0>. Указывает, следует ли добавлять содержимое источника данных к существующим данным на листе. Используйте этот параметр, если, например, вам необходимо объединить данные из нескольких похожих файлов данных XML в одну XML-таблицу или вы не хотите, чтобы содержимое ячейки с функцией было перезаписано.
При импорте данных XML вам может понадобиться заменить некоторые сопоставленные ячейки. Например, если сопоставленные ячейки содержат формулы и эти формулы не следует заменять при импорте XML-файла. Эту проблему можно решить двумя способами:
-
перед импортом данных XML отмените сопоставление элементов, которые не следует заменять. По завершении импорта данных XML вы можете повторно сопоставить XML-элементы ячейкам с формулами, чтобы экспортировать в файл данных XML результаты, полученные после применения формул;
-
создайте две карты XML на основе одной схемы XML. Используйте одну карту XML для импорта данных XML. В этой «карте импорта» не сопоставляйте элементы с ячейками, содержащим формулы или другие данные, которые не следует заменять. Другую карту XML используйте для экспорта данных. В этой «карте экспорта» сопоставьте с XML-файлом элементы, которые необходимо экспортировать.
Примечание: Возможность импорта данных XML из веб-службы с помощью файла подключения службы извлечения данных (UXDC) для подключения к источнику данных больше не поддерживается в пользовательском интерфейсе более новых версий, чем Excel 2003. Если вы откроете книгу, созданную в Excel 2003, вы сможете только просмотреть их, но не сможете изменить или обновить исходные данные.
Работа с полученной схемой
При импорте данных XML без добавления соответствующей схемы XML для создания карты XML Excel пытается получить схему, основываясь на тегах, определенных в файле данных XML. Полученная схема хранится в книге и позволяет работать с данными XML, даже если файл схемы XML не связан с книгой.
При работе с импортированными данными XML, которые имеют полученную схему, вы можете настроить область задач Источник XML. Выберите параметр Предварительный просмотр данных в области задач на кнопке Параметры, чтобы отобразить первую строку данных в качестве образца данных в списке элементов, если вы импортировали данные XML, связанные с картой XML в текущем сеансе Excel.
Полученную схему Excel невозможно экспортировать как отдельный файл данных схемы XML (XSD). Несмотря на наличие редакторов схем XML и других методов создания файлов схем XML, они могут оказаться недоступными или неудобными в работе. Вместо них вы можете воспользоваться надстройкой Excel 2003 XML Tools 1.1, с помощью которой можно создавать файлы схемы на основе карты XML. Дополнительные сведения см. в Excel XML Tools версии 1.1.
Экспорт данных XML
Экспорт данных XML осуществляется путем экспорта содержимого сопоставленных ячеек листа. При экспорте данных в Excel применяются такие правила для определения данных и способов их сохранения:
-
пустые элементы не создаются при наличии пустых ячеек для дополнительного элемента, но они создаются при наличии пустых ячеек для обязательного элемента;
-
запись данных производится в кодировке UTF-8;
-
все пространства имен определяются в корневом XML-элементе;
-
Excel перезаписывать существующие префиксы пространства имен. По умолчанию области имен назначен префикс ns0. Последовательные пространства имен обозначаются ns1, ns2 для ns<>, где <count> — количество пространства имен, записанное в XML-файл.
-
узлы комментариев не сохраняются.
Вы можете отобразить диалоговое окно Свойства карты XML (нажмите кнопку Свойства карты в группе XML на вкладке Разработчик).) а затем используйте параметр Проверить данные на схеме для импорта и экспорта (активны по умолчанию), чтобы указать, Excel проверяет данные на карте XML при экспорте. Выберите этот параметр, если вы хотите, чтобы экспортируемая XML-информация соответствовала схеме XML.
Использование файла Excel формата Office Open XML с поддержкой макросов
Книгу Excel можно сохранять в различных форматах файла, включая файлы Excel формата Office Open XML (XLSM) с поддержкой макросов. Excel содержит схему XML, определяющую содержимое книги Excel, в том числе теги XML, в которых хранятся все сведения книги (например, данные и свойства), а также всю структуру книги. Файл Excel формата Office XML с поддержкой макросов может применяться в пользовательских приложениях. Например, разработчики могут создать приложение, которое выполняет поиск данных в нескольких книгах, сохраненных в этом формате, и создает систему отчетов на основании полученных данных.
К началу страницы
Дополнительные сведения
Вы всегда можете задать вопрос специалисту Excel Tech Community или попросить помощи в сообществе Answers community.
См. также
Импорт данных XML
Сопоставление XML-элементов с ячейками карты XML
Экспорт данных XML
Переописывание данных XML
XSLT Excel engine
This project is dedicated to changing the world, together. There’s a lot of Microsoft Office documents generated by the ERP / CRM / whatever systems around the world, but most of those exports are done in SpreadsheetML. This project is specifically aimed at any kind of Excel generation, that uses XSLT transformation.
Using SpreadsheetML is bad. More than bad. You generate the xml file, save it as .xsl and when it’s opened, the user has to repair the file — forcing himself into three clicks per file. When he tries to save it, Excel tries to save it in XML format and therefore, the user is forced into further clicking.
Let’s generate VALID 2007+ formats!
All you need to do is following:
<?xml version='1.0'?>
<xsl:stylesheet version="2.0" xmlns:xsl="http://www.w3.org/1999/XSL/Transform">
    <xsl:include href="2012.engine.xsl" />

    <xsl:template match="/">
        <xsl:call-template name="generate_excel"></xsl:call-template>
    </xsl:template>
</xsl:stylesheet>
That will produce empty, valid xlsx file structure. You want to replace assets (if you’re using free version of Saxon) and mainly — zip it & rename the .zip into .xlsx . No questions asked, excel will open the file and it will be perfectly valid.
Documentation
Documentation is available within Wiki of this project as walkthrough.
tl;dr
Here’s your template.xsl file:
<xsl:stylesheet version="2.0" xmlns:xsl="http://www.w3.org/1999/XSL/Transform">
    <xsl:include href="engine/2012.engine.xsl" />
    <xsl:include href="static.xsl" />

    <!-- put your data-preprocessing in here -->

    <xsl:variable name="images">
        <!-- generate <image> structure in here based on data -->
    </xsl:variable>

    <xsl:variable name="contents">
        <!-- put your worksheet generation in here -->
    </xsl:variable>

    <xsl:template match="/">
        <xsl:call-template name="generate_excel">
            <xsl:with-param name="author">ACME Corp.</xsl:with-param>
            <xsl:with-param name="themes"><xsl:copy-of select="$themes" /></xsl:with-param>
            <xsl:with-param name="styles"><xsl:copy-of select="$styles" /></xsl:with-param>
            <xsl:with-param name="images"><xsl:copy-of select="$images" /></xsl:with-param>
            <xsl:with-param name="sheetContents"><xsl:copy-of select="$contents" /></xsl:with-param>
        </xsl:call-template>
    </xsl:template>
</xsl:stylesheet>
Run it as follows:
cd tmp/outputtransform -xsl:../template.xslt -s:../data.xmlcd tmp/output && zip * report.zip && mv report.zip report.xslx
Done!
Implementing into current systems
See under the hood chapter of documentation.
License
Licensed under MIT license. Full text of license available in LICENSE.md file.
Authors
Author of the engine is Pavel Ptacek and contributors | @foglcz | in/foglcz | birdie@animalgroup.cz
This project has been created with love, in spare time. The main reason was to teach the ERP systems new & valid formats of excel — while in 2007 it was not suitable to generate xlsx formats, it’s 2013 now. I think it’s time we abandoned the SpredsheetML and started using OpenXML instead.
Feel free to fork, update and pull-request the shit out of this! We need this to grow.
|
0 / 0 / 0 Регистрация: 30.06.2016 Сообщений: 9 |
|
|
1 |
|
|
30.06.2016, 12:16. Показов 9384. Ответов 16
Соратники, У меня получилось только выгрузить нужные элементы в шапку. А дальше застряла. Миниатюры
0 |


|
Programming Эксперт 94731 / 64177 / 26122 Регистрация: 12.04.2006 Сообщений: 116,782 |
30.06.2016, 12:16 |
|
Ответы с готовыми решениями: Преобразование XSLT в Excel XSLT 3.0 XSLT XSLT и т.д. Ссылки на смежные темы: 16 |
|
203 / 184 / 42 Регистрация: 23.10.2015 Сообщений: 778 |
|
|
30.06.2016, 13:31 |
2 |
|
legotar, Добавлено через 3 минуты Добавлено через 16 минут
0 |
|
0 / 0 / 0 Регистрация: 30.06.2016 Сообщений: 9 |
|
|
30.06.2016, 13:54 [ТС] |
3 |
|
ФридрихФ, входной xml прикреплен в архиве, в прикрепленном в первом сообщении xml_trans.txt — то, что получилось у меня. Получилось вывести заголовок. Сейчас затруднение в том, что я не понимаю как циклить имеющуюся у меня структуры, чтобы она вписалась в тот шаблон, что под катом. В прикрепленном файле предполагаемый шаблон.
0 |
|
203 / 184 / 42 Регистрация: 23.10.2015 Сообщений: 778 |
|
|
30.06.2016, 14:01 |
4 |
|
legotar,
я не понимаю как циклить имеющуюся у меня структуры вот чтоб разобраться тебе во всем этом, надо понять что делается с XML данными…у тебя есть некий XML файл с некими данными, потом ты хочешь его импортировать в какую нибудь программу, но для того чтоб это сделать надо написать фильтр для импорта и экспорта. А этот фильтр ни что иное как технология XSLT в данном случае и в этой технологии всё циклится и рекурсируется…
0 |

|
6192 / 2444 / 717 Регистрация: 11.04.2015 Сообщений: 3,956 Записей в блоге: 43 |
|
|
30.06.2016, 14:27 |
5 |
|
legotar, «циклить» можно с помощью for-each или apply-templates, хотя, строго говоря, настоящих циклов здесь нет, но «Если не видно разницы, зачем платить больше?» )))
1 |
|
0 / 0 / 0 Регистрация: 30.06.2016 Сообщений: 9 |
|
|
30.06.2016, 15:03 [ТС] |
6 |
|
diadiavova, обрезала образец входной таблицы до двух дней) Трудность у меня заключается в том, что иерархия такая: итем в заголовке-календарный день-почасовка, И вопрос в том, возможно ли разложить входящую структуру в конечную.
0 |
|
203 / 184 / 42 Регистрация: 23.10.2015 Сообщений: 778 |
|
|
30.06.2016, 15:15 |
7 |
|
legotar, ты с какими программами работаешь? напиши сам процесс действий!
0 |
|
0 / 0 / 0 Регистрация: 30.06.2016 Сообщений: 9 |
|
|
30.06.2016, 15:24 [ТС] |
8 |
|
ФридрихФ, в sap erp я получаю внутреннюю таблицу, которую мне нужно выгрузить в excel, для чего раньше я пользовалась ole-способом. Но с текущими объемами оле уже не очень вариант, в связи с чем я открыла для себя большой новый мир XSLT. В котором, собственно, сейчас и пытаюсь разобраться. Прямо сейчас с трансформацией, которая должна преобразовать xml внутренней таблицы sap в xml excel.
0 |
|
diadiavova 6192 / 2444 / 717 Регистрация: 11.04.2015 Сообщений: 3,956 Записей в блоге: 43 |
||||
|
30.06.2016, 15:38 |
9 |
|||
|
обрезала образец входной таблицы до двух дней) Ну, сократила с двенадцати тысяч до одной — уже прогресс. ))
итем в заголовке-календарный день-почасовка, Можешь пояснить, где это находится в самом документе. Я не понимаю, что такое почасовка и как она представлена в документе. Общая методика выглядит так. Сначала переносишь пространства имен из корневого элемента готового документа в корневой элемент преобразования. Потом также переносишь туда все элементы, которые в результирующем документе не меняются(статические данные). А потом с изменяющимися элементами уже можно работать. Что я извлек из тех скудных сведений, что ты предоставила — изобразил здесь
Естественно в фориче селект напиши свой (Вместо Row_Path) там должен быть реальный путь к блокам, содержащим данные для одной строки. Вместо конкретных значений ячеек (типа SERGE_TXT_1) впиши value-of, со ссылкой на реальные данные в текущем блоке. Что касается изменения порядка следования данных в ячейках, то тут все вообще просто: если ячейки одной строки перечисляются вручную, как в моем примере, то и проблемы такой не будет, просто правильно надо указать выражения, откуда берутся данные.
0 |
|
0 / 0 / 0 Регистрация: 30.06.2016 Сообщений: 9 |
|
|
30.06.2016, 15:59 [ТС] |
11 |
|
изобразил здесь ненене, это часть формирующая заголовок выходного листа и с ним более-менее ок. И там форич должен быть именно по ячейке, потому что SERGE_TXT всегда неопределенное количество(количество столбцов разное) и в столбцах должны содержаться данные по ним. Сейчас входная структура такая: Насколько я поняла, ескель из шаблона данные берет построчно, то есть мне входную иерархию надо перебирать сначала по дню, потом по часу, птом подниматься на уровень вверх и уже в зависимости от столбца брать почасовку. Добавлено через 1 минуту
0 |
|
6192 / 2444 / 717 Регистрация: 11.04.2015 Сообщений: 3,956 Записей в блоге: 43 |
|
|
30.06.2016, 16:26 |
12 |
|
legotar, в таком случае тебе надо при запросе данных обращаться к той части документа, где находятся заголовки, извлекать из них нужную информацию и использовать ее при обращении к элементам ячеек. Я мог бы показать как это выглядит, но тут проблема все та же — ты не объяснила, где в исходном документе находятся интересующие тебя данные. А между тем, что я вижу в исходном документе и в конечном — сходств мало. Можешь более конкретно объяснить, где в исходном документе берутся данные и как они должны вставляться в результирующий? Без вот этих всех почасовок, у тебя в документе нет никаких почасовок, а есть элементы, атрибуты и их имена и значения.
0 |
|
0 / 0 / 0 Регистрация: 30.06.2016 Сообщений: 9 |
|
|
01.07.2016, 10:06 [ТС] |
13 |
|
исходный хмл = xml_table.7z Мне нужно сделать xslt таким образом, чтобы в выходном хмл для еселя содержимое <I_POK_EE> выводилось в столбец для каждого итема, а дни и часы в первых двух столбцах, как на первом скриншоте. Добавлено через 5 минут то есть сначала ряд если форич по итемам, то I_POK_EE выводится только для первого часа первого дня.
0 |
|
6192 / 2444 / 717 Регистрация: 11.04.2015 Сообщений: 3,956 Записей в блоге: 43 |
|
|
01.07.2016, 13:14 |
14 |
|
legotar, я кучу времени потратил на то, чтобы сопоставить то, что ты написала с тем что содержится в представленных документах. И ты знаешь, у меня сложилось впечатление, что документы эти из разных мест надерганы. На скриншотах я вижу заголовки, которых нет в исходных документах. Для того, чтобы мне понять, что откуда берется мне нужно иметь исходный документ и то, что из него должно получиться. А у тебя в исходном документе одни данные, на скриншотах другие, а в примере результирующего документа вообще какая-то абракадабра типа 1_1, 1_2 и так далее. И как это все сопоставлять? Тем более, что ты сама пишешь, что заголовки столбцов всегда разные и количество их разное. Вот и укажи, что в документе является заголовком столбца, и как данные сопоставляются с этим заголовком. И примеры исходного и результирующего документа должны содержать одни и те же данные.
0 |
|
6192 / 2444 / 717 Регистрация: 11.04.2015 Сообщений: 3,956 Записей в блоге: 43 |
|
|
01.07.2016, 13:42 |
15 |
|
На данный момент, из того что понял сделал вот такой набросок и результат преобразования (в аттаче).Преобразовал твою таблицу. В экселе не открывается, но общая идея должна быть понятна.
0 |
|
6192 / 2444 / 717 Регистрация: 11.04.2015 Сообщений: 3,956 Записей в блоге: 43 |
|
|
01.07.2016, 13:58 |
16 |
|
Ошибки исправил, теперь можно и в экселе просмотреть
1 |
|
0 / 0 / 0 Регистрация: 30.06.2016 Сообщений: 9 |
|
|
04.07.2016, 08:30 [ТС] |
17 |
|
diadiavova, попробовала, спасибо, но не оно. По вашему выводу календарных дней получается вообще по количеству записей в паре <ZHOUR> и <I_POK_EE>, В любом случае большое спасибо, благодаря вашему примеру есть над чем поразбираться + купила книгу Тидуэлла по xslt. ТЕперь, когда не жмут сроки (оле уже сдала) можно будет поразбираться с трансформацией)
0 |
|
IT_Exp Эксперт 87844 / 49110 / 22898 Регистрация: 17.06.2006 Сообщений: 92,604 |
04.07.2016, 08:30 |
|
Помогаю со студенческими работами здесь Запуск xslt Readviewentries & Xslt Xslt преобразование XSLT рекурсия Искать еще темы с ответами Или воспользуйтесь поиском по форуму: 17 |
Creating XSL-XML Templates For BI/XML EXCEL Reports
Introduction:
An XSL-XML template is a report layout that can be designed in Microsoft Excel for retrieving and formatting our enterprise reporting data in Excel.
Creating the Real Excel templates is possible in EBS R12 with Excel Analyzer but this feature is not available in EBS R11i.
Features of XSL-XML Templates:
1. Till now rtf templates were used and MS Word only supports 63 columns in the report. So if the report consists of more than 63 columns then use the method of developing XSL-XML template which in turn will give the EXCEL format of report.
2. We do not need BI Publisher software for this (Third Party Tools are available for XSL Conversions).
Prerequisites:
Following are prerequisites for designing the XSL-XML templates:
- Microsoft Excel 2003 or later. The template file must be saved as XML Spreadsheet 2003.
- The report designer aka Developer should have knowledge of XSL.
- The report data model should be readily available.
Steps Building a Simple XSL-XML Template:
Follow the below mentioned steps:
- Obtain sample XML data from the rdf output (Set the output to ‘XML’).
- Open the Blank Excel Template file and save as name (Required name).Design the layout in Excel. Map the tags accordingly onto your layout.
- Save the file as .xml in xml 2003 spreadsheet
- Convert the xml file into xsl file(Third Party Tool xml to xsl convertor)
- Register the template as XML-XSL in XML Publisher Administrator
- Set the viewer options from System Administrator
- View the Report Output
Step 1: Obtain sample XML data from rdf
Sample data needed in order to know the field names and the hierarchical relationships to properly mark up on the template.
Eg:<ROOT>
<G>
<A>a1</A>
<B>b1</B>
<C>c1</C>
<D>d1</D>
<E>e1</</E>
<F>f1</F1>
</G>
<G>
<A>a2</A>
<B>b2</B>
<C>c2</C>
<D>d2</D>
<E>e2</</E>
<F>f2</F1>
</G>
</ROOT>
Step 2: Map the Tags in EXCEL file
Write the tags manually in the blank excel file according to the tags generated in the sample xml file according to the fields.

Step 3: Save the file in xml spreadsheet 2003 format with .xml extension.

Step 4: Make XSL file from the above XML file.
Use the third party tool XML to XSL converter or the knowledge of XSL is required to manually prepare the XSL file.
Step 5: Register the template as type XSL-XML file.
Register the template with type as XSL-XML, data definition in XML Publisher Administrator. Create the concurrent program in Oracle Applications and attach this XML programs to it.

Step 6: Set the Viewer options.
Go to System Administrator Responsibility. Viewer options Select file format as xml and mime type as “application/vnd.ms-excel”
Run the concurrent request for the report created as mentioned above, the output will be in excel format.

Step 7: After running the Concurrent Program, Viewer Option window is available to view the output
After running the concurrent program, click on the output button, the viewer options window pops up. Select Microsoft Excel for viewing the output in Excel.

Author: Ekta Rani Sindhu
Email: ektarani.sindhu@gmail.com
04 Jun 2004
Use ASP.NET and a generic XSL file to convert any XML data into an Excel spreadsheet. This generic XSL can be used to present XML reports to users in Excel via their web browser.

Feedback
Views (Total / Last 10 Days):
87014/
104
[ Back To Top ]
[Download Code]
Use ASP.NET and a generic XSL file to convert any XML data into an Excel spreadsheet. This generic XSL can be used to present XML reports to users in Excel via their web browser. The XML data actually gets converted to an Excel XML spreadsheet, and for that reason Excel 2002/2003 is required on the client. Once the data has been converted it can be saved, on the client, as an Excel Spreadsheet or opened in the client’s web browser.
[ Back To Top ]
[Download Code]
This is an example of the XML file that is included in the download. The XML file is required to be in this format to work with the XSL.
<?xml version="1.0"?>
<NewDataSet>
  <authors>
    <au_id>172-32-1176</au_id>
    <au_lname>White</au_lname>
    <au_fname>Johnson</au_fname>
    <phone>408 496-7223</phone>
    <address>10932 Bigge Rd.</address>
    <city>Menlo Park</city>
    <state>CA</state>
    <zip>94025</zip>
    <contract>true</contract>
  </authors>
  <authors>
    <au_id>213-46-8915</au_id>
    <au_lname>Green</au_lname>
    <au_fname>Marjorie</au_fname>
    <phone>415 986-7020</phone>
    <address>309 63rd St. #411</address>
    <city>Oakland</city>
    <state>CA</state>
    <zip>94618</zip>
    <contract>true</contract>
  </authors>
  <authors>
    <au_id>238-95-7766</au_id>
    <au_lname>Carson</au_lname>
    <au_fname>Cheryl</au_fname>
    <phone>415 548-7723</phone>
    <address>589 Darwin Ln.</address>
    <city>Berkeley</city>
    <state>CA</state>
    <zip>94705</zip>
    <contract>true</contract>
  </authors>
</NewDataSet>
[ Back To Top ]
[Download Code]
The XSL file gets the element local names and uses them for the header row in the Excel spreadsheet. This way you don’t have to have the column names in the XSL. And you can resuse the XSL with any XML file that is in the proper format. This generic XSL will work if you have one column or many columns. In addition, the XSL gets the second level element local name and uses it for the worksheet name.
<xsl:stylesheet version="1.0"
    xmlns="urn:schemas-microsoft-com:office:spreadsheet"
    xmlns:xsl="http://www.w3.org/1999/XSL/Transform"
 xmlns:msxsl="urn:schemas-microsoft-com:xslt"
 xmlns:user="urn:my-scripts"
 xmlns:o="urn:schemas-microsoft-com:office:office"
 xmlns:x="urn:schemas-microsoft-com:office:excel"
 xmlns:ss="urn:schemas-microsoft-com:office:spreadsheet" >

<xsl:template match="/">
  <Workbook xmlns="urn:schemas-microsoft-com:office:spreadsheet"
    xmlns:o="urn:schemas-microsoft-com:office:office"
    xmlns:x="urn:schemas-microsoft-com:office:excel"
    xmlns:ss="urn:schemas-microsoft-com:office:spreadsheet"
    xmlns:html="http://www.w3.org/TR/REC-html40">
    <xsl:apply-templates/>
  </Workbook>
</xsl:template>


<xsl:template match="/*">
  <Worksheet>
  <xsl:attribute name="ss:Name">
  <xsl:value-of select="local-name(/*/*)"/>
  </xsl:attribute>
    <Table x:FullColumns="1" x:FullRows="1">
      <Row>
        <xsl:for-each select="*[position() = 1]/*">
          <Cell><Data ss:Type="String">
          <xsl:value-of select="local-name()"/>
          </Data></Cell>
        </xsl:for-each>
      </Row>
      <xsl:apply-templates/>
    </Table>
  </Worksheet>
</xsl:template>


<xsl:template match="/*/*">
  <Row>
    <xsl:apply-templates/>
  </Row>
</xsl:template>


<xsl:template match="/*/*/*">
  <Cell><Data ss:Type="String">
    <xsl:value-of select="."/>
  </Data></Cell>
</xsl:template>


</xsl:stylesheet>
[ Back To Top ]
[Download Code]
The first thing the ASP.NET page does is set the content type to MS Excel. It then opens the XML file as an XML data document, transforms it with XSL, and sends it to the client’s browser.
<%@ Page Language="c#" %>
<%@ Import Namespace="System.Data" %>
<%@ Import Namespace="System.Xml" %>
<%@ Import Namespace="System.Xml.Xsl" %>
<script language="C#" runat="server">
    public void Page_Load(Object sender, EventArgs E) {
        Response.ContentType = "application/vnd.ms-excel";
        Response.Charset = "";
        DataSet ds = new DataSet();
        ds.ReadXml(Server.MapPath("Authors.xml"));
        XmlDataDocument xdd = new XmlDataDocument(ds);
        XslTransform  xt = new XslTransform();
        xt.Load(Server.MapPath("Excel.xsl"));
        xt.Transform(xdd, null, Response.OutputStream);
        Response.End();
      }
</script>
[ Back To Top ]
[Download Code]
Hopefully, I have demonstrated how easy it is to convert XML to an Excel spreadsheet using XSL. But, there is more you can do with this same XSL file. For example, you can convert data from various database types to Excel. Just use a one-table DataSet in place of the XML file. One thing’s for sure—if your users want their reports in Excel, you’re going to save a lot of time.
[Run Sample] Requires Excel 2002/2003 to run.
User Comments
No comments posted yet.
- Remove From My Forums
-
Question
-
hi,
I am new to xml and xslt. I am converting xml to excel using xslt, I am facing one issue while merging cells with having common data from a colom. I come to know that I can use ss:MergeDown attribute to cell to merge two or more cells
but I dont know how to identify cells those are having same data. Please check below sample XML and expected result.<?xml version=»1.0″?>
<?xml-stylesheet type=’text/xsl’ href=’Transform.xslt’?>
<NewDataSet>
<ReportSummary>
<Division>US</Division>
<Region>West</Region>
<SalesTeam>abc abc</SalesTeam>
</ReportSummary>
<ReportSummary>
<Division>US</Division>
<Region>West</Region>
<SalesTeam>abc saq</SalesTeam>
</ReportSummary>
<ReportSummary>
<Division>US</Division>
<Region>East</Region>
<SalesTeam>abc xyz</SalesTeam>
</ReportSummary>
<ReportSummary>
<Division>US</Division>
<Region>East</Region>
<SalesTeam>abc rte</SalesTeam>
</ReportSummary>
<ReportSummary>
<Division>India</Division>
<Region>West</Region>
<SalesTeam>abc lmn</SalesTeam>
</ReportSummary>
<ReportSummary>
<Division>India</Division>
<Region>West</Region>
<SalesTeam>abc str</SalesTeam>
</ReportSummary>
</NewDataSet>Expect XLS with merging of common cells in Division and Region coloms:
Division Region SalesTeam US West abc xyz East vbn lnm India West lkj asd Please any help will be really appreciable.. Thanks in advance…