
Время на прочтение
16 мин
Количество просмотров 54K
Задача обработки документов в формате docx, а также таблиц xlsx и презентаций pptx является весьма нетривиальной. В этой статье расскажу как научиться парсить, создавать и обрабатывать такие документы используя только XSLT и ZIP архиватор.
Зачем?
docx — самый популярный формат документов, поэтому задача отдавать информацию пользователю в этом формате всегда может возникнуть. Один из вариантов решения этой проблемы — использование готовой библиотеки, может не подходить по ряду причин:
- библиотеки может просто не существовать
- в проекте не нужен ещё один чёрный ящик
- ограничения библиотеки по платформам и т.п.
- проблемы с лицензированием
- скорость работы
Поэтому в этой статье будем использовать только самые базовые инструменты для работы с docx документом.
Структура docx
Для начала разоберёмся с тем, что собой представляет docx документ. docx это zip архив который физически содержит 2 типа файлов:
- xml файлы с расширениями
xmlиrels - медиа файлы (изображения и т.п.)
А логически — 3 вида элементов:
- Типы (Content Types) — список типов медиа файлов (например png) встречающихся в документе и типов частей документов (например документ, верхний колонтитул).
- Части (Parts) — отдельные части документа, для нашего документа это document.xml, сюда входят как xml документы так и медиа файлы.
- Связи (Relationships) идентифицируют части документа для ссылок (например связь между разделом документа и колонтитулом), а также тут определены внешние части (например гиперссылки).
Они подробно описаны в стандарте ECMA-376: Office Open XML File Formats, основная часть которого — PDF документ на 5000 страниц, и ещё 2000 страниц бонусного контента.
Минимальный docx
Простейший docx после распаковки выглядит следующим образом
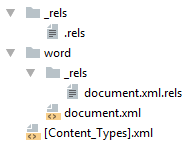
Давайте посмотрим из чего он состоит.
[Content_Types].xml
Находится в корне документа и перечисляет MIME типы содержимого документа:
<Types xmlns="http://schemas.openxmlformats.org/package/2006/content-types">
    <Default Extension="rels" ContentType="application/vnd.openxmlformats-package.relationships+xml"/>
    <Default Extension="xml" ContentType="application/xml"/>
    <Override PartName="/word/document.xml"
              ContentType="application/vnd.openxmlformats-officedocument.wordprocessingml.document.main+xml"/>
</Types>
_rels/.rels
Главный список связей документа. В данном случае определена всего одна связь — сопоставление с идентификатором rId1 и файлом word/document.xml — основным телом документа.
<Relationships xmlns="http://schemas.openxmlformats.org/package/2006/relationships">
    <Relationship
        Id="rId1"
        Type="http://schemas.openxmlformats.org/officeDocument/2006/relationships/officeDocument"
        Target="word/document.xml"/>
</Relationships>
word/document.xml
Основное содержимое документа.
word/document.xml
<w:document xmlns:wpc="http://schemas.microsoft.com/office/word/2010/wordprocessingCanvas"
            xmlns:mc="http://schemas.openxmlformats.org/markup-compatibility/2006"
            xmlns:o="urn:schemas-microsoft-com:office:office"
            xmlns:r="http://schemas.openxmlformats.org/officeDocument/2006/relationships"
            xmlns:m="http://schemas.openxmlformats.org/officeDocument/2006/math"
            xmlns:v="urn:schemas-microsoft-com:vml"
            xmlns:wp14="http://schemas.microsoft.com/office/word/2010/wordprocessingDrawing"
            xmlns:wp="http://schemas.openxmlformats.org/drawingml/2006/wordprocessingDrawing"
            xmlns:w10="urn:schemas-microsoft-com:office:word"
            xmlns:w="http://schemas.openxmlformats.org/wordprocessingml/2006/main"
            xmlns:w14="http://schemas.microsoft.com/office/word/2010/wordml"
            xmlns:wpg="http://schemas.microsoft.com/office/word/2010/wordprocessingGroup"
            xmlns:wpi="http://schemas.microsoft.com/office/word/2010/wordprocessingInk"
            xmlns:wne="http://schemas.microsoft.com/office/word/2006/wordml"
            xmlns:wps="http://schemas.microsoft.com/office/word/2010/wordprocessingShape"
            mc:Ignorable="w14 wp14">
    <w:body>
        <w:p w:rsidR="005F670F" w:rsidRDefault="005F79F5">
            <w:r>
                <w:t>Test</w:t>
            </w:r>
            <w:bookmarkStart w:id="0" w:name="_GoBack"/>
            <w:bookmarkEnd w:id="0"/>
        </w:p>
        <w:sectPr w:rsidR="005F670F">
            <w:pgSz w:w="12240" w:h="15840"/>
            <w:pgMar w:top="1440" w:right="1440" w:bottom="1440" w:left="1440"
                     w:header="720" w:footer="720" w:gutter="0"/>
            <w:cols w:space="720"/>
            <w:docGrid w:linePitch="360"/>
        </w:sectPr>
    </w:body>
</w:document>
Здесь:
<w:document>— сам документ<w:body>— тело документа<w:p>— параграф<w:r>— run (фрагмент) текста<w:t>— сам текст<w:sectPr>— описание страницы
Если открыть этот документ в текстовом редакторе, то увидим документ из одного слова Test.
word/_rels/document.xml.rels
Здесь содержится список связей части word/document.xml. Название файла связей создаётся из названия части документа к которой он относится и добавления к нему расширения rels. Папка с файлом связей называется _rels и находится на том же уровне, что и часть к которой он относится. Так как связей в word/document.xml никаких нет то и в файле пусто:
<Relationships xmlns="http://schemas.openxmlformats.org/package/2006/relationships">
</Relationships>
Даже если связей нет, этот файл должен существовать.
docx и Microsoft Word
docx созданный с помощью Microsoft Word, да в принципе и с помощью любого другого редактора имеет несколько дополнительных файлов.
Вот что в них содержится:
docProps/core.xml— основные метаданные документа согласно Open Packaging Conventions и Dublin Core [1], [2].docProps/app.xml— общая информация о документе: количество страниц, слов, символов, название приложения в котором был создан документ и т.п.word/settings.xml— настройки относящиеся к текущему документу.word/styles.xml— стили применимые к документу. Отделяют данные от представления.word/webSettings.xml— настройки отображения HTML частей документа и настройки того, как конвертировать документ в HTML.word/fontTable.xml— список шрифтов используемых в документе.word/theme1.xml— тема (состоит из цветовой схемы, шрифтов и форматирования).
В сложных документах частей может быть гораздо больше.
Реверс-инжиниринг docx
Итак, первоначальная задача — узнать как какой-либо фрагмент документа хранится в xml, чтобы потом создавать (или парсить) подобные документы самостоятельно. Для этого нам понадобятся:
- Архиватор zip
- Библиотека для форматирования XML (Word выдаёт XML без отступов, одной строкой)
- Средство для просмотра diff между файлами, я буду использовать git и TortoiseGit
Инструменты
- Под Windows: zip, unzip, libxml2, git, TortoiseGit
- Под Linux:
apt-get install zip unzip libxml2 libxml2-utils git
Также понадобятся скрипты для автоматического (раз)архивирования и форматирования XML.
Использование под Windows:
unpack file dir— распаковывает документfileв папкуdirи форматирует xmlpack dir file— запаковывает папкуdirв документfile
Использование под Linux аналогично, только ./unpack.sh вместо unpack, а pack становится ./pack.sh.
Использование
Поиск изменений происходит следующим образом:
- Создаём пустой docx файл в редакторе.
- Распаковываем его с помощью
unpackв новую папку. - Коммитим новую папку.
- Добавляем в файл из п. 1. изучаемый элемент (гиперссылку, таблицу и т.д.).
- Распаковываем изменённый файл в уже существующую папку.
- Изучаем diff, убирая ненужные изменения (перестановки связей, порядок пространств имён и т.п.).
- Запаковываем папку и проверяем что получившийся файл открывается.
- Коммитим изменённую папку.
Пример 1. Выделение текста жирным
Посмотрим на практике, как найти тег который определяет форматирование текста жирным шрифтом.
- Создаём документ
bold.docxс обычным (не жирным) текстом Test. - Распаковываем его:
unpack bold.docx bold. - Коммитим результат.
- Выделяем текст Test жирным.
- Распаковываем
unpack bold.docx bold. - Изначально diff выглядел следующим образом:
Рассмотрим его подробно:
docProps/app.xml
@@ -1,9 +1,9 @@
-  <TotalTime>0</TotalTime>
+  <TotalTime>1</TotalTime>
Изменение времени нам не нужно.
docProps/core.xml
@@ -4,9 +4,9 @@
-  <cp:revision>1</cp:revision>
+  <cp:revision>2</cp:revision>
   <dcterms:created xsi:type="dcterms:W3CDTF">2017-02-07T19:37:00Z</dcterms:created>
-  <dcterms:modified xsi:type="dcterms:W3CDTF">2017-02-07T19:37:00Z</dcterms:modified>
+  <dcterms:modified xsi:type="dcterms:W3CDTF">2017-02-08T10:01:00Z</dcterms:modified>
Изменение версии документа и даты модификации нас также не интересует.
word/document.xml
diff
@@ -1,24 +1,26 @@
    <w:body>
-    <w:p w:rsidR="0076695C" w:rsidRPr="00290C70" w:rsidRDefault="00290C70">
+    <w:p w:rsidR="0076695C" w:rsidRPr="00F752CF" w:rsidRDefault="00290C70">
       <w:pPr>
         <w:rPr>
+          <w:b/>
           <w:lang w:val="en-US"/>
         </w:rPr>
       </w:pPr>
-      <w:r>
+      <w:r w:rsidRPr="00F752CF">
         <w:rPr>
+          <w:b/>
           <w:lang w:val="en-US"/>
         </w:rPr>
         <w:t>Test</w:t>
       </w:r>
       <w:bookmarkStart w:id="0" w:name="_GoBack"/>
       <w:bookmarkEnd w:id="0"/>
     </w:p>
-    <w:sectPr w:rsidR="0076695C" w:rsidRPr="00290C70">
+    <w:sectPr w:rsidR="0076695C" w:rsidRPr="00F752CF">
Изменения в w:rsidR не интересны — это внутренняя информация для Microsoft Word. Ключевое изменение тут
         <w:rPr>
+          <w:b/>
в параграфе с Test. Видимо элемент <w:b/> и делает текст жирным. Оставляем это изменение и отменяем остальные.
word/settings.xml
@@ -1,8 +1,9 @@
+  <w:proofState w:spelling="clean"/>
@@ -17,10 +18,11 @@
+    <w:rsid w:val="00F752CF"/>
Также не содержит ничего относящегося к жирному тексту. Отменяем.
7 Запаковываем папку с 1м изменением (добавлением <w:b/>) и проверяем что документ открывается и показывает то, что ожидалось.
8 Коммитим изменение.
Пример 2. Нижний колонтитул
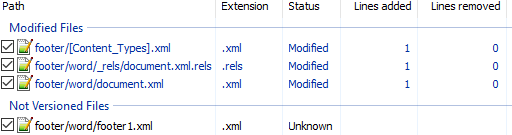
Теперь разберём пример посложнее — добавление нижнего колонтитула.
Вот первоначальный коммит. Добавляем нижний колонтитул с текстом 123 и распаковываем документ. Такой diff получается первоначально:

Сразу же исключаем изменения в docProps/app.xml и docProps/core.xml — там тоже самое, что и в первом примере.
[Content_Types].xml
@@ -4,10 +4,13 @@
   <Default Extension="xml" ContentType="application/xml"/>
   <Override PartName="/word/document.xml" ContentType="application/vnd.openxmlformats-officedocument.wordprocessingml.document.main+xml"/>
+  <Override PartName="/word/footnotes.xml" ContentType="application/vnd.openxmlformats-officedocument.wordprocessingml.footnotes+xml"/>
+  <Override PartName="/word/endnotes.xml" ContentType="application/vnd.openxmlformats-officedocument.wordprocessingml.endnotes+xml"/>
+  <Override PartName="/word/footer1.xml" ContentType="application/vnd.openxmlformats-officedocument.wordprocessingml.footer+xml"/>
footer явно выглядит как то, что нам нужно, но что делать с footnotes и endnotes? Являются ли они обязательными при добавлении нижнего колонтитула или их создали заодно? Ответить на этот вопрос не всегда просто, вот основные пути:
- Посмотреть, связаны ли изменения друг с другом
- Экспериментировать
- Ну а если совсем не понятно что происходит:
Идём пока что дальше.
word/_rels/document.xml.rels
Изначально diff выглядит вот так:
diff
@@ -1,8 +1,11 @@
 <?xml version="1.0" encoding="UTF-8" standalone="yes"?>
 <Relationships xmlns="http://schemas.openxmlformats.org/package/2006/relationships">
+  <Relationship Id="rId5" Type="http://schemas.openxmlformats.org/officeDocument/2006/relationships/theme" Target="theme/theme1.xml"/>
   <Relationship Id="rId3" Type="http://schemas.openxmlformats.org/officeDocument/2006/relationships/webSettings" Target="webSettings.xml"/>
+  <Relationship Id="rId4" Type="http://schemas.openxmlformats.org/officeDocument/2006/relationships/fontTable" Target="fontTable.xml"/>
   <Relationship Id="rId2" Type="http://schemas.openxmlformats.org/officeDocument/2006/relationships/settings" Target="settings.xml"/>
   <Relationship Id="rId1" Type="http://schemas.openxmlformats.org/officeDocument/2006/relationships/styles" Target="styles.xml"/>
-  <Relationship Id="rId5" Type="http://schemas.openxmlformats.org/officeDocument/2006/relationships/theme" Target="theme/theme1.xml"/>
-  <Relationship Id="rId4" Type="http://schemas.openxmlformats.org/officeDocument/2006/relationships/fontTable" Target="fontTable.xml"/>
+  <Relationship Id="rId6" Type="http://schemas.openxmlformats.org/officeDocument/2006/relationships/footer" Target="footer1.xml"/>
+  <Relationship Id="rId7" Type="http://schemas.openxmlformats.org/officeDocument/2006/relationships/endnotes" Target="endnotes.xml"/>
+  <Relationship Id="rId8" Type="http://schemas.openxmlformats.org/officeDocument/2006/relationships/footnotes" Target="footnotes.xml"/>
 </Relationships>
Видно, что часть изменений связана с тем, что Word изменил порядок связей, уберём их:
@@ -3,6 +3,9 @@
+  <Relationship Id="rId6" Type="http://schemas.openxmlformats.org/officeDocument/2006/relationships/footer" Target="footer1.xml"/>
+  <Relationship Id="rId7" Type="http://schemas.openxmlformats.org/officeDocument/2006/relationships/endnotes" Target="endnotes.xml"/>
+  <Relationship Id="rId8" Type="http://schemas.openxmlformats.org/officeDocument/2006/relationships/footnotes" Target="footnotes.xml"/>
Опять появляются footer, footnotes, endnotes. Все они связаны с основным документом, перейдём к нему:
word/document.xml
@@ -15,10 +15,11 @@
       </w:r>
       <w:bookmarkStart w:id="0" w:name="_GoBack"/>
       <w:bookmarkEnd w:id="0"/>
     </w:p>
     <w:sectPr w:rsidR="0076695C" w:rsidRPr="00290C70">
+      <w:footerReference w:type="default" r:id="rId6"/>
       <w:pgSz w:w="11906" w:h="16838"/>
       <w:pgMar w:top="1134" w:right="850" w:bottom="1134" w:left="1701" w:header="708" w:footer="708" w:gutter="0"/>
       <w:cols w:space="708"/>
       <w:docGrid w:linePitch="360"/>
     </w:sectPr>
Редкий случай когда есть только нужные изменения. Видна явная ссылка на footer из sectPr. А так как ссылок в документе на footnotes и endnotes нет, то можно предположить что они нам не понадобятся.
word/settings.xml
diff
@@ -1,19 +1,30 @@
 <?xml version="1.0" encoding="UTF-8" standalone="yes"?>
 <w:settings xmlns:mc="http://schemas.openxmlformats.org/markup-compatibility/2006" xmlns:o="urn:schemas-microsoft-com:office:office" xmlns:r="http://schemas.openxmlformats.org/officeDocument/2006/relationships" xmlns:m="http://schemas.openxmlformats.org/officeDocument/2006/math" xmlns:v="urn:schemas-microsoft-com:vml" xmlns:w10="urn:schemas-microsoft-com:office:word" xmlns:w="http://schemas.openxmlformats.org/wordprocessingml/2006/main" xmlns:w14="http://schemas.microsoft.com/office/word/2010/wordml" xmlns:w15="http://schemas.microsoft.com/office/word/2012/wordml" xmlns:sl="http://schemas.openxmlformats.org/schemaLibrary/2006/main" mc:Ignorable="w14 w15">
   <w:zoom w:percent="100"/>
+  <w:proofState w:spelling="clean"/>
   <w:defaultTabStop w:val="708"/>
   <w:characterSpacingControl w:val="doNotCompress"/>
+  <w:footnotePr>
+    <w:footnote w:id="-1"/>
+    <w:footnote w:id="0"/>
+  </w:footnotePr>
+  <w:endnotePr>
+    <w:endnote w:id="-1"/>
+    <w:endnote w:id="0"/>
+  </w:endnotePr>
   <w:compat>
     <w:compatSetting w:name="compatibilityMode" w:uri="http://schemas.microsoft.com/office/word" w:val="15"/>
     <w:compatSetting w:name="overrideTableStyleFontSizeAndJustification" w:uri="http://schemas.microsoft.com/office/word" w:val="1"/>
     <w:compatSetting w:name="enableOpenTypeFeatures" w:uri="http://schemas.microsoft.com/office/word" w:val="1"/>
     <w:compatSetting w:name="doNotFlipMirrorIndents" w:uri="http://schemas.microsoft.com/office/word" w:val="1"/>
     <w:compatSetting w:name="differentiateMultirowTableHeaders" w:uri="http://schemas.microsoft.com/office/word" w:val="1"/>
   </w:compat>
   <w:rsids>
     <w:rsidRoot w:val="00290C70"/>
+    <w:rsid w:val="000A7B7B"/>
+    <w:rsid w:val="001B0DE6"/>
А вот и появились ссылки на footnotes, endnotes добавляющие их в документ.
word/styles.xml
diff
@@ -480,6 +480,50 @@
       <w:rFonts w:ascii="Times New Roman" w:hAnsi="Times New Roman"/>
       <w:b/>
       <w:sz w:val="28"/>
     </w:rPr>
   </w:style>
+  <w:style w:type="paragraph" w:styleId="a4">
+    <w:name w:val="header"/>
+    <w:basedOn w:val="a"/>
+    <w:link w:val="a5"/>
+    <w:uiPriority w:val="99"/>
+    <w:unhideWhenUsed/>
+    <w:rsid w:val="000A7B7B"/>
+    <w:pPr>
+      <w:tabs>
+        <w:tab w:val="center" w:pos="4677"/>
+        <w:tab w:val="right" w:pos="9355"/>
+      </w:tabs>
+      <w:spacing w:after="0" w:line="240" w:lineRule="auto"/>
+    </w:pPr>
+  </w:style>
+  <w:style w:type="character" w:customStyle="1" w:styleId="a5">
+    <w:name w:val="Верхний колонтитул Знак"/>
+    <w:basedOn w:val="a0"/>
+    <w:link w:val="a4"/>
+    <w:uiPriority w:val="99"/>
+    <w:rsid w:val="000A7B7B"/>
+  </w:style>
+  <w:style w:type="paragraph" w:styleId="a6">
+    <w:name w:val="footer"/>
+    <w:basedOn w:val="a"/>
+    <w:link w:val="a7"/>
+    <w:uiPriority w:val="99"/>
+    <w:unhideWhenUsed/>
+    <w:rsid w:val="000A7B7B"/>
+    <w:pPr>
+      <w:tabs>
+        <w:tab w:val="center" w:pos="4677"/>
+        <w:tab w:val="right" w:pos="9355"/>
+      </w:tabs>
+      <w:spacing w:after="0" w:line="240" w:lineRule="auto"/>
+    </w:pPr>
+  </w:style>
+  <w:style w:type="character" w:customStyle="1" w:styleId="a7">
+    <w:name w:val="Нижний колонтитул Знак"/>
+    <w:basedOn w:val="a0"/>
+    <w:link w:val="a6"/>
+    <w:uiPriority w:val="99"/>
+    <w:rsid w:val="000A7B7B"/>
+  </w:style>
 </w:styles>
Изменения в стилях нас интересуют только если мы ищем как поменять стиль. В данном случае это изменение можно убрать.
Посмотрим теперь собственно на сам нижний колонтитул (часть пространств имён опущена для читабельности, но в документе они должны быть):
<w:ftr xmlns:w="http://schemas.openxmlformats.org/wordprocessingml/2006/main">
  <w:p w:rsidR="000A7B7B" w:rsidRDefault="000A7B7B">
    <w:pPr>
      <w:pStyle w:val="a6"/>
    </w:pPr>
    <w:r>
      <w:t>123</w:t>
    </w:r>
  </w:p>
</w:ftr>
Тут виден текст 123. Единственное, что надо исправить — убрать ссылку на <w:pStyle w:val="a6"/>.
В результате анализа всех изменений делаем следующие предположения:
- footnotes и endnotes не нужны
- В
[Content_Types].xmlнадо добавить footer - В
word/_rels/document.xml.relsнадо добавить ссылку на footer - В
word/document.xmlв тег<w:sectPr>надо добавить<w:footerReference>
Уменьшаем diff до этого набора изменений:
Затем запаковываем документ и открываем его.
Если всё сделано правильно, то документ откроется и в нём будет нижний колонтитул с текстом 123. А вот и итоговый коммит.
Таким образом процесс поиска изменений сводится к поиску минимального набора изменений, достаточного для достижения заданного результата.
Практика
Найдя интересующее нас изменение, логично перейти к следующему этапу, это может быть что-либо из:
- Создания docx
- Парсинг docx
- Преобразования docx
Тут нам потребуются знания XSLT и XPath.
Давайте напишем достаточно простое преобразование — замену или добавление нижнего колонтитула в существующий документ. Писать я буду на языке Caché ObjectScript, но даже если вы его не знаете — не беда. В основном будем вызовать XSLT и архиватор. Ничего более. Итак, приступим.
Алгоритм
Алгоритм выглядит следующим образом:
- Распаковываем документ.
- Добавляем наш нижний колонтитул.
- Прописываем ссылку на него в
[Content_Types].xmlиword/_rels/document.xml.rels. - В
word/document.xmlв тег<w:sectPr>добавляем тег<w:footerReference>или заменяем в нём ссылку на наш нижний колонтитул. - Запаковываем документ.
Приступим.
Распаковка
В Caché ObjectScript есть возможность выполнять команды ОС с помощью функции $zf(-1, oscommand). Вызовем unzip для распаковки документа с помощью обёртки над $zf(-1):
/// Используя %3 (unzip) распаковать файл %1 в папку %2
Parameter UNZIP = "%3 %1 -d %2";

/// Распаковать архив source в папку targetDir
ClassMethod executeUnzip(source, targetDir) As %Status
{
    set timeout = 100
    set cmd = $$$FormatText(..#UNZIP, source, targetDir, ..getUnzip())
    return ..execute(cmd, timeout)
}
Создаём файл нижнего колонтитула
На вход поступает текст нижнего колонтитула, запишем его в файл in.xml:
<xml>TEST</xml>В XSLT (файл — footer.xsl) будем создавать нижний колонтитул с текстом из тега xml (часть пространств имён опущена, вот полный список):
<xsl:stylesheet
  xmlns:xsl="http://www.w3.org/1999/XSL/Transform"
  xmlns="http://schemas.openxmlformats.org/package/2006/relationships" version="1.0">
    <xsl:output method="xml" omit-xml-declaration="no" indent="yes" standalone="yes"/>
    <xsl:template match="/">

        <w:ftr xmlns:w="http://schemas.openxmlformats.org/wordprocessingml/2006/main">
            <w:p>
                <w:r>
                    <w:rPr>
                        <w:lang w:val="en-US"/>
                    </w:rPr>
                    <w:t>
                        <xsl:value-of select="//xml/text()"/>
                    </w:t>
                </w:r>
            </w:p>
        </w:ftr>
    </xsl:template>
</xsl:stylesheet>
Теперь вызовем XSLT преобразователь:
do ##class(%XML.XSLT.Transformer).TransformFile("in.xml", "footer.xsl", footer0.xml") В результате получится файл нижнего колонтитула footer0.xml:
<w:ftr xmlns:w="http://schemas.openxmlformats.org/wordprocessingml/2006/main">
    <w:p>
        <w:r>
            <w:rPr>
                <w:lang w:val="en-US"/>
            </w:rPr>
            <w:t>TEST</w:t>
        </w:r>
    </w:p>
</w:ftr>
Добавляем ссылку на колонтитул в список связей основного документа
Сссылки с идентификатором rId0 как правило не существует. Впрочем можно использовать XPath для получения идентификатора которого точно не существует.
Добавляем ссылку на footer0.xml c идентификатором rId0 в word/_rels/document.xml.rels:
XSLT
<xsl:stylesheet  xmlns:xsl="http://www.w3.org/1999/XSL/Transform"  xmlns="http://schemas.openxmlformats.org/package/2006/relationships"  version="1.0">
    <xsl:output method="xml" omit-xml-declaration="yes" indent="no"  />
    <xsl:param name="new">
        <Relationship
           Id="rId0"
           Type="http://schemas.openxmlformats.org/officeDocument/2006/relationships/footer"
           Target="footer0.xml"/>
    </xsl:param>

    <xsl:template match="/*">
        <xsl:copy>
            <xsl:copy-of select="$new"/>
            <xsl:copy-of select="@* | node()"/>
        </xsl:copy>
    </xsl:template>
</xsl:stylesheet>
Прописываем ссылки в документе
Далее надо в каждый тег <w:sectPr> добавить тег <w:footerReference> или заменить в нём ссылку на наш нижний колонтитул. Оказалось, что у каждого тега <w:sectPr> может быть 3 тега <w:footerReference> — для первой страницы, четных страниц и всего остального:
XSLT
<xsl:stylesheet xmlns:xsl="http://www.w3.org/1999/XSL/Transform"
xmlns:r="http://schemas.openxmlformats.org/officeDocument/2006/relationships"
xmlns:w="http://schemas.openxmlformats.org/wordprocessingml/2006/main"
version="1.0">
    <xsl:output method="xml" omit-xml-declaration="yes" indent="yes" />
    <xsl:template match="//@* | //node()">
        <xsl:copy>
            <xsl:apply-templates select="@*"/>
            <xsl:apply-templates select="node()"/>
        </xsl:copy>
    </xsl:template>
    <xsl:template match="//w:sectPr">
        <xsl:element name="{name()}" namespace="{namespace-uri()}">
            <xsl:copy-of select="./namespace::*"/>
            <xsl:apply-templates select="@*"/>
            <xsl:copy-of select="./*[local-name() != 'footerReference']"/>
            <w:footerReference w:type="default" r:id="rId0"/>
            <w:footerReference w:type="first" r:id="rId0"/>
            <w:footerReference w:type="even" r:id="rId0"/>
        </xsl:element>
    </xsl:template>
</xsl:stylesheet>
Добавляем колонтитул в [Content_Types].xml
Добавляем в [Content_Types].xml информацию о том, что /word/footer0.xml имеет тип application/vnd.openxmlformats-officedocument.wordprocessingml.footer+xml:
XSLT
<xsl:stylesheet  xmlns:xsl="http://www.w3.org/1999/XSL/Transform"  xmlns="http://schemas.openxmlformats.org/package/2006/content-types"  version="1.0">
    <xsl:output method="xml" omit-xml-declaration="yes" indent="no"  />
    <xsl:param name="new">
        <Override
         PartName="/word/footer0.xml"
         ContentType="application/vnd.openxmlformats-officedocument.wordprocessingml.footer+xml"/>
    </xsl:param>

    <xsl:template match="/*">
        <xsl:copy>
            <xsl:copy-of select="@* | node()"/>
            <xsl:copy-of select="$new"/>
        </xsl:copy>
    </xsl:template>
</xsl:stylesheet>
В результате
Весь код опубликован. Работает он так:
do ##class(Converter.Footer).modifyFooter("in.docx", "out.docx", "TEST")Где:
in.docx— исходный документout.docx— выходящий документTEST— текст, который добавляется в нижний колонтитул
Выводы
Используя только XSLT и ZIP можно успешно работать с документами docx, таблицами xlsx и презентациями pptx.
Открытые вопросы
- Изначально хотел использовать 7z вместо zip/unzip т… к. это одна утилита и она более распространена на Windows. Однако я столкнулся с такой проблемой, что документы запакованные 7z под Linux не открываются в Microsoft Office. Я попробовал достаточно много вариантов вызова, однако положительного результата добиться не удалось.
- Ищу XSD со схемами ECMA-376 версии 5 и комментариями. XSD версии 5 без комментариев доступен к загрузке на сайте ECMA, но без комментариев в нём сложно разобраться. XSD версии 2 с комментариями доступен к загрузке.
Ссылки
- ECMA-376
- Описание docx
- Подробная статья про docx
- Репозиторий со скриптами
- Репозиторий с преобразователем нижнего колонтитула
Как всем известно, Microsoft Word не смог стать удобным инструментом для блоггеров по причине того, что код, генерируемый Microsoft Word, мягко сказать, ужасный, и пестрит большим количеством ненужных стилей и дополнительного HTML мусора. Но, согласитесь, более удобного способа для написания больших текстов на сегодняшний момент нет. Поэтому в этой статье я расскажу, как можно получить чистый HTML код из Microsoft Word.
Если создать новый Microsoft Word 2010 документ и вставить туда текст «Word Cleanup» и сохранить его как HTML страницу, то получим приблизительно следующее:
<html xmlns:v="urn:schemas-microsoft-com:vml"
xmlns:o="urn:schemas-microsoft-com:office:office"
xmlns:w="urn:schemas-microsoft-com:office:word"
xmlns:m="http://schemas.microsoft.com/office/2004/12/omml"
xmlns="http://www.w3.org/TR/REC-html40">

<head>
<meta http-equiv=Content-Type content="text/html; charset=windows-1251">
<meta name=ProgId content=Word.Document>
<meta name=Generator content="Microsoft Word 14">
<meta name=Originator content="Microsoft Word 14">
<link rel=File-List href="word_files/filelist.xml">
<!--[if gte mso 9]><xml>
 <o:DocumentProperties>
  <o:Author>Marina</o:Author>
 <o:OfficeDocumentSettings>
  <o:AllowPNG/>
 </o:OfficeDocumentSettings>
</xml><![endif]-->
<link rel=themeData href="word_files/themedata.thmx">
<link rel=colorSchemeMapping href="word_files/colorschememapping.xml">
<!--[if gte mso 9]><xml>
 <w:WordDocument>
  </m:mathPr></w:WordDocument>
</xml><![endif]--><!--[if gte mso 9]><xml>
 <w:LatentStyles DefLockedState="false" DefUnhideWhenUsed="true"
  DefSemiHidden="true" DefQFormat="false" DefPriority="99"
  LatentStyleCount="267">
  <w:LsdException Locked="false" Priority="0" SemiHidden="false"
   UnhideWhenUsed="false" QFormat="true" Name="Normal"/>
 </w:LatentStyles>
</xml><![endif]-->
<style>
<!--
 /* Font Definitions */
 @font-face
    {font-family:Calibri;
    panose-1:2 15 5 2 2 2 4 3 2 4;
    mso-font-charset:204;
    mso-generic-font-family:swiss;
    mso-font-pitch:variable;
    mso-font-signature:-520092929 1073786111 9 0 415 0;}
 /* Style Definitions */
@page WordSection1
    {size:595.3pt 841.9pt;
    margin:42.5pt 42.5pt 42.5pt 70.85pt;
    mso-header-margin:35.4pt;
    mso-footer-margin:35.4pt;
    mso-paper-source:0;}
div.WordSection1
    {page:WordSection1;}
-->
</style>
<!--[if gte mso 10]>
<style>
 /* Style Definitions */
 table.MsoNormalTable
    {mso-style-name:"Table Normal";
      mso-fareast-language:EN-US;}
</style>
<![endif]--><!--[if gte mso 9]><xml>
 <o:shapedefaults v:ext="edit" spidmax="1026"/>
</xml><![endif]--><!--[if gte mso 9]><xml>
 <o:shapelayout v:ext="edit">
  <o:idmap v:ext="edit" data="1"/>
 </o:shapelayout></xml><![endif]-->
</head>
<body lang=EN-GB style='tab-interval:36.0pt'>
<div class=WordSection1>
<p class=MsoNormal><span lang=EN-US style='mso-ansi-language:EN-US'>Word
cleanup.<o:p></o:p></span></p>
</div>
</body>
</html>
Я упустил большую часть документа, размер которого составил около 20 KB текста!!! Это просто какая-то феерия!
Документ состоит из мета информации о документе, стилях, а также наличием большого количества тэгов span и дополнительного «мусора».
Давайте все это почистим.
Создадим Windows Forms приложение, которые будет иметь два элемента управления — компонент WebBrowser (в режиме редактирования) и кнопка, по клику которой будем очищать HTML. Вот код самой программы:
using System;
using System.Windows.Forms;
using System.Data.Extracting;

namespace WordCleanUpTool
{
    public partial class Form1 : Form
    {
        public Form1()
        {
            InitializeComponent();
        }

        private void InitWebBrowser()
        {
            string Encoding = "ISO-8859-1";
            HtmlDocument hd;
            mshtml.IHTMLDocument2 axObj;

            webBrowser.DocumentText = "";
            webBrowser.Document.Encoding = Encoding;
            hd = webBrowser.Document;
            axObj = hd.DomDocument as mshtml.IHTMLDocument2;
            axObj.designMode = "On";
            webBrowser.Navigate("about:blank");
        }

        private void button1_Click(object sender, EventArgs e)
        {
            ChangeAllowWebBrowserDrop();
            webBrowser.DocumentText = webBrowser.DocumentText.GetCleanedWordHtml();
        }

        void ChangeAllowWebBrowserDrop()
        {
            webBrowser.AllowWebBrowserDrop = !webBrowser.AllowWebBrowserDrop;
        }

        private void Form1_Load(object sender, EventArgs e)
        {
            InitWebBrowser();
        }
    }
}
Главная функция, которая очищает текст, называется GetCleanedWordHtml(). Она входит в состав Data Extracting SDK.
Вот ее код:
public static string GetCleanedWordHtml(this string html)
{
    // start by completely removing all unwanted tags
    html = Regex.Replace(html,
        @"<[/]?(font|span|xml|del|ins|[ovwxp]:w+)[^>]*?>",
    "", RegexOptions.IgnoreCase);

    // then run another pass over the html (twice), removing unwanted attributes
    html = Regex.Replace(html,
        @"<([^>]*)(?:class|lang|style|size|face|[ovwxp]:w+)=(?:'[^']*'|""[^""]*""|[^s>]+)([^>]*)>",
        "<$1$2>", RegexOptions.IgnoreCase);

    html = Regex.Replace(html,
        @"<([^>]*)(?:class|lang|style|size|face|[ovwxp]:w+)=(?:'[^']*'|""[^""]*""|[^s>]+)([^>]*)>",
        "<$1$2>", RegexOptions.IgnoreCase);

    html = Regex.Replace(html, @"<style[^>]*?>[sS]*?</style>",
       "", RegexOptions.IgnoreCase);

    html = Regex.Replace(html, @"<!--[if [^>]*?]>[sS]*?<![endif]-->",
        "", RegexOptions.IgnoreCase);

     return html.TrimSafe();
}
После того, как мы запустим приложение, загрузим наш сохраненный из Word файл и нажмем кнопку «Очистить», то получим такой код:
<html xmlns:v="urn:schemas-microsoft-com:vml"
xmlns:o="urn:schemas-microsoft-com:office:office"
xmlns:w="urn:schemas-microsoft-com:office:word"
xmlns:m="http://schemas.microsoft.com/office/2004/12/omml"
xmlns="http://www.w3.org/TR/REC-html40">

<head>
<meta http-equiv=Content-Type content="text/html; charset=windows-1251">
<meta name=ProgId content=Word.Document>
<meta name=Generator content="Microsoft Word 14">
<meta name=Originator content="Microsoft Word 14">
<link rel=File-List href="word_files/filelist.xml">

<link rel=themeData href="word_files/themedata.thmx">
<link rel=colorSchemeMapping href="word_files/colorschememapping.xml">

</head>
<body >
<div >
<p >Word
cleanup.</p>
</div>
</body>
</html>
Несомненно, намного лучше. Еще еще немного поиграться, то можно довести код до совершенства 
Кроме того,можно написать небольшое расширение для Microsoft Word, с помощью которого можно очищать ваши статьи перед публикацией в блог. (Хотя рекомендую использовать Live Writer, а такой подход использовать когда у вас есть уже написанный кем-то текст, который нужно опубликовать на веб-сайте.)
Пример использования:

Фрагмент кода, генерируемого программой Word:

После очищения получим следующий результат:

И такой HTML код:

To update on above answer by vencedor and remove the extra empty character encoding added to your header/footer images/text you can do something like this:
<html
xmlns:o='urn:schemas-microsoft-com:office:office'
xmlns:w='urn:schemas-microsoft-com:office:word'
xmlns='http://www.w3.org/TR/REC-html40'>
<head>
<meta http-equiv="Content-Type" content="text/html; charset=utf-8">
<title></title>

<!--[if gte mso 9]><xml>
 <w:WordDocument>
  <w:View>Print</w:View>
  <w:Zoom>100</w:Zoom>
</w:WordDocument>
</xml><![endif]-->
<style>
<!-- /* Style Definitions */
p.MsoHeader, li.MsoHeader, div.MsoHeader{
    margin:0in;
    margin-top:.0001pt;
    mso-pagination:widow-orphan;
    tab-stops:center 3.0in right 6.0in;
}
p.MsoFooter, li.MsoFooter, div.MsoFooter{
    margin:0in 0in 1in 0in;
    margin-bottom:.0001pt;
    mso-pagination:widow-orphan;
    tab-stops:center 3.0in right 6.0in;
}
.footer {
    font-size: 9pt;
}
@page Section1{
    size:8.5in 11.0in;
    margin:0.5in 0.5in 0.5in 0.5in;
    mso-header-margin:0.5in;
    mso-header:h1;
    mso-footer:f1;
    mso-footer-margin:0.5in;
    mso-paper-source:0;
}
div.Section1{
    page:Section1;
}
table#hrdftrtbl{
    margin:0in 0in 0in 9in;
}
-->
</style>
<style type="text/css" media="screen,print">
body {
    font-family: "Calibri", "Verdana","HelveticaNeue-Light", "Helvetica Neue Light", "Helvetica Neue", Helvetica, Arial, "Lucida Grande", sans-serif;
    font-size:12pt;
}
pageBreak {
  clear:all;
  page-break-before:always;
  mso-special-character:line-break;
}
</style>
</head>
<body style='tab-interval:.5in'>
<div class="Section1">

Something page 1
<div class="pageBreak"></div>
Something page 2
<div class="pageBreak"></div>

<table id='hrdftrtbl' border='1' cellspacing='0' cellpadding='0'>
        <tr>
            <td>
                <div style='mso-element:header' id="h1" >
                    <p class="MsoHeader">
                        <table border="0" width="100%">
                            <tr>
                                <td>

                                    YOUR_HEADER IMAGE/TEXT

                                </td>
                            </tr>
                        </table>
                    </p>
               </div>
          </td>
          <td>
            <div style='mso-element:footer' id="f1">
                <p class="MsoFooter">
                    <table width="100%" border="0" cellspacing="0" cellpadding="0">
                        <tr>
                            <td align="center" class="footer">
                            YOUR_FOOTER_TEXT
                                <g:message code="offer.letter.page.label"/> <span style='mso-field-code: PAGE '></span> of <span style='mso-field-code: NUMPAGES '></span>
                            </td>
                        </tr>
                    </table>
                </p>
            </div>
        </td>
    </tr>
    </table>
  </div>
</body>
</html>
This now includes full css components for header and footer segments.
The trick that actually removes the extra encoding is declaring yet another table within the MsoFooter and MsoHeader sections.
I am trying to create a word document in the machine(office 2003 version and office 2007 reader installed) it is not generating the document(Document is blank ).
But creating the document in office 2007 version installed machine and opening the document in office 2003 installed machine, it open the document with a warning message.The difference in size clearly indicates that the document generated by the custom code
in the web application using OpenXML is not following the standards, so that it misses some of the core components in the .docx file. Once this docx is opened in word 2007 and resaved, word 2007 automatically corrects the issue and this resaved document is
getting opened in Office 2003 (but with warnings).
Please provide a solution on this.
I have provided the dynamic html content we are using
StringBuilder strBody = new StringBuilder ();
strBody.AppendFormat(«<html » +
xmlns:o=’urn:schemas-microsoft-com:office:office’ «+
«xmlns:w=’urn:schemas-microsoft-com:office:word'»+
«xmlns=’http://www.w3.org/TR/REC-html40′>»+
«<head> <title>Generate Proposal Document</title><style type=’text/css=’>{0}</style>» , styleSheetContent);
strBody.Append(
«<!—[if gte mso 9]>» + «<xml>»+
«<w:WordDocument>» + «<w:View>Print</w:View>»+ «<w:Zoom>100</w:Zoom>» +
«<w:Header>Test</w:Header>» +
«<w:DoNotOptimizeForBrowser/>» +
«</w:WordDocument>»+ «</xml>» +
«<![endif]—>»
);
strBody.Append(«<style>» +
«<!— /* Style Definitions */» + «@page Section1» +
» {size:8.5in 11.0in; » +
» margin:1.0in 1.25in 0.5in 1.25in ; » +
» mso-header-margin:.5in;mso-header:h1 » +
» mso-footer-margin:.5in; mso-paper-source:0;}» +
» div.Section1″ + » {page:Section1;}» + «—>» +
«</style>» );
strBody.Append( » <div style=’mso-element:header’ id=h1>»+
«<p class=MsoHeader style=’text-align:center’> Test Word Document Header » +
«</p> </div> » );
strBody.Append( «</head>»);
after this we are creating the header and footer for the document and using altchunk we are placing the html content in the document and then opening it using Response.OutputStream.Write(since we are using memory stream to avoid saving in file system)
-
Moved by
Thursday, January 5, 2012 10:59 AM
Open XML question (From:Word for Developers)
Inside Your Document
Introduction
Readers with long memories may remember that a purported strength of the COBOL computer
language was that it was ‘English-like’ and, thus, in some way, understandable by normal mortals:
this claim was, of course, nonsense. Jump forward 50 years and you find XML, with a
similar purported strength, that of being ‘human-readable’: this claim, too, is patent nonsense.
Nonetheless, XML is the flavour of the 21st century, and software developers seem to want
to use it at every opportunity, whether or not it is suitable: it is the hammer that makes everything else look
like a nail.
So it is with Microsoft Word Documents (and, more generally, with Microsoft Office). The .doc format, in which Word documents were stored prior to Word 2007, was a proprietary
binary format, the details of which were not public; trying to make sense of document files outside Word was, shall
we say, challenging. Although details of the format have now been published by Microsoft under their Open Specification PromiseOpen Specification Promise [link to Microsoft’s site at http://www.microsoft.com/openspecifications], it is still pretty hard to understand.
The .docx format, in which Word documents are now stored is called Office
Open XML, and it has been formally adopted as an industry standard, having been agreed firstly by ECMAECMA [link to The ECMA site at http://www.ecma-international.org], whose full name is rather a mouthful, as
ECMA-376ECMA-376 [link to The ECMA-376 standard at http://www.ecma-international.org/publications/standards/Ecma-376.htm] and, latterly, by
ISOISO [link to The ISO site at http://www.iso.org/iso], the International Organization
for Standardization, as ISO 29500. If you will allow me, I would like to be your human guide through the
human-readable jungle.
Lest my rhetoric gives the wrong impression let me say, finally, in this introduction, that, although I often cast
a cynical eye over things, I actually like XML. For years I have watched large organisations
try to beat their hierarchical data into submission and force it into relational structures; at last they have an
approved hierarchical storage mechanism. Whether documents could be considered hierarchical is, perhaps, moot.
A First Look
In this article I am going to talk a walk through a genuine, but arbitrary, document, and explain some of what
is there. I hope that you will learn something along the way; I’m fairly sure I will. Further articles
will wander down whatever byways take my fancy. The first walk begins here …
If a file contains text, the obvious thing to do is to open it in a text editor: Notepad, for example. If you try
this you will find, as I’m sure you know, that your document files are not text at all, just what appears to
be a meaningless collection of letters and symbols and what look like blank spaces.

A Word Document viewed in a Text Editor
Your document files are, as I suspect you know, compressed; this allows Microsoft to claim that
Word 2007‑format files are smaller than Word 2003‑format files. There are two reasons for
the compression: the first is that it is a convenient, indeed the only really practical, way to combine all the
components of a document into a single file, and the second is that, without it, they would be huge! Before you can
see inside your Word document, it must be uncompressed, and, if you need details, the process of uncompressing is
described separately herehere [link to Uncompress.php]. If you uncompress a simple
document you will end up with a structure that looks like this:
![]() MyDocument.docx
MyDocument.docx
![]() _rels
_rels
![]() rels
rels
![]() docProps
docProps
![]() app.xml
app.xml
![]() core.xml
core.xml
![]() word
word
![]() _rels
_rels
![]() document.xml.rels
document.xml.rels
![]() theme
theme
![]() theme1.xml
theme1.xml
![]() document.xml
document.xml
![]() fontTable.xml
fontTable.xml
![]() settings.xml
settings.xml
![]() styles.xml
styles.xml
![]() stylesWithEffects.xml
stylesWithEffects.xml
![]() webSettings.xml
webSettings.xml
![]() [Content_Types].xml
[Content_Types].xml
The matter of understanding this collection of files will be addressed later. For now, you can assume (and, please,
remember, this is just an assumption, and not necessarily true) that the main content in the body of your document
will be in the worddocument.xml file. If you open the worddocument.xml file in Notepad, you will
find that it is now text, but not, perhaps the text you might have been expecting.

Some of the ‘text’ in a Word Document
This is, in fact, XML. To even begin to understand it you have to know what
it is. On the assumption that many readers will know the basics of XML, and not want to be
bothered by an explanation, I have taken the said explanation and put it on a separate page: if you are interested,
it is herehere [link to XMLBasics.php].
Knowing that you have XML is but a small victory in the first of many battles, but a victory
nonetheless. As you can see from the picture above, the XML is rather a mess and not, in any
real sense, ‘human readable’. It has none of the features you normally take for granted in something
that is meant to be readable: it has no redundant white space, and it does not have many line breaks; in short it
is not formatted for reading. If you want to read it, you must, first, make it readable; you could edit it in,
Notepad or some other basic text editor, it being text after all, but you would probably give up in despair long
before you got to anything that resembled the content of your document as you could understand it. To save your
sanity, here is what the beginning of the file would look like if you were to format it — I have removed some text
to help to make it readable.
<?xml version="1.0" encoding="UTF-8" standalone="yes"?>

<w:document xmlns:wpc  = "http://schemas.microsoft.com/office/word/2010/wordprocessingCanvas"
            xmlns:mc   = "http://schemas.openxmlformats.org/markup-compatibility/2006"
            xmlns:o    = "urn:schemas-microsoft-com:office:office"
            xmlns:r    = "http://schemas.openxmlformats.org/officeDocument/2006/relationships"
            xmlns:m    = "http://schemas.openxmlformats.org/officeDocument/2006/math"
            xmlns:v    = "urn:schemas-microsoft-com:vml"
            xmlns:wp14 = "http://schemas.microsoft.com/office/word/2010/wordprocessingDrawing"
            xmlns:wp   = "http://schemas.openxmlformats.org/drawingml/2006/wordprocessingDrawing"
            xmlns:w10  = "urn:schemas-microsoft-com:office:word"
            xmlns:w    = "http://schemas.openxmlformats.org/wordprocessingml/2006/main"
            xmlns:w14  = "http://schemas.microsoft.com/office/word/2010/wordml"
            xmlns:wpg  = "http://schemas.microsoft.com/office/word/2010/wordprocessingGroup"
            xmlns:wpi  = "http://schemas.microsoft.com/office/word/2010/wordprocessingInk"
            xmlns:wne  = "http://schemas.microsoft.com/office/word/2006/wordml"
            xmlns:wps  = "http://schemas.microsoft.com/office/word/2010/wordprocessingShape"
            mc:Ignorable = "w14 wp14">

  <w:body>

    <w:p w:rsidR="000407E4" w:rsidRDefault="000407E4" w:rsidP="000407E4">

      <w:pPr>
        <w:pStyle w:val="Heading2"/>
      </w:pPr>

      <w:bookmarkStart w:id="0" w:name="_GoBack"/>
      <w:bookmarkEnd   w:id="0"/>

      <w:r>
        <w:t>Introduction</w:t>
      </w:r>

    </w:p>

    <w:p w:rsidR="000407E4" w:rsidRDefault="000407E4" w:rsidP="007236E6">

      <w:r>
        <w:t xml:space="preserve">Readers with long ... [text removed] ... find XML, with a </w:t>
      </w:r>

      <w:r w:rsidR="007236E6">
        <w:t>similar purported  ... [text removed] ... flavour of the 21</w:t>
      </w:r>

      <w:r w:rsidR="007236E6" w:rsidRPr="000407E4">

        <w:rPr>
          <w:vertAlign w:val="superscript"/>
        </w:rPr>

        <w:t>st</w:t>

      </w:r>

      <w:r w:rsidR="007236E6">
        <w:t xml:space="preserve"> century ... [text removed] ... like a nail.</w:t>
      </w:r>

    </w:p>
You can probably read this, and you might even be able to take a stab at understanding it, but it would only be
a stab – there is nothing there that is any kind of aid to understanding. Perhaps the documentation can
help; there is that standards document referenced earlier: 6000 or so, somewhat repetitive, pages of, largely,
technical mumbo-jumbo, and Microsoft have even published some details of the extent to which Office conforms to it
(see conformance notes on MDSNconformance notes on MDSN [link to http://msdn.microsoft.com/en-us/library/ee908652(office.12).aspx] if you are interested). Not much joy so far!
You will have read, in my introduction to XMLmy introduction to XML [link to XMLBasics.php], about
namespaces, and you will, of course, be able to see that all the tags shown
belong to the “w” namespace, and that “w” is defined as an alias for the “http://schemas.openxmlformats.org/wordprocessingml/2006/main” namespace,
but you probably don’t find any of that information useful; I certainly don’t! The name of the
namespace is a technical gimmick, and no more: you might as well forget it! You’re still on your own.
The file begins with what is called a Processing Instruction,
the line that begins “<?xml”. This just tells the XML consumer (Word, in this case) something about the file, and is not anything to do
with the document content. This is followed by an opening “<document>”
tag; it lists aliases for all the namespaces used in the document, and one slightly interesting attribute of the
file: the “mc:Ignorable” line: this tells
Word it can ignore any parts of the XML that are tagged as being in the namespaces aliased by either “w14” or “wp14”. I will opine more on this at a later stage. Document is actually a rather misleading name for this tag, as, indeed, document.xml is for the file. For the moment, however, you can continue on the basis that this tag, and
everything contained within it, is, in effect, your document.
The document tag is followed by an opening “<body>” tag, which, you
might guess, represents the body of your document. The body of your document is made up of paragraphs. If you’ve ever coded any web pages, you may recognise the “<p>” tag that represents a paragraph, but, what you may wonder, do all the
attributes mean? “rsidR”? “000407E4”? Deep within the bowels of the new, improved,
Options dialogs you may be aware of a setting: “Store random numbers to improve Combine accuracy”
(this can be found by taking the File tab from the Ribbon and going Backstage, selecting “Options”,
then Selecting “Trust Center” from the list on the left of the “Word Options” dialog,
clicking on the “Trust Center Settings” button on the right to invoke the “Trust Center”
dialog, and looking on the “Privacy Options” tab, under “Document-specific settings”).
This setting has been around for many a long year; it has no visible effect on the document surface, but it does
help Word do what it does behind the scenes. The ‘random numbers’ that are stored are represented by
these rather opaque values, and, for the moment, at least, they can be ignored.
Paragraphs have “properties”, represented in this case, and generally, by a “Pr” suffix.
The “<pPr>” tag represents paragraph properties. This paragraph has a
single property, its Style represented by the “<pStyle>” tag. The style
of this paragraph is “Heading2”, a standard Word built-in Style: at last something that describes part
of your document – or my document, anyway – that you can understand. It is worth pointing out that
this tag is self-contained, ending in “/>”,
whereas the earlier tags have all been simple opening tags of elements of an ever deeper hierarchical structure.
The meaning of the next two tags: “<bookmarkStart>” and “<bookmarkEnd>”, is, I hope, fairly obvious. The two are separate stand-alone tags
for good reasons that are not relevant here; the “id” – “0” – is what ties the two together. There must exist both start and end
bookmark with matching ids: if not the document is considered what is called non-conformant; this is not as bad as not being well
formed, but still, strictly, a problem; news of this fact does not seem to have reached Word. The
name of this bookmark is, as you can see, “_GoBack”. This is a special hidden bookmark that Word
uses to keep track of the previous edit position so that the user can return to it. In this instance it happens
to be at the beginning of the document; it isn’t part of your document content but, once again, it is something,
behind the scenes, that enables Word to do what it does.
Following the bookmark is an “<r>” tag. You can now begin to sense some
of your document: “<r>” means “run”, and a Run is an arbitrary part of your document. Paragraphs are made up of Runs of text. This run has no special attributes and is immediately followed by a
“<t>” tag. “<t>” means
“text”, and text is, well, text: part of your document content. The heading paragraph that you are
currently seeing contains the single word, “Introduction”, and this is followed, in short order, by
a “</t>” end tag, ending the text, a “</r>” end tag, ending the run, and a “</p>” end tag, ending the paragraph. It’s taken some time to get here but now, at last, you see the full
markup for a single, short, simple, paragraph.
With the knowledge gained so far you can more easily scan the next paragraph, the one subordinate to the heading,
containing some meaningful text. I have removed a lot of the actual text to make the whole thing easier to read,
but you may recognise what you see as being a Word document containing the beginning of this web page.
The first thing to note is that this second paragraph is split into four runs.
The first run is a simple one, like the one in the previous paragraph except for the fact that the text element (an
element being that bounded by matching start and end tags) has an attribute of
“xml:space=«preserve«”. Normally, in XML, as in
HTML if you are familiar with that, any leading and trailing space, or, more generally,
white space is ignored, and multiple embedded spaces are collapsed to single
spaces. There are good reasons for this and it is generally what one would want, but when sentences are split into
arbitrary runs, however, as here, leading or trailing space is likely to be
significant. The designers of XML knew this and provided a general mechanism for specifying it, which is what you
see here. space=«preserve« means, in case you hadn’t
guessed, ‘leave all space in this string exactly as it is’, and the space attribute is defined in the “xml” namespace, that comes with XML, and needs no special declarations to be able to
be used. In this particular bit of text, it ensures that the single space following “a” at the end is
maintained, to stop the word running straight into the word “similar” at the start of the next bit of
text.
The next run is almost entirely straightforward. In contrast to the previous one, it does not specify xml:space=«preserve«, as there is no space to preserve.
The “21” at the end should run straight into the “st” that follows. If you, now, look
at the run containing that “st” you can see it contains an “<rPr>” tag introducing an extra element. You will remember, from the first paragraph, that a “Pr”
suffix generally introduces properties of the parent element, and so it is
here. The property of this run is the slightly specialist “superscript”;specified as a ‘vertical alignment’,
a “<vertAlign>”. The “st” ordinal
indicator is superscripted immediately after the number, 21.
Finally, the rest of the paragraph is specified as another run. This run has no special properties other than
that the leading space, and consequently, all space in the text, is to be preserved as entered.
Time to Draw Breath!
Truth is, I haven’t said very much, for all the text I’ve written! When one delves behind the scenes
one often discovers a wealth of interesting information and, with nothing to guide one, all that one can really do
is go through it step by step. I have chosen an arbitrary document and described exactly what it contains, for better
or worse. Now it’s time to extract the wheat from the chaff, so to speak, and to summarise the important points, so
that you will be able to make some sense of the next document you see.
There is a basic structure underlying the XML that makes up a large part of a Word Document. The <document> contains a <body> which, in turn, contains <p>aragraphs, each made up of <r>uns, which,
finally, may contain <t>ext. Many elements may also contain properties,
often using tags with names that are the same as the name of the element itself, but with “Pr”
appended.
Clearly there is much more to come, but what you need now is a way to look at, and be able to read, the
documents yourself. I will not always be around to reformat them for you!
There are no suitable tools built into either Windows or Office, but if you are unable to install anything else, an
ordinary browser, Internet Explorer, for example, will do some basic formatting to make XML readable. If you are
able to install software, a quick web search shows there to be several free, potentially helpful, editors available.
As this is Microsoft data, a Microsoft editor seems like a good bet for a first attempt, and one, called XML
Notepad can be found herehere [link to download Microsoft’s XML Notepad at http://www.microsoft.com/download/en/details.aspx?&id=7973]. If you download and install
this (you may have to also install a version of the .NET Framework, which I am not going to explain here, but you
should just be able to follow whatever instructions you are given) you should then be able to use it open the
worddocument.xml file that looked so awful in Notepad, and, if you do, you should see something like this:

A first view in XML Notepad
Things, at least, look a bit better now — but only a bit! What you can see is readable, but not wonderfully
informative. This just shows the first part of what you have already seen, and none of the content of your document
at all. Do not despair! At the bottom of the left hand pane, there is a little ⊞ symbol; click on this, and,
as you probably expect, the “w:body” element
will be expanded — to something like this:

An expanded view in XML Notepad
This does show, quite clearly, that the document is made up of lots of paragraphs. There could be other elements
– tables, for example – but in this simple document there are just paragraphs. To see what’s actually
in those paragraphs you must expand all the elements. Do this for the first couple of paragraphs and this is what
you will see:

An even more expanded view in XML Notepad
This is just the XML I formatted somewhere way up the page, just shown from a slightly different perspective. It
is, perhaps, slightly easier to understand than the XML itself, but only slightly, and with the truncated strings
of text it is probably not the most useful view. XML Notepad has one more trick
up its sleeve; it has a mechanism for translating the XML using what is called an
XML StyleSheet. Before going into any further detail, if you click on the “XSL Output” tab near
the top of the window you will see a different view of the document:

A different view in XML Notepad
The message in yellow at the top may not mean very much to you, but XML StyleSheets
can be used to do many things with XML, and you can write, and use, your own if you wish. In the absence
of any further information, XML Notepad does as the message says: it tries
to reformat your XML to be readable, and it does as good a job as can be expected. You still see all the
metadata, as you must, but the colouring does make the text –
the document content – reasonably clear.
I hope that, with what I have told you already, you will be able to, relatively easily, scan this and extract
information from it. The eye can quite quickly come to ignore the common tags and attributes and, the more one
gets to know, the more one tends to take in information subconsciously. I don’t want to make light of this, and
documents are, or can be, extremely complex; you will not get familiar with this overnight, but if you are keen to
discover what makes Word documents the playgrounds they are, the fluff will quickly blend into the background,
although it will remain all too easy to miss something critical!
If you scroll down a page or, depending on your window size, two, to the second paragraph, you will see that,
although structurally similar to the first, it contains some tags you haven’t seen before and a whole
new construct, that of a hyperlink:

The second paragraph in XML Notepad
You can easily spot the bold black text, split over several runs, but what you haven’t seen before are the
properties of the third run: “<w:i/>”, and “<w:iCs/>”. What do these cryptic codes mean? If you scroll back to the begining of this
article, you will see that “.doc” is in italics; even if you don’t know about the “<i>” tag in HTML, it isn’t a great leap of faith to think
that, perhaps, <w:i> might mean “italics”, and it does. There are some
rather complex rules for italic formatting when applied via styles but when applied, as here, as direct formatting
to the text, everything is as straightforward as it appears.
The “<w:iCs/>” tag is applying no obvious formatting to the text, and,
indeed, is applying no ‘un-obvious’ formatting either! Although it is not impossible to guess, it would
be quite inspired guesswork that led you to the discovery that the “Cs” suffix on the tag refers to
Complex Scripts. Word has separate styling attributes for what it considers
simple (or Latin) scripts, and complex (generally, Asian) scripts, as can be seen in, for example, the “Format
Font” Dialog. Although there is no text here in any complex script, and no instruction to format as though the
script were complex (which can happen), Word has, nonetheless, and probably correctly, explicitly set italics to be
applied to any complex script that may be inserted here. Although there are no examples in my document, bold
formatting uses similar tags: “<w:b/>”, and “<w:bCs/>”
Move a little further through the paragraph and you will see the last thing I want to look at here: the hyperlink.
This is a run of text like all the others, with a property of the “Hyperlink” style, but it is
enclosed within a “<w:hyperlink/>” element. There is nothing here that
indicates where the hyperlink goes to. This information is buried elsewhere in another file within the zip archive
and it is time to examine the contents of some of the other files and how all the elements that make up a Word
Document hang together.
That is enough for a first look. I will write more about hyperlinks, as aready said, and Styles, later, but,
in order to understand you need to know something of the basic structure of what are called Packages. I have already mentioned them briefly in my notes about uncompressing Word
documents, but will explain more fully in my next outing (which I will link to from here when I have written it!)
Как я разбирал docx с помощью XSLT
Задача обработки документов в формате docx, а также таблиц xlsx и презентаций pptx является весьма нетривиальной. В этой статье расскажу как научиться парсить, создавать и обрабатывать такие документы используя только XSLT и ZIP архиватор.
Зачем?
docx — самый популярный формат документов, поэтому задача отдавать информацию пользователю в этом формате всегда может возникнуть. Один из вариантов решения этой проблемы — использование готовой библиотеки, может не подходить по ряду причин:
- библиотеки может просто не существовать
- в проекте не нужен ещё один чёрный ящик
- ограничения библиотеки по платформам и т.п.
- проблемы с лицензированием
- скорость работы
Поэтому в этой статье будем использовать только самые базовые инструменты для работы с docx документом.
Структура docx
Для начала разоберёмся с тем, что собой представляет docx документ. docx это zip архив который физически содержит 2 типа файлов:
- xml файлы с расширениями
xmlиrels - медиа файлы (изображения и т.п.)
А логически — 3 вида элементов:
- Типы (Content Types) — список типов медиа файлов (например png) встречающихся в документе и типов частей документов (например документ, верхний колонтитул).
- Части (Parts) — отдельные части документа, для нашего документа это document.xml, сюда входят как xml документы так и медиа файлы.
- Связи (Relationships) идентифицируют части документа для ссылок (например связь между разделом документа и колонтитулом), а также тут определены внешние части (например гиперссылки).
Они подробно описаны в стандарте ECMA-376: Office Open XML File Formats, основная часть которого — PDF документ на 5000 страниц, и ещё 2000 страниц бонусного контента.
Минимальный docx
Простейший docx после распаковки выглядит следующим образом

Давайте посмотрим из чего он состоит.
[Content_Types].xml
Находится в корне документа и перечисляет MIME типы содержимого документа:
<Types xmlns="http://schemas.openxmlformats.org/package/2006/content-types">
    <Default Extension="rels" ContentType="application/vnd.openxmlformats-package.relationships+xml"/>
    <Default Extension="xml" ContentType="application/xml"/>
    <Override PartName="/word/document.xml"
              ContentType="application/vnd.openxmlformats-officedocument.wordprocessingml.document.main+xml"/>
</Types>
_rels/.rels
Главный список связей документа. В данном случае определена всего одна связь — сопоставление с идентификатором rId1 и файлом word/document.xml — основным телом документа.
<Relationships xmlns="http://schemas.openxmlformats.org/package/2006/relationships">
    <Relationship
        Id="rId1"
        Type="http://schemas.openxmlformats.org/officeDocument/2006/relationships/officeDocument"
        Target="word/document.xml"/>
</Relationships>
word/document.xml
Основное содержимое документа.
<w:document xmlns:wpc="http://schemas.microsoft.com/office/word/2010/wordprocessingCanvas"
            xmlns:mc="http://schemas.openxmlformats.org/markup-compatibility/2006"
            xmlns:o="urn:schemas-microsoft-com:office:office"
            xmlns:r="http://schemas.openxmlformats.org/officeDocument/2006/relationships"
            xmlns:m="http://schemas.openxmlformats.org/officeDocument/2006/math"
            xmlns:v="urn:schemas-microsoft-com:vml"
            xmlns:wp14="http://schemas.microsoft.com/office/word/2010/wordprocessingDrawing"
            xmlns:wp="http://schemas.openxmlformats.org/drawingml/2006/wordprocessingDrawing"
            xmlns:w10="urn:schemas-microsoft-com:office:word"
            xmlns:w="http://schemas.openxmlformats.org/wordprocessingml/2006/main"
            xmlns:w14="http://schemas.microsoft.com/office/word/2010/wordml"
            xmlns:wpg="http://schemas.microsoft.com/office/word/2010/wordprocessingGroup"
            xmlns:wpi="http://schemas.microsoft.com/office/word/2010/wordprocessingInk"
            xmlns:wne="http://schemas.microsoft.com/office/word/2006/wordml"
            xmlns:wps="http://schemas.microsoft.com/office/word/2010/wordprocessingShape"
            mc:Ignorable="w14 wp14">
    <w:body>
        <w:p w:rsidR="005F670F" w:rsidRDefault="005F79F5">
            <w:r>
                <w:t>Test</w:t>
            </w:r>
            <w:bookmarkStart w:id="0" w:name="_GoBack"/>
            <w:bookmarkEnd w:id="0"/>
        </w:p>
        <w:sectPr w:rsidR="005F670F">
            <w:pgSz w:w="12240" w:h="15840"/>
            <w:pgMar w:top="1440" w:right="1440" w:bottom="1440" w:left="1440"
                     w:header="720" w:footer="720" w:gutter="0"/>
            <w:cols w:space="720"/>
            <w:docGrid w:linePitch="360"/>
        </w:sectPr>
    </w:body>
</w:document>
Здесь:
<w:document>— сам документ<w:body>— тело документа<w:p>— параграф<w:r>— run (фрагмент) текста<w:t>— сам текст<w:sectPr>— описание страницы
Если открыть этот документ в текстовом редакторе, то увидим документ из одного слова Test.
word/_rels/document.xml.rels
Здесь содержится список связей части word/document.xml. Название файла связей создаётся из названия части документа к которой он относится и добавления к нему расширения rels. Папка с файлом связей называется _rels и находится на том же уровне, что и часть к которой он относится. Так как связей в word/document.xml никаких нет то и в файле пусто:
<Relationships xmlns="http://schemas.openxmlformats.org/package/2006/relationships">
</Relationships>
Даже если связей нет, этот файл должен существовать.
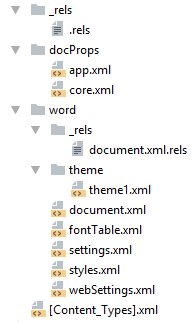
docx и Microsoft Word
docx созданный с помощью Microsoft Word, да в принципе и с помощью любого другого редактора имеет несколько дополнительных файлов.
Вот что в них содержится:
docProps/core.xml— основные метаданные документа согласно Open Packaging Conventions и Dublin Core [1], [2].docProps/app.xml— общая информация о документе: количество страниц, слов, символов, название приложения в котором был создан документ и т.п.word/settings.xml— настройки относящиеся к текущему документу.word/styles.xml— стили применимые к документу. Отделяют данные от представления.word/webSettings.xml— настройки отображения HTML частей документа и настройки того, как конвертировать документ в HTML.word/fontTable.xml— список шрифтов используемых в документе.word/theme1.xml— тема (состоит из цветовой схемы, шрифтов и форматирования).
В сложных документах частей может быть гораздо больше.
Реверс-инжиниринг docx
Итак, первоначальная задача — узнать как какой-либо фрагмент документа хранится в xml, чтобы потом создавать (или парсить) подобные документы самостоятельно. Для этого нам понадобятся:
- Архиватор zip
- Библиотека для форматирования XML (Word выдаёт XML без отступов, одной строкой)
- Средство для просмотра diff между файлами, я буду использовать git и TortoiseGit
Инструменты
- Под Windows: zip, unzip, libxml2, git, TortoiseGit
- Под Linux:
apt-get install zip unzip libxml2 libxml2-utils git
Также понадобятся скрипты для автоматического (раз)архивирования и форматирования XML.
Использование под Windows:
unpack file dir— распаковывает документfileв папкуdirи форматирует xmlpack dir file— запаковывает папкуdirв документfile
Использование под Linux аналогично, только ./unpack.sh вместо unpack, а pack становится ./pack.
Использование
Поиск изменений происходит следующим образом:
- Создаём пустой docx файл в редакторе.
- Распаковываем его с помощью
unpackв новую папку. - Коммитим новую папку.
- Добавляем в файл из п. 1. изучаемый элемент (гиперссылку, таблицу и т.д.).
- Распаковываем изменённый файл в уже существующую папку.
- Изучаем diff, убирая ненужные изменения (перестановки связей, порядок пространств имён и т.п.).
- Запаковываем папку и проверяем что получившийся файл открывается.
- Коммитим изменённую папку.
Пример 1. Выделение текста жирным
Посмотрим на практике, как найти тег который определяет форматирование текста жирным шрифтом.
- Создаём документ
bold.docxс обычным (не жирным) текстом Test. - Распаковываем его:
unpack bold.docx bold. - Коммитим результат.
- Выделяем текст Test жирным.
- Распаковываем
unpack bold.docx bold. - Изначально diff выглядел следующим образом:
Рассмотрим его подробно:
docProps/app.xml
@@ -1,9 +1,9 @@
-  <TotalTime>0</TotalTime>
+  <TotalTime>1</TotalTime>
Изменение времени нам не нужно.
docProps/core.xml
@@ -4,9 +4,9 @@
-  <cp:revision>1</cp:revision>
+  <cp:revision>2</cp:revision>
   <dcterms:created xsi:type="dcterms:W3CDTF">2017-02-07T19:37:00Z</dcterms:created>
-  <dcterms:modified xsi:type="dcterms:W3CDTF">2017-02-07T19:37:00Z</dcterms:modified>
+  <dcterms:modified xsi:type="dcterms:W3CDTF">2017-02-08T10:01:00Z</dcterms:modified>
Изменение версии документа и даты модификации нас также не интересует.
word/document.xml
«`diff
@@ -1,24 +1,26 @@
—
+
+
—
+
+
Test
—
+
«`
Изменения в w:rsidR не интересны — это внутренняя информация для Microsoft Word. Ключевое изменение тут
в параграфе с Test. Видимо элемент <w:b/> и делает текст жирным. Оставляем это изменение и отменяем остальные.
word/settings.xml
@@ -1,8 +1,9 @@
+  <w:proofState w:spelling="clean"/>
@@ -17,10 +18,11 @@
+    <w:rsid w:val="00F752CF"/>
Также не содержит ничего относящегося к жирному тексту. Отменяем.
7 Запаковываем папку с 1м изменением (добавлением <w:b/>) и проверяем что документ открывается и показывает то, что ожидалось.
8 Коммитим изменение.
Пример 2. Нижний колонтитул
Теперь разберём пример посложнее — добавление нижнего колонтитула.
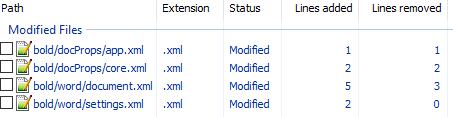
Вот первоначальный коммит. Добавляем нижний колонтитул с текстом 123 и распаковываем документ. Такой diff получается первоначально:
Сразу же исключаем изменения в docProps/app.xml и docProps/core.xml — там тоже самое, что и в первом примере.
[Content_Types].xml
@@ -4,10 +4,13 @@
   <Default Extension="xml" ContentType="application/xml"/>
   <Override PartName="/word/document.xml" ContentType="application/vnd.openxmlformats-officedocument.wordprocessingml.document.main+xml"/>
+  <Override PartName="/word/footnotes.xml" ContentType="application/vnd.openxmlformats-officedocument.wordprocessingml.footnotes+xml"/>
+  <Override PartName="/word/endnotes.xml" ContentType="application/vnd.openxmlformats-officedocument.wordprocessingml.endnotes+xml"/>
+  <Override PartName="/word/footer1.xml" ContentType="application/vnd.openxmlformats-officedocument.wordprocessingml.footer+xml"/>
footer явно выглядит как то, что нам нужно, но что делать с footnotes и endnotes? Являются ли они обязательными при добавлении нижнего колонтитула или их создали заодно? Ответить на этот вопрос не всегда просто, вот основные пути:
- Посмотреть, связаны ли изменения друг с другом
- Экспериментировать
- Ну а если совсем не понятно что происходит:
Идём пока что дальше.
word/_rels/document.xml.rels
Изначально diff выглядит вот так:
«`diff
@@ -1,8 +1,11 @@
+
+
—
—
+
+
+
«`
Видно, что часть изменений связана с тем, что Word изменил порядок связей, уберём их:
«`diff
@@ -3,6 +3,9 @@
+
+
+
«`
Опять появляются footer, footnotes, endnotes. Все они связаны с основным документом, перейдём к нему:
word/document.xml
@@ -15,10 +15,11 @@
       </w:r>
       <w:bookmarkStart w:id="0" w:name="_GoBack"/>
       <w:bookmarkEnd w:id="0"/>
     </w:p>
     <w:sectPr w:rsidR="0076695C" w:rsidRPr="00290C70">
+      <w:footerReference w:type="default" r:id="rId6"/>
       <w:pgSz w:w="11906" w:h="16838"/>
       <w:pgMar w:top="1134" w:right="850" w:bottom="1134" w:left="1701" w:header="708" w:footer="708" w:gutter="0"/>
       <w:cols w:space="708"/>
       <w:docGrid w:linePitch="360"/>
     </w:sectPr>
Редкий случай когда есть только нужные изменения. Видна явная ссылка на footer из sectPr. А так как ссылок в документе на footnotes и endnotes нет, то можно предположить что они нам не понадобятся.
word/settings.xml
@@ -1,19 +1,30 @@
 <?xml version="1.0" encoding="UTF-8" standalone="yes"?>
 <w:settings xmlns:mc="http://schemas.openxmlformats.org/markup-compatibility/2006" xmlns:o="urn:schemas-microsoft-com:office:office" xmlns:r="http://schemas.openxmlformats.org/officeDocument/2006/relationships" xmlns:m="http://schemas.openxmlformats.org/officeDocument/2006/math" xmlns:v="urn:schemas-microsoft-com:vml" xmlns:w10="urn:schemas-microsoft-com:office:word" xmlns:w="http://schemas.openxmlformats.org/wordprocessingml/2006/main" xmlns:w14="http://schemas.microsoft.com/office/word/2010/wordml" xmlns:w15="http://schemas.microsoft.com/office/word/2012/wordml" xmlns:sl="http://schemas.openxmlformats.org/schemaLibrary/2006/main" mc:Ignorable="w14 w15">
   <w:zoom w:percent="100"/>
+  <w:proofState w:spelling="clean"/>
   <w:defaultTabStop w:val="708"/>
   <w:characterSpacingControl w:val="doNotCompress"/>
+  <w:footnotePr>
+    <w:footnote w:id="-1"/>
+    <w:footnote w:id="0"/>
+  </w:footnotePr>
+  <w:endnotePr>
+    <w:endnote w:id="-1"/>
+    <w:endnote w:id="0"/>
+  </w:endnotePr>
   <w:compat>
     <w:compatSetting w:name="compatibilityMode" w:uri="http://schemas.microsoft.com/office/word" w:val="15"/>
     <w:compatSetting w:name="overrideTableStyleFontSizeAndJustification" w:uri="http://schemas.microsoft.com/office/word" w:val="1"/>
     <w:compatSetting w:name="enableOpenTypeFeatures" w:uri="http://schemas.microsoft.com/office/word" w:val="1"/>
     <w:compatSetting w:name="doNotFlipMirrorIndents" w:uri="http://schemas.microsoft.com/office/word" w:val="1"/>
     <w:compatSetting w:name="differentiateMultirowTableHeaders" w:uri="http://schemas.microsoft.com/office/word" w:val="1"/>
   </w:compat>
   <w:rsids>
     <w:rsidRoot w:val="00290C70"/>
+    <w:rsid w:val="000A7B7B"/>
+    <w:rsid w:val="001B0DE6"/>
А вот и появились ссылки на footnotes, endnotes добавляющие их в документ.
word/styles.xml
«`diff
@@ -480,6 +480,50 @@
+
+
+
+
+
+
+
+
+
+
+
+
+
+
+
+
+
+
+
+
+
+
+
+
+
+
+
+
+
+
+
+
+
+
+
+
+
+
+
+
+
+
+
+
«`
Изменения в стилях нас интересуют только если мы ищем как поменять стиль. В данном случае это изменение можно убрать.
word/footer1.xml
Посмотрим теперь собственно на сам нижний колонтитул (часть пространств имён опущена для читабельности, но в документе они должны быть):
<w:ftr xmlns:w="http://schemas.openxmlformats.org/wordprocessingml/2006/main">
  <w:p w:rsidR="000A7B7B" w:rsidRDefault="000A7B7B">
    <w:pPr>
      <w:pStyle w:val="a6"/>
    </w:pPr>
    <w:r>
      <w:t>123</w:t>
    </w:r>
  </w:p>
</w:ftr>
Тут виден текст 123. Единственное, что надо исправить — убрать ссылку на <w:pStyle w:val="a6"/>.
В результате анализа всех изменений делаем следующие предположения:
- footnotes и endnotes не нужны
- В
[Content_Types].xmlнадо добавить footer - В
word/_rels/document.xml.relsнадо добавить ссылку на footer - В
word/document.xmlв тег<w:sectPr>надо добавить<w:footerReference>
Уменьшаем diff до этого набора изменений:
Затем запаковываем документ и открываем его.
Если всё сделано правильно, то документ откроется и в нём будет нижний колонтитул с текстом 123. А вот и итоговый коммит.
Таким образом процесс поиска изменений сводится к поиску минимального набора изменений, достаточного для достижения заданного результата.
Практика
Найдя интересующее нас изменение, логично перейти к следующему этапу, это может быть что-либо из:
- Создания docx
- Парсинг docx
- Преобразования docx
Тут нам потребуются знания XSLT и XPath.
Давайте напишем достаточно простое преобразование — замену или добавление нижнего колонтитула в существующий документ. Писать я буду на языке Caché ObjectScript, но даже если вы не знаете — не беда. В основном будем вызовать XSLT и архиватор. Ничего более. Итак, приступим.
Алгоритм
Алгоритм выглядит следующим образом:
- Распаковываем документ
- Добавляем наш нижний колонтитул
- Прописываем ссылку на него в
[Content_Types].xmlиword/_rels/document.xml.rels - В
word/document.xmlв тег<w:sectPr>добавляем тег<w:footerReference>или заменяем в нём ссылку на наш нижний колонтитул. - Запаковываем документ
Приступим.
Распаковка
В Caché ObjectScript есть возможность выполнять команды ОС с помощью функции $zf(-1, oscommand). Вызовем unzip для распаковки документа с помощью обёртки над $zf(-1):
/// Используя %3 (unzip) распаковать файл %1 в папку %2
Parameter UNZIP = "%3 %1 -d %2";

/// Распаковать архив source в папку targetDir
ClassMethod executeUnzip(source, targetDir) As %Status
{
    set timeout = 100
    set cmd = $$$FormatText(..#UNZIP, source, targetDir, ..getUnzip())
    return ..execute(cmd, timeout)
}
Создаём файл нижнего колонтитула
На вход поступает текст нижнего колонтитула, запишем его в файл in.xml:
В XSLT (файл — footer.xsl) будем создавать нижний колонтитул с текстом из тега xml (часть пространств имён опущена, вот полный список):
<xsl:stylesheet
  xmlns:xsl="http://www.w3.org/1999/XSL/Transform"
  xmlns="http://schemas.openxmlformats.org/package/2006/relationships" version="1.0">
    <xsl:output method="xml" omit-xml-declaration="no" indent="yes" standalone="yes"/>
    <xsl:template match="/">

        <w:ftr xmlns:w="http://schemas.openxmlformats.org/wordprocessingml/2006/main">
            <w:p>
                <w:r>
                    <w:rPr>
                        <w:lang w:val="en-US"/>
                    </w:rPr>
                    <w:t>
                        <xsl:value-of select="//xml/text()"/>
                    </w:t>
                </w:r>
            </w:p>
        </w:ftr>
    </xsl:template>
</xsl:stylesheet>
Теперь вызовем XSLT преобразователь:
do ##class(%XML.XSLT.Transformer).TransformFile("in.xml", "footer.xsl", footer0.xml")
В результате получится файл нижнего колонтитула footer0.xml:
<w:ftr xmlns:w="http://schemas.openxmlformats.org/wordprocessingml/2006/main">
    <w:p>
        <w:r>
            <w:rPr>
                <w:lang w:val="en-US"/>
            </w:rPr>
            <w:t>TEST</w:t>
        </w:r>
    </w:p>
</w:ftr>
Добавляем ссылку на колонтитул в список связей основного документа
Сссылки с идентификатором rId0 как правило не существует. Впрочем можно использовать XPath для получения идентификатора которого точно не существует.
Добавляем ссылку на footer0.xml c идентификатором rId0 в word/_rels/document.xml.rels:
«`xml
<xsl:template match="/*">
    <xsl:copy>
        <xsl:copy-of select="$new"/>
        <xsl:copy-of select="@* | node()"/>
    </xsl:copy>
</xsl:template>
</xsl:stylesheet>
</spoiler>

#### Прописываем ссылки в документе

Далее надо в каждый тег `<w:sectPr>` добавить тег `<w:footerReference>` или заменить в нём ссылку на наш нижний колонтитул. [Оказалось](https://msdn.microsoft.com/en-us/library/documentformat.openxml.wordprocessing.footerreference(v=office.14).aspx), что у каждого тега `<w:sectPr>` может быть 3 тега `<w:footerReference>` - для первой страницы, четных страниц и всего остального:
<spoiler title="XSLT">
```xml
<xsl:stylesheet xmlns:xsl="http://www.w3.org/1999/XSL/Transform"
xmlns:r="http://schemas.openxmlformats.org/officeDocument/2006/relationships"
xmlns:w="http://schemas.openxmlformats.org/wordprocessingml/2006/main"
version="1.0">
    <xsl:output method="xml" omit-xml-declaration="yes" indent="yes" />
    <xsl:template match="//@* | //node()">
        <xsl:copy>
            <xsl:apply-templates select="@*"/>
            <xsl:apply-templates select="node()"/>
        </xsl:copy>
    </xsl:template>
    <xsl:template match="//w:sectPr">
        <xsl:element name="{name()}" namespace="{namespace-uri()}">
            <xsl:copy-of select="./namespace::*"/>
            <xsl:apply-templates select="@*"/>
            <xsl:copy-of select="./*[local-name() != 'footerReference']"/>
            <w:footerReference w:type="default" r:id="rId0"/>
            <w:footerReference w:type="first" r:id="rId0"/>
            <w:footerReference w:type="even" r:id="rId0"/>
        </xsl:element>
    </xsl:template>
</xsl:stylesheet>
Добавляем колонтитул в [Content_Types].xml
Добавляем в [Content_Types].xml информацию о том, что /word/footer0.xml имеет тип application/vnd.openxmlformats-officedocument.wordprocessingml.footer+xml:
«`xml
<xsl:template match="/*">
    <xsl:copy>
        <xsl:copy-of select="@* | node()"/>
        <xsl:copy-of select="$new"/>
    </xsl:copy>
</xsl:template>
</xsl:stylesheet>
</spoiler>


#### В результате

Весь код [опубликован](https://github.com/intersystems-ru/Converter/blob/master/Converter/Footer.cls.xml). Работает он так:
```cos
do ##class(Converter.Footer).modifyFooter("in.docx", "out.docx", "TEST")
Где:
in.docx— исходный документout.docx— выходящий документTEST— текст, который добавляется в нижний колонтитул
Выводы
Используя только XSLT и ZIP можно успешно работать с документами docx, таблицами xlsx и презентациями pptx.
Открытые вопросы
- Изначально хотел использовать 7z вместо zip/unzip т..к. это одна утилита и она более распространена на Windows. Однако я столкнулся с такой проблемой, что документы запакованные 7z под Linux не открываются в Microsoft Office. Я попробовал достаточно много вариантов вызова, однако положительного результата добиться не удалось.
- Ищу XSD со схемами ECMA-376 версии 5 и комментариями. XSD версии 5 без комментариев доступен к загрузке на сайте ECMA, но без комментариев в нём сложно разобраться. XSD версии 2 с комментариями доступен к загрузке.
Ссылки
- ECMA-376
- Описание docx
- Подробная статья про docx
- Репозиторий со скриптами
- Репозиторий с преобразователем нижнего колонтитула
<?php
/**
* Convert HTML to MS Word document
* @name html_to_doc
* @version 2.0
* @author TutorialsWebsite
* @link https://www.tutorialswebsite.com
*/
class HTML_TO_DOC
{
var $docFile = »;
var $title = »;
var $htmlHead = »;
var $htmlBody = »;
/**
* Constructor
*
* @return void
*/
function __construct(){
$this->title = »;
$this->htmlHead = »;
$this->htmlBody = »;
}
/**
* Set the document file name
*
* @param String $docfile
*/
function setDocFileName($docfile){
$this->docFile = $docfile;
if(!preg_match(«/.doc$/i»,$this->docFile) && !preg_match(«/.docx$/i»,$this->docFile)){
$this->docFile .= ‘.doc’;
}
return;
}
/**
* Set the document title
*
* @param String $title
*/
function setTitle($title){
$this->title = $title;
}
/**
* Return header of MS Doc
*
* @return String
*/
function getHeader(){
$return = ‘<html xmlns:v=»urn:schemas-microsoft-com:vml»
xmlns:o=»urn:schemas-microsoft-com:office:office»
xmlns:w=»urn:schemas-microsoft-com:office:word»
xmlns=»http://www.w3.org/TR/REC-html40″>
<head>
<meta http-equiv=Content-Type content=»text/html; charset=utf-8″>
<meta name=ProgId content=Word.Document>
<meta name=Generator content=»Microsoft Word 9″>
<meta name=Originator content=»Microsoft Word 9″>
<!—[if !mso]>
<style>
v:* {behavior:url(#default#VML);}
o:* {behavior:url(#default#VML);}
w:* {behavior:url(#default#VML);}
.shape {behavior:url(#default#VML);}
</style>
<![endif]—>
<title>’.$this->title.‘</title>
<!—[if gte mso 9]><xml>
<w:WordDocument>
<w:View>Print</w:View>
<w:DoNotHyphenateCaps/>
<w:PunctuationKerning/>
<w:DrawingGridHorizontalSpacing>9.35 pt</w:DrawingGridHorizontalSpacing>
<w:DrawingGridVerticalSpacing>9.35 pt</w:DrawingGridVerticalSpacing>
</w:WordDocument>
</xml><![endif]—>
<style>
<!—
/* Font Definitions */
@font-face
{font-family:Verdana;
panose-1:2 11 6 4 3 5 4 4 2 4;
mso-font-charset:0;
mso-generic-font-family:swiss;
mso-font-pitch:variable;
mso-font-signature:536871559 0 0 0 415 0;}
/* Style Definitions */
p.MsoNormal, li.MsoNormal, div.MsoNormal
{mso-style-parent:«»;
margin:0in;
margin-bottom:.0001pt;
mso-pagination:widow-orphan;
font-size:7.5pt;
mso-bidi-font-size:8.0pt;
font-family:«Verdana»;
mso-fareast-font-family:«Verdana»;}
p.small
{mso-style-parent:«»;
margin:0in;
margin-bottom:.0001pt;
mso-pagination:widow-orphan;
font-size:1.0pt;
mso-bidi-font-size:1.0pt;
font-family:«Verdana»;
mso-fareast-font-family:«Verdana»;}
@page Section1
{size:8.5in 11.0in;
margin:1.0in 1.25in 1.0in 1.25in;
mso-header-margin:.5in;
mso-footer-margin:.5in;
mso-paper-source:0;}
div.Section1
{page:Section1;}
—>
</style>
<!—[if gte mso 9]><xml>
<o:shapedefaults v:ext=»edit» spidmax=»1032″>
<o:colormenu v:ext=»edit» strokecolor=»none»/>
</o:shapedefaults></xml><![endif]—><!—[if gte mso 9]><xml>
<o:shapelayout v:ext=»edit»>
<o:idmap v:ext=»edit» data=»1″/>
</o:shapelayout></xml><![endif]—>
‘.$this->htmlHead.‘
</head>
<body> ‘;
return $return;
}
/**
* Return Document footer
*
* @return String
*/
function getFotter(){
return «</body></html>»;
}
/**
* Create The MS Word Document from given HTML
*
* @param String $html :: HTML Content or HTML File Name like path/to/html/file.html
* @param String $file :: Document File Name
* @param Boolean $download :: Wheather to download the file or save the file
* @return boolean
*/
function createDoc($html, $file, $download = false){
if(is_file($html)){
$html = @file_get_contents($html);
}
$this->_parseHtml($html);
$this->setDocFileName($file);
$doc = $this->getHeader();
$doc .= $this->title;
$doc .= $this->htmlBody;
$doc .= $this->getFotter();
if($download){
@header(«Cache-Control: «);// leave blank to avoid IE errors
@header(«Pragma: «);// leave blank to avoid IE errors
@header(«Content-type: application/octet-stream»);
@header(«Content-Disposition: attachment; filename=»$this->docFile»»);
echo $doc;
return true;
}else {
return $this->write_file($this->docFile, $doc);
}
}
/**
* Parse the html and remove <head></head> part if present into html
*
* @param String $html
* @return void
* @access Private
*/
function _parseHtml($html){
$html = preg_replace(«/<!DOCTYPE((.|n)*?)>/ims», «», $html);
$html = preg_replace(«/<script((.|n)*?)>((.|n)*?)</script>/ims», «», $html);
preg_match(«/<head>((.|n)*?)</head>/ims», $html, $matches);
$head = !empty($matches[1])?$matches[1]:»;
preg_match(«/<title>((.|n)*?)</title>/ims», $head, $matches);
$this->title = !empty($matches[1])?$matches[1]:»;
$html = preg_replace(«/<head>((.|n)*?)</head>/ims», «», $html);
$head = preg_replace(«/<title>((.|n)*?)</title>/ims», «», $head);
$head = preg_replace(«/</?head>/ims», «», $head);
$html = preg_replace(«/</?body((.|n)*?)>/ims», «», $html);
$this->htmlHead = $head;
$this->htmlBody = $html;
return;
}
/**
* Write the content in the file
*
* @param String $file :: File name to be save
* @param String $content :: Content to be write
* @param [Optional] String $mode :: Write Mode
* @return void
* @access boolean True on success else false
*/
function write_file($file, $content, $mode = «w»){
$fp = @fopen($file, $mode);
if(!is_resource($fp)){
return false;
}
fwrite($fp, $content);
fclose($fp);
return true;
}
}
PHP Create Word Document from HTML
In this article, you will learn how to create a word document in doc or docx using the PHP programming language.
The conversion of HTML into MS Word Document is primarily utilised in the web application to produce .doc/.docx records with dynamic HTML content. The server-side script is needed to dynamically export data from HTML to Word Document. The MS Word document can be quickly generated with HTML content using a PHP script. There are many third-party libraries available for HTML to Word conversion. But, you can easily convert the HTML content to a Word document using PHP without any external library.
PHP provides features for adding HTTP headers. Like, we can set the HTTP header to download the content or attachment, and we can also set it to show a ‘Save as‘ dialog box while downloading on the browser. So in this example, we have added the content headers to make the generated doc file downloadable. For file formatting, we have utilized word-accommodating CSS. It is important to use inline CSS instead of an external CSS file.
Here is the script to generate and download a word document. So, copy and paste this code either on the localhost or on the server, only you will have to change the body element content.
<?php
$filename = 'demo.doc';
header("Content-Type: application/force-download");
header( "Content-Disposition: attachment; filename=".basename($filename));
header( "Content-Description: File Transfer");
@readfile($filename);

$content = '<html xmlns:v="urn:schemas-microsoft-com:vml" '
        .'xmlns:o="urn:schemas-microsoft-com:office:office" '
        .'xmlns:w="urn:schemas-microsoft-com:office:word" '
        .'xmlns:m="http://schemas.microsoft.com/office/2004/12/omml"= '
        .'xmlns="http://www.w3.org/TR/REC-html40">'
        .'<head><meta http-equiv="Content-Type" content="text/html; charset=Windows-1252">'
        .'<title></title>'
        .'<!--[if gte mso 9]>'
        .'<xml>'
        .'<w:WordDocument>'
        .'<w:View>Print'
        .'<w:Zoom>100'
        .'<w:DoNotOptimizeForBrowser/>'
        .'</w:WordDocument>'
        .'</xml>'
        .'<![endif]-->'
        .'<style>
        @page
        {
            font-family: Arial;
            size:215.9mm 279.4mm;  /* A4 */
            margin:14.2mm 17.5mm 14.2mm 16mm; /* Margins: 2.5 cm on each side */
        }
        h2 { font-family: Arial; font-size: 18px; text-align:center; }
        p.para {font-family: Arial; font-size: 13.5px; text-align: justify;}
        </style>'
        .'</head>'
        .'<body>'
        .'<h2>Welcome To eTutorialsPoint</h2><br/>'
        .'<p class="para">'
        .'Our aim is to spread the knowledge. This website is developed for education purpose.'

        .'It contain web development tutorials, interview questions and answers and some useful development resources  '

        .'This website is fully responsive. We can easily study the resources on the smart phone.'
        .'</p>'
        .'</body>'
        .'</html>';

echo $content;
?>
In the above example, attributes in the HTML tag are MS office attributes. The XML tags in the HEAD element specify the manner in which the contents display in the word document.
<xml>
<w:WordDocument>
<w:View>Print
<w:Zoom>100
<w:DoNotOptimizeForBrowser/>
</w:WordDocument>
</xml>
The @page css is used to set the style properties of the document. Within this CSS, we can set margins, page breaks, orphans in the generated document.
@page
{
    font-family: Arial;
    size:215.9mm 279.4mm;  /* A4 */
    margin:14.2mm 17.5mm 14.2mm 16mm; /* Margins: 2.5 cm on each side */
}
Related Articles
PHP get IP address of visitor
How to display PDF file in PHP from database
How to read CSV file in PHP and store in MySQL
Preventing Cross Site Request Forgeries(CSRF) in PHP
PHP code to send email using SMTP
Simple pagination in PHP
Simple PHP File Cache
PHP Connection and File Handling on FTP Server
CRUD operations in Python using MYSQL Connector
Windows commands to Create and Run first Django app
How to send emojis in email subject and body using PHP
PHP7.3 New Features, Functions and Deprecated Functions
Create pie chart using google api
Create And Download Word Document in PHP
PHP SplFileObject Standard Library
Simple File Upload Script in PHP
Sending form data to an email using PHP

25 марта 2020 HTML JavaScript
Экспортировать HTML-страницу как документ Microsoft Word можно различными способами. Существуют PHP-библиотеки, плагины jQuery. Но когда HTML-файл прост без какой-либо сложной разметки, тогда можно экспортировать HTML-содержимое в формат .doc без особых усилий. Мне даже не нужны сторонние библиотеки. Если вы хотите преобразовать HTML в документ Word, без плагинов или библиотек простым JavaScript-кодом, тогда читайте эту статью.
Для экспорта HTML нам потребуется немного простого кода JavaScript, где к исходному HTML добавляется содержимое переменных header и footer. Переменные содержат обычную HTML-разметку и пространства имен XML, необходимые для документа в формате .doc. Так же JS-скрипт динамически создаст ссылку для загрузки документа с названием файла.
HTML-код
На целевой странице будет отображаться просто отформатированный контент HTML с кнопкой управления экспортом. При нажатии этой кнопки будет вызвана JavaScript-функция exportHTML(). Часть HTML, которая будет экспортирована в документ Word, будет идентифицирована с помощью селектора id. В данном случае содержимое элемента div с id="source-html«.
Підручник Інформатика за 7 клас Ривкінд 2020
<div id="source-html">
    <h1>Искусственный интеллект</h1>
    <h2>Обзор</h2>
    <p>
        Искусственный интеллект (ИИ) - это новая технология демонстрирующая машинный интеллект. Технологии, такие как <u><i>Нейронные Сети</i>, <i>Робототехника</i>или<i> Машинное обучение </i></u> части ИИ. Ожидается, что эта технология станет основной частью реального мира на всех уровнях.

    </p>
</div>
<div class="content-footer">
    <button id="btn-export" onclick="exportHTML();">Сохранить в Word</button>
</div>
Функция JavaScript для конвертации HTML в Word
Перейдем непосредственно к самой функции JavaScript. Функция создает переменную header, содержащую XML-код, необходимый для формата .doc и HTML-разметку. В переменной footer содержатся закрывающие HTML-теги документа. Далее скрипт получает HTML-код содержащийся в контейнере div с id="source-html" и добавляет к нему содержимое переменных header и footer. В заключительном этапе динамически формируется ссылка на загрузку документа Word с указанным названием.
<script>
    function exportHTML(){
       var header = "<html xmlns:o='urn:schemas-microsoft-com:office:office' "+
            "xmlns:w='urn:schemas-microsoft-com:office:word' "+
            "xmlns='http://www.w3.org/TR/REC-html40'>"+
            "<head><meta charset='utf-8'><title>Export HTML to Word Document with JavaScript</title></head><body>";
       var footer = "</body></html>";
       var sourceHTML = header+document.getElementById("source-html").innerHTML+footer;

       var source = 'data:application/vnd.ms-word;charset=utf-8,' + encodeURIComponent(sourceHTML);
       var fileDownload = document.createElement("a");
       document.body.appendChild(fileDownload);
       fileDownload.href = source;
       fileDownload.download = 'document.doc';
       fileDownload.click();
       document.body.removeChild(fileDownload);
    }
</script>