
TextCompare
TextCompare
Compare ExcelPDF DiffImage DiffReadability ToolsCSV Tools
LoginRegister
Convert XML to Excel online easily. Enter string or upload file with XML content and get Excel output.
| 1 |
|---|
XML Import Options
Ignore AttributesParse Attribute ValueAllow Boolean AttributesTrim Values
Give Rating
Very DissatisfiedDissatisfiedNeutralSatisfiedVery SatisfiedEmpty
XML to Excel Converter Online
How to convert XML to Excel?
- Enter XML in input textarea or choose and upload .xml file.
- Choose parsing options
- Click on
Processbutton to get output preview. - Click on
Downloadto get Excel file as xlsx.
References
- XML
- Excel
Libraries Used
- Fast-XML-Parser
- Sheetjs
Добавить это приложение в закладки
Нажмите Ctrl + D, чтобы добавить эту страницу в избранное, или Esc, чтобы отменить действие.
Отправьте ссылку для скачивания на
Отправьте нам свой отзыв
Ой! Произошла ошибка.
Недопустимый файл. Убедитесь, что загружается правильный файл.
Ошибка успешно зарегистрирована.
Вы успешно сообщили об ошибке. Вы получите уведомление по электронной почте, когда ошибка будет исправлена.
Нажмите эту ссылку, чтобы посетить форумы.
Немедленно удалите загруженные и обработанные файлы.
Вы уверены, что хотите удалить файлы?
Введите адрес
If you previously created an XML Map, you can use it to import XML data into cells that are mapped, but there also are several methods and commands for importing XML data without an XML Map.
If you have an XML Map, do this to import XML data into mapped cells:
-
In the XML Map, select one of the mapped cells.
-
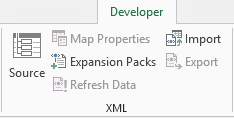
Click Developer > Import.
If you don’t see the Developer tab, see Show the Developer tab.
-
In the Import XML dialog box, locate and select the XML data file (.xml) you want to import, and click Import.
Other ways to import XML data
-
Import an XML data file as an XML table
-
Import multiple XML data files
-
Import multiple XML data files as external data
-
Open an XML data file to import its data
For more information about issues, see Common issues with importing XML data at the end of this article.
Import an XML data file as an XML table
-
Click Developer > Import.
If you don’t see the Developer tab, see Show the Developer tab.
-
In the Import XML dialog box, locate and select the XML data file (.xml) you want to import, and click Import.
If the XML data file doesn’t refer to a schema, Excel infers the schema from the XML data file.
-
In the Import Data dialog box, do one of the following:
-
Select XML table in existing worksheet to import the contents of the XML data file into an XML table in your worksheet at the specified cell location.
-
Select XML table in new worksheet to import the contents of the file into an XML table in a new worksheet starting at cell A1. The schema of the XML data file is displayed in the XML Source task pane.
-
-
If the XML data file doesn’t refer to a schema, then Excel infers the schema from the XML data file.
-
To control the behavior of XML data (such as data binding, format, and layout), click Properties, which displays the XML Map properties dialog box. For example, existing data in a mapped range will be overwritten when you import data by default, but you can change this.
Import multiple XML data files
-
Select a mapped cell to import multiple XML files into a single set of mapped cells.
If you want to import multiple XML files into multiple sets of mapped cells, click a cell anywhere on the worksheet that isn’t mapped.
-
Click Developer > Import.
If you don’t see the Developer tab, see Show the Developer tab.
-
In the Import XML dialog box, locate and select the XML data file (.xml) you want to import.
-
If the files are contiguous, press Shift, and click the first and the last file in the list. All of the data from the XML files will be imported and appended to the mapped cells.
-
If the files aren’t contiguous, press and hold Ctrl, and click each file you want to import in the list.
-
-
Click Import.
If you selected files that aren’t contiguous, the Importing <filename>.xml dialog box appears. Select the XML Map that corresponds to the XML data file you’re importing for each file.
To use a single map for all of the selected files that aren’t yet imported, select Use this XML Map for all selected files of this schema.
Import multiple XML data files as external data
To import multiple XML files that use the same namespace but different XML schemas, you can use the From XML Data Import command. Excel creates a unique XML Map for each XML data file you import.
Note: If you’re importing multiple XML files that don’t define a namespace, these XML files are treated as if they use the same namespace.
-
If you’re using Excel with a Microsoft 365 subscription, click Data > Get Data > From File > From XML.
If you’re using Excel 2016 or earlier, click Data > From Other Sources > From XML Data Import.
-
Go to the drive, folder, or Internet location that has the XML data file (.xml) you want to import.
-
Select the file and click Open.
-
In the Import Data dialog box, do one of the following:
-
XML table in existing worksheet The contents of the file are imported into a new XML table in a new worksheet. If the XML data file doesn’t refer to a schema, Excel infers the schema from the XML data file.
-
Existing worksheet The XML data is imported in a two-dimensional table with rows and columns that shows XML tags as column headings, and data in rows below the column headings. The first element (the root node) is used like a title and is displayed in the specified cell location. The rest of the tags are sorted alphabetically across the second row. In this case, Excel doesn’t infer a schema, and you can’t use an XML Map.
-
New worksheet Excel adds a new worksheet to your workbook and automatically puts the XML data in the upper-left corner of the new worksheet. If the XML data file doesn’t refer to a schema, Excel infers the schema from the XML data file.
-
-
To control the behavior of XML data, such as data binding, format, and layout, click Properties, which displays the XML Map properties dialog box. For example, existing data in a mapped range is overwritten when you import data by default, but you can change this.
Open an XML data file to import its data
-
Click File > Open.
If you’re using Excel 2007, click Microsoft Office Button
 > Open.
 -
In the Open dialog box, click the drive, folder, or Internet location that has the file that you want to open.
-
Select the file and click Open.
-
If the Import XML dialog box appears, the file you opened refers to one or more Extensible Stylesheet Language Transformation (XSLT) style sheets, so you can click one of the following options:
-
Open the file without applying a style sheet The XML data is imported in a two-dimensional table with rows and columns that shows XML tags as column headings, and data in rows below the column headings. The first element (the root node) is used like a title and is displayed in the specified cell location. The rest of the tags are sorted alphabetically across the second row. In this case, Excel doesn’t infer a schema, and you can’t use an XML Map.
-
Open the file with the following style sheet applied (select one) Select the style sheet that you want to apply, and then click OK. The XML data is formatted according to the style sheet that you selected.
Note: The XML data is opened as read-only in Excel so that you don’t accidentally save your original source file in the Excel Macro-Enabled Workbook file format (.xlsm). In this case, Excel doesn’t infer a schema, and you can’t use an XML Map.
-
-
If the Open XML dialog box appears, the XML file doesn’t have any XSLT style sheet references. To open the file, click one of the following options:
-
Click As an XML table to create an XML table in a new workbook.
The contents of the file are imported into the XML table. If the XML data file doesn’t refer to a schema, Excel infers the schema from the XML data file.
-
Click As a read-only workbook.
The XML data is imported in a two-dimensional table with rows and columns that shows XML tags as column headings, and data in rows below the column headings. The first element (the root node) is used like a title and is displayed in the specified cell location. The rest of the tags are sorted alphabetically across the second row. In this case, Excel doesn’t infer a schema, and you can’t use an XML Map.
The XML data is opened as read-only in Excel so that you don’t accidentally save your original source file in the Excel Macro-Enabled Workbook file format (.xlsm). In this case, Excel doesn’t infer a schema, and you can’t use an XML Map.
-
Click Use the XML Source task pane.
The schema of the XML data file is displayed in the XML Source task pane. You can then drag elements of the schema to the worksheet to map those elements to the worksheet.
If the XML data file doesn’t refer to a schema, Excel infers the schema from the XML data file.
-
 > Open.
Common issues with importing XML data
Excel displays the XML Import Error dialog box when it can’t validate data according to the XML Map. In this dialog box, click Details for additional information about each error. The following table lists some common import errors:
|
Error |
What happened |
|
Failed schema validation |
When you clicked Validate data against schema for import and export in the XML Map Properties dialog box, the data was imported, but the data wasn’t validated against the specified XML Map. |
|
Some data was imported as text |
Some or all of the data you imported was converted from its declared data type to text. To use this data in a calculation, you’ll need to convert the data from text to numbers or dates. For example, a date value converted to text won’t work as intended in the YEAR function until you convert it to the Date data type. Excel converts data to text when:
|
|
XML parse error |
The XML parser can’t open the specified XML file. Make sure the XML file doesn’t have syntax errors, and that the XML is well-formed. |
|
Can’t find an XML Map that corresponds to the data |
This problem can occur when you select more than one XML data file to import, and Excel can’t find a matching XML Map for one of the files. For the file named in the title bar of the dialog box, import an appropriate schema first, and then try importing the file again. |
|
An XML table can’t be resized to accommodate data |
You’re attempting to add rows by importing or appending data to the XML table, but there’s no room for the table to expand. An XML table can only expand from the bottom down. For example, there may be an object, such as a picture or another table, immediately below the XML table that prevents the XML table from expanding. Or, for the XML table to expand, it will exceed the Excel row limit of 1,048,576. To fix this problem, rearrange the tables and objects on the worksheet to allow the XML table to expand from the bottom down. |
The specified XML file doesn’t refer to a schema
The XML file you’re trying to open doesn’t refer to an XML schema. To work with the XML data that’s in the file, Excel needs a schema based on the contents of the XML file. If that schema is incorrect or insufficient, remove it from your workbook. Then create an XML schema file and edit the XML data file so that the XML data file refers to the schema. For more information, see Map XML elements to cells in an XML Map.
Note: You can’t export the Excel inferred schema as a separate XML schema data file (.xsd). Although there are XML schema editors and other methods for creating an XML schema file, you may not have convenient access to them or know how to use them.
Follow these steps to remove the schema that Excel created from your workbook:
-
Click Developer > Source.
If you don’t see the Developer tab, see Show the Developer tab.
-
In the XML Source task pane, click XML Maps.
-
In the XML Maps dialog box, click the XML Map Excel created, and click Delete.
Importing multiple XML files that use the same namespace but different schemas doesn’t work as expected
When you work with multiple XML data files and XML schemas, you typically create an XML Map for each schema, map the elements you want, and then import each XML data file to the appropriate XML Map. Using the Import command to open multiple XML files with the same namespace, you can only use one XML schema. When you use this command to open multiple XML files that use the same namespace but different schemas, you can get unexpected results. For example, data may get overwritten, or the files won’t open.
To import multiple XML files that use the same namespace but different XML schemas, try use the From XML Data Import command (click Data > From Other Sources). This command allows multiple XML files with the same namespace to use multiple XML schemas. Excel creates a unique XML Map for each XML data file you want to import.
Note: If you’re importing multiple XML files that don’t define a namespace, these XML files are treated as if they use the same namespace.
Show the Developer tab
If you don’t see the Developer tab, do the following to display it:
-
In Excel 2013 and Excel 2010:
-
Click File > Options.
-
Click the Customize Ribbon category.
-
Under Main Tabs, check the Developer box, and click OK.
-
-
In Excel 2007:
-
Click the Microsoft Office Button
> Excel Options. -
Click the Popular category.
-
Under Top options for working with Excel, check the Show Developer tab in the Ribbon box, and click OK.
-
See Also
Over view of XML in Excel
Map XML elements to cells in an XML Map
Export XML data
Содержание
- Процесс конвертации
- Способ 1: встроенный функционал Excel
- Способ 2: импорт данных
- Способ 3: онлайн-конвертер
- Вопросы и ответы
XML является одним из самых распространенных форматов для хранения данных и обмена ими между различными приложениями. С данными работает и программа Microsoft Excel, поэтому очень актуальным является вопрос конвертации файлов из стандарта XML в форматы Excel. Выясним, как произвести эту процедуру различными способами.
Процесс конвертации
XML-файлы написаны на специальном языке разметки чем-то похожим на HTML веб-страниц. Поэтому у этих форматов довольно сходная структура. В то же время, Эксель – это в первую очередь программа, имеющая несколько «родных» форматов. Самые известные из них: Книга Excel (XLSX) и Книга Excel 97 – 2003 (XLS). Выясним основные способы конвертации файлов XML в эти форматы.
Способ 1: встроенный функционал Excel
Программа Excel отлично работает с файлами формата XML. Она может открывать их, изменять, создавать, сохранять. Поэтому самый простой вариант поставленной перед нами задачи — это открыть данный объект и сохранить его через интерфейс приложения в виде документов XLSX или XLS.
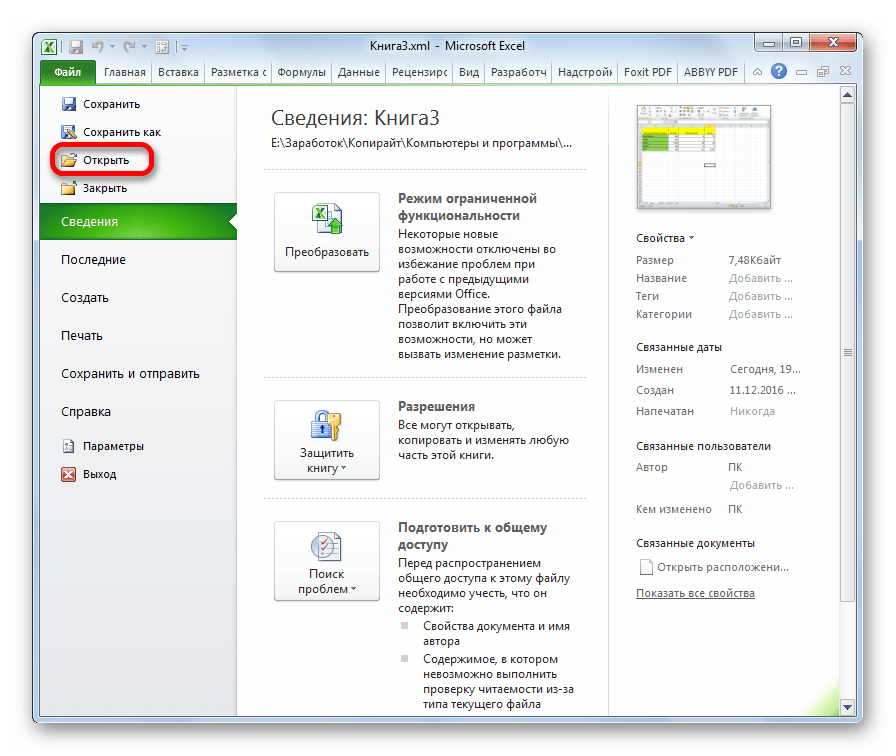
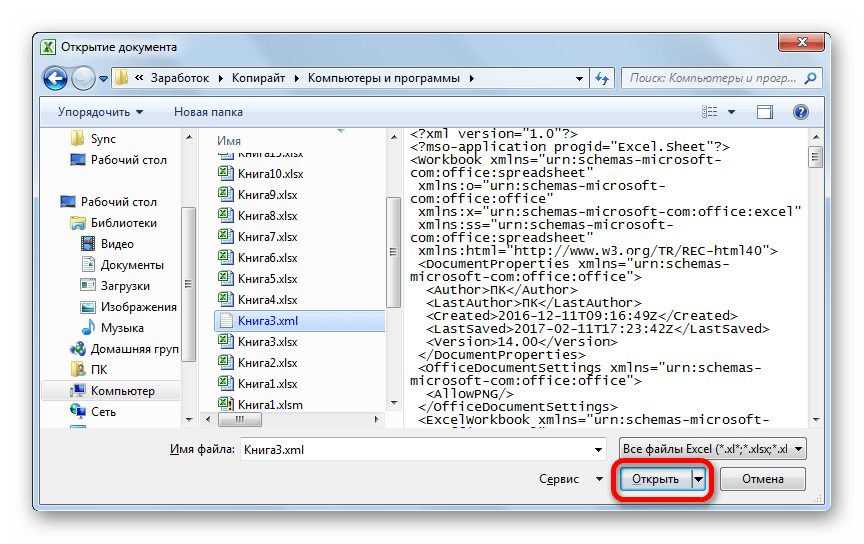
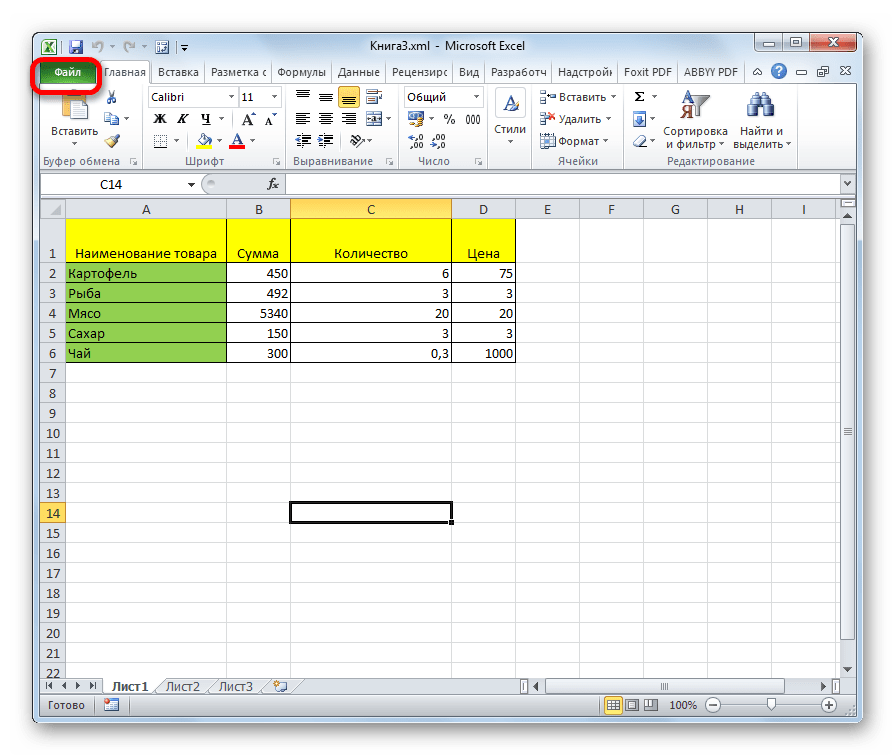
- Запускаем Эксель. Во вкладке «Файл» переходим по пункту «Открыть».
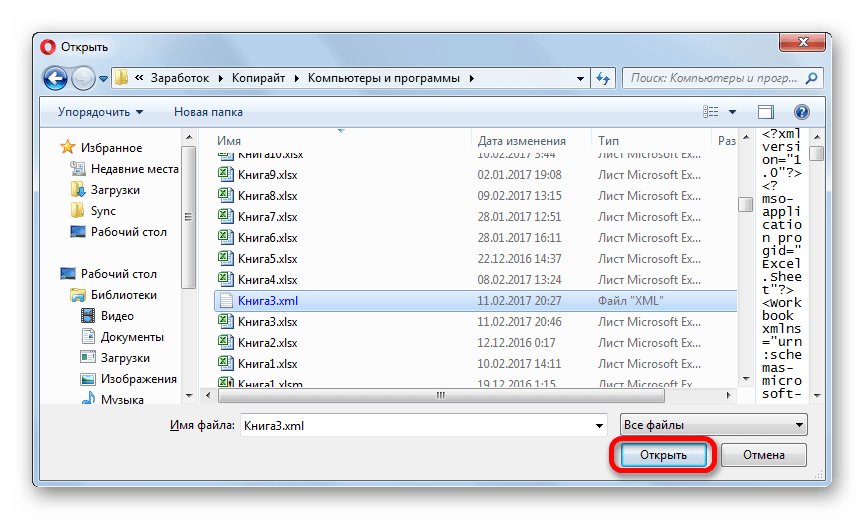
- Активируется окно открытия документов. Переходим в директорию, где хранится нужный нам документ XML, выделяем его и жмем на кнопку «Открыть».
- После того, как документ открыт через интерфейс Эксель, опять переходим во вкладку «Файл».
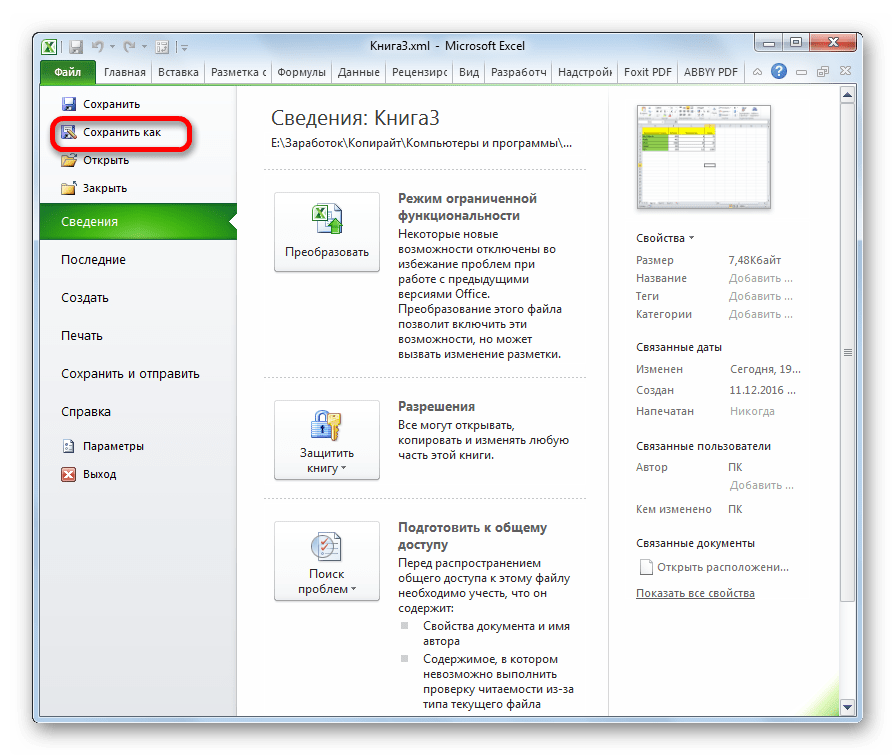
- Перейдя в эту вкладку, кликаем по пункту «Сохранить как…».
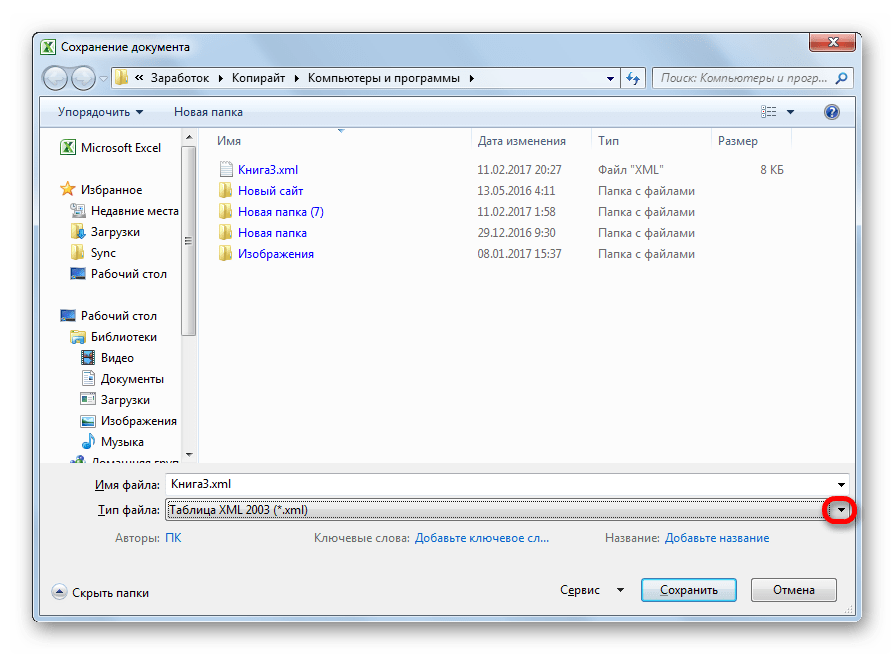
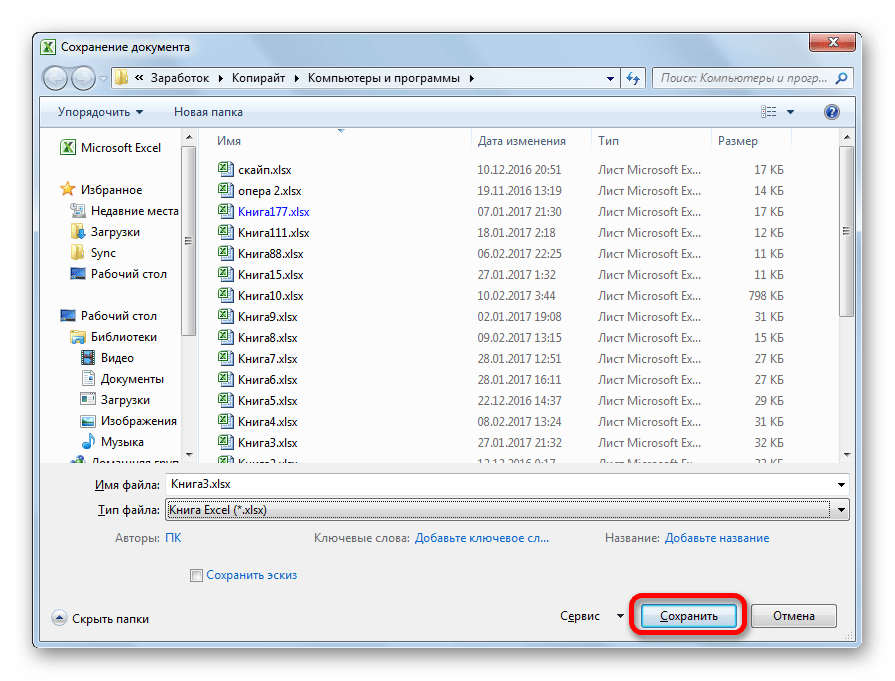
- Открывается окно, похожее на окно для открытия, но с некоторыми отличиями. Теперь нам нужно сохранить файл. С помощью инструментов навигации переходим в директорию, где будет храниться преобразованный документ. Хотя можно его оставить и в текущей папке. В поле «Имя файла» при желании можно его переименовать, но это тоже не обязательно. Для нашей задачи основным является следующее поле – «Тип файла». Кликаем по этому полю.

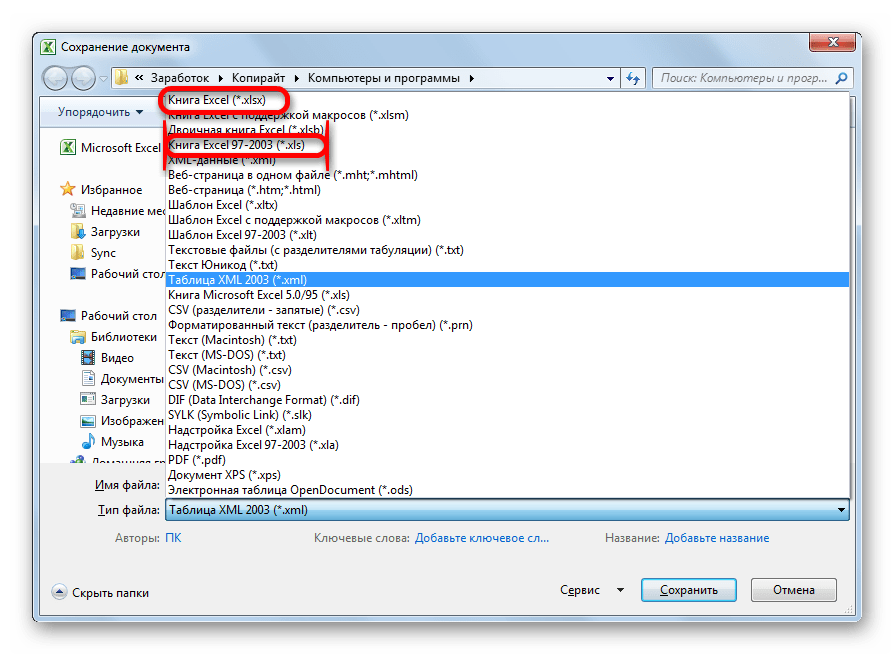
Из предложенных вариантов выбираем Книга Excel или Книга Excel 97-2003. Первый из них более новый, второй – уже несколько устаревший.
- После того, как выбор произведен, жмем на кнопку «Сохранить».
На этом процедура конвертации файла XML в формат Excel через интерфейс программы окончена.
Способ 2: импорт данных
Вышеописанный способ подходит только для файлов XML с самой простой структурой. Более сложные таблицы при конвертации таким способом могут быть переведены некорректно. Но, существует ещё один встроенный инструмент Excel, который поможет корректно произвести импорт данных. Он расположен в «Меню разработчика», которое по умолчанию отключено. Поэтому, прежде всего, его нужно активировать.
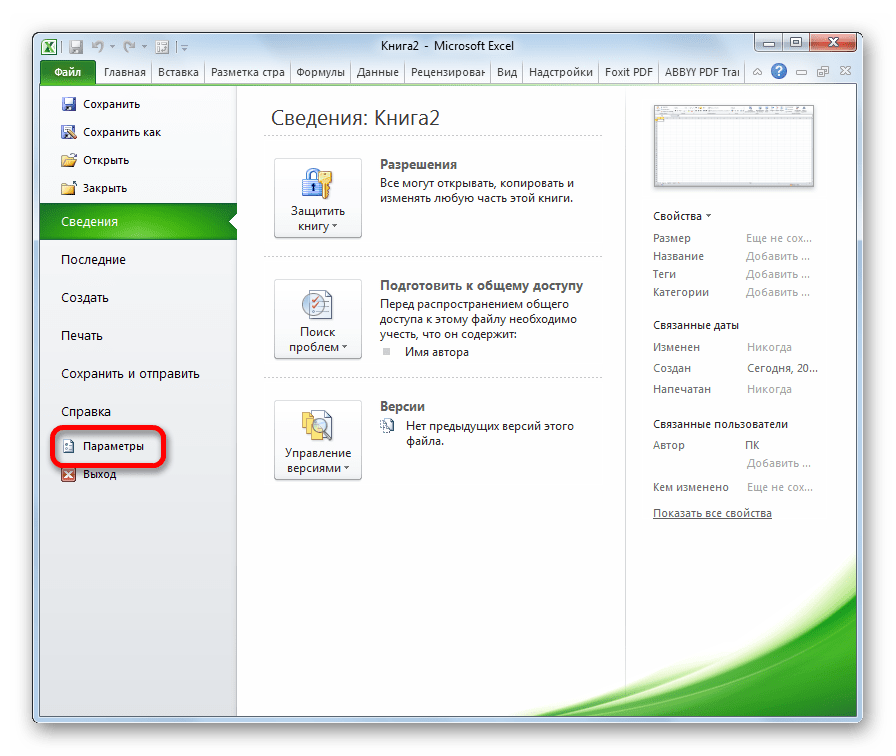
- Перейдя во вкладку «Файл», кликаем по пункту «Параметры».
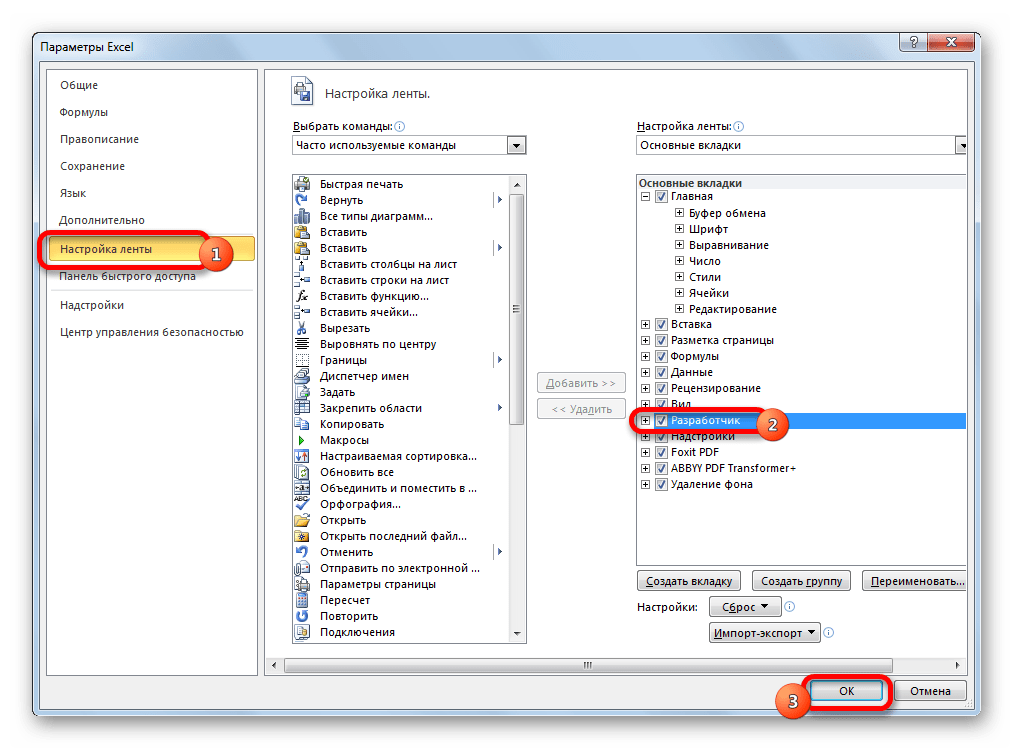
- В окне параметров переходим в подраздел «Настройка ленты». В правой части окна ставим галочку около пункта «Разработчик». Жмем на кнопку «OK». Теперь нужная функция активирована, а соответствующая вкладка появилась на ленте.
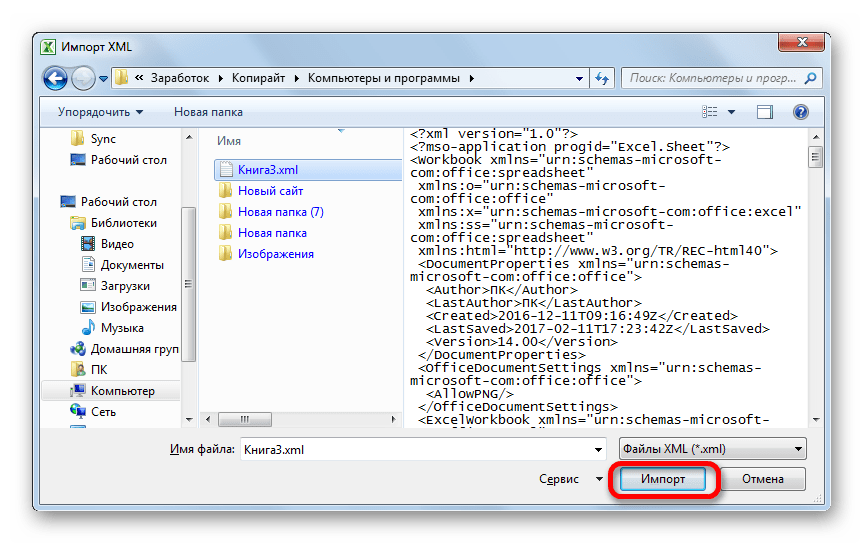
- Переходим во вкладку «Разработчик». На ленте в блоке инструментов «XML» жмем на кнопку «Импорт».
- Открывается окно импорта. Переходим в директорию, где располагается нужный нам документ. Выбираем его и жмем на кнопку «Импорт».
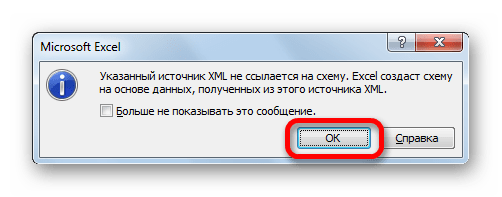
- Далее может открыться диалоговое окно, в котором говорится, что выбранный файл не ссылается на схему. В нем будет предложено создать программе схему самостоятельно. В этом случае соглашаемся и жмем на кнопку «OK».
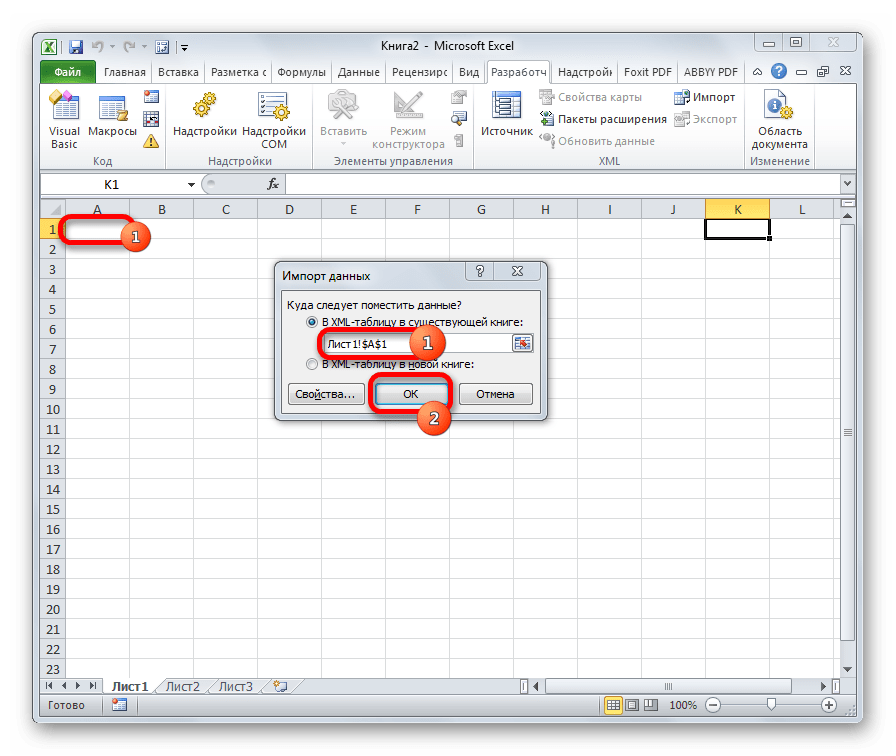
- Далее открывается следующее диалоговое окно. В нем предлагается определиться открывать таблицу в действующей книге или в новой. Так как мы запустили программу без открытия файла, то можем оставить данную настройку по умолчанию и продолжить работу с текущей книгой. Кроме того, это же окно предлагает определить координаты на листе, куда будет импортирована таблица. Можно вписать адрес вручную, но намного проще и удобнее просто кликнуть по ячейке на листе, которая станет верхним левым элементом таблицы. После того, как адрес занесен в поле диалогового окна, жмем на кнопку «OK».
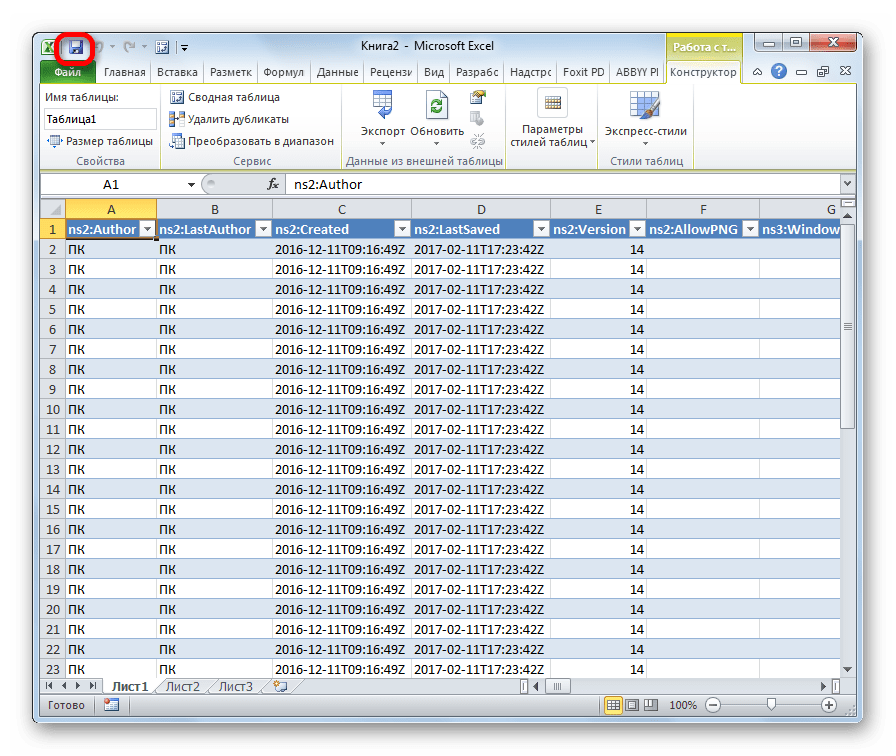
- После этих действий таблица XML будет вставлена в окно программы. Для того чтобы сохранить файл в формате Excel кликаем по иконке в виде дискеты в верхнем левом углу окна.
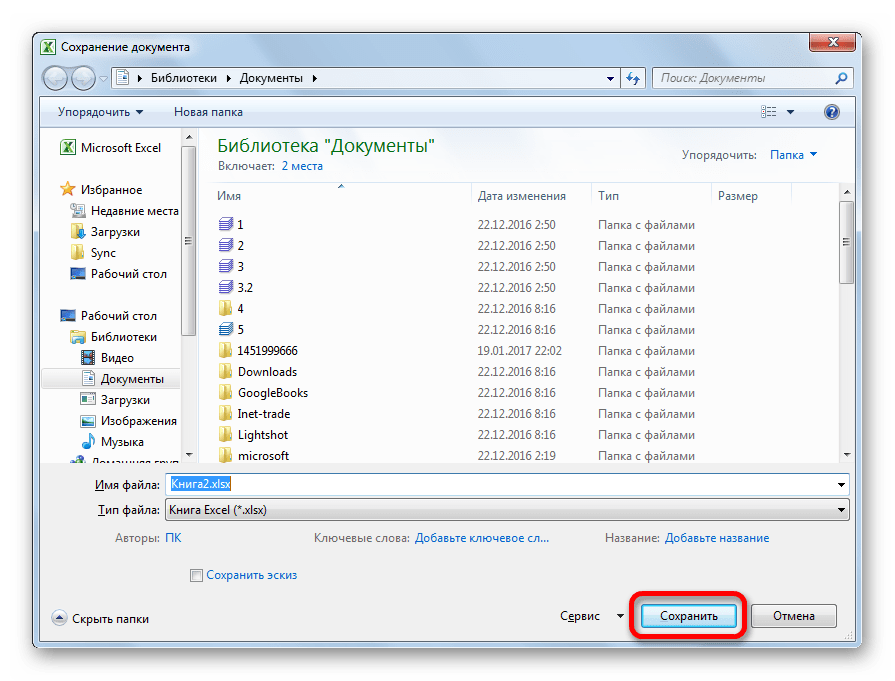
- Открывается окно сохранения, в котором нужно определить директорию, где будет храниться документ. Формат файла на этот раз будет уже предустановлен XLSX, но при желании вы можете раскрыть поле «Тип файла» и установить другой формат Эксель – XLS. После того, как настройки сохранения выставлены, хотя в данном случае они могут быть и оставленными по умолчанию, жмем на кнопку «Сохранить».


Таким образом, конвертация в нужном для нас направлении будет совершена с максимально корректным преобразованием данных.
Способ 3: онлайн-конвертер
Тем пользователям, у которых по какой-то причине не установлена на компьютере программа Эксель, но нуждающимся в срочном преобразовании файла из формата XML в EXCEL, можно воспользоваться одним из множества специализированных онлайн-сервисов для конвертации. Одним из наиболее удобных сайтов подобного типа является Convertio.
Онлайн-конвертер Convertio
- Переходим на данный веб-ресурс с помощью любого браузера. На нем можно выбрать 5 способов загрузки конвертируемого файла:
- С жесткого диска компьютера;
- Из онлайн-хранилища Dropbox;
- Из онлайн-хранилища Google Drive;
- По ссылке из интернета.
Так как в нашем случае документ размещен на ПК, то жмем на кнопку «С компьютера».
- Запускается окно открытия документа. Переходим в ту директорию, где он размещен. Кликаем по файлу и жмем на кнопку «Открыть».

Существует также альтернативный вариант добавления файла на сервис. Для этого нужно просто перетянуть его название мышкой из Проводника Windows.
- Как видим, файл добавился на сервис и находится в состоянии «Подготовлено». Теперь нужно выбрать необходимый нам формат для конвертации. Кликаем по окошку рядом с буквой «В». Открывается список групп файлов. Выбираем «Документ». Далее открывается перечень форматов. Выбираем «XLS» или «XLSX».
- После того, как наименование нужного расширения добавлено в окошко, жмем на большую красную кнопку «Преобразовать». После этого, документ будет преобразован и доступен для загрузки на этом ресурсе.


Данный вариант может послужить хорошей подстраховкой на случай неимения доступа к стандартным инструментам для переформатирования по данному направлению.
Как видим, в самом Экселе есть встроенные инструменты, позволяющие преобразовать файл формата XML в один из «родных» форматов этой программы. Простейшие экземпляры можно легко конвертировать через обычную функцию «Сохранить как…». Для документов с более сложной структурой существует отдельная процедура преобразования через импорт. Те пользователи, которые по какой-либо причине не могут воспользоваться данными инструментами, имеют возможность выполнить задачу с помощью специализированных онлайн-сервисов для конвертации файлов.
Еще статьи по данной теме:
Помогла ли Вам статья?
The XML file format is quite commonly used on the web, and there is a possibility that sometimes you may have to work with the data in the XML file.
Now you can’t use the XML file directly, as it’s not meant to be read by humans (but machines).
In such a case, it would help to know how to convert the XML file to Excel so you can easily work with the data and analyze it.
In this tutorial, I will show you two really simple ways to import an XML file into Excel using Power Query.
What is an XML File?
XML stands for Extensible Markup Language. An XML file can hold data in a format that can easily be read by apps and systems.
But it’s not as easy to read for humans, which is why we may have to transform it into a format that’s easier to use.
If it contains a lot of text data, then you can use a text editor to read the XML file, and if it contains data, then you can import that XML file into Excel and then work with the data.
XML is quite widely accepted as a file format to store and transmit data over the web.
A lot of popular file formats, such as Microsoft Office Open XML, LibreOffice, OpenDocument, XHTML, and SVG, also use the XML file format.
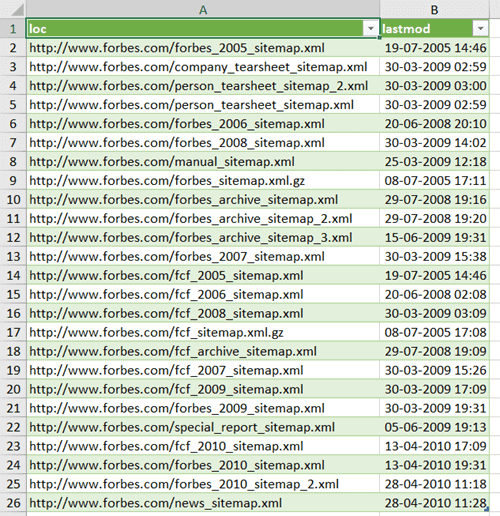
Most popular websites on the Internet have their sitemap in an XML format.
This is a file that contains the details of all the important pages and categories on a website. Here is an example of the sitemap from Forbes.
Now let’s see how to convert an XML file to Excel using Power Query.
Import XML File to Excel
If you already have an XML file (either downloaded on your system or a link to it on the web), you can easily convert it into data in an Excel file.
Thanks to Power Query (now called ‘Get & Transform’)
Import XML File that is Saved On your System
For the purpose of this tutorial, I’ll use an XML file that contains the sitemap for Forbes. You can download the file by going to this link, then right-click and save the file.
Once you have the XML file on your system, follow the below steps to get the XML file data into Excel:
- Open the Excel file where you want to get the data from the XML file
- Click the Data tab

- In the ‘Get & Transform’ data group, click on the ‘Get Data’ option

- Go to the ‘From file’ option
- Click on ‘From XML’

- In the input data dialog box that opens up, locate the XML file that you want to import and select it
- Click Import. This will import the XML file into power query and open the Navigator dialog box
- Select the data from the XML file that you want to import. In this case, I would click on ‘sitemap’ in the left pane

- [Optional] Click on the Transform Data button, if you want to transform the data before loading it into Excel (such as change the column names or remove some columns)
- Click on Load


The above steps would insert a new worksheet in the Excel file, and load all the data from the XML file into the new worksheet.
The great thing about using Power Query to fetch the data from an XML file into Excel is that in case the XML file updates and there are new records in it, you don’t have to repeat the same process.
You can simply right-click on any cell in the table and refresh the query.

Import XML File into Excel using the web URL
In the above example, we first downloaded the XML file on the system and then imported the data into Excel.
In case you have a web URL that contains the XML file (such as this one – https://www.forbes.com/sitemap_index.xml), you don’t even need to download the file. you can connect Power Query to that URL and extract the XML data into Excel.
Below are the steps to connect power query do a web URL that contains the XML data and import that data into Excel:
- Open the Excel file where you want to import the data
- Click the Data tab
- In the Get & Transform group, click on the ‘Get Data’ option
- Go to the ‘From Other Sources’ option
- Click on ‘From Web’

- In the ‘From Web’ dialog box, copy and paste the URL that has the XML data

- Click OK. This will open the Navigator dialog box where you can choose which XML data to import
- Click on ‘sitemap’, which is the XML data that I want in Excel

- [Optional] Click on the Transform Data button, if you want to transform the data before loading it into Excel (such as change the column names or remove some columns)
- Click on Load


The above steps would insert a new worksheet in the Excel file, and load all the data from the XML file into the new worksheet.
And again, in case the data updates in this URL, simply refresh the query to get the new data in Excel.
So these are two simple ways that you can use to convert an XML file into Excel.
If you have the XML file on your system, you can import the data easily using Power Query. And if you have a web URL of the XML file, then you can also fetch that data into Excel.
I hope you found this tutorial useful.
Other Excel tutorials you may also like:
- 8 Ways to Reduce Excel File Size (that actually work)
- How to Automatically Open Specific Excel File on Startup
- How to Recover Unsaved Excel Files [All Options + Precautions]
- Microsoft Excel Won’t Open – How to Fix it! (6 Possible Solutions)
- How to Convert Excel to PDF Using VBA
- Split Each Excel Sheet Into Separate Files (Step-by-Step)
- Combine Data from Multiple Workbooks in Excel (using Power Query)