
Microsoft Excel makes it easy to import Extensible Markup Language (XML) data that is created from other databases and applications, to map XML elements from an XML schema to worksheet cells, and to export revised XML data for interaction with other databases and applications. Think of these XML features as turning Office Excel into an XML data file generator with a familiar user interface.
In this article
-
Why use XML in Excel?
-
XML data and schema files
-
Key XML and Excel scenarios
-
-
The basic process of using XML data in Excel
-
Working with XML maps
-
Using the XML Source task pane
-
Element types and their icons
-
Working with single-mapped cells
-
Working with repeating cells in XML tables
-
XML map security considerations
-
Importing XML data
-
Working with an inferred schema
-
Exporting XML data
-
Using the Excel macro-enabled Office Open XML Format file
-
Why use XML in Excel?
XML is a technology that is designed for managing and sharing structured data in a human-readable text file. XML follows industry-standard guidelines and can be processed by a variety of databases and applications. Using XML, application designers can create their own customized tags, data structures, and schemas. In short, XML greatly eases the definition, transmission, validation, and interpretation of data between databases, applications, and organizations.
XML data and schema files
Excel works primarily with two types of XML files:
-
XML data files (.xml), which contain the custom tags and structured data.
-
Schema files (.xsd), which contain schema tags that enforce rules, such as data type and validation.
The XML standard also defines Extensible Stylesheet Language Transformation (XSLT) (.xslt) files, which are used to apply styles and transform XML data into different presentation formats. You can apply these transforms before you import XML files into Excel and after you export XML files from Excel. If XSLT files are linked to XML data files that you import into Excel, you do have the option to apply or not apply the formatting before the data is added to the worksheet, but only when you open an XML file by using the Open command from within Excel. Choose the XML Files (*.xml) file type before you click the Open button to see the XML files in the folder.
Key XML and Excel scenarios
By using XML and Excel, you can manage workbooks and data in ways that were previously impossible or very difficult. By using XML maps, you can easily add, identify, and extract specific pieces of business data from Excel documents. For example, an invoice that contains the name and address of a customer or a report that contains last quarter’s financial results are no longer just static reports. You can easily import this information from databases and applications, revise it, and export it to the same or other databases and applications.
The following are key scenarios that the XML features are designed to address:
-
Extend the functionality of existing Excel templates by mapping XML elements onto existing cells. This makes it easier to get XML data into and out of your templates without having to redesign them.
-
Use XML data as input to your existing calculation models by mapping XML elements onto existing worksheets.
-
Import XML data files into a new workbook.
-
Import XML data from a Web service into your Excel worksheet.
-
Export data in mapped cells to XML data files independent from other data in the workbook.
Top of Page
The basic process of using XML data in Excel
The following diagram shows how the different files and operations work together when you use XML with Excel. Essentially, there are five phases to the process:
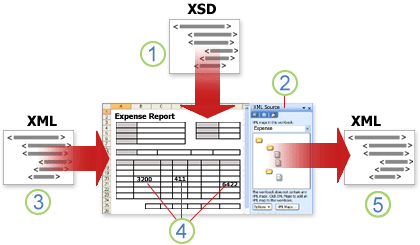
 Adding an XML schema file (.xsd) to a workbook
 Mapping XML schema elements to individual cells or XML tables
 Importing an XML data file (.xml) and binding the XML elements to mapped cells
 Entering data, moving mapped cells, and leveraging Excel functionality, while preserving XML structure and definitions
 Exporting revised data from mapped cells to an XML data file
Working with XML maps
You can create or open a workbook in Excel, attach an XML schema file (.xsd) to the workbook, and then use the XML Source task pane to map XML elements of the schema to individual cells or tables. After you map the XML elements to your worksheet, you can import and export XML data into and out of the mapped cells.
When you add an XML schema file (.xsd) to your workbook, you create an XML map. In general, XML maps are used to create mapped cells and to manage the relationship between mapped cells and individual elements in the XML schema. In addition, these XML maps are used to bind the contents of mapped cells to elements in the schema when you import or export XML data files (.xml).
There are two kinds of mapped cells that you can create: single-mapped cells and repeating cells (which appear as XML tables). To make designing your worksheet more flexible, you can drag the mapped cells anywhere on a worksheet and into any order — even one different from the XML schema. You can also choose which elements to map and not map.
The following rules about using XML maps are important to know:
-
A workbook can contain one or more XML maps.
-
You can only map one element to one location in a workbook at a time.
-
Each XML map is an independent entity, even if multiple XML maps in the same workbook refer to the same schema.
-
An XML map can only contain one root element. If you add a schema that defines more than one root element, you are prompted to choose the root element to use for the new XML map.
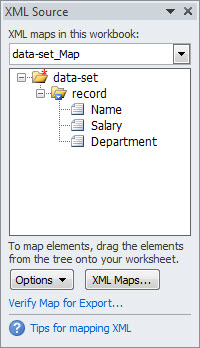
Using the XML Source task pane
You use the XML Source task pane to manage XML maps. To open it, on the Developer tab, in the XML group, click Source. The following diagram shows the main features of this task pane.
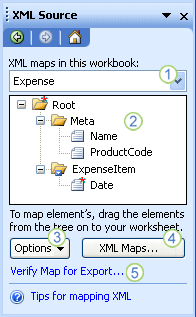
1. Lists XML maps that were added to the workbook
2. Displays a hierarchical list of XML elements in the currently listed XML map
3. Sets options when working with the XML Source task pane and the XML data, such as how to preview the data and control headings
4. Opens the XML Maps dialog box, which you can use to add, delete, or rename XML maps
5. Verifies whether you can export XML data through the current XML map
Top of Page
Element types and their icons
The following table summarizes each type of XML element that Excel can work with and the icon that is used to represent each type of element.
|
Element type |
Icon |
|---|---|
|
Parent element |
|
|
Required parent element |
|
|
Repeating parent element |
|
|
Required repeating parent element |
|
|
Child element |
|
|
Required child element |
|
|
Repeating child element |
|
|
Required repeating child element |
|
|
Attribute |
|
|
Required attribute |
|
|
Simple content in a complex structure |
|
|
Required simple content in a complex structure |
|


Top of Page
Working with single-mapped cells
A single-mapped cell is a cell that has been mapped to a nonrepeating XML element. You create a single-mapped cell by dragging a nonrepeating XML element from the XML Source task pane onto a single cell in your worksheet.
When you drag a nonrepeating XML element onto the worksheet, you can use a smart tag to choose to include the XML element name as a heading above or just to the left of the single-mapped cell, or you can use an existing cell value as a heading.
You can also use a formula in a single-mapped cell, if the cell is mapped to an XML element with an XML Schema Definition (XSD) data type that Excel interprets as a number, date, or time.
Top of Page
Working with repeating cells in XML tables
XML tables are similar in appearance and functionality to Excel tables. An XML table is an Excel table that has been mapped to one or more XML repeating elements. Each column in the XML table represents an XML element.
An XML table is created when you:
-
Use the Import command (in the XML group on the Developer tab) to import an XML data file.
-
Use the Open command from within Excel to open an XML data file — and then select As an XML table in the Open XML dialog box.
-
Use the From XML Data Import command (from the From Other Sources command button, in the Get External Data group, on the Data tab) to import an XML data file — and then select XML table in existing worksheet or New worksheet in the Import Data dialog box.
-
Drag one or more repeating elements from the XML Source task pane to a worksheet.
When you create an XML table, the XML element names are automatically used as column headings. You can change these to any column headings that you want. However, the original XML element names are always used when you export data from the mapped cells.
Two options under the Options button in the XML Source task pane are useful when you work with XML tables:
-
Automatically Merge Elements When Mapping
When selected, Excel creates one XML table from multiple fields as they are dropped onto the worksheet. This option works as long as the multiple fields are dropped on the same row, one adjacent to the other. When this option is cleared, each element appears as its own XML table. -
My Data Has Headings
When selected, existing heading data is used as column headings for repeating elements that you map to your worksheet. When this option is cleared, the XML element names are used as column headings.
Using XML tables, you can easily import, export, sort, filter, and print data based on an XML data source. However, XML tables do have some limitations regarding how they can be arranged on the worksheet.
-
XML tables are row-based, meaning that they grow from the header row down. You cannot add new entries above existing rows.
-
You cannot transpose an XML table so that new entries will be added to the right.
You can use formulas in columns that are mapped to XML elements with an XML Schema Definition (XSD) data type that Excel interprets as a number, date, or time. Just as in an Excel table, formulas in an XML table are filled down the column when new rows are added to the table.
XML map security considerations
An XML map and its data source information are saved with the Excel workbook, not a specific worksheet. A malicious user can view this map information by using a Microsoft Visual Basic for Applications (VBA) macro. Furthermore, if you save your workbook as a macro-enabled Excel Office Open XML Format File, this map information can be viewed through Microsoft Notepad or through another text-editing program.
If you want to keep using the map information but remove the potentially sensitive data source information, you can delete the data source definition of the XML schema from the workbook, but still export the XML data, by clearing the Save data source definition in workbook check box in the XML Map Properties dialog box, which is available from the Map Properties command in the XML group on the Developer tab.
If you delete a worksheet before you delete a map, the map information about the data sources, and possibly other sensitive information, is still saved in the workbook. If you are updating the workbook to remove sensitive information, make sure that you delete the XML map before you delete the worksheet, so that the map information is permanently removed from the workbook.
Top of Page
Importing XML data
You can import XML data into an existing XML map in your workbook. When you import data, you bind the data from the file to an XML map that is stored in your workbook. This means that each data element in the XML data file has a corresponding element, in the XML schema, that you mapped from an XML Schema file or inferred schema. Each XML map can only have one XML data binding, and an XML data binding is bound to all of the mappings that were created from a single XML map.
You can display the XML Map Properties dialog box (Click Map Properties in the XML group on the Developer tab.), which has three options, all selected by default, that you can set or clear to control the behavior of an XML data binding:
-
Validate data against schema for import and export Specifies whether Excel validates data against the XML map when importing data. Click this option when you want to ensure that the XML data that you import conforms to the XML schema.
-
Overwrite existing data with new data Specifies whether data is overwritten when you import data. Click this option when you want to replace the current data with new data, for example, when up-to-date data is contained in the new XML data file.
-
Append new data to existing XML tables Specifies whether the contents of the data source are appended to the existing data on the worksheet. Click this option, for example, when you are consolidating data from several similar XML data files into an XML table, or you do not want to overwrite the contents of a cell that contains a function.
When you import XML data, you may want to overwrite some mapped cells but not others. For example, some mapped cells may contain formulas and you don’t want to overwrite the formula when you import an XML file. There are two approaches that you can take:
-
Unmap the elements that you don’t want overwritten, before you import the XML data. After you import the XML data, you can remap the XML element to the cells containing the formulas, so that you can export the results of the formulas to the XML data file.
-
Create two XML maps from the same XML schema. Use one XML map for importing the XML data. In this «Import» XML map, don’t map elements to the cells that contain formulas or other data that you don’t want overwritten. Use another XML map for exporting the data. In this «Export» XML map, map the elements that you want to export to an XML file.
Note: The ability to import XML data from a Web service by using a Data Retrieval Service Connection (.uxdc) file to connect to a data source is no longer supported in versions later than Excel 2003 through the user interface. If you open a workbook that was created in Excel 2003, you can still view the data, but you cannot edit or refresh the source data.
Working with an inferred schema
If you import XML data without first adding a corresponding XML schema to create an XML map, Excel tries to infer a schema for you based on the tags that are defined in the XML data file. The inferred schema is stored with the workbook, and the inferred schema allows you to work with XML data if an XML schema file isn’t associated with the workbook.
When you work with imported XML data that has an inferred schema, you can also customize the XML Source task pane. Select the Preview Data in Task Pane option from the Options button to display the first row of data as sample data in the element list, if you imported XML data associated with the XML map in the current session of Excel.
You cannot export the Excel inferred schema as a separate XML schema data file (.xsd). Although there are XML schema editors and other methods for creating an XML schema file, you may not have convenient access to them or know how to use them. As an alternative, you can use the Excel 2003 XML Tools Add-in Version 1.1, which can create a schema file from an XML map. For more information, see Using the Excel 2003 XML Tools Add-in Version 1.1.
Exporting XML data
You export XML data by exporting the contents of mapped cells on the worksheet. When you export data, Excel applies the following rules to determine what data to save and how to save it:
-
Empty items are not created when blank cells exist for an optional element, but empty items are created when blank cells exist for a required element.
-
Unicode Transformation Format-8 (UTF-8) encoding is used to write the data.
-
All namespaces are defined in the Root XML element.
-
Excel overwrites existing namespace prefixes. The default namespace is assigned a prefix of ns0. Successive namespaces are designated ns1, ns2 to ns<count> where <count> is the number of namespaces written to the XML file.
-
Comment nodes are not preserved.
You can display the XML Map Properties dialog box (Click Map Properties in the XML group on the Developer tab.) and then use the Validate data against schema for import and export option (active by default) to specify whether Excel validates data against the XML map when exporting data. Click this option when you want to ensure that the XML data you export conforms to the XML schema.
Using the Excel Macro-enabled Office Open XML Format File
You can save an Excel workbook in a variety of file formats, including the Excel macro-enabled Office Open XML Format File (.xlsm). Excel has a defined XML schema that defines the contents of an Excel workbook, including XML tags that store all workbook information, such as data and properties, and define the overall structure of the workbook. Custom applications can use this Excel macro-enabled Office XML Format File. For example, developers may want to create a custom application to search for data in multiple workbooks that are saved in the this format and create a reporting system based on the data found.
Top of Page
Need more help?
You can always ask an expert in the Excel Tech Community or get support in the Answers community.
See Also
Import XML data
Map XML elements to cells in an XML Map
Export XML data
Append or overwrite mapped XML data
Excel spreadsheets are great for storing large amounts of data that would be unmanageable elsewhere. But what happens when you need to transfer that data somewhere else? What if you have hundreds or thousands of cells crammed with information? That would be a lot of data to manually re-type, especially if you need it in another format.
Extensible Markup Language, or XML, is an easy-to-use, read, and format document markup language. It can be used to store data in Excel files and help transfer them to other applications. It is a widely used format on the internet and in other applications.
In this guide, you’ll learn a quick and easy way to convert Excel to XML. All you need is an Excel spreadsheet, an XML schema, and a rudimentary understanding of Excel, which you can learn in this Excel training course for beginners.
Step 1: Create your Excel spreadsheet
The first thing you need is an Excel spreadsheet. Below is an example spreadsheet with six columns and seven rows of data. The columns separate the last names, first names, ages, majors (subject), GPAs (Grade Point Average), and school year of each student listed in the spreadsheet.

Step 2: Create your XML schema
After you have your Excel document set up, you need an XML schema. An XML schema is the document that defines an XML file’s structure. You can create an XML schema in Notepad, as it is a text file format. Here is a basic structure:
<?xml version="1.0" encoding="UTF-8" standalone="yes"?>
<student-data xmlns:xsi="http://www.w3.org/2001/XMLSchema-instance">
    <record>
       <TAGNAME>data</TAGNAME>
       <TAGNAME2>data</TAGNAME2>
       <TAGNAME3>data</TAGNAME3>
    </record>
</student-data>
The first line is a standard line. It identifies that it is an XML file, using the encoding UTF-8 and the XML version 1.0.
The second line identifies that the data is about “student-data”. If you simplify this line and the last line, you have:
<student-data>
</student-data>
The first line above opens the element, and the last line, which includes a “/”, ends this element. It is important that you have a closing tag for every opening tag, and that they are in the right order. Everything in between these lines is part of this element. In other words, it is “student-data”. Because this is the first element, it is also called the “root element”.
The “student-data” above includes a “record” element, which has three data elements, TAGNAME, TAGNAME2, and TAGNAME3.
You can change the name of the <TAGNAME> tags into the names of your columns. They do not have to be the exact name of the columns, as long as they’re in the correct order. You only need to fill out a few examples manually, but we can get Excel to do the rest for us later.
Here’s an example XML schema for our Excel spreadsheet:
<?xml version="1.0" encoding="UTF-8" standalone="yes"?>
<student-data xmlns:xsi="http://www.w3.org/2001/XMLSchema-instance">
    <record>
       <LastName>Takahashi</LastName>
       <FirstName>Jesse</FirstName>
       <Age>19</Age>
       <Major>Literature</Major>
       <GPA>3.8</GPA>
       <Year>Freshman</Year>
    </record>
    <record>
       <LastName>Nguyen</LastName>
       <FirstName>May</FirstName>
       <Age>23</Age>
       <Major>Chemistry</Major>
       <GPA>3.5</GPA>
       <Year>Senior</Year>
    </record>
</student-data>
As you can see, data elements have become <LastName> and <FirstName>, in line with the columns in our data set. You do not need to have the lines indented, but that aids readability.
Also take note of the <student-data> tags that hold the contents of each <record> tag. It should be renamed according to the name of your Excel spreadsheet. In this example, our Excel workbook is called student-data.xlsx, and so our root element tag is called <student-data>.
Don’t forget to name your XML schema with a .xml at the end. In this example, our schema is simply called schema.xml, if you’d like to follow along.
If you want to know more about XML documents, how they work, and what they’re useful for, check out this introduction to XML course. You can also get started with this beginners XML tutorial class.
Step 3: Enable the Developer tab
If the Developer tab is not available, you need to enable it. Click on File – Options, and then the “Customize Ribbon” page. In the column on the right is a list of tabs called Main Tabs with check marks.

Make sure that the check box next to the Developer tab is checked, then click OK. The Developer tab should now be visible in the main Excel window.
If you’re having trouble navigating Excel and its various options, it would be beneficial to take a basic Microsoft Office course for beginners and learn your way around the application.
If you want more advanced skills, then why not take advanced Excel training courses if you need experience with the more complicated elements of Excel.
Step 4: Open the XML Source pane
Now that you’ve brought up the Developer tab and clicked on it, you should see a number of sections called Code, Add-Ins, Controls, and XML.

In the XML section, click on the large button that reads Source. This will bring up the XML Source task pane to the right of the screen, where you’ll have the option to manage XML maps. That’s what we want to do next.
Step 5: Add an XML Map
In the XML Source task pane, click the XML Maps option at the very bottom right. A dialog box will appear. Click Add to add a new XML schema, find your schema.xml file in the browser, and click OK.

Now that your XML file is added, click OK again.
The computer may give you a warning – that’s fine.

Click OK and return to the XML Source task pane.
Step 6: Drag and drop the XML elements into your spreadsheet
Each of your columns should appear as a new element in the record tree created by the XML Source task pane. Drag each element individually into its appropriate column, starting at Row 1.

Converted columns become part of a table and should turn blue. Do this until all of your columns have been mapped to the XML elements.
Step 7: Export your XML data
Once you’ve finished converting each column into an XML element, you can either click on Developer – Export, or go to File – Save As, and change the File Type to “XML Data (*.xml).”

Save your XML file, and Excel will export it to XML. It may warn you that it will result in the loss of non-XML features, such as formatting, pictures, and objects. Again, that’s fine.

You can then open it in Notepad to see your results. Go to File – Open, and change the file type from “Text Files (*.txt)” to “All Files”:
<?xml version="1.0" encoding="UTF-8" standalone="yes"?>
<student-data xmlns:xsi="http://www.w3.org/2001/XMLSchema-instance">
	<record>
		<LastName>Takahashi</LastName>
		<FirstName>Jesse</FirstName>
		<Age>19</Age>
		<Major>Literature</Major>
		<GPA>3.8</GPA>
		<Year>Freshman</Year>
	</record>
	<record>
		<LastName>Nguyen</LastName>
		<FirstName>May</FirstName>
		<Age>23</Age>
		<Major>Chemistry</Major>
		<GPA>3.5</GPA>
		<Year>Senior</Year>
	</record>
	<record>
		<LastName>Johnson</LastName>
		<FirstName>Ori</FirstName>
		<Age>20</Age>
		<Major>Business</Major>
		<GPA>3.2</GPA>
		<Year>Junior</Year>
	</record>
	<record>
		<LastName>Kang</LastName>
		<FirstName>Han</FirstName>
		<Age>18</Age>
		<Major>Biology</Major>
		<GPA>3.9</GPA>
		<Year>Freshman</Year>
	</record>
	<record>
		<LastName>Jones</LastName>
		<FirstName>Raymond</FirstName>
		<Age>19</Age>
		<Major>Engineering</Major>
		<GPA>3.3</GPA>
		<Year>Sophomore</Year>
	</record>
	<record>
		<LastName>Akhtar</LastName>
		<FirstName>Ali</FirstName>
		<Age>19</Age>
		<Major>Literature</Major>
		<GPA>4.0</GPA>
		<Year>Freshman</Year>
	</record>
</student-data>
Excel was able to format all of this information automatically, so you didn’t have to.
This trick can come in handy with large data sets of over thousands of cells, so you can create multiple XML data files quickly. However, you can still save time and export XML more reliably with any amount of data.
This was a very simple example, though, and in the future, you might find yourself facing some tougher scenarios. If this happens, it will help if you have advanced Excel skills. If you want to learn how to handle these scenarios, take a look at this course about Pivot Tables, Power Query, Power Pivot, and DAX.
I hope that you have enjoyed this article. You’ve now successfully converted Excel to XML. Hopefully when you need to do it in your work, you will find it easy to do.
If you’re interested in learning more advanced Excel skills, let’s move on to learning how to use SQL in Excel.
Frequently Asked Questions
What is Excel XML format?
Excel can export data into XML (or Extensible Markup Language). It is based on an XML schema, which defines the structure of the file. You can create it in NotePad. To convert the data, go to the Developer tab – Source. You can then load your XML schema and match it to the data. You can then go to Developer – Export, or File – Save as – XML file.
How do I open an XML file in Excel?
To open an XML file in Excel, you should go to File – Open. On the PC, you should change the File Type from “All Excel Files (*.xl*)” to “XML file (*.xml).” You should then navigate to where the file is stored, click on it, and click OK. Your file will then be opened in Excel.
How do I view an XML file?
You can view an XML file in either Notepad or Excel. To view it in NotePad, go to File – Open, and change the File Type from “Text Documents (*.txt)” to “All Files (*.*)”. To view it in Excel, go to File – Open, and change the File Type to “XML Files (*.xml).”
How to Convert Excel to XML – Step-by-Step Tutorial (2023)
We all know basic excel skills that help us work in excel spreadsheets with extensive data. But what if you need to transfer the excel file somewhere and change it into other formats?
The extensible markup language or XML comes in handy for this. Simply put, it is a markup language that helps store data in an excel spreadsheet and changes its format.
You can easily convert excel data into XML data – but how do you do that?
For that, download our FREE Exercise Workbook here and continue reading the article below. 😀
What is the XML file format?
The XML file format is a way to write text in a document using tags. These tags are customizable and represent the structure of the document.
It also tells how the XLS file can be converted to an XML file and transferred to another application.
XML format uses the DOM or Document Object Model as its basic structure and can help separate text in HTML.
For instance, XML data for a company employee might be:

The tags ‘Name, ID No., Post, Salary, and Status’ consist of the document’s data. You can customize the tags as we did here for an employee’s data.
Create the Excel File
To convert Excel to XML, you need to create an XLS file containing all the data. I have created an example below that lists the members of a company and their details.

Each field contains certain information about every employee.
How to Create the XML Schema?
The XML Schema will structure each spreadsheet field and its appearance in the XML file.
Our spreadsheet has five columns with different data types setting the base for our XML file.
1. To create the XML file, open any text editor and begin entering the standard XML elements.

Don’t fret just yet; We’ll explain all the alien-like items in this image one by one. 😄
The first line in the image is the standard XML line. It is used each time you create XML documents.
The version 1.0 encoding UTF specifies that it is an XML format.
The second line indicates the type of text. For example, this data was about employees of a company, hence <employee-data>. The remaining line is the default.
Since this statement starts with <employee-data>, it is the root element here. The remaining elements of the argument make up for the child element.

The third line, containing the record tag, indicates the beginning and end of a single field. It consists of the information in each field of the spreadsheet.
For instance, the first field is about Alice A. So it will include all the information about Alice on each tag.

The TAG NAME specifies the items in each column, whereas the data contains the corresponding value.
You don’t have to manually input the exact and each column name; they just need to be in the correct order. Excel can help us do the rest.

For the TAG NAME, say we want the first employee’s name.
So, we will write – <Name>Alice A.</Name> – Similarly, for her ID, we will write – <ID No.>2854</ID No.> – .
Pro Tip!
Must note the opening and closing tag identified by a forward slash (/).
These are to be used at the beginning and each of each statement. Also, the closing and opening tags must be in the correct order, as the data between the two tags make for the XML elements.

The last closing tag </employee-data> marks the end of the file. In the last step, save the XML data file as “employee-data.xml.”
Enable the Developer Tab
Now that your schema markup is prepared, let’s add it to Excel.
1. Make sure the developer tab is enabled on your Excel spreadsheet. If it is not visible, right-click on the ribbon and select Customize the ribbon.

2. A dialog box will appear on the screen. On the bottom right side, mark the develop option as shown and click ok.

3. Now, you should be able to view the developer’s tab on the ribbon like this:

That’s it – now what? Now we add the Schema file to Microsoft Excel. 😃
Open the XML Source Task Pane & Add XML Maps
1. Click on Developer from the ribbon, and you will see a number of options. Select the Source icon:

The XML source pane will appear on the Excel spreadsheet.
2. Click XML Maps at the bottom right corner.

It shows a dialog box that searches for the XML map in the workbook.
3. Click the add button and select the XML map stored on your desktop.
You will see a warning like this one below from Microsoft Excel upon adding the map.

There’s nothing to worry about.
4. Simply press ‘Ok’.
5. You will now see the XML map in the workbook.

6. Click ‘Okay’ and move to the XML source pane, which looks like this.

7. Now, mark the data on the XML Map.
Assign XML Elements
Now that you have the XML schema and the XLSX ready, mark the XML tags to the spreadsheets’ data.
All you need to do now is drag one XML element from the source pane. Then drop it on the corresponding spreadsheets’ column name.
For instance, I will drop the “Name” XML element on the “Name” column, and a blue table will appear.

Apply the same process to the remaining columns. If you have been successful till now, your spreadsheet will look like this:

If you’ve achieved this form, it means all your data is perfectly mapped with XML tags.
Now that we’ve come this far, it is only fair we export it. So, onto the next step.
Export the XML File
1. To convert Excel to XML file formats, open the developer tab and click the export command.

A dialog box will appear, asking the location to save the file. The file type should be set by default.
2. Select a location, enter the name and click export.
The file is now saved on your desktop with all your XML data. You can open the file from the XML section on a Wordpad or other apps.
The XML file will show up like this:

You might receive a warning from Microsoft office. Exporting the file may cause loss of pictures, formatting, or other non-XML objects.
That’s not an issue. Go ahead and hit ‘Ok’. 🙂
That’s it — Now What
Beginning to convert Excel to XML files can be challenging at the start. But once you get hold of it, you can do it with your eyes closed.
In the above article, we not only learned about creating an XML schema but also to convert an Excel file into XML format and export it.
But that’s only about creating and retaining your Excel file in different formats. There’s so much more to Excel that you’d still want to learn like the VLOOKUP, SUMIF and IF functions.
Want to learn them all? Click here to sign up for my free 30-minute email course to master these functions.
Kasper Langmann2023-01-19T12:23:02+00:00
Page load link
Содержание
- XML in Excel
- XML in Excel – Extensible Markup Language
- How to Import XML Data into Excel? (with Examples)
- Example #1 – Website (XML data) Data Download
- Example #2 – Add XML (Markup Schema) to Excel
- Things to Remember
- Recommended Articles
- Map XML elements to cells in an XML Map
- Locate or create XML schema and XML data files
- Use sample XML schema and XML data files
- Create an XML Map
- Map XML elements
- Show the Developer tab
XML in Excel


XML in Excel – Extensible Markup Language
XML are the files used in the databases which are shared over the web. Excel has made it easier for us to import the data in XML to Excel in the form of tables or databases. XML is external data that can be imported to Excel from the “Data” tab under the “Get Data” tab from the data from other sources.
Data is the platform that almost all business entities revolve around. In the modern world, all businesses use different platforms and programs to store data for analysis and decision-making purposes.
XML – extensible markup language is the most common format to work and analyze data in this modern world. Excel allows us to convert spreadsheet data into XML files, and getting started is strange for common Excel users.
XML is structured data and one of the external data sources. We create a link or import data from outside where data resides outside the spreadsheet. We have many external databases like Payroll Payroll Payroll refers to the overall compensation payable by any organization to its employees on a certain date for a specific period of services they have provided in the entity. This total net pay comprises salary, wages, bonus, commission, deduction, perquisites, and other benefits. read more , POS (Point of Sale), Inventory Software, SQL Servers, etc.
You are free to use this image on your website, templates, etc., Please provide us with an attribution link How to Provide Attribution? Article Link to be Hyperlinked
For eg:
Source: XML in Excel (wallstreetmojo.com)
Like every other database software, XML has its own rules and regulations. Below are some of the common rules for XML.
- While writing the code data, both the head (start) and tail (end) should have similar tag names. For example:
- Both head and tail are case sensitive.
Table of contents
How to Import XML Data into Excel? (with Examples)
Let us see how to import XML data into Excel.
Example #1 – Website (XML data) Data Download
When searching the internet, we may find some useful information on the web. However, we need that data dumped into the worksheet of Excel. This article will show you how to download the data from the web server to a worksheet in Excel.
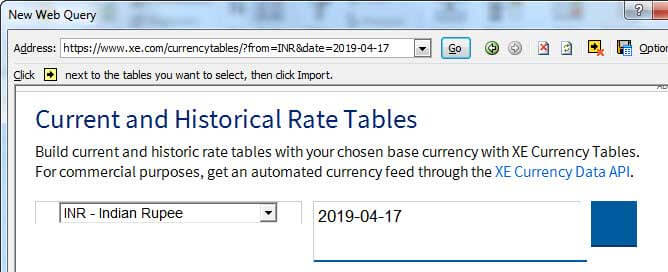
Assume you are working with foreign markets regularly and need the data of all the currency exchange rates for INR. Usually, we rely on XE.com for all the historical currency rates.
Follow the steps below to download the currency rates for 17th Jan 2019.
- Open the XE.com website.
Search for “Historical Currency Rates.”
Select the currency and date which you want the data for. For example, we have selected INR and 17-04-2019.
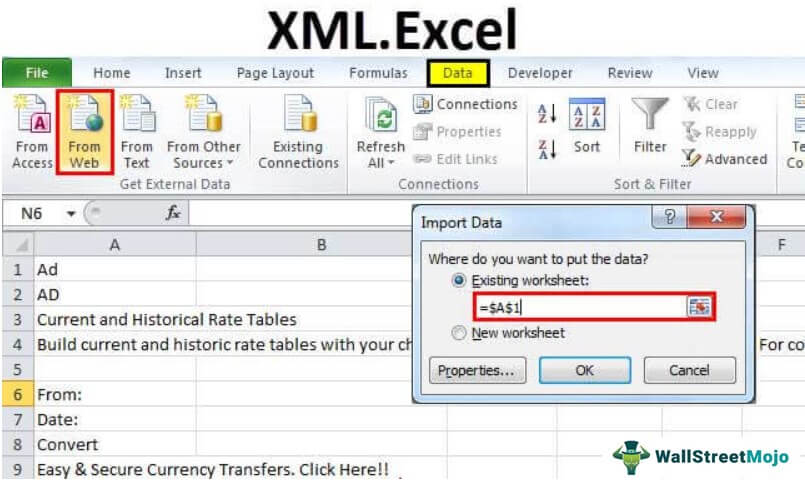
Go to the “Data” tab in Excel, and under “Get Data,” select the “From Web” option.
Once you click on this, you will see this window.

Now, copy the URL you have created in XE.com and paste it into the “Address” section and click on “Go.”
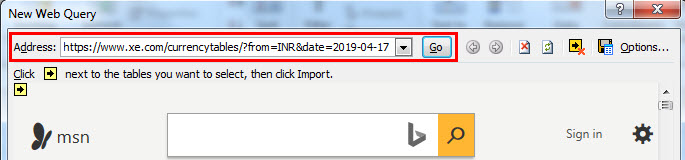
After clicking on “Go,” you will see the webpage.
Once you see the result click on “Import.”
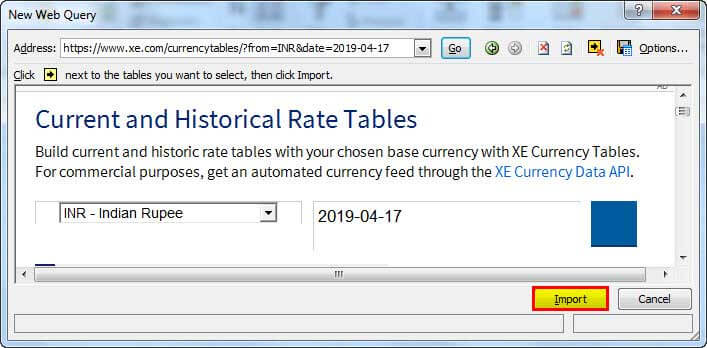
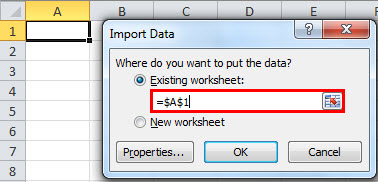
After clicking the “IMPORT” button, Excel will ask you where to store the data. Select A1 as the cell reference.
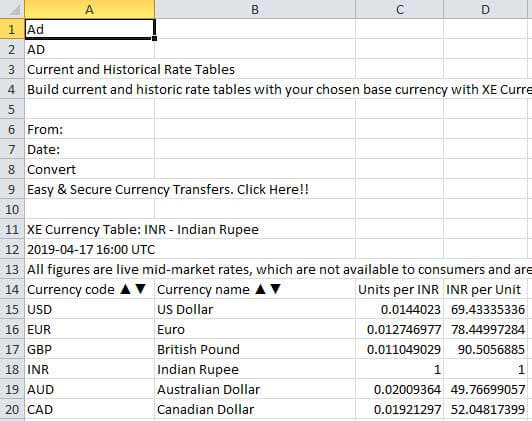
After selecting the cell reference, excel will store the XML data as it is on the website and will take a few seconds to complete it.
This way, we can download the data from web servers and have our data in the spreadsheet.
Example #2 – Add XML (Markup Schema) to Excel
To add “XML Schema,” we need perfect column headings. We can create an XML Schema by using column headings.
- Step 1: Open Notepad and copy the below code and paste.
- Step 2: Save this as data-set.xml

It is important to ask two pieces of information from the data. First, we have added two names’ data to the list. It is an indication of the Excel to repeat throughout the worksheet.
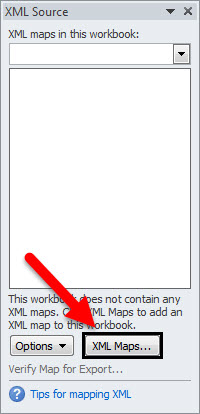
- Step 3: Ensure the “Developer” tab is enabled in your Excel ribbonExcel RibbonThe ribbon is an element of the UI (User Interface) which is seen as a strip that consists of buttons or tabs; it is available at the top of the excel sheet. This option was first introduced in the Microsoft Excel 2007.read more and select “Source” from the “Developer” tab.

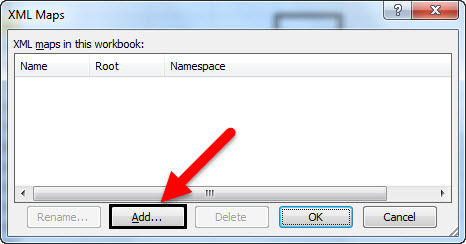
- Step 4: Under “XML Source” right-click on the “XML Maps.”
- Step 5: Select the file you want to add.
- Step 6: Select the desired file and click on the “OK” button.
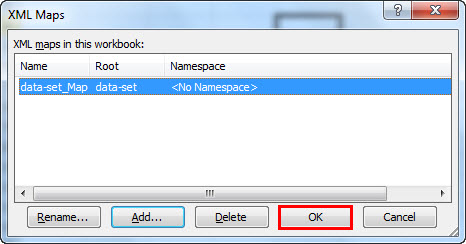
Once you click on the “OK” button, you will see the following output.
Things to Remember
- XML is one of the structured languages for a database.
- XML is an extensible markup language.
- We can import and export under XML to the spreadsheet and spreadsheet to the XML.
- Head and tails should be the same under notepad coding.
- You need to save the file as.XML
- XML is available as add-ins too. Search on the internet for more information regarding this.
Recommended Articles
This article is a guide to the XML in Excel. We discuss importing and adding XML Markup Schema to Excel and practical examples here. You can learn more about Excel from the following articles: –
Источник
Map XML elements to cells in an XML Map
To import and export XML data in Excel, an XML Map that associates XML elements with data in cells to get the results you want will be useful. To create one, you need to have an XML schema file (.xsd) and an XML data file (.xml). After creating the XML Map, you can map XML elements the way you want.
Tip: You’ll find more information about using XML with Excel in this overview of XML in Excel.
Locate or create XML schema and XML data files
If another database or application created an XML schema or XML data file, you might already have them available. For example, you might have a line-of-business application that exports data into these XML file formats, a commercial web site or web service that supplies these XML files, or a custom application developed by your IT department that automatically creates these XML files.
If you don’t have the necessary XML files, you can create them by saving the data you want to use as a text file. You can then use both Access and Excel to convert that text file to the XML files you need. Here’s how:
Import the text file you want to convert and link it to a new table.
Click File > Open.
In the Open dialog box, select and open the database in which you want to create a new table.
Click External Data > Text File, and follow the instructions for each step, making sure that you link the table to the text file.
Access creates the new table and displays it in the Navigation Pane.
Export the data from the linked table to an XML data file and an XML schema file.
Click External Data > XML File (in the Export group).
In the Export — XML File dialog box, specify the file name and format, and click OK.
Create an XML Map based on the XML schema file you exported from Access.
If the Multiple Roots dialog box appears, make sure you choose dataroot so you can create an XML table.
Create an XML table by mapping the dataroot element. See Map XML elements for more information.
Import the XML file you exported from Access.
There are several types of XML schema element constructs Excel doesn’t support. The following XML schema element constructs can’t be imported into Excel:
This element allows you to include elements that aren’t declared by the schema.
This element allows you to include attributes that aren’t declared by the schema.
Recursive structures A common example of a recursive structure is a hierarchy of employees and managers in which the same XML elements are nested several levels. Excel doesn’t support recursive structures more than one level deep.
Abstract elements These elements are meant to be declared in the schema, but never used as elements. Abstract elements depend on other elements being substituted for the abstract element.
Substitution groups These groups allow an element to be swapped wherever another element is referenced. An element indicates it’s a member of another element’s substitution group through the attribute.
Mixed content This content is declared by using mixed=»true» on a complex type definition. Excel doesn’t support the simple content of the complex type but does support the child tags and attributes defined in that complex type.
Use sample XML schema and XML data files
The following sample data has basic XML elements and structures you can use to test XML mapping if you don’t have XML files or text files to create the XML files. Here’s how you can save this sample data to files on your computer:
Select the sample text of the file you want to copy, and press Ctrl+C.
Start Notepad, and press Ctrl+V to paste the sample text.
Press Ctrl+S to save the file with the file name and extension of the sample data you copied.
Press Ctrl+N in Notepad and repeat step 1-3 to create a file for the second sample text.
Sample XML data (Expenses.xml)
Sample XML schema (Expenses.xsd)
Create an XML Map
You create an XML Map by adding an XML schema to a workbook. The schema can be copied from an XML schema file (.xsd), or Excel can try to infer one from an XML data file (.xml).
Click Developer > Source.
If you don’t see the Developer tab, see Show the Developer tab.
In the XML Source task pane, click XML Maps, and then click Add.
In the Look in list, click the drive, folder, or Internet location that contains the file you want to open.
Click the file, and then click Open.
For an XML schema file, XML will create an XML Map based on the XML schema. If the Multiple Roots dialog box appears, choose one of the root nodes defined in the XML schema file.
For an XML data file, Excel will try to infer the XML schema from the XML data, and then creates an XML Map.
The XML Map appears in the XML Source task pane.
Map XML elements
You map XML elements to single-mapped cells and repeating cells in XML tables so you can create a relationship between the cell and the XML data element in the XML schema.
Click Developer > Source.
If you don’t see the Developer tab, see Show the Developer tab.
In the XML Source task pane, select the elements you want to map.
To select nonadjacent elements, click one element, and then hold down Ctrl and click each element you want to map.
To map the elements, do the following:
Right-click the selected elements, and click Map element.
In the Map XML elements dialog box, select a cell and click OK.
Tip: You can also drag the selected elements to the worksheet location where you want them to appear.
Each element appears in bold type in the XML Source task pane to indicate the element is mapped.
Decide how you want handle labels and column headings:
When you drag a nonrepeating XML element onto the worksheet to create a single-mapped cell, a smart tag with three commands is displayed, which you can use to control the placement of the heading or label:
My Data Already Has a Heading Click this option to ignore the XML element heading, because the cell already has a heading (to the left of the data or above the data).
Place XML Heading to the Left Click this option to use the XML element heading as the cell label (to the left of the data).
Place XML Heading Above Click this option to use the XML element heading as the cell heading (above the data).
When you drag a repeating XML element onto the worksheet to create repeating cells in an XML table, the XML element names are automatically used as column headings for the table. However, you can change the column headings to any headings that you want by editing the column header cells.
In the XML Source task pane, you can click Options to further control XML table behavior:
Automatically Merge Elements When Mapping When this check box is selected, XML tables are automatically expanded when you drag an element to a cell adjacent to the XML table.
My Data Has Headings When this check box is selected, existing data can be used as column headings when you map repeating elements to your worksheet.
If all XML commands are dimmed, and you can’t map XML elements to any cells, the workbook might be shared. Click Review > Share Workbook to verify that and to remove it from shared use as needed.
If you want to map XML elements in a workbook you want to share, map the XML elements to the cells you want, import the XML data, remove all of the XML maps, and then share the workbook.
If you can’t copy an XML table that contains data to another workbook, the XML table might have an associated XML Map that defines the data structure. This XML Map is stored in the workbook, but when you copy the XML table to a new workbook, the XML Map isn’t automatically included. Instead of copying the XML table, Excel creates an Excel table that contains the same data. If you want the new table to be an XML table, do the following:
Add an XML Map to the new workbook by using the .xml or .xsd file you used to create the original XML Map. You should save these files if you want to add XML Maps to other workbooks.
Map the XML elements to the table to make it an XML table.
When you map a repeating XML element to a merged cell, Excel unmerges the cell. This is expected behavior, because repeating elements are designed to work with unmerged cells only.
You can map single, nonrepeating XML elements to a merged cell, but mapping a repeating XML element (or an element that contains a repeating element) to a merged cell isn’t allowed. The cell will be unmerged, and the element will be mapped to the cell where the pointer is located.
You can unmap XML elements you don’t want to use, or to prevent the contents of cells from being overwritten when you import XML data. For example, you could temporarily unmap an XML element from a single cell or repeating cells that have formulas you don’t want to overwrite when you import an XML file. When the import is complete, you can map the XML element to the formula cells again, so you can export the results of the formulas to the XML data file.
To unmap XML elements, right-click their name in the XML Source task pane, and click Remove element.
Show the Developer tab
If you don’t see the Developer tab, do the following to display it:
In Excel 2010 and newer versions:
Click File > Options.
Click the Customize Ribbon category.
Under Main Tabs, check the Developer box, and click OK.
Click the Microsoft Office Button  > Excel Options.
Click the Popular category.
Under Top options for working with Excel, check the Show Developer tab in the Ribbon box, and click OK.
Источник
Create an XML schema
Allowing Excel to infer a schema for an XML map is fine if the nodes don’t contain optional items or if the first occurrence of each node contains all of its possible children. Otherwise, Excel may omit items from the schema it creates and some nodes won’t appear in the XML map.
You can solve this problem by creating
an XML schema and referencing that schema in the XML file you import. Excel copies the referenced XML schema into the XML map when the XML map is created.
Figure 15-16. A list with denormalized data

Figure 15-17. Put repeating and nonrepeating data items in separate lists to avoid denormalized data
Having an external XML schema is also useful for making changes to the XML map. As mentioned earlier, you can’t update an XML map inside of Excel; you can, however, modify the XML schema stored in the workbook by editing it outside of Excel. To edit an XML map schema:
-
In Excel, save the workbook as an XML spreadsheet.
-
Close the workbook in Excel.
-
Open the XML spreadsheet in an XML editor. It is a good idea to use a full-featured XML editor here because the schema generated by Excel does not include whitespace such as tabs and line feeds.
-
Edit the items in the map info/schema node as needed, or simply replace the entire schema node with the contents of your external …