
To import and export XML data in Excel, an XML Map that associates XML elements with data in cells to get the results you want will be useful. To create one, you need to have an XML schema file (.xsd) and an XML data file (.xml). After creating the XML Map, you can map XML elements the way you want.
-
Locate or create XML schema and XML data files
-
Use sample XML schema and XML data files
-
Create an XML Map
-
Map XML elements
Locate or create XML schema and XML data files
If another database or application created an XML schema or XML data file, you might already have them available. For example, you might have a line-of-business application that exports data into these XML file formats, a commercial web site or web service that supplies these XML files, or a custom application developed by your IT department that automatically creates these XML files.
If you don’t have the necessary XML files, you can create them by saving the data you want to use as a text file. You can then use both Access and Excel to convert that text file to the XML files you need. Here’s how:
Access
-
Import the text file you want to convert and link it to a new table.
-
Click File > Open.
-
In the Open dialog box, select and open the database in which you want to create a new table.
-
Click External Data > Text File, and follow the instructions for each step, making sure that you link the table to the text file.
Access creates the new table and displays it in the Navigation Pane.
-
-
Export the data from the linked table to an XML data file and an XML schema file.
-
Click External Data > XML File (in the Export group).
-
In the Export — XML File dialog box, specify the file name and format, and click OK.
-
-
Exit Access.
Excel
-
Create an XML Map based on the XML schema file you exported from Access.
If the Multiple Roots dialog box appears, make sure you choose dataroot so you can create an XML table.
-
Create an XML table by mapping the dataroot element. See Map XML elements for more information.
-
Import the XML file you exported from Access.
Notes:
-
There are several types of XML schema element constructs Excel doesn’t support. The following XML schema element constructs can’t be imported into Excel:
-
<any> This element allows you to include elements that aren’t declared by the schema.
-
<anyAttribute> This element allows you to include attributes that aren’t declared by the schema.
-
Recursive structures A common example of a recursive structure is a hierarchy of employees and managers in which the same XML elements are nested several levels. Excel doesn’t support recursive structures more than one level deep.
-
Abstract elements These elements are meant to be declared in the schema, but never used as elements. Abstract elements depend on other elements being substituted for the abstract element.
-
Substitution groups These groups allow an element to be swapped wherever another element is referenced. An element indicates it’s a member of another element’s substitution group through the <substitutionGroup> attribute.
-
Mixed content This content is declared by using mixed=»true» on a complex type definition. Excel doesn’t support the simple content of the complex type but does support the child tags and attributes defined in that complex type.
Use sample XML schema and XML data files
The following sample data has basic XML elements and structures you can use to test XML mapping if you don’t have XML files or text files to create the XML files. Here’s how you can save this sample data to files on your computer:
-
Select the sample text of the file you want to copy, and press Ctrl+C.
-
Start Notepad, and press Ctrl+V to paste the sample text.
-
Press Ctrl+S to save the file with the file name and extension of the sample data you copied.
-
Press Ctrl+N in Notepad and repeat step 1-3 to create a file for the second sample text.
-
Exit Notepad.
Sample XML data (Expenses.xml)
<?xml version="1.0" encoding="UTF-8" standalone="no" ?>
<Root>
  <EmployeeInfo>
    <Name>Jane Winston</Name>
    <Date>2001-01-01</Date>
    <Code>0001</Code>
  </EmployeeInfo>
  <ExpenseItem>
    <Date>2001-01-01</Date>
    <Description>Airfare</Description>
    <Amount>500.34</Amount>
  </ExpenseItem>
  <ExpenseItem>
    <Date>2001-01-01</Date>
    <Description>Hotel</Description>
    <Amount>200</Amount>
  </ExpenseItem>
  <ExpenseItem>
    <Date>2001-01-01</Date>
    <Description>Taxi Fare</Description>
    <Amount>100.00</Amount>
  </ExpenseItem>
  <ExpenseItem>
    <Date>2001-01-01</Date>
    <Description>Long Distance Phone Charges</Description>
    <Amount>57.89</Amount>
  </ExpenseItem>
  <ExpenseItem>
    <Date>2001-01-01</Date>
    <Description>Food</Description>
    <Amount>82.19</Amount>
  </ExpenseItem>
  <ExpenseItem>
    <Date>2001-01-02</Date>
    <Description>Food</Description>
    <Amount>17.89</Amount>
  </ExpenseItem>
  <ExpenseItem>
    <Date>2001-01-02</Date>
    <Description>Personal Items</Description>
    <Amount>32.54</Amount>
  </ExpenseItem>
  <ExpenseItem>
    <Date>2001-01-03</Date>
    <Description>Taxi Fare</Description>
    <Amount>75.00</Amount>
  </ExpenseItem>
  <ExpenseItem>
    <Date>2001-01-03</Date>
    <Description>Food</Description>
    <Amount>36.45</Amount>
  </ExpenseItem>
  <ExpenseItem>
    <Date>2001-01-03</Date>
    <Description>New Suit</Description>
    <Amount>750.00</Amount>
  </ExpenseItem>
</Root>
Sample XML schema (Expenses.xsd)
<?xml version="1.0" encoding="UTF-8" standalone="no" ?>
<xsd:schema xmlns:xsd="http://www.w3.org/2001/XMLSchema">
  <xsd:element name="Root">
    <xsd:complexType>
      <xsd:sequence>
        <xsd:element minOccurs="0" maxOccurs="1" name="EmployeeInfo">
          <xsd:complexType>
            <xsd:all>
              <xsd:element minOccurs="0" maxOccurs="1" name="Name" />
              <xsd:element minOccurs="0" maxOccurs="1" name="Date" />
              <xsd:element minOccurs="0" maxOccurs="1" name="Code" />
            </xsd:all>
          </xsd:complexType>
        </xsd:element>
        <xsd:element minOccurs="0" maxOccurs="unbounded" name="ExpenseItem">
          <xsd:complexType>
            <xsd:sequence>
              <xsd:element name="Date" type="xsd:date"/>
              <xsd:element name="Description" type="xsd:string"/>
              <xsd:element name="Amount" type="xsd:decimal" />
            </xsd:sequence>
          </xsd:complexType>
        </xsd:element>
      </xsd:sequence>
    </xsd:complexType>
  </xsd:element>
</xsd:schema>
Create an XML Map
You create an XML Map by adding an XML schema to a workbook. The schema can be copied from an XML schema file (.xsd), or Excel can try to infer one from an XML data file (.xml).
-
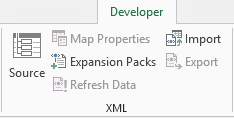
Click Developer > Source.

If you don’t see the Developer tab, see Show the Developer tab.
-
In the XML Source task pane, click XML Maps, and then click Add.
-
In the Look in list, click the drive, folder, or Internet location that contains the file you want to open.
-
Click the file, and then click Open.
-
For an XML schema file, XML will create an XML Map based on the XML schema. If the Multiple Roots dialog box appears, choose one of the root nodes defined in the XML schema file.
-
For an XML data file, Excel will try to infer the XML schema from the XML data, and then creates an XML Map.
-
-
Click OK.
The XML Map appears in the XML Source task pane.
Map XML elements
You map XML elements to single-mapped cells and repeating cells in XML tables so you can create a relationship between the cell and the XML data element in the XML schema.
-
Click Developer > Source.
If you don’t see the Developer tab, see Show the Developer tab.
-
In the XML Source task pane, select the elements you want to map.
To select nonadjacent elements, click one element, and then hold down Ctrl and click each element you want to map.
-
To map the elements, do the following:
-
Right-click the selected elements, and click Map element.
-
In the Map XML elements dialog box, select a cell and click OK.
Tip: You can also drag the selected elements to the worksheet location where you want them to appear.
Each element appears in bold type in the XML Source task pane to indicate the element is mapped.
-
-
Decide how you want handle labels and column headings:
-
When you drag a nonrepeating XML element onto the worksheet to create a single-mapped cell, a smart tag with three commands is displayed, which you can use to control the placement of the heading or label:
My Data Already Has a Heading Click this option to ignore the XML element heading, because the cell already has a heading (to the left of the data or above the data).
Place XML Heading to the Left Click this option to use the XML element heading as the cell label (to the left of the data).
Place XML Heading Above Click this option to use the XML element heading as the cell heading (above the data).
-
When you drag a repeating XML element onto the worksheet to create repeating cells in an XML table, the XML element names are automatically used as column headings for the table. However, you can change the column headings to any headings that you want by editing the column header cells.
In the XML Source task pane, you can click Options to further control XML table behavior:
Automatically Merge Elements When Mapping When this check box is selected, XML tables are automatically expanded when you drag an element to a cell adjacent to the XML table.
My Data Has Headings When this check box is selected, existing data can be used as column headings when you map repeating elements to your worksheet.
Notes:
-
If all XML commands are dimmed, and you can’t map XML elements to any cells, the workbook might be shared. Click Review > Share Workbook to verify that and to remove it from shared use as needed.
If you want to map XML elements in a workbook you want to share, map the XML elements to the cells you want, import the XML data, remove all of the XML maps, and then share the workbook.
-
If you can’t copy an XML table that contains data to another workbook, the XML table might have an associated XML Map that defines the data structure. This XML Map is stored in the workbook, but when you copy the XML table to a new workbook, the XML Map isn’t automatically included. Instead of copying the XML table, Excel creates an Excel table that contains the same data. If you want the new table to be an XML table, do the following:
-
Add an XML Map to the new workbook by using the .xml or .xsd file you used to create the original XML Map. You should save these files if you want to add XML Maps to other workbooks.
-
Map the XML elements to the table to make it an XML table.
-
-
When you map a repeating XML element to a merged cell, Excel unmerges the cell. This is expected behavior, because repeating elements are designed to work with unmerged cells only.
You can map single, nonrepeating XML elements to a merged cell, but mapping a repeating XML element (or an element that contains a repeating element) to a merged cell isn’t allowed. The cell will be unmerged, and the element will be mapped to the cell where the pointer is located.
-
-
Tips:
-
You can unmap XML elements you don’t want to use, or to prevent the contents of cells from being overwritten when you import XML data. For example, you could temporarily unmap an XML element from a single cell or repeating cells that have formulas you don’t want to overwrite when you import an XML file. When the import is complete, you can map the XML element to the formula cells again, so you can export the results of the formulas to the XML data file.
-
To unmap XML elements, right-click their name in the XML Source task pane, and click Remove element.
Show the Developer tab
If you don’t see the Developer tab, do the following to display it:
-
In Excel 2010 and newer versions:
-
Click File > Options.
-
Click the Customize Ribbon category.
-
Under Main Tabs, check the Developer box, and click OK.
-
-
In Excel 2007:
-
Click the Microsoft Office Button
> Excel Options. -
Click the Popular category.
-
Under Top options for working with Excel, check the Show Developer tab in the Ribbon box, and click OK.
-
 > Excel Options.
See Also
Delete XML map information from a workbook
Append or overwrite mapped XML data
Overview of XML in Excel
Import XML data
Export XML data
Microsoft Excel makes it easy to import Extensible Markup Language (XML) data that is created from other databases and applications, to map XML elements from an XML schema to worksheet cells, and to export revised XML data for interaction with other databases and applications. Think of these XML features as turning Office Excel into an XML data file generator with a familiar user interface.
In this article
-
Why use XML in Excel?
-
XML data and schema files
-
Key XML and Excel scenarios
-
-
The basic process of using XML data in Excel
-
Working with XML maps
-
Using the XML Source task pane
-
Element types and their icons
-
Working with single-mapped cells
-
Working with repeating cells in XML tables
-
XML map security considerations
-
Importing XML data
-
Working with an inferred schema
-
Exporting XML data
-
Using the Excel macro-enabled Office Open XML Format file
-
Why use XML in Excel?
XML is a technology that is designed for managing and sharing structured data in a human-readable text file. XML follows industry-standard guidelines and can be processed by a variety of databases and applications. Using XML, application designers can create their own customized tags, data structures, and schemas. In short, XML greatly eases the definition, transmission, validation, and interpretation of data between databases, applications, and organizations.
XML data and schema files
Excel works primarily with two types of XML files:
-
XML data files (.xml), which contain the custom tags and structured data.
-
Schema files (.xsd), which contain schema tags that enforce rules, such as data type and validation.
The XML standard also defines Extensible Stylesheet Language Transformation (XSLT) (.xslt) files, which are used to apply styles and transform XML data into different presentation formats. You can apply these transforms before you import XML files into Excel and after you export XML files from Excel. If XSLT files are linked to XML data files that you import into Excel, you do have the option to apply or not apply the formatting before the data is added to the worksheet, but only when you open an XML file by using the Open command from within Excel. Choose the XML Files (*.xml) file type before you click the Open button to see the XML files in the folder.
Key XML and Excel scenarios
By using XML and Excel, you can manage workbooks and data in ways that were previously impossible or very difficult. By using XML maps, you can easily add, identify, and extract specific pieces of business data from Excel documents. For example, an invoice that contains the name and address of a customer or a report that contains last quarter’s financial results are no longer just static reports. You can easily import this information from databases and applications, revise it, and export it to the same or other databases and applications.
The following are key scenarios that the XML features are designed to address:
-
Extend the functionality of existing Excel templates by mapping XML elements onto existing cells. This makes it easier to get XML data into and out of your templates without having to redesign them.
-
Use XML data as input to your existing calculation models by mapping XML elements onto existing worksheets.
-
Import XML data files into a new workbook.
-
Import XML data from a Web service into your Excel worksheet.
-
Export data in mapped cells to XML data files independent from other data in the workbook.
Top of Page
The basic process of using XML data in Excel
The following diagram shows how the different files and operations work together when you use XML with Excel. Essentially, there are five phases to the process:
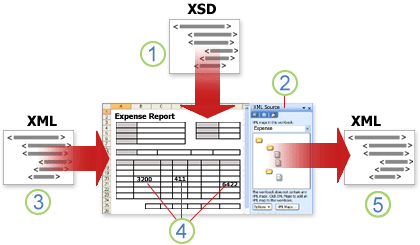
 Adding an XML schema file (.xsd) to a workbook
 Mapping XML schema elements to individual cells or XML tables
 Importing an XML data file (.xml) and binding the XML elements to mapped cells
 Entering data, moving mapped cells, and leveraging Excel functionality, while preserving XML structure and definitions
 Exporting revised data from mapped cells to an XML data file
Working with XML maps
You can create or open a workbook in Excel, attach an XML schema file (.xsd) to the workbook, and then use the XML Source task pane to map XML elements of the schema to individual cells or tables. After you map the XML elements to your worksheet, you can import and export XML data into and out of the mapped cells.
When you add an XML schema file (.xsd) to your workbook, you create an XML map. In general, XML maps are used to create mapped cells and to manage the relationship between mapped cells and individual elements in the XML schema. In addition, these XML maps are used to bind the contents of mapped cells to elements in the schema when you import or export XML data files (.xml).
There are two kinds of mapped cells that you can create: single-mapped cells and repeating cells (which appear as XML tables). To make designing your worksheet more flexible, you can drag the mapped cells anywhere on a worksheet and into any order — even one different from the XML schema. You can also choose which elements to map and not map.
The following rules about using XML maps are important to know:
-
A workbook can contain one or more XML maps.
-
You can only map one element to one location in a workbook at a time.
-
Each XML map is an independent entity, even if multiple XML maps in the same workbook refer to the same schema.
-
An XML map can only contain one root element. If you add a schema that defines more than one root element, you are prompted to choose the root element to use for the new XML map.
Using the XML Source task pane
You use the XML Source task pane to manage XML maps. To open it, on the Developer tab, in the XML group, click Source. The following diagram shows the main features of this task pane.
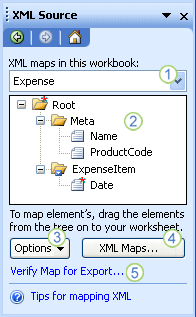
1. Lists XML maps that were added to the workbook
2. Displays a hierarchical list of XML elements in the currently listed XML map
3. Sets options when working with the XML Source task pane and the XML data, such as how to preview the data and control headings
4. Opens the XML Maps dialog box, which you can use to add, delete, or rename XML maps
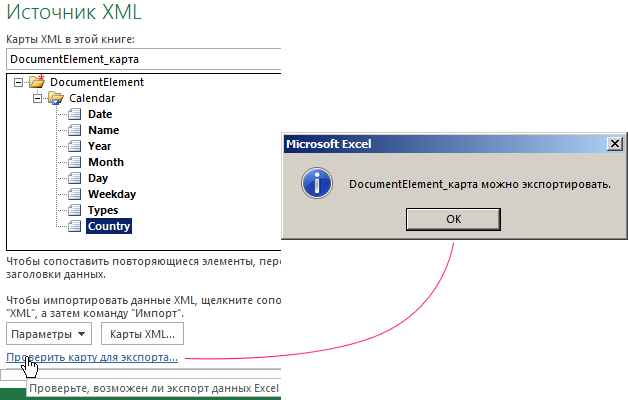
5. Verifies whether you can export XML data through the current XML map
Top of Page
Element types and their icons
The following table summarizes each type of XML element that Excel can work with and the icon that is used to represent each type of element.
|
Element type |
Icon |
|---|---|
|
Parent element |
|
|
Required parent element |
|
|
Repeating parent element |
|
|
Required repeating parent element |
|
|
Child element |
|
|
Required child element |
|
|
Repeating child element |
|
|
Required repeating child element |
|
|
Attribute |
|
|
Required attribute |
|
|
Simple content in a complex structure |
|
|
Required simple content in a complex structure |
|


Top of Page
Working with single-mapped cells
A single-mapped cell is a cell that has been mapped to a nonrepeating XML element. You create a single-mapped cell by dragging a nonrepeating XML element from the XML Source task pane onto a single cell in your worksheet.
When you drag a nonrepeating XML element onto the worksheet, you can use a smart tag to choose to include the XML element name as a heading above or just to the left of the single-mapped cell, or you can use an existing cell value as a heading.
You can also use a formula in a single-mapped cell, if the cell is mapped to an XML element with an XML Schema Definition (XSD) data type that Excel interprets as a number, date, or time.
Top of Page
Working with repeating cells in XML tables
XML tables are similar in appearance and functionality to Excel tables. An XML table is an Excel table that has been mapped to one or more XML repeating elements. Each column in the XML table represents an XML element.
An XML table is created when you:
-
Use the Import command (in the XML group on the Developer tab) to import an XML data file.
-
Use the Open command from within Excel to open an XML data file — and then select As an XML table in the Open XML dialog box.
-
Use the From XML Data Import command (from the From Other Sources command button, in the Get External Data group, on the Data tab) to import an XML data file — and then select XML table in existing worksheet or New worksheet in the Import Data dialog box.
-
Drag one or more repeating elements from the XML Source task pane to a worksheet.
When you create an XML table, the XML element names are automatically used as column headings. You can change these to any column headings that you want. However, the original XML element names are always used when you export data from the mapped cells.
Two options under the Options button in the XML Source task pane are useful when you work with XML tables:
-
Automatically Merge Elements When Mapping
When selected, Excel creates one XML table from multiple fields as they are dropped onto the worksheet. This option works as long as the multiple fields are dropped on the same row, one adjacent to the other. When this option is cleared, each element appears as its own XML table. -
My Data Has Headings
When selected, existing heading data is used as column headings for repeating elements that you map to your worksheet. When this option is cleared, the XML element names are used as column headings.
Using XML tables, you can easily import, export, sort, filter, and print data based on an XML data source. However, XML tables do have some limitations regarding how they can be arranged on the worksheet.
-
XML tables are row-based, meaning that they grow from the header row down. You cannot add new entries above existing rows.
-
You cannot transpose an XML table so that new entries will be added to the right.
You can use formulas in columns that are mapped to XML elements with an XML Schema Definition (XSD) data type that Excel interprets as a number, date, or time. Just as in an Excel table, formulas in an XML table are filled down the column when new rows are added to the table.
XML map security considerations
An XML map and its data source information are saved with the Excel workbook, not a specific worksheet. A malicious user can view this map information by using a Microsoft Visual Basic for Applications (VBA) macro. Furthermore, if you save your workbook as a macro-enabled Excel Office Open XML Format File, this map information can be viewed through Microsoft Notepad or through another text-editing program.
If you want to keep using the map information but remove the potentially sensitive data source information, you can delete the data source definition of the XML schema from the workbook, but still export the XML data, by clearing the Save data source definition in workbook check box in the XML Map Properties dialog box, which is available from the Map Properties command in the XML group on the Developer tab.
If you delete a worksheet before you delete a map, the map information about the data sources, and possibly other sensitive information, is still saved in the workbook. If you are updating the workbook to remove sensitive information, make sure that you delete the XML map before you delete the worksheet, so that the map information is permanently removed from the workbook.
Top of Page
Importing XML data
You can import XML data into an existing XML map in your workbook. When you import data, you bind the data from the file to an XML map that is stored in your workbook. This means that each data element in the XML data file has a corresponding element, in the XML schema, that you mapped from an XML Schema file or inferred schema. Each XML map can only have one XML data binding, and an XML data binding is bound to all of the mappings that were created from a single XML map.
You can display the XML Map Properties dialog box (Click Map Properties in the XML group on the Developer tab.), which has three options, all selected by default, that you can set or clear to control the behavior of an XML data binding:
-
Validate data against schema for import and export Specifies whether Excel validates data against the XML map when importing data. Click this option when you want to ensure that the XML data that you import conforms to the XML schema.
-
Overwrite existing data with new data Specifies whether data is overwritten when you import data. Click this option when you want to replace the current data with new data, for example, when up-to-date data is contained in the new XML data file.
-
Append new data to existing XML tables Specifies whether the contents of the data source are appended to the existing data on the worksheet. Click this option, for example, when you are consolidating data from several similar XML data files into an XML table, or you do not want to overwrite the contents of a cell that contains a function.
When you import XML data, you may want to overwrite some mapped cells but not others. For example, some mapped cells may contain formulas and you don’t want to overwrite the formula when you import an XML file. There are two approaches that you can take:
-
Unmap the elements that you don’t want overwritten, before you import the XML data. After you import the XML data, you can remap the XML element to the cells containing the formulas, so that you can export the results of the formulas to the XML data file.
-
Create two XML maps from the same XML schema. Use one XML map for importing the XML data. In this «Import» XML map, don’t map elements to the cells that contain formulas or other data that you don’t want overwritten. Use another XML map for exporting the data. In this «Export» XML map, map the elements that you want to export to an XML file.
Note: The ability to import XML data from a Web service by using a Data Retrieval Service Connection (.uxdc) file to connect to a data source is no longer supported in versions later than Excel 2003 through the user interface. If you open a workbook that was created in Excel 2003, you can still view the data, but you cannot edit or refresh the source data.
Working with an inferred schema
If you import XML data without first adding a corresponding XML schema to create an XML map, Excel tries to infer a schema for you based on the tags that are defined in the XML data file. The inferred schema is stored with the workbook, and the inferred schema allows you to work with XML data if an XML schema file isn’t associated with the workbook.
When you work with imported XML data that has an inferred schema, you can also customize the XML Source task pane. Select the Preview Data in Task Pane option from the Options button to display the first row of data as sample data in the element list, if you imported XML data associated with the XML map in the current session of Excel.
You cannot export the Excel inferred schema as a separate XML schema data file (.xsd). Although there are XML schema editors and other methods for creating an XML schema file, you may not have convenient access to them or know how to use them. As an alternative, you can use the Excel 2003 XML Tools Add-in Version 1.1, which can create a schema file from an XML map. For more information, see Using the Excel 2003 XML Tools Add-in Version 1.1.
Exporting XML data
You export XML data by exporting the contents of mapped cells on the worksheet. When you export data, Excel applies the following rules to determine what data to save and how to save it:
-
Empty items are not created when blank cells exist for an optional element, but empty items are created when blank cells exist for a required element.
-
Unicode Transformation Format-8 (UTF-8) encoding is used to write the data.
-
All namespaces are defined in the Root XML element.
-
Excel overwrites existing namespace prefixes. The default namespace is assigned a prefix of ns0. Successive namespaces are designated ns1, ns2 to ns<count> where <count> is the number of namespaces written to the XML file.
-
Comment nodes are not preserved.
You can display the XML Map Properties dialog box (Click Map Properties in the XML group on the Developer tab.) and then use the Validate data against schema for import and export option (active by default) to specify whether Excel validates data against the XML map when exporting data. Click this option when you want to ensure that the XML data you export conforms to the XML schema.
Using the Excel Macro-enabled Office Open XML Format File
You can save an Excel workbook in a variety of file formats, including the Excel macro-enabled Office Open XML Format File (.xlsm). Excel has a defined XML schema that defines the contents of an Excel workbook, including XML tags that store all workbook information, such as data and properties, and define the overall structure of the workbook. Custom applications can use this Excel macro-enabled Office XML Format File. For example, developers may want to create a custom application to search for data in multiple workbooks that are saved in the this format and create a reporting system based on the data found.
Top of Page
Need more help?
You can always ask an expert in the Excel Tech Community or get support in the Answers community.
See Also
Import XML data
Map XML elements to cells in an XML Map
Export XML data
Append or overwrite mapped XML data
XML in Excel – Extensible Markup Language
XML are the files used in the databases which are shared over the web. Excel has made it easier for us to import the data in XML to Excel in the form of tables or databases. XML is external data that can be imported to Excel from the “Data” tab under the “Get Data” tab from the data from other sources.
Data is the platform that almost all business entities revolve around. In the modern world, all businesses use different platforms and programs to store data for analysis and decision-making purposes.
XML – extensible markup language is the most common format to work and analyze data in this modern world. Excel allows us to convert spreadsheet data into XML files, and getting started is strange for common Excel users.
XML is structured data and one of the external data sources. We create a link or import data from outside where data resides outside the spreadsheet. We have many external databases like PayrollPayroll refers to the overall compensation payable by any organization to its employees on a certain date for a specific period of services they have provided in the entity. This total net pay comprises salary, wages, bonus, commission, deduction, perquisites, and other benefits.read more, POS (Point of Sale), Inventory Software, SQL Servers, etc.
You are free to use this image on your website, templates, etc, Please provide us with an attribution linkArticle Link to be Hyperlinked
For eg:
Source: XML in Excel (wallstreetmojo.com)
Like every other database software, XML has its own rules and regulations. Below are some of the common rules for XML.
- While writing the code data, both the head (start) and tail (end) should have similar tag names. For example:
<TableName> Data </TableName>
- Both head and tail are case sensitive.
Table of contents
- XML in Excel – Extensible Markup Language
- How to Import XML Data into Excel? (with Examples)
- Example #1 – Website (XML data) Data Download
- Example #2 – Add XML (Markup Schema) to Excel
- Things to Remember
- Recommended Articles
- How to Import XML Data into Excel? (with Examples)
How to Import XML Data into Excel? (with Examples)
Let us see how to import XML data into Excel.
Example #1 – Website (XML data) Data Download
When searching the internet, we may find some useful information on the web. However, we need that data dumped into the worksheet of Excel. This article will show you how to download the data from the web server to a worksheet in Excel.
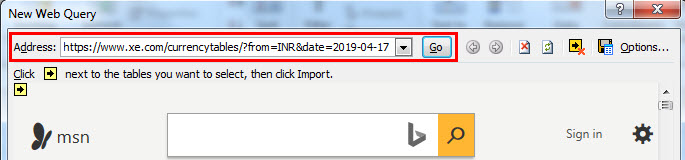
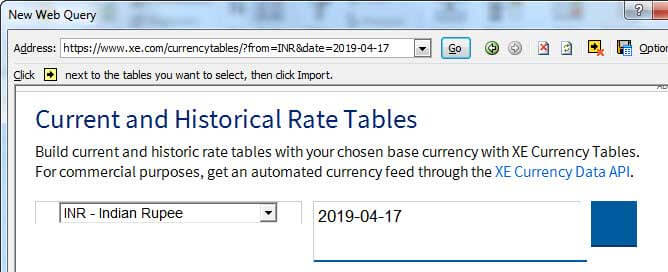
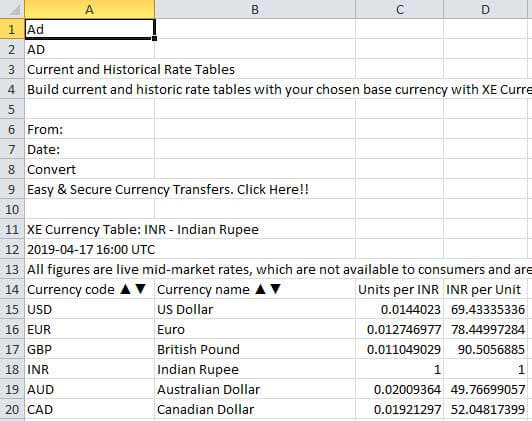
Assume you are working with foreign markets regularly and need the data of all the currency exchange rates for INR. Usually, we rely on XE.com for all the historical currency rates.
Follow the steps below to download the currency rates for 17th Jan 2019.
- Open the XE.com website.
- Search for “Historical Currency Rates.”
- Select the currency and date which you want the data for. For example, we have selected INR and 17-04-2019.
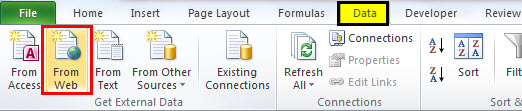
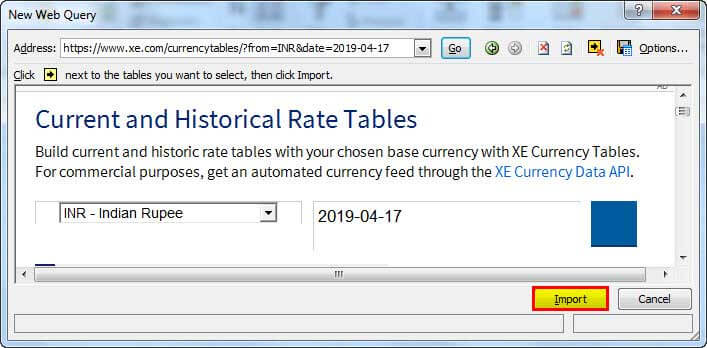
- Go to the “Data” tab in Excel, and under “Get Data,” select the “From Web” option.

- Once you click on this, you will see this window.

- Now, copy the URL you have created in XE.com and paste it into the “Address” section and click on “Go.”

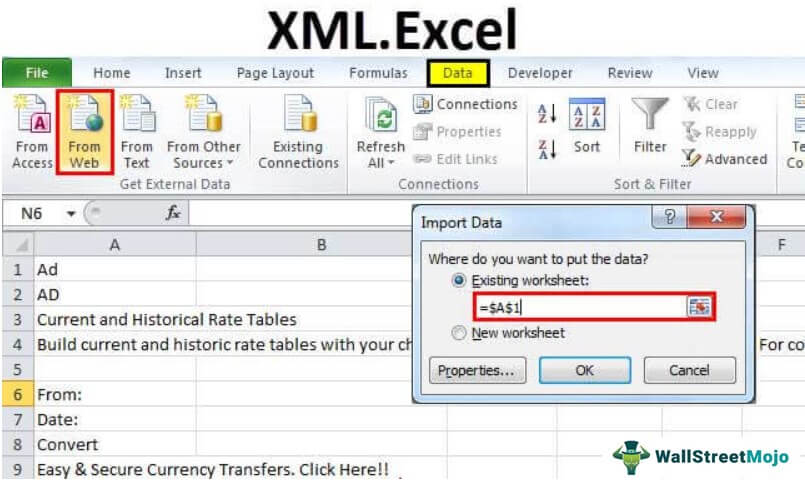
- After clicking on “Go,” you will see the webpage.

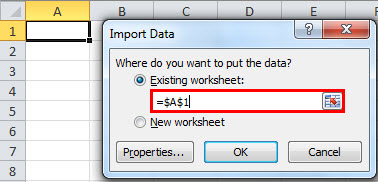
- Once you see the result click on “Import.”

- After clicking the “IMPORT” button, Excel will ask you where to store the data. Select A1 as the cell reference.

- After selecting the cell reference, excel will store the XML data as it is on the website and will take a few seconds to complete it.

This way, we can download the data from web servers and have our data in the spreadsheet.

Example #2 – Add XML (Markup Schema) to Excel
To add “XML Schema,” we need perfect column headings. We can create an XML Schema by using column headings.
- Step 1: Open Notepad and copy the below code and paste.
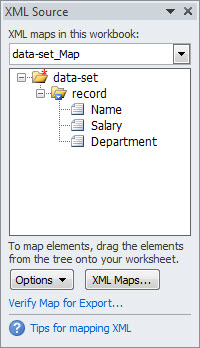
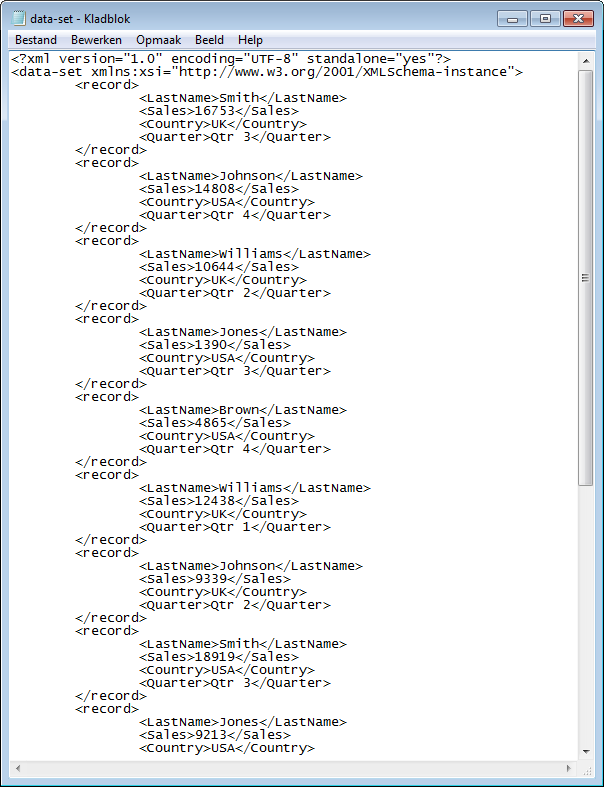
<?xml version="1.0" encoding="UTF-8" standalone="yes"?>
<data-set xmlns:xsi="http://www.w3.org/2001/XMLSchema-instance">
<record>
<Name>Amar Jyothi</Name>
<Salary>14051</Salary>
<Department>Sales</Department>
</record>
<record>
<Name>Radha</Name>
<Salary>17061</Salary> <Department>Marketing</Department>
</record>
</data-set>
- Step 2: Save this as data-set.xml

It is important to ask two pieces of information from the data. First, we have added two names’ data to the list. It is an indication of the Excel to repeat throughout the worksheet.
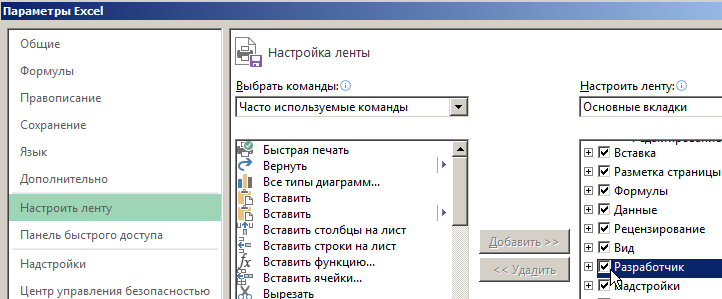
- Step 3: Ensure the “Developer” tab is enabled in your Excel ribbonThe ribbon is an element of the UI (User Interface) which is seen as a strip that consists of buttons or tabs; it is available at the top of the excel sheet. This option was first introduced in the Microsoft Excel 2007.read more and select “Source” from the “Developer” tab.

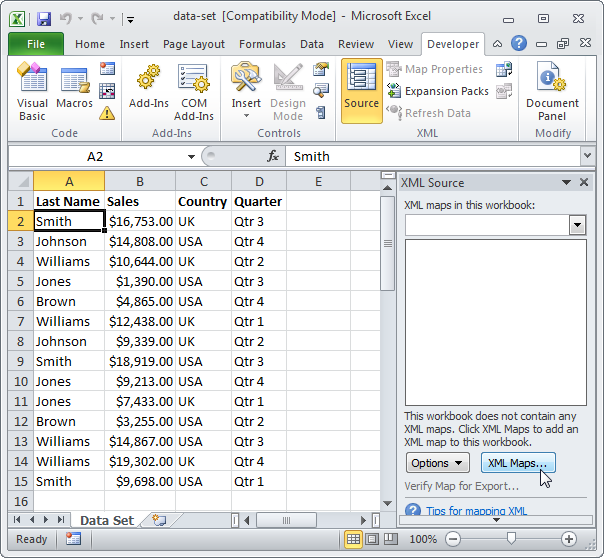
- Step 4: Under “XML Source” right-click on the “XML Maps.”
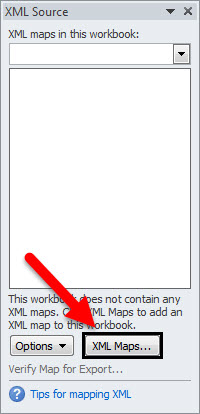
- Step 5: Select the file you want to add.
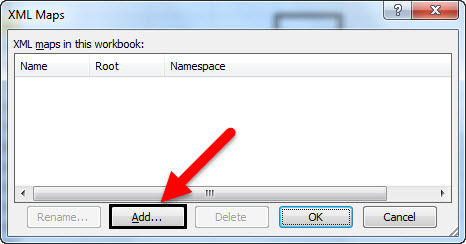
- Step 6: Select the desired file and click on the “OK” button.
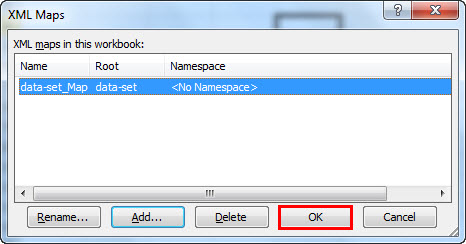
Once you click on the “OK” button, you will see the following output.
Things to Remember
- XML is one of the structured languages for a database.
- XML is an extensible markup language.
- We can import and export under XML to the spreadsheet and spreadsheet to the XML.
- Head and tails should be the same under notepad coding.
- You need to save the file as.XML
- XML is available as add-ins too. Search on the internet for more information regarding this.
Recommended Articles
This article is a guide to the XML in Excel. We discuss importing and adding XML Markup Schema to Excel and practical examples here. You can learn more about Excel from the following articles: –
- Open XML File in ExcelXML (Extensible Markup Language) is a text-based mark-up language that stores & organizes data in a human & machine-readable format. As it follows a specific script, you need to fulfill a particular set of prerequisites for importing the data into Excel or opening Excel Data into this format. read more
- VBA LENThe Len function is a common function for both worksheet and VBA. In both platforms, the arguments to this function are the same, which is a string. This function returns the length of a string.read more
- File Formats in ExcelExcel extensions represent the file format. It helps the user to save different types of excel files in various formats. For instance, .xlsx is used for simple data, and XLSM is used to store the VBA code.read more
- How to Import Data into Excel?
- Share an Excel WorkbookUnder the Review menu tab, there is a Share Excel Workbook option that allows the other user to review the document and make changes as well.read more
Трюк №95. Загрузка документа XML в Excel
Если кто-либо пришлет файл XML, содержащий данные в таблицах, вам не придется читать весь текст и все угловые скобки с тегами. Можно загрузить этот документ напрямую в Excel, сообщить Excel, как следует отобразить этот документ, и работать с данными при помощи карт.
В последние несколько лет язык XML (Extensible Markup Language, букв, «расширяемый язык разметки») стал распространенным форматом обмена информацией, и нет ничего необычного в том, что люди и организации отправляют друг другу файлы XML. Простые структуры, лежащие в основе XML, делают обмен информацией чрезвычайно простым, причем неважно, используют ли все стороны одно и то же программное обеспечение и браузеры. Однако до недавних пор, хотя общие утилиты XML стали широко распространены, заполнить пробел между документами XML и пользовательским интерфейсом было еще достаточно трудно. Microsoft Excel упрощает эту задачу, по крайней мере, для данных в сетке таблицы.
В этом трюке используются возможности Excel, доступные только в Excel для Windows старше 2003 года. Более ранние версии Excel не поддерживают их; эти возможности не поддерживаются и в существующих, и планируемых версиях Excel для Macintosh.
Начнем с простого документа XML, приведенного в листинге 8.1.
// Листинг 8.1. Простой документ XML для анализа в Excel 2003-10-05 0596005385 Off1ce 2003 XML Essentia1s
34.95 200 Zork’s Books
2003-10-05 0596002920 XML in a Nutshell. 2nd Edition
90 Zork’s Books 2003-10-05 0596002378 SAX2
300 Zork’s Books 2003-10-05 0596005385 Office 2003 XML Essentials
10 Books of Glory 2003-10-05 0596002920 XML in a Nutshell, 2nd Edition
25 Books of Glory 2003-10-07 0596002378 SAX2
5 Books of Glory 2003-10-18 0596002378 SAX2
15 Title Wave 2003-10-21 0596002920 XML in a Nutshell. 2nd Edition
15 Books for You
Этот документ можно открыть непосредственно в Excel командой Файл → Открыть (File → Open). Откроется диалоговое окно (рис. 8.1).

Рис. 8.1. Открытие файла XML в Excel
Если вы выберете переключатель XML-список (As an XML list), то увидите предупреждение, что Excel создаст собственную схему для этого документа, не имеющего схемы (рис. 8.2).

Рис. 8.2. Предупреждение Excel об отсутствии ссылок на схему
Щелкнув кнопку ОК, вы увидите, какой способ Excel выбрал для представления информации в открываемом документе в виде электронной таблицы (рис. 8.3). Обратите внимание, что Excel ожидает встретить формат даты, который используется для элемента даты, поэтому даты, импортированные как 2003-10-05, будут отображаться как 10/5/2003.

Рис. 8.3. Данные XML, представленные как XML-список в Excel
Теперь, когда документ загружен в Excel, обрабатывать данные можно так же, как любые другие данные в Excel, — вставлять их в формулы, создавать именованные диапазоны, строить диаграммы на основе содержимого и т. д. Чтобы помочь вам, в Excel предусмотрено несколько встроенных возможностей анализа данных.
Раскрывающиеся списки в заголовках столбцов позволяют выбирать способ сортировки данных (по умолчанию данные выводятся в том порядке, в котором они записаны в исходном документе). Можно также включить отображение строки итогов Итог (Total); для этого можно воспользоваться панелью инструментов Список (List) или щелкнуть правой кнопкой мыши в любом месте списка и в контекстном меню выбрать команду Список → Строка итогов (List → Total Row). Когда строка итогов появится, выбрать вид итоговой информации можно будет в раскрывающемся меню (рис. 8.4).

Рис. 8.4. Выбор итогов для списка XML в Excel
Данные можно обновить, добавив при этом в обновляемую область информацию из документа XML с такой же структурой. Если у вас есть еще один документ с такой структурой, можете щелкнуть список правой кнопкой мыши, в контекстном меню выбрать команду XML → Импорт (XML → Import) и выбрать второй документ. Кроме того, после редактирования данные можно экспортировать обратно в файл XML, щелкнув список правой кнопкой мыши и выбрав в контекстном меню команду XML → Экспорт (XML → Export). Это превращает Excel в очень удобный инструмент редактирования простых XML-документов с табличной структурой.
Если данные достаточно простые, вы чаще всего можете доверить Excel выбор способа представления содержимого файла и использовать предусмотренные настройки по умолчанию. Если же данные усложняются, особенно если они содержат даты или текст, который выглядит как числа, то вы, возможно, захотите использовать схемы XML, чтобы указать Excel, как следует читать данные и какие данные подойдут к данной карте. Для нашего документа XML-схема может выглядеть, как в листинге 8.2.
// Листинг 8.2. Схема для данных о продаже книг
Обратите внимание, что элемент date определен как дата, а элемент ISBN определен как строка, а не как целое число. Если вы начнете с открытия этой схемы, а не документа, то заставите Excel загружать документ, сохранив ведущий нуль в ISBN.
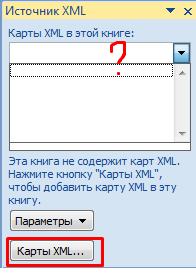
На этот раз вы создадите список до загрузки документа XML, начав с пустого рабочего листа. Вам понадобится открыть область задач Источник XML (XML Source). Если она еще не открыта, нажмите сочетание клавиш Ctrl+Fl. Затем в раскрывающемся списке вверху области задач выберите Источник XML (XML Source) и вы увидите что-то похожее на рис. 8.6.

Рис. 8.6. Область задач Источник XML
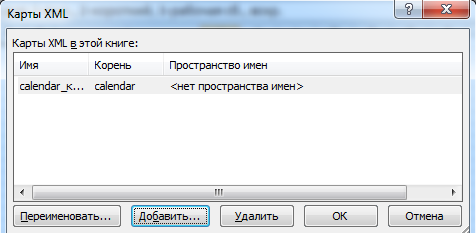
Чтобы загрузить схему, щелкните кнопку Карты XML (XML Maps). Откроется диалоговое окно Карты XML (XML Maps) (рис. 8.7).

Рис. 8.7. Диалоговое окно Карты XML
Щелкните кнопку Добавить (Add), чтобы открыть схему, и выберите схему (рис. 8.8). Если схема не ограничивает документы одним начальным элементом, появится диалоговое окно с просьбой выбрать корневой элемент. Так как документы в этом примере начинаются с элемента sales, выберите «sales».

Рис. 8.8. Выбор XML-схемы
Когда вы щелкнете кнопку ОК, появится предупреждение о возможных сложностях с интерпретацией схем. XML-схема (XML Schema) — это огромная спецификация, поддерживающая чрезвычайно много структур, не отвечающих способу восприятия информации в Excel, поэтому в Excel есть некоторые ограничения.
В диалоговом окне Карты XML (XML Maps) Excel сообщит, что схема была добавлена к электронной таблице. Если вы щелкнете кнопку ОК, то вернетесь в главное окно Excel и в области задач Источник XML (XML Source) появится диаграмма, отображающая структуру схемы. Теперь, когда у вас есть структура, можно создать список. Самый простой способ сделать это, особенно с небольшими документами, как наш, — перетащить значок sales на ячейку А1.
Теперь, обустроив дом для данных, нужно заселить его. Можно щелкнуть кнопку Импорт XML-данных (Import XML Data) на панели инструментов Список (List) или щелкнуть правой кнопкой мыши список и в контекстном меню выбрать кнопку XML → Импорт (XML → Import). Если вы выберете файл, который уже открывали ранее (в листинге 8.1), то увидите результат, как на рис. 8.3. Обратите внимание на добавление ведущих нулей к значениям, которые теперь являются текстовыми, как и должно быть.
Элементы можно перетаскивать и по отдельности, если вы хотите поменять их местами, или помещать разные фрагменты информации в разные места электронной таблицы.
Поддержка XML-карт и списков в Excel означает, что можно создавать электронные таблицы, работающие с данными, которые поступают в отдельных файлах, с большей гибкостью, чем это было с предыдущими форматами, например CSV (с разделителями-запятыми) или форматом с разделительной табуляцией.
Вместо того чтобы подключаться к базе данных для интерактивного редактирования данных, пользователь сможет отредактировать файл XML, находясь в самолете, и передать его заказчику сразу же после приземления. Возможно, лучшее свойство новых возможностей XML Excel — это их гибкость. Пока данные организованы в структуру, соответствующую сетке таблицы, у Excel имеется совсем немного правил относительно того, какие виды XML можно передавать туда. Несколько раз щелкнув мышью и совершенно ничего не программируя, можно интегрировать данные XML в электронные таблицы.
Конвертация файлов XML в форматы Excel
XML является одним из самых распространенных форматов для хранения данных и обмена ими между различными приложениями. С данными работает и программа Microsoft Excel, поэтому очень актуальным является вопрос конвертации файлов из стандарта XML в форматы Excel. Выясним, как произвести эту процедуру различными способами.
Процесс конвертации
XML-файлы написаны на специальном языке разметки чем-то похожим на HTML веб-страниц. Поэтому у этих форматов довольно сходная структура. В то же время, Эксель – это в первую очередь программа, имеющая несколько «родных» форматов. Самые известные из них: Книга Excel (XLSX) и Книга Excel 97 – 2003 (XLS). Выясним основные способы конвертации файлов XML в эти форматы.
Способ 1: встроенный функционал Excel
Программа Excel отлично работает с файлами формата XML. Она может открывать их, изменять, создавать, сохранять. Поэтому самый простой вариант поставленной перед нами задачи — это открыть данный объект и сохранить его через интерфейс приложения в виде документов XLSX или XLS.
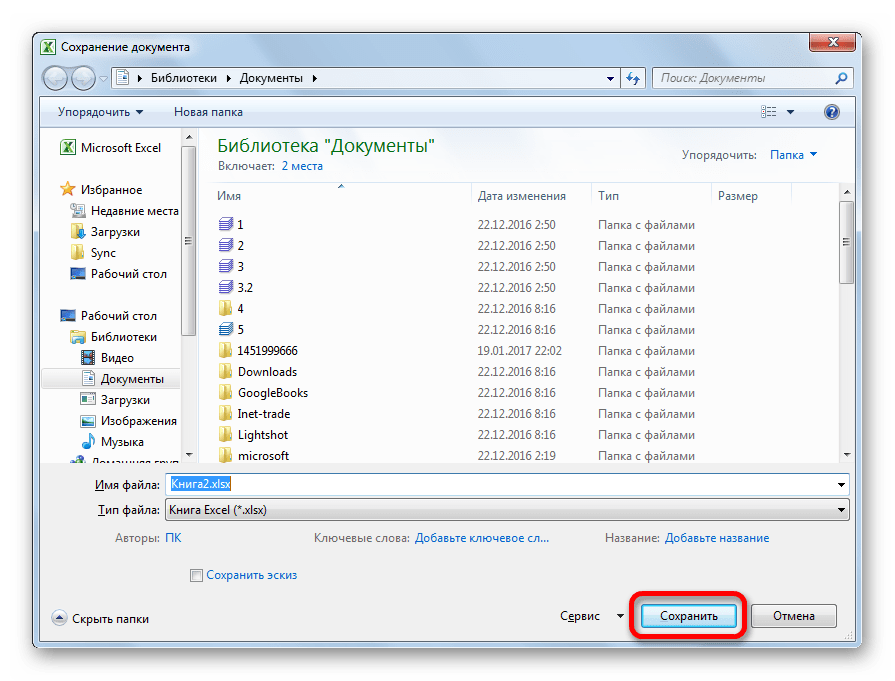
- Запускаем Эксель. Во вкладке «Файл» переходим по пункту «Открыть».
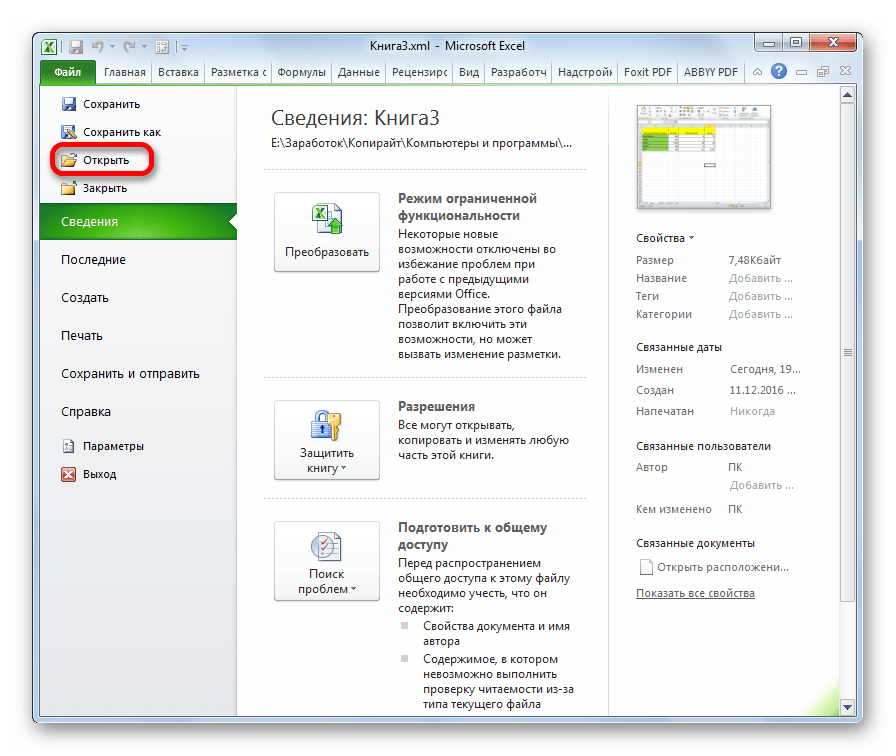
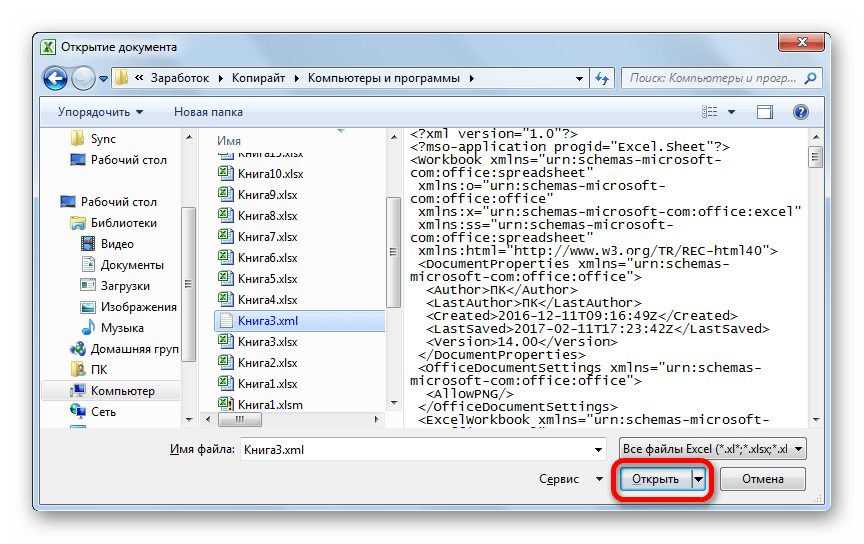
Активируется окно открытия документов. Переходим в директорию, где хранится нужный нам документ XML, выделяем его и жмем на кнопку «Открыть».
После того, как документ открыт через интерфейс Эксель, опять переходим во вкладку «Файл».
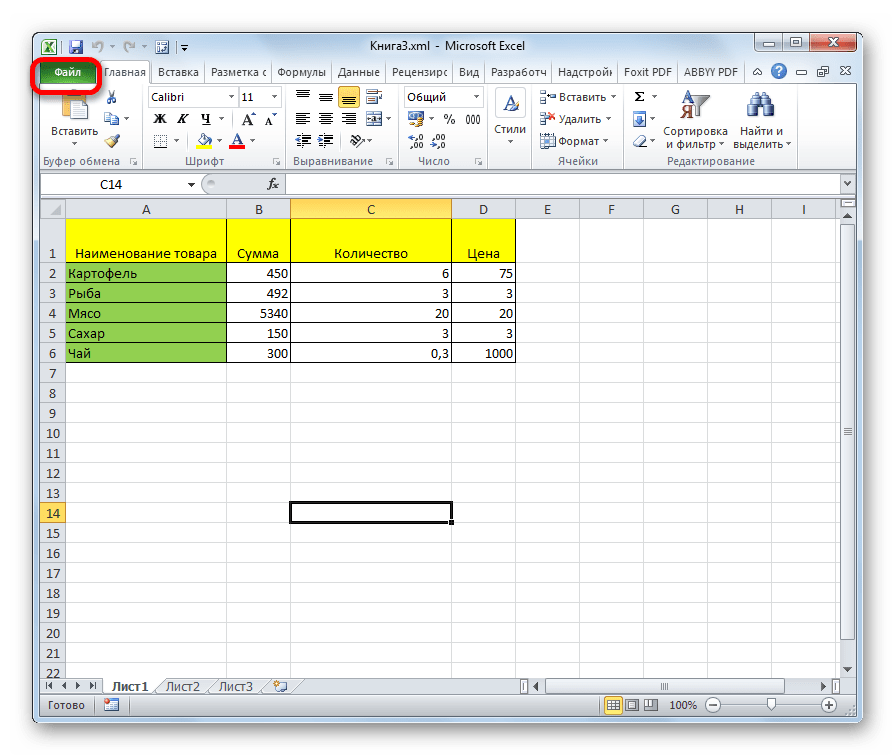
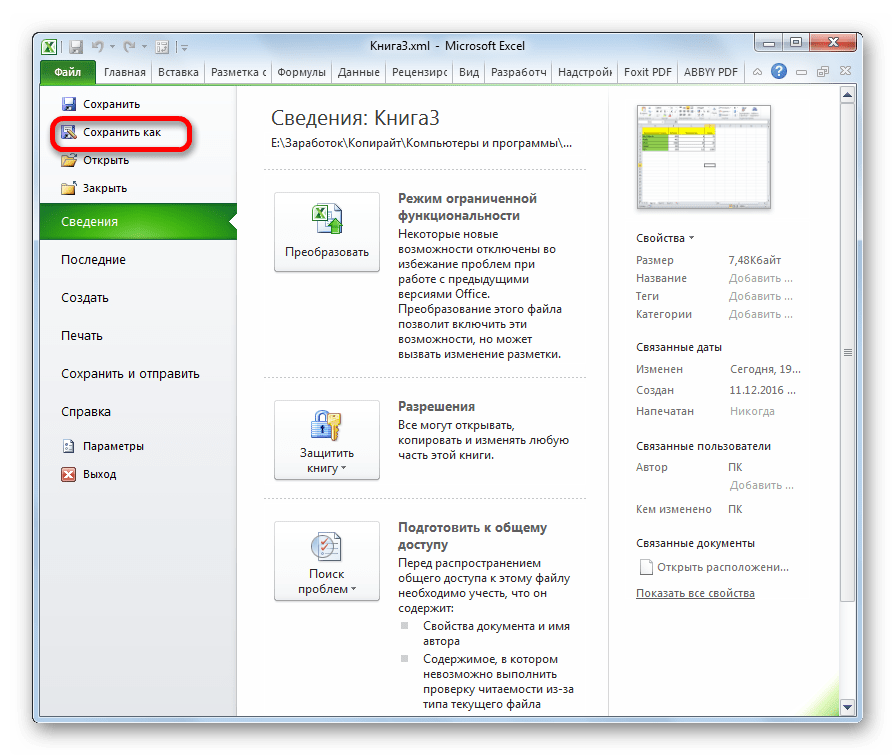
Открывается окно, похожее на окно для открытия, но с некоторыми отличиями. Теперь нам нужно сохранить файл. С помощью инструментов навигации переходим в директорию, где будет храниться преобразованный документ. Хотя можно его оставить и в текущей папке. В поле «Имя файла» при желании можно его переименовать, но это тоже не обязательно. Для нашей задачи основным является следующее поле – «Тип файла». Кликаем по этому полю.
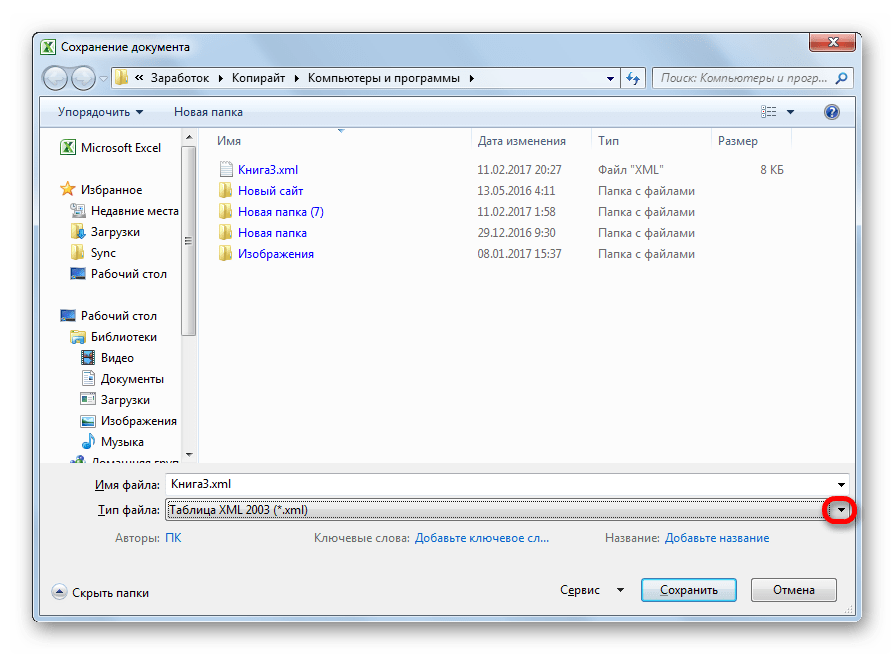
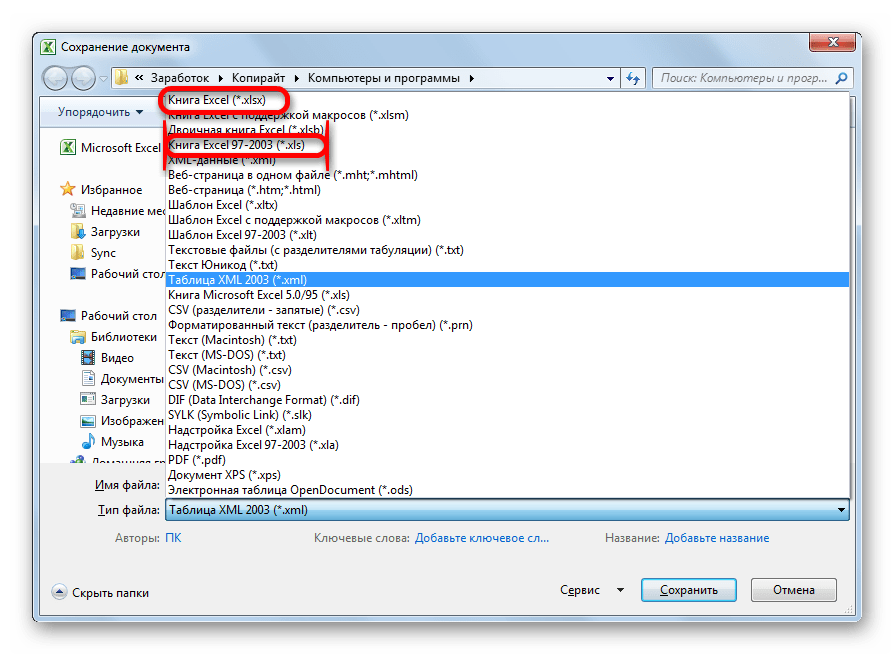
Из предложенных вариантов выбираем Книга Excel или Книга Excel 97-2003. Первый из них более новый, второй – уже несколько устаревший.
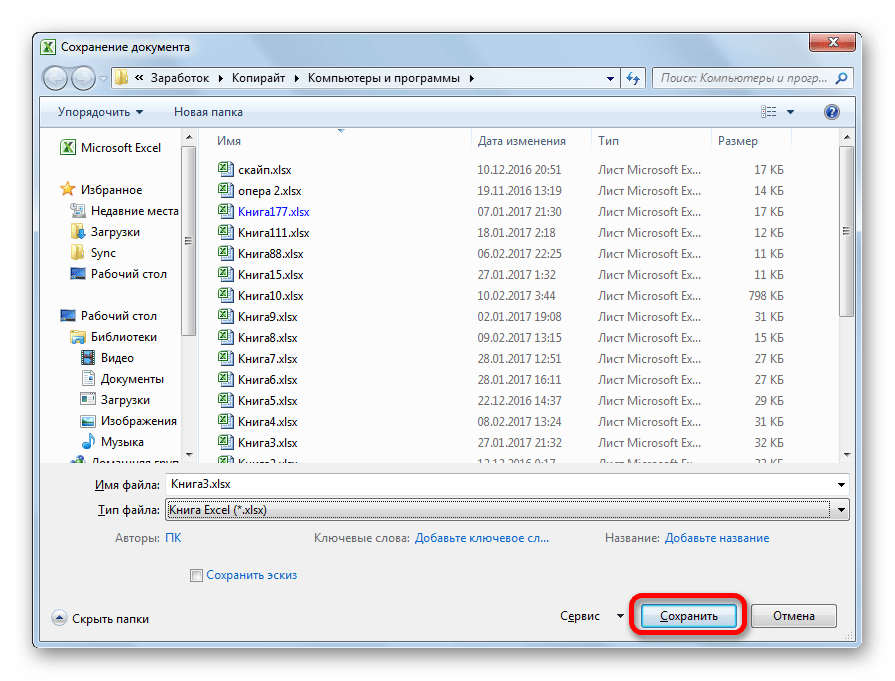
На этом процедура конвертации файла XML в формат Excel через интерфейс программы окончена.
Способ 2: импорт данных
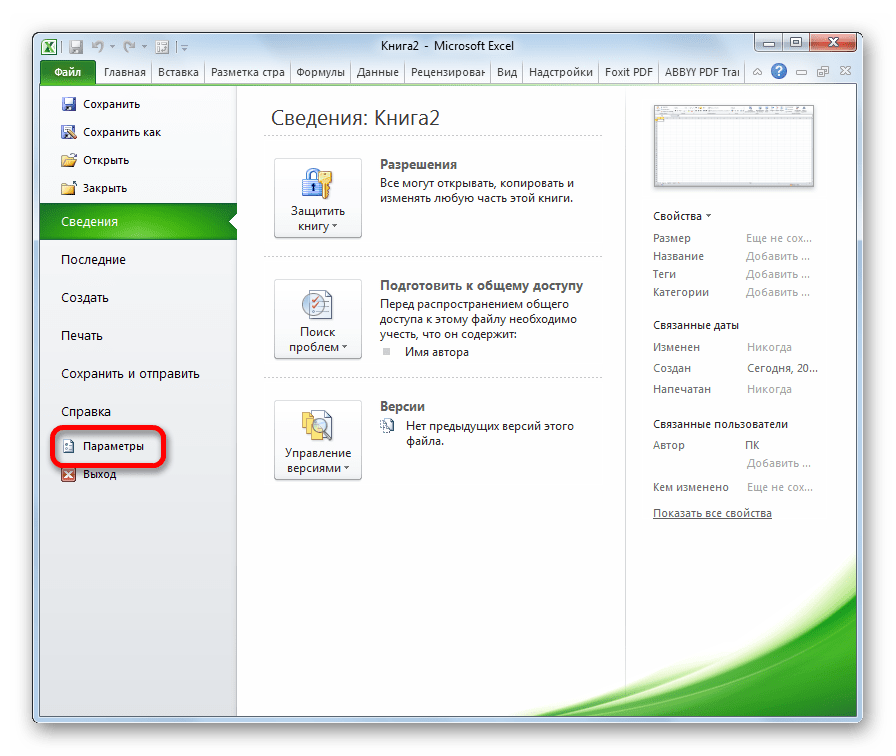
Вышеописанный способ подходит только для файлов XML с самой простой структурой. Более сложные таблицы при конвертации таким способом могут быть переведены некорректно. Но, существует ещё один встроенный инструмент Excel, который поможет корректно произвести импорт данных. Он расположен в «Меню разработчика», которое по умолчанию отключено. Поэтому, прежде всего, его нужно активировать.
-
Перейдя во вкладку «Файл», кликаем по пункту «Параметры».
В окне параметров переходим в подраздел «Настройка ленты». В правой части окна ставим галочку около пункта «Разработчик». Жмем на кнопку «OK». Теперь нужная функция активирована, а соответствующая вкладка появилась на ленте.
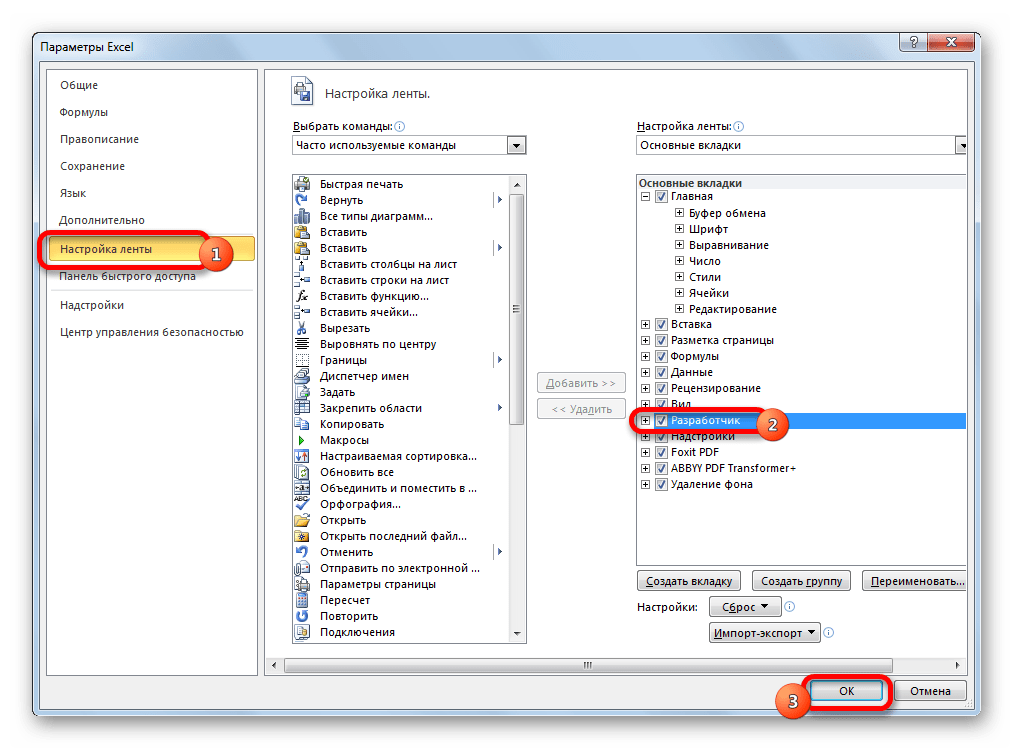
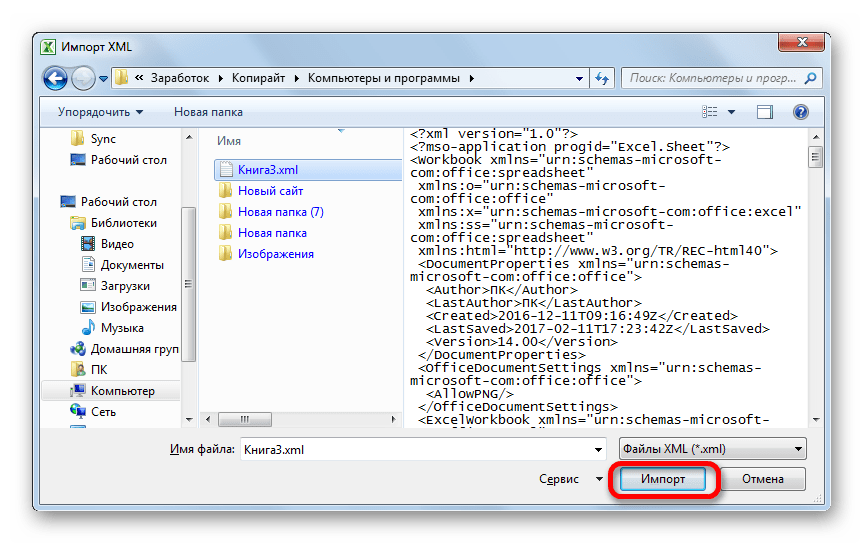
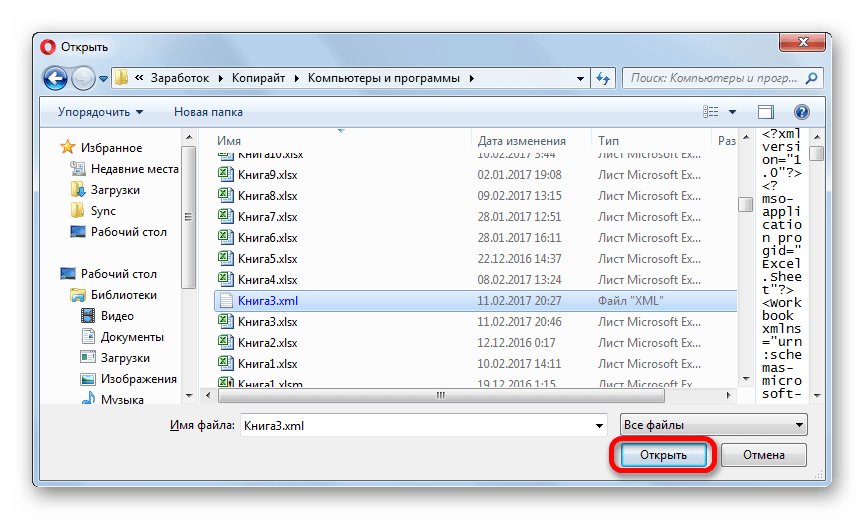
Переходим во вкладку «Разработчик». На ленте в блоке инструментов «XML» жмем на кнопку «Импорт».

Открывается окно импорта. Переходим в директорию, где располагается нужный нам документ. Выбираем его и жмем на кнопку «Импорт».
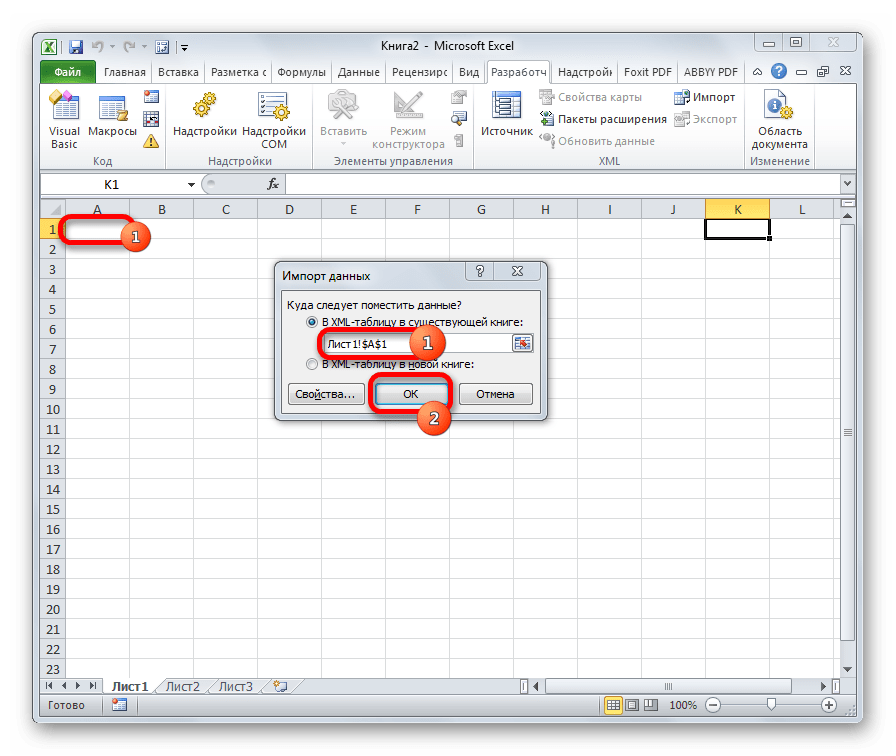
Далее может открыться диалоговое окно, в котором говорится, что выбранный файл не ссылается на схему. В нем будет предложено создать программе схему самостоятельно. В этом случае соглашаемся и жмем на кнопку «OK».
Далее открывается следующее диалоговое окно. В нем предлагается определиться открывать таблицу в действующей книге или в новой. Так как мы запустили программу без открытия файла, то можем оставить данную настройку по умолчанию и продолжить работу с текущей книгой. Кроме того, это же окно предлагает определить координаты на листе, куда будет импортирована таблица. Можно вписать адрес вручную, но намного проще и удобнее просто кликнуть по ячейке на листе, которая станет верхним левым элементом таблицы. После того, как адрес занесен в поле диалогового окна, жмем на кнопку «OK».
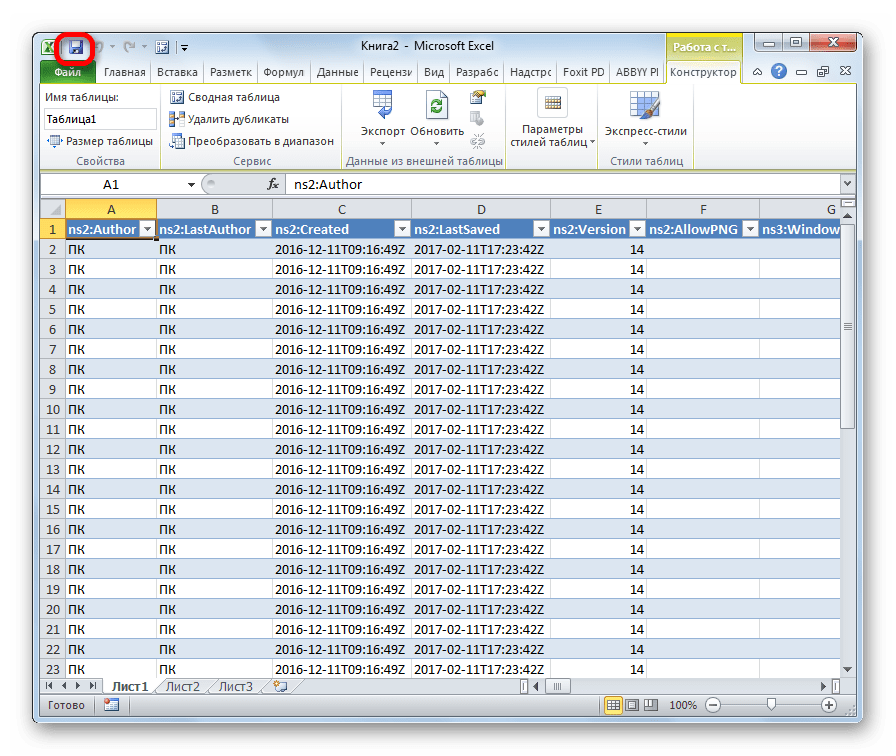
После этих действий таблица XML будет вставлена в окно программы. Для того чтобы сохранить файл в формате Excel кликаем по иконке в виде дискеты в верхнем левом углу окна.
Таким образом, конвертация в нужном для нас направлении будет совершена с максимально корректным преобразованием данных.
Способ 3: онлайн-конвертер
Тем пользователям, у которых по какой-то причине не установлена на компьютере программа Эксель, но нуждающимся в срочном преобразовании файла из формата XML в EXCEL, можно воспользоваться одним из множества специализированных онлайн-сервисов для конвертации. Одним из наиболее удобных сайтов подобного типа является Convertio.
- Переходим на данный веб-ресурс с помощью любого браузера. На нем можно выбрать 5 способов загрузки конвертируемого файла:
- С жесткого диска компьютера;
- Из онлайн-хранилища Dropbox;
- Из онлайн-хранилища Google Drive;
- По ссылке из интернета.
Так как в нашем случае документ размещен на ПК, то жмем на кнопку «С компьютера».

Запускается окно открытия документа. Переходим в ту директорию, где он размещен. Кликаем по файлу и жмем на кнопку «Открыть».
Существует также альтернативный вариант добавления файла на сервис. Для этого нужно просто перетянуть его название мышкой из Проводника Windows.
Как видим, файл добавился на сервис и находится в состоянии «Подготовлено». Теперь нужно выбрать необходимый нам формат для конвертации. Кликаем по окошку рядом с буквой «В». Открывается список групп файлов. Выбираем «Документ». Далее открывается перечень форматов. Выбираем «XLS» или «XLSX».


Данный вариант может послужить хорошей подстраховкой на случай неимения доступа к стандартным инструментам для переформатирования по данному направлению.
Как видим, в самом Экселе есть встроенные инструменты, позволяющие преобразовать файл формата XML в один из «родных» форматов этой программы. Простейшие экземпляры можно легко конвертировать через обычную функцию «Сохранить как…». Для документов с более сложной структурой существует отдельная процедура преобразования через импорт. Те пользователи, которые по какой-либо причине не могут воспользоваться данными инструментами, имеют возможность выполнить задачу с помощью специализированных онлайн-сервисов для конвертации файлов.
Отблагодарите автора, поделитесь статьей в социальных сетях.
Экспорт Excel в XML и наоборот
Вы можете конвертировать файл Excel в файл данных XML или наоборот. Это позволяет обмениваться информацией между различными приложениями. Для начала откройте вкладку Developer (Разработчик).
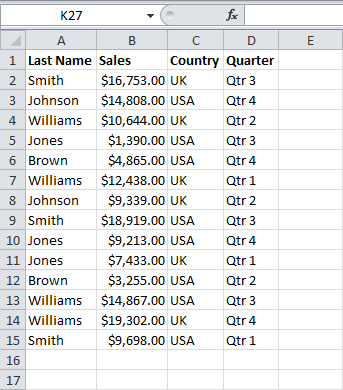
Вот данные, которые мы хотим преобразовать в файл XML:
Сперва создадим схему, основанную на исходных данных в формате XML. Схема определяет структуру XML-файла.
-
Excel для этой цели не подойдёт, поэтому откройте, к примеру, Блокнот и вставьте следующие строки:
Примечание: Теги названы по именам столбцов, но вы можете дать им любое название. Например, вместо – .
- Сохраните файл как schema.xml.
- Откройте книгу Excel.
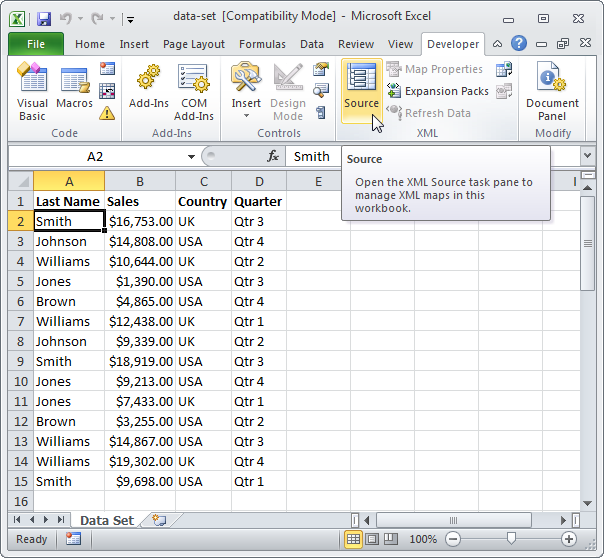
- Кликните по Source (Источник) на вкладке Developer (Разработчик). Откроется XML панель задач.
- Чтобы добавить карту XML, нажмите кнопку XML Maps (XML карты).Появится диалоговое окно XML Maps (Карты XML).
- Нажмите Add (Добавить).
- Выберите schema.xml и дважды кликните ОК.
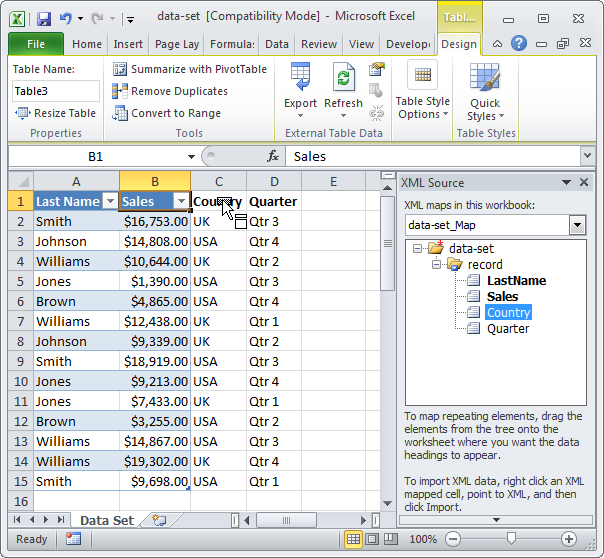
- Теперь просто перетащите 4 элемента из дерева в XML панели задач на лист (строка 1).
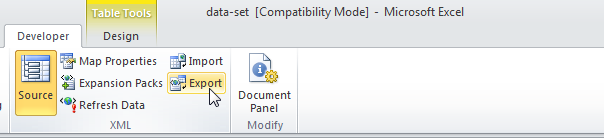
- Нажмите кнопку Export (Экспорт) в разделе XML на вкладке Developer (Разработчик).
- Сохраните файл и нажмите Enter.
 Появится диалоговое окно XML Maps (Карты XML).
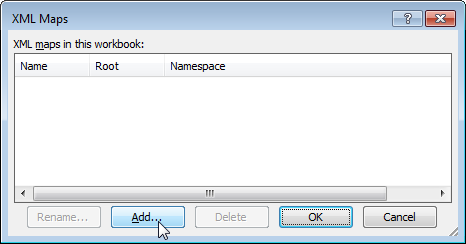
Это экономит немало времени!
Примечание: Для импорта XML-файла откройте пустую книгу. На вкладке Developer (Разработчик) нажмите кнопку Import (Импорт) и выберите XML-файл.
Собрать данные из XML файлов в Excel и экспортировать
Microsoft Excel – удобный инструмент для организации и структурирования самых разнообразных данных. Он позволяет обрабатывать информацию разными методами, редактировать массивы данных.
Рассмотрим возможности использования его для формирования и обработки файлов веб-приложений. На конкретном примере изучим основы работы с XML в Excel.
Как создать XML-файл из Excel
XML – стандарт файла для передачи данных в Сети. Excel поддерживает его экспорт и импорт.
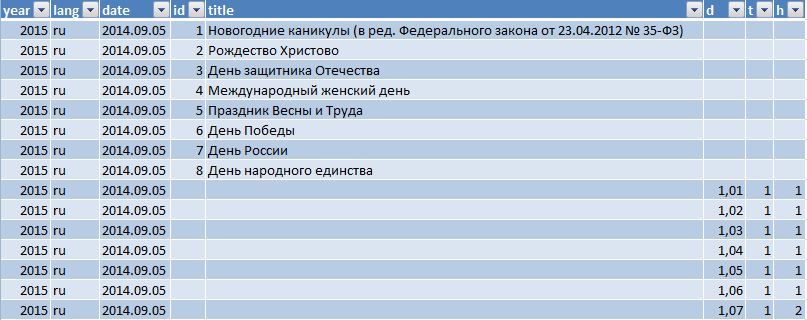
Рассмотрим создание XML-файла на примере производственного календаря.
- Сделаем таблицу, по которой нужно создать XML файл в Excel и заполним ее данными.
- Создадим и вставим карту XML с необходимой структурой документа.
- Экспортируем данные таблицы в XML формат.
- Наша таблица – производственный календарь.
- Создаем в любом текстовом редакторе (например, «Блокнот») желаемую карту XML структуры для генерации файла сохраним. В данном примере буде использовать следующую карту структуры:


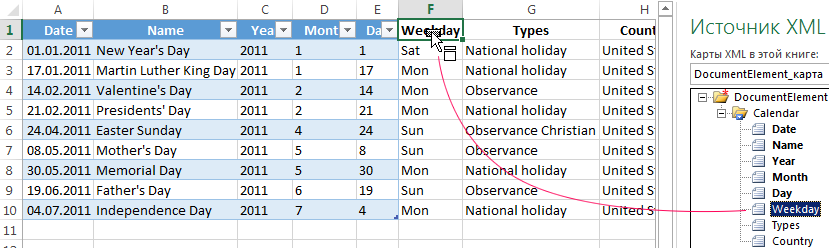
Сохраняем в XML файл.
Другие способы получения XML-данных (схемы):
- Скачать из базы данных, специализированного бизнес-приложения. Схемы могут предоставляться коммерческими сайтами, службами. Простые варианты находятся в открытом доступе.
- Использовать готовые образцы для проверки карт XML. В образцах – основные элементы, структура XML. Копируете – вставляете в программу «Блокнот» — сохраняете с нужным расширением.
Как сохранить файл Excel в формате XML
Один из вариантов:
- Нажимаем кнопку Office. Выбираем «Сохранить как» — «Другие форматы».
- Назначаем имя. Выбираем место сохранения и тип файла – XML.
Если выдает ошибку, книгу можно сохранить в виде таблицы XML 2003 либо веб-страницы. С этими форматами проблем, как правило, не возникает.
- Скачать конвертер XLC в XML. Либо найти сервис, с помощью которого можно экспортировать файл онлайн.
- Скачать с официального сайта Microsoft надстройку XML Tools Add-in. Она в бесплатном доступе.
- Открываем новую книгу. Кнопка Office – «Открыть».
Как открыть XML файл в Excel
- Меняем формат на «файлы XML». Выбираем нужный файл. Жмем «Открыть».
- Способ открытия – XML-таблица. ОК.
- Появляется оповещение типа


Жмем ОК. С полученной таблицей можно работать, как с любым файлом Excel.
Как преобразовать файл XML в Excel
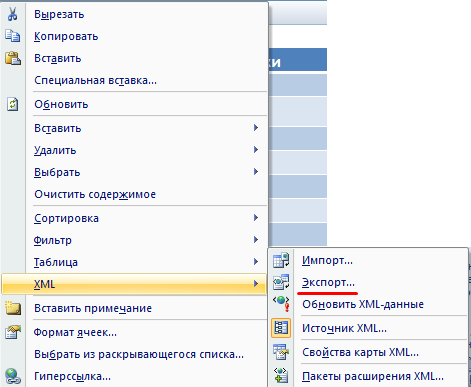
- Меню «Разработчик» — вкладка «Импорт».
- В диалоговом окне выбираем файл XML, который хотим преобразовать.
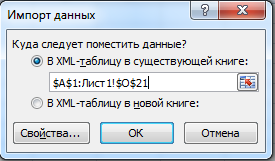
- Нажимаем «Импорт». Программа Excel предложит самостоятельно создать схему на основе полученных данных. Соглашаемся – ОК. Откроется окно, где нужно выбрать место для импортируемого файла.
- Назначаем диапазон для импорта. Лучше брать с «запасом». Жмем ОК.

Созданную таблицу редактируем и сохраняем уже в формате Excel.
Как собрать данные из XML файлов в Excel
Принцип сбора информации из нескольких XML-файлов такой же, как и принцип преобразования. Когда мы импортируем данные в Excel, одновременно передается карта XML. В эту же схему можно переносить и другие данные.
Каждый новый файл будет привязываться к имеющейся карте. Каждому элементу в структуре таблицы соответствует элемент в карте. Допускается только одна привязка данных.
Чтобы настроить параметры привязки, откройте в меню «Разработчик» инструмент «Свойства карты».
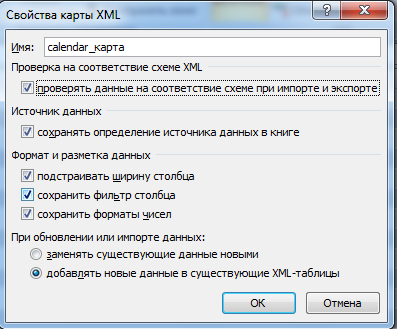
- Каждый новый файл будет проверяться программой Excel на соответствие установленной карте (если поставим галочку напротив этого пункта).
- Данные могут обновляться. Либо новая информация добавится в существующую таблицу (имеет смысл, если нужно собрать данные из похожих файлов).
Это все ручные способы импорта и экспорта файлов.
Excel «Из импорта данных XML» не будет добавлять новые столбцы
В Excel 2010 имеется потрясающая функция «Данные из других источников» -> «Из импорта данных XML», позволяющая извлекать XML из веб-службы, кодирование не требуется. Прекрасно работает, но мой сервис добавил новую колонку в конце. Обновление соединения в Excel не добавляет новый столбец. Фактически, при создании второго соединения с точно таким же URL-адресом в той же электронной таблице новый столбец также не будет отображаться (хотя то же самое будет сделано в другой книге Excel). Очевидно, Excel как-то кеширует столбцы.
Я нашел эту ссылку который описывает возможный обходной путь путем ручного взлома файла Excel; но это было 3 года назад. Конечно, сейчас есть лучший способ.
Любой совет? Вы можете повторить это, просто сохранив следующий XML-файл в виде текстового файла, импортировав его в Excel, затем отредактировав файл и добавив новый столбец.
Параметры:
- вкладка «Разработчик Excel 2010» (см. вопрос Excel Добавить Поле для карты XML ) ( search )
- Excel 2007 (возможно, другие). Похоже, что решение было разработано с использованием VBA на форуме. сообщение: Вопрос XML — схема обновления /Картография ( архив ) ( архив программно с использованием функции отображения XML страница, на которой размещаются ссылки ). Код VBA приведен ниже.
- Excel 2003 Панель инструментов XML для Excel 2003
- ALL: ниже представлен обходной путь, который не нарушает формулы.
Я не пробовал код VBA из связанного поста на форуме и включен ниже. Я надеюсь, что это работает для вас. Тем не менее, обходной путь, представленный ниже, кажется простым и не нарушает формул, ссылающихся на данные внутри сопоставления. Таким образом, я бы использовал это, если только это не работает для вас, или если ваше отображение сложное, или вы ожидаете, что вам потребуется полуавтоматическое обновление несколько раз (хотя обходной путь ниже занимает очень мало времени).
Официального решения для Excel 2007 не существует. Похоже, существует два отдельных официальных решения: одно для Excel 2003 (надстройка) и одно для Excel 2010 (вкладка «Разработчик»).
Вопрос Excel Добавить поле в Xml Карта предлагает три метода, которые могут работать.
- Первым был Набор инструментов XML для Excel 2003 который может сделать это в Excel 2003. Комментарий к этому решению указал, что у него есть некоторые проблемы /проблемы и могут или не могут быть функциональными для вас. Ты можешь приходится использовать более старую версию в Excel или даже более старую операционную система.
- Второй метод — «отредактировать файл .xls».
- Третий — использовать вкладку «Разработчик Excel 2010».
- Обходной путь представлен ниже (возможно, я выбрал простые одноразовые обновления, которые не должны повторяться, а сопоставление простое).
- Сохраните лист в виде электронной таблицы XML. Отредактируйте схему, записанную в конце файла. Учитывая, что это XML, он целиком в тексте. Схема проста для понимания. Добавить столбец так же просто, как просто скопировать и вставить (с изменениями) несколько строк XML-текста. При использовании этого метода, вероятно, проще всего сделать копию вашего рабочего листа, удалить и заново создать карту и карту, а затем вырезать и вставить. Пример XML:
(SO-форматирование требует пустой текст)
Обходной путь: [добавлены /вставлены /удалены столбцы (столбцы)] (легко для простых сопоставлений, например, одной большой таблицы):
- Сделайте резервную копию своего листа.
- Удалите карту XML . Не отображение на листе. Просто карта XML.
- Пересоздайте карту. Теперь у него будет новая XML-схема.
- Если у вас есть формула /данные, которые будут перезаписаны дополнительными столбцами: вставьте достаточно столбцов сразу справа от текущей области налист, который содержит сопоставленные данные XML.
- Если есть какие-либо столбцы, которые были вставлены между старыми столбцами, вставьте в лист столбец, куда они пойдут. Да, это верно в области сопоставленных данных XML, и общее имя столбца будет временно назначено.
- Удалите все столбцы, которые не существуют в новом XML.
- Перетащите элементы из новой сопоставленной таблицы в верхний левый угол текущего сопоставления (или иным образом воссоздайте сопоставление на листе непосредственно над сопоставлением, которое вы не удалили ) .
- Вручную измените все заголовки, которые были обновлены (если ваши данные были помечены как имеющие заголовки).
- Повторите шаги с 4 по 8 для всех отдельных сопоставлений, которые есть в вашей книге. Обычно у меня есть только одно большое сопоставление, на которое я ссылаюсь, а не несколько маленьких сопоставлений.
- Обновите данные XML.
Ваши формулы не должны были изменяться, и ссылки на ячейки в отображенных данных XML должны оставаться правильными. Чтобы убедиться, что вы правильно вставили все столбцы на шаге 3, перед внесением любых других изменений (т. Е. На шаге 1a) вы можете создать строку над сопоставлением XML, скопировать и вставить только значения из верхней строки. Обновив данные XML на шаге 10, вы можете убедиться, что старые заголовки строк соответствуют новому месту размещения.
Примечание. Шаги 3 и 4 можно поочередно выполнить, сделав более сложное отображение элементов XML. Мне проще вставлять столбцы и сохранять соответствие 1-1 с элементами XMl.
Это работало на моей машине через несколько испытаний и оставило формулы, ссылающиеся на область, как правильные. Файл, в котором вы можете экспериментировать, называется SO-XML mapping.xml и включен в приведенный ниже пример файла ( и здесь). )
Учет общих изменений столбцов в некоторых таблицах данных, полученных из источника (или с использованием нескольких источников взаимозаменяемо):
Бывают случаи, когда имеющиеся у вас данные не предоставляются динамически чем-то вроде карты XML или когда вы не хотите суетиться, вспоминая вставленные столбцы. Обходным путем для решения этой проблемы является создание собственного сопоставления столбцов данных в таблице (листе) на рабочем листе, в которой вы контролируете расположение столбцов. Вы можете сделать это, создав таблицу, которая косвенно ссылается на данные, которые вы импортировали /скопировали на другой лист. использование косвенного отображения, подобного этому, также может использоваться для простого переключения между двумя или более различными наборами данных в качестве входных данных для любых установленных вами формул.
При косвенном сопоставлении используется INDIRECT() для ссылки на лист, содержащий исходные данные. Все ваши формулы затем указывают на этот косвенный лист вместо исходных данных. Содержимое столбцов в косвенном листе организовано в фиксированных местоположениях с данными, извлеченными из столбца в исходных данных, который соответствует указанному заголовку столбца. Затем, если внесены изменения в организацию столбцов в исходных данных, вы можете просто создать новый лист с альтернативно отформатированными данными или поместить его на лист, где были исходные данные, и изменить заголовки столбцов, которыми вы являетесь. используя для ссылки. Если вы переключаетесь между несколькими наборами данных, вы можете полностью изменить исходные данные, используя одну ячейку.
Этот лист косвенного сопоставления позволяет фиксировать столбцы в ваших формулах (за пределами косвенного листа) вместо того, чтобы беспокоиться о возможной реорганизации исходных данных. Кроме того, он позволяет вам иметь два или более набора данных, которые автоматически переключаются в одну и ту же организацию столбцов при переключении между ними. Вы можете сделать это, даже если наборы данных имеют разные заголовки, используемые для одних и тех же фактических данных (просто есть строка заголовков, которая используется, когда альтернативный набор (ы) данныхвыбран (ы).
Это, вероятно, легче показать, чем объяснить в посте, подобном этому. Таким образом, вот пример, который выбирает данные из пяти различных листов .
В этом примере все ваши формулы будут ссылаться на косвенную страницу. В этом примере предполагается, что все файлы находятся в каталоге C: . К сожалению, для использования сопоставлений XML требуется полный путь к файлу, а C: — это место с наибольшей вероятностью на большинстве компьютеров с Excel.
VBA-код от KMKfan 16 ноября 2009 г .:
Комментарий в посте был:
Вот обновление для этого кода. Этот код допускает несколько XML карты для обновления в той же книге, что и карты xsd и xml имеют одно и то же имя (то есть: исходная карта «MyMap» основана на MyMap.xsd. Должно быть очень полезно, если вы используете XML для отчетности и решите добавить часть данных для захвата. Вы можете обновить существующий сопоставление автоматически и нужно только вручную обновить новые данные элементы.
Выделите импортированные данные и удалите заполненные строки. Затем выберите ячейку, в которую хотите вставить данные, и заново создайте соединение, перейдя в «Данные» -> Из импорта данных XML. Когда он воссоздает соединение, он должен добавить ваш дополнительный столбец. (Если вы попытаетесь обновить таблицу данных, которая в данный момент существует, она не добавит ваш столбец.)
The XML file format is quite commonly used on the web, and there is a possibility that sometimes you may have to work with the data in the XML file.
Now you can’t use the XML file directly, as it’s not meant to be read by humans (but machines).
In such a case, it would help to know how to convert the XML file to Excel so you can easily work with the data and analyze it.
In this tutorial, I will show you two really simple ways to import an XML file into Excel using Power Query.
What is an XML File?
XML stands for Extensible Markup Language. An XML file can hold data in a format that can easily be read by apps and systems.
But it’s not as easy to read for humans, which is why we may have to transform it into a format that’s easier to use.
If it contains a lot of text data, then you can use a text editor to read the XML file, and if it contains data, then you can import that XML file into Excel and then work with the data.
XML is quite widely accepted as a file format to store and transmit data over the web.
A lot of popular file formats, such as Microsoft Office Open XML, LibreOffice, OpenDocument, XHTML, and SVG, also use the XML file format.
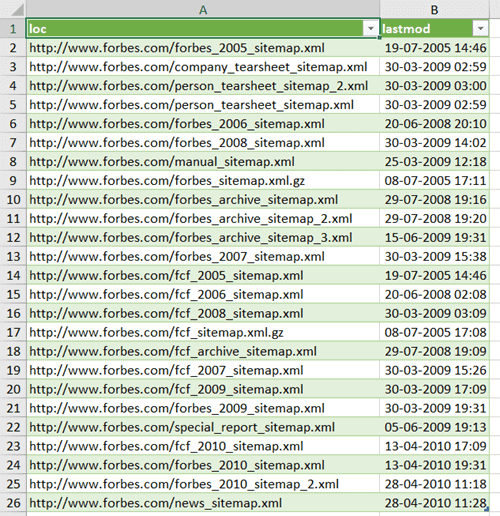
Most popular websites on the Internet have their sitemap in an XML format.
This is a file that contains the details of all the important pages and categories on a website. Here is an example of the sitemap from Forbes.
Now let’s see how to convert an XML file to Excel using Power Query.
Import XML File to Excel
If you already have an XML file (either downloaded on your system or a link to it on the web), you can easily convert it into data in an Excel file.
Thanks to Power Query (now called ‘Get & Transform’)
Import XML File that is Saved On your System
For the purpose of this tutorial, I’ll use an XML file that contains the sitemap for Forbes. You can download the file by going to this link, then right-click and save the file.
Once you have the XML file on your system, follow the below steps to get the XML file data into Excel:
- Open the Excel file where you want to get the data from the XML file
- Click the Data tab

- In the ‘Get & Transform’ data group, click on the ‘Get Data’ option

- Go to the ‘From file’ option
- Click on ‘From XML’

- In the input data dialog box that opens up, locate the XML file that you want to import and select it
- Click Import. This will import the XML file into power query and open the Navigator dialog box
- Select the data from the XML file that you want to import. In this case, I would click on ‘sitemap’ in the left pane

- [Optional] Click on the Transform Data button, if you want to transform the data before loading it into Excel (such as change the column names or remove some columns)
- Click on Load


The above steps would insert a new worksheet in the Excel file, and load all the data from the XML file into the new worksheet.
The great thing about using Power Query to fetch the data from an XML file into Excel is that in case the XML file updates and there are new records in it, you don’t have to repeat the same process.
You can simply right-click on any cell in the table and refresh the query.

Import XML File into Excel using the web URL
In the above example, we first downloaded the XML file on the system and then imported the data into Excel.
In case you have a web URL that contains the XML file (such as this one – https://www.forbes.com/sitemap_index.xml), you don’t even need to download the file. you can connect Power Query to that URL and extract the XML data into Excel.
Below are the steps to connect power query do a web URL that contains the XML data and import that data into Excel:
- Open the Excel file where you want to import the data
- Click the Data tab
- In the Get & Transform group, click on the ‘Get Data’ option
- Go to the ‘From Other Sources’ option
- Click on ‘From Web’

- In the ‘From Web’ dialog box, copy and paste the URL that has the XML data

- Click OK. This will open the Navigator dialog box where you can choose which XML data to import
- Click on ‘sitemap’, which is the XML data that I want in Excel

- [Optional] Click on the Transform Data button, if you want to transform the data before loading it into Excel (such as change the column names or remove some columns)
- Click on Load


The above steps would insert a new worksheet in the Excel file, and load all the data from the XML file into the new worksheet.
And again, in case the data updates in this URL, simply refresh the query to get the new data in Excel.
So these are two simple ways that you can use to convert an XML file into Excel.
If you have the XML file on your system, you can import the data easily using Power Query. And if you have a web URL of the XML file, then you can also fetch that data into Excel.
I hope you found this tutorial useful.
Other Excel tutorials you may also like:
- 8 Ways to Reduce Excel File Size (that actually work)
- How to Automatically Open Specific Excel File on Startup
- How to Recover Unsaved Excel Files [All Options + Precautions]
- Microsoft Excel Won’t Open – How to Fix it! (6 Possible Solutions)
- How to Convert Excel to PDF Using VBA
- Split Each Excel Sheet Into Separate Files (Step-by-Step)
- Combine Data from Multiple Workbooks in Excel (using Power Query)
I have an excel spreadsheet with XML in a single column. I know that you can import XML data into Excel; but only imports the entire file. However, I need to do this on a cell by cell basis.
With VBA you could probably do it, but is there a stock way of doing this in Excel?
EDIT #1:
To be clear, I haven’t written any VBA code to do this, but I can manage that myself. My question is whether or not this is existing functionality like «Text to Columns». So far I’ve attempted Googling but only found examples of importing entire XML files.
asked Apr 22, 2014 at 15:03
![]()
4
Have a look at the newest stock formulas for Excel 2013: =WEBSERVICE and =FILTERXML
Here is an example: In cell A1 place the following webservice formula. It will retrieve the latest weather for John F Kennedy airport.
=WEBSERVICE("http://www.aviationweather.gov/adds/dataserver_current/httpparam?dataSource=metars&requestType=retrieve&format=xml&hoursBeforeNow=3&mostRecent=true&stationString=KJFK")
In cell A2 enter the following formula. It will parse the XML data using XPATH to get the station identifier KJFK. Using XPATH you should be able to extract any portion of the XML you want.
=FILTERXML(A1,"/response/data/METAR/station_id")
answered Apr 24, 2014 at 4:51
![]()
wbeard52wbeard52
3,4073 gold badges27 silver badges40 bronze badges
0
I would «Save As» the XML sheet to a Text file (e.g File / Save & Send / Change File Type / Text (tab-delimited) (*.txt) ).
Then I would use Windows Explorer to change the file extension to .xml. Then you can import it into Excel using the Data ribbon / From Other Sources / From XML Data Import.
answered Apr 22, 2014 at 23:34
![]()
Mike HoneyMike Honey
2,4722 gold badges11 silver badges12 bronze badges
Using excel Developer I can convert a data table into XML file using a template.
It is possible to load this XML file content as String to a cell in another sheet?
e.g.,
Sheet 1
       A       B     C     ...

 1    col1   col2   col3
 2    a      1      z
 3    b      2      x
 4    c      3      w
This table can be exported using a template as
<?xml version="1.0" encoding="UTF-8" standalone="yes"?>
<conf xmlns:xsi="http://www.w3.org/2001/XMLSchema-instance">
    <data>
        <col1>a</col1>
        <col2>1</col2>
        <col3>z</col3>
    </data>
    <data>
        <col1>b</col1>
        <col2>2</col2>
        <col3>x</col3>
    </data>
    <data>
        <col1>c</col1>
        <col2>3</col2>
        <col3>w</col3>
    </data>
</conf>
How can I put this XML as String into Sheet2 in A1 cell?
Probably the best way is to create a macro button that can export as XML and post the value into the cell. If is true, how can I do it?
asked Aug 11, 2014 at 22:30
![]()
X-PippesX-Pippes
1,1707 silver badges25 bronze badges
Found an easy way to do it.
Using a macro:
Sub TestXML()
 Dim strContactData As String
 Dim myWb As Excel.Workbook
 Set myWb = ActiveWorkbook

 myWb.XmlMaps("configuration_Map").ExportXml Data:=strContactData

 Worksheets("SHEET_NAME").Cells(LINE_NUMBER, COL_NUMBER) = strContactData


End Sub
answered Aug 12, 2014 at 11:10
![]()
X-PippesX-Pippes
1,1707 silver badges25 bronze badges
This post will guide you how to extract attribute values from XML or HTML data in a range or cells in excel. How to strip values from XML or other markup in excel Cells.
Table of Contents
- Extract Attribute Values from XML
- Related Formulas
- Related Functions
Assuming that you have a table that contains the content of the markup language, such as: XML or HTML markup data. If you want to extract only attribute values from xml data, you can use a combination of the MID function and the LEN function to create a new excel formula.
The format of markup value is like this:
<item>excel</item>

<item>word</item>

<item>ppt</item>
To strip attribute value in Cell B1, you can use the following formula:
=MID(B1,7,LEN(B1)-13)
Let’s see how this formula works:
=LEN(B1)
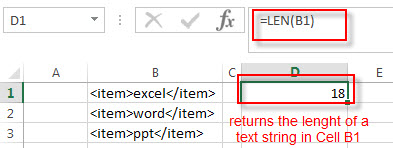
The LEN function returns the length of the text string in Cell B1. It returns 18.
=LEN(B1)-13
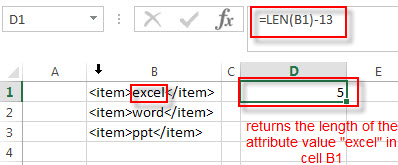
This formula returns the length of the attribute value in Cell B1, it use the length value of the cell B1 to subtract 13. The number 13 is the length of the markup containing the starting tag (<item>) and the closing tag (</item>).
=MID(B1,7,LEN(B1)-13)
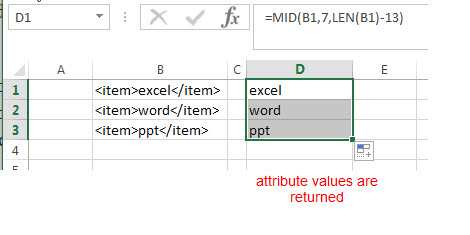
The length of the starting tag is 6, so the position of the first character that you want to extract in attribute value in Cell B1 is 7. And the num_chars is returned by the above LEN function as 5. So the MID function extracts the attribute value between two markup tags as “excel”.
Note: you can drag the Fill Handle down to other cells to extract attribute values from other Cells (B2:B3).
- Remove Numeric Characters from a Cell
If you want to remove numeric characters from alphanumeric string, you can use the following complex array formula using a combination of the TEXTJOIN function, the MID function, the Row function, and the INDIRECT function..… - Split Text String to an Array
If you want to convert a text string into an array that split each character in text as an element, you can use an excel formula to achieve this result. the below will guide you how to use a combination of the MID function, the ROW function, the INDIRECT function and the LEN function to split a string… - remove non numeric characters from a cell
If you want to remove non numeric characters from a text cell in excel, you can use the array formula:{=TEXTJOIN(“”,TRUE,IFERROR(MID(B1,ROW(INDIRECT(“1:”&LEN(B1))),1)+0,””))} - Get the position of Last Occurrence
If you want to get the position of the last occurrence of a character in a cell, then you can use a combination of the LOOKUP function, the MID function, the ROW function, the INDIRECT function and the LEN function to create an excel formula…
- Excel MID function
The Excel MID function returns a substring from a text string at the position that you specify.The syntax of the MID function is as below:= MID (text, start_num, num_chars)… - Excel LEN function
The Excel LEN function returns the length of a text string (the number of characters in a text string).The LEN function is a build-in function in Microsoft Excel and it is categorized as a Text Function.The syntax of the LEN function is as below:= LEN(text)…
XML is an Extensible Markup Language that contains the data in text format inside tags. It is a transmission format that is widely used across the web. The data in XML is not as much as readable in Excel. Excel stores data in table format that is more readable.
This chapter is all about XML file and how they can be opened on Excel software. For this, we will explore different methods. The XML users can use MS Excel software to import the XML data in it.
These XML to Excel topics we are covering in this chapter:
- What is XML?
- Where to open the XML file?
- Why to use Excel for XML?
- Import XML file to Excel
- Convert XML file to Excel format
- Import the XML file from web to Excel
- Import the XML from developer tab
What is XML?
XML is a markup language similar to HTML. Markup is basically a computer language that defines the text in tags (<>). In other words, you can say that XML is a tag-based language. Every file with .xml extension is an XML file.
The XML file is saved with .xml extension. XML is easily readable but not all the time for the non-technical users. Below is a simple code snippet example for XML code:
Remember that the first line of the XML file should contain the below line of code:
<?xml version= «1.0» encoding= «UTF-8»?>
Where to open the XML file?
A question might come to your mind: How can an XML file be opened if you have never worked with XML data. Which app can be used to open the XML file? You do not need to worry about it. It is very simple to open the XML file.
There are several ways in which the XML file can be opened, like in Chrome, any text editor (like Notepad, WordPad), XML explorer, and MS Excel as well. Besides this, the XML file can also be opened/read online. It means that the online XML editor tools are also there to open and read the XML file data.
Our target for this chapter is MS Excel. In this chapter, we will learn how an XML can be opened in Microsoft Excel.
Why to use Excel for XML?
XML is a good format to transmit the data on the internet that may use by developers. But for non-technical users, it is usually difficult to interpret the data in an XML file as it is a simple text-based file.
We know that Excel has a table structure to keep the data. So, this type of data can be easily handled by MS Excel. When the XML file is imported to Excel, a mapping is done between XML data and the Excel table through Power Query Editor.
With the help of a few clicks in Excel Power Query Editor, you can get the data in an easy-to-read format.
Import XML file into Excel
We will learn to import the XML file into Excel by taking an example. If you already have an XML file, you can just follow the below steps. For this example, we have taken a simple XML file to which we will import or convert into MS Excel.
Step 1: Look at the following XML data of book details. It has data such as — book title, description, price, publish date, etc.
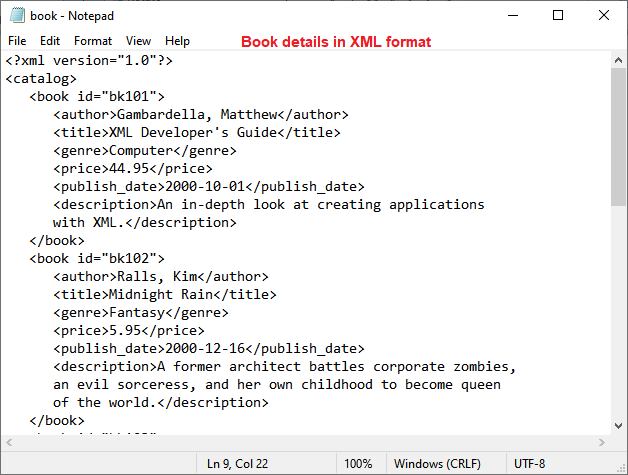
We will convert this XML data to Excel format. Open a new Excel file in which to import the XML data.
Step 2: Select a cell to start placing the data and move to the Data tab in Excel ribbon on the Excel sheet.

Here, you see the New Query dropdown button inside the Get & Transform data group.
Step 3: Click the New Query inside the Get & Transform data group. From the list, select the From File and then choose From XML.
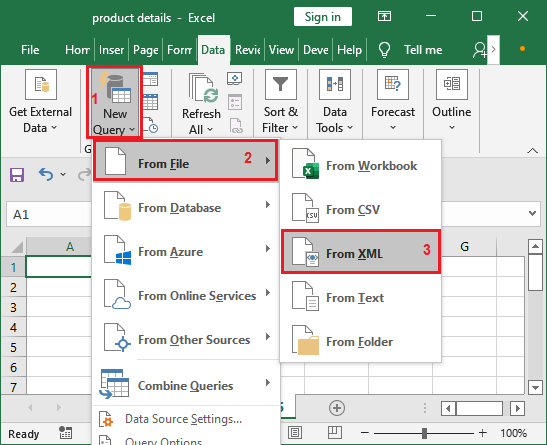
This will allow the users to select the XML file from the local storage to import into Excel.
Step 5: Look for the XML file inside your local storage and select it (the XML file), then click Import.

The select XML file will load to the PowerQuery (an advanced feature of Excel), from where you can take it to Excel.
Expand the fields in Query Editor
Step 6: A navigator with a selected XML file will open. Here, click the XML file in the left panel. Select the book to preview the inserted XML file data.
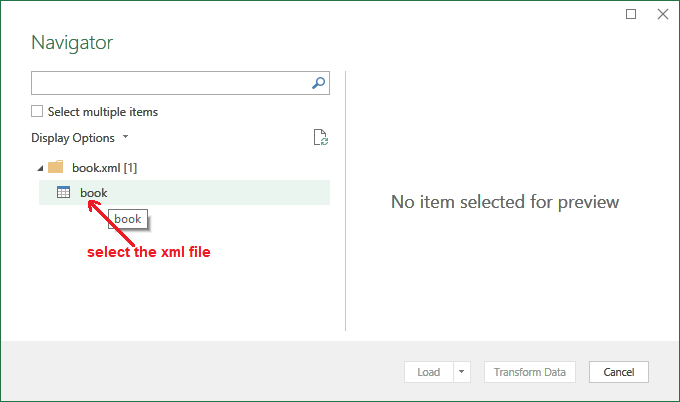
Step 8: The data is now transformed to the Excel Power Query Editor.
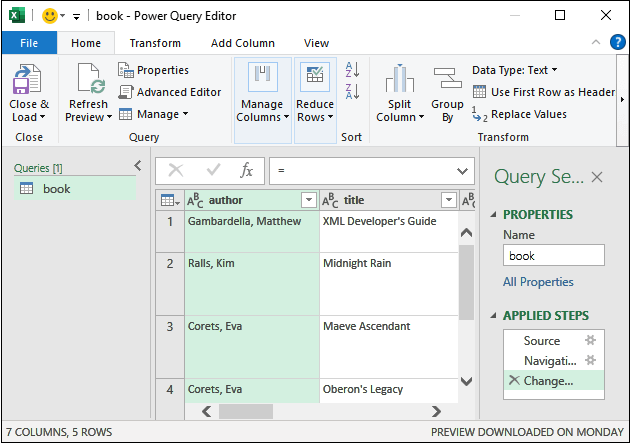
If your XML data does not contain the sub-fields, the users can skip the Power Query steps and directly click the Load button to load this data to Excel.
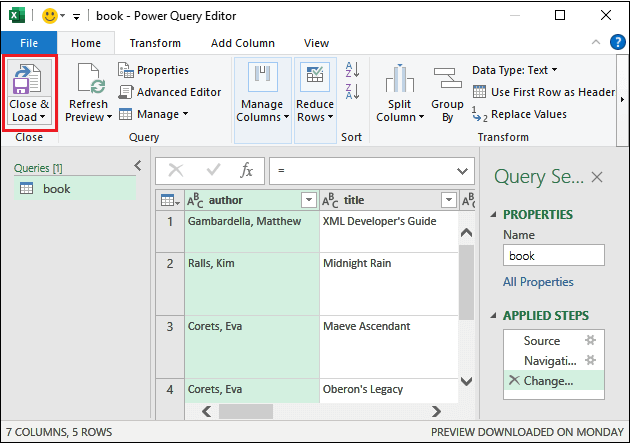
See that the xml data has been imported to the Excel sheet. Total five rows have been loaded to the Excel sheet.
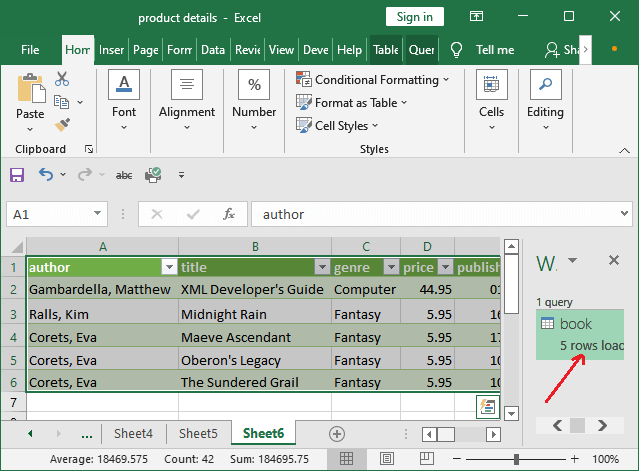
If it has subfields, you have to follow a few steps further.
Steps when XML data have subfields
When the data is not fully shown in PowerQuery, you have to expand it first and then load the data into an Excel table. At the end, when the data is ready, load the data into an Excel table.
- Before this, click right corner icon of the column whose data is not showing.
- A small window joined with it will open where select Expand radio button and click OK.
- In the Power Query Editor, click the Close & Load button inside the Home This will successfully import the data to Excel table.
- See the imported data in the Excel sheet at the end of this example.
We have no such column with subfields. You need to perform these steps only when your data have subfields.
These steps can be used when the xml file is available on your system. If you do not have the XML file created or downloaded on your system, you have to use another method in Excel. This method works only for files stored on local storage.
Convert the XML file to Excel format
Rather than importing the XML file data directly into Excel, you can use another way. They can convert the XML file to Excel format using file conversion software or an online conversion website.
Several websites on the internet from which you can convert the xml file to Excel format. Xmlgrid.net is an online xml to excel converter site. You can use this site to convert the XML data to Excel format.
Conversion Tool is an XML to Excel file Conversion tool that is free to use. The users can convert up to 100 GB of XML data. For non-registered users, it offers 10 conversions per day. Let us see the steps for this tool as well.
Step 1: Click the link to open the XML to Excel conversion tool online. Here, click the Browse button that will allow the users to search the file in local storage.
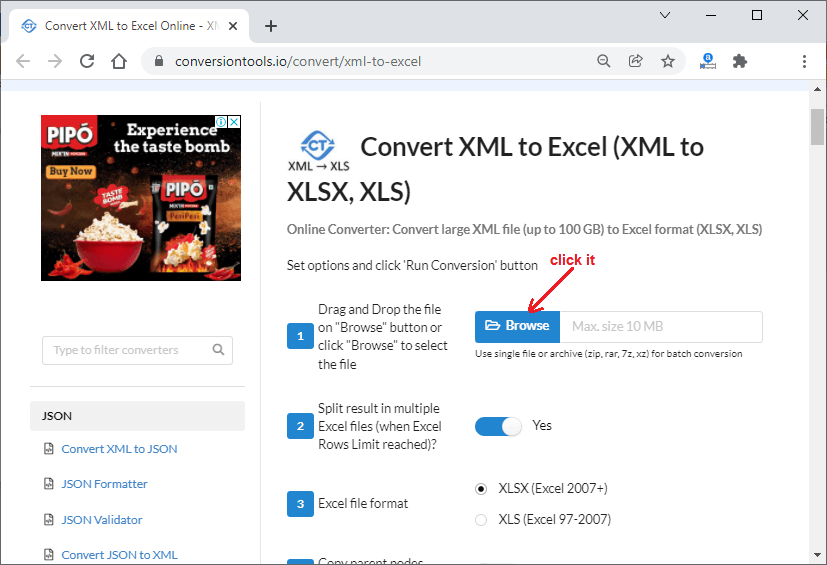
Step 2: Select the XML to convert in xlsx format and click the Open button on this window.
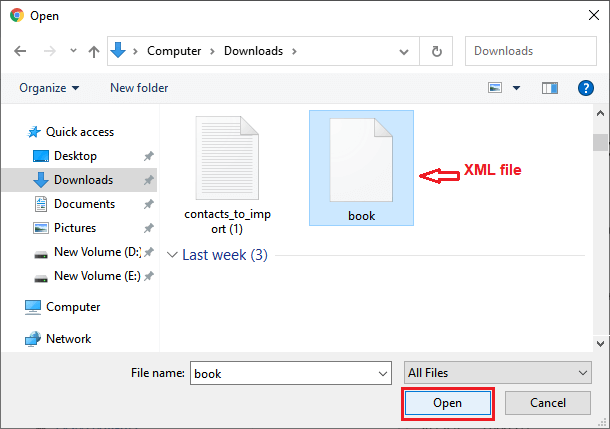
XLSX is for Excel 2007+ version. For the below versions, go for XLS format.
Step 3: Selected XML file is inserted into the conversion tool. Now, choose .XLSX as we are using Excel 2016 version.
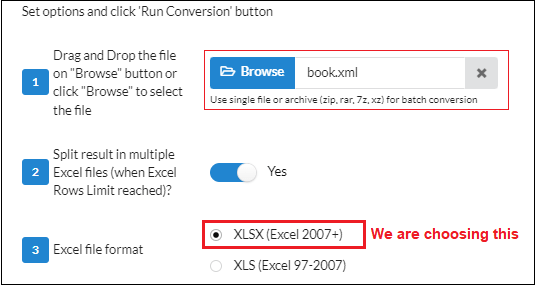
Step 4: Click the Run Conversion to convert the data into Excel.
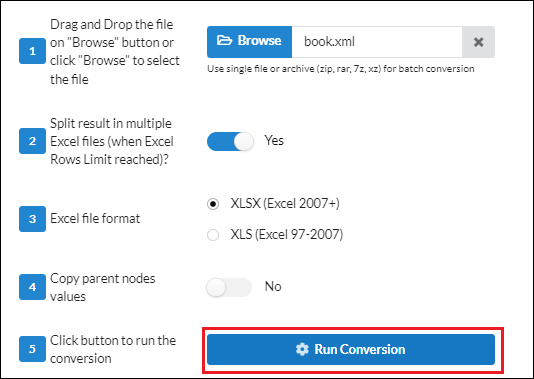
Step 5: The uploaded XML file has been converted of size 5.76 KB. Click the Download File (the green highlighted button) to download it.
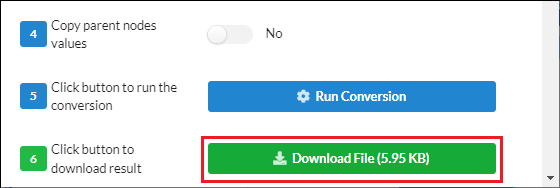
Step 6: After downloading the converted XML file data, you can open it into the Excel application. See the data after conversion.
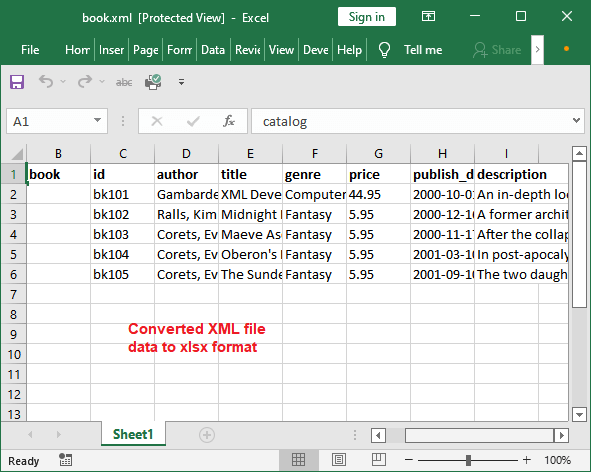
Similarly, you can convert more XML files to xlsx format that can be later opened in Excel software.
Import the XML file from web to Excel
In the above example, you have seen that we had either imported the XML file into Excel or converted it online into Excel format that was stored on the local computer. In both examples, you had an XML file on your system.
What if you do not have any XML files stored in your system? You have an XML file on the web that you directly want to import and open into Excel software. For example, you have a web URL (https://www.forbes.com/sitemap_index.xml) of that XML file. For this, you have to use a different process for it.
«Remember this, you do not need to download that XML file and then import it to Excel.» You can directly import the file from the web by connecting it with Power Query.
Steps to import the web XML file to Excel
Following are the steps to import the web XML file to Excel software by connecting it Power Query with XML file web URL.
Step 1: Open the Excel file or sheet where to import the XML data from web.
Step 2: Select a cell in the sheet and move to the Data tab and then click the New Query under the Get & Transform group.
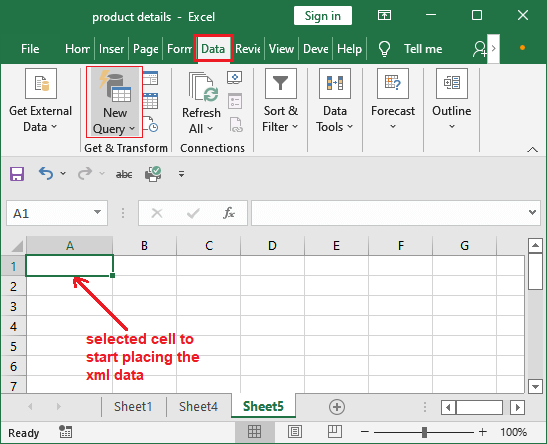
Step 3: From the list, select the From Other Sources and then choose From Web.
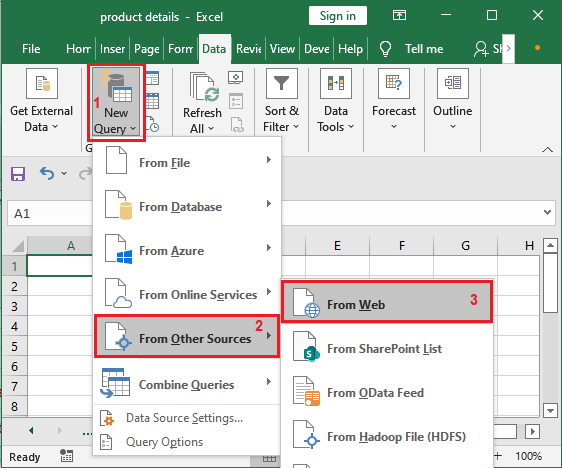
Step 4: MS Excel may ask for the security potential to connect with any external data source. Click OK to move forward.
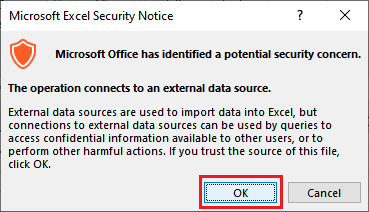
Step 5: A From Web dialogue box will open where you enter the web URL of the XML file after choosing the Basic radio button. Then click OK.
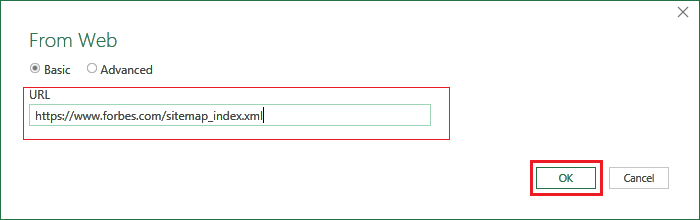
Step 6: An anonymous window will open for the access web content. Here, click Connect to get access to this site.
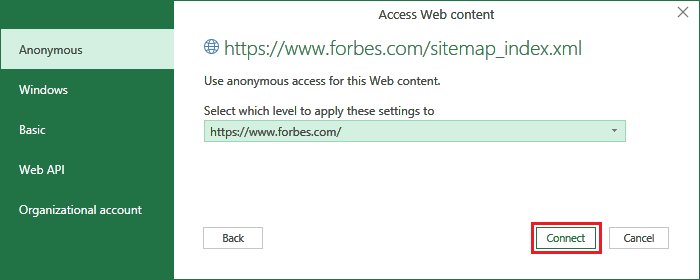
Step 7: A navigator will open with a web XML data sitemap. Click the Sitemap containing XML data to preview the XML data from the web.
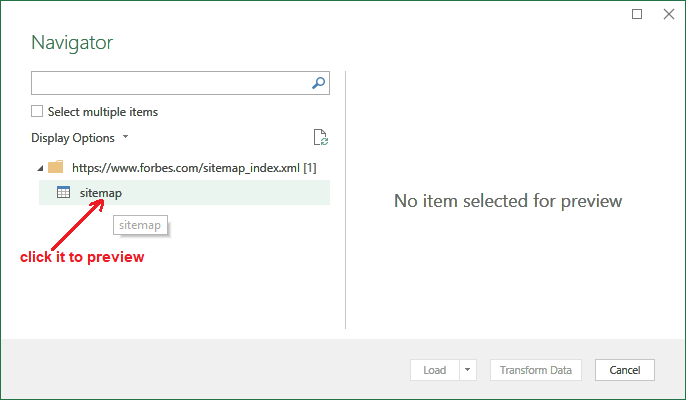
Step 8: See the preview for the web XML data that contains links and click the Transform Data button on this navigator.
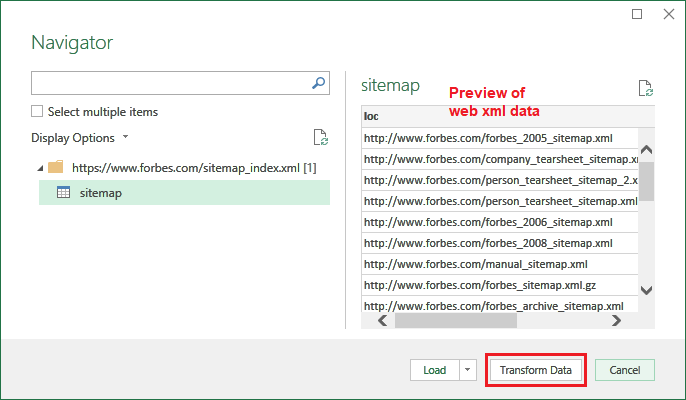
- Use Transform data if you want to transform data before loading it into the Excel sheet. Thus, you can add or remove the columns and rows, change the column names as well.
- If you do not want any change and directly load it into the Excel sheet, choose Load.
Step 9: A Power Query Editor with web XML data will open where you can add or remove the row/column. All link has been loaded to Power Query Editor.
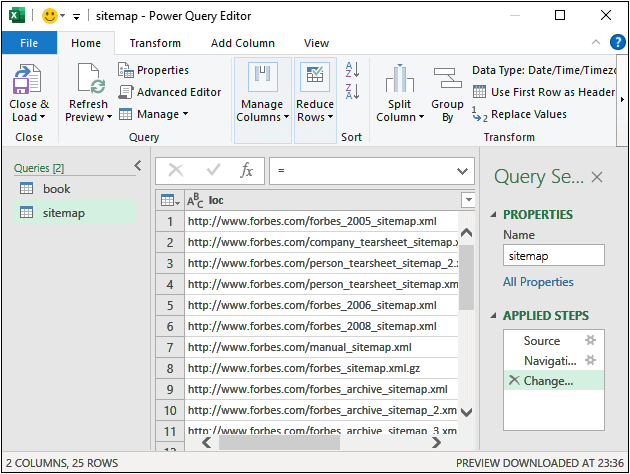
Step 10: Make the changes whatever you want and click the Close & Load button inside the Home tab.
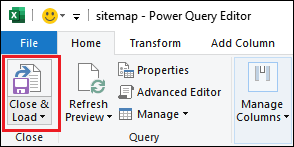
Step 11: See that the data is now successfully imported to the Excel sheet started from the selected cell in step 1. 25 rows are imported here from the web XML URL.
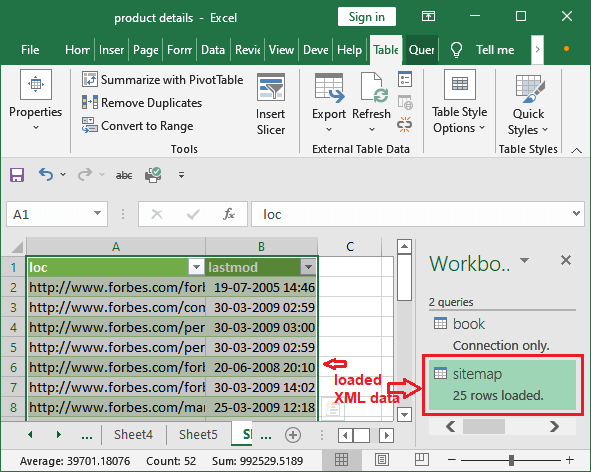
If the data changes in the XML file whose weblink you provided, you simply need to refresh the query to get the newly updated data.
Import the XML from developer tab
There is another way to import the XML file data to Excel through the developer tab. From the developer tab, you need to follow fewer steps than the above methods to import the XML data to an Excel sheet.
To import the XML data from the developer tab to Excel, follow the given steps:
Step 1: Open the Excel file or sheet where to import the XML data from web.
Step 2: Move to the Developer tab inside, which click the XML dropdown button present in the end, then choose Import.
Developer > XML > Import
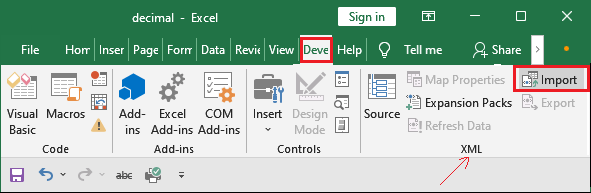
Step 3: Browse the XML file in your system and select it, then click Import to load the selected file in Excel.
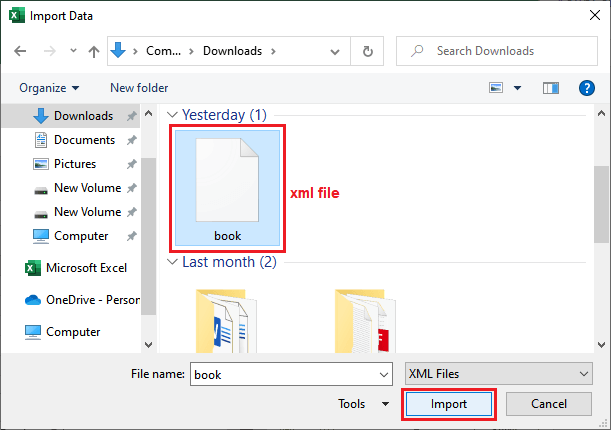
Step 4: The specified XML format does not refer to a schema. Excel will create the schema for the source data itself. Click OK on this panel.
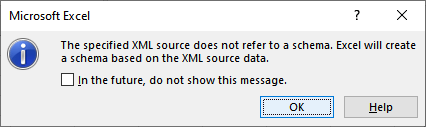
Step 5: A cell in the sheet has been selected automatically. You can also select a new sheet. Click OK on this window.
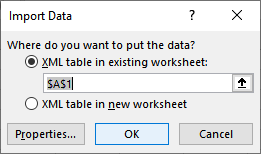
Step 6: See that the data has been successfully loaded/imported to the Excel sheet.

Now, you can read the data and close the file.