
Microsoft Excel makes it easy to import Extensible Markup Language (XML) data that is created from other databases and applications, to map XML elements from an XML schema to worksheet cells, and to export revised XML data for interaction with other databases and applications. Think of these XML features as turning Office Excel into an XML data file generator with a familiar user interface.
In this article
-
Why use XML in Excel?
-
XML data and schema files
-
Key XML and Excel scenarios
-
-
The basic process of using XML data in Excel
-
Working with XML maps
-
Using the XML Source task pane
-
Element types and their icons
-
Working with single-mapped cells
-
Working with repeating cells in XML tables
-
XML map security considerations
-
Importing XML data
-
Working with an inferred schema
-
Exporting XML data
-
Using the Excel macro-enabled Office Open XML Format file
-
Why use XML in Excel?
XML is a technology that is designed for managing and sharing structured data in a human-readable text file. XML follows industry-standard guidelines and can be processed by a variety of databases and applications. Using XML, application designers can create their own customized tags, data structures, and schemas. In short, XML greatly eases the definition, transmission, validation, and interpretation of data between databases, applications, and organizations.
XML data and schema files
Excel works primarily with two types of XML files:
-
XML data files (.xml), which contain the custom tags and structured data.
-
Schema files (.xsd), which contain schema tags that enforce rules, such as data type and validation.
The XML standard also defines Extensible Stylesheet Language Transformation (XSLT) (.xslt) files, which are used to apply styles and transform XML data into different presentation formats. You can apply these transforms before you import XML files into Excel and after you export XML files from Excel. If XSLT files are linked to XML data files that you import into Excel, you do have the option to apply or not apply the formatting before the data is added to the worksheet, but only when you open an XML file by using the Open command from within Excel. Choose the XML Files (*.xml) file type before you click the Open button to see the XML files in the folder.
Key XML and Excel scenarios
By using XML and Excel, you can manage workbooks and data in ways that were previously impossible or very difficult. By using XML maps, you can easily add, identify, and extract specific pieces of business data from Excel documents. For example, an invoice that contains the name and address of a customer or a report that contains last quarter’s financial results are no longer just static reports. You can easily import this information from databases and applications, revise it, and export it to the same or other databases and applications.
The following are key scenarios that the XML features are designed to address:
-
Extend the functionality of existing Excel templates by mapping XML elements onto existing cells. This makes it easier to get XML data into and out of your templates without having to redesign them.
-
Use XML data as input to your existing calculation models by mapping XML elements onto existing worksheets.
-
Import XML data files into a new workbook.
-
Import XML data from a Web service into your Excel worksheet.
-
Export data in mapped cells to XML data files independent from other data in the workbook.
Top of Page
The basic process of using XML data in Excel
The following diagram shows how the different files and operations work together when you use XML with Excel. Essentially, there are five phases to the process:
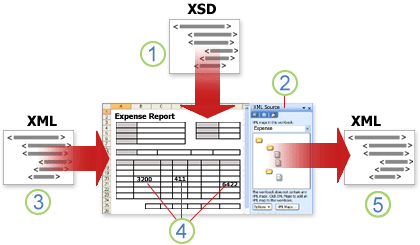
 Adding an XML schema file (.xsd) to a workbook
 Mapping XML schema elements to individual cells or XML tables
 Importing an XML data file (.xml) and binding the XML elements to mapped cells
 Entering data, moving mapped cells, and leveraging Excel functionality, while preserving XML structure and definitions
 Exporting revised data from mapped cells to an XML data file
Working with XML maps
You can create or open a workbook in Excel, attach an XML schema file (.xsd) to the workbook, and then use the XML Source task pane to map XML elements of the schema to individual cells or tables. After you map the XML elements to your worksheet, you can import and export XML data into and out of the mapped cells.
When you add an XML schema file (.xsd) to your workbook, you create an XML map. In general, XML maps are used to create mapped cells and to manage the relationship between mapped cells and individual elements in the XML schema. In addition, these XML maps are used to bind the contents of mapped cells to elements in the schema when you import or export XML data files (.xml).
There are two kinds of mapped cells that you can create: single-mapped cells and repeating cells (which appear as XML tables). To make designing your worksheet more flexible, you can drag the mapped cells anywhere on a worksheet and into any order — even one different from the XML schema. You can also choose which elements to map and not map.
The following rules about using XML maps are important to know:
-
A workbook can contain one or more XML maps.
-
You can only map one element to one location in a workbook at a time.
-
Each XML map is an independent entity, even if multiple XML maps in the same workbook refer to the same schema.
-
An XML map can only contain one root element. If you add a schema that defines more than one root element, you are prompted to choose the root element to use for the new XML map.
Using the XML Source task pane
You use the XML Source task pane to manage XML maps. To open it, on the Developer tab, in the XML group, click Source. The following diagram shows the main features of this task pane.
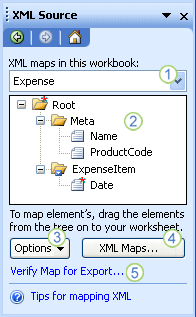
1. Lists XML maps that were added to the workbook
2. Displays a hierarchical list of XML elements in the currently listed XML map
3. Sets options when working with the XML Source task pane and the XML data, such as how to preview the data and control headings
4. Opens the XML Maps dialog box, which you can use to add, delete, or rename XML maps
5. Verifies whether you can export XML data through the current XML map
Top of Page
Element types and their icons
The following table summarizes each type of XML element that Excel can work with and the icon that is used to represent each type of element.
|
Element type |
Icon |
|---|---|
|
Parent element |
|
|
Required parent element |
|
|
Repeating parent element |
|
|
Required repeating parent element |
|
|
Child element |
|
|
Required child element |
|
|
Repeating child element |
|
|
Required repeating child element |
|
|
Attribute |
|
|
Required attribute |
|
|
Simple content in a complex structure |
|
|
Required simple content in a complex structure |
|


Top of Page
Working with single-mapped cells
A single-mapped cell is a cell that has been mapped to a nonrepeating XML element. You create a single-mapped cell by dragging a nonrepeating XML element from the XML Source task pane onto a single cell in your worksheet.
When you drag a nonrepeating XML element onto the worksheet, you can use a smart tag to choose to include the XML element name as a heading above or just to the left of the single-mapped cell, or you can use an existing cell value as a heading.
You can also use a formula in a single-mapped cell, if the cell is mapped to an XML element with an XML Schema Definition (XSD) data type that Excel interprets as a number, date, or time.
Top of Page
Working with repeating cells in XML tables
XML tables are similar in appearance and functionality to Excel tables. An XML table is an Excel table that has been mapped to one or more XML repeating elements. Each column in the XML table represents an XML element.
An XML table is created when you:
-
Use the Import command (in the XML group on the Developer tab) to import an XML data file.
-
Use the Open command from within Excel to open an XML data file — and then select As an XML table in the Open XML dialog box.
-
Use the From XML Data Import command (from the From Other Sources command button, in the Get External Data group, on the Data tab) to import an XML data file — and then select XML table in existing worksheet or New worksheet in the Import Data dialog box.
-
Drag one or more repeating elements from the XML Source task pane to a worksheet.
When you create an XML table, the XML element names are automatically used as column headings. You can change these to any column headings that you want. However, the original XML element names are always used when you export data from the mapped cells.
Two options under the Options button in the XML Source task pane are useful when you work with XML tables:
-
Automatically Merge Elements When Mapping
When selected, Excel creates one XML table from multiple fields as they are dropped onto the worksheet. This option works as long as the multiple fields are dropped on the same row, one adjacent to the other. When this option is cleared, each element appears as its own XML table. -
My Data Has Headings
When selected, existing heading data is used as column headings for repeating elements that you map to your worksheet. When this option is cleared, the XML element names are used as column headings.
Using XML tables, you can easily import, export, sort, filter, and print data based on an XML data source. However, XML tables do have some limitations regarding how they can be arranged on the worksheet.
-
XML tables are row-based, meaning that they grow from the header row down. You cannot add new entries above existing rows.
-
You cannot transpose an XML table so that new entries will be added to the right.
You can use formulas in columns that are mapped to XML elements with an XML Schema Definition (XSD) data type that Excel interprets as a number, date, or time. Just as in an Excel table, formulas in an XML table are filled down the column when new rows are added to the table.
XML map security considerations
An XML map and its data source information are saved with the Excel workbook, not a specific worksheet. A malicious user can view this map information by using a Microsoft Visual Basic for Applications (VBA) macro. Furthermore, if you save your workbook as a macro-enabled Excel Office Open XML Format File, this map information can be viewed through Microsoft Notepad or through another text-editing program.
If you want to keep using the map information but remove the potentially sensitive data source information, you can delete the data source definition of the XML schema from the workbook, but still export the XML data, by clearing the Save data source definition in workbook check box in the XML Map Properties dialog box, which is available from the Map Properties command in the XML group on the Developer tab.
If you delete a worksheet before you delete a map, the map information about the data sources, and possibly other sensitive information, is still saved in the workbook. If you are updating the workbook to remove sensitive information, make sure that you delete the XML map before you delete the worksheet, so that the map information is permanently removed from the workbook.
Top of Page
Importing XML data
You can import XML data into an existing XML map in your workbook. When you import data, you bind the data from the file to an XML map that is stored in your workbook. This means that each data element in the XML data file has a corresponding element, in the XML schema, that you mapped from an XML Schema file or inferred schema. Each XML map can only have one XML data binding, and an XML data binding is bound to all of the mappings that were created from a single XML map.
You can display the XML Map Properties dialog box (Click Map Properties in the XML group on the Developer tab.), which has three options, all selected by default, that you can set or clear to control the behavior of an XML data binding:
-
Validate data against schema for import and export Specifies whether Excel validates data against the XML map when importing data. Click this option when you want to ensure that the XML data that you import conforms to the XML schema.
-
Overwrite existing data with new data Specifies whether data is overwritten when you import data. Click this option when you want to replace the current data with new data, for example, when up-to-date data is contained in the new XML data file.
-
Append new data to existing XML tables Specifies whether the contents of the data source are appended to the existing data on the worksheet. Click this option, for example, when you are consolidating data from several similar XML data files into an XML table, or you do not want to overwrite the contents of a cell that contains a function.
When you import XML data, you may want to overwrite some mapped cells but not others. For example, some mapped cells may contain formulas and you don’t want to overwrite the formula when you import an XML file. There are two approaches that you can take:
-
Unmap the elements that you don’t want overwritten, before you import the XML data. After you import the XML data, you can remap the XML element to the cells containing the formulas, so that you can export the results of the formulas to the XML data file.
-
Create two XML maps from the same XML schema. Use one XML map for importing the XML data. In this «Import» XML map, don’t map elements to the cells that contain formulas or other data that you don’t want overwritten. Use another XML map for exporting the data. In this «Export» XML map, map the elements that you want to export to an XML file.
Note: The ability to import XML data from a Web service by using a Data Retrieval Service Connection (.uxdc) file to connect to a data source is no longer supported in versions later than Excel 2003 through the user interface. If you open a workbook that was created in Excel 2003, you can still view the data, but you cannot edit or refresh the source data.
Working with an inferred schema
If you import XML data without first adding a corresponding XML schema to create an XML map, Excel tries to infer a schema for you based on the tags that are defined in the XML data file. The inferred schema is stored with the workbook, and the inferred schema allows you to work with XML data if an XML schema file isn’t associated with the workbook.
When you work with imported XML data that has an inferred schema, you can also customize the XML Source task pane. Select the Preview Data in Task Pane option from the Options button to display the first row of data as sample data in the element list, if you imported XML data associated with the XML map in the current session of Excel.
You cannot export the Excel inferred schema as a separate XML schema data file (.xsd). Although there are XML schema editors and other methods for creating an XML schema file, you may not have convenient access to them or know how to use them. As an alternative, you can use the Excel 2003 XML Tools Add-in Version 1.1, which can create a schema file from an XML map. For more information, see Using the Excel 2003 XML Tools Add-in Version 1.1.
Exporting XML data
You export XML data by exporting the contents of mapped cells on the worksheet. When you export data, Excel applies the following rules to determine what data to save and how to save it:
-
Empty items are not created when blank cells exist for an optional element, but empty items are created when blank cells exist for a required element.
-
Unicode Transformation Format-8 (UTF-8) encoding is used to write the data.
-
All namespaces are defined in the Root XML element.
-
Excel overwrites existing namespace prefixes. The default namespace is assigned a prefix of ns0. Successive namespaces are designated ns1, ns2 to ns<count> where <count> is the number of namespaces written to the XML file.
-
Comment nodes are not preserved.
You can display the XML Map Properties dialog box (Click Map Properties in the XML group on the Developer tab.) and then use the Validate data against schema for import and export option (active by default) to specify whether Excel validates data against the XML map when exporting data. Click this option when you want to ensure that the XML data you export conforms to the XML schema.
Using the Excel Macro-enabled Office Open XML Format File
You can save an Excel workbook in a variety of file formats, including the Excel macro-enabled Office Open XML Format File (.xlsm). Excel has a defined XML schema that defines the contents of an Excel workbook, including XML tags that store all workbook information, such as data and properties, and define the overall structure of the workbook. Custom applications can use this Excel macro-enabled Office XML Format File. For example, developers may want to create a custom application to search for data in multiple workbooks that are saved in the this format and create a reporting system based on the data found.
Top of Page
Need more help?
You can always ask an expert in the Excel Tech Community or get support in the Answers community.
See Also
Import XML data
Map XML elements to cells in an XML Map
Export XML data
Append or overwrite mapped XML data
The XML file format is quite commonly used on the web, and there is a possibility that sometimes you may have to work with the data in the XML file.
Now you can’t use the XML file directly, as it’s not meant to be read by humans (but machines).
In such a case, it would help to know how to convert the XML file to Excel so you can easily work with the data and analyze it.
In this tutorial, I will show you two really simple ways to import an XML file into Excel using Power Query.
What is an XML File?
XML stands for Extensible Markup Language. An XML file can hold data in a format that can easily be read by apps and systems.
But it’s not as easy to read for humans, which is why we may have to transform it into a format that’s easier to use.
If it contains a lot of text data, then you can use a text editor to read the XML file, and if it contains data, then you can import that XML file into Excel and then work with the data.
XML is quite widely accepted as a file format to store and transmit data over the web.
A lot of popular file formats, such as Microsoft Office Open XML, LibreOffice, OpenDocument, XHTML, and SVG, also use the XML file format.
Most popular websites on the Internet have their sitemap in an XML format.
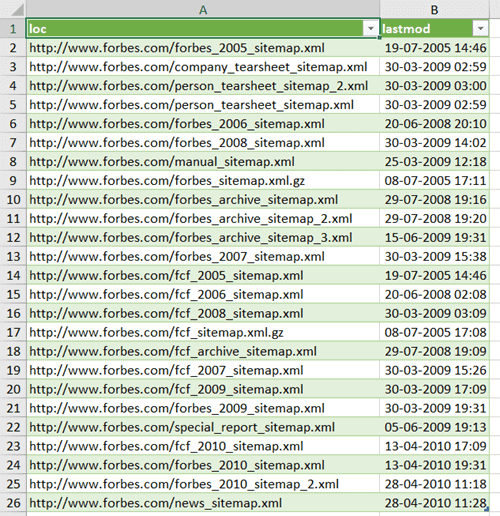
This is a file that contains the details of all the important pages and categories on a website. Here is an example of the sitemap from Forbes.
Now let’s see how to convert an XML file to Excel using Power Query.
Import XML File to Excel
If you already have an XML file (either downloaded on your system or a link to it on the web), you can easily convert it into data in an Excel file.
Thanks to Power Query (now called ‘Get & Transform’)
Import XML File that is Saved On your System
For the purpose of this tutorial, I’ll use an XML file that contains the sitemap for Forbes. You can download the file by going to this link, then right-click and save the file.
Once you have the XML file on your system, follow the below steps to get the XML file data into Excel:
- Open the Excel file where you want to get the data from the XML file
- Click the Data tab

- In the ‘Get & Transform’ data group, click on the ‘Get Data’ option

- Go to the ‘From file’ option
- Click on ‘From XML’

- In the input data dialog box that opens up, locate the XML file that you want to import and select it
- Click Import. This will import the XML file into power query and open the Navigator dialog box
- Select the data from the XML file that you want to import. In this case, I would click on ‘sitemap’ in the left pane

- [Optional] Click on the Transform Data button, if you want to transform the data before loading it into Excel (such as change the column names or remove some columns)
- Click on Load


The above steps would insert a new worksheet in the Excel file, and load all the data from the XML file into the new worksheet.
The great thing about using Power Query to fetch the data from an XML file into Excel is that in case the XML file updates and there are new records in it, you don’t have to repeat the same process.
You can simply right-click on any cell in the table and refresh the query.

Import XML File into Excel using the web URL
In the above example, we first downloaded the XML file on the system and then imported the data into Excel.
In case you have a web URL that contains the XML file (such as this one – https://www.forbes.com/sitemap_index.xml), you don’t even need to download the file. you can connect Power Query to that URL and extract the XML data into Excel.
Below are the steps to connect power query do a web URL that contains the XML data and import that data into Excel:
- Open the Excel file where you want to import the data
- Click the Data tab
- In the Get & Transform group, click on the ‘Get Data’ option
- Go to the ‘From Other Sources’ option
- Click on ‘From Web’

- In the ‘From Web’ dialog box, copy and paste the URL that has the XML data

- Click OK. This will open the Navigator dialog box where you can choose which XML data to import
- Click on ‘sitemap’, which is the XML data that I want in Excel

- [Optional] Click on the Transform Data button, if you want to transform the data before loading it into Excel (such as change the column names or remove some columns)
- Click on Load


The above steps would insert a new worksheet in the Excel file, and load all the data from the XML file into the new worksheet.
And again, in case the data updates in this URL, simply refresh the query to get the new data in Excel.
So these are two simple ways that you can use to convert an XML file into Excel.
If you have the XML file on your system, you can import the data easily using Power Query. And if you have a web URL of the XML file, then you can also fetch that data into Excel.
I hope you found this tutorial useful.
Other Excel tutorials you may also like:
- 8 Ways to Reduce Excel File Size (that actually work)
- How to Automatically Open Specific Excel File on Startup
- How to Recover Unsaved Excel Files [All Options + Precautions]
- Microsoft Excel Won’t Open – How to Fix it! (6 Possible Solutions)
- How to Convert Excel to PDF Using VBA
- Split Each Excel Sheet Into Separate Files (Step-by-Step)
- Combine Data from Multiple Workbooks in Excel (using Power Query)
XML stands for eXtensible Markup Language and is a common data storage and transmission format. It’s widely used across the web and in many apps and software.
It’s a great data structure for computers to read, but it’s a bit less accessible for a human to read.
In this post we’ll take a look at how to import an XML file into Excel and turn it into a more friendly table format. Excel has support for XML files and it’s actually really easy to import and covert them to tables using power query.
You can download the example files used in this post here.
Video Tutorial
XML File Examples
You don’t need to look very far to find an example, Excel files are really just a collection of XML files in a zip folder.
Try it for yourself by taking any Excel file and changing the extension from .xlsx to .zip and then exploring the files in the zip folder. You’ll see a ton of XML files. You can open any of the XML files in your text editor of choice to view the inner workings of an Excel file.
Another common example can be found across the web. Most websites have a sitemap.xml file which is an XML file of the website’s link structure. This is literally a map of the website for bots like Google to crawl and index.
Check out the XML sitemap on one of my favourite Excel sites, https://www.vertex42.com/sitemaps/pages.xml. It lists all the pages on the site and includes information about when the page was last updated, how often the page is updated and how much weight search engines should give that page.
Create an XML Query
In this example we will use a simple XML file containing mock contact information with names, emails, cities and countries.
We can quickly create a new query that imports the XML file into Excel.
- Go to the Data tab in the ribbon.
- Select Get Data found in the Get & Transform Data section.
- Choose From File.
- Choose From XML.
This will open a file selection window and we can navigate to the location of the XML file and press the Import button.
Expand Fields in the Query Editor
The Navigator window will now open and we can see a preview of the data from the XML file. Notice that it’s in a nice table format? That’s automatically done by power query.
Since the Name and Email fields in the XML data contain sub-fields we see Table listed underneath the column headings in the preview. For example, the Name field contains a First and Last field for the first and last names of the person. If our data had a simple structure without any sub-fields, we could skip the query editor and press the Load button to directly load the data into the workbook.
To expand these tables out in the power query editor, press the Transform Data button.
In the query editor, click on the expand column toggle for the Name column which contains the Table elements. Choose the Expand option and press the OK button.
Repeat the process for the Email column as well. Depending on the data structure, we may need to do this several times.
Load the Data into a Table in the Workbook
Now our data is ready to be loaded into a table in the workbook.
Go to the Home tab in the query editor and press the the Close & Load button to load the data into a table in the workbook.
Conclusions
XML data is a very common format. You’re likely to come across it sooner or later if you work with data.
It can be hard to interpret what’s going on in an XML file, but luckily Excel can handle this type of data with ease.
In a few clicks, we can use power query to get our XML data into a nice table format.
About the Author
John is a Microsoft MVP and qualified actuary with over 15 years of experience. He has worked in a variety of industries, including insurance, ad tech, and most recently Power Platform consulting. He is a keen problem solver and has a passion for using technology to make businesses more efficient.
Содержание
- Процесс конвертации
- Способ 1: встроенный функционал Excel
- Способ 2: импорт данных
- Способ 3: онлайн-конвертер
- Вопросы и ответы
XML является одним из самых распространенных форматов для хранения данных и обмена ими между различными приложениями. С данными работает и программа Microsoft Excel, поэтому очень актуальным является вопрос конвертации файлов из стандарта XML в форматы Excel. Выясним, как произвести эту процедуру различными способами.
Процесс конвертации
XML-файлы написаны на специальном языке разметки чем-то похожим на HTML веб-страниц. Поэтому у этих форматов довольно сходная структура. В то же время, Эксель – это в первую очередь программа, имеющая несколько «родных» форматов. Самые известные из них: Книга Excel (XLSX) и Книга Excel 97 – 2003 (XLS). Выясним основные способы конвертации файлов XML в эти форматы.
Способ 1: встроенный функционал Excel
Программа Excel отлично работает с файлами формата XML. Она может открывать их, изменять, создавать, сохранять. Поэтому самый простой вариант поставленной перед нами задачи — это открыть данный объект и сохранить его через интерфейс приложения в виде документов XLSX или XLS.
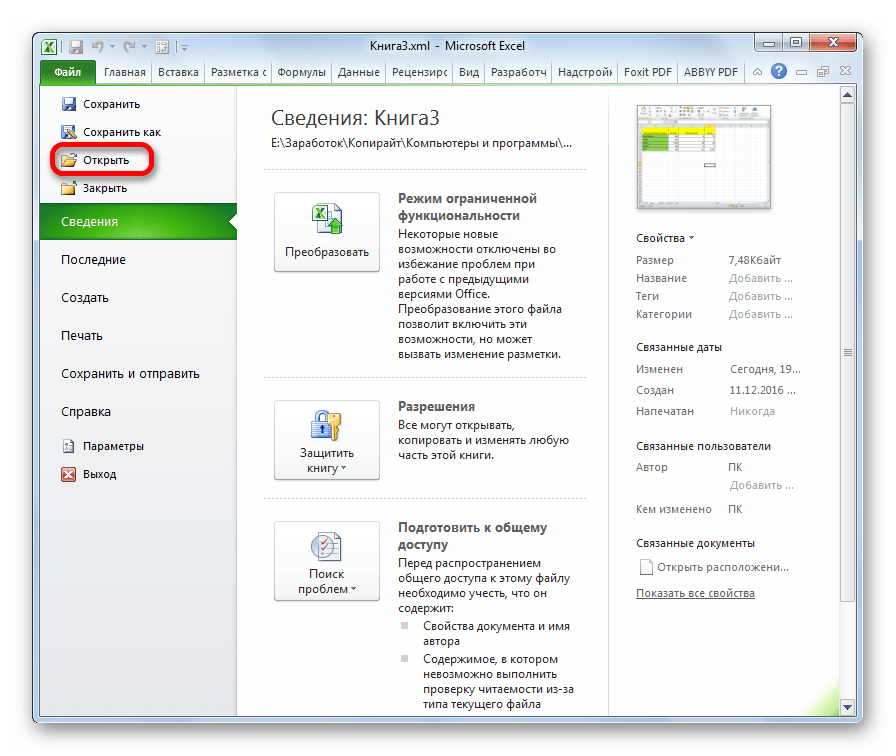
- Запускаем Эксель. Во вкладке «Файл» переходим по пункту «Открыть».
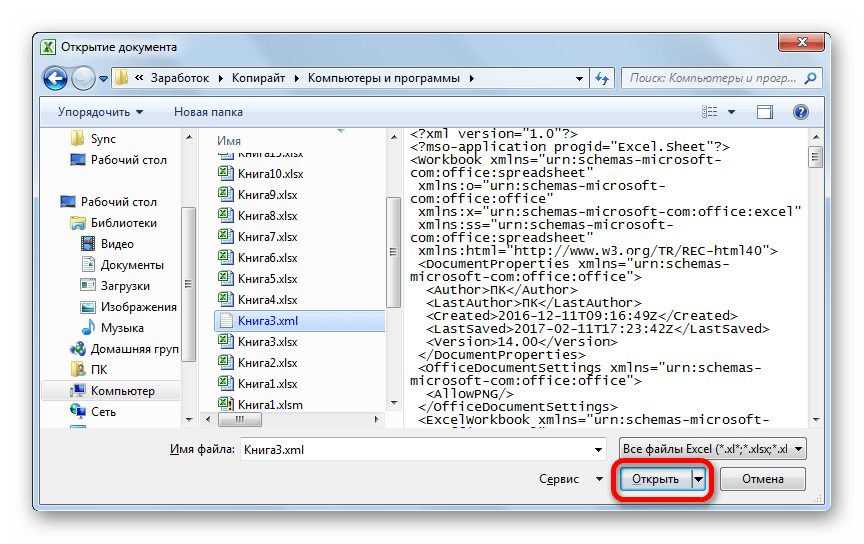
- Активируется окно открытия документов. Переходим в директорию, где хранится нужный нам документ XML, выделяем его и жмем на кнопку «Открыть».
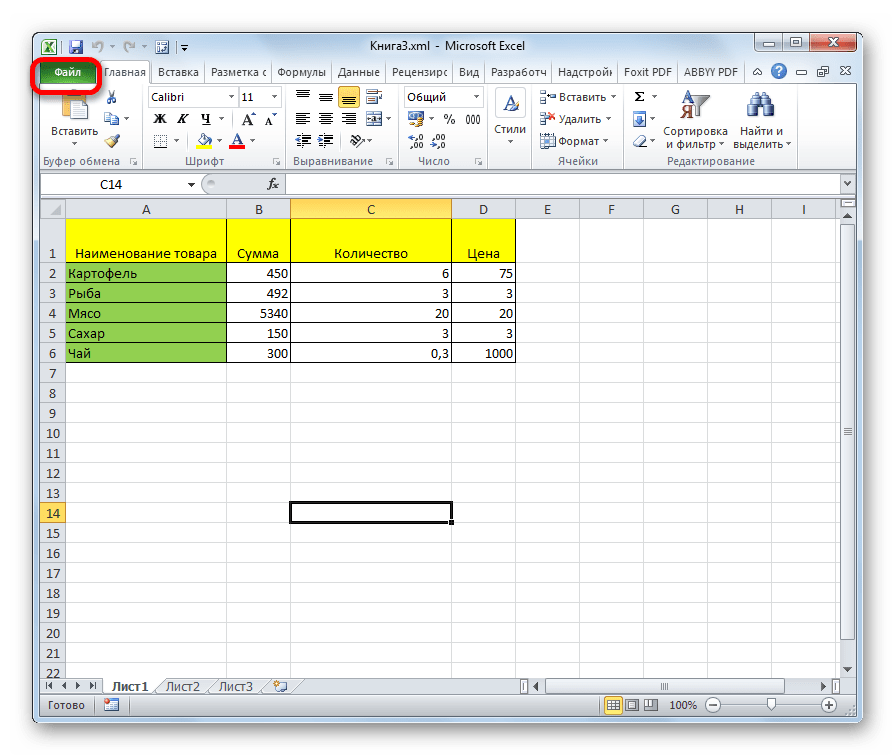
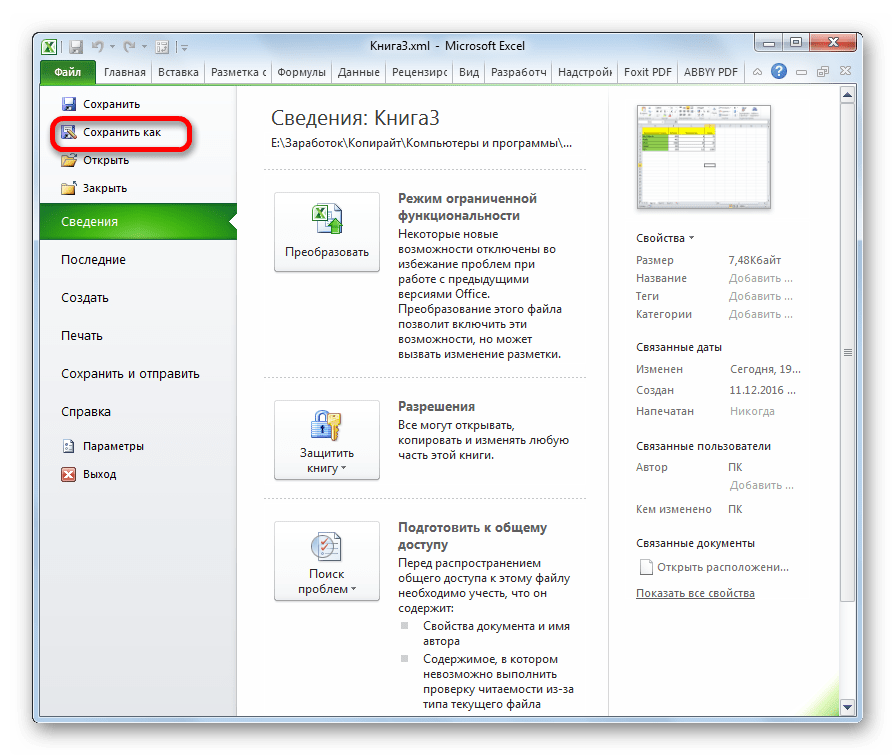
- После того, как документ открыт через интерфейс Эксель, опять переходим во вкладку «Файл».
- Перейдя в эту вкладку, кликаем по пункту «Сохранить как…».
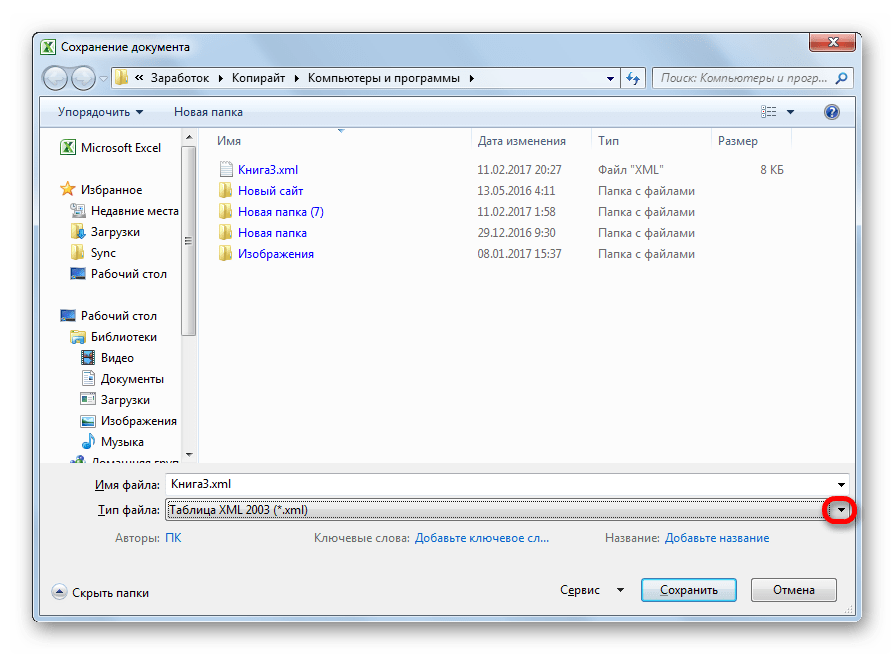
- Открывается окно, похожее на окно для открытия, но с некоторыми отличиями. Теперь нам нужно сохранить файл. С помощью инструментов навигации переходим в директорию, где будет храниться преобразованный документ. Хотя можно его оставить и в текущей папке. В поле «Имя файла» при желании можно его переименовать, но это тоже не обязательно. Для нашей задачи основным является следующее поле – «Тип файла». Кликаем по этому полю.

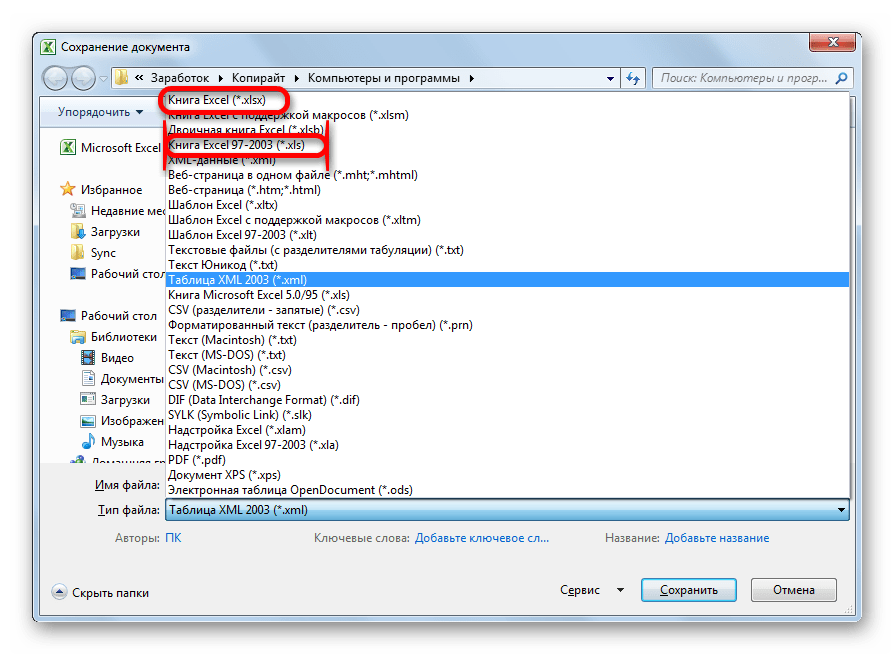
Из предложенных вариантов выбираем Книга Excel или Книга Excel 97-2003. Первый из них более новый, второй – уже несколько устаревший.
- После того, как выбор произведен, жмем на кнопку «Сохранить».
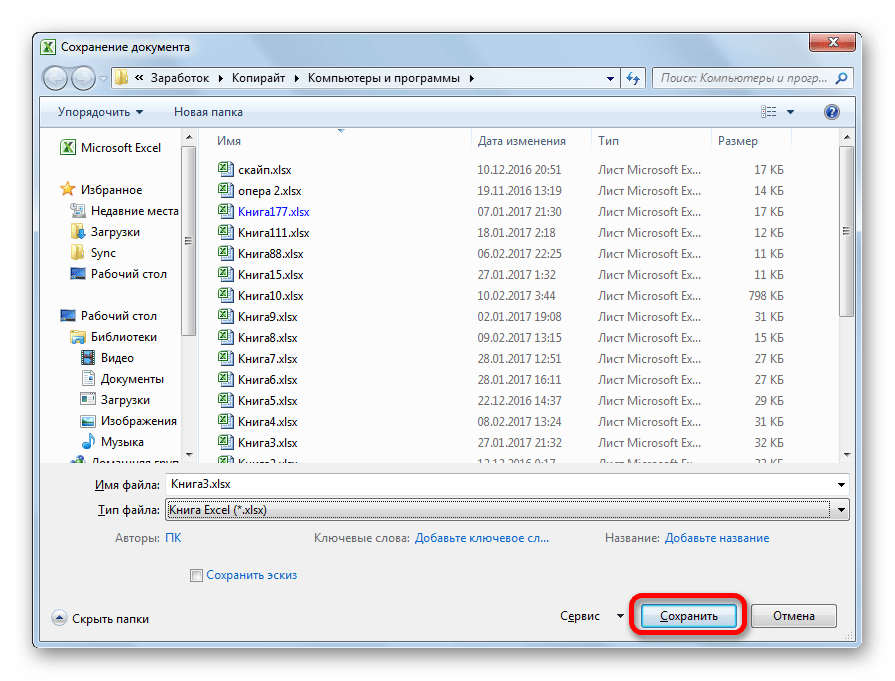
На этом процедура конвертации файла XML в формат Excel через интерфейс программы окончена.
Способ 2: импорт данных
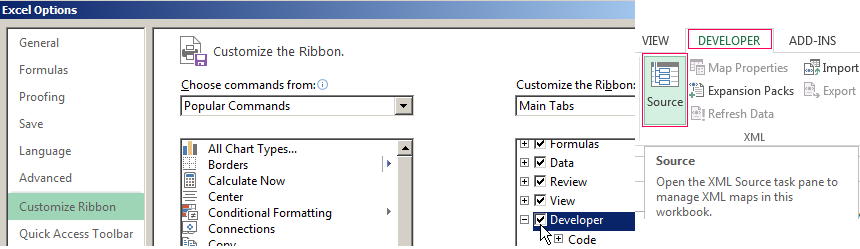
Вышеописанный способ подходит только для файлов XML с самой простой структурой. Более сложные таблицы при конвертации таким способом могут быть переведены некорректно. Но, существует ещё один встроенный инструмент Excel, который поможет корректно произвести импорт данных. Он расположен в «Меню разработчика», которое по умолчанию отключено. Поэтому, прежде всего, его нужно активировать.
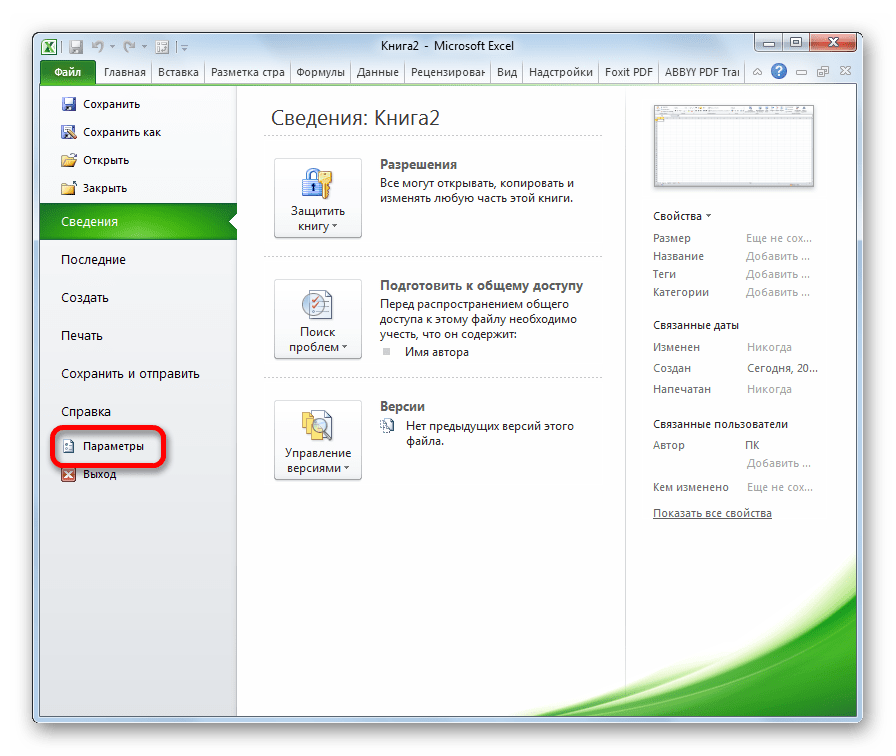
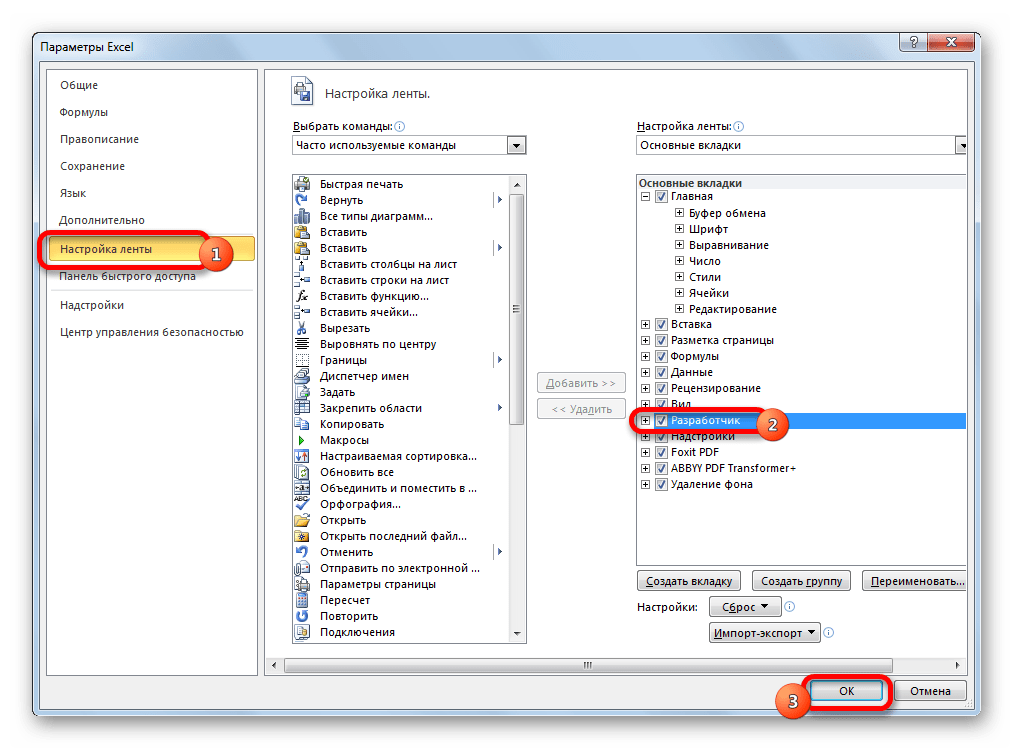
- Перейдя во вкладку «Файл», кликаем по пункту «Параметры».
- В окне параметров переходим в подраздел «Настройка ленты». В правой части окна ставим галочку около пункта «Разработчик». Жмем на кнопку «OK». Теперь нужная функция активирована, а соответствующая вкладка появилась на ленте.
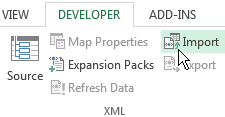
- Переходим во вкладку «Разработчик». На ленте в блоке инструментов «XML» жмем на кнопку «Импорт».
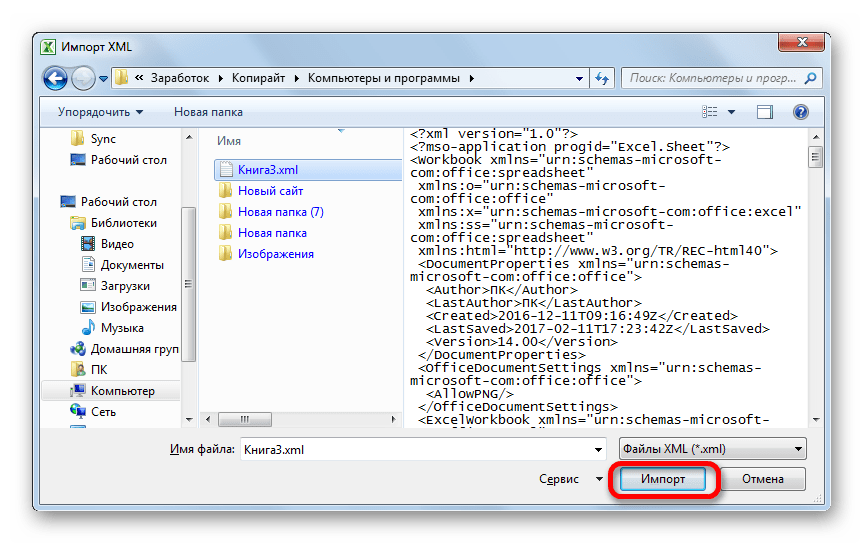
- Открывается окно импорта. Переходим в директорию, где располагается нужный нам документ. Выбираем его и жмем на кнопку «Импорт».
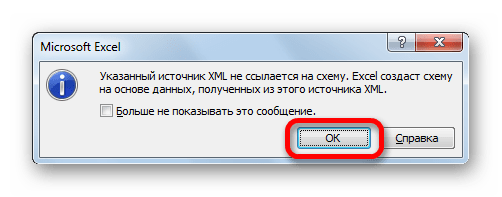
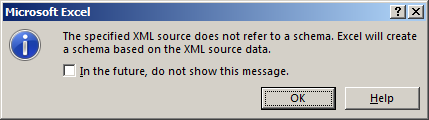
- Далее может открыться диалоговое окно, в котором говорится, что выбранный файл не ссылается на схему. В нем будет предложено создать программе схему самостоятельно. В этом случае соглашаемся и жмем на кнопку «OK».
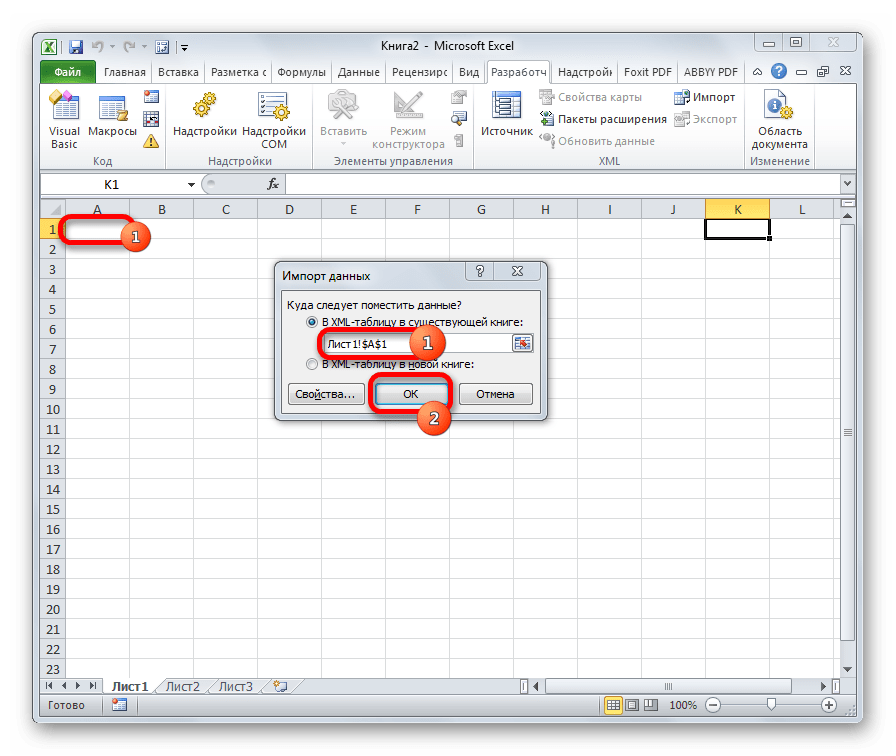
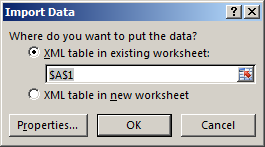
- Далее открывается следующее диалоговое окно. В нем предлагается определиться открывать таблицу в действующей книге или в новой. Так как мы запустили программу без открытия файла, то можем оставить данную настройку по умолчанию и продолжить работу с текущей книгой. Кроме того, это же окно предлагает определить координаты на листе, куда будет импортирована таблица. Можно вписать адрес вручную, но намного проще и удобнее просто кликнуть по ячейке на листе, которая станет верхним левым элементом таблицы. После того, как адрес занесен в поле диалогового окна, жмем на кнопку «OK».
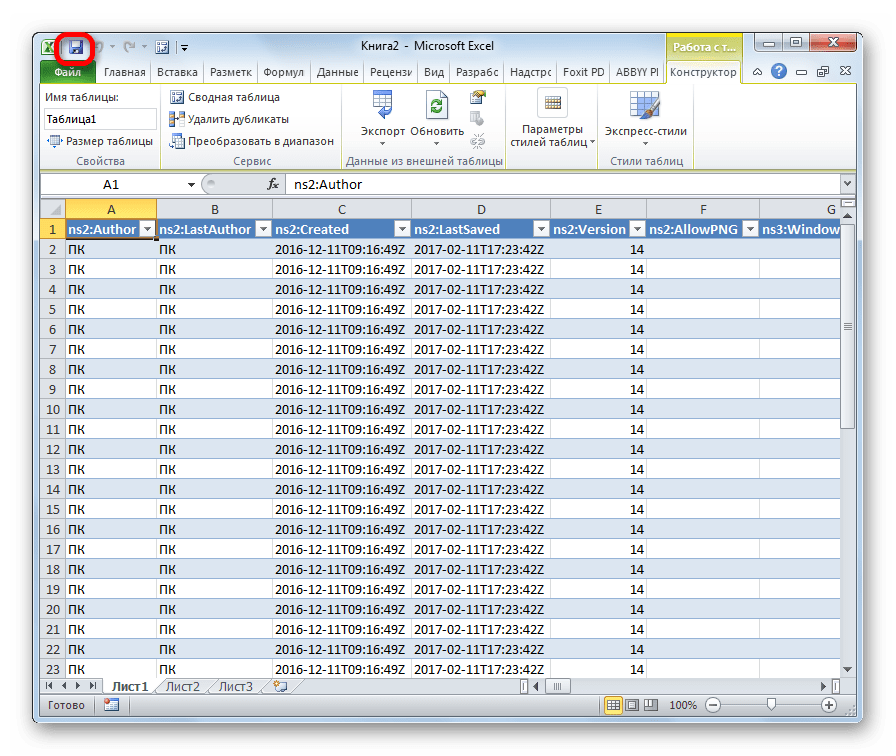
- После этих действий таблица XML будет вставлена в окно программы. Для того чтобы сохранить файл в формате Excel кликаем по иконке в виде дискеты в верхнем левом углу окна.
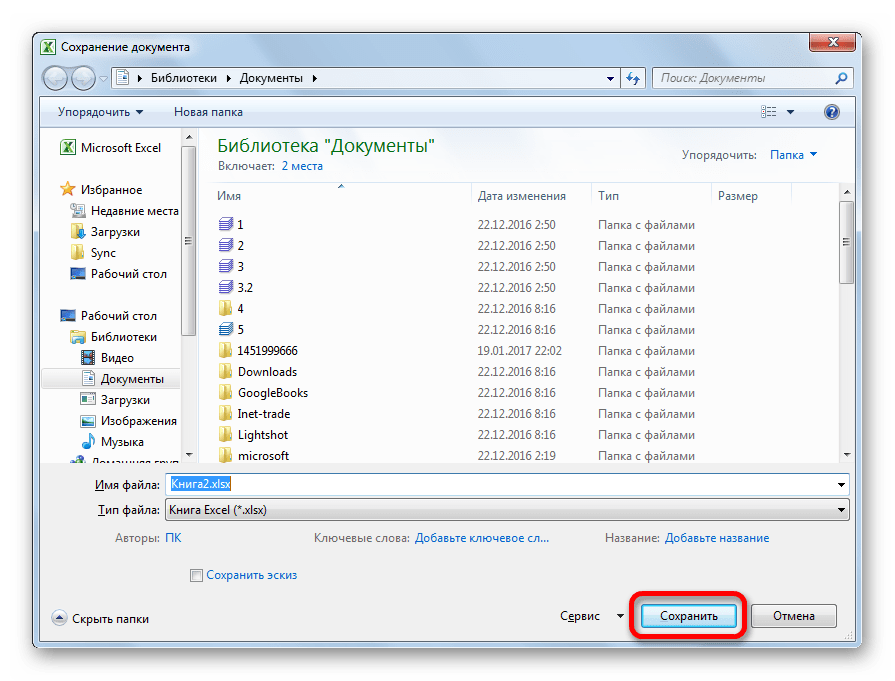
- Открывается окно сохранения, в котором нужно определить директорию, где будет храниться документ. Формат файла на этот раз будет уже предустановлен XLSX, но при желании вы можете раскрыть поле «Тип файла» и установить другой формат Эксель – XLS. После того, как настройки сохранения выставлены, хотя в данном случае они могут быть и оставленными по умолчанию, жмем на кнопку «Сохранить».


Таким образом, конвертация в нужном для нас направлении будет совершена с максимально корректным преобразованием данных.
Способ 3: онлайн-конвертер
Тем пользователям, у которых по какой-то причине не установлена на компьютере программа Эксель, но нуждающимся в срочном преобразовании файла из формата XML в EXCEL, можно воспользоваться одним из множества специализированных онлайн-сервисов для конвертации. Одним из наиболее удобных сайтов подобного типа является Convertio.
Онлайн-конвертер Convertio
- Переходим на данный веб-ресурс с помощью любого браузера. На нем можно выбрать 5 способов загрузки конвертируемого файла:
- С жесткого диска компьютера;
- Из онлайн-хранилища Dropbox;
- Из онлайн-хранилища Google Drive;
- По ссылке из интернета.
Так как в нашем случае документ размещен на ПК, то жмем на кнопку «С компьютера».
- Запускается окно открытия документа. Переходим в ту директорию, где он размещен. Кликаем по файлу и жмем на кнопку «Открыть».

Существует также альтернативный вариант добавления файла на сервис. Для этого нужно просто перетянуть его название мышкой из Проводника Windows.
- Как видим, файл добавился на сервис и находится в состоянии «Подготовлено». Теперь нужно выбрать необходимый нам формат для конвертации. Кликаем по окошку рядом с буквой «В». Открывается список групп файлов. Выбираем «Документ». Далее открывается перечень форматов. Выбираем «XLS» или «XLSX».
- После того, как наименование нужного расширения добавлено в окошко, жмем на большую красную кнопку «Преобразовать». После этого, документ будет преобразован и доступен для загрузки на этом ресурсе.


Данный вариант может послужить хорошей подстраховкой на случай неимения доступа к стандартным инструментам для переформатирования по данному направлению.
Как видим, в самом Экселе есть встроенные инструменты, позволяющие преобразовать файл формата XML в один из «родных» форматов этой программы. Простейшие экземпляры можно легко конвертировать через обычную функцию «Сохранить как…». Для документов с более сложной структурой существует отдельная процедура преобразования через импорт. Те пользователи, которые по какой-либо причине не могут воспользоваться данными инструментами, имеют возможность выполнить задачу с помощью специализированных онлайн-сервисов для конвертации файлов.
Еще статьи по данной теме:
Помогла ли Вам статья?
Convert your XML file to an Excel file, or vice versa. This enables you to exchange data between different applications.
From XML to Excel is really easy. Simply execute the following steps.
1. Open a blank workbook.
2. Turn on the Developer tab.
3. On the Developer tab, in the XML group, click Import.

4. Select the XML file and click Import.
5. Click OK.

Result:

To convert an Excel file to an XML file, simply execute the following steps.
First, we will create a schema based on XML source data. The schema defines the structure of the XML file. We have to do this outside Excel.
1. For example, open Notepad and add the following lines.
<?xml version=»1.0″ encoding=»UTF-8″ standalone=»yes»?>
<data-set xmlns:xsi=»http://www.w3.org/2001/XMLSchema-instance»>
<record>
<LastName>Smith</LastName>
<Sales>16753</Sales>
<Country>UK</Country>
<Quarter>Qtr 3</Quarter>
</record>
<record>
<LastName>Johnson</LastName>
<Sales>14808</Sales>
<Country>USA</Country>
<Quarter>Qtr 4</Quarter>
</record>
</data-set>
Note: the tags refer to the column names, but you can give them any name you want! For example, instead of LastName use Name.
2. Save the file as schema.xml.
3. Open data-set.xlsx.
4. On the Developer tab, in the XML group, click Source to open the XML Source task pane.

5. To add an XML map, click XML Maps.

The XML Maps dialog box appears.
6. Click Add.

7. Select schema.xml and click OK twice.
8. Now simply drag (map) the 4 elements from the tree onto the worksheet (row 1).

9. On the Developer tab, in the XML group, click Export.

10. Save your file as data-set.xml and press Enter.
Result:

That saves quite a lot of time!
Microsoft Excel is a useful instrument for organizing and structuring very different data. It can be used to process information by various methods and edit data arrays.
Let us see its tools for generation and processing web applications files. Using a particular example, we will learn the basics of work with XML in Excel.
How to create XML-file in Excel
XML is a file standard for transferring files over the Internet. Excel supports its export and import.
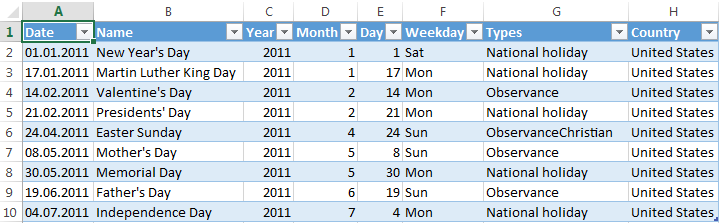
We are going to look through the process of creation an XML-file using factory calendar as a particular example.
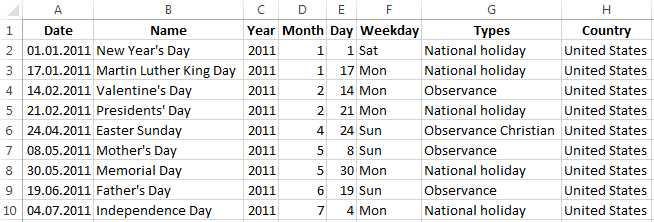
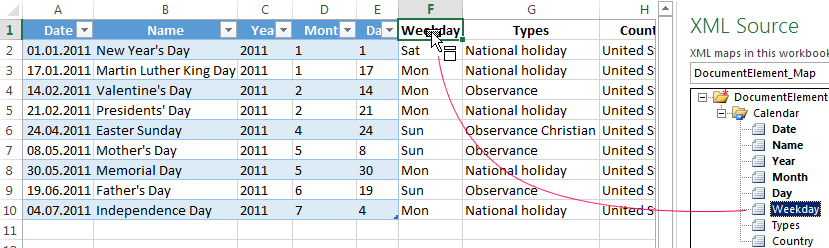
- Create a table on which you want to create an XML file in Excel and fill it with data.
- Create and insert a map with the required XML document structure.
- Export the table data in XML format.
Altogether.
- Our table is a Holiday calendar.
- Create any text editor (such as «Notepad») the desired XML structure to generate a map file is saved. In this example, use the map structure:
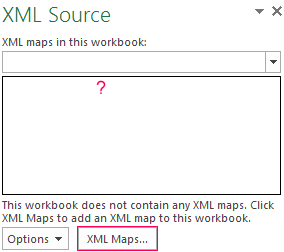
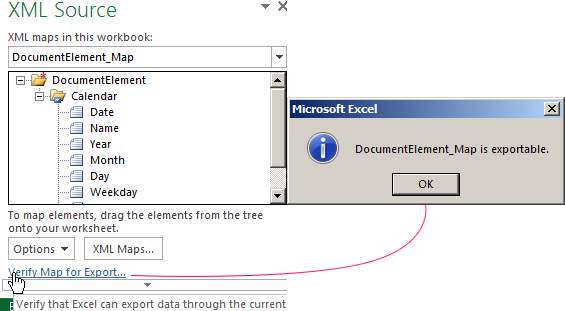
- Open the tool «DEVELOPER». Choose the dialog box «Source» in the XML tab.
- If Excel cannot see XML maps, they have to be added. Press «XML Maps» button.
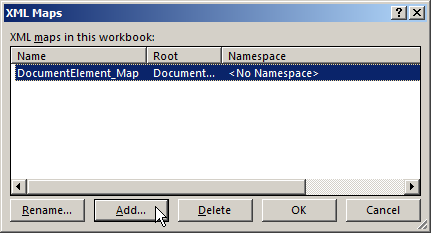
- Press «Add». Find your XML file – press ОК.
- Elements of the schema will appear in the right column. They have to be dragged to the corresponding column names of the table.
- Check whether the export is possible.
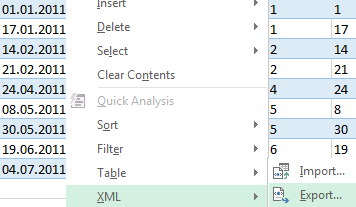
- When all of the elements will be associated, right click any cell on the table and choose XML – Export.
Save the file.
How to save an Excel file in XML format
One of the options:
- Press CTRL+S, choose «Save as» — «Other formats».
- Set the name. Choose the file destination and type – XML.
Press «Save» button.
If you get any errors, try to save the workbook as XML 2003 table or web page. Usually, there are no problems with these formats.
Other options:
- Download XLC to XML converter, or find a service, which exports files online.
- Download XML Tools Add-in from the official Microsoft web site. It is available free of charge.
- Open a new workbook. Press CTRL+O «Open».
How to open an XML file in Excel
- Change the format to XML file. Choose the desired file. Press CTRL+O.
- Open it as an XML-table. Press OK.
- Similar notification will appear.
- Press OK. You can work with this table the same way as with any Excel file.
How to convert XML file to Excel
- Open the tool «DEVELOPER». Choose the dialog box «Import».
- Choose a file in the dialog box, that you want to convert.
- Press «Import». Excel will offer to create a scheme automatically based on the data received. Press OK. A window will open, where you will need to choose a destination for the importing file.
- Set the range for import. It is better to add extra cells for future entries. Press «OK».
From now on, the created table is being edited and saved in Excel format.
How to collect data from XML-files to Excel
The principle of collecting data from several XML-files is the same as the principle of conversion. When we import data to Excel, the XML map transfers at the same time. You can also transfer other data in this schema.
Each new file will be linked to the existing map. Every element of the table structure binds to an element from XML map. Only one data link is allowed.
In order to configure binding settings, in the «DEVELOPER» menu choose the «Map Proparties» instrument.
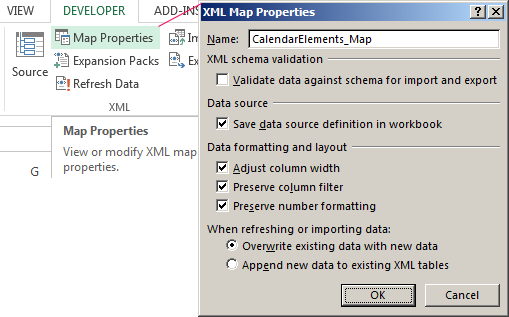
Features:
- Excel will check every new file for compliance with the existing map (if you check the box next to this line).
- The data can be update. Also, new information can be added to the existing table (it makes sense, if you need to collect data from similar files).
Other ways to get structure data (schema):
- Download it from a database of a specialized business application. Commercial sites and services may provide schemas. Simple options are in the public domain.
- Use prepared examples in order to validate the maps. Examples contain the basic elements and structure data. Copy and paste it into the program «Notepad» – and save it with the desired extension.
These are all manual methods of import and export files structure data.
XML-файл содержит в себе данные, из которых можно автоматически создать удобную таблицу. Сегодня покажу, как превратить xml в Excel: в самой программе Майкрософт Эксель и онлайн-конвертерах, на случай если у вас нет приложения для управления таблицами.
Содержание
- Что такое форматы XML, XLS, XLSX, XLSM: какой выбрать для сохранения
- Microsoft Excel
- Обычное сохранение в xlsx
- Импорт данных через меню разработчика
- Онлайн-сервисы для конвертации
- Convertio
- Aconvert
- Aspose
Что такое форматы XML, XLS, XLSX, XLSM: какой выбрать для сохранения
XML – это язык разметки, используется на веб-страницах и является базовым форматом офисного инструмента Excel. Если открыть файл с расширением xml в Ворде или другом редакторе, появится текст-структура, чем-то похожая на html. Она будет непонятна обычным пользователям, но информативна для разработчиков.
Если говорить простым языком, XML – это структурированный набор данных, из которых можно автоматически сделать удобную таблицу с ячейками, столбцами и строками.
XLS и XLSX – это основные форматы таблиц Excel. Первый – более устаревший, второй – более новый, основан на формате XML.
У XLSX больше преимуществ, чем у простого XLS. Именно в нем рекомендуется сохранять таблицы. Почему: файлы XLSX легче переносить в другие приложения, они менее подвержены повреждению и имеют меньший вес. Недостатков у нового расширения два: файлы могут дольше сохраняться и запускаться, их нельзя открыть в старых Excel 2003 года (XLSX стал форматом по умолчанию в версиях Эксель 2007 и выше).
У файлов Excel есть и другие, менее популярные расширения:
- XLSM – поддерживает макросы. Если в вашей таблице они есть, выбирайте этот формат.
- XLSTX – таблица, сохраненная в виде шаблона, который можно использовать как отправную точку для других ваших книг Эксель.
- XLSTM – тот же файл-шаблон, только с поддержкой макросов.
- XLSB – формат, который тоже работает с макросами. Подходит для больших таблиц с десятками тысяч строк. Размер файла уменьшается чуть ли не в два раза, а работа с ним при этом ускоряется. Недостаток – открывается только в Excel. Большинство альтернативных программ не запустят этот файл.
Microsoft Excel
Excel спокойно запустит файл xml, превратив структурированные данные в удобную пользовательскую таблицу. А уже открытую книгу с заполненными ячейками можно сохранить в формате xlsx – в самом интерфейсе Excel.
Обычное сохранение в xlsx
Способ подойдет для простых таблиц. Для сложных лучше использовать следующий метод с импортом данных в меню разработчика.
Инструкцию сделала на примере Excel 2016. В зависимости от версии программы названия разделов и последовательность шагов могут отличаться, но в целом ход действий будет одинаковым.
Что нужно сделать для перевода xml в Эксель:
- Запустите Microsoft Excel через ярлык на рабочем столе или в меню «Пуск».

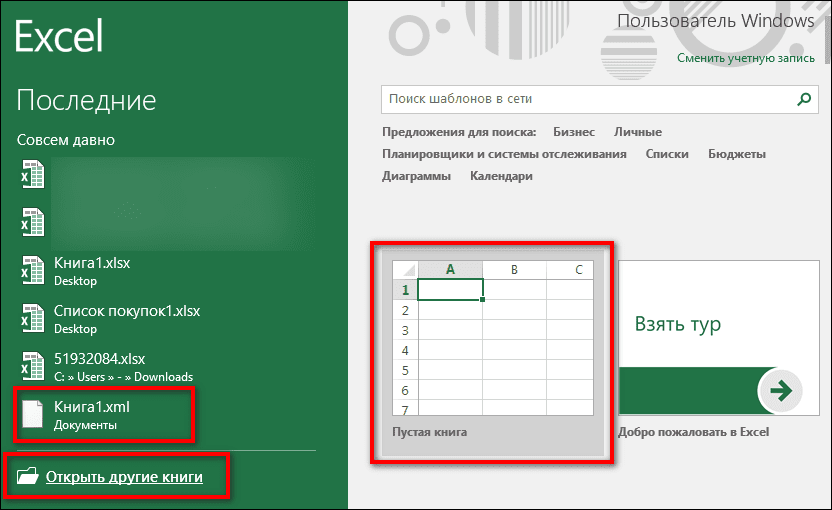
- Также можно открыть панель поиска по системе и отыскать иконку приложения там.

- Попробуйте найти ваш файл xml в списке последних документов. Если там его нет, нажмите «Открыть другие книги», чтобы сразу запустить поиск файла в «Проводнике Windows». Либо нажмите «Пустая книга» – на экране появится пока что пустая таблица.

- Кликните «Файл», если запустили пустую книгу.

- Перейдите в раздел «Открыть» и кликните «Обзор».

- Выберите папку, выделите файл и щелкните снова «Открыть».

- Или просто отыщите xml на жестком диске ПК и перетащите его на пустую таблицу в окне Excel.

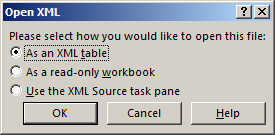
- Выберите режим просмотра: «Xml-таблица» или «Книга, доступная только для чтения». Нажмите «ОК».

- При желании поставьте галочку «Больше не показывать это сообщение» и щелкните «ОК». Программа создаст схему на основе данных из текущего xml.

- При необходимости внесите изменения в таблицу и кликните «Файл».
- Зайдите в «Сохранить как». Выберите папку в списке справа или щелкните «Обзор».

- Укажите папку для сохранения таблицы, при желании смените имя. Затем раскройте меню «Тип файла».

- Выберите формат: xlsx, xls, xlsm и т. д. Нажмите «Сохранить».

- В выбранной папке (в моем случае на рабочем столе, так как я указала «Desktop» для сохранения) появится файл с иконкой Excel. Теперь вы можете запускать документ, как и все другие файлы на ПК – двойным щелчком левой кнопки мыши.


Импорт данных через меню разработчика
Если конвертация таблицы прошла некорректно в предыдущем способе, тогда используйте полноценный импорт данных. Эта функция находится в меню разработчика, которое по умолчанию отключено.
Как его включить и запустить импорт:
- Откройте Excel с помощью ярлыка на рабочем столе или в «Пуске». Создайте пустую книгу. Также можно запустить любую таблицу, хранящуюся на ПК, если вдруг не нашли ярлык пустого окна программы. Раскройте меню «Файл». Перейдите в «Параметры».

- Зайдите в раздел «Настроить ленту». Поставьте галочку «Разработчик». Нажмите «ОК».

- Теперь перейдите в саму вкладку «Разработчик», которая появилась вверху рядом с другими привычными разделами. Щелкните «Импорт».

- Найдите и выделите файл xml. Кликните «Импорт».

- Нажмите «ОК».
- Если вы ранее запустили пустой лист с помощью ярлыка Excel, оставьте отмеченным пункт «В XML-таблицу в существующей книге» и выберите левую верхнюю ячейку, с которой должна начинаться ваша таблица. Можно вручную прописать адрес ячейки в поле или выбрать ее в самой книге. Если вы ранее открыли существующую таблицу, выберите пункт «В XML-таблицу в новой книге». Нажмите «ОК».

- На экране появится содержимое документа xml. При необходимости внесите какие-либо изменения. Далее для сохранения кликните по дискете либо по меню «Файл» – «Сохранить как».

- Нажмите «Обзор».

- Укажите папку для сохранения, новое имя файла, выберите тип файла. Нажмите «Сохранить».


Онлайн-сервисы для конвертации
Если конвертация с помощью Excel не сработала должным образом, попробуйте преобразовать файл на специальных сайтах. Сервисы также пригодятся, если у вас на ПК нет программы Эксель, а сконвертировать документ нужно срочно.
Регистрироваться на сайтах необязательно. Просто загружаете один или несколько файлов, выбираете формат таблицы и скачиваете готовый документ Excel.
Convertio
Convertio преобразует самые разные виды файлов: картинки, видео, текстовые документы, таблицы, шрифты, презентации, электронные книги, архивы. Всего на счету у сервиса более 300 форматов.
Три способа загрузки файлов: с жесткого диска ПК, из облачных хранилищ Dropbox и Google Drive.
Есть лимиты бесплатной версии. Общий вес загружаемых файлов не должен превышать 100 Мб за один раз. Стоимость подписки: от 10$ до 26$ в месяц в зависимости от тарифа.
Как пользоваться:
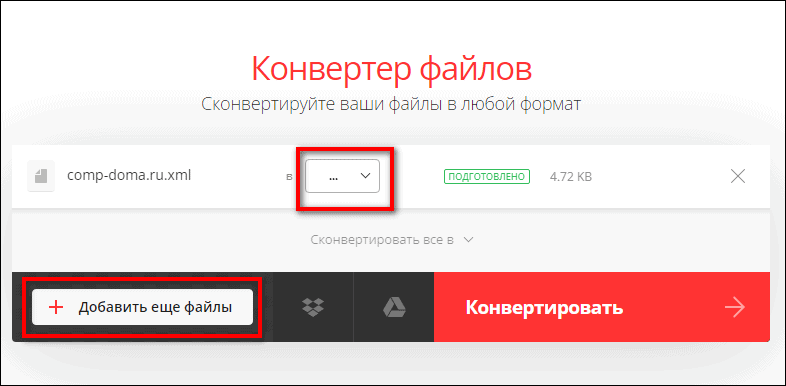
- Перейдите на сайт Convertio и выберите способ загрузки файла: с жесткого диска ПК (папка с лупой), из «облака» Dropbox или Google Drive. В первом случае найдите xml-документы в «Проводнике Windows». В последних двух – сначала предоставьте доступ к хранилищу, написав логин и пароль от него.

- Подождите, пока файл загрузится на сайт. Далее раскройте меню «в». Либо добавьте еще файлов с помощью специальной кнопки, если про какие-то забыли в предыдущем шаге.

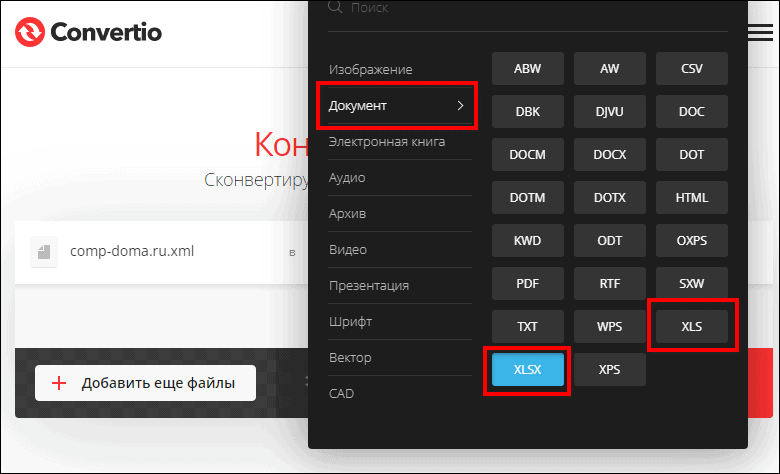
- Укажите один из форматов Excel: xlsx, xls. Они расположены в разделе «Документ». Нажмите на красную кнопку «Конвертировать», чтобы запустить преобразование.

- Подождите, пока закончится конвертация. Если файл большой, возможно, понадобится больше времени. Преобразование продолжится даже если вы закроете страницу или перейдите в другую вкладку браузера. Если боитесь потерять сайт, скопируйте адрес в буфер обмена ПК с помощью специальной ссылки под файлом.

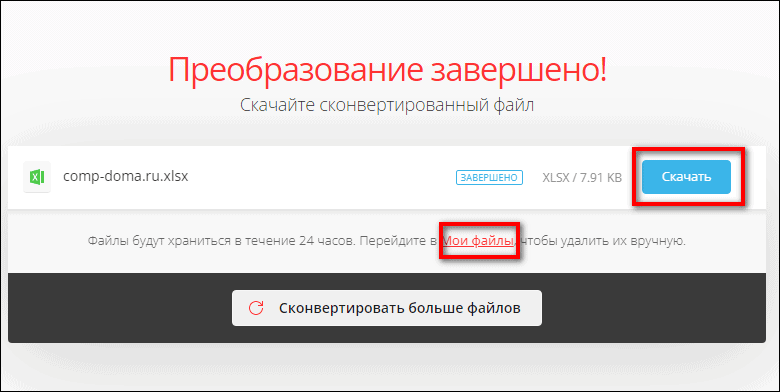
- Когда появится кнопка «Скачать», нажмите на нее и укажите папку для сохранения таблицы. Если у вас в браузере отключена функция ручного выбора каталога, файл автоматически скачается в папку «Загрузки» или в любую другую, установленную в настройках веб-обозревателя. Документ будет храниться на сервере Convertio в течение суток. В любой момент этого срока вы можете перейти в раздел «Мои файлы» (функция доступна даже без регистрации) и еще раз загрузить таблицу на ПК.


Aconvert
Сервис Aconvert предлагает на выбор два способа загрузки. Первый – классический, с жесткого диска ПК (кнопка «File»).

Второй – по ссылке в интернете. Если ваш xml-документ опубликован в сети, вы можете просто вставить ссылку на него в меню «URL».

Послужной список форматов тоже внушительный. Базу данных xml можно сконвертировать не только в xls и xlsx, но и в другие виды: pdf, doc, ppt, rtf, odt, xps и т. д. Сервис полностью бесплатный. Купить подписку никто не предлагает.

Обработать за раз можно только один файл. Конечный документ будет в таблице «Результаты конверсий». Чтобы перейти к скачиванию, кликните по стрелке.

На открывшейся странице появится QR-код. Вы можете отсканировать его смартфоном – тогда эта же страница откроется в мобильном браузере, сможете скачать документ на телефон. Файл можно отправить в ваше облачное хранилище: Dropbox, Google Drive, One Drive. Также разрешается сжать файл перед загрузкой, если есть требования к его весу. Вверху будет отображаться обратный отсчет – через сколько времени обработанный файл автоматически удалится с сервера Aconvert.
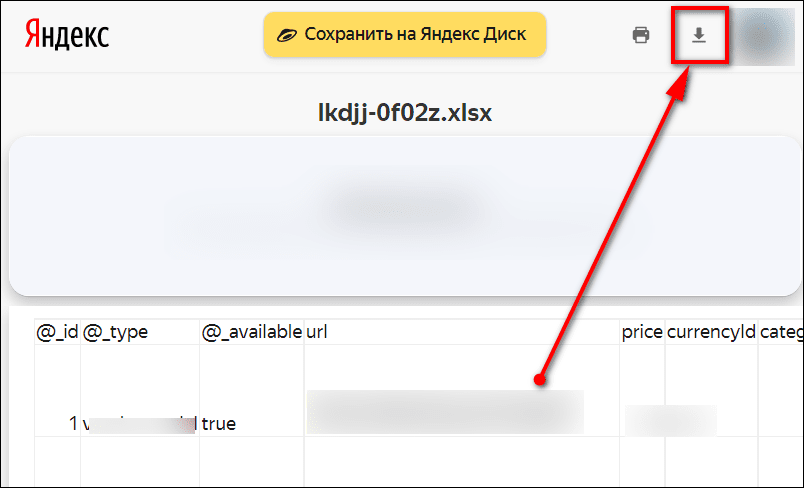
Чтобы скачать xls-таблицу на ПК, кликните по ссылке «URL-адрес файла». 
Откроется страница Яндекса с предпросмотром таблицы. Щелкните по стрелке, чтобы запустить загрузку либо сохраните документ на Яндекс Диске.
Aspose
У Aspose еще больше способов загрузки. Можно добавить файл с ПК, вставить ссылку на него в интернете или выбрать документ из «облака» (Dropbox, Google Drive).

XML можно перевести в xls, xlsx, xlsm, xlsb, xlt, xltx, xltm, pdf, png, jpg, html и многие другие форматы. Одновременно можно обработать до 10 файлов.

Готовые таблицы скачиваются на ПК либо помещаются в те же облачные хранилища Dropbox, Google Drive. Также разрешается отправить ссылку на скачивание файлов по электронной почте. Обработанные документы хранятся на сервере Aspose в течение 24 часов. Сервис бесплатный. Подписку оформить никто не предлагает.

***
Если на вашем ПК установлена программа Excel, используйте ее как конвертер xml. Заодно можете внести какие-либо изменения в документ. Если таблица относительно простая, используйте обычное сохранение. Если сложная и большая – лучше запустить импорт данных в меню разработчика.
За неимением Эксель можно всегда использовать онлайн-конвертеры. Они работают без регистрации. Для одновременной обработки нескольких файлов возьмите Convertio или Aspose. Aconvert позволит открыть предпросмотр таблицы перед скачиванием.