
Начиная с Microsoft Office 2007, в Microsoft Office используются форматы файлов на основе XML, например DOCX, XLSX и PPTX. Эти форматы и расширения имен файлов применяются к Microsoft Word, Microsoft Excel и Microsoft PowerPoint. В этой статье описаны основные преимущества формата, описаны расширения имен файлов и описано, как можно делиться файлами Office с людьми, которые используют более ранние версии Office.

В этой статье
Каковы преимущества форматов Open XML?
Что такое расширения имен XML-файлов?
Можно ли использовать одни и те же файлы в разных версиях Office?
Каковы преимущества форматов Open XML?
Форматы Open XML имеют множество преимуществ не только для разработчиков и их решений, но и для отдельных людей и организаций любого размера.
-
Сжатие файлов Файлы сжимаются автоматически и в некоторых случаях могут быть на 75 процентов меньше. Формат Open XML использует технологию zip-сжатия для хранения документов, что позволяет сэкономить место на диске, необходимое для хранения файлов, и уменьшает пропускную способность, необходимую для отправки файлов по электронной почте, по сетям и через Интернет. Когда вы открываете файл, он автоматически обновляется. При сохранение файла он автоматически застекается снова. Для открытия и закрытия файлов в Office не нужно устанавливать специальные почтовые Office.
-
Улучшенные возможности восстановления поврежденных файлов. Файлы имеют модульную структуру, поэтому различные компоненты данных файла хранятся отдельно друг от друга. Это позволяет открывать файлы даже в том случае, если компонент в файле (например, диаграмма или таблица) поврежден.
-
Поддержка расширенных функций Многие из расширенных Microsoft 365 требуют, чтобы документ хранился в формате Open XML. Например, автоскрытиеи проверка доступности (вдвух примерах) можно работать только с файлами, которые хранятся в современном формате Open XML.
-
Улучшенная конфиденциальность и дополнительный контроль над персональными данными. К документам можно делиться конфиденциально, так как личные сведения и конфиденциальные бизнес-данные, такие как имена авторов, комментарии, отслеживаемые изменения и пути к файлам, можно легко найти и удалить с помощью инспектора документов.
-
Улучшенная интеграция и совместимость бизнес-данных. Использование форматов Open XML в качестве основы для обеспечения взаимосвязи данных в наборе продуктов Office означает, что документы, книги, презентации и формы могут быть сохранены в формате XML, который доступен для использования и лицензирования бесплатно. Office также поддерживает определяемую клиентом схему XML, улучшающую существующие Office типов документов. Это означает, что клиенты могут легко разблокировать информацию в существующих системах и действовать с ней в Office программах. Сведения, которые создаются в Office могут быть легко использованы другими бизнес-приложениями. Все, что нужно для открытия и редактирования файла Office, — это с помощью ZIP-редактора и редактора XML.
-
Упрощенное обнаружение документов, содержащих макросы. Файлы, сохраненные с использованием стандартного суффикса x (например, .docx, .xlsx и .pptx), не могут содержать макрос Visual Basic для приложений (VBA) и макрос XLM. Макросами могут быть только файлы, расширение имени которых заканчивается на «m» (например, DOCM, XLSM и PPTM).

Прежде чем сохранять файл в двоичном формате, ознакомьтесь со статьей Могут ли разные версии Office одинаковыми файлами?
Как преобразовать файл из старого двоичного формата в современный формат Open XML?
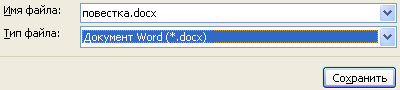
Откройте файл в Приложение Office выберите файл > Сохранить как (или Сохранить копию,если файл хранится в OneDrive или SharePoint) и убедитесь, что для типа Сохранить как за установлен современный формат.
При этом будет создаваться новая копия файла в формате Open XML.
Что такое расширения имен XML-файлов?
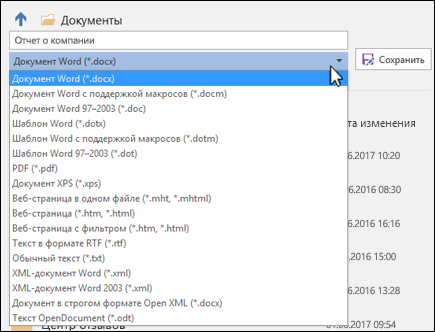
По умолчанию документы, книги и презентации, которые вы создаете в Office, сохраняются в формате XML с расширениями имен файлов, которые добавляют «x» или «м» к уже знакомым расширениям имен файлов. Знак «x» означает XML-файл, в котором нет макроса, а «м» — XML-файл, содержащий макрос. Например, при сохранение документа в Word по умолчанию используется расширение .docx имени файла, а не .doc файла.
При сохранение файла в виде шаблона вы видите такое же изменение. Расширение шаблона, используемее в более ранних версиях, уже существует, но теперь в его конце есть «x» или «м». Если файл содержит код или макрос, его необходимо сохранить с помощью нового формата XML-файла с поддержкой макроса, который добавляет в расширение файла «м» для макроса.
В следующих таблицах перечислить все расширения имен файлов по умолчанию в Word, Excel и PowerPoint.
Word
|
Тип XML-файла |
Расширение |
|
Документ |
DOCX |
|
Документ с поддержкой макросов |
DOCM |
|
Шаблон |
DOTX |
|
Шаблон с поддержкой макросов |
DOTM |
Excel
|
Тип XML-файла |
Расширение |
|
Книга |
XLSX |
|
Книга с поддержкой макросов |
XLSM |
|
Шаблон |
XLTX |
|
Шаблон с поддержкой макросов |
XLTM |
|
Двоичная книга (не XML) |
XLSB |
|
Надстройка с поддержкой макросов |
XLAM |
PowerPoint
|
Тип XML-файла |
Расширение |
|
Презентация |
PPTX |
|
Презентация с поддержкой макросов |
PPTM |
|
Шаблон |
POTX |
|
Шаблон с поддержкой макросов |
POTM |
|
Надстройка с поддержкой макросов |
PPAM |
|
Демонстрация |
PPSX |
|
Демонстрация с поддержкой макросов |
PPSM |
|
Слайд |
SLDX |
|
Слайд с поддержкой макросов |
SLDM |
|
Тема Office |
THMX |
Можно ли использовать одни и те же файлы в разных версиях Office?
Office позволяет сохранять файлы в форматах Open XML и в двоичном формате файлов более ранних версий Office и включает в себя проверку совместимости и конвертеры файлов, позволяющие совместно использовать файлы в разных Office.
Открытие существующих файлов в Office Вы можете открыть файл, созданный в более ранней версии Office, а затем сохранить его в существующем формате. Так как, возможно, вы работаете над документом совместно с человеком, использующим более ранную версию Office, Office использует проверку совместимости, которая проверяет, что функция, которая не поддерживается в предыдущих версиях Office, не поддерживается. Когда вы сохраняете файл, проверка совместимости сообщает вам об этих функций, а затем позволяет удалить их, прежде чем продолжить сохранение.
From Wikipedia, the free encyclopedia
| Filename extension | .XML (XML document) |
|---|---|
| Developed by | Microsoft |
| Type of format | Document file format |
| Extended from | XML, DOC |
| Filename extension | .VDX (XML Drawing),.VSX (XML Stencil),.VTX (XML Template) |
|---|---|
| Developed by | Microsoft |
| Type of format | Diagramming vector graphics |
| Extended from | XML, VSD, VSS, VST |
| Filename extension | .XML (XML Spreadsheet) |
|---|---|
| Developed by | Microsoft |
| Type of format | Spreadsheet |
| Extended from | XML, XLS |
The Microsoft Office XML formats are XML-based document formats (or XML schemas) introduced in versions of Microsoft Office prior to Office 2007. Microsoft Office XP introduced a new XML format for storing Excel spreadsheets and Office 2003 added an XML-based format for Word documents.
These formats were succeeded by Office Open XML (ECMA-376) in Microsoft Office 2007.
File formats[edit]
- Microsoft Office Word 2003 XML Format — WordProcessingML or WordML (.XML)
- Microsoft Office Excel 2002 and Excel 2003 XML Format — SpreadsheetML (.XML)
- Microsoft Office Visio 2003 XML Format — DataDiagramingML (.VDX, .VSX, .VTX)
- Microsoft Office InfoPath 2003 XML Format — XML FormTemplate (.XSN) (Compressed XML templates in a Cabinet file)
- Microsoft Office InfoPath 2003 XML Format — XMLS FormTemplate (.XSN) (Compressed XML templates in a Cabinet file)
Limitations and differences with Office Open XML[edit]
Besides differences in the schema, there are several other differences between the earlier Office XML schema formats and Office Open XML.
- Whereas the data in Office Open XML documents is stored in multiple parts and compressed in a ZIP file conforming to the Open Packaging Conventions, Microsoft Office XML formats are stored as plain single monolithic XML files (making them quite large, compared to OOXML and the Microsoft Office legacy binary formats). Also, embedded items like pictures are stored as binary encoded blocks within the XML. In case of Office Open XML, the header, footer, comments of a document etc. are all stored separately.
- XML Spreadsheet documents cannot store Visual Basic for Applications macros, auditing tracer arrows, chart and other graphic objects, custom views, drawing object layers, outlining, scenarios, shared workbook information and user-defined function categories.[1] In contrast, the newer Office Open XML formats support full document fidelity.
- Poor backward compatibility with the version of Word/Excel prior to the one in which they were introduced. For example, Word 2002 cannot open Word 2003 XML files unless a third-party converter add-in is installed.[2] Microsoft has released a Word 2003 XML Viewer which allows WordProcessingML files saved by Word 2003 to be viewed as HTML from within Internet Explorer.[3] For Office Open XML, Microsoft provides converters for Office 2003, Office XP and Office 2000.
- Office Open XML formats are also defined for PowerPoint 2007, equation editing (Office MathML), vector drawing, charts and text art (DrawingML).
Word XML format example[edit]
<?xml version="1.0" encoding="utf-8" standalone="yes"?>
<?mso-application progid="Word.Document"?>
<w:wordDocument
   xmlns:w="http://schemas.microsoft.com/office/word/2003/wordml"
   xmlns:wx="http://schemas.microsoft.com/office/word/2003/auxHint"
   xmlns:o="urn:schemas-microsoft-com:office:office"
   w:macrosPresent="no"
   w:embeddedObjPresent="no"
   w:ocxPresent="no"
   xml:space="preserve">
  <o:DocumentProperties>
    <o:Title>This is the title</o:Title>
    <o:Author>Darl McBride</o:Author>
    <o:LastAuthor>Bill Gates</o:LastAuthor>
    <o:Revision>1</o:Revision>
    <o:TotalTime>0</o:TotalTime>
    <o:Created>2007-03-15T23:05:00Z</o:Created>
    <o:LastSaved>2007-03-15T23:05:00Z</o:LastSaved>
    <o:Pages>1</o:Pages>
    <o:Words>6</o:Words>
    <o:Characters>40</o:Characters>
    <o:Company>SCO Group, Inc.</o:Company>
    <o:Lines>1</o:Lines>
    <o:Paragraphs>1</o:Paragraphs>
    <o:CharactersWithSpaces>45</o:CharactersWithSpaces>
    <o:Version>11.6359</o:Version>
  </o:DocumentProperties>
  <w:fonts>
    <w:defaultFonts
       w:ascii="Times New Roman"
       w:fareast="Times New Roman"
       w:h-ansi="Times New Roman"
       w:cs="Times New Roman" />
  </w:fonts>

  <w:styles>
    <w:versionOfBuiltInStylenames w:val="4" />
    <w:latentStyles w:defLockedState="off" w:latentStyleCount="156" />
    <w:style w:type="paragraph" w:default="on" w:styleId="Normal">
      <w:name w:val="Normal" />
      <w:rPr>
        <wx:font wx:val="Times New Roman" />
        <w:sz w:val="24" />
        <w:sz-cs w:val="24" />
        <w:lang w:val="EN-US" w:fareast="EN-US" w:bidi="AR-SA" />
      </w:rPr>
    </w:style>
    <w:style w:type="paragraph" w:styleId="Heading1">
      <w:name w:val="heading 1" />
      <wx:uiName wx:val="Heading 1" />
      <w:basedOn w:val="Normal" />
      <w:next w:val="Normal" />
      <w:rsid w:val="00D93B94" />
      <w:pPr>
        <w:pStyle w:val="Heading1" />
        <w:keepNext />
        <w:spacing w:before="240" w:after="60" />
        <w:outlineLvl w:val="0" />
      </w:pPr>
      <w:rPr>
        <w:rFonts w:ascii="Arial" w:h-ansi="Arial" w:cs="Arial" />
        <wx:font wx:val="Arial" />
        <w:b />
        <w:b-cs />
        <w:kern w:val="32" />
        <w:sz w:val="32" />
        <w:sz-cs w:val="32" />
      </w:rPr>
    </w:style>
    <w:style w:type="character" w:default="on" w:styleId="DefaultParagraphFont">
      <w:name w:val="Default Paragraph Font" />
      <w:semiHidden />
    </w:style>
    <w:style w:type="table" w:default="on" w:styleId="TableNormal">
      <w:name w:val="Normal Table" />
      <wx:uiName wx:val="Table Normal" />
      <w:semiHidden />
      <w:rPr>
        <wx:font wx:val="Times New Roman" />
      </w:rPr>
      <w:tblPr>
        <w:tblInd w:w="0" w:type="dxa" />
        <w:tblCellMar>
          <w:top w:w="0" w:type="dxa" />
          <w:left w:w="108" w:type="dxa" />
          <w:bottom w:w="0" w:type="dxa" />
          <w:right w:w="108" w:type="dxa" />
        </w:tblCellMar>
      </w:tblPr>
    </w:style>
    <w:style w:type="list" w:default="on" w:styleId="NoList">
      <w:name w:val="No List" />
      <w:semiHidden />
    </w:style>
  </w:styles>
  <w:docPr>
    <w:view w:val="print" />
    <w:zoom w:percent="100" />
    <w:doNotEmbedSystemFonts />
    <w:proofState w:spelling="clean" w:grammar="clean" />
    <w:attachedTemplate w:val="" />
    <w:defaultTabStop w:val="720" />
    <w:punctuationKerning />
    <w:characterSpacingControl w:val="DontCompress" />
    <w:optimizeForBrowser />
    <w:validateAgainstSchema />
    <w:saveInvalidXML w:val="off" />
    <w:ignoreMixedContent w:val="off" />
    <w:alwaysShowPlaceholderText w:val="off" />
    <w:compat>
      <w:breakWrappedTables />
      <w:snapToGridInCell />
      <w:wrapTextWithPunct />
      <w:useAsianBreakRules />
      <w:dontGrowAutofit />
    </w:compat>
  </w:docPr>
  <w:body>
    <wx:sect>
      <w:p>
        <w:r>
          <w:t>This is the first paragraph</w:t>
        </w:r>
      </w:p>
      <wx:sub-section>
        <w:p>
          <w:pPr>
            <w:pStyle w:val="Heading1" />
          </w:pPr>
          <w:r>
            <w:t>This is a heading</w:t>
          </w:r>
        </w:p>
        <w:sectPr>
          <w:pgSz w:w="12240" w:h="15840" />
          <w:pgMar w:top="1440"
		   w:right="1800"
		   w:bottom="1440"
		   w:left="1800"
		   w:header="720"
		   w:footer="720"
		   w:gutter="0" />
          <w:cols w:space="720" />
          <w:docGrid w:line-pitch="360" />
        </w:sectPr>
      </wx:sub-section>
    </wx:sect>
  </w:body>
</w:wordDocument>
Excel XML spreadsheet example[edit]
<?xml version="1.0" encoding="UTF-8"?>
<?mso-application progid="Excel.Sheet"?>
<Workbook xmlns="urn:schemas-microsoft-com:office:spreadsheet" xmlns:x="urn:schemas-microsoft-com:office:excel" xmlns:ss="urn:schemas-microsoft-com:office:spreadsheet" xmlns:html="https://www.w3.org/TR/html401/">
<Worksheet ss:Name="CognaLearn+Intedashboard">
<Table>
<Column ss:Index="1" ss:AutoFitWidth="0" ss:Width="110"/>
<Row>
<Cell><Data ss:Type="String">ID</Data></Cell>
<Cell><Data ss:Type="String">Project</Data></Cell>
<Cell><Data ss:Type="String">Reporter</Data></Cell>
<Cell><Data ss:Type="String">Assigned To</Data></Cell>
<Cell><Data ss:Type="String">Priority</Data></Cell>
<Cell><Data ss:Type="String">Severity</Data></Cell>
<Cell><Data ss:Type="String">Reproducibility</Data></Cell>
<Cell><Data ss:Type="String">Product Version</Data></Cell>
<Cell><Data ss:Type="String">Category</Data></Cell>
<Cell><Data ss:Type="String">Date Submitted</Data></Cell>
<Cell><Data ss:Type="String">OS</Data></Cell>
<Cell><Data ss:Type="String">OS Version</Data></Cell>
<Cell><Data ss:Type="String">Platform</Data></Cell>
<Cell><Data ss:Type="String">View Status</Data></Cell>
<Cell><Data ss:Type="String">Updated</Data></Cell>
<Cell><Data ss:Type="String">Summary</Data></Cell>
<Cell><Data ss:Type="String">Status</Data></Cell>
<Cell><Data ss:Type="String">Resolution</Data></Cell>
<Cell><Data ss:Type="String">Fixed in Version</Data></Cell>
</Row>
<Row>
<Cell><Data ss:Type="Number">0000033</Data></Cell>
<Cell><Data ss:Type="String">CognaLearn Intedashboard</Data></Cell>
<Cell><Data ss:Type="String">janardhana.l</Data></Cell>
<Cell><Data ss:Type="String"></Data></Cell>
<Cell><Data ss:Type="String">normal</Data></Cell>
<Cell><Data ss:Type="String">text</Data></Cell>
<Cell><Data ss:Type="String">always</Data></Cell>
<Cell><Data ss:Type="String"></Data></Cell>
<Cell><Data ss:Type="String">GUI</Data></Cell>
<Cell><Data ss:Type="String">2016-10-14</Data></Cell>
<Cell><Data ss:Type="String"></Data></Cell>
<Cell><Data ss:Type="String"></Data></Cell>
<Cell><Data ss:Type="String"></Data></Cell>
<Cell><Data ss:Type="String">public</Data></Cell>
<Cell><Data ss:Type="String">2016-10-14</Data></Cell>
<Cell><Data ss:Type="String">IE8 browser_Modules screen tool tip text is shown twice</Data></Cell>
<Cell><Data ss:Type="String">new</Data></Cell>
<Cell><Data ss:Type="String">open</Data></Cell>
<Cell><Data ss:Type="String"></Data></Cell>
</Row>
</Table>
</Worksheet>
</Workbook>
See also[edit]
- List of document markup languages
- Comparison of document markup languages
References[edit]
- ^ «Features and limitations of XML Spreadsheet format (broken)». Archived from the original on 2007-10-09. Retrieved 2007-11-01.
- ^ «Polar WordML add-in (broken)». Archived from the original on 2009-04-11. Retrieved 2007-11-01.
- ^ Word 2003 XML Viewer
- Overview of Office 2003 Developer Technologies
- Office 2003 XML. ISBN 0-596-00538-5
External links[edit]
- MSDN: XML Spreadsheet Reference
- MSDN: Word 2003 XML Reference
- Lawsuit about XML patent
Время на прочтение
16 мин
Количество просмотров 54K
Задача обработки документов в формате docx, а также таблиц xlsx и презентаций pptx является весьма нетривиальной. В этой статье расскажу как научиться парсить, создавать и обрабатывать такие документы используя только XSLT и ZIP архиватор.
Зачем?
docx — самый популярный формат документов, поэтому задача отдавать информацию пользователю в этом формате всегда может возникнуть. Один из вариантов решения этой проблемы — использование готовой библиотеки, может не подходить по ряду причин:
- библиотеки может просто не существовать
- в проекте не нужен ещё один чёрный ящик
- ограничения библиотеки по платформам и т.п.
- проблемы с лицензированием
- скорость работы
Поэтому в этой статье будем использовать только самые базовые инструменты для работы с docx документом.
Структура docx
Для начала разоберёмся с тем, что собой представляет docx документ. docx это zip архив который физически содержит 2 типа файлов:
- xml файлы с расширениями
xmlиrels - медиа файлы (изображения и т.п.)
А логически — 3 вида элементов:
- Типы (Content Types) — список типов медиа файлов (например png) встречающихся в документе и типов частей документов (например документ, верхний колонтитул).
- Части (Parts) — отдельные части документа, для нашего документа это document.xml, сюда входят как xml документы так и медиа файлы.
- Связи (Relationships) идентифицируют части документа для ссылок (например связь между разделом документа и колонтитулом), а также тут определены внешние части (например гиперссылки).
Они подробно описаны в стандарте ECMA-376: Office Open XML File Formats, основная часть которого — PDF документ на 5000 страниц, и ещё 2000 страниц бонусного контента.
Минимальный docx
Простейший docx после распаковки выглядит следующим образом
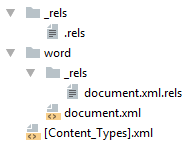
Давайте посмотрим из чего он состоит.
[Content_Types].xml
Находится в корне документа и перечисляет MIME типы содержимого документа:
<Types xmlns="http://schemas.openxmlformats.org/package/2006/content-types">
    <Default Extension="rels" ContentType="application/vnd.openxmlformats-package.relationships+xml"/>
    <Default Extension="xml" ContentType="application/xml"/>
    <Override PartName="/word/document.xml"
              ContentType="application/vnd.openxmlformats-officedocument.wordprocessingml.document.main+xml"/>
</Types>
_rels/.rels
Главный список связей документа. В данном случае определена всего одна связь — сопоставление с идентификатором rId1 и файлом word/document.xml — основным телом документа.
<Relationships xmlns="http://schemas.openxmlformats.org/package/2006/relationships">
    <Relationship
        Id="rId1"
        Type="http://schemas.openxmlformats.org/officeDocument/2006/relationships/officeDocument"
        Target="word/document.xml"/>
</Relationships>
word/document.xml
Основное содержимое документа.
word/document.xml
<w:document xmlns:wpc="http://schemas.microsoft.com/office/word/2010/wordprocessingCanvas"
            xmlns:mc="http://schemas.openxmlformats.org/markup-compatibility/2006"
            xmlns:o="urn:schemas-microsoft-com:office:office"
            xmlns:r="http://schemas.openxmlformats.org/officeDocument/2006/relationships"
            xmlns:m="http://schemas.openxmlformats.org/officeDocument/2006/math"
            xmlns:v="urn:schemas-microsoft-com:vml"
            xmlns:wp14="http://schemas.microsoft.com/office/word/2010/wordprocessingDrawing"
            xmlns:wp="http://schemas.openxmlformats.org/drawingml/2006/wordprocessingDrawing"
            xmlns:w10="urn:schemas-microsoft-com:office:word"
            xmlns:w="http://schemas.openxmlformats.org/wordprocessingml/2006/main"
            xmlns:w14="http://schemas.microsoft.com/office/word/2010/wordml"
            xmlns:wpg="http://schemas.microsoft.com/office/word/2010/wordprocessingGroup"
            xmlns:wpi="http://schemas.microsoft.com/office/word/2010/wordprocessingInk"
            xmlns:wne="http://schemas.microsoft.com/office/word/2006/wordml"
            xmlns:wps="http://schemas.microsoft.com/office/word/2010/wordprocessingShape"
            mc:Ignorable="w14 wp14">
    <w:body>
        <w:p w:rsidR="005F670F" w:rsidRDefault="005F79F5">
            <w:r>
                <w:t>Test</w:t>
            </w:r>
            <w:bookmarkStart w:id="0" w:name="_GoBack"/>
            <w:bookmarkEnd w:id="0"/>
        </w:p>
        <w:sectPr w:rsidR="005F670F">
            <w:pgSz w:w="12240" w:h="15840"/>
            <w:pgMar w:top="1440" w:right="1440" w:bottom="1440" w:left="1440"
                     w:header="720" w:footer="720" w:gutter="0"/>
            <w:cols w:space="720"/>
            <w:docGrid w:linePitch="360"/>
        </w:sectPr>
    </w:body>
</w:document>
Здесь:
<w:document>— сам документ<w:body>— тело документа<w:p>— параграф<w:r>— run (фрагмент) текста<w:t>— сам текст<w:sectPr>— описание страницы
Если открыть этот документ в текстовом редакторе, то увидим документ из одного слова Test.
word/_rels/document.xml.rels
Здесь содержится список связей части word/document.xml. Название файла связей создаётся из названия части документа к которой он относится и добавления к нему расширения rels. Папка с файлом связей называется _rels и находится на том же уровне, что и часть к которой он относится. Так как связей в word/document.xml никаких нет то и в файле пусто:
<Relationships xmlns="http://schemas.openxmlformats.org/package/2006/relationships">
</Relationships>
Даже если связей нет, этот файл должен существовать.
docx и Microsoft Word
docx созданный с помощью Microsoft Word, да в принципе и с помощью любого другого редактора имеет несколько дополнительных файлов.
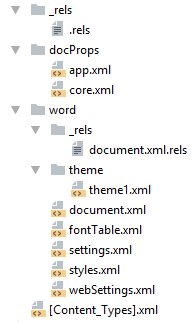
Вот что в них содержится:
docProps/core.xml— основные метаданные документа согласно Open Packaging Conventions и Dublin Core [1], [2].docProps/app.xml— общая информация о документе: количество страниц, слов, символов, название приложения в котором был создан документ и т.п.word/settings.xml— настройки относящиеся к текущему документу.word/styles.xml— стили применимые к документу. Отделяют данные от представления.word/webSettings.xml— настройки отображения HTML частей документа и настройки того, как конвертировать документ в HTML.word/fontTable.xml— список шрифтов используемых в документе.word/theme1.xml— тема (состоит из цветовой схемы, шрифтов и форматирования).
В сложных документах частей может быть гораздо больше.
Реверс-инжиниринг docx
Итак, первоначальная задача — узнать как какой-либо фрагмент документа хранится в xml, чтобы потом создавать (или парсить) подобные документы самостоятельно. Для этого нам понадобятся:
- Архиватор zip
- Библиотека для форматирования XML (Word выдаёт XML без отступов, одной строкой)
- Средство для просмотра diff между файлами, я буду использовать git и TortoiseGit
Инструменты
- Под Windows: zip, unzip, libxml2, git, TortoiseGit
- Под Linux:
apt-get install zip unzip libxml2 libxml2-utils git
Также понадобятся скрипты для автоматического (раз)архивирования и форматирования XML.
Использование под Windows:
unpack file dir— распаковывает документfileв папкуdirи форматирует xmlpack dir file— запаковывает папкуdirв документfile
Использование под Linux аналогично, только ./unpack.sh вместо unpack, а pack становится ./pack.sh.
Использование
Поиск изменений происходит следующим образом:
- Создаём пустой docx файл в редакторе.
- Распаковываем его с помощью
unpackв новую папку. - Коммитим новую папку.
- Добавляем в файл из п. 1. изучаемый элемент (гиперссылку, таблицу и т.д.).
- Распаковываем изменённый файл в уже существующую папку.
- Изучаем diff, убирая ненужные изменения (перестановки связей, порядок пространств имён и т.п.).
- Запаковываем папку и проверяем что получившийся файл открывается.
- Коммитим изменённую папку.
Пример 1. Выделение текста жирным
Посмотрим на практике, как найти тег который определяет форматирование текста жирным шрифтом.
- Создаём документ
bold.docxс обычным (не жирным) текстом Test. - Распаковываем его:
unpack bold.docx bold. - Коммитим результат.
- Выделяем текст Test жирным.
- Распаковываем
unpack bold.docx bold. - Изначально diff выглядел следующим образом:
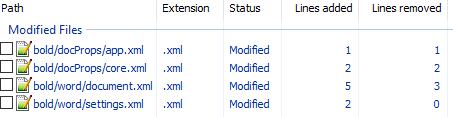
Рассмотрим его подробно:
docProps/app.xml
@@ -1,9 +1,9 @@
-  <TotalTime>0</TotalTime>
+  <TotalTime>1</TotalTime>
Изменение времени нам не нужно.
docProps/core.xml
@@ -4,9 +4,9 @@
-  <cp:revision>1</cp:revision>
+  <cp:revision>2</cp:revision>
   <dcterms:created xsi:type="dcterms:W3CDTF">2017-02-07T19:37:00Z</dcterms:created>
-  <dcterms:modified xsi:type="dcterms:W3CDTF">2017-02-07T19:37:00Z</dcterms:modified>
+  <dcterms:modified xsi:type="dcterms:W3CDTF">2017-02-08T10:01:00Z</dcterms:modified>
Изменение версии документа и даты модификации нас также не интересует.
word/document.xml
diff
@@ -1,24 +1,26 @@
    <w:body>
-    <w:p w:rsidR="0076695C" w:rsidRPr="00290C70" w:rsidRDefault="00290C70">
+    <w:p w:rsidR="0076695C" w:rsidRPr="00F752CF" w:rsidRDefault="00290C70">
       <w:pPr>
         <w:rPr>
+          <w:b/>
           <w:lang w:val="en-US"/>
         </w:rPr>
       </w:pPr>
-      <w:r>
+      <w:r w:rsidRPr="00F752CF">
         <w:rPr>
+          <w:b/>
           <w:lang w:val="en-US"/>
         </w:rPr>
         <w:t>Test</w:t>
       </w:r>
       <w:bookmarkStart w:id="0" w:name="_GoBack"/>
       <w:bookmarkEnd w:id="0"/>
     </w:p>
-    <w:sectPr w:rsidR="0076695C" w:rsidRPr="00290C70">
+    <w:sectPr w:rsidR="0076695C" w:rsidRPr="00F752CF">
Изменения в w:rsidR не интересны — это внутренняя информация для Microsoft Word. Ключевое изменение тут
         <w:rPr>
+          <w:b/>
в параграфе с Test. Видимо элемент <w:b/> и делает текст жирным. Оставляем это изменение и отменяем остальные.
word/settings.xml
@@ -1,8 +1,9 @@
+  <w:proofState w:spelling="clean"/>
@@ -17,10 +18,11 @@
+    <w:rsid w:val="00F752CF"/>
Также не содержит ничего относящегося к жирному тексту. Отменяем.
7 Запаковываем папку с 1м изменением (добавлением <w:b/>) и проверяем что документ открывается и показывает то, что ожидалось.
8 Коммитим изменение.
Пример 2. Нижний колонтитул
Теперь разберём пример посложнее — добавление нижнего колонтитула.
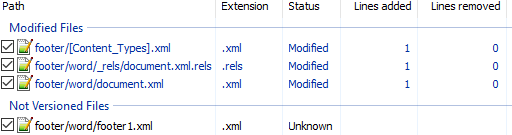
Вот первоначальный коммит. Добавляем нижний колонтитул с текстом 123 и распаковываем документ. Такой diff получается первоначально:

Сразу же исключаем изменения в docProps/app.xml и docProps/core.xml — там тоже самое, что и в первом примере.
[Content_Types].xml
@@ -4,10 +4,13 @@
   <Default Extension="xml" ContentType="application/xml"/>
   <Override PartName="/word/document.xml" ContentType="application/vnd.openxmlformats-officedocument.wordprocessingml.document.main+xml"/>
+  <Override PartName="/word/footnotes.xml" ContentType="application/vnd.openxmlformats-officedocument.wordprocessingml.footnotes+xml"/>
+  <Override PartName="/word/endnotes.xml" ContentType="application/vnd.openxmlformats-officedocument.wordprocessingml.endnotes+xml"/>
+  <Override PartName="/word/footer1.xml" ContentType="application/vnd.openxmlformats-officedocument.wordprocessingml.footer+xml"/>
footer явно выглядит как то, что нам нужно, но что делать с footnotes и endnotes? Являются ли они обязательными при добавлении нижнего колонтитула или их создали заодно? Ответить на этот вопрос не всегда просто, вот основные пути:
- Посмотреть, связаны ли изменения друг с другом
- Экспериментировать
- Ну а если совсем не понятно что происходит:

Идём пока что дальше.
word/_rels/document.xml.rels
Изначально diff выглядит вот так:
diff
@@ -1,8 +1,11 @@
 <?xml version="1.0" encoding="UTF-8" standalone="yes"?>
 <Relationships xmlns="http://schemas.openxmlformats.org/package/2006/relationships">
+  <Relationship Id="rId5" Type="http://schemas.openxmlformats.org/officeDocument/2006/relationships/theme" Target="theme/theme1.xml"/>
   <Relationship Id="rId3" Type="http://schemas.openxmlformats.org/officeDocument/2006/relationships/webSettings" Target="webSettings.xml"/>
+  <Relationship Id="rId4" Type="http://schemas.openxmlformats.org/officeDocument/2006/relationships/fontTable" Target="fontTable.xml"/>
   <Relationship Id="rId2" Type="http://schemas.openxmlformats.org/officeDocument/2006/relationships/settings" Target="settings.xml"/>
   <Relationship Id="rId1" Type="http://schemas.openxmlformats.org/officeDocument/2006/relationships/styles" Target="styles.xml"/>
-  <Relationship Id="rId5" Type="http://schemas.openxmlformats.org/officeDocument/2006/relationships/theme" Target="theme/theme1.xml"/>
-  <Relationship Id="rId4" Type="http://schemas.openxmlformats.org/officeDocument/2006/relationships/fontTable" Target="fontTable.xml"/>
+  <Relationship Id="rId6" Type="http://schemas.openxmlformats.org/officeDocument/2006/relationships/footer" Target="footer1.xml"/>
+  <Relationship Id="rId7" Type="http://schemas.openxmlformats.org/officeDocument/2006/relationships/endnotes" Target="endnotes.xml"/>
+  <Relationship Id="rId8" Type="http://schemas.openxmlformats.org/officeDocument/2006/relationships/footnotes" Target="footnotes.xml"/>
 </Relationships>
Видно, что часть изменений связана с тем, что Word изменил порядок связей, уберём их:
@@ -3,6 +3,9 @@
+  <Relationship Id="rId6" Type="http://schemas.openxmlformats.org/officeDocument/2006/relationships/footer" Target="footer1.xml"/>
+  <Relationship Id="rId7" Type="http://schemas.openxmlformats.org/officeDocument/2006/relationships/endnotes" Target="endnotes.xml"/>
+  <Relationship Id="rId8" Type="http://schemas.openxmlformats.org/officeDocument/2006/relationships/footnotes" Target="footnotes.xml"/>
Опять появляются footer, footnotes, endnotes. Все они связаны с основным документом, перейдём к нему:
word/document.xml
@@ -15,10 +15,11 @@
       </w:r>
       <w:bookmarkStart w:id="0" w:name="_GoBack"/>
       <w:bookmarkEnd w:id="0"/>
     </w:p>
     <w:sectPr w:rsidR="0076695C" w:rsidRPr="00290C70">
+      <w:footerReference w:type="default" r:id="rId6"/>
       <w:pgSz w:w="11906" w:h="16838"/>
       <w:pgMar w:top="1134" w:right="850" w:bottom="1134" w:left="1701" w:header="708" w:footer="708" w:gutter="0"/>
       <w:cols w:space="708"/>
       <w:docGrid w:linePitch="360"/>
     </w:sectPr>
Редкий случай когда есть только нужные изменения. Видна явная ссылка на footer из sectPr. А так как ссылок в документе на footnotes и endnotes нет, то можно предположить что они нам не понадобятся.
word/settings.xml
diff
@@ -1,19 +1,30 @@
 <?xml version="1.0" encoding="UTF-8" standalone="yes"?>
 <w:settings xmlns:mc="http://schemas.openxmlformats.org/markup-compatibility/2006" xmlns:o="urn:schemas-microsoft-com:office:office" xmlns:r="http://schemas.openxmlformats.org/officeDocument/2006/relationships" xmlns:m="http://schemas.openxmlformats.org/officeDocument/2006/math" xmlns:v="urn:schemas-microsoft-com:vml" xmlns:w10="urn:schemas-microsoft-com:office:word" xmlns:w="http://schemas.openxmlformats.org/wordprocessingml/2006/main" xmlns:w14="http://schemas.microsoft.com/office/word/2010/wordml" xmlns:w15="http://schemas.microsoft.com/office/word/2012/wordml" xmlns:sl="http://schemas.openxmlformats.org/schemaLibrary/2006/main" mc:Ignorable="w14 w15">
   <w:zoom w:percent="100"/>
+  <w:proofState w:spelling="clean"/>
   <w:defaultTabStop w:val="708"/>
   <w:characterSpacingControl w:val="doNotCompress"/>
+  <w:footnotePr>
+    <w:footnote w:id="-1"/>
+    <w:footnote w:id="0"/>
+  </w:footnotePr>
+  <w:endnotePr>
+    <w:endnote w:id="-1"/>
+    <w:endnote w:id="0"/>
+  </w:endnotePr>
   <w:compat>
     <w:compatSetting w:name="compatibilityMode" w:uri="http://schemas.microsoft.com/office/word" w:val="15"/>
     <w:compatSetting w:name="overrideTableStyleFontSizeAndJustification" w:uri="http://schemas.microsoft.com/office/word" w:val="1"/>
     <w:compatSetting w:name="enableOpenTypeFeatures" w:uri="http://schemas.microsoft.com/office/word" w:val="1"/>
     <w:compatSetting w:name="doNotFlipMirrorIndents" w:uri="http://schemas.microsoft.com/office/word" w:val="1"/>
     <w:compatSetting w:name="differentiateMultirowTableHeaders" w:uri="http://schemas.microsoft.com/office/word" w:val="1"/>
   </w:compat>
   <w:rsids>
     <w:rsidRoot w:val="00290C70"/>
+    <w:rsid w:val="000A7B7B"/>
+    <w:rsid w:val="001B0DE6"/>
А вот и появились ссылки на footnotes, endnotes добавляющие их в документ.
word/styles.xml
diff
@@ -480,6 +480,50 @@
       <w:rFonts w:ascii="Times New Roman" w:hAnsi="Times New Roman"/>
       <w:b/>
       <w:sz w:val="28"/>
     </w:rPr>
   </w:style>
+  <w:style w:type="paragraph" w:styleId="a4">
+    <w:name w:val="header"/>
+    <w:basedOn w:val="a"/>
+    <w:link w:val="a5"/>
+    <w:uiPriority w:val="99"/>
+    <w:unhideWhenUsed/>
+    <w:rsid w:val="000A7B7B"/>
+    <w:pPr>
+      <w:tabs>
+        <w:tab w:val="center" w:pos="4677"/>
+        <w:tab w:val="right" w:pos="9355"/>
+      </w:tabs>
+      <w:spacing w:after="0" w:line="240" w:lineRule="auto"/>
+    </w:pPr>
+  </w:style>
+  <w:style w:type="character" w:customStyle="1" w:styleId="a5">
+    <w:name w:val="Верхний колонтитул Знак"/>
+    <w:basedOn w:val="a0"/>
+    <w:link w:val="a4"/>
+    <w:uiPriority w:val="99"/>
+    <w:rsid w:val="000A7B7B"/>
+  </w:style>
+  <w:style w:type="paragraph" w:styleId="a6">
+    <w:name w:val="footer"/>
+    <w:basedOn w:val="a"/>
+    <w:link w:val="a7"/>
+    <w:uiPriority w:val="99"/>
+    <w:unhideWhenUsed/>
+    <w:rsid w:val="000A7B7B"/>
+    <w:pPr>
+      <w:tabs>
+        <w:tab w:val="center" w:pos="4677"/>
+        <w:tab w:val="right" w:pos="9355"/>
+      </w:tabs>
+      <w:spacing w:after="0" w:line="240" w:lineRule="auto"/>
+    </w:pPr>
+  </w:style>
+  <w:style w:type="character" w:customStyle="1" w:styleId="a7">
+    <w:name w:val="Нижний колонтитул Знак"/>
+    <w:basedOn w:val="a0"/>
+    <w:link w:val="a6"/>
+    <w:uiPriority w:val="99"/>
+    <w:rsid w:val="000A7B7B"/>
+  </w:style>
 </w:styles>
Изменения в стилях нас интересуют только если мы ищем как поменять стиль. В данном случае это изменение можно убрать.
Посмотрим теперь собственно на сам нижний колонтитул (часть пространств имён опущена для читабельности, но в документе они должны быть):
<w:ftr xmlns:w="http://schemas.openxmlformats.org/wordprocessingml/2006/main">
  <w:p w:rsidR="000A7B7B" w:rsidRDefault="000A7B7B">
    <w:pPr>
      <w:pStyle w:val="a6"/>
    </w:pPr>
    <w:r>
      <w:t>123</w:t>
    </w:r>
  </w:p>
</w:ftr>
Тут виден текст 123. Единственное, что надо исправить — убрать ссылку на <w:pStyle w:val="a6"/>.
В результате анализа всех изменений делаем следующие предположения:
- footnotes и endnotes не нужны
- В
[Content_Types].xmlнадо добавить footer - В
word/_rels/document.xml.relsнадо добавить ссылку на footer - В
word/document.xmlв тег<w:sectPr>надо добавить<w:footerReference>
Уменьшаем diff до этого набора изменений:
Затем запаковываем документ и открываем его.
Если всё сделано правильно, то документ откроется и в нём будет нижний колонтитул с текстом 123. А вот и итоговый коммит.
Таким образом процесс поиска изменений сводится к поиску минимального набора изменений, достаточного для достижения заданного результата.
Практика
Найдя интересующее нас изменение, логично перейти к следующему этапу, это может быть что-либо из:
- Создания docx
- Парсинг docx
- Преобразования docx
Тут нам потребуются знания XSLT и XPath.
Давайте напишем достаточно простое преобразование — замену или добавление нижнего колонтитула в существующий документ. Писать я буду на языке Caché ObjectScript, но даже если вы его не знаете — не беда. В основном будем вызовать XSLT и архиватор. Ничего более. Итак, приступим.
Алгоритм
Алгоритм выглядит следующим образом:
- Распаковываем документ.
- Добавляем наш нижний колонтитул.
- Прописываем ссылку на него в
[Content_Types].xmlиword/_rels/document.xml.rels. - В
word/document.xmlв тег<w:sectPr>добавляем тег<w:footerReference>или заменяем в нём ссылку на наш нижний колонтитул. - Запаковываем документ.
Приступим.
Распаковка
В Caché ObjectScript есть возможность выполнять команды ОС с помощью функции $zf(-1, oscommand). Вызовем unzip для распаковки документа с помощью обёртки над $zf(-1):
/// Используя %3 (unzip) распаковать файл %1 в папку %2
Parameter UNZIP = "%3 %1 -d %2";

/// Распаковать архив source в папку targetDir
ClassMethod executeUnzip(source, targetDir) As %Status
{
    set timeout = 100
    set cmd = $$$FormatText(..#UNZIP, source, targetDir, ..getUnzip())
    return ..execute(cmd, timeout)
}
Создаём файл нижнего колонтитула
На вход поступает текст нижнего колонтитула, запишем его в файл in.xml:
<xml>TEST</xml>В XSLT (файл — footer.xsl) будем создавать нижний колонтитул с текстом из тега xml (часть пространств имён опущена, вот полный список):
<xsl:stylesheet
  xmlns:xsl="http://www.w3.org/1999/XSL/Transform"
  xmlns="http://schemas.openxmlformats.org/package/2006/relationships" version="1.0">
    <xsl:output method="xml" omit-xml-declaration="no" indent="yes" standalone="yes"/>
    <xsl:template match="/">

        <w:ftr xmlns:w="http://schemas.openxmlformats.org/wordprocessingml/2006/main">
            <w:p>
                <w:r>
                    <w:rPr>
                        <w:lang w:val="en-US"/>
                    </w:rPr>
                    <w:t>
                        <xsl:value-of select="//xml/text()"/>
                    </w:t>
                </w:r>
            </w:p>
        </w:ftr>
    </xsl:template>
</xsl:stylesheet>
Теперь вызовем XSLT преобразователь:
do ##class(%XML.XSLT.Transformer).TransformFile("in.xml", "footer.xsl", footer0.xml") В результате получится файл нижнего колонтитула footer0.xml:
<w:ftr xmlns:w="http://schemas.openxmlformats.org/wordprocessingml/2006/main">
    <w:p>
        <w:r>
            <w:rPr>
                <w:lang w:val="en-US"/>
            </w:rPr>
            <w:t>TEST</w:t>
        </w:r>
    </w:p>
</w:ftr>
Добавляем ссылку на колонтитул в список связей основного документа
Сссылки с идентификатором rId0 как правило не существует. Впрочем можно использовать XPath для получения идентификатора которого точно не существует.
Добавляем ссылку на footer0.xml c идентификатором rId0 в word/_rels/document.xml.rels:
XSLT
<xsl:stylesheet  xmlns:xsl="http://www.w3.org/1999/XSL/Transform"  xmlns="http://schemas.openxmlformats.org/package/2006/relationships"  version="1.0">
    <xsl:output method="xml" omit-xml-declaration="yes" indent="no"  />
    <xsl:param name="new">
        <Relationship
           Id="rId0"
           Type="http://schemas.openxmlformats.org/officeDocument/2006/relationships/footer"
           Target="footer0.xml"/>
    </xsl:param>

    <xsl:template match="/*">
        <xsl:copy>
            <xsl:copy-of select="$new"/>
            <xsl:copy-of select="@* | node()"/>
        </xsl:copy>
    </xsl:template>
</xsl:stylesheet>
Прописываем ссылки в документе
Далее надо в каждый тег <w:sectPr> добавить тег <w:footerReference> или заменить в нём ссылку на наш нижний колонтитул. Оказалось, что у каждого тега <w:sectPr> может быть 3 тега <w:footerReference> — для первой страницы, четных страниц и всего остального:
XSLT
<xsl:stylesheet xmlns:xsl="http://www.w3.org/1999/XSL/Transform"
xmlns:r="http://schemas.openxmlformats.org/officeDocument/2006/relationships"
xmlns:w="http://schemas.openxmlformats.org/wordprocessingml/2006/main"
version="1.0">
    <xsl:output method="xml" omit-xml-declaration="yes" indent="yes" />
    <xsl:template match="//@* | //node()">
        <xsl:copy>
            <xsl:apply-templates select="@*"/>
            <xsl:apply-templates select="node()"/>
        </xsl:copy>
    </xsl:template>
    <xsl:template match="//w:sectPr">
        <xsl:element name="{name()}" namespace="{namespace-uri()}">
            <xsl:copy-of select="./namespace::*"/>
            <xsl:apply-templates select="@*"/>
            <xsl:copy-of select="./*[local-name() != 'footerReference']"/>
            <w:footerReference w:type="default" r:id="rId0"/>
            <w:footerReference w:type="first" r:id="rId0"/>
            <w:footerReference w:type="even" r:id="rId0"/>
        </xsl:element>
    </xsl:template>
</xsl:stylesheet>
Добавляем колонтитул в [Content_Types].xml
Добавляем в [Content_Types].xml информацию о том, что /word/footer0.xml имеет тип application/vnd.openxmlformats-officedocument.wordprocessingml.footer+xml:
XSLT
<xsl:stylesheet  xmlns:xsl="http://www.w3.org/1999/XSL/Transform"  xmlns="http://schemas.openxmlformats.org/package/2006/content-types"  version="1.0">
    <xsl:output method="xml" omit-xml-declaration="yes" indent="no"  />
    <xsl:param name="new">
        <Override
         PartName="/word/footer0.xml"
         ContentType="application/vnd.openxmlformats-officedocument.wordprocessingml.footer+xml"/>
    </xsl:param>

    <xsl:template match="/*">
        <xsl:copy>
            <xsl:copy-of select="@* | node()"/>
            <xsl:copy-of select="$new"/>
        </xsl:copy>
    </xsl:template>
</xsl:stylesheet>
В результате
Весь код опубликован. Работает он так:
do ##class(Converter.Footer).modifyFooter("in.docx", "out.docx", "TEST")Где:
in.docx— исходный документout.docx— выходящий документTEST— текст, который добавляется в нижний колонтитул
Выводы
Используя только XSLT и ZIP можно успешно работать с документами docx, таблицами xlsx и презентациями pptx.
Открытые вопросы
- Изначально хотел использовать 7z вместо zip/unzip т… к. это одна утилита и она более распространена на Windows. Однако я столкнулся с такой проблемой, что документы запакованные 7z под Linux не открываются в Microsoft Office. Я попробовал достаточно много вариантов вызова, однако положительного результата добиться не удалось.
- Ищу XSD со схемами ECMA-376 версии 5 и комментариями. XSD версии 5 без комментариев доступен к загрузке на сайте ECMA, но без комментариев в нём сложно разобраться. XSD версии 2 с комментариями доступен к загрузке.
Ссылки
- ECMA-376
- Описание docx
- Подробная статья про docx
- Репозиторий со скриптами
- Репозиторий с преобразователем нижнего колонтитула

Формат XML предназначен для хранения данных, которые могут быть полезны в работе некоторых программ, сайтов и поддержке определенных языков разметки. Создать и открыть файл в этом формате несложно. Это можно сделать, даже если на вашем компьютере не установлено специализированное программное обеспечение.
XML сам по себе является языком разметки, чем-то похожим на HTML, который используется на веб-страницах. Но если последний используется только для отображения информации и ее правильной разметки, XML позволяет структурировать ее определенным образом, что делает этот язык похожим на аналог базы данных, не требующий СУБД.
Вы можете создавать файлы XML, используя как специализированные программы, так и встроенный текстовый редактор Windows. Удобство написания кода и уровень его функциональности зависят от типа используемого программного обеспечения.
Способ 1: Visual Studio
Вместо этого редактора кода Microsoft вы можете использовать любые его аналоги от других разработчиков. Фактически, Visual Studio — это более продвинутая версия обычного Блокнота. Код теперь имеет специальную подсветку, ошибки автоматически выделяются или исправляются, а специальные шаблоны уже загружены в программу, что упрощает создание больших файлов XML.
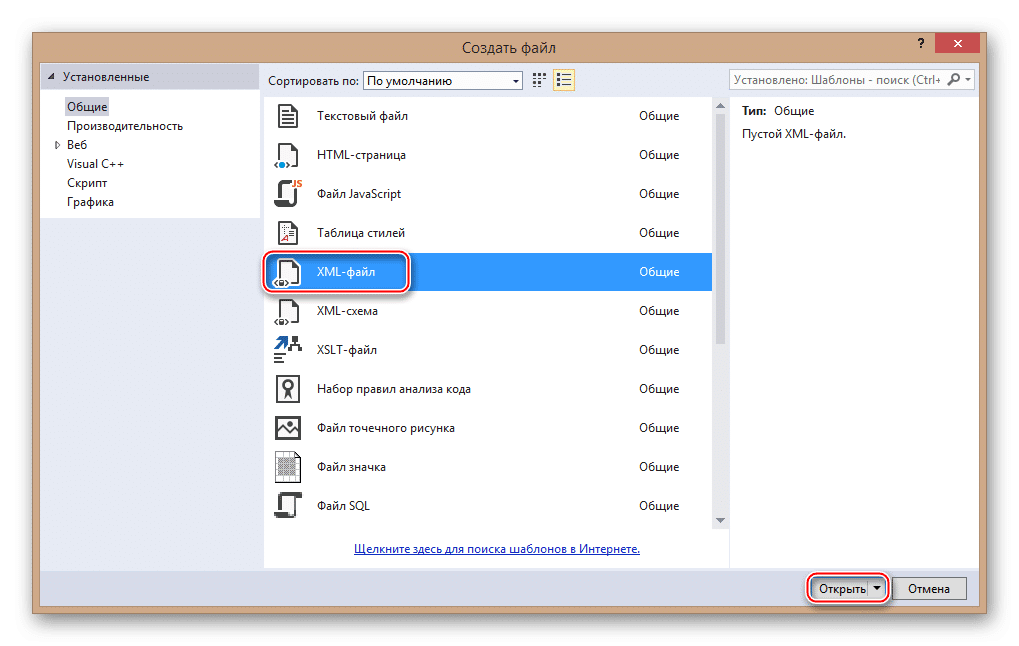
Для начала вам необходимо создать файл. Щелкните элемент «Файл» на верхней панели и выберите «Создать…» в раскрывающемся меню. Откроется список, в котором указана запись «Файл».

Вам будет перенесено окно с выбором расширения файла, соответственно выберите пункт «XML файл».
Во вновь созданном файле уже будет первая строка с кодировкой и версией. По умолчанию записывается первая версия и кодировка UTF-8, которую вы можете изменить в любой момент. Затем, чтобы создать полный XML-файл, вам нужно записать все, что было в предыдущем операторе.
По окончании работы снова выберите в верхней панели «Файл», затем из выпадающего меню пункт «Сохранить все».
Способ 2: Microsoft Excel
Вы можете создать XML-файл без написания кода, например, используя современные версии Microsoft Excel, что позволяет сохранять таблицы с этим расширением. Однако нужно понимать, что в этом случае у вас не получится создать что-то более функциональное, чем обычный стол.
Этот метод лучше всего подходит для тех, кто не хочет или не умеет работать с кодом. Однако в этом случае пользователь может столкнуться с некоторыми проблемами при перезаписи файла в формате XML. К сожалению, преобразование обычной таблицы в XML возможно только в более новых версиях MS Excel. Для этого воспользуйтесь следующими пошаговыми инструкциями:
- Дополните таблицу некоторым содержанием.
- Нажмите кнопку «Файл» в верхнем меню.
- Откроется специальное окно, в котором нужно нажать «Сохранить как…». Этот пункт находится в левом меню.
- Укажите папку, в которой вы хотите сохранить файл. Папка указана в центре экрана.
- Теперь вам нужно указать имя файла и в разделе «Тип файла» из выпадающего меню выбрать
Данные XML». - Нажмите кнопку «Сохранить».
Способ 3: Блокнот
Даже обычный Блокнот вполне подходит для работы с XML, но у пользователя, незнакомого с синтаксисом языка, возникнут трудности, так как в нем придется писать различные команды и теги. Несколько проще и продуктивнее процесс будет в специализированных программах для редактирования кода, например, в Microsoft Visual Studio. В них есть специальные метки и подсказки, которые значительно упрощают работу человеку, не знающему синтаксиса этого языка.
Для этого метода ничего скачивать не нужно, так как в операционной системе уже есть встроенный «Блокнот». Попробуем создать простую XML-таблицу по приведенным инструкциям:
- Создайте простой текстовый документ с расширением TXT. Вы можете разместить его где угодно. Открой это.
- Начните набирать в нем первые команды. Во-первых, вам нужно установить кодировку для всего файла и указать версию XML, это делается с помощью следующей команды:
Первое значение — это версия, менять ее не нужно, а второе значение — это кодировка. Рекомендуется использовать кодировку UTF-8, так как с ней прекрасно работает большинство программ и обработчиков. Однако его можно изменить на любое другое, просто набрав желаемое имя.
- Создайте первый каталог в вашем файле, написав тег и закрыв его вот так .
- Теперь вы можете написать какой-то контент внутри этого тега. Создаем тег и даем ему любое имя, например «Иван Иванов». Готовая конструкция должна выглядеть так:
- Внутри тега теперь можно писать более подробные параметры, в данном случае это информация об определенном Иване Иванове. Мы пропишем ваш возраст и местонахождение.
- Если вы следовали инструкциям, вы должны получить тот же код, что и ниже. Когда закончите, найдите «Файл» в верхнем меню и выберите «Сохранить как…» в раскрывающемся меню. При сохранении в поле «Имя файла» после точки должно стоять расширение не TXT, а XML.
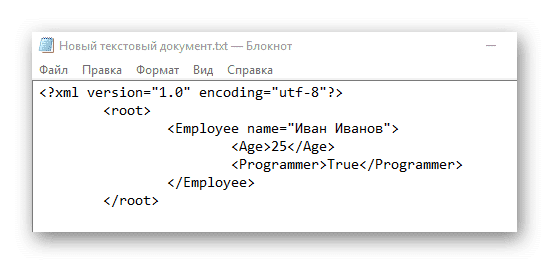
Компиляторам XML необходимо обработать этот код в виде таблицы с одним столбцом, содержащей данные о некоем Иване Иванове.
В «Блокноте» вполне можно создавать такие простые таблицы, но при создании массивов более объемных данных могут возникнуть трудности, так как в обычном «Блокноте» нет функций для исправления ошибок в коде или их выделения.
Как видите, в создании XML-файла нет ничего сложного. При желании его может создать любой пользователь, более-менее умеющий работать на компьютере. Однако для создания полного XML-файла рекомендуется изучить этот язык разметки, по крайней мере, на примитивном уровне.
Table of Contents
- Introduction
- What is Open XML
- Why use Open XML
- Installation
- Using Open XML
- Taking small steps
- Repetitive code
- Building blocks
- Alternate methods to using Open XML.
- Code samples
- Integration into your solution
- References
- Tools
- See also
- Requires
- Summary
- Source code

Introduction

This article will provide a solid base for performing common operations in Microsoft Word document 2007 format using Open XML SDK 2.5 for Office. What this article does not cover are drilling down each element type such as a paragraph element or what makes
up a specific type of style be it for a paragraph or a table.
The intent is to provide examples for developers who have never worked with Open XML for Office documents to create documents quickly without getting into all the specifics
What is Open XML
Open XML is an open ECMA 376 standard and is also approved as the ISO/IEC 29500 standard that defines a set of XML schemas for representing spreadsheets, charts, presentations, and word processing documents. Microsoft Office Word 2007, Excel 2007, PowerPoint
2007, and the later versions all use Open XML as the default file format.
A document (WordprocessingML document) is organized around the concept of stories. A story is a region of content in a WordprocessingML document.
Not all stories must be present in a valid WordprocessingML document. The simplest, valid WordprocessingML document only requires a single story—the main document story. In WordprocessingML, the main document story is represented by the main document part.
At a minimum, to create a valid WordprocessingML document using code, add a main document part to the document. In the code samples provided, the first code sample creates a document only with the main document part.
public
bool
CreateEmptyDocument(string
pFileName)
{
var fileName = Path.Combine(DocumentFolder, pFileName);
if
(File.Exists(fileName))
{
File.Delete(fileName);
}
using(var document = WordprocessingDocument.Create(fileName, WordprocessingDocumentType.Document))
{
MainDocumentPart mainPart = document.AddMainDocumentPart();
mainPart.Document = new
Document();
mainPart.Document.AppendChild(new
Body());
mainPart.Document.Save();
}
returnHelpers.ValidateWordDocument(fileName) == 0;
}
The main document story of the simplest WordprocessingML document consists of the following XML elements:
| document | The root element for a WordprocessingML’s main document part, which defines the main document story. |
| body | The container for the collection of block-level structures that comprise the main story. |
| p paragraph | Paragraph para = body.AppendChild(new Paragraph()); |
| r run | runPara = para.AppendChild(new Run()); |
| trange of text | runPara.AppendChild(new Text(“Some text in a paragraph”)); |
A simple example using the three parts above.
public
bool
CreateDocumentWithSimpleParagraph(string
pFileName)
{
var fileName = Path.Combine(DocumentFolder, pFileName);
if(File.Exists(fileName))
{
File.Delete(fileName);
}
using
(var document = WordprocessingDocument.Create(fileName, WordprocessingDocumentType.Document))
{
MainDocumentPart mainPart = document.AddMainDocumentPart();
mainPart.Document =
new
Document();
var body = mainPart.Document.AppendChild(new
Body());
Paragraph para = body.AppendChild(new
Paragraph());
Run runPara = para.AppendChild(new
Run());
// Set the font to Arial to the first Run.
var runProperties = new
RunProperties(
new
RunFonts()
{
Ascii =
"Arial"
});
var color =
new
Color { Val = Helpers.ColorConverter(System.Drawing.Color.SandyBrown) };
runProperties.Append(color);
Run run = document.MainDocumentPart.Document.Descendants<Run>().First();
run.PrependChild<RunProperties>(runProperties);
var paragraphText = "Hello from Word";
runPara.AppendChild(new
Text(paragraphText));
mainPart.Document.Save();
}
return
Helpers.ValidateWordDocument(fileName) == 0;
}
Generates the following xml which can be viewed by changing the .docx file extension to .zip.
<?xml
version="1.0"
encoding="utf-8"?>
<w:body>
<w:p>
<w:r>
<w:rPr>
<w:rFonts
w:ascii="Arial"
/>
<w:color
w:val="F4A460"
/>
</w:rPr>
<w:t>Hello from Word"</w:t>
</w:r>
</w:p>
</w:body>
</w:document>
Why use Open XML
The Open XML file formats are useful for developers because they use an open standard and are based on well-known technologies: ZIP and XML. See also,
seven key benefits of Open XML by Eric White.
Installation
To work with Open XML documents a NuGet package needs to be installed by either right clicking on a Visual Studio solution, select manage NuGet packages, select the “Browse” tab, type into the search box DocumentFormat and the first item will be
DocumentFormat.OpenXml. With this item selected choose which project in your solution will use the library via clicking on the check box next to the project name and pressing the install button.
An alternate method is via Visual Studio Tool menu, select NuGet package manager, Package manager console, copy the install link from the following page into the console, press enter to install.
Using Open XML
Depending on what your objectives are using statements will be needed. To learn which using statements are required first create a class for performing operations on documents as done in the accompanying code samples (Operations.cs), for instance, copy the
method CreateEmptyDocument using section, change the file name. At this point Visual Studio will complain about not knowing what the objects are. Hover over each object, when the lightbulb appears allow it to insert the appropriate using statements.
Create a class to the new method and execute the method followed by opening the document from Windows Explorer. If the document fails to open this means the construct (code used) to create the document most likely created a malformed document. Rather than
traversing to the document in Windows Explorer copy the following code Helpers.ValidateWordDocument into your project from the accompanying source code passing in the newly created document and check for a return value of 0 which means the document should
be valid while any return value greater than 0 indicates one or more errors in the document structure. The method ValidateWordDocument as is writes the exceptions to Visual Studio’s Output window for inspection which will assist in tracking down the problem.
Caveat: Although there is very little exception handling in the source code provided does not mean you should not implement exception handling in the form of try/catch statements. The most common reason for an exception, the document already exists and is
currently open perhaps in Word as developers like to check the labor of their coding, forget to the close the document followed by running the same code again which created the document in the first place.
Taking small steps
Rather than write a document with a header, several paragraphs, images and list at once start out slow which is how the code samples were done for this reason, for easy of learning.
Step 1, create an empty document as shown below.
using
(var document = WordprocessingDocument.Create(fileName, WordprocessingDocumentType.Document))
{
MainDocumentPart mainPart = document.AddMainDocumentPart();
mainPart.Document = new
Document();
mainPart.Document.AppendChild(new
Body());
mainPart.Document.Save();
}
Even with this simple code it’s recommended during development time to validate the newly created document using Helpers.ValidateWordDocument. When ready for production disable this method from being called using directives are the easiest method e.g. if
in DEBUG mode run validation while in RELEASE mode don’t run the validation or perhaps do run the validation depending on your comfort level of “can something go wrong” in the wild.
Once you have studied the code above move on to adding a paragraph.
private
void
NextLevel(string
pFileName)
{
var fileName = Path.Combine(DocumentFolder, pFileName);
if(File.Exists(fileName))
{
File.Delete(fileName);
}
using(var document = WordprocessingDocument.Create(fileName, WordprocessingDocumentType.Document))
{
MainDocumentPart mainPart = document.AddMainDocumentPart();
mainPart.Document = new
Document();
var body = mainPart.Document.AppendChild(new
Body());
var para = body.AppendChild(new
Paragraph());
Run runPara = para.AppendChild(new
Run());
var paragraphText = "My first paragraph.";
runPara.AppendChild(new
Text(paragraphText));
mainPart.Document.Save();
}
Console.WriteLine(Helpers.ValidateWordDocument(fileName));
}
In the example above a paragraph is added to a newly created document, zero styling of text as this can get complex and as mentioned it’s best to learn in steps.
The following example adds to the above example styling the sole paragraph font color. The color for styling is in hex which many developers don’t know a hex representation of colors without referencing a conversion table. For this reason a method is provided
to translate a Color to its hex representation using Helpers.ColorConverter, pass in System.Drawing.Color.SandyBrown and get back F4A460.
private
void
NextLevel_1(string
pFileName)
{
var fileName = Path.Combine(DocumentFolder, pFileName);
if
(File.Exists(fileName))
{
File.Delete(fileName);
}
using
(var document = WordprocessingDocument.Create(fileName, WordprocessingDocumentType.Document))
{
MainDocumentPart mainPart = document.AddMainDocumentPart();
mainPart.Document = new
Document();
var body = mainPart.Document.AppendChild(new
Body());
var para = body.AppendChild(new
Paragraph());
Run runPara = para.AppendChild(new
Run());
// Set the font to Arial to the first Run.
var runProperties = new
RunProperties(
new
RunFonts()
{
Ascii =
"Arial"
});
var color = new
Color { Val = Helpers.ColorConverter(System.Drawing.Color.SandyBrown) };
runProperties.Append(color);
Run run = document.MainDocumentPart.Document.Descendants<Run>().First();
run.PrependChild<RunProperties>(runProperties);
var paragraphText = "Styling paragraph with font color";
runPara.AppendChild(new
Text(paragraphText));
mainPart.Document.Save();
}
Console.WriteLine(Helpers.ValidateWordDocument(fileName));
}
Repetitive code
When a developer finds they are writing the same code over and over again this is a sure sign a common method may be in order. The perfect case may be adding a new paragraph yet there is not a lot of code for this to warrant a common method. A good candidate
is creating borders for a table within a document.
The following is a generic method to create borders for a table.
public
static
TableProperties CreateTableProperties()
{
return
newTableProperties(
new
TableBorders(
new
TopBorder { Val = new
EnumValue<BorderValues>(BorderValues.Single), Size = 12 },
new
BottomBorder { Val = new
EnumValue<BorderValues>(BorderValues.Single), Size = 12 },
new
LeftBorder { Val = new
EnumValue<BorderValues>(BorderValues.Single), Size = 12 },
new
RightBorder { Val = new
EnumValue<BorderValues>(BorderValues.Single), Size = 12 },
new
InsideHorizontalBorder { Val = new
EnumValue<BorderValues>(BorderValues.Single), Size = 12 },
new
InsideVerticalBorder { Val = new
EnumValue<BorderValues>(BorderValues.Single), Size = 12 })
);
}
Which is called as follows.
var table =
new
Table();
// set borders
TableProperties props = Helpers.CreateTableProperties();
table.AppendChild(props);
By writing a method as shown above not only can it be used again it clear up code for easier coding and maintenance. Another example for code reuse is for adding an image to a document as there are many parts to write code for appending an image as shown
below.
public
static
voidAddImageToBody(WordprocessingDocument document,
string
relationshipId, int
pWidth, int
pHeight)
{
// Define the reference of the image.
var element =
new
Drawing(
new
Inline(
new
Extent() { Cx = pWidth, Cy = pHeight },
new
EffectExtent()
{
LeftEdge = 0L,
TopEdge = 0L,
RightEdge = 0L,
BottomEdge = 0L
},
new
DocProperties()
{
Id = (UInt32Value)1U,
Name =
"Picture 1"
},
new
NonVisualGraphicFrameDrawingProperties(
new
GraphicFrameLocks()
{
NoChangeAspect =
true
}),
new
Graphic(
new
GraphicData(
new
Picture(
new
NonVisualPictureProperties(
new
NonVisualDrawingProperties()
{
Id = (UInt32Value)0U,
Name =
"New Bitmap Image.jpg"
},
new
NonVisualPictureDrawingProperties()),
new
BlipFill(
new
Blip(
new
BlipExtensionList(
new
BlipExtension()
{
Uri =
"{28A0092B-C50C-407E-A947-70E740481C1C}"
})
)
{
Embed = relationshipId,
CompressionState =
BlipCompressionValues.Print
},
new
Stretch(
new
FillRectangle())),
new
ShapeProperties(
new
Transform2D(
new
Offset() { X = 0L, Y = 0L },
new
Extents() { Cx = pWidth, Cy = pHeight }),
new
PresetGeometry(
new
AdjustValueList()
)
{ Preset = ShapeTypeValues.Rectangle }))
)
)
{
DistanceFromTop = (UInt32Value)0U,
DistanceFromBottom = (UInt32Value)0U,
DistanceFromLeft = (UInt32Value)0U,
DistanceFromRight = (UInt32Value)0U
});
// Append the reference to body, the element should be in a Run.
document.MainDocumentPart.Document.Body.AppendChild(new
Paragraph(new
Run(element)));
}
Note the structure of the method above, rather than attempting to write this method in a conventional manner as shown next, imagine debugging this code or modifying the code. This is why formatting the code as done above makes sense for not only this example
but for any complex operation.
public
static
voidAddImageToBodyBad(WordprocessingDocument document,
string
relationshipId, int
pWidth, int
pHeight)
{
// Define the reference of the image.
var element = new
Drawing(new
Inline(new
Extent() { Cx = pWidth, Cy = pHeight },new
EffectExtent() {LeftEdge = 0L,TopEdge = 0L,RightEdge = 0L,BottomEdge = 0L},
new
DocProperties() {Id = (UInt32Value)1U,Name = "Picture 1"},new
NonVisualGraphicFrameDrawingProperties(new
GraphicFrameLocks() {NoChangeAspect = true}),
new
Graphic(new
GraphicData(new
Picture(new
NonVisualPictureProperties(new
NonVisualDrawingProperties() {Id = (UInt32Value)0U,Name =
"New Bitmap Image.jpg"},new
NonVisualPictureDrawingProperties()),
new
BlipFill(new
Blip(new
BlipExtensionList(new
BlipExtension() {Uri = "{28A0092B-C50C-407E-A947-70E740481C1C}"
})) {Embed = relationshipId,CompressionState =BlipCompressionValues.Print},
new
Stretch(new
FillRectangle())), new
ShapeProperties(new
Transform2D( new
Offset() { X = 0L, Y = 0L }, new
Extents() { Cx = pWidth, Cy = pHeight }), new
PresetGeometry( new
AdjustValueList() ) { Preset = ShapeTypeValues.Rectangle }))) { Uri =
"http://schemas.openxmlformats.org/drawingml/2006/picture"
})) {DistanceFromTop = (UInt32Value)0U,DistanceFromBottom = (UInt32Value)0U,DistanceFromLeft = (UInt32Value)0U, DistanceFromRight = (UInt32Value)0U });
// Append the reference to body, the element should be in a Run.
document.MainDocumentPart.Document.Body.AppendChild(new
Paragraph(new
Run(element)));
}
Building blocks
By breaking up building a document the maintainer of the code can better understand code flow along with adding or modifying code to create a document. In the following code example (included with accompanying source code) there are several methods (with
overloads) to add paragraphs and bullets to a document along with a method to save the document to disk. When there is a need for new functionality such as adding a header, footer or appending an image the developer writes a method for each new feature needed
rather than code everything in one method which goes back to code reusability discussed above.
using
System;
using
System.Collections.Generic;
using
System.IO;
using
System.Linq;
using
DocumentFormat.OpenXml;
using
DocumentFormat.OpenXml.Packaging;
using
DocumentFormat.OpenXml.Wordprocessing;
namespace
WordOpenXml_cs
{
/// <summary>
/// Code by Karen Payne MVP along with assistance
/// from various forum post this class has been glued
/// together.
/// </summary>
public
classDocumentWriter : IDisposable
{
private
MemoryStream _memoryStream;
/// <summary>
/// Represents the document to work on
/// </summary>
private
WordprocessingDocument _document;
/// <summary>
/// Create a new document
/// </summary>
public
DocumentWriter()
{
_memoryStream =
new
MemoryStream();
_document = WordprocessingDocument.Create(_memoryStream, WordprocessingDocumentType.Document);
var mainPart = _document.AddMainDocumentPart();
var body =
new
Body();
mainPart.Document =
new
Document(body);
}
/// <summary>
/// Append a paragraph to the document
/// </summary>
/// <param name="sentence"></param>
public
voidAddParagraph(string
sentence)
{
List<Run> runList = ListOfStringToRunList(new
List<string> { sentence });
AddParagraph(runList);
}
/// <summary>
/// Append multiple paragraphs to the document
/// </summary>
/// <param name="sentences"></param>
public
voidAddParagraph(List<string> sentences)
{
List<Run> runList = ListOfStringToRunList(sentences);
AddParagraph(runList);
}
/// <summary>
/// Append paragraphs from a list of Run objects.
/// </summary>
/// <param name="runList"></param>
public
voidAddParagraph(List<Run> runList)
{
var para =
new
Paragraph();
foreach
(Run runItem in
runList)
{
para.AppendChild(runItem);
}
var body = _document.MainDocumentPart.Document.Body;
body.AppendChild(para);
}
/// <summary>
/// Append to the document a list of sentences (list of string) and create bullet list
/// </summary>
/// <param name="sentences"></param>
public
voidAddBulletList(List<string> sentences)
{
var runList = ListOfStringToRunList(sentences);
AddBulletList(runList);
}
/// <summary>
/// Append to the document a list of sentences (list of Run) and create bullet list
/// </summary>
/// <param name="runList"></param>
public
voidAddBulletList(List<Run> runList)
{
// Introduce bulleted numbering in case it will be needed at some point
NumberingDefinitionsPart numberingPart = _document.MainDocumentPart.NumberingDefinitionsPart;
if
(numberingPart == null)
{
numberingPart = _document.MainDocumentPart.AddNewPart<NumberingDefinitionsPart>("NumberingDefinitionsPart001");
var element =
new
Numbering();
element.Save(numberingPart);
}
// Insert an AbstractNum into the numbering part numbering list. The order seems to matter or it will not pass the
// Open XML SDK productivity Tools validation test. AbstractNum comes first and then NumberingInstance and we want to
// insert this AFTER the last AbstractNum and BEFORE the first NumberingInstance or we will get a validation error.
var abstractNumberId = numberingPart.Numbering.Elements<AbstractNum>().Count() + 1;
var abstractLevel =
new
Level(new
NumberingFormat()
{
Val = NumberFormatValues.Bullet
},
new
LevelText() { Val = "·"
}) { LevelIndex = 0 };
var abstractNum1 =
new
AbstractNum(abstractLevel) { AbstractNumberId = abstractNumberId };
if
(abstractNumberId == 1)
{
numberingPart.Numbering.Append(abstractNum1);
}
else
{
var lastAbstractNum = numberingPart.Numbering.Elements<AbstractNum>().Last();
numberingPart.Numbering.InsertAfter(abstractNum1, lastAbstractNum);
}
// Insert an NumberingInstance into the numbering part numbering list. The order seems to matter or it will not pass the
// Open XML SDK Productity Tools validation test. AbstractNum comes first and then NumberingInstance and we want to
// insert this AFTER the last NumberingInstance and AFTER all the AbstractNum entries or we will get a validation error.
var numberId = numberingPart.Numbering.Elements<NumberingInstance>().Count() + 1;
var numberingInstance1 =
new
NumberingInstance() { NumberID = numberId };
var abstractNumId1 =
new
AbstractNumId() { Val = abstractNumberId };
numberingInstance1.Append(abstractNumId1);
if
(numberId == 1)
{
numberingPart.Numbering.Append(numberingInstance1);
}
else
{
var lastNumberingInstance = numberingPart.Numbering.Elements<NumberingInstance>().Last();
numberingPart.Numbering.InsertAfter(numberingInstance1, lastNumberingInstance);
}
Body body = _document.MainDocumentPart.Document.Body;
foreach
(Run runItem in
runList)
{
// Create items for paragraph properties
var numberingProperties =
new
NumberingProperties(new
NumberingLevelReference()
{
Val = 0
},
new
NumberingId() { Val = numberId });
var spacingBetweenLines1 =
new
SpacingBetweenLines() { After = "0"
}; // Get rid of space between bullets
var indentation =
new
Indentation() { Left = "720", Hanging =
"360" };
// correct indentation
var paragraphMarkRunProperties1 =
new
ParagraphMarkRunProperties();
var runFonts1 =
new
RunFonts() { Ascii = "Symbol", HighAnsi =
"Symbol" };
paragraphMarkRunProperties1.Append(runFonts1);
// create paragraph properties
var paragraphProperties =
new
ParagraphProperties(
numberingProperties,
spacingBetweenLines1,
indentation,
paragraphMarkRunProperties1);
// Create paragraph
var newPara =
new
Paragraph(paragraphProperties);
// Add run to the paragraph
newPara.AppendChild(runItem);
// Add one bullet item to the body
body.AppendChild(newPara);
}
}
public
voidDispose()
{
CloseAndDisposeOfDocument();
if
(_memoryStream != null)
{
_memoryStream.Dispose();
_memoryStream =
null;
}
}
/// <summary>
/// Save document.
/// </summary>
/// <param name="pFileName">Path and file name to save to</param>
public
voidSaveToFile(string
pFileName)
{
if
(_document != null)
{
CloseAndDisposeOfDocument();
}
if
(_memoryStream == null)
throw
new
ArgumentException("This object has already been disposed of so you cannot save it!");
using
(var fs = File.Create(pFileName))
{
_memoryStream.WriteTo(fs);
}
}
/// <summary>
/// Dispose of document object.
/// </summary>
private
voidCloseAndDisposeOfDocument()
{
if
(_document != null)
{
_document.Close();
_document.Dispose();
_document =
null;
}
}
private
staticList<Run> ListOfStringToRunList(List<string> sentences)
{
var runList =
new
List<Run>();
foreach
(var item in
sentences)
{
var newRun =
new
Run();
newRun.AppendChild(new
Text(item));
runList.Add(newRun);
}
return
runList;
}
}
}
Alternate methods to using Open XML.
A logical choice for many is Word automation which is done by adding references to Primary Interop Assemblies (PIAs) as explained in the following code sample. Using Word automation is easier to use than Open XML with drawbacks such as PIA’s must be present
on the machine creating and modifying documents along with matching the same version of DLL’s your solution is dependent on. There is a possibility of objects not being properly released which overtime can ultimately slow or crash a machine.
Another option is to use a third party library such as Aspose, e-iceblue or GemBox. These libraries are easier to use then Open XML or Word automation yet this doesn’t negate using any of these options. In the accompanying code samples there is a project
mirroring the Open XML project which uses GemBox code samples to get an idea the difference between both methods. There are no code samples for Word automation as there is a chance of failure dependent on the developer machine which attempts to run automation
code samples while the Open XML and Gembox code samples will not fail unless when attempting to run the Open XML code samples a package is missing which may be resolved by selecting restore NuGet packages from right clicking on Solution Explorer and selecting
restore NuGet packages.
Code samples
Code samples are broken down into separate methods where from top to bottom build on each other from an creating an empty document to working with list (bulleted list), images, styling, tables and simple modification of text.
You are encouraged to run each code sample once, view results then go back and run each code sample again by setting a breakpoint at the start of each code sample and run through the code to better understand what the code does.
Integration into your solution
Add the NuGet package for DocumentFormat.OpenXml as explained in the Installation section above. Create a unit test project, create a test method for each operation which will be done in your application. As the methods don’t exist Visual Studio will prompt
for you to create the method(s).
If in a test method you write
var wordOperations =
new
WordOperations();
The method does not exist, select the lightbulb and select generate class WordOperations in a new file. Once created open this file and change the class from internal to public or select “generate new type” which brings up a dialog to add this class to another
project which is the best option as the class does not need to be in the unit test project. Once this is done create methods (which of course don’t exists) and as with the creation of the class Visual Studio will create these methods and properties for you.
This style of unit test is known as TDD (Test Driven Development).
The alternate which many developers opt for is to first create Open XML code in a class project or a class in the same project which will call the Word methods, create a unit test project and add a reference to the class project to write unit test against.
The last alternate is to simply write methods, once the code executes open the newly generated or modified documents from Windows Explorer and examine the documents.
Important notes in both projects documents are created under BinDebugDocuments where if the folder Documents does not exists it will be created by a post build event (refer to project properties, build events.
References
GitHub OfficeDev/Open-XML-SDK
Tools
Open XML Package Editor for Modern Visual Studios
See also
- Excel operations with Open XML, Automation and OleDb
- Processing Power Point templates using OpenXml
Requires
To run the code samples,
Microsoft Visual Studio 2015 or higher.
Summary
This article has presented the basics to write code for most common operations for generating Word documents using Open XML with tips and suggestions to write maintainable code. There is a good deal more which Open XML can perform which as a developer becomes
comfortable with Open XML will become easier while little interaction with Open XML can be frustrating which means, take your time building on what has been examined in this article.
Source code
GitHub repo