
- Home
- Windows
- Developer Tools
- XML Tools
- Excel 2003 Tool: Excel XML Toolbox for Microsoft Office Excel 2003

Developer’s Description
The Excel XML Toolbox for Microsoft Office Excel 2003 provides many useful tools for working with XML in Excel. This toolbox helps developers in a number of ways: Working with Custom-defined XML Schema; Working with XML and the Excel Object Model; Working with SpreadsheetML; and Shortcuts. This version is the first release on CNET Download.com.
Full Specifications
What’s new in version 5-May
This version is the first release on CNET Download.com.
General
Release December 5, 2008
Date Added October 4, 2007
Version 5-May
Operating Systems
Operating Systems Windows, Windows 2000, Windows XP
Additional Requirements Windows 2000/XP/2003 Server
Popularity
Total Downloads 9,080
Downloads Last Week 24
Report Software
Related Software

Edit XML files with an editor that uses a synchronized table-tree-and-text display.
XML Marker

Edit and format your XML code documents.
XmlPad

Modify and examine the contents of XML files.
XML Viewer

Get the best price on everything
Shop your favorite products and we’ll find the best deal with a single click. Designed to make shopping easier.
Содержание
- Как создать xml файл из excel
- Собрать данные из XML файлов в Excel и экспортировать
- Как создать XML-файл из Excel
- Как сохранить файл Excel в формате XML
- Как открыть XML файл в Excel
- Как преобразовать файл XML в Excel
- Как собрать данные из XML файлов в Excel
- Преобразование файлов Excel в XML и обратно
- Немного об Excel и XML
- Как преобразовать Excel в XML
- Как перевести XML в Excel
- Подведём итоги
- Конвертируем xls в xml
- Экспорт Excel в XML и наоборот
- Как перевести документ Excel в формат XML?
Как создать xml файл из excel
Собрать данные из XML файлов в Excel и экспортировать
Microsoft Excel – удобный инструмент для организации и структурирования самых разнообразных данных. Он позволяет обрабатывать информацию разными методами, редактировать массивы данных.
Рассмотрим возможности использования его для формирования и обработки файлов веб-приложений. На конкретном примере изучим основы работы с XML в Excel.
Как создать XML-файл из Excel
XML – стандарт файла для передачи данных в Сети. Excel поддерживает его экспорт и импорт.
Рассмотрим создание XML-файла на примере производственного календаря.
- Сделаем таблицу, по которой нужно создать XML файл в Excel и заполним ее данными.
- Создадим и вставим карту XML с необходимой структурой документа.
- Экспортируем данные таблицы в XML формат.
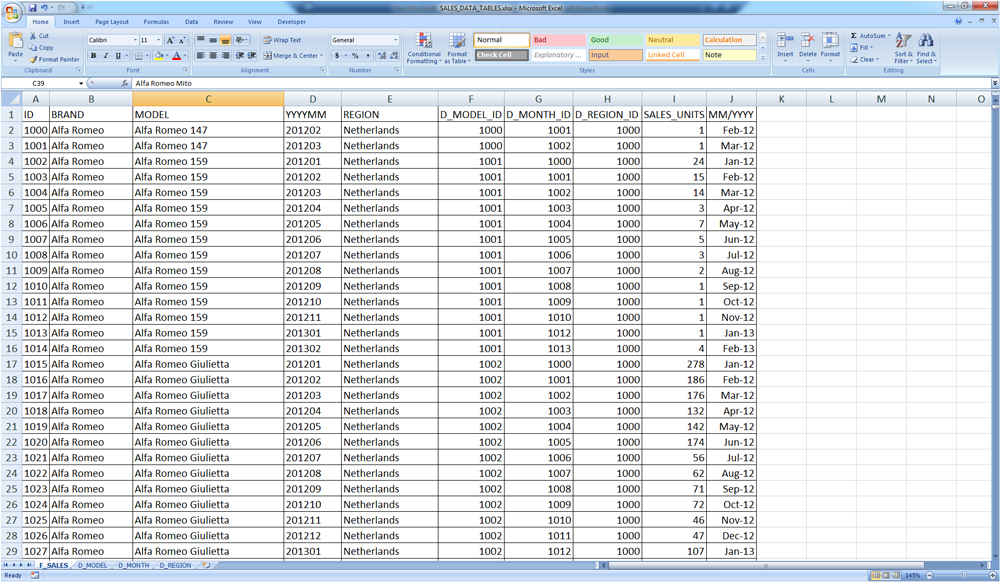
- Наша таблица – производственный календарь.

- Создаем в любом текстовом редакторе (например, «Блокнот») желаемую карту XML структуры для генерации файла сохраним. В данном примере буде использовать следующую карту структуры:


Сохраняем в XML файл.
Другие способы получения XML-данных (схемы):
- Скачать из базы данных, специализированного бизнес-приложения. Схемы могут предоставляться коммерческими сайтами, службами. Простые варианты находятся в открытом доступе.
- Использовать готовые образцы для проверки карт XML. В образцах – основные элементы, структура XML. Копируете – вставляете в программу «Блокнот» — сохраняете с нужным расширением.
Как сохранить файл Excel в формате XML
Один из вариантов:
- Нажимаем кнопку Office. Выбираем «Сохранить как» — «Другие форматы».
- Назначаем имя. Выбираем место сохранения и тип файла – XML.
Если выдает ошибку, книгу можно сохранить в виде таблицы XML 2003 либо веб-страницы. С этими форматами проблем, как правило, не возникает.
- Скачать конвертер XLC в XML. Либо найти сервис, с помощью которого можно экспортировать файл онлайн.
- Скачать с официального сайта Microsoft надстройку XML Tools Add-in. Она в бесплатном доступе.
- Открываем новую книгу. Кнопка Office – «Открыть».
Как открыть XML файл в Excel
- Меняем формат на «файлы XML». Выбираем нужный файл. Жмем «Открыть».
- Способ открытия – XML-таблица. ОК.
- Появляется оповещение типа


Жмем ОК. С полученной таблицей можно работать, как с любым файлом Excel.
Как преобразовать файл XML в Excel
- Меню «Разработчик» — вкладка «Импорт».
- В диалоговом окне выбираем файл XML, который хотим преобразовать.
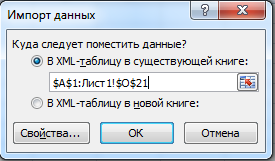
- Нажимаем «Импорт». Программа Excel предложит самостоятельно создать схему на основе полученных данных. Соглашаемся – ОК. Откроется окно, где нужно выбрать место для импортируемого файла.
- Назначаем диапазон для импорта. Лучше брать с «запасом». Жмем ОК.

Созданную таблицу редактируем и сохраняем уже в формате Excel.
Как собрать данные из XML файлов в Excel
Принцип сбора информации из нескольких XML-файлов такой же, как и принцип преобразования. Когда мы импортируем данные в Excel, одновременно передается карта XML. В эту же схему можно переносить и другие данные.
Каждый новый файл будет привязываться к имеющейся карте. Каждому элементу в структуре таблицы соответствует элемент в карте. Допускается только одна привязка данных.
Чтобы настроить параметры привязки, откройте в меню «Разработчик» инструмент «Свойства карты».
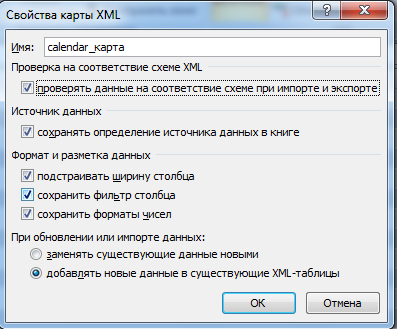
- Каждый новый файл будет проверяться программой Excel на соответствие установленной карте (если поставим галочку напротив этого пункта).
- Данные могут обновляться. Либо новая информация добавится в существующую таблицу (имеет смысл, если нужно собрать данные из похожих файлов).
Это все ручные способы импорта и экспорта файлов.
Преобразование файлов Excel в XML и обратно
Немного об Excel и XML
Итак, прежде чем узнать, как открыть, создать или перевести файл XML в Excel и обратно, давайте поближе познакомимся с типами этих файлов. Здесь нужно сразу отметить, что документы Excel имеют множество форматов, в то время, как XML — и есть формат файла. Поэтому не стоит путать эти два понятия.
Microsoft Excel является мощной программой для вычислений с множеством полезных функций
Программа Microsoft Excel является специальной утилитой, предназначенной для создания и редактирования таблиц. С ними вы уже можете делать всё что угодно: создавать базы, диаграммы, формулы и другие типы данных. Это очень мощный инструмент, поэтому все его возможности мы обсуждать не будем. Сегодня наша цель несколько другая, и мы не станем отходить от темы сегодняшней дискуссии.
Файлы XML, для более простого понимания, предназначены для хранения, обмена различных данных между утилитами. Особенно часто пользуются этим языком разметки при передаче информации через интернет. И когда вам нужно перенести табличные данные из Экселя на сайт, например, то вам нужно будет преобразовать свой документ, чтобы он правильно отображался. Поэтому давайте не будем оттягивать момент истины и сразу приступим к выполнению операции.
Как преобразовать Excel в XML
Дорогие друзья, на самом деле преобразование файлов является достаточно простым занятием. Однако, у некоторых пользователей могут возникнуть проблемы при переносе данных, поэтому сегодня мы с вами рассмотрим несколько способов для осуществления нашего замысла. Поэтому набираемся терпения и приступаем к действиям:
- Самый простой способ, который может не сработать в некоторых случаях, это сохранение файла в нужном формате в самой программе Microsoft Excel. Для этого откройте необходимый документ в этом приложении. Затем нажмите на кнопку «Файл» (рассматривается на примере Office 2013, в других версиях процесс сохранения может несколько отличаться) в верхнем левом углу окна Экселя, затем пункт «Сохранить как», после чего выберите место сохранения документа, дайте ему имя и во вкладке типа файла укажите «XML данные». После этого проверьте, правильно ли всё у вас получилось. Если нет, то пробуем следующие способы.
- Итак, если возникает ошибка в предыдущем случае, то, возможно, в вашей копии программы не предусмотрена поддержка и соответствующие надстройки. Чтобы их установить перейдите на сайт компании Microsoft http://www.microsoft.com/en-us/download/details.aspx?displaylang=en&id=3108, скачайте и инсталлируйте этот файл к себе на компьютер или ноутбук. Далее, запустите программу Microsoft Excel и нажмите на большую цветную кнопку в левом верхнем углу окна приложения (здесь мы уже смотрим пример на версии 2007-го года). В появившемся блоке кликните по параметрам, слева от выхода из утилиты. Теперь зайдите в пункт надстроек и нажмите на кнопку «Перейти» напротив пункта «Управление». Выскочит диалоговое окно, где нужно кликнуть по обзору и найти документ, который вы скачали с сайта Майкрософта ранее. Теперь кликаем ОК и переходим в основное окно программы, где у вас теперь есть вкладка XML Tools — с помощью него теперь вы спокойно можете создать файл XML из существующей таблицы. Сохранять его нужно аналогично предыдущему пункту.
- Если вам совсем не хочется загружать и себя, и свой компьютер такой информацией, то можете прибегнуть к помощи специальных утилит-конвертеров или онлайн-версий этих программ. К примеру, вы можете загрузить приложение Format Factory, которое позволит вам совершить все необходимые действия. Но стоит помнить, что сохранённые и преобразованные таким образом файлы не всегда работают в дальнейшем. То есть во время операции могут повредиться сектора или области в памяти документа, что негативно скажется на нём — он попросту может не открыться в XML-редакторе, например. Поэтому рекомендуется использовать либо профессиональные программы, либо сам Microsoft Excel.
Как перевести XML в Excel
Прежде чем перевести XML в Excel, нужно его для начала открыть. Рассмотрим весь этот непродолжительный процесс ниже. Итак, приступаем:
- Запустите программу Microsoft Excel с помощью ярлыка на рабочем столе или через меню проводника.
- Нажмите на «Открыть другие книги» внизу главной страницы, если вы используете Office В других версиях процесс может несколько отличаться.
- Далее, нажимаем на «Компьютер» или другое место, где расположен ваш XML-файл, затем кликните «Обзор» и смените в появившемся окне тип данных на «Файлы XML».
- Теперь ищем необходимый файл и открываем его в нашей программе с помощью одноимённой кнопки.
- Далее, обсудим то, как преобразовать наш документ. Перейдите во вкладку разработчика, затем нажмите на кнопку импорта.
- В открывшемся окне нужно будет снова найти и выбрать наш документ, над которым вы и хотите произвести действие, затем кликаем на кнопку «Импорт».
- Затем настраиваете всё под себя: область для импорта, место сохранения и другие параметры. После чего вы получите таблицу, которую позже можно сохранить в нужном для вас формате. Как видите, ничего сложного нет.
Подведём итоги
Дорогие читатели, сегодня мы с вами узнали не только как преобразовать файлы XML в Excel и обратно, но и как создать и открыть их при несовместимости версий. Надеемся, что у вас всё получилось и больше не осталось никаких вопросов. Не забываем делиться в комментариях своим мнением и опытом: возможно, вы знаете простой способ конвертации. Расскажите другим пользователям, получилось ли у вас перевести один тип документа. Если сработало, то поделитесь тем, каким способом воспользовались вы.
Конвертируем xls в xml

Расскажу вам быстрый способ создания xml-файла из таблицы экселя!
XML документы — это очень сильная и мощная вещь. С помощью одного XML файла можно наполнить сайт информацией за считанные секунды! Ведь во всех современных движках (CMS) присутствует возможность импорта из хмл файла. Так к чему это я.
Файлы формата XML используются не только для наполнения сайтов, каждый может использовать их в своих целях (о них в последующих статьях поведаю). Совсем недавно мне потребовалось экспортировать файл XLS в XML. Сначала я начал искать конверторы для этого, но ненайдя ничего стоящего, попробовал сделать операцию конвертирования с помощью самого экселя. И теперь хочу с вами поделиться этим «тайным» знанием!
Офф-топ, о том, как из djvu сделать pdf, можно прочесть тут.
Как известно, форматы *.xls (*.xlsx в 2007 офисе) — это форматы Microsoft Office Excel. 2003 офис ушел в прошлое, уже есть 2010, но я работаю на 2007, а, следовательно, рассказывать буду, основываясь на нем. Погнали!
1. Заходим на сайт Microsoft, и скачиваем надстройку для работы с XML. Скачать Excel 2003 Add-in: XML Tools Add-in. Весит она не много, 397 KB.

2. Устанавливаем ее к себе на компьютер. Сложного в установке ничего нет. По умолчанию надстройка устанавливается вот сюда: c:Office SamplesOfficeExcel2003XMLToolsAddin
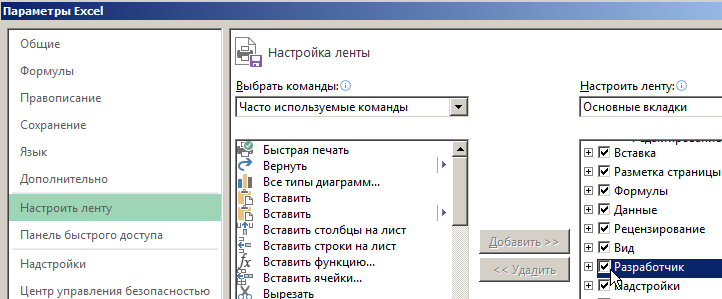
3. Теперь открываем Excel, заходим в меню и выбираем пункт «Параметры Excel».

4. В появившемся окне, слева, выбираем пункт «Надстройки», а внизу окна, нажимаем на кнопку «Перейти…»

5. Перед вами откроется новое окно, в нем вам необходимо нажать кнопку «Обзор…». Как оно выглядит, показано ниже.

6. Теперь вам необходимо найти установленную надстройку XmlTools (смотреть пункт 2). Выбрать ее и нажать ОК!

7. Если вы все сделали правильно, вы увидите следующее окно! Смело жмем ОК, установка завершена!

8. У вас появилось в верхнем меню вкладка надстройка, а слева пункт XML Tools.

С установкой разобрались, а теперь переходим непосредственно к конвертированию (экспорту) xls в xml.
1. Для этого открываем файл с данными, которые необходимо перегнать. Затем выбираем первый пункт в раскрывающемся меню «Convert a Range to an XML List…»

2. Перед вами откроется небольшое окошко, что вам в нем необходимо? Там есть радио кнопки, No и Yes, для чего они? Все просто, если у вас есть заголовок к данным (в моем случае он есть) выбираем Yes, а если его нет, то соответственно No. Затем нажимаем на маленький прямоугольник в верхней строке.

3. Выделяем область данных, которые конвертируем и нажимаем на кнопку справа в появившемся окне. Возвращается предыдущее окно, в котором жмем ОК.

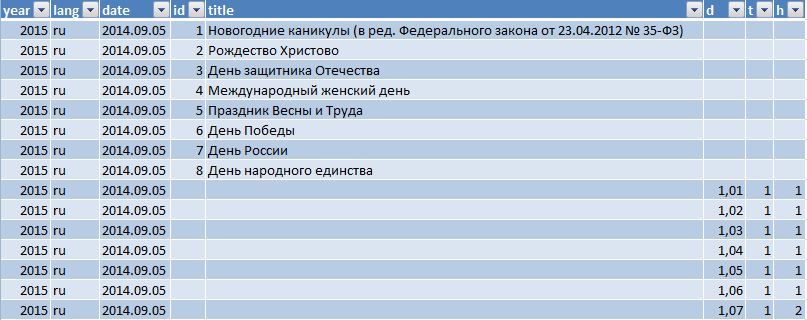
4. Ваша табличка должна измениться, можно сказать преобразиться, у меня это выглядит вот так:

5. Все готово, осталось только сохранить готовый xml документ. Заходим в меню, выбираем «Сохранить как…», «Другие форматы».

6. В раскрывающемся списке «Тип файла» выбираем XML-данные, нажимаем «Сохранить».

Я вас поздравляю, ваш файл создан!
Надеюсь, все было изложено подробно и понятно, однако если возникнут вопросы, пишите!
Экспорт Excel в XML и наоборот
Вы можете конвертировать файл Excel в файл данных XML или наоборот. Это позволяет обмениваться информацией между различными приложениями. Для начала откройте вкладку Developer (Разработчик).
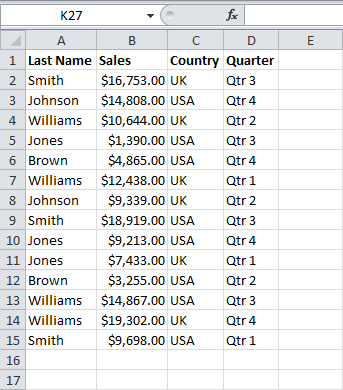
Вот данные, которые мы хотим преобразовать в файл XML:
Сперва создадим схему, основанную на исходных данных в формате XML. Схема определяет структуру XML-файла.
- Excel для этой цели не подойдёт, поэтому откройте, к примеру, Блокнот и вставьте следующие строки:
Примечание: Теги названы по именам столбцов, но вы можете дать им любое название. Например, вместо – .
- Сохраните файл как schema.xml.
- Откройте книгу Excel.
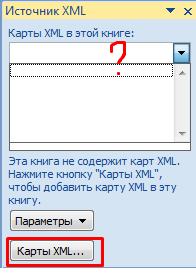
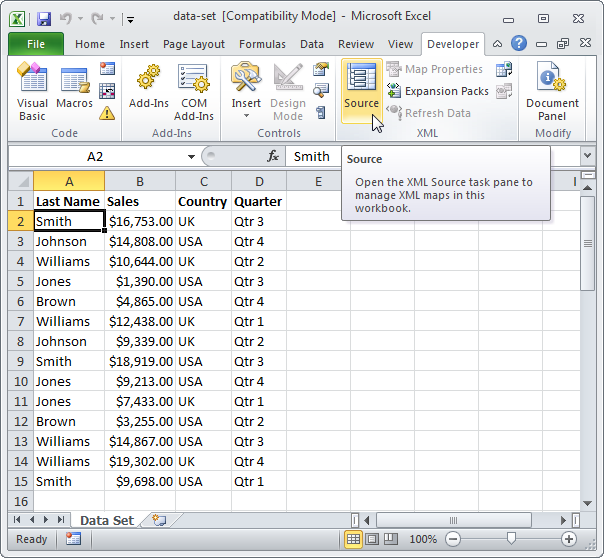
- Кликните по Source (Источник) на вкладке Developer (Разработчик). Откроется XML панель задач.
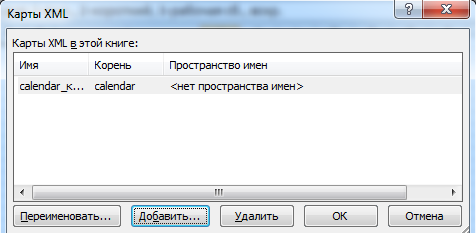
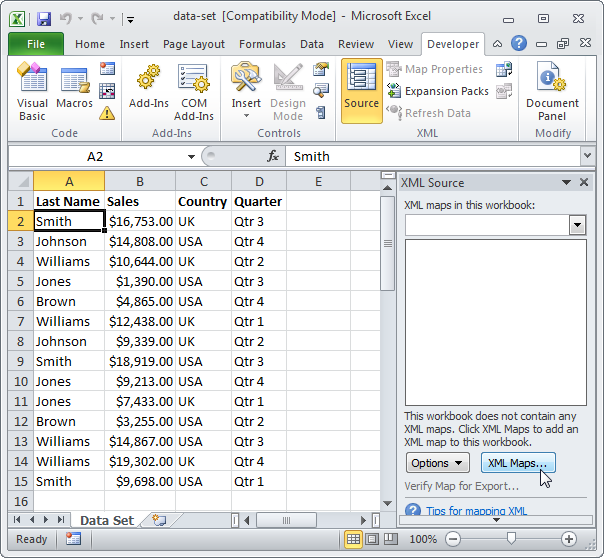
- Чтобы добавить карту XML, нажмите кнопку XML Maps (XML карты).Появится диалоговое окно XML Maps (Карты XML).
- Нажмите Add (Добавить).
- Выберите schema.xml и дважды кликните ОК.
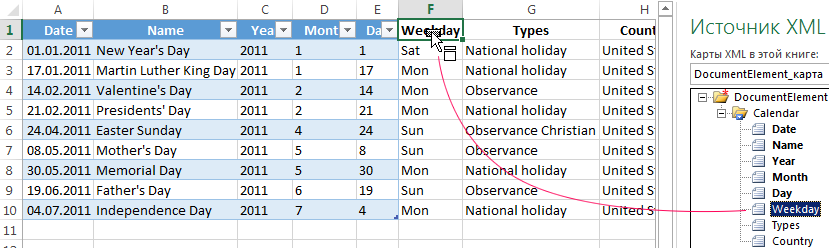
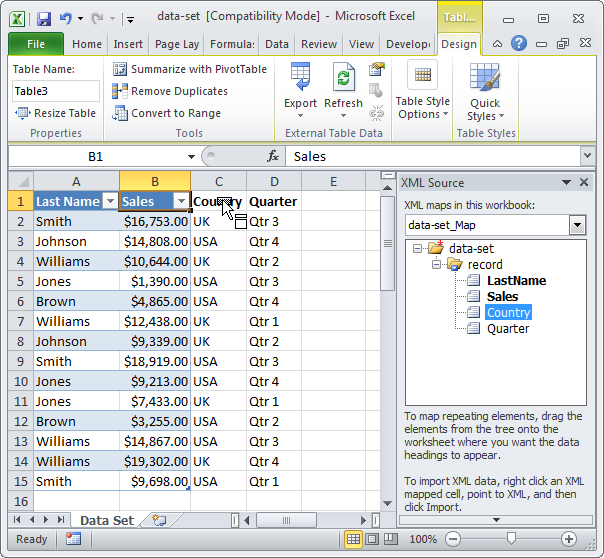
- Теперь просто перетащите 4 элемента из дерева в XML панели задач на лист (строка 1).
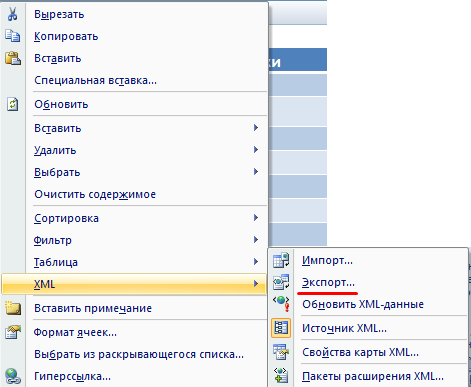
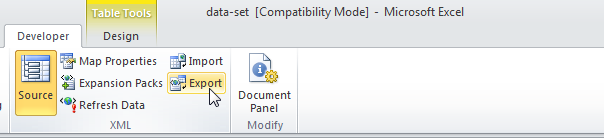
- Нажмите кнопку Export (Экспорт) в разделе XML на вкладке Developer (Разработчик).
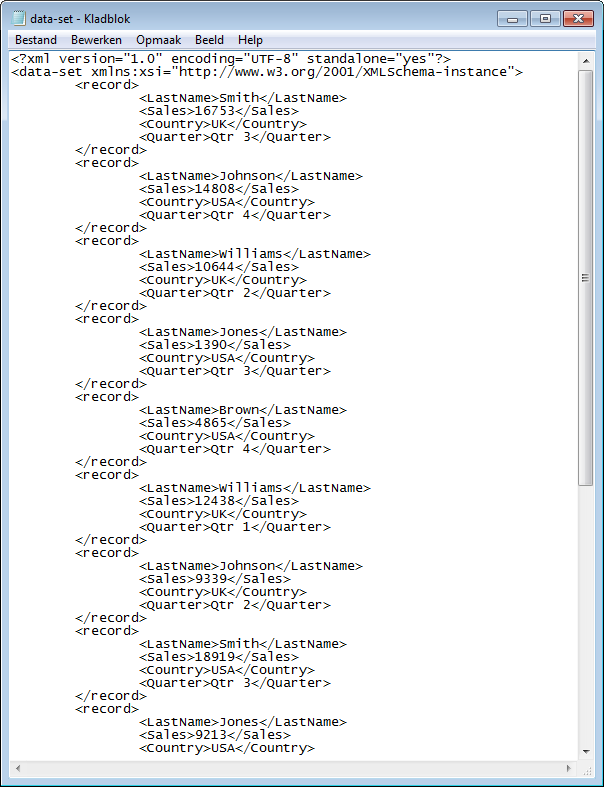
- Сохраните файл и нажмите Enter.
 Появится диалоговое окно XML Maps (Карты XML).
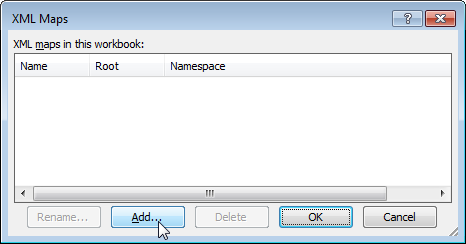
Это экономит немало времени!
Примечание: Для импорта XML-файла откройте пустую книгу. На вкладке Developer (Разработчик) нажмите кнопку Import (Импорт) и выберите XML-файл.
Как перевести документ Excel в формат XML?
Очень нужно для сдачи алкогольной декларации в СКБ-Контур. Может кто-то знает?

Как сохранить документ в формате XML:
- Выберите в меню «Файл» пункт «Сохранить как».
- В окне «Сохранение файла» выберите в раскрывающемся списке «Тип файла» пункт «XML-документ».
И все, нажимайте «Сохранить»!

Для преобразования файла в Exel в формат XML не требуется никакого дополнительного программного обеспечения.
Microsoft Excel предоставляет два формата файлов для XML. Один из них подходит только для версий Microsoft Excel 2002 и более ранних, другой формат понимается всеми более поздними версиями.
- Переходим в меню Файл в Microsoft Excel/ Сохранить как. Важно: обычная команда «сохранить» не предоставляет функциональные возможности конвертирования документов в другие форматы. А «сохранить как» обеспечит необходимое преобразование для документа экспортируемого в XML.
- Выберите «XML-данные» под «сохранить как» в раскрывающемся списке меню в нижней части диалогового окна. Это формат XML для всех версий Excel после 2002. Если файл XML будет использоваться более старыми программами Excel, выберите тип файла электронной таблицы XML.
Введите желаемое имя файла для нового файла XML в поле «File Name». Укажите место в поле «Сохранить в».
Нажмите на кнопку «Сохранить». Файл Microsoft Excel будет экспортирован в виде файла XML.
Источник
Microsoft Excel makes it easy to import Extensible Markup Language (XML) data that is created from other databases and applications, to map XML elements from an XML schema to worksheet cells, and to export revised XML data for interaction with other databases and applications. Think of these XML features as turning Office Excel into an XML data file generator with a familiar user interface.
In this article
-
Why use XML in Excel?
-
XML data and schema files
-
Key XML and Excel scenarios
-
-
The basic process of using XML data in Excel
-
Working with XML maps
-
Using the XML Source task pane
-
Element types and their icons
-
Working with single-mapped cells
-
Working with repeating cells in XML tables
-
XML map security considerations
-
Importing XML data
-
Working with an inferred schema
-
Exporting XML data
-
Using the Excel macro-enabled Office Open XML Format file
-
Why use XML in Excel?
XML is a technology that is designed for managing and sharing structured data in a human-readable text file. XML follows industry-standard guidelines and can be processed by a variety of databases and applications. Using XML, application designers can create their own customized tags, data structures, and schemas. In short, XML greatly eases the definition, transmission, validation, and interpretation of data between databases, applications, and organizations.
XML data and schema files
Excel works primarily with two types of XML files:
-
XML data files (.xml), which contain the custom tags and structured data.
-
Schema files (.xsd), which contain schema tags that enforce rules, such as data type and validation.
The XML standard also defines Extensible Stylesheet Language Transformation (XSLT) (.xslt) files, which are used to apply styles and transform XML data into different presentation formats. You can apply these transforms before you import XML files into Excel and after you export XML files from Excel. If XSLT files are linked to XML data files that you import into Excel, you do have the option to apply or not apply the formatting before the data is added to the worksheet, but only when you open an XML file by using the Open command from within Excel. Choose the XML Files (*.xml) file type before you click the Open button to see the XML files in the folder.
Key XML and Excel scenarios
By using XML and Excel, you can manage workbooks and data in ways that were previously impossible or very difficult. By using XML maps, you can easily add, identify, and extract specific pieces of business data from Excel documents. For example, an invoice that contains the name and address of a customer or a report that contains last quarter’s financial results are no longer just static reports. You can easily import this information from databases and applications, revise it, and export it to the same or other databases and applications.
The following are key scenarios that the XML features are designed to address:
-
Extend the functionality of existing Excel templates by mapping XML elements onto existing cells. This makes it easier to get XML data into and out of your templates without having to redesign them.
-
Use XML data as input to your existing calculation models by mapping XML elements onto existing worksheets.
-
Import XML data files into a new workbook.
-
Import XML data from a Web service into your Excel worksheet.
-
Export data in mapped cells to XML data files independent from other data in the workbook.
Top of Page
The basic process of using XML data in Excel
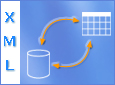
The following diagram shows how the different files and operations work together when you use XML with Excel. Essentially, there are five phases to the process:
 Adding an XML schema file (.xsd) to a workbook
 Mapping XML schema elements to individual cells or XML tables
 Importing an XML data file (.xml) and binding the XML elements to mapped cells
 Entering data, moving mapped cells, and leveraging Excel functionality, while preserving XML structure and definitions
 Exporting revised data from mapped cells to an XML data file
Working with XML maps
You can create or open a workbook in Excel, attach an XML schema file (.xsd) to the workbook, and then use the XML Source task pane to map XML elements of the schema to individual cells or tables. After you map the XML elements to your worksheet, you can import and export XML data into and out of the mapped cells.
When you add an XML schema file (.xsd) to your workbook, you create an XML map. In general, XML maps are used to create mapped cells and to manage the relationship between mapped cells and individual elements in the XML schema. In addition, these XML maps are used to bind the contents of mapped cells to elements in the schema when you import or export XML data files (.xml).
There are two kinds of mapped cells that you can create: single-mapped cells and repeating cells (which appear as XML tables). To make designing your worksheet more flexible, you can drag the mapped cells anywhere on a worksheet and into any order — even one different from the XML schema. You can also choose which elements to map and not map.
The following rules about using XML maps are important to know:
-
A workbook can contain one or more XML maps.
-
You can only map one element to one location in a workbook at a time.
-
Each XML map is an independent entity, even if multiple XML maps in the same workbook refer to the same schema.
-
An XML map can only contain one root element. If you add a schema that defines more than one root element, you are prompted to choose the root element to use for the new XML map.
Using the XML Source task pane
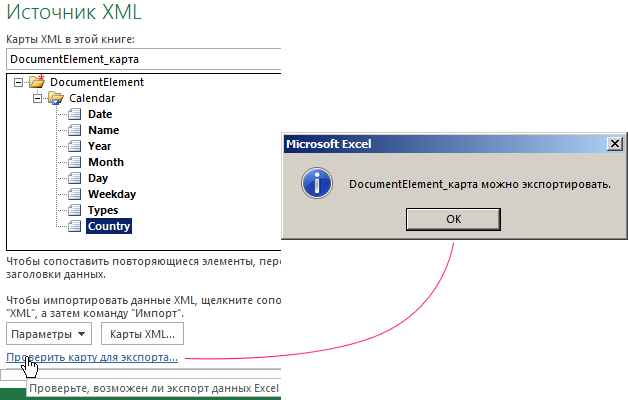
You use the XML Source task pane to manage XML maps. To open it, on the Developer tab, in the XML group, click Source. The following diagram shows the main features of this task pane.
1. Lists XML maps that were added to the workbook
2. Displays a hierarchical list of XML elements in the currently listed XML map
3. Sets options when working with the XML Source task pane and the XML data, such as how to preview the data and control headings
4. Opens the XML Maps dialog box, which you can use to add, delete, or rename XML maps
5. Verifies whether you can export XML data through the current XML map
Top of Page
Element types and their icons
The following table summarizes each type of XML element that Excel can work with and the icon that is used to represent each type of element.
|
Element type |
Icon |
|---|---|
|
Parent element |
|
|
Required parent element |
|
|
Repeating parent element |
|
|
Required repeating parent element |
|
|
Child element |
|
|
Required child element |
|
|
Repeating child element |
|
|
Required repeating child element |
|
|
Attribute |
|
|
Required attribute |
|
|
Simple content in a complex structure |
|
|
Required simple content in a complex structure |
|


Top of Page
Working with single-mapped cells
A single-mapped cell is a cell that has been mapped to a nonrepeating XML element. You create a single-mapped cell by dragging a nonrepeating XML element from the XML Source task pane onto a single cell in your worksheet.
When you drag a nonrepeating XML element onto the worksheet, you can use a smart tag to choose to include the XML element name as a heading above or just to the left of the single-mapped cell, or you can use an existing cell value as a heading.
You can also use a formula in a single-mapped cell, if the cell is mapped to an XML element with an XML Schema Definition (XSD) data type that Excel interprets as a number, date, or time.
Top of Page
Working with repeating cells in XML tables
XML tables are similar in appearance and functionality to Excel tables. An XML table is an Excel table that has been mapped to one or more XML repeating elements. Each column in the XML table represents an XML element.
An XML table is created when you:
-
Use the Import command (in the XML group on the Developer tab) to import an XML data file.
-
Use the Open command from within Excel to open an XML data file — and then select As an XML table in the Open XML dialog box.
-
Use the From XML Data Import command (from the From Other Sources command button, in the Get External Data group, on the Data tab) to import an XML data file — and then select XML table in existing worksheet or New worksheet in the Import Data dialog box.
-
Drag one or more repeating elements from the XML Source task pane to a worksheet.
When you create an XML table, the XML element names are automatically used as column headings. You can change these to any column headings that you want. However, the original XML element names are always used when you export data from the mapped cells.
Two options under the Options button in the XML Source task pane are useful when you work with XML tables:
-
Automatically Merge Elements When Mapping
When selected, Excel creates one XML table from multiple fields as they are dropped onto the worksheet. This option works as long as the multiple fields are dropped on the same row, one adjacent to the other. When this option is cleared, each element appears as its own XML table. -
My Data Has Headings
When selected, existing heading data is used as column headings for repeating elements that you map to your worksheet. When this option is cleared, the XML element names are used as column headings.
Using XML tables, you can easily import, export, sort, filter, and print data based on an XML data source. However, XML tables do have some limitations regarding how they can be arranged on the worksheet.
-
XML tables are row-based, meaning that they grow from the header row down. You cannot add new entries above existing rows.
-
You cannot transpose an XML table so that new entries will be added to the right.
You can use formulas in columns that are mapped to XML elements with an XML Schema Definition (XSD) data type that Excel interprets as a number, date, or time. Just as in an Excel table, formulas in an XML table are filled down the column when new rows are added to the table.
XML map security considerations
An XML map and its data source information are saved with the Excel workbook, not a specific worksheet. A malicious user can view this map information by using a Microsoft Visual Basic for Applications (VBA) macro. Furthermore, if you save your workbook as a macro-enabled Excel Office Open XML Format File, this map information can be viewed through Microsoft Notepad or through another text-editing program.
If you want to keep using the map information but remove the potentially sensitive data source information, you can delete the data source definition of the XML schema from the workbook, but still export the XML data, by clearing the Save data source definition in workbook check box in the XML Map Properties dialog box, which is available from the Map Properties command in the XML group on the Developer tab.
If you delete a worksheet before you delete a map, the map information about the data sources, and possibly other sensitive information, is still saved in the workbook. If you are updating the workbook to remove sensitive information, make sure that you delete the XML map before you delete the worksheet, so that the map information is permanently removed from the workbook.
Top of Page
Importing XML data
You can import XML data into an existing XML map in your workbook. When you import data, you bind the data from the file to an XML map that is stored in your workbook. This means that each data element in the XML data file has a corresponding element, in the XML schema, that you mapped from an XML Schema file or inferred schema. Each XML map can only have one XML data binding, and an XML data binding is bound to all of the mappings that were created from a single XML map.
You can display the XML Map Properties dialog box (Click Map Properties in the XML group on the Developer tab.), which has three options, all selected by default, that you can set or clear to control the behavior of an XML data binding:
-
Validate data against schema for import and export Specifies whether Excel validates data against the XML map when importing data. Click this option when you want to ensure that the XML data that you import conforms to the XML schema.
-
Overwrite existing data with new data Specifies whether data is overwritten when you import data. Click this option when you want to replace the current data with new data, for example, when up-to-date data is contained in the new XML data file.
-
Append new data to existing XML tables Specifies whether the contents of the data source are appended to the existing data on the worksheet. Click this option, for example, when you are consolidating data from several similar XML data files into an XML table, or you do not want to overwrite the contents of a cell that contains a function.
When you import XML data, you may want to overwrite some mapped cells but not others. For example, some mapped cells may contain formulas and you don’t want to overwrite the formula when you import an XML file. There are two approaches that you can take:
-
Unmap the elements that you don’t want overwritten, before you import the XML data. After you import the XML data, you can remap the XML element to the cells containing the formulas, so that you can export the results of the formulas to the XML data file.
-
Create two XML maps from the same XML schema. Use one XML map for importing the XML data. In this «Import» XML map, don’t map elements to the cells that contain formulas or other data that you don’t want overwritten. Use another XML map for exporting the data. In this «Export» XML map, map the elements that you want to export to an XML file.
Note: The ability to import XML data from a Web service by using a Data Retrieval Service Connection (.uxdc) file to connect to a data source is no longer supported in versions later than Excel 2003 through the user interface. If you open a workbook that was created in Excel 2003, you can still view the data, but you cannot edit or refresh the source data.
Working with an inferred schema
If you import XML data without first adding a corresponding XML schema to create an XML map, Excel tries to infer a schema for you based on the tags that are defined in the XML data file. The inferred schema is stored with the workbook, and the inferred schema allows you to work with XML data if an XML schema file isn’t associated with the workbook.
When you work with imported XML data that has an inferred schema, you can also customize the XML Source task pane. Select the Preview Data in Task Pane option from the Options button to display the first row of data as sample data in the element list, if you imported XML data associated with the XML map in the current session of Excel.
You cannot export the Excel inferred schema as a separate XML schema data file (.xsd). Although there are XML schema editors and other methods for creating an XML schema file, you may not have convenient access to them or know how to use them. As an alternative, you can use the Excel 2003 XML Tools Add-in Version 1.1, which can create a schema file from an XML map. For more information, see Using the Excel 2003 XML Tools Add-in Version 1.1.
Exporting XML data
You export XML data by exporting the contents of mapped cells on the worksheet. When you export data, Excel applies the following rules to determine what data to save and how to save it:
-
Empty items are not created when blank cells exist for an optional element, but empty items are created when blank cells exist for a required element.
-
Unicode Transformation Format-8 (UTF-8) encoding is used to write the data.
-
All namespaces are defined in the Root XML element.
-
Excel overwrites existing namespace prefixes. The default namespace is assigned a prefix of ns0. Successive namespaces are designated ns1, ns2 to ns<count> where <count> is the number of namespaces written to the XML file.
-
Comment nodes are not preserved.
You can display the XML Map Properties dialog box (Click Map Properties in the XML group on the Developer tab.) and then use the Validate data against schema for import and export option (active by default) to specify whether Excel validates data against the XML map when exporting data. Click this option when you want to ensure that the XML data you export conforms to the XML schema.
Using the Excel Macro-enabled Office Open XML Format File
You can save an Excel workbook in a variety of file formats, including the Excel macro-enabled Office Open XML Format File (.xlsm). Excel has a defined XML schema that defines the contents of an Excel workbook, including XML tags that store all workbook information, such as data and properties, and define the overall structure of the workbook. Custom applications can use this Excel macro-enabled Office XML Format File. For example, developers may want to create a custom application to search for data in multiple workbooks that are saved in the this format and create a reporting system based on the data found.
Top of Page
Need more help?
You can always ask an expert in the Excel Tech Community or get support in the Answers community.
See Also
Import XML data
Map XML elements to cells in an XML Map
Export XML data
Append or overwrite mapped XML data
Конвертируем excel файл xls в xml формат.

Для того что бы начать конвертировать файл xls в xml нужно подготовить Microsoft Office Excel.
Переходим на сайт Microsoft для того что бы скачать надстройку Excel 2003 Add-in: XML Tools Add-in

После того как вы скачали надстройку Excel 2003 Add-in: XML Tools Add-in для конвертации xls в xml, устанавливаем надстройку на свой компьютер. Программа установится по адресу c:Office SamplesOfficeExcel2003XMLToolsAddin
Ну а теперь начинается самое интересное, активируем надстройку конвертера xls в Microsoft Office Excel. Для этого запускаем Excel и открываем «Параметры Excel»

Затем переходим к пункту Надстройки и Перейти

Теперь перед вами открылось окно надстройки, судя по этому окну у нас программа спрашивает а где лежит наша новая надстройка, мы не тянем время и щелкаем по вкладке Обзор. Если вы были внимательны то в начале статьи я упомянул куда автоматически устанавливается надстройка OfficeExcel2003XMLToolsAddin, ну если вы скажем так забыли я вам напомню.
Нажали вкладку Обзор и переходим на диск С, а точнее:
С:Office SamplesOfficeExcel2003XMLToolsAddin

Теперь находим нашу надстройку XmlTools и нажимаем ОК

После того как вы нажали ОК, вам откроется опять окно с надстройками и в нем мы увидим нашу долгожданную надстройку XmlTools, смело ставим галочку и нажимаем ОК

Теперь посмотрим на нашу работу, смотрим на шапку Excel и видим меню Надстройки переходим на него и видим XML Tools это и есть наш конвертер.

На этом установка и активация надстройки для конвертирования xls в xml закончена.
Теперь будем учится конвертировать
Для этого нам нужно открыть файл xls который мы хотим конвертировать в xml, после этого в меню Надстройки открываем пункт XML Tools и в нем кликаем по пункту Convert a Range to an XML List…

После того как вы нажали Convert a Range to an XML List вам откроется окно Convert a Range to XML List в этом окне кликаем на вкладку Click here and drag select a range

После того как у вас пропадет большое окно Convert a Range to an XML List и появится маленькое окошко Convert a Range to XML List, нужно будет выделить нужную вам область данных и нажать кнопку как показано на скриншоте

После этого у вас все изменится как на скришоте, теперь сохраняем

Выбираем Сохранить как — Другие форматы тип файла выбираем XML


Вот и все, у нас удалось конвертировать xls в xml
Источник: http://www.rtiopt64.ru/blog/konverter_fajl_excel_xls_v_xml_format/2016-10-10-424
Данный материал является частной записью члена сообщества Club.CNews.
Редакция CNews не несет ответственности за его содержание.
If you want to create an XML data file and XML schema file from a cell range on a worksheet, you can use version 1.1 of the Excel 2003 XML Tools Add-in to enhance the existing XML features in Microsoft Excel 2007 and later.
Step 1: Download the XML Tools Add-in and activate it
-
To download the add-in, click this link, Excel 2003 XML Tools Add-in, and then follow the instructions on the download page.
-
Start Excel.
-
Click the File > Options > Add-Ins.
In Excel 2007, click the Microsoft Office Button
> Excel Options > Add-Ins. -
In the Manage box, click Excel Add-ins, and then click Go.
-
In the Add-Ins dialog box, click Browse, locate the XmlTools.xla file, select the file, and then click OK.
By default, this file is stored in the following folder on your hard drive:
Office SamplesOfficeExcel2003XMLToolsAddin. -
Verify that the XmlTools check box is selected in the Add-Ins available list, and then click OK to load the add-in.
-
To verify that the add-in is active, on the Add-ins tab, in the Menu commands category, make sure that the XML Tools command menu appears.
 > Excel Options > Add-Ins.
Note: This add-in was developed for Excel 2003. The documentation and the user interface refer to lists, which are now called Excel tables in versions of Excel later than Excel 2003.
For more information about how to use this add-in, see the article Using the Excel 2003 XML Tools Add-in Version 1.1.
Step 2: Convert a cell range to an XML Table
-
Enter the data for which you want to create the XML data file and XML schema file. The data must be in a tabular format of columns and rows (also called flat data).
-
On the Add-ins tab, in the Menu commands group, click the arrow next to XML Tools, and then click Convert a Range to an XML List.
-
Enter the cell range of the data that you want to convert as an absolute reference in the text box.
Tip: To make it easier to enter the correct cell reference, in the dialog box, click the button to the right of the text box, click and hold the upper-left cell of the range, and then drag to the lower-right cell of the range.
-
Under Use first row as column names, select No if the first row contains data or Yes if the first row contains column headers, and then click OK.
Excel automatically creates an XML schema, maps the cells to the schema, and creates an XML table.
Important: If the Visual Basic Editor appears and displays a Visual Basic for Applications (VBA) error message, do the following:
-
Click OK.
-
In the highlighted line in the VBA code module, remove «50» from the line. In other words, change:
XMLDoc As msxml2.DOMDocument50
To:
XMLDoc As msxml2.DOMDocument -
Press F5 to find the next line that contains «XMLDoc As msxml2.DOMDocument50,» click OK, and change the line as you did in step 2.
-
Press F5 again to find and change any additional instances of the string.
-
When you press F5 and the VBA error message no longer appears, close the Visual Basic Editor to return to your workbook. Your cell range will have been converted to an XML table.
Note: To see all the XML maps in the workbook, on the Developer tab, in the XML group, click Source to display the XML Source task pane. In the lower portion of the task pane, click XML Maps.
If the Developer tab is not visible, perform the three steps under step 1 in the next section to add it to the Excel Ribbon.
-
Step 3: Export the XML table to an XML data file (.xml)
-
If the Developer tab is not available, enable it. For more information, see Show the Developer tab.
-
On the Developer tab, in the XML group, click Export.
Note: If a small Export XML dialog box with only an OK and Cancel button appears, click the XML map that you want to use, and then click OK. This small Export XML dialog box appears only if no XML table is selected and the workbook contains more than one XML map.
-
In the large Export XML dialog box, in the File name box, type a name for the XML data file.
-
Click Export.

Note: When creating XML maps and exporting data in Excel to XML files, there is a limit on the number of rows that can be exported. Export to XML from Excel will save a maximum of 65536 rows. If your file contains more than 65536 rows, Excel will export the first (#ROWS mod 65537) rows. For example, if your worksheet has 70000 rows, Excel will export 70000 mod 65537 = 4464 rows. Our recommendation is to 1) use xlsx instead or 2) save the file as XML Spreadsheet 2003 (.xml), which will lose the mappings, or 3) delete all rows after 65536 and then export again which will keep the mappings but lose the data at the end of the file.
Step 4: Save the XML schema to an XML schema file (.xsd)
-
Select any cell in a mapped Excel table.
-
On the Add-ins tab, in the Menu commands group, click the arrow next to XML Tools, and then click Create XSD files for the XML Schema at the active cell.
Excel copies the XML schema and pastes it into Notepad.
-
In Notepad, click File, and then click Save As.
-
Type a file name and file type, such as ProdOrders.xsd, and then click Save.
Need more help?
You can always ask an expert in the Excel Tech Community, get support in the Answers community, or suggest a new feature or improvement on Excel User Voice.
Top of Page