
Some rules of thumb for your thesis-writing process:
- Read the Graduate School’s Guidelines for Master’s Theses and Doctoral Dissertations (pdf, 536k) and follow their rules.
-
Choose some basic formats, then use them for everything:
- A common 10 or 12 point font (Times New Roman is good).
- Margins: 1.5 inches on the left, 1 inch each for top, bottom and right.
- Paragraphs for chapters: double-spaced, first line indented 0.5 inch, widow and orphan protection on (required), no hyphenation (recommended); left-justified or full-justified.
- Block quotes: indent the left margin of your paragraph.
- Use the Spelling checker. Add technical words for your discipline to its dictionary.
- All tables and figures must fit within the required margins. If some don’t, you will have to rotate them or place them on landscape-oriented pages.
- Ask the Office of Degree Requirements questions early if you aren’t sure how to handle something.
- Use styles to make your headings within chapters consistent.
- The Bibliography must be single-spaced with a blank line between entries. Use MS Word to keep each entry on the same page, as required.
-
Some things to avoid:
- Do not attempt to put dots in a list by pressing the period key repeatedly. Use “leading dots”: set a tab stop and under Leader choose option #2.
- Do not attempt to line things up by pressing the tab key repeatedly. Set a tab stop where you want it.
- Don’t type your Table of Contents yourself. Word can create a Table of Contents based on the Heading styles.
- Follow the instructions in the IT tutorials for managing different types of page numbers in one document.
Both dissertations and master’s theses must be submitted electronically as PDF files. However, the processes for submitting them differ. Consult the Graduate School’s Web site for more information.
The format of a PhD thesis is as important as the content of the thesis. Different institutions have different formatting guidelines so PhD students should always refer to their handbook.
However, there are some standard requirements of PhD theses which do not change with institutions thus making the theses look similar in many aspects. This article highlights the common formatting standards expected of PhD theses and provides step-by-step instructions on how to format some sections in Microsoft Word.
A PhD thesis or dissertation is divided into three distinct components – front matter, main text and back matter – each of which has its own sub-components, as discussed below:
- Front matter
- Title page
- Declaration by the candidate and approval of thesis
- Abstract
- Table of contents
- List of figures
- List of tables
- List of abbreviations
- Acknowledgements
- Dedication
- Main text
- Inserting figures into main text
- Inserting tables into main text
- Back matter
- Numbering the thesis
- Related article
Front matter
The front matter refers to the preliminary pages that come before the main chapters of the theses. These include:
Title page
The title page is the first page of the thesis. It includes: the title of the PhD thesis, the name of the PhD student, the school or department and university in which the study took place, the city and country in which the university is located, and lastly the month and year in which the degree was conferred.
A sample title page is shown below:
Declaration by the candidate and approval of thesis
Originality is very crucial for PhD-level theses and dissertations. In this section, the PhD candidate declares that his work has not been published elsewhere to the best of his knowledge. The declaration is followed by approval of thesis and includes the names of all those people who reviewed and approved the thesis. These could be the supervisors, the Head of Department/School and/or the Dean of the School of Graduate Studies. The wordings on this page may vary from one institution to another, it is therefore important for the candidates to refer to their handbooks.
Abstract
The abstract is a short summary of the thesis, normally a paragraph in length. Abstracts can be structured or unstructured. A structured abstract is one that has headings and text below each heading, while an unstructured abstract does not have headings, it is written in paragraph form.
A sample of a structured and unstructured abstract is provided below:
Table of contents
The table of contents provides the outline of the thesis and shows all the headings and sub-headings of the thesis and their page numbers.
To insert a table of contents in Microsoft Word:
- Make sure all the headings and sub-headings of the front matter pages, the main text and the back matter pages have been properly specified in the Word document.
- Click the references tab, then select table of contents option.
- The table of contents has a drop-down arrow which when clicked shows the different style of TOC.
- Select the preferred style of TOC and click OK.
- The TOC will be inserted automatically.

How to insert a table of contents in MS Word 
Table of contents styles


List of figures
The list of figures shows the titles of all the figures in the thesis and their page numbers.
To insert the list of figures in Microsoft Word:
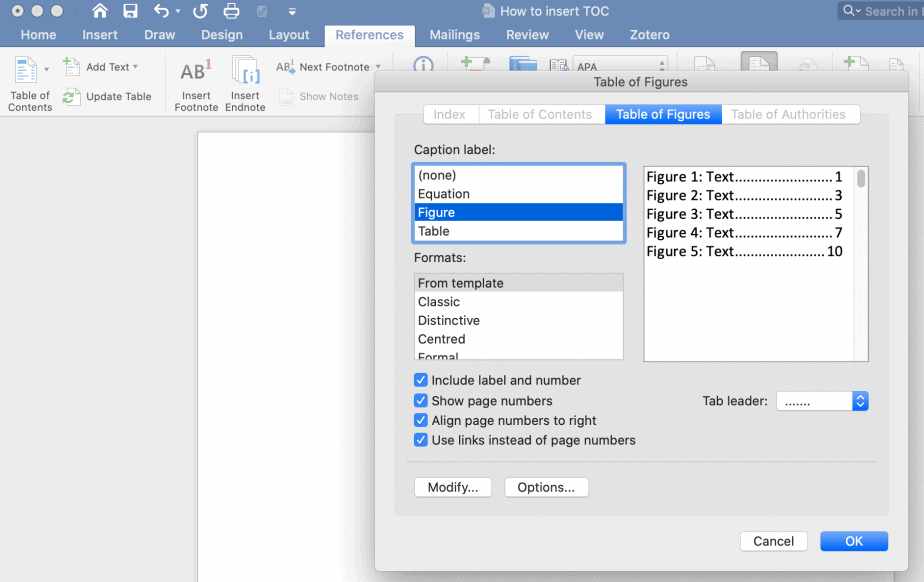
- Click on the references tab, then click on “insert table of figures” option.
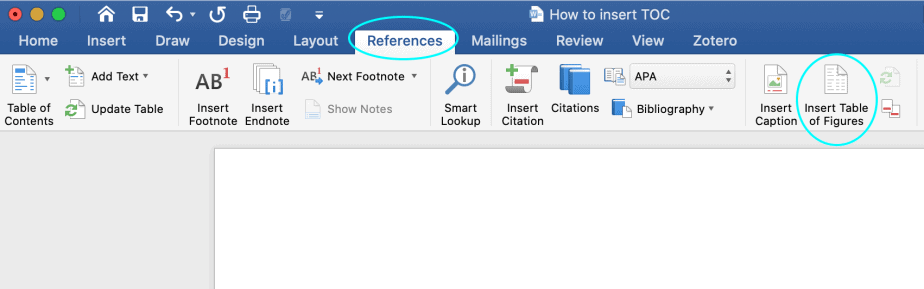
- The following dialogue box will open. In the caption label window, select “figure”. It will show different formats for the list of figures. Choose the style you prefer and click OK.
List of tables
Like the list of figures, the list of tables shows the titles of all the tables in the thesis and their page numbers.
To insert the list of tables in Microsoft Word:
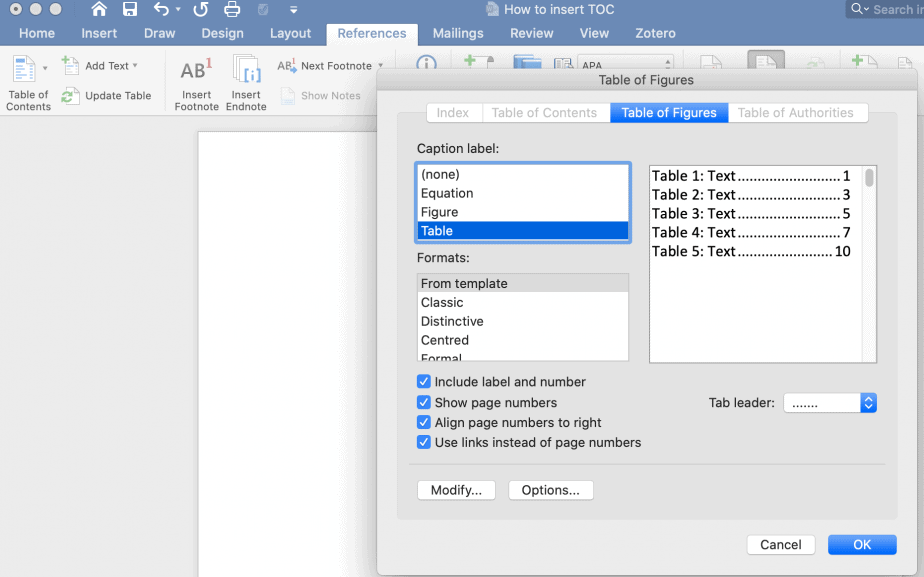
- Click on the references tab, then click on “insert table of figures” option.

- The following dialogue box will open. In the caption label window, select “table”. It will show different formats for the list of tables. Choose the style you prefer and click OK.
The list of figures and the list of tables should be on different pages.
List of abbreviations
All acronyms and their abbreviations used throughout the thesis should be highlighted in their own separate page titled ‘list of abbreviations.”
Acknowledgements
In a PhD thesis, it is mandatory to acknowledge all those who helped you in your PhD journey. These include: your supervisors, other faculty who either reviewed your work or gave advice, people who proofread your work, institutions that helped you gain access to your data, your research respondents, fellow colleagues etc.
Dedication
Some PhD candidates dedicate their thesis to people who are dear to them, for instance, parents, siblings, spouse/partner, children etc. This section is however not mandatory.
Page numbering for front matter
For front matter, Roman numerals should be used excluding the title page which should not be numbered. The page numbers should be placed at the bottom and centre-aligned.
Main text
The main text of thesis is the meat of the thesis and starts from chapter all the way to the last chapter of the thesis. The chapters of theses vary from one institution to another but generally have the following structure:
Chapter 1: Introduction
Chapter 2: Literature review
Chapter 3: Research methodology
Chapter 4: Research findings/results
Chapter 5: Discussions
Chapter 6: Conclusions and recommendations
Each chapter should be organised into headings. There are different levels of headings: level 1, level 2, level 3 etc. The use of these different levels depends on a student’s work.
Other formatting requirements for the main text include:
Font: the most recommended font styles are Times New Roman, Arial, Book Antiqua etc. Students should refer to their handbook for guidance on the font required by their institution.
Spacing: the most recommended spacing for theses is 1.5 for the main text except for things like tables.
Referencing style: the recommended referencing style (such as APA, MLA, Havard etc) should be used throughout the text.
Page numbering: for main text, Arabic numerals are used. The page numbers should be placed at the bottom and centre-aligned.
Inserting figures into main text
It is advisable to include figures into theses. Figures help to present some information in a more appealing way than plain text. For each figure inserted, make sure to number it and include a caption explaining what the figure is about.
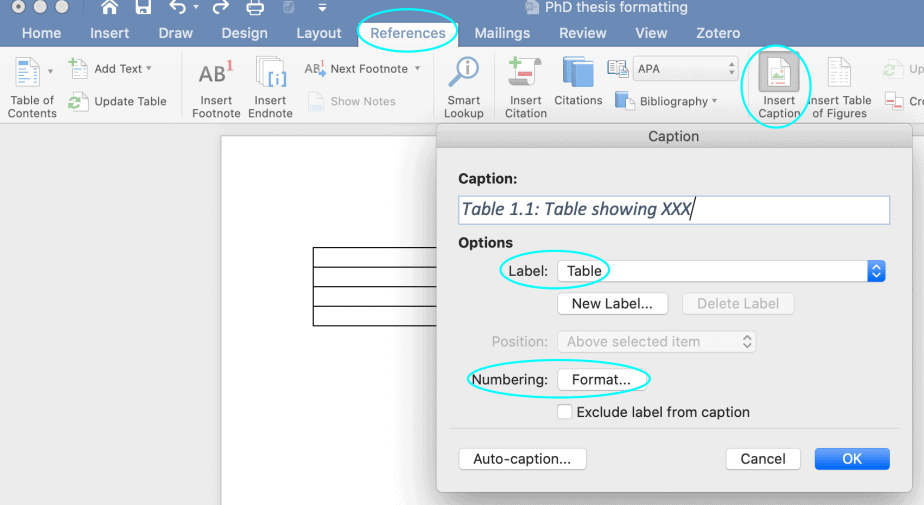
To insert figures’ captions and numbers into Microsoft Word:
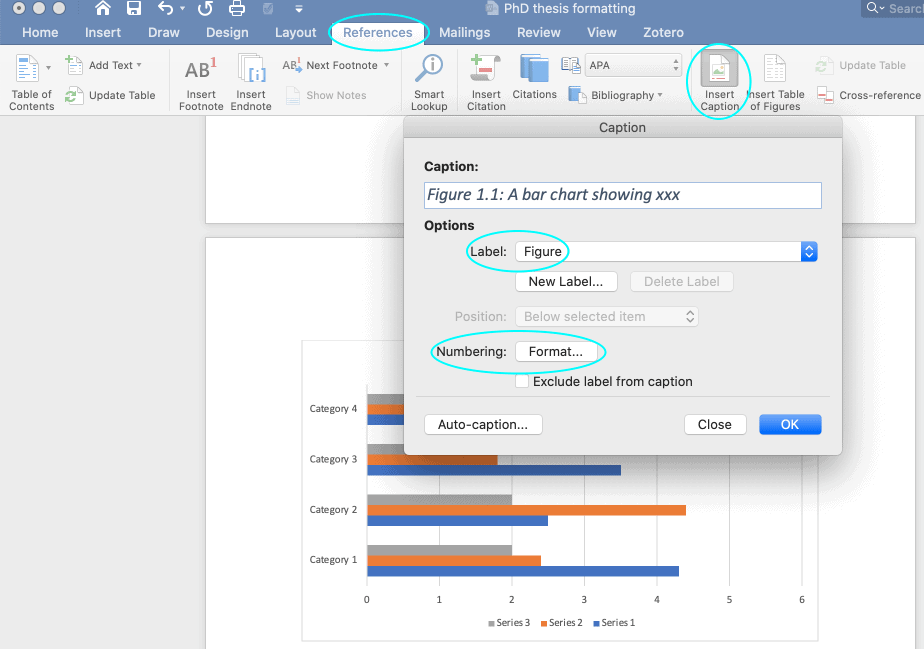
Click on the references tab, then click on insert caption.
A dialogue box will open. Under options, choose “figure” as the label.
Type the caption for the figure, choose the numbering format preferred and click OK. The caption and number of the figure will be inserted.
Inserting tables into main text
The procedure for tables is the same as for figures.
To insert tables’ captions and numbers into Microsoft Word:
Click on the references tab, then click on insert caption.
A dialogue box will open. Under options, choose “table” as the label.
Type the caption for the table, choose the numbering format preferred and click OK. The caption and number of the table will be inserted.
The same procedure is used when you have equations, maps and other illustrations.
Important points to remembers:
When inserting captions and numbers for figures and tables, the cursor should be placed at the right position, that is, above the figures and tables.
If the table or figure has been lifted from somewhere else, the source should be acknowledged at the bottom of the table or figure.
The numbering of the figures and tables should be done by chapter. For instance, all figures in chapter 1 should be numbered: figure 1.1, figure 1.2, figure 1.3 etc. while all figures in chapter 2 should be numbered: figure 2.1, figure 2.2, figure 2.3 etc. Same for the tables, equations and all other illustrations.
Back matter
The back matter has two main content: the references and the appendices.
The references should be done in accordance with the referencing style recommended by the institution.
The appendices section lists all other materials pertaining to the study that were not included in the front matter. Depending on the study, these may include: the research protocol, a letter of introduction for the research, the questionnaire used for the study, the list of respondents etc.
The page numbers for the references and appendices should be Arabic numerals and a continuation of the pages from main text.
The title of the appendices should be done using either Roman numerals (Appendix I, Appendix II, Appendix III etc) or the alphabet letters in caps, that is, Appendix A, Appendix B, Appendix C… etc.
Each appendix should start on its own page.
Numbering the thesis
As discussed earlier, different numbering styles are used for the different sections of the thesis:
The title page should not be numbered.
The other front matter pages should be numbered using Roman numerals.
The main text and back matter pages should be numbered using Arabic numerals.
Many students struggle with doing the numbering correctly.
The best way to do this in Microsoft Word is to use the “section break” function which divides the thesis into different sections. Each section is then numbered separately from the other sections. To do this:
Go to the end of the page where you want to insert the section break. This should be: at the end of the title page, and after the last front matter page (dedication). Because the main text and back matter pages are numbered using the same style, there is no need to create a section break after the main text.
From insert menu, go to break then section break and select the one written (next page).
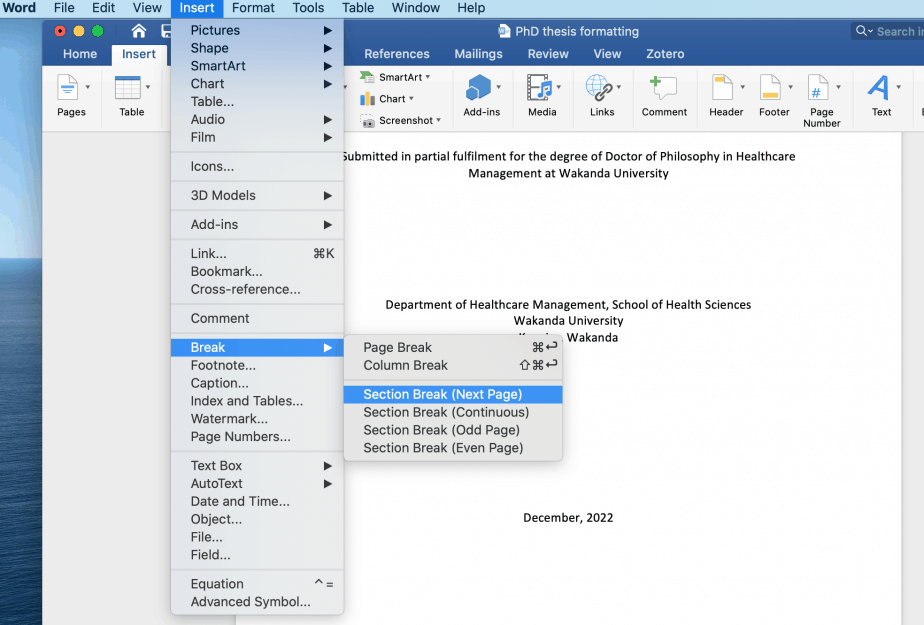
Word will create different sections for the title page, the other front matter pages and the main text and back matter pages.
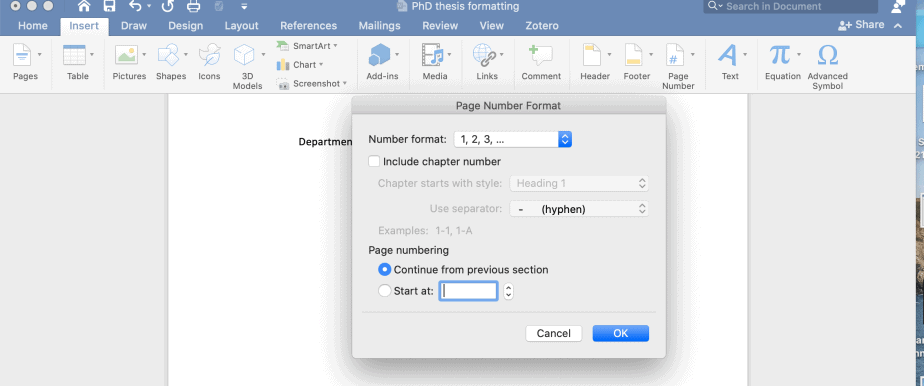
Use the insert tab and page number function to insert different formats for the different sections: not to be numbered (title page), numbered using Roman numerals (for front matter pages) and numbered using Arabic numerals (main text and back matter pages).
In conclusion, formatting a PhD thesis requires careful consideration of the requirements given by an institution for the different parts of a thesis. PhD students should always consult their handbooks to ensure that their theses meet the high academic standards required of them. This article discussed some key formatting issues and provided step-by-step instructions on some formatting options.
Related article
Comprehensive Guidelines for Writing a PhD Thesis Proposal (+ free checklist for PhD Students)
When I started the third year of my Ph.D., and the thought of creating a thesis outline was looming, I was advised to attend a course to learn how to use Microsoft Word properly before I started writing.
I laughed! Of course I knew how to use Word! Why on earth would I spend 3 hours at a course on something I already know how to do?
My friend was insistent that I should attend. Since she had never steered me wrong in the lab before, I figured it couldn’t hurt to see if there was a trick or two I could pick up along the way.
Initially, I was quietly despairing that the course was a waste of an afternoon, especially after hearing questions such as “How do you insert a table?”, but I persevered, and by the second half of the session realized that I knew nothing about the advanced functions of Word that make writing a thesis that much easier.
Finding out how little I actually knew had me feeling down at first, with that “worst Ph.D. student ever” feeling sinking in. But after talking to other students, I soon found out that I wasn’t alone! Surprisingly few people I spoke to (including several students who had just submitted theses) had any idea of how much of the work of thesis writing Word will do automatically (or auto-magically) for you.
In the hopes that I can make at least one student’s write up less stressful, I’ve created several posts that will show you how to use Microsoft Word‘s advanced functions to write your thesis. Today’s topic starts from the beginning.
Creating a Thesis Outline
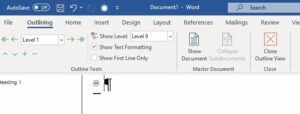
The first trick that I found fantastically helpful in laying out thesis chapters is the Outlining function. Creating a thesis outline allows you to set out the headings for your chapters, sections and subsections, and provides an easy means of moving them about without having to copy and paste things all over your document. To use the outline function, click the “View” tab at the top of the Word menu and select “Outline”.
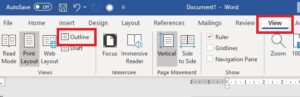
This will give you the outlining toolbar.
From here, you can start your thesis outline by jotting down your main headings for each chapter and building a plan for each section.

At this stage, you will have a very rough idea of the points you want to include. Now, you can designate the level, or importance, of each heading. The level will decide the size and type of font used for the heading and will be useful later on when you generate the table of contents.
Give it Some Style
Before you start assigning levels to the headings, decide how you want each level to look: e.g., Chapter heading needs to be size 20, bold and underlined, level 2 section headings need to be size 18, bold… etc.
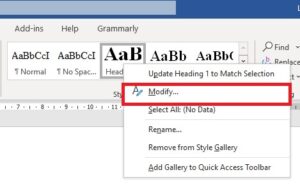
Then set up the style for each level:
- Close outline view
- Return to the home tab
- Go to the styles gallery
- Right-click “Heading 1“
- Select “Modify” and set up your preferred font styles
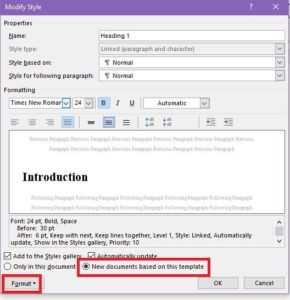
I found it useful to set this to “New documents based on this template” so that in each thesis chapter that I wrote, the headings were identical. You can also use the format option to make even more changes, like adjusting the line spacing, indents, or setting text to “keep with next” so paragraphs don’t break over a page or figures and legends don’t become separated.
Level Up
Once you have this set up for each of the headings (I went as far as Heading 5 and didn’t need to go any further), you can set up the levels for your chapter headings within your thesis outline.
To do this
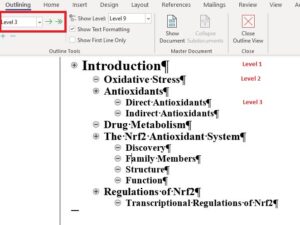
- Return to outline view
- Using the tool marked “level” use the single arrows on either side of it to promote or demote each heading a level, the double arrows move the headings to either end, i.e. Heading 1 or body text.
If you decide you need to move sections around, rather than copying and pasting, simply click the grey circle next to the heading and drag it to its new position.
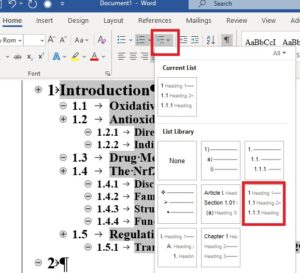
Give Them Numbers
Next, you can add numbering to your headings. Still in outline view:
- Highlight all the headings in your thesis outline
- Click the Home tab and select “multilevel list” (located beside list numbering and bullet points)
- Select the type of numbering you want. I opted for the 1, 1.1, 1.1.1 format, but don’t be afraid to play around with other options if that’s not what you’re looking for.
With your thesis outline laid out for each chapter, it just becomes a matter of filling in the gaps. This will break your thesis into much more manageable chunks.
Pick a small section to write each week and your thesis will practically write itself!
Stay tuned for my next post on generating a table of contents, inserting captions, and cross-referencing sections.
Originally published October 15, 2014. Reviewed and updated on November 22, 2020.
**Note: All screenshots taken from Word for Windows, 2019.
Share this to your network:
MS Word Template
Template BETA
Download iitthesis2.dot
The template provides a basic thesis layout, which meets the IIT thesis manual requirement. It consists of the following parts:
- Cover page
- Acknowledgement
- Authorship Statement (New Template ONLY)
- Table of Contents
- List of Tables
- List of Figures
- List of Symbols
- Abstract
- Appendix
- Bibliography
plus - 5 Chapters each having 3 sections. (You may delete chapter and sections or add extra ones in case your thesis has a different number of chapters and sections).
Style Elements Template
This document has includes several examples of figures, tables, and their captions for Microsoft Word. You can cut-and-paste one- or two-line figure titles and table titles and insert columns and rows as needed to formatted tables.
Note
This template only provides a basic layout of what is required (i.e. contrary to the LaTeX template, it is not “intelligent” enough to automatically track figure and table labels and their page numbers. Therefore, all of the following should be done manually:
- Page numbers in the Table of Contents
- Figure and Table label numbers and page numbers for the List of Figures or List of Tables
- Provide bibliography parts and the relevant citations
- Revise the above items if any related changes are made (e.g. a figure/table/page is added or deleted)
A note on writing a PhD thesis in MS Word
Below is a simple note on a few formatting tricks in Microsoft Word
for PhD thesis writing. Briefly, this needs to account for how to make
a proper page numbering, table of contents, and references to list of
figures and tables.
- Page Numbering
- Add Table of Contents
- Add List of Figures
Page Numbering
-
use “Layout” –> “Breaks” to insert “Sections/Continous” to separate different Chapters
into different sections. -
Go to the very first page. Under “Insert”, use “Page Number” –> “Bottom of Page” –>
“Plain Number 2”. We shall return to format the prefix into Roman numbering later in a few
steps. -
Find the first page of Chapter 1, then double-click on the footer page number; this will
pop up a ribbon “Design” on top. In “Design” tab, find the highlighted “Link to Previous”,
click to uncheck it. This will allow the page numbering to start fresh for this section. -
In the “Design” tab, find “Page Number” –> “Format Page Numbers”, then in the poped-up window,
set “Start at: 1”. Now the Prefix and Chapters have separated numbering. -
Go back to the first page of the Prefix, again use “Format Page Numbers” and set “Number Format”
to Roman Numbering for the Prefix.
Add Table of Contents
-
Format the Section and Subsection heading by “Home” –> “Heading 1/2/3”.
-
In the ToC page, click “References” –> “Table of Contents”.
-
In “Home” tab, right-click on the “Heading 1/2/3” and “Modify..” to change the heading
to the same style of the main texts. This includes font, bold, and paragraph (which usually
is double spacing).
Add List of Figures
-
Set cursor at the first
chapter location (e.g. “Chapter 1”), then in “Home” tab, select “Multilevel list” –> “Chapter”.
(“Multilevel list” is in “Home/Paragraph” group and above “Aligning” buttons.)
This will create a list for all chapters and the corresponding sections/subsections. -
Select the caption of a particular figure, then “References” –> “Insert Caption”.
In “Numbering..”, select “Including chapter number”, and set “Use separator” is “. period”.
Make sure the label is “Figure” as not to be mixed with “Tables”. -
In the Prefix/List of Figures page, from “References” –> “Table of Figure Dialog”, insert
the list. -
Format the Caption in “Home” tab, similar to the above.