
Word for Microsoft 365 Word 2021 Word 2019 Word 2016 Word 2013 Word 2010 Word Starter 2010 More…Less
You can easily insert a special character, fraction, or other symbol in your Word documents.
The most important thing to understand when inserting symbols, fractions, special characters, or international characters is that the font you use is critical. Not all fonts have the same characters in them. For example, the Elephant font has no fraction characters in it, while Verdana does. As a result it’s important to use the right font to find the symbol or character you want.
These marks are static symbols. If you’re looking for an interactive check box that you can click on to check or uncheck, see Make a checklist in Word.
Symbol such as currency (¥), music (♫), or check marks (✔)
-
Place your cursor in the file at the spot where you want to insert the symbol.
-
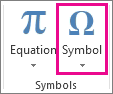
Go to Insert > Symbol.

-
Pick a symbol, or choose More Symbols.
-
Scroll up or down to find the symbol you want to insert.
Different font sets often have different symbols in them and the most commonly used symbols are in the Segoe UI Symbol font set. Use the Font selector above the symbol list to pick the font you want to browse through.
-
When you find the symbol you want, double-click it. The symbol will be inserted in your file.
-
Select Close.
Tip: If you want to make your symbol larger or smaller, select it and use the Font Size setting.
If you’re going to insert the same symbol often, consider setting up AutoCorrect to insert it for you. You can find more info about that here: Insert a check mark or other symbol using AutoCorrect.
-
Click or tap where you want to insert the special character.
-
Go to Insert > Symbol > More Symbols.
-
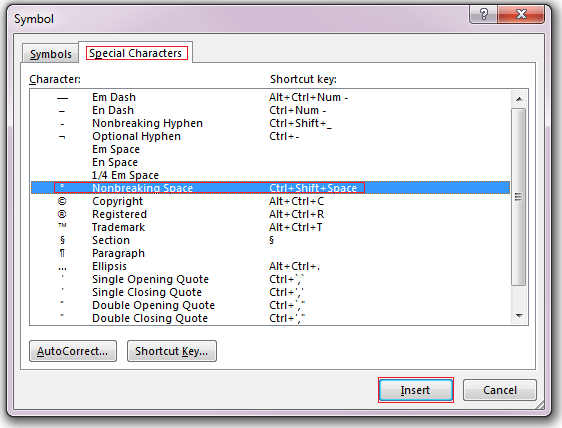
Go to Special Characters.
-
Double-click the character that you want to insert.
Tip: Many of the special characters have shortcut keys associated with them. If you want to insert that special character again in the future, just press the shortcut key. ALT+CTRL+C inserts the Copyright symbol (©), for example.
-
Select Close.
Some fractions (1/4, 1/2, and 3/4) automatically switch to a fraction character (¼, ½, ¾) when you type them. But others do not (1/3, 2/3, 1/5, etc.) so if you want to insert those as symbols you’ll need to use the insert symbol process.
-
Click or tapwhere you want to insert the fraction.
-
Go to Insert > Symbol > More Symbols.
-
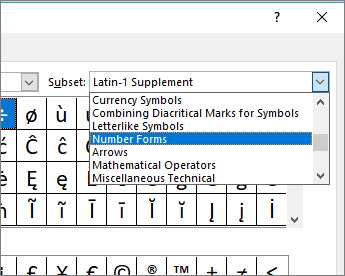
In the Subset dropdown, choose Number Forms.
Note: Not all fonts have a number forms subset. If you don’t see the number forms subset available for your font you will have to use a different font, such as Calibri, to insert the fraction character.
-
Double-click the fraction that you want to insert.
-
Select Close.
Only a handful of common fractions have a symbol that you can substitute. For more unusual fractions, such as 8/9, you can approximate the symbol by setting the numerator as superscript and the denominator as subscript. For more information see Insert subscript or superscript text.
If you plan to type in other languages often you should consider switching your keyboard layout to that language. You can find more information about that at Enable or change a keyboard layout language.
For one-off characters there are almost always keyboard shortcuts in Office to do that. For example:
-
CTRL+SHIFT+ALT+? inserts a ¿
-
CTRL+SHIFT+~ followed immediately by «a» will insert ã.
-
CTRL+SHIFT+: followed immediately by «u» will insert ü.
For more info on international characters see: Keyboard shortcuts for international characters.
You can also use the character code of the symbol as a keyboard shortcut. Symbols and special characters are either inserted using ASCII or Unicode codes. You can tell which is which when you look up the code for the character.
-
Go to Insert >Symbol > More Symbols.
-
Scroll up or down the list to find the symbol you want. You might have to change the font or the subset to locate it.
Tip: The Segoe UI Symbol font has a very large collection of Unicode symbols to choose from.
-
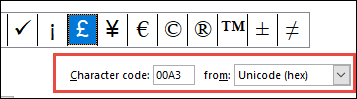
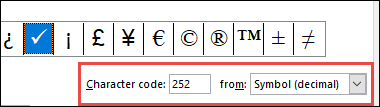
Towards the bottom right you’ll see boxes for Character code and a from:. The character code is what you’ll enter to insert this symbol from the keyboard and the from: tells you what kind of character it is. If from: says «Unicode (hex)» it’s a Unicode character. If from: says «Symbol (Decimal)» then it’s an ASCII character.
Unicode
ASCII
ASCII and Unicode information and character tables
For more info about using ASCII or Unicode characters, see Insert ASCII or Unicode character codes.
Insert a check mark
For info on inserting a check mark, see Insert a check mark.
Need more help?
Your average keyboard has enough letters, numbers, and punctuation marks for all your day-to-day typing needs. But what if you need symbols or special characters that aren’t on your keyboard?
Well, in Microsoft Word, you have three main options:
- Use the Symbol menu.
- Learn some ASCII codes.
- Use Microsoft Word’s special character shortcuts.
In the rest of this post, we’ll look at how to do each of these in your writing. Watch the video or read the post below to get started:
1. Using the Symbol Menu
To see the Symbol menu in Microsoft Word, go to Insert > Symbols on the ribbon and click the Symbol button (or Insert > Advanced Symbol > Symbols in the menu system in Word for Mac).
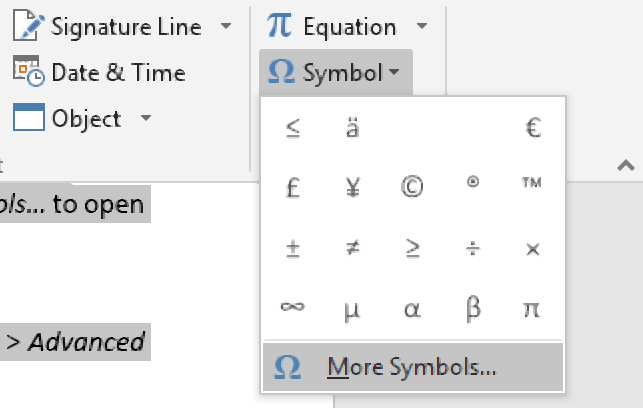
This will open a quick access menu of 20 frequently used symbols to pick from. However, you can also access the full range of special characters in Microsoft Word as follows:
- Go to Insert > Symbols and click Symbol to open the menu.
- Click More Symbols… to open a new window.
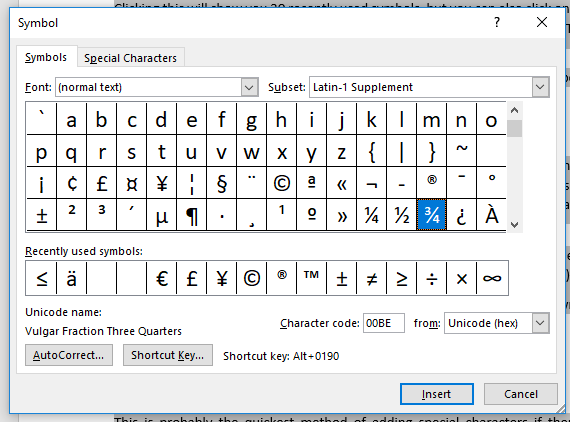
- Scroll through until you find the symbol you want to use.
- Click Insert to add the symbol to your document.
The symbol will then appear in your document at your cursor. Microsoft Word will also add it to the quick access menu, saving your time if you need to use the same symbol again.
2. ASCII Codes
ASCII codes each indicate a different symbol, so you can use them to add special characters to a document quickly via the numeric keypad:
- Learn or look up the correct ASCII code for the symbol(s) you need.
- Turn on Num Lock on your keyboard to activate the numeric keypad.
- Hold down the Alt key and type the required code.
The corresponding symbol will then appear at your cursor position.
3. Shortcuts for Special Characters
For some special characters, your simplest option is to let Microsoft Word do the hard work! There are, for example, shortcuts available for the following common symbols:
|
Special Character |
Shortcut |
Autocorrect Option |
|
Trademark symbol (™) |
Ctrl + Alt + T |
Write “TM” in parentheses |
|
Registered trademark symbol (®) |
Ctrl + Alt + R |
“R” in parentheses |
|
Copyright symbol (©) |
Ctrl + Alt + C |
“C” in parentheses |
|
Closed Ellipsis (…) |
Ctrl + Alt + . |
Three periods without spaces |
|
Euro (€) |
Ctrl + Alt + E |
“E” in parentheses |
You’ll notice we’ve included an “autocorrect” version for each symbol above. In these cases, Microsoft Word will automatically correct the specified text to create the symbol.
Find this useful?
Subscribe to our newsletter and get writing tips from our editors straight to your inbox.
For example, to add a trademark symbol to a document, we have two options:
- Hold down Ctrl + Alt + T at the same time.
- Write “(TM)” and let Microsoft Word change this to the symbol.
These shortcuts are very quick and simple, so it is worth memorizing them if you use any of these symbols frequently. Similar shortcuts are also available for accented letters.
Microsoft Word symbols cannot be easily typed in using the keyboard.
However,
the need to include these characters in documents is increasingly common these
days.
Even when writing in English, foreign names of places and people may require some of these special characters.
Scientific writings also include mathematical symbols and Greek letters.
Text may also include characters like the degree symbol and copyright symbol.
There
are character codes you can use to enter a symbol in Word. However, most people
don’t have the time to memorize these character codes.
So, in this guide today, you’ll learn how to insert any symbol in Word either using the mouse pointer or a keyboard shortcut.
NOTE: There are several methods you can use to type symbols in Word. For me, the method I use to type symbols depends on how many and how frequently I need to type them. Keep reading to choose the best method for you
Without
further ado, below are the ways to type symbols in word
1st Method: Using Insert Symbols
This
method involves using the symbols dialog box located in the symbols area at the
right border of the insert tab.
Below are steps to insert symbols in MS Word using Insert Symbols.
NOTE: in the steps below, I’ll illustrate how to insert symbols in MS Word by inserting the greater than or equal to symbol. You can use the same steps to insert any symbol of your choice.

- STEP 1: Click to position the insertion point at where you want to insert the symbol. In this example, we will place the symbol between X and 10 as you can see in the above picture.
- STEP 2: Go to the Insert tab, in the Symbols group and click Symbol, then More Symbols.

NOTE: If the symbol you want to insert is found in the symbols gallery as shown in the picture above, click it to insert it into your document. Any symbol you use will move to the first position in the gallery. Thus, the symbol gallery box gives you access to the 20 most recently used symbols. However, if you can’t find the symbol you are looking for in the symbol gallery, click on More Symbols to display all the symbols.
- STEP 3: Select your desired font from the Font drop down. You can leave it as default (Normal text). You don’t have to explore every font in the list. However, it is worth looking at Wingdings or Symbol if you want a fancy symbol.

- Step 4: Scroll down or up until you find the required symbol, then
click to select it. You can also click the desired symbol in the Recently used
symbols. - Step 5: Click Insert to insert the selected symbol then click
to close the dialog. Alternatively, double-click on the desired symbol to
insert it into your document, then close the dialog.
As soon as you click insert or double-click the symbol, Word will insert it into your document.
2nd
Method: Using the keyboard to insert symbols in Word.
Not all the symbols in Word can be found on the keyboard.
However, all the symbols can be typed using the keyboard.
Typing symbols that are not found on the keyboard can be very tedious. In fact, it is not even necessary in Word because using the first method above is much easier and simple to compare with.
However, it is still useful to know as it becomes handy to obtain certain characters or symbols in software that has no access to Insert Symbol like in Microsoft Word.
Let’s use the following exercise for example:
- Turn on your Num Lock.
- Whilst holding down the [Alt] key, type [065]
on the numeric keypad (on the right). - Then release the [Alt] key. The letter A should
appear. - To type the letter B, repeat steps 2 and 3. But this
time type [Alt 066] on the numeric keypad. - [Alt 067] should give you C, and [Alt 068] should give
you D, and so on.
This
exercise isn’t really necessary because one can easily type in any letter
directly with the keyboard.
However, not all characters and symbols are on the keyboard. Hence let’s try out the following:
- Hold down the [Alt] and type [0176] for a degree sign (°)
- Type [Alt 0189] and [Alt 0190] for fractions (½ and ¾)
- Also try [Alt 0181] for µ
But
how do you remember the number for each symbol?
It’s
almost impossible to remember. It’s not even necessary.
Instead, you should make a note of the symbols or characters you use very often.
In the next section, you’ll learn how to get the shortcut to any symbol into your Word document.
How to find the keyboard shortcut for symbols in word
You
can use the Symbol dialog box to find the character code (or keyboard shortcut)
for any symbol or character.
This way you can insert symbols by typing them on your keyboard instead of using the Symbol dialog box.
Here’s how to learn the keyboard shortcut code for a particular symbol or character in Word:
- Open the Symbols dialog box.
To
display the Symbols dialog box, go to the Insert tab, in the
Symbols group and click Symbol, then More Symbols.
- Select the symbol you want to take note of, then look near
the bottom of the dialog for the symbol name as well as its code. - To insert any symbol using its character code, press down the
[Alt] key, type the code, then release the [Alt] key.
If you are lucky, you’ll see another shortcut key aside from the character code which is much easier to type than the code.
See
screenshot below:

Assigning
shortcut keys to symbols
In
Microsoft word, you are not limited to the default hotkeys.
You can assign any keyboard shortcut key to any command or symbol to fit your needs.
As
mentioned, each and every character or symbol in Microsoft Word has a character
code that you can use on the keyboard.
Aside from these character codes, Word still gives you the space to assign a shortcut key to any symbol.
Below
are the steps to do so:
- Open the Symbols dialog box.
To
display the Symbols dialog, navigate to the Insert tab, in the
Symbols group and click Symbol, then More Symbols. The Symbols
dialog box should display.
- Click to select the symbol to which you want to assign a shortcut.
- At the bottom area of the dialog, click Shortcut Key… The Customize Keyboard dialog box appears.

- Under Specify keyboard sequence, in the Press new shortcut key field, type the keyboard shortcut you want to assign for the symbol.
If the shortcut key you assign is already assigned for a command, Word will tell you that hey dude, the shortcut key you are assigning to this symbol is already taken by another command. If you ignore and continue to assign, Word will not stop you. However, this shortcut will not work again for the command it was previously assigned to. It will now work for this symbol.

- Click Assign to assign the shortcut.
NOTE: There is another box labeled Current keys. These are the current hotkeys assigned to the selected symbol. You can take note of these hotkeys without assigning another one for the same symbol.
Typing
any symbol in Word doesn’t have to be difficult as you can see.
If you don’t understand anything explained here, let me know in the comments section below for more clarification.
Thank you very much for reading this article.
This tutorial shows three ways to insert special characters in Microsoft Word:
1. The Symbol dialog box
2. Keyboard shortcuts
3. AutoCorrect
Word’s special characters include twelve text characters, such as the en dash, that don’t appear on traditional keyboards and fifteen formatting characters, such as the nonbreaking hyphen, that affect text layout. The table below lists all twenty-seven special characters.
| 1. Em Dash | 10. Registered Symbol | 19. No-Width Optional Break |
| 2. En Dash | 11. Trademark | 20. No-Width Non Break |
| 3. Nonbreaking Hyphen | 12. Section Break | 21. Left-to-Right Mark |
| 4. Optional Hyphen | 13. Paragraph Break | 22. Right-to-Left Mark |
| 5. Em Space | 14. Ellipsis | 23. Left-to-Right Embedding |
| 6. En Space | 15. Single Opening Quote | 24. Right-to-Left Embedding |
| 7. 1/4 Em Space | 16. Single Closing Quote | 25. Left-to-Right Override |
| 8. Nonbreaking Space | 17. Double Opening Quote | 26. Right-to-Left Override |
| 9. Copyright Symbol | 18. Double Closing Quote | 27. Pop Directional Formatting |
For a description of each character, visit “What Are Special Characters in Microsoft Word?”
If you want to insert accent marks (the extra marks that appear above and below letters) instead of special characters, visit “Three Ways to Insert Accent Marks in Microsoft Word.”
This tutorial is also available as a YouTube video showing all the steps in real time.
Watch more than 100 writing-related software tutorials on my YouTube channel.
The images below are from Word for Microsoft 365. The steps are the same for Word 2021, Word 2019, and Word 2016, and are similar for Word 2013 and Word 2010.
Insert Special Characters Using the Symbol Dialog Box
All twenty-seven special characters can be inserted using the Symbol dialog box.
1. Place your cursor where the special character should be inserted in your text.
2. Select the Insert tab in the ribbon.

3. Select Symbols in the Symbols group.

4. Select More Symbols in the drop-down menu.

5. Select the Special Characters tab in the Symbol dialog box.

6. Select the special character that you need from the Character menu.

7. Select the Insert button to insert the special character.

8. Select the Close button to close the Symbol dialog box.

Pro Tip: If the Symbol dialog box blocks your view of your newly inserted special character, left-click your mouse arrow on the uppermost area of the dialog box to grab it and then move it to a different location on your screen.

Insert Special Characters Using Keyboard Shortcuts
Thirteen special characters can be inserted with preset keyboard shortcuts.
Please note that the shortcuts shown below for the Double Opening Quote and Double Closing Quote are different than those shown in Word’s Symbol dialog box (which may be typos because they don’t function as intended).
1. Place your cursor where the special character should be inserted.
2. Select the appropriate key combination on your keyboard.
Em Dash: Alt + Ctrl + Num –
(Alt plus Ctrl plus the minus sign on the number pad)
En Dash: Ctrl + Num –
(Ctrl plus the minus sign on the number pad)
Nonbreaking Hyphen: Ctrl + Shift + _
(Ctrl plus Shift plus underscore)
Optional Hyphen: Ctrl + –
(Ctrl plus hyphen)
Nonbreaking Space: Ctrl + Shift + Spacebar
Copyright: Alt + Ctrl + C
Registered: Alt + Ctrl + R
Trademark: Alt + Ctrl + T
Ellipsis: Alt + Ctrl + .
(Alt plus Ctrl plus period)
Single Opening Quote: Ctrl + `,`
(Ctrl plus two grave accents)
Single Closing Quote: Ctrl + ‘,’
(Ctrl plus two single quotation marks)
Double Opening Quote: Ctrl + ` , Shift + ‘
(Ctrl plus one grave accent followed by Shift plus one single quotation mark)
Double Closing Quote: Ctrl + ‘, Shift + ‘
(Ctrl plus one single quotation mark followed by Shift plus one single quotation mark)
Insert (a Few) Special Characters Using AutoCorrect
Word’s preset AutoCorrect feature lets you insert the copyright symbol, trademark symbol, registered mark, and en dash by typing specific character strings into your text.
Trademark: (tm)
Copyright: (c)
Registered: (r)
En Dash: --
The en dash won’t appear automatically until you complete the next word or character string and then press the spacebar.
Pro Tips: Select Ctrl + Z to reject an autocorrected character. You can also customize Word’s autocorrect options in the Proofing section of the Word Options dialog box.
Further Reading: How to Find and Replace Special Characters in Microsoft Word
Updated November 14, 2021
RushInformation recommends Hello Ivy for automating your workflow and project management for free. Learn More
We all Use Microsoft Word , Text Editors , Word Processors in Our Daily Life For Completing Our Projects .But Have You Ever Thought Of Writing Symbols Like Sigma,Alpha,mu,Beta,Gamma etc in a Microsoft Word .Most of Us are Not aware on How to Write these Symbols in Word So they Try to Copy and Paste these Symbols from Internet whenever they need them So Here in this I am Going to tell you a very Simple Method to Write all these Difficult Symbols in a Very Easy and convenient Way in Microsoft Word.This Methods Works For all Word Processors , Text Editors , Even in Browsers and Email Clients.So Here is a Step By Step Guide On How to Write these Symbols in Word or any Text Editors
How to Write Symbols in Word : Steps to Follow
- First of all Open Microsoft Word or Text Editor or Browser where You want to Write the Symbols
- Now Press NumLock on the Keyboard and Set it to NumLock Mode
- Now Hold down the ALT key on the Keyboard and Write the Numbers Using Numpad ( Numbers are Given Below For Different Types of Symbols)
Type 224 for – Alpha
Type 225 for – Beta
Type 226 for – Factorial
Type 227 for – Pie
Type 228 for – Summation
Type 229 for – Sigma
Type 230 for – Mu
Type 231 for – Tow
Type 232 for – Phase or Angle
Type 234 for – Ohm
Type 235 for – Del
Type 236 for – Infinity
Type 238 for – Permittivity
Type 241 for – Sum and Difference
Type 242 for – Greater than Equal to
Type 243 for – Less than Equal to
Type 244 for – Upper half of integration sign
Type 245 for – Lower half of integration sign
Type 246 for – Divide
Type 247 for – Approximation
Type 248 for – Degree
Type 251 for – Root
Type 252 for – Raise to the Power n
Type 253 for – Raise to the Power of 2
FULL CHART SHOWING VARIOUS ALT KEY COMBINATIONS
Note – Many Laptops have a Blue FN key that Changes a Set of Keys So Please Check That Key Before Doing this
RushInformation recommends Hello Ivy for automating your workflow and project management for free. Learn More