
How to type Text over a Line in Word
- Highlight the text and click the Underline button on the Home tab in the Font group, and you will notice that the text will be on the line.
- The second technique is to click the Insert tab and click the Text box button in the Text group.
Contents
- 1 How do you make lines to write on in Word?
- 2 How do you write on top of a line?
- 3 How do you put a line above text in Word?
- 4 How do you type Overbar?
- 5 How do you put a line under a letter in Word?
- 6 How do you type a horizontal line on a keyboard?
- 7 How do you write on lined paper?
- 8 How do I edit lines in Word?
- 9 How do you put a line above and below text in Word?
- 10 How do you get a line above a letter on a keyboard?
- 11 How do you make an O with a line through it?
- 12 How do you pronounce a with a line over it?
- 13 How do you add lines to a resume in Word?
How do you make lines to write on in Word?
Use the Shapes Menu to Insert a Line in Word
- Place the cursor in the spot where you want to insert a line.
- Go to the Insert tab.
- In the Illustrations group, select the Shapes drop-down arrow.
- In the Lines group, choose a line shape.
- In the Word document, drag across the location where you want the line to appear.
How do you write on top of a line?
In the drop-down menu, click on the button labeled “Special Characters” and then “More Symbols.” You will find a list of special characters under this section. Scroll through them until you find the specific overlined letter you want to add, such as an a with a line over it, and then click on it.
How do you put a line above text in Word?
Type the text you want to overline into your Word document and make sure the “Home” tab is active on the ribbon bar. Click the down arrow on the “Borders” button in the “Paragraph” section of the “Home” tab. Select “Top Border” from the drop-down menu.
How do you type Overbar?
Method 1: Use Word’s Equation Editor
- Go to the Insert tab > Symbols group (far right), then click Equation.
- Select Insert New Equation from the bottom of the list.
- Click Accent on the Design tab > Structures group.
- Scroll down past the Boxed Formulas section to the Overbars and Underbars section.
- Click the Overbar icon.
How do you put a line under a letter in Word?
Hold the “Ctrl” key and press “U” to put a line under the letter. Press the combination again to remove the line.
How do you type a horizontal line on a keyboard?
Press and hold the “Shift” key, then press and hold the hyphen “-” key, located two keys to the left of “Backspace” on a PC or “Delete” on a Mac. This creates a solid, horizontal straight line.
How do you write on lined paper?
Always on your left.
Also, don’t write in the white space above the first line. You can write your name and date there, but that’s all. And don’t write outside the red lines – you should leave at least an inch of white space all around the outside edge of the paper.
How do I edit lines in Word?
In Excel, Outlook, PowerPoint, and Word
- Select the line that you want to change.
- Under Drawing Tools, on the Format tab, in the Shape Styles group, click the arrow next to Shape Outline.
- Point to Dashes, and then click the line style that you want.
How do you put a line above and below text in Word?
To insert a line in Word above and / or below a paragraph using the Borders button:
- Select the paragraph(s) to which you want to add a line.
- Click the Home tab in the Ribbon.
- Click Borders in the Paragraph group. A drop-down menu appears.
- Select the line you want to use.
How do you get a line above a letter on a keyboard?
These keyboard shortcuts will help you display text more accurately in your business documents.
- Open a document in Microsoft Word.
- Press “Ctrl-Shift” and the caret (” ^ “) key and then the letter to insert a circumflex accent.
- Press “Ctrl-Shift” and the tilde (” ~ “) key and then the letter to insert a tilde accent.
How do you make an O with a line through it?
ø = Hold down the Control and Shift keys and type a / (slash), release the keys, and type an o. Ø = Hold down the Control and Shift keys and type a / (slash), release the keys, hold down the Shift key and type an O.
How do you pronounce a with a line over it?
For instance, a line over the letter “i” would be pronounced like “eye” like in the word “pie,” and a line over the letter “o” would be pronounced “oh” like in the word “toe.” A line over the vowel “a” would be pronounced “ay” like in “stray,” and a line over the letter “e” would be pronounced like “ee” in “tree.”
How do you add lines to a resume in Word?
To add a line under a header or line of text, highlight the text and select the bottom border option under Paragraph/Borders. Another way is to Insert>Shapes>choose the Line shape and drag the line under the text from left to right.
Microsoft Word’s cartoon band helps you accumulate pieces of a circuitous cartoon calm on a distinct canvas.

Image: justplay1412/Shutterstock
Years ago, Word added an added band back you amid shapes and graphics. It was awkward to assignment with and created abashing for users who weren’t acquainted it was there. Eventually, Word accustomed us to admit cartoon and shapes in the absolute certificate and set wrapping options to actuate how the cartoon and argument mingle. Now we accept addition option: The cartoon canvas is a new alignment apparatus for inserting circuitous assets with lots of parts. In this article, I’ll appearance you how to access assets in the cartoon layer.
SEE: 83 Excel tips every user should master (TechRepublic)
I’m application Word Online because not anybody has upgraded to 365, and this affection is accessible alone to Word Online and 365 subscribers. There’s no affirmation file; you won’t charge one.
For the best part, the cartoon band is an authoritative tool. For instance, you ability admit a account and again comment it with ink. You could do so at the certificate level, but you ability acquisition it easier in the cartoon layer, at atomic while you’re alive on it. It’s affectionate of a access for shapes, pictures, text, and so on. You can admit added pieces and move them about after impacting the agreeable breeze in the certificate layer. You’re not appropriate to use the cartoon band though; if your “drawing” has alone a brace of pieces, the cartoon band ability be overkill.
SEE: Office 365: A adviser for tech and business leaders (free PDF) (TechRepublic)
To admit a cartoon application the cartoon layer, position the cursor area you appetite the drawing. Then, bang the Admit tab and again bang Drawing. Doing so displays a new canvas, as apparent in Figure A. If you don’t accept the Draw tab in 365 desktop, bang the Admit tab. In the illustrations group, bang the Shapes dropdown. At the basal of the consistent list, bang New Cartoon Layer. Word will affectation a new cartoon layer.
Figure A

Add a new cartoon layer.
Once you accept a canvas, you can admit text, shapes, or address application one of the abounding pen options. Microsoft 365 desktop additionally lets you admit clear files into the cartoon layer. To admit the cartoon into the document, bang Save and Close.
The pieces in Figure B are bald silliness, but don’t let the abridgement of my architecture abilities abstract you from this feature. As you can see in Figure C, the cartoon is now allotment of the document. (If the cartoon is too large, use the alternative handles to abate its size.) While you assignment on the drawing, annihilation happens at the argument level. Once the cartoon is inserted, use formats as you commonly would. To adapt the drawing, double-click it. Back you annoyance it through the content, Word treats aggregate in the cartoon band as a distinct object.
Figure B
Actualize a cartoon to admit into the document.
Figure C
The cartoon is in the certificate band now.

Each cartoon uses its own canvas, which agency you can actualize assorted assets in the aforementioned document. Also, I mentioned you could use the Admit tab (in 365 desktop) if you don’t accept the Draw tab. Best likely, if you do a lot of cartoon in Word you’ll appetite to add the Draw tab as follows:
Now that you apperceive how to use the cartoon canvas, let’s attending at connectors.
True connectors aren’t accessible in the certificate layer. Application Word Online, you can use curve and accumulation them, but alike again they can be a bit difficult to assignment with. In the cartoon layer, connectors break connected. Not alone do they “stick,” they amplitude and angle as you move the affiliated shapes. Let’s analyze this affection now:
Figure D
At this point, the shapes aren’t connected. Annoyance one end of the band to the appearance on the left. Back the affiliation credibility (little dots) appear, annoyance the band to one of the points. You’ll apperceive they’re affiliated back the point changes color. In Figure E, you can see that the affiliation arrow is blooming instead of bare like the point to the right. Figure F shows both shapes affiliated to the aforementioned connector. Move one or both of the shapes and watch the adapter accommodate to the new positions. Back you’re done, bang Save and Close to admit the new cartoon into the document. Figure G shows the new cartoon amid into the certificate layer.
Figure E
Annoyance the affiliation point on the band to a affiliation point on the shape.

Figure F
Both shapes are affiliated to the connector.
Figure G
Admit the cartoon into the document.
We’ve affected agilely on this adolescent affection and had a bit of fun. If you charge to actualize assets in Word, you’ll acquisition the new cartoon canvas accessible in befitting the pieces together.
Be your company’s Microsoft cabal by account these Windows and Office tips, tricks, and bluff sheets. Delivered Mondays and Wednesdays
How To Write On Top Of A Line In Word – How To Write On Top Of A Line In Word
| Encouraged to be able to my own blog, with this period I’m going to show you about How To Delete Instagram Account. Now, this can be the initial photograph:
:max_bytes(150000):strip_icc()/Word_linedesign-56270eba450549208dc1a55a4203b1f7.jpg "How to Insert a Line in Word")
How about impression above? is usually of which awesome???. if you feel so, I’l t provide you with several image once again under:
So, if you wish to receive all of these awesome shots regarding (How To Write On Top Of A Line In Word), just click save button to save these pictures in your pc. These are available for obtain, if you’d rather and want to get it, just click save badge on the post, and it will be immediately saved in your pc.} Finally if you wish to secure unique and latest photo related with (How To Write On Top Of A Line In Word), please follow us on google plus or bookmark this page, we try our best to offer you regular up grade with fresh and new images. Hope you love staying here. For many up-dates and recent information about (How To Write On Top Of A Line In Word) graphics, please kindly follow us on twitter, path, Instagram and google plus, or you mark this page on book mark section, We try to provide you with up-date regularly with fresh and new shots, love your browsing, and find the ideal for you.
Here you are at our site, contentabove (How To Write On Top Of A Line In Word) published . Nowadays we are delighted to declare we have discovered an awfullyinteresting nicheto be pointed out, that is (How To Write On Top Of A Line In Word) Some people looking for details about(How To Write On Top Of A Line In Word) and certainly one of these is you, is not it?


:max_bytes(150000):strip_icc()/003_insert-horizontal-lines-in-word-4169481-5c797a97c9e77c0001f57bf9.jpg "How to Insert a Line in Word")
:max_bytes(150000):strip_icc()/002_insert-horizontal-lines-in-word-4169481-5c7979b7c9e77c000136a71e.jpg "How to Insert a Line in Word")

:max_bytes(150000):strip_icc()/Word_linetypes-3121d46c463b4445837ff9fcb06c8471.jpg "How to Insert a Line in Word")
")

:max_bytes(150000):strip_icc()/003-vertically-align-text-in-word-3540004-34d4bec359394d1eaaa5dd192d3f83b7.jpg "How to Vertically Align Text in Microsoft Word")

")


Microsoft Word presents many ways to interact with the documents on the screen, including typing into an existing document or form. Over the course of a single day, you may have to type your initials on a line to approve a purchase, scrawl a digital signature on a piece of electronic correspondence, fill out order forms and include a document’s date, all above lines already in place on the document. Adding to a Word document puts you at risk of interrupting the flow of the page, but there are quick workarounds to write above lines while keeping the rest of the content in place.
-
Open the Word document and scroll to the section with the line. If the line is small, it may help to use the Word zoom tool to zoom in so the line is large and easy to see on the screen.
-
Click the Insert tab, then click the “Text Box” button. On the menu, choose “Simple Text Box.” Drag to form a text box directly above the line on the page.
-
Click inside the text box to type any text you want above the line.
-
Handwrite any text you want to appear above the line. Click the Insert tab, then click the «Shapes» button. Choose the «Scribble» tool, which looks like a squiggly line. When the cursor changes to a plus sign, click inside the text box above the line, press and hold down the left mouse button and draw what you want to write. Release the left mouse button when the word is complete.
-
Click the orange Text Box Tools tab, then click the “Shape Outline” menu. Choose “No Outline.” Click the “Shape Fill” menu and choose “No Fill.” This ensures your text shows above the line, but it doesn’t appear to be in a text box, as the box’s border is invisible.
Download PC Repair Tool to quickly find & fix Windows errors automatically
Have you tried to type over a line in Microsoft Word, but the text is not staying on the line but keeps on moving and creating space, and you are wondering how can I get the text on the line without the line moving and creating space? In this tutorial, we will discuss some techniques to write over the line.
Open Microsoft Word.
Draw a line in your document.
The first technique we will use is to write on the line; notice, when you are typing on the line the text, is not staying on the line, and the line keeps on moving.
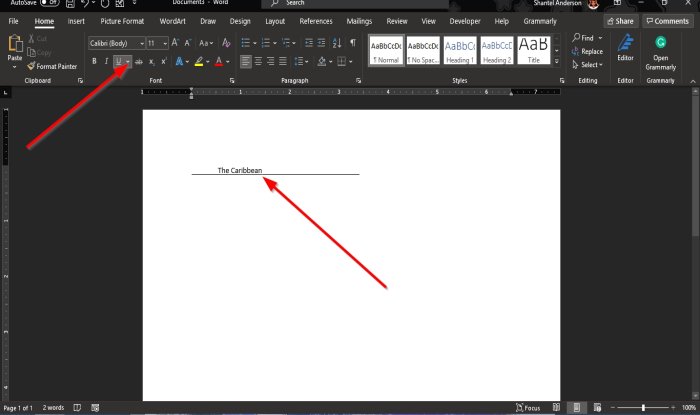
Highlight the text and click the Underline button on the Home tab in the Font group, and you will notice that the text will be on the line.
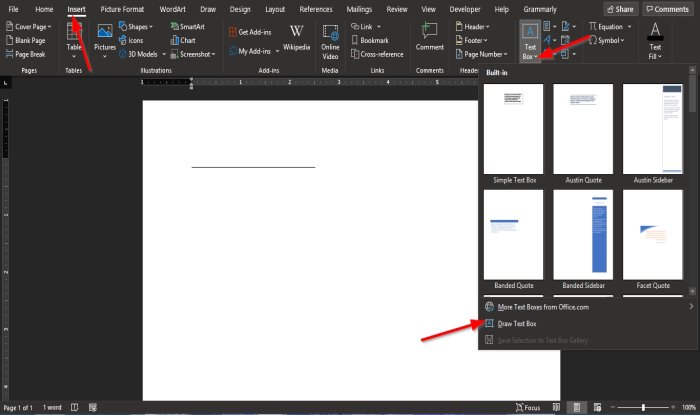
The second technique is to click the Insert tab and click the Text box button in the Text group.
In the drop-down list, select Draw Text Box.
A text box will appear in the document.
Move the text box over the line; ensure that the bottom of the text box matches the line.
We do not want the text box to have an outline; we will click the Shape Format tab.
The Shape Format tab appears whenever the shape is selected, including the text box.

On the Shape Format tab in the Shape Styles group, click the Shape Outline button, and in the drop-down list, select No Outline.
Notice that the text box lines become invisible.
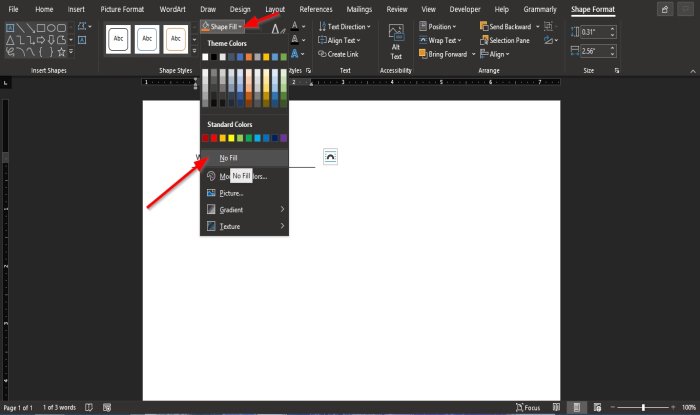
Then click the Shape Fill button, and in the drop-down list, click No Fill.
Drag the text box closer to the line.
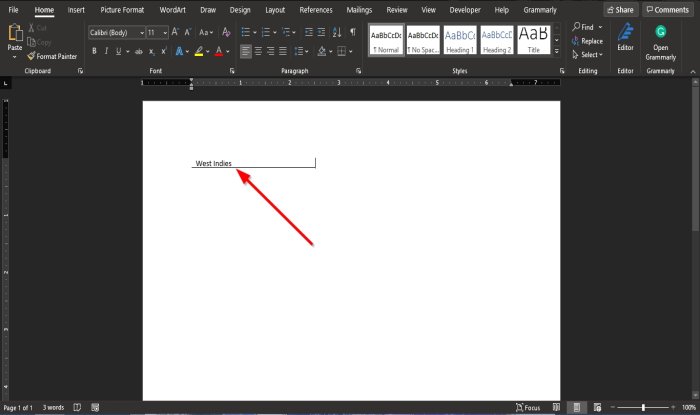
Now, we have the text on the line.
We hope this tutorial helps you understand how to type over lines in Microsoft Word.
Read next: How to add Citations & References in Word.

Shantel has studied Data Operations, Records Management, and Computer Information Systems. She is quite proficient in using Office software. Her goal is to become a Database Administrator or a System Administrator.
While not quite as easy as writing a signature on a paper contract, Microsoft Word allows you to graphically sign above lines with its the built-in drawing tools. This can save you the trouble of having to print out a document and keep paper copies on file. It also allows you to initial or sign a document and then send it back electronically.
Step 1
Open the Word document and scroll to the line you want to write above. You may need to zoom in on the line if it’s small.
Step 2
Click on the «Insert» tab and then click the «Text Box» button, which is in the «Text» part of the ribbon. A menu window will come up. Select «Simple Text Box.»
Step 3
Drag your mouse cursor to make a text box over the signature line. Click inside the box to make it the active text entry field.
Step 4
Click on the «Insert» tab, and then go to the «Shapes» button in the «Illustrations» area. Select the «Scribble» tool, which is located under the «Lines» heading. Click it and draw your signature with the mouse, holding down the left mouse button the entire time you’re drawing it.
Step 5
Click the orange Text Box Tools tab. Click the «Shape Outline» menu and choose «No Outline.» Click the «Shape Fill» menu and choose «No Fill.» This sets the text box’s border to be invisible and keeps your signature above the line.
References
Writer Bio
Ken Burnside has been writing freelance since 1990, contributing to publications as diverse as «Pyramid» and «Training & Simulations Journal.» A Microsoft MVP in Excel, he holds a Bachelor of Arts in English from the University of Alaska. He won the Origins Award for Attack Vector: Tactical, a board game about space combat.
Image Credit
Jupiterimages/Comstock/Getty Images
i Thinkstock Images/Comstock/Getty Images
Microsoft Word includes tools allowing you to create user entry forms, which many people utilize to create quizzes, surveys or applications. The program includes various types of form controls, including check lists or multiple choice options. You also have the ability to insert a text field, allowing people to click the item and type anything. Use this option to create an underline that people can type on top of.
Step 1
Click «File» at the top left and click «Options.» A dialog box opens.
Step 2
Click «Customize Ribbon» on the left side of the dialog box.
Step 3
Select the «Customize The Ribbon» menu on the right side and select «Main Tabs.» A list of tabs appears in the box below.
Step 4
Click the check box next to «Developer» to select it and click «OK.» The Developer tab now appears in the Ribbon.
Step 5
Place your cursor in your document where you want to insert a text entry line.
Step 6
Click «Developer» above the Ribbon.
Step 7
Click the folder icon in the bottom right corner of the Controls section in the Ribbon. A drop-down list appears.
Step 8
Click the black «Aa» button. A text entry field inserts into your document.
Step 9
Click on the field and press «Ctrl» and «U» to underline it.
References
Writer Bio
Aaron Wein is a copy editor for Skagit Valley Publishing. He has been a writer and editor since 2004, contributing to Washington-based publications and clients such as the «Bellingham Herald,» «Western Athletics,» «GNAC Sports» and Microsoft. Wein obtained a bachelor’s degree in journalism from Western Washington University.

Underlining is a common task in Word, and easily done, but what if you need to overline (also called overscore or overbar), some text? Overlining is common in scientific fields, but there are various reasons for overlining text. However, Word doesn’t make it easy.
You can apply overlining to your text in Word using a field code or the equation editor, or you can add a paragraph border to the top of the text.
Using a Field Code
First, we’ll show you how to use a field code to apply overlining to text. Open an existing or new document in Word and place the cursor where you want to put the text with overlining. Press “Ctrl + F9” to insert field code brackets, which are highlighted in gray. The cursor is automatically placed in between the brackets.

Enter the following text between the brackets.
EQ x to()
NOTE: There is a space between “EQ” and “x” and between “x” and “t()”. “EQ” is the field code used to create an equation and the “x” and “to” are switches used to format the equation or text. There are other switches you can use in the EQ field code, including ones that apply bottom, right, left, and box borders to the equation or text.
Put the cursor between the parentheses and enter the text you want to overline.
To display this as text rather than a field code, right-click anywhere in the field code and select “Toggle Field Codes” from the popup menu.
The text you entered into the field code displays with a line above it. When the field code displays as normal text, you can highlight it and apply various formatting to it, such as font, size, bold, color, etc.
NOTE: To display the field code again, simply right-click in the text and select “Toggle Field Codes” again. When you put the cursor in text generated from using a field code, the text is highlighted in gray, just like the field code.
If you want the line to extend beyond either end of the text, add spaces when entering the text into the field code. This is useful for creating lines with names under them for signing official documents.
Field codes work in all versions of Word, for both Windows and Mac.
Using the Equation Editor
You can also apply overlining to text using the equation editor. To do so, click the “Insert” tab in your Word document.
In the “Symbols” section of the “Insert” tab, click “Equation”.
The “Design” tab under “Equation Tools” displays. In the “Structures” section, click “Accent” to access various accents you can apply to the top of the text in the equation. There are two different accents you can use. Select either the “Bar” under “Accents” on the drop-down menu…
…or select the “Overbar” under “Overbars and Underbars”. The “Overbar” produces a slightly longer line above the text than the “Bar”.
The selected accent displays over the small dotted box in the equation object.
To enter your text, click on the dotted box to select it.
Type your text into the dotted box. The line extends to cover the text as you type.
Click outside of the equation object to view the finished “equation”, or overlined text.
Notice that when entering a hyphenated word or phrase into an equation in the Equation Editor, such as “How-To Geek”, there are spaces before and after the dash. That’s because it’s an equation and Word is treating the dash as a minus sign between two operands. If you would rather not have those spaces (or if you don’t have the Equation Editor installed), the first method above, or the following method, may work better for you.
Adding a Paragraph Border
Applying an overline to text can also be accomplished using paragraph borders. Type the text you want to overline into your Word document and make sure the “Home” tab is active on the ribbon bar. Click the down arrow on the “Borders” button in the “Paragraph” section of the “Home” tab.
Select “Top Border” from the drop-down menu.
The line above the paragraph extends from the left margin to the right margin. However, you can adjust the indents for that paragraph to shorten the line. To do this, you must make the ruler visible. Click the “View” tab.
In the “Show” section of the “View” tab, click the “Ruler” check box so there is a check mark in the check box.
To change the indents for the paragraph, put the cursor in the paragraph and put your mouse over one of the indent markers on the ruler. For this example, we’ll make the “Right Indent” bigger, shortening the line from the right.
NOTE: To move the left indent, put your mouse over the small box directly under the two small triangles on the left side of the ruler to move the triangles together. Do NOT move the triangles separately.
Click and drag the indent until the line is the length you want.
Release the mouse button when you’re done moving the indent. The line is now shorter.
Until Microsoft adds this capability as a regular feature, these methods provide ways around the limitation. They may not be as easy as highlighting text and clicking a single button, or pressing a shortcut key, but they’ll work in a pinch.
READ NEXT
- › 5 Ways to Underline in Microsoft Word
- › Discord Direct Message Won’t Go Away? Here’s the Fix
- › Android’s Nearby Share Has (Unofficially) Arrived on Mac
- › The New Winamp Is Here, but It’s Not What You’d Expect
- › How to Get a Refund on the PlayStation Store
- › Windows 11 Has a New Photo Gallery in the File Explorer
- › Save Hundreds on Elegoo’s New PHECDA Laser Engraver Through Kickstarter