
Write great papers with Microsoft Word
You may already use Microsoft Word to write papers, but you can also use for many other tasks, such as collecting research, co-writing with other students, recording notes on-the-fly, and even building a better bibliography!
Explore new ways to use Microsoft Word below.
Getting started
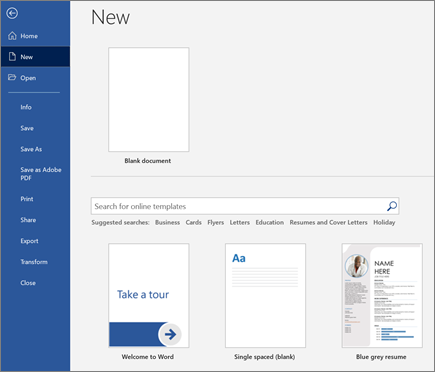
Let’s get started by opening Microsoft Word and choosing a template to create a new document. You can either:
-
Select Blank document to create a document from scratch.
-
Select a structured template.
-
Select Take a tour for Word tips.
The basics
Next, let’s look at creating and formatting copy. You can do so by clicking onto the page and beginning to type your content. The status bar at the bottom of the document shows your current page number and how many words you’ve typed, in case you’re trying to stay maintain a specific word count.

-
To format text and change how it looks, select the text and select an option on the Home tab: Bold, Italic, Bullets, Numbering, etc.
-
To add pictures, shapes, or other media, simply navigate to the Insert tab, then select any of the options to add media to your document.
-
Word automatically saves your content as you work, so you don’t have to stress about losing your progress if you forget to press Save.
Cool stuff
Here are some of the advanced tools you can try out while using Microsoft Word.
Type with your voice
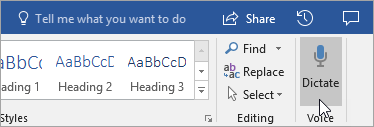
Have you ever wanted to speak, not write, your ideas? Believe it or not, there’s a button for that! All you have to do is navigate to the Home tab, select the Dictate button, and start talking to “type” with your voice. You’ll know Dictate is listening when the red recording icon appears.
Tips for using Dictate
-
Speak clearly and conversationally.
-
Add punctuation by pausing or saying the name of the punctuation mark.
-
If you make a mistake, all you have to do is go back and re-type your text.
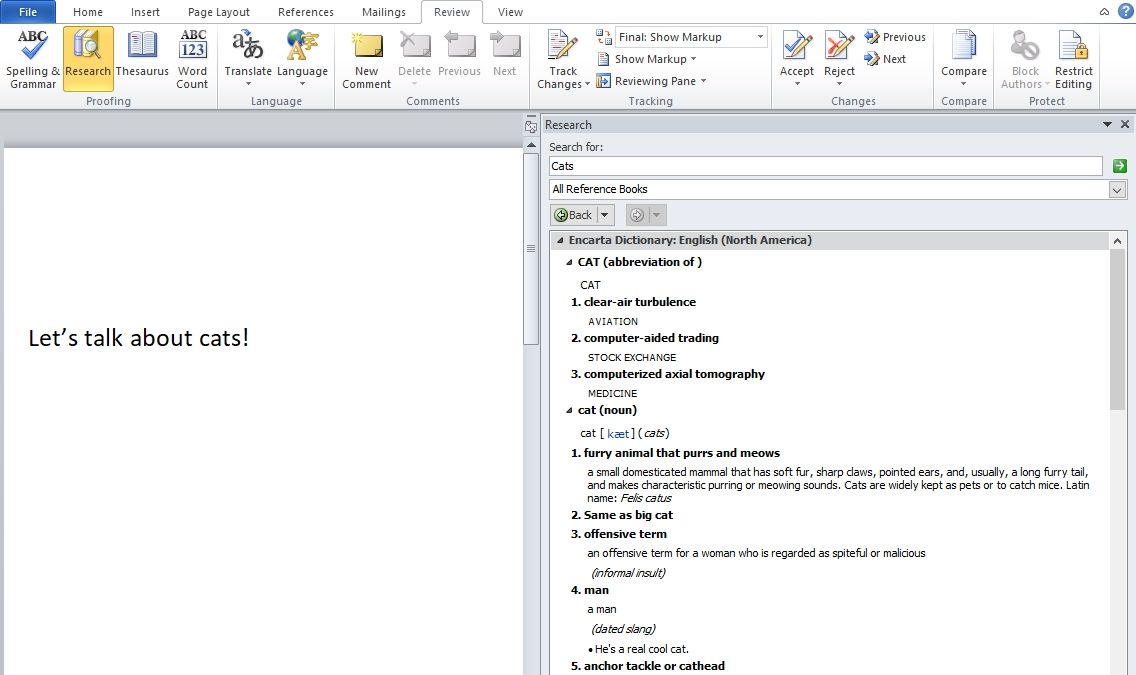
Finding and citing sources
Get a head start on collecting sources and ideas for a big paper by searching key words in Researcher in the References tab of your document.
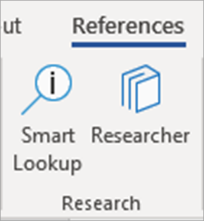
Researcher uses Bing to search the web and deliver high-quality research sources to the side of your page. Search for people, places, or ideas and then sort by journal articles and websites. Add a source to your page by selecting the plus sign.
As you write, Researcher saves a record of your searches. Just select My Research to see the complete list.
Citations
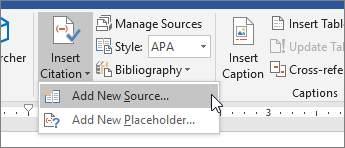
Keep track of all your sources by using Word’s built-in bibliography maker. Simply navigate to the References tab.
-
First, choose the style you want your citations to be in. In this example, we’ve selected APA style.
-
Select Insert Citation and Add New Source.
-
In the next window, choose what kind of work you’re citing—an article, book, etc.—and fill in the required details. Then select OK to cite your source.
-
Keep writing. At the ends of sentences that need sources, select Insert Citation to keep adding new sources, or pick one you already entered from the list.
As you write, Word will keep track of all the citations you’ve entered. When you’re finished, select Bibliography and choose a format style. Your bibliography will appear at the end of your paper, just like that.
Make things look nice
Make your report or project look extra professional in the Design tab! Browse different themes, colors, fonts, and borders to create work you’re proud of!
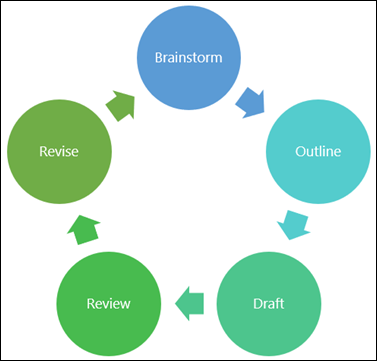
Illustrate a concept with a chart or a model by navigating to the Insert tab and choosing SmartArt. In this example, we chose Cycle and filled in text from the writing process to make a simple graphic. Choose other graphic types to represent hierarchies, flow charts, and more.
To insert a 3D model, select Insert > 3D Models to choose from a library of illustrated dioramas from different course subjects and 3D shapes.
Invite someone to write with you
If you’re working on a group project, you can work on a document at the same time without emailing the file back and forth. Select Share at the top of your page and create a link you can send to other students.
Now, everybody can open the same file and work together.
Keep learning
Check out more Microsoft Word training and support
Microsoft paper and report templates
Need more help?
Microsoft Word is a simple program that is used to create all kinds of documents. Whether you need a professional-looking document for work or just creating a school project, Microsoft Word is a perfect choice.
Although the majority of Microsoft Word tutorials and guides are geared towards productivity, not many of them cover the aspect of creative writing.
Microsoft Word is packed with a plethora of amazing features, and while most of those features make Word seem like the perfect program for business settings, it works equally great for creative writers.
1. Learn About Article Structure
If you do not know how to structure your article properly, everything will look like a mess. This can be a challenge for creative writers, especially with broad subjects.
However, there is a structure that you can easily follow. Always start with an announcement of the overall theme or topic.
Then proceed to the introduction of the topic, the presentation, and the conclusion. If you need help creating structured reports and documents in Word, you can check out this article.
2. Keyboard Shortcuts Are Useful
One of the first things you should learn is the keyboard shortcuts for Microsoft Word. You can improve your productivity a lot by using shortcuts, as this allows you to focus more on creative writing than formatting and other things.
3. Enhance Your Vocabulary
How often do you use Google to find synonyms of words that you want to use in your document? Well, did you know that Word has that feature already? All you have to do is select the word, right-click on it, and select Synonyms from the drop menu, as is shown below.

In addition, you should also learn more about the Researcher toolset. Most of us like to use Google when writing an article, whether you are trying to gather some information or make your document seem richer.
With the Researcher toolset, you can easily search up all kinds of information, and use filters to find higher quality content.
4. Text-to-Speech Is Quite Helpful
If you spent all day answering emails, creating presentations, and writing documents, you are probably tired. But if you aren’t feeling like typing, and you need to make some documents, you should check out the Dictation feature in Word.
This feature works effortlessly; you can talk to your computer and type what you are saying. This is an Office add-in for not only Microsoft Word but also PowerPoint and Outlook. You can learn more about this tool on Microsoft’s official website.

One thing you should keep in mind is that if you are using Dictation to write your documents, it is always a good idea to check what you wrote before submitting the document.
Dictation does not always work, as some of us might hope, which can also depend on your microphone. Checking your document will ensure that you correct all the avoidable mistakes.
On top of being able to use Dictation, you have the ability to review your article with Read Aloud option.
It does not matter how many times we re-read our articles, it is common to overlook some basic mistakes. With the Read Aloud option, you can hear what you typed out loud, thus catch mistakes a lot easier.
5. Check Your Grammar
While we are on the topic of avoidable mistakes, Microsoft Word does a great job checking your grammar. It always has. But, with the newest updates, you have a lot more options to check out.
All you have to do is click on File>Options and select Proofreading. You can see the pictures below.
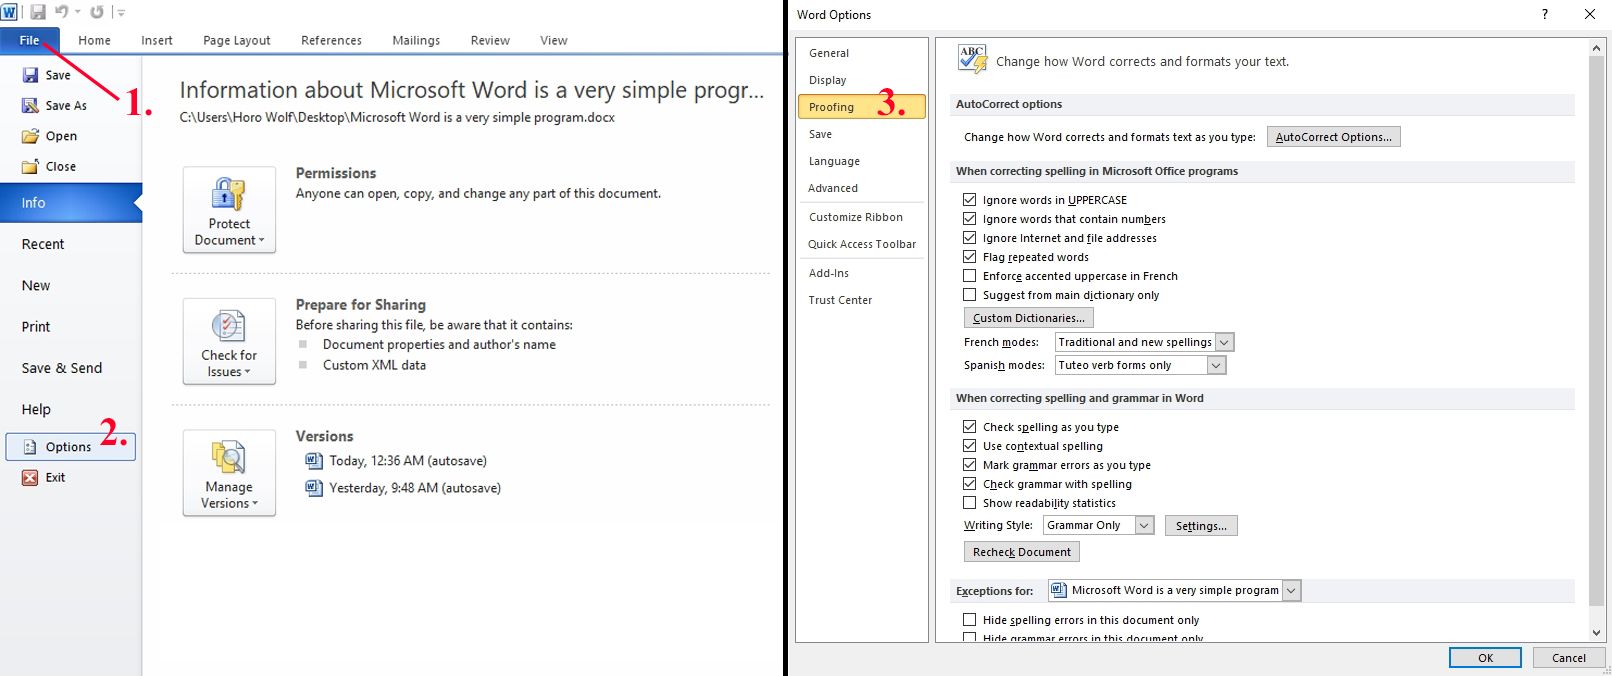
From this many, you can select whatever you want. You can choose to have your document corrected as you type, check your grammar and style, or hide your spelling errors in case you are not writing in English.
There are advanced options as well, where you can add your own dictionary, correct mistakes you often make, etc.
6. Pay Attention to Your Word Count
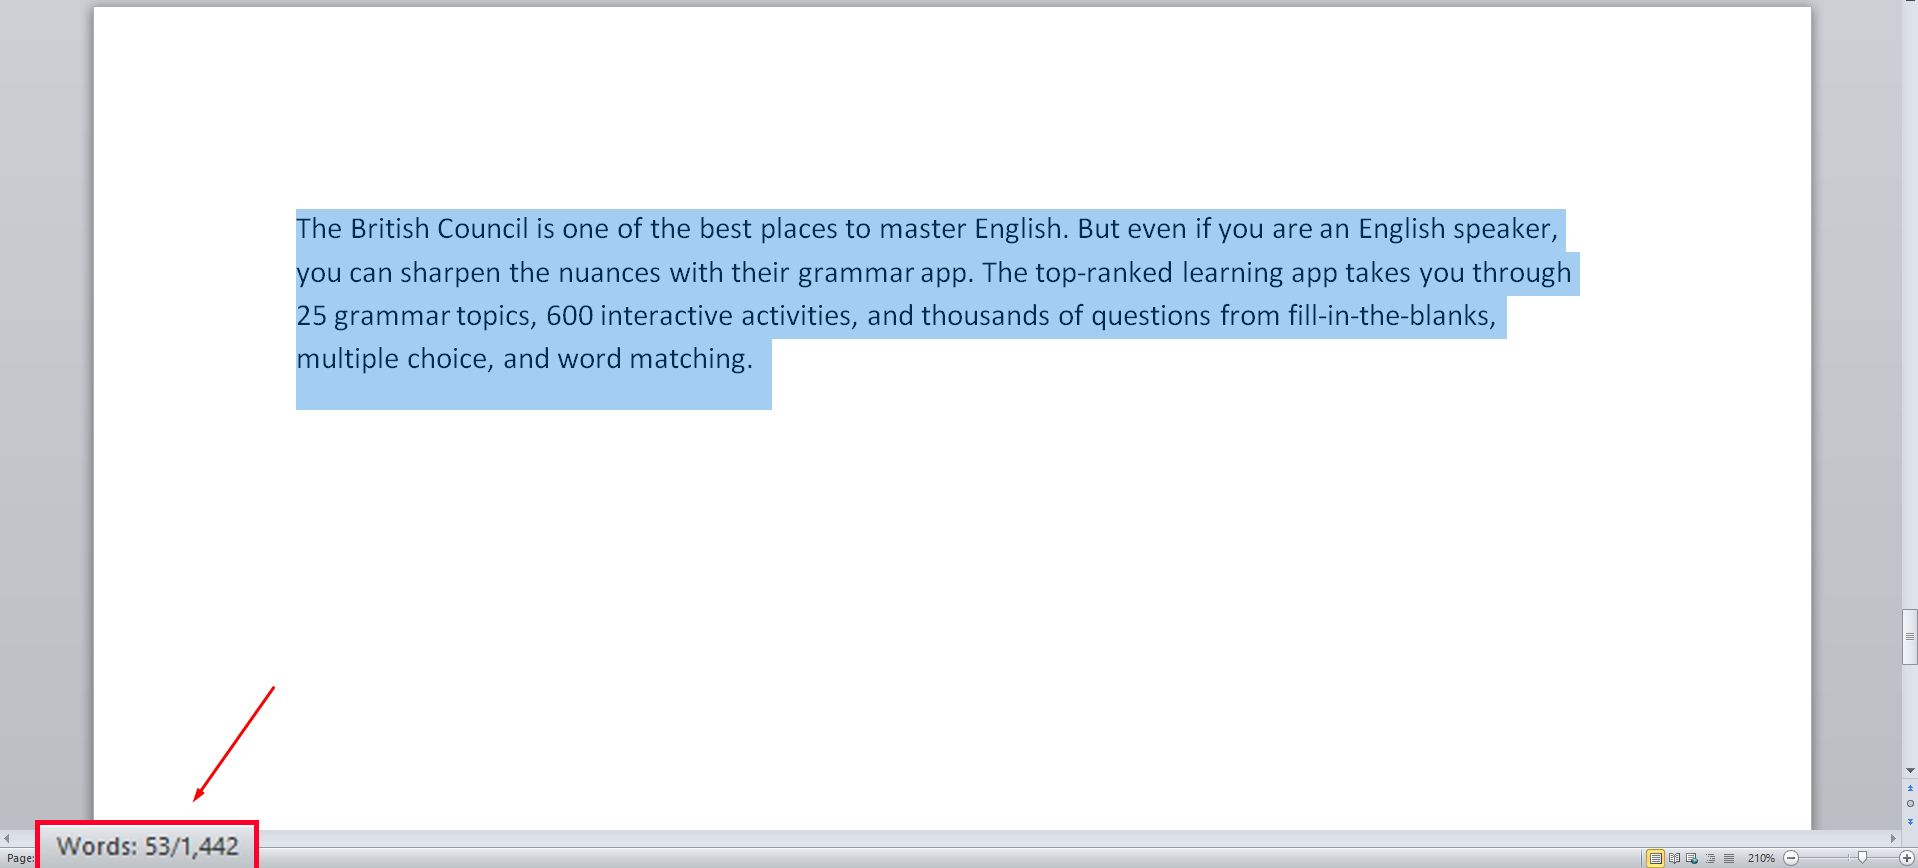
The length of an article should depend on what you are writing about and your target audience. So what is the ideal length of an article? The longer the content, the more shares it will get. Studies have shown that posts that are over 3000 words long do well.
However, when your topic is not broad enough to cover 3000 words, it’s always better to write shorter, more direct articles instead. Luckily for you, Word will keep track of the number of words as you write them. You can also select a sentence/paragraph to see how many words it has.
7. Autosave Your Work
As writers, we all want to make sure that we have backups for our backups. One of the worst things that can happen is to lose hours of work in just a second, which you can avoid.
Microsoft Word allows you to set up the AutoRecover option, which will also autosave your document. This means that if your document suddenly closes, Microsoft Word will recover your document for any number of reasons.
8. Create Notes for Yourself
It does not matter if you are working with an editor or you are editing the document by yourself, creating comments is a good way to keep yourself up-to-date. Sometimes, we just have too many things to deal with, and it is easy to forget important things.
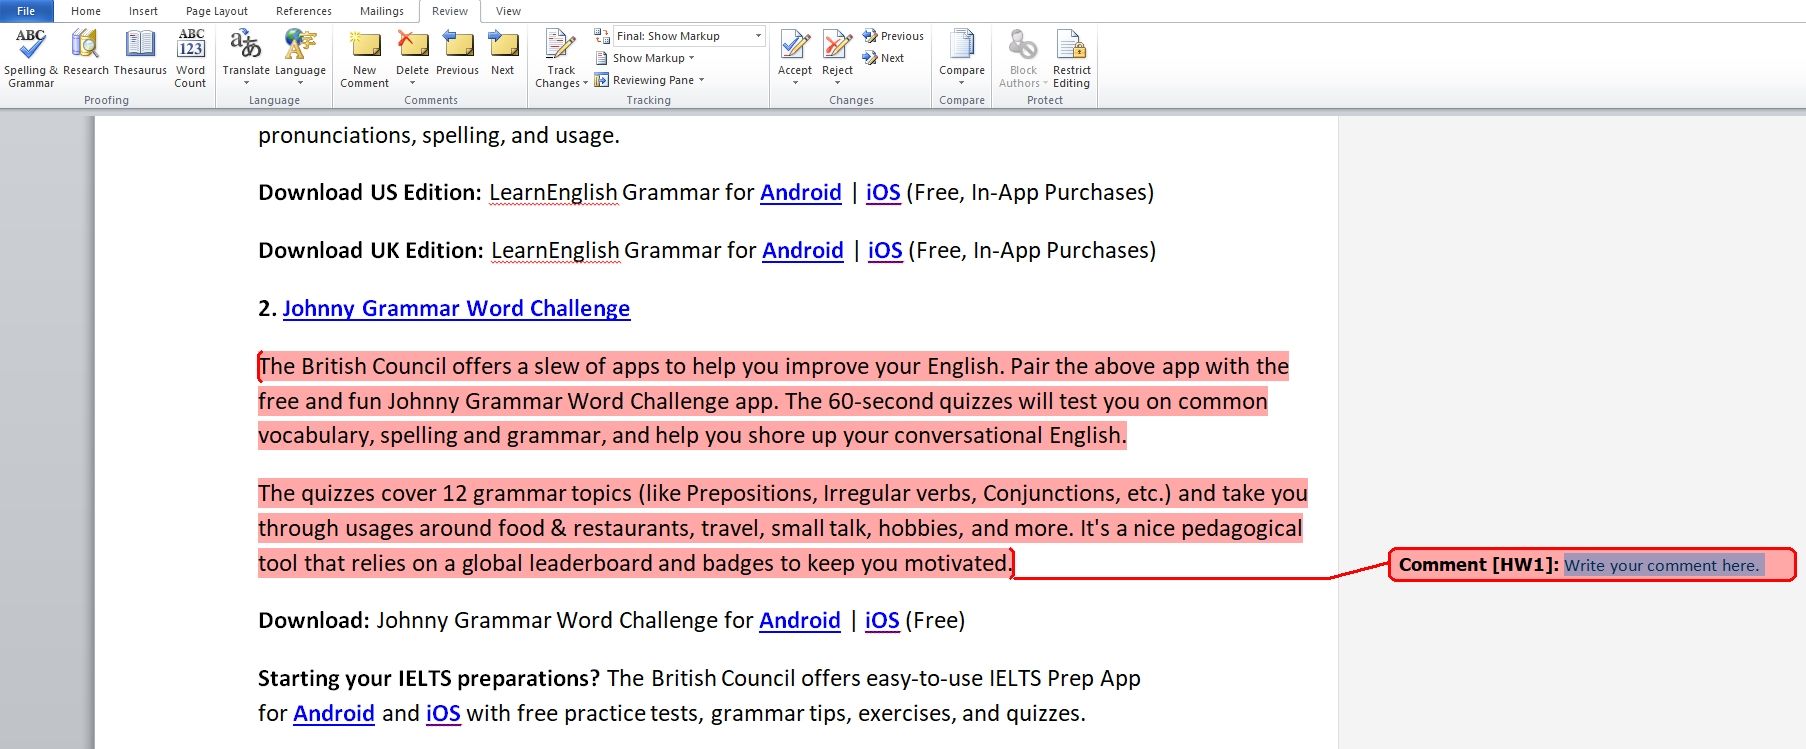
For example, if you are unsure about something that you wrote and would like to get back to it a bit later, writing comments to that section of the document will help you remember later.
Creative Writing Is Simple if You Know What You Are Doing
There are many simple guidelines you can follow in order to make your creative writing assignments easier. Of course, a lot of this will depend on the topic or theme that you are covering.
With that said, things, such as the Dictation option where you can talk to your computer and have everything typed out automatically, can always come in handy!

Microsoft Office Word является программным инструментом для написания и обработки текста. Данная программа очень распространена в повседневной офисной работе. Зачастую у сотрудников, которым приходится работать с текстом, требуют минимальных навыков работы в Офисе. В печати текста ничего сложного нет, но для его обработки и правильного оформления нужны определённые знания.
Содержание
- Основы работы в Microsoft Word
- Набор текста в документ
- Сохранение готового документа
- Работаем со шрифтом
- Выравнивание содержимого документа
- Изменение начертания текста
- Вставка изображения в документ Word
С помощью Ворда можно создавать тексты разного типа: рефераты, курсовые работы, документы и прочее. Предоставляется возможность оформления текста с помощью изменения внешнего вида, добавления картинок, таблиц и других необходимых элементов.
Скачать программу Microsoft Word
Набор текста в документ
Открыв программу с рабочего стола или меню «Пуск», нас встретит чистый белый лист бумаги формата A4. Формат листа можно изменить под любой другой стандартный, об этом немного позже.

Прокручивать страницы можно с помощью специального ползунка справа от листа A4, либо колёсиком компьютерной мыши.
![]()
Чтобы начать печать текста, используя левую кнопку мыши, установите курсор на начало предполагаемого текста вверху страницы.
Если вы случайно что-то сделали не так либо удалили фрагмент текста, можно вернуть действие назад. Для этого используйте комбинацию клавиш «Ctrl + Z».
Сохранение готового документа
Для сохранения ваших трудов, написанных на чистом листе электронной «бумаги», в полноценный файл для его дальнейшего использования или обработки, существует несколько вариантов действий:
- Сохранение с помощью нажатия на отведённую под это клавишу в меню «Файл». Нажимаем на кнопку «Файл» в левом верхнем углу экрана, затем выбираем пункт «Сохранить как».

Высветится окно, в котором будет предложено выбрать название документа и место, где он разместится после сохранения для доступа к нему.

Сохранение методом «Сохранить как» возможно также нажатием комбинации клавиш, установленных в настройках программы. У версий разных годов выпуска эти комбинации по умолчанию могут отличаться. Комбинацией может быть как «Ctrl + Shift + S» так и «Shift + F12».
- Быстрое сохранение возможно с помощью комбинации клавиш «Ctrl + S» либо с помощью специальной кнопки над меню «Файл». Как и в пункте перед этим, вам будет предложено выбрать место хранения файла и его будущее местоположение. Если до этого файл уже существовал или вы производили его сохранение, окно высвечиваться не будет, а новое содержимое заменит старое.


Программа Microsoft Word по умолчанию устанавливает параметр автоматического сохранения документа. Отключить данный параметр можно по пути: «Файл» — «Параметры» — «Сохранение». В этом меню можно выбрать как возможность отключения автосохранения, так и интервал времени, через который данная функция будет сохранять изменённый файл автоматически. Очень полезная функция для людей, забывающих сохранять свои документы вручную.

При работе с важными для вас документами не отключайте функцию автоматического сохранения во избежание потери данных. Причиной аварийного завершения программы может быть что угодно: случайное закрытие программы, аварийное завершение работы компьютера из-за погодных условий и прочее.
Работаем со шрифтом
Визуальное восприятие текста очень важно для читателя. Порой, из-за неправильного оформления у человека, читающего текст, пропадает всякое желание его дочитывать, каким интересным он бы не был. Для презентабельного вида набранного потока букв и символов существуют встроенные в программу инструменты.
Чем сложнее выглядит оформление текста, тем меньше желания его читать будет у пользователей документа. Принято при выборе внешнего вида текста использовать шрифт «Times New Roman» 14-го размера. Для заголовков используется 16-й размер.
Если вы всё же решились использовать другой шрифт на своё усмотрение, Ворд предлагает своим пользователям готовый список из шрифтов, предустановленных вместе с операционной системой. В случае, когда вам предоставленного количества недостаточно, вы можете установить скачанные или купленные в интернете шрифты дополнительно.
Шрифт имеет два основных параметра, это тип шрифта и его размер. Помимо них существуют также другие, дополнительные параметры для более оригинального оформления текста. Чтобы применить любой из параметров, сначала нужно выделить определённый фрагмент документа для его обработки. Для этого зажимаем левой кнопкой мыши на начало фрагмента и тянем до его конца. Чтобы выделить сразу всех документ, жмём комбинацию клавиш «Ctrl + A».

-
- Для изменения типа достаточно нажать на панели на его название и выбрать из списка новый шрифт. При наведении на желаемый вариант вы сможете предварительно просмотреть, как будет выглядеть текст перед окончательным выбором. Листать список можно с помощью колёсика мыши либо нажатием ползунка, который появился справа в открытом окне.

-
- Чтобы изменить размер шрифта, нажмите на цифровое значение справа от названия шрифта и таким же способом сможете подобрать размер букв и символов.

Дополнительно, можно изменять размер шрифта, не выбирая цифровой параметр, а лишь нажимая на две отвечающие за это кнопки. Левая кнопка увеличивает размер букв на одну ступень, а правая, соответственно, уменьшает.

-
- Порой требуется масштабное изменение регистра текста по всему документу. Сам регистр отвечает за прописную и заглавную букву в тексте, какой именно она будет выглядеть. Пользователь может написать большой символ с помощью зажатия клавиши «Shift» и желаемой буквы либо включением «Caps Lock». Если нужно изменить регистр большого объема материала без переписывания, приходит на помощь функция «Регистр».

При нажатии на данную кнопку нам предоставляются несколько параметров, выбор которых зависит от ваших предпочтений. Их действие можно увидеть на примерах, указанных в строках выбора. Как и в случае с изменением шрифта, перед применением параметра необходимо выделить фрагмент текста для обработки.
- Порой требуется масштабное изменение регистра текста по всему документу. Сам регистр отвечает за прописную и заглавную букву в тексте, какой именно она будет выглядеть. Пользователь может написать большой символ с помощью зажатия клавиши «Shift» и желаемой буквы либо включением «Caps Lock». Если нужно изменить регистр большого объема материала без переписывания, приходит на помощь функция «Регистр».


Выравнивание содержимого документа
Существует четыре функции для выравнивания содержимого в документе по листу:
- Выравнивание по левому краю (комбинация клавиш «Ctrl + L»);
- Выравнивание по центру (комбинация клавиш «Ctrl + E»);
- Выравнивание по правому краю (комбинация клавиш «Ctrl + R»);
- Выравнивание по ширине (комбинация клавиш «Ctrl + E»).
Если с тремя первыми функциями всё понятно, тогда в чём же заключается суть выравнивания по ширине? Всё предельно просто. Данный параметр обязателен при приёме документов в некоторых организациях, поскольку после его применения текст регулярно заполняет лист с обеих сторон. Чтобы понять это, посмотрим его действие на примере:
-
- Выравнивание по левому краю:

-
- Выравнивание по ширине:

На примере видно, что во втором варианте текст с правой стороны разместился более аккуратно, ближе к краю. Именно таким должен быть формат официального материала, когда речь касается выравнивания.
Изменение начертания текста
Практически в любом редакторе есть возможность изменения стиля текста, и эта функция, конечно же, не обошла легендарный Word. Для этих параметров также есть комбинации клавиш для быстрого оформления материалов.
В редакторе Ворд представлены три основных функции для изменения начертания. Доступ к ним открыт в верхней панели управления, в том же окне, что и выбор шрифта.

-
- Полужирный (комбинация клавиш «Ctrl + B»);

-
- Курсив (комбинация клавиш «Ctrl + I»);

-
- Подчёркнутый (комбинация клавиш «Ctrl + U»).

Данные параметры можно совмещать между собой. Так будет выглядеть текст с применёнными к нему тремя параметрами начертания, упомянутыми выше:

Вставка изображения в документ Word
-
- Чтобы вставить элемент в документ, необходимо в первую очередь открыть подменю «Вставка» в верхней панели программы.

-
- В галерее программы Ворд уже есть определённый набор изображений для их вставки в документ. Для просмотра данных файлов нажимаем кнопку «Картинка».

-
- В появившемся окне справа производим поиск по галерее с пустым запросом, то есть, ничего не вводя в строку поиска.

Если картинки уже есть, искать их больше нет необходимости, достаточно прокрутить колёсиком мыши и выбрать желаемое изображение.
- Если же вы желаете вставить собственное изображение, сохранённое на компьютере, нажимаем кнопку левее с надписью «Рисунок».
- В появившемся окне справа производим поиск по галерее с пустым запросом, то есть, ничего не вводя в строку поиска.


В появившемся окне ищем желаемое изображение среди файлов на вашем компьютере.

Как видим, выполнять основную работу в офисной программе Word не сложно, главное привыкнуть к интерфейсу и приноровиться к функциям для понимания их назначения.
If you want to write a book, you’ll need book writing software that’s up to the task. Yes, you can invest in dedicated book writing programs. But you don’t have to: a great writing tool is likely already at your fingertips, if you know how to write a book using Microsoft Word.
There’s a lot of book writing software out there. Many of these programs claim to offer intuitive use, help with organization, and even say they’ll keep you from distraction. The options can be overwhelming.
There’s still one tried and true option if you’re not interested in all that (or can’t afford the fancier programs): Microsoft Word.
I write most of my books in Microsoft Word, not to mention short stories. Here’s the rundown of how to write a book using Microsoft Word, and why that might be your best choice.
The Benefits of Microsoft Word for Book Writing
You most likely already have it. And so does everybody else. Word is the standard, accepted across platforms, and is easy to access for non-writers (your beta readers). It’s been around forever, so most people know how to use it.
There are book formatting templates. A ton of them. They have them for short story format and for manuscript format. Personally, I don’t use those templates, but they’re a nice baseline for beginners, or even old hats that just want to hurry up and write without setting up their document first.
It’s simple and uncluttered. There are a ton of apps and programs out there that will allow you to keep your plot structure notes close at hand, to rearrange your chapters with the click of a button, and to keep detailed character profiles right in the program. That’s all a little too much for me. I prefer handwritten notes and nothing else blocking my screen while I’m typing and Word gives me that.
It is worth noting that if all that sounds appealing to you, you can do those things in Word as well, it just won’t be as fancy as other programs.
Hey writer: the first step to writing a book is coming up with a great idea. The second step is figuring out the structure of your book. If you have an idea but you need help with the structure, check out our new book The Write Structure. In it, we’ll teach you how to apply timeless story structure principles to write a great book. Get The Write Structure »
How to Navigate Your Book in Microsoft Word
When you have a 90,000-word manuscript, navigating becomes daunting. Luckily there are ways to do it in Word that make it easier if you know where to look.
Chapter Headings
Word doesn’t divide your book into chapters for you like some other programs. There will be no easy way to click and drag to rearrange chapters.
What I recommend is using headings. On Word’s Home page, there are already standard headings listed. Definitely mess with them and change their formatting to something simple.
No one needs giant blue words as their chapter headings. (You can set your simpler formatting as your default style as well, so you don’t have to change it every time.)
Make the title or number of each chapter a heading. Then you can easily bounce around to different chapters through the navigation pane (check the Navigation Pane box under the View menu).
Bookmarks
These basically work the same way as headings, but they’re for anywhere in your document. Have a specific scene you need to do more research on? You can bookmark it and jump back to it later.
Bookmark by going to the Insert menu and clicking Bookmark. Name your bookmark and voilà. You can delete them easily from the popup menu as well.
Find and Replace
CTRL+F brings up a simple search option to find words and phrases in your document. CTRL+H brings up the full gambit. From that dialogue box, you can search, replace certain words with others (i.e. Jennifer now becomes Julia all through the manuscript), and go to any page, section, heading, bookmark, etc. that you need to go to.
Microsoft Word is Great for Editing Your Book
Word has a ton of options for editing your story, including comments, tracking changes, and comparing documents. All of these are under the Review menu.
I use the comments feature to make notes to myself where I need to recheck facts or add description later. It’s easy to navigate through the comments with the search feature or the buttons under the Review menu. Don’t forget to remove them all before saving your document as a PDF or sending it off to an editor.
Tracking changes is awesome and a lot of editors (for short stories anyway) will use this feature to collaborate with you during the editing process. You can accept or reject changes or even revert back to the original.
Finally, make sure you have grammar and spellcheck on! Grammar check even allows you to check style issues (like how to use an ellipsis correctly) and passive voice. It’s invaluable.
Pro tip: To keep you on track while you’re writing, turn off some of the more fine-tuning features of grammar check. There’s nothing that will ruin your flow more than a bunch of underlining you feel like you need to take care of immediately. I recommend running the full check when you’re done (or at least done for the day).
Formatting Your Book in Microsoft Word
Make sure you’re familiar with standard manuscript format for novels and formatting short stories. Take a look at those links and follow their instructions. You don’t want to get rejected out of hand because you tried some weird formatting that’s hard to look at.
One of the biggest gripes I see from editors is writers using spaces to indent paragraphs. Don’t do this. It makes it super hard on them when they’re putting a book together. Instead, use the ruler in Word (under the View menu) or the paragraph settings (under the Home menu) to adjust your tabs. A half inch is standard.
Despite what most of us were taught in school, the standard is now one space after periods, not two. This is another sticking point with editors, so don’t do it. If you’re used to two, there’s a grammar check feature in Word you can turn on to highlight every time you use two spaces.
Finally, use the page break option to break for a new chapter, not enter or a million spaces. You can find the page break under the Insert menu.
Pro tip: When in doubt about your formatting, you can turn on the Show/Hide option under the Home menu (looks like a paragraph symbol) to see all your formatting symbols.
Now That You’ve Mastered Microsoft Word, Go Write Your Book
Don’t let choosing writing software stagnant your writing. Don’t overthink it. You don’t need to keep up with the Joneses with the latest writing technology that’s trotted out on tech forums and in writing chats.
The important thing about writing a book is actually writing it. No fancy book writing software is going to help you with that.
So get writing!
Ever used Word to write a book? Do you have any more tips for how to write a book using Word? Let me know in the comments!
PRACTICE
Take fifteen minutes to write. Just write. Don’t worry about page setup, formatting, or which program you’re going to use. Open up Word or get out a pen and paper if you’d like!
When you’re done, share your writing in the comments. Don’t forget to comment on your fellow writers’ work!

Sarah Gribble
Sarah Gribble is the author of dozens of short stories that explore uncomfortable situations, basic fears, and the general awe and fascination of the unknown. She just released Surviving Death, her first novel, and is currently working on her next book.
Follow her on Instagram or join her email list for free scares.
Things You Should Know
- To create a basic document, choose a template from the list provided or start with a blank document.
- Use the File tab to open, save, and start documents, and the Insert tab to add any images, symbols, or other media to your document.
- Highlight your text and play around with formatting options in the «Home» tab. You can change the font, italicize/bold/underline your words, and play around with font size.
-

1
Open the Microsoft Word application. Do this by double-clicking the Microsoft Word icon.
-
2
Review the available templates. On the right side of the screen, you’ll see several templates of interest:
- Blank document — A blank document with default formatting.
- Creative Resume/Cover Letter — A clean, pre-formatted resume (and accompanying cover letter) document.
- Student Report with Cover Photo — A document format geared toward an academic demographic.
- Fax Cover Sheet — A document to preface fax reports.
- You can also search for specific templates online from within Word by using the search bar at the top of this screen.
Advertisement
-
3
Choose a template. Doing so will open the template in Word with whatever pre-determined formatting applies to it. Now that your document is open, you’re ready to review your Toolbar options.
- When in doubt, open a blank document.


Advertisement
-
1
Click the File tab. It’s in the top left side of the screen (or in the menu bar for Mac users). From here, you have several useful options on the far left side of your screen:
- Info (PC only) — Click this to review the documents statistics, such as when it was last modified, as well as any potential issues with the document.
- New — Click this to bring up the «New Document» page that lists all of the pre-formatted templates. Opening a new document will prompt you to save your old one.
- Open — Click this to review a list of recently-opened documents. You can also select a directory (e.g., «This PC») in which to search.
- Save — Click this to save your document. If this is your first time saving this particular document, you’ll be prompted to enter a name, save location, and preferred file format as well.
- Save As — Click this to save your document «as» something (e.g., a different name or file format).
- Print — Click this to bring up your printer settings.
- Share — Click this to view sharing options for this document, including email and cloud options.
- Export — Click this to quickly create a PDF or change the file type.
-
2
Click ← in the top left corner of your screen. If you’re using a Mac, you won’t have this option—simply click your document to exit the «File» menu.
-
3
Review the Home tab to see your formatting options. At the top of your screen—from left to right—are five sub-sections of this tab:
- Clipboard — Whenever you copy text, it is saved on your clipboard. You can view copied text by clicking the Clipboard option here.
- Font — From this section, you can change your font style, size, color, formatting (e.g., bold or italic), and highlighting.
- Paragraph — You can change aspects of your paragraph formatting—such as line spacing, indentation, and bullet formatting—from this section.
- Styles — This section covers different types of text for various situations (e.g., headings, titles, and subtitles). You’ll also see the popular «No Spacing» option here, which removes excess spaces between lines of text.
- Editing — A couple of commonly-used tools—such as «Find and Replace», which allows you to quickly replace all appearances of one word with another—live here.
-
4
Click the Insert tab to review the types of media you can place in your document. Insert is to the right of the Home tab. The Insert tab allows you to add things like graphics and page numbers to your document. From left to right, a couple of notable options include the following:
- Table — Clicking this option will allow you to create an Excel-style table right in your document.
- Pictures — Use this feature to insert a picture into your document.
- Header, Footer, and Page Number — These options are all essential for writing in MLA- or APA-style formatting. The Header places a space at the top of the document for comment, while the Footer goes at the bottom—page numbers are customizable.
- Equation/Symbol — These options use special formatting to accurately display simple equations. You can select these equations or symbols from the pertinent drop-down menu.
-
5
Click the Design tab to create your own template. It’s to the right of the Insert tab.
- The Design tab contains pre-designed themes and formats listed across the top of the page.
-
6
Click the Layout tab to customize your page’s formatting. This tab contains options for changing the following aspects of your document:
- Margins
- Page orientation (vertical or horizontal)
- Page size
- Number of columns (defaults to one)
- Location of page breaks
- Indentation
-
7
Click the References to manage your citations. If you have a bibliography page, you can also manage it from here.
- For quick bibliography formatting, click the Bibliography drop-down menu and select a template.
- In the «Citations & Bibliography» group of options, you can change your bibliography formatting from APA to MLA (or other citation styles).
- The «Captions» group has an option to insert a table of figures. This is useful for scientific review papers or similar documents in which statistical data is prioritized over quotations.
-
8
Click the Mailings tab to review your document sharing options. You can review your email settings and share your documents from within this section.
- You can also print an envelope or label template by clicking the pertinent option in the top left corner of your screen.
- The Select Recipients drop-down menu allows you to choose Outlook contacts as well as an existing contact list within Word.
-
9
Click the Review tab. The Review section is geared towards editing, so it includes options for marking up documents and proofreading. A couple of important options include:
- Spelling & Grammar — Click this option (far left corner) to underline any spelling or grammatical errors.
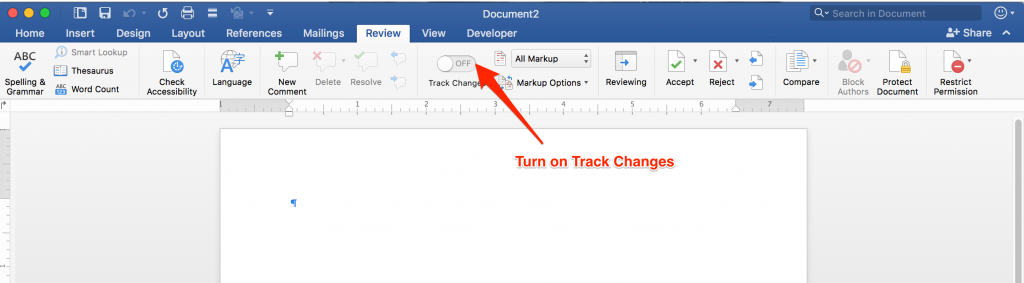
- The «Changes» section — This is to the far right of the toolbar. From here, you can enable the «Track Changes» feature which automatically formats any additions or deletions you make in a document to appear in red print.
-
10
Decide on the set of options that best apply to your work. If you’re a student, for example, you’ll likely use the Insert and References tab often. Now that you’re familiar with the toolbar options, you can format your first Word document.


Advertisement
-
1
Open a new Blank Document in Word. If you have an existing document, you can open that instead.
-
2
Enter text. Do this by clicking on the blank section of the document and typing away.
- If you opened an existing document, be sure to save your work before re-formatting.
-
3
Highlight a section of text. To do this, click and drag your cursor across your writing, then let go when you’ve highlighted the section you wish to edit.
-
4
Consider what you want to do to the writing. Some potential options include:
- Quickly format your writing. Do this by right-clicking (or two-finger clicking) your highlighted text and then selecting an option from the right-click menu.
- Change the font of your selection. You can do this by clicking the drop-down bar at the top of the «Font» section (Home tab) and then selecting a new font.
- Bold, italicize, or underline your highlighted section. To do this, click the B, I, or U in the «Font» section of the Home tab.
- Change your document’s spacing. This is easiest to accomplish by right-clicking your selected text, clicking Paragraph, and modifying the «Line Spacing» value in the bottom right corner of this window.
-
5
Continue working with Word. Your preferred options for your documents will differ based on the intention behind creating them, so the more you work within your own particular format, the more proficient you’ll become.


Advertisement
Add New Question
-
Question
How do I copy and paste?

To copy a certain piece of text, highlight it and press Ctrl + C. Then click the spot you want to place the copied text and press Ctrl + V to paste.
-
Question
How do I place a logo in MS Word?
Press the Insert tab and then press the Pictures button. You will then be allowed to select the image.
-
Question
How can I save a document to a specific location?
Click File —> Save As… and you’ll be allowed to select the destination location (and filename and format) of the file.
Ask a Question
200 characters left
Include your email address to get a message when this question is answered.
Submit
Advertisement
-
A red line under a word means the word is misspelled, a green underline suggests a grammatical error, and a blue underline pertains to formatting.
-
If you right-click (or two-finger click) an underlined word, you’ll see a replacement suggestion at the top of the right-click menu.
-
You can quick-save your document by holding down Control (or Command on Mac) and tapping S.
Thanks for submitting a tip for review!
Advertisement
-
Don’t forget to save your work before closing Word.
Advertisement
About This Article
Article SummaryX
1. Create blank documents or from templates.
2. Format text colors, fonts, and sizes.
3. Insert media like photos and animations.
4. Insert data like tables, page numbers, headers, and equations.
5. Customize the on-screen and print layouts.
6. Add references and citations.
Did this summary help you?
Thanks to all authors for creating a page that has been read 213,472 times.
Is this article up to date?
Everyone could use a little help writing. With Microsoft Editor in Word, you can improve your skills and your document at the same time.
Not long ago, we explained what Microsoft Editor is and what it can do for you. Here, we’ll go into more detail on the features of the tool in Microsoft Word. With helpful suggestions and tips, you can use these to enhance your writing and improve your document.
Currently, Microsoft Editor offers a few extra features in Word for the web than in the desktop version of Word. So we’ll walk through using the tool there first.
Visit the Word website, sign in, and open your document. Head to the Home tab and click the Editor button in the toolbar. You’ll immediately see the Editor sidebar open with everything you need to improve your document.

Editor Score
The first thing you’ll see in the sidebar is your Editor Score. The tool calculates this score “based on the number and type of suggestions to be reviewed and the document length”. Obviously, the higher your score, the better.

Writing Style
Next, you can select the style of writing you’re using for the document. Choose from Formal, Professional, or Casual in the drop-down list. Keep in mind that the more formal your document is, the more stringent the refinements will be.

Corrections and Refinements
The following two sections for Corrections and Refinements are what you want to review. If you see a checkmark next to a category like spelling, clarity, or conciseness, that means you’ve done well! If you see a number, click to review the issues that were found.

In our example, we see Formality has the number 4, so we click to see each problem in our writing. You’ll see a small pop-up explaining the issue and providing a suggestion. Click to use the suggestion or choose to Ignore instead.

You can also click the light bulb icon to see a helpful tip for that particular item.

When you finish handling the item found, click the arrow at the bottom of the pop-up to go to the next one in the list. After you address each issue, you should see the number decrease in the sidebar and your score increase at the top!

Web Similarity
The Similarity checker is a helpful tool to see if any online writings closely resemble yours. With many locations, such as schools and publications, checking for plagiarism, this is a handy check to use.
If a similarity is found, you’ll see a pop-up corresponding to that source in your content. You can then visit the website, add an in-text citation, or copy the full citation and paste it yourself.

Text Predictions
To help speed up your writing, you can enable Text Predictions. With it, Word will anticipate your next words as you type.

Document Insights
When you need document statistics such as word count, time to read, and readability, click to see the Document stats box.

Microsoft Editor in Word on Your Desktop
With Word on your Windows desktop, you can take advantage of only a few of the same features as Word online. As of this writing, here’s what you’ll find and how to use the Microsoft Editor.
Go to the Home tab, click the Editor button in the toolbar, and the Editor sidebar will open. You’ll then see the Total Suggestions at the top with Corrections and Refinements beneath.
Like online, you want to see checkmarks next to the items, and if you see a number, that shows how many issues were found. Click that number and the sidebar will transform into an informative area.

You’ll see an explanation of the problem that you can expand for further details. You’ll also receive suggestions that you can click to use. If you’re unsure, click the arrow next to a suggestion to hear it read aloud or spelled out for you.

After you take care of refinements, the sidebar will show you the next one. You can also manually move through them using the arrows on the top right of the sidebar.

You also have the option to adjust the settings for Microsoft Editor in Word on your desktop. Click Settings at the bottom of the sidebar. This opens the Word Options window right to the Proofing settings you can adjust.

Will You Use Microsoft Editor in Word?
As you use Microsoft Editor for your Word documents, you’ll likely pay more attention to the items that the tool finds every time. And hopefully, with each use, it will find fewer issues. This can not only help you improve your writing skills but provide better final documents.
If you also use Google Docs, take a look at how to enhance your writing skills with the Explore feature.
![]()
Ah, Microsoft Word. Every aspiring author who even imagines writing and publishing has, in one way or another, experienced MS Word. Microsoft Office introduced Word back in 1983, making it close to 40 years old! During its long tenure, Word has set the bar for word processing, editing, and page layout for millions of authors.
Bookmakers from traditional publishers to self-publishers use Word as their book writing software and primary editing tool. And for its time, Word offered the best way to write. Today, Word is a bit out-moded by some newer tools, but it’s still a standard for authors.
So let’s take a deeper look at what Microsoft Word offers authors.
Microsoft Word, at its core, is a formatting and editing tool. Over the years they have added hundreds of Microsoft Word templates to help you create a resume, business letters, and research papers. Oddly enough, there isn’t a built-in template for a book. Though one could argue that a blank MS Word document is already perfectly suited for the writing process.
Using style-based formatting to create different ‘sets’ of text, Word makes simple formatting easy. Style principles are common now and using them when writing has always made sense to organize chapters and sections within a larger piece. If you applied styles from the moment you started writing your book, searching and organizing during the editing process will be easy.
Here’s a blank, open page ready for your creative writing. Or nonfiction. Or whatever. Word is is an impressive writing space and with their rich style options, you can do a fair amount of basic design.
That said, there is an overwhelming amount of options. And unlike some other writing tools, Word doesn’t have a focus mode (that I’m aware of).
Writing, once you’ve got your features set up to your liking, is just fine with Word. I find the speed of characters displaying to be quick enough that it keeps pace with my typing, but not jumbled or distracting. One feature I would love to see is a ‘typewriter’ mode that binds my cursor to the middle of the screen. But no writing tool is ever 100% perfect.
Editing With Word
I generally find Word to be fine, but lackluster as a writing tool. That said, it’s superior as an editor. Yes, if you’re using the desktop version of Word, you must literally share the file. Archaic. But the upside is the delightful ‘Track Changes’ tool under the Review menu.
Track Changes create a column on the right side of the document, organizing and listing any edits. This includes deleting or adding text, updating any existing text, new formatting, and providing the opportunity for in-document notation.
The notes (called ‘Comments’) allow you and your editors/proofreaders to make changes and have a conversation within the document, making nothing permanent. The file will be a true living document, and the flow of ideas can run back and forth until you settle on phrasing, organization, and other elements of the design of the manuscript. If you like a change or have acted on a comment, they can be ‘Accepted’ to remove them from the running list of Track Changes and keep the interface nice and clean.
Other writing tools have document sharing and editing options, but Word wins out for clarity and simplicity.
Going Beyond The Basic
You can build in a lot of advanced formatting into your Microsoft Word document. In fact, I wrote an entire post about this very subject. While I don’t recommend using Word to layout your book, you can achieve a very nice final design.
Without digging into the details, the Formatting panels in Word offer a ton of ways to customize your DOCX file and control the style and layout of your pages.
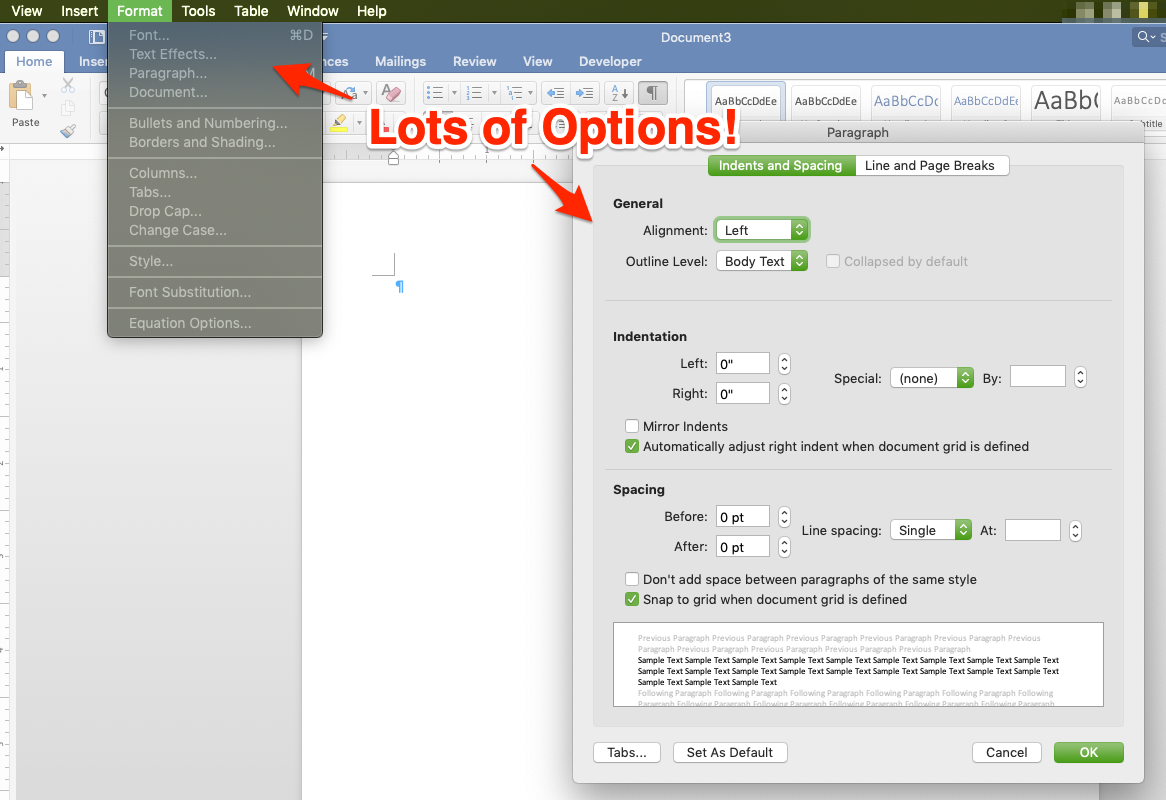
Even just this one Paragraph Format window offers a variety of options for your text. This isn’t even getting into things like drop caps, section and page breaks, and header/footer layout.
The last piece of formatting I want to touch on is page numbering. Again, I’ve written in-depth about this, but it needs to be mentioned that while Word can handle page numbering, it’s a pain in the ass. If there’s one reason to use a dedicated layout tool to create your book file, the challenge of page numbering would be it.
Laying Out Your Book With Word
Finally, the manuscript is done and edited. Now you can start playing with all those options Word offers in their ribbon. If you’re creating a novel with limited graphics, Word is fine for your book’s layout. Anything involving a lot of graphics, charts, or tables and think about a dedicated layout tool like InDesign.
The first step in laying out a file to print and publish a book is setting up the page.
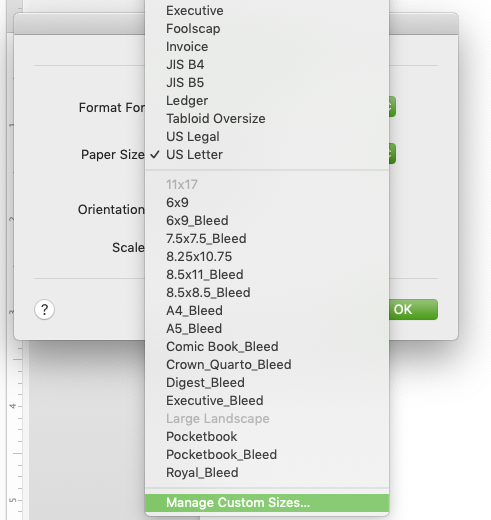
Word handles that nicely with the ‘Layout’ menu to set the page size for the entire document. While they do pre-load common page sizes, they do not include the standard Trade 6 x 9. So you would need to create a custom size, also easy to do in the Layout menu.
Along with the critical layout and design tools, Word can manipulate the content on the page. Breaks (both Page and Section) give you control over the positioning of content, and images can be in line with the text, behind the text, or nested with the text through Word’s ‘Picture’ menu.
Once you’ve got your page all laid out, you must export from DOCX to PDF so the file is ready to be sent to a printer. Some printers may accept a variety of file types, but most require PDF. Regardless, take the time to create a PDF. It’s the only way to ensure printers keep your formatting and will streamline any troubleshooting if a problem arises.
Microsoft Word, At A Price
If you’re PC or laptop came with the basic Office Suite built-in (so Word, Excel, and PowerPoint) you may not know that Microsoft’s products are actually pretty expensive. Particularly when you consider you can do almost all the writing, styling, collaborating, and editing for free with Google Docs.
If your machine did not come with Office installed (or if you’re still running Office 2013) you can purchase the Suite directly from Microsoft. They offer three options to get access to Word:
- Microsoft 365 Family – $99.99/year
- Microsoft 365 Personal – $69.99/year
- Office Home & Student – $149.99 (one-time)
Office 365 Vs. Office Suite
Like many software creators, Microsoft is moving to a subscription model. At first glance, this might seem like a shameless cash grab. You can buy the basic Office Suite for less than just two years of their 365 service! Who would ever do this?
First, we have to acknowledge that most, if not all, paid software is going to shift to subscription models. Because maintaining and updating software takes a lot of time and resources, these software companies need a steady, reliable income to stay in business.
What’s more, while Word 2013 might be fine for writing and editing, it’s outdated. And eventually, it won’t be supported any longer. Once that happens, file standards and new features won’t be available.
So the benefit of the subscription is that you’re always lined up for the newest features and fixes. The downside is that you’re paying for a tool readily available in other (arguably better) forms.
I also want to note that, if you’re considering subscribing to Office 365, there is a free version (for 1 month) to try it out. And you do get access to a TON of tools from Microsoft with this subscription.
Microsoft Word: The Bottom Line
Word is a powerful writing tool. And it has amazing in-line editing options. If you write novels or memoirs, it’s probably all you’ll ever need to create, edit, and design your book files. But it does come at a price—either annually or in purchasing a version that will eventually be outdated.

Paul H
Paul is the Content Marketing Manager at Lulu. When he’s not entrenched in the publishing and print-on-demand world, he likes to hike the scenic North Carolina landscape, read, sample the fanciest micro-brewed beer, and collect fountain pens. Paul is a dog person but considers himself cat tolerant.