
Excel for Microsoft 365 Word for Microsoft 365 PowerPoint for Microsoft 365 OneNote for Microsoft 365 Publisher for Microsoft 365 Visio Plan 2 Excel for Microsoft 365 for Mac Word for Microsoft 365 for Mac PowerPoint for Microsoft 365 for Mac Word for the web Excel 2021 Word 2021 PowerPoint 2021 Publisher 2021 Visio Professional 2021 Visio Standard 2021 OneNote 2021 Excel 2021 for Mac Word 2021 for Mac PowerPoint 2021 for Mac Excel 2019 Word 2019 PowerPoint 2019 Publisher 2019 Visio Professional 2019 Visio Standard 2019 Excel 2019 for Mac Word 2019 for Mac PowerPoint 2019 for Mac Excel 2016 Word 2016 Outlook 2016 PowerPoint 2016 OneNote 2016 Publisher 2016 Visio Professional 2016 Visio Standard 2016 Excel 2013 Word 2013 Outlook 2013 PowerPoint 2013 OneNote 2013 Publisher 2013 Visio Professional 2013 Visio 2013 Outlook.com Excel 2010 Word 2010 Outlook 2010 PowerPoint 2010 OneNote 2010 Publisher 2010 Visio 2010 Visio Standard 2010 New Outlook for Windows More…Less

The Translate feature is currently available for Word, Excel, OneNote, Outlook, and PowerPoint.
Note: The procedures for Outlook for the web are the same as the procedures for the new Outlook for Windows. Select the Web tab above for those instructions.
Translate an email in Outlook
In Outlook, you can translate words, phrases, and full messages when you need them. You can also set Outlook to automatically translate messages you receive in other languages.
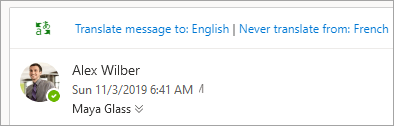
When you receive an email in another language, you’ll see a prompt at the top of the message asking if you’d like Outlook to translate it into your preferred language.
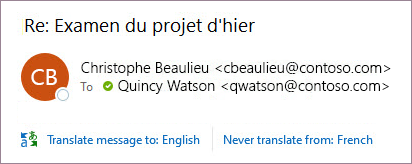
When you receive an email in another language, you can respond in two different ways:
-
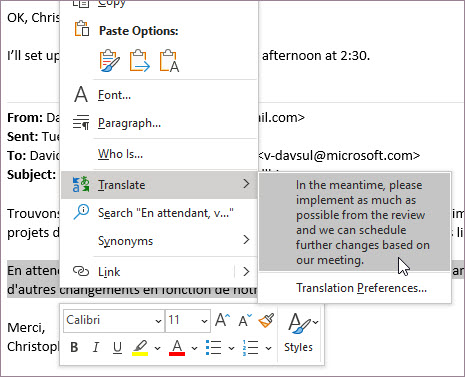
In the message, select Translate message. Outlook replaces the message text with translated text.
After you’ve translated the message, you can select Show original to see the message in the original language or Turn on automatic translation to always translate messages to your preferred language.
-
In the message, select Never translate. Outlook won’t ask you if you’d like to translate messages in the future.
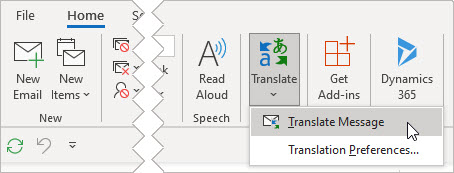
If, for some reason, Outlook doesn’t offer these options, select the Translate button from the ribbon, or right-click on the message and select Translate, then Translate Message.
-
On the Home tab, select Translate > Translate Message.

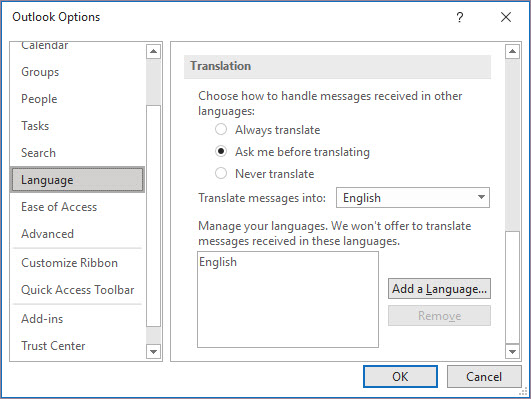
To change your translation preferences, go to Home > Translate > Translation Preferences.

Here you can set your preferred language.
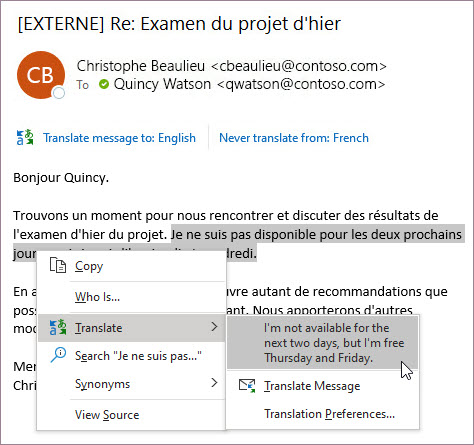
Translate part of an email
To translate just a bit of text from a message, select that text and right-click. Outlook will show you the translation right there in the context menu that appears.
You can also select text and right-click to translate to your preferred language when you’re composing an email. When you click the translated text, you can insert it into the message you’re writing.
To learn more see Announcing new translation features in Outlook.
Note: Automatic translation and intelligent translation suggestions are only available for Exchange Online mailboxes.
Word for Microsoft 365 makes it easy
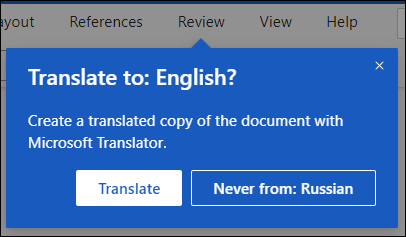
In Word for Microsoft 365 when you open a document in a language other than a language you have installed in Word, Word will intelligently offer to translate the document for you. Click the Translate button and a new, machine-translated, copy of the document will be created for you.

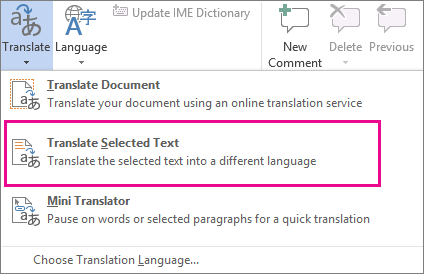
Translate words or phrases in Word, Excel, or PowerPoint
-
In your document, spreadsheet or presentation, highlight the cell or text you want to translate.
-
Select Review > Translate.
-
Select your language to see the translation.
-
Select Insert. The translated text will replace the text you highlighted in step 1.
Note: In Excel, there is no Insert button, you’ll have to copy/paste the text you highlighted in step1.
You might see a list of several translations. Expand the translated item to show a usage example in both languages. Choose the one you want and click Copy.

Available in: 


This feature is available to Microsoft 365 subscribers and Office 2019 customers using Version 1710 or higher of Word; or Version 1803 or higher of PowerPoint or Excel. You must also be connected to the internet, and have Office connected experiences enabled to use Translator.
Subscribers get new features and improvements monthly.
Buy or try Microsoft 365
Not sure what version of Office you’re running? See What version of Office am I using?
This feature is not currently available to customers using Microsoft 365 operated by 21Vianet.
Translate a whole file in Word
-
Select Review > Translate > Translate Document.
-
Select your language to see the translation.
-
Select Translate. A copy of the translated document will be opened in a separate window.
-
Select OK in the original window to close translator.
Available in:
This feature is available to Microsoft 365 subscribers and Office 2019 customers using Version 1710 or higher of Word. You must also be connected to the internet, and have Office connected experiences enabled to use Translator.
Users with Office 2016, but without a subscription, will have the same translation features that are available in Office 2013 and earlier.
Subscribers get new features and improvements monthly.
Not sure what version of Office you’re running? See What version of Office am I using?

Translate words or phrases in OneNote for Windows 10
-
In your notes highlight the text you want to translate.
-
Select View > Translate > Selection.
-
Select your language to see the translation.
-
Select Insert. The translated text will replace the text you highlighted in step 1.
Translate a whole page in OneNote for Windows 10
-
Select View > Translate > Page.
-
Select your language to see the translation.
-
Select Translate. The translated page will be added as a sub-page of the existing page.
-
Select OK in the original window to close translator.
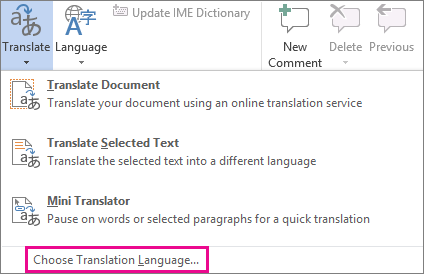
If you later want to change the To language for document translation, or if you need to translate a document to more than one language, you can do so, by selecting Set Document Translation Language…from the Translate menu.

See also
-
Admin considerations for modern translator feature in Office
-
Languages supported by Microsoft Translator
The translation tools available depend on which Office program you’re using:
-
Translate Document/Translate Item: Word, Outlook.
-
Translate Selected Text: Word, Outlook, OneNote, PowerPoint, Publisher, Excel, Visio.
-
Mini Translator: Word, Outlook, PowerPoint, OneNote

You can have an entire Word document or Outlook message translated by a computer («machine translation») and displayed in a web browser. When you choose this kind of translation, the content in your file is sent over the Internet to a service provider.
Note: Machine translation is helpful for conveying the basic subject matter of the content and for confirming whether the content is relevant to you. For high accuracy or sensitive files, human translation is recommended, because machine translation might not preserve the full meaning and tone of the text.
Choose your translation language
-
On the Review tab, in the Language group, click Translate > Choose Translation Language.
-
Under Choose document translation languages click the Translate from and Translate to languages that you want, and then click OK.
Translate the document or message
-
On the Review tab, in the Language group, click Translate.
-
Click Translate Document (Translate Item in Outlook). The From and To languages that you selected are listed.
A browser tab opens with your file in both the original language and the language that you selected for translation.
Note: If this is the first time you have used translation services, you may need to click OK to install the bilingual dictionaries and enable the translation service through the Research pane. You can also see which bilingual dictionaries and machine translation services you have enabled by clicking the Translation options link in the Research pane. See the next section (Translate selected text) to learn how to access the Research pane.
You can use the Research pane to translate a phrase, sentence, or paragraph into several selected language pairs in the following Microsoft Office programs: Excel, OneNote, Outlook, PowerPoint, Publisher, Visio, and Word.
Note: In PowerPoint, only one slide’s text box can be translated at a time.
-
On the Review tab, in the Language group, click Translate > Translate Selected Text to open the Research pane.
Note: In Word, you can right-click anywhere in the document, and then click Translate.
-
In the Research pane, in the All Reference Books list, click Translation.
-
Do one of the following to translate a word or short phrase:
-
Select the words, press ALT, and then click the selection. The results appear in the Research pane under Translation.
-
Type the word or phrase in the Search for box, and then press Enter.
Notes:
-
If this is the first time you have used translation services, click OK to install the bilingual dictionaries and enable the translation service through the Research pane.
-
You can also see which bilingual dictionaries and machine translation services you have enabled by clicking the Translation options link in the Research pane.
-
To change the languages that are used for translation, in the Research pane, under Translation, select the languages that you want to translate from and to. For example, to translate English to French, click English in the From list and French in the To list.
-
To customize which resources are used for translation, click Translation options, and then select the options that you want.
-
-

In Word, Outlook, PowerPoint, and OneNote, the Mini Translator displays the translation of one word as you point at it with your cursor. You can also copy the translated text to the Clipboard, paste it into another document, or play a pronunciation of the translated word.
-
On the Review tab, in the Language group, click Translate > Mini Translator.
-
Point to a word or phrase that you want translated with your mouse. When a faint dialog box appears overlayed in your document, move your mouse over it to see any translations available.
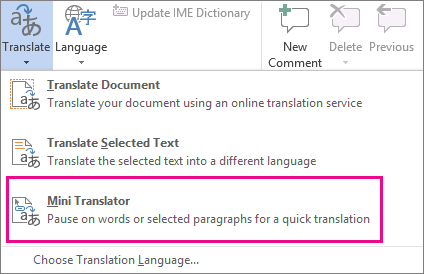
Note: The Mini Translator will continue to appear whenever you move over words. To turn it off, repeat step 1 above.
For more information, see See translations with the Mini Translator.
This feature is only available if you have an Office 365 subscription, or Office 2019 for Mac, and only for Word, Excel, and PowerPoint. For Translator in Outlook see Translator for Outlook for more information.
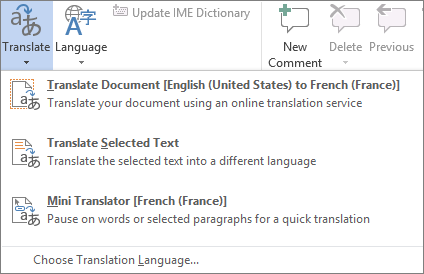
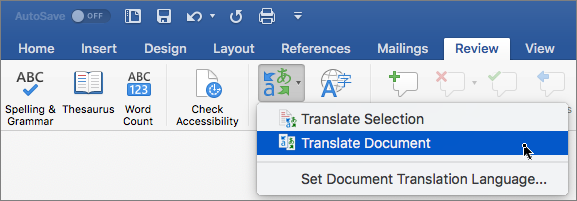
Translate a whole document
-
Select Review > Translate > Translate Document.
-
Select your language to see the translation.
-
Select Translate. A copy of the translated document will be opened in a separate window.
Available in:
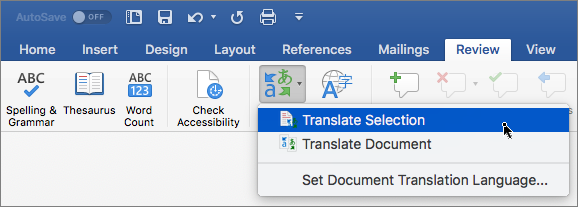
Translate selected text
-
In your document, highlight the text you want to translate.
-
Select Review > Translate > Translate Selection.
-
Select your language to see the translation.
-
Select Insert. The translated text will replace the text you highlighted in step 1.
Note: In Excel, there is no Insert button, you’ll have to copy/paste the text you highlighted in step1.
Available in:
Translate a whole document
Word for the web makes it easy to translate an entire document. When you open a document that is in a language other than your default language, Word for the web will automatically offer to create a machine-translated copy for you.
If you’d prefer to initiate the translation manually, you can still do that with these steps:
-
Select Review > Translate > Translate Document.
-
Select your language to see the translation.
-
Select Translate. A copy of the translated document will be opened in a separate window.
Available in:
Translate selected text
-
In your document, highlight the text you want to translate.
-
Select Review > Translate > Translate Selection.
-
Select your language to see the translation.
-
Select Insert. The translated text will replace the text you highlighted in step 1.
Available in:
Translate an email
-
When you receive an email in another language, a prompt will appear at the top of the message asking if you’d like Outlook to translate it into your default language.
-
If you select Translate message, Outlook will replace the message text with translated text.
You can then select Show original message to see the message in the original language or Turn on automatic translation to always translate messages in another language.
-
If you select Never translate, Outlook won’t ask you if you’d like to translate messages in that language in the future.
-
You can change your translation preferences and choose your translation language by going to Settings
> View all Outlook settings > Mail > Message handling.Available in:
 > View all Outlook settings > Mail > Message handling.
More information
-
Microsoft Translator languages
-
Right-to-left languages
-
Language Accessory Pack for Office
-
Change the language Office uses in its menus and proofing tools
-
Enable or change the keyboard layout language
-
Check spelling and grammar in a different language
Need more help?
All businesses are fluid, so your accumulated abstracts should be as well. When you actualize templates, they’re usually to save yourself and your advisers time, as able-bodied as creating standards in language, diction and alike the way abstracts appear. In Microsoft Word, you can adapt templates, which agency you won’t accept to alpha over from scratch.
:max_bytes(150000):strip_icc()/rwi4q9xYWR-ab5c70821a0a47dd894a73d357441d13.png "How to Change Language in Microsoft Word and Office")
Launch Microsoft Word and accessible the arrangement to adapt by beat the “Open” advantage on the Book tab. To acquisition templates added quickly, bang the “All Files” drop-down card and baddest “All Word Templates,” again double-click the arrangement to edit.
Scroll through the arrangement to get an abstraction of how abounding pages it comprises; the altered genitalia it contains, such as argument boxes and forms; and the accepted layout.
Make across-the-board changes to the absolute arrangement by beat “Select” on the Home tab and allotment “Select All.” When all of the argument is highlighted, use the award options such as chantry blush and chantry admeasurement in the “Font” area to accomplish formatting changes.

Delete article from the template, such as a account or argument box, either by beat it or highlighting it by boring the cursor and again acute the “Delete” key on the keyboard. You can additionally annul by right-clicking and selecting “Delete.”
Add an account to the template, such as a argument box, by beat the Insert tab. Bang the “Text Box” button on the ribbon, accept “Simple Argument Box,” annoyance the cursor to anatomy the admeasurement of the box on the template, again blazon any argument if desired. The Insert tab is additionally area you’ll bang to add clear elements to your template. Bang the “Picture” button on the ribbon, browse to the clear and double-click it.
Give the arrangement a black or blooming accomplishments by beat the Page Blueprint tab. Bang the “Page Color” button on the award and agreement with the black boxes and “Fill Effects” menu. Skip this footfall if you will use black cardboard for your arrangement or if you adopt the white background.
:max_bytes(150000):strip_icc()/001-overtype-and-insert-modes-microsoft-word-3539682-2cfea666856940e198afde07a77c2a84.jpg "How to Change Language in Microsoft Word and Office")
Click the Book tab already more. Baddest the “Save As” option, blazon a altered book name or add the date or your brand to accord the arrangement a new name. This prevents you from overwriting the aboriginal template, so you can still admission it. If you absolutely appetite to annul the aboriginal template, you can artlessly save the edited adaptation over the aboriginal by befitting the aforementioned name. Accomplish abiding the “Save as type” card shows “Word Template” and bang the “Save” button.
References
Tips

Writer Bio
Fionia LeChat is a abstruse biographer whose above accomplishment sets accommodate the MS Office Suite (Word, PowerPoint, Excel, Publisher), Photoshop, Paint, desktop publishing, architecture and graphics. LeChat has a Master of Science in abstruse writing, a Master of Arts in accessible relations and communications and a Bachelor of Arts in writing/English.
How To Write In Different Languages On Microsoft Word – How To Write In Different Languages On Microsoft Word
| Delightful to be able to my website, within this time I’ll explain to you in relation to How To Delete Instagram Account. And now, this can be a first photograph:

Why not consider impression preceding? is actually which wonderful???. if you think thus, I’l l demonstrate a number of image yet again under:
So, if you want to get all of these fantastic pics related to (How To Write In Different Languages On Microsoft Word), just click save link to download these shots for your laptop. They’re all set for transfer, if you’d prefer and want to obtain it, just click save badge in the article, and it’ll be directly downloaded to your home computer.} Finally if you desire to receive unique and recent photo related to (How To Write In Different Languages On Microsoft Word), please follow us on google plus or bookmark this website, we attempt our best to offer you daily up-date with fresh and new photos. Hope you like keeping right here. For most updates and recent news about (How To Write In Different Languages On Microsoft Word) images, please kindly follow us on tweets, path, Instagram and google plus, or you mark this page on bookmark section, We attempt to provide you with up-date periodically with fresh and new pictures, enjoy your exploring, and find the right for you.
Here you are at our website, articleabove (How To Write In Different Languages On Microsoft Word) published . At this time we’re pleased to announce we have discovered an awfullyinteresting nicheto be discussed, that is (How To Write In Different Languages On Microsoft Word) Lots of people searching for info about(How To Write In Different Languages On Microsoft Word) and certainly one of these is you, is not it?


:max_bytes(150000):strip_icc()/sxGNDyMV5f-80a91c506e534abdb45d43cc69122680.png "How to Change Language in Microsoft Word and Office")

/001-overtype-and-insert-modes-microsoft-word-3539682-2cfea666856940e198afde07a77c2a84.jpg "How to Change Language in Microsoft Word and Office")


![How to type twi in ms word.[and other languages]. - YouTube](https://i.ytimg.com/vi/VJiCDLOZl8Q/maxresdefault.jpg "How to type twi in ms word.[and other languages]. - YouTube")


Who now is not familiar with the Microsoft Word application. That’s the first thing that we learn on the computer. Documents, thesis, reports, scripts everything that you need a softcopy of is written in MS Word. Microsoft word is not just a word-processing application. It is much more. You can even call it a graphical word processing software. Bear with me to find out about Writing in Other Languages in Microsoft Word.
Here’s a list of activities possible on MS Word
-
Spelling and Grammer checker, word count (this also counts letters and lines)
-
Speech Recognition
-
Inserts pictures in documents
-
Web pages, graphs, etc.
-
Tables
-
Huge dictionary
-
Prints in different ways
-
Many o many language packs
You can belong to any region of the world, speak any language of the world, you can still use this mighty piece of software. Word package comes with an option, you can install, the MS word language packs and use it two ways.
OFFICE DISPLAY LANGUAGE
You can change the language of buttons, controls, and the ribbon of MS Word. But this doesn’t affect the authoring language of the editor.
OFFICE AUTHORING LANGUAGES AND PROOFING
Changing the authoring language online changes the language that you write in and not the display language of the software
How to Write in Other Languages in Microsoft Word
Step-by-Step Tutorial
1. Go to Microsoft Word.
2. Click on “File”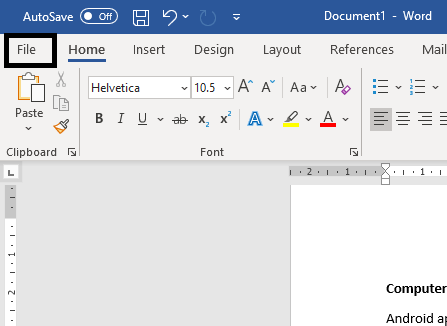
3. Click on “Options”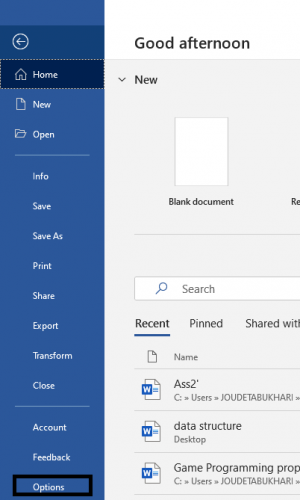
4. Hit “Language”
5. Set the office display language. And click “Set as preferred”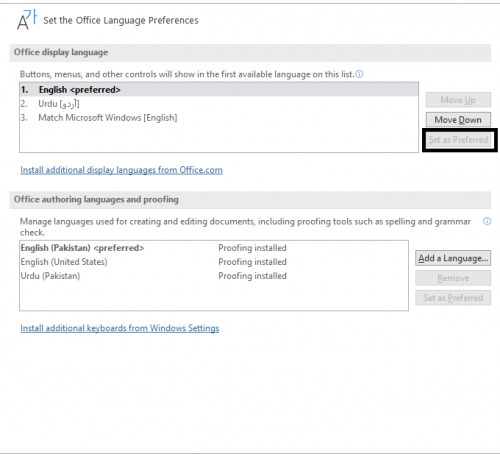
6. Change the authoring and proofing language.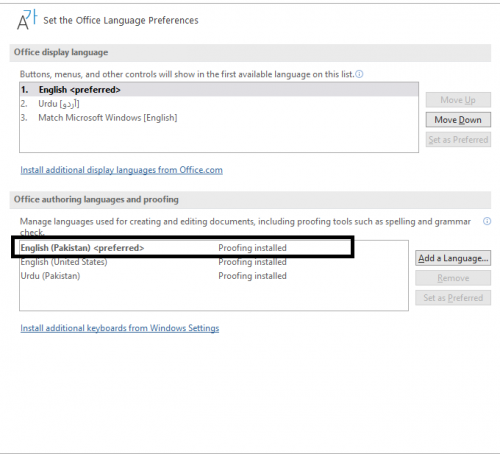
7. Add the language, if your preferred language is not available.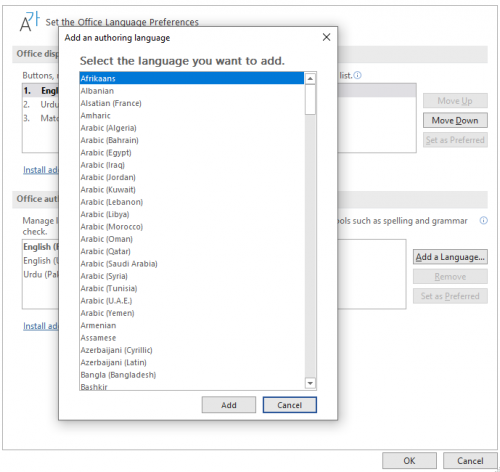
8. Click on “Proofing available”.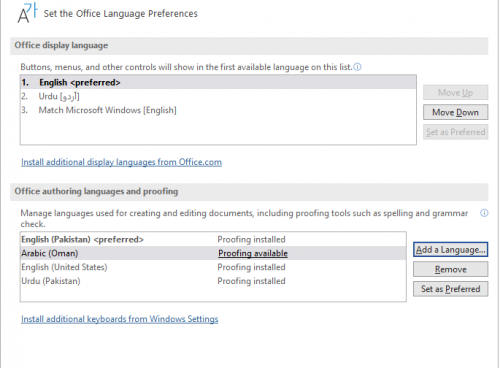
9. Now click “Download”
10. Let it install, restart MS Word, and repeat the above steps.
That’s all folks.
Check out these MS Word Tech-Recipes
How to Add Simple and Downloadable Links on WordPress
How to Open and Exit the Full Screen Mode in MS Word in Easy Steps
Create and Print an Envelope in Word 360
How to Protect an MS Word 365 Document from Unauthorized Access
Arch your Text in Word – Bend your Words With WordArt Magic
How to Manage Section breaks in Word Easily – Insert, Find, and Delete

Joudet Ahsan
SEO Content Creator, a Computer Scientist in making and someone who
sucks at writing bios.
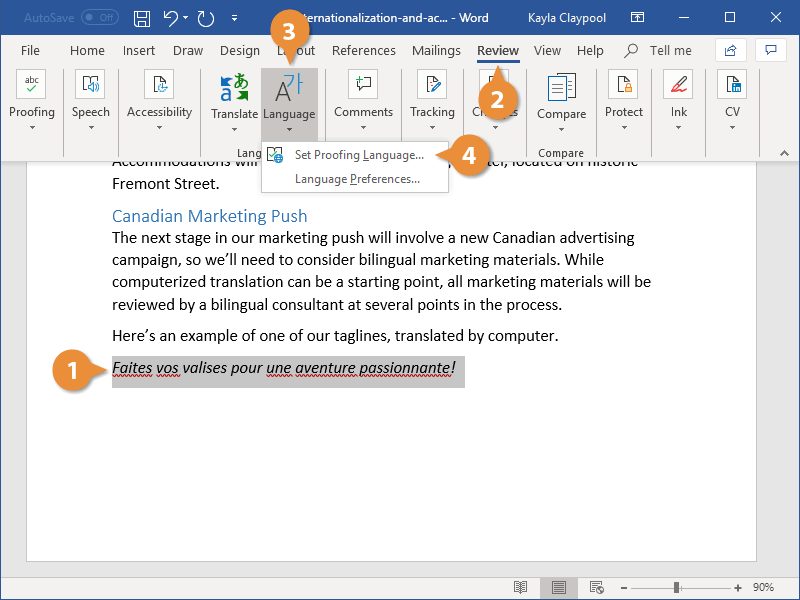
Microsoft Word is used in different countries and many languages. For some documents such as international Agreements, you need to write the documents or just parts of the document in a different language.
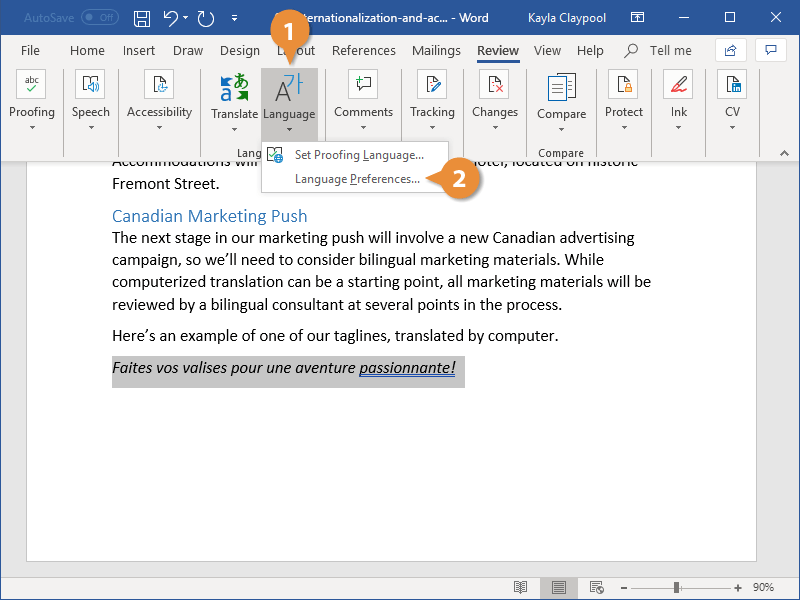
To change the text language, select the text for which you want to change language and do one of the following:
- On the Review tab, in the Language group, click the Language button, then choose Set Proofing Language…:

- On the status bar, click the Language icon:

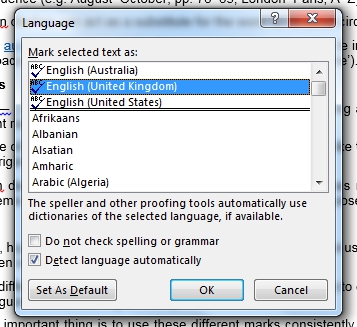
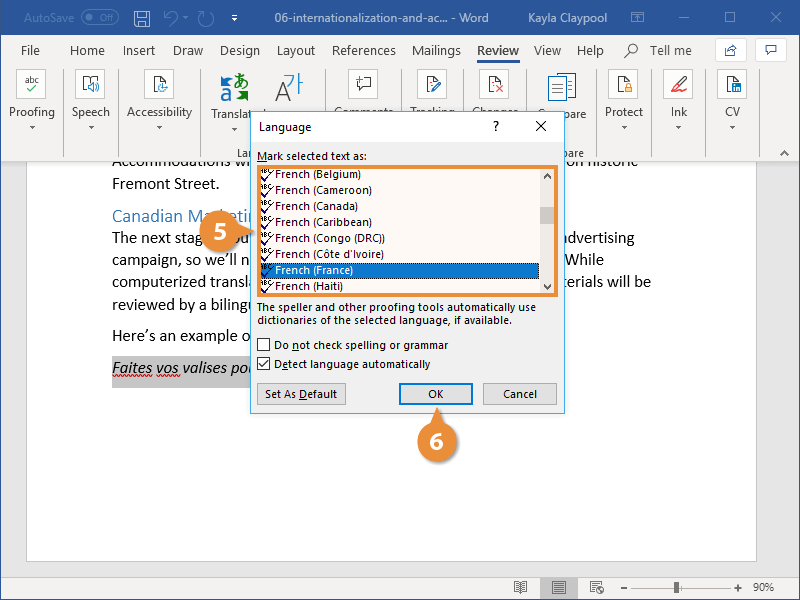
In the Language dialog box, choose the language you want to use for the selected text and click OK:

Notes:
- You can set different languages to different words, sentences, paragraphs, pages, or sections in the document.
- You can
skip some words or sentences from spelling and grammar checking or add them to the custom dictionary for some language.
Please, disable AdBlock and reload the page to continue
Today, 30% of our visitors use Ad-Block to block ads.We understand your pain with ads, but without ads, we won’t be able to provide you with free content soon. If you need our content for work or study, please support our efforts and disable AdBlock for our site. As you will see, we have a lot of helpful information to share.
Do you want to write a letter or an article in a foreign language? Microsoft Office offers a Translate feature available in Microsoft Word, Microsoft Excel, PowerPoint, and One Note. The Translate feature converts content into a different language using the Microsoft Translator online service; in Microsoft Word, it includes two options Translate Selection and Translate Document.
Although the Translate feature is offered in Microsoft Office programs such as Microsoft Word, Microsoft Excel, PowerPoint, and One Note, Translate Selection and Translate Document are only found in Microsoft Word. The Translate Selection’s purpose is to translate the selection with Microsoft Translator, and the Translate Document’s purpose is to create a translated copy of your Document with Microsoft Translator.
In this tutorial, we will explain:
- How to use the option Translate Selection.
- How to use the option Translate Document.
Let us discuss this in more detail.
1] How to use Translate Selection option in Office

Highlight the text.
On the Review tab of any Office programs, click the Translate button in the language group.
In Microsoft Word or OneNote, when the Translate button is clicked, you will see a drop-down list.
In the drop-down, click Translate Selection.
![]()
A Translator Pane will pop up on the right of the window.
In the Translator Pane, there are two options From and To
From is the language you want to translate.
To is the language you want the selected text to be translated to.
Choose a language from the To section by clicking the drop-down arrow and selecting a language.
Then click Insert.
The text is translated.
In the Microsoft Excel and PowerPoint programs, when the Translate button is selected.
A Translator Pane will pop up on the right of the window.
![]()
For PowerPoint, like Word, you have to highlight the text first before selecting a language and clicking Insert.
![]()
In Excel, you don’t have to highlight the text.
2] How to use Translate Document option in Office
![]()
On the Review tab of any Office programs, click the Translate button in the language group.
In Microsoft Word or OneNote, when the Translate button is clicked, you will see a drop-down list.
In the drop-down, click Translate Document.
![]()
A Translator Pane will pop up on the right of the window.
Inside the Translator Pane in the To section, click the drop-down arrow and choose a language.
If you want to keep that particular language, check the checkbox for Always translate to this language.
Then click Translate.
A copy of the document is open with the translated text.
In OneNote, PowerPoint, and Excel, this option is not available.
![]()
In OneNote, instead of a Translate Document option, there is a Mini Translator option.
Highlight the text in the notebook.
Click the Translate button.
In the drop-down list select the Mini Translator option.
![]()
Once the Mini Translator option is selected, a Translation Language Options dialog box will open.
Inside the dialog box, choose a language from the Translate to list box.
Then click OK.
Hover the cursor over the text, and you see a small window containing the foreign language.
Once the language is chosen, it will remain as the language selected in the Mini Translator.
To set it back to English, highlight the text.

Click the Translate button and select Choose Translation Language.
![]()
A Translation Language Options dialog box will open.
Inside the dialog box, choose a language from the Translate to list box.
Then click OK.
We hope this tutorial helps you understand how to translate text into a different language in Microsoft Office.
Need to write or read in a different language? Follow these tips
Updated on October 15, 2022
What to Know
- In Windows: Choose the desired Display and Help Languages in File > Options > Word Options > Language.
- Then, select Choose Editing Options in the same section to change the editing language.
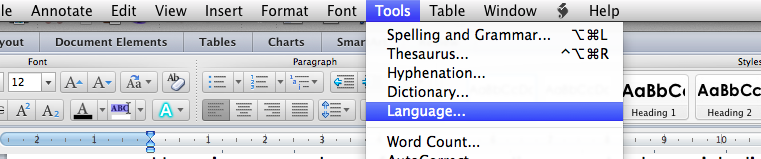
- All but the proofing language in Office for Mac are the same as those for the operating system. To change it in Word: Tools > Language.
This article explains how to change display and/or editing languages in Word for Office 365, Word 2019, Word 2016, Word 2013, Word 2010, Word Online, and Word for Mac. In Windows—but not in macOS—you can choose them independently of the language installed for your operating system.
How to Change the Display Language
The display language in Word governs the ribbon, buttons, tabs, and other controls. To force a display language in Word that’s different from that of your operating system:
-
Select File > Options.
-
In the Word Options dialog box, select Language.
-
In the Choose Display Language section, choose the Display Language and Help Language you want to use. Languages installed in Windows 10 are listed.
-
If a specific language is not listed, select Get more display and help languages from Office.com. If necessary, install a Language Accessory Pack, then close and re-launch Word. You may need to reboot your computer, as well. After a language pack loads, go to the Word Options menu and choose that pack in the Display Language and Help Language lists.
-
Select Set as Default for both the Display Language and the Help Language lists.
-
Select OK to save your changes.
How to Change the Editing Language in Word
The editing language—which governs spelling, grammar, and word sorting—can be changed in the Word Options screen. Go to the Choose Editing Languages section, and select a language from the list. If the language isn’t listed, select the Add additional editing languages drop-down arrow and choose a language.
To proofread in the selected language, highlight the text, then go to the Review tab and select Language > Set proofing language. Choose a language from the list. Word will consider the highlighted selection to be the non-default, selected language and will check the spelling and grammar accordingly.
How to Change Language in Word Online
Language options for Office Online are similar to those in desktop versions of Office. In Office Online, highlight the text for proofing in the non-default language. Select Review > Spelling and Grammar > Set Proofing Language, then choose your alternative language. All proofing in that selected block will be governed by the rules of the alternative language.
How to Change Language in Word for Mac
The display and keyboard layout languages used in Office for Mac are the same as the ones for the operating system. You cannot use separate languages for the OS and Office applications. However, you can specify a different proofing language for Office for Mac.
To change the proofing language in Office for Mac, select Tools > Language in Word or another Office application. To change the proofing language for new documents, select Default.
If you select OK instead of Default, the proofing language you chose will only apply to the current file.
Normally, Word defaults to the language of the operating system. As a rule, you should use Windows to install language files rather than rely on an application like Word to do it for you.
FAQ
-
How do you delete a page in Word?
To delete a page in Word, select View, then go to the Show section and select Navigation Pane. In the left pane, select Pages, choose the page you want to delete and tap the delete or backspace key.
-
How do I check the word count in Word?
To check the word count in Microsoft Word, look at the status bar. If you don’t see the number of words, right-click the status bar and choose Word Count.
-
How do I insert a signature in Word?
To insert a signature in Microsoft Word, scan and insert a signature image into a new Word document and type your information beneath the signature. Then, select the signature block and go to Insert > Quick Parts > Save Selection to Quick Part Gallery. Name the signature > AutoText > OK.
Thanks for letting us know!
Get the Latest Tech News Delivered Every Day
Subscribe
If you are writing an essay at a UK university, chances are you will have to write in British English. Likewise, if you’re in the UK and writing for an international audience, you should make sure to adapt your language use accordingly.
Most word processors, including Microsoft Word, are automatically set to US spelling. This is fine if you’re writing for an American (or even international) audience. But otherwise you might need to make a change. In this post, we explain how to change the language of a document in Microsoft Word.
Step One
Select all of the text in your document. To do this quickly, use ‘Ctrl + A’ (or ‘command + A’ on Mac). If you want to use different language settings in different parts of the document, simply selected the text you want to modify.
Step Two
On a Windows PC, go to the ‘Review’ tab, click ‘Language’ and select ‘Set Proofing Language’.
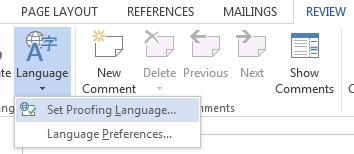 On a Mac, go to ‘Tools-Language’.
Alternatively, you can click on the ‘Language’ setting at the bottom of the screen.
Find this useful?
Subscribe to our newsletter and get writing tips from our editors straight to your inbox.
![]() This will open a new dialogue box.
This will open a new dialogue box.
Step Three
In the window that opens, choose your preferred language from the list. Click ‘OK’ to change the proofing language of the selected text.
 Step Four
If you usually use this language for your documents, click ‘Set As Default’. And that’s it! Good luck!
When you’re creating a document that’s aimed at an international audience, using text in multiple languages, there are extra considerations to keep in mind.
Change the Proofing Language
You can change the proofing language for all or part of a document, which sets the language for spelling and grammar check.
- Select the relevant text.
- Click the Review tab on the ribbon
- Click the Language button.
- Select Set Proofing Language.
The top of the Languages window shows the languages currently in use, while the rest of the languages Word supports will be listed below it.

- Select a language from the list.
- Click OK.
The editing language for the selected paragraph is changed. Spelling and grammar check now understands the additional language. You can even view synonyms for a word in the new language.
Customize Language Preferences
If you’re working with multiple languages, you can manage the list of editing languages in use in the Word Options screen.
- Click the Language button on the Review tab.
- Select Language Preferences.
Here, you can see all the editing languages currently in use and add new ones quickly.
- Click the Add additional editing languages list arrow.
- Select a language.
- Click Add.
The new language is added to the list. You can also remove languages from the editing list
Additionally, you can change the default editing language, the display language used for ribbon tabs and buttons, and the default language for help files from here.
- Click OK.

The language preferences are updated.
Best Practices for International Documents
When working on documents meant for an international, multilingual audience, there are a few best practices to keep in mind.
- Keep syntax simple. Word includes built-in translation tools that, while not perfect, work pretty well when translating something simple.
- Don’t use ambiguous date and time formats. Make sure that you don’t use date and time formats that mean different things in different regions. For example, 6/12 can mean either June 12th, or December 6th. Instead, write out the month and date to remove ambiguity.
- Use default Body and Header fonts. This way, someone viewing your document can switch font sets easily if necessary to make it easier to read.
- Globalize examples and avoid specific cultural references and colloquialism. Avoid using specific colloquialisms where, if the words translate perfectly, the meaning may not. For example, the phrase «for the birds» is simple enough to translate word-for-word, but the meaning may get changed or lost depending on the culture of the reader.?

FREE Quick Reference
Click to Download
Free to distribute with our compliments; we hope you will consider our paid training.
![]()
Written by Allen Wyatt (last updated August 6, 2022)
This tip applies to Word 2007, 2010, 2013, 2016, 2019, Word in Microsoft 365, and 2021
Word includes many tools to make your writing better. A few of the tools make use of specialized dictionaries; for instance, the grammar and spelling checker. You can pick a language to be used on either a single paragraph, or on all instances of a particular paragraph style. To change which language is used for a particular paragraph, follow these steps:
- Select the paragraphs or defined style for which you want to change the language.
- Display the Review tab of the ribbon.
- If you are using Word 2007 click the Set Language tool in the Proofing group. If you are using Word 2010 or a later version, click the Language tool in the Language group and then click Set Proofing Language. Word displays the Language dialog box. (See Figure 1.)
- Select a language from those in the language list.
- Click on OK.

Figure 1. The Language dialog box.
If you want to specify that all paragraphs formatted with a particular style use a certain language, then follow these steps:
- Display the Home tab of the ribbon.
- Click the small icon at the bottom-right of the Styles group. Word displays the Styles pane at the right side of the desktop.
- In the list of styles, make sure the style you want to change is visible.
- Hover the mouse pointer over the name of the style you want to change. Notice that a downward-pointing arrow appears at the right side of the style name.
- Click on the downward-pointing arrow and choose the Modify option from the resulting menu. Word displays the Modify Style dialog box.
- Click on the Format button, then choose the Language option. Word displays the Language dialog box.
- Select a language from those in the language list.
- Click on OK, then on OK again.
- Close the Styles pane.
Any paragraphs currently using the style you specified in step 4 (or any paragraphs to which you apply that style in the future) will be formatted for the language you picked in step 7.
WordTips is your source for cost-effective Microsoft Word training.
(Microsoft Word is the most popular word processing software in the world.)
This tip (5938) applies to Microsoft Word 2007, 2010, 2013, 2016, 2019, Word in Microsoft 365, and 2021.
Author Bio
With more than 50 non-fiction books and numerous magazine articles to his credit, Allen Wyatt is an internationally recognized author. He is president of Sharon Parq Associates, a computer and publishing services company. Learn more about Allen…
MORE FROM ALLEN
Displaying the Selected Cell’s Address
Need to know the address of the cell that is currently selected? There is no worksheet function to return this …
Discover More
Clearing All Tab Stops
Tab stops allow you to modify the horizontal position at which text is positioned on a line. If you want to get rid of …
Discover More
Editing a Scenario
Once a scenario is defined and saved, you can later revisit the values you created for the scenario and modify them. …
Discover More
More WordTips (ribbon)
Changing the Language Setting for All Document Text
Word supports a number of different languages for documents you create. If you need to routinely change the language used …
Discover More
Converting Word to German
Want to convert your usage of Word from one language to another? It’s not as easy as one would hope, as you’ll discover …
Discover More
Pasting Text in a Specific Language
When copying information into a Word document, you may want to make sure that the information pasted is formatted as a …
Discover More
- Remove From My Forums
-
Question
-
Here’s my problem: I need a word document that will be published (probably as a PDF) in two dfiferent languages. The obvious solution would be to create two different documents, each with the text in one language, but there are several problems: first of
all the structure of the document is quite complex, there is not only text but also images, tables, graphs, formulas; secondly, the document will be updated quite often. As a result, mantaining two different documents would be clearly highly impractictal.What I need is a feature that let me write, somehow, text in two languages and, when needed, I should be able to switch between the two, so that I can export the document in the selected language. Is such a thing possible?