
Excel for Microsoft 365 Word for Microsoft 365 Outlook for Microsoft 365 PowerPoint for Microsoft 365 Access for Microsoft 365 Publisher for Microsoft 365 Excel 2021 Word 2021 Outlook 2021 PowerPoint 2021 Access 2021 Project Standard 2021 Publisher 2021 Visio Standard 2021 OneNote 2021 Excel 2019 Word 2019 Outlook 2019 PowerPoint 2019 Access 2019 Project Standard 2019 Publisher 2019 Visio Standard 2019 Excel 2016 Word 2016 Outlook 2016 PowerPoint 2016 Access 2016 OneNote 2016 Project Standard 2016 Publisher 2016 Visio Standard 2016 Office 2016 Excel 2013 Word 2013 Outlook 2013 PowerPoint 2013 Access 2013 OneNote 2013 Project Professional 2013 Project Standard 2013 Publisher 2013 Visio Professional 2013 Visio 2013 Excel 2010 Word 2010 Outlook 2010 PowerPoint 2010 Access 2010 OneNote 2010 Project 2010 Project Standard 2010 Publisher 2010 Visio 2010 Visio Standard 2010 Office 2010 More…Less
Microsoft 365 supports right-to-left functionality and features for languages that work in a right-to-left (or a combined right-to-left, left-to-right) environment for entering, editing, and displaying text. In this context, «right-to-left languages» refers to any writing system that is written from right to left and includes languages that require contextual shaping, such as Arabic, and languages that do not. You can change your display to show the menus and buttons right-to-left and/or change individual files so their contents read from right to left.
To compose in a right-to-left language you will want to enable the Windows keyboard language for the right-to-left language that you want to use. See add an input language in Windows and enable the keyboard layout for the right-to-left language.
Click a heading below for more information
Depending on how you prefer to customize your computer, you can use one language for your display (menus, dialog boxes, and wizards), and type in a different language as needed. If you want to both type in a right-to-left language and see the menus and online Help in that language, you can set the Microsoft 365 display to that language preference. For more information, see Change the language of Microsoft Office.
Note: If you’d like to see a short video on how to do this, here’s a video at YouTube that a member of the community created showing how it’s done. Change Language Office 2016.
Several right-to-left features in Microsoft 365 programs use the display language to determine the screen layout direction and the alignment of text within dialog boxes. When you specify a right-to-left user display language in the Set the Office Language Preferences dialog box, the layout of menus, dialog boxes, and wizards are right to left, but the Microsoft Windows settings remain left to right.
For example, when Arabic is selected as the display language in Microsoft 365 you see the following display:

The menus are displayed right to left. If the Windows display language is still set to English, the title bar remains in English and the Close, Minimize, and Maximize buttons remain in the upper-right corner as they do in a left-to-right interface. If the Windows display language is set up for a right-to-left language, the language in the title bar would also be translated, and the Close, Minimize, and Maximize buttons would be in the upper-left corner.
If you work primarily in a left-to-right language but sometimes need to insert text in a right-to-left language, you can select your left-to-right language (such as English) for your display language and type in the right-to-left language in most of the Microsoft 365 programs when you want to. To do this, Set right-to-left text, bullets, and numbering for the editing area and enable the keyboard layout.
You can change the text direction from within a Microsoft 365 program by choosing the Right-to-left paragraph button in the Paragraph group on the Home tab (this only appears if you have a right-to-left language enabled). Even after changing your display to appear in a right-to-left language, you must have the appropriate keyboard language enabled to enter text in that language.
If your usual display language is English but you want to change it to an Arabic dialect, do the following:
-
Open an Microsoft 365 program file, such as a Word document.
-
On the File tab, choose Options > Language.
-
In the Set the Office Language Preferences dialog box, in the Editing Language list, choose the Arabic dialect you want, and then choose Add.
-
In the Choose Editing Languages table, make sure the newly added Arabic dialect is highlighted and then choose Set as Default.
Important: When you set the newly assigned editing language as the default, it becomes the default for all your Microsoft 365 programs.
To type using a particular language’s native keyboard, you must add the appropriate keyboard layout. For instruction on how to add an additional keyboard language see Change the language of Microsoft Office.
After adding a keyboard layout for another language, a language indicator (called the «Language bar») appears on the taskbar, next to the clock, and displays the current keyboard language. For example, in Windows 10, the language indicator for Hebrew is  .
.
Note: The Language bar appears automatically after adding a keyboard for at least one language in addition to English in the Text Services and Input Languages dialog box in Microsoft Windows.
To change the current keyboard language click the Language bar and select the language you want, or press ALT + SHIFT to toggle thru the list of installed keyboards.
If you only want to enter a little text in another language and don’t want to switch your keyboard, you can use the Character Map, one of the Accessories in Microsoft Windows. You can choose a character from one of the right-to-left or left-to-right language font pages, copy it to the Clipboard, and then insert the character in your document. For more information about how to use the Character Map to enter text, see Using special characters (Character Map).
Depending on which languages you need, you may also be able to enter small amounts of text by using the Symbol gallery, see Insert a check mark or other symbol.
When both left-to-right and right-to-left languages are enabled, the Left-to-right and Right-to-left paragraph buttons are enabled on the ribbon in most of the Microsoft 365 programs. When you click these buttons, you can change the direction of text when entering and justifying text.
Note: In Microsoft OneNote, the Left-to-right and Right-to-left buttons are available by clicking the Paragraph Alignment arrow.
Text in a cell or field can be left-aligned, center-aligned, or right-aligned. In some programs, such as Access and Excel, text can also have Context text direction.
When text has Context text direction, text and numbers are aligned according to the language of the first character entered — for example, text in the cell or field is right-aligned if the first character is in a right-to-left language, and left-aligned if the first character is in a left-to-right language. You can override Context text direction and switch to Left, Center, or Right text direction for individual objects.
Many right-to-left or combined right-to-left and left-to-right programs apply context rules that control text direction and the reading order of text. Boxes, lists, and other elements control the context rules for the text that they contain.
The context rules for the reading order and text direction are as follows:
-
If the first strong character is left-to-right, the reading order is also left-to-right, and the text is left-aligned.
-
If the first strong character is right-to-left, the reading order is also right-to-left, and the text is right-aligned.
-
If only neutral characters are typed, both the reading order and the direction follow the paragraph direction (which can be either left-to-right or right-to-left) until the first strong character is typed.
Any time you change the first strong character from a left-to-right language to a right-to-left language (or vice versa), both the reading order and the text direction change accordingly.
In Word and other word-processing programs, you can select, find, and replace individual diacritics and individual Arabic characters regardless of whether they are ligated. Each ligature and diacritic is managed as a discrete unit of a right-to-left language word.
The following example shows selecting an Arabic word that has a three-character ligature (as each character is selected).
Indic languages, such as Bengali, Gujarati, Hindi, Kannada, Malayalam, Marathi, Punjabi, Tamil, and Telugu, might not be compatible with every search option in Microsoft Office. For example, the Match case and Find whole words only options do not work for scripts in these languages. However, these options can still be used to find matching Latin characters in the same document.
Right-to-left languages
Find-and-replace features search text in the order in which the text is entered in the Search box, instead of the order in which it is displayed. Therefore, you can search for strings of right-to-left text, regardless of the direction of the paragraph. You can also search for matches of characters with or without kashidas (Arabic only), Alef Hamzas (Arabic only), or diacritics, such as the Hebrew niqqud. For a list of ASCII and Unicode character codes, see Insert ASCII or Unicode Latin-based symbols and characters.
Indic languages
Indic languages, such as Bengali, Gujarati, Hindi, Kannada, Malayalam, Marathi, Punjabi, Tamil, and Telugu, might not be compatible with every search option in Microsoft Office. For example, the Match case and Find whole words only options do not work for scripts in these languages. However, these options can still be used to find matching Latin characters in the same document.
Southeast Asian languages
Southeast Asian languages, such as Thai and Vietnamese, might not be compatible with every search option in Microsoft Office. For example, the Match case and Find whole words only options do not work for Southeast Asian characters. However, these options can still be used to find matching Latin characters in the same document.
See Also
Check spelling and grammar in a different language
Change the language of Microsoft Office
Need more help?
Several languages such as Arabic, Persian, Urdu or Hebrew are usually written from right to left. Today we will learn how to shift the writing direction in Office 2016/2019/365 from the default Left To Right (LTR) into Right To Left direction (RTL). For convenience, we are providing detailed instructions for Word and Outlook; however process is similar for other Office apps such as Excel and PowerPoint.
Set Word paragraph defaults to right to left
To ensure that your Word document default writing direction is RTL, proceed as following:
- Open a new Microsoft Word document.
- In the Home tab, locate the Paragraph section in the Ribbon.
- Hit the small arrow at the bottom right side of the section as shown below:

- The Paragraph Settings dialog will open up.
- In the General section, you’ll notice the Alignment combo box.
- Set the Alignment value to be Right.
- Select Right-to-left check box below.
- At the bottom of the dialog hit the Set as Default button.
- In the next dialog, select to apply this setting to all documents based on the normal.dotm template.
Word right to left writing
If you are not able to locate the RTL direction buttons in Word, proceed as following:
- Open your Word document, click on File and select Options.
- In the customize ribbon, click on the drop down box and select All commands.
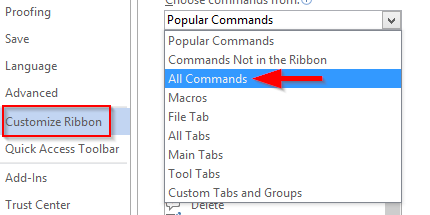
- Then search for the Left to Right and Right to Left in the options.
- Press on New Group at the bottom and rename it as you need.
- Add both LTR and RTL in the created group and select OK to add it in the Ribbon.

In Quick Access Toolbar:
- Open your word document, click on File and select Options.
- In the Quick Access Toolbar, click on the drop down box and select All commands.

- Then search for Left to Right and Right to Left in the options.
- Click Add and select OK to add those options in Quick access toolbar.
Right to left switching with Macros
Readers asked me whether there is a way to programmatically set Right to Left for specific pages / ranges and paragraphs in a Word document.
The VBA method .RtlPara allows you to set the paragraph direction for a specific selection using Macros.
Default RTL in Outlook emails
To set right-to-left as your default Outlook email text direction, proceed as following:
- In the Outlook ribbon , hit the New Email button to open a new email item.
- Navigate to the Format Text tab.
- In the Paragraph Ribbon header, hit the small arrow at the bottom right side.
- The Paragraph settings dialog opens up.
- In the Alignment combo box, select Right.
- Then pick right-to-left as the email document Direction.
- Hit the Set as default button and apply all changes to all email items created off the normalemail.dotm template.
Note: While writing this tutorial, i have noticed that the Format Text Ribbon (including the Paragraph section) buttons are disabled by default. If so, just click your email item body and the Ribbon will be enabled.
Enable RTL buttons in Outlook
- Open your Outlook 365 and Click on New mail in the Home ribbon.
- Now in the opened compose mail dialog box, click on File and select Options.
- In the Customize Ribbon, click on the drop down box and select All commands.
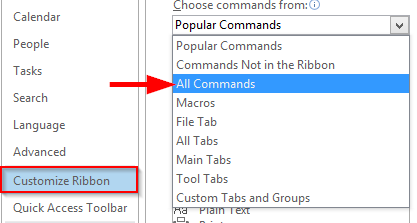
- Search for Left to Right and Right to Left options.
- Press on New Group at the bottom and rename it as you need.
- Add both LTR and RTL in the created group and select OK to add it to the ribbon.

In Quick Access Toolbar:
- In your Outlook then hit New mail in the Home ribbon.
- In the dialog box of compose mail, click on File and select Options.
- In the Quick Access Toolbar, click on the drop down box and select All commands.

- Search for Left to Right and Right to Left options.
- Click Add and select OK to add it in Quick Access Toolbar.

- Hit either LTR to write from Left to Right and RTL to write from Right to Left in both Quick Access Toolbar and Customize ribbon.

99.9% of the time in English language writing, sentences start on the left hand side of the page. This is simply how we do things. But not every language uses this convention.
In Hebrew and Arabic, for instance, sentences begin at the right hand side of the page. Versions of Microsoft Word designed for these languages therefore default to right-to-left.
Whichever version of Word you’re using, though, you can adjust the text direction to suit your particular needs.
Writing in a Right-to-Left Language
If you need to write in a language that reads from right to left and your version of Word doesn’t support this, you will have to install the necessary language and keyboard settings.
If both left-to-right and right-to-left languages are enabled in a document, the ‘LTR’ and ‘RTL’ buttons should appear in the ‘Paragraph’ section of the ‘Home’ tab.
Changing the Text Direction
Even if you’re not writing in a right-to-left language, you may need to change the text direction if you’re using a version of Word where right-to-left is the default or if you’re editing a document written using this format.
In these cases, with Word 2010 or later on a Windows computer, your simplest option is to add buttons to the Quick Access Toolbar. To do this:
You can now use these buttons to set the text direction for all (or part) of a document.
Find this useful?
Subscribe to our newsletter and get writing tips from our editors straight to your inbox.
Alternatively, you can also add these buttons to the main ribbon on Microsoft Word by right clicking on the ribbon and selecting ‘Customize the Ribbon’.
This opens a menu similar to the one used to customize the Quick Access Toolbar. The main difference is that you need to create a new ‘Group’ under one of the main tabs so that the commands have somewhere to appear.
Microsoft Hates Mac Computers
It’s a melodramatic subtitle, we’ll grant you, but it’s the only explanation for why Microsoft Word on the Mac has only recently added support for right-to-left languages.
If you want to change the text direction from right-to-left to left-to-right in older versions of Word on an Apple computer, you’ll need to cheat using this workaround:
- Copy and paste your text into Pages, where it will default to left-to-right
- Copy and paste your reformatted text back into Word
You can also change the text direction from left-to-right to right-to-left using this method if you have an appropriate right-to-left script installed on Pages.
The text direction should then match the settings you chose in Pages (or other compatible program). If not, it might be time to get a PC instead.
![]()
Word left-to-right/right-to-left handling (LTR/RTL) works on two levels: the paragraph level, which can be controlled by right-clicking on the paragraph and choosing the appropriate direction (right-to-left, or left-to-right); and the run level.
Consider the following sequence of letters:
ABCD
This is an example of an LTR run. If we are using an RTL language, even though the sequence of letters is the same order, the text should be displayed in reverse, as a RTL run.
Actual order: ABCD
Visual order: DCBA
When we add netural characters — characters that don’t have rules about whether they are displayed as LTR or RTL — the run direction cannot be determined based on the characters themselves; we have to explicitly define the direction of the run:
(assumes LTR paragraph direction)
Actual order:    ABCD0123
LTR run:         ABCD0123
partial RTL run: DCBA0123
full RTL run:    3210DCBA
When typing, there is no need for you to set the run direction; Word sets the run direction of a given neutral character based on the direction of the current language you are typing in.
In older versions of Word (<=2003), I didn’t find any way to do this through the UI, only through the VBA editor.
- Select the text you want to change
- Press ALT+F11 to open the VBA programming environment
- Click on the Immediate pane; or if it’s not visible, press CTRL+G
- Type
Selection.LtrRunand press ENTER
Note: To set the run to RTL, type Selection.RtlRun
In Word 2010, you can customize the ribbon by adding the commands LtrRun and RtlRun to set the LTR/RTL run direction.
Release Date: November 7, 2018
Category: Writing Tools
Author: Amanda W., Ph.D.
Many versions of Word allow users to enter text in right-to-left format to accommodate other languages.
Most of these change the formatting to left-to-right text direction when users select English for the text language.
However, a few versions have bugs in this process and the formatting remains right to left, such as the Arabic versions of Word.
If you receive a document originally written in one of these versions, the cursor, text direction, and/or punctuation will behave abnormally.

Here, we describe 1) how to fix this problem in a selected segment of text and 2) how to set all new comments to run in the correct direction.
The information in this guide was compiled from instructions for the 2010, 2013, and 2016 versions of Word, so these instructions should be accurate for those versions, but might not work with older versions.
Changing right-to-left to left-to-right formatting
To do this, we will add two buttons to our Quick Toolbar.
These will stay in Word as long as it is installed on your computer, so you can use them whenever you encounter this problem.
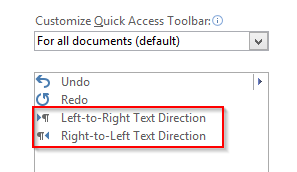
- In the Quick Access Toolbar at the top left of the screen (where the save and undo buttons are), click the arrow at the right side and select “More Commands”.
- Under «Choose commands from:» select «All Commands.»
- Find «Left-to-Right Text Direction» in the alphabetical list and click «Add>>».
- Find «Ltr Run» and click «Add>>».
- Click «OK» to close the window.
- You should now have two new buttons in the Quick Access toolbar at the top left of your screen: the Left-to-Right Text Direction button, which looks like an arrow and a paragraph symbol, and the Ltr Run button, which looks like an open, gray, or green circle depending on your version of Word.
- Select the text that needs to be fixed, or select all text in the document by pressing Ctrl-A.
- Click both the Left-to-Right Text Direction and Ltr Run buttons (it doesn’t matter which you click first).


Text should now run left to right as we expect in English writing.
If the text is suddenly right justified, meaning that it all lines up along the right margin, don’t worry – that means the author of the original document was trying to get around the bug and make the text look normal.
Just select the text and click “Left Align” in the “Paragraph” section under the “Home” tab.

Setting comments to default to left-to-right text
If you are providing feedback on this document, you will likely need to add comments to the document.
Although the directions above are effective in comments, it can get very annoying to click your two Quick Access buttons every time you need to write a new comment.
Luckily, we can set Word to use the correct formatting for all future comments.
- If there are no comments, write one and fix it using the directions above.
- In a properly formatted comment, click somewhere in the comment text that doesn’t have any special formatting (no italic, bold, superscript, etc.).
- Go to «Home» tab and click the tiny arrow in the bottom right corner of the “Styles” section.
- Click “Options…”
- Change “Select how list is sorted:” to “Alphabetical”.
- Change «Select styles to show:» to «All styles.»
-
Find «Comment Text» in the list and click it if it’s not already selected.
- If there are no styles in the list and it’s just a blank white box, click the «Style Inspector» button at the bottom (the one in the middle with a magnifying glass), and the first item in the smaller box that pops up should be “Comment Text.” You’ll follow the next steps within that box.
- If clicking “Comment Text” changes the comment back to right-to-left formatting, select all the text in that comment and click your two new Quick Access buttons again.
- Hover your mouse over «Comment Text» and click the drop-down arrow that appears.
- Click «Update Comment Text to Match Selection.»
- Close all open style boxes.
Try adding new comments; the text should run left to right.
This will save a bit of time and a lot of frustration.
It will need to be done for each document in which you encounter this issue, but once you’ve done it, that style information should stay with the document even if you send it to someone else.
Keywords: Microsoft Word, Microsoft Office, Text Direction, Editing, Comments
Scientific Writing Workshops
If you like our articles, try our workshops!
Our articles are based on the material from our scientific writing workshops, which cover these and many other topics more thoroughly, with more examples and discussion.
We offer on-site workshops for your event or organization, and also host workshops that individual participants can attend.
Our on-site scientific writing workshops can range from 1-2 hours to several days in length.
We can tailor the length to suit your needs, and we can deliver a writing workshop as a stand-alone activity or as part of scheduled meetings.
Our scientific writing workshops consistently receive high praise from participants including graduate students, post-docs, and faculty in diverse fields.
Please see our scientific writing workshop page for details.
If you found this article helpful or if there is a topic you want us to address in a future article, please
use our
online comment submission form,
or
contact us directly. Your comments and suggestions are valuable!
Click here to return to our scientific editing article library.
![]()
Download Article
An easy-to-follow guide on changing the direction of text in Microsoft Word
![]()
Download Article
- Rotating Text
- Making Text Vertical
- Mirroring Text
- Changing Paper Orientation
|
|
|
Do you want to type vertically in word? You can create vertical text by creating a textbox and adjusting its settings to set the position. You can change the text’s direction, rotate it, and mirror it. You could also change the document’s orientation from portrait to landscape mode. This wikiHow will show you how to write vertically in word on your Windows or Mac computer.
Things You Should Know
- Create a textbox with your text. Click «Shape Format» → «Text Direction» → «Rotate all text 90°».
- To make text vertical, drag the right-center circle of your textbox towards the left.
- To mirror text, right-click the textbox, then «Format Shape». Click «Effects», then input «180» into the X or Y Rotation field.
-

1
-
2
Create a textbox. To do this, click the Insert tab in the top toolbar, then click the Text Box icon in the Text section. You can select Simple Text Box from the presets.
Advertisement
-
3
Insert your text. Input the text you want to edit. You can copy and paste from another program into Microsoft Word.
- Make sure the textbox is still selected.
-
4
Click Shape Format. You can find this at the top toolbar, next to Help. Alternatively, double-click the edge of the textbox to be quickly redirected.
-
5
Click Text Direction. This will be in the Text section.
- A drop-down menu will open.
-
6
Select Rotate all text 90°. You can also select Rotate all text 270° if you want the top of the words to face the left side.
- Your text will be rotated.
- You can continue to edit your text in the textbox. The words will type in the direction set.


Advertisement
-
1
Open a project in Microsoft Word. This looks like a W on top of a blue square. Microsoft Word is available to install for Windows and Mac.
- You must have a subscription to use Office 365.
-
2
Create a textbox. To do this, click the Insert tab in the top toolbar, then click the Text Box icon in the Text section. You can select Simple Text Box from the presets.
-
3
Insert your text. Input the text you want to edit. You can copy and paste from another program into Microsoft Word.
- Make sure the textbox is still selected.
-
4
Click and drag the center circle on the right towards the left. With the textbox selected, you’ll see four circles at each point of the text box and one circle between each corner. Use the middle circle on the left side.
- As you drag the text box towards the left, it will become smaller. The text inside will adjust to fit the size of the box in vertical format.
- Make sure not to drag past the point of the left line. This could result in the words returning to their normal positions.
-
5
Remove the textbox lines (optional). If you want to remove the lines around the text, double-click the textbox to return to the Shape Format tab.
- Click Shape Outline, then select No Outline from the drop-down menu.
- The textbox lines will be hidden. Be sure to save your document if you need to return to it later.


Advertisement
-
1
Open a project in Microsoft Word. This looks like a W on top of a blue square. Microsoft Word is available to install for Windows and Mac.
- You must have a subscription to use Office 365.
-
2
Create a text box. To do this, click the Insert tab in the top toolbar, then click the Text Box icon in the Text section. You can select Simple Text Box from the presets.
-
3
Insert your text. Input the text you want to edit. You can copy and paste from another program into Microsoft Word.
- Make sure the textbox is still selected.
-
4
Right-click the textbox. A drop-down menu will open.
-
5
Click Format Shape…. This will be at the very bottom of the menu.
- A panel will open on the right side.
- If you don’t see this option, make sure the textbox is selected, not the text.
-
6
Click the «Effects» icon. This looks like a pentagon, next to the paint bucket icon.
-
7
Enter 180 in the X or Y field. If you want your text to be mirrored left-right, enter 180 into the X Rotation field. If you want your text to be mirrored up-down, enter 180 into the Y Rotation field.
- The changes will take effect immediately.
-
8
Remove the textbox lines (optional). If you want to remove the lines around the text, double-click the textbox to return to the Shape Format tab.
- Click Shape Outline, then select No Outline from the drop-down menu.
- The textbox lines will be hidden. You can print your document if needed.


Advertisement
-
1
Open a project in Microsoft Word. This looks like a W on top of a blue square. Microsoft Word is available to install for Windows and Mac.
- You must have a subscription to use Office 365.
- Use this method if you want to change your paper orientation from portrait to landscape.
-
2
Click Layout. This will be in the top toolbar, between Design and References.
-
3
Click Orientation. You can find this at the top, next to Margins.
- A drop-down menu will open.
-
4
Click Landscape. Your Microsoft Word document will change to landscape orientation.
- If you change back to portrait mode after inputting text, the text will follow the portrait mode orientation. It will not save in its landscape position.


Advertisement
Ask a Question
200 characters left
Include your email address to get a message when this question is answered.
Submit
Advertisement
Thanks for submitting a tip for review!
About This Article
Article SummaryX
1. Click Insert.
2. Click Text.
3. Click Text Box.
4. Click Draw Text Box.
5. Click and drag a text box.
6. Type text into the box.
7. Hover the mouse over the box outline.
8. Click the rotation icon and drag in any direction.
Did this summary help you?
Thanks to all authors for creating a page that has been read 1,279,441 times.
Is this article up to date?
Microsoft Office supports right-to-left functionality and features for languages that work in a right-to-left or a combined right-to-left, left-to-right environment for entering, editing, and displaying text. In this context, «right-to-left languages» refers to any writing system that is written from right to left and includes languages that require contextual shaping, such as Arabic, and languages that do not. You can change your display to read right-to-left or change individual files so their contents read from right to left.
If your computer doesn’t have a right-to-left language version of Office installed, you will need to install the appropriate language pack. You must also be running a Microsoft Windows operating system that has right-to-left support and enable the keyboard language for the right-to-left language that you want to use.
Windows requirements for working with text in right-to-left languages
Before you can use any of the right-to-left features in Microsoft Office, or even correctly display right-to-left scripts, you must add an input language in Windows and enable the keyboard layout for the right-to-left language.
If you’re using Windows XP, you must first go to the control panel home page in Windows XP to install the required Microsoft Windows complex scripts. After installing the complex script software, add the keyboard language. For more information, see Set up Windows XP for multiple languages.
Select or change the display language
Depending on how you prefer to customize your computer, you can use one language for your display (menus, dialog boxes, and wizards), and type in a different language as needed. If you want to both type in a right-to-left language and see the menus and online Help in that language, you can set the Office display to that language preference. For more information, see Add a language or set language preferences in Office.
Several right-to-left features in Office programs use the display language to determine the screen layout direction and the alignment of text within dialog boxes. When you specify a right-to-left user display language in the Set the Office Language Preferences dialog box, the layout of menus, dialog boxes, and wizards are right to left, but the Microsoft Windows settings remain left to right.
For example, when Arabic is selected as the display language in Office (but not in Windows), you see the following display:

Although the menus are displayed right to left, the title bar remains in English and the Close, Minimize, and Maximize buttons remain in the upper-right corner as they do in a left-to-right interface. If the Windows display is set up for a right-to-left language, the language in the title bar would also be translated, and the Close, Minimize, and Maximize buttons would be in the upper-left corner.
If you work primarily in a left-to-right language but sometimes need to insert text in a right-to-left language, you can select English (U.S.) for your display language and type in the right-to-left language in most of the Office programs when you want to. To do this, Set right-to-left text, bullets, and numbering for the editing area and enable the keyboard layout.
You can change the text direction from within a Microsoft Office program by choosing the Right-to-left paragraph button in the Paragraph group on the Home tab (this only appears if you have a right-to-left language enabled). Even after changing your display to appear in a right-to-left language, you must have the appropriate keyboard language enabled to enter text in that language.
If your usual display language is English but you want to change it to an Arabic dialect, do the following:
-
Open an Office program file, such as a Word document.
-
On the File tab, choose Options > Language.
-
In the Set the Office Language Preferences dialog box, in the Editing Language list, choose the Arabic dialect you want, and then choose Add.
-
In the Choose Editing Languages table, make sure the newly added Arabic dialect is highlighted and then choose Set as Default.
Important: When you set the newly assigned editing language as the default, it becomes the default for all your Microsoft Office programs.
Add a keyboard language
To type using a particular language’s native keyboard, you must install the appropriate language pack for that language. You also must add the appropriate keyboard layout. After adding a keyboard layout for another language and selecting the Language bar to be Docked on the taskbar, a language indicator appears on the taskbar  and displays the current keyboard language. For example, the language indicator for Arabic is
  .
.
Note: The Language bar appears automatically after adding a keyboard for at least one language in addition to English in the Text Services and Input Languages dialog box in Microsoft Windows.
-
To display the Language bar when the language indicator on the taskbar is visible, choose the language indicator, and then choose Show the Language bar.
-
To display the language indicator on the taskbar when the Language bar is visible, choose Minimize.
-
To select the keyboard for a different language, choose either the name of the current language (on the Language bar) or the language indicator, and then choose the name of the other language.
For instructions about how to enable a language-specific keyboard, see Enable or change the keyboard layout language.
Depending on which languages you need, you can enter text by using the Character Map or ASCII character codes. To learn how to automatically insert ASCII character codes by using the Symbol gallery, see Insert symbols.
If you only want to enter a little text in another language and don’t want to switch your keyboard, you can use the Character Map, one of the Accessories in Microsoft Windows. You can choose a character from one of the right-to-left or left-to-right language font pages, copy it to the Clipboard, and then insert the character in your document. For more information about how to use the Character Map to enter text, see Using special characters (Character Map).
Display text right-to-left text
Text direction refers to the reading order, alignment, and overall layout of screen elements. When right-to-left and left-to-right texts are used together in the same sentence, paragraph, or control, the combined text is known as «mixed.»
When the Office program is set up and enabled to display a right-to-left text environment, the appearance of the cursor varies to indicate a left-to-right run  or
or  , or a right-to-left run
  . The cursor can either move according to the direction of the language recognized (logical movement) or move to the next visually adjacent character (visual movement).
Set right-to-left text, bullets, and numbering
When both left-to-right and right-to-left languages are enabled, the Left-to-right and Right-to-left paragraph buttons are enabled on the ribbon in most of the Office programs. When you click these buttons, you can change the direction of text when entering and justifying text.
Note: In Microsoft OneNote, the Left-to-right and Right-to-left buttons are available by clicking the Paragraph Alignment arrow.
About text direction in Access or Excel
Text in a cell or field can be left-aligned, center-aligned, or right-aligned. In some programs, such as Access and Excel, text can also have Context text direction.
When text has Context text direction, text and numbers are aligned according to the language of the first character entered — for example, text in the cell or field is right-aligned if the first character is in a right-to-left language, and left-aligned if the first character is in a left-to-right language. You can override Context text direction and switch to Left, Center, or Right text direction for individual objects.
Many right-to-left or combined right-to-left and left-to-right programs apply context rules that control text direction and the reading order of text. Boxes, lists, and other elements control the context rules for the text that they contain.
The context rules for the reading order and text direction are as follows:
-
If the first strong character is left-to-right, the reading order is also left-to-right, and the text is left-aligned.
-
If the first strong character is right-to-left, the reading order is also right-to-left, and the text is right-aligned.
-
If only neutral characters are typed, both the reading order and the direction follow the paragraph direction (which can be either left-to-right or right-to-left) until the first strong character is typed.
Any time you change the first strong character from a left-to-right language to a right-to-left language (or vice versa), both the reading order and the text direction change accordingly.
Select ligatures and diacritics
In Word and other word-processing programs, you can select, find, and replace individual diacritics and individual Arabic characters regardless of whether they are ligated. Each ligature and diacritic is managed as a discrete unit of a right-to-left language word.
The following example shows selecting an Arabic word that has a three-character ligature (as each character is selected).
Save right-to-left text in HTML format
You can save files in HTML format for posting on the Web in right-to-left or left-to-right direction. Webpages that have right-to-left direction are marked by using the standard HTML DIR attribute in the HTML file. If the web browser that you’re using recognizes the DIR attribute, the page displays in a right-to-left direction. If your web browser does not recognize the DIR attribute, the page is displayed in a left-to-right direction.
Tip: To view right-to-left webpages, use a browser that recognizes the DIR attribute, such as at least Microsoft Internet Explorer 3.02 Middle East, Microsoft Internet Explorer 4.01 for Complex Scripts, or at least Microsoft Internet Explorer 5.
Sort data lists in right-to-left order
Right-to-left sort order is applied wherever possible. This applies to data lists in table view, card view, and icon view, and to group-by lists, contact lists, folder lists, and address lists.
Note: Some server-side views might not sort data according to right-to-left sort order because they follow supported server-side sort orders.
Issues with finding and replacing characters in right-to-left, Indic, and Southeast Asian languages
Indic languages, such as Bengali, Gujarati, Hindi, Kannada, Malayalam, Marathi, Punjabi, Tamil, and Telugu, might not be compatible with every search option in Microsoft Office. For example, the Match case and Find whole words only options do not work for scripts in these languages. However, these options can still be used to find matching Latin characters in the same document.
Right-to-left languages
Find-and-replace features search text in the order in which the text is entered in the Search box, instead of the order in which it is displayed. Therefore, you can search for strings of right-to-left text, regardless of the direction of the paragraph. You can also search for matches of characters with or without kashidas (Arabic only), Alef Hamzas (Arabic only), or diacritics, such as the Hebrew niqqud. For a list of ASCII and Unicode character codes, see Insert ASCII or Unicode Latin-based symbols and characters.
Indic languages
Indic languages, such as Bengali, Gujarati, Hindi, Kannada, Malayalam, Marathi, Punjabi, Tamil, and Telugu, might not be compatible with every search option in Microsoft Office. For example, the Match case and Find whole words only options do not work for scripts in these languages. However, these options can still be used to find matching Latin characters in the same document.
Southeast Asian languages
Southeast Asian languages, such as Thai and Vietnamese, might not be compatible with every search option in Microsoft Office. For example, the Match case and Find whole words only options do not work for Southeast Asian characters. However, these options can still be used to find matching Latin characters in the same document.
Code pages
Microsoft Office programs support the following code pages that are available to Arabic, Hebrew, and mixed-text users:
Arabic
Each code page is identified by a unique code page number. The code page (CP) for Arabic is CP 1256.
-
UTF-8, ISO 8859-6, DOS-720, ASMO-708
Dari, Pashto, Persian, Uighur, and Urdu use the same code pages as Arabic.
Hebrew
Each code page is identified by a unique code page number. The code page (CP) for Hebrew is CP 1255.
-
UTF-8, ISO 8859-8, DOS-86
Yiddish uses the same code page as Hebrew.
by
·
Published April 11, 2014
· Updated May 30, 2018
Today i visited one of our clients office, one of their employ was having strange problem, whenever she opens the MS word, the cursor is always indent to the right side, and she have to manually select left to right writing style every time,
i searched everywhere on internet , but couldn’t find any solution
so i found permanent solution by myself, with this method you can chose both ways writing style , i mean RTL or LTR as default writing style,
here is easy 6 step guide with imagesNote: This solution may be applied in Office 2010 & 2013, not tested by myself but i hope it should work.
1. Normally when you open office, you see styles toolbar on top, make sure you selected the normal style. click on down arrow for more options, as you can see in the image below

2. when you will click on it a new smaller windows will open and then click on “apply styles” button, see in the image below

3. when you will click on this button you will see a small windows, with 2 button, dont change anything here,
just click on “Modify” button, see image below

4. then again a new windows should open to modify the style, in this windows you have to chose either LTR or RTL.after modifying your style make sure you chose “New Document Based On This Template ” at the bottom of this windows. see in the image below.

5. after you click OK button a small windows will appear again click ” Reapply ” button, and close that small window. see image below

6. after this set this style as default , see in the image below

So now every time you will open MS office your cursor should be at you chosen position.
Mutahhar Bashir
Passionate blogger, have excellent problem solving skills, quick learner, love to accomplish difficult tasks, improving my skills while helping others through this blog.
I have on my Mac — Microsoft Word 2010, now … I want to write from right to left ( not only text-align right, but direction ltr).
I’ll be thankful for some help. 
![]()
Graham Perrin
7,61314 gold badges80 silver badges241 bronze badges
asked Jun 13, 2011 at 18:10
![]()
5
Word 2016 has this language feature if you can upgrade Word.
There’s no right-to-left support for Microsoft Word 2011 for Mac presently. There are several alternative word processors that do support RTL, however:
- OpenOffice
- Mellel
- Nisus Writer Pro
![]()
bmike♦
228k78 gold badges404 silver badges876 bronze badges
answered Jun 13, 2011 at 19:13
![]()
michaelmichaelmichaelmichael
3,4111 gold badge26 silver badges24 bronze badges
5
After endless effort to find a solution the only thing that worked for me was opening another document that was already saved with a paragraph direction from right to left. Worked like a charm!
![]()
nohillside♦
93.2k39 gold badges198 silver badges243 bronze badges
answered May 13, 2014 at 19:20
![]()
1
You must log in to answer this question.
Not the answer you’re looking for? Browse other questions tagged
.
Not the answer you’re looking for? Browse other questions tagged
.
|
04-23-2012, 11:39 PM |
|
Oh, there is a simpler solution, but you probabaly won’t like that:
__________________
|

