
by CJ McDaniel // February 28
Writing is fun when you have the right tools. These could be a pen (if you’re writing directly on paper), an iPad or laptop. Microsoft has also blessed writers with a powerful tool that comes packed with diverse features. It’s called the “Microsoft Word.”
Other word processing and document processing platforms are now available. But it’s so obvious that many of us, including myself, may have to stick with Microsoft Word for a long time.
But now here’s a tricky question for every Microsoft Word user and those interested. Here it is.
How many Microsoft Word pages equal a book page?
Now let’s rephrase the question. How can you tell how many Microsoft word pages you have to write to make a book page? The answer isn’t direct. Many factors play a crucial role when it comes to determining the number of Microsoft Word pages that can make a book page.
Factors That Determines Microsoft Word Pages That Equals A Book Page
Several factors determine the number of MSWord pages that forms a book page. The answer is not set in stone. It can be one, two, three or more. Let’s find out factors that plays a crucial role.
The Size of the Paper:
There are several paper sizes on Microsoft Word, ranging from letter-sized papers — the default paper size—measured at 21.59cm x 27.94cm to JIS B5 measured at 18.2cm x 25.7cm. The most commonly used paper size is the A4, measured at 21cm x 29.7cm, and a page contains roughly five hundred to two hundred words.
The Font/ Font Size:
Most fonts on Microsoft Word, like the Aharoni fonts, are bigger and bolder than fonts like Calibri, which is lighter. Therefore, an Aharoni font at size 12 consumes more space than a Calibri font of the same size.
Margin Size:
Microsoft Word has a default margin size of 1 inch from the top, bottom, and sides of the paper, but Word users have the freedom to adjust and customize the margin sizes according to their writing tastes.
Line Spacing:
Line spacing plays a considerable role. Single line spacing allows for more words to be included on a page but makes the word appear clustered; meanwhile, double line spacing gives room for the words to breathe but take up more pages.
Therefore, considering the factors stated above, if you make use of an A4 paper size using Times New Roman in Size 12, the default margin setting, and single line spacing, you should have roughly between 350-500 words on a single Microsoft Word page.
Other factors that contribute to the number of words in a single Microsoft Word page are the kerning, leading, word formatting, paragraphing, alignment, etc
Therefore, there is no hard and fast rule for his many words that it can contain on one Word page as it varies all the time. Once the number of words on a Word page has been deduced, it should be easier to determine how many of these words would make up a book page.
To do that, one thing that has to be considered is what a book page is. Books come in different forms, volumes, sizes, shapes, and designs depending on economic and aesthetic elements. One of the things that are considered is the number of pages that will make up a book.
A Handy Tip: A book page refers to the front and back of a leaf of one paper in the book. A book page is a bit smaller in size than a Microsoft Word page.
Microsoft Word Pages And Book Pages
Book pages are entirely different from Microsoft Word pages. Consequently, the layouts and arrangements are reasonably distinct. Depending on the book’s context and what you intend to portray, there are different types of formats to depict that feeling.
The book format used for an academic paper to educate readers would vary in size and style from a fictional novel set in the middle ages or the biography, painting a picture of the life and times of a famous person.
The paper size used for a fictional novel or a novella falls within the range of 4.25 x 6.87, or 5 x 8 inches. The paper size of a non-fictional book ranges from somewhere between 5.5 x 8.5 and 7x 10 in inches.
To know how many pages a book would contain, however, an author must first have an idea of the range of the number of words they intend to write. For every genre of writing, there is a stipulated word count range that is presupposed.
Since the information in non-fictional and academic works is supposed to be sharp, precise, and straight to the point, the word count range is somewhere between fifty thousand to seventy thousand words. It can contain approximately two hundred pages. Still, because a work of fiction involves creating an imaginary world out of nothing, the content is usually more voluminous.
Hence, the word count range is approximately one hundred thousand words which can account for about three hundred and twenty to three hundred and fifty pages of a book.
Also, while there is a sizeable difference between a Microsoft Word page and a book page, the same rule that applies in Microsoft Word applies to a book page regarding the factors that determine how many words can be contained in a book page. Hence, things like margins, spacing, fonts, and font size also have to be considered when writing a book.
Generally, it has been deduced that the approximate amount of word you can get from a Word document using a font like Times New Roman in a 12 point font size, single line spacing, and justify alignment is five hundred words.
One Microsoft page is closely determined to be about 1.5 to 1.75 book pages, but this is solely an assumption. It is important to reiterate that certain factors play an essential role in determining the word count and book pages.
Many components are examined to determine how many Microsoft Word pages make up a book page. Still, because there is no universal style for writing and no fixed rule for formatting a book, we might never really be able to reach a resolute conclusion to this debate.
However, it is possible to have an idea of how many word pages equal a book page. The first thing you need to do is determine the number of words on the Microsoft Word page. Then, choose the trim size that you favour for your book.
For example, you can choose to use a trim size of 5.5 x8.5 inches for a fiction book. If you decide to use a 12 point font size for your book, divide your word count by three hundred—this is the approximate amount of pages your book is deduced to have based on the trim size— and you should have a rough analysis of how many pages your book would contain.
Please note that this formula is only meant to give you an idea of the number of pages your book will comprise. Nonetheless, the general perception is that smaller trim sizes produce more book pages than bigger trim sizes.
For example, if you employ a trim size format of 6×9 inches for your book using twelve-point font size, you are expected to divide your word count by four hundred and twenty-five to get your approximate amount of pages.
Does The Number Of Microsoft Word Pages Or Book Pages Matter?
Most times, publishers turn down a book solely because the word count does not meet the quota of readers’ expectations. Also, if a book is too voluminous, it might incur extra costs in terms of printing, shipping, and sales, and this might contribute to the loss of your customer base because most readers would only spend a certain amount on the books they want to read.
However, if your book is below the appropriate word count, it might be straightforward to overlook it as uninteresting and devoid of information. Therefore, one of an author’s objectives is to make sure their book is the right length.
Conclusion
By considering the various factors mentioned here, you can understand how many Microsoft Word page would make up a book page. You can also use information stated on this post to figure out the number of pages too.
Asides from Microsoft Word, these tips are useful even if you are using other word processors like Google Doc and the likes. This is because they are not so different from using Microsoft Word.

CJ grew up admiring books. His family owned a small bookstore throughout his early childhood, and he would spend weekends flipping through book after book, always sure to read the ones that looked the most interesting. Not much has changed since then, except now some of those interesting books he picks off the shelf were designed by his company!
Create a booklet or book
-
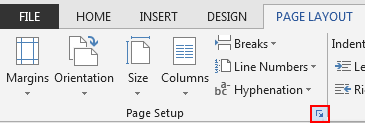
Go to Layout and select the Page Setup dialog launch icon at the bottom-right corner.

-
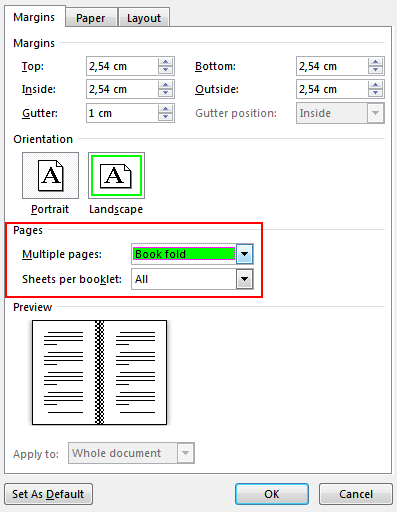
On the Margins tab, change the setting for Multiple pages to Book fold. The orientation automatically changes to Landscape.
Tip: If you have a long document, you might want to split it into multiple booklets, which you can then bind into one book. Under Sheets per booklet, choose how many pages to print per booklet.
-
Select and increase the value of Gutter to reserve space on the inside fold for binding.
-
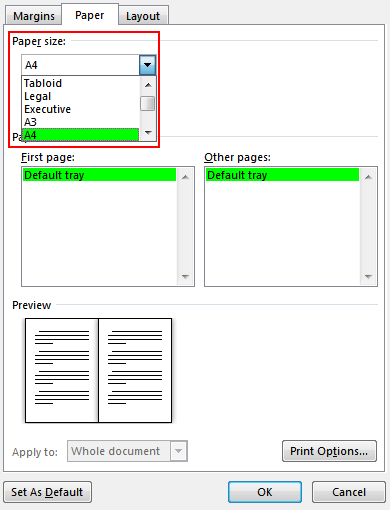
Go to the Paper tab and select the Paper size. The final size of the booklet is one half width of the paper size.
Tip: You can add many embellishments to your booklet’s appearance. For example, to add borders to every page, on the Layout tab of the Page Setup window, click Borders.
-
Click OK. If your document already has content, the text is formatted automatically, but you might need to adjust objects like images and tables manually.
Print settings for booklets
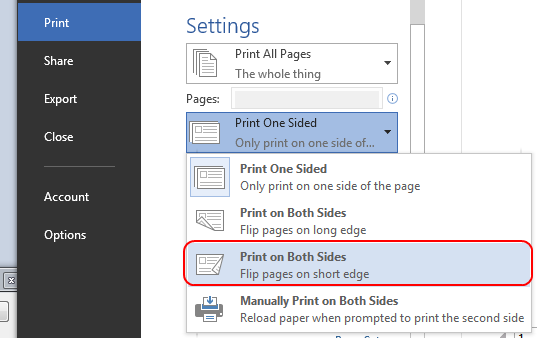
When you print the booklet, check the print settings to make sure you print on both sides of the paper and flip the papers correctly for the printing to work as intended.
-
Go to File > Print.
-
If your printer supports automatic printing on both sides, change Print One Sidedto Print on Both Sides. Choose the option Flip pages on short edge to avoid printing the second side of each sheet upside down.
-
If your printer doesn’t support automatic printing on both sides, select Manually Print on Both Sides, and feed the pages back to the printer when prompted. To avoid pages from printing upside down, flip the sheets on the short edge of the paper according to your printer’s instructions.
Tip: For a professional touch, consider adding page numbers in the header or the footer. For more info, see Add page numbers.
See Also
Create a booklet using a Word template
Booklet: Page numbering tips.
Create different headers or footers for odd and even pages
Get Microsoft publishing templates
Create a booklet or book
-
Go to Layout > Margins > Custom Margins.
-
Change the setting for Multiple pages to Book fold. The orientation automatically changes to Landscape.
Tip: If you have a long document, you might want to split it into multiple booklets, which you can then bind into one book. Under Sheets per booklet, choose how many pages to print per booklet.
-
To reserve space on the inside fold for binding, increase the width of the Gutter.
-
You can add many embellishments to your booklet’s appearance. For example, to add borders to every page, on the Layout tab of the Custom Margins window, select Borders.
-
Select OK.
If your document already has content, the text is formatted automatically, but you might need to adjust objects like images and tables manually.
-
Go to File > Page Setup and check the paper size. Keep in mind that the final size of the booklet is one half of the paper size. Make sure your printer is stocked with paper of the right size.
Print settings for booklets
When you print the booklet, check the print settings to make sure you print on both sides of the paper and flip the papers correctly for the printing to work as intended. If your printer supports automatic printing on both sides, follow these steps.
-
Click File > Print.
-
Under Two-sided, select Booklet.
Tip: For a professional touch, consider adding page numbers in the header or the footer. For more info, see Add page numbers.
Note: If your printer doesn’t support automatic printing on both sides, you’ll need to print each page manually.
See Also
Create a booklet using a Word template
Booklet: Page numbering tips.
Create different headers or footers for odd and even pages
Get Microsoft publishing templates
Sometimes you have to know how many MS word pages are equal to a book page, which is essential for your business exactly. Here are some simple ways to calculate the page count of your manuscripts before printing. So no need to wait for the answer to the question of how many Microsoft word pages equals a book page? Let’s start at…
Book page count by Microsoft word count:
Click anywhere on the MS word page, at the bottom left of your page you can see the word count of your page. As you already know the number of words on a single page, just follow the below methods to determine the number of pages.
Choose your book trim size

This is necessary to choose a trim size first as the beginning. So select the size below, which is most accurate for your book.
For fiction: 5.5″ x 8.5″
For nonfiction: 6″ x 9″
Now the question appears what the trim size of larger books is? Basically, it is the same as regular fiction and non-fiction books. Books with larger formats use the same text block as a small format. User can use 6″ x 9″ formulae for larger format books as an initial point.
Calculate page numbers:
With appropriate word count and given formulae below, you can calculate the number of pages of your expected book.
Calculation of 5″ × 8″ book page count:
- If 12 pt font size divide your word count by 300
- If 11 pt font size divide your word count by 350
- If 10 pt font size divide your word count by 400
Calculation of 5.5″ × 8.5″ book page count:
- If 12 pt font size divide your word count by 350
- If 11 pt font size divide your word count by 425
- If 10 pt font size divide your word count by 475
Calculation of 6″ × 9″ book page count:
- If 12 pt font size divide your word count by 425
- If 11 pt type – divide your word count by 500
- If 10 pt type – divide your word count by 600
You can see here smaller trim size creates more pages than larger trim size for the same word count. Those formulas are based on
- A standard margin (0.75″ on all sides except 0.85″ at the top)
- A standard spacing
- A standard typeface (serif typeface) for book publishing.
- The same type of size
Number of pages calculations in front and back
Some pages are not included in word count which includes a title page, appendix, copyright page, table of contents, dedication, quote or epigraph, references, list of illustrations, acknowledgments, and other pages. Those are not included in the manuscript but must be part of your book.
Page count calculation for the Image
There are possibilities that you may add images to your book. If it is, images may keep influences on word count. Here we are proposing some formulas to estimate how many extra pages images will require.
- At first, you have to count your images and divide them into rough sizes: full page, half page, and quarter page
- Secondly, you have to estimate the number of pages based on these figures. For example:
- 5 images @ 1 page = 5 pages
- 20 images @ 0.5 page = 10 pages
- 20 images @ 0.25 page = 5 pages
Now you can calculate the approximate number of pages of your book. You have to just add the number of pages from
- Word count
- Front and back matter
- Images.
How many pages are 20000 words in a book?
Basically, 20000 words generate 40 pages single-spaced or 80 pages double-spaced. In this case, our assumption is a standard margin (1”) with a 12pt font size, and the font is Times New Roman or Arial. Page count mostly depends on your font-style, margins, and paragraph space setting.
How many book pages are 50,000 words?
A book with 50,000 words tends to 100 pages single-spaced or 200 pages double-spaced with previously said standard assumption as the same count depends mostly on how dense the content is, the font and spacing, any images or graphics that may appear in the text.
Word documents that contain more than 50000 words can be nobles or other published books. One important fact is if there exist so many dialogues and long paragraphs in that book, it may take more pages. Finally, the thickness of a book depends on the paper.
How many pages are 80000 words in a book?
You may have already known that the number of words count varies with different factors. A novel is what it is. Each chapter is the length it needs to be. Still in confusion about the desirable word count for your book?
Make a book list of your genre and buy at least 10 of them. Or you can check in the library if available. The next step is to survey their lengths according to word count. One book page could be 250 words.
So 80000 words generate 320 pages book with standard assumption. The practice of this idea gives you practical ideas on book-length expectations in the market. Please don’t forget to read our another article, Microsoft Word Won’t Open
How many book pages are 10,000 words?
Normally single spaced 1000 words make 20 pages and double spaced 10000 words can make 40 pages approximately. That mostly depends on the type of your word processor setting and how you format your work.
Our approximation is based on the standard format, as previously said. The page count will vary according to margin, font style, paragraph spacing, and multiple spaces after one period. You can check our other post Spell Check not working in Word.
Although we try to make our attempt more accurate as possible, it won’t be perfect. All the issues we represented above are just estimations. Those are not a hundred percent accurate results. The page count will make you realize your book will be thinner or thicker than your assumption.
Counting all those, increasing a bit of page size may decrease the cost-effective number of pages. That information may help your book designer in various ways.
Thanks for being with us for a long time. We hope this post is helpful to you.
If you want to write a book, you’ll need book writing software that’s up to the task. Yes, you can invest in dedicated book writing programs. But you don’t have to: a great writing tool is likely already at your fingertips, if you know how to write a book using Microsoft Word.
There’s a lot of book writing software out there. Many of these programs claim to offer intuitive use, help with organization, and even say they’ll keep you from distraction. The options can be overwhelming.
There’s still one tried and true option if you’re not interested in all that (or can’t afford the fancier programs): Microsoft Word.
I write most of my books in Microsoft Word, not to mention short stories. Here’s the rundown of how to write a book using Microsoft Word, and why that might be your best choice.
The Benefits of Microsoft Word for Book Writing
You most likely already have it. And so does everybody else. Word is the standard, accepted across platforms, and is easy to access for non-writers (your beta readers). It’s been around forever, so most people know how to use it.
There are book formatting templates. A ton of them. They have them for short story format and for manuscript format. Personally, I don’t use those templates, but they’re a nice baseline for beginners, or even old hats that just want to hurry up and write without setting up their document first.
It’s simple and uncluttered. There are a ton of apps and programs out there that will allow you to keep your plot structure notes close at hand, to rearrange your chapters with the click of a button, and to keep detailed character profiles right in the program. That’s all a little too much for me. I prefer handwritten notes and nothing else blocking my screen while I’m typing and Word gives me that.
It is worth noting that if all that sounds appealing to you, you can do those things in Word as well, it just won’t be as fancy as other programs.
Hey writer: the first step to writing a book is coming up with a great idea. The second step is figuring out the structure of your book. If you have an idea but you need help with the structure, check out our new book The Write Structure. In it, we’ll teach you how to apply timeless story structure principles to write a great book. Get The Write Structure »
How to Navigate Your Book in Microsoft Word
When you have a 90,000-word manuscript, navigating becomes daunting. Luckily there are ways to do it in Word that make it easier if you know where to look.
Chapter Headings
Word doesn’t divide your book into chapters for you like some other programs. There will be no easy way to click and drag to rearrange chapters.
What I recommend is using headings. On Word’s Home page, there are already standard headings listed. Definitely mess with them and change their formatting to something simple.
No one needs giant blue words as their chapter headings. (You can set your simpler formatting as your default style as well, so you don’t have to change it every time.)
Make the title or number of each chapter a heading. Then you can easily bounce around to different chapters through the navigation pane (check the Navigation Pane box under the View menu).
Bookmarks
These basically work the same way as headings, but they’re for anywhere in your document. Have a specific scene you need to do more research on? You can bookmark it and jump back to it later.
Bookmark by going to the Insert menu and clicking Bookmark. Name your bookmark and voilà. You can delete them easily from the popup menu as well.
Find and Replace
CTRL+F brings up a simple search option to find words and phrases in your document. CTRL+H brings up the full gambit. From that dialogue box, you can search, replace certain words with others (i.e. Jennifer now becomes Julia all through the manuscript), and go to any page, section, heading, bookmark, etc. that you need to go to.
Microsoft Word is Great for Editing Your Book
Word has a ton of options for editing your story, including comments, tracking changes, and comparing documents. All of these are under the Review menu.
I use the comments feature to make notes to myself where I need to recheck facts or add description later. It’s easy to navigate through the comments with the search feature or the buttons under the Review menu. Don’t forget to remove them all before saving your document as a PDF or sending it off to an editor.
Tracking changes is awesome and a lot of editors (for short stories anyway) will use this feature to collaborate with you during the editing process. You can accept or reject changes or even revert back to the original.
Finally, make sure you have grammar and spellcheck on! Grammar check even allows you to check style issues (like how to use an ellipsis correctly) and passive voice. It’s invaluable.
Pro tip: To keep you on track while you’re writing, turn off some of the more fine-tuning features of grammar check. There’s nothing that will ruin your flow more than a bunch of underlining you feel like you need to take care of immediately. I recommend running the full check when you’re done (or at least done for the day).
Formatting Your Book in Microsoft Word
Make sure you’re familiar with standard manuscript format for novels and formatting short stories. Take a look at those links and follow their instructions. You don’t want to get rejected out of hand because you tried some weird formatting that’s hard to look at.
One of the biggest gripes I see from editors is writers using spaces to indent paragraphs. Don’t do this. It makes it super hard on them when they’re putting a book together. Instead, use the ruler in Word (under the View menu) or the paragraph settings (under the Home menu) to adjust your tabs. A half inch is standard.
Despite what most of us were taught in school, the standard is now one space after periods, not two. This is another sticking point with editors, so don’t do it. If you’re used to two, there’s a grammar check feature in Word you can turn on to highlight every time you use two spaces.
Finally, use the page break option to break for a new chapter, not enter or a million spaces. You can find the page break under the Insert menu.
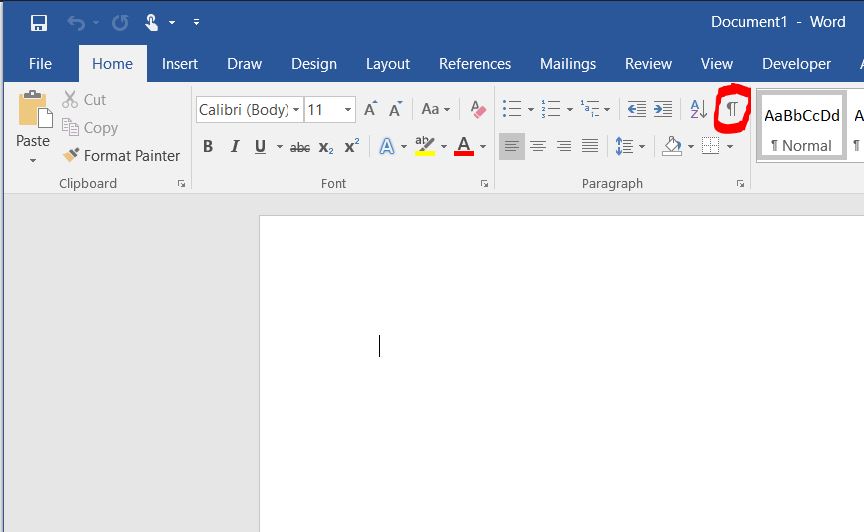
Pro tip: When in doubt about your formatting, you can turn on the Show/Hide option under the Home menu (looks like a paragraph symbol) to see all your formatting symbols.
Now That You’ve Mastered Microsoft Word, Go Write Your Book
Don’t let choosing writing software stagnant your writing. Don’t overthink it. You don’t need to keep up with the Joneses with the latest writing technology that’s trotted out on tech forums and in writing chats.
The important thing about writing a book is actually writing it. No fancy book writing software is going to help you with that.
So get writing!
Ever used Word to write a book? Do you have any more tips for how to write a book using Word? Let me know in the comments!
PRACTICE
Take fifteen minutes to write. Just write. Don’t worry about page setup, formatting, or which program you’re going to use. Open up Word or get out a pen and paper if you’d like!
When you’re done, share your writing in the comments. Don’t forget to comment on your fellow writers’ work!

Sarah Gribble
Sarah Gribble is the author of dozens of short stories that explore uncomfortable situations, basic fears, and the general awe and fascination of the unknown. She just released Surviving Death, her first novel, and is currently working on her next book.
Follow her on Instagram or join her email list for free scares.
When writing your book you should separate the writing from the formatting. Write first, format later. However, there are some steps you can make when writing your book in Microsoft Word that will make the job of formatting your book easier and help prevent errors in the book formatting process.
Below are some of the most common issues I see in book documents sent to Jera Publishing to be formatted.
- Extra spaces or tabs used to create an indent for the first line of each paragraph
- Two or more paragraph breaks between paragraphs
- Two spaces between sentences instead of one
- Manual line breaks at the end of each line of text in a paragraph
- Two line breaks inserted at the end of a paragraph instead of a paragraph break
- Using tabs at the end of a paragraph to create a new paragraph
- Creating complex tables, charts, graphs at a page size larger than your book size
- Using only a paragraph break to create a scene break between paragraphs
- A series of paragraph breaks (created by hitting the enter key) to force text onto the next page
If you have a document already written in Word and it has some of these issues, don’t worry too much! There are many Find and Replace commands you can use in Word to correct them, which I detail below. If you are not sure which find/replace command to use to correct your issue, leave a comment describing your scenario and I will reply back with a Find and Replace for you to try.
The first thing you will want to do is view the formatting markup by toggling on the Show / Hide icon in Microsoft Word. The location for this in Word 2016 is shown below. If you can’t find it, you can also press Ctrl + * as a shortcut. This will show you all of the formatting markup in your Word document.
1. First Line Paragraph Indentation:
You should not use extra spaces or tabs to indent the first line of each paragraph. When formatting, your book designer will use style settings to set the first line paragraph indent. If you used extra spaces or tabs to create a first line indent in your document, they will need to delete them from your document.
WRONG:
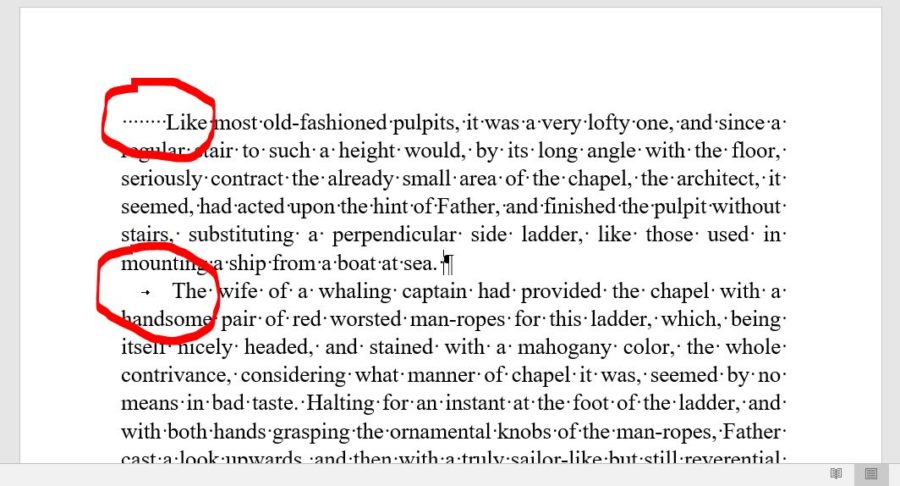
The reason many people do this is the default Normal style in Microsoft Word is set to not indent the first line of a paragraph. Authors mistakenly create an indent manually so they can distinguish paragraph breaks without realizing they should be modifying the style to do this automatically.
Instead of adding the indentation with spaces or tabs, you should be changing the style settings for the style you are using for the chapter text, if using Word’s defaults this would likely be the Normal style.
In Word 2016 right-click the Normal style in the Home / Styles ribbon. Click on Modify.
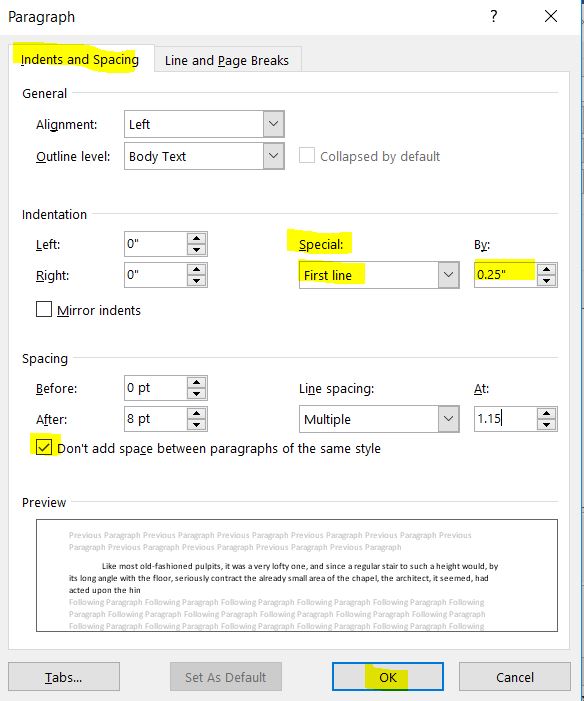
Click on the Format button at the bottom of the window that appears. Select Paragraph….
Under the Indents and Spacing tab, navigate to Special: First Line and enter 0.25. Then check Don’t add space between paragraphs of the same style.
Now, when you type your text into Word using the Normal style and hit Enter to start a new paragraph, it will be indented automatically and no extra spaces or tabs should be used. When you send your document to your book designer they will not need to remove any tabs or spaces, which will speed up your job and reduce the possibility of errors (plus your designer will love you).
See also: Word Tips For Writers: First Line Indents Using Styles (video)
2. Extra Paragraph Breaks Between Paragraphs
Another common mistake authors make is adding two or more paragraph breaks between paragraphs (hitting Enter more than once at the end of a paragraph). Microsoft Word’s default Normal style in older versions of Word is set to not add space between paragraphs by default so authors learned to add them in manually with extra paragraph breaks instead of modifying the style settings.
WRONG:
Your book designer will need to remove all of these extra paragraph breaks in order to format your book properly.
A single paragraph break should always be used between paragraphs, not two or more. If you find it easier to write with extra space between paragraphs then you can change the style of Normal (or whatever style you are using for your chapter text) to add the space for you automatically. Using the directions above, uncheck the Don’t add space between paragraphs of the same style and make sure Auto is selected for space above and below.
Then, when you hit the Enter key to start a new paragraph using that style, Word will automatically add extra spacing between the paragraphs.
3. Inserting Two Spaces Between Sentences
When people were using manual typewriters, they were taught to hit the space bar twice between two sentences. However, with modern word processors (such as Microsoft Word) and fonts, only a single space should be inserted between sentences. If you place two between sentences, it will throw of justification and the book designer will need to remove the extra spaces.
To fix, use Find / Replace to replace each instance of two spaces with one.
See: Word Tips for Writers: Replace Two Spaces with One in our video library.
4. Inserting a Manual Line Break at the End of Each Line
This mistake is also commonly done by people who learned to type on a manual typewriter. You should not create a line break by hitting the Enter key at the end of each line of text; instead, let the text wrap naturally to the next line.
WRONG:
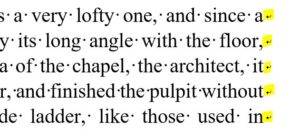
To fix this issue, I suggest doing a Find / Replace for a manual line break ( ^l ) and replace with a space. You would then want to follow up with a Find / Replace for two spaces with one.
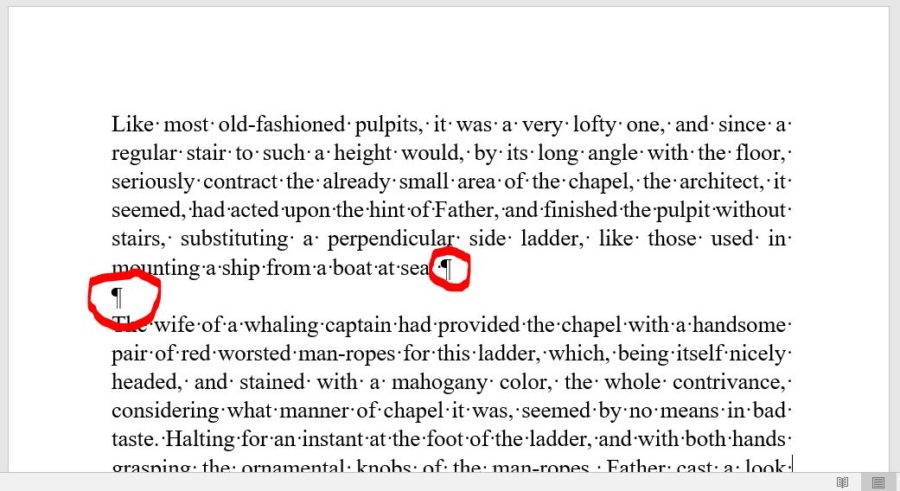
5. Using Two Line Breaks at the End of Each Paragraph
Do not use a line break or multiple line breaks (pressing Ctrl + Enter) and the end of a paragraph. The proper method is to hit the Enter key once to create a paragraph break.
WRONG:
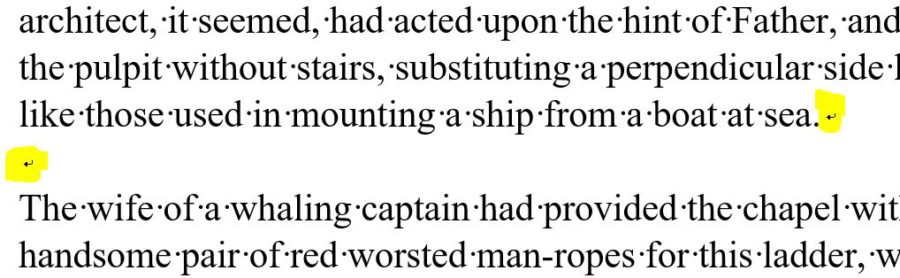
CORRECT:
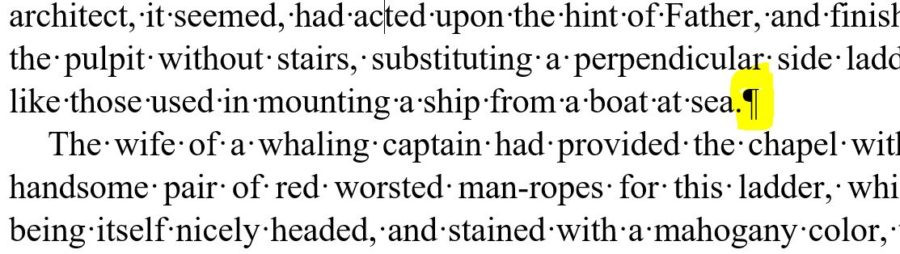
To fix this issue, try doing a Find / Replace for two manual line breaks ( ^l^l ) and replace with a single paragraph break ( ^p ).
6. Using Tabs at the End of a Paragraph to Create a New Paragraph
When you reach the end of a paragraph, do not hit the tab key to move your cursor to the next line to start a new paragraph. Instead hit the Enter key once to start a new paragraph.
WRONG:
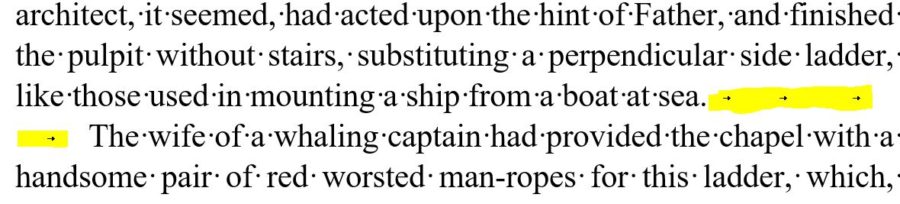
CORRECT:
Fix this issue by searching for a tab ( ^t ) and replacing with a paragraph break ( ^p ). Then search for two paragraph breaks ( ^p^p ) and replace with a single one ( ^p ). You will need to run the last search multiple times until Word says that no results are found. Keep in mind that this will remove ALL tabs in your document, so be careful!
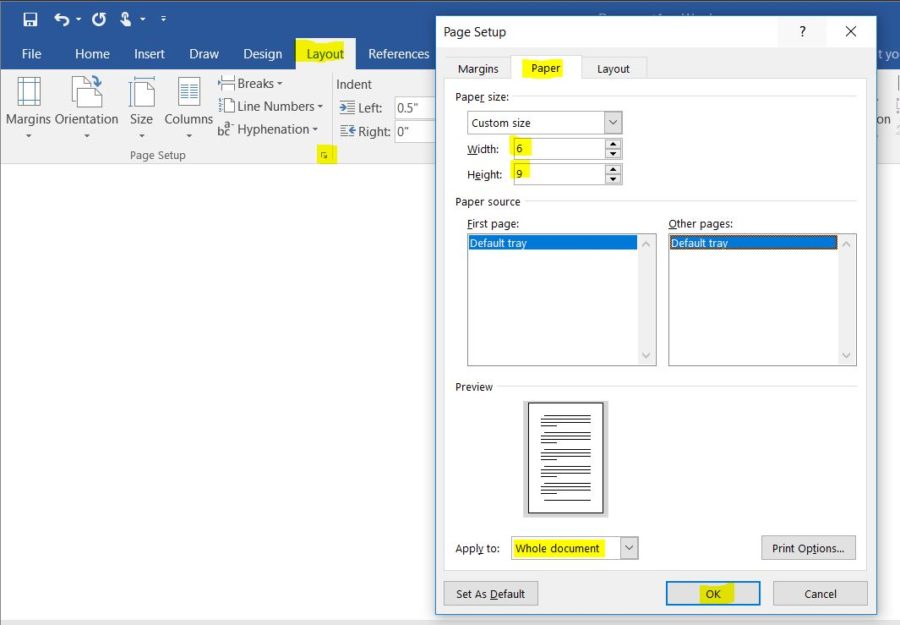
7. Creating Complex Tables, Charts, Graphs or Similar at a Page Size Larger Than What Your Book Will Be
Most likely, you will write your book in a typical 8 1/2 x 11 page size in Word. However, if you will be creating tables, charts, graphs, or other similar items you should consider setting your page size to the size you plan on printing your book. If you create your tables or other elements for an 8 1/2 x 11 page and your book is smaller, such as 5 x 8, they might need to be redone to fit the smaller size.
You can set your page size under the Page Setup window in Word.
8. Using an Extra Paragraph Break (Or More) to Create Extra Space for a Scene Break
It is common when writing to create a visual break when there is a scene change or time lapse in a book. Often this is done by simply inserting a few extra paragraph breaks before the new scene. The problem occurs when your book is sent to your book designer. One of the first things they will usually do is a find and replace to replace two paragraph breaks with a single one, as placing two paragraph breaks between paragraphs is a common mistake they correct for (see #2). If you only use paragraph breaks to create the scene breaks they can be lost in the formatting process.
I suggest inserting a few asterisks (***) between scene breaks, then instructing your designer on how you want them to appear visually. This way, they will not accidentally be lost and it will be clear to your designer where the scene break is located and they can format it accordingly.
9. Using Paragraph Breaks to Create a Page Break
Do not use a series of paragraph breaks, created by hitting the Enter key, to force a page break.
WRONG:
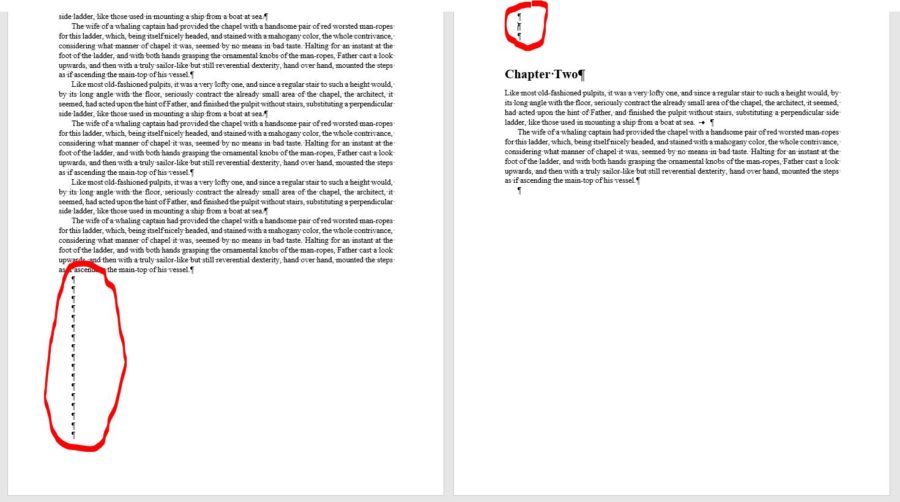
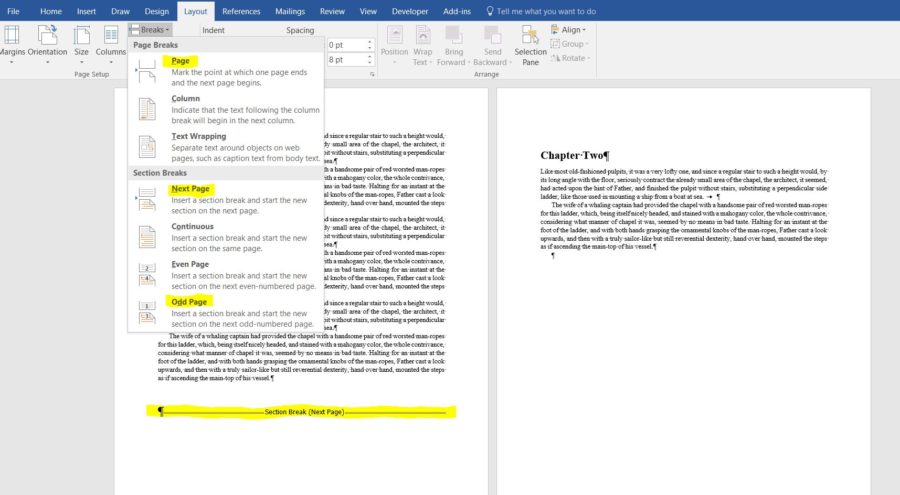
Instead, insert a hard page break (Insert > Page break) or a Section Break (Layout > Breaks > Next page or Odd page to start a new page. Also, only place a page break in places such as between chapters, after title pages, etc., not between pages within a chapter.
CORRECT:
I hope this helps! Please leave a comment if you have a question about fixing an issue in your Word document.
Be sure to check out our Word Tips for Writers videos for even more tips on working with Word when writing your book.