
Overview
This chapter summarizes the differences in use between OpenOffice.org Writer 2.0 and Microsoft Word (various versions). The information in this chapter builds upon the information given in General Differences in Use between OpenOffice.org and Microsoft Office.
The Writer interface
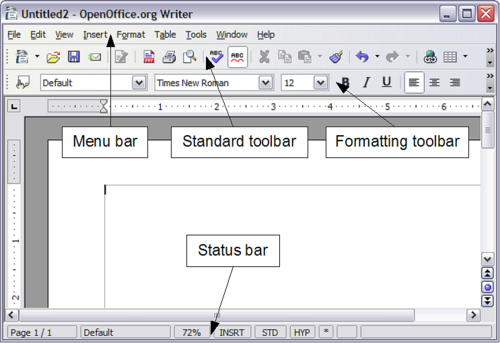
The main Writer workspace is shown below. The menus and toolbars are similar to those in Word, with the exceptions described in this chapter.
Views
Word has 4 or 5 views, depending on the version (here with the 5 views of Word 2003) called:
Normal: Recommended view (by Microsoft) for doing most of your typing and editing. Writer has no real equivalent view.
Print Layout: This shows the document (more or less) as it will print. This is the closest equivalent to the Print Layout view in Writer.
Web Layout: In theory, this shows the document as if viewed on-line. Writer’s equivalent is a view option called Web Layout. To access this view, select View > Web Layout.
Reading Layout: Reading Layout view formats your screen to make reading your document more comfortable. Writer has no real equivalent view, but you can go to View > Zoom to choose the view that will fit the best for you on your screen.
Outline: For working with heading hierarchies. Outline view displays the document in outline form. Headings can be displayed without the text. If you move a heading, the accompanying text moves with it. Writer has the Navigator, which is detailed later in this chapter.
Writer also has an HTML source view that only shows when editing an HTML document. To access this view, select View > HTML Source.
When field codes are turned on, Writer displays less information about the field than does Word. To get detailed information, right-click the field > Fields (or select the field > Edit > Fields).
Status bar
The status bar is similar to Word’s except it does not show the current location of the cursor on the page (row number and number of characters across). It does however show the position within a table in spreadsheet style format; for example, Top left cell =A1.
Navigator
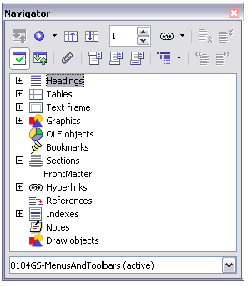
Word does not have a similar concept to the Navigator and, in the author’s opinion, it is such a useful tool it is worth taking the time to learn more about it.
To launch the Navigator, press F5 or click the Navigator icon on the Standard toolbar.
To get a detailed description of what each of the buttons does, press Shift+F1 and hover the cursor over the buttons.
The Headings at the top of the list box in the Navigator are the closest equivalent to Word’s Outline View.
With the List Box on there is a drop-down list box at the bottom of the Navigator. With this list box it is possible to select any of the open Writer documents so that their contents are available for dragging and dropping. What happens when the selection is dropped is determined by the drag mode specified by the Drag Mode button. Click the arrow next to the Drag Mode button to see the available options (Insert as: Hyperlink, Link, or Copy).
When viewing a master document, the Navigator is quite different. For more details, see Working with Master Documents in the Writer Guide.
| Graphics, indexes, OLE objects, and references cannot be dragged and dropped when in the Insert as link or Insert as Copy modes. |
Formatting and Styles
For a more detailed guide on using styles, see “Use templates and styles” and the Chapter Working with Styles in the Getting Started Guide, or Chapter Introduction to Styles and Chapter Working with Styles in the Writer Guide.
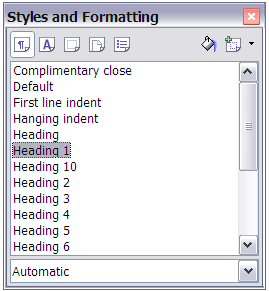
Use Shift+F1 to check out the different buttons on the Styles and Formatting window. Use the bottom list box to change the style group that is displayed. For example, Applied Styles only shows those styles that have been used in the document.
Keyboard
When some text has a character attribute at the end of a paragraph (say bold or a hyperlink) but the new text does not require that attribute, press the right arrow key before typing.
Deleting paragraph marks: pressing Delete at the end of a paragraph effectively moves the text of the following paragraph into the current paragraph, and the paragraph formatting of the top paragraph remains. Press Backspace at the start of a paragraph and the format of the lower paragraph remains.
| An aid to remember this is: the format of the paragraph that has the cursor will be the format of the combined paragraph, unless the current paragraph is empty; in that case, backspacing will leave the previous paragraph’s formatting. |
Control+Home when in tables: In Word, Control+Home always positions the cursor to the top of the document; in Writer Control+Home first positions the cursor at the start of the cell, then at the start of the table and then the start of the document. Control+End has similar behavior.
How to select multiple parts of the text
To copy, cut, format, or delete parts of the text in different areas of the document, use:
- Control + selection with one click, double-click or sliding.
or
- Click once on the field “STD” (STanDard) in the status bar. The field now shows “EXT” (EXTended selection).
- Another click and it changes to “ADD” (ADD to selection).
| The ADD mode is the equivalent to Control + click and EXT is equivalent to Shift + click. |
Multiple selections and tables
The following limitations apply when selections involve tables:
- It is possible to have multiple selections within a cell, or even parts of other cells, but only one selection is possible that involves at least one entire cell.
- A selection that starts in a table cannot extend beyond the table.
- A selection that starts outside a table will include the entire table (that is, a selection cannot start outside a table and also contain a portion of a table).
Comparison of shortcut keys
Word vs Writer different default shortcut keys (incomplete)| Function | Word standard shortcut | Writer standard shortcut |
|---|---|---|
| Underline words not spaces | Control + Shift + W | No equivalent |
| Thesaurus | Shift + F7 | Control + F7 |
| Show/hide non-printing characters | Control + Shift + * | Control + F10 |
| Hanging indent | Control + T | No standard equivalent |
| “Unhang” indent | Control + Shift + T | No standard equivalent |
| Indent | Control + M | No standard equivalent |
| UnIndent | Control + Shift + M | No standard equivalent |
| Superscript | Control + Shift = | Control + Shift + P |
| Subscript | Control + = | Control + Shift + B |
| Remove character formatting | Control + Space bar | Right-click > Default |
| Remove paragraph formatting | Control + Q | Right-click > Default |
| Jump to previous edit point | Shift + F5 | Need to use the reminders on the Navigator |
| Shift paragraph up | No equivalent | Control + Up |
| Shift paragraph down | No equivalent | Control + Down |
| Find | Control + F | Control + F |
| Replace | Control + H | Control + F |
See AltKeyHandler.sxw (available from http://homepages.paradise.net.nz/hillview/OOo/) for macros that extend Writer’s key shortcut ability – including the indent functionality similar to that provided in Word.
Mouse use
Some differences are:
- No quick selection of paragraphs or lines by clicking to the left of the paragraph.
- Control + click does not select a sentence, but a triple-click does (a quadruple-click selects the paragraph).
Tables
Selections involving tables
Tables are like one special paragraph so when selecting text using the keyboard (Shift+arrow) from, say, above the paragraph, the whole table is selected followed by the line below it.
The location for displaying the table grid when a table has no borders is not particularly intuitive: use Tools > Options > OpenOffice > Appearance and select the Table boundaries checkbox.
Heading rows
By default new tables have a heading row. This default behavior can be changed by Tools > Options > OpenOffice Writer > Table.
When creating a new table using Table > Insert Table, you can choose to turn on or off the heading row, by checking Heading in Options > OpenOffice Writer > Table
Whether the top row(s) repeat at the start of each new page can be altered by selecting the relevant top row(s) > Table > Repeat on each page. This does not change the format of the rows, only whether they repeat at each page break.
Adjusting column widths and row heights using the keyboard
The different methods of adjusting the column width available via Tools > Options > OpenOffice Writer > Table are:
- Fixed: Overall width of the table stays the same, but the adjoining column shrinks or grows correspondingly.
- Fixed Proportional: The current column and the end column change by corresponding amounts, keeping the overall width the same.
- Variable: Only the current column changes so the overall width of the table changes.
Use Alt and the arrow keys as follows to adjust the width of columns (or height of rows):
- Alt and arrow keys adjusts the right side (bottom for rows).
- Alt+Shift and arrow keys adjusts the left side (top for rows).
- Alt+Control+left or right arrow keys adjusts the current cell only.
Copying and pasting cells in a table
Writer never inserts new rows or columns when pasting data, it always overwrites the contents of the cells. This makes it clear as to what will happen. To avoid overwriting cells, first insert the required number of rows or columns.
Inserting and deleting rows or columns
If you use Table > Insert > Row or Table > Insert > Column or right-click > Insert Row or Insert Column, you can choose whether to insert before or after the current row or column.
The icons on the Table toolbar insert below for rows and to the right for columns (opposite of Word).
| This is a surprising inconsistency as Calc inserts above and to the left. |
In Linux, to insert rows or columns using the keyboard: Alt+Insert > arrow key (this is hold down Alt and Insert keys together, release the keys, then press the arrow key). To delete rows or columns using the keyboard: Alt+Delete > arrow key. The insertion or deletion is in the direction of the arrow key. For example, Alt+Insert > Up inserts a row above the current row.
Equal row heights and column widths
On the Table toolbar there is a long click button called Optimize. The Optimize button becomes active when more than one cell is selected. This presents a tear-off menu for easily adjusting row heights and column widths to being the same.
Splits and merges
Merge cells last, as you would in Word.
To merge cells: Select cells to be merged > Table > Merge cells (or use the Merge cells button on the Table toolbar).
To split cells: Select merged cells > Table > Split cells (or use the Split cells button on the Table toolbar).
To split a table (horizontally): Table > Split Table.
To join two tables, they need to be one below the other, then Table > Merge Table. If there is a table above and below the current table you will be prompted for which one you wish to join.
Sorting
To sort a table:
- Select the cells to be sorted; do not include the headings. The option to sort only becomes available when something is selected.
- Tools > Sort.
Unlike Word, the sort dialog uses column number rather than the names of the column.
Entering numbers and formulas
Unlike Word, tables in Writer can work much more like spreadsheets. For example, calculated values change as the data is input (no more selecting and pressing F9 to update calculated results).
With number recognition turned on, when entering a number Writer will automatically format the number according to a specified number format. To change this behavior, right-click when the cursor is in a table and click on Number Recognition to deselect it.
To change the number format, select the cells, Table > Number Format.
To enter a formula like SUM():
- Select the cell where the result is to go.
- Press F2 to display the Formula bar.
- Click and hold the Formula button to display the formula menu.
- Select the desired function (list separator is for separating constants, for example =mean 5 | 12 | 20).
- Click and drag on cells to input ranges.
- Press Enter to finish.
To enter a formula like “this cell plus that cell minus that cell”:
- Select the cell where the result is to go.
- Press F2 to display the Formula bar.
- Click on a cell.
- Type or select the desired operator.
- Click on the next cell.
- Repeat steps 4 and 5 until done.
- Press Enter to finish.
Creating a table from a data source
To create a table from a data source:
- Display the Data source viewer (F4).
- In the Data explorer window, navigate to the desired table or query.
- Drag the name of the table or query into the document.
- Select the desired fields and set other properties as required in the dialog.
Charts in Writer
Charts copied from a Calc spreadsheet and pasted into a Writer document are, by default, embedded objects. Unlike doing this in Microsoft Office, only the relevant data for the chart is embedded. In Microsoft Office copying and pasting a chart also embeds it, but if the Excel workbook was 8 MB in size (not unrealistic for a spreadsheet) then each chart pasted into a Word document would increase the Word document by 8 MB.
Linking of charts does not exist.
Customizing the user interface
Most functions are found in similar places in both programs, but a few are slightly different, and the degree of control varies. Table 6 summarizes where to find the setup choices.
Customizing the user interface| To do this | In Word | In Writer |
|---|---|---|
| Change measurement system | Tools > Options > General | Tools > Options > OpenOffice Writer > General |
| Turn off Auto completion | Not applicable | Tools > AutoCorrect. In the Word completion tab, deselect Enable word completion. |
| Turn on/off Help Agent | Help > Microsoft Word Help > Options | Tools > Options > OpenOffice > General |
| Set up document window (rulers, status bar, default toolbars, etc) | View > select required items | View > select required items |
| Customize toolbars | Tools > Customize | Tools > Customize |
| Customize menus | Tools > Customize | Tools > Customize |
| Display font names in their font (in toolbar drop-down font list) | Tools > Customize > Options | Tools > Options > OpenOffice > View, select Show preview of fonts |
| Always show full menus (include unavailable and little-used items) | Tools > Customize > Options | Tools > Options > OpenOffice > View, select Show inactive menu items |
| Show/hide ScreenTips (ToolTips) on toolbars | Tools > Customize > Options | Tools > Options > OpenOffice > General |
| Always create backup copy | Tools > Options > Save | Tools > Options > Load/Save > General, select Always create backup copy |
| Autosave every x minutes | Tools > Options > Save | Tools > Options > Load/Save > General, select Save AutoRecovery information every, and choose a time in the Minutes list |
| Show paragraph marks, tabs, etc. | Tools > Options > View | Tools > Options > OpenOffice Writer > Formatting Aids, select required items |
| Change file locations | Tools > Options > File Locations | Tools > Options > OpenOffice > Paths |
| Change user information | Tools > Options > User Information | Tools > Options > OpenOffice > User Data |
| Set up AutoCorrect and AutoFormat options | Tools > AutoCorrect Options | Tools > AutoCorrect > Options, select required items |
Write, edit, and review documents
Most writing, editing, and reviewing techniques in OOoWriter are similar to those in Microsoft Word, but the details often vary.
Write, edit and review documents| To do this | In Word | In Writer |
|---|---|---|
| Jump quickly to other parts of a document | Edit > Go to | Edit > Navigator (or F5), double-click on required heading, figure, table, etc. |
| Choose language for spelling checker | Tools > Language > Set Language | Tools > Options > Language Settings > Language. (Note: OpenOffice.org has no grammar checker.) |
| Ignore some text when checking spelling | Select text; Tools > Language > Set Language > Do not check (or) Format > Style > Modify> Format > Language | Select text; right-click, Character > Font > Language = [None] or the real language of the selected text, if that is foreign. |
| Recheck spelling | Tools > Spelling & Grammar > Recheck Document | Always rechecks |
| Find and replace text, formatting, and styles | Edit > Replace > More; choices as needed | Edit > Find & Replace; details are a bit different |
| Use wildcards in find and replace | Edit > Replace > More > select Use Wildcards checkbox | Edit > Find & Replace, click on the More Options and select Regular expressions; wildcards themselves are different. See the section on Regular expressions in Chapter General Differences in use between Microsoft Office and OpenOffice.org. |
| Choose, create, or edit a custom dictionary | Tools > Options > Spelling & Grammar > Custom Dictionaries | Tools > Options > Language Settings > Writing Aids |
| Create exception (exclude) dictionary | File > New, type words, Save As > text only, file extension .EXC | As for custom dictionary, but after clicking on the New button, select Exception (-) in the New Dictionary dialog |
| Track changes (choose options) | Tools > Options > Track Changes | Tools > Options > OpenOffice Writer > Changes |
| Protect document for editing | Tools > Protect Document | Edit > Changes > Protect Records(Password needs to be at least 5 characters) |
| Mark and track changes | (Word 2000) Tools > Track Changes > Highlight Changes | Edit > Changes > Record |
| Insert comments associated with a change | Highlight text; Insert > Comment | Edit > Changes > Comment |
| Insert notes (comments not associated with a change) | Highlight text; Insert > Comment | Insert > Note |
| Show changes as pop-up text | Options > View > Screentips | Tools > Options > OpenOffice > General |
| Merge documents | Tools > Merge Documents | Edit > Changes > Merge Document |
| Accept or reject changes | View > Toolbars > Reviewing | Edit > Changes > Accept or Reject |
| Change document properties | File > Properties | File > Properties |
| Get a word count | Tools > Word Count | Tools > Word Count |
| Create AutoText entry | Select text; Insert > AutoText > New | Edit > AutoText (or) Control+F3 |
| Insert AutoText | Type shortcut and press F3 | Type shortcut and press F3; or type Name and press Enter. Writer distinguishes between the “name” and the “shortcut” of an autotext. Word does not. |
AutoText in Writer always ends with a paragraph mark. So for a short in-line shortcut, it is better to use AutoCorrect.
Control page layout
This section covers such things as margins, headers, and footers.
Writer and Word have somewhat different notions of page layout.
Word’s notion of page layout
Page layout is a property of the document as a whole. If you change the page layout (for instance, set the document to landscape), it changes for the entire document. You can then arrange for specific sections to have a different layout.
Writer’s notion of page layout
Page layout is a property of the page style (for example, First Page, Index and Default). If you change the page layout for one page style (for instance, set Default to have a header with page numbers), only that style will be affected.
Using page styles gives Writer some very useful features. For instance, you can define the First Page page style so that, after you have typed the first page, the style switches to Index (or any other style you choose). You can then set Index so that it is followed by Default.
Comparison for page layout
Control page layout| To do this | In Word | In Writer |
|---|---|---|
| Define margins | File > Page Setup > Margins | Format > Page > Page |
| Specify different headers and footers on first, odd, and even pages | File > Page Setup > Layout > Headers and Footers section | Format > Page, select required items Define different page styles for First, Left (even), and Right (odd) pages, using Header and Footer tabs |
| Edit headers and footers | View > Headers and Footers, then you can type or insert fields; you can also double-click in existing header or footer regions | After you have specified Header and Footer areas for a page, they are always active. Single-click to type or insert fields |
| Change from roman to arabic page numbers in the footer of a page | Insert a section break, deselect “Same as Previous” in the second section, define a new footer with page numbers restarting at 1 in Arabic numerals | Insert a manual page break and apply a different page style |
| Use paragraph styles for page layout | Can define paragraph styles with offset from left margin, with heading styles aligned left or right | Can define paragraph styles with offset from left margin, with heading styles aligned left or right |
| Use columns for page layout | Insert continuous sections to switch from single to multiple columns on one page | Format > Page > Columns (or)Insert > Section > Columns (or) Format > Columns |
| Use frames or text boxes for page layout | Frames are used in Word 97 but mostly replaced by text boxes in Word2000 and 2002; can be linked to flow text from one to next, as in a newsletter | Insert > Frame (can link frames to flow text from one to next, as in a newsletter); “text boxes” are fields, not positioning devices |
| Use tables for page layout | Table > Insert > Table (use dialog to format) | Insert > Table (use dialog to format) |
| Put portrait headers on landscape pages | Use rotated text box linked to header | Use rotated text in a frame |
| Set first page number to greater than 1 | Insert > Page Numbers > Format | In first paragraph on first page, Format > Paragraph > Text Flow > Breaks, select Insert and With Page Style, choose the page style, specify the page number |
| View and edit facing pages | File > Print Preview; click Zoom button to enable editing | File > Page Preview; cannot edit when previewing, |
| Reduce page count by 1 | File > PagePreview, click ShrinkToFit button. | See http://homepages.paradise.net.nz/hillview/OOo/ShrinkToFit.sxw. |
Use templates and styles
Use templates and styles| To do this | In Word | In Writer |
|---|---|---|
| Find which template is associated with a document | Tools > Templates and Add-ins | File > Properties > General tab. |
| Specify default template | «Normal» template is default | File > Templates > Organize lets you set any template as default |
| Create a new template | File > Save As, set type to Document Template (.DOT) | File > Templates > Save |
| Edit a template | File > Open, choose template | File > Templates > Edit |
| Copy styles between templates | Tools > Templates and Add-ins > Organizer | File > Templates > Organize. There, you can copy styles with drag and drop between templates. |
| Create a new document from a template | File > New (opens a list of templates) | File > New > Templates and Documents |
| Apply a different template to a document | Tools > Templates and Add-ins > Attach, select template, Open | Start a new document based on the different template; copy contents of old document into new document. |
| Apply a style to text | (Word 2000) Select from Style List or Style dialog(XP) Can also use task pane. | Format > Styles and Formatting (or press F11), double-click the style in list; after the second use, paragraph styles appear in Apply Style list on the Formatting toolbar. |
| Change a style definition | (Word 2000) Format > Style > Modify; (XP) can also select in task pane and click Modify | Select a style in the Styles and Formatting window, right-click, and choose Modify. |
| Create a new style | Format > Style > New | Right-click in Styles and Formatting window, then click New. |
| Use outline numbering | Format > Style, select style > Format > Numbering | Tools > Outline Numbering |
| Drop caps | Format >Drop CapOne character only, can not be part of a style. | Format > Paragraph > Drop Caps tabDrop caps can be part of a style. Can be >= 1 char or word. |
Font size
When a style is based on another style, it is possible to set the font to being a percentage of the font size of the original style. In the font size field simply type the number followed by a percentage sign, for example 120%. This way, changes to the underlying style will be better reflected in this style. To change it back to being an absolute font size type the number followed by the characters “pt”, such as 12pt. It is also possible to specify how many points larger or smaller, for example +2pt for 2 points larger, or -2pt for two points smaller.
Space between paragraphs and page breaks before
In Writer, some paragraph properties behave differently to the way they behave in Word. Specifically:
- Space before if at the top of a page is ignored.
- Space between paragraphs: the greatest of space above and space below for the two paragraphs is applied.
- Page break before: if at the top of a page, does not create a blank page.
This makes using styles possible without having to apply direct paragraph formating to fix issues afterwards.
Fields
For a comparison of fields between Writer and Word, see Chapter Sharing Files with Microsoft Office Users.
Use of fields| To do this | In Word | In Writer |
|---|---|---|
| Insert a field | Insert > Field(or) CTRL + F9 for blank field | Insert > Fields and choose the requested field. |
| Define a number range field | Insert > Field, use SEQ (sequence) | Insert > Fields > Other > Variables tab, then Number range in the Type area |
| Insert a bookmark | Select text; Insert > Bookmark | Select text; Insert > Bookmark |
| Insert a cross-reference to a bookmark | Insert > Cross Reference, choose Bookmark as type | Insert > Cross Reference > Bookmark[1] |
| Insert a cross-reference to a heading | Insert > Cross Reference, choose Heading as type | Either bookmark the heading or use Insert > Cross Reference > References tab > Set Reference to mark the heading, then Insert > Cross Reference > References tab > Insert Reference. |
| Insert a cross-reference to a figure or table | Insert > Cross Reference, choose type | Insert > Cross Reference > References tab > Insert Reference > Figure (or Table) |
| Use conditional content | Use IF or other fields, or styles (all workarounds) | Insert > Fields > Other > Variables (among other ways) |
Work with large or complex documents
Major differences exist in the use of master documents. The table does not attempt to summarize all these differences.
Work with large or complex documents| To do this | In Word | In Writer |
|---|---|---|
| Create a table of contents, list of figures, or an alphabetic index | Insert > Index and Tables | Insert > Indexes and Tables > Indexes and Tables |
| Insert index entries | ALT + SHIFT + X | Insert > Indexes and Tables > Entry |
| Create a bibliographic database | Need to use other package | Tools > Bibliography Database |
| Insert bibliographic references into text | Link to field in database | Insert > Indexes and Tables > Bibliography Entry |
| Insert footnotes and endnotes | Insert > Footnote | Insert > Footnote |
| Insert other files | Insert > File, choose Insert or As Link | Insert > File |
| Cross-reference between documents | Use Includetext fields | Currently have to remember the name of the set reference. Reference will show correctly when in master document. (Or use the OutlineCrossRef3-fr-3 macro available from[1]http://ooomacros.org/ user.php#113812. |
| Use master documents | Some experts do not recommend using Master Documents in Word. | File > Send > Create Master Document; use the Navigator (F5) to insert subdocuments. |
Work with graphics
Most graphics work should be done outside Word or Writer, with the graphic files embedded or linked to the Word or Writer file. However, you can do some simple graphics using the drawing tools in Word or Writer. This table covers the basics.
Work with graphics| To do this | In Word | In Writer |
|---|---|---|
| Create Drawing objects | (Word 2000) View > Toolbars > Drawing; (XP) Insert > Picture > New Drawing | Click Show Draw Functions icon in the Standard toolbar. |
| Combine graphics objects and drawing objects | (Word 2000) Edit > Picture > Reset Picture Boundary; (XP) Use drawing canvas | Place all objects in a frame |
| Insert graphics files into a text document (embed or link) | Insert > Picture > From File, choose Insert or As Link | Insert > Picture > From File |
| Anchor graphics | Format > Picture > Layout > Advanced > Picture Position | Use icons on the Drawing Object Properties or Frame toolbar (these toolbars replace the Formatting toolbar when a drawing object or frame is selected) or right-click and choose from pop-up menu, or click Format > Picture |
| Wrap text around graphics | Format > Picture (or Object) > Layout | Use icons on the Frame toolbar, or right-click and choose from pop-up menu, or click Format > Picture > Wrap |
| Crop graphics | Format > Picture > Crop, (or) click Crop tool on Picture toolbar | Format > Picture > Crop(No tool for dragging crop area) |
| Create captions for graphics | Select graphic; Insert > Reference > Caption | Select graphic; Insert > Caption |
| Annotate graphics | Use drawing objects; group, or place in frame or on drawing canvas (XP) | Place all objects in a frame |
| Insert watermark | Format > Background > Printed Watermark > Picture (or Text) Watermark | Format > Page > Background tab or create drawing object, Wrap > In Background, Anchor > To Page |
Mail Merge
Mail merging is significantly different in Writer to Word. See Chapter Using Mail Merge in the Writer Guide.
Envelopes
Adding an envelope
Insert > Envelope
Removing an envelope
- Place the cursor at the beginning of the envelope page.
- If the Styles and Formatting window is not open, press F11 or use Format > Styles and Formatting to display it.
- Change to the Page Styles option. It is the fourth icon from the left.
- Double-click on Default.
- Remove the remaining elements that make up the envelope.
Page styles
Modify a page style
In Writer all pages have a page style. To modify the page style of the page where the cursor is positioned, use Format > Page.
| As the page style is being changed, all pages with this style will be changed as well. |
Create a style
To create a new page style:
- If the Styles and Formatting window is not currently displayed, press F11 to display it.
- Click Page Styles in the Styles and Formatting window (fourth icon from left).
- Right-click in a free area of the Styles and Formatting window > New.
The Page Style dialog
Click Format > Page. The Page Style window opens.
Organizer tab
Name: Nothing tricky here, simply a name to help the user remember what the settings are for.
Next style: This setting specifies what page style to use at the next page break (manual or automatic) for any page that has this page style. Set it to a different page style when the page style is only for one page (such as the first page of each chapter), otherwise this should be the same as Name to keep the same page style for the following pages.
Page tab
Paper format : Format is the paper size, the other settings have the same names in Word (on the paper size tab of page setup).
Margin : Same as for Word. Each setting represents the distance from the edge of the page, but see “Header and footer tabs” as the location of headers and footers relative to the margins is different.
Layout settings: Page layout is for specifying whether the page style is mirrored (used for left and right pages). There are more options here than in Word, but there is not a different first page option, that is because it is handled by the Next style setting as mentioned above in Organizer tab. Format refers to the format of page numbers. Register true is to make the text line up better at the top of the page (see help for more details).
Background tab
For specifying a background color or graphic (watermark). (An alternative to this with more flexibility is to create a drawing object, then use Arrange > To Background, Anchor > To Page.)
Header and footer tabs
Headers and footers are printed between the margins of the page rather than in the top or bottom margins as they are in Word. Another way of saying this is that for the top of a page the area between the edge of the page and the top margin is always blank, next is the header, and after the header, the main text area for the page.
Height: AutoFit height allows the header or footer to grow and shrink depending on their contents.
Spacing specifies the distance between the header/footer and the main text area on the page. Dynamic spacing allows the header/footer to expand into the area between the header/footer and the main text area.
The left and right margins are indenting from the margins of the page and cannot have negative values.
The More button is for specifying borders and backgrounds for the header/footer area. In some versions of Word this approach was used to create a watermark. Since it is possible to have graphics in the background of the main document, this is not the required way of having a watermark in Writer.
Borders, columns and footnote tabs
These tabs are for specifying the borders (lines around the outside), number and widths of newspaper style columns and defining the area for footnotes (if any) for the page style.
Page breaks and page numbering
Changing the style used for a page and changing the numbering sequence
To insert a page break and change page style or page numbering, method 1:
- Press Control+Enter.
- Cursor will be in the first paragraph of the new page.
- Format > Paragraph > Text Flow tab.
- Breaks will be enabled.
- Select With Page style, specify the page style to use and specify the page number to start from.
To insert a page break and change page style or page numbering, method 2:
- Insert > Manual Break
- By default it will specify Page breaks.
- Choose the page style in the Page style list.
- Select Change page number.
- Enter the new starting page number.
To insert page numbering
- Define a page style with header or footer turned on.
- Position the cursor in the header or footer (use the mouse or the shortcut keys Control+PageUp for Header or Control+PageDown for footer).
- Optionally type: Page <space>.
- Insert > Fields > Page Number.
- Optionally type <space> of <space>, then click Insert > Fields > Page Count.
To insert a field that calculates a different page count (for example, when you have a title page but want to have the remaining pages say page 1 of 2 (instead of page 1 of 3 ):
- Press F2 to display the text formula bar.
- Type =page – 1.
- Press Enter.
| Unfortunately this field does not automatically update, so press F9 to update it before printing. |
Page numbers on portrait and landscape pages in the same place and orientation
- Create a style for landscape pages. Set the margins for the landscape style such that they correspond with the portrait style when rotated (top = left, bottom = right, left = bottom and right = top). For page numbering on left, turn on headers; on right – footers. Select Use dynamic spacing.
- Create a style for the landscape header or footer based on the style for the portrait header or footer. (In the Styles and Formatting window, select the style that is used for the portrait header or footer > right-click > New.) Change the font position to 270°. If the page numbering is on the bottom choose left alignment, for the top choose right.
- Insert the page break and choose the page style just created (see above); do not change the numbering.
- In the relevant header/footer (as per step 1) insert the page number field.
Conditional text
In Word the only way to have conditional text is with the “if” field[2]. The equivalent in Writer is the field “Conditional text”.
To insert a conditional field in Writer: Insert > Fields > Other > Functions > Conditional text or Control+F2 > Functions > Conditional text.
There is also a field “Hidden text” that hides the text when the condition is true.
Working with the relevant fields for conditional text, both in Word and in Writer, means that only small amounts of text can be conditional. However, there are times when having whole paragraphs or sections of text be conditionally hidden is very convenient. Some examples:
A test so that the same document can be used for the test itself and for the model answers.
Technical documents where the same document with variations can be used for similar models of equipment.
Writer provides a field for conditionally hiding paragraphs and the ability to conditionally hide sections. Here is an example to show how this could be done:
- Ensure that hidden text is viewable: Tools > Options > OpenOffice Writer > Formatting Aids, select both “Fields: Hidden text” and “Fields: Hidden paragraphs”.
| Conditionally hidden sections are not visible regardless of these settings if the condition for hiding them is true. |
- At the top of the document: Insert > Fields > Other > Variables.
- Name: DocType. Value: Model Answers.
- At the start of a one paragraph answer: Insert > Fields > Other > Functions > Hidden Paragraph. For the condition type DocType == “Test” (To make this easier to insert repeatedly, create an autocorrect entry).
- For longer answers: Enter the model answer, select it, Insert > Section, select Hide, and enter DocType == “Test” for the condition.
- To print the document for a test, double-click the field at the top of the document created in steps 2 and 3, and change the value to Test. Print as usual.
| The field “Input list” has a name, but this is not a variable, so its value cannot be used in the condition. |
| To keep adding sections, it is easier if the selection does not include the last paragraph. But if the last paragraph is selected, simply move to the end of the document (Control+End ) and then press Alt+Enter. |
Master documents
OOo Help covers the basics of using master documents, or see Work with large or complex documents, or for even more information see Chapter Working with Master Documents in the Writer Guide.
It is possible to insert cross-references across subdocuments but the names of the references must be typed in rather than selected from a list.
Use Insert > Fields > Other > References.
A macro to help insert references to headings, including references across documents that will be subdocuments in a master document, is available in a document called OutlineCrossRef3-fr-3.available from https://sourceforge.net/projects/ooomacros/files/Heading%20Cross%20Referencer/Version%203-fr-3/OutlineCrossRef3-fr-3.zip/download.
| There is no way to have a landscape page in a subdocument remain as a landscape page when included in the master document. The workarounds are to have the landscape page be part of the master document rather than a subdocument or to have the entire subdocument as landscape. |
Cite error: <ref> tags exist, but no <references/> tag was found
In Word, you can select all text in a document (Ctrl+A), or select specific text or items in a table by using the mouse or keyboard. You can also select text or items that are in different places. For example, you can select a paragraph on one page and a sentence on a different page.
Select all text
-
Click anywhere within the document.
-
Press Ctrl+A on your keyboard to select all text in the document.
Select specific text
You can also select a specific word, line of text, or one or more paragraphs.
-
Place your cursor in front of the first letter of the word, sentence, or paragraphs you want to select.
-
Click and hold while you drag your cursor to select the text you want.
Other ways to select text
-
To select a single word, quickly double-click that word.
-
To select a line of text, place your cursor at the start of the line, and press Shift + down arrow.
-
To select a paragraph, place your cursor at the start of the paragraph, and press Ctrl + Shift + down arrow.
Select text by using the mouse
Select text in the body of a document
Notes: To select an entire document, do one of the following:
-
On the Home tab, in the Editing group, click Select, and then click Select All.
-
Move the pointer to the left of any text until it turns into a right-pointing arrow, and then triple-click.
|
To select |
Do this |
|---|---|
|
Any amount of text |
Click where you want to begin the selection, hold down the left mouse button, and then drag the pointer over the text that you want to select. |
|
A word |
Double-click anywhere in the word. |
|
A line of text |
Move the pointer to the left of the line until it changes to a right-pointing arrow, and then click. |
|
A sentence |
Hold down CTRL, and then click anywhere in the sentence. |
|
A paragraph |
Triple-click anywhere in the paragraph. |
|
Multiple paragraphs |
Move the pointer to the left of the first paragraph until it changes to a right-pointing arrow, and then press and hold down the left mouse button while you drag the pointer up or down. |
|
A large block of text |
Click at the start of the selection, scroll to the end of the selection, and then hold down SHIFT while you click where you want the selection to end. |
|
An entire document |
Move the pointer to the left of any text until it changes to a right-pointing arrow, and then triple-click. |
|
Headers and footers |
In Print Layout view, double-click the dimmed header or footer text. Move the pointer to the left of the header or footer until it changes to a right-pointing arrow, and then click. |
|
Footnotes and endnotes |
Click the footnote or endnote text, move the pointer to the left of the text until it changes to a right-pointing arrow, and then click. |
|
A vertical block of text |
Hold down ALT while you drag the pointer over the text. |
|
A text box or frame |
Move the pointer over the border of the frame or text box until the pointer becomes a four-headed arrow, and then click. |
Select items in a table
|
To select |
Do this |
|---|---|
|
The contents of a cell |
Click in the cell. Under Table Tools, click the Layout tab. In the Table group, click Select, and then click Select Cell. |
|
The contents of a row |
Click in the row. Under Table Tools, click the Layout tab. In the Table group, click Select, and then click Select Row. |
|
The contents of a column |
Click in the column. Under Table Tools, click the Layout tab. In the Table group, click Select, and then click Select Column. |
|
The contents of multiple cells, rows, or columns |
Click in a cell, a row, or a column and then hold the left mouse button down while you drag across all the cells, rows, or columns that contain the content that you want to select. To select the contents of cells, rows, or columns that are not next to each other, click in the first cell, row, or column, press CTRL, and then click the additional cells, rows, or columns that contain the content that you want to select. |
|
The contents of an entire table |
Click in the table. Under Table Tools, click the Layout tab. In the Table group, click Select, and then click Select Table. |
Select text in different places
You can select text or items in a table that are not next to each other. For example, you can select a paragraph on one page and a sentence on a different page.
-
Select some text or an item in a table.
-
Hold down CTRL while you select any additional text or item in a table that you want.
Select text in Outline view
To view your document in Outline view, click the View tab, and then click Outline in the Document Views group.
|
To select |
Move the pointer to |
|---|---|
|
A heading |
The left of the heading until it changes to a right-pointing arrow, and then click. |
|
A heading, its subheading, and body text |
The left of the heading until it changes to a right-pointing arrow, and then double-click. |
|
A paragraph of body text |
The left of the paragraph until it changes to a right-pointing arrow, and then click. |
|
Multiple headings or paragraphs of body text |
The left of the text until it changes to a right-pointing arrow, and then drag up or down. |
Notes:
-
In Outline view, clicking once to the left of a paragraph selects the entire paragraph instead of a single line.
-
If you select a heading that includes collapsed subordinate text, the collapsed text is also selected (even though it is not visible). Any changes that you make to the heading — such as moving, copying, or deleting it — also affect the collapsed text.
Select text by using the keyboard
Select text in the body of a document
Note: To select an entire document, press CTRL+A.
|
To select |
Do this |
|---|---|
|
One character to the right |
Press SHIFT+RIGHT ARROW. |
|
One character to the left |
Press SHIFT+LEFT ARROW. |
|
A word from its beginning to its end |
Place the insertion point at the beginning of the word, and then press CTRL+SHIFT+RIGHT ARROW. |
|
A word from its end to its beginning |
Move the pointer to the end of the word, and then press CTRL+SHIFT+LEFT ARROW. |
|
A line from its beginning to its end |
Press HOME, and then press SHIFT+END. |
|
A line from its end to its beginning |
Press END, and then press SHIFT+HOME. |
|
One line down |
Press END, and then press SHIFT+DOWN ARROW. |
|
One line up |
Press HOME, and then press SHIFT+UP ARROW. |
|
A paragraph from its beginning to its end |
Move the pointer to the beginning of the paragraph, and then press CTRL+SHIFT+DOWN ARROW. |
|
A paragraph from its end to its beginning |
Move the pointer to the end of the paragraph, and then press CTRL+SHIFT+UP ARROW. |
|
A document from its end to its beginning |
Move the pointer to the end of the document, and then press CTRL+SHIFT+HOME. |
|
A document from its beginning to its end |
Move the pointer to the beginning of the document, and then press CTRL+SHIFT+END. |
|
From the beginning of a window to its end |
Move the pointer to the beginning of the window, and then press ALT+CTRL+SHIFT+PAGE DOWN. |
|
The entire document |
Press CTRL+A. |
|
A vertical block of text |
Press CTRL+SHIFT+F8, and then use the arrow keys. Press ESC to turn off the selection mode. |
|
The nearest character |
Press F8 to turn on selection mode, and then press LEFT ARROW or RIGHT ARROW; press ESC to turn off the selection mode. |
|
A word, a sentence, a paragraph, or a document |
Press F8 to turn on selection mode, and then press F8 once to select a word, twice to select a sentence, three times to select a paragraph, or four times to select the document. Press ESC to turn off the selection mode. |
Select items in a table
|
To select |
Do this |
|---|---|
|
The contents of the cell to the right |
Press TAB. |
|
The contents of the cell to the left |
Press SHIFT+TAB. |
|
The contents of adjacent cells |
Hold down SHIFT while you repeatedly press the appropriate arrow key until you’ve selected the contents of all the cells that you want. |
|
The contents of a column |
Click in the column’s top or bottom cell. Hold down SHIFT while you repeatedly press the UP ARROW or DOWN ARROW key until you have selected the contents of the column. |
|
The contents of an entire table |
Click in the table, and then press ALT+5 on the numeric keypad (with NUM LOCK off). |
Stop selecting the entire word
-
Click the File tab, and then click Options.
-
Click Advanced.
-
Under Editing options, clear the checkbox next to When selecting, automatically select entire word.
Important:
Office 2007 is no longer supported. Upgrade to Microsoft 365 to work anywhere from any device and continue to receive support.
Upgrade now
Select text by using the mouse
Select text in the body of a document
Note: To select an entire document, do one of the following:
-
On the Home tab, in the Editing group, click Select, and then click Select All.

-
Move the pointer to the left of any text until it turns into a right-pointing arrow, and then triple-click.

|
To select |
Do this |
|---|---|
|
Any amount of text |
Click where you want to begin the selection, hold down the left mouse button, and then drag the pointer over the text that you want to select. |
|
A word |
Double-click anywhere in the word. |
|
A line of text |
Move the pointer to the left of the line until it changes to a right-pointing arrow, and then click. |
|
A sentence |
Hold down CTRL, and then click anywhere in the sentence. |
|
A paragraph |
Triple-click anywhere in the paragraph. |
|
Multiple paragraphs |
Move the pointer to the left of the first paragraph until it changes to a right-pointing arrow, and then press and hold down the left mouse button while you drag the pointer up or down. |
|
A large block of text |
Click at the start of the selection, scroll to the end of the selection, and then hold down SHIFT while you click where you want the selection to end. |
|
An entire document |
Move the pointer to the left of any text until it changes to a right-pointing arrow, and then triple-click. |
|
Headers and footers |
In Print Layout view, double-click the dimmed header or footer text. Move the pointer to the left of the header or footer until it changes to a right-pointing arrow, and then click. |
|
Footnotes and endnotes |
Click the footnote or endnote text, move the pointer to the left of the text until it changes to a right-pointing arrow, and then click. |
|
A vertical block of text |
Hold down ALT while you drag the pointer over the text. |
|
A text box or frame |
Move the pointer over the border of the frame or text box until the pointer becomes a four-headed arrow, and then click. |
Select items in a table
|
To select |
Do this |
|---|---|
|
The contents of a cell |
Click in the cell. Under Table Tools, click the Layout tab. In the Table group, click Select, and then click Select Cell. |
|
The contents of a row |
Click in the row. Under Table Tools, click the Layout tab. In the Table group, click Select, and then click Select Row. |
|
The contents of a column |
Click in the column. Under Table Tools, click the Layout tab. In the Table group, click Select, and then click Select Column. |
|
The contents of multiple cells, rows, or columns |
Click in a cell, a row, or a column and then hold the left mouse button down while you drag across all of the cells, rows, or columns that contain the content that you want to select. To select the contents of cells, rows, or columns that are not next to each other, click in the first cell, row, or column, press CTRL, and then click the additional cells, rows, or columns that contain the content that you want to select. |
|
The contents of an entire table |
Click in the table. Under Table Tools, click the Layout tab. In the Table group, click Select, and then click Select Table. |
Select text in different places
You can select text or items in a table that are not next to each other. For example, you can select a paragraph on one page and a sentence on a different page.
-
Select some text or an item in a table.
-
Hold down CTRL while you select any additional text or item in a table that you want.
Select text in Outline view
To view your document in Outline view, click the View tab, and then click Outline in the Document Views group.
|
To select |
Move the pointer to |
|---|---|
|
A heading |
The left of the heading until it changes to a right-pointing arrow, and then click. |
|
A heading, its subheading, and body text |
The left of the heading until it changes to a right-pointing arrow, and then double-click. |
|
A paragraph of body text |
The left of the paragraph until it changes to a right-pointing arrow, and then click. |
|
Multiple headings or paragraphs of body text |
The left of the text until it changes to a right-pointing arrow, and then drag up or down. |
Notes:
-
In Outline view, clicking once to the left of a paragraph selects the entire paragraph instead of a single line.
-
If you select a heading that includes collapsed subordinate text, the collapsed text is also selected (even though it’s not visible). Any changes that you make to the heading — such as moving, copying, or deleting it — also affect the collapsed text.
Select text by using the keyboard
Select text in the body of a document
Note: To select an entire document, press CTRL+A.
|
To select |
Do this |
|---|---|
|
One character to the right |
Press SHIFT+RIGHT ARROW. |
|
One character to the left |
Press SHIFT+LEFT ARROW. |
|
A word from its beginning to its end |
Place the insertion point at the beginning of the word, and then press CTRL+SHIFT+RIGHT ARROW. |
|
A word from its end to its beginning |
Move the pointer to the end of the word, and then press CTRL+SHIFT+LEFT ARROW. |
|
A line from its beginning to its end |
Press HOME, and then press SHIFT+END. |
|
A line from its end to its beginning |
Press END, and then press SHIFT+HOME. |
|
One line down |
Press END, and then press SHIFT+DOWN ARROW. |
|
One line up |
Press HOME, and then press SHIFT+UP ARROW. |
|
A paragraph from its beginning to its end |
Move the pointer to the beginning of the paragraph, and then press CTRL+SHIFT+DOWN ARROW. |
|
A paragraph from its end to its beginning |
Move the pointer to the end of the paragraph, and then press CTRL+SHIFT+UP ARROW. |
|
A document from its end to its beginning |
Move the pointer to the end of the document, and then press CTRL+SHIFT+HOME. |
|
A document from its beginning to its end |
Move the pointer to the beginning of the document, and then press CTRL+SHIFT+END. |
|
From the beginning of a window to its end |
Move the pointer to the beginning of the window, and then press ALT+CTRL+SHIFT+PAGE DOWN. |
|
The entire document |
Press CTRL+A. |
|
A vertical block of text |
Press CTRL+SHIFT+F8, and then use the arrow keys. Press ESC to turn off the selection mode. |
|
The nearest character |
Press F8 to turn on selection mode, and then press LEFT ARROW or RIGHT ARROW; press ESC to turn off the selection mode. |
|
A word, a sentence, a paragraph, or a document |
Press F8 to turn on selection mode, and then press F8 once to select a word, twice to select a sentence, three times to select a paragraph, or four times to select the document. Press ESC to turn off the selection mode. |
Select items in a table
|
To select |
Do this |
|---|---|
|
The contents of the cell to the right |
Press TAB. |
|
The contents of the cell to the left |
Press SHIFT+TAB. |
|
The contents of adjacent cells |
Hold down SHIFT while you press the appropriate arrow key repeatedly until you have selected the contents of all of the cells that you want. |
|
The contents of a column |
Click in the column’s top or bottom cell. Hold down SHIFT while you press the UP ARROW or DOWN ARROW key repeatedly until you have selected the contents of the column. |
|
The contents of an entire table |
Click in the table, and then press ALT+5 on the numeric keypad (with NUM LOCK off). |
Stop selecting the entire word
-
Click the Microsoft Office Button
, and then click Word Options. -
Click Advanced.
-
Under Editing options, clear the check box next to When selecting, automatically select entire word.
 , and then click Word Options.
Consider using an auxiliary numbers table.
NB: This MS SQL
Create a Sequence table — This could include all the numbers you need or at least up to 999.
I have limited it to the least but it adds extra logic.
CREATE TABLE [dbo].[Sequence]
    (
      seq INTEGER NOT NULL UNIQUE,
      word [varchar](25) NOT NULL
    )

INSERT INTO [Sequence] SELECT 0, ''
INSERT INTO [Sequence] SELECT 1, 'One'
INSERT INTO [Sequence] SELECT 2, 'Two'
INSERT INTO [Sequence] SELECT 3, 'Three'
INSERT INTO [Sequence] SELECT 4, 'Four'
INSERT INTO [Sequence] SELECT 5, 'Five'
INSERT INTO [Sequence] SELECT 6, 'Six'
INSERT INTO [Sequence] SELECT 7, 'Seven'
INSERT INTO [Sequence] SELECT 8, 'Eight'
INSERT INTO [Sequence] SELECT 9, 'Nine'

INSERT INTO [Sequence] SELECT 10, 'Ten'
INSERT INTO [Sequence] SELECT 11, 'Eleven'
INSERT INTO [Sequence] SELECT 12, 'Twelve'
INSERT INTO [Sequence] SELECT 13, 'Thirteen'
INSERT INTO [Sequence] SELECT 14, 'Fourteen'
INSERT INTO [Sequence] SELECT 15, 'Fifteen'
INSERT INTO [Sequence] SELECT 16, 'Sixteen'
INSERT INTO [Sequence] SELECT 17, 'Seventeen'
INSERT INTO [Sequence] SELECT 18, 'Eighteen'
INSERT INTO [Sequence] SELECT 19, 'Nineteen'

INSERT INTO [Sequence] SELECT 20, 'Twenty'
INSERT INTO [Sequence] SELECT 30, 'Thirty'
INSERT INTO [Sequence] SELECT 40, 'Forty'
INSERT INTO [Sequence] SELECT 50, 'Fifty'
INSERT INTO [Sequence] SELECT 60, 'Sixty'
INSERT INTO [Sequence] SELECT 70, 'Seventy'
INSERT INTO [Sequence] SELECT 80, 'Eighty'
INSERT INTO [Sequence] SELECT 90, 'Ninty'
Then Create the user defined function.
CREATE FUNCTION dbo.udf_NumToWords (
                @num AS INTEGER
)       RETURNS VARCHAR(50)
AS
BEGIN

DECLARE @words AS VARCHAR(50)

IF      @num =     0 SELECT @words = 'Zero'
ELSE IF @num <    20 SELECT @words = word FROM sequence WHERE seq = @num
ELSE IF @num <   100 (SELECT @words = TTens.word + ' ' + TUnits.word
                      FROM Sequence AS TUnits
                     CROSS JOIN Sequence AS TTens
                     WHERE TUnits.seq = (@num % 100) % 10
                       AND TTens.seq = (@num % 100) - (@num % 100) % 10
                    )
ELSE IF @num =   100 (SELECT @words = THundreds.word + ' Hundred'
                      FROM Sequence AS THundreds
                     WHERE THundreds.seq = (@num / 100)
                    )
ELSE IF @num <  1000 (
                    SELECT @words = THundreds.word + ' Hundred and '
                                    + TTens.word + ' ' + TUnits.word
                      FROM Sequence AS TUnits
                     CROSS JOIN Sequence AS TTens
                     CROSS JOIN Sequence AS THundreds
                     WHERE TUnits.seq = (@num % 100) % 10
                       AND TTens.seq = (@num % 100) - (@num % 100) % 10
                       AND THundreds.seq = (@num / 100)
                    )
ELSE IF @num =  1000 (SELECT @words = TThousand.word + ' Thousand'
                      FROM Sequence AS TThousand
                     WHERE TThousand.seq = (@num / 1000)
                    )
ELSE IF @num < 10000 (
                    SELECT @words = TThousand.word + ' Thousand '
                                    + THundreds.word + ' Hundred and '
                                    + TTens.word + ' ' + TUnits.word
                      FROM Sequence AS TUnits
                     CROSS JOIN Sequence AS TTens
                     CROSS JOIN Sequence AS THundreds
                     CROSS JOIN Sequence AS TThousand
                     WHERE TUnits.seq = (@num % 100) % 10
                       AND TTens.seq = (@num % 100) - (@num % 100) % 10
                       AND THundreds.seq = (@num / 100) - (@num / 1000) * 10
                       AND TThousand.seq = (@num / 1000)
                    )
ELSE SELECT @words = STR(@num)

RETURN @words

END
Now Test Function:
SELECT NumberAsWords = dbo.udf_NumToWords(888);
SQL input consists of a sequence of commands. A command is composed of a sequence of tokens, terminated by a semicolon (“;”). The end of the input stream also terminates a command. Which tokens are valid depends on the syntax of the particular command.
A token can be a key word, an identifier, a quoted identifier, a literal (or constant), or a special character symbol. Tokens are normally separated by whitespace (space, tab, newline), but need not be if there is no ambiguity (which is generally only the case if a special character is adjacent to some other token type).
For example, the following is (syntactically) valid SQL input:
SELECT * FROM MY_TABLE;
UPDATE MY_TABLE SET A = 5;
INSERT INTO MY_TABLE VALUES (3, 'hi there');
This is a sequence of three commands, one per line (although this is not required; more than one command can be on a line, and commands can usefully be split across lines).
Additionally, comments can occur in SQL input. They are not tokens, they are effectively equivalent to whitespace.
The SQL syntax is not very consistent regarding what tokens identify commands and which are operands or parameters. The first few tokens are generally the command name, so in the above example we would usually speak of a “SELECT”, an “UPDATE”, and an “INSERT” command. But for instance the UPDATE command always requires a SET token to appear in a certain position, and this particular variation of INSERT also requires a VALUES in order to be complete. The precise syntax rules for each command are described in Part VI.
4.1.1. Identifiers and Key Words
Tokens such as SELECT, UPDATE, or VALUES in the example above are examples of key words, that is, words that have a fixed meaning in the SQL language. The tokens MY_TABLE and A are examples of identifiers. They identify names of tables, columns, or other database objects, depending on the command they are used in. Therefore they are sometimes simply called “names”. Key words and identifiers have the same lexical structure, meaning that one cannot know whether a token is an identifier or a key word without knowing the language. A complete list of key words can be found in Appendix C.
SQL identifiers and key words must begin with a letter (a—z, but also letters with diacritical marks and non-Latin letters) or an underscore (_). Subsequent characters in an identifier or key word can be letters, underscores, digits (0—9), or dollar signs ($). Note that dollar signs are not allowed in identifiers according to the letter of the SQL standard, so their use might render applications less portable. The SQL standard will not define a key word that contains digits or starts or ends with an underscore, so identifiers of this form are safe against possible conflict with future extensions of the standard.
The system uses no more than NAMEDATALEN-1 bytes of an identifier; longer names can be written in commands, but they will be truncated. By default, NAMEDATALEN is 64 so the maximum identifier length is 63 bytes. If this limit is problematic, it can be raised by changing the NAMEDATALEN constant in src/include/pg_config_manual.h.
Key words and unquoted identifiers are case insensitive. Therefore:
UPDATE MY_TABLE SET A = 5;
can equivalently be written as:
uPDaTE my_TabLE SeT a = 5;
A convention often used is to write key words in upper case and names in lower case, e.g.:
UPDATE my_table SET a = 5;
There is a second kind of identifier: the delimited identifier or quoted identifier. It is formed by enclosing an arbitrary sequence of characters in double-quotes ("). A delimited identifier is always an identifier, never a key word. So "select" could be used to refer to a column or table named “select”, whereas an unquoted select would be taken as a key word and would therefore provoke a parse error when used where a table or column name is expected. The example can be written with quoted identifiers like this:
UPDATE "my_table" SET "a" = 5;
Quoted identifiers can contain any character, except the character with code zero. (To include a double quote, write two double quotes.) This allows constructing table or column names that would otherwise not be possible, such as ones containing spaces or ampersands. The length limitation still applies.
Quoting an identifier also makes it case-sensitive, whereas unquoted names are always folded to lower case. For example, the identifiers FOO, foo, and "foo" are considered the same by PostgreSQL, but "Foo" and "FOO" are different from these three and each other. (The folding of unquoted names to lower case in PostgreSQL is incompatible with the SQL standard, which says that unquoted names should be folded to upper case. Thus, foo should be equivalent to "FOO" not "foo" according to the standard. If you want to write portable applications you are advised to always quote a particular name or never quote it.)
A variant of quoted identifiers allows including escaped Unicode characters identified by their code points. This variant starts with U& (upper or lower case U followed by ampersand) immediately before the opening double quote, without any spaces in between, for example U&"foo". (Note that this creates an ambiguity with the operator &. Use spaces around the operator to avoid this problem.) Inside the quotes, Unicode characters can be specified in escaped form by writing a backslash followed by the four-digit hexadecimal code point number or alternatively a backslash followed by a plus sign followed by a six-digit hexadecimal code point number. For example, the identifier "data" could be written as
U&"d061t+000061"
The following less trivial example writes the Russian word “slon” (elephant) in Cyrillic letters:
U&"44143B43E43D"
If a different escape character than backslash is desired, it can be specified using the UESCAPE clause after the string, for example:
U&"d!0061t!+000061" UESCAPE '!'
The escape character can be any single character other than a hexadecimal digit, the plus sign, a single quote, a double quote, or a whitespace character. Note that the escape character is written in single quotes, not double quotes, after UESCAPE.
To include the escape character in the identifier literally, write it twice.
Either the 4-digit or the 6-digit escape form can be used to specify UTF-16 surrogate pairs to compose characters with code points larger than U+FFFF, although the availability of the 6-digit form technically makes this unnecessary. (Surrogate pairs are not stored directly, but are combined into a single code point.)
If the server encoding is not UTF-8, the Unicode code point identified by one of these escape sequences is converted to the actual server encoding; an error is reported if that’s not possible.
4.1.2. Constants
There are three kinds of implicitly-typed constants in PostgreSQL: strings, bit strings, and numbers. Constants can also be specified with explicit types, which can enable more accurate representation and more efficient handling by the system. These alternatives are discussed in the following subsections.
4.1.2.1. String Constants
A string constant in SQL is an arbitrary sequence of characters bounded by single quotes ('), for example 'This is a string'. To include a single-quote character within a string constant, write two adjacent single quotes, e.g., 'Dianne''s horse'. Note that this is not the same as a double-quote character (").
Two string constants that are only separated by whitespace with at least one newline are concatenated and effectively treated as if the string had been written as one constant. For example:
SELECT 'foo'
'bar';
is equivalent to:
SELECT 'foobar';
but:
SELECT 'foo' 'bar';
is not valid syntax. (This slightly bizarre behavior is specified by SQL; PostgreSQL is following the standard.)
4.1.2.2. String Constants with C-Style Escapes
PostgreSQL also accepts “escape” string constants, which are an extension to the SQL standard. An escape string constant is specified by writing the letter E (upper or lower case) just before the opening single quote, e.g., E'foo'. (When continuing an escape string constant across lines, write E only before the first opening quote.) Within an escape string, a backslash character () begins a C-like backslash escape sequence, in which the combination of backslash and following character(s) represent a special byte value, as shown in Table 4.1.
Table 4.1. Backslash Escape Sequences
| Backslash Escape Sequence | Interpretation |
|---|---|
b |
backspace |
f |
form feed |
n |
newline |
r |
carriage return |
t |
tab |
o = 0–7) |
octal byte value |
x, x (h = 0–9, A–F) |
hexadecimal byte value |
u, U (x = 0–9, A–F) |
16 or 32-bit hexadecimal Unicode character value |
Any other character following a backslash is taken literally. Thus, to include a backslash character, write two backslashes (\). Also, a single quote can be included in an escape string by writing ', in addition to the normal way of ''.
It is your responsibility that the byte sequences you create, especially when using the octal or hexadecimal escapes, compose valid characters in the server character set encoding. A useful alternative is to use Unicode escapes or the alternative Unicode escape syntax, explained in Section 4.1.2.3; then the server will check that the character conversion is possible.
Caution
If the configuration parameter standard_conforming_strings is off, then PostgreSQL recognizes backslash escapes in both regular and escape string constants. However, as of PostgreSQL 9.1, the default is on, meaning that backslash escapes are recognized only in escape string constants. This behavior is more standards-compliant, but might break applications which rely on the historical behavior, where backslash escapes were always recognized. As a workaround, you can set this parameter to off, but it is better to migrate away from using backslash escapes. If you need to use a backslash escape to represent a special character, write the string constant with an E.
In addition to standard_conforming_strings, the configuration parameters escape_string_warning and backslash_quote govern treatment of backslashes in string constants.
The character with the code zero cannot be in a string constant.
4.1.2.3. String Constants with Unicode Escapes
PostgreSQL also supports another type of escape syntax for strings that allows specifying arbitrary Unicode characters by code point. A Unicode escape string constant starts with U& (upper or lower case letter U followed by ampersand) immediately before the opening quote, without any spaces in between, for example U&'foo'. (Note that this creates an ambiguity with the operator &. Use spaces around the operator to avoid this problem.) Inside the quotes, Unicode characters can be specified in escaped form by writing a backslash followed by the four-digit hexadecimal code point number or alternatively a backslash followed by a plus sign followed by a six-digit hexadecimal code point number. For example, the string 'data' could be written as
U&'d061t+000061'
The following less trivial example writes the Russian word “slon” (elephant) in Cyrillic letters:
U&'44143B43E43D'
If a different escape character than backslash is desired, it can be specified using the UESCAPE clause after the string, for example:
U&'d!0061t!+000061' UESCAPE '!'
The escape character can be any single character other than a hexadecimal digit, the plus sign, a single quote, a double quote, or a whitespace character.
To include the escape character in the string literally, write it twice.
Either the 4-digit or the 6-digit escape form can be used to specify UTF-16 surrogate pairs to compose characters with code points larger than U+FFFF, although the availability of the 6-digit form technically makes this unnecessary. (Surrogate pairs are not stored directly, but are combined into a single code point.)
If the server encoding is not UTF-8, the Unicode code point identified by one of these escape sequences is converted to the actual server encoding; an error is reported if that’s not possible.
Also, the Unicode escape syntax for string constants only works when the configuration parameter standard_conforming_strings is turned on. This is because otherwise this syntax could confuse clients that parse the SQL statements to the point that it could lead to SQL injections and similar security issues. If the parameter is set to off, this syntax will be rejected with an error message.
4.1.2.4. Dollar-Quoted String Constants
While the standard syntax for specifying string constants is usually convenient, it can be difficult to understand when the desired string contains many single quotes or backslashes, since each of those must be doubled. To allow more readable queries in such situations, PostgreSQL provides another way, called “dollar quoting”, to write string constants. A dollar-quoted string constant consists of a dollar sign ($), an optional “tag” of zero or more characters, another dollar sign, an arbitrary sequence of characters that makes up the string content, a dollar sign, the same tag that began this dollar quote, and a dollar sign. For example, here are two different ways to specify the string “Dianne’s horse” using dollar quoting:
$$Dianne's horse$$
$SomeTag$Dianne's horse$SomeTag$
Notice that inside the dollar-quoted string, single quotes can be used without needing to be escaped. Indeed, no characters inside a dollar-quoted string are ever escaped: the string content is always written literally. Backslashes are not special, and neither are dollar signs, unless they are part of a sequence matching the opening tag.
It is possible to nest dollar-quoted string constants by choosing different tags at each nesting level. This is most commonly used in writing function definitions. For example:
$function$
BEGIN
    RETURN ($1 ~ $q$[trnv\]$q$);
END;
$function$
Here, the sequence $q$[trnv\]$q$ represents a dollar-quoted literal string [trnv\], which will be recognized when the function body is executed by PostgreSQL. But since the sequence does not match the outer dollar quoting delimiter $function$, it is just some more characters within the constant so far as the outer string is concerned.
The tag, if any, of a dollar-quoted string follows the same rules as an unquoted identifier, except that it cannot contain a dollar sign. Tags are case sensitive, so $tag$String content$tag$ is correct, but $TAG$String content$tag$ is not.
A dollar-quoted string that follows a keyword or identifier must be separated from it by whitespace; otherwise the dollar quoting delimiter would be taken as part of the preceding identifier.
Dollar quoting is not part of the SQL standard, but it is often a more convenient way to write complicated string literals than the standard-compliant single quote syntax. It is particularly useful when representing string constants inside other constants, as is often needed in procedural function definitions. With single-quote syntax, each backslash in the above example would have to be written as four backslashes, which would be reduced to two backslashes in parsing the original string constant, and then to one when the inner string constant is re-parsed during function execution.
4.1.2.5. Bit-String Constants
Bit-string constants look like regular string constants with a B (upper or lower case) immediately before the opening quote (no intervening whitespace), e.g., B'1001'. The only characters allowed within bit-string constants are 0 and 1.
Alternatively, bit-string constants can be specified in hexadecimal notation, using a leading X (upper or lower case), e.g., X'1FF'. This notation is equivalent to a bit-string constant with four binary digits for each hexadecimal digit.
Both forms of bit-string constant can be continued across lines in the same way as regular string constants. Dollar quoting cannot be used in a bit-string constant.
4.1.2.6. Numeric Constants
Numeric constants are accepted in these general forms:
digitsdigits.[digits][e[+-]digits] [digits].digits[e[+-]digits]digitse[+-]digits
where digits is one or more decimal digits (0 through 9). At least one digit must be before or after the decimal point, if one is used. At least one digit must follow the exponent marker (e), if one is present. There cannot be any spaces or other characters embedded in the constant. Note that any leading plus or minus sign is not actually considered part of the constant; it is an operator applied to the constant.
These are some examples of valid numeric constants:
42
3.5
4.
.001
5e2
1.925e-3
A numeric constant that contains neither a decimal point nor an exponent is initially presumed to be type integer if its value fits in type integer (32 bits); otherwise it is presumed to be type bigint if its value fits in type bigint (64 bits); otherwise it is taken to be type numeric. Constants that contain decimal points and/or exponents are always initially presumed to be type numeric.
The initially assigned data type of a numeric constant is just a starting point for the type resolution algorithms. In most cases the constant will be automatically coerced to the most appropriate type depending on context. When necessary, you can force a numeric value to be interpreted as a specific data type by casting it. For example, you can force a numeric value to be treated as type real (float4) by writing:
REAL '1.23'  -- string style
1.23::REAL   -- PostgreSQL (historical) style
These are actually just special cases of the general casting notations discussed next.
4.1.2.7. Constants of Other Types
A constant of an arbitrary type can be entered using any one of the following notations:
type'string' 'string'::typeCAST ( 'string' AStype)
The string constant’s text is passed to the input conversion routine for the type called type. The result is a constant of the indicated type. The explicit type cast can be omitted if there is no ambiguity as to the type the constant must be (for example, when it is assigned directly to a table column), in which case it is automatically coerced.
The string constant can be written using either regular SQL notation or dollar-quoting.
It is also possible to specify a type coercion using a function-like syntax:
typename( 'string' )
but not all type names can be used in this way; see Section 4.2.9 for details.
The ::, CAST(), and function-call syntaxes can also be used to specify run-time type conversions of arbitrary expressions, as discussed in Section 4.2.9. To avoid syntactic ambiguity, the type 'string'type 'string':: or CAST() to specify the type of an array constant.
The CAST() syntax conforms to SQL. The type 'string':: is historical PostgreSQL usage, as is the function-call syntax.
4.1.3. Operators
An operator name is a sequence of up to NAMEDATALEN-1 (63 by default) characters from the following list:
+ — * / < > = ~ ! @ # % ^ & | ` ?
There are a few restrictions on operator names, however:
-
--and/*cannot appear anywhere in an operator name, since they will be taken as the start of a comment. -
A multiple-character operator name cannot end in
+or-, unless the name also contains at least one of these characters:~ ! @ # % ^ & | ` ?
For example,
@-is an allowed operator name, but*-is not. This restriction allows PostgreSQL to parse SQL-compliant queries without requiring spaces between tokens.
When working with non-SQL-standard operator names, you will usually need to separate adjacent operators with spaces to avoid ambiguity. For example, if you have defined a prefix operator named @, you cannot write X*@Y; you must write X* @Y to ensure that PostgreSQL reads it as two operator names not one.
4.1.4. Special Characters
Some characters that are not alphanumeric have a special meaning that is different from being an operator. Details on the usage can be found at the location where the respective syntax element is described. This section only exists to advise the existence and summarize the purposes of these characters.
-
A dollar sign (
$) followed by digits is used to represent a positional parameter in the body of a function definition or a prepared statement. In other contexts the dollar sign can be part of an identifier or a dollar-quoted string constant. -
Parentheses (
()) have their usual meaning to group expressions and enforce precedence. In some cases parentheses are required as part of the fixed syntax of a particular SQL command. -
Brackets (
[]) are used to select the elements of an array. See Section 8.15 for more information on arrays. -
Commas (
,) are used in some syntactical constructs to separate the elements of a list. -
The semicolon (
;) terminates an SQL command. It cannot appear anywhere within a command, except within a string constant or quoted identifier. -
The colon (
:) is used to select “slices” from arrays. (See Section 8.15.) In certain SQL dialects (such as Embedded SQL), the colon is used to prefix variable names. -
The asterisk (
*) is used in some contexts to denote all the fields of a table row or composite value. It also has a special meaning when used as the argument of an aggregate function, namely that the aggregate does not require any explicit parameter. -
The period (
.) is used in numeric constants, and to separate schema, table, and column names.
4.1.6. Operator Precedence
Table 4.2 shows the precedence and associativity of the operators in PostgreSQL. Most operators have the same precedence and are left-associative. The precedence and associativity of the operators is hard-wired into the parser. Add parentheses if you want an expression with multiple operators to be parsed in some other way than what the precedence rules imply.
Table 4.2. Operator Precedence (highest to lowest)
| Operator/Element | Associativity | Description |
|---|---|---|
. |
left | table/column name separator |
:: |
left | PostgreSQL-style typecast |
[ ] |
left | array element selection |
+ - |
right | unary plus, unary minus |
^ |
left | exponentiation |
* / % |
left | multiplication, division, modulo |
+ - |
left | addition, subtraction |
| (any other operator) | left | all other native and user-defined operators |
BETWEEN IN LIKE ILIKE SIMILAR |
range containment, set membership, string matching | |
< > = <= >= <> |
comparison operators | |
IS ISNULL NOTNULL |
IS TRUE, IS FALSE, IS NULL, IS DISTINCT FROM, etc. |
|
NOT |
right | logical negation |
AND |
left | logical conjunction |
OR |
left | logical disjunction |
Note that the operator precedence rules also apply to user-defined operators that have the same names as the built-in operators mentioned above. For example, if you define a “+” operator for some custom data type it will have the same precedence as the built-in “+” operator, no matter what yours does.
When a schema-qualified operator name is used in the OPERATOR syntax, as for example in:
SELECT 3 OPERATOR(pg_catalog.+) 4;
the OPERATOR construct is taken to have the default precedence shown in Table 4.2 for “any other operator”. This is true no matter which specific operator appears inside OPERATOR().
Note
PostgreSQL versions before 9.5 used slightly different operator precedence rules. In particular, <= >= and <> used to be treated as generic operators; IS tests used to have higher priority; and NOT BETWEEN and related constructs acted inconsistently, being taken in some cases as having the precedence of NOT rather than BETWEEN. These rules were changed for better compliance with the SQL standard and to reduce confusion from inconsistent treatment of logically equivalent constructs. In most cases, these changes will result in no behavioral change, or perhaps in “no such operator” failures which can be resolved by adding parentheses. However there are corner cases in which a query might change behavior without any parsing error being reported.
I want to select current word under the cursor without using mouse.
After searching this forum, I learned how double click works.
(I noticed that it is a bit complicated and there were no direct key bindings.)
What is the best way to select current word with only keyboard?
I also don’t want to use emacs function or script with a customized binding
because I want to use it universally(Android studio, Jetbrains…)
![]()
Drew
74.1k9 gold badges108 silver badges222 bronze badges
asked Aug 23, 2017 at 10:08
![]()
2
I usually use C-M-SPC or, with easy-kill installed, M-w w.
answered Aug 23, 2017 at 11:08
![]()
1
You can use the expand-region package to do this and more.
Let | be point and (...) indicate that ... is marked.
foo-|bar
Calling er/expand-region once:
foo-(|bar)
Calling it again:
(|foo-bar)
answered Sep 12, 2017 at 22:52
![]()
M-@ is mark-word, but it does not grab the part of the word that is before point.
You can write a command (or create a keyboard macro) that does M-<left> (which is command left-word) followed by M-@, to pick up also the first part of the word.
For example:
(defun mark-whole-word (&optional arg allow-extend)
  "Like `mark-word', but selects whole words and skips over whitespace.
If you use a negative prefix arg then select words backward.
Otherwise select them forward.

If cursor starts in the middle of word then select that whole word.

If there is whitespace between the initial cursor position and the
first word (in the selection direction), it is skipped (not selected).

If the command is repeated or the mark is active, select the next NUM
words, where NUM is the numeric prefix argument.  (Negative NUM
selects backward.)"
  (interactive "Pnp")
  (let ((num  (prefix-numeric-value arg)))
    (unless (eq last-command this-command)
      (if (natnump num)
          (skip-syntax-forward "\s-")
        (skip-syntax-backward "\s-")))
    (unless (or (eq last-command this-command)
                (if (natnump num)
                    (looking-at "\b")
                  (looking-back "\b")))
      (if (natnump num)
          (left-word)
        (right-word)))
    (mark-word arg allow-extend)))
And if you want to point all global mark-word key bindings (such as M-@) to mark-whole-word instead:
(global-set-key [remap mark-word] 'mark-whole-word)
answered Aug 23, 2017 at 13:38
![]()
DrewDrew
74.1k9 gold badges108 silver badges222 bronze badges
4
A solution for users of evil:
In normal state, just type: viw
answered Sep 13, 2017 at 21:53
![]()
izkonizkon
1,7489 silver badges23 bronze badges
Place the cursor on either side of the word, then hold the shift key down and hold the alt/option key down, and then use the left or right arrow.
If the cursor is not on either side of the word, then hold the alt/option key down and use the left or right arrow key to move to either side of the word before selecting it as set forth in the preceding paragraph.
answered Sep 13, 2017 at 23:07
![]()
lawlistlawlist
18.5k5 gold badges36 silver badges118 bronze badges
1
The simplest way I’ve come up with to mark «around» a word is the fully built in combo of C-M-SPC C-M-b (hold down Ctrl+Meta then press Space and b), AKA mark-sexp and backward-sexp. Once your fingers are trained for the paredit (and relatives) way of C-M- all the time, it’s really fast. Then you’ve also got the remaining niceties of multiple presses of C-M-SPC to extend the selection. From Marking Objects:
Repeated invocations extend the region to subsequent expressions, while positive or negative numeric arguments move the mark forward or backward by the specified number of expressions.
(I used to use easy-mark, as mentioned in another answer here, but I couldn’t work around it always losing the top of the mark stack, which was just too annoying.)
answered Feb 9 at 21:02
![]()