
To be able to protected documents in Word to edit, you must remove the write protection. We will show you how to do it.
Word: write protection with password override
If you have forgotten the password, you can unlock the document easily in this way.
- To do this, open the file in Word.
- Then, click on «file > get info» > «protect document» and select restrict editing.
- On the right side you will see your permissions. Here, click on «unprotect».
- Enter the password, the document can be edited again.
If you know your password yet, you can cancel the write protection in Word with just a few clicks
(Screenshot: Felix Wölwer)

Write-protection bypass — With this Trick it works
If the password is omitted for the write protection, you can work around it:
- Press the key combination [Ctrl]+ [A] to select the entire document.
- Then you will have to copy the mark with [Ctrl] + [C].
- Then open a new Word document.
- Here paste the Copied with [Ctrl] + [V].
- Now you have the same content in another document that you can edit but.
Alternative: password instead of write protection
In Word, there are in addition to the write-protection in addition to the way to protect the document with a password, which you must enter before you can open the document.
- To remove such a password, you must open the file first, however, in with said password.
- In the opened file, navigate to «file > get info» > «protect document».
- If you now click in the appearing drop-down menu, select «encrypt With password», you will see a dialog box with the current password. Remove this line and then click «OK».
- In order for the Change to be effective, you must save the document again.
- Important: if you Have forgotten the password for the file, there is no way to open the file again.
Password write protection on a Word to remove
(Screenshot: Felix Wölwer)

using GemBox.Document;

class Program
{
    static void Main()
    {
        // If using the Professional version, put your serial key below.
        ComponentInfo.SetLicense("FREE-LIMITED-KEY");

        var document = new DocumentModel();

        document.Sections.Add(
            new Section(document,
                new Paragraph(document, "This document has been opened in read-only mode."),
                new Paragraph(document, "Changes cannot be made to the original document."),
                new Paragraph(document, "To save changes a new copy of the document must be created.")));

        WriteProtection protection = document.WriteProtection;
        protection.SetPassword("pass");

        document.Save("DOCX Write Protection.docx");
    }
}
Imports GemBox.Document
Module Program
Sub Main()
' If using the Professional version, put your serial key below.
ComponentInfo.SetLicense("FREE-LIMITED-KEY")
Dim document As New DocumentModel()
document.Sections.Add(
New Section(document,
New Paragraph(document, "This document has been opened in read-only mode."),
New Paragraph(document, "Changes cannot be made to the original document."),
New Paragraph(document, "To save changes a new copy of the document must be created.")))
Dim protection As WriteProtection = document.WriteProtection
protection.SetPassword("pass")
document.Save("DOCX Write Protection.docx")
End Sub
End Module
- Download Word_Protect_EXE — 5.5 Kb
- Download source — 74 Kb
Are you looking for a way to protect your word document programmatically ? Are you looking for a way to give ‘readonly‘ access to your word file so that no one should edit it ? Are you looking for a way to secure your word file in a such way that it can be only used for ‘view purpose’, and no one should copy contents of it ? Are looking for a way to secure your word file in a such a way that the changes done by another person get tracked/audited?
If yes, then you are at right place, we can secure our word file programmatically and cover all above scenarios, this article will give you answer of all your word securities question
Background
Most of the time we use Microsoft word for our documentation purpose and we prefer, it should be secure enough, but can we really know how to make word file secure ? Many of us is unaware of it, Do we know how many types of securities we can add to word file ? if Not, Don’t worry this article will let you travel through the security world
Let’s start
How to protect word file?
![]()
1. File level protection
1. Document ask password to open a file (Open file security), without password file will not open
2. Document ask password to edit file (Modify file security), if we do not have a password to modify still we can open file in Readonly mode
Note: If you lose or forget the password it is not easily recoverable.
2. Content level protection
With this type of protection we can deal with file content security, there are 5 types of protection, see below
1. ReadOnly
2. Track changes
3. Comments only
4. Filling in forms
5. Partial locking
Let’s discuss them in detail
1. ReadOnly Protection
If we protect document with ReadOnly protection then document gets locked and all editing options are get disabled. To apply this security you need to go to Developer Tab — Select Protect document — select restrict formatting and editing — select Only this type of editing in the document checkbox — select Nochanges(ReadOnly) option from dropdown then click on Yes, Start enforcing protection button, see below snap
)
Can’t find Developer Tab ??? follow the image below
)
Make Read-Only protection enable

2. Comments-Only Protection
If we protect document with CommentsOnly protection then document gets locked and all editing options are get disabled, just the difference is, we can only put comments in document. Once document gets locked with comments only locking, each user comments recorded with different color for identification. You can follow above same steps to lock document, just select ‘Comments‘ from dropdown, see below snap to check how behave document with comments, see below snap
)
3. Tracked changes
Once document is locked with ‘TrackedChanges‘ it can be editable but all activities/changes done by user are get tracked, the changes are painted with different color than original document font color, which easily identified the changes. see below snap
)
4. Filling in forms
Once document is locked with ‘filling in forms‘ option, we can only fill text in forms fields, all other editing options are disabled, see below snap

5. Partial locking/ lock in parts
Partial locking can be done in Word file, there is no direct option to lock partial file or files in parts, we can achieve by using following steps
— Click on protect document — select Restrict formatting and editing — select No changes (Read Only) in editing restrictions — Select part of the document you want to keep free to edit — click Everyone checkbox in Exceptions and finally click on ‘Yes, start enforcing protection‘ button, see below snap

Travel with the code
We have seen all protection types in word, we have locked them manually now its time to do it programmatically
Things we need
Before start cooking we need Visual studio, C# and Word (2007+)
Getting started
First step is to create a New solution in C# with visual studio and add reference of interop assemblies in our code, version of interop libraries are depend upon version of Microsoft, see below table
| MS-Word installed | Interop Version |
| 2003 | 8.0 Word Object library |
| 2007 | 12.0 Word Object library |
| 2010 | 14.0 Word Object library |
| 2013 | 15.0 Word Object library |
If you are beginner to Word Interop automation with C# then you should go with this article Word Automation with C#, After adding interop reference we need to create Application object and Document object, see below snippet
Word._Application objApp = null;
Word._Document objDoc = null;
After creating Application and Document object, we can open any document and accesss them easily, see below snippet one by one
1. Open file security (Password to open a file)
objApp = new Word.Application();
objDoc = objApp.Documents.Open(ref fileToOpen, ref objMiss, ref objMiss, ref objMiss, ref objMiss,
    ref objMiss, ref objMiss, ref objMiss, ref objMiss, ref objMiss, ref objMiss,
    ref objMiss, ref objMiss, ref objMiss, ref objMiss, ref objMiss);

if (objDoc.ProtectionType == Word.WdProtectionType.wdNoProtection)
{
    objDoc.Password = szPassword.ToString();
    objDoc.ReadOnlyRecommended = false;
    objDoc.Save();
    MessageBox.Show("Word locked for OpenFile successfully !", "Word Protect", MessageBoxButtons.OK, MessageBoxIcon.Information);
}
else
{
    MessageBox.Show("Word document is already protected !", "Word Protect", MessageBoxButtons.OK, MessageBoxIcon.Information);
}
In above snippet, We have use ProtectionType property of document object to check if the document is already protected, and Password helps us to set password to open word document.
2. Modify file security (Password to modify a file)
objApp = new Word.Application();
objDoc = objApp.Documents.Open(ref fileToOpen, ref objMiss, ref objMiss, ref objMiss, ref objMiss,
    ref objMiss, ref objMiss, ref objMiss, ref objMiss, ref objMiss, ref objMiss,
    ref objMiss, ref objMiss, ref objMiss, ref objMiss, ref objMiss);

if (objDoc.ProtectionType == Word.WdProtectionType.wdNoProtection)
{
    objDoc.Password = "";
    objDoc.WritePassword = szPassword.ToString();
    objDoc.ReadOnlyRecommended = false;
    objDoc.Save();
    MessageBox.Show("Word locked for Modify File scurity successfully !", "Word Protect", MessageBoxButtons.OK, MessageBoxIcon.Information);
}
else
{
    MessageBox.Show("Word document is already protected !", "Word Protect", MessageBoxButtons.OK, MessageBoxIcon.Information);
}
In above snippet, We have use WritePassword propety to set password for modify file, Save() method is used to save document.
3. ReadOnly Protection
objApp = new Word.Application();
objDoc = objApp.Documents.Open(ref fileToOpen, ref objMiss, ref objMiss, ref objMiss, ref objMiss,
    ref objMiss, ref objMiss, ref objMiss, ref objMiss, ref objMiss, ref objMiss,
    ref objMiss, ref objMiss, ref objMiss, ref objMiss, ref objMiss);

if (objDoc.ProtectionType == Word.WdProtectionType.wdNoProtection)
{
    objDoc.Protect(Word.WdProtectionType.wdAllowOnlyReading, ref bFalse, ref szPassword, ref bFalse, ref bTrue);
    objDoc.Save();
    MessageBox.Show("Word document Protected successfully (for Read only)!", "Word Protect", MessageBoxButtons.OK, MessageBoxIcon.Information);
}
else
{
    MessageBox.Show("Word document is already protected !", "Word Protect", MessageBoxButtons.OK, MessageBoxIcon.Information);
}
In above snippet, We have use Protect method to lock document, Protect method work according to the parameters we have used, here we have pass ‘wdAllowOnlyReading‘ enum to protect file as ReadOnly.
4. Comments-Only Protection
objApp = new Word.Application();
objDoc = objApp.Documents.Open(ref fileToOpen, ref objMiss, ref objMiss, ref objMiss, ref objMiss,
    ref objMiss, ref objMiss, ref objMiss, ref objMiss, ref objMiss, ref objMiss,
    ref objMiss, ref objMiss, ref objMiss, ref objMiss, ref objMiss);

if (objDoc.ProtectionType == Word.WdProtectionType.wdNoProtection)
{
    objDoc.Protect(Word.WdProtectionType.wdAllowOnlyComments, ref bFalse, ref szPassword, ref bFalse, ref bTrue);
    objDoc.Save();
    MessageBox.Show("Word document Protected successfully (for Comments only)!", "Word Protect", MessageBoxButtons.OK, MessageBoxIcon.Information);
}
else
{
    MessageBox.Show("Word document is already protected !", "Word Protect", MessageBoxButtons.OK, MessageBoxIcon.Information);
}
In above snippet, we have use ‘wdAllowCommentsOnly‘ as protection type to locked word document for comments only.
4. Tracked changes
objApp = new Word.Application();
objDoc = objApp.Documents.Open(ref fileToOpen, ref objMiss, ref objMiss, ref objMiss, ref objMiss,
    ref objMiss, ref objMiss, ref objMiss, ref objMiss, ref objMiss, ref objMiss,
    ref objMiss, ref objMiss, ref objMiss, ref objMiss, ref objMiss);

if (objDoc.ProtectionType == Word.WdProtectionType.wdNoProtection)
{
    objDoc.Protect(Word.WdProtectionType.wdAllowOnlyRevisions, ref bFalse, ref szPassword, ref bFalse, ref bTrue);
    objDoc.Save();
    MessageBox.Show("Word document Protected successfully (for TrackChanges only)!", "Word Protect", MessageBoxButtons.OK, MessageBoxIcon.Information);
}
else
{
    MessageBox.Show("Word document is already protected !", "Word Protect", MessageBoxButtons.OK, MessageBoxIcon.Information);
}
In above snippet, we have use ‘wdAllowOnlyRevisions‘ as protection type to locked word document for tracked changes only.
5. Filling in forms
objApp = new Word.Application();
objDoc = objApp.Documents.Open(ref fileToOpen, ref objMiss, ref objMiss, ref objMiss, ref objMiss,
    ref objMiss, ref objMiss, ref objMiss, ref objMiss, ref objMiss, ref objMiss,
    ref objMiss, ref objMiss, ref objMiss, ref objMiss, ref objMiss);

if (objDoc.ProtectionType == Word.WdProtectionType.wdNoProtection)
{
    objDoc.Protect(Word.WdProtectionType.wdAllowOnlyFormFields, ref bFalse, ref szPassword, ref bFalse, ref bTrue);
    objDoc.Save();
    MessageBox.Show("Word document Protected successfully (for Read only)!", "Word Protect", MessageBoxButtons.OK, MessageBoxIcon.Information);
}
else
{
    MessageBox.Show("Word document is already protected !", "Word Protect", MessageBoxButtons.OK, MessageBoxIcon.Information);
}
In above snippet, we have use ‘wdAllowOnlyFormsFields‘ as protection type to locked word document for form fields locking only.
Unlocking word document
objApp = new Word.Application();
objDoc = objApp.Documents.Open(ref fileToOpen, ref objMiss, ref objMiss, ref objMiss, ref objMiss,
    ref objMiss, ref objMiss, ref objMiss, ref objMiss, ref objMiss, ref objMiss,
    ref objMiss, ref objMiss, ref objMiss, ref objMiss, ref objMiss);

if (objDoc.ProtectionType != Word.WdProtectionType.wdNoProtection)
{
    objDoc.Unprotect(ref szPassword);
    objDoc.Save();
    MessageBox.Show("Word document UnProtected successfully !", "Word Protect", MessageBoxButtons.OK, MessageBoxIcon.Information);
}
else
    MessageBox.Show("Selected word document is not protected !", "Word Protect", MessageBoxButtons.OK, MessageBoxIcon.Error);
In above snippet we have use ‘UnProtect()‘ method to unprotect word document
Finally…
COM/Interop objects are very heavy and unmanaged objects, GC alone can not able to collect them and dispose them, we SHOULD release objects after we have use them, finally is the recommended place to release all com objects, Close() and quit() methods are used to release Document and Application object respectively. see below snippet
finally
{

    if (objDoc != null)
    {
        objDoc.Close();
        objDoc = null;
    }
    if (objApp != null)
    {
        objApp.Quit();
        objApp = null;
    }
}
Application Scenarios
— If you want your word document should ask password to open file, you can use Password to open a file security
— If you want to open file only for reading purpose only you can use Modify file security or ReadOnly protection
— If you want peoples to edit your file but needs to audit that changes then you can use Tracked changes security
— If you want peoples, not to copy/paste your word file content and not to edit it then you can locked word document with Forms filing security
— If you have fillable forms and you want peoples to edit only in forms fields then you can locked word document with Forms filing security
— If you want peoples to edit only some part of your document then you can use partial locking security
Programming with word application is a epic, it will not finished in couple of articles, i will cover more points in upcoming versions of this article, till then you can enjoy this stuff
Article scope : MS-Word 2007/2010/2013+, Visual studio 2005+
Suggestion and Queries are always welcome
Thanks
koolprasad2003
In this article, we decide to show you the way to write protect a part or the entire of your Word document.
There are times when you finish creating a Word document you want no one else but yourself to have the access to modify it. Naturally, some of you may come to the idea of encrypting your document with password. Certainly, it can protect your privacy well. However, there are also occasions when you have to allow others to view you document. In such cases, you need to make use of “Restrict Editing” option in Word to ensure file content integrity.
In the below are two different situations of preventing people from changing your document. The first is obviously restricting editing for the whole document. As to the second one, considering various purposes, we offer you two ways to restrict editing in parts of the document.
Situation 1: Write Protect the Whole Document
- Firstly, open the file you want to protect.
- Click “File” on the “Menu Bar”.
- Then click “Info” option.
- Next, click “Protect Document” on the right side.
- Choose “Restrict Editing” on the list-menu.

- Now you have opened the “Restrict Formatting and Editing” pane. Choose “No changes (Read only)” in the list box below “Editing restrictions”.
- Then check the box of “Allow only this type of editing in the document”.
- Now click “Yes, Start Enforcing Protection” button.

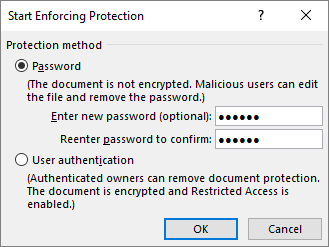
- In “Start Enforcing Protection” dialog box, enter your password.
- Then reenter your password.
- Click “OK”. You can see the explanation of your permissions on the “Restrict Formatting and Editing” pane.


- Finally, remember to save the change by saving the document.


Next time you open this document and need to edit it, follow the below steps:
- Repeat above steps from step 2 to step 5 so as to open the “Restrict Formatting and Editing” pane.
- Click “Stop Protection”.

- Enter password in “Unprotect Document” dialog box.
- Click “OK”.

- If you want to stop the protection permanently, you have to save the document before you close it.


Situation 2: Write Protect Parts of a Document
As we have mentioned above, there are two ways to achieve this task:
Method 1: Make Exceptions
- Repeat steps from 1 to 7 in “Situation 1: Restrict Editing in the Whole Document”.
- Select the part of text allowing editing.
- Check “Everyone” box.
- Repeat steps from 8 to 11 in “Situation 1: Restrict Editing in the Whole Document”.


Now you can see the region you can edit in highlight, such as below:
Method 2: lock Parts of a Document
To inform you at the beginning, this method shall use “Developer” option. So, before all the moves, you should add “Developer” to “Menu Bar” first. For the specific steps, please go to one of our articles: How to Insert Background Music into Your Word Document
- First, select the part allowing no modification.
- Click “Developer”.
- Then click “Rich Text Content Control”.

- Next, click “Properties”.

- In “Content Control Properties” dialog box, type a title.
- Then check “Content control cannot be deleted” box.
- And check “Contents cannot be edited” box.
- Click “OK”.


Now put your cursor at the locked area, you shall see the below effect:
How to Manage Word Collapse
Despite of its powerful feature, Word can still succumb to collapse and leave you with all broken files. Once you lost data due to word crash, it’s best for you to take the help of a specialized word repair tool in order to retrieve your information as much as possible.
Author Introduction:
Vera Chen is a data recovery expert in DataNumen, Inc., which is the world leader in data recovery technologies, including excel recovery and pdf repair software products. For more information visit www.datanumen.com
If you have written about secret info on Microsoft Word, you can take these solutions to secure the sensitive content to avoid anyone can modify or edit it. Most of the useful fixes are related to the built-in feature of Microsoft Word, which offers several options to restrict editing. You can try it on your preference.
5 Ways to Protect Word File from Editing (Windows)
For Windows users, you can choose 5 ways to protect word documents from editing and copying. Four of the methods are built-in functions of the software, of course, you can also try more convenient third-party software.
1 — Enforce Protection on Word Document
Step 1. Open your word file and go to the Review tab in the Word ribbon.
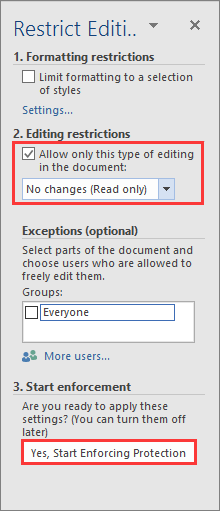
Step 2. Click Restrict Editing under the Protect section.

Step 3. Once the Restrict Editing pop up, move to the second option. Check Allow only this type if editing in the document, and select No changes (Read-only).
Step 4. Click Yes, Start Enforcing Protection.
Step 5. Type a password and confirm it again.
2 — Use Word Document Protection Software
To protect your word document into Read-only mode, there is an easy and safe software, EaseUS LockMyFile, you can use this word file protection tool on PC to protect files from editing and copying. Nobody can rename, delete, and modify the word document.
Not only protect files, but this software also has many reliable functions you can try:
- Let your files, folders, and drives turn invisible and unsearchable.
- Lock your data with password in the local drives, external hard drive, USB flash drive.
- Use the AES encryption algorithm to encrypt files and folders.
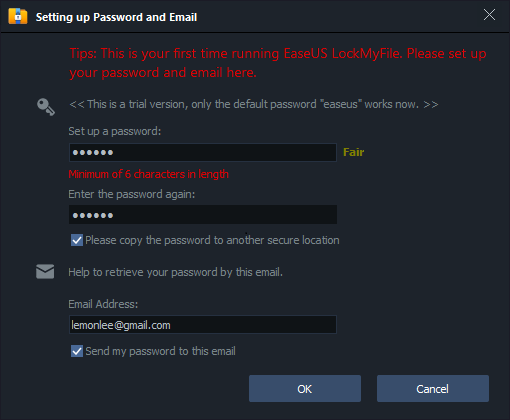
Step 1. Launch EaseUS LockMyFile, enter the valid email, and set password to register.
Step 2. Click Protecting File under the Local Disk. Select Protect File(s) ,Folder or drive from the right panel.
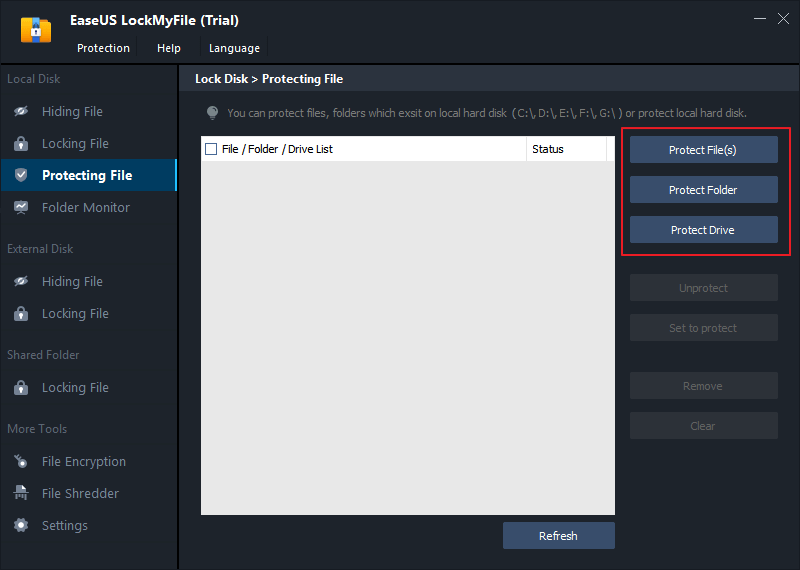
A. Add file(s) or folder from the specific location.
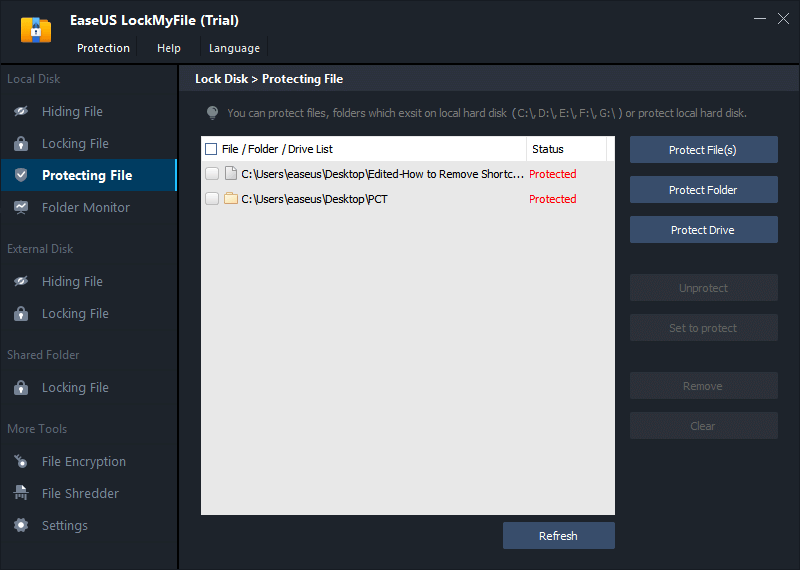
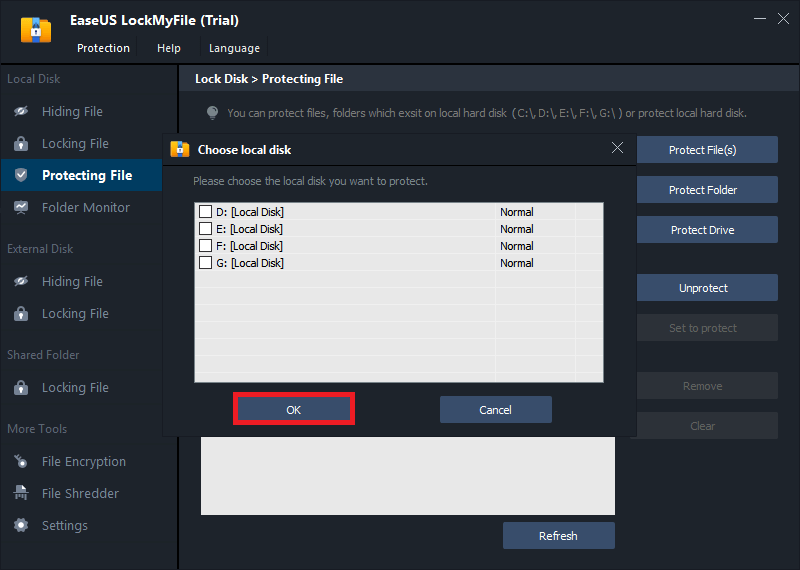
B. Click on the Protect Drive to add drive you want to protect. Select drive and click OK.
Step 3. Check and confirm the files, folder, and drive that you want to protect.
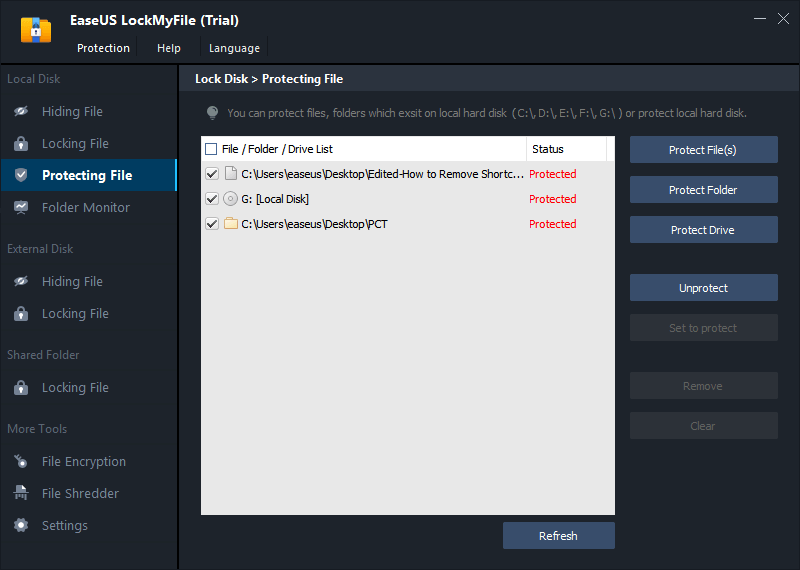
Notes:
If you want to unprotect the selected files, folder, or drive, tick the target data and click on the Unprotect button.
Download the software and follow the steps:
3 — Mark as Final
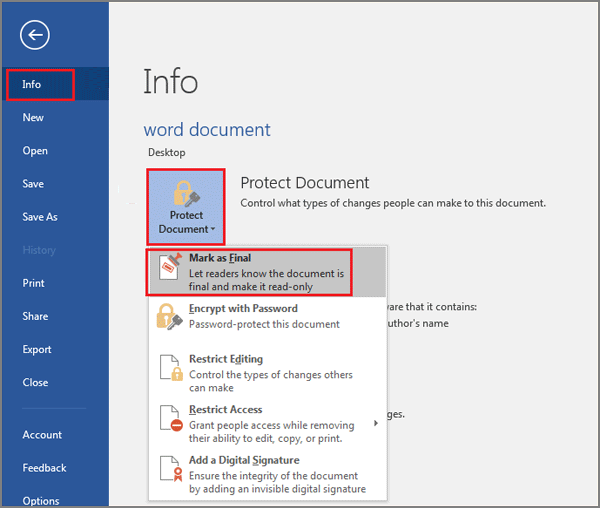
Step 1. Click File tab > Info.
Step 2. Click Protect Document and select Mark as Final.
4 — Enable Read-only Mode
Step 1. Open File tab > Info.
Step 2. Choose Protect Document and click Always Open Read-only.
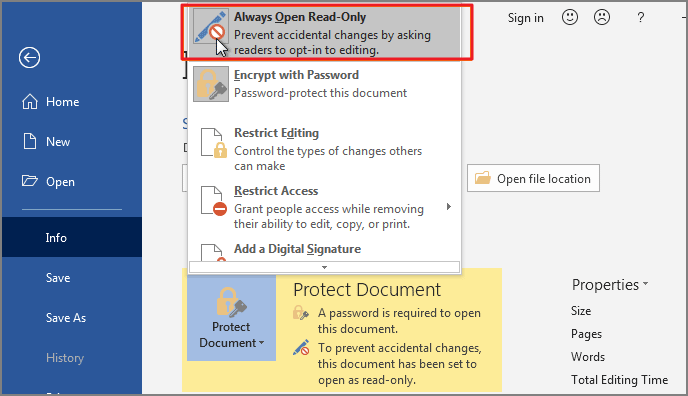
Step 3. Save the word file and re-open it again.
Note: To disable Read-only mode, open the file and click the File tab. Follow path: Info > Protect Document > Always Open Read-only.
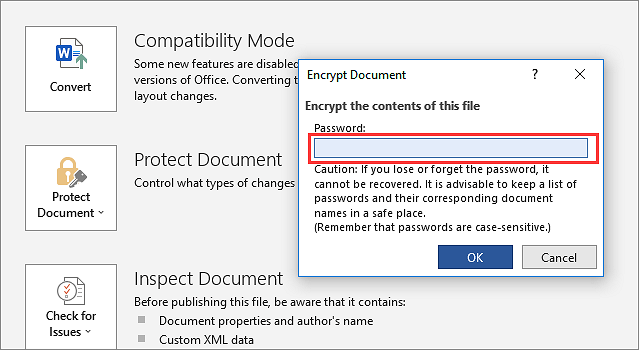
5 — Encrypt with Password
Step 1. Move to File tab > Info.
Step 2. Choose Protect Document and then click Encrypt with password from the options menu.
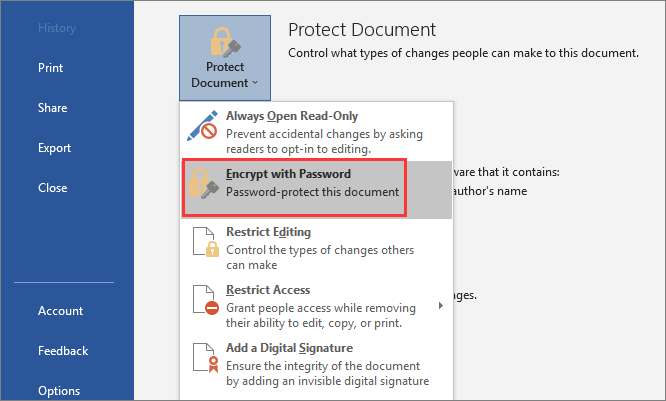
Step 3. Set your password and click OK.
How to Protect Word Document from Editing and Coping Mac
For Mac users, you can try 2 ways to limit the edit function.
1 — Click Always Open Read-Only Option
Step 1. Open the Microsoft Word for Mac and select the document you want to set Read-only mode.
Step 2. Click the File tab from the top menu bar.
Step 3. Choose Always Open Read-Only from the option list.
Step 4. Close the window and click Save in the pop-up window.
Open your word file again, your word file will be in Read-only mode.
2 — Encrypt Word Document
Step 1. Open Word files for Mac.
Step 2. Go to the Review tab > Move to Protect > Choose Protect Document.
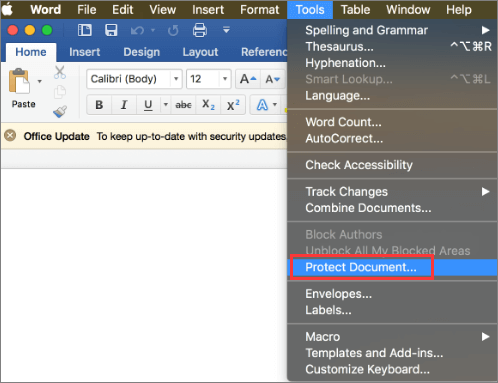
Step 3. In the Password Protection window, set a password to open or modify the document. (Use a password you can remember and save it in a safe location.)
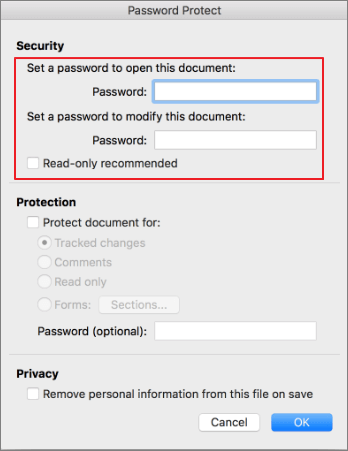
Step 4. Click OK.
Bonus Tip: How Do I Lock Certain Text in Word
What if you just want to lock a certain paragraph from being edited? Here the Restrict Editing function can allow you to set limited access for everyone.
1 — Restrict Formatting Style
Step 1. Click the File tab and choose Restrict Editing.
Step 2. Under Formatting restrictions, check Limit formatting to a selection of styles. And then click Settings.
Step 3. Select the styles you want to allow on your document. And click OK.
Step 4. Under Start enforcement, click Yes, Start Enforcing Protection.
Step 5. Enter the password and reenter the password to confirm.
2 — Use Editing Restrictions
Step 1. Open your file and click the Review tab, go to Editing restrictions.
Step 2. Check to Allow only this type of editing in the document and select No changes (Read-only).
Step 3. Choose the area (paragraph or page) that other users can edit. Check Everyone under the Exceptions (optional).
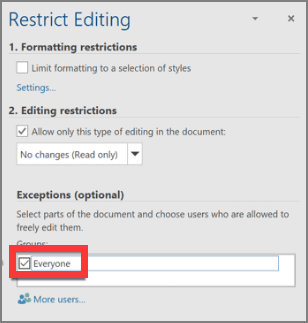
To confirm the Exceptions, click Yes, Start Enforcing Protection.
Step 4. Enter the password for protection.
Final Words
Have you finished text restriction on PC and Mac? Microsoft Word serves up several choices so that only you and specific people can change the whole part or certain section. Note: You’d better back up the sensitive text to another safe location. Double protection is good for your materials.