
i. Using the Text Box in Word 2007 and later
- Go to the Insert tab, click the Text Box button then choose Simple Text Box.
- Enter and format the text you need in the margin inside the text box.
- Drag the text box inside the margin that you want.
Contents
- 1 How do you write in the margins in Word 2020?
- 2 How do you write margin notes?
- 3 How do I add text to the outside border in Word?
- 4 How do I set margins in Word 2010?
- 5 What does writing in the margins mean?
- 6 What types of notes might you write in the margins while annotating?
- 7 How do I make vertical text in Word margins?
- 8 How do I put page numbers outside the border?
- 9 How do I show Margins in Word 2016?
- 10 How do I set the Margins in Word 2013?
- 11 How do I change Margins in Word 2016?
- 12 How do you use the text margins in the Tell Me box to get help on change margins?
- 13 How do you show commands in Word?
- 14 How do you use the text columns in the tell me box?
- 15 What is an example of a margin?
- 16 Is it better to annotate in pen or pencil?
- 17 Where is Autoshape in Word?
- 18 How do I put page numbers on certain pages in Word?
- 19 How do you change page 1 to 2nd in Word?
- 20 How do I show the margin in Word 2013?
How do you write in the margins in Word 2020?
Method 1: Set Negative Indent
- First and foremost, select the text which you want to put in margin.
- Then click “Home” tab.
- Next, click the extend button in “Paragraph” group.
- Now you will open the “Paragraph” dialog box. Look at the “Indentation” part.
- At last, click “OK” to save the change.
How do you write margin notes?
Creating Margin Notes
- Open your source document (. doc or .
- Place your cursor at the point you’d like to insert the margin note. Click the Margin Note button and select Create from the drop-down list.
- Type the margin note (or insert an image) in the left hand column of the table.
How do I add text to the outside border in Word?
Once the text is highlighted, click the Home tab. On the Home tab, click the down arrow on the border to get border options, like those shown in the picture. Select the type of border you want to use. If you want a single border around the text, click Outside Borders.
How do I set margins in Word 2010?
How to Change Page Margins in Microsoft Word 2010
- Open your document in Word 2010.
- Select the Page Layout tab.
- Click the Margins button.
- Choose the desired page margin setting.
What does writing in the margins mean?
Writing and drawing in the margins is an active reading strategy that asks students to analyze and interact with a text, using either notes in the margins or sticky notes to make comments and raise questions in preparation for discussion or writing tasks.
What types of notes might you write in the margins while annotating?
Main points and/or sub-points. References to other sources that keep appearing. Key terms/concepts. Other information that you find particularly important.
How do I make vertical text in Word margins?
Position text vertically in a shape or text box
- Right-click the border of the shape or text box.
- On the shortcut menu, select Format Shape, and then select Text Box in the left pane.
- Under Text layout, select the option that you want in the Vertical alignment list.
- Select Close.
How do I put page numbers outside the border?
To add page numbers:
- On the Insert tab, click the Page Number command.
- Open the Top of Page, Bottom of Page, or Page Margin menu, depending on where you want the page number to be positioned.
- Page numbering will appear.
- Press the Esc key to lock the header and footer.
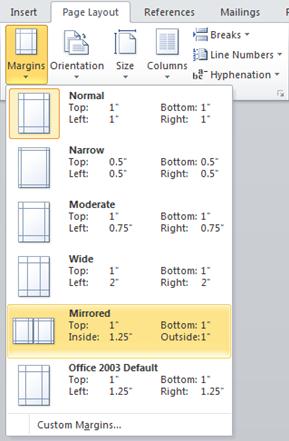
How do I show Margins in Word 2016?
To enable the option, open a Word document, click File>Options to open Word Options, click Advanced Tab, under Show document content group, select Show text boundaries option.
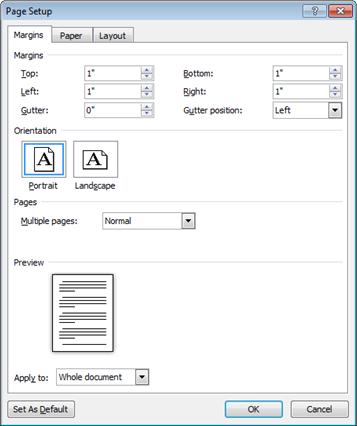
How do I set the Margins in Word 2013?
Create custom margins
Click PAGE LAYOUT > Margins. At the bottom, click Custom Margins. In the Page Setup box, enter new values for the margins.
How do I change Margins in Word 2016?
Word also allows you to customize the size of your margins in the Page Setup dialog box.
- From the Layout tab, click Margins. Select Custom Margins from the drop-down menu.
- The Page Setup dialog box will appear.
- Adjust the values for each margin, then click OK.
- The margins of the document will be changed.
How do you use the text margins in the Tell Me box to get help on change margins?
Set margins for a text box
- Click on the text box you created to highlight it.
- Click on the Format tab in the ribbon.
- Click the small button in the lower left of the Size group.
- In the Format Text Box window, click the Text Box tab.
- In the Internal margin section, you can customize the margins to your desired size.
How do you show commands in Word?
At the top right of the Word window, click the Ribbon Display Options button, and then click Show Tabs and Commands. At the top right of the Word window, click the Ribbon Display Options button, and then click Show Tabs and Commands.
How do you use the text columns in the tell me box?
Click in the “Tell me what you want to do. . .” text box. Type an action you want to do such as Print, Save, or Hyperlink. A menu appears that lists different commands, as shown here. Typing in the “Tell me what you want to do. . .” text box displays a menu of commands to select.
What is an example of a margin?
Understanding Margin
For example, if you have an initial margin requirement of 60% for your margin account, and you want to purchase $10,000 worth of securities, then your margin would be $6,000, and you could borrow the rest from the broker.
Is it better to annotate in pen or pencil?
Writing in the text with a simple pen or pencil is always preferable. When annotating, choose pencil or ball-point ink rather than gel or permanent marker. Ball point ink is less likely to soak through the page. If using erasable pens, test in an inconspicuous area to make sure they actually erase on that paper.
Where is Autoshape in Word?
Click the Insert tab on the menu bar, and click on the Shapes button located in the Illustrations menu on the formatting toolbar. Take note of the different Auto Shapes now visible in the pull-down menu. Insert an Auto Shape into the document.
How do I put page numbers on certain pages in Word?
At the top of the page, before the first line/word, click on the document to place your curser. Then choose Page Layout from the top menu. Next select Breaks – Next Page. Now choose Insert from the top menu and then select Page Numbers and then choose how you want them to appear in the document.
How do you change page 1 to 2nd in Word?
Move multiple pages’ order/number in Word
- Enable the Navigation Pane by checking Navigation Pane option on the View tab.
- Click the Pages tab on the Navigation Pane.
- Please (1) click the Page 1 on the Navigation pane to skip to Page 1, (2) type Page 1 at the beginning of the page, and then (3) click Home > Heading 1.
How do I show the margin in Word 2013?
Show and Hide the Rulers
Click the View tab. Select or clear the Ruler check box. To view the horizontal ruler, click the Web Layout View or Draft View button. To view the horizontal and vertical rulers, click the Print Layout View button.
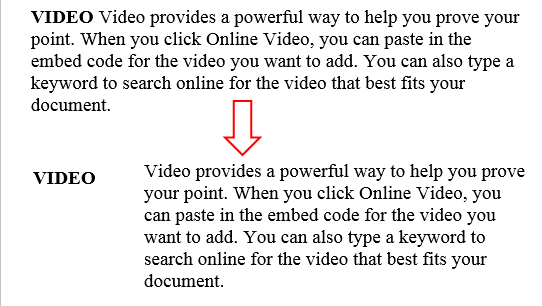
Have you ever wondered whether it’s possible to type in the margin of a Word document? Something like this:
I was the other day because I recalled seeing it in some papers and books but never on the Word documents people typically type. So it turns out it’s actually possible and is relatively easy to accomplish using either one of two methods.
The methods discussed below will work on all versions of Word from 2003 and later. If you’ve trouble following the instructions, watch the embedded video from my channel to see the steps.
Method 1: Type Text in the Margin using Negative Indentation
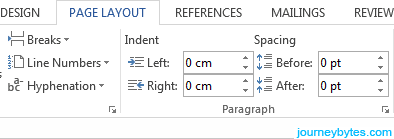
This method uses the indent option to move the target text past the margin. The indent buttons on the ribbon however don’t accomplish this, and so we need to use the paragraph settings dialog for this.
1. Select the text you need in the margin.
2. Right-click on the selected text and select Paragraph. This is the easiest way to do this plus it works in all versions of MS Word as of this writing.
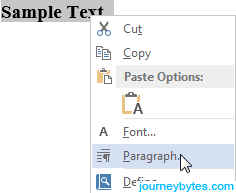
Alternatively, you can also click on the little arrow inside the paragraph options in the ribbon or simply head to the Page Layout tab for quick access to the indentation settings (MS Word 2007 and later only).
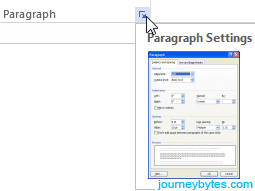
3. In the dialog under Indentation, enter a negative value inside the left box e.g. -1.75 cm, -2 cm or -2.5cm etc. then click the Ok button.

If you need the text inside the right margin instead of the left, first align the text to the right then enter a negative value in the right box e.g. -1.75 cm, -2 cm or -2.5cm etc.
Note: Don’t enter a very high value (above -3 cm) as this will move the text outside the page boundary.
Method 2: Type Text in the Margin using a Text Box
The first method works quite quick but I realized later on that it may not be practical in most situations. Reason being, the indentation setting applies to the whole line and as such you can’t add text on the same line without it being constrained to this setting.
Clearly, most of us don’t want this and this is where the text box comes in.
The text box method works a bit differently on Word 2003 and Word 2007 and later versions. I’ll cover both cases individually.
i. Using the Text Box in Word 2007 and later
1. Go to the Insert tab, click the Text Box button then choose Simple Text Box.
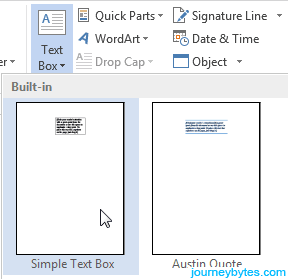
2. Enter and format the text you need in the margin inside the text box.
3. Drag the text box inside the margin that you want.
4. To remove the text box boundary, select the text box then switch to the Format tab in the ribbon. Now just look for Shape outline, click the small arrow beside it and select No Outline. That’s it!
ii. Using the Text Box in Word 2003
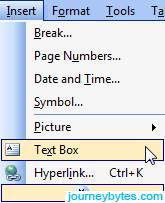
1. In the menu bar under Insert select Text Box.
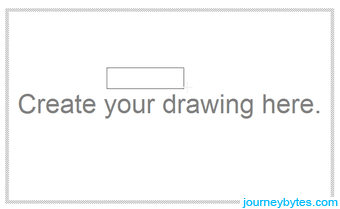
2. Doing that will only insert a blank canvas. To draw a text box, click and hold inside the canvas, then drag your mouse. Release the button once the size meets your needs.
3. Enter and format the text you need in the margin inside the text box.
4. Drag the text box inside the margin that you want. You can now delete the canvas by clicking inside it followed by pressing the Delete button on your keyboard.
Note: If you delete the canvas without moving the text box, the text box will also be deleted.
5. To remove the text box boundary, first select the text box, right-click on the boundary then select Format Text Box. You can also just double-click on the boundary.
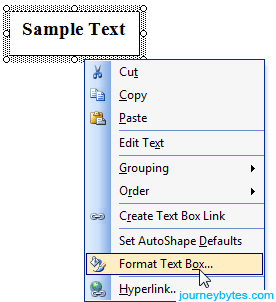
6. In the Format Text Box dialog, go to the line settings and change the colour to white. Press the Ok button and you’re done!
Still having problems? Just drop me a comment below and I’ll get to you as soon as I can.
In this piece of writing, we will present you 3 different methods to create margin texts in your Word document.
Once in a while, we can see on brochures that texts are displayed on page margins. Therefore, in case you too, want to add some texts which are useful but not quite relevant to document content, we here will offer you 3 varying methods for you to complete the task in Word.
Method 1: Set Negative Indent
- First and foremost, select the text which you want to put in margin.
- Then click “Home” tab.
- Next, click the extend button in “Paragraph” group.

- Now you will open the “Paragraph” dialog box. Look at the “Indentation” part. For example, if you want to employ left indent, you can choose an indentation value from the spin control behind “Left”.
- At last, click “OK” to save the change.


Now you can see the text moves to the left margin.
Method 2: Insert a Text Box
- Since you cannot directly insert a text box into the margins, you should insert it into the document editing area first. Click “Insert” tab.
- Then click “Text Box” in “Text” group.
- Next you can either choose a built-in text box style or choose “Draw Text Box” option to draw one by yourself.

- Now enter text into text box.
- Next drag the text box to a margin.
- Certainly, you can click the text box to rotate. And you can also set the text font, text direction, etc.

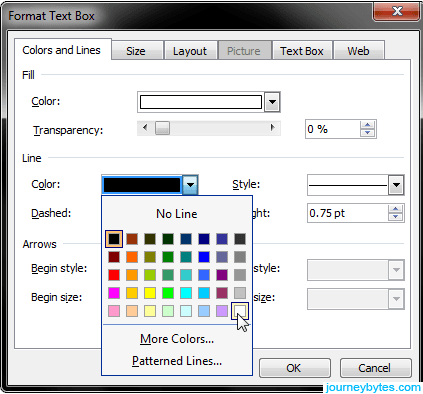
- The last step is to remove the text box lines if necessary. Right click on text box.
- Then choose “Format Shape”.
- In “Format Shape” dialog box, click “Line Color” first.
- Then choose “No line”.
- Finally, click “Close”.


Method 3: Anchor Text Box to “Header” or “Footer”
By applying method 2, your text only shows in the margin of one page. How about making it appearing on each page repeatedly? That’s the reason why you must read method 3.
- At the beginning, double click “Header” or “Footer” area to enter editing mode.
- Then either in “Header” or “Footer” area, you should make use of method 2 to insert a text box, enter a text.
- Now drag the text box to a margin where you want it to stay.
- Next double click the empty area to exit “Header” or “Footer”.


Eventually, you can see in the below picture that the same text shows on the same place on every page of the document.
Comparison of 3 Methods
| Methods | Advantages | Disadvantages |
| Set Negative Indent | 1. It’s the quickest way.
2. You can directly modify the margin text whenever you need. |
When you make change on other document content, the margin text may get affected. |
| Insert a Text Box | 1. The margin text is free from the effect of document modification.
2. Click the text box and you can edit the text again. |
1. You cannot insert a text box in margins directly.
2. You may have to remove text box lines if necessary. 3. The margin text will not appear on every page of the document. |
| Anchor Text Box to “Header” or “Footer” | 1. The same text will show on the same place on every page of document.
2. The margin text is free from the effect of document modification. |
1. You have to enter “Header” or “Footer” before editing margin text again.
2. You have to insert a text box in “Header” or “Footer” first and you may need to remove text box lines. |
Rescue Corrupt Files
Over time, people are growing to realize that a damaged file is to some degree recoverable. So when a file gets damaged, they will certainly try the built-in repair function in word first. Yet, most corrupt files are far beyond the capability of this feature. Therefore, you should get an awesome corrupt Word file repair tool to save critical files as soon as possible.
Author Introduction:
Vera Chen is a data recovery expert in DataNumen, Inc., which is the world leader in data recovery technologies, including Excel damage repair tool and pdf repair software products. For more information visit www.datanumen.com
![]()
Download Article
A user-friendly guide to changing a Word document’s margins to wide, narrow, and more
![]()
Download Article
- Applying Preset Margins (Desktop)
- Creating Custom Margins (Desktop)
- Using the Mobile App
- Q&A
- Warnings
|
|
|
|
Are you trying to adjust your margins in Microsoft Word? The margins are the empty space between the edge of the page and the contents of the document. Depending on your needs, you can change the margins to become wider, narrower, or a mix of both. You’ll be able to select from a few preset options or customize your own. This wikiHow will show you how to fix and change the default 1-inch margins in Microsoft Word using your iPhone, Android, or Windows or Mac computer.
Things You Should Know
- On desktop, click «Layout» → «Margins» → select a margin preset.
- For custom margins, click «Custom Margins…» and enter the values for Top, Left, Bottom, and Right.
- On mobile, tap «•••» → «Home» → «Layout» → «Margins» → select a preset or «Custom Margins». Enter a new value and tap «Done».
-
1
-
2
Click Layout. This will be in the top toolbar, between Design and References.
Advertisement
-
3
Click Margins. You can find this in the upper-left corner of the Layout tab. This looks like a rectangle with blue lining the margins.
- A pop-up menu will open.
-
4
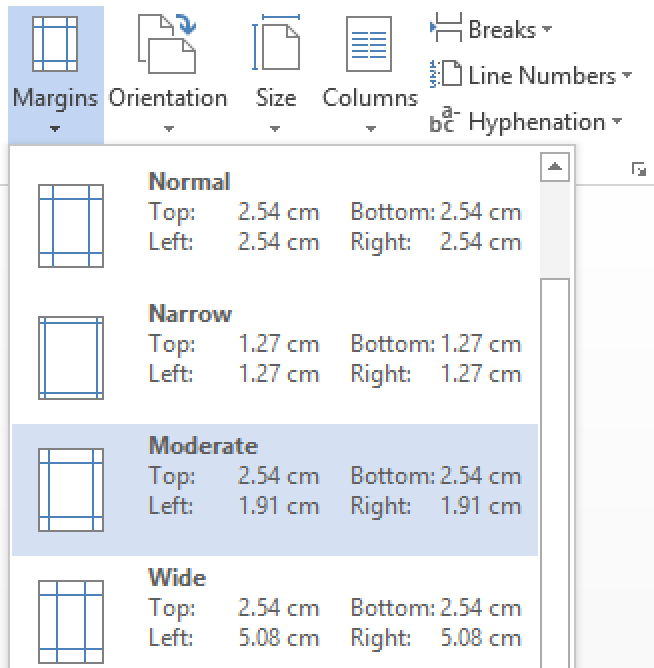
Select a margin type. You’ll see a list of preset margins: Normal, Narrow, Moderate, Wide, Mirrored, and Office 2003 Default. Click a preset margin to apply it to your document. It should be applied immediately.
- If you don’t like how it looks, you can select Normal again, or press CTRL + Z (Windows) or CMD + Z (Mac) to undo the change.
Advertisement
-
1
Click Layout. This will be in the top toolbar, between Design and References.
-
2
Click Margins. You can find this in the upper-left corner of the Layout tab. This looks like a rectangle with blue lining the margins.
- A menu will open.
-
3
Click Custom Margins…. This will be at the bottom of the drop-down menu.
- A new window will open.
-
4
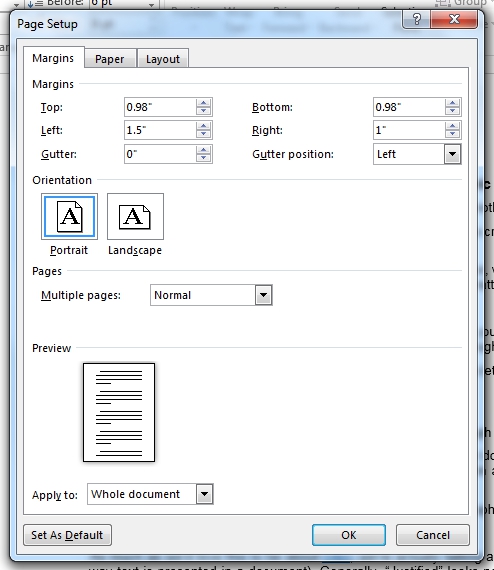
Set your new margins. On the desktop application, you’ll be able to edit the margin sizes for: Top, Left, Bottom, Right, Gutter, and Gutter Positions. On the web version, you’ll only be able to edit the margin sizes for: Top, Left, Bottom, and Right. You’ll see a preview of the document layout at the bottom of the window.
- Click the field and enter your new margin size, or use the up/down arrow to adjust the current margins.
- For Gutter Positions, select Left or Top.
- Only adjust the Gutter margin if you intend to use the document in a bound format, like a book or report, and you need space for the binding. In this case, type a number in Gutter that will allow enough room for the binding and use the drop-down to indicate whether the binding will be on the top or on the left.
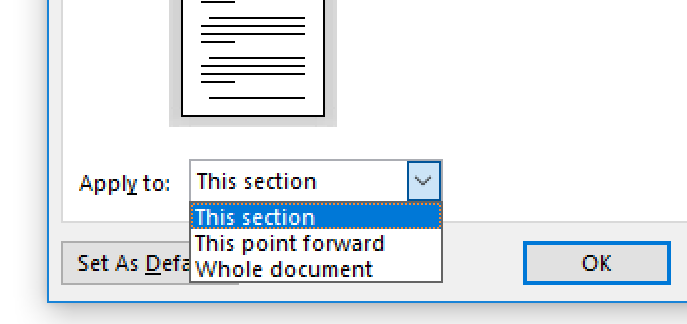
- Make sure Apply to is set to Whole document, unless you only want to change the margins from This point forward.
-
5
Set new default margins (optional). If you want to use this margin for all new documents in Microsoft Word, click Set as default in the bottom-left corner. Click Yes to confirm.
- When you create a new document, the margins will reflect the change.
-
6
Click OK when finished. The changes will be applied immediately.
Advertisement
-
1
Open the Microsoft Word app. Microsoft Word is available for iOS in the App Store and for Android in the Google Play Store.
- If you aren’t already logged in to your Microsoft account, enter your email address and password to do so now.
-
2
Open a new or existing project. Tap a recent project on your homepage, or tap the + tab to create a new one.
-
3
Tap ••• . This is the «•••» located at the top of your on-screen keyboard. If you don’t see your keyboard, tap the document to open it.
- A new menu will open at the bottom.
-
4
Tap Home. This is located at the top of the new menu.
- A pop-up menu will open.
-
5
Tap Layout. You can find this between Draw and Review.
-
6
Tap Margins. This is the first listing in the Layout tab.
-
7
Select a margin type. You’ll see a list of preset margins: Normal, Narrow, Moderate, Wide, and Mirrored. Tap a preset margin to apply it to your document. It should be applied immediately.
- If you don’t like how it looks, you can select Normal again, or pick a new preset.
- Be sure to save your document when you’re finished.
-
8
Create a custom margin (optional). Tap Custom Margins at the bottom of the Margins menu. You’ll be able to edit the margin sizes for: Top, Left, Bottom, and Right.
- Tap a margin to edit it.
- Tap the backspace button to erase the existing margin.
- Enter a new margin value.
- Tap Done in the top-right corner.
- Tap Margins → Custom Margins to edit another margin.
- The changes will be applied immediately.
Advertisement
Add New Question
-
Question
I want the page ruler. What can I do?

To get the ruler, go into the View tab (Word 2010 and newer) and select the Ruler checkbox.
-
Question
Can I ever allow one more letter on a line to finish a long word rather than wrap to the next line?
No. The only thing you could possibly do would be to make all the margins wider. Making only one word go to the next line is impossible unless you do the same for all words.
Ask a Question
200 characters left
Include your email address to get a message when this question is answered.
Submit
Advertisement
Thanks for submitting a tip for review!
-
Leaving the margin under .25″ may lead to text being cut off when printed.
Advertisement
About This Article
Article SummaryX
1. Open a Microsoft Word document.
2. Click the Layout tab.
3. Click Margins.
4. Click Custom Margins….
5. Set the margins.
6. Click the Apply to drop-down.
7. Select how to apply the margins.
8. Click OK.
Did this summary help you?
Thanks to all authors for creating a page that has been read 493,303 times.
Is this article up to date?
Change margins

In Word, each page automatically has a one-inch margin. You can customize or choose predefined margin settings, set margins for facing pages, allow extra margin space to allow for document binding, and change how margins are measured.
-
Select Layout > Margins.
-
Select the margin configuration you want, or select Custom Margins to define your own margins.
Important:
Office 2010 is no longer supported. Upgrade to Microsoft 365 to work anywhere from any device and continue to receive support.
Upgrade now
What would you like to do?
-
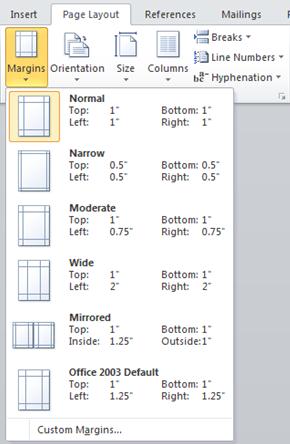
On the Page Layout tab, in the Page Setup group, choose Margins and the Margins gallery appears.

-
Choose the margin type that you want to apply.
Note: If your document contains multiple sections, the new margin type will only be applied to the current section. To apply the new margin type to multiple sections, be sure to select each one.
3. Make your new margin settings the default for your template. Each new document based on that template will automatically use the new margin settings.
-
Choose Margins after you select a new margin, and then choose Custom Margins.
-
In the Page Setup dialog box, choose Set As Default.
-
On the Page Layout tab, in the Page Setup group, choose Margins and the Margins gallery appears.
-
At the bottom of the Margins gallery, choose Custom Margins.
-
In the Page Setup dialog box, enter new values for the margins.
More tips about margins
-
Change the margins for only a section of a document by selecting the text and entering the new margins in the Page Setup dialog box. In the Apply to box, click Selected text. Microsoft Word automatically inserts section breaks before and after the text with new margin settings.
-
Most printers require a minimum width for margin settings. If your settings are too narrow, Microsoft Word displays the message One or more margins are set outside the printable area of the page. Click Fix to automatically increase the margin width. If you ignore the message, Word will display another message asking whether you want to continue.
-
Minimum margin settings for printing depend on your printer, printer driver, and paper size. To learn about your minimum settings, check your printer manual.
Use mirror margins to set up facing pages for double-sided documents, such as books or magazines. When you choose mirror margins, the margins of the left page are a mirror image of those on the right page. The inside margins are the same width, and the outside margins are the same width.
-
On the Page Layout tab, in the Page Setup group, click Margins >Mirrored.
Note: To change margin widths, click Custom Margins at the bottom of the Margins gallery. Enter new values in the Inside and Outside boxes.
A gutter margin adds extra space to the side margin, top margin, or inside margins of a document that you plan to bind to help ensure that text isn’t obscured by binding.
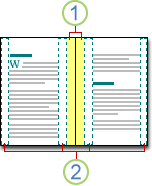
1. Gutter margins for binding
2. Mirror margins for facing pages
To set the gutter margin
-
On the Page Layout tab, in the Page Setup group, click Margins.
-
Click Custom Margins.
-
In the Gutter box, enter a width for the gutter margin.
-
In the Gutter position box, click Left or Top.
Note: The Gutter position box is not available when you use the Mirror margins, 2 pages per sheet, or Book fold option. For those options, the gutter position is determined automatically.
Word can display lines in your document to represent text boundaries.
-
On the File tab, click Options.
-
Click Advanced, and then select the Show text boundaries check box under Show document content.
The page margins appear in your document as dotted lines.
Note: You can view page margins in either Print Layout view or Web Layout view, and the text boundaries don’t appear on the printed page.
Important:
Office 2007 is no longer supported. Upgrade to Microsoft 365 to work anywhere from any device and continue to receive support.
Upgrade now
What would you like to do?
Microsoft Word offers several page margin options. You can use the default page margins or specify your own.
-
Add margins for binding
A gutter margin adds extra space to the side margin, top margin, or inside margins of a document that you plan to bind to help ensure that text isn’t obscured by binding.
1. Gutter margins for binding
2. Mirror margins for facing pages
-
Set margins for facing pages
Use mirror margins to set up facing pages for double-sided documents, such as books or magazines. In this case, the margins of the left page are a mirror image of those of the right page. The inside margins are the same width, and the outside margins are the same width. -
Note: You can set gutter margins for a document that has mirror margins if the document needs extra space for binding.
-
Add a book fold
Using the Book fold option in the Page Setup dialog box, you can create a booklet. Use the same option to create a menu, invitation, event program, or any other type of document with a single center fold.

1. Word inserts a single, center book fold
After you set up a document as a booklet, work with it just as you would any document to insert text, graphics, and other visual elements.
-
Most printers require a minimum width for margin settings. If you try to set margins that are too narrow, Microsoft Word displays the message One or more margins are set outside the printable area of the page. Click Fix to automatically increase the margin width. If you ignore the message, Word will display another message asking whether you want to continue.
-
Minimum margin settings depend on your printer, printer driver, and paper size. To learn about your minimum margin settings, check the printer manual.
-
On the Page Layout tab, in the Page Setup group, click Margins.
-
Click the margin type that you want. For the most common margin width, click Normal.
Note: When you click the margin type that you want, your entire document automatically changes to the margin type that you have selected.
-
You can specify your own custom margin settings. Click Margins, click Custom Margins, and then in the Top, Bottom, Left, and Right boxes, enter new values for the margins.

-
To change the default margins, click Margins after you select a new margin, and then click Custom Margins. In the Page Setup dialog box, click the Default button, and then click Yes. The new default settings are saved in the template on which the document is based. Each new document based on that template automatically uses the new margin settings.
-
To restore the original margin settings, click Margins and then click Custom Margins. Change the margins for Top, Bottom, Left, and Right to 1″. Then click the Default button and click Yes.
-
To change the margins for part of a document, select the text, and then set the margins that you want by entering the new margins in the Page Setup dialog box. In the Apply to box, click Selected text. Microsoft Word automatically inserts section breaks before and after the text that has the new margin settings. If your document is already divided into sections, you can click in a section or select multiple sections and then change the margins.
-
Click the Microsoft Office Button
, and then click Word Options. -
Click Advanced, and then click the Show text boundaries check box under Show document content.
The page margins appear in your document as dotted lines.
 , and then click Word Options.
Note: You can view page margins in either Print Layout view or Web Layout view, and the text boundaries do not appear on the printed page.
When you choose mirror margins, the margins of the left page are a mirror image of those on the right page. The inside margins are the same width, and the outside margins are the same width.
-
On the Page Layout tab, in the Page Setup group, click Margins >Mirrored.
-
Click Margins > Custom Margins, and in the Inside and Outside boxes, enter the widths that you want.
A gutter margin setting adds extra space to the side margin or top margin of a document that you plan to bind. A gutter margin helps ensure that text isn’t obscured by the binding.
-
On the Page Layout tab, in the Page Setup group, click Margins >Custom Margins.
-
In the Multiple pages list, click Normal.
-
In the Gutter box, enter a width for the gutter margin.
-
In the Gutter position box, click Left or Top.
Note: The Gutter position box is not available when you use the Mirror margins, 2 pages per sheet, or Book fold option. For those options, the gutter position is determined automatically.
-
Click on the text box you created to highlight it.
-
Click on the Format tab in the ribbon.
-
Click the small button in the lower left of the Size group.
-
In the Format Text Box window, click the Text Box tab.
-
In the Internal margin section, you can customize the margins to your desired size.
-
Click OK.
If this article did not answer your question, you can chat with a Microsoft virtual agent or a person at any time.
Need more help?
Microsoft Word computer software has become one of the most widely used tools. It contains a wide variety of functions that make using it a smooth and easy experience. If you have ever wondered how to write on the left or right side margins in Word ; a practical Word solution to achieve this will be presented.
Microsoft Word contains a function called comment. A comment is a note that a writer or reviewer can make on a document.
When you create such a note or comment, a balloon is added to the right side of the Word sheet. This balloon shows all the elements or comments made on the document. They are shown in the margins so as not to modify the layout of the document.
Comments can be used and made visible in the Web Design and Print Design views . It is very easy to create these comments, in addition, they can be edited, answered or deleted. Here are the steps to write in the left or right side margins in Word using the comment option:
Change control.
- Open the document you want to edit and write in the margins .
- Hover over the part of the text where you want to add a comment. You can add a comment for one or more words, paragraphs or on a whole sheet.
- Go to the top menu and choose the “Review” option .
- Later you will see the option ” New comment “, when you click a balloon will appear on the right side of the document.
- Position yourself on the balloon and you can add a new comment. Which will be identified with the name of the user, the date and time it was made.
- Then, you can go to the ” Change control ” option . There you will find the options available for the reviews of the comments written to the sides. With this option you can configure comments and permissions so that other users can review, modify and reply to them.
Right clicking
- Open the document to edit.
- Hover over the text you want to add a comment to. Select by right clicking and dragging the mouse until all the text is shaded.
- Keeping the area highlighted, left click and choose the ” New comment ” option .
- Doing so will enable the balloons on the right side of the document. You can click on the balloon to start writing the notes you want.
To write comment in the side margins
- Open the Word document for editing.
- In the upper menu choose the option ” Insert “.
- You will see that the menu is displayed with all the available options. Now choose the option ” Comment “. When you do this, you will see that the balloon to write the comment appears on the right side of the sheet.
Comments settings
Once the comments are created in the document, their use can be configured. At the same time, in the top menu of Word you must choose the option ” Review “. In fact, there you can access all the options regarding comments. For example, you can delete one or all comments, grant or block permissions, and change the display format.
If you have allowed other users to modify the comments, they can also add comments that will be identified with the username . They can also reply to existing comments. If you have already modified the text and want to delete the comment, you can go to the option resolve comment.
Take advantage of these and other Microsoft Word features . When writing in the left or right side margins in Word using comments. You can easily locate information, add clarifications , modifications, ideas, etc. In short, it is a valuable tool to simplify the use of this computer program.
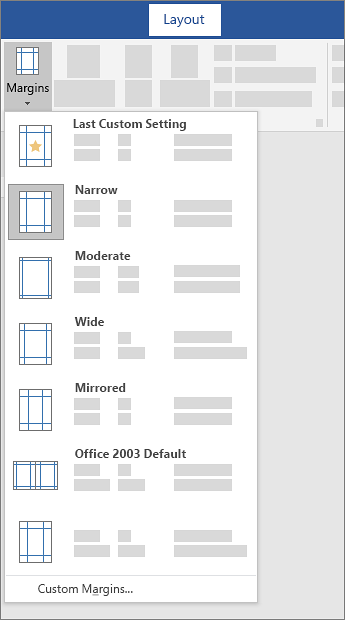
Among other formatting options, Microsoft Word lets you adjust the page layout of a document. Two key factors in this respect are the margins and page orientation. Both of these have a big effect on how a document looks, so check out our guide below to find out how they work.
Margins in Microsoft Word
The margins in a document are the spaces at the edge of each page. You may need to change these to leave space to make notes (e.g., in a college paper). Or you may simply want to control where text appears on the page. In either case, you can adjust the margins in a document by:
- Going to Layout > Page Setup on the main ribbon.
- Clicking Margins and then either:
- Selecting on of the preset margin options.
- Clicking Custom Margins… to open the Page Setup menu and setting the size of the top, bottom, left, and right margins as required.
In Microsoft Word for Windows, you can also access the Page Setup menu by clicking the arrow in the bottom right of the relevant section on the ribbon. Margin options available here include:
- Gutter margin size and position – A gutter margin is extra space on the page used for binding. This won’t be necessary for most documents, but you can add one here if required.
- Mirror margins – Selecting mirror margins from the Multiple Pages submenu will change the “Left” and “Right” margin options to “Inner” and “Outer” margins. This ensures that the margins on facing pages are equal if you’re binding something as a book.
You can also use the Apply To options in the Page Setup menu to control which part of the document you format (e.g., Whole document, This section only, or This point forward). However, you may also want to add your own section breaks for full control over where margin formatting is applied.
Page Orientation
Page orientation refers to whether the document is landscape or portrait. Most documents will be portrait, which is the default in Microsoft Word. But the landscape format can be useful in some cases, such as when a document contains illustrations or charts too wide to fit on a portrait page.
Find this useful?
Subscribe to our newsletter and get writing tips from our editors straight to your inbox.
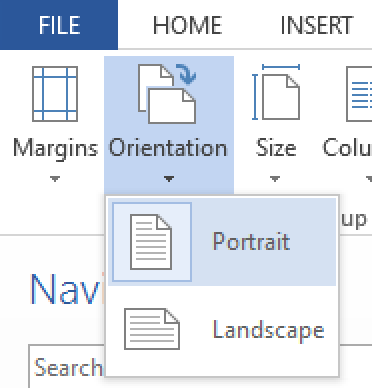
To adjust the page orientation in a whole Microsoft Word document:
- Go to Layout > Page Setup > Orientation on the main ribbon.
- Select either Portrait or Landscape as required.
To change the orientation of part of a document, you will need to either:
- Add section breaks before and after the section you want to format.
- Open the Page Setup window, select an orientation, and pick which part of the document you want to format via the Apply To menu (as described above in relation to margins).
This will let you present one page in a landscape format (e.g., to fit in a chart). But make sure to add section breaks before changing the orientation.

on
September 11, 2012, 1:34 AM PDT
Three ways to display text in the margin of a Word document
Use these simple methods to display text and graphics in the left or right margin of a Word document.
You might think adding text to the margin of a document is a job for publishing software, but Word can handle it. You can use a negative left indent for text that starts in the left margin and then extends into the body of the document. When you want to position text completely in the left margin, alongside normal text, you can use a text box, a column, or even a table. The text box is the easiest method to implement and maintain.
Negative left indent
This first method for displaying text in the margin is the easiest – you simply apply a negative left indent as follows:
- Select the text.
- Click the Paragraph group’s dialog launcher (the small arrow in the bottom-right corner). In Word 2003, choose Paragraph from the Formatting menu.
- Click the Indents and Spacing tab, if necessary.
- In the Indention section, enter a negative Left value, such as -.75.
- Click OK.
If you apply this format often, consider creating a style. This method is certainly easy, but the text extends to the right, beyond the margin – it isn’t confined to the margin. For that, you can use a text box.
Margin text box
When you want to drop text into the margin, as a special visual element, the negative indent won’t do. Fortunately, a text box is easy to insert, format, and position. Before you try this, however, be sure to disable Word’s drawing layer, as follows:
- Click the File tab and choose Options (under Help). In Word 2007, click the Office button and then click Word Options. In Word 2003, choose Options from the Tools menu.
- Click Advanced in the left pane. In Word 2003, click the General tab.
- In the Editing Options section, uncheck the Automatically Create Drawing Canvas When Inserting AutoShapes options. (In Word 2003, it’s in the General Options section.)
- Click OK.
You can still use all the drawing tools; you just won’t have the added headache of working in layers. Now, let’s add the text “Use Quick Styles” to the left of the formatting paragraph in the example document, as follows:
- Click the Insert menu and Click Text Box in the Text group. Then, choose Draw Text Box (from the list below the gallery options). In Word 2003, choose Text Box from the Drawing toolbar (View, Toolbars, Drawing).
- Use the mouse to drag and drop a text box of the approximate size in the margin. Notice that the box is about the same height as the paragraph – that will help us center the text later.
- Enter the text “Use Quick Styles.”
- On the Contextual Format ribbon, choose Middle from the Align Text dropdown in the Text group.
- Choose No Outline from the Shape Outline dropdown in the Shape Styles group.
- Next, click the Home tab and click Italics in the Font group and Center in the Paragraph group. You can also change the font’s color, face, and so on.
In Print Layout (view), Word easily displays the text. You can move the box or apply most any formatting that you like, as long as the drawing layer is disabled. (For more information on Word’s drawing layer, read 10+ ways to avoid drawing layer headaches in Word.)
Anchor to the header
We could easily quit here and have a comprehensive review of adding text to the left margin, but let’s push on. You can also anchor margin text to the header and Word will display it on every page! First, open the header by double-clicking the header section. In Word 2003, choose Header and Footer from the View menu. The technique is essentially the same in both versions, but the header section looks different.
With the header in edit mode, and the cursor in the header section, repeat the steps above to add a text box, format it, and position it in the right margin. As you can see below, I used WordArt and rotated the text box. Then, with the header still in edit mode, I moved it to the right of its corresponding section, within the body of the document. When you’re done, close the header.
In this case, you probably wouldn’t want to display this text on every page, but the technique itself is sound. To edit the text box, you’ll have to work in the header – remember, the text box is actually in the header, regardless of where you position it.
-
Software
Updated: 03/13/2021 by
Changing or setting the margins on a document is sometimes necessary if you need to reduce its number of pages. Reducing the size of the margins can increase the amount of text displayed on each page. Increasing the size of the margins can decrease the amount of text displayed on a page, but it may improve the readability.
Select one of the following links on changing or setting the margins of a document in the program you are using.
Setting margins in most software programs
In general, the margins of any document are usually adjusted through the properties, page properties, or page layout of the document. Below are some more specific ways to adjust the margins in the program you may be using.
Setting margins in Microsoft Word and Excel
Microsoft Word and Excel 2007 and later
- In the Ribbon bar, click the Layout or Page Layout tab, and then click the Margins option.
- Select one of the preset margin options or click Custom Margins to specify the margins you want the document to have. As shown below, the Top, Bottom, Left, and Right margins are set to one inch.
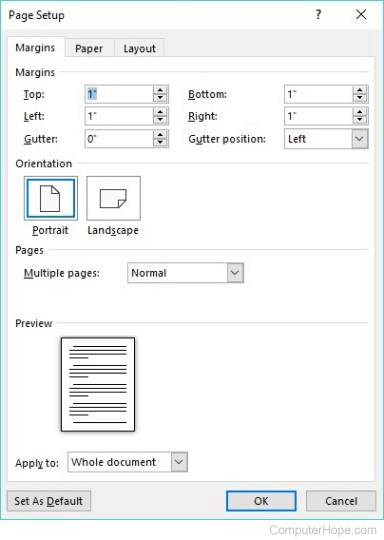
- Click the OK button to set the selected margins.
Microsoft Word and Excel 2003 and earlier
- Click the File menu, then click Page Setup.
- Under the Margins heading, enter the desired margin lengths or use the arrow buttons beside each margin to increase or decrease the margins.
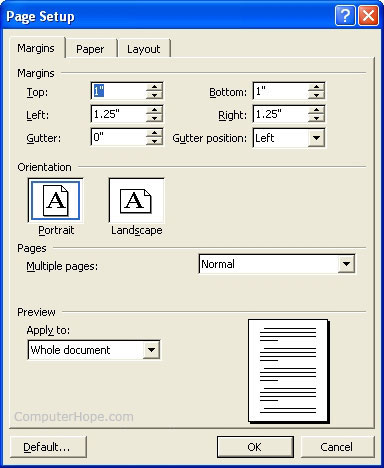
- Click the OK button to set the selected margins.
Setting margins in Google Docs
To set margins in Google Docs, follow the steps below.
- Open the Google Docs document.
- Click File and then Page setup.
- On the Page setup window, you can set the Top, Bottom, Left, and Right margins.

- Click the OK button to set the selected margins.
Setting the margins in WordPad
To set margins in Microsoft WordPad, follow the steps below.
- Click File, and then Page setup.
- On the Page setup window, you can set the Left, Right, Top, and Bottom margins.
- Click the OK button to set the selected margins.
Setting margins in OpenOffice Writer
To set margins in OpenOffice.org Writer, follow the steps below.
- Click the Format menu, then click Page.
- On the Page tab, in the Margins section, enter the desired margin lengths, or use the arrow buttons beside each margin to increase or decrease the margins.
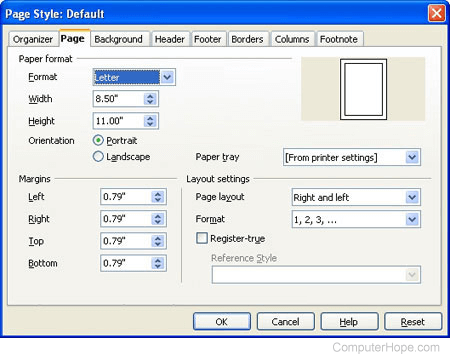
- Click OK to set the selected margins.