
Содержание
- Methods for transferring data to Excel from Visual Basic
- Summary
- More Information
- Use Automation to transfer data cell by cell
- Use automation to transfer an array of data to a range on a worksheet
- Use automation to transfer an ADO recordset to a worksheet range
- Use automation to create a QueryTable on a worksheet
- Use the clipboard
- Create a delimited text file that Excel can parse into rows and columns
- Transfer data to a worksheet by using ADO
- Use DDE to transfer data to Excel
- Методы передачи данных в Excel из Visual Basic
- Аннотация
- Дополнительная информация
- Использование службы автоматизации для передачи данных по ячейкам
- Использование автоматизации для передачи массива данных в диапазон на листе
- Использование автоматизации для передачи набора записей ADO в диапазон листа
- Использование автоматизации для создания таблицы QueryTable на листе
- Использование буфера обмена
- Создание текстового файла с разделителями, который Excel может анализировать по строкам и столбцам
- Передача данных на лист с помощью ADO
- Использование DDE для передачи данных в Excel
Methods for transferring data to Excel from Visual Basic
Summary
This article discusses numerous methods for transferring data to Microsoft Excel from your Microsoft Visual Basic application. This article also presents the advantages and the disadvantages for each method so that you can choose the solution that works best for you.
More Information
The approach most commonly used to transfer data to an Excel workbook is Automation. Automation gives you the greatest flexibility for specifying the location of your data in the workbook as well as the ability to format the workbook and make various settings at run time. With Automation, you can use several approaches for transferring your data:
- Transfer data cell by cell
- Transfer data in an array to a range of cells
- Transfer data in an ADO recordset to a range of cells using the CopyFromRecordset method
- Create a QueryTable on an Excel worksheet that contains the result of a query on an ODBC or OLEDB data source
- Transfer data to the clipboard and then paste the clipboard contents into an Excel worksheet
There are also methods that you can use to transfer data to Excel that do not necessarily require Automation. If you are running an application server-side, this can be a good approach for taking the bulk of processing the data away from your clients. The following methods can be used to transfer your data without Automation:
- Transfer your data to a tab- or comma-delimited text file that Excel can later parse into cells on a worksheet
- Transfer your data to a worksheet using ADO
- Transfer data to Excel using Dynamic Data Exchange (DDE)
The following sections provide more detail on each of these solutions.
Note When you use Microsoft Office Excel 2007, you can use the new Excel 2007 Workbook (*.xlsx) file format when you save the workbooks. To do this, locate the following line of code in the following code examples:
Replace this code with with the following line of code:
Additionally, the Northwind database is not included in Office 2007 by default. However, you can download the Northwind database from Microsoft Office Online.
Use Automation to transfer data cell by cell
With Automation, you can transfer data to a worksheet one cell at a time:
Transferring data cell by cell can be a perfectly acceptable approach if the amount of data is small. You have the flexibility to place data anywhere in the workbook and can format the cells conditionally at run time. However, this approach is not recommended if you have a large amount of data to transfer to an Excel workbook. Each Range object that you acquire at run time results in an interface request so that transferring data in this manner can be slow. Additionally, Microsoft Windows 95 and Windows 98 have a 64K limitation on interface requests. If you reach or exceed this 64k limit on interface requests, the Automation server (Excel) might stop responding or you might receive errors indicating low memory.
Once more, transferring data cell by cell is acceptable only for small amounts of data. If you need to transfer large data sets to Excel, you should consider one of the solutions presented later.
For more sample code for Automating Excel, see How to automate Microsoft Excel from Visual Basic.
Use automation to transfer an array of data to a range on a worksheet
An array of data can be transferred to a range of multiple cells at once:
If you transfer your data using an array rather than cell by cell, you can realize an enormous performance gain with a large amount of data. Consider this line from the code above that transfers data to 300 cells in the worksheet:
This line represents two interface requests (one for the Range object that the Range method returns and another for the Range object that the Resize method returns). On the other hand, transferring the data cell by cell would require requests for 300 interfaces to Range objects. Whenever possible, you can benefit from transferring your data in bulk and reducing the number of interface requests you make.
Use automation to transfer an ADO recordset to a worksheet range
Excel 2000 introduced the CopyFromRecordset method that allows you to transfer an ADO (or DAO) recordset to a range on a worksheet. The following code illustrates how you could automate Excel 2000, Excel 2002, or Office Excel 2003 and transfer the contents of the Orders table in the Northwind Sample Database using the CopyFromRecordset method.
Note If you use the Office 2007 version of the Northwind database, you must replace the following line of code in the code example:
Replace this line of code with the following line of code:
Excel 97 also provides a CopyFromRecordset method but you can use it only with a DAO recordset. CopyFromRecordset with Excel 97 does not support ADO.
For more information about using ADO and the CopyFromRecordset method, see How to transfer data from an ADO recordset to Excel with automation.
Use automation to create a QueryTable on a worksheet
A QueryTable object represents a table built from data returned from an external data source. While automating Microsoft Excel, you can create a QueryTable by simply providing a connection string to an OLEDB or an ODBC data source along with an SQL string. Excel assumes the responsibility for generating the recordset and inserting it into the worksheet at the location you specify. Using QueryTables offers several advantages over the CopyFromRecordset method:
- Excel handles the creation of the recordset and its placement into the worksheet.
- The query can be saved with the QueryTable so that it can be refreshed at a later time to obtain an updated recordset.
- When a new QueryTable is added to your worksheet, you can specify that data already existing in cells on the worksheet be shifted to accommodate the new data (see the RefreshStyle property for details).
The following code demonstrates how you could automate Excel 2000, Excel 2002, or Office Excel 2003 to create a new QueryTable in an Excel worksheet using data from the Northwind Sample Database:
Use the clipboard
The Windows Clipboard can also be used as a mechanism for transferring data to a worksheet. To paste data into multiple cells on a worksheet, you can copy a string where columns are delimited by tab characters and rows are delimited by carriage returns. The following code illustrates how Visual Basic can use its Clipboard object to transfer data to Excel:
Create a delimited text file that Excel can parse into rows and columns
Excel can open tab- or comma-delimited files and correctly parse the data into cells. You can take advantage of this feature when you want to transfer a large amount of data to a worksheet while using little, if any, Automation. This might be a good approach for a client-server application because the text file can be generated server-side. You can then open the text file at the client, using Automation where it is appropriate.
The following code illustrates how you can create a comma-delimited text file from an ADO recordset:
Note If you use the Office 2007 version of the Northwind database, you must replace the following line of code in the code example:
Replace this line of code with the following line of code:
If your text file has a .CSV extension, Excel opens the file without displaying the Text Import Wizard and automatically assumes that the file is comma-delimited. Similarly, if your file has a .TXT extension, Excel automatically parse the file using tab delimiters.
In the previous code sample, Excel was launched using the Shell statement and the name of the file was used as a command line argument. No Automation was used in the previous sample. However, if so desired, you could use a minimal amount of Automation to open the text file and save it in the Excel workbook format:
Transfer data to a worksheet by using ADO
Using the Microsoft Jet OLE DB Provider, you can add records to a table in an existing Excel workbook. A «table» in Excel is merely a range with a defined name. The first row of the range must contain the headers (or field names) and all subsequent rows contain the records. The following steps illustrate how you can create a workbook with an empty table named MyTable.
Excel 97, Excel 2000, and Excel 2003
Start a new workbook in Excel.
Add the following headers to cells A1:B1 of Sheet1:
A1: FirstName B1: LastName
Format cell B1 as right-aligned.
On the Insert menu, choose Names and then select Define. Enter the name MyTable and click OK.
Save the new workbook as C:Book1.xls and quit Excel.
To add records to MyTable using ADO, you can use code similar to the following:
Excel 2007
In Excel 2007, start a new workbook.
Add the following headers to cells A1:B1 of Sheet1:
A1: FirstName B1: LastName
Format cell B1 as right-aligned.
On the Ribbon, click the Formulas tab, and then click Define Name. Type the name MyTable, and then click OK.
Save the new workbook as C:Book1.xlsx, and then quit Excel.
To add records to the MyTable table by using ADO, use code that resembles the following code example.
When you add records to the table in this manner, the formatting in the workbook is maintained. In the previous example, new fields added to column B are formatted with right alignment. Each record that is added to a row borrows the format from the row above it.
You should note that when a record is added to a cell or cells in the worksheet, it overwrites any data previously in those cells; in other words, rows in the worksheet are not «pushed down» when new records are added. You should keep this in mind when designing the layout of data on your worksheets.
The method to update data in an Excel worksheet by using ADO or by using DAO does not work in Visual Basic for Application environment within Access after you install Office 2003 Service Pack 2 (SP2) or after you install the update for Access 2002 that is included in Microsoft Knowledge Base article 904018. The method works well in Visual Basic for Application environment from other Office applications, such as Word, Excel, and Outlook.
For more information, see the following article:
For more information about using ADO to access an Excel workbook, see How To Query and Update Excel Data Using ADO From ASP.
Use DDE to transfer data to Excel
DDE is an alternative to Automation as a means for communicating with Excel and transferring data; however, with the advent of Automation and COM, DDE is no longer the preferred method for communicating with other applications and should only be used when there is no other solution available to you.
To transfer data to Excel using DDE, you can use the LinkPoke method to poke data to a specific range of cell(s), or you use the LinkExecute method to send commands that Excel will execute.
The following code example illustrates how to establish a DDE conversation with Excel so that you can poke data to cells on a worksheet and execute commands. Using this sample, for a DDE conversation to be successfully established to the LinkTopic Excel|MyBook.xls, a workbook with the name MyBook.xls must already be opened in a running instance of Excel.
When you use Excel 2007, you can use the new .xlsx file format to save the workbooks. Make sure that you update the file name in the following code example. In this example, Text1 represents a Text Box control on a Visual Basic form:
When using LinkPoke with Excel, you specify the range in row-column (R1C1) notation for the LinkItem. If you are poking data to multiple cells, you can use a string where the columns are delimited by tabs and rows are delimited by carriage returns.
When you use LinkExecute to ask Excel to carry out a command, you must give Excel the command in the syntax of the Excel Macro Language (XLM). The XLM documentation is not included with Excel versions 97 and later.
DDE is not a recommended solution for communicating with Excel. Automation provides the greatest flexibility and gives you more access to the new features that Excel has to offer.
Источник
Методы передачи данных в Excel из Visual Basic
Аннотация
В этой статье рассматриваются различные методы передачи данных в Microsoft Excel из приложения Microsoft Visual Basic. В этой статье также представлены преимущества и недостатки каждого метода, чтобы можно было выбрать оптимальное решение.
Дополнительная информация
Для передачи данных в книгу Excel чаще всего используется автоматизация. Автоматизация обеспечивает максимальную гибкость при указании расположения данных в книге, а также возможность форматирования книги и создания различных параметров во время выполнения. С помощью службы автоматизации можно использовать несколько подходов для передачи данных:
- Передача ячейки данных по ячейкам
- Передача данных в массиве в диапазон ячеек
- Передача данных из набора записей ADO в диапазон ячеек с помощью метода CopyFromRecordset
- Создание таблицы QueryTable на листе Excel, содержащей результат запроса к источнику данных ODBC или OLEDB
- Передача данных в буфер обмена и вставка содержимого буфера обмена на лист Excel
Существуют также методы, которые можно использовать для передачи данных в Excel, которые не обязательно требуют автоматизации. Если вы работаете на стороне сервера приложений, это может быть хорошим подходом для того, чтобы отойдите от клиентов к массовой обработке данных. Для передачи данных без автоматизации можно использовать следующие методы:
- Передача данных в текстовый файл с разделителями-табуляции или запятыми, который Excel позже может проанализировать в ячейки на листе
- Передача данных на лист с помощью ADO
- Передача данных в Excel с помощью Динамического обмена данными (DDE)
В следующих разделах приведены более подробные сведения о каждом из этих решений.
Примечание При использовании Microsoft Office Excel 2007 можно использовать новый формат файла книги Excel 2007 (*.xlsx) при сохранении книг. Для этого найдите следующую строку кода в следующих примерах кода:
Замените этот код следующей строкой кода:
Кроме того, база данных Northwind по умолчанию не включена в Office 2007. Однако базу данных Northwind можно скачать из Microsoft Office Online.
Использование службы автоматизации для передачи данных по ячейкам
С помощью службы автоматизации можно передавать данные на лист по одной ячейке за раз:
Передача ячеек данных по ячейкам может быть вполне приемлемым подходом, если объем данных невелик. Вы можете размещать данные в любом месте книги и условно форматировать ячейки во время выполнения. Однако этот подход не рекомендуется, если у вас есть большой объем данных для передачи в книгу Excel. Каждый объект Range, полученный во время выполнения, приводит к запросу интерфейса, чтобы передача данных таким образом была медленной. Кроме того, Microsoft Windows 95 и Windows 98 имеют ограничение в 64 КБ на запросы интерфейса. Если вы достигнете или превысите это ограничение в 64 КБ для запросов интерфейса, сервер автоматизации (Excel) может перестать отвечать на запросы или могут возникнуть ошибки, указывающие на нехватку памяти.
Еще раз перенос ячеек данных допускается только для небольших объемов данных. Если вам нужно перенести большие наборы данных в Excel, следует рассмотреть одно из решений, представленных позже.
Дополнительные примеры кода для автоматизации Excel см. в статье «Автоматизация Microsoft Excel из Visual Basic».
Использование автоматизации для передачи массива данных в диапазон на листе
Массив данных можно передать в диапазон из нескольких ячеек одновременно:
При передаче данных с помощью массива, а не ячейки по ячейкам вы можете реализовать огромное повышение производительности с большим объемом данных. Рассмотрим следующую строку из приведенного выше кода, который передает данные в 300 ячеек листа:
Эта строка представляет два запроса интерфейса (один для объекта Range, возвращаемого методом Range, и другой для объекта Range, возвращаемого методом Resize). С другой стороны, для передачи ячейки данных по ячейкам требуются запросы 300 интерфейсов к объектам Range. По возможности вы можете воспользоваться преимуществами массовой передачи данных и сокращения количества запросов интерфейса.
Использование автоматизации для передачи набора записей ADO в диапазон листа
В Excel 2000 представлен метод CopyFromRecordset, который позволяет переносить набор записей ADO (или DAO) в диапазон на листе. В следующем коде показано, как автоматизировать Excel 2000, Excel 2002 или Office Excel 2003 и передавать содержимое таблицы Orders в образце базы данных Northwind с помощью метода CopyFromRecordset.
Примечание Если вы используете версию Office 2007 базы данных Northwind, необходимо заменить следующую строку кода в примере кода:
Замените эту строку кода следующей строкой кода:
Excel 97 также предоставляет метод CopyFromRecordset, но его можно использовать только с набором записей DAO. CopyFromRecordset с Excel 97 не поддерживает ADO.
Дополнительные сведения об использовании ADO и метода CopyFromRecordset см. в статье «Передача данных из набора записей ADO в Excel с помощью автоматизации».
Использование автоматизации для создания таблицы QueryTable на листе
Объект QueryTable представляет таблицу, созданную на основе данных, возвращаемых из внешнего источника данных. При автоматизации Microsoft Excel можно создать таблицу QueryTable, просто указав строку подключения к OLEDB или источнику данных ODBC вместе со строкой SQL. Excel несет ответственность за создание набора записей и его вставку на лист в указанном расположении. Использование таблиц QueryTables дает несколько преимуществ по сравнению с методом CopyFromRecordset:
- Excel обрабатывает создание набора записей и его размещение на листе.
- Запрос можно сохранить с помощью таблицы QueryTable, чтобы его можно было обновить позже, чтобы получить обновленный набор записей.
- При добавлении новой таблицы QueryTable на лист можно указать, что данные, уже существующие в ячейках листа, будут сдвинуты в соответствии с новыми данными (дополнительные сведения см. в свойстве RefreshStyle).
В следующем коде показано, как автоматизировать Excel 2000, Excel 2002 или Office Excel 2003 для создания новой таблицы QueryTable на листе Excel с помощью данных из образца базы данных Northwind:
Использование буфера обмена
Буфер обмена Windows также можно использовать в качестве механизма передачи данных на лист. Чтобы вставить данные в несколько ячеек на листе, можно скопировать строку, в которой столбцы разделены символами табуляции, а строки разделены символами каретки. В следующем коде показано, как Visual Basic может использовать объект буфера обмена для передачи данных в Excel:
Создание текстового файла с разделителями, который Excel может анализировать по строкам и столбцам
Excel может открывать файлы с разделителями-табуляции или запятыми и правильно анализировать данные в ячейках. Эту функцию можно использовать, если вы хотите перенести большой объем данных на лист, используя небольшой объем (при наличии) службы автоматизации. Это может быть хорошим подходом для клиент-серверного приложения, так как текстовый файл может быть создан на стороне сервера. Затем можно открыть текстовый файл на клиенте с помощью службы автоматизации, где это необходимо.
В следующем коде показано, как создать текстовый файл с разделителями-запятыми из набора записей ADO:
Обратите внимание, что при использовании версии Office 2007 базы данных Northwind необходимо заменить следующую строку кода в примере кода:
Замените эту строку кода следующей строкой кода:
Если в текстовом файле есть расширение .CSV, Excel открывает его без отображения мастера импорта текста и автоматически предполагает, что файл разделен запятыми. Аналогичным образом, если файл имеет расширение .TXT, Excel автоматически анализирует файл с помощью разделителей вкладок.
В предыдущем примере кода Excel был запущен с помощью инструкции Оболочки, а имя файла использовался в качестве аргумента командной строки. В предыдущем примере автоматизация не использовалась. Однако при необходимости можно использовать минимальный объем автоматизации, чтобы открыть текстовый файл и сохранить его в формате книги Excel:
Передача данных на лист с помощью ADO
С помощью поставщика Microsoft Jet OLE DB можно добавлять записи в таблицу в существующей книге Excel. «Таблица» в Excel — это просто диапазон с определенным именем. Первая строка диапазона должна содержать заголовки (или имена полей), а все последующие строки — записи. Ниже показано, как создать книгу с пустой таблицей с именем MyTable.
Excel 97, Excel 2000 и Excel 2003
Запустите новую книгу в Excel.
Добавьте следующие заголовки в ячейки A1:B1 листа Sheet1:
A1: FirstName B1: LastName
Отформатировать ячейку B1 как выровненную по правому краю.
В меню «Вставка» выберите «Имена», а затем выберите «Определить». Введите имя MyTable и нажмите кнопку «ОК».
Сохраните новую книгу как C:Book1.xls и закройте Excel.
Чтобы добавить записи в MyTable с помощью ADO, можно использовать следующий код:
Excel 2007
В Excel 2007 запустите новую книгу.
Добавьте следующие заголовки в ячейки A1:B1 листа Sheet1:
A1: FirstName B1: LastName
Отформатировать ячейку B1 как выровненную по правому краю.
На ленте откройте вкладку «Формулы » и выберите команду «Определить имя». Введите имя MyTable и нажмите кнопку «ОК».
Сохраните новую книгу как C:Book1.xlsx и закройте Excel.
Чтобы добавить записи в таблицу MyTable с помощью ADO, используйте код, похожий на следующий пример кода.
При добавлении записей в таблицу таким образом форматирование в книге сохраняется. В предыдущем примере новые поля, добавленные в столбец B, форматируются с выравниванием по правому краю. Каждая запись, добавляемая в строку, заимствует формат из строки над ней.
Обратите внимание, что при добавлении записи в ячейку или ячейки листа она перезаписывает все данные, которые ранее были в этих ячейках. Другими словами, строки на листе не «помещаются вниз» при добавлении новых записей. Это следует учитывать при проектировании макета данных на листах.
Метод обновления данных на листе Excel с помощью ADO или DAO не работает в среде Visual Basic для приложений в Access после установки Пакета обновления 2 (SP2) Office 2003 или после установки обновления для Access 2002, включенного в статью базы знаний Майкрософт 904018. Этот метод хорошо работает в среде Visual Basic для приложений из других приложений Office, таких как Word, Excel и Outlook.
Дополнительные сведения см. в следующей статье:
Дополнительные сведения об использовании ADO для доступа к книге Excel см. в статье «Как запрашивать и обновлять данные Excel с помощью ADO из ASP».
Использование DDE для передачи данных в Excel
DDE — это альтернатива автоматизации в качестве средства взаимодействия с Excel и передачи данных. Однако с появлением автоматизации и COM DDE больше не является предпочтительным методом для взаимодействия с другими приложениями и должен использоваться только в том случае, если вам не доступно другое решение.
Для передачи данных в Excel с помощью DDE можно использовать метод LinkPoke для передачи данных в определенный диапазон ячеек или метод LinkExecute для отправки команд, которые будет выполнять Excel.
В следующем примере кода показано, как установить диалог DDE с Excel, чтобы можно было перенести данные в ячейки на листе и выполнить команды. В этом примере для успешной установки беседы DDE в LinkTopic Excel|MyBook.xls, книга с именем MyBook.xls уже должна быть открыта в работающем экземпляре Excel.
При использовании Excel 2007 для сохранения книг можно использовать новый формат .xlsx файла. Убедитесь, что имя файла обновлено в следующем примере кода. В этом примере Text1 представляет элемент управления Text Box в форме Visual Basic:
При использовании LinkPoke с Excel вы указываете диапазон в нотации столбца строк (R1C1) для LinkItem. Если данные разделяются на несколько ячеек, можно использовать строку, в которой столбцы разделяются вкладками, а строки разделяются символами возврата каретки.
Если вы используете LinkExecute, чтобы попросить Excel выполнить команду, необходимо предоставить Excel команду в синтаксисе языка макросов Excel (XLM). Документация по XLM не входит в excel версий 97 и более поздних версий.
DDE не рекомендуется для взаимодействия с Excel. Автоматизация обеспечивает максимальную гибкость и предоставляет больше доступа к новым функциям, которые предлагает Excel.
Источник
I am trying to create a button on my Access form that takes the current entry and writes the information to an Excel doc
Public Sub ExportExcel()
Dim ObjEx As Object
Dim WhatIsThisVariableFor As Object
Dim Selec As Object
Dim Column As Integer
Dim Row As Integer

Dim CustName As String
Dim Org As String
Dim Contact As String
Dim Product As String
Dim Quantity As Integer

Dim rst As DAO.Recordset

Set ObjEx = CreateObject("EXCEL.APPLICATION")
Set WhatIsThisVariableFor = ObjEx.Workbooks.Add

'Set rst = CurrentDb.OpenRecordset("Select") <---- This will be used when I get the code working
Column = 1
Row = 1
CustName = "Test" '<---- This is only used for the test

Cells(Row, Column) = CustName

ObjEx.Visible = True

Set Selec = ObjEx.Selection
End Sub
This code creates the Excel doc, but leaves it blank. I think that the Cells(Row, Column) command isn’t working because it would have to be called from within excel? I’m not sure (I am very new to VBA)
How can I write to the spreadsheet cells from within Access?
![]()
braX
11.5k5 gold badges20 silver badges33 bronze badges
asked Jan 21, 2019 at 16:25
![]()
You need to qualify your Cells() function to Excel’s application object.
ObjEx.ActiveSheet.Cells(Row, Column).Value = CustName
I would recommend that you also choose the worksheet object explicitly:
Dim ws As object
Set ws = ObjEx.Worksheets("Sheet1")

ws.Cells(row, column).value = CustName
answered Jan 21, 2019 at 16:36
![]()
K.DᴀᴠɪsK.Dᴀᴠɪs
9,89511 gold badges34 silver badges43 bronze badges

 Continuing on the topic of working with files using VBA. Text/binary files are common ways of storing data as opposed to databases or regular Excel files.
Looking at various resources I missed a single resource which would demonstrate the various methods for PROPERLY writing files in VBA. It is important to remember that you shouldn’t write all fills using the same approach. Be aware of the structure of the file. If you want performance – always select the right approach.
Approach #1: The Write function (strings in quotes)
Writing strings of data to text files with quotes:
Dim fileName As String, textData As String, textRow As String, fileNo As Integer
fileName = "C:test.txt"
fileNo = FreeFile 'Get first free file number
textData ="Hello World!"

Open fileName For Output As #fileNo  'Open file for overwriting! Replace Output with Append to append
Write #fileNo, textData
Close #fileNo
This approach will result in the following output:
"Hello, World!"
Notice the “” quotes. Writing further strings will result in appending further strings wrapped in double quotes which might not be a satisfactory approach. Look down to the Print function to avoid these quotes.
To Append to the text file instead of overwriting replace For Output with For Append in the Open fileName For Output As #fileNo
Approach #2: The Print function (dumping strings without quotes)
Writing strings of data to text files without quotes:
Dim fileName As String, textData As String, textRow As String, fileNo As Integer
fileName = "C:test.txt"
fileNo = FreeFile 'Get first free file number

Open fileName For Output As #fileNo 'Open file for overwriting! Replace Output with Append to append
Print #fileNo, textData
Close #fileNo
This approach will result in the following output:
Hello, World!
This time there are no quotes in the file. In most case you will want to use the Print function instead of the Write function
Writing binary files in VBA
Dim fileName As String, fileNo As Integer, testVar As Integer
fileName = "C:test.bin"
testVar = 4
fileNo = FreeFile
Open fileName For Binary Lock Read Write As #fileNo
Put #fileNo, , testVar
Close #fileNo
With Binary files often you will be using objects which are not of fixed byte length like Integers. For example you would want to save Strings. In such cases use the VBA Type object data type.
Below a simple example using the Type data type to save an object with an Integer and String.
Type TestType
    intVar As Integer
    strVar As String
End Type

Sub WriteBinary()
  Dim fileName As String, fileNo As Integer, testVar As TestType
  fileName = "C:test.bin"
  testVar.intVar = 4
  testVar.strVar = "Hello!"
  fileNo = FreeFile
  Open fileName For Binary Lock Read Write As #fileNo
  Put #fileNo, , testVar
  Close #fileNo
End Sub
Writing CSV files in VBA
If you want to save your worksheet as CSV you can always resort to the Text file section. However, this is an ineffective approach. If you want to save your current worksheet as a semicolon delimited file (‘;’) you can use the Workbook.SaveAs function like below.
PathName = "C:test.csv"
'Assuming you want to export your current Worksheet
ActiveSheet.Move 'Move the Worksheet to a new Workbook
ActiveWorkbook.SaveAs Filename:=PathName, FileFormat:=xlCSV, CreateBackup:=False
In case you want to instead copy your worksheet simply replace Move for Copy:
PathName = "C:test.csv"
'Assuming you want to export your current Worksheet
ActiveSheet.Copy 'Copy the Worksheet to a new Workbook
ActiveWorkbook.SaveAs Filename:=PathName, FileFormat:=xlCSV, CreateBackup:=False
Functions needed to write files in VBA
| Function | Description |
|---|---|
| FreeFile | Get next free file number available for the Open statement / FileOpen function. Using this function is important especially when operating on multiple files simultaneously. More info here. |
| BOF(fileNumber) | Returns true if you are at the beginning of the file described by the file number. More info here. |
| EOF(fileNumber) | Returns true if you have reached the end of the file described by the file number. More info here. |
| Loc(fileNumber) | Returns the current read/write position within an open file. More info here. |
| LOF(fileNumber) | Returns the size in bytes of the file represented by the file number. More info here. |
Write file VBA summary
Writing files in VBA is not hard and usually takes just a couple of lines of code. It makes sense however to do it write and be aware of certain traps like not omitting the use of the FreeFile function or knowing the difference between Print and Write.
Write Data to Worksheet Cell in Excel VBA
Description:
In the previous post we have seen, how to read data from excel to VBA. We will see how to write data to Worksheet Cell in Excel VBA.
Write Data to Worksheet Cell in Excel VBA – Solution(s):
![]() It is same as reading the data from Excel to VBA. We can use Cell or Range Object to write into a Cell.
It is same as reading the data from Excel to VBA. We can use Cell or Range Object to write into a Cell.
Write Data to Worksheet Cell in Excel VBA – An Example of using Cell Object
The following example will show you how to write the data to Worksheet Cell using Cell Object.
Example Codes
In this example I am writing the data to first Cell of the Worksheet.
Sub sbWriteIntoCellData()

Cells(1, 1)="Hello World"
'Here the first value is Row Value and the second one is column value
'Cells(1, 1) means first row first column
End Sub
In this example I am writing the data to first row and fourth column of the worksheet.
Sub sbWriteIntoCellData1()

Cells(1, 4)="Hello World"

End Sub
Write Data to Worksheet Cell in Excel VBA – An Example of using Range Object
The following example will show you how to write the data into Worksheet Cell or Range using Range Object.
Example Codes
In this example I am reading the data from first Cell of the worksheet.
Sub sbRangeData()

Range("A1")="Hello World"
'Here you have to specify the Cell Name which you want to read - A is the Column and 1 is the Row

End Sub
Write Data to Worksheet Cell in Excel VBA – Specifying the Parent Objects
When you are writing the data using Cell or Range object, it will write the data into Active Sheet. If you want to write the data to another sheet, you have to mention the sheet name while writing the data.
The below example is reading the data from Range A5 of Sheet2:
Sub sbRangeData1()

Sheets("Sheet2").Range("A5")="Hello World"
'Here the left side part is sheets to refer and the right side part is the range to read.

End Sub
In the same way you can mention the workbook name, if you are writing the data to different workbooks.
A Powerful & Multi-purpose Templates for project management. Now seamlessly manage your projects, tasks, meetings, presentations, teams, customers, stakeholders and time. This page describes all the amazing new features and options that come with our premium templates.
Save Up to 85% LIMITED TIME OFFER

All-in-One Pack
120+ Project Management Templates
Essential Pack
50+ Project Management Templates
Excel Pack
50+ Excel PM Templates
PowerPoint Pack
50+ Excel PM Templates
MS Word Pack
25+ Word PM Templates
Ultimate Project Management Template
Ultimate Resource Management Template
Project Portfolio Management Templates
Related Posts
-
- Description:
- Write Data to Worksheet Cell in Excel VBA – Solution(s):
- Write Data to Worksheet Cell in Excel VBA – An Example of using Cell Object
- Write Data to Worksheet Cell in Excel VBA – An Example of using Range Object
- Write Data to Worksheet Cell in Excel VBA – Specifying the Parent Objects
VBA Reference
Effortlessly
Manage Your Projects
120+ Project Management Templates
Seamlessly manage your projects with our powerful & multi-purpose templates for project management.
120+ PM Templates Includes:
29 Comments
-
Tamil
February 4, 2015 at 4:42 PM — ReplyHi Madam,
the way of tutor is awesome for Beginners. Thanks a lot
Edward Tamil
-
Waris
March 27, 2015 at 11:09 AM — ReplyHi Team,
I am just starting learning ABC of VBA macro, I hope it is very useful site for such learner like me….
Keep it…
Waris
-
JAVAID IQBAL
June 8, 2015 at 4:39 AM — ReplyHi Madam,
the way of tutor is awesome for Beginners.Thanks a lot
-
JAVAID IQBAL
June 8, 2015 at 4:40 AM — ReplyHi Madam,
Awesome for Beginners.
Thanks a lot
-
PNRao
June 8, 2015 at 9:39 AM — ReplyVery nice feedback! Thanks Javid!
Thanks-PNRao! -
Ekram
July 31, 2015 at 2:20 AM — ReplyI have been trying to learn Macro for sometime. And this is the first site that has been very helpful. I would definitely recommend this site for anyone to understand what to command and how. We need more ppl like you. Thank you for being such a awesome person.
-
Yogesh Kumar
August 30, 2015 at 6:53 PM — ReplyHi,
I am wondering for a VBA code to read entire data from active excel sheet and print line by line in immediate window.
I searched a lot but unfortunately I did not get any code. Can you help me ? Thanks in advance…Yogi
-
PNRao
August 30, 2015 at 11:31 PM — ReplyHi Yogesh,
You can loop through each cell in the used range of a worksheet and print in the immediate window, the below code will check the each cell, and it will print if the value is not blank.Sub sbReadEachCellPrintinImmediateWindow() For Each cell In ActiveSheet.UsedRange.Cells If Trim(cell.Value) <> " Then Debug.Print cell.Value Next End SubHope this helps!
Thanks-PNRao! -
Yogesh Kumar
September 1, 2015 at 12:00 PM — ReplyHi PNRao,
Thanks a lot for your help, this code worked. May I know , how to print excel row data line by line ?
I want to print a row data in one line and next row data should be print in next line in immediate window or Is there any way to print entire excel sheet data in tabular form in immediate window. Please let me know if this is possible. Thank you in advance.Thanks
Yogi -
Yogesh Kumar
September 2, 2015 at 11:56 AM — ReplySub show()
Dim Arr() As Variant
Arr = Range(“A1:I12”)
Dim R As Long
Dim C As Long
For R = 1 To UBound(Arr, 1)
For C = 1 To UBound(Arr, 2)
Debug.Print Arr(R, C)
Next C
Next REnd Sub
This code prints a range as column in immediate window. Can any one tell me how to print data line by line ? I want to print one row data in one line and next data from next row should be print in next line in immediate window. Please help. Thanks in advance.
Yogi
-
PNRao
September 2, 2015 at 11:12 PM — ReplyHi Yogesh,
You need a small change in your code, see the below code to print each row in one line. In this example, we are storing all the data in a variable and printing for each record:Sub show() Dim Arr() As Variant Arr = Range("A1:I12") Dim R As Long Dim C As Long For R = 1 To UBound(Arr, 1) strnewRow = " For C = 1 To UBound(Arr, 2) strnewRow = strnewRow & " " & Arr(R, C) Next C Debug.Print strnewRow Next R End SubThanks-PNRao!
-
Yogesh Kumar
September 3, 2015 at 1:31 PM — ReplyThank you very much PNRao. This code prints data exactly as per my need.
You are genius ! Hats off to you. Thanks a lot for your help. -
PNRao
September 3, 2015 at 3:59 PM — ReplyYou are most welcome Yogesh! I am glad you found this useful.
Thanks-PNRao! -
Yogesh Kumar
September 6, 2015 at 2:30 PM — ReplyHi
Sub show()
Dim Arr() As Variant
Arr = Range(“A1:I12″)
Dim R As Long
Dim C As Long
For R = 1 To UBound(Arr, 1)
strnewRow = ”
For C = 1 To UBound(Arr, 2)
strnewRow = strnewRow & ” ” & Arr(R, C)
Next C
Debug.Print strnewRowNext R
End SubIn this code I have to do some modifications that this code can read only even columns. Please help me.
Thanks in advance. -
driqbal
October 16, 2015 at 11:31 PM — ReplyYogesh Kumar September 6, 2015 at 2:30 PM
Reply
you need very little modification
Sub show()Dim Arr() As Variant
Arr = Range(“A1:I12”)
Dim R As Long
Dim C As Long
For R = 1 To UBound(Arr, 1)
strnewRow = “”
For C = 2 To UBound(Arr, 2) step 2
strnewRow = strnewRow & ” ” & Arr(R, C)
Next C
Debug.Print strnewRowNext R
End SubThis code will read only even columns.
-
driqbal
October 16, 2015 at 11:33 PM — ReplySub show()
Dim Arr() As Variant
Arr = Range(“A1:I12”)
Dim R As Long
Dim C As Long
For R = 1 To UBound(Arr, 1)
strnewRow = “”
For C = 1 To UBound(Arr, 2)
strnewRow = strnewRow & ” ” & Arr(R, C)
Next C
Debug.Print strnewRowNext R
End Sub -
Jon
November 6, 2015 at 3:26 PM — ReplyI am a V basic user of excel but have created a time sheet at work, i would like to take the information from these sheets completed by multiple people and bring the m together on one sheet is this possible, is it reasonably simple?
Any help would be great.
-
PNRao
November 7, 2015 at 11:21 AM — ReplyHi Jon,
We can use VBA to combine the data from different sheets and workbooks. It can be done in couple of hours based on the requirement. Please let us know if you want us to do this for you.Thanks-PNRao!
-
Abhishek
November 9, 2015 at 10:44 AM — ReplyHi,
I need one big help . Basically, i have 3 worksheets wherein one is the main template ,other one is mapping sheet and third one is the actual scattered data . Now i have to create a macro and run the same for multiple sheets with multiple formats. So, how we can write the vba code to read the scattered data from the 3rd worksheet and through mapping worksheet we can have the data entered into the main template . As the header available in in main template for eg . description can be different like description-value in the other worksheet having scattered data . So we have to use the mapping sheet to get the correct value .Kindly help
-
PNRao
November 9, 2015 at 3:39 PM — ReplyHi Abhishek,
We can use VBA to read the scattered data from the defined worksheet. It will take 2-3 hours based on the requirement. Please let us know if you want us to do this for you.Thanks-PNRao!
-
David
January 13, 2016 at 11:45 PM — ReplyI have a set of data A1:L171 that needs to be merged to multiple Excel templates. However, I only need B,F,G,H (Client, Date, Time AM, Time PM). So basically what I am looking for is a mail merge but through Excel. Is this possible?
-
Surendra
March 14, 2016 at 9:23 PM — ReplyI want to create a function which can help me to find if any particular cell has special character or not. can anyone help me out. thanks
-
Desk Tyrant
June 24, 2016 at 11:36 AM — ReplyHey,
thanks for the super quick tutorial. This stuff is pretty complicated at times and it’s hard to find solutions on the internet, but this helped me a bit so thanks again.
-
Claire
July 7, 2016 at 9:35 AM — ReplyHi,
I am trying to change the output from a macro that I have designed which is a series of combo boxes – currently the output is across the sheet, with each combo box selection being input into a consecutive column. I’d like them to be input into consecutive rows (so the text appears in a single column).
The current script that I’m using is:Private Sub CommandButton1_Click()
If Me.ComboBox1.Value = “Select” Then
MsgBox “Please select a wildlife health option”, vbExclamation, “Wildlife Health”
Me.ComboBox1.SetFocus
Exit Sub
End If
If Me.ComboBox2.Value = “Select” Then
MsgBox “Please select an option for normal ecology”, vbExclamation, “Normal ecology”
Me.ComboBox2.SetFocus
Exit Sub
End If
If Me.ComboBox3.Value = “Select” Then
MsgBox “Please select an option for disease”, vbExclamation, “Disease”
Me.ComboBox3.SetFocus
Exit Sub
End IfRowCount = Sheets(“Sheet2”).Range(“A1”).CurrentRegion.Rows.Count
With Sheets(“Sheet2”).Range(“A1”)
.Offset(RowCount, 1).Value = Me.ComboBox1.Value
.Offset(RowCount, 2).Value = Me.ComboBox2.Value
.Offset(RowCount, 3).Value = Me.ComboBox3.Value
End With
End SubAny help appreciated.
Regards,
Claire -
Ratish
September 29, 2016 at 7:27 PM — ReplyHi,
I am new to excel, My requirement is if I click a button on excel it should update the highlighted cell with the name of the person who clicked and with the time stamp
-
Man
October 5, 2016 at 12:41 PM — Reply -
Ram
July 8, 2017 at 3:23 PM — ReplyHi, Can some one help me on below request.
i have created excel sheet with data from columns A to E (inputs: column A,B,C,D and output: E)
how to read output (E column) data if i give input data from column A- D though macros.
-
PNRao
July 17, 2017 at 1:56 PM — ReplyExample:
Range("E1")=Range("A1")+Range("B1")+Range("C1")+Range("D1")
If Range("E1")>70 Then
MsgBox "Good"
Else
MsgBox "Try Again"
End If
Hope this helps!
-
Zach
October 19, 2019 at 12:37 AM — ReplyHello,
Thanks for the cell tip, I was only aware of using Range(“A1”) = “text” to print to excel. Is there a way to print text to excel starting at a specified cell but not stating every other following text cells location.
Effectively Manage Your
Projects and Resources
ANALYSISTABS.COM provides free and premium project management tools, templates and dashboards for effectively managing the projects and analyzing the data.
We’re a crew of professionals expertise in Excel VBA, Business Analysis, Project Management. We’re Sharing our map to Project success with innovative tools, templates, tutorials and tips.
Project Management
Excel VBA
Download Free Excel 2007, 2010, 2013 Add-in for Creating Innovative Dashboards, Tools for Data Mining, Analysis, Visualization. Learn VBA for MS Excel, Word, PowerPoint, Access, Outlook to develop applications for retail, insurance, banking, finance, telecom, healthcare domains.
Page load link

3 Realtime VBA Projects
with Source Code!
Go to Top
To save an Excel workbook using VBA, you need to use the SAVE method to write a macro. And in that macro, you need to specify the workbook that you want to save and then use the SAVE method. When you run this code, it works like the keyboard shortcut (Control + S).

- Specify the workbook hat you want to save.
- Type a dot to get the list of all the properties and methods.
- Select the “Save” method out of those or type “Save”
- In the end, run the code to save the workbook.
In this tutorial, we will look at different ways that we can use to save a workbook. So make sure to open the VBA editor from the developer tab to use the code you have in this tutorial.
Helpful Links: Run a Macro – Macro Recorder – Visual Basic Editor – Personal Macro Workbook
Save the ActiveWorkbook
If you want to save the active workbook in that case you can use a code like the following code, instead of specifying the workbook by its name.
ActiveWorkbook.SaveWhen you use the ActiveWorkbook as the workbook, VBA always refers to the workbook which is active despite in which file you are writing the code.
Save the Workbook where you are Writing Code
If you want to save the file where you are writing the code you need to use “ThisWorkbook” instead of the workbook name.
ThisWorkbook.SaveSave All the Open Workbooks
Here we can use a loop to loop through all the workbooks that are open and save them one by one. Look at the below code.
Sub vba_save_workbook()
'variable to use as a workbook
Dim wb As Workbook
'For each to loop through each open workbook and save it
For Each wb In Workbooks
    wb.Save
Next wb
End Sub
The above code uses the FOR EACH loop in each workbook it uses the SAVE method to each file one by one.
Note: If you are trying to save a workbook with the SAVE method that is not saved already, Excel will show a dialog box to ask for your permission to save that file, and then you need to choose if you want to save that file on the default location in the default format.
Now here’s the point: As you are using a macro to save the workbook, that file should be saved in the macro-enabled format and the best way to deal with this situation is to use the SAVE AS method (we’ll see in the next section of this tutorial).
To SAVE a file that is not saved yet, using VBA, you need to use the SAVE AS method. In this method, you can define the file name and the path where you want to save the file, and apart from that, there are ten more arguments that you can define.
expression.SaveAs (FileName, FileFormat, Password, WriteResPassword, ReadOnlyRecommended, CreateBackup, AccessMode, ConflictResolution, AddToMru, TextCodepage, TextVisualLayout, Local)In the following code, you don’t have any argument with the “SAVE AS” method.

When you run this code, it asks you a few things, like, which format you want to use to save the file, do you want to replace the existing file that is already saved with the same name. So it’s better to define the use of some of the arguments.
Save As File on the Current Location
By default, VBA uses the current location to save the file. When you write code with the SAVE AS method and just specify the name that file straight goes to the current folder. You can see in the following code where you have the which saves the active workbook.

Sub save_as_file()
    ActiveWorkbook.SaveAs Filename:="myNewWorkbook"
End Sub
Save As File on a Specific Location
The filename argument also allows you to use the location path in case you want to use a different location to save the file.

Sub save_as_file()
    ActiveWorkbook.SaveAs _
        Filename:="C:UsersDellDesktopmyNewBook"
End Sub
In the above code, you have the path in the FileName argument and VBA uses that path to the file.
Note: You can also use this method to check if a workbook exists in a folder or not before you use the SAVE AS method to save it on a particular location and you can learn more about SAVE AS method from here.
More on VBA Workbooks
VBA Close Workbook | VBA Delete Workbook | VBA ThisWorkbook | VBA Rename Workbook | VBA Activate Workbook | VBA Combine Workbook | VBA Protect Workbook (Unprotect) | VBA Check IF a Workbook is Open | VBA Open Workbook | VBA Check IF an Excel Workbook Exists in a Folder| VBA Create New Workbook (Excel File)
- VBA Workbook
Return to VBA Code Examples
Write Description
Writes data to a sequential file.
Write Syntax
Write #FileNumber, [OutputList]The Write statement contains 2 arguments:
FileNumber: Any valid file number.
OutputList: Optional. One or more comma-delimited numeric expressions or string expressions to write to a file.
Examples of Excel VBA Write Function
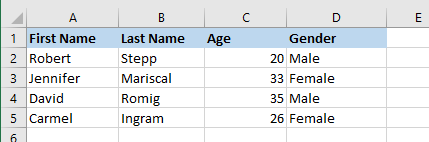
| First Name | Last Name | Age | Gender |
| Robert | Stepp | 20 | Male |
| Jennifer | Mariscal | 33 | Female |
| David | Romig | 35 | Male |
| Carmel | Ingram | 26 | Female |
To output Range(“A2:D5”) in a sheet like the above picture to a file, you can use the following code.
Sub WriteRangeToFile(strFile As String, rng As Range)
    Dim row As Range, cell As Range
    Dim FileNumber As Integer
    FileNumber = FreeFile

    Open strFile For Output As #FileNumber
        For Each row In rng.Rows
            For Each cell In row.Cells
                If cell.Column = row.Cells.Count Then
                    Write #FileNumber, cell
                Else
                    Write #FileNumber, cell,
                End If
            Next cell
        Next row
    Close #FileNumber
End Sub

Sub Write_Example()
    Dim strFolder As String
    Dim strFile As String
    Dim dlgFolder As FileDialog
    Dim rng As Range

    Set dlgFolder = Application.FileDialog(msoFileDialogFolderPicker)

    If dlgFolder.Show = True Then
        strFolder = dlgFolder.SelectedItems(1)
    Else
        Exit Sub
    End If

    Set rng = Range("A1:D5")

    strFile = "Write_Output.txt"
    WriteRangeToFile strFolder & "" & strFile, rng
End Sub
The output to the file “Write_Output.txt”:
"First Name","Last Name","Age","Gender"
"Robert","Stepp","20","Male"
"Jennifer","Mariscal","33","Female"
"David","Romig","35","Male"
"Carmel","Ingram","26","Female"
VBA Coding Made Easy
Stop searching for VBA code online. Learn more about AutoMacro — A VBA Code Builder that allows beginners to code procedures from scratch with minimal coding knowledge and with many time-saving features for all users!

Learn More!
Write Text File in Excel VBA
We all come across with such kind of situation where we had to put huge data in excel files, but eventually, we have faced the situation when the size of that file with the huge data went so up that we had to convert that into a text file. Due to this we could neither work on that file nor saving the file into excel format. This kind of situation we have seen in many projects where we need to extract the data from the database. Extracting the data from the database is possible if use text file for this purpose. The text file doesn’t get hanged and we can store as many data and tables into a single text file without crashing the file. For this, we need to convert the excel file into a text file. Although it is not a big task to when it is a repetitive activity and may take huge time to perform.
To avoid this, we have a process in VBA, with that, we can convert the excel file into a text file without harming the data. By this, we can save a huge set of data in the text file by reducing and compressing the file size as well.
Understanding the VBA code of writing the text file is quite complex but it is not difficult to understand.
Process followed:
- File Path: Putting the path of the file where we have kept the excel file.
- Mode: For what purpose we need to open the file. It can be the read-only mode or writing purpose or we need to use it for appending the data.
- File Number: By this, we can count the number of time we have used for excel file for a text file.
How to Write Text File in Excel VBA?
We will learn how to write a text file using VBA code in excel with a few examples.
You can download this VBA Write Text File Excel Template here – VBA Write Text File Excel Template
Example #1 – VBA Write Text File
In this example, we will see how to map file location with VBA code to write it over the Text file format. For this, we need a module.
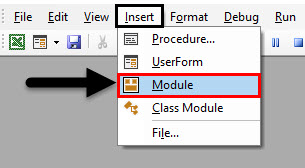
Step 1: Go to Insert menu option and select Module as shown below.
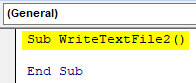
Step 2: Now, in the opened module, write the subcategory of VBA Write Text or we can choose any name as per our choice.
Code:
Sub WriteTextFile2()

End Sub
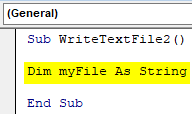
Step 3: In the first step of coding, declare the variable myFile as String as shown below.
Code:
Sub WriteTextFile2()

Dim myFile As String

End Sub
Step 4: In the assigned variable put the location of the file which we need to convert from Excel to Text. Here we have named that file as Test with the extension .txt as shown below.
Code:
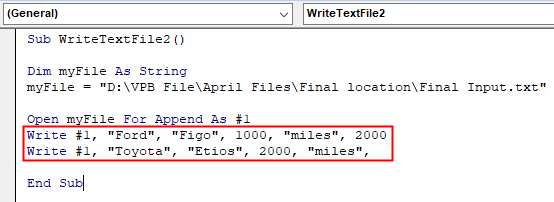
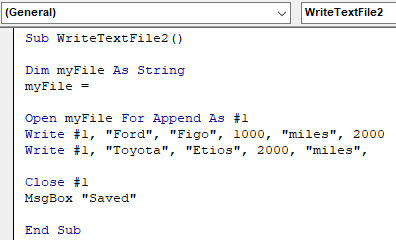
Sub WriteTextFile2()

Dim myFile As String
myFile = "D:VPB FileApril FilesFinal locationFinal Input.txt"

End Sub

Step 5: As we have seen in the description of VBA Write Text File, we will first open the excel file and then append the data from Excel to a Text file with below command line.
Code:
Sub WriteTextFile2()

Dim myFile As String
myFile = "D:VPB FileApril FilesFinal locationFinal Input.txt"

Open myFile For Append As #1
End Sub

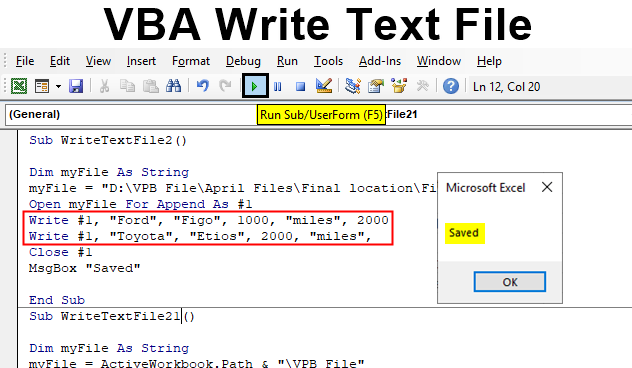
Step 6: Now let’s put some text in a text file which we would like to see as shown below with the help of Write #1 for the first table. We have entered some random car brands with model name and specifications.
Code:
Sub WriteTextFile2()

Dim myFile As String
myFile = "D:VPB FileApril FilesFinal locationFinal Input.txt"

Open myFile For Append As #1
Write #1, "Ford", "Figo", 1000, "miles", 2000
Write #1, "Toyota", "Etios", 2000, "miles",

End Sub
Step 7: Now close the first table as shown below.
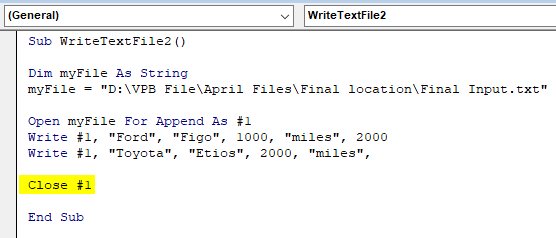
Code:
Sub WriteTextFile2()
Dim myFile As String
myFile = "D:VPB FileApril FilesFinal locationFinal Input.txt"

Open myFile For Append As #1
Write #1, "Ford", "Figo", 1000, "miles", 2000
Write #1, "Toyota", "Etios", 2000, "miles",

Close #1
End Sub
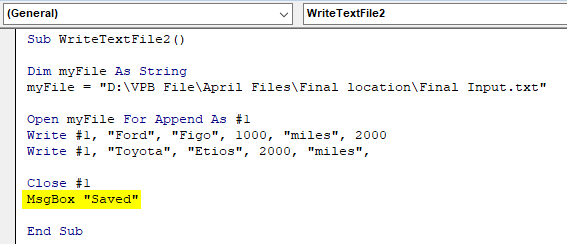
Step 8: We would also like to see the message once the process is done.
Code:
Sub WriteTextFile2()

Dim myFile As String
myFile = "D:VPB FileApril FilesFinal locationFinal Input.txt"

Open myFile For Append As #1
Write #1, "Ford", "Figo", 1000, "miles", 2000
Write #1, "Toyota", "Etios", 2000, "miles",

Close #1
MsgBox "Saved"

End Sub
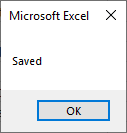
Step 9: Now compile the code and run it by clicking on the Play button located below the menu bar as shown below. If there is no error found, then we would get the message box with the message as Saved as shown below.
Step 10: Now go to the location which we have mentioned in the code above, we will see the text file with the name Test as shown below.
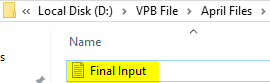
Now to check whether this text file has the same data which we have entered through VBA, open it. We will see the same data has been entered.

Example #2 – VBA Write Text File
There is another way to the same work.
Step 1: In the example, we will use the same code which we have written above but there would be a slight change in the code used. Let’s consider the same code as shown in example-1.
Code:
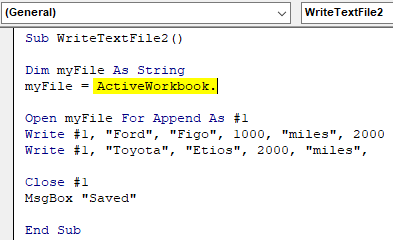
Sub WriteTextFile2()

Dim myFile As String
myFile =

Open myFile For Append As #1
Write #1, "Ford", "Figo", 1000, "miles", 2000
Write #1, "Toyota", "Etios", 2000, "miles",

Close #1
MsgBox "Saved"

End Sub
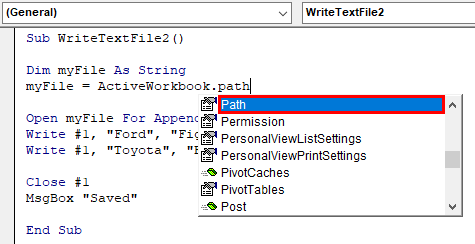
Step 2: Now in place of file location, select the active workbook with ActiveWorkbook as shown below.
Code:
Sub WriteTextFile2()

Dim myFile As String
myFile = ActiveWorkbook.

Open myFile For Append As #1
Write #1, "Ford", "Figo", 1000, "miles", 2000
Write #1, "Toyota", "Etios", 2000, "miles",

Close #1
MsgBox "Saved"

End Sub
Step 3: Now select the Path from the dropdown list of ActiveWorkBook.
Code:
Sub WriteTextFile2()

Dim myFile As String
myFile = ActiveWorkbook.Path

Open myFile For Append As #1
Write #1, "Ford", "Figo", 1000, "miles", 2000
Write #1, "Toyota", "Etios", 2000, "miles",

Close #1
MsgBox "Saved"

End Sub
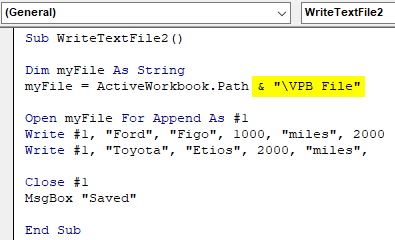
Step 4: Then select the path where we need to append the data into the text file separated by an ampersand.
Code:
Sub WriteTextFile2()

Dim myFile As String
myFile = ActiveWorkbook.Path & "VPB File"

Open myFile For Append As #1
Write #1, "Ford", "Figo", 1000, "miles", 2000
Write #1, "Toyota", "Etios", 2000, "miles",

Close #1
MsgBox "Saved"

End Sub
Step 5: Now again compile the code and run it after that. On the successful completion of run, we will get the message as Saved.

Now again go to that path where we have kept this file which is having the code and see if the Text file is saved there or not.
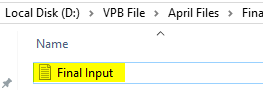
Now open the file to check if the data is properly appended or not. We will find that data is appended in the similar way as it happened in example-1.
Pros of Excel VBA Write Text File
- We don’t even have to open any file to append the data.
- If the data is huge then we can append the data from Excel to Text without opening the file. So, there is no problem in handling the file as well.
- If we go with the process shared in example-2, then we don’t even have to give the path where we want to see the output Text file.
Things to Remember
- In the process shown in example-1, we can place the file in the location where we want to see the output.
- In the process shown in example-2, it will automatically consider the file location which has VBA code of VBA Write Text File.
- We can even select the data from any excel file which we want to convert in the Text file.
- We can select and create any many as a table that we want to append in the Text file.
Recommended Articles
This is a guide to VBA Write Text File. Here we discuss how to write a Text File in Excel using VBA code along with practical examples and a downloadable excel template. You can also go through our other suggested articles –
- VBA InStr
- VBA Integer
- VBA ISNULL
- VBA Text