
For anyone coming here looking for how to do this in C#, I have tried the following method and had success in dotnet core 2.0.3 and entity framework core 2.0.3
First create your model class.
public class User
{
    public string Name { get; set; }
    public int Address { get; set; }
    public int ZIP { get; set; }
    public string Gender { get; set; }
}
Then install EPPlus Nuget package. (I used version 4.0.5, probably will work for other versions as well.)
Install-Package EPPlus -Version 4.0.5
The create ExcelExportHelper class, which will contain the logic to convert dataset to Excel rows. This class do not have dependencies with your model class or dataset.
public class ExcelExportHelper
    {
        public static string ExcelContentType
        {
            get
            { return "application/vnd.openxmlformats-officedocument.spreadsheetml.sheet"; }
        }

        public static DataTable ListToDataTable<T>(List<T> data)
        {
            PropertyDescriptorCollection properties = TypeDescriptor.GetProperties(typeof(T));
            DataTable dataTable = new DataTable();

            for (int i = 0; i < properties.Count; i++)
            {
                PropertyDescriptor property = properties[i];
                dataTable.Columns.Add(property.Name, Nullable.GetUnderlyingType(property.PropertyType) ?? property.PropertyType);
            }

            object[] values = new object[properties.Count];
            foreach (T item in data)
            {
                for (int i = 0; i < values.Length; i++)
                {
                    values[i] = properties[i].GetValue(item);
                }

                dataTable.Rows.Add(values);
            }
            return dataTable;
        }

        public static byte[] ExportExcel(DataTable dataTable, string heading = "", bool showSrNo = false, params string[] columnsToTake)
        {

            byte[] result = null;
            using (ExcelPackage package = new ExcelPackage())
            {
                ExcelWorksheet workSheet = package.Workbook.Worksheets.Add(String.Format("{0} Data", heading));
                int startRowFrom = String.IsNullOrEmpty(heading) ? 1 : 3;

                if (showSrNo)
                {
                    DataColumn dataColumn = dataTable.Columns.Add("#", typeof(int));
                    dataColumn.SetOrdinal(0);
                    int index = 1;
                    foreach (DataRow item in dataTable.Rows)
                    {
                        item[0] = index;
                        index++;
                    }
                }


                // add the content into the Excel file
                workSheet.Cells["A" + startRowFrom].LoadFromDataTable(dataTable, true);

                // autofit width of cells with small content
                int columnIndex = 1;
                foreach (DataColumn column in dataTable.Columns)
                {
                    int maxLength;
                    ExcelRange columnCells = workSheet.Cells[workSheet.Dimension.Start.Row, columnIndex, workSheet.Dimension.End.Row, columnIndex];
                    try
                    {
                        maxLength = columnCells.Max(cell => cell.Value.ToString().Count());
                    }
                    catch (Exception) //nishanc
                    {
                        maxLength = columnCells.Max(cell => (cell.Value +"").ToString().Length);
                    }

                    //workSheet.Column(columnIndex).AutoFit();
                    if (maxLength < 150)
                    {
                        //workSheet.Column(columnIndex).AutoFit();
                    }


                    columnIndex++;
                }

                // format header - bold, yellow on black
                using (ExcelRange r = workSheet.Cells[startRowFrom, 1, startRowFrom, dataTable.Columns.Count])
                {
                    r.Style.Font.Color.SetColor(System.Drawing.Color.White);
                    r.Style.Font.Bold = true;
                    r.Style.Fill.PatternType = OfficeOpenXml.Style.ExcelFillStyle.Solid;
                    r.Style.Fill.BackgroundColor.SetColor(Color.Brown);
                }

                // format cells - add borders
                using (ExcelRange r = workSheet.Cells[startRowFrom + 1, 1, startRowFrom + dataTable.Rows.Count, dataTable.Columns.Count])
                {
                    r.Style.Border.Top.Style = ExcelBorderStyle.Thin;
                    r.Style.Border.Bottom.Style = ExcelBorderStyle.Thin;
                    r.Style.Border.Left.Style = ExcelBorderStyle.Thin;
                    r.Style.Border.Right.Style = ExcelBorderStyle.Thin;

                    r.Style.Border.Top.Color.SetColor(System.Drawing.Color.Black);
                    r.Style.Border.Bottom.Color.SetColor(System.Drawing.Color.Black);
                    r.Style.Border.Left.Color.SetColor(System.Drawing.Color.Black);
                    r.Style.Border.Right.Color.SetColor(System.Drawing.Color.Black);
                }

                // removed ignored columns
                for (int i = dataTable.Columns.Count - 1; i >= 0; i--)
                {
                    if (i == 0 && showSrNo)
                    {
                        continue;
                    }
                    if (!columnsToTake.Contains(dataTable.Columns[i].ColumnName))
                    {
                        workSheet.DeleteColumn(i + 1);
                    }
                }

                if (!String.IsNullOrEmpty(heading))
                {
                    workSheet.Cells["A1"].Value = heading;
                   // workSheet.Cells["A1"].Style.Font.Size = 20;

                    workSheet.InsertColumn(1, 1);
                    workSheet.InsertRow(1, 1);
                    workSheet.Column(1).Width = 10;
                }

                result = package.GetAsByteArray();
            }

            return result;
        }

        public static byte[] ExportExcel<T>(List<T> data, string Heading = "", bool showSlno = false, params string[] ColumnsToTake)
        {
            return ExportExcel(ListToDataTable<T>(data), Heading, showSlno, ColumnsToTake);
        }
    }
Now add this method where you want to generate the excel file, probably for a method in the controller. You can pass parameters for your stored procedure as well. Note that the return type of the method is FileContentResult. Whatever query you execute, important thing is you must have the results in a List.
[HttpPost]
public async Task<FileContentResult> Create([Bind("Id,StartDate,EndDate")] GetReport getReport)
{
    DateTime startDate = getReport.StartDate;
    DateTime endDate = getReport.EndDate;

    // call the stored procedure and store dataset in a List.
    List<User> users = _context.Reports.FromSql("exec dbo.SP_GetEmpReport @start={0}, @end={1}", startDate, endDate).ToList();
    //set custome column names
    string[] columns = { "Name", "Address", "ZIP", "Gender"};
    byte[] filecontent = ExcelExportHelper.ExportExcel(users, "Users", true, columns);
    // set file name.
    return File(filecontent, ExcelExportHelper.ExcelContentType, "Report.xlsx");
}
More details can be found here
There are several ways to Export/Import SQL Server data to an Excel file. In this article, a couple of ways to import and export SQL Server data to an Excel file will be explained:
- Export SQL Server data to an Excel file using
- the SQL Server Import and Export Wizard
- T-SQL code
- Export to Excel from ApexSQL Complete
- Import SQL Server data into Excel using the Data Connection Wizard
In SQL Server Management Studio (SSMS), there is a feature that provides for exporting data from one data source to another data source; in this case, data from SQL Server will be copied to an Excel file trough Export Wizard.
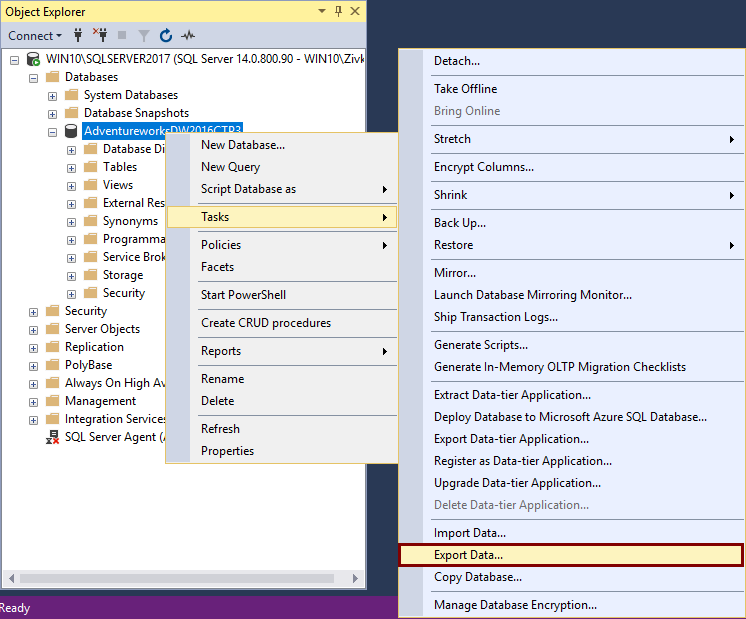
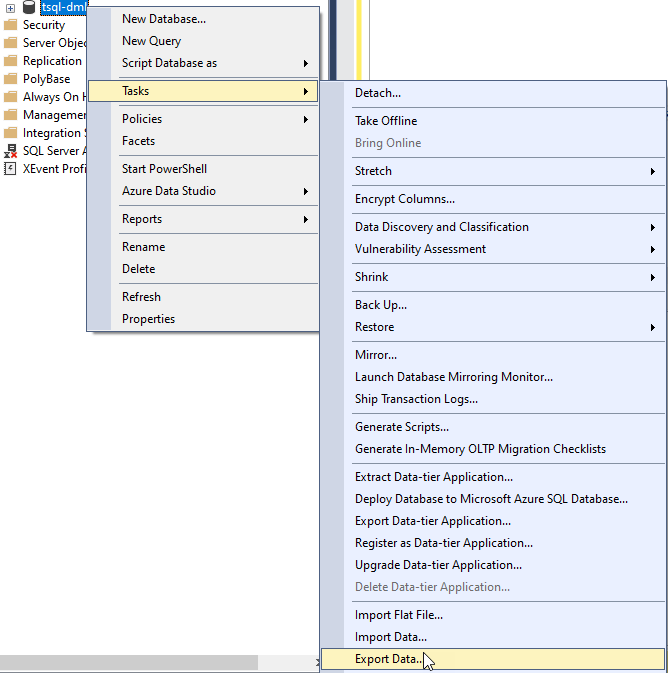
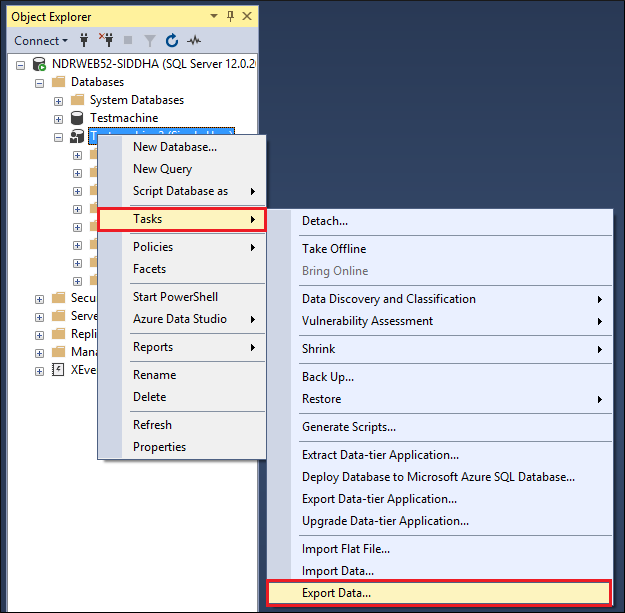
To start to use this feature, go to Object Explorer, right click on any database (e.g. AdventureworksDW2016CTP3), under the Tasks, choose Export Data command:
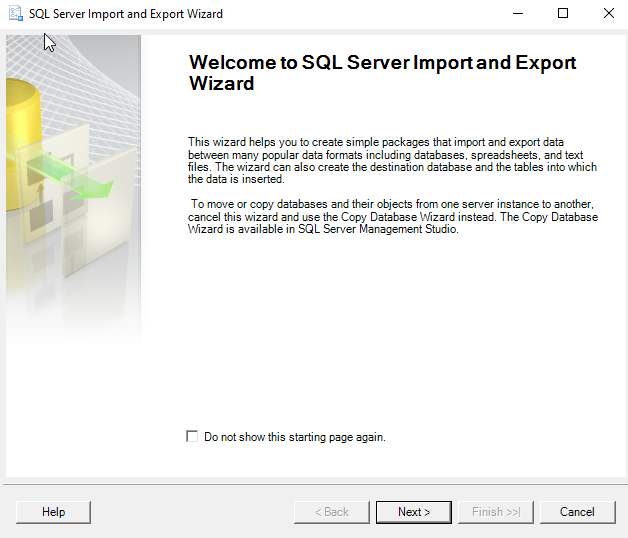
This will open the SQL Server Import and Export Wizard window:
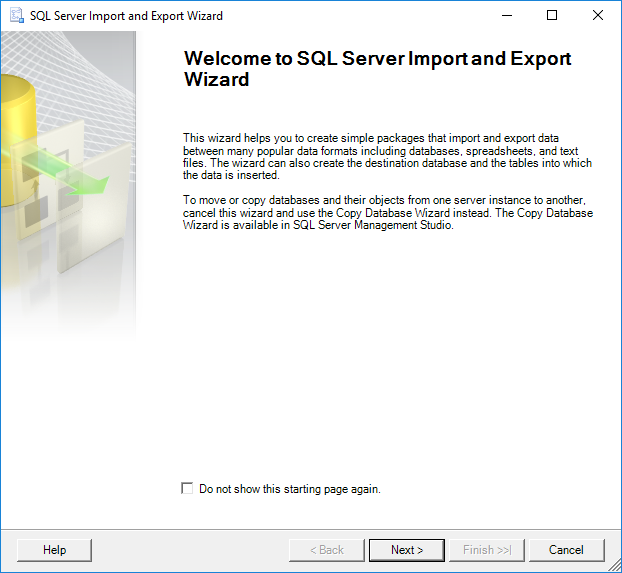
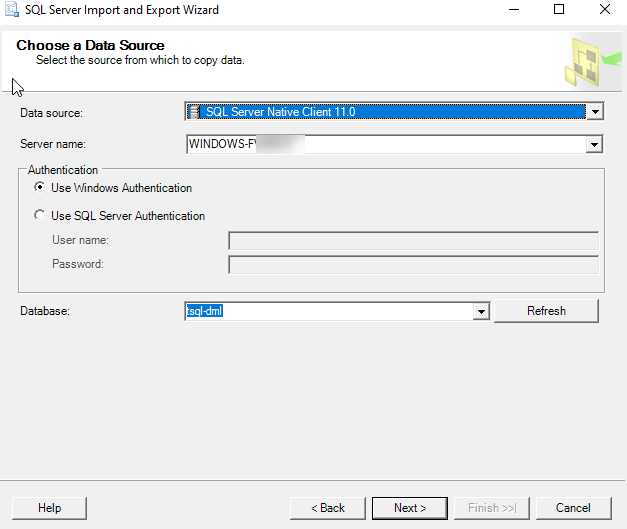
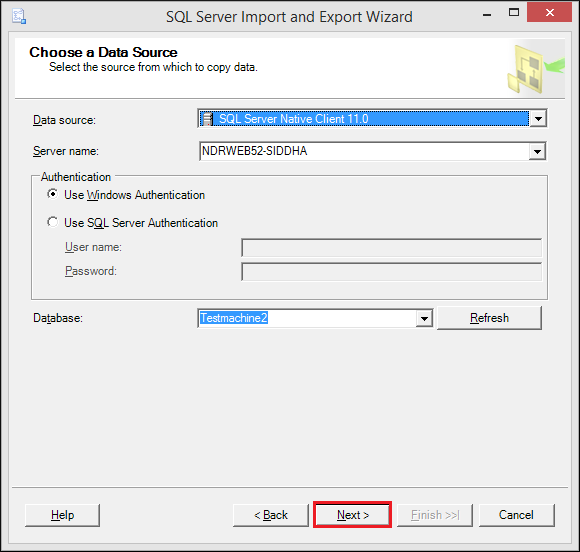
To proceed with exporting SQL Server data to an Excel file, click the Next button. This will open the Choose a Data Source window. On this window, a source from which you want to copy data can be chosen:
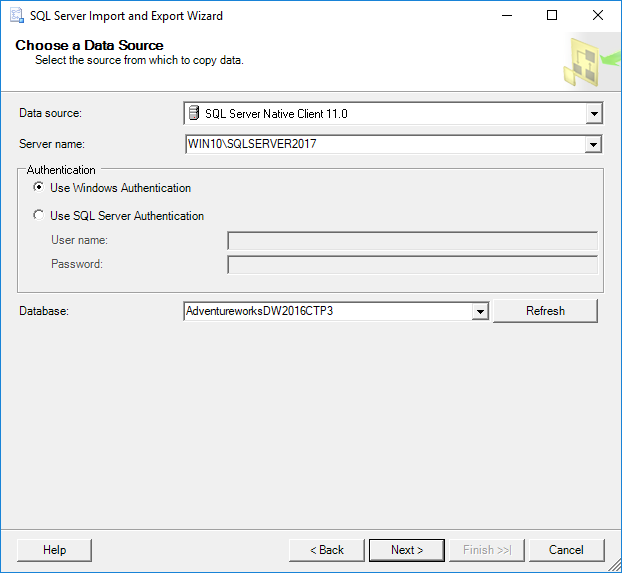
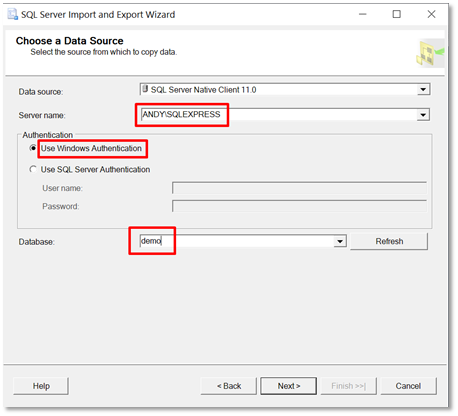
From the Data source drop down box, choose the SQL Server Native Client 11.0 item. Under the Server name drop down box, choose the SQL Server instance from which data need to be copied. In the Authentication section, choose the authentication mode for the data source connection and under the Database drop down box, choose the database from which the data will be copied. After all these options are set, click the Next button to proceed.
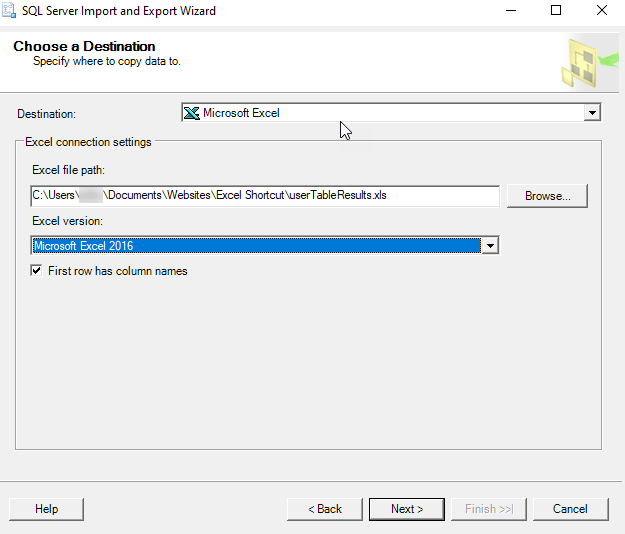
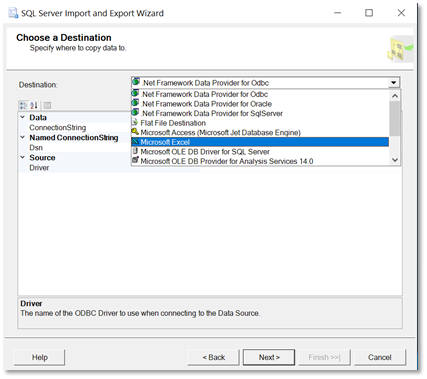
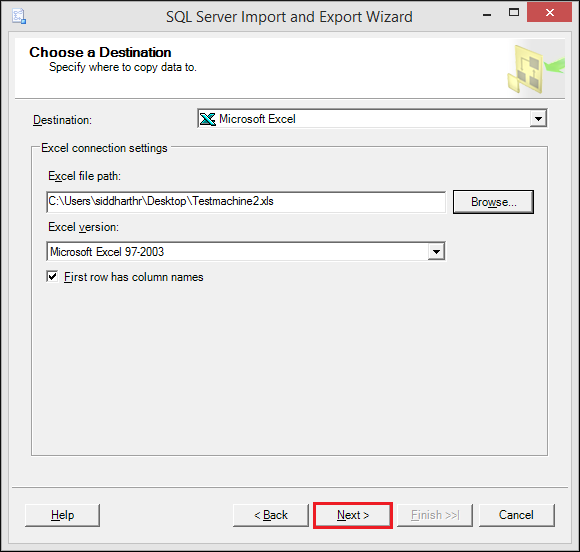
This will open the Choose a Destination window in which can be specified where to copy data from the data source:

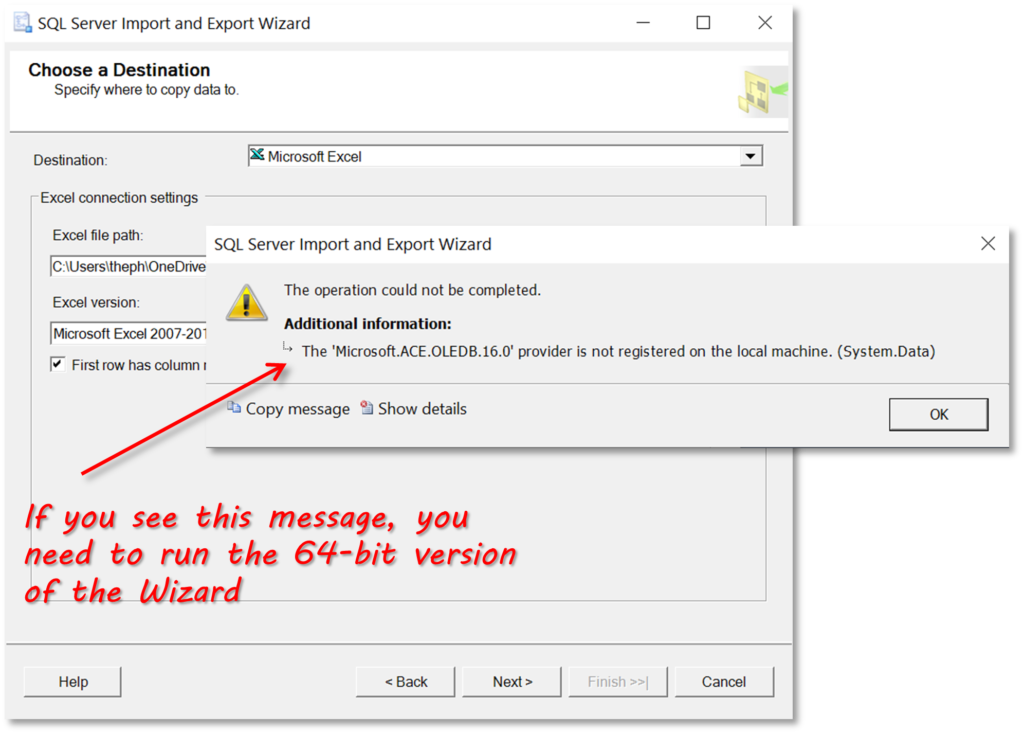
In the Destination drop down box, choose the Microsoft Excel item. Under the Excel file path, choose the destination for copied data from SQL Server data source (SQL Data.xlsx). In the Excel version drop down box, choose the version of the Microsoft Excel worksheet. After these are all set, press the Next button to continue. But after pressing the Next button, the following warning message may appear:
The operation could not be completed.
ADDITIONAL INFORMATION:
The ‘Microsoft.ACE.OLEDB.12.0’ provider is not registered on the local machine. (System.Data)
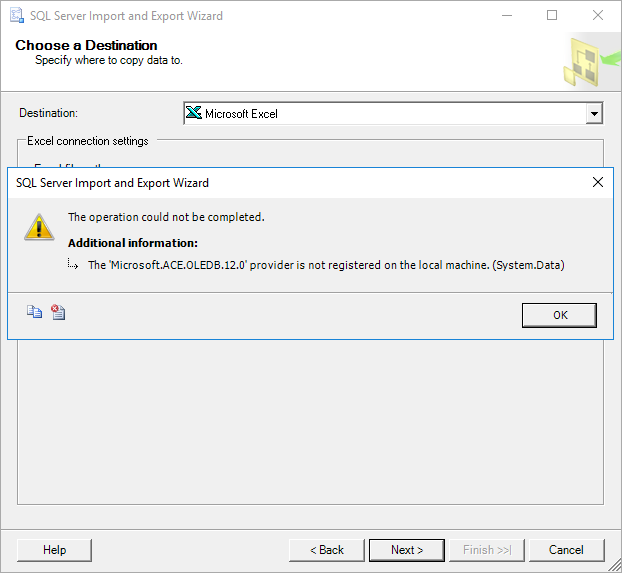
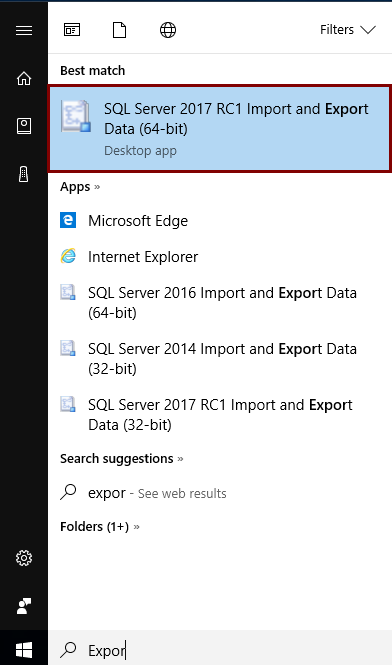
This happens because SSMS is a 32-bit application and when you launch the Export Wizard via SSMS, it launches a 32-bit version of Export Wizard. On the other hand, the machine (Operating system) on which SSMS is installed is a 64-bit version and the installed SQL Server is a 64-bit version.
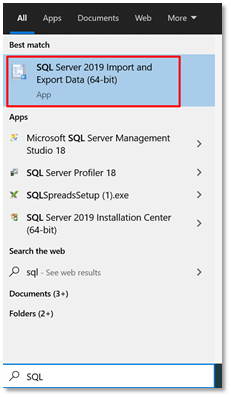
To solve this problem, close SSMS, go to the Start menu and find the 64-bit version of SQL Server Import and Export Data:
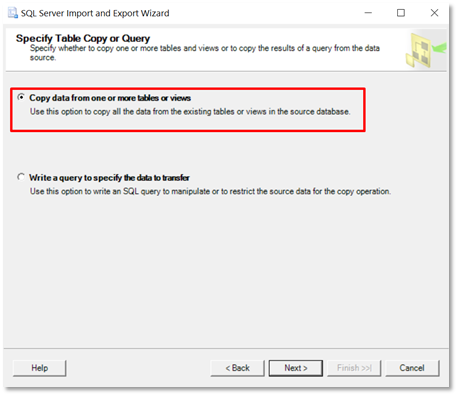
After launching this SQL Server Import and Export Wizard, it will be prompted with the same window that is used via SSMS. After setting all previous options, click the Next button. The Specify Table Copy or Query window will appear:
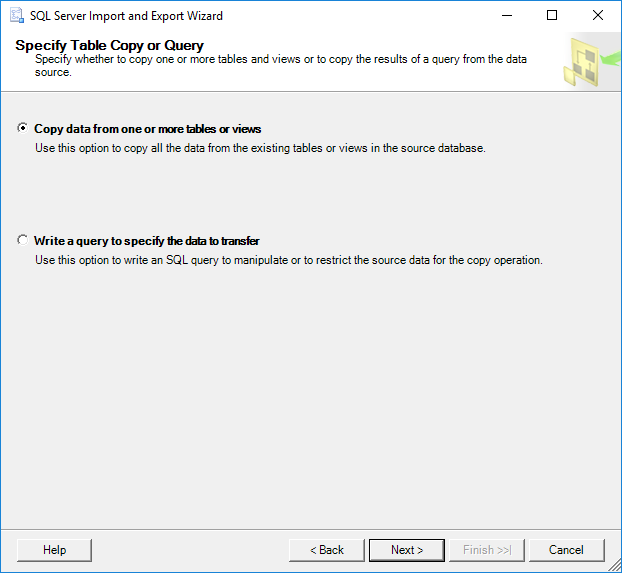
On this window, whether to copy data from one or more tables and views or to copy the results of a query can be specified.
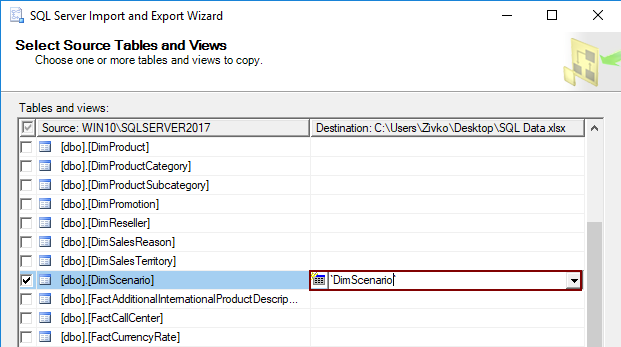
Select the Copy data from one or more tables or views radio button and click the Next button. The Select Source Table and Views window allows choosing one or more tables and views from which you want to export SQL Server data to an Excel file by clicking the check box next to the name of the table/view:
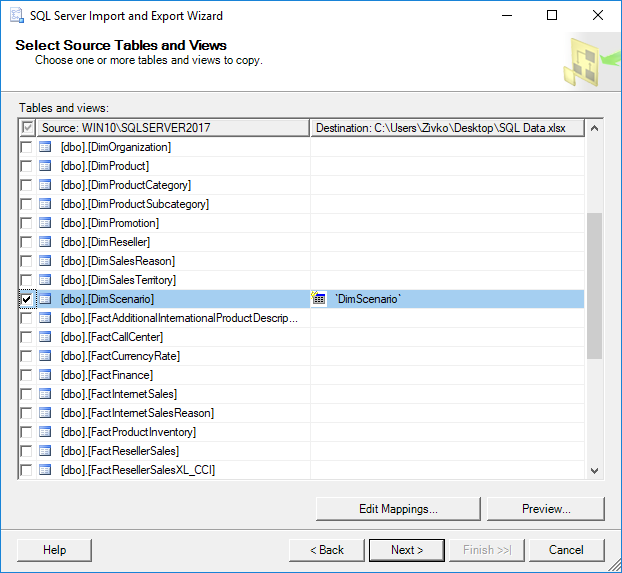
As it may be noticed, as soon as the check box next to a table/view is checked, the name of the table/view will be copied under the Destination column. This name represents the name of the sheet where the data from the table will be put, this name can be changed to whatever you like, but for now, it will be left as it is:
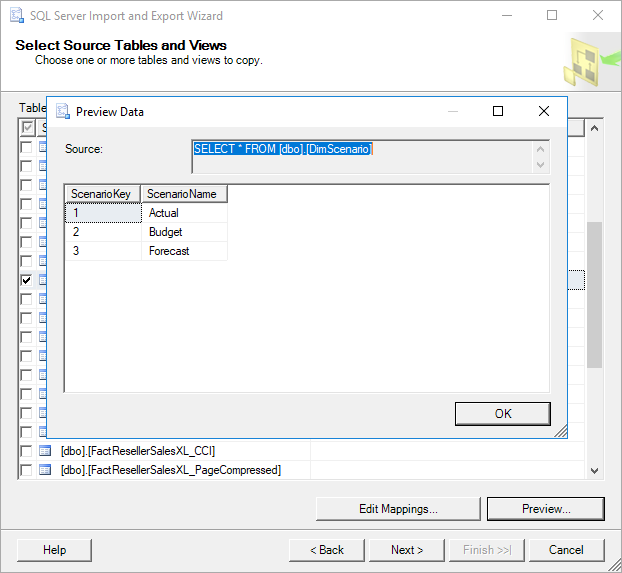
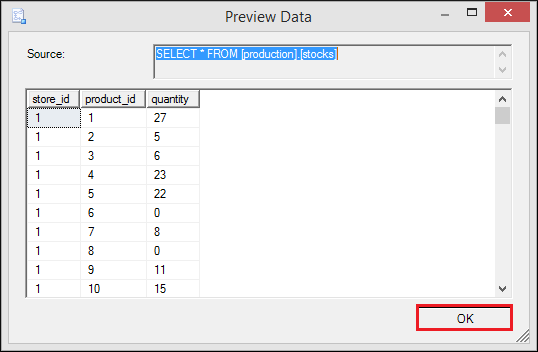
To preview which data will be generated to an Excel file, click the Preview button:
After choosing which tables/views data will be copied to an Excel file, click the Next button:
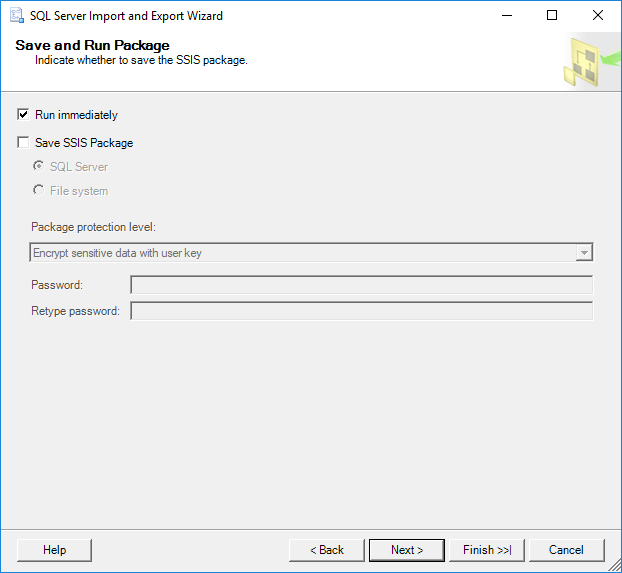
On the Save as Run Package window, check the Run immediately check box and click the Next button:
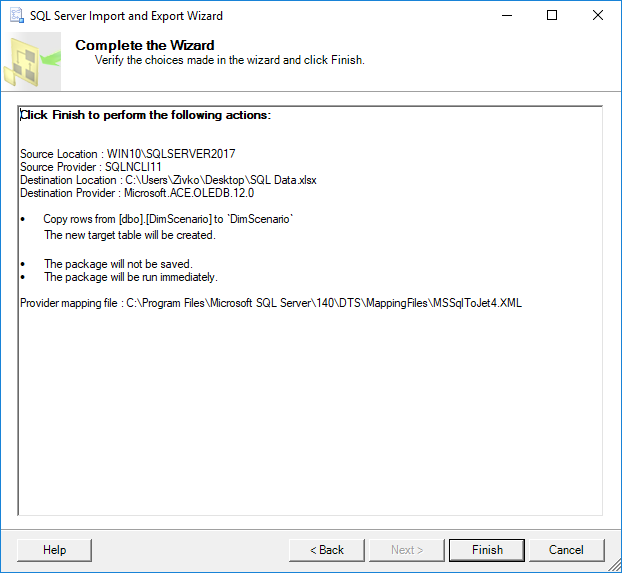
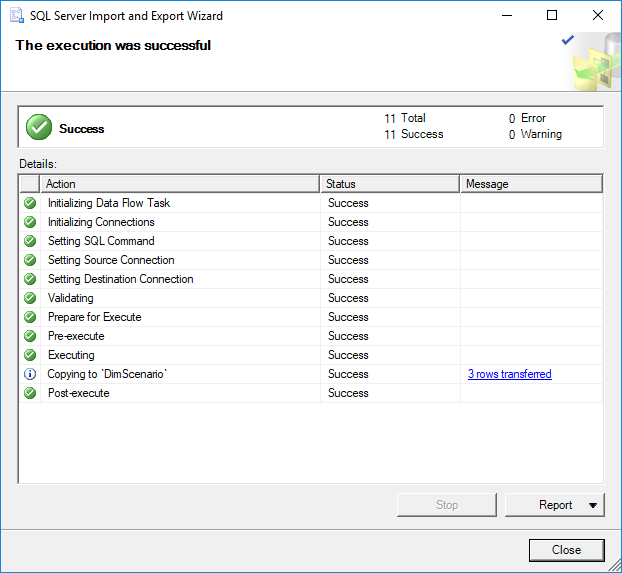
The Complete the Wizard window shows all options that are chosen for exporting operations. To finalize the process of export SQL Server data to an Excel file, click the Finish button. The last SQL Server Import and Export Wizard window shows the state of the data have been successfully exported or some errors occurred during exporting data:
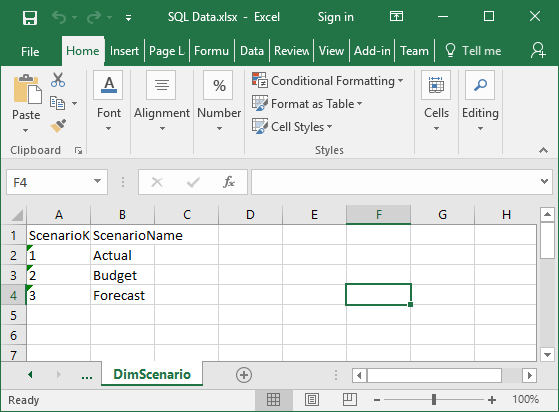
In our case, the data were successfully generated into the SQL Data.xlsx file in the DimScenario sheet:
Export SQL Server data to an Excel file using T-SQL code
The Transact-SQL OPENROWSET can be used to export SQL Server data to an Excel file via SSMS. In a query editor type and execute the following code:
INSERT INTO OPENROWSET('Microsoft.ACE.OLEDB.12.0','Excel 12.0;
Database=C:UsersZivkoDesktopSQL Data.xlsx;','SELECT * FROM [Sheet1$]')
SELECT * FROM dbo.DimScenario
But, when executing the above code, the following error may occur:
Msg 15281, Level 16, State 1, Line 1
SQL Server blocked access to STATEMENT ‘OpenRowset/OpenDatasource’ of component ‘Ad Hoc Distributed Queries’ because this component is turned off as part of the security configuration for this server. A system administrator can enable the use of ‘Ad Hoc Distributed Queries’ by using sp_configure. For more information about enabling ‘Ad Hoc Distributed Queries’, search for ‘Ad Hoc Distributed Queries’ in SQL Server Books Online.
To resolve this error the Ad Hoc Distributed Queries option should be enabled This can be done by using the sp_configure procedure and executing the following SQL code in a query editor:
EXEC sp_configure 'show advanced options', 1
RECONFIGURE
EXEC sp_configure 'Ad Hoc Distributed Queries', 1
RECONFIGURE
After executing the above code, the following message will appear that indicate that the show advanced options and Ad Hoc Distributed Queries options are enabled:
Configuration option ‘show advanced options’ changed from 0 to 1. Run the RECONFIGURE statement to install.
Configuration option ‘Ad Hoc Distributed Queries’ changed from 0 to 1. Run the RECONFIGURE statement to install.
Now, when again the code is executed:
INSERT INTO OPENROWSET('Microsoft.ACE.OLEDB.12.0','Excel 12.0;
Database=C:UsersZivkoDesktopSQL Data.xlsx;','SELECT * FROM [Sheet1$]')
SELECT * FROM dbo.DimScenario
The following error may appear:
OLE DB provider “Microsoft.ACE.OLEDB.12.0” for linked server “(null)” returned message “The Microsoft Access database engine cannot open or write to the file ”. It is already opened exclusively by another user, or you need permission to view and write its data.”.
Msg 7303, Level 16, State 1, Line 1
Cannot initialize the data source object of OLE DB provider “Microsoft.ACE.OLEDB.12.0” for linked server “(null)
This usually happens because of inadequate permissions.
More about how to resolving these issues can be found in the How to query Excel data using SQL Server linked servers page.
One way for resolving this issue is to open SSMS as an administrator and execute the code again. But this time, another error may appear:
Msg 213, Level 16, State 1, Line 1
Column name or number of supplied values does not match table definition.
To resolved this, open excel file (e.g. SQL Data.xlsx) for which is planned to store the data from SQL Server table (e.g. dbo.DimScenario) and enter the column names which will represent the column names from the DimScenario table:
Close the SQL Data.xlsx file and once again execute the code:
Now, the following message will appear:
(3 rows affected)
Finally, the data from the SQL Server table are copied into the Excel file:
Import SQL Server data into Excel using the Data Connection Wizard dialog
Another way to copy data from SQL Server table to an Excel file is to use the Data Connection Wizard dialog from Excel.
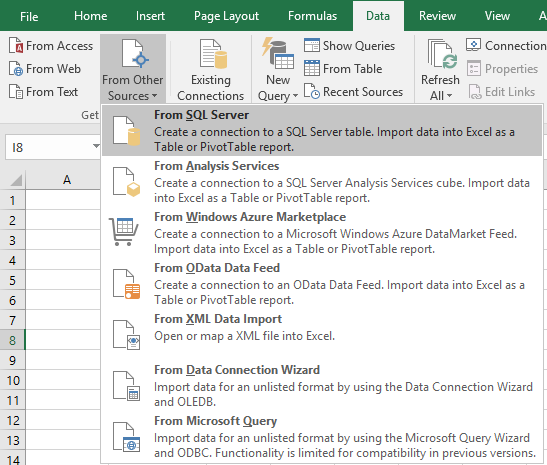
In order to achieve that, open an Excel file (e.g. SQL Data.xlsx) in which you want to import data. In the Data tab, under the From Other Source sub-menu, choose the From SQL Server command:
This will open the Data Connection Wizard dialog. In the Server name, enter a name of the SQL Server instance from which data need to be copied. In the Log on credentials section, choose the authentication mode for the data source connection and click the Next button:

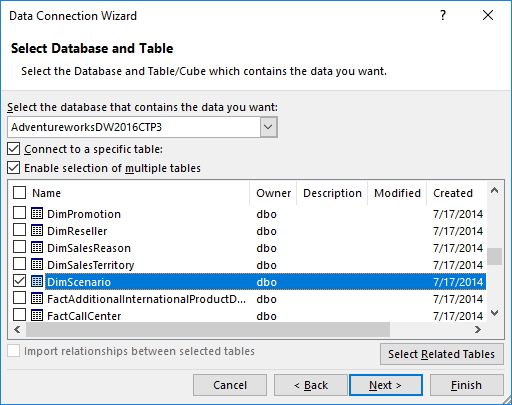
From the Select the database that contains the data you want drop down box, choose the database from which the data will be copied. In the grid, all available tables and views will be listed. Choose a desired table / view (e.g. DimScenario) and click the Next button to proceed.
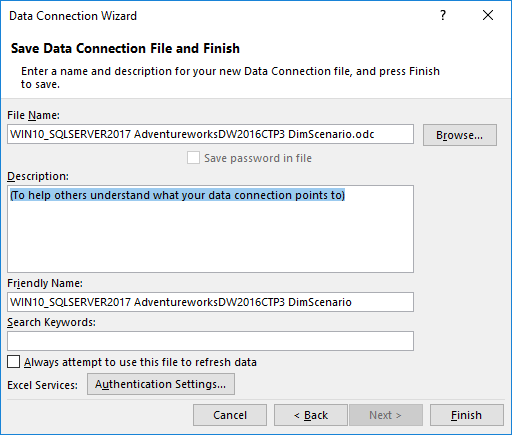
On this window, leave everything as it is and press the Finish button:
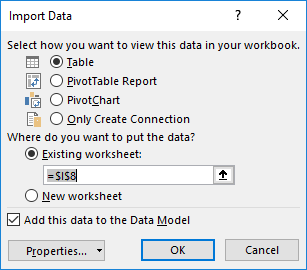
In the Import Data dialog, choose the Table radio button, under the Where do you want to put the data? section, choose the Existing worksheet radio button and press the OK button:
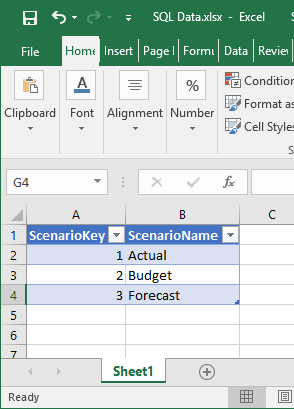
After pressing the OK button, the data from the DimScenario table will be copied to the SQL Data.xslx file:
Export SQL Server data to an Excel file using Export to Excel from ApexSQL Complete
Using the Export to Excel feature from ApexSQL Complete, add-in for SSMS and Visual Studio, exporting data from the SQL Server table to an Excel file can be done by one click.
In a query editor, type and execute the following code:
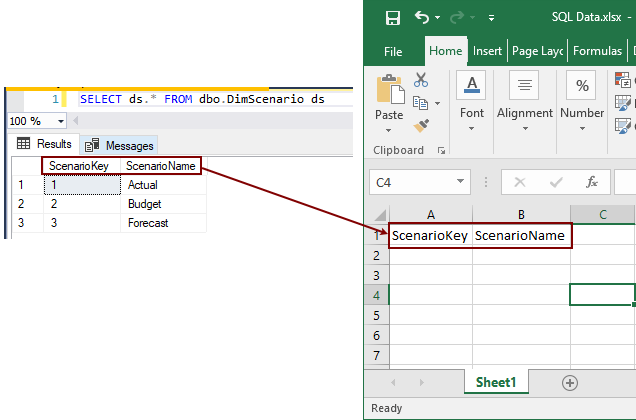
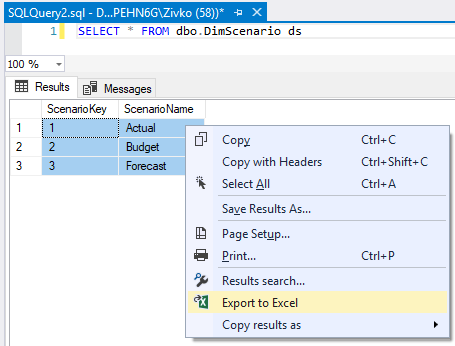
SELECT * FROM dbo.DimScenario ds
From the Results grid, select data that you want to export to an Excel file, right click in the Result grid and, from the context menu, choose the Export to Excel option:
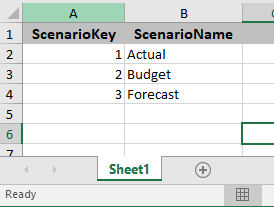
This will open a new Excel workbook and the selected data from the Results grid will be copied in the first worksheet:
More about exporting to Excel via ApexSQL Complete can be found on the Export to Excel page.
See also:
- Tutorial: Import Data into Excel, and Create a Data Model
- Get started with this simple example of the Import and Export Wizard
- How to query Excel data using SQL Server linked servers
- Export to Excel
September 11, 2017
Export SQL Data to Excel from Microsoft SQL Server
Let’s go over three ways to export an SQL Query to an Excel File Using MSSQL
Despite the pushback from Database aficionados, sometimes it makes sense to export data from SQL to an Excel file. It really depends on who is the audience of the information. Not everyone is great with SQL Analysis. Few people require access to the database.
And lots of times the boss just needs to see the information in Excel.
So, if Excel is the Output required this article is here to help you Export SQL Queries to Excel.
Here are three ways to Export a SQL query to Excel format. The last one can be kind of tricky. I’ll provide a condensed version followed by a detailed version with screenshots.
Three quick ways to Export SQL Data to Excel:
Choose the Summarized Version and then scroll to further down to use the SQL Export Version to Excel that works best for you.
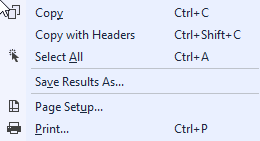
Method Number 1 – Copy Grid results and Paste into Excel
Under Query, Make sure results to Grid are selected.
After Running your query, right-click the top right corner of the grid.
Copy With Headers.
Paste into an Excel File
Possible Issues:
I’ve seen formatting issues with this strategy. For Example, there are situations where the spreadsheet drops preceding zeroes after the copy-paste.
I’ve also noticed lengthy fields, (think of a really long free text field) end up running into the next line.
For the reasons above, I prefer this next method for a clean Excel file.
Method Number 2: Export the Query Results as a Task
In the object explorer window, find the database you want to export from.
Right Click the Database, Click Tasks, and Export Data
The Wizard walks you through the rest of the steps but I have included screenshots below.
Method Number 3 – Use Good Old fashioned TSQL to send the data to an excel file
For those who value speed above all use the following script format.
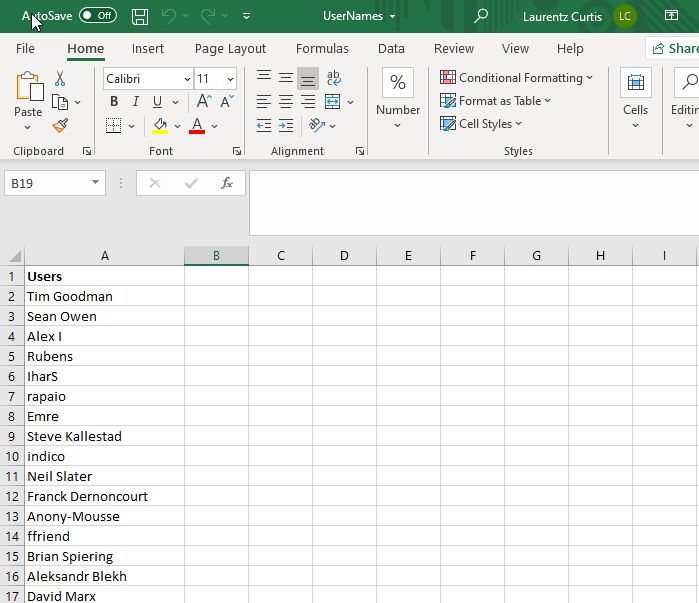
INSERT INTO OPENROWSET(‘Microsoft.ACE.OLEDB.12.0′,’Excel 12.0; Database=C:SQL2019ReportsUsernames.xlsx;’,’SELECT * FROM [Sheet1$]’) SELECT DisplayName FROM dbo.Users Where Reputation > 2000
Possible Issues – Configuring this might not be your type of fun and getting this straight deserves its own article.
Step by Step instructions with screenshots
Method Number 1 – Copy Grid results and paste into Excel
After ensuring results to grid turned on, Execute your query, right-click the top left-hand corner of the results grid.
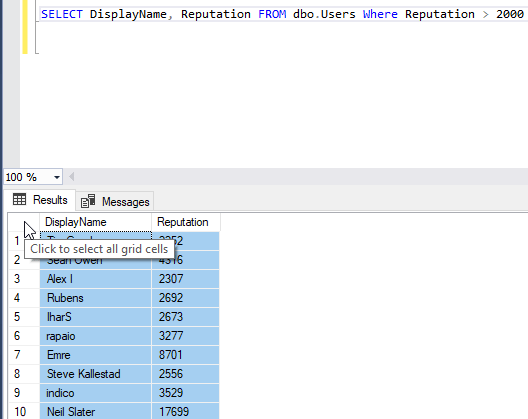
Choose Copy with Headers and then you are ready to paste in Excel with Ctrl + C
Method 2 – Export Via the Export Wizard
Right-click on the database you want to export from. Then Select tasks and “Export Data”.
The SQL Server Wizard will startup. Click Next through the prompts.
Select the appropriate Native client, your server name, and database and choose “Next”.
Next, Select Microsoft Excel and the file path where you want to import the data. The .xls file that you name will be created by this process.
Now you can choose to export a whole table or a query. For the purpose of this exercise, we are creating a query.
Paste the query into the SQL Statement field. Make sure every output field has a unique name.
Click Next on the “Select Source Tables and Views” screen.

I use the default settings on the “conversion issues and data type mapping screen”
Now you can choose to Run immediately or Save an SSIS Package for later reuse.
Double Check your settings and click finish.
Make sure there were no errors in the Export.
Now Go to the directory you choose earlier and make sure you have a sweet-looking Excel File at that location!
Method Number 3 – Use TSQL to send the data to an excel file
This method is the quickest once you get it set up but the configuration is the tricky part. Permissions can be a limiting factor.
Also with the script below, you have to make sure the file exists before you run the query for it to import properly.
First, create a blank excel file at the directory of your choosing.
C:SQL2019ReportsUsernames.xlsx
Then run this script below.
INSERT INTO OPENROWSET(‘Microsoft.ACE.OLEDB.12.0’,’Excel 12.0;
Database=C:SQL2019ReportsUsernames.xlsx;’,’SELECT * FROM [Sheet1$]’)
SELECT DisplayName FROM dbo.Users Where Reputation > 2000

Configuring this can be tricky and dependent on your level of permissions. Make sure you have the correct Linked Server/Provider installed (‘Microsoft.ACE.OLEDB.12.0’) And check your Database user settings to this server .

In a previous article, SQL and Excel: Why you need both, we showed that for many businesses the use of both SQL Server and Excel is an optimum approach to data management. For organizations that use SQL Server and Excel extensively, there is often a need to export data from SQL Server to Excel. The most common reasons to get the data into Excel are to:
- produce data visualizations such as charts and graphs for use in reports
- aggregate or analyze data in pivot charts
- collate data from multiple sources for further transformation
- make the data available to non-database users to view or process
In this article, we’re going to look at how to export data from SQL Server to Excel. The first method uses the SQL Server Import and Export Wizard, which can be used to export data to a number of destination types, not just Excel. The second method uses native functionality in Excel. The third method uses the SQL Spreads Add-In for Excel, which provides functionality beyond the export process. There are pros and cons of each method, which we’ll summarise at the end of the article.
Table of contents
- 1. Method (1): Exporting using SQL Server Import and Export Wizard
- 2. Method (2): Exporting using native functionality in Excel
- 3. Method (3): Exporting using SQL Spreads Add-In for Excel
- 4. Summary
Method (1): Exporting using SQL Server Import and Export Wizard
The SQL Server Import and Export Wizard can be launched from within SQL Server Management Studio or as a stand-alone application.
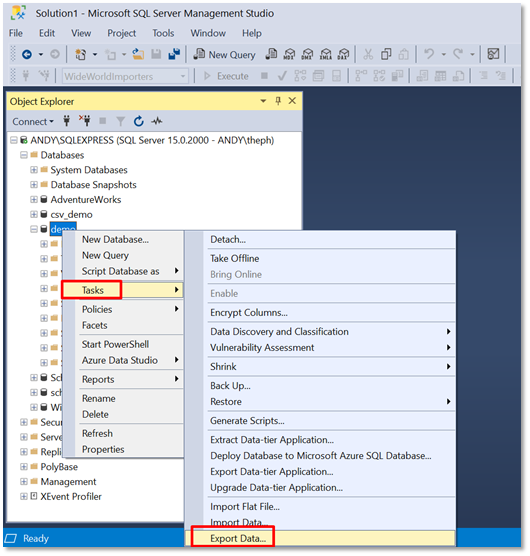
From within SQL Server Management Studio, click on the database from which you want to export data. We’re using the demo database in our example, so click on that and then right-click and select Tasks > Export Data.
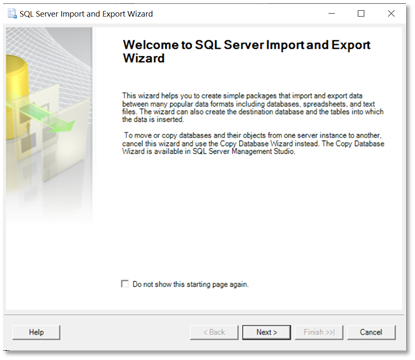
The Welcome page is displayed, and you can go ahead and click ‘Next’.
On the next screen, select the data source. To export from SQL Server, select ‘SQL Server Native Client’.
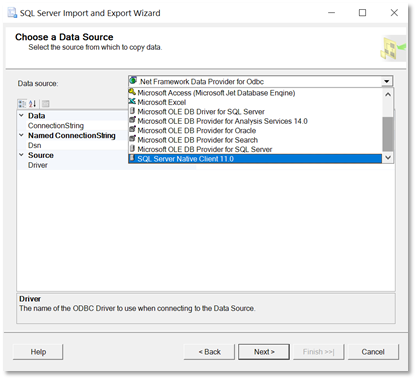
Once you’ve selected ‘SQL Server Native Client’, the details about the data source will be populated by the wizard.
Click ‘Next’ to go to the next screen, where you going to choose the destination for the export, which for us is Excel.
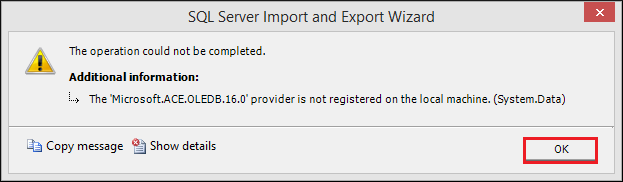
When you select Excel as the choice of destination, you then need to provide the location of the Excel file. When you then click ‘Next’, you may see the following message:
The operation could not be completed.
ADDITIONAL INFORMATION:
The ‘Microsoft.ACE.OLEDB.16.0’ provider is not registered on the local machine. (System.Data)
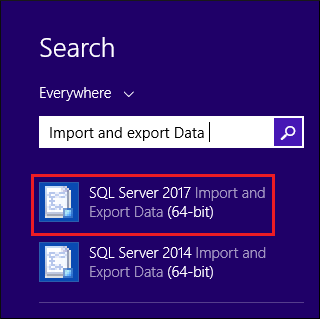
The reason this message appears is that when you launch the SQL Server Import and Export Wizard from SSMS, a 32-bit version of the wizard is launched (because SSMS is 32-bit) and your operating system is 64-bit. There is more information on this here.
To get around this, you need to close SSMS and go to the Windows Start menu and search for the 64-bit version of the SQL Server Import and Export Wizard from the Start menu. Note that this version will only be installed on your computer if you have installed SQL Server.
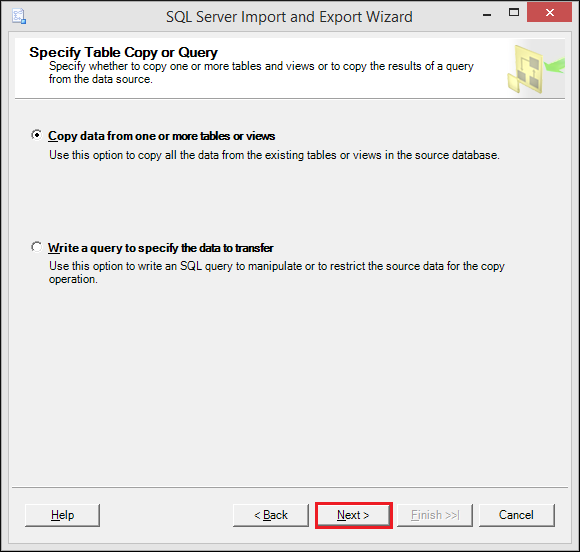
Once the stand-alone version of the Wizard has started, you can go through the steps as discussed so far, which was to specify the source and destination of the data copy. We now need to define what we want to copy, and (optionally) configure the copy operation.
After clicking ‘Next’ on the ‘Choose a Destination’ screen, you specify whether you want to export one or more complete tables or views, or a subset of data via a SQL query. In our case, we are exporting from a single table, so we can leave the default option selected.
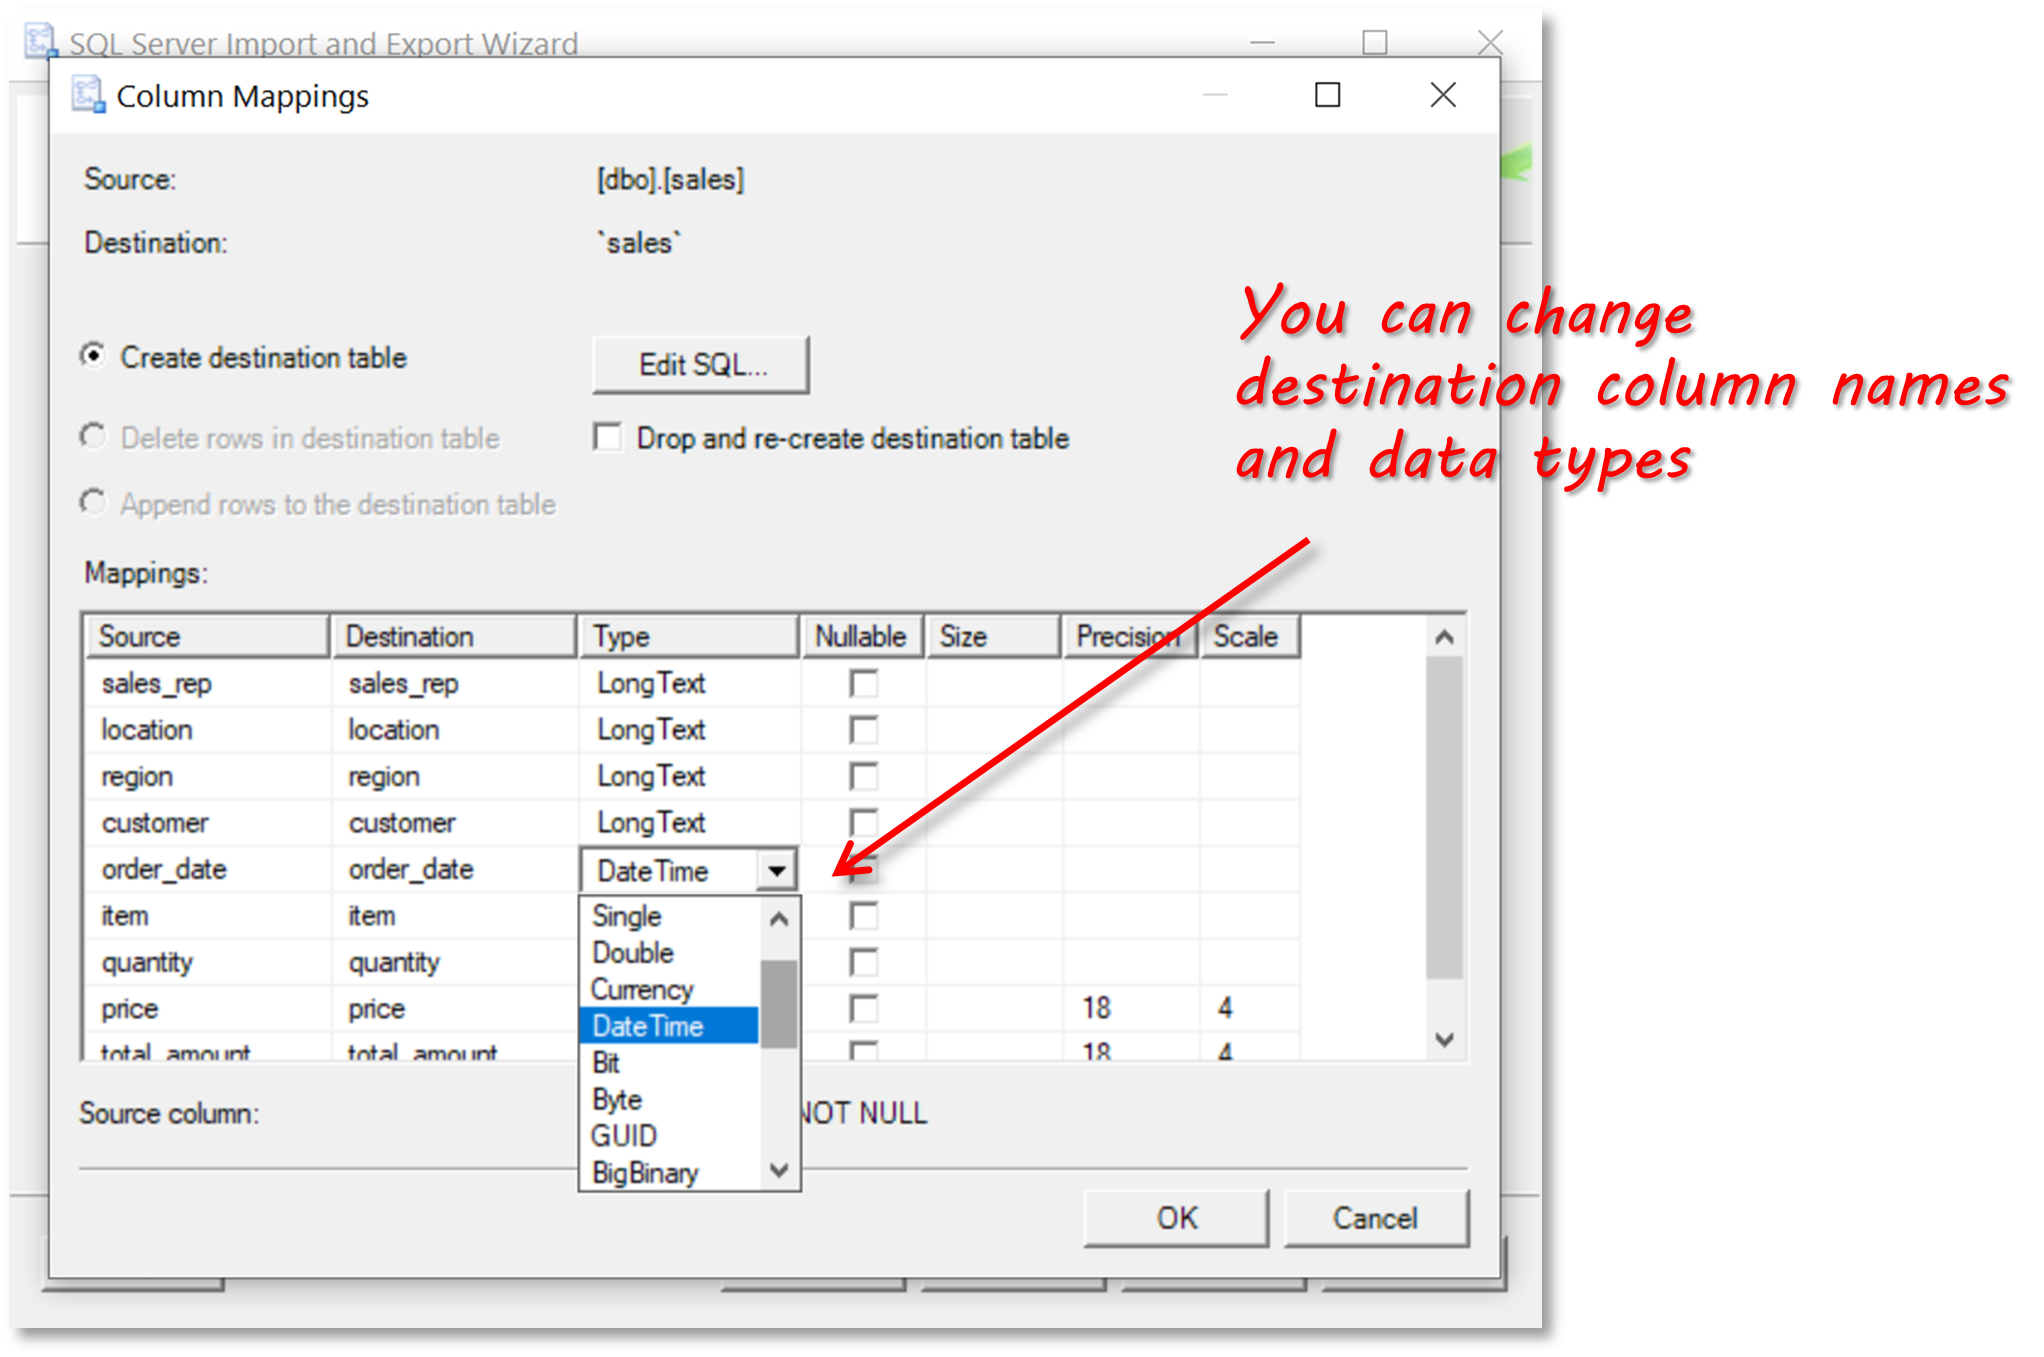
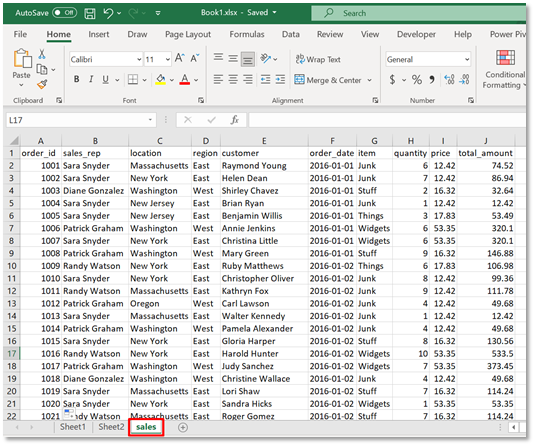
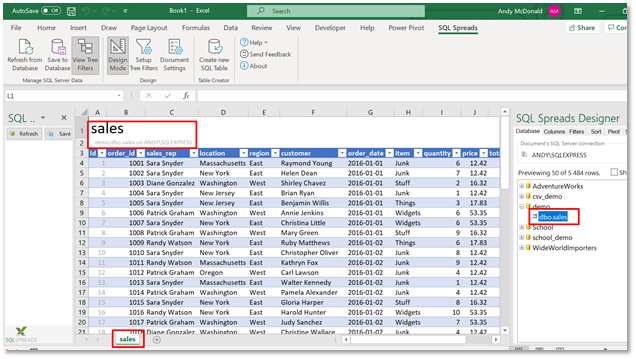
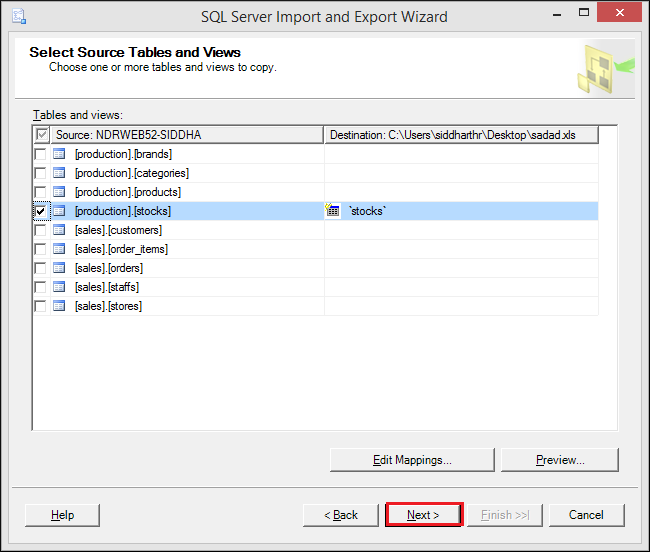
Next, we’re going to edit the column mappings by clicking the ‘Edit Mappings…’ button. The Column Mappings screen allows you to make changes to the name and data type of the columns that will be created in Excel by the copy operation. In our example, we’re going to change the data type for the ‘order_date’ column from VarChar to DateTime. We’ll leave the others as the default set by the wizard. Click ‘Next’. The next screen in the wizard summarizes that the source is a SQL table called sales and the destination will be to a sheet called ‘sales’ in the Excel workbook. You can change the name of the sheet as needed.
Once done, click ‘Ok’ to close the dialog and then ‘Next’.
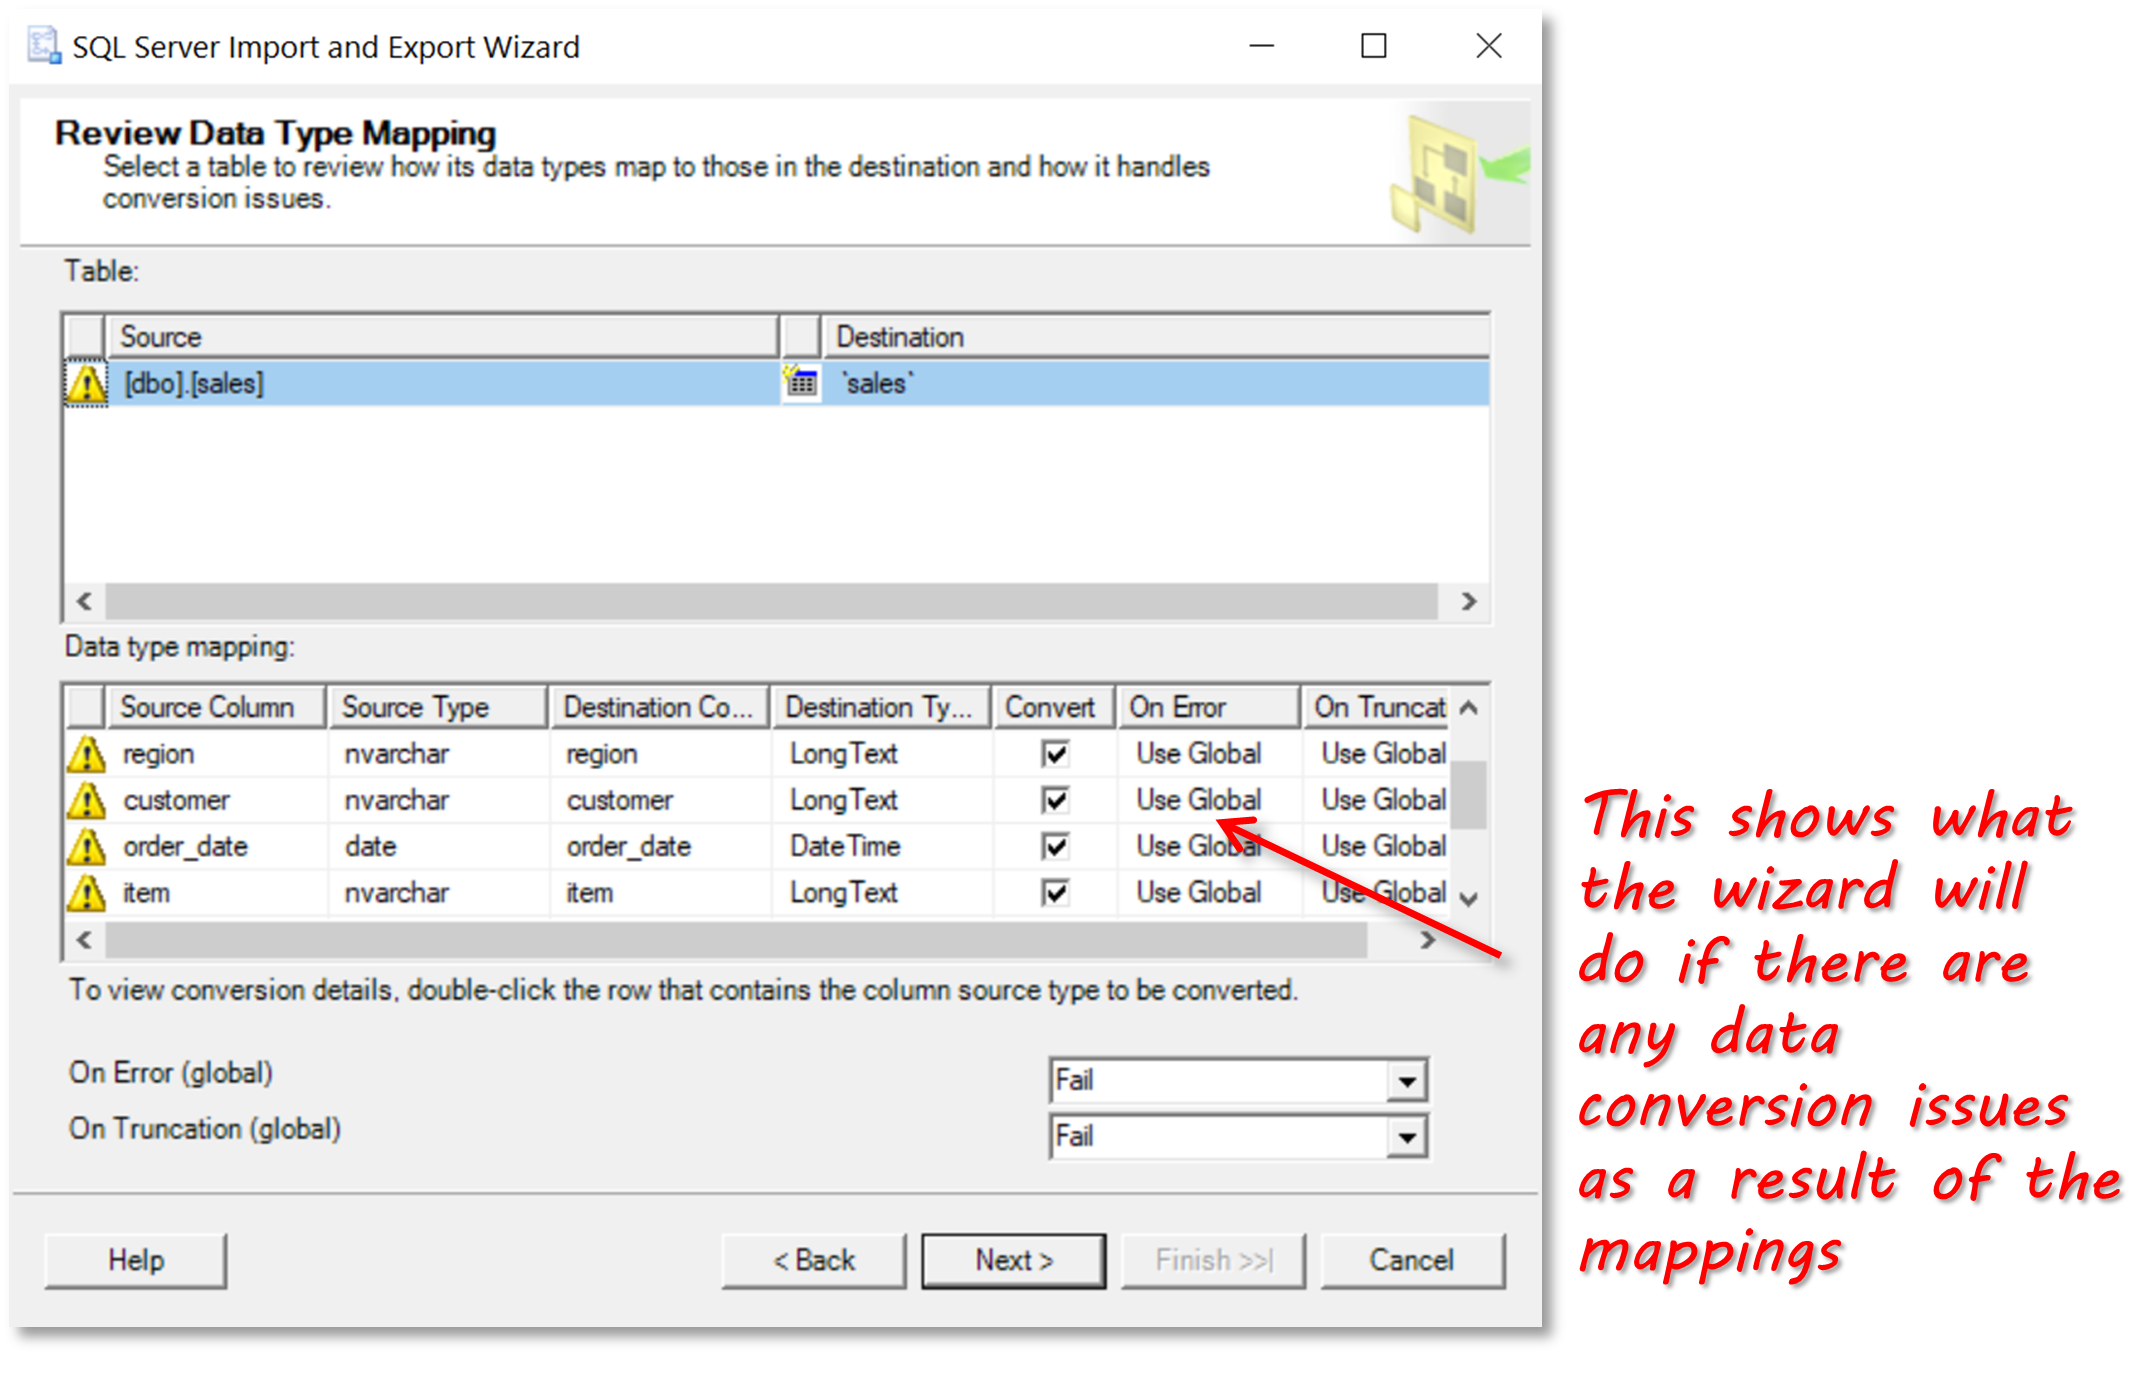
If any of the mappings that we specified may not succeed in the export process the SQL Server Import and Export Wizard shows the Review Data Type Mapping page. This page will highlight the conversions that the wizard needs to perform to handle the mappings that you have specified. It also indicates what the wizard will do if a there is an error during the conversion. It can either ignore the error or cause the export to fail. In our example, several columns have been flagged: the ones where there is a conversion from nvarchar(max) to its Excel equivalent, Long Text, and also the conversion from VarChar to DateTime for the ‘order_date’ column. The default setting is for the wizard to fail if there is an error, so we’ll leave that option in place.
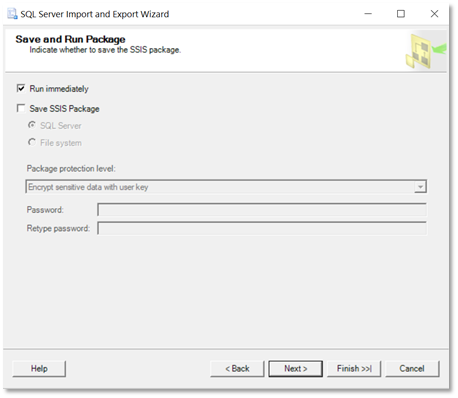
Note: This SQL Import and Export Wizard uses SSIS under the hood; in other words, each time you run the wizard, you are creating an SSIS package. This is why you are given the option of saving it for future use.Click ‘Next’. The wizard now offers you the chance to save the Wizard configuration as an SSIS package in addition to the default option of running the copy immediately.
We are just going to leave the default option ticked and then click the ‘Next’ button.
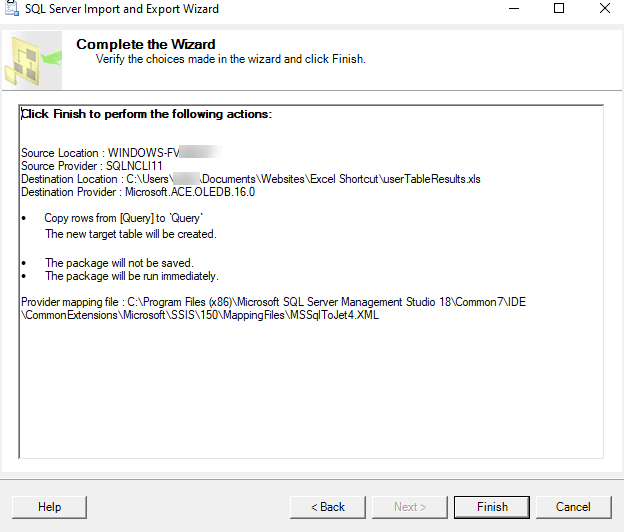
The wizard now displays a summary of the steps that we have configured.

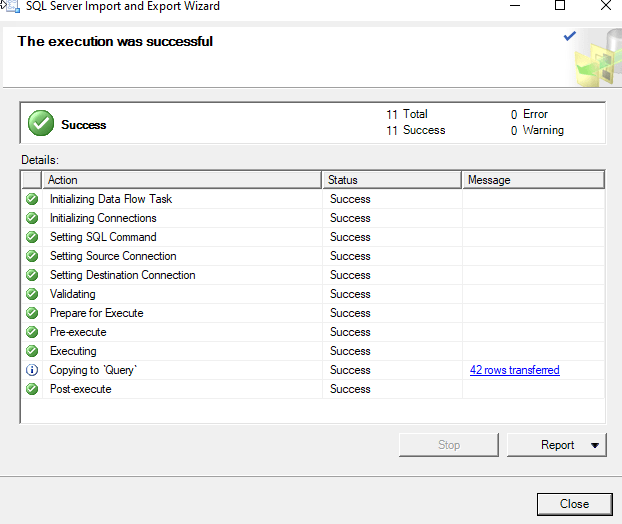
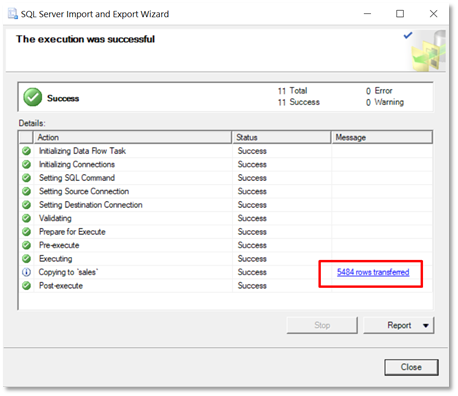
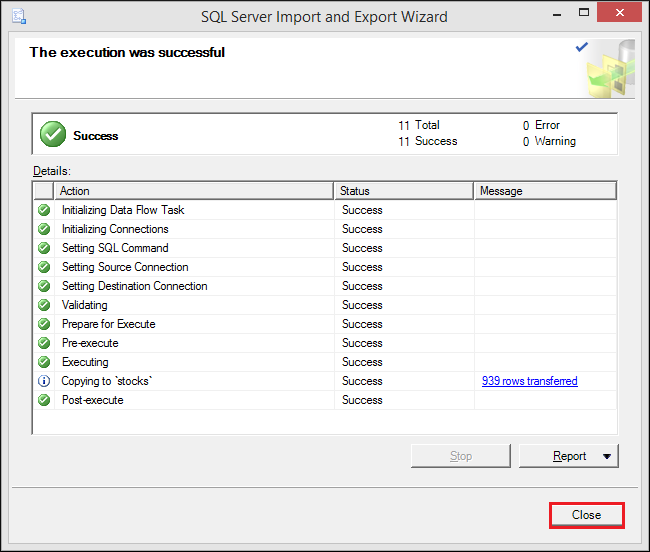
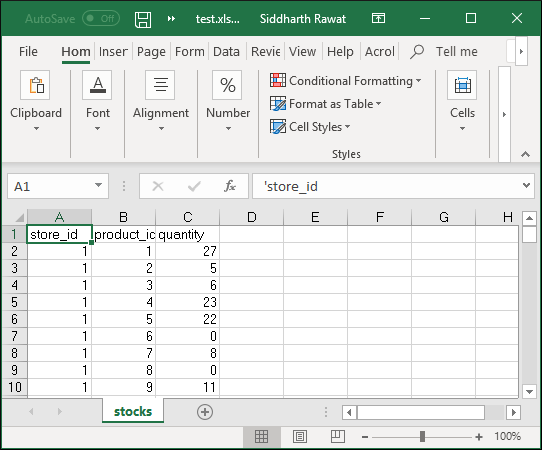
Click ‘Finish’, and the wizard will now show the final screen, which is the result of the execution. In our case, the execution was successful, and we can see that 5484 records were copied to the ‘Query’ sheet in our Excel workbook.
We can check that the data has been exported from SQL Server to Excel by opening up the file that we specified and checking the ‘sales’ sheet.
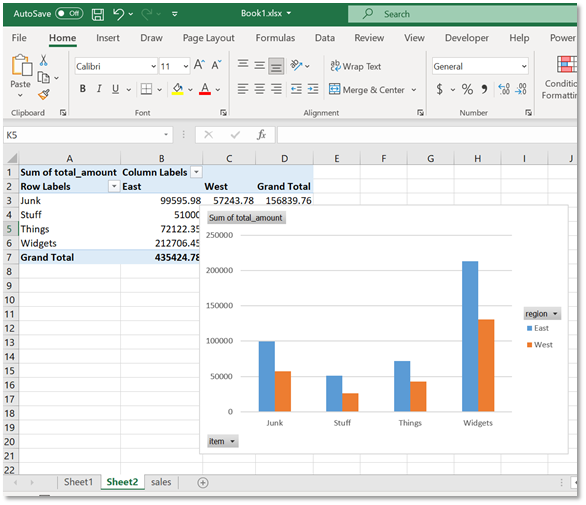
Now that the data is in Excel, we can create some visualizations or aggregations, or whatever other processing we want to perform. For example, we could create a pivot chart to display the Total per item per region.
Method (2): Exporting using native functionality in Excel
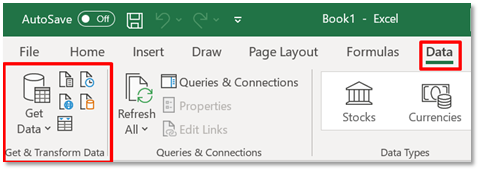
Although the method itself is much the same, Microsoft has made improvements in the last few releases to the way you get data from other sources into Excel. The main change was the addition of the Power Query data import wizards and tools as a native component in Excel 2016. These are accessed from the Power Query Editor, although it’s not displayed as such on the Excel Ribbon – instead, it is branded as Get & Transform Data group on the Data tab of the Excel ribbon.
The steps described below are valid for Excel 2016 and beyond.
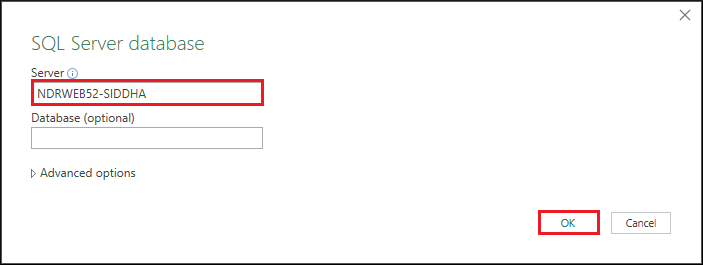
To get started with the export from SQL Server to Excel, click on Data > Get Data > From Database > From SQL Server Database.
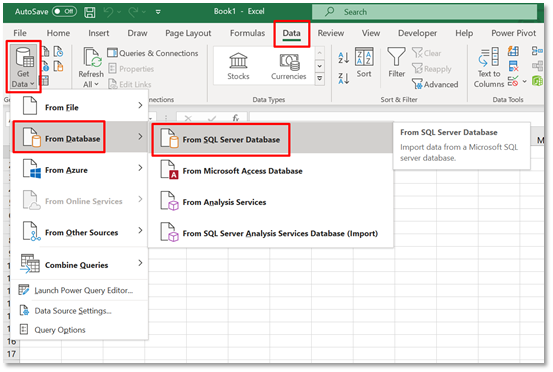
You are next prompted to enter the database server to connect to and, optionally, specify a database. If you don’t specify a database, you can select from the available ones on the next screen.
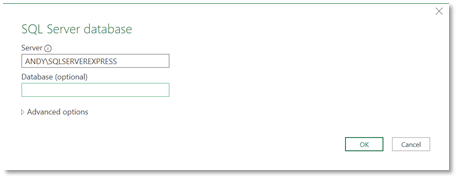
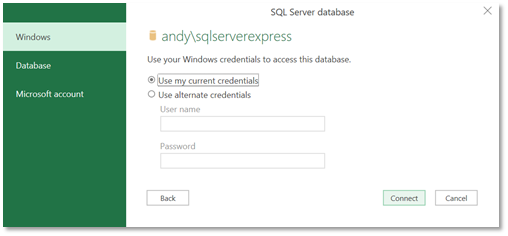
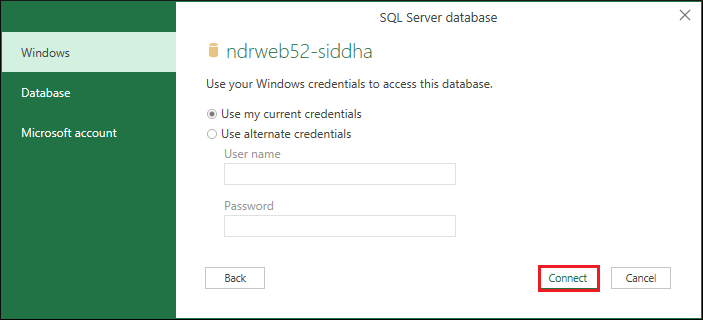
Click ‘Ok’. You’ll then be prompted to provide authentication details. The default is Windows, so you can go ahead and click ‘Connect’.
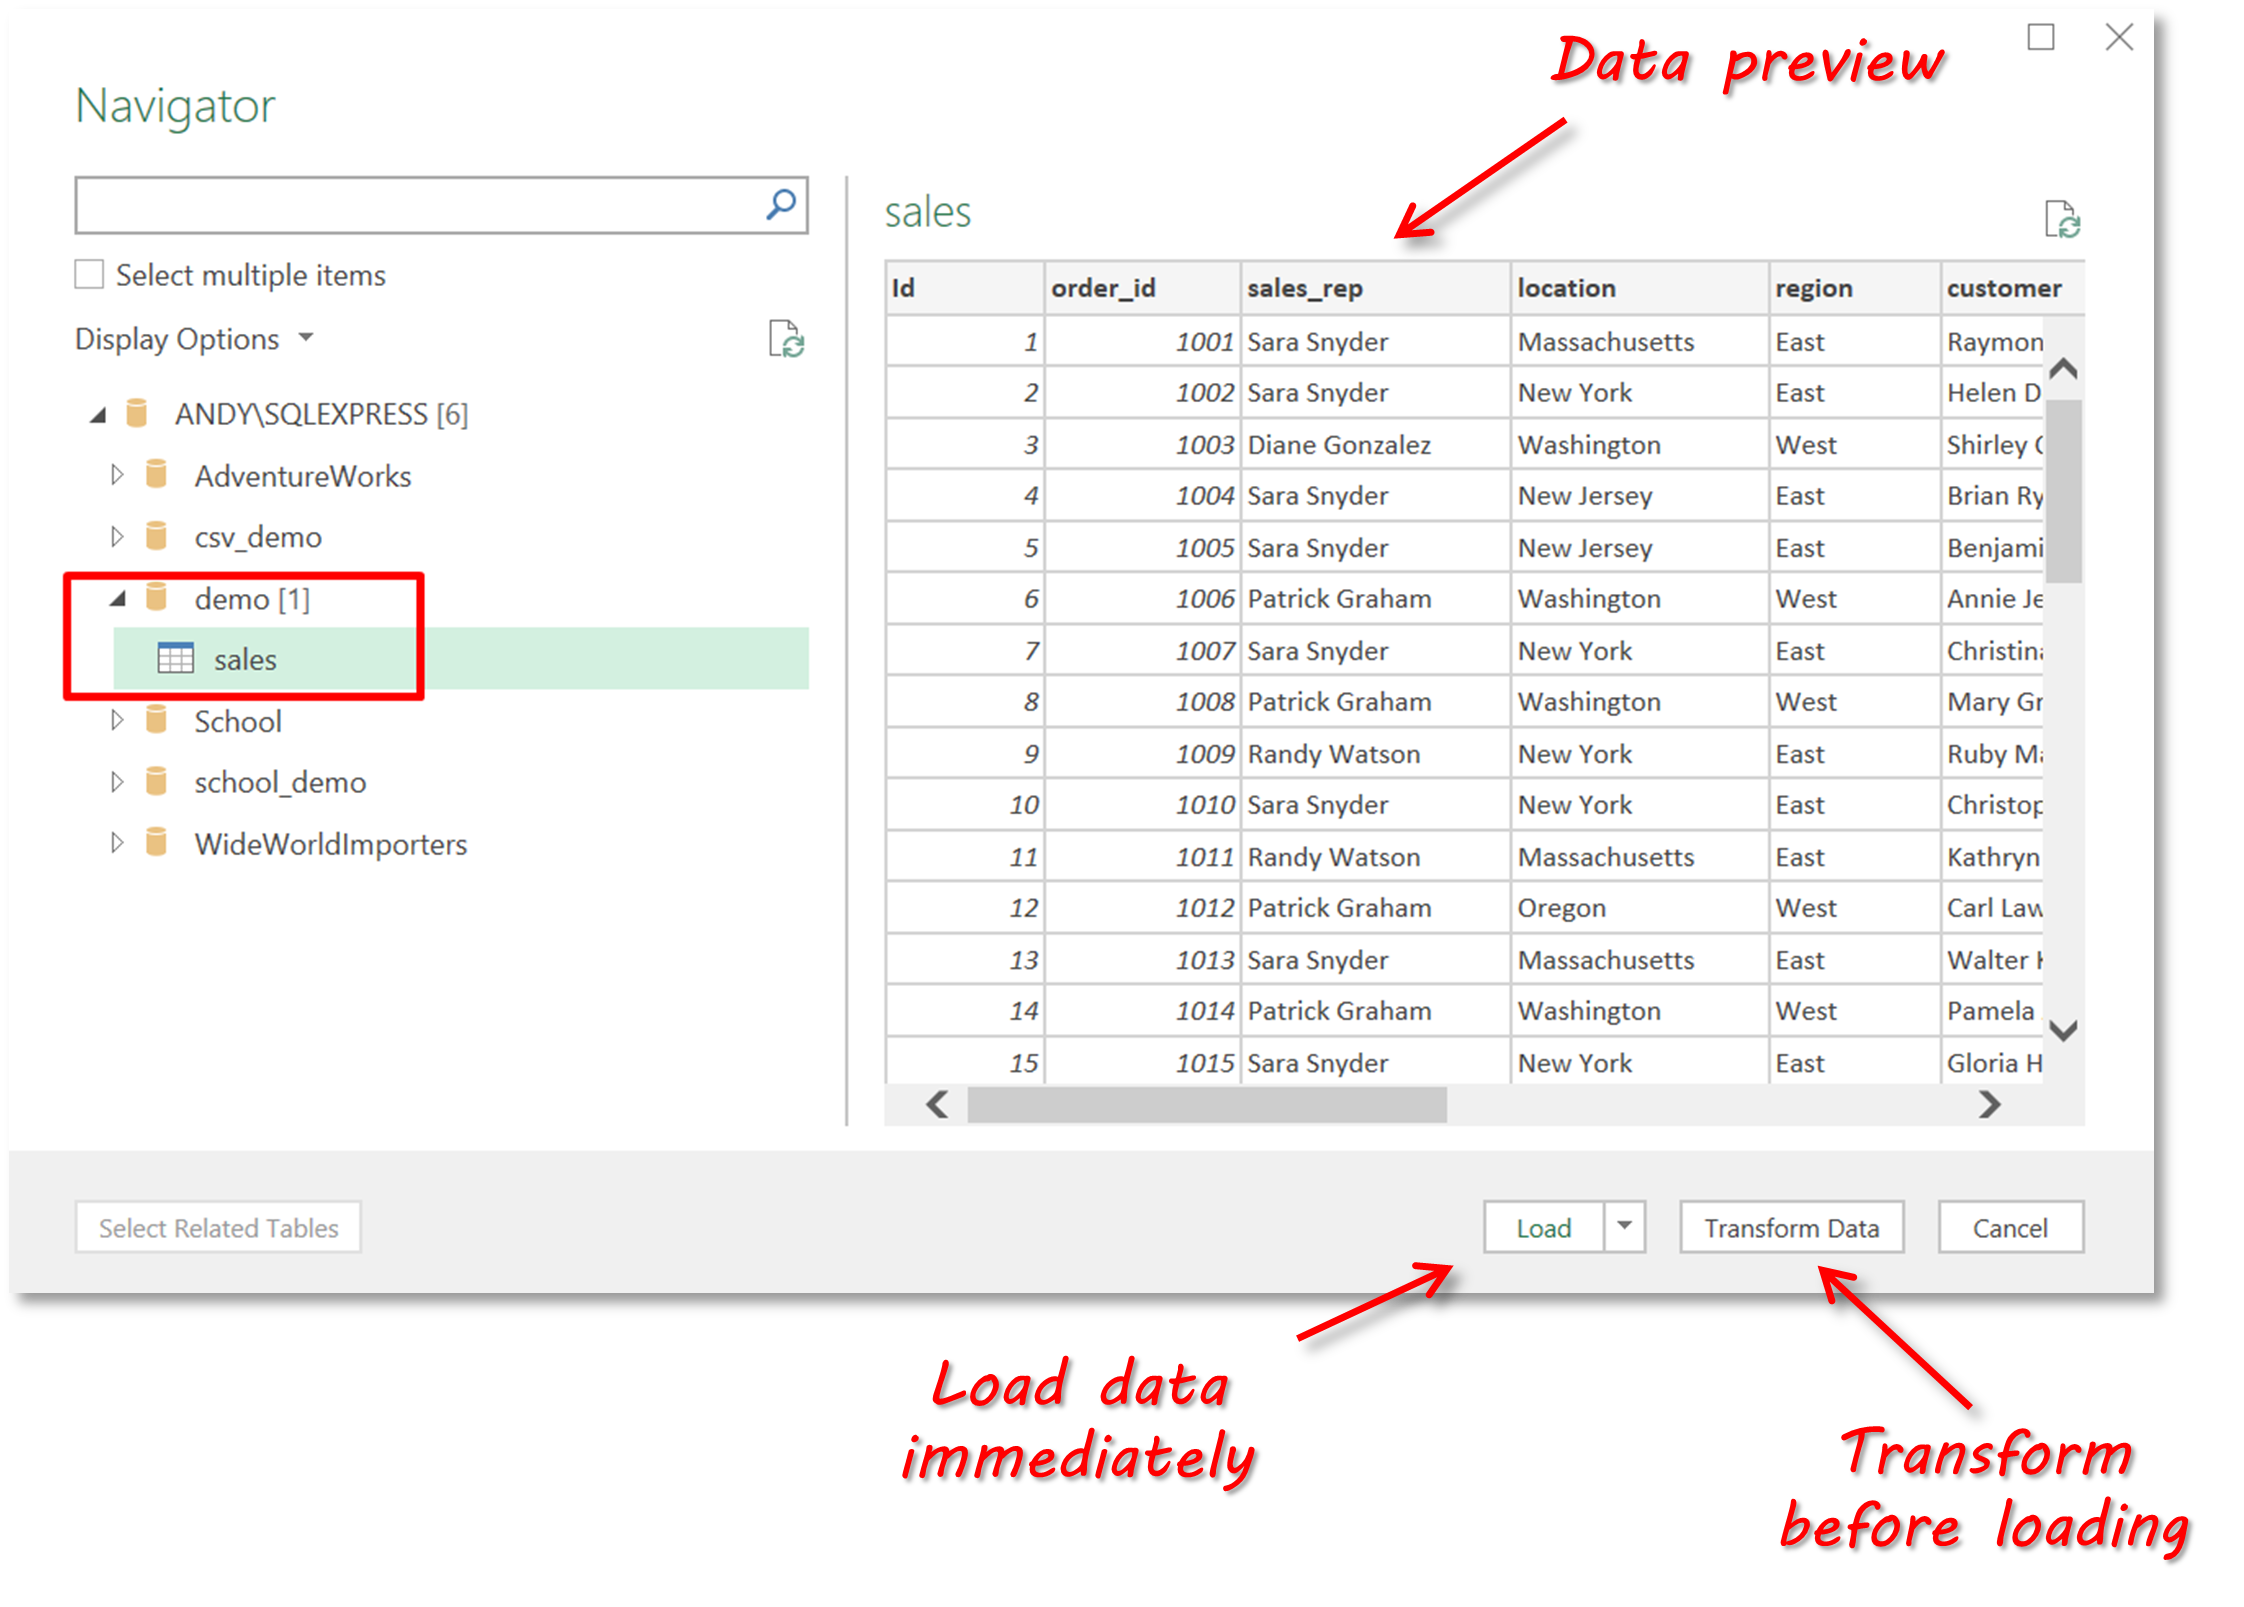
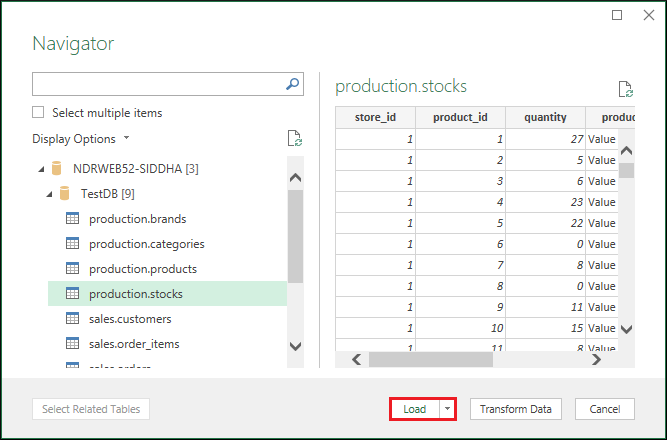
The next screen allows you to navigate through the databases and tables on the database server that you specified. Click on the ‘demo’ database to expand it and then click on the ‘sales’ table. The data for the selected table is displayed in the right-hand window. We could now click the ‘Load’ button to get the data into Excel immediately. Alternatively, we can click on ‘Transform Data’ to perform transformations on the data (eg change data types, clean up some data, perform computations). For this example, we’re just going to load the data as it is, so go ahead and click ‘Load’.
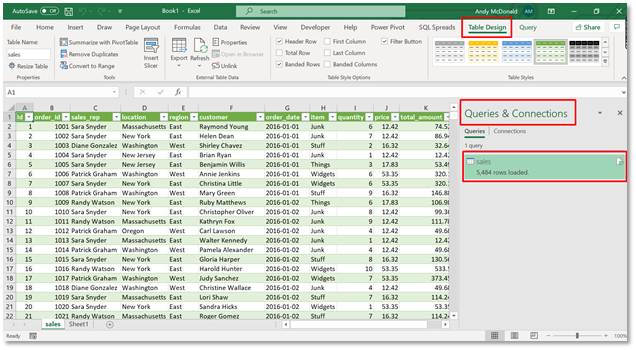
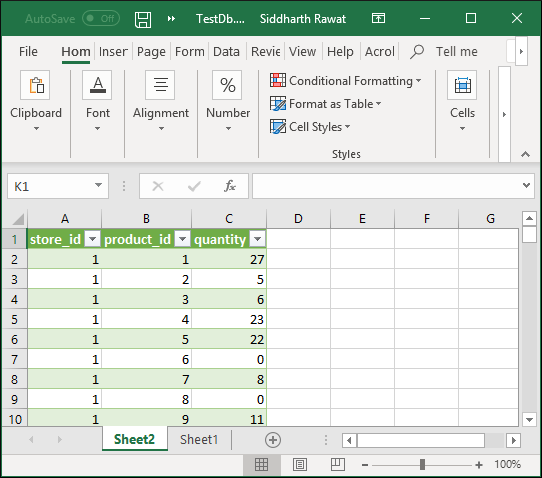
The data is now exported from the table in SQL Server and loaded into a new sheet in Excel.
That is all we need to do to perform a simple export of a full table from SQL Server to Excel. Aside from the simple procedure we’ve described here, the Power Query data import wizards and tools provide ways to ‘shape’ the data from external sources. For example, you can remove a column, change a data type, merge tables to meet your specific needs.
Method (3): Exporting using SQL Spreads Add-In for Excel
If you don’t already have the SQL Spreads Add-In for Excel installed, you can download a copy here.
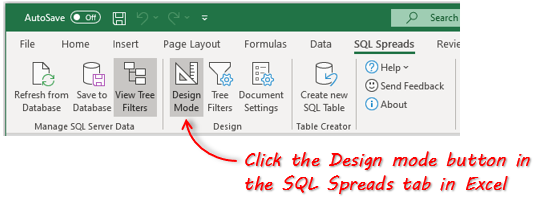
Once SQL Spreads is installed, you’ll see that it has been added as a new ribbon tab; go here and click the Design Mode button.
In the SQL Spreads Designer panel on the right side, click the Edit button to open the SQL Server connection dialog.
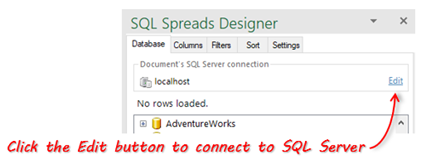
Enter the name of your SQL Server into the SQL Server name field. You also need to choose an authentication method: Windows-login (Windows Authentication) or SQL Server Authentication (using a name and password set up in SQL Server). Windows authentication is the more secure of the two options.
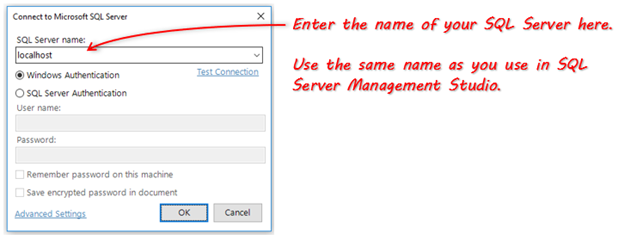
Click OK. SQL Spreads will try to connect to the database. If the connection is successful, your databases will show up in the SQL Spreads Designer panel.
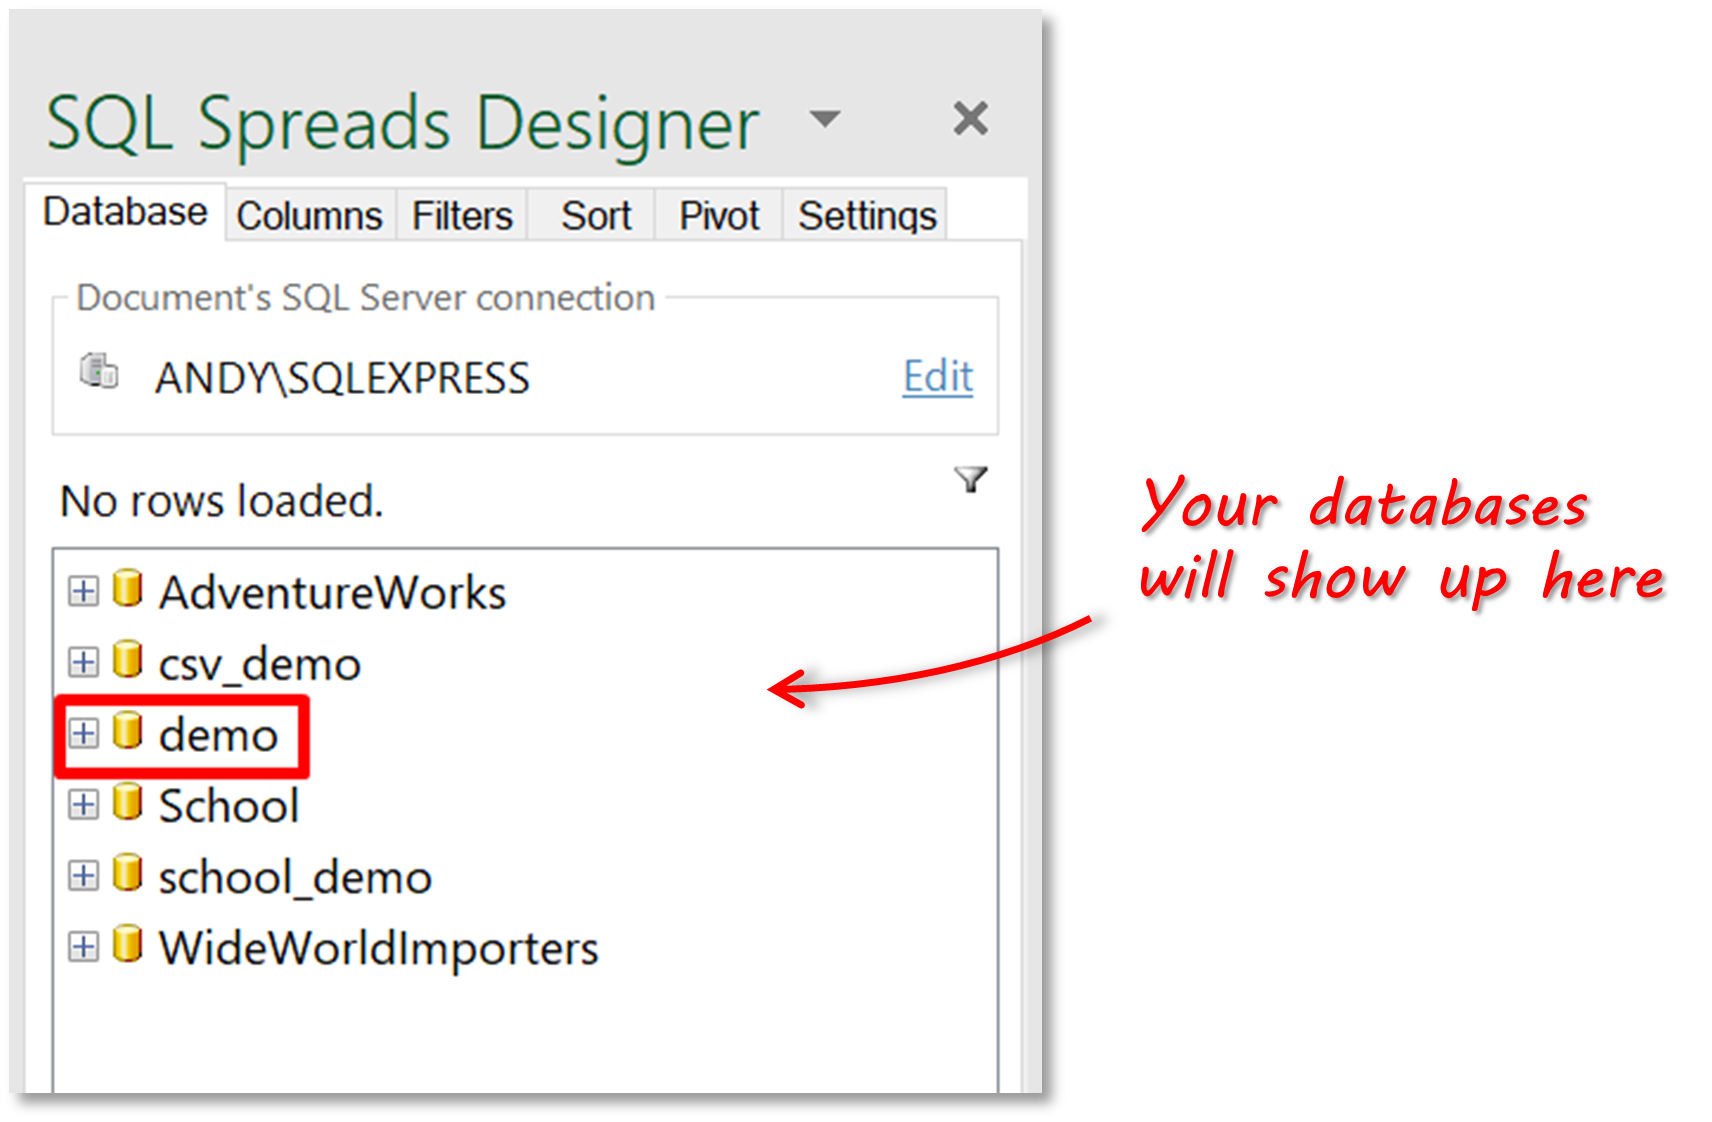
We can now expand the demo database and select the sales table.
When you click on the table, the data is immediately exported from SQL Server and copied to a sheet called ‘sales’ in Excel.
That’s it! We’ve managed to export data from SQL Server to Excel with just a couple of clicks.
There are several more options available to us in the SQL Spreads Designer. For example, we can:
- filter the data that is exported from SQL Server
- set whether certain columns are displayed and/or read-only
- use a look-up value to display text instead of an id for a column
- sort data
- make updates in Excel and save changes to SQL Server
There is more information on these features in the SQL Spreads knowledgebase here.
Summary
Being able to export data from SQL Server to Excel is a common requirement in most businesses. We’ve looked at three methods for performing this day-to-day task. The first uses the SQL Server Import and Export Wizard, which is native functionality in SQL Server. The second method uses the native ‘Get & Transform’ tools in Excel. The third uses the SQL Spreads Add-In for Excel.
So which method should you use?
If you normally work with databases, and SSMS is your second home, you’ll probably feel that the SQL Server Import and Export Wizard is the best option for you. If you are an Excel user, then it makes sense to work from within Excel itself to export data from SQL Server. Both of the two Excel options that we’ve looked at are robust and easy to use, but SQL Spreads has a distinct advantage because it allows users to make updates to data directly in Excel and then save the data back to SQL Server. This is a huge advantage for those organizations that like the best of both worlds: the ease of use and familiarity of Excel, with the power and data integrity associated with SQL Server.
Try SQL Spreads to see how quick and easy it is to export data from SQL Server to Excel; download a free trial version today.
*This article was originally published on August 26, 2021 and was updated on July 4, 2022 to include some new screenshots.

Andy McDonald
Andy has worked 20+ years in the Engineering, Financial, and IT sectors with data analysis and presentation using tools such as SQL Server, Excel, Power Query and Power BI.
Writes for SQL Spreads about Excel and SQL Server and how to tie those two together.

Read time 8 minutes
SQL Server Management Studio (SSMS) is an excellent utility to configure, manage, and administer all Microsoft SQL Server components. There are many advantages of having SQL data in spreadsheet programs like Excel. Spreadsheets are easy to use and flexible compared to SQL. The novice users have a similar query on how they can export the SQL Database to an Excel file. Here is an example-
“I am new to SQL server database and looking for ways to export the database output to excel. I have a few database files that I urgently want to save to .xlsx or .csv. Can anyone with expertise please guide me on how to automate this process?”
Benefits of saving SQL database in an excel file
Although, the Excel file does not have the same protection level as the SQL Server, it has the essential advantages of a backup file. It can help you in the following situations-
- If the user drops a column in a table by mistake, it can be recovered from the excel file.
- You can overcome the hardware or media failure situations.
- It can be used as a secondary backup file useful in several routine administrative needs and valuable when a natural disaster hits the on-premises location.
Now, we are going to discuss ways to export the SQL Server data to Excel. Two manual methods can be employed to achieve this task, which is described below:
Method #1 Export from SQL Table to Excel Using the SQL Server Import and Export Wizard
There exists an inbuilt feature in SQL Server Management Studio (SSMS) to export data to Excel. The detailed steps are described below:
- Right-click on the database table that you would like to export. Under the Tasks, click on Export Data.

- In SQL Server Import and Export Wizard, click Next. This will open up a new dialog window- Choose a Data Source. From the drop-down menu in Data sources, select SQL Server Native Client 11.0, then click Next.

- In the Destination field, choose Microsoft Excel. Next, in the Excel file path field, provide the location and filename by clicking on the Browse button. Click Next to proceed.
- At this point, you might encounter an error.

- To solve this issue in the search field, search for the 64-bit version of SQL Server Import and Export Data.

- Next, repeat steps 1-3. In the Specify Table Copy or Query window, select Copy data from one or more tables or views, and hit Next.
- Next, select the source tables that you would like to export.

- Click on the table and click on the Preview tab to view the table content. Click OK to exit.

- In the Save and Run package window, make sure Run immediately is checked and then click Next.
- In Complete the Wizard window, click Finish.
- In the end, you will get a message of successful completion, as shown below:
- Next, go to the location where you have exported the SQL database table as an Excel file and open the Excel file.

Method #2 Import from SQL Table to Excel Using Data Connection Wizard Dialog
Another easy way to export the SQL table to Excel is by exploiting the inbuilt Excel feature that enables us to import any SQL table. The detailed steps to do so are outlined below:
- Create a Blank worksheet and open it.
- On the Data tab, click the Get Data icon, select From Database > From SQL Server Database.

- Enter the name of your SQL Server in the text field and click OK.

- Select the appropriate option and click Connect.

- Click OK to proceed.

- In the Navigator window, select the database and then the table that you would like to import in Excel and click on Load.

- Next, click on Close & Load icon.

- Congratulations! You have successfully imported the SQL table into Excel.


Kernel for SQL Database Recovery
Just like any other database file, SQL database files are also prone to database corruption. In gruesome scenarios like these, one should rely only on professional tools such as Kernel for SQL Database Recovery. It is a feature-rich tool that can quite quickly repair your earlier corrupt/inaccessible database files, irrespective of the server version. It is also possible to create a backup of the restored databases in script form.
Conclusion
Many a time, it is easier to work with spreadsheets in comparison to SQL database tables. Therefore, it becomes necessary to export these SQL tables to Excel. In this post, we have explored two manual ways to achieve this task quickly. A damaged/ corrupted database file can hinder you from exporting from SQL to Excel; hence we recommend the user to rely on advanced tools to repair corrupt SQL databases with ease.
More Information
- Recover deleted records in SQL Server
- Fix SQL database recovery pending state
- Recover SQL database from suspect mode
- Restore SQL Server database with Norecovery
In several scenarios, we need to use some data which is available in SQL Server, but we need it in MS Excel. Instead of putting every data manually into Excel, the SQL Server provides an option to import and export data from SQL Server to Excel sheets. In this tutorial, we will learn various methods of importing and exporting data from or to SQL Server. Also, we will cover these topics.
- How to export data from SQL Server to Excel using Import and Export Wizard
- How to export data from SQL Server to Excel automatically
- How to export data from SQL Server to Excel using the query
- How to import data from SQL Server into Excel using Data Connection Wizard
- Export data from SQL Server to Excel using stored procedures
Here, for all the functionality, I have used SQL Server 2019 Express edition.
Export data from SQL Server to Excel using Import and Export Wizard
In this section, we will learn how to export data from the SQL Server database into an Excel worksheet automatically using import & export Wizard. We will be using the import and export wizard in SQL Server Management Studio.
- Below is the table that we are going to export automatically using the import and export wizard in SQL Server.

- Right-click on the database using which table is created.
- Select the Tasks option from the dropdown another dropdown will appear.
- Click on the Export Data.

- Once you have clicked on the Export Data option from the drop-down menu then Import and Export wizard window will appear.
- Click on Next to proceed in the process.

- Once you have clicked on the Next button on Import and Export wizard a new window will appear asking to Choose a Data Source
- Select SQL Server Native Client 11.0 in Data Source
- Select the instance from the dropdown for the Server name.
- For Authentication, you can use:
- Use Windows Authentication, which means the username and password of your computer. It automatically picks up from the system.
- Use SQL Server Authentication, this requests the Username and Password that was creating an instance.
- Select the database name from the dropdown and click on the Next button.

- The SQL Server Import and Export Wizard will ask for destination details. Choose Destination field as Microsoft Excel
- Give the path to the Excel file into which you want to export the data
- Select the Excel Version according to the version of the Excel that you have installed on your system and click Next.

- Now the SQL Server Import and Export Wizard will ask whether you want to copy all data from the existing tables or query-specific data. We can select Copy data from one or more tables or views to import all the table data.
- We will also explain how you can copy data that is modified by SQL query with Write a query to specify the data to transfer option
Read: How to Create a Database in SQL Server 2019 [Step by Step]
Export data from SQL Server to Excel automatically
SQL Server 2019 provides a method to export all the data from SQL server to Excel worksheet. In this section, we will demonstrate how to export SQL server data to Excel automatically using Import and Export Wizard.

- Choose the table from the Source tab which you want to export and specify the name of the table in the Destination tab and click Next

- In the next step, you can choose whether you want to save the SSIS Package or not. In this section, we will continue without saving.

- Now you will see the final overview of the operation before the execution, click on the Finish Button.

- Now data has been successfully exported from SQL Server to Excel worksheet.Click on the Close button to exit the window.

- You can check that the file is created at the specified location.

Read: How to create a table in sql server management studio
At times, it is not necessary to export all the table data. Instead, we need to export data using a query. In such situations, we can export query-specific data from SQL Server to Excel worksheet.
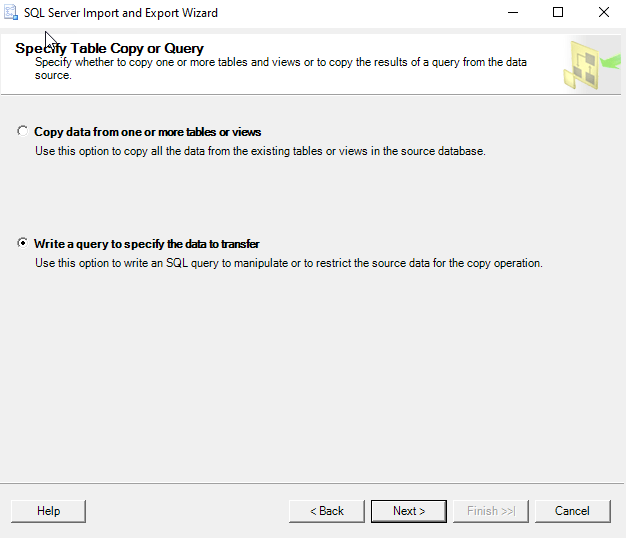
- After selecting the source and destination of data using SQL Import and Export Wizard, the wizard show two options. Choose the second option which says Write a query to specify the data to transfer and then click on the Next button.

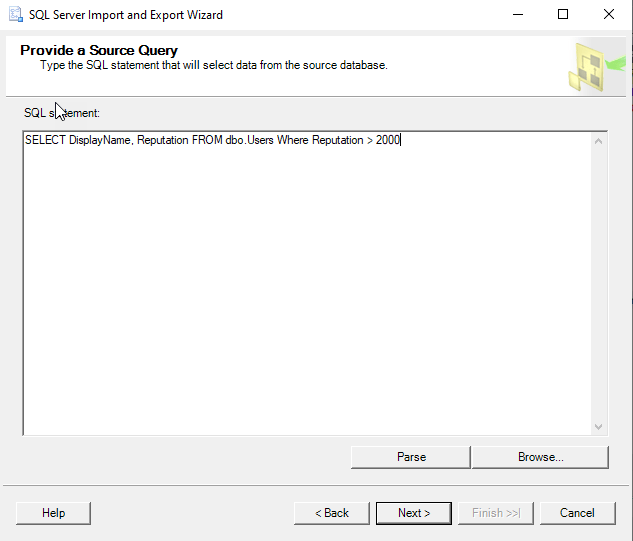
- Then we need to specify the query which we want to implement. In our case we will execute a query to show the Name and Age of people whose salaries are greater than 100000. After writing the query, click Next

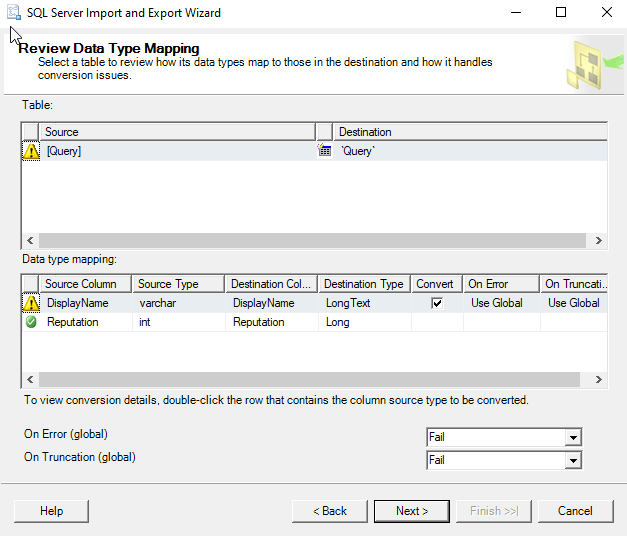
- Now you will see the overview of table source and destination. You can also see how the data looks after the query is implemented by clicking on the Preview button. Then click Next

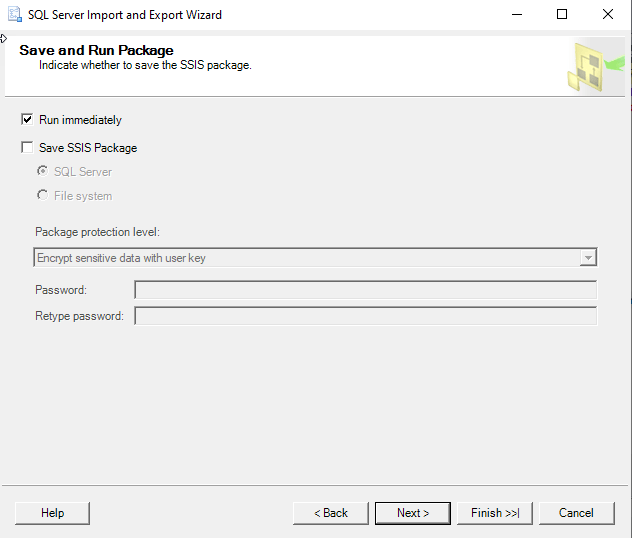
- Run immediately is checked by default, click on Next button.
- Now all the configurations are complete. You can click on the Finish button to start the Wizard

- If all actions are successfully completed, your query is implemented and the data is exported. You can close this window.

- Navigate to the destination path and you can see that data is exported successfully

Read: Advanced Stored Procedure Examples in SQL Server
How to import data from SQL Server into Excel using Data Connection Wizard
We can also import data from SQL Server to Excel using the Data Connection Wizard in Excel. The benefit of using this method is that we can get live data from SQL Server.
Live data means that the changes made in the SQL Server database will be reflected into the Excel worksheet also. We will demonstrate this with the help of an example
- Open MS Excel and create a new worksheet or open an existing worksheet into which you want to import the data from SQL Server
- Go to the Data tab and click on From Other Sources and then From SQL Server as shown in the image below

- Enter the name of the Server instance that you have created in the Server name field. You can use either Windows Authentication or SQL Server login credentials to make a connection with the database. After inserting the required details, click Next

- Now select the database and the table that you want to import. You can also import data from multiple tables by checking the option Enable selection of multiple tables

- Save the Data Connection File. Add description to it to store more information about the connection. It will help you to know the information about the connection when you will connect to the database again. Click Next

- A small window will appear where you can decide how you want to view your data in the Excel Workbook. You can import the data either in an existing worksheet or in a new worksheet. Select the desired option and then click OK

- Now you can see, your data is imported successfully from SQL Server

- As mentioned above, this type of connection is a live connection to the database. Try to change the data in SQL Server. You will see that the changes will be reflected in the Excel worksheet also. Let us see an example
- Run the following query in the SQL Query Window in SQL Studio Management
update Employees set Age =20 where [Employee ID]=1;
select * from Employees;
Here is the implementation of above mentioned code snippet.

- Changes are made in the table. Now refresh the excel worksheet where you have imported the data or open it again. You will the same changes in the imported data

In this tutorial, we have learned how to import data from SQL Server into MS Excel using Import and Export wizard in different ways. Also, we have covered these topics.
Export data from SQL Server to Excel using stored procedures
- There is a method in SQL Server called OPENROWSET method which is used to export data from SQL Server to Excel
- OPENROWSET method has some requirements that need to be fulfilled before we can use this method
- Administrator permissions to SQL Server Management Studio
- enable “Show Advanced Options”
- enable “Ad Hoc Distributed Queries”
- Run SQL Server Management Studio as Administrator
- Write the query following query to enable these options
EXEC sp_configure 'show advanced options', 1;
RECONFIGURE;
GO
EXEC sp_configure 'Ad Hoc Distributed Queries',1;
RECONFIGURE;
GO
- Give permissions to the Microsoft.ACE.OLEDB.12.0 driver by excecuting the following command
EXEC sp_MSset_oledb_prop N'Microsoft.ACE.OLEDB.12.0', N'AllowInProcess', 1
EXEC sp_MSset_oledb_prop N'Microsoft.ACE.OLEDB.12.0', N'DynamicParameters', 1- After successfully running the above commands, you have to create an Excel sheet with the same fields which are there in the database table

- Now you can write the query to export data from SQL Server to Excel
INSERT INTO OPENROWSET('Microsoft.ACE.OLEDB.12.0','Excel 12.0;
Database=C:UsersBladesDesktopexported_data.xls;','SELECT * FROM [Sheet1$]')
Select * from Employees;- Remember to set the Database path, Excel file name, Excel worksheet name and database name in the above query
- You may encounter the following error while executing the query
- This error states that the SQL Server is running on 64-bit architecture but Microsoft Access Database Engine only has 32-bit drivers installed

This means you have to download the 64-bit Access Database Engine
You can download the 64-bit version of Access Database Engine from the specified link
Install Access Database Engine and this will install the 64-bit version of Microsoft.ACE.OLEDB.12.0 driver.
Now run the query again
INSERT INTO OPENROWSET('Microsoft.ACE.OLEDB.12.0','Excel 12.0;
Database=C:UsersBladesDesktopexported_data.xls;','SELECT * FROM [Sheet1$]')
Select * from Employees;- Now you can see, the query is run successfully

- You can open the Excel file and see if the data is exported

- You can use this OPENROWSET method in your own stored procedure and export data from SQL Server to Excel.
You may like the following sql server articles:
- SQL Server Substring Function
- SQL Server Replace Function + Examples
- SQL Server Convert String to Date
In this tutorial, we learned about the various methods of exporting the data from SQL Server to Excel. We solved some encountered errors also.
- How to export data from SQL Server to Excel using Import and Export Wizard
- How to export data from SQL Server to Excel automatically
- How to export data from SQL Server to Excel using the query
- How to import data from SQL Server into Excel using Data Connection Wizard
- Export data from SQL Server to Excel using stored procedures
I am Bijay having more than 15 years of experience in the Software Industry. During this time, I have worked on MariaDB and used it in a lot of projects. Most of our readers are from the United States, Canada, United Kingdom, Australia, New Zealand, etc.
Want to learn MariaDB? Check out all the articles and tutorials that I wrote on MariaDB. Also, I am a Microsoft MVP.
SQL Server is very popular in Relational Database and it is used across many software industries. Portability of data is a much-required feature of any database. i.e. Database should support features like exporting database data to Excel/CSV/JSON and also should import data from them. In this article, let us see how to import and export SQL Server Data to an Excel file. Azure data studio is a very useful tool for export options and the best part is it can run on Windows/Linux/Mac Operating system.
Method 1: exporting data to Excel via Azure DataStudio
Step 1: Database creation
We should have a database to proceed further. Let us keep ‘GEEKSFORGEEKS’ as the database name.
Syntax:
--Command to create database:
 - CREATE DATABASE <dbname>;
Create Database GEEKSFORGEEKS:
Query:
--Make the database active
USE GEEKSFORGEEKS;

Step 2: Adding the tables to the database
Creating a table with a Primary Key. Each author will have their unique ID and hence it is a Primary Key.
Query:
CREATE TABLE Posts (
    ID INT IDENTITY NOT NULL PRIMARY KEY,
    PostName VARCHAR(255) NOT NULL,
    Category VARCHAR(255),
    Likes INT,
    Shares INT
);
GO

Step 3: Inserting rows in the table. We can add only the necessary columns.
Query:
insert into Posts(PostName,Category,Likes,Shares)
 VALUES ('Core Java Programming','Java',10,5);
insert into Posts(PostName,Category,Likes,Shares)
VALUES ('SQLServer Programming','Java',20,8);
insert into Posts(PostName,Category,Likes,Shares)
 VALUES ('Oracle Programming','Java',25,12);
insert into Posts(PostName,Category,Likes,Shares)
 VALUES ('MongoDB Programming','Java',50,18);
insert into Posts(PostName,Category,Likes,Shares)
VALUES ('Python Programming','Java',15,10);

Step 4: Let us do a general query
Query:
SELECT * FROM Posts;
Output:

Step 5: Suppose if we want to exporting data to Excel via Azure Datastudio
Azure Datastudio has come with rich features for exporting data to Excel. Even exporting to CSV/JSON/XML/Chart are also possible. As given in below screenshot, need to click the option in the right corner
Output:

On clicking on “Save As Excel”, the resultant output is saved in excel format. We can see the saved contents below:

Step 6: We can write queries as per our needs and those data alone also can be exported. i.e. ultimately whatever results are in the “Results” pane are saved into excel format.
Query:
-- To get the details of Posts in
which category is like Database

SELECT PostName,Category,Likes,Shares FROM Posts
WHERE Category LIKE '%Database%'
ORDER BY PostName
Output:

This output can be exported to excel by clicking on “Save as Excel”, upon completion we can see the results as

Method 2: Import data from EXCEL into SQL server using SQL Server Management Studio
Importing data via SQL Server Management Studio. This is an easier option.
Step 1: Click on “Tasks” and choose “Import Data” option.

Step 2: The below screens are self-explanatory. Let us see one by one.

Step 3:Click on “Microsoft Excel” option.

Step 4: Source location can be selected as given below

Step 5: Destination location can be chosen from this window


Step 6: We can see that a table with the name “dataFromExcelForPostsByCategory” is created. If we compare the contents of excel data, they are the same.

In every database, portability is much important. In SQL server, by above-mentioned ways, they are done. For export, using Azure data studio it is explained and for import, by using SQL Server Management Studio, it is explained.
In the previous article, Learn SQL: SQL Server Pivot Tables, we’ve
discussed how to create a report using a PIVOT table query. We’ve created such a report directly in the SQL Server.
In this article, we’ll do the same, but this time we’ll use SQL Server export to Excel. So, let’s start.
Data model and the general idea
The data model we’ll use is the same that we’ve been using throughout this series. Even the queries used are the
ones we’ve analyzed in the previous article and therefore I won’t explain them in-depth here. In case, you’ve missed the previous article, I
strongly recommend taking a look at how these queries work.

The goal of this article is to show how we could combine data returned using SQL query and SQL Server export to Excel. This combination could prove to be very powerful. One of the main reasons is that MS Excel provides many additional options like graphs, calculations, formatting results. Also, you could use one “master” Excel workbook where you would join data from multiple sources, much easier than you could do it in case you read these data from original sources. And, worth to mention, that Excel is widespread and people are usually much more familiar with it than with databases.
SQL Server export to Excel – Using PIVOT Query
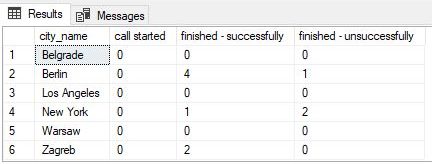
We want to create a report that contains a list of all cities from our database. For each city, we need to know a
number of calls grouped by their outcome.
To achieve that, we’ll use the final query from the previous article. This query shall always return all combinations of cities and call outcomes (we’ve used CROSS JOIN to create reporting categories). Also, we’ll be able to pivot by outcome (name), because our query is dynamic (we’re adding outcomes to the pivot part of the query based on the current contents of the dictionary). Therefore, our query shall work in all cases – even if we add new outcomes to the dictionary.
|
1 2 3 4 5 6 7 8 9 10 11 12 13 14 15 16 17 18 19 20 21 22 23 24 25 26 27 28 29 30 31 32 33 34 35 36 37 38 39 40 41 42 43 44 45 46 47 48 49 50 51 52 53 54 55 56 57 |
— 1 — report (including dynamic PIVOT) DECLARE @columns NVARCHAR(MAX) = », @query NVARCHAR(MAX) = »; — get all column names for the table we need for pivot SELECT @columns += QUOTENAME(TRIM(co.outcome_text)) + ‘,’ FROM call_outcome co ORDER BY co.outcome_text; — remove «,» from the end of the string SET @columns = LEFT(@columns, LEN(@columns) — 1); — dynamic SQL query SET @query =‘ SELECT * FROM ( SELECT — rc.city_id, rc.city_name, — rc.call_outcome_id, rc.outcome_text, rd.call_duration FROM ( SELECT c.id AS city_id, c.city_name, co.id AS call_outcome_id, co.outcome_text FROM call_outcome co CROSS JOIN city c ) rc LEFT JOIN ( SELECT ci.id AS city_id, co.id AS call_outcome_id, DATEDIFF(SECOND, c.start_time, c.end_time) AS call_duration FROM call c INNER JOIN call_outcome co ON c.call_outcome_id = co.id INNER JOIN customer cu ON c.customer_id = cu.id INNER JOIN city ci ON cu.city_id = ci.id ) rd ON rc.city_id = rd.city_id AND rc.call_outcome_id = rd.call_outcome_id ) report_data PIVOT( COUNT(call_duration) FOR outcome_text IN (‘+ @columns +‘) ) AS pivot_table;’; — execute dynamic query EXECUTE sp_executesql @query; |
Let’s take a look at the query result now. As expected, the result is the pivot table with all the data we need. Now
is the time to use SQL Server export to Excel.
SQL Server is a great tool and it has many addons you could use for specific purposes. Still, one of the frequently
used options are to simply copy the SQL Server query result to MS Excel and make desired additional transformations
there. The reason for that is that MS Excel provides a variety of options to present data. Some of the most commonly
used are tables, pivot tables, many different graph types, etc. Also, you could use MS Excel workbook as a central place where you will gather data from different sources (based on different formats or technologies) and combine
them to get an overall insight at your business. One more thing worth mentioning here is that MS Excel is widespread
and people are used to working with it. I don’t have an actual statistic related to SQL Server and MS Excel usage,
and I guess it would be hard to have actual numbers, so I’ll go with estimations available online. Around 750
million people worldwide use Excel, while in 2019 we had around 26.5 million developers (database developers are a small part of that number).
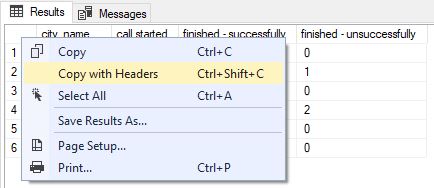
After you run the query, you can simply select the whole query result by clicking in the upper left corner (above
row numbers and left of the column names). The next thing to do is to select the “Copy with headers” option from the
drop-down list.
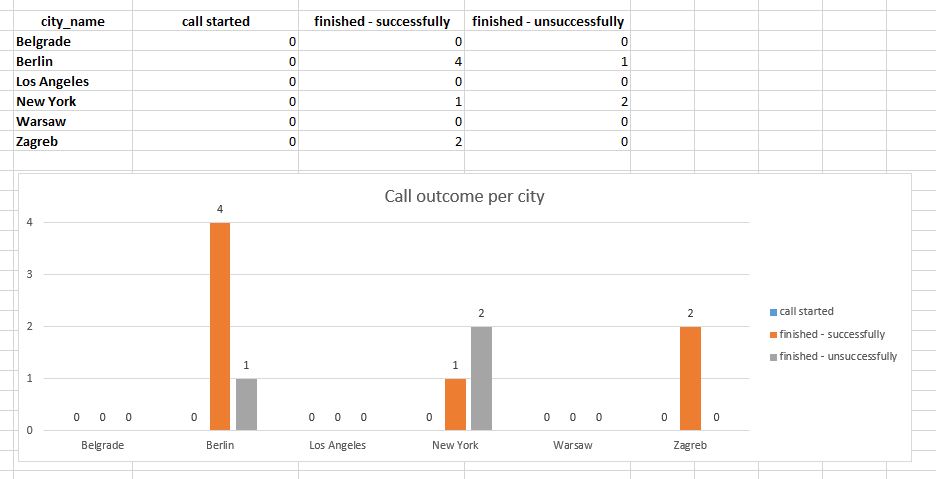
We’ve pasted the query result in the MS Excel worksheet. In real-life examples, we could have more formatting than
just applying bold to the categories. The graph below the table with data is prepared and formatted so it will
change accordingly changes in the data.
There are a few more things we could have done differently here:
-
We could paste data (pivot table) in a separate worksheet and have the “presentation” worksheet formatted
additionally -
In case we have more details, we could prepare several different graphs, as well as calculate parameters
relevant to our business
I’ve used this approach on real-world data as it enables you to create very complex dashboards after running a few
queries. Of course, you’ll spend a lot of time to prepare dashboards (and adjust them accordingly changes in
reporting requirements), but once you do that, you’ll profit a lot each time you need to create a new report.
And even better, this is not only limited to SQL Server export to Excel combination, but you could extract data from
different sources (other DBMSs, files, text…) and use your dashboard as a central place to get an overall insight.
SQL Server export to Excel – Without PIVOT Query
The final goal of our task is to create a pivot table as well as a graph to visually represent the result. The approach in the previous section was to create a PIVOT table query directly in SQL and paste this query to Excel.
There are (at least) 4 good reasons when you won’t always be able to use this approach:
-
You have the SQL query ready and you don’t want to waste additional time turning this query into the PIVOT table
query, but rather spend that time manipulating the result in the Excel -
Maybe you don’t use SQL Server (and MS Excel) and your DBMS simply doesn’t support PIVOT table queries (and
dynamic queries which is what we need) -
You want to have data in the raw format because you’ll need it for other purposes as well. Maybe you’ll create
more than 1 pivot table from the data returned. Maybe you’ll combine these data with other data directly in Excel -
You simply don’t know how to create a PIVOT table query in SQL Server but you know how to do it in MS Excel. OK,
this is not an excuse, but still, this is a common case in real life
Let’s now see what can be done if we go with the option that we don’t use the SQL Server pivot query. Once more
we’ll use the query described in the previous article. It’s almost the same as the previous query, with the main difference that we lack the PIVOT part of the query.
|
1 2 3 4 5 6 7 8 9 10 11 12 13 14 15 16 17 18 19 20 21 22 23 24 25 26 27 28 29 30 31 32 33 34 |
— 2 — report categories & data (without pivot) SELECT rc.city_id, rc.city_name, rc.call_outcome_id, rc.outcome_text, rd.call_duration FROM ( SELECT c.id AS city_id, c.city_name, co.id AS call_outcome_id, co.outcome_text FROM call_outcome co CROSS JOIN city c ) rc LEFT JOIN ( SELECT ci.id AS city_id, co.id AS call_outcome_id, DATEDIFF(SECOND, c.start_time, c.end_time) AS call_duration FROM call c INNER JOIN call_outcome co ON c.call_outcome_id = co.id INNER JOIN customer cu ON c.customer_id = cu.id INNER JOIN city ci ON cu.city_id = ci.id ) rd ON rc.city_id = rd.city_id AND rc.call_outcome_id = rd.call_outcome_id ORDER BY rc.city_id, rc.call_outcome_id; |
The first step is done. We’ve successfully returned all the data we need. Our result contains all combinations of
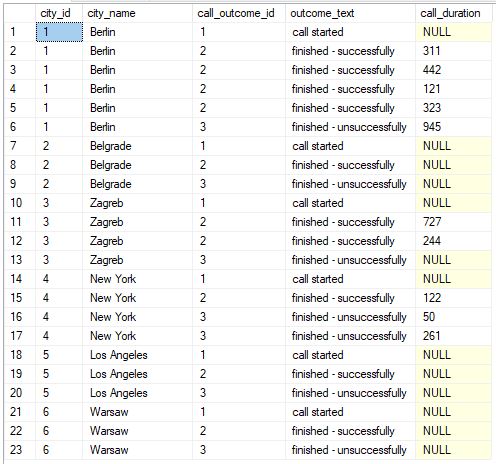
cities and possible outcomes (we’ve used CROSS JOIN) and one row per each call (NULL where we had no call).
Now we’re ready to create a PIVOT table directly in Excel. After clicking on the “Insert” -> “Pivot Table” (in
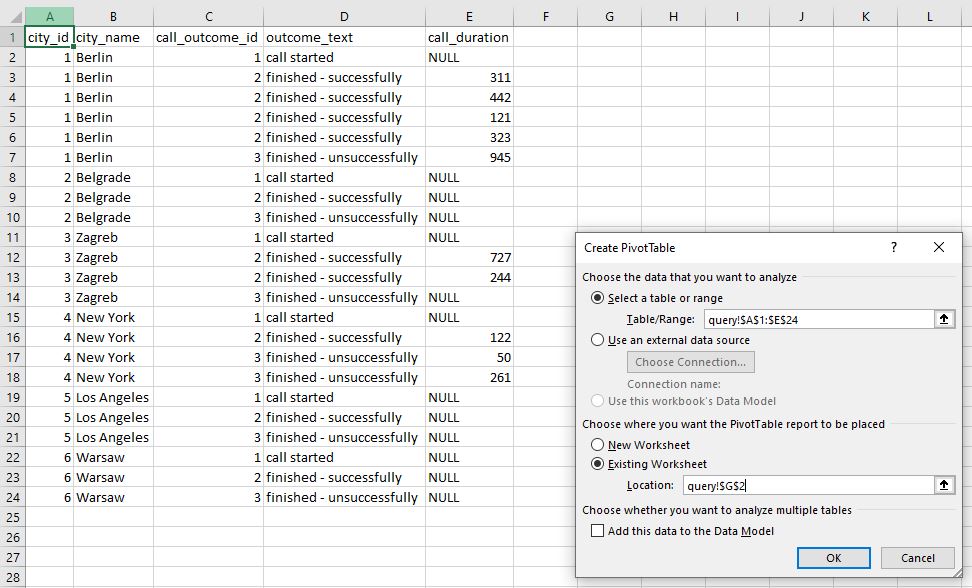
Tab List and Ribbon) the window like the one on the picture above shall appear. We’ll “Select a table or range”
containing the data and the location where we want to place our pivot table (in our case that is “Existing
Worksheet”, starting from cell G2).
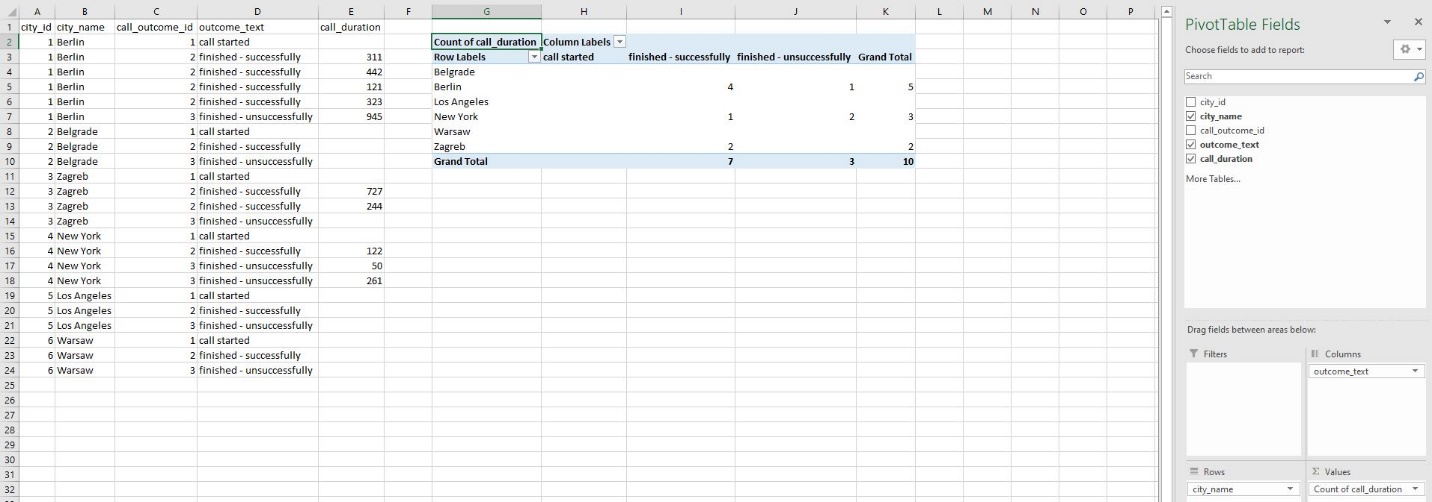
The next thing we did was to define what goes where. City names shall be “Rows” of our table, outcome texts shall go
into “Columns” and we’ll count call duration (“Values”). Please notice that in the original table (output), I’ve
replaced NULL values in column E, with blank spaces. This is important because the count function shall count 1 if
the row contains any non-empty value.
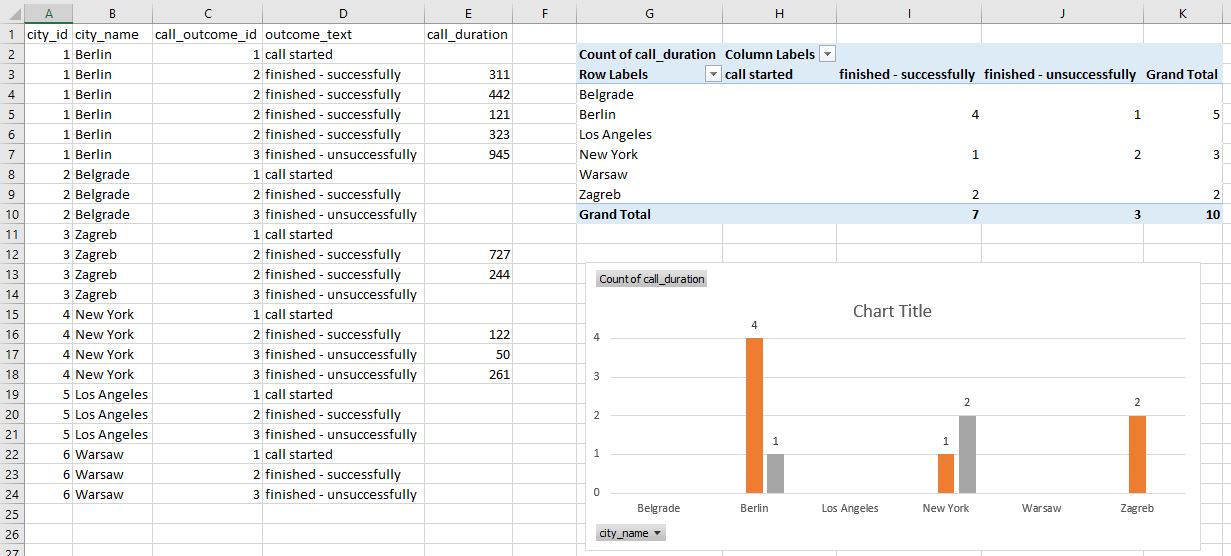
The last thing we’ll do is to create a graph. The data source for our graph is the pivot table created in the
previous step. We’ll apply formatting to our graph (graph style, labels, axis, etc.), and we’re done.
This approach could be applied more generally compared to the approach when the pivot table is created directly in
SQL Server. And that’s it – we’ve used SQL Server export to Excel to pull data from the database and create a simple
dashboard.
Conclusion
Today we’ve seen how we could combine the powers of SQL Server export to Excel – using the SQL query to grab data,
importing it to MS Excel, and making additional changes there. This is something you could easily do for various
purposes and the limit is only your imagination (and, of course, business needs). The next step could be automating
exports of tables or graphs created in MS Excel, directly to Word or PowerPoint.
Table of contents
| Learn SQL: CREATE DATABASE & CREATE TABLE Operations |
| Learn SQL: INSERT INTO TABLE |
| Learn SQL: Primary Key |
| Learn SQL: Foreign Key |
| Learn SQL: SELECT statement |
| Learn SQL: INNER JOIN vs LEFT JOIN |
| Learn SQL: SQL Scripts |
| Learn SQL: Types of relations |
| Learn SQL: Join multiple tables |
| Learn SQL: Aggregate Functions |
| Learn SQL: How to Write a Complex SELECT Query? |
| Learn SQL: The INFORMATION_SCHEMA Database |
| Learn SQL: SQL Data Types |
| Learn SQL: Set Theory |
| Learn SQL: User-Defined Functions |
| Learn SQL: User-Defined Stored Procedures |
| Learn SQL: SQL Views |
| Learn SQL: SQL Triggers |
| Learn SQL: Practice SQL Queries |
| Learn SQL: SQL Query examples |
| Learn SQL: Create a report manually using SQL queries |
| Learn SQL: SQL Server date and time functions |
| Learn SQL: Create SQL Server reports using date and time functions |
| Learn SQL: SQL Server Pivot Tables |
| Learn SQL: SQL Server export to Excel |
| Learn SQL: Intro to SQL Server loops |
| Learn SQL: SQL Server Cursors |
| Learn SQL: SQL Best Practices for Deleting and Updating data |
| Learn SQL: Naming Conventions |
| Learn SQL: SQL-Related Jobs |
| Learn SQL: Non-Equi Joins in SQL Server |
| Learn SQL: SQL Injection |
| Learn SQL: Dynamic SQL |
| Learn SQL: How to prevent SQL Injection attacks |
- Author
- Recent Posts

Emil is a database professional with 10+ years of experience in everything related to databases. During the years, he worked in the IT and finance industry and now works as a freelancer.
His past and present engagements vary from database design and coding to teaching, consulting, and writing about databases. Also not to forget, BI, creating algorithms, chess, philately, 2 dogs, 2 cats, 1 wife, 1 baby…
You can find him on LinkedIn
View all posts by Emil Drkusic