
Word for Microsoft 365 Word for the web Word 2021 Word 2019 Word 2016 Word 2013 More…Less
Moving or repositioning a picture on page in Word is as simple as dragging it with your mouse. But sometimes it doesn’t work. The key to getting the results you want is to select Layout Options.

-
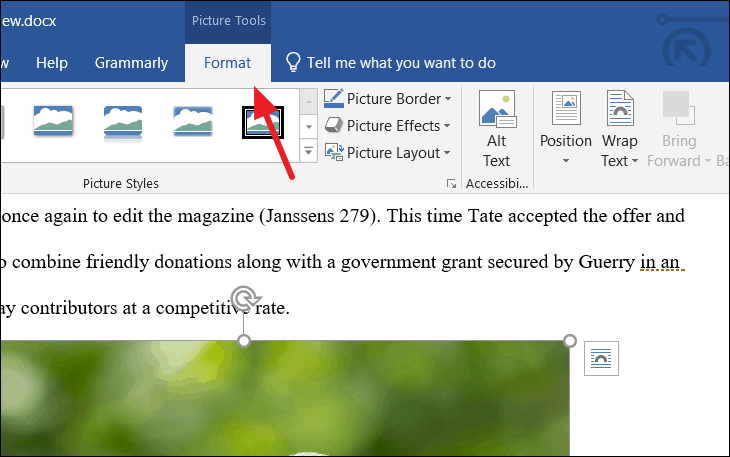
Select a picture.
-
Select the Layout Options icon.
-
Choose the layout options you want:

-
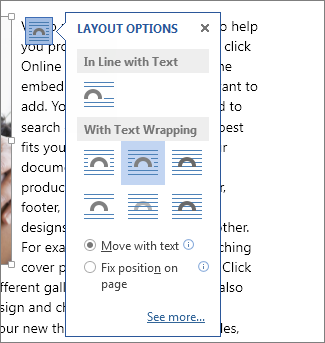
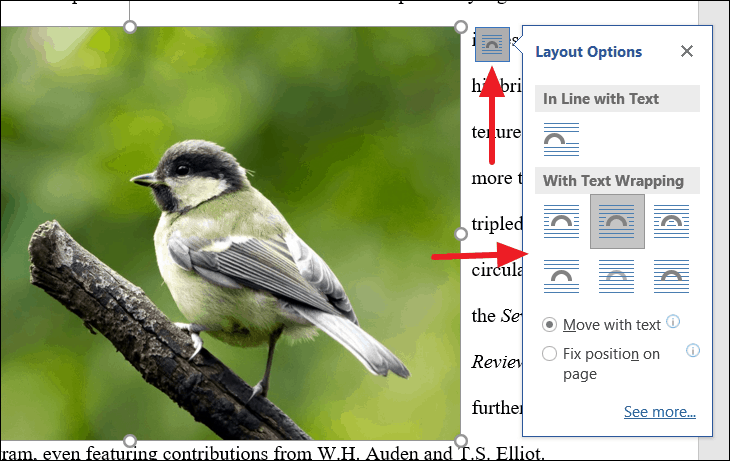
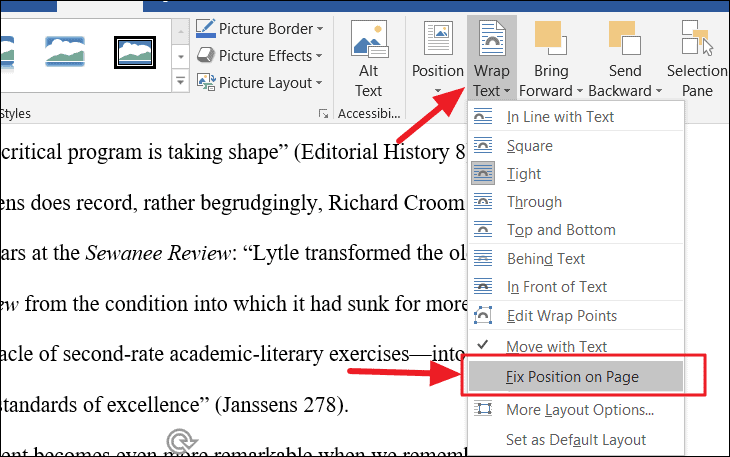
To bring your picture in front of the text and set it so it stays at a certain spot on the page, select In Front of Text (under With Text Wrapping), and then select Fix position on page.
-
To wrap text around the picture but have the picture move up or down as text is added or deleted, select Square (under With Text Wrapping), and then select Move with text.
-
For or more information and examples of text wrapping, see Wrap text around pictures in Word
The picture is probably behind another object, like a block of text:
To select the picture, use the Selection pane:
-
Select Home > Select > Selection Pane.
-
In the Selection pane, select the picture.
To move a picture a tiny amount, select the picture, then hold down the Ctrl key and press an arrow key.
To move several objects at the same time, group them together:
-
Select the first object.
-
Hold down the Ctrl key and select the other objects.
-
Right-click one of the objects, point to Group, and then select Group.
Tip: If you are unable to group or multi-select pictures, it’s possible that the layout of your picture is inline with text. If so, please refer to Open Layout Options to change the picture layout to any option under With Text Wrapping.
For absolute control over the alignment and positioning of a picture, use the Layout box to set alignment relative to margins or columns, absolute position in inches, or relative position by percentage. This comes in handy when you want to place a picture a certain distance from something else, like a page margin.
-
Select the picture.
-
Select the Layout Options icon.
-
Select See more, and then make alignment and position adjustments on the Position tab.
If you can’t select any of the position options on the Position tab, select the Text Wrapping tab, and then select any option except the In line with text option.
If you have more than one picture that you want to overlap on a page, you can enable this in the Layout box.
-
Select a picture.
-
Select the Layout Options icon.
-
Select See more.
-
On the Position tab, in the Options group at the bottom, select the Allow overlap check box.
-
Repeat for each picture for which you want to enable overlapping.
In addition to aligning and positioning pictures on a page, you can also align pictures to each other, or to other objects on the page. Although picture-to-picture alignment is not available from the Layout Options icon or the Layout dialog box, it’s a common task that you might do while working with picture positioning and alignment.
-
Hold down the Ctrl key and select each object that you want to align.
-
Go to Picture Format or Picture Tools Format > Align, and then choose an option, such as Center, Top, or Bottom.
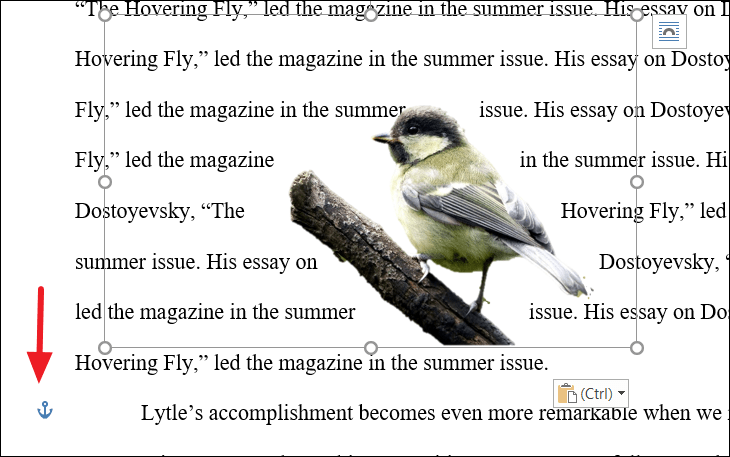
An object anchor  indicates where a picture or object is located in relation to the text in your document. Anchors do not appear for inline pictures; inline objects are tied to the place within the text where they were inserted and are treated like any text character—»in line with text.»
All other wrapping options (Square, Tight, Through, Top and Bottom, Behind Text, In Front of Text) are anchored to a particular place in the document; the anchor indicates the paragraph with which the object is associated. Select a picture, and then select the Layout Options icon to find out how your picture is inserted.
Notes: If you select a picture and it’s not inline with text, but you don’t see an object anchor, you can ensure that anchors are shown in two ways:
-
Show formatting marks On the Home tab, in the Paragraph group, select Show/Hide ¶.
-
Always show anchors Select File > Options > Display, and then select Object anchors.
Because anchors are simply a visual indication of a picture’s relative position on a page, they cannot be removed. However, by trying different text wrapping options, you should find all the flexibility you need in positioning a picture, regardless of its anchor.
For or more information and examples of text wrapping, see Wrap text around pictures in Word.
If you want to ensure that an image stays put even if the text around it is deleted, you can lock its anchor:
-
Select the picture.
-
Select the Layout Options icon.
-
Select See more, and then select Lock anchor.
Note: Because anchors are not used for pictures placed In Line with Text, anchor locking and all other positioning options are unavailable for inline images.
See also
Wrap text around pictures in Word
Rotate a text box, shape, WordArt, or picture in Word
Group or ungroup shapes, pictures, or other objects
If you inserted a picture into your document while using Word for the web, you can cut and paste it to move it within a document, and you can apply paragraph formatting, like vertical spacing and centering, to it. However, you cannot move a picture that was inserted while using the desktop version of Word if the picture has text wrapping or a fixed position on the page.
If you find that you cannot make changes to a picture, and you have the desktop version of Word, select Open in Word to open your document in Word and make changes to its layout.
When you are done, press Ctrl+S to save your document to its original location. You can then open the document again in Word for the web, and continue editing. Word for the web will retain the layout settings that you applied in the desktop version of Word.
Need more help?
Word’s Position and Wrap Text features help arrange images and text on the page. Position features automatically place the object at the location of your choice on the page (see how to position figures in Word for more details). Text Wrap features determine how text wraps around an image or other objects on the page, depending on the chosen option.
Wrap Text features work for figures in a Word document (see text wrapping for tables). Figures in Word mean any visual objects except tables and equations. So, using the same Wrap Text features can be used for images, ClipArt objects, charts, text boxes, diagrams, and SmartArt objects.
Change text wrapping
By default, Word inserts (see examples below):
- Pictures (images and photos), charts in line with the text.
- Text boxes, shapes in front of the text.
- WordArt objects behind the text.
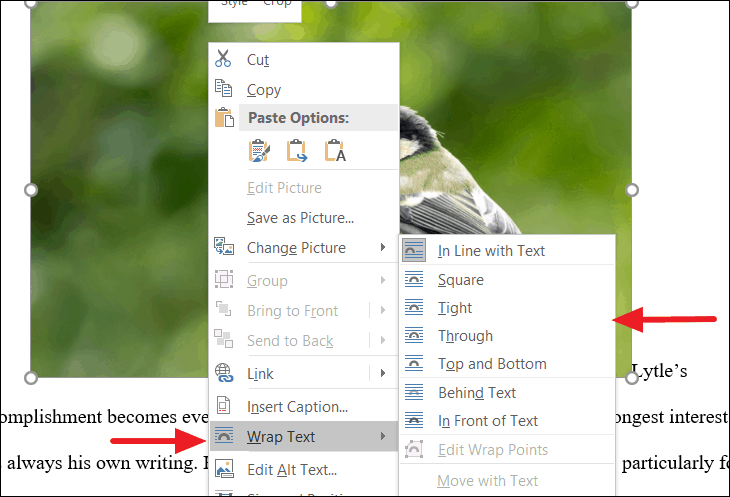
To change the way how text should wrap the object, select it, then do one of the following:
- On the Picture Format (Shape Format, Graphics Format) tab, in the Arrange group, click the Wrap Text button:

- Right-click on the object, then choose Wrap Text in the popup menu:

or

- Click the Layout Options button that appears next to the selected figure:


From the Wrap Text list, choose the option you prefer:
- In Line with Text places an object in a paragraph on the same line as the surrounding text. The text does not wrap around it.

- Square wraps the text around the picture or shape on all sides at right angles (a square pattern) as if it is rectangular. The text fills the remaining rectangular region.
This option is the most common form of text wrapping.

- Tight wraps the text around the edges of the figure. The text follows the shape.
This option is most useful for larger images covering most of the page width.

- Through wraps the text around the picture or shape edges, including any white gaps. If there is no white space in the image or shape, text wrapping works the same as Tight.
This option is an advanced setting because you pull or drag image and shape points in and out of their original borders:
See how to edit hyphenation points.
- Top and Bottom wraps the text above and below the figure to keep the image on its line. There is no text on either side of it.
- Behind Text places the figure behind, or underneath, any existing text. The text does not wrap around it.
The picture looks like a watermark or background image.
Note: Use the Selection pane when working with objects behind the text.
- In Front of Text places the object on top of the text. The text is not wrapped, so some of it may be blocked depending on the figure’s transparency.


Note: Figures that use the Square, Tight, Through, Top and Bottom, Behind Text, or In Front of Text wrapping style are all considered floating.
Position a figure to a paragraph or page
Also, Word offers two options for all wrapping styles except In line with Text (for floating figures):

or

- Move with Text moves the figure along with the surrounding text.
If a figure is positioned inside the paragraph, and you delete or add any content before the paragraph, the figure moves with the paragraph. See more about Positioning a picture, text box, or shape on the page.
- Fix Position on Page keeps the figure at the same place on the page when text is added or removed.
If the paragraph where the figure is located (that paragraph contains anchor) moves to the next page, the figure moves and keeps its position relative to the page.
Note: The same options you can find in the Layout dialog box, on the Position tab, in the Options section:

Checking the Move object with text check box is equivalent to the Move with Text option from the Wrap Text dropdown list. Unchecking the Move object with text check box is equivalent to the Fix Position on Page option.
Wrap text on both sides, or one side only
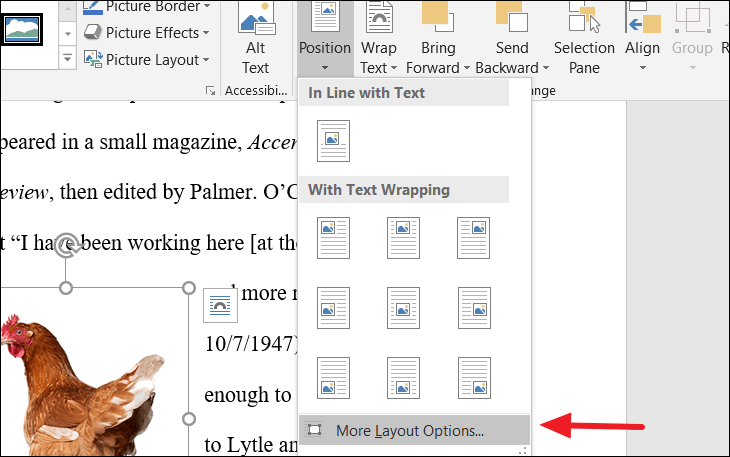
To change additional options, choose More Layout Options… from the Wrap Text dropdown list or the See more… link in the Layout Options menu.
In the Layout dialog box, on the Text Wrapping tab:

- In the Wrapping style group, choose any style exact In line with text (see above).
- In the Wrap text group (available for the Square, Tight, and Thought wrapping styles), choose any of the additional options:
- Both sides wraps text around either side of the image or shape:
- Left only wraps text around only the left side of the image or shape:
- Right only wraps text around only the right side of the image or shape:
- Largest only wraps text on the side of the image or shape with the larger distance from the margin.
- Both sides wraps text around either side of the image or shape:


Change the distance between text and object
To change the distance between text and the visual object, open the Layout dialog box by one of the following methods:
- On the Picture Format (Shape Format, Graphics Format) tab, in the Arrange group, click the Wrap Text button, then select More Layout Options…
- Right-click on the object, click the Wrap Text list, then select More Layout Options… in the popup menu.
- Click the See more… link in the Layout Options menu.
In the Layout dialog box, on the Text Wrapping tab, in the Distance from text section, enter custom values for the distance between the text and the picture independently for:
- Top and Bottom (available for the Square, Tight, Thought, and Top and Bottom wrapping styles),
- Left and Right (available for the Square, Tight, and Thought wrapping styles).
For example, with the 0.3-inch distance on all sides:

Edit hyphenation points
To use the Tight or Through options effectively, you may need to adjust the wrapping points for the image or shape. To edit wrap points, select the object, then activate the Edit Wrap Points view by one of the following methods:
- Picture Format (Shape Format, Graphics Format) tab, in the Arrange group, click the Wrap Text button. Then choose Edit Wrap Points from the Wrap Text dropdown list:

- Right-click on the object and select Wrap Text -> Edit Wrap Points in the popup menu:


In the Edit Wrap Points view, drag the red lines to adjust where the text wraps:

Note: There is no way to add points. You can move existing wrap points however you want.
Be careful! After changing a text wrapping option or copy-pasting the picture, Word lost the changes of Wrap Points.
![]()
Download Article
![]()
Download Article
- Adding an Image
- Wrapping Text
- Removing Wrap Text
- Video
- Q&A
- Things You’ll Need
|
|
|
|
|
Microsoft Word helps you incorporate images and text together in order to illustrate a document, and you can learn to wrap text around images in order to change the default settings. This wikiHow shows you how to use wrap text in Word to add captions to images.
-
1
Click on the area where you want your image. Once you do, a flashing vertical line appears right where you want the image placed.
- A mouse is useful for working with images in Word, because you have more control of the size and shape when you can click and drag the image.
-
2
Click Insert. This appears in the menu at the top of the page and pulls up a menu of different options.
Advertisement
-
3
Select Pictures.This will allow you to insert any jpg, pdf or other type of image that you have on your computer (or drives) into the document.
-
4
Select Photo Browser. This will let you choose from the photo program on your computer.
- Choose Picture From File if your image is on your desktop or in another folder.[1]
- Choose Picture From File if your image is on your desktop or in another folder.[1]
-
5
Select your image. Once you’ve opened the dialog box for inserting an image, navigate to the folder where your image is saved and click on it once to select it for insertion into the document.
-
6
Click Insert. This appears as a button at the bottom of the dialog box. Once done, your image is in the location you selected with your cursor.
-
7
View your image. Keep in mind that Word’s default setting is to put the image “in line.” This means it will treat it as if it is a large letter or a tall line of text.
- Text wrapping will allow the text to wrap around the image, go over the image or beside the image.


Advertisement
-
1
Click on the picture with your cursor. This action will bring up the Picture Formatting menu in the ribbon at the top of Word.
- Clicking outside of the image will take the picture formatting menu away and bring you back to the text formatting menu.[2]
- Clicking outside of the image will take the picture formatting menu away and bring you back to the text formatting menu.[2]
-
2
Select Wrap Text. It may be inside the Arrange grouping or in the Advanced Layout tab, Drawing Tools tab or SmartArt Tools tab, depending on the version of Word you are running.
-
3
Click the Wrap Text button. This appears in the top-right corner of your image when you click on it and will pull up a drop-down menu listing different text wrapping options.
-
4
Select a text wrapping option. Word has different text wrapping options, which you can pick according to your needs:
- Choose Square if your image is square and you want to wrap the text around the square border of your image.
- Choose Top and Bottom if you want the image to stay on its own line, but be between text on the top and bottom.
- Choose Tight to wrap text around a round or irregularly shaped image.
- Choose Through to customize the areas that the text will wrap. This is best if you want the text to be incorporated with your image in some way, or not follow the borders of the image file. This is an advanced setting, because you will pull or drag image points in and out of their original borders.
- Choose Behind Text to use the image as a watermark behind the text.
- Choose In Front of Text to display the image over the text. You may want to change the color, or it can make the text illegible.
-
5
Re-position the image. After you have selected your text wrapping option, you can click and drag your image to re-position it on the page. The program will allow you to place it where you want it now, with the text flowing around it.
-
6
Experiment with different types of text wrapping. Each image and project requires different types of text wrapping. Browse through options when you add a new image to make sure your wrap text is properly formatted.


Advertisement
-
1
Click on the text box with your wrap text. This will pull up the markers for expanding and/or moving the text box along with making your text editable.
-
2
Highlight all but the first letter of your wrap text. It’s important to leave the first letter un-highlighted because you’ll need to press the Backspace key, which could end up deleting the image you inserted above the wrap text.
-
3
Press the ← Backspace key. This will delete the text you highlighted from the text box. Make sure to delete the first letter after the rest of the text, since this will reset your wrap text settings.


Advertisement
Add New Question
-
Question
I inserted a picture, chose «text wrapping,» and selected «tight.» How do I unwrap it?

Select the «In Line with Text» option in the same text wrapping menu. This will return the image to the default text wrapping setting — the same as when you initially added the image.
-
Question
How do I get two images next to each other?
Just insert one picture right after the other (or put a space in-between if you want). If they don’t both fit on the same line, then resize them by clicking one of the corner squares and moving it inward.
-
Question
How do I select which text will wrap around the picture?
Highlight the paragraph/words you would like to use and then select «Wrap text.»
Ask a Question
200 characters left
Include your email address to get a message when this question is answered.
Submit
Advertisement
Thanks for submitting a tip for review!
wikiHow Video: How to Wrap Text in Word
Things You’ll Need
- Mouse
- Microsoft Word
References
About This Article
Article SummaryX
«When you insert an object, such as an image or shape, into your Word document, you can choose how your text wraps around it. First, insert an object. To do this, click the place in your document where you’d like it to appear, click the «»Insert»» tab, and then select the object you want to include. By default, the object will be placed in line with the text, which means it’ll probably interrupt the document’s text flow. To make text wrap around the object instead, click the object once to select it, and then click the Layout Options icon at its top-right corner—it’s the half-circle surrounded by a bunch of lines. Now you’ll see several text-wrapping options under «»With Text Wrapping.»» Each option has an icon which illustrates how the text will wrap around the object. Click the first icon in this section to wrap the text around the object in a nice clean manner that adds a little space between the object and text. Or, click through the other options to see if they better suit your needs. If you drag the object to another location in the text, the text will continue to wrap around it using your selected text-wrapping setting. Click anywhere outside the object to close your Layout Options and return to editing your document.
»
Did this summary help you?
Thanks to all authors for creating a page that has been read 271,870 times.
Is this article up to date?
Text wrapping in Word is about how text behaves around a graphical object or illustration, such as a picture, shape, textbox or even a table. It controls how text position itself or flexibly flows to the position of a graphic in your Word document. For example, you can use the Square text wrapping to wrap text around the shape or picture.
There are four options that allow you to wrap text around objects in Word. These four options are explained and illustrated below.
With this option, the object sits inside a rectangular container. And text flows around the rectangle, leaving some space between the text and the object. When this option is used, the object (picture, shape or textbox) can be dragged to a different location within the document, while maintaining its rectangular shape.
To set a square text wrapping:
- Right-click on the picture
- A shortcut menu appears. Click on Wrap Text.
- Another shortcut menu appears with the layout options, click on the Square option.

- Alternatively, click to select the object. The Layout Options icon will appear at the top right corner of the object. Click on this icon and then choose Square from the list of wrapping options.
This is how you may apply the Square layout option to a picture in Word. This option can also allow you to move the picture anywhere in your Word document by dragging.
Tight text wrapping option
Wrapping text with the tight layout option is similar to the square wrap. The difference is that the text is closer to the object and matches its shape. For example, if the shape of the object is a circle or a rectangle, the hole in the text will be shaped like a circle or rectangle respectively around the object.
To set Tight text wrapping in Word:
- Right-click on the picture
- A shortcut menu appears. Click on Wrap Text.
- Another shortcut menu appears with the layout options, click on the Tight option.

- Alternatively, select the picture to display the Layout Options icon. Click on this icon and select the Tight layout option.
This is how you may set a tight text wrap in Word.
Top and Bottom wrap
This places the image or picture in a rectangular box that has the same width as the margin. This way, the text flows above and below, but not beside the picture or shape.
To set Top and Bottom text wrap in Word:
- Right-click on the picture
- A shortcut menu appears. Click on Wrap Text.
- Another shortcut menu appears with the layout options, click on the Top and Bottom option.

- Alternatively, click on the Layout Option at the top right corner of the object, then select the desired text wrapping option from the shortcut menu.
Text wrapping in Word – Through option
Depending on the nature of the image, the text flows through any open area of the image. However, there is no enough proof that it works. In practice, this option appears to have the same effects and behavior as the Tight wrapping.
To set text wrapping in Word with the Through option:
- Right-click on the picture
- A shortcut menu appears. Click on Wrap Text.
- Another shortcut menu appears with the layout options, click on the Through option.

- Alternatively, use the Layout Options icon at the top right corner of the picture to select the desired wrapping option.
These are the four layout options that allow you to wrap text around a picture, shape, or text box in Word.
From company logos to diagrams in project papers, there are many reasons why you may want to insert images in a Word document. But images and texts don’t always work together well. When you include an object like images or other illustration types into a Word document, it doesn’t look as good as it could and it’s difficult to move it exactly where you want.
By default, when you insert an image into a Word document, Word treats that image as an individual character in line with the text and increases line spacing depending on the size of the picture. This will give the document an awkward look and with a lot of empty spaces. Also, whenever you add more texts or remove texts from the document, the image moves around with the rest of the texts.
If you want the texts to flow around the object in the way you want, you’ll need to wrap your text around the object in Word. To do this, Word provides several text wrapping options which allow you to control how images and objects are displayed in a document. Let’s see how to wrap text around an image or object in a Word document.
Insert Image in Word
You can only change wrap text wrapping options after you inserted the image into the Word document. You can insert various illustration objects such as pictures, icons, SmartArt, charts, and screenshots. Word treats all of these illustration types the same way. So if you learn how to wrap text around a picture, you would know how to wrap text around other objects.
There are two ways to insert an image in a Word document. You can either insert from a file in your local drive or you can insert an image online. Here’s how you do it:
First, place the insertion point (text cursor) where you want to insert the image.
Next, go to the ‘Insert’ tab on the Ribbon and click the ‘Pictures’ option in the Illustrations group.

In the Insert Picture dialog, navigate to the folder where your picture is located. Then select the image and click ‘Insert’.
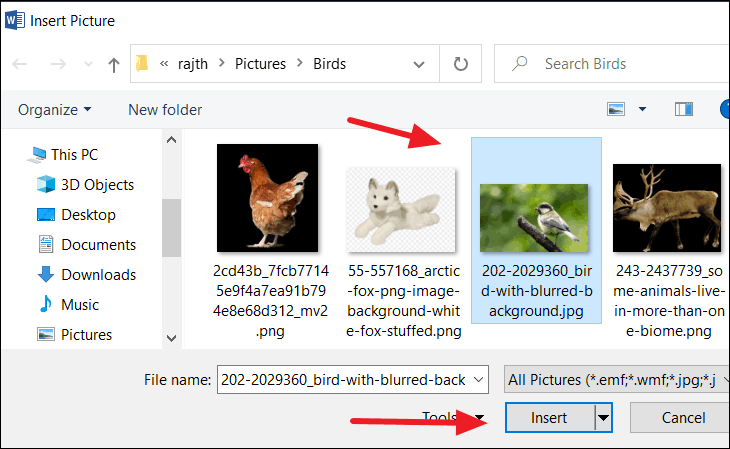
The image will be inserted in the document.
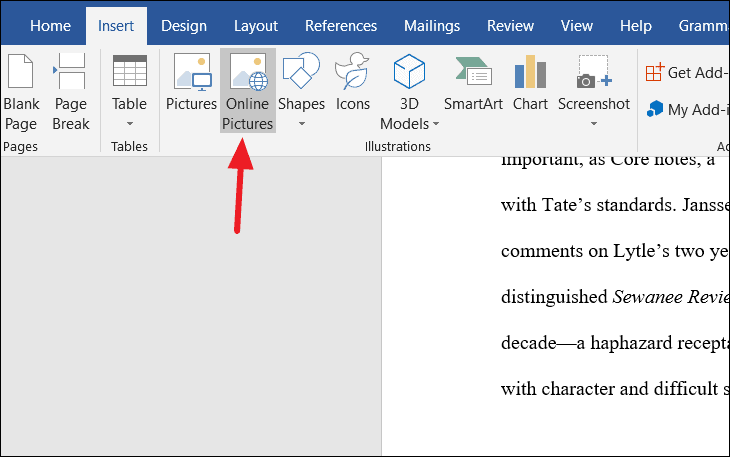
Insert an Online Picture
If you want to insert an image from online sources, click the ‘Online Pictures’ option instead of Pictures on the Ribbon.
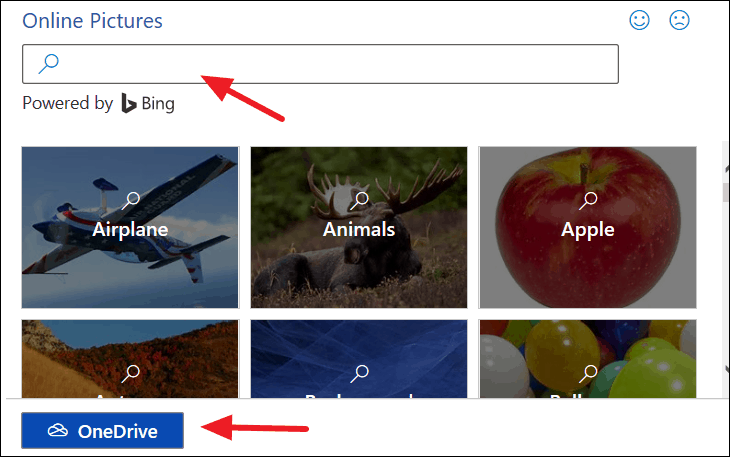
The Online Pictures window will appear. Here, you can choose an image from your ‘OneDrive’ or from Bing image search.
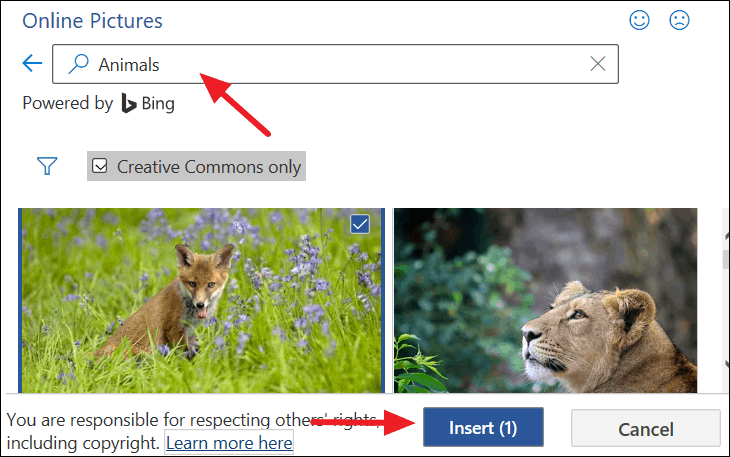
Search for an image in the Bing search, select it and click ‘Insert’ to add the image to the document.
Wrapping Text Around an Image in Word
Now the picture is inserted, but the text is only displayed above, below, or on the same line as the bottom of the picture, and not around it. This is because the picture is inserted in line with the text by default. This gives an awkward look to your document.
Besides, you can’t move the image freely as you please. To fix these issues, you will have to change the default text wrapping setting.
Text wrapping causes text to flow around the picture, go over the picture, or next to the picture in a more natural way. Here’s how you do it.
You can wrap text in three ways:
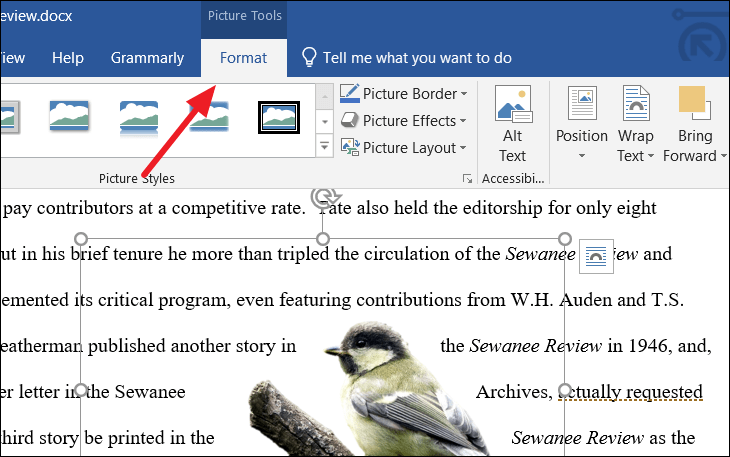
Method 1: Select the image you want to wrap text around in the document. And a new ‘Format’ tab under ‘Picture Toolbar’ will appear on the Ribbon, which contains a collection of picture formatting tools to allow the user to insert and manage pictures.
Go to that Picture Tools ‘Format’ tab, click the ‘Wrap Text’ button in the Arrange group, and choose an option in the drop-down.

As you move your cursor over the options, you can see a preview of the text wrapping in the document. When you click on an option, it will be applied to the document. We will discuss each of these options in detail later.
Method 2: When you select an image or object in the document, you’ll see a floating button (Layout Options) to its right. Click on it to access the text-wrapping options.
Method 3: Right-click the image, select the ‘Text Wrap’ option from the context menu and choose one of the text wrapping options from the submenu.
Now, let’s talk about what each of these text wrapping options means.
Inserting Image In Line with Text
This is the default option that is applied when you insert an image. Word treats the image as a large letter (like a letter with a large font size) or a tall line of text and places it on the same line as the surrounding text. And the text doesn’t freely flow around it.
When you select the image, you will see sizing handles around the image and a rotation control at the top. You can use these controls to resize the image to your desired size.
Wrap Text Squared Around the Image’s Frame
The ‘Square’ option wraps text around the square border of your image such as above, below, left, and to the right as shown below. You can click and drag the image to move it anywhere, as you do it, text shifts around to accommodate the picture on both sides.

Wrap Text Around the Shape of the Image
The ‘Tight’ option allows text to wrap around the shape of the image itself, not of its frame. This option is best suited for odd-shaped images and images that have no background (transparent background). Since the below image has a background, it wraps text as it did for the Square option.
Another Example:
This option is the more obvious choice for irregularly shaped images to wrap text around. If you insert the following image with transparent background (no background), you can easily wrap this image with the ‘Tight’ option.
When you choose the ‘Tight’ option, you can see that the text hugs and flows around the shape of the image.
But if you have an image like in the previous example, you will have to remove the background and adjust the wrap points to wrap text around the image as shown above.
Wrap Text Through the Empty Spaces in Images
The ‘Through’ option is very similar to the Tight option, however, this option also fills any whitespaces inside the image.
There is also ‘Edit wrap point’ control on the same menu, which will enable you to alter the wrap points to incorporate text in your image. We’ll show you how to use this functionality along with how to remove the background in the later section.
Wrap Text Around Top and Bottom of the Image
The ‘Behind’ option wraps text above and below the picture to stay on its own line, but not on either side, as shown in the below screenshot. This option is best suitable for wide-width images.
Overlay Text over Image
Choose the Behind Text option to overlay the text on top of the picture (like a watermark). Although, in this case, it’s hard to discern some of the text.
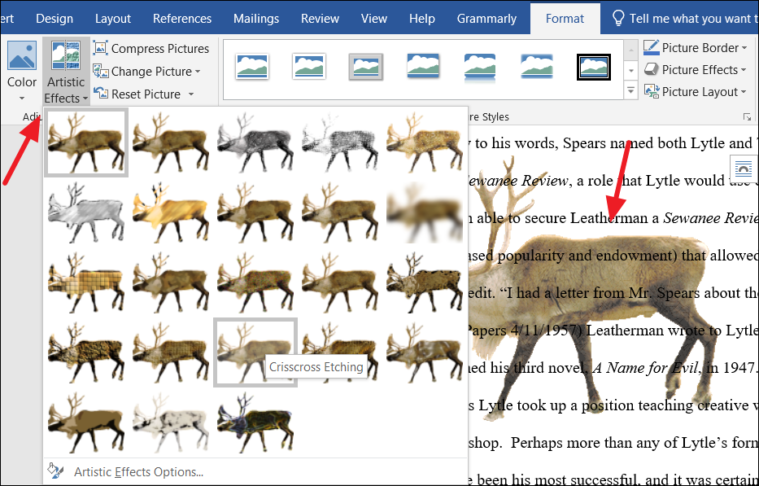
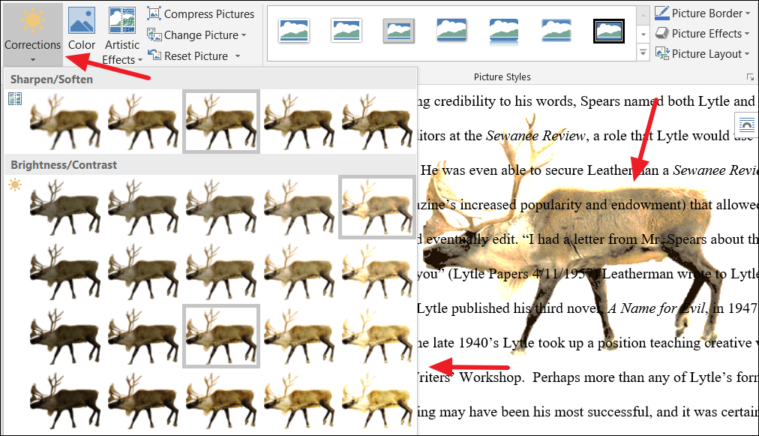
But you can fix this by toning down the colors of the picture a bit. You can do that with the three options available in the Adjust group of the ‘Format’ tab.
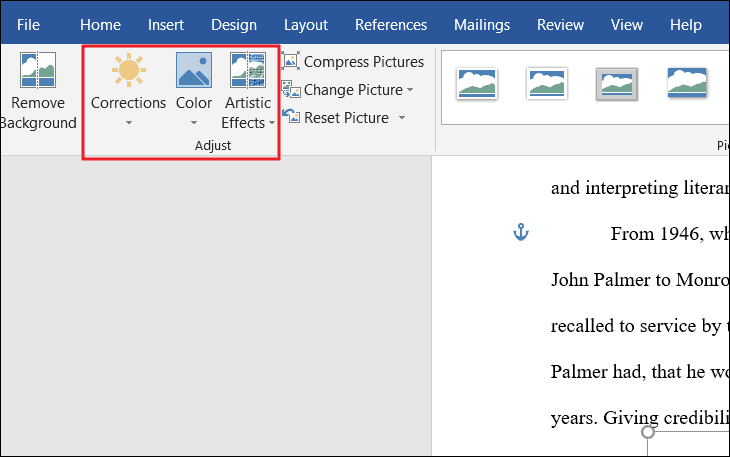
You can click the ‘Artistic Effects’ option to choose one of the effects.
Or click the ‘Corrections’ button to adjust the brightness, contrast, and sharpness of the picture with one of the options from the drop-down. Now, texts are more visible than before.
Or you can select the ‘Color’ button and change the color saturation, tone, and recolor of the image. Here, we are choosing the ‘Washout’ option in the Recolor.
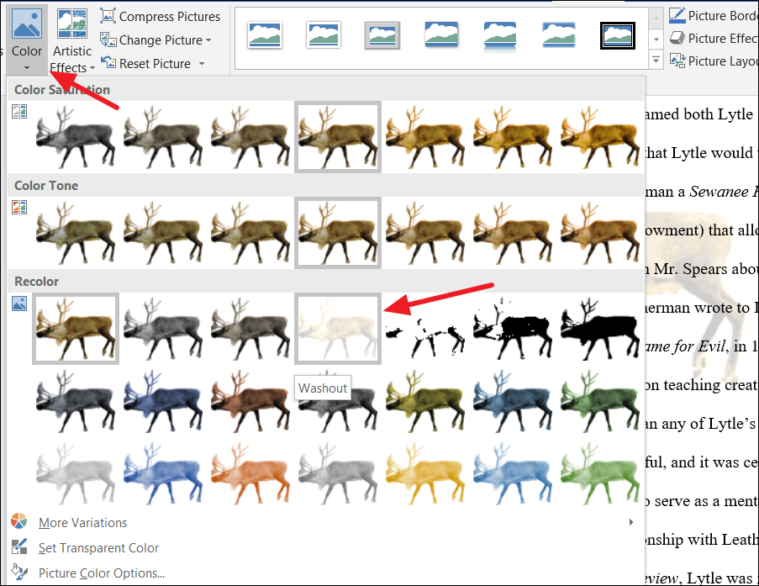
Now, the colors are toned down significantly and you can clearly see the text with the picture in the background. The text flows over the picture as if it’s never wrapped.
This is an interesting effect which can useful in some cases.
Overlay Image over Text
The final option ‘In Front of Text’ is the opposite of the Behind the Text option. This places the image over the text and obscures the text behind it as shown below.
This is option is not often used but it’s an effective way to wrap text. For example, this can be used to draw an arrow to highlight a phrase or text.
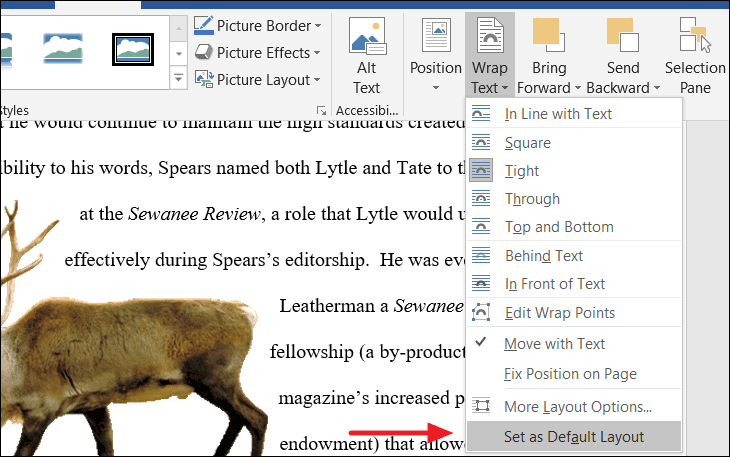
If you want to use the current text wrapping and positioning option as the default for any new pictures, charts, or SmartArt graphics, click the ‘Set as Default Layout’ at the bottom of the same menu.
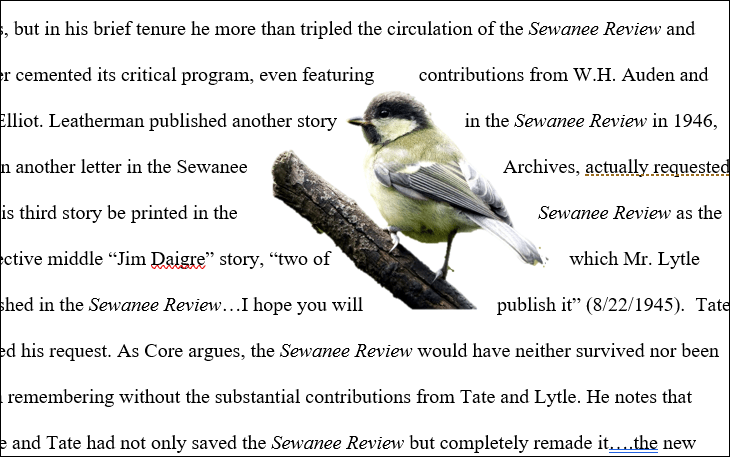
Editing Wrap Points
You have seen how to wrap around the edges of the image itself with the ‘Tight’ text wrapping option. Once you have chosen your wrapping option for an image, you can customize how close the text can come to the image by editing or adding the wrap points. By editing wrap points, you can define how close or how far the text can to the picture.
By default when you add an image in Word, wrap points surround the outer frame of the image. They will form a rectangle or square shape around the picture.
When you choose the ‘Tight’ wrap option for the picture that has no background or transparent background, the text will wrap around the shape of the image itself, not of its frame.
But if you have inserted a picture that has a background like the one shown below, the text won’t wrap around the shape of the image, instead, it will surround the frame.
You can still add or edit wrap points, but the text won’t wrap around the edges of the image as you want.
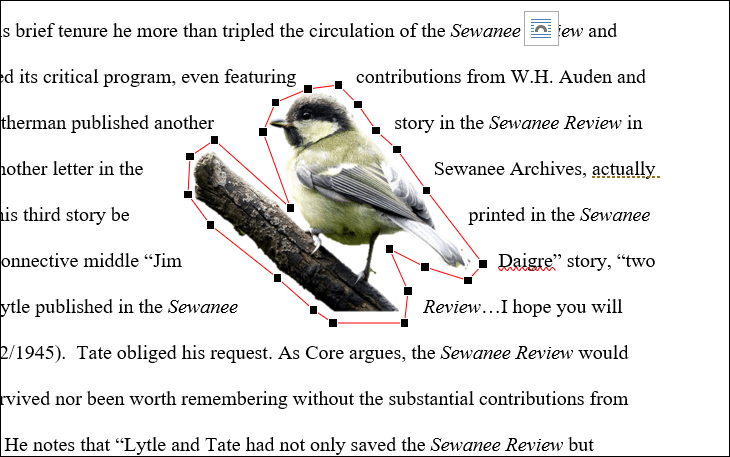
Remove the Background from an Image in Word
If you want to edit the wrap point and wrap text around the shape of the image that has a background, you have to remove the background first. Let’s see how to remove background from an image.
Select the image, go to the ‘Format’ tab or ‘Picture Format’ tab on the Ribbon and click the ‘Remove Background’ button on the far-left side.
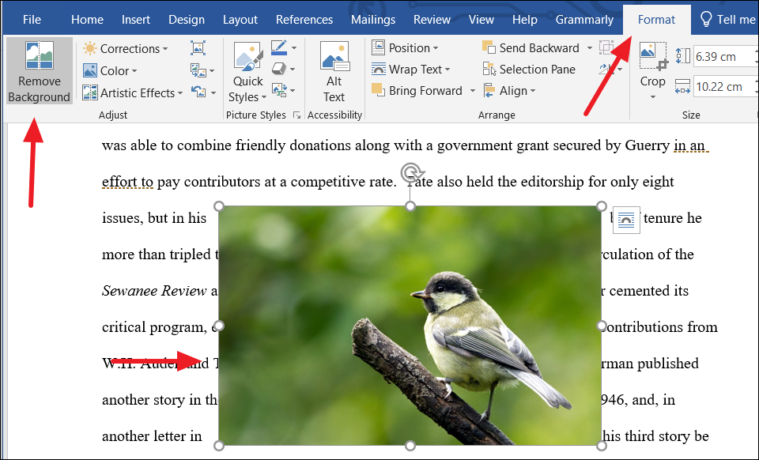
Remember, the ‘Format’ tab will only appear if the picture or the object is selected.
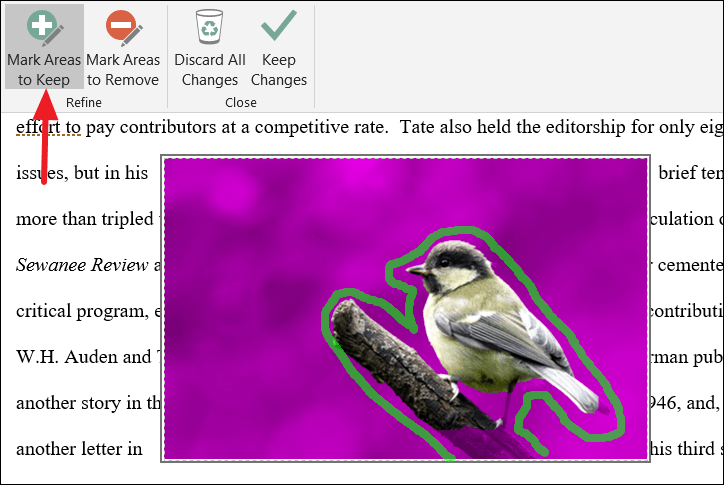
Once you click the ‘Remove Background’ button, a new ‘Background Removal’ tab will open up on a new Ribbon just for this image, and Word colors the background in magenta color to show what will be removed. Word tries to auto-detect the background of the image by coloring them in magenta.

But most of the time, Word can’t accurately mark the background on pictures – there are some parts of the bird and wood are covered in magenta too (in the above image). That’s why Word provides you with two tools to manually remove the background. You can use the ‘Mark Areas to Keep’ and ‘Mark Areas to Remove’ tools in the ‘Background Removal’ tab.
Click the ‘Mark Areas to Keep’ button to highlight the section of the image that you want to keep. When you click this button, your cursor pointer changes to a drawing pen that lets you mark the section of the picture. Use the pen to click a spot or draw the areas you want to keep.
When you’re finished highlighting the areas, click outside the picture to see the result. Your image may look something like this.
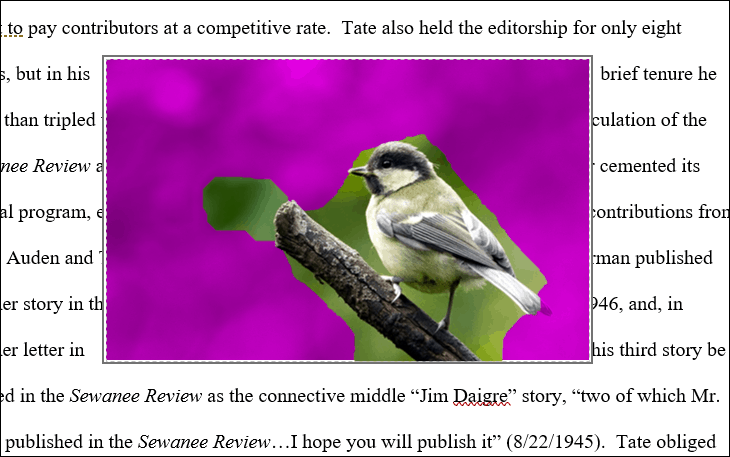
But there’s still some of the background remains. You need to remove those with the ‘Mark Areas to Remove’ button.
Now, click the ‘Mark Areas to Remove’ to mark the areas of the image that should be removed. Again, use the pen to click or draw the sections you want to remove from the picture and click outside to see the effect.
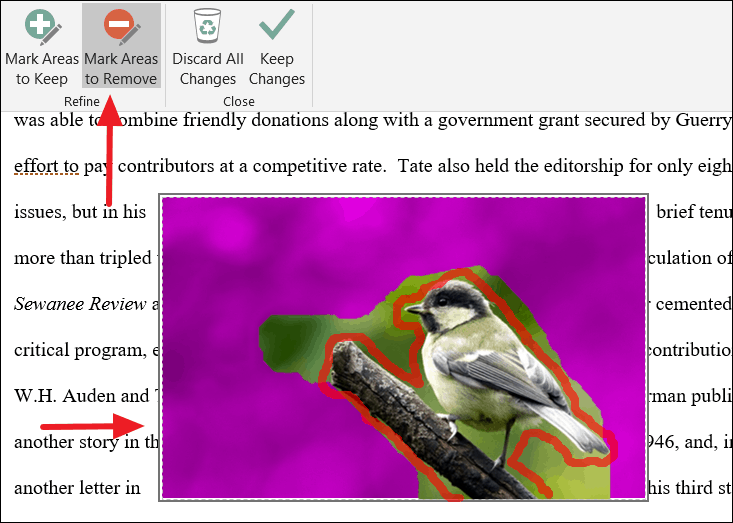
Once you’re done, your picture should look something like the below picture. As you can see, every bit of the background is removed from the picture. Now, only the bird and the branch remains (this is what we want).
You may not be able to get this on the first try, so you should try it out on your picture a few times to get it right. If you made mistakes while marking, you can always undo an action by pressing Ctrl + Z or you can click the ‘Discard All Changes’ button to discard all your changes and start over.
When you’re finished removing the background, click the ‘Keep Changes’ button in the ‘Background Removal’ tab to save the changes and close the Background removal tab.
Now, you have the picture with no background.
Editing Wrap Points after Removing Background
After you removed the background of the picture, you can edit the wrap points to specify how close the text can come to the picture. Editing wrap points is really useful when you want to use ‘Tight’ or ‘Through’ wrapping text settings effectively. If you have a picture with transparent background, you have no need to remove the background, you can directly edit the wrap points.
To edit wrap points, select the image and switch to the ‘Format’ tab.
Then, click the ‘Wrap Text’ button and select the ‘Edit Wrap Points’ option from the same text wrapping drop-down.
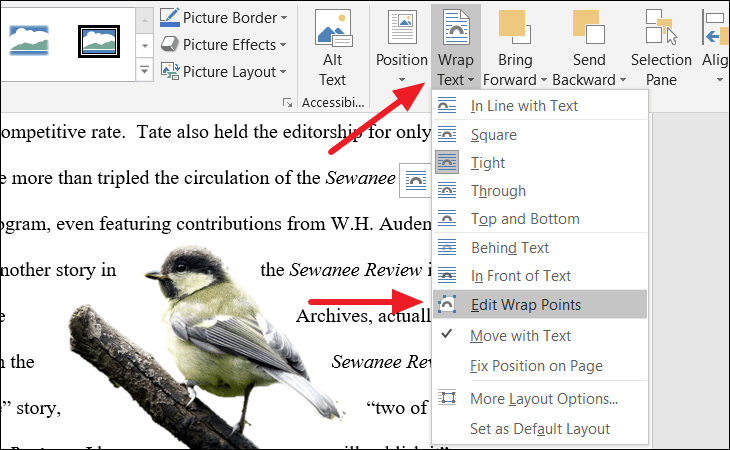
Word will display the wrap points around the image, which are the small black squares handles connected by a small red line. The number of wrap points a picture has depends on the shape of the picture.
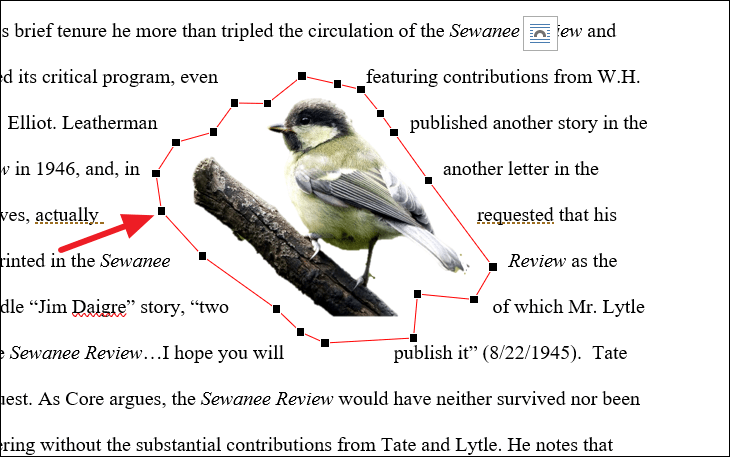
You can click one of these small square handles and drag it to a new location where you want the new boundary. You can move these wrap points as much as required to control how the text flows around it.
Besides editing the existing wrap points, you can also create new wrap point by holding down the Ctrl key, as you click on the red line where you want it.
To remove an existing or newly created wrap point, click on the wrap point while holding the Ctrl key.
In the example, we are going to move the wrap points a little closer to the image to tighten the space between the image and text.
Once you’re done editing wrap points, click anywhere outside the picture to see the result.
Extra Text Wrapping Layout Options
Once your text is wrapped with one of the wrapping options, you can further customize your text wrapping setting with Layout Options.
To open the Layout Options, select the image and click the ‘More Layout Options’ option on the same ‘Wrap Text’ dropdown menu.
The Layout dialog box will appear. Switch to the ‘Text Wrapping’ tab to find the ‘Wrapping style’, ‘Wrap text’, and ‘Distance from text’ sections. The Wrapping style lets choose the Wrapping style of the image (which we already discussed). And ‘Wrap text’ and ‘Distance from text’ sections let you fine-tune the layout of the wrapping style.

Note: You can only use these options if your wrapping style is set to Square, Tight, or Through.
In the Wrap text section, you can choose which sides you want to wrap the text around the image. You can wrap text on Both sides, Left side only, Right side only, or wrap text on the Largest side only. The default option is set to both sides, but you can change it to one-side options. If you choose a one-side option, it will leave the other side empty with white space.
For example, if you only want the text wrap around on the right side of the picture, select the ‘Right only’ option and click ‘OK’.
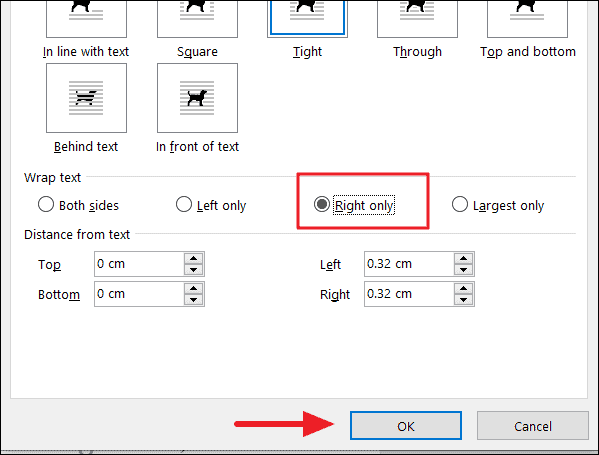
All the text will be wrapped only on the right side of the image.
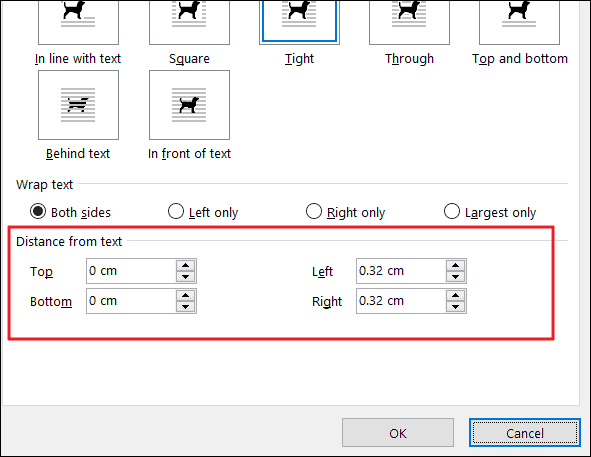
Another option section we have here is ‘Distance from text’, which allows you to set the amount of space between the text and the picture. You can set distance on all four sides of your picture, a smaller distance means less white space and a bigger distance means more space around your picture.
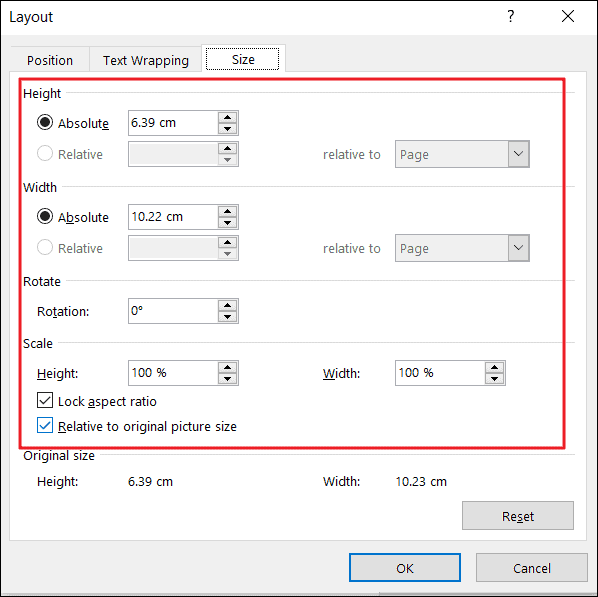
On the ‘Size’ tab, you can also adjust the height, width, rotation angle, and scale of the picture. Once you’re done, click ‘OK’ to apply or tap ‘Reset’ to revert back to the original settings.
Anchoring Your Image in Word
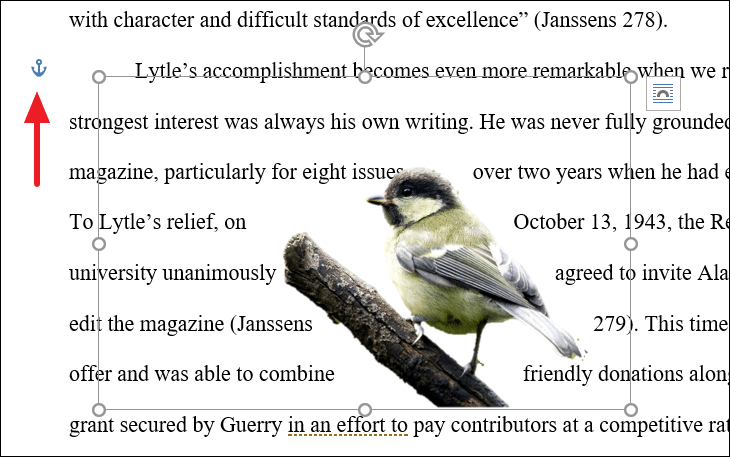
By default, when you insert a picture in a particular paragraph of a Word document, Word anchors the picture to that paragraph. That means if you add or remove text above the paragraph, the picture will move along with the paragraph. You can find out which paragraph your image is anchored with by clicking the image and searching for the small anchor icon in front of the paragraph.
Instead of moving with the text, you can also anchor the image to a fixed position on the page. This means the picture stays in the same position on the same page no matter what you add or remove above the picture.
To do this, open the ‘Wrap Text’ drop-down from the Format tab and change the option from the ‘Move With Text’ to the ‘Fix Position On Page’ option.
Now the image stays in the same place on the page, while the little anchor moves with the paragraph that image is linked with.
Position With Text Wrapping
Another way you can wrap text in Word is to use the ‘Position’ menu to move the picture to a specific location on the page and have the text automatically wrap around the picture.
You can’t move your image freely in your document without wrapping it first. But with the Position menu, you can quickly place an image (or object) in one of the nine predefined positions on the page and have the text flow around it. Here’s how
After inserting, select the image you want to position. Then, go to the new ‘Format’ tab and click the ‘Position’ drop-down menu in the Arrange group.

A drop-down menu will appear with two sections: ‘In Line With Text’ and ‘With Text Wrapping’.
The ‘In line with text’ section gives you a single default option which is to keep the image inline with the text.
The ‘With Text Wrapping’ section lets you choose from one of nine automatic positions on the page for your image. And it forces the text to wrap around the image automatically. These are the nine options available under ‘With Text Wrapping’:
- Position in Top Left with Square Text Wrapping
- Position in Top Centre with Square Text Wrapping
- Position in Top Right with Square Text Wrapping
- Position in Middle Left with Square Text Wrapping
- Position in Middle Centre with Square Text Wrapping
- Position in Middle Right with Square Text Wrapping
- Position in Bottom Left with Square Text Wrapping
- Position in Bottom Centre with Square Text Wrapping
- Position in Bottom Right with Square Text Wrapping
As you move your cursor over each of the options, you can see a preview of the image position with text wrapping on the page.
For example, lets try one of the positions on this inserted picture (below).
Here, we selected ‘Position in Top Left with Square Text Wrapping’ for our image, and this what it looks like:
And this is what the ‘middle center’ looks like:
The image is fixed to that position on that page no matter how much text/objects you add on the page or remove from the page.
You can also select ‘More Layout Options’ from the same drop-down to open the ‘Layout’ window, where you can fine tune and use other precise positioning options.
That’s it.