
Word for Microsoft 365 Word for the web Word 2021 Word 2019 Word 2016 Word 2013 More…Less
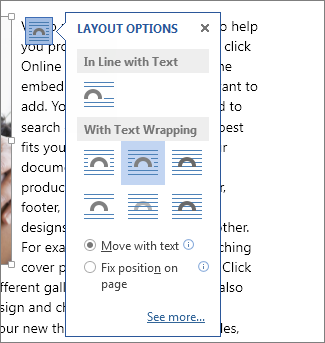
Moving or repositioning a picture on page in Word is as simple as dragging it with your mouse. But sometimes it doesn’t work. The key to getting the results you want is to select Layout Options.

-
Select a picture.
-
Select the Layout Options icon.
-
Choose the layout options you want:

-
To bring your picture in front of the text and set it so it stays at a certain spot on the page, select In Front of Text (under With Text Wrapping), and then select Fix position on page.
-
To wrap text around the picture but have the picture move up or down as text is added or deleted, select Square (under With Text Wrapping), and then select Move with text.
-
For or more information and examples of text wrapping, see Wrap text around pictures in Word
The picture is probably behind another object, like a block of text:
To select the picture, use the Selection pane:
-
Select Home > Select > Selection Pane.
-
In the Selection pane, select the picture.
To move a picture a tiny amount, select the picture, then hold down the Ctrl key and press an arrow key.
To move several objects at the same time, group them together:
-
Select the first object.
-
Hold down the Ctrl key and select the other objects.
-
Right-click one of the objects, point to Group, and then select Group.
Tip: If you are unable to group or multi-select pictures, it’s possible that the layout of your picture is inline with text. If so, please refer to Open Layout Options to change the picture layout to any option under With Text Wrapping.
For absolute control over the alignment and positioning of a picture, use the Layout box to set alignment relative to margins or columns, absolute position in inches, or relative position by percentage. This comes in handy when you want to place a picture a certain distance from something else, like a page margin.
-
Select the picture.
-
Select the Layout Options icon.
-
Select See more, and then make alignment and position adjustments on the Position tab.
If you can’t select any of the position options on the Position tab, select the Text Wrapping tab, and then select any option except the In line with text option.
If you have more than one picture that you want to overlap on a page, you can enable this in the Layout box.
-
Select a picture.
-
Select the Layout Options icon.
-
Select See more.
-
On the Position tab, in the Options group at the bottom, select the Allow overlap check box.
-
Repeat for each picture for which you want to enable overlapping.
In addition to aligning and positioning pictures on a page, you can also align pictures to each other, or to other objects on the page. Although picture-to-picture alignment is not available from the Layout Options icon or the Layout dialog box, it’s a common task that you might do while working with picture positioning and alignment.
-
Hold down the Ctrl key and select each object that you want to align.
-
Go to Picture Format or Picture Tools Format > Align, and then choose an option, such as Center, Top, or Bottom.
An object anchor  indicates where a picture or object is located in relation to the text in your document. Anchors do not appear for inline pictures; inline objects are tied to the place within the text where they were inserted and are treated like any text character—»in line with text.»
All other wrapping options (Square, Tight, Through, Top and Bottom, Behind Text, In Front of Text) are anchored to a particular place in the document; the anchor indicates the paragraph with which the object is associated. Select a picture, and then select the Layout Options icon to find out how your picture is inserted.
Notes: If you select a picture and it’s not inline with text, but you don’t see an object anchor, you can ensure that anchors are shown in two ways:
-
Show formatting marks On the Home tab, in the Paragraph group, select Show/Hide ¶.
-
Always show anchors Select File > Options > Display, and then select Object anchors.
Because anchors are simply a visual indication of a picture’s relative position on a page, they cannot be removed. However, by trying different text wrapping options, you should find all the flexibility you need in positioning a picture, regardless of its anchor.
For or more information and examples of text wrapping, see Wrap text around pictures in Word.
If you want to ensure that an image stays put even if the text around it is deleted, you can lock its anchor:
-
Select the picture.
-
Select the Layout Options icon.
-
Select See more, and then select Lock anchor.
Note: Because anchors are not used for pictures placed In Line with Text, anchor locking and all other positioning options are unavailable for inline images.
See also
Wrap text around pictures in Word
Rotate a text box, shape, WordArt, or picture in Word
Group or ungroup shapes, pictures, or other objects
If you inserted a picture into your document while using Word for the web, you can cut and paste it to move it within a document, and you can apply paragraph formatting, like vertical spacing and centering, to it. However, you cannot move a picture that was inserted while using the desktop version of Word if the picture has text wrapping or a fixed position on the page.
If you find that you cannot make changes to a picture, and you have the desktop version of Word, select Open in Word to open your document in Word and make changes to its layout.
When you are done, press Ctrl+S to save your document to its original location. You can then open the document again in Word for the web, and continue editing. Word for the web will retain the layout settings that you applied in the desktop version of Word.
Need more help?
Want more options?
Explore subscription benefits, browse training courses, learn how to secure your device, and more.
Communities help you ask and answer questions, give feedback, and hear from experts with rich knowledge.
Word’s Position and Wrap Text features help arrange images and text on the page. Position features automatically place the object at the location of your choice on the page (see how to position figures in Word for more details). Text Wrap features determine how text wraps around an image or other objects on the page, depending on the chosen option.
Wrap Text features work for figures in a Word document (see text wrapping for tables). Figures in Word mean any visual objects except tables and equations. So, using the same Wrap Text features can be used for images, ClipArt objects, charts, text boxes, diagrams, and SmartArt objects.
Change text wrapping
By default, Word inserts (see examples below):
- Pictures (images and photos), charts in line with the text.
- Text boxes, shapes in front of the text.
- WordArt objects behind the text.
To change the way how text should wrap the object, select it, then do one of the following:
- On the Picture Format (Shape Format, Graphics Format) tab, in the Arrange group, click the Wrap Text button:

- Right-click on the object, then choose Wrap Text in the popup menu:

or

- Click the Layout Options button that appears next to the selected figure:


From the Wrap Text list, choose the option you prefer:
- In Line with Text places an object in a paragraph on the same line as the surrounding text. The text does not wrap around it.

- Square wraps the text around the picture or shape on all sides at right angles (a square pattern) as if it is rectangular. The text fills the remaining rectangular region.
This option is the most common form of text wrapping.

- Tight wraps the text around the edges of the figure. The text follows the shape.
This option is most useful for larger images covering most of the page width.

- Through wraps the text around the picture or shape edges, including any white gaps. If there is no white space in the image or shape, text wrapping works the same as Tight.
This option is an advanced setting because you pull or drag image and shape points in and out of their original borders:
See how to edit hyphenation points.
- Top and Bottom wraps the text above and below the figure to keep the image on its line. There is no text on either side of it.
- Behind Text places the figure behind, or underneath, any existing text. The text does not wrap around it.
The picture looks like a watermark or background image.
Note: Use the Selection pane when working with objects behind the text.
- In Front of Text places the object on top of the text. The text is not wrapped, so some of it may be blocked depending on the figure’s transparency.


Note: Figures that use the Square, Tight, Through, Top and Bottom, Behind Text, or In Front of Text wrapping style are all considered floating.
Position a figure to a paragraph or page
Also, Word offers two options for all wrapping styles except In line with Text (for floating figures):

or

- Move with Text moves the figure along with the surrounding text.
If a figure is positioned inside the paragraph, and you delete or add any content before the paragraph, the figure moves with the paragraph. See more about Positioning a picture, text box, or shape on the page.
- Fix Position on Page keeps the figure at the same place on the page when text is added or removed.
If the paragraph where the figure is located (that paragraph contains anchor) moves to the next page, the figure moves and keeps its position relative to the page.
Note: The same options you can find in the Layout dialog box, on the Position tab, in the Options section:

Checking the Move object with text check box is equivalent to the Move with Text option from the Wrap Text dropdown list. Unchecking the Move object with text check box is equivalent to the Fix Position on Page option.
Wrap text on both sides, or one side only
To change additional options, choose More Layout Options… from the Wrap Text dropdown list or the See more… link in the Layout Options menu.
In the Layout dialog box, on the Text Wrapping tab:

- In the Wrapping style group, choose any style exact In line with text (see above).
- In the Wrap text group (available for the Square, Tight, and Thought wrapping styles), choose any of the additional options:
- Both sides wraps text around either side of the image or shape:
- Left only wraps text around only the left side of the image or shape:
- Right only wraps text around only the right side of the image or shape:
- Largest only wraps text on the side of the image or shape with the larger distance from the margin.
- Both sides wraps text around either side of the image or shape:


Change the distance between text and object
To change the distance between text and the visual object, open the Layout dialog box by one of the following methods:
- On the Picture Format (Shape Format, Graphics Format) tab, in the Arrange group, click the Wrap Text button, then select More Layout Options…
- Right-click on the object, click the Wrap Text list, then select More Layout Options… in the popup menu.
- Click the See more… link in the Layout Options menu.
In the Layout dialog box, on the Text Wrapping tab, in the Distance from text section, enter custom values for the distance between the text and the picture independently for:
- Top and Bottom (available for the Square, Tight, Thought, and Top and Bottom wrapping styles),
- Left and Right (available for the Square, Tight, and Thought wrapping styles).
For example, with the 0.3-inch distance on all sides:

Edit hyphenation points
To use the Tight or Through options effectively, you may need to adjust the wrapping points for the image or shape. To edit wrap points, select the object, then activate the Edit Wrap Points view by one of the following methods:
- Picture Format (Shape Format, Graphics Format) tab, in the Arrange group, click the Wrap Text button. Then choose Edit Wrap Points from the Wrap Text dropdown list:

- Right-click on the object and select Wrap Text -> Edit Wrap Points in the popup menu:


In the Edit Wrap Points view, drag the red lines to adjust where the text wraps:

Note: There is no way to add points. You can move existing wrap points however you want.
Be careful! After changing a text wrapping option or copy-pasting the picture, Word lost the changes of Wrap Points.
Go to Picture Format or Shape Format and select Arrange > Wrap Text. If the window is wide enough, Word displays Wrap Text directly on the Picture Format tab. Choose the wrapping options that you want to apply. For example, In Line with Text, Top and Bottom, and Behind Text.
Contents
- 1 Why is my text not wrapping in Word?
- 2 What is word wrap in Word?
- 3 What is the wrap text?
- 4 What are the text wrapping options?
- 5 How do I edit text wrap in Word?
- 6 What is word wrap example?
- 7 How do I wrap text in word 2007?
- 8 How do I wrap text in Notepad?
- 9 How do you wrap text with keyboard?
- 10 How do you wrap text in a cell?
- 11 How do you unwrap text in Word?
- 12 How do I make text the default wrap in Word?
- 13 How do I change text wrapping settings?
- 14 How do you wrap text in Java?
- 15 How do you wrap text in CSS?
- 16 How do you wrap text in HTML code?
- 17 How do you wrap text in Word 2010?
- 18 How do I wrap text in Wordpad?
- 19 What is word wrap in Windows Notepad?
- 20 In which menu of Notepad word wrap option is found?
Why is my text not wrapping in Word?
The advanced options in the Word Options dialog box. Make sure the Show Text Wrapped Within the Document Window check box is cleared.
What is word wrap in Word?
Definition of word wrap
: a word processing feature that automatically transfers a word for which there is insufficient space from the end of one line of text to the beginning of the next.
What is the wrap text?
“Wrapping text” means displaying the cell contents on multiple lines, rather than one long line. This will allow you to avoid the “truncated column” effect, make the text easier to read and better fit for printing. In addition, it will help you keep the column width consistent throughout the entire worksheet.
What are the text wrapping options?
What are the Text Wrapping Options?
- Square, Tight, and Through: These three options are all variations on the same thing.
- Top and Bottom: This option keeps the text above and below the object, but not to its sides.
- Behind Text and In Front Of Text: These two options don’t affect the text at all.
How do I edit text wrap in Word?
On the Format tab, click Wrap Text, and then click Edit Wrap Points. After you click Edit Wrap Points, you see a red dashed outline with square black handles (called wrap points) on it around the picture. You can change the shape of the outline by dragging the black handles.
What is word wrap example?
An example of word wrap is the automatic moving of the words on a long line of words to fit the words within a cell on a spreadsheet. A word processing feature that moves words to the next line automatically as you type based on the current right margin setting.Words exceeding the margins are set to begin a new line.
How do I wrap text in word 2007?
Select the text box. Click the dialog launcher in the Paragraph group of the Home tab. Click the Indents And Spacing tab and select Centered in the Alignment box. Click the Line And Page Breaks tab, select All in the Tight Wrap box (Figure D), and click OK.
How do I wrap text in Notepad?
Step 1: Open Notepad. Step 2: Click the Format tab at the top of the window. Step 3: Select the Word Wrap option from this menu. Note that this setting persists through different files, and as you open and close Notepad.
How do you wrap text with keyboard?
Wrap Text Keyboard Shortcut
Select the cells to which you want to apply wrap text then press Alt ➜ H ➜ W. Certainly a quick and easy way to apply the formatting.
How do you wrap text in a cell?
Wrap text automatically
On the Home tab, in the Alignment group, click Wrap Text. (On Excel for desktop, you can also select the cell, and then press Alt + H + W.) Notes: Data in the cell wraps to fit the column width, so if you change the column width, data wrapping adjusts automatically.
How do you unwrap text in Word?
Right-click the control for which you want to enable or disable text wrapping, and then click Control Properties on the shortcut menu. Click the Display tab. Select or clear the Wrap text check box.
How do I make text the default wrap in Word?
In line with text may not be what you prefer, so here’s how to change the default.
- Go to File > Options >Advanced.
- In the Cut, copy, and paste section, change the setting under Insert/paste pictures as: to the text wrapping style you want.
- Select OK.
How do I change text wrapping settings?
To wrap text around an image:
- Select the image you want to wrap text around. The Format tab will appear on the right side of the Ribbon.
- On the Format tab, click the Wrap Text command in the Arrange group. Then select the desired text wrapping option.
- The text will wrap around the image.
How do you wrap text in Java?
The first wrap() method takes the String to wrap as its first argument and the wrap length as its second argument. The second wrap() method takes for arguments. The first is the String to wrap and the second is the wrap length. The third is the newline characters to use when a line is wrapped.
How do you wrap text in CSS?
The overflow-wrap property in CSS allows you to specify that the browser can break a line of text inside the targeted element onto multiple lines in an otherwise unbreakable place. This helps to avoid an unusually long string of text causing layout problems due to overflow.
How do you wrap text in HTML code?
To wrap text around an image by altering the HTML code:
- Example:
Paragraph text.
- Example:
Paragraph text.
- Example:
How do you wrap text in Word 2010?
Summary – How to use text wrapping in Word 2010
- Select the picture.
- Click the Format tab under Picture Tools.
- Click the Wrap Text button.
- Select the style of text wrapping that you want to use for this picture.
How do I wrap text in Wordpad?
Go to the “View” menu and choose “Options.” On the “Rich Text Tab” select how you want the words to wrap in WordPad. You can have the words wrap to the window, wrap to the ruler or not wrap at all. This does not affect the margins of your page, just how the words appear in the work space.
What is word wrap in Windows Notepad?
Word wrap is a feature in many text editors such as Notepad++ that formats long lines of text by wrapping extra text onto multiple lines.To add a new line to code, a specific “newline” character has to be used, therefore, as Word wrap doesn’t add newline characters, a compiler doesn’t count the text as a new line.
Tap or click to open Notepad. Tap or click the Format menu, and then tap or click Word Wrap.
Text wrapping in Word is about how text behaves around a graphical object or illustration, such as a picture, shape, textbox or even a table. It controls how text position itself or flexibly flows to the position of a graphic in your Word document. For example, you can use the Square text wrapping to wrap text around the shape or picture.
There are four options that allow you to wrap text around objects in Word. These four options are explained and illustrated below.
With this option, the object sits inside a rectangular container. And text flows around the rectangle, leaving some space between the text and the object. When this option is used, the object (picture, shape or textbox) can be dragged to a different location within the document, while maintaining its rectangular shape.
To set a square text wrapping:
- Right-click on the picture
- A shortcut menu appears. Click on Wrap Text.
- Another shortcut menu appears with the layout options, click on the Square option.

- Alternatively, click to select the object. The Layout Options icon will appear at the top right corner of the object. Click on this icon and then choose Square from the list of wrapping options.
This is how you may apply the Square layout option to a picture in Word. This option can also allow you to move the picture anywhere in your Word document by dragging.
Tight text wrapping option
Wrapping text with the tight layout option is similar to the square wrap. The difference is that the text is closer to the object and matches its shape. For example, if the shape of the object is a circle or a rectangle, the hole in the text will be shaped like a circle or rectangle respectively around the object.
To set Tight text wrapping in Word:
- Right-click on the picture
- A shortcut menu appears. Click on Wrap Text.
- Another shortcut menu appears with the layout options, click on the Tight option.

- Alternatively, select the picture to display the Layout Options icon. Click on this icon and select the Tight layout option.
This is how you may set a tight text wrap in Word.
Top and Bottom wrap
This places the image or picture in a rectangular box that has the same width as the margin. This way, the text flows above and below, but not beside the picture or shape.
To set Top and Bottom text wrap in Word:
- Right-click on the picture
- A shortcut menu appears. Click on Wrap Text.
- Another shortcut menu appears with the layout options, click on the Top and Bottom option.

- Alternatively, click on the Layout Option at the top right corner of the object, then select the desired text wrapping option from the shortcut menu.
Text wrapping in Word – Through option
Depending on the nature of the image, the text flows through any open area of the image. However, there is no enough proof that it works. In practice, this option appears to have the same effects and behavior as the Tight wrapping.
To set text wrapping in Word with the Through option:
- Right-click on the picture
- A shortcut menu appears. Click on Wrap Text.
- Another shortcut menu appears with the layout options, click on the Through option.

- Alternatively, use the Layout Options icon at the top right corner of the picture to select the desired wrapping option.
These are the four layout options that allow you to wrap text around a picture, shape, or text box in Word.
Home > Microsoft Word > How to Wrap Text in Word? 6 Wrap Text Options Explained
(Note: This guide on how to wrap text in Word is suitable for all MS Word versions including Office 365)
When working on documents in Word, the usage of pictures in between texts helps in a better portrayal of the context and better understanding. Images can be used for a wide variety of documents ranging from how-to guides, tutorials, explanations, and documentation. Images have become an indispensable part of making documents that are easy to understand.
When you add an image in Word, it appears at the center of the screen. Though it serves the purpose sometimes, it doesn’t provide an aesthetic look in terms of text alignment.
In this article, I will show you how to wrap a text in Word so that it improves the overall texture and readability of the document.
You’ll Learn:
- What Is Wrapping a Text and Where Do We Use Them?
- How to Insert an Image in Word?
- How to Wrap a Text in Word?
- Move the Image Around the Text
- Other Options to Wrap a Text in Word
- Inline with Text
- Square
- Add Image to the Center of the Page
- Tight
- Adjust the Flow of Text Around the Image
- Through
- Up and Down
- Behind Text and Infront of Text
- More Layout Options
Watch this video to learn more on How to Wrap Text in Word
Related Reads:
How to Convert Speech to Text in Word? A step-by-Step Guide
How to Add Columns in Microsoft Word? All You Need to Know
How to Find and Replace in Word? 7 Simple Methods
What Is Wrapping a Text and Where Do We Use Them?
Before we learn how to wrap a text in Word, let us see what wrapping is and where we use them.
You might have seen newspapers and articles having images in different orientations on them. Some images might be on the left with the text on the right or vice versa. Others might have text over the image and some pages might have the image in the center and text all around them.
Wrapping text in Word improves the overall look of the document and helps in a better flow of content around the image.
How to Insert an Image in Word?
Before we learn how to wrap text in Word, let us learn how to add an image to the Word document. To insert an image, place the cursor where you want to insert the image. Navigate to Insert, and click on the dropdown from Pictures. You can either select This Device, download the images from stock images, or import them online. In this case, we’ll use the images from the local drive.

This opens up a dialog box. Navigate to the folder and select the image you want to add. Click Open.

This adds the image to the place where you have placed the cursor. The image automatically populates the page based on the resolution and dimensions of the image.
You will then need to change the alignment and wrap the text to suit the document overall.
How to Wrap a Text in Word?
Move the Image Around the Text
We know that by clicking and dragging we cannot move the image freely as we do in PowerPoint. To move an image and wrap the text along with it, click on the image and navigate to Picture Format and click on the dropdown from Position. Click on the place where you want to add the image. In this case, let us choose to add the image to the top center of the page. This moves the image to the top center and wraps the text around it.

Now, you can click on the image and use the anchor points to resize the image and even rotate the image. You can freely move the image using the border lines. When you move the image, the text automatically wraps around it.

Also Read:
How to Recover a Word Document? 4 Proven Ways
How to Superscript in Word? 4 Easy Methods
How to Double Space in Word? 4 Easy Ways
Other Options to Wrap a Text in Word
There are a few options you can use to move the image and wrap text around it.
To wrap a text, click on the image. You can click on the Layout Options shortcut button.

Or, you can navigate to Picture Format and click on the dropdown from Wrap Text for more choices to wrap the text.

You can see a variety of ways to align the image and wrap the text around it. Let us see different ways you can wrap text in Word in detail.
Inline with Text
When the image is wrapped around the text with this option, Word treats the image as a text. All other options to customize and edit them will be disabled. However, you can move, resize, and rotate them and they will align themselves next to the text.
In this option, you cannot move the image freely and the text won’t wrap around the image. Instead, the text occupies the space before and after the image, making it look odd.

Square
In this option, the space around the image takes the shape of a square and the text wraps around the image. This case is mostly used when you have to place the image in the center of the page.
Select the wrap option by navigating to Picture Format. From the Wrap Text dropdown, select Square.

Though selecting this option might not immediately move the image to the center, it gives you the flexibility to change the alignment and move the image as the text wraps around it.
Add Image to the Center of the Page
To place the image in the center of the page, navigate to Picture Format. Under Position, click on More Layout Options.
In the Layout dialog box, under Position, click on the Alignment option and select Centered in both horizontal and vertical headers.

This aligns the image to the center of the page and wraps the text around it.

You can also click on the image and drag it till you reach the center of the page. There is a crosshair line that serves as your guide to the middle of the page.

Tight
Wrapping text in Word using the Tight option is also similar to the Square option. While using the Tight option, the image becomes a square and the text is wrapped evenly around it. If you use the Tight option, the text around the image is tightly packed and unevenly wrapped around the image.
Adjust the Flow of Text Around the Image
This wrap text option is more suitable when you want to adjust the flow of text around the image. First, move the image where you want. Let us move the image to the center so that the text will flow around it evenly.
Now, select the wrap text option Tight from the Wrap Text dropdown. However, you can see the text unevenly wrapped around the image.

If you want, you can even remove the background of any image to adjust the flow of text perfectly around it. Use the Background Remover option under Picture Format to help you remove any background both automatically and manually.
Now, you can fine-tune the wrapped text around the image if you feel like there is any extra spacing around the image. To fine-tune the text around the image, you can use the Edit Wrap Points under the Wrap Text dropdown to help you alter the wrapping of the text.

Note: Use the wrap points to adjust the wrapping of the text. Double-click on the line to add extra wrap points.
Through
This option allows the text to appear as if it passes around, but the text does not literally pass through the image. Using this option, you can easily move, resize, and rotate the text freely.

Up and Down
This method of wrapping text in Word has the text up and down the image, leaving the sides empty. The image populates in the middle of the page, and the text to the left and right of the image moves to the top and bottom.

Behind Text and Infront of Text
This is also a common way of wrapping the text. After deciding the position where you want to move the text to, you can either move the image to the background where the text overlaps the image, or you can move the image to the foreground where the image overlaps the text.
Navigate to Picture Format. Under the dropdown from Wrap Text, click on the Behind Text option to add an image behind the text. If you want it in front of the text, click on the In Front of Text option to add an image before the text.

These options are mostly used when adding a vector or background or watermark to the document.
More Layout Options
If you are still not happy with the way the images and the text look even after placing the image in position, you can always use the More Layout Options to customize the existing layouts.
Navigate to Picture Format. Click on the dropdown from Wrap Text or Position and select More Layout Options. This opens up a Layout dialog box.

This layout offers in-depth customization to the existing layouts. You can change the alignment and positions of the image either horizontally, vertically, or both using the Positions tab.
From the Text Wrapping tab, you can change the layout, wrap the texts, and alter the distance of the image from the text. From the Size tab, you can change the size of the image to specific dimensions and change the aspect ratio of the image.
Suggested Reads:
How to Make a Checklist in Word? 3 Simple Steps
How to Track Changes in Word? A Step-by-Step Guide
How to Delete a Page in Word?
Frequently Asked Questions
How do I wrap text in Word?
Wrapping text in Word is so simple. Select the image, go to Picture Format, and select an option from the Wrap Text dropdown according to your preference.
Can we wrap text around a table?
Yes, you can wrap text around a table. To wrap a table, select the table, right-click, and select Properties. Choose the way you want to wrap the text from the Properties dialog box.
Why is the Wrap Text option grayed out?
When the wrap text option is grayed out, it means that the text is already wrapped. In other cases, if additional wrapping options are disabled, the wrap mode might be set to Inline with Text.
Closing Thoughts
Microsoft Word offers a variety of options and customizations to wrap a text. This helps in making your document aesthetically pleasing and helps portray the importance of both the image and the text.
In this article, we saw how to wrap text in Word using different wrapping options. Choose the option that portrays your thoughts and suits your purpose best.
For more high-quality guides on MS Word or Excel, please visit our free resources section.
SimonSezIT has been successfully teaching Excel for 15 years. We have a very exhaustive set of courses with in-depth training modules covering all major business software.
You can access all these 100+ courses for a low monthly fee. Please visit our courses section for more information.
Simon Calder

Chris “Simon” Calder was working as a Project Manager in IT for one of Los Angeles’ most prestigious cultural institutions, LACMA.He taught himself to use Microsoft Project from a giant textbook and hated every moment of it. Online learning was in its infancy then, but he spotted an opportunity and made an online MS Project course — the rest, as they say, is history!