
Home / VBA / VBA Wrap Text (Cell, Range, and Entire Worksheet)
In VBA, there is a property called “WrapText” that you can access to apply wrap text to a cell or a range of cells. You need to write code to turn it ON or OFF. It’s a read and writes property, so you can apply it, or you can also get it if it’s applied on a cell.
In this tutorial, we will look at different ways of applying wrap text using a VBA code.
Wrap Text to a Cell using VBA
Use the following steps to apply Wrap Text using a VBA Code.
- Define the cell where you want to apply the wrap text using the range property.
- Type a dot to see the list of the properties and methods for that cell.
- Select the “WrapText” property from the list.
- Enter the equals sign “=” and type TRUE to turn on the wrap text.
Sub vba_wrap_text()
  Range("A1").WrapText = True
End Sub
You can also specify a cell using the following way.
Cells(1, 1).WrapText = TrueWrap Text to a Range of Cells
And if you want to apply wrap text to an entire range then you need to specify the range instead of a single cell.
Range("A1:A5").WrapText = True
You can also apply it to the used range (selection of the worksheet where you have entered data) by using the “UsedRange” property.
Worksheets("Sheet1").UsedRange.WrapText = True
ActiveSheet.UsedRange.WrapText = True
In the above code’s first line, you have specified the worksheet and then the “UsedProperty” to wrap the text. In the second line, you have the active sheet’s used range. But both lines work in the same way.
Here are a few more examples that you need to know:
- Non-continues cells
- Entire Row
- Entire Column
- Named Range

Range("A1:A10,C1:C10").WrapText = True
Range("A:A").WrapText = True
Range("1:1").WrapText = True
Range("myRange").WrapText = True
To refer to the entire worksheet you need to use the Cells property as you have in the following code.
Cells.WrapText = True
Worksheets("Sheet1").Cells.WrapText = True
The first line of code refers to the active sheet and the second line to the worksheet “Sheet1”. You can also use a loop using FOR EACH (For Next) to loop through all the worksheets of the workbook and apply the wrap text on all the cells.

Dim ws As Worksheet
For Each ws In ActiveWorkbook.Worksheets
   Cells.WrapText = True
Next ws
In the above code, you have “ws” as a variable and then For Each Loop loops through all the worksheets from the workbook and applies to wrap text to the entire worksheet using Cells.
Turn OFF WrapText
As you have seen you need to turn on the WrapText property, and in the same way you can turn it off by using add declaring FALSE.
Range("A1").WrapText = False
Note: There’s one thing you need to understand if you have a value in a cell and the width of the cells is enough to store that value, then even if you apply wrap text, Excel won’t shift the content to the next line.

More Tutorials
- Count Rows using VBA in Excel
- Excel VBA Font (Color, Size, Type, and Bold)
- Excel VBA Hide and Unhide a Column or a Row
- Excel VBA Range – Working with Range and Cells in VBA
- Apply Borders on a Cell using VBA in Excel
- Find Last Row, Column, and Cell using VBA in Excel
- Insert a Row using VBA in Excel
- Merge Cells in Excel using a VBA Code
- Select a Range/Cell using VBA in Excel
- SELECT ALL the Cells in a Worksheet using a VBA Code
- ActiveCell in VBA in Excel
- Special Cells Method in VBA in Excel
- UsedRange Property in VBA in Excel
- VBA AutoFit (Rows, Column, or the Entire Worksheet)
- VBA ClearContents (from a Cell, Range, or Entire Worksheet)
- VBA Copy Range to Another Sheet + Workbook
- VBA Enter Value in a Cell (Set, Get and Change)
- VBA Insert Column (Single and Multiple)
- VBA Named Range | (Static + from Selection + Dynamic)
- VBA Range Offset
- VBA Sort Range | (Descending, Multiple Columns, Sort Orientation
- VBA Check IF a Cell is Empty + Multiple Cells
⇠ Back to What is VBA in Excel
Helpful Links – Developer Tab – Visual Basic Editor – Run a Macro – Personal Macro Workbook – Excel Macro Recorder – VBA Interview Questions – VBA Codes
Return to VBA Code Examples
In this tutorial, you will learn about how to enable or disable Wrap Text in Excel using VBA.
Wrapping Text using VBA
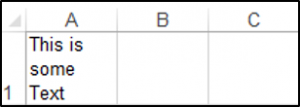
You wrap the text in a cell or range by setting the Range.WrapText Property of the Range object to True. The following code will wrap the text in cell A1:
Worksheets("Sheet1").Range("A1").WrapText = TrueThe result is:
You can Wrap a larger range of cells as well:
Range("A1:A10").WrapText = TrueDisabling Wrapping in a Cell using VBA
You can disable text wrapping in a certain cell or range using VBA. The following code will disable text wrapping in cell B2:
Range("B2").WrapText = FalseDisabling Wrapping in An Entire Worksheet
You can disable text wrapping in all the cells on a worksheet using VBA. The following code will allow you to disable text wrapping in all the cells in the ActiveSheet:
Sub DisableWrapText ()

    Cells.WrapText = False

End Sub
VBA Coding Made Easy
Stop searching for VBA code online. Learn more about AutoMacro — A VBA Code Builder that allows beginners to code procedures from scratch with minimal coding knowledge and with many time-saving features for all users!

Learn More!
In this article I will explain how you can use VBA to modify the wrap text property of a cell or range. I will also explain how you can use VBA to check the current status of the wrap text property for a cell or range.
Jump To:
- Basics, .WrapText
- Example 1, Set Wrap Text Property
- Example 2, Get Wrap Text Property
You can download the file and code related to this article here.
–
Basics, .WrapText:
The following code applies the wrap text formatting to cell A1:
Range("A1").WrapText = True
Before:

After:

The following code removes the wrap text formatting from cell A1:
Range("A1").WrapText = False
–
Example 1, Set Wrap Text Property:
In this example there is text in row 2. There are drop down lists in row 1 where the user selects whether to apply the wrap text formatting or not. For more information about drop down lists in Excel please see Excel VBA Drop Down Lists:

After selecting “No” from the drop down list the wrap text property of cell F2 is set off:

The Yes/No values in the drop down list are stored in sheet 2:

The program uses a Worksheet_Change event handler. The event handler executes whenever the user selects a new value from the drop down lists:
'executes when drop down list values change

Private  Sub  worksheet_change(ByVal  target As  Range)

Dim  i As  Integer

For  i = 1 To  6

    If  Cells(1, i) = "Yes" Then

        'sets the text wrap property to true

        Range(Cells(2, i), Cells(2, i)).WrapText = True

    Else

        'sets the text wrap property to false

        Range(Cells(2, i), Cells(2, i)).WrapText = False

    End If

Next  i

End  Sub
–
Example 2, Get Wrap Text Property:
In the following example similar to Example 1, there are text values in row 2. When the user presses the run button the program searches the cells in row 2. The cells above the cells with the wrap text formatting will be colored green:

As you can see in the figure below the user turned off the wrap text property from cell A2 and therefore removing the green color from cell A1. Also the wrap text property of cell B2 and D2 were set on, therefore coloring the cells B1 and D1 to green:

This is the code used in the event handler for the Run button:
'event handler for the run button

Private  Sub  btnRun_Click()

Dim  i As  Integer

'loops through the cells in row 2

For  i = 1 To  6

    'checks if the wrap property is on

    If  Range(Cells(2, i), Cells(2, i)).WrapText = True Then

        'colors the cell green

        Range(Cells(1, i), Cells(1, i)).Interior.Color = 3394611

    Else

        'removes any previous color assigned to the cell

        Range(Cells(1, i), Cells(1, i)).Interior.Color = xlNone

    End If

Next  i

End  Sub
The If statement below checks the current wrap text property of the cell:
If  Range(Cells(2, i), Cells(2, i)).WrapText = True Then

...

End If
The line below colores the cell green. The number 3394611 is a color code. This was obtained using the macro recorder. For more information about the macro recorder please see Excel VBA Formatting Cells and Ranges Using the Macro Recorder:
Range(Cells(1, i), Cells(1, i)).Interior.Color = 3394611
The line below removes all previous coloring applied to the cell:
Range(Cells(1, i), Cells(1, i)).Interior.Color = xlNone
You can download the file and code related to this article here.
See also:
- VBA Excel, Alignment
- Excel VBA, Shrink to Fit On/Off
- Excel VBA, Merge Cells
If you need assistance with your code, or you are looking for a VBA programmer to hire feel free to contact me. Also please visit my website www.software-solutions-online.com
I know this question is really old, but as I had the same needs, after searching SO and google, I found pieces of answers but nothing usable. So with those pieces and bites I made my solution that I share here.
What I needed
- Knowing the column width in pixels
- Be able to measure the length of a string in pixels in order to cut it at the dimension of the column
What I found
- About the width in pixels of a column, I found this in Excel 2010 DocumentFormat :
To translate the value of width in the file into the column width value at runtime (expressed in terms of pixels), use this calculation:
=Truncate(((256 * {width} + Truncate(128/{Maximum Digit Width}))/256)*{Maximum Digit Width})
Even if it’s Excel 2010 format, it’s still working in Excel 2016. I’ll be able to test it soon against Excel 365.
- About the width of a string in pixels, I used the solution proposed by @TravelinGuy in this question, with small corrections for typo and an overflow. By the time I’m writing this the typo is already corrected in his answer, but there is still the overflow problem. Nevertheless I commented his answer so there is everything over there for you to make it works flawlessly.
What I’ve done
Code three recursive functions working this way :
- Function 1 : Guess the approximate place where to cut the sentence so if fits in the column and then call Function 2 and 3 in order to determine the right place. Returns the original string with CR (Chr(10)) characters in appropriate places so each line fits in the column size,
- Function 2 : From a guessed place, try to add some more words in the line while this fit in the column size,
- Function 3 : The exact opposite of function 2, so it retrieves words to the sentence until it fits in the column size.
Here is the code
Sub SplitLineTest()
    Dim TextRange As Range
    Set TextRange = FeuilTest.Cells(2, 2)

 'Take the text we want to wrap then past it in multi cells
    Dim NewText As String
    NewText = SetCRtoEOL(TextRange.Value2, TextRange.Font.Name, TextRange.Font.Size, xlWidthToPixs(TextRange.ColumnWidth) - 5) '-5 to take into account 2 white pixels left and right of the text + 1 pixel for the grid

'Copy each of the text lines in an individual cell
    Dim ResultArr() As String
    ResultArr() = Split(NewText, Chr(10))
    TextRange.Offset(2, 0).Resize(UBound(ResultArr) + 1, 1).Value2 = WorksheetFunction.Transpose(ResultArr())
End Sub


Function xlWidthToPixs(ByVal xlWidth As Double) As Long
'Fonction to convert the size of an Excel column width expressed in Excel unit(Range.ColumnWidth) in pixels
'Parameters :   - xlWidth : that is the width of the column Excel unit
'Return :       - The size of the column in pixels

    Dim pxFontWidthMax As Long

    'Xl Col sizing is related to workbook default string configuration and depends of the size in pixel from char "0". We need to gather it
    With ThisWorkbook.Styles("Normal").Font
        pxFontWidthMax = pxGetStringW("0", .Name, .Size)    'Get the size in pixels of the '0' character
    End With

    'Now, we can make the calculation
    xlWidthToPixs = WorksheetFunction.Floor_Precise(((256 * xlWidth + WorksheetFunction.Floor_Precise(128 / pxFontWidthMax)) / 256) * pxFontWidthMax) + 5
End Function


Function SetCRtoEOL(ByVal Original As String, ByVal FontName As String, ByVal FontSize As Variant, ByVal pxAvailW) As String
'Function aiming to make a text fit into a given number of pixels, by putting some CR char between words when needed.
'If some words are too longs to fit in the given width, they won't be cut and will get out of the limits given.
'The function works recursively. Each time it find an End Of Line, it call itself with the remaining text until.
'The recursive process ends whent the text fit in the given space without needing to be truncated anymore
'Parameters :   - Original : The text to fit
'               - FontName : Name of the font
'               - FontSize : Size of the font
'               - pxAvailW : Available width in pixels in wich we need to make the text fit
'Return :       - The orignal text with CR in place of spaces where the text needs to be cut to fit the width

    'If we got a null string, there is nothing to do so we return a null string
    If Original = vbNullString Then Exit Function

    Dim pxTextW As Long

    'If the text fit in, may be it's the original or this is end of recursion. Nothing to do more than returne the text back
    pxTextW = pxGetStringW(Original, FontName, FontSize)
    If pxTextW < pxAvailW Then
        SetCRtoEOL = Original
        Exit Function
    End If

    'The text doesn't fit, we need to find where to cut it
    Dim WrapPosition As Long
    Dim EstWrapPosition As Long
    EstWrapPosition = Len(Original) * pxAvailW / pxTextW   'Estimate the cut position in the string given to a proportion of characters
    If pxGetStringW(Left(Original, EstWrapPosition), FontName, FontSize) < pxAvailW Then
        'Text to estimated wrap position fits in, we try to see if we can fits some more words
        WrapPosition = FindMaxPosition(Original, FontName, FontSize, pxAvailW, EstWrapPosition)
    End If

    'If WrapPosition = 0, we didn't get a proper place yet, we try to find the previous white space
    If WrapPosition = 0 Then
        WrapPosition = FindMaxPositionRev(Original, FontName, FontSize, pxAvailW, EstWrapPosition)
    End If

    'If WrapPosition is still 0, we are facing a too long word for the pxAvailable. We'll cut after this word what ever. (Means we must search for the first white space of the text)
    If WrapPosition = 0 Then
        WrapPosition = InStr(Original, " ")
    End If

    If WrapPosition = 0 Then
        'Words too long to cut, but nothing more to cut, we return it as is
        SetCRtoEOL = Original
    Else
        'We found a wrap position. We recurse to find the next EOL and construct our response by adding CR in place of the white space
        SetCRtoEOL = Left(Original, WrapPosition - 1) & Chr(10) & SetCRtoEOL(Right(Original, Len(Original) - WrapPosition), FontName, FontSize, pxAvailW)
    End If
End Function


Function FindMaxPosition(ByVal Text As String, ByVal FontName As String, ByVal FontSize As Variant, ByVal pxAvailW, ByVal WrapPosition As Long) As Long
'Function that finds the maximum number of words fitting in a given space by adding words until it get out of the maximum space
'The function is inteded to work on text with a "guessed" wrap position that fit in the space allowed
'The function is recursive. Each time it guesses a new position and the word still fits in the space, it calls itself with a further WrapPosition
'Parameters :   - Text : The text to fit
'               - FontName : Name of the font
'               - FontSize : Size of the font
'               - pxAvailW : Available width in pixels in wich we need to make the text fit
'               - WrapPosition : The initial wrap position, positionned someware in the text (WrapPosition < len(Text)) but inside pxAvailW
'Return :       - The position were the text must be wraped to put as much words as possible in pxAvailW, but without getting outside of it. If no position can be found, returns 0

    Dim NewWrapPosition As Long
    Static isNthCall As Boolean

    'Find next Whitespace position
    NewWrapPosition = InStr(WrapPosition, Text, " ")

    If NewWrapPosition = 0 Then Exit Function                                               'We can't find a wrap position, we return 0
    If pxGetStringW(Left(Text, NewWrapPosition - 1), FontName, FontSize) < pxAvailW Then    '-1 not to take into account the last white space
        'It still fits, we can try on more word
        isNthCall = True
        FindMaxPosition = FindMaxPosition(Text, FontName, FontSize, pxAvailW, NewWrapPosition + 1)
    Else
        'It doesnt fit. If it was the first call, we terminate with 0, else we terminate with previous WrapPosition
        If isNthCall Then
            'Not the first call, we have a position to return
            isNthCall = False                               'We reset the static to be ready for next call of the function
            FindMaxPosition = WrapPosition - 1              'Wrap is at the first letter of the word due to the function call FindMax...(...., NewWrapPosition + 1). The real WrapPosition needs to be minored by 1
        Else
            'It's the first call, we return 0 | Strictly speaking we can remove this part as FindMaxPosition is already 0, but it make the algo easier to read
            FindMaxPosition = 0
        End If
    End If
End Function


Function FindMaxPositionRev(ByVal Text As String, ByVal FontName As String, ByVal FontSize As Variant, ByVal pxAvailW, ByVal WrapPosition As Long) As Long
'Function working backward of FindMaxPosition. It finds the maximum number of words fitting in a given space by removing words until it fits the given space
'The function is inteded to work on text with a "guessed" wrap position that fit in the space allowed
'The function is recursive. Each time it guesses a new position and the word still doesn't fit in the space, it calls itself with a closer WrapPosition
'Parameters :   - Text : The text to fit
'               - FontName : Name of the font
'               - FontSize : Size of the font
'               - pxAvailW : Available width in pixels in wich we need to make the text fit
'               - WrapPosition : The initial wrap position, positionned someware in the text (WrapPosition < len(Text)), but outside of pxAvailW
'Return :       - The position were the text must be wraped to put as much words as possible in pxAvailW, but without getting outside of it. If no position can be found, returns 0

    Dim NewWrapPosition As Long

    NewWrapPosition = InStrRev(Text, " ", WrapPosition)
    'If we didn't found white space, we are facing a "word" too long to fit pxAvailW, we leave and return 0
    If NewWrapPosition = 0 Then Exit Function

    If pxGetStringW(Left(Text, NewWrapPosition - 1), FontName, FontSize) >= pxAvailW Then   '-1 not to take into account the last white space
        'It still doesnt fits, we must try one less word
        FindMaxPositionRev = FindMaxPositionRev(Text, FontName, FontSize, pxAvailW, NewWrapPosition - 1)
    Else
        'It fits, we return the position we found
        FindMaxPositionRev = NewWrapPosition
    End If
End Function
Known limitations
This code will work as long as the text in the cell has only one font and one font size. Here I assume that the font is not Bold nor Italic, but this can be easily handled by adding few parameters as the function measuring the string length in pixels is already able to do it.
I’ve made many test and I always got the same result than the autowrap function of Excel worksheet, but it may vary from one Excel version to an other. I assume it works on Excel 2010, and I tested it with success in 2013 and 2016. Fo others I don’t know.
If you need to handle cases where fonts type and/or attributs vary inside a given cell, I assume it’s possible to achieve it by testing the text in the cell character by character by using the range.caracters property. It should be really slower, but for now, even with texts to split in almost 200 lines, it takes less than one instant so maybe it’s viable.
Переноса текста по словам в ячейках диапазона на рабочем листе Excel из кода VBA. Свойство WrapText объекта Range, возвращаемые значения. Примеры.
Range.WrapText – это свойство, которое возвращает или задает значение типа Variant, указывающее, переносится ли текст в ячейках диапазона на новые строки, если длина текста превышает ширину ячейки.
Текст в ячейках переносится по словам. Если слово не умещается в ячейке целиком, происходит перенос части слова. Обычно, высота строки рабочего листа автоматически подбирается под ячейку с максимальным количеством строк, образовавшихся в результате переноса текста.
Синтаксис
Expression.WrapText
Expression – выражение (переменная), возвращающее объект Range.
Значения
Значения, которые возвращает свойство Range.WrapText:
| Параметр | Значение |
|---|---|
| True | Во всех ячейках указанного диапазона включен перенос текста на новые строки. |
| False | Во всех ячейках указанного диапазона отключен перенос текста на новые строки. |
| Null | В указанном диапазоне присутствуют пустые ячейки, или есть ячейки как с переносом текста, так и без переноса. |
Примеры
Пример 1
Указание программе Microsoft Excel, что она должна или не должна переносить текст в ячейках заданного диапазона:
|
‘переносить текст в активной ячейке ActiveCell.WrapText = True ‘переносить текст во всех ячейках заданного диапазона Range(«A1:F20»).WrapText = True ‘не переносить текст в ячейке Cells(1, 5) Cells(1, 5).WrapText = False ‘не переносить текст во всех ячейках выбранного диапазона Selection.WrapText = False |
Пример 2
Присвоение значения, возвращаемого свойством Range.WrapText, переменной:
|
Dim a As Variant a = Range(«B2»).WrapText a = Rows(«1:2»).WrapText |
Пример 3
Просмотр значения, возвращаемого свойством Range.WrapText, с помощью информационного окна MsgBox:
|
If Not Selection.WrapText = Null Then MsgBox Selection.WrapText Else MsgBox «Null» End If |
Условие необходимо из-за того, что MsgBox не может отобразить значение Null – возникает ошибка. Поэтому, когда свойство Range.WrapText = Null, мы задаем в качестве аргумента функции MsgBox – строку «Null».
In this post, you will learn how to wrap text in Excel VBA with some examples showing how to apply them in your excel spreadsheet.
Wrapping Text using VBA
To wrap the text in VBA, you can use Range.WrapText Property of the Range object.
Wrapping Text
Code:
Worksheets("Sheet1").Range("A1").WrapText = True
To wrap a range of cells
Code:
Range("A1:A10").WrapText = True
Disabling Wrapping in a Cell using VBA
To disable Wrapping.
Code:
Range("A1").WrapText = False
Disabling Wrapping in An Entire Worksheet
To disable wrapping in an Entire Worksheet,
Code:
Sub DisableWrapText()
 Cells.WrapText = False
End Sub
Formatting Cells Number
General
Range("A1").NumberFormat = "General"Number
Range("A1").NumberFormat = "0.00"Currency
Range("A1").NumberFormat = "$#,##0.00"Accounting
Range("A1").NumberFormat = "_($* #,##0.00_);_($* (#,##0.00);_($* ""-""??_);_(@_)"Date
Range("A1").NumberFormat = "yyyy-mm-dd;@"Time
Range("A1").NumberFormat = "h:mm:ss AM/PM;@"Percentage
Range("A1").NumberFormat = "0.00%"Fraction
Range("A1").NumberFormat = "# ?/?"Scientific
Range("A1").NumberFormat = "0.00E+00"Text
Range("A1").NumberFormat = "@"Special
Range("A1").NumberFormat = "00000"Custom
Range("A1").NumberFormat = "$#,##0.00_);[Red]($#,##0.00)"Formatting Cells Alignment
Text Alignment
Horizontal
The value of this property can be set to one of the constants: xlGeneral, xlCenter, xlDistributed, xlJustify, xlLeft, xlRight.
The following code sets the horizontal alignment of cell A1 to center.
Range("A1").HorizontalAlignment = xlCenterVertical
The value of this property can be set to one of the constants: xlBottom, xlCenter, xlDistributed, xlJustify, xlTop.
The following code sets the vertical alignment of cell A1 to bottom.
Range("A1").VerticalAlignment = xlBottomText Control
Wrap Text
This example formats cell A1 so that the text wraps within the cell.
Range("A1").WrapText = TrueShrink To Fit
This example causes text in row one to automatically shrink to fit in the available column width.
Rows(1).ShrinkToFit = TrueMerge Cells
This example merge range A1:A4 to a large one.
Range("A1:A4").MergeCells = TrueRight-to-left
Text direction
The value of this property can be set to one of the constants: xlRTL (right-to-left), xlLTR (left-to-right), or xlContext (context).
The following code example sets the reading order of cell A1 to xlRTL (right-to-left).
Range("A1").ReadingOrder = xlRTLOrientation
The value of this property can be set to an integer value from –90 to 90 degrees or to one of the following constants: xlDownward, xlHorizontal, xlUpward, xlVertical.
The following code example sets the orientation of cell A1 to xlHorizontal.
Range("A1").Orientation = xlHorizontalFont
Font Name
The value of this property can be set to one of the fonts: Calibri, Times new Roman, Arial…
The following code sets the font name of range A1:A5 to Calibri.
Range("A1:A5").Font.Name = "Calibri"Font Style
The value of this property can be set to one of the constants: Regular, Bold, Italic, Bold Italic.
The following code sets the font style of range A1:A5 to Italic.
Range("A1:A5").Font.FontStyle = "Italic"Font Size
The value of this property can be set to an integer value from 1 to 409.
The following code sets the font size of cell A1 to 14.
Range("A1").Font.Size = 14Underline
The value of this property can be set to one of the constants: xlUnderlineStyleNone, xlUnderlineStyleSingle, xlUnderlineStyleDouble, xlUnderlineStyleSingleAccounting, xlUnderlineStyleDoubleAccounting.
The following code sets the font of cell A1 to xlUnderlineStyleDouble (double underline).
Range("A1").Font.Underline = xlUnderlineStyleDoubleFont Color
The value of this property can be set to one of the standard colors: vbBlack, vbRed, vbGreen, vbYellow, vbBlue, vbMagenta, vbCyan, vbWhite or an integer value from 0 to 16,581,375.
To assist you with specifying the color of anything, the VBA is equipped with a function named RGB. Its syntax is:
Function RGB(RedValue As Byte, GreenValue As Byte, BlueValue As Byte) As longThis function takes three arguments and each must hold a value between 0 and 255. The first argument represents the ratio of red of the color. The second argument represents the green ratio of the color. The last argument represents the blue of the color. After the function has been called, it produces a number whose maximum value can be 255 * 255 * 255 = 16,581,375, which represents a color.
The following code sets the font color of cell A1 to vbBlack (Black).
Range("A1").Font.Color = vbBlackThe following code sets the font color of cell A1 to 0 (Black).
Range("A1").Font.Color = 0The following code sets the font color of cell A1 to RGB(0, 0, 0) (Black).
Range("A1").Font.Color = RGB(0, 0, 0)Font Effects
Strikethrough
True if the font is struck through with a horizontal line.
The following code sets the font of cell A1 to strikethrough.
Range("A1").Font.Strikethrough = TrueSubscript
True if the font is formatted as subscript. False by default.
The following code sets the font of cell A1 to Subscript.
Range("A1").Font.Subscript = TrueSuperscript
True if the font is formatted as superscript; False by default.
The following code sets the font of cell A1 to Superscript.
Range("A1").Font.Superscript = TrueBorder
Border Index
Using VBA you can choose to create borders for the different edges of a range of cells:
- xlDiagonalDown (Border running from the upper left-hand corner to the lower right of each cell in the range).
- xlDiagonalUp (Border running from the lower left-hand corner to the upper right of each cell in the range).
- xlEdgeBottom (Border at the bottom of the range).
- xlEdgeLeft (Border at the left-hand edge of the range).
- xlEdgeRight (Border at the right-hand edge of the range).
- xlEdgeTop (Border at the top of the range).
- xlInsideHorizontal (Horizontal borders for all cells in the range except borders on the outside of the range).
- xlInsideVertical (Vertical borders for all the cells in the range except borders on the outside of the range).
Line Style
The value of this property can be set to one of the constants: xlContinuous (Continuous line), xlDash (Dashed line), xlDashDot (Alternating dashes and dots), xlDashDotDot (Dash followed by two dots), xlDot (Dotted line), xlDouble (Double line), xlLineStyleNone (No line), xlSlantDashDot (Slanted dashes).
The following code example sets the border on the bottom edge of cell A1 with continuous line.
Range("A1").Borders(xlEdgeBottom).LineStyle = xlContinuousThe following code example removes the border on the bottom edge of cell A1.
Range("A1").Borders(xlEdgeBottom).LineStyle = xlNoneLine Thickness
The value of this property can be set to one of the constants: xlHairline (Hairline, thinnest border), xlMedium (Medium), xlThick (Thick, widest border), xlThin (Thin).
The following code example sets the thickness of the border created to xlThin (Thin).
Range("A1").Borders(xlEdgeBottom).Weight = xlThinLine Color
The value of this property can be set to one of the standard colors: vbBlack, vbRed, vbGreen, vbYellow, vbBlue, vbMagenta, vbCyan, vbWhite or an integer value from 0 to 16,581,375.
The following code example sets the color of the border on the bottom edge to green.
Range("A1").Borders(xlEdgeBottom).Color = vbGreenYou can also use the RGB function to create a color value.
The following example sets the color of the bottom border of cell A1 with RGB fuction.
Range("A1").Borders(xlEdgeBottom).Color = RGB(255, 0, 0)Fill
Pattern Style
The value of this property can be set to one of the constants:
- xlPatternAutomatic (Excel controls the pattern.)
- xlPatternChecker (Checkerboard.)
- xlPatternCrissCross (Criss-cross lines.)
- xlPatternDown (Dark diagonal lines running from the upper left to the lower right.)
- xlPatternGray16 (16% gray.)
- xlPatternGray25 (25% gray.)
- xlPatternGray50 (50% gray.)
- xlPatternGray75 (75% gray.)
- xlPatternGray8 (8% gray.)
- xlPatternGrid (Grid.)
- xlPatternHorizontal (Dark horizontal lines.)
- xlPatternLightDown (Light diagonal lines running from the upper left to the lower right.)
- xlPatternLightHorizontal (Light horizontal lines.)
- xlPatternLightUp (Light diagonal lines running from the lower left to the upper right.)
- xlPatternLightVertical (Light vertical bars.)
- xlPatternNone (No pattern.)
- xlPatternSemiGray75 (75% dark moiré.)
- xlPatternSolid (Solid color.)
- xlPatternUp (Dark diagonal lines running from the lower left to the upper right.)
Protection
Locking Cells
This property returns True if the object is locked, False if the object can be modified when the sheet is protected, or Null if the specified range contains both locked and unlocked cells.
The following code example unlocks cells A1:B22 on Sheet1 so that they can be modified when the sheet is protected.
Worksheets("Sheet1").Range("A1:B22").Locked = False
Worksheets("Sheet1").Protect
Hiding Formulas
This property returns True if the formula will be hidden when the worksheet is protected, Null if the specified range contains some cells with FormulaHidden equal to True and some cells with FormulaHidden equal to False.
Don’t confuse this property with the Hidden property. The formula will not be hidden if the workbook is protected and the worksheet is not, but only if the worksheet is protected.
The following code example hides the formulas in cells A1 and C1 on Sheet1 when the worksheet is protected.
Worksheets("Sheet1").Range("A1:C1").FormulaHidden = True-
07-09-2005, 10:05 PM
#1
stefan via OfficeKB.com
Guest
[SOLVED] Wrap Text in Merged Cell
Hello,
Ich have a merged cell «C22» which spans over columns C:H in row 22.
Contracry to single cells, when the text wraps, the cell height does not
adjust automatically. Actually, does not even adjust when you click between
the row headers. One has to drag it to fit. Is there a workaround, something
that can be embedded into a Worksheet_Change option or so?
Thank you for your help.
StefanLast edited by shg; 06-28-2008 at 03:20 PM.
-
07-09-2005, 10:05 PM
#2
Re: Wrap Text in Merged Cell
Hi Stefan,
See the following post from Jim Rech (last post in the thread):
http://tinyurl.com/738dd
Also see the following post from Greg Wilson (Post 2):
http://tinyurl.com/cqhwl
—
Regards,
Norman«stefan via OfficeKB.com» <forum@OfficeKB.com> wrote in message
news:51168939C53A0@OfficeKB.com…
> Hello,
> Ich have a merged cell «C22» which spans over columns C:H in row 22.
> Contracry to single cells, when the text wraps, the cell height does not
> adjust automatically. Actually, does not even adjust when you click
> between
> the row headers. One has to drag it to fit. Is there a workaround,
> something
> that can be embedded into a Worksheet_Change option or so?
> Thank you for your help.
> Stefan
>
>
> —
> Message posted via OfficeKB.com
> http://www.officekb.com/Uwe/Forums.a…mming/200507/1
-
07-09-2005, 11:05 PM
#3
stefan via OfficeKB.com
Guest
Re: Wrap Text in Merged Cell
Hi Norman,
Thank you for the URL’s.
Of course, after i posted i found some helpful ones too.
One post was also from Greg Wilson, which i modified to my needs. See below.
Now that i see that this works so great i would like to have a second range
(G:H40) included and have not been successful doing so. Would you have a hint?Thank you,
StefanPrivate Sub Worksheet_SelectionChange(ByVal Target As Excel.Range)
Dim RowHt As Single, MergeWidth As Single
Dim C As Range, AutoFitRng As Range
Dim CWidth As Single, NewRowHt As Single
Static OldRng As Range
On Error Resume Next
If OldRng Is Nothing Then _
Set OldRng = Range(«C22»).MergeArea
Set AutoFitRng = Range(«C22:H22»)
If Not Intersect(OldRng, AutoFitRng) Is Nothing Then
Application.ScreenUpdating = False
With OldRng
RowHt = .RowHeight
CWidth = .Cells(1).ColumnWidth
For Each C In OldRng
MergeWidth = C.ColumnWidth + MergeWidth
Next
.MergeCells = False
.Cells(1).ColumnWidth = MergeWidth
.EntireRow.AutoFit
NewRowHt = .RowHeight
.Cells(1).ColumnWidth = CWidth
.MergeCells = True
.RowHeight = NewRowHt
End With
Application.ScreenUpdating = True
End If
Set OldRng = Target
End SubLast edited by shg; 06-28-2008 at 03:19 PM.
-
07-09-2005, 11:05 PM
#4
Re: Wrap Text in Merged Cell
Hi Stefan,
Try :
—
Regards,
NormanLast edited by shg; 06-28-2008 at 03:21 PM.
-
07-10-2005, 01:05 AM
#5
stefan via OfficeKB.com
Guest
Re: Wrap Text in Merged Cell
Hi Norman,
This is genius. And so simple, if you know how to do it. Thank you so much.
Hey, i assume that you can have has many ranges as you want or is there a
limitation? Not that i’d need it (now), just wondering.
Thank you,
StefanLast edited by shg; 06-28-2008 at 03:19 PM.
-
07-10-2005, 02:05 AM
#6
Re: Wrap Text in Merged Cell
Hi Stefan,
I see no intrinsic reason why this could not be extended to cover numerous
ranges.If you had a number of merged ranges, for ease of maintenance and clarity, I
would use a form like:Set Rng1 = Range(…).MergeArea
Set Rng2 = Range(…).MergeArea
…..
…..
Set RngN = Range(…).MergeAreaset OldRng =Union(Rng1,rng2….rngN)
That said, you did note Jim Rech’s instruction about ensuring to set the
wrap format ? In testing, if I didn’t, I got a painful kick!Whilst you appear very happy, I should tell you that I abhor merged cells
and never use them. Where I might otherwise use merged cells, I use ‘Center
across selection’.—
Regards,
NormanLast edited by shg; 06-28-2008 at 03:19 PM.
-
07-10-2005, 03:05 PM
#7
stefan via OfficeKB.com
Guest
Re: Wrap Text in Merged Cell
Hi Norman,
I appreciate the info and help.
I too like the ‘Center across selection’ better then merging. I’d really like
it if there would be a ‘Left across selection’ or ‘Right across selection’
option.I put together a «Service Form» and C30:F40 are individually used cells
whereas the ranges next to them G30:G40 are a mix of merge and ‘Center across
selection’ . Range G40:H40 is one that the user may choose to insert more
data then it would fit to be visible and hence i found the workaround with
«autofitting the merged cells» great.Another question…or so…
My range G40 (G40:H40) is one that changes, depending on how many cells the
user uses/inserts above. I changed the code to
Set OldRng = Union(Range(«C22»).MergeArea, _
Range(«Commentrange»).MergeArea) ‘ Was G40
Set AutoFitRng = Union(Range(«C22:H22»), _
Range(«Commentrange»)) ‘ WasG40:H40
which seems to be working just fine. Do you see anything that would cause me
trouble, that may have not shown up when testing it so far?And to the formatting «wrap». Yes, i too fell in that hole once i got a bit
frustrated that the code, which worked on one range, did not work on the
second, until i figured that the cells were not even set for «wrap».Thank you,
Stefan
Message posted via OfficeKB.com
http://www.officekb.com/Uwe/Forums.a…mming/200507/1Last edited by shg; 06-28-2008 at 03:18 PM.
-
07-10-2005, 03:05 PM
#8
Re: Wrap Text in Merged Cell
Hi Stefan,
Replacing a hard coded range with a named range should cause no problem and,
in my opinion, increases flexibility.As I avoid the use of merged cells, I have no experience of using similar
code and could not, therefore, comment on what problems you might encounter.I am aware that merged cells are subject to a number of problems and
restrictions, which is why I don’t use them.I would suggest you make a Google search for ‘Merged Cells’ and see if any
of the reported problems could have an impact on your workbook and your
code.—
Regards,
NormanLast edited by shg; 06-28-2008 at 03:18 PM.
-
06-28-2008, 02:08 PM
#9

Registered User
I’ve tried the VBA-script and it is working just fine.
Just one problem:
When I select more than one merged cel and delete the content all cells are beging merged.
Can this problem be fixed?Greetings Nees
-
06-28-2008, 03:16 PM
#10
Nees,
Please don’t respond to three-year-old threads — start a new one. You can provide a link to this one if appropriate.
If you intend to post code, make sure to use Code Tags.
Thanks.

