
Asked
13 years, 2 months ago
Viewed
3k times
I want to create a table like an Excel sheet. The table has rows’ headers and columns’ headers. How to make the rows header move when the vertical scrollbar is dragged and statistic when the horizontal scrollbar is dragged and vice versa for the Columns header like in Excel sheet. Does anyone have any ideas how to do it? Thank you very much for your help
![]()
Dave Clemmer
3,78712 gold badges49 silver badges72 bronze badges
asked Feb 9, 2010 at 5:33
![]()
You need to use a DataGrid, try one of these:
Microsoft datagrid (will be released as part of dot net 4.0, currently in beta)
Xceed datagrid
infragistics
there’s probably a few others too. im pretty sure they all deal with column reordering.
![]()
Dave Clemmer
3,78712 gold badges49 silver badges72 bronze badges
answered Feb 9, 2010 at 6:01
![]()
Aran MulhollandAran Mulholland
23.4k28 gold badges139 silver badges228 bronze badges
0
Можно примерно так. Заводишь класс с основным объектом, примерно такой:
public class Worker
{
public string FIO {get;set;}
public SpanTime WorkTime {get;set;}
}
Для отображения списка рабочих используете ListBox с шаблоном из двух текстбоксов:
<ListBox x:Name="lst">
<ListBox.ItemTemplate>
<DataTemplate>
<Grid>
<Grid.ColumnDefinitions>
<ColumnDefinition Width="100" />
<ColumnDefinition Width="*" />
</Grid.ColumnDefinitions>
<TextBox Text="{Binding FIO}" />
<TextBox Text="{Binding WorkTime}" Grid.Column="1"/>
</Grid>
</DataTemplate>
</ListBox.ItemTemplate>
</ListBox>
И заполняете своими данными:
lst.ItemSource = new List<Worker>() {new Worker(){FIO = "Иванов"}, new Worker(){FIO = "Петров"}};Но лучше найти какой-нибудь контрол табличный и работать с ним.
Introduction
Every developer who has already worked with Excel Interop knows that the spreadsheet cell object typing is a nightmare. Excel cell typing (performed with Excel Interop with Excel.Range objects) is not easy either. An Open Source tool to build beautiful Excel compliant spreadsheet reports, using a clean object modelisation, was indeed a need.
)
Background
Anyone with some WPF knowledge can add a spreadsheet grid in their WPF application. In order to extend this spreadsheet grid with new features, such as graphs, a decent WPF understanding is required.
Using the Code
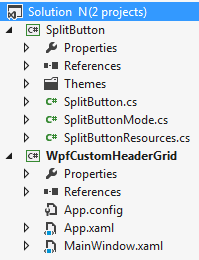
The source code is hosted on CodePlex at https://wpfsheet.codeplex.com/.
The code is using the View / ViewModel separation paradigm. The main View in the application is the SpreadsheetWindow.xaml Window class in OpenLS.Spreadsheet.UI.40, containing the ribbon, the docking panel and the workbook view.
The SpreadsheetWindow.xaml class references the DevXPress WPF Docking Framework; for those interested in simpler but free docking frameworks, they might use AvalonDock https://avalondock.codeplex.com/ . It also uses DevXpress DataGrid in its «Big data table» concepts, which are type-sensitive sortable groupable grids linked to a spreadsheet selection area. In order to keep using open source software, this DataGrid is «in process» of being replaced by the open source WPF grid:
- http://wpfextendeddatagrid.codeplex.com/
The spreadsheet is designed to support multiple languages (as for now, French, English are fully supported, but for the core functions the resources libraries for up to 30 languages are included).
Because the code is vast (it contains the WPF spreadsheet view, the graphs, the document serialization class, the computation engine, the command classes, the data connectors, the styling classes, the function add-in libraries), this article will mainly focus on:
- The Workbook UI (to be referenced on a WPF Window if a multi-sheet workbook is required in the application) is
SpreadSheetElement. - The ViewModel associated to this
SpreadSheetElementis theWorkbookclass.
public partial class Workbook : ViewModelBase,
IOfficeXmlSerializable, IThemedElement, IReferenceFactory, IWorkbook, IFormatValueConverter
{
	internal IEnumerable<Cell> GetCells()
	{
		return Enumerable.SelectMany(Enumerable.OfType<Worksheet>(this.Sheets), w => w.GetCells());
	}

	public ObservableCollection<Sheet> Sheets
	{
		get
		{
			if (_sheets == null)
			{
				_sheets = new ObservableCollection<Sheet>();
				_sheets.CollectionChanged += (sender, e) =>
				{
					if (AreSheetsProtected)
					throw new InvalidOperationException("Sheets are protected");
				};
			}
			return _sheets;
		}
	}

	public List<DataConnection> Connections
        {
		get
		{
			return _connections;
		}
		set
		{
			_connections = value;
		}
	}

	public ObservableCollection<DefinedName> DefinedNames
	{
		get
		{
			return NameManager.definedNames;
		}
	}
The core Spreadsheet ViewModel, the Workbook object, implements the ViewModelBase for inheriting from INotifyPropertyChanged, from IOfficeXmlSerializable to be saved in an XML format (compliant with XSLX), from IThemedElement because a Theme can be applied on the object, from IReferenceFactory because the worbook object can be referenced as an object in a spreadsheet formula.
public partial class Cell : INotifyPropertyChanged, ICellEnumerator {
{
	internal Cell(Row row, Column column) : this(row)
	{
		Contract.Requires(row != null);
		Contract.Requires(column != null);
		_column = column;
	}

	private Cell(Row row, Column column, object value) : this(row, column)
	{
		Value = value;
	}

	public CellAddress Address
	{
		get
		{
			return new CellAddress(Row.Index, Column.Index);
		}
	}

	internal Cell GetNeighbor(NavigationDirection k)
	{
		...
	}

	public Comment Comment
	{
		...
	}
	private object getFormatedValue(Format format, object value, int maxCount)
	{
		...
	}
	public string Formula
	{
		get
		{
			try
			{
				if (HasExtraData && ExtraData.FormulaWithoutEqual != null)
				return "=" + ExtraData.FormulaWithoutEqual;
				if (Expression != null) return Expression.GetTextWithEqual
				(new TextContext(new CellEvaluationContext(this)));
				return null;
			}
			catch (Exception e)
			{
				Debug.WriteLine("Invalid formula " + e);
				return "Invalid formula " + e.Message;
			}
		}
		set
		{
			SetFormulaImp(value, LocalizationMode.NonLocalized, null);
		}
	}
...
partial class Cell: IDependencyNode
{
	IRange ICellEnumerator.ToRange()
	{
		return this.ToRange();
	}

	internal void AddDependent(IDependencyNode n)
	{
		promote();
		HashListNoDuplicate<IDependencyNode> dependencies = EnsureExtraData.Dependencies;
		if (dependencies.Contains(n)) return;
		dependencies.Add(n);
	}
Cell Value Change Notification
The Cell object contains the Formula, Comment, Address (used in formula) objects. In a partial class, it implements IDependencyNode, which defines the spreadsheet objects dependency tree.
interface IDependencyNode
{
	IEnumerable<IDependencyNode> Dependents();
	bool ProcessChange();
	void ChainRecalc();
	void AddDependent(IDependencyNode node);
	void RemoveDependent(IDependencyNode node);
}
The ChainRecalc() method in the Cell object will basically trigger the Workbook.NotifyValueChanged(cell, oldValue, cell.Value) command.
Cell Ranges
Ranges in formula (such as for SUM(C1, C2) use the notion of «cell cluster key» (in the previous case, (C1, C2)).
They are defined using a CellCLusterKey class.
struct CellClusterKey
{
	public override string ToString()
	{
		return RangeAddress.ToString();
	}
	public CellClusterKey(CellAddress cell) : this(GetRounded(cell.Row ), GetRounded(cell.Column))
	{
		...
	}
	public RangeAddress RangeAddress
	{
		get
		{
			return new RangeAddress(new CellAddress(Row, Column),
			new CellAddress(Row + Size - 1, Column + Size - 1));
		}
	}
	...
Spreadsheet Functions Add-In
Spreadsheet functions are added using the FunctionManager Functions.FunctionManager.AddAddIn(typeof(TextFunctions).Assembly) in the SpreadsheetApplication.xaml.cs file. In order to be added as an AddIn function list, a class must have the [AddInFunctions] class attribute. Functions can deal with spreadsheet objects define using parameters attributes, such as in the example below.
[AddInFunctions]
public static class LookupFunctions
{
	public static object Address([WorksheetContext]IWorksheet worksheet,
	int row_num, int column_num, [Optional(1)] int abs_num,
	[Optional(true)] bool A1, [Optional(null)] string sheet_text)
	{
		return worksheet.Address(row_num, column_num, abs_num, A1, sheet_text);
	}
	public static int Areas([AllowCellToRangeConversion] params IRange[] range)
	{
		int result = 0;
		foreach (var r in range)
			result += r.Areas;
		return result;
	}
	public static object Choose(double index_num, [NoConversion]params object[] values)
	{
		var actualIndex = (int) Math.Floor(index_num);
		if (actualIndex < 1 || actualIndex > values.Length)
			return Errors.ValueError; return values[actualIndex - 1];
	}

	[NoValueAccess]
	public static int Column([CellContext]ICell context,
	[AcceptsRangeFirstCell, Optional(null)] ICell cr)
	{
		ICell cell = cr ?? context; return cell.ColumnIndex + 1;
	}

	[NoValueAccess]
	public static object Columns(IArray array)
	{
		return array.ColumnCount;
	}
Several conversion attributes used in function add-ins will inherit from the IParameterConverter interface; they will therefore provide a way to convert data using the ConversionData context object.
Points of Interest
The interesting part of the project is the «complex» object structure and object dependencies of a spreadsheet application. WPF revealed itself well architectured enough to define objects behavior and interaction (update, grouping, styling, formatting) without any extension required.
History
This project started in 2011 but is only published now; the goal is to provide a foundation for better charting and data entry in a spreadsheet software.
This member has not yet provided a Biography. Assume it’s interesting and varied, and probably something to do with programming.
- Download Src — WpfCustomHeaderGrid.zip — 10.4 KB
Introduction
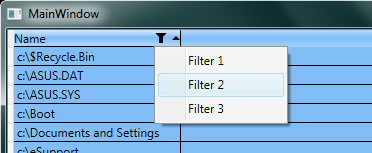
This article explains a way to create a DataGrid in WPF which has drop down filters embedded in column.
Background
When I looked for an neat/intact filtering UI for DataGrid, I could not locate the one I wanted. Some worth mentioning here:
- http://www.codeproject.com/Articles/42227/Automatic-WPF-Toolkit-DataGrid-Filtering
- http://www.codeproject.com/Articles/442498/Multi-filtered-WPF-DataGrid-with-MVVM
- http://www.codeproject.com/Articles/9947/DataGrid-with-built-in-filter-functionality
This one came closest to my idea: http://www.codeproject.com/Articles/32602/Autofiltering-Support-for-Silverlight-DataGrid. But I did not like the interface. So, I started working on a template of my own.
Note: This template will evolve to eventually discard using the ContextMenu for a more powerful pop up filter window, something like in the «Autofiltering-Support-for-Silverlight-DataGrid» article.
Using the code
Code is mostly XAML based code, with prime focus on the DataGridColumnHeader template. I have added a couple of brushes to change the look react to mouse activity. This can be customized as per need.
First, we will create a simple WPF application.
<Window x:Class="WpfCustomHeaderGrid.MainWindow"
    xmlns="http://schemas.microsoft.com/winfx/2006/xaml/presentation"
    xmlns:x="http://schemas.microsoft.com/winfx/2006/xaml"
    Title="MainWindow" Height="350" Width="525">
    <Grid></Grid>
</Window>
|
Then, we will add references of
in the XAML. You can choose the themes as per your requirement. |
 |
Here is the modified XAML code:
<Window x:Class="WpfCustomHeaderGrid.MainWindow"
        xmlns="http://schemas.microsoft.com/winfx/2006/xaml/presentation"
        xmlns:x="http://schemas.microsoft.com/winfx/2006/xaml"
        xmlns:aero="clr-namespace:Microsoft.Windows.Themes;assembly=PresentationFramework.Aero"
        xmlns:sb="clr-namespace:Wpf.Controls;assembly=Wpf.SplitButton"
        Title="MainWindow" Height="350" Width="525">
    <Grid></Grid>
</Window>
Next, I would add couple of brushes to give the custom header a decent look » />
<LinearGradientBrush x:Key="lightBrushBack" EndPoint="0.5,1" StartPoint="0.5,0">
	<GradientStop Color="#7EFFFFFF" Offset="0"/>
	<GradientStop Color="#03FFFFFF" Offset=".4"/>
	<GradientStop Color="#00030000" Offset=".5"/>
	<GradientStop Color="#0AFFFFFF" Offset=".55"/>
	<GradientStop Color="#7EFFFFFF" Offset="1"/>
</LinearGradientBrush>


<LinearGradientBrush x:Key="normalBrushBack" EndPoint="0.5,1" StartPoint="0.5,0">
	<GradientStop Color="#7EF0F0F0" Offset="0"/>
	<GradientStop Color="#03FFFFFF" Offset=".4"/>
	<GradientStop Color="#00030000" Offset=".5"/>
	<GradientStop Color="#0AFFFFFF" Offset=".55"/>
	<GradientStop Color="#3EFFFFFF" Offset="1"/>
</LinearGradientBrush>
Another addition would be a custom button look. A default button adds a lot of margin between the content and the boundary, in addition to a bloated design. We want just a small button.
<Style x:Key="RectPlainButton" TargetType="{x:Type Button}">
  <Setter Property="SnapsToDevicePixels" Value="True"/>
  <Setter Property="OverridesDefaultStyle" Value="True"/>
  <Setter Property="Template">
    <Setter.Value>
      <ControlTemplate TargetType="{x:Type Button}">
        <Grid Background="{TemplateBinding Background}">
          <Border x:Name="border" BorderThickness="1" BorderBrush="Transparent" />
          <ContentPresenter HorizontalAlignment="Center" VerticalAlignment="Center"/>
          <Border x:Name="glow" Opacity="0" HorizontalAlignment="Stretch" CornerRadius="4" Background="{StaticResource lightBrushBack}" />
        </Grid>
        <ControlTemplate.Triggers>
          <Trigger Property="IsMouseOver" Value="True">
            <Setter TargetName="glow" Property="Opacity" Value="1" />
            <Setter TargetName="border" Property="BorderBrush" Value="#FFFFFFFF" />
          </Trigger>
        </ControlTemplate.Triggers>
      </ControlTemplate>
    </Setter.Value>
  </Setter>
</Style>
Now, let us get to DataGrid part. I will put a datagrid in the MainWindow:
<Grid>
    <DataGrid x:Name="dataGrid" RowBackground="Transparent" Background="#FF81BEF7" />
</Grid>
Now that will put up a simple blue colored datagrid in the window. What do we populate this datagrid with? I will show a list of files and folders in C drive root folder. You are welcome to make data source more complicated » />
This is the C# code behind the window class:
using System.Linq;
using System.Windows;

namespace WpfCustomHeaderGrid {

  public partial class MainWindow : Window {

    public MainWindow() {
      InitializeComponent();
      dataGrid.Loaded += dataGrid_Loaded;
    }

    void dataGrid_Loaded(object sender, RoutedEventArgs e) {
      dataGrid.Loaded -= dataGrid_Loaded;
      dataGrid.ItemsSource = System.IO.Directory.GetDirectories("c:\", "*",
                      System.IO.SearchOption.TopDirectoryOnly)
                      .Select(f => new FileName() { Name = f });
    }
  };


  public class FileName {
    public string Name { get; set; }
  };
}
Now that we have something to display in datagrid, let’s redesign it. Whatever XAML code I will put down now, will belong to section
<DataGrid><DataGrid.Resources></DataGrid.Resources></DataGrid>
Item 1 — Custom Column Header Gripper styling
<Style x:Key="ColumnHeaderGripperStyle" TargetType="{x:Type Thumb}">
  <Setter Property="Width" Value="3"/>
  <Setter Property="Foreground" Value="Transparent" />
  <Setter Property="Cursor" Value="SizeWE"/>
  <Setter Property="Template">
    <Setter.Value>
      <ControlTemplate TargetType="{x:Type Thumb}">
        <Border Padding="{TemplateBinding Padding}" Background="{TemplateBinding Foreground}"/>
      </ControlTemplate>
    </Setter.Value>
  </Setter>
</Style>
This part tells datagrid how to behave when mouse cursor hovers over the thumb (left/right boundary in this case) of a column. The cursor changes to horizontal East-West mode, signaling that you can resize the column.
Item 2 — Custom Column Header template to show extra elements in the header
<Style TargetType="{x:Type DataGridColumnHeader}">
  <Setter Property="Template">
    <Setter.Value>
      <ControlTemplate TargetType="{x:Type DataGridColumnHeader}">

        <Grid x:Name="fullHeader" Background="{StaticResource normalBrushBack}">

          <aero:DataGridHeaderBorder x:Name='HeaderBorder'
                         SortDirection="{TemplateBinding SortDirection}"
                         IsHovered="{TemplateBinding IsMouseOver}"
                         IsPressed="{TemplateBinding IsPressed}"
                         IsClickable="{TemplateBinding CanUserSort}"
                         BorderThickness="0,0,1,1"
                         BorderBrush="{TemplateBinding Foreground}"
                         Background="Transparent"
                         SeparatorVisibility="{TemplateBinding SeparatorVisibility}"
                         SeparatorBrush="#FFC9CACA">

            <Grid Margin="0,0,0,0">
              <Grid.ColumnDefinitions>

                <ColumnDefinition Width="*" />

                <ColumnDefinition Width="14" />

                <ColumnDefinition Width="12" />
              </Grid.ColumnDefinitions>

              <Rectangle x:Name="HoverRectangle"
                 Stretch="Fill"
                 Grid.ColumnSpan="3"
                 Fill="{StaticResource lightBrushBack}"
                 Opacity="0"
                 StrokeThickness="0"
                 />

              <ContentPresenter Grid.Column="0"
                  SnapsToDevicePixels="{TemplateBinding SnapsToDevicePixels}"
                  VerticalAlignment="{TemplateBinding VerticalContentAlignment}"
                  HorizontalAlignment="{TemplateBinding HorizontalContentAlignment}"
                  Margin="{TemplateBinding Padding}"
                  Cursor="{TemplateBinding Cursor}" />


              <sb:SplitButton x:Name="PART_DropDown"
                      Grid.Column="1"
                      Mode="Dropdown"
                      Background="{TemplateBinding Background}"
                      BorderBrush="{TemplateBinding Foreground}"
                      Foreground="{TemplateBinding Foreground}"
                      Style="{StaticResource RectPlainButton}"
                      >
                <sb:SplitButton.Content>

                  <Path Data="M 0,0 L 1,1 1,3 2,3 2,1 3,0 Z"
                      Stretch="UniformToFill"
                      Stroke="{TemplateBinding Foreground}"
                      Fill="{TemplateBinding Foreground}"
                      Margin="2"
                      />
                </sb:SplitButton.Content>

                <MenuItem Header="Filter 1"/>
                <MenuItem Header="Filter 2"/>
                <MenuItem Header="Filter 3"/>
              </sb:SplitButton>


              <Path x:Name="SortArrow"
                  Grid.Column="2"
                  HorizontalAlignment="Right" VerticalAlignment="Center"
                  Width="8"
                  RenderTransformOrigin=".5,.5"
                  Visibility="Visible"
                  Fill="{TemplateBinding Foreground}"
                  Stretch="Uniform"
                  Data="F1 M -5.215,6.099L 5.215,6.099L 0,0L -5.215,6.099 Z">
              </Path>
            </Grid>
          </aero:DataGridHeaderBorder>
          <Thumb x:Name="PART_LeftHeaderGripper" HorizontalAlignment="Left" Style="{StaticResource ColumnHeaderGripperStyle}" />
          <Thumb x:Name="PART_RightHeaderGripper" HorizontalAlignment="Right" Style="{StaticResource ColumnHeaderGripperStyle}" />
        </Grid>

        <ControlTemplate.Triggers>
          <Trigger Property="SortDirection" Value="Descending">
            <Setter TargetName="SortArrow" Property="RenderTransform">
              <Setter.Value>
                <RotateTransform Angle="180" />
              </Setter.Value>
            </Setter>
          </Trigger>
          <Trigger Property='IsMouseOver' SourceName="fullHeader" Value='True'>
            <Trigger.EnterActions>
              <BeginStoryboard>
                <Storyboard>
                  <DoubleAnimation BeginTime="00:00:00" Duration="00:00:00.20000"
                           Storyboard.TargetName="HoverRectangle"
                           Storyboard.TargetProperty="(UIElement.Opacity)"
                           To='1.0' />
                </Storyboard>
              </BeginStoryboard>
            </Trigger.EnterActions>
            <Trigger.ExitActions>
              <BeginStoryboard>
                <Storyboard>
                  <DoubleAnimation BeginTime="00:00:00" Duration="00:00:00.20000"
                           Storyboard.TargetName="HoverRectangle"
                           Storyboard.TargetProperty="(UIElement.Opacity)"
                           To='0' />
                </Storyboard>
              </BeginStoryboard>
            </Trigger.ExitActions>
          </Trigger>
        </ControlTemplate.Triggers>
      </ControlTemplate>
    </Setter.Value>
  </Setter>
</Style>
This is the main code to change the look of a datagrid header. This header will contain 3 major parts:
- Content of the header
- A drop down filter button
- A sort order arrow indicator
However, this introduces a slight visible problem. There is a default DataGridColumnHeader object in the DataGridColumnHeadersPresenter, called «PART_FillerColumnHeader«. Since this is also a header object, it is shown to us as a (usually) non-interactable, no text/data header. Why?

If you take a note of XAML in item 2, ContentPresenter represents the column data (text/button etc.), and is responsible to display the column data. Since, we added extra items (button and sort order arrow icon) which don’t belong to any default column type available in .NET framework (obviously), DataGridColumnHeadersPresenter doesn’t bother to hide them. So, we constantly see a permanent, annoying, untouchable, drop down filter button in the datagrid header area, especially, if the datagrid size is wider than all columns width. Oh, and let’s not forget the sort icon which never changes the direction!
I think this problem can be fixed by creating a custom column type class by deriving from the most significant .NET Framework datagrid column class for your project. But this presents additional problems, like you need to know which type of columns you want to display in DataGrid, and limit the flexibility. More about default column types here.
I will use a simpler XAML approach in item 3.
Item 3 — Custom DataGridColumnHeadersPresenter
<Style TargetType="{x:Type DataGridColumnHeadersPresenter}">
  <Setter Property="Template">
    <Setter.Value>
      <ControlTemplate TargetType="{x:Type DataGridColumnHeadersPresenter}">
        <Grid>


          <ItemsPresenter x:Name="itemsPresenter" />
        </Grid>
      </ControlTemplate>
    </Setter.Value>
  </Setter>
</Style>
So, how do we remove the annoying controls in ghost column header? We remove the column header object from the DataGridColumnHeadersPresenter template. But this leaves a blank area in the header portion,which looks even uglier.

I filled that with a Rectangle of the same style, as that of a column header that I styled in item 2.
<Style TargetType="{x:Type DataGridColumnHeadersPresenter}">
  <Setter Property="Template">
    <Setter.Value>
      <ControlTemplate TargetType="{x:Type DataGridColumnHeadersPresenter}">
        <Grid>

          <Rectangle Fill="{StaticResource normalBrushBack}" />


          <ItemsPresenter x:Name="itemsPresenter" />
        </Grid>
      </ControlTemplate>
    </Setter.Value>
  </Setter>
</Style>
<span style="color: rgb(17, 17, 17); font-family: 'Segoe UI',Arial,sans-serif; font-size: 14px;"> </span>
Points of Interest
I would like to highlight couple of works, which helped me in designing this solution quickly.
- http://www.c-sharpcorner.com/UploadFile/nipuntomar/wpf-datagrid-style
- http://www.codeproject.com/Articles/20612/A-WPF-SplitButton
Points of Concerns
For consistency sake, make sure the themes and styling you apply are evenly applied to the Rectangle in DataGridColumnHeadersPresenter and «fullHeader» Grid in DataGridColumnHeader.
History
- 2013-Sep-23: Article published, along with code.
- 2013-Sep-25: Item 2 section revised.
I am a software architect, team coach, C# fan, programmer, gamer, thinker. I love performance optimization of code and people.
Introduction
Here in this blog, we will see how to export datagrid to excel C# WPF and WPF datagrid export to CSV without using any library or third party library.
 |
Getting Started
Lets say you have a WPF datagrid where you are populating list of data like below image in your project for reporting or any other purpose. You want export the populated data from WPF datagrid to excel or csv file with help of a button.
 |
WPF DataGrid Export to Excel |
We will see how to export populated data from WPF Datagrid to CSV files using the clipboard rather than using any library. On the button click event we will copy WPF Datagrid data into clipboard then will export it to CSV file. The following code helps copy the WPF Datagrid data into the clipboard.
 this.dgvStudents.SelectAllCells();
 this.dgvStudents.ClipboardCopyMode = DataGridClipboardCopyMode.IncludeHeader;
 ApplicationCommands.Copy.Execute(null, this.dgvStudents);
 this.dgvStudents.UnselectAllCells();
The below code snippet helps to retrieve data from clipboard then same it into csv file.
 String result = (string) Clipboard.GetData(DataFormats.CommaSeparatedValue);
 try
 {
   StreamWriter sw = new StreamWriter("wpfdata.csv");
   sw.WriteLine(result);
   sw.Close();
   Process.Start("wpfdata.csv");
 }
 catch(Exception ex)
 {}
Above are the two code examples which actually export the populated data in WPF Datagrid into CSV file. Now will demonstrate how to achieve WPF Datagrid to excel in WPF project.
Demonstration
Open your WPF project where you want to export data from WPF Datagrid to excel, go that container control(WPF Windows or WPF User control) where you have used Datagrid which data you want to export.
I hope that you have already taken a button in your project for the purpose of data exportation or if you have taken any other control , in the event put the below code. For example, if you want to export data in the button click event then put the below code in the button event.
 private void Button_Click_1(object sender, RoutedEventArgs e)
 {
      this.dgvStudents.SelectAllCells();
      this.dgvStudents.ClipboardCopyMode = DataGridClipboardCopyMode.IncludeHeader;
      ApplicationCommands.Copy.Execute(null, this.dgvStudents);
      this.dgvStudents.UnselectAllCells();
      String result = (string) Clipboard.GetData(DataFormats.CommaSeparatedValue);
      try
      {
           StreamWriter sw = new StreamWriter("wpfdata.csv");
           sw.WriteLine(result);
           sw.Close();
           Process.Start("wpfdata.csv");
      }
      catch(Exception ex)
      {}
 }
The above code example in the button click event, contains all the code that copies WPF datagrid populated data into clipboard by selecting all the cells of WPF datagrid then with help of StreamWriter class exports to csv file(«wpfdata.csv»). After saving data into file, it opens the csv file in Excel application.
Go and see the below full code, if you have doubts. The full code is given by separating classes for better understanding, you can use this classes to build demo project.
Main Window XAML
 <Window x:Class="WPFDataGridExport.MainWindow" xmlns="http://schemas.microsoft.com/winfx/2006/xaml/presentation" xmlns:x="http://schemas.microsoft.com/winfx/2006/xaml" Title="MainWindow" Height="350" Width="525">
   <DockPanel>
     <StackPanel Orientation="Horizontal" FlowDirection="RightToLeft" DockPanel.Dock="Bottom">
       <Button Content="Export" Click="Button_Click_1" Margin="5"></Button>
     </StackPanel>
     <DataGrid AutoGenerateColumns="False" Name="dgvStudents">
       <DataGrid.Columns>
         <DataGridTextColumn Header="Name" Width="*" Binding="{Binding Path=Name, Mode=Default}"></DataGridTextColumn>
         <DataGridTextColumn Header="Roll no." Width="100" Binding="{Binding Path=RollNo, Mode=Default}"></DataGridTextColumn>
         <DataGridTextColumn Header="Age" Width="100" Binding="{Binding Path=Age, Mode=Default}"></DataGridTextColumn>
       </DataGrid.Columns>
     </DataGrid>
   </DockPanel>
 </Window>
Student Class
 public class Student
   {
     public string Name { get; set; }
     public int RollNo { get; set; }
     public int Age { get; set; }
   }
Main Window CS
 namespace wpfexporttoexcel
 {
   /// <summary>
   /// Interaction logic for MainWindow.xaml
   /// </summary>
   public partial class MainWindow : Window
   {
     public List<Student> Students
     {
       get;
       set;
     }
     public MainWindow()
     {
       InitializeComponent();
       FillDate();
     }
     private void Button_Click_1(object sender, RoutedEventArgs e)
     {
       this.dgvStudents.SelectAllCells();
       this.dgvStudents.ClipboardCopyMode = DataGridClipboardCopyMode.IncludeHeader;
       ApplicationCommands.Copy.Execute(null, this.dgvStudents);
       this.dgvStudents.UnselectAllCells();
       String result = (string)Clipboard.GetData(DataFormats.CommaSeparatedValue);
       try
       {
         StreamWriter sw = new StreamWriter("export.csv");
         sw.WriteLine(result);
         sw.Close();
         Process.Start("export.csv");
       }
       catch (Exception ex)
       { }
     }
     private void FillDate()
     {
       this.Students = new List<Student>();
       this.Students.Add(new Student()
       {
         Name = "Kailash",
         RollNo = 1,
         Age = 10
       });
       this.Students.Add(new Student()
       {
         Name = "Munna",
         RollNo = 2,
         Age = 10
       });
       this.Students.Add(new Student()
       {
         Name = "Suraj",
         RollNo = 3,
         Age = 10
       });
       this.Students.Add(new Student()
       {
         Name = "Kiran",
         RollNo = 4,
         Age = 10
       });
       this.Students.Add(new Student()
       {
         Name = "Akash",
         RollNo = 5,
         Age = 10
       });
       this.Students.Add(new Student()
       {
         Name = "Vishal",
         RollNo = 6,
         Age = 10
       });
       this.Students.Add(new Student()
       {
         Name = "Manoj",
         RollNo = 7,
         Age = 10
       });
       this.Students.Add(new Student()
       {
         Name = "Ajay",
         RollNo = 8,
         Age = 10
       });
       this.Students.Add(new Student()
       {
         Name = "Rushi",
         RollNo = 9,
         Age = 10
       });
       this.Students.Add(new Student()
       {
         Name = "Ruchit",
         RollNo = 10,
         Age = 10
       });
       this.dgvStudents.ItemsSource = this.Students;
     }
   }
 }
Summary
In the above example we saw how to export data from WPF DataGrid to CSV file, I hope you have enjoyed it a lot.
Thanks
На чтение 1 мин Просмотров 1.2к. Опубликовано 04.12.2020
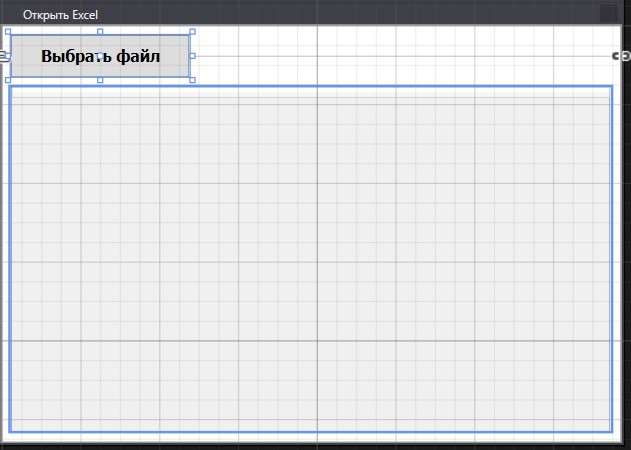
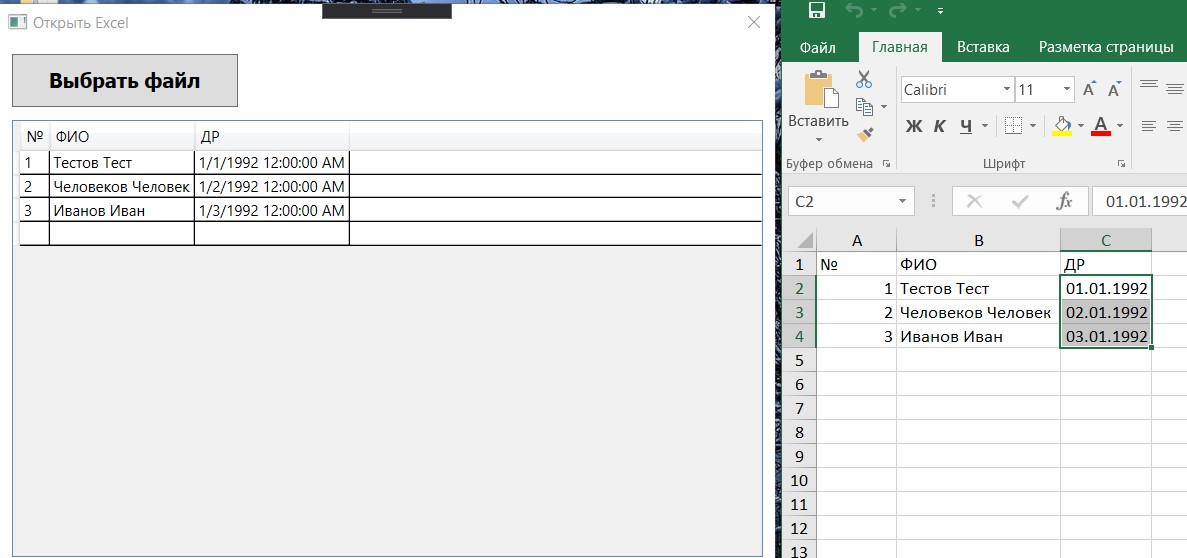
В этой статье я хочу создать простое приложение для импорта данных из excel таблицы в DataGrid.
- Приложение будет состоять из двух элементов: кнопки для выбора файла и таблицы DataGrid для отображения полученных данных.

MainWindows.xaml
|
1 2 3 4 5 6 7 8 9 10 11 12 13 14 15 16 17 18 19 20 21 22 23 24 25 26 27 28 |
<Window x:Class=«WPFExcelView.MainWindow» xmlns=«http://schemas.microsoft.com/winfx/2006/xaml/presentation» xmlns:x=«http://schemas.microsoft.com/winfx/2006/xaml» xmlns:d=«http://schemas.microsoft.com/expression/blend/2008» xmlns:mc=«http://schemas.openxmlformats.org/markup-compatibility/2006» xmlns:local=«clr-namespace:WPFExcelView» mc:Ignorable=«d» Title=«DataGrid For Excel» Height=«556.647» Width=«973.637» ResizeMode=«NoResize»> <StackPanel> <Button x:Name=«OpenExcel» Content=«Выбрать файл» HorizontalAlignment=«Left» VerticalAlignment=«Top» Height=«43» FontFamily=«Tahoma» FontSize=«16» Margin=«10,10,0,0» FontWeight=«Bold» Cursor=«Hand» Click=«OpenExcel_Click» Width=«181»/> <DataGrid x:Name=«DbGrig» ItemsSource=«{Binding}» Margin=«10» Height=«444» /> </StackPanel> </Window> |
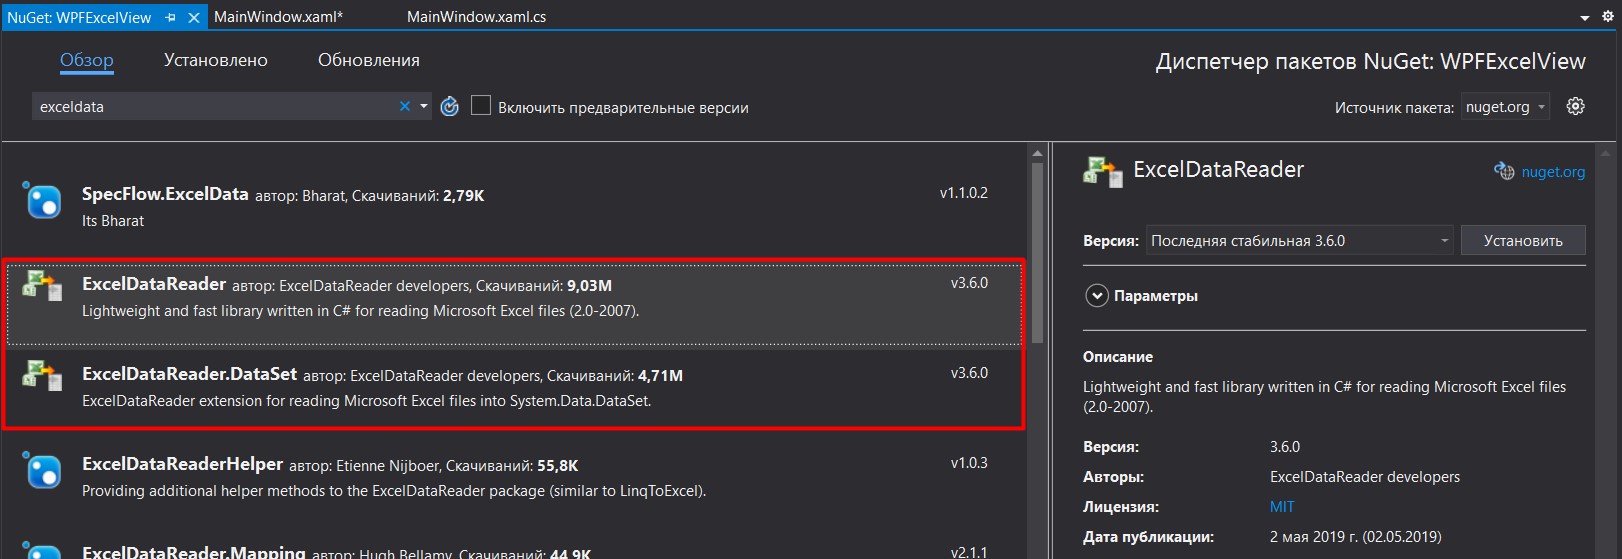
2. Для чтения excel файлов я использовал две библиотеки ExcelDataReader и ExcelDataReader.DataSet. Скачать их можно через диспетчер пакетов NuGet.
3. Функционал приложения описан в файле MainWindows.xaml.cs.
MainWindows.xaml.cs
|
1 2 3 4 5 6 7 8 9 10 11 12 13 14 15 16 17 18 19 20 21 22 23 24 25 26 27 28 29 30 31 32 33 34 35 36 37 38 39 40 41 42 43 44 45 46 47 48 49 50 51 52 53 54 55 56 57 58 59 |
using System.Windows; using Microsoft.Win32; using ExcelDataReader; using System.Data; using System.IO; namespace WPFExcelView { public partial class MainWindow : Window { IExcelDataReader edr; public MainWindow() { InitializeComponent(); } private void OpenExcel_Click(object sender, RoutedEventArgs e) { OpenFileDialog openFileDialog = new OpenFileDialog(); openFileDialog.Filter = «EXCEL Files (*.xlsx)|*.xlsx|EXCEL Files 2003 (*.xls)|*.xls|All files (*.*)|*.*»; if (openFileDialog.ShowDialog() != true) return; DbGrig.ItemsSource = readFile(openFileDialog.FileName); } private DataView readFile(string fileNames) { var extension = fileNames.Substring(fileNames.LastIndexOf(‘.’)); // Создаем поток для чтения. FileStream stream = File.Open(fileNames, FileMode.Open, FileAccess.Read); // В зависимости от расширения файла Excel, создаем тот или иной читатель. // Читатель для файлов с расширением *.xlsx. if (extension == «.xlsx») edr = ExcelReaderFactory.CreateOpenXmlReader(stream); // Читатель для файлов с расширением *.xls. else if (extension == «.xls») edr = ExcelReaderFactory.CreateBinaryReader(stream); //// reader.IsFirstRowAsColumnNames var conf = new ExcelDataSetConfiguration { ConfigureDataTable = _ => new ExcelDataTableConfiguration { UseHeaderRow = true } }; // Читаем, получаем DataView и работаем с ним как обычно. DataSet dataSet = edr.AsDataSet(conf); DataView dtView = dataSet.Tables[0].AsDataView(); // После завершения чтения освобождаем ресурсы. edr.Close(); return dtView; } } } |
Готовое приложение
Полезные ссылки:
- ExcelDataReader
- ExcelDataReader примеры использования
How to export the WPF DataGrid (SfDataGrid) to excel with RowHeader?
About the sample
This example illustrates how to export the WPF DataGrid (SfDataGrid) to excel with RowHeader?
WPF DataGrid (SfDataGrid) does not provide the support to export the row header. You can export the row header column by using Worksheet.InsertColumn method to insert column manually in ExcelSheet and make customization in inserted column.
private void btnExportToExcel_Click(object sender, RoutedEventArgs e)
{
            var options = new ExcelExportingOptions();
            options.ExcelVersion = ExcelVersion.Excel2013;
            var excelEngine = sfDataGrid.ExportToExcel(sfDataGrid.View, options);
            var workBook = excelEngine.Excel.Workbooks[0];

            IWorksheet sheet = workBook.Worksheets[0];

            sheet.InsertColumn(1, 1, ExcelInsertOptions.FormatDefault);
            var rowcount = this.sfDataGrid.RowGenerator.Items.Count;

            for (int i = 1; i < rowcount; i++)
            {
                sheet.Range["A" + (i + 1).ToString()].Number = i;
            }

            SaveFileDialog sfd = new SaveFileDialog
            {
                FilterIndex = 2,
                Filter = "Excel 97 to 2003 Files(*.xls)|*.xls|Excel 2007 to 2010 Files(*.xlsx)|*.xlsx|Excel 2013 File(*.xlsx)|*.xlsx"
            };

            if (sfd.ShowDialog() == true)
            {
                using (Stream stream = sfd.OpenFile())
                {
                    if (sfd.FilterIndex == 1)
                        workBook.Version = ExcelVersion.Excel97to2003;
                    else if (sfd.FilterIndex == 2)
                        workBook.Version = ExcelVersion.Excel2010;
                    else
                        workBook.Version = ExcelVersion.Excel2013;
                    workBook.SaveAs(stream);
                }

                //Message box confirmation to view the created workbook.
                if (MessageBox.Show("Do you want to view the workbook?", "Workbook has been created",
                                    MessageBoxButton.YesNo, MessageBoxImage.Information) == MessageBoxResult.Yes)
                {

                    //Launching the Excel file using the default Application.[MS Excel Or Free ExcelViewer]
                    System.Diagnostics.Process.Start(sfd.FileName);
                }
            }
}
The following screenshot illustrates the RowHeader displayed in WPF DataGrid (SfDataGrid),

The following screenshot illustrates exported Excel Sheet with RowHeader,

Take a moment to peruse the WPF DataGrid — Export To Excel documentation, where you can find about export to excel with code examples.
KB article: How to export the WPF DataGrid (SfDataGrid) to excel with RowHeader?
Requirements to run the demo
Visual Studio 2015 and above versions