
“
Продолжаем работу над приложением и сегодня изучим способы его взаимодействия с Word. Разберем основные методы программной работы с документами такого типа и попробуем применить их на практике.
Для успешного освоения материала рекомендуем вам изучить следующие понятия:
DB (Database), БД. Организованная структура, предназначенная для хранения, изменения и обработки взаимосвязанной информации, преимущественно больших объемов
Windows Presentation Foundation. Аналог WinForms, система для построения клиентских приложений Windows с визуально привлекательными возможностями взаимодействия с пользователем, графическая (презентационная) подсистема в составе .NET Framework (начиная с версии 3.0), использующая язык XAML
Демонстрация работы с документами Word в WPF
На данном занятии будет реализована возможность экспорта данных из приложения для визуализации расходов пользователей в документ Word. Расходы каждого пользователя будут экспортироваться на отдельную страницу, названием которой будет ФИО пользователя. Расходы будут просуммированы по категориям и представлены в виде таблицы. Под таблицей будет размещена информация о максимальном и минимальном платежах данного пользователя. Основные шаги построения приложения:
- Подготовительный этап
- Реализация экспорта в документ Word
- Завершение оформления документа Word
1. Подключаем библиотеку для работы с Word


Важно
Для экспорта данных в Word используется библиотека InteropWord (Object Library), расположенная во вкладке COM
2. Добавляем кнопку экспорта

Важно
Экспорт данных в Word будет осуществляться с помощью кнопки «Экспорт в Word»
3. Подключаем пространство имен для работы с Word

Важно
Требуемое пространство имен подключается с помощью директивы using
Реализация экспорта в документ Word
1. Получаем список пользователей и категорий

Важно
Список пользователей и категорий выгружается из базы данных
2. Создаем новый документ Word

Важно
После создания экземпляра Word в приложение добавляется новый документ, с которым далее происходит работа
3. Создаем параграф для хранения названий страниц

Важно
Основной структурной единицей текста является параграф, представленный объектом Paragraph. Все абзацы объединяются в коллекцию Paragraphs, причем новые параграфы добавляются с помощью метода Add. Доступ к тексту предоставляет объект Range, являющийся свойством Paragraph, а текстовое содержание абзаца доступно через Range.Text. В данном случае для хранения ФИО каждого пользователя создается новый параграф
4. Добавляем названия страниц

Важно
В качестве названия выбирается имя пользователя, к которому применяется стиль «Title», после чего добавляется новый параграф для таблицы с платежами
5. Добавляем и форматируем таблицу для хранения информации о платежах

Важно
После создания параграфа для таблицы и получения его Range, добавляется таблица с указанием числа строк (по количеству категорий + 1) и столбцов. Последние две строчки касаются указания границ (внутренних и внешних) и выравнивания ячеек (по центру и по вертикали)
6. Добавляем названия колонок и их форматирование

Важно
Таблица состоит из трех колонок с названиями «Иконка», «Категория» и «Сумма расходов». Названия колонок выделяются жирным шрифтом и выравниваются по центру
7. Заполняем первую колонку таблицы

Важно
Положение ячейки заносится в переменную cellRange. Метод AddPicture() класса InlineShape позволяет добавить изображение в ячейку. Иконки категорий размещаются в новой папке Assets, основные шаги создания которой изображены на скриншоте
8. Форматируем первую колонку таблицы

Важно
Для первой колонки устанавливаются длина, ширина, а также горизонтальное выравнивание по центру
9. Заполняем вторую и третью колонки

Важно
Сумма платежей приводится к нужному формату с указанием единиц измерения (руб.) непосредственно в коде
Завершение оформления документа Word
1. Добавляем максимальную величину платежа

Важно
Для поиска максимального платежа сначала платежи сортируются по стоимости. В случае, если такой платеж найден, добавляется новый параграф. Получается диапазон и выводится текст с информацией о наименовании платежа, его стоимости и дате совершения. В заключение устанавливается стиль и цвет текста (красный)
2. Добавляем минимальную величину платежа

Важно
Аналогично среди всех платежей данного пользователя определяется наименьший платеж и отображается шрифтом зеленого цвета
3. Делаем заключительные шаги

Важно
По завершении работы с данными пользователя добавляется разрыв страницы. Далее, разрешается отображение таблицы по завершении экспорта. Наконец, документ сохраняется в формате .docx и .pdf

“
Вы познакомились с основными программными методами работы с документами Word в WPF. Теперь давайте перейдем от теории к практике!
Для закрепления полученных знаний пройдите тест
Выберите неверное утверждение относительно работы с документами Word:
Paragraph содержит все абзацы документа
Range предоставляет доступ к тексту абзаца
Обращение к ячейке начинается с указания номера строки
Range.Text и Paragraphs являются:
К сожалению, вы ответили неправильно
Прочитайте лекцию и посмотрите видео еще раз
Но можно лучше. Прочитайте лекцию и посмотрите видео еще раз
Вы отлично справились. Теперь можете ознакомиться с другими компетенциями
Работа с Word
          //  using(AppContext db = new AppContext())
            {
                //var products = db.Products.ToList();

                //var application = new Word.Application();

                //Word.Document document = application.Documents.Add();


                // Создаем параграф для хранения страниц


                // Основной структурной единицей текста является параграф, представленный объектом
                // Paragraph. Все абзацы объединяются в коллекцию Paragraphs, причем новые параграфы
                // добавляются с помощью метода Add. Доступ к тексту предоставляет объект Range,
                // являющийся свойством Paragraph, а текстовое содержание абзаца доступно через
                // Range.Text. В данном случае для хранения ФИО каждого пользователя создается новый параграф

                /*foreach (var p in products)
                {
                    Word.Paragraph productParagraph = document.Paragraphs.Add();
                    Word.Range productRange = productParagraph.Range;


                    // Добавляем названия страниц
                    productRange.Text = p.Title;
                    //productParagraph.set_Style("Title");
                    productRange.InsertParagraphAfter();

                    //Добавляем и форматируем таблицу для хранения информации о продуктах
                    Word.Paragraph tableParagraph = document.Paragraphs.Add();
                    Word.Range tableRange = tableParagraph.Range;
                    Word.Table paymentsTable = document.Tables.Add(tableRange, products.Count() + 1, 3);


                    //После создания параграфа для таблицы и получения его Range, добавляется таблица
                    //с указанием числа строк (по количеству категорий + 1) и столбцов. Последние две строчки
                    //касаются указания границ (внутренних и внешних) и выравнивания ячеек (по центру и по вертикали)

                    paymentsTable.Borders.InsideLineStyle = paymentsTable.Borders.OutsideLineStyle
                        = Word.WdLineStyle.wdLineStyleSingle;
                    paymentsTable.Range.Cells.VerticalAlignment = Word.WdCellVerticalAlignment.wdCellAlignVerticalCenter;


                    Word.Range cellRange;

                    cellRange = paymentsTable.Cell(1, 1).Range;
                    cellRange.Text = "Текст 1";
                    cellRange = paymentsTable.Cell(1, 2).Range;
                    cellRange.Text = "Текст 2";
                    cellRange = paymentsTable.Cell(1, 3).Range;
                    cellRange.Text = "Текст 3";

                    paymentsTable.Rows[1].Range.Bold = 1;
                    paymentsTable.Rows[1].Range.ParagraphFormat.Alignment = Word.WdParagraphAlignment.wdAlignParagraphCenter;*/


                    // Положение ячейки заносится в переменную cellRange. Метод AddPicture() класса
                    // InlineShape позволяет добавить изображение в ячейку. Иконки категорий размещаются
                    // в новой папке Assets, основные шаги создания которой изображены на скриншоте


                   /* for (int i = 0; i < products.Count(); i++)
                    {
                        var currentProduct = products[i];
                        cellRange = paymentsTable.Cell(i + 2, 1).Range;


                        //Word.InlineShape imageShape = cellRange.InlineShapes.AddPicture(AppDomain.CurrentDomain.BaseDirectory
                          //  + "..\..\" + currentProduct.Id);

                        // Для первой колонки устанавливаются длина, ширина,
                        // а также горизонтальное выравнивание по центру

                        //imageShape.Width = imageShape.Height = 40;
                        //cellRange.ParagraphFormat.Alignment = Word.WdParagraphAlignment.wdAlignParagraphCenter;

                        cellRange = paymentsTable.Cell(i + 2, 2).Range;
                        cellRange.Text = currentProduct.Title;


                    }*/

            }
Работа с Word. Поиск и замена значений
 try
            {
                Abiturient abiturient = UsersComboBox.SelectedItem as Abiturient;
                File.Copy(System.IO.Path.Combine(Environment.CurrentDirectory, "заявление.doc"), System.IO.Path.Combine(Environment.CurrentDirectory, $"заявление {abiturient.FullName}.doc"));

                Word.Application wordApp = new Microsoft.Office.Interop.Word.Application { Visible = false };
                Word.Document aDoc = wordApp.Documents.Open(Environment.CurrentDirectory + "/" + $"заявление {abiturient.FullName}.doc", ReadOnly: false, Visible: false); // файлу дать разрешения для записdи
                Word.Range range = aDoc.Content;

                //range.Find.ClearFormatting();
                range.Find.Execute(FindText: "[Фамилия]", ReplaceWith: abiturient.FullName.Split(" ")[0], Replace: Word.WdReplace.wdReplaceAll);
                range.Find.Execute(FindText: "[Имя]", ReplaceWith: abiturient.FullName.Split(" ")[1], Replace: Word.WdReplace.wdReplaceAll);
                range.Find.Execute(FindText: "[Отчество]", ReplaceWith: abiturient.FullName.Split(" ")[2], Replace: Word.WdReplace.wdReplaceAll);
                range.Find.Execute(FindText: "[Дата рождения]", ReplaceWith: abiturient.BirthDay, Replace: Word.WdReplace.wdReplaceAll);
                range.Find.Execute(FindText: "[Место рождения]", ReplaceWith: abiturient.PlaceOfBirth, Replace: Word.WdReplace.wdReplaceAll);
                range.Find.Execute(FindText: "[Гражданство]", ReplaceWith: abiturient.Citizenship, Replace: Word.WdReplace.wdReplaceAll);
                range.Find.Execute(FindText: "[серия] ", ReplaceWith: abiturient.SeriesNumberPassport.Split(" ")[0], Replace: Word.WdReplace.wdReplaceAll);
                range.Find.Execute(FindText: "[номер]", ReplaceWith: abiturient.SeriesNumberPassport.Split(" ")[1], Replace: Word.WdReplace.wdReplaceAll);
                range.Find.Execute(FindText: "[Кем и когда выдан]", ReplaceWith: abiturient.PassportIssued, Replace: Word.WdReplace.wdReplaceAll);
                range.Find.Execute(FindText: "[Адрес регистрации]", ReplaceWith: abiturient.RegistrationAddress, Replace: Word.WdReplace.wdReplaceAll);
                range.Find.Execute(FindText: "[Адрес фактического проживания]", ReplaceWith: abiturient.AddressActualResidence, Replace: Word.WdReplace.wdReplaceAll);
                range.Find.Execute(FindText: "[телефон]", ReplaceWith: abiturient.NumberPhone, Replace: Word.WdReplace.wdReplaceAll);
                range.Find.Execute(FindText: "[код] ", ReplaceWith: (db.Specialties.Find(abiturient.SpecialtyId) as Specialty).Code   , Replace: Word.WdReplace.wdReplaceAll);
                range.Find.Execute(FindText: "[наименование]", ReplaceWith: db.Specialties.Find(abiturient.SpecialtyId).Name, Replace: Word.WdReplace.wdReplaceAll);
                range.Find.Execute(FindText: "[образовательное учреждение]", ReplaceWith: abiturient.Education, Replace: Word.WdReplace.wdReplaceAll);
                range.Find.Execute(FindText: "[год окончания]", ReplaceWith: abiturient.SchoolGraduationYear, Replace: Word.WdReplace.wdReplaceAll);
                range.Find.Execute(FindText: "[номер аттестата]", ReplaceWith: abiturient.CertificateNumber, Replace: Word.WdReplace.wdReplaceAll);
                range.Find.Execute(FindText: "[дата выдачи]", ReplaceWith: abiturient.DateCertificate, Replace: Word.WdReplace.wdReplaceAll);
                range.Find.Execute(FindText: "[иностранный язык]", ReplaceWith: abiturient.Language, Replace: Word.WdReplace.wdReplaceAll);
                range.Find.Execute(FindText: "[национальность]", ReplaceWith: abiturient.Nationality, Replace: Word.WdReplace.wdReplaceAll);
                range.Find.Execute(FindText: "[общежитие]", ReplaceWith: abiturient.NeedHostel, Replace: Word.WdReplace.wdReplaceAll);
                range.Find.Execute(FindText: "[дата]", ReplaceWith: DateTime.Now.ToShortDateString(), Replace: Word.WdReplace.wdReplaceAll);

                if (abiturient.Specialty.Base == "9")
                {
                    if (range.Find.Execute("общего"))

                      range.Font.Underline = Word.WdUnderline.wdUnderlineDouble;
                }
                else
                {
                    if (range.Find.Execute("среднего"))

                        range.Font.Underline = Word.WdUnderline.wdUnderlineDouble;
                }

                // создаю новый range так как старый range становится весь другой. С этим можно разобраться

                Word.Range range1 = aDoc.Content;

                if (abiturient.Specialty.FormEducation == "очная")
                {
                    if (range1.Find.Execute("очное"))

                        range1.Font.Underline = Word.WdUnderline.wdUnderlineSingle;
                }
                else
                {

                    if (range1.Find.Execute("заочное"))

                         range1.Font.Underline = Word.WdUnderline.wdUnderlineSingle;
                }

                MessageBox.Show("Заявление создано!", MessageBoxButton.OK.ToString());

                // Надо сохранять в файл с правами записи
                string gesturefile = System.IO.Path.Combine(Environment.CurrentDirectory + "/" + $"заявление {abiturient.FullName}.doc");
                string gesturefilePdf = System.IO.Path.Combine(Environment.CurrentDirectory + "/" + $"заявление {abiturient.FullName}.pdf");

                if (PdfCheck.IsChecked == true)
                {
                    aDoc.SaveAs2(gesturefilePdf, Word.WdExportFormat.wdExportFormatPDF);
                }

                aDoc.Close();
                wordApp.Quit();

            }
            catch (Exception ex)
            {
                MessageBox.Show($"{ex.Message}");
            }
Добавление фото в Word
 // находим диапазон с фото
                Word.Range range1 = aDoc.Content;
                range1.Find.Execute(FindText: "[Фото]");

                // добавляем рядом картинку
                Word.InlineShape ils = aDoc.InlineShapes.AddPicture(abiturient.ImagePath, false, true, Range: range1);

                // удаляем слово фото
                range1.Find.Execute(FindText: "[Фото]", ReplaceWith: "", Replace: Word.WdReplace.wdReplaceAll);
Довольно часто в разработке приложений для работы с документами возникает необходимость отобразить эти самые документы не переключаясь из приложения. В подавляющем большинстве этими документами являются текстовые документы MS Word и электронные таблицы MS Excel. К сожалению мне не удалось найти каких-либо достойных контролов для их отображения в свободном доступе, так что было решено встроить сам офис в приложение, благо он установлен практически на каждом компьютере. В этой и следующей статье посмотрим как это можно сделать.
Начнём с создания юзерконтрола, отображающего документы Word.
Задача следующая: открывать документ внутри нашего приложения только для чтения без возможности отредактировать или пересохранить документ, меню и панели ворда спрятать.
Структура контрола будет такая: WPF-UserControl => WindowsFormsHost => WindowsForms-UserControl => Panel => Word app
Для работы нам понадобится подключить две библиотеки:
Microsoft.Office.Interop.Word
Office
WindowsForms UserControl
Для работы понадобится несколько WinApi функций:
#region Изменить родителя окна
[DllImport("user32.dll")]
private static extern IntPtr SetParent(IntPtr hWndChild, IntPtr hWndNewParent);
#endregion

#region Перемещение окна
[DllImport("user32.dll", SetLastError = true)]
public static extern bool MoveWindow(IntPtr hWnd, int X, int Y, int nWidth, int nHeight, bool bRepaint);
#endregion

#region Развернуть окно на весь экран
private const int SW_SHOWMAXIMIZED = 3;
[DllImport("user32.dll")]
private static extern bool ShowWindow(IntPtr hWnd, int nCmdShow);
#endregion

#region Спрятать заголовок окна
const int WS_BORDER = 8388608;
const int WS_DLGFRAME = 4194304;
const int WS_CAPTION = WS_BORDER | WS_DLGFRAME;
const int WS_SYSMENU = 524288;
const int WS_THICKFRAME = 262144;
const int WS_MINIMIZE = 536870912;
const int WS_MAXIMIZEBOX = 65536;
const int GWL_STYLE = -16;
const int GWL_EXSTYLE = -20;
const int WS_EX_DLGMODALFRAME = 0x00000001;
const int SWP_NOMOVE = 0x2;
const int SWP_NOSIZE = 0x1;
const int SWP_FRAMECHANGED = 0x20;
const uint MF_BYPOSITION = 0x400;
const uint MF_REMOVE = 0x1000;

[DllImport("user32.dll")]
public static extern int GetWindowLong(IntPtr hWnd, int nIndex);

[DllImport("user32.dll")]
public static extern int SetWindowLong(IntPtr hWnd, int nIndex, int dwNewLong);

[DllImport("user32.dll")]
public static extern bool SetWindowPos(IntPtr hWnd, IntPtr hWndInsertAfter, int X, int Y, int cx, int cy, int uFlags);

public void MakeExternalWindowBorderless(IntPtr MainWindowHandle)
{
    int Style = 0;
    Style = GetWindowLong(MainWindowHandle, GWL_STYLE);
    Style = Style & Not(WS_CAPTION);
    Style = Style & Not(WS_SYSMENU);
    Style = Style & Not(WS_THICKFRAME);
    Style = Style & Not(WS_MINIMIZE);
    Style = Style & Not(WS_MAXIMIZEBOX);
    SetWindowLong(MainWindowHandle, GWL_STYLE, Style);
    Style = GetWindowLong(MainWindowHandle, GWL_EXSTYLE);
    SetWindowLong(MainWindowHandle, GWL_EXSTYLE, Style | WS_EX_DLGMODALFRAME);
    //SetWindowPos(MainWindowHandle, new IntPtr(0), 0, 0, 0, 0, SWP_NOMOVE | SWP_NOSIZE | SWP_FRAMECHANGED);
}
#endregion

#region Спрятать меню окна
[DllImport("user32.dll")]
private static extern IntPtr GetMenu(IntPtr hWnd);

[DllImport("user32.dll")]
private static extern int GetMenuItemCount(IntPtr hMenu);

[DllImport("user32.dll")]
private static extern bool DrawMenuBar(IntPtr hWnd);

[DllImport("user32.dll")]
private static extern bool RemoveMenu(IntPtr hMenu, uint uPosition, uint uFlags);

public void WindowsReStyle(IntPtr MainWindowHandle)
{
    int style = GetWindowLong(MainWindowHandle, GWL_STYLE);
    IntPtr HMENU = GetMenu(MainWindowHandle);
    int count = GetMenuItemCount(HMENU);

    if (count > 0)
    {
        for (int i = count; i >= 0; i += -1)
        {
            uint menuToRemove = Convert.ToUInt32(i);

            RemoveMenu(HMENU, menuToRemove, (MF_BYPOSITION | MF_REMOVE));
        }

        DrawMenuBar(MainWindowHandle);
    }
}
#endregion
Переменные контрола
private Process process;
private Word.Application word;
private Word.Document document;
private List<string> hiddenBars;
private int originalWordWindowWidth;
private int originalWordWindowHeight;
private int originalWordWindowLeft;
private int originalWordWindowTop;
Методы открытия/закрытия Word
/// <summary>
/// Запустить Word
/// </summary>
private void StartWord()
{
    this.word = new Word.Application();
    this.word.Application.Caption = "WORD VIEWER";

    this.originalWordWindowWidth = this.word.Width;
    this.originalWordWindowHeight = this.word.Height;
    this.originalWordWindowLeft = this.word.Left;
    this.originalWordWindowTop = this.word.Top;

    this.word.Width = 0;
    this.word.Height = 0;
    this.word.Left = -100;
    this.word.Top = -100;

    this.word.Visible = true;
    this.word.CommandBars.ActiveMenuBar.Enabled = false;

    foreach (Process proc in Process.GetProcessesByName("winword"))
        if (proc.MainWindowTitle == "WORD VIEWER")
            this.process = proc;

    SetParent(this.process.MainWindowHandle, this.wordContainer.Handle);
    ShowWindow(this.process.MainWindowHandle, SW_SHOWMAXIMIZED);
    MakeExternalWindowBorderless(this.process.MainWindowHandle);
    WindowsReStyle(this.process.MainWindowHandle);
    MoveWindow(this.process.MainWindowHandle, -3, -3, this.wordContainer.Width + 6, this.wordContainer.Height + 6, true);
}

/// <summary>
/// Закрыть Word
/// </summary>
private void CloseWord()
{
    if ((this.word != null))
    {
        if (this.word.Documents.Count > 0)
            this.document.Close(SaveChanges: false);

        this.word.CommandBars.ActiveMenuBar.Enabled = true;

        foreach (string cb in this.hiddenBars)
            this.word.CommandBars[cb].Visible = true;

        this.word.Width = this.originalWordWindowWidth;
        this.word.Height = this.originalWordWindowHeight;
        this.word.Left = this.originalWordWindowLeft;
        this.word.Top = this.originalWordWindowTop;

        this.word.Quit(SaveChanges: false);

        GC.Collect();
        GC.WaitForPendingFinalizers();

        Marshal.ReleaseComObject(this.document);
        Marshal.ReleaseComObject(this.word);
    }
}
Методы открытия/закрытия документа
/// <summary>
/// Открыть документ
/// </summary>
/// <param name="path">Путь к документу</param>
public void OpenWordDocument(string path)
{
    if (this.word == null)
        this.StartWord();

    foreach (Microsoft.Office.Core.CommandBar cb in this.word.CommandBars)
    {
        if (cb.Visible)
        {
            try
            {
                if (!this.hiddenBars.Contains(cb.Name))
                    this.hiddenBars.Add(cb.Name);

                cb.Visible = false;
            }
            catch { }
        }
    }

    if (this.word.Documents.Count > 0)
        this.document.Close(SaveChanges: false);

    this.document = this.word.Documents.Open(FileName: path, ReadOnly: true);
}

/// <summary>
/// Закрывает текущую таблицу
/// </summary>
public void CloseWordDocument()
{
    if (this.word != null && this.word.Documents.Count > 0)
        this.document.Close(SaveChanges: false);
}
Подцепимся к нескольким событиям для изменения размера word’а / корректного закрытия приложения
/// <summary>
/// При изменении размеров родительского контейнера
/// </summary>
void OnContainerResize(object sender, EventArgs e)
{
    Panel container = sender as Panel;

    if (container == null)
        return;

    if ((this.process != null))
    {
        MakeExternalWindowBorderless(this.process.MainWindowHandle);
        WindowsReStyle(this.process.MainWindowHandle);
        MoveWindow(this.process.MainWindowHandle, -3, -3, container.Width + 6, container.Height + 6, true);
    }
}

/// <summary>
/// При закрытии приложения
/// </summary>
void OnMainWindowClosing(object sender, System.ComponentModel.CancelEventArgs e)
{
    this.CloseWord();
}

/// <summary>
/// При краше приложения
/// </summary>
void OnUnhandledException(object sender, UnhandledExceptionEventArgs e)
{
    this.CloseWord();
}
WPF UserControl
XAML контрола будет содержать лишь одну строку:
<WindowsFormsHost x:Name="wordHost" />
При загрузке WPF-контрола добавляем в WindowFormsHost WindowsForms-контрол
private WordWindowsForms control;

private void UserControl_Loaded(object sender, RoutedEventArgs e)
{
    this.control = new WordWindowsForms();

    this.wordHost.Child = this.control;
}
Dependency Property чтоб можно было биндить путь к файлу
/// <summary>
/// Путь к файлу
/// </summary>
public string File
{
    get { return (string)this.GetValue(FileProperty); }
    set { this.SetValue(FileProperty, value); }
}

public static readonly DependencyProperty FileProperty = DependencyProperty.Register("File", typeof(string), typeof(Word), new PropertyMetadata(null, OnFilePropertyChanged));

public static void OnFilePropertyChanged(object sender, DependencyPropertyChangedEventArgs e)
{
    Word ech = sender as Word;

    if (ech == null || ech.control == null)
        return;

    if (string.IsNullOrWhiteSpace((string)e.NewValue))
        ech.control.CloseWordDocument();
    else
        ech.control.OpenWordDocument((string)e.NewValue);
}This article is going to introduce how to create, write and save word document in WPF via Spire.Doc for WPF.
Spire.Doc for WPF enables users to do a large range of manipulations (such as create, write, open, edit, convert and save, etc.) on word with high performance and efficiency. In addition, as a powerful and independent library, it doesn’t require Microsoft Office or any other 3rd party tools to be installed on system.
Note: please download and install Spire.Doc correctly and add the dll file from the installation folder as reference.
First, let’s begin to create a word document in WPF.
Use namespace:
using System.Windows;
using Spire.Doc;
using Spire.Doc.Documents;
Step 1: Create a new word document instance, next add a section and a paragraph to it.
//Create New Word
Document doc = new Document();
//Add Section
Section section = doc.AddSection();
//Add Paragraph
Paragraph Para = section.AddParagraph();
Second, we’re going to write something into the document.
Step 2: Append some text to it.
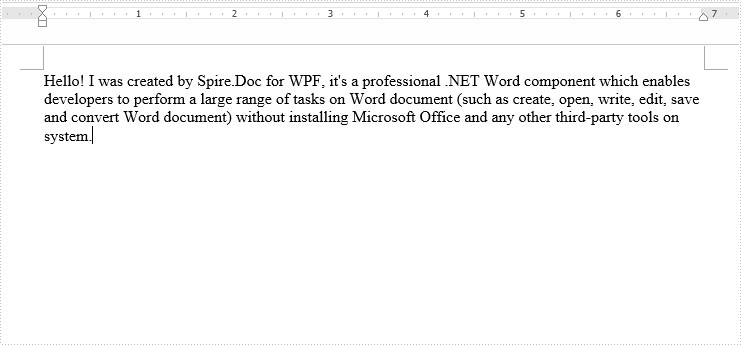
//Append Text
Para.AppendText("Hello! "
+ "I was created by Spire.Doc for WPF, it's a professional .NET Word component "
+ "which enables developers to perform a large range of tasks on Word document (such as create, open, write, edit, save and convert "
+ "Word document) without installing Microsoft Office and any other third-party tools on system.");
Third, save the generated document.
Step 3: Save and launch the document.
//Save and launch
doc.SaveToFile("MyWord.docx", FileFormat.Docx);
System.Diagnostics.Process.Start("MyWord.docx");
Output:
Full codes:
using Spire.Doc;
using Spire.Doc.Documents;
using System.Windows;

namespace WpfApplication1
{
    public partial class MainWindow : Window
    {
        public MainWindow()
        {
            InitializeComponent();
        }
        private void button1_Click(object sender, RoutedEventArgs e)
        {
            //Create New Word
            Document doc = new Document();
            //Add Section
            Section section = doc.AddSection();
            //Add Paragraph
            Paragraph Para = section.AddParagraph();
            //Append Text
            Para.AppendText("Hello! "
            + "I was created by Spire.Doc for WPF, it's a professional .NET Word component "
            + "which enables developers to perform a large range of tasks on Word document (such as create, open, write, edit, save and convert "
            + "Word document) without installing Microsoft Office and any other third-party tools on system.");
            //Save and launch
            doc.SaveToFile("MyWord.docx", Spire.Doc.FileFormat.Docx);
            System.Diagnostics.Process.Start("MyWord.docx");
        }

    }
}
Introduction
Microsoft Office Documents like Word , Excel, PowerPoint are very difficult to View in WPF. I have seen a lot of posts related to viewing office files in forums. So to be straight forward there is no direct method to view office
documents in WPF. Office files should be converted to a suitable format so that it could be viewed in WPF. Here are the steps to view an office Document in WPF
Steps
1.) Create a WPF 4.0 Application and Place a Document Viewer.
<Window
x:Class="DocumentViewer.MainWindow"
Title="Office Files Viewer"
Height="700"
Width="1200">
<Grid>
<DocumentViewer
Name="documentViewer1"
/>
</Grid>
2.) Add the Following Com Components in your References
- Microsoft Word 14.0 Object Library
- Microsoft Excel 14.0 Object Library
- Microsoft PowerPoint 14.0 Object Library
Ensure that you are having version 12.0 or Above. Which means Microsoft word 2007 or higher versions.
3.) The next step is to convert the Office Documents into a suitable format which are XPS Documents. Before that add the following dll to your Reference
- ReachFramework.dll

4.) To convert the Office Documents to XPS Documents. Attach the OfficetoXps.cs class file to your project. You can download the class files and the whole project from my skydrive.
5.) Next step is to invoke the class and convert the office files to XPS and View in the Document Viewer. Using the code Below.
public void openFile()

{

System.Windows.Xps.Packaging.XpsDocument xpsDoc;
/*Creating a Xps Documnet*/
Microsoft.Win32.OpenFileDialog dlg =
new
Microsoft.Win32.OpenFileDialog(); /* Open File Dialog to open .docx Files */
string
xpsFilePath=String.Empty;
// Set filter for file extension and default file extension
dlg.DefaultExt =
".txt";
dlg.Filter =
"Office Files(*.docx;*.doc;*.xlsx;*.xls;*.pptx;*.ppt)|*.docx;*.doc;*.xlsx;*.xls;*.pptx;*.ppt";
// Display OpenFileDialog by calling ShowDialog method
Nullable<bool> result = dlg.ShowDialog();
if
(result == true)
{
string
filename = dlg.FileName;
xpsFilePath = System.Environment.CurrentDirectory +
"\" + dlg.SafeFileName + ".xps";
}
var convertResults = OfficeToXps.ConvertToXps(SourceUrl.Text,
ref
xpsFilePath);
switch
(convertResults.Result)
{
case
ConversionResult.OK:
/* Creating a XPS Document in Read Write Mode*/
xpsDoc =
new
System.Windows.Xps.Packaging.XpsDocument(xpsFilePath, FileAccess.ReadWrite);
/*Open in a Document Viewer*/
documentViewer1.Document = xpsDoc.GetFixedDocumentSequence();
break;
case
ConversionResult.InvalidFilePath:
// Handle bad file path or file missing
break;
case
ConversionResult.UnexpectedError:
// This should only happen if the code is modified poorly
break;
case
ConversionResult.ErrorUnableToInitializeOfficeApp:
// Handle Office 2007 (Word | Excel | PowerPoint) not installed
break;
case
ConversionResult.ErrorUnableToOpenOfficeFile:
// Handle source file being locked or invalid permissions
break;
case
ConversionResult.ErrorUnableToAccessOfficeInterop:
// Handle Office 2007 (Word | Excel | PowerPoint) not installed
break;
case
ConversionResult.ErrorUnableToExportToXps:
// Handle Microsoft Save As PDF or XPS Add-In missing for 2007
break;
}

}
Download the Project from My Skydrive:
https://skydrive.live.com/?cid=841ACEE3077E04E5&id=841ACEE3077E04E5%21138
I would like to load a Word or Excel document into a window of a WPF application so that users can view or edit the document within the application. Is there any way to achieve that?
![]()
asked Dec 7, 2009 at 12:13
![]()
1
To simplify things what you can do is print the document to XPS which comes with office or Windows (can’t remember which) as a printer of the name «Microsoft XPS Document Writer».
Once you have the document, this can be displayed using a view of:
<DocumentViewer Name="docContent"/>
And simply set the document.
System.Windows.Xps.Packaging.XpsDocument doc
    = new System.Windows.Xps.Packaging.XpsDocument(
    "myDoc.xps", System.IO.FileAccess.Read);
docContent.Document = doc.GetFixedDocumentSequence();
For this to work you only need to reference «ReachFramework».
As for edit support you can use the XPS manipulation strategies provided by the XPS specification.
answered May 9, 2011 at 8:46
![]()
Brett RyanBrett Ryan
26.3k30 gold badges127 silver badges161 bronze badges
You add web browser control from toolbox and then load the Word document in it.
You can even open any document that browser support e.g. Word, Excel, PDF, SWF etc…
Example Load Word
webBrowser1.Navigate("C:\word.doc");
Example Load Excel
webBrowser1.Navigate("C:\excel.xls");
![]()
likeitlikeit
5,5155 gold badges40 silver badges56 bronze badges
answered Dec 7, 2009 at 12:18
![]()
Armen MkrtchyanArmen Mkrtchyan
9211 gold badge13 silver badges34 bronze badges
1
SpreadsheetGear for .NET comes with a .NET Windows Forms control which can easily be used in WPF applications to view and edit Excel documents.
You can download a free trial here if you want to try it yourself.
Disclaimer: I own SpreadsheetGear LLC
answered Dec 7, 2009 at 14:52
![]()
Joe EricksonJoe Erickson
7,0591 gold badge31 silver badges31 bronze badges
1
1 2 3 4 5 6 7 8 9 10 11 12 13 14 15 16 17 18 19 20 21 22 23 24 25 26 27 28 29 30 31 32 33 34 35 36 37 38 39 40 41 42 43 44 45 46 47 48 49 50 51 52 53 54 55 56 57 58 59 60 61 62 63 64 65 66 67 68 69 70 71 72 73 74 75 76 77 78 79 80 81 82 83 84 85 86 87 88 89 90 91 92 93 94 95 96 97 98 99 100 101 102 103 104 105 106 107 108 109 110 111 112 113 114 115 116 117 118 119 120 121 122 123 124 125 126 127 128 129 130 131 132 133 134 135 136 137 138 139 140 141 142 143 144 145 146 147 148 149 150 151 152 153 154 155 156 157 158 159 160 161 162 163 164 165 166 167 168 169 170 171 172 173 174 175 176 177 178 179 180 181 182 183 184 185 186 187 188 189 190 191 192 193 194 195 196 197 |
/// <summary> /// TO WORD /// </summary> Word.Application wrdApp; Word._Document wrdDoc; Object oMissing = System.Reflection.Missing.Value; Object oFalse = false; private void InsertLines(int LineNum) { int iCount; // Insert "LineNum" blank lines. for (iCount = 1; iCount <= LineNum; iCount++) { wrdApp.Selection.TypeParagraph(); } } private void FillRow(Word._Document oDoc, int Row, string Text1, string Text2, string Text3, string Text4) { // Insert the data into the specific cell. oDoc.Tables[1].Cell(Row, 1).Range.InsertAfter(Text1); oDoc.Tables[1].Cell(Row, 2).Range.InsertAfter(Text2); oDoc.Tables[1].Cell(Row, 3).Range.InsertAfter(Text3); oDoc.Tables[1].Cell(Row, 4).Range.InsertAfter(Text4); } private void button21_Click(object sender, RoutedEventArgs e) { Word.Selection wrdSelection; Word.MailMerge wrdMailMerge; Word.MailMergeFields wrdMergeFields; Word.Table wrdTable; string StrToAdd; // Create an instance of Word and make it visible. wrdApp = new Word.Application(); wrdApp.Visible = true; // Add a new document. wrdDoc = wrdApp.Documents.Add(ref oMissing, ref oMissing, ref oMissing, ref oMissing); wrdDoc.Select(); wrdSelection = wrdApp.Selection; wrdMailMerge = wrdDoc.MailMerge; // Create a MailMerge Data file. //CreateMailMergeDataFile(); // Create a string and insert it into the document. StrToAdd = "State UniversityrnElectrical Engineering Department"; wrdSelection.ParagraphFormat.Alignment = Word.WdParagraphAlignment.wdAlignParagraphCenter; wrdSelection.TypeText(StrToAdd); InsertLines(4); // Insert merge data. wrdSelection.ParagraphFormat.Alignment = Word.WdParagraphAlignment.wdAlignParagraphLeft; wrdMergeFields = wrdMailMerge.Fields; wrdMergeFields.Add(wrdSelection.Range, "FirstName"); wrdSelection.TypeText(" "); wrdMergeFields.Add(wrdSelection.Range, "LastName"); wrdSelection.TypeParagraph(); wrdMergeFields.Add(wrdSelection.Range, "Address"); wrdSelection.TypeParagraph(); wrdMergeFields.Add(wrdSelection.Range, "CityStateZip"); InsertLines(2); // Right justify the line and insert a date field // with the current date. wrdSelection.ParagraphFormat.Alignment = Word.WdParagraphAlignment.wdAlignParagraphRight; Object objDate = "dddd, MMMM dd, yyyy"; wrdSelection.InsertDateTime(ref objDate, ref oFalse, ref oMissing, ref oMissing, ref oMissing); InsertLines(2); // Justify the rest of the document. wrdSelection.ParagraphFormat.Alignment = Word.WdParagraphAlignment.wdAlignParagraphJustify; wrdSelection.TypeText("Dear "); wrdMergeFields.Add(wrdSelection.Range, "FirstName"); wrdSelection.TypeText(","); InsertLines(2); // Create a string and insert it into the document. StrToAdd = "Thank you for your recent request for next " + "semester's class schedule for the Electrical " + "Engineering Department. Enclosed with this " + "letter is a booklet containing all the classes " + "offered next semester at State University. " + "Several new classes will be offered in the " + "Electrical Engineering Department next semester. " + "These classes are listed below."; wrdSelection.TypeText(StrToAdd); InsertLines(2); // Insert a new table with 9 rows and 4 columns. wrdTable = wrdDoc.Tables.Add(wrdSelection.Range, 9, 4, ref oMissing, ref oMissing); // Set the column widths. wrdTable.Columns[1].SetWidth(51, Word.WdRulerStyle.wdAdjustNone); wrdTable.Columns[2].SetWidth(170, Word.WdRulerStyle.wdAdjustNone); wrdTable.Columns[3].SetWidth(100, Word.WdRulerStyle.wdAdjustNone); wrdTable.Columns[4].SetWidth(111, Word.WdRulerStyle.wdAdjustNone); // Set the shading on the first row to light gray. wrdTable.Rows[1].Cells.Shading.BackgroundPatternColorIndex = Word.WdColorIndex.wdGray25; // Bold the first row. wrdTable.Rows[1].Range.Bold = 1; // Center the text in Cell (1,1). wrdTable.Cell(1, 1).Range.Paragraphs.Alignment = Word.WdParagraphAlignment.wdAlignParagraphCenter; // Fill each row of the table with data. FillRow(wrdDoc, 1, "Class Number", "Class Name", "Class Time", "Instructor"); FillRow(wrdDoc, 2, "EE220", "Introduction to Electronics II", "1:00-2:00 M,W,F", "Dr. Jensen"); FillRow(wrdDoc, 3, "EE230", "Electromagnetic Field Theory I", "10:00-11:30 T,T", "Dr. Crump"); FillRow(wrdDoc, 4, "EE300", "Feedback Control Systems", "9:00-10:00 M,W,F", "Dr. Murdy"); FillRow(wrdDoc, 5, "EE325", "Advanced Digital Design", "9:00-10:30 T,T", "Dr. Alley"); FillRow(wrdDoc, 6, "EE350", "Advanced Communication Systems", "9:00-10:30 T,T", "Dr. Taylor"); FillRow(wrdDoc, 7, "EE400", "Advanced Microwave Theory", "1:00-2:30 T,T", "Dr. Lee"); FillRow(wrdDoc, 8, "EE450", "Plasma Theory", "1:00-2:00 M,W,F", "Dr. Davis"); FillRow(wrdDoc, 9, "EE500", "Principles of VLSI Design", "3:00-4:00 M,W,F", "Dr. Ellison"); // Go to the end of the document. Object oConst1 = Word.WdGoToItem.wdGoToLine; Object oConst2 = Word.WdGoToDirection.wdGoToLast; wrdApp.Selection.GoTo(ref oConst1, ref oConst2, ref oMissing, ref oMissing); InsertLines(2); // Create a string and insert it into the document. StrToAdd = "For additional information regarding the " + "Department of Electrical Engineering, " + "you can visit our Web site at "; wrdSelection.TypeText(StrToAdd); // Insert a hyperlink to the Web page. Object oAddress = "http://www.ee.stateu.tld"; Object oRange = wrdSelection.Range; wrdSelection.Hyperlinks.Add(oRange, ref oAddress, ref oMissing, ref oMissing, ref oMissing, ref oMissing); // Create a string and insert it into the document StrToAdd = ". Thank you for your interest in the classes " + "offered in the Department of Electrical " + "Engineering. If you have any other questions, " + "please feel free to give us a call at " + "555-1212.rnrn" + "Sincerely,rnrn" + "Kathryn M. Hinschrn" + "Department of Electrical Engineering rn"; wrdSelection.TypeText(StrToAdd); // Perform mail merge. //wrdMailMerge.Destination = Word.WdMailMergeDestination.wdSendToNewDocument; //wrdMailMerge.Execute(ref oFalse); wrdDoc.Saved = true; object fileName = "D:\daily_report.doc"; wrdDoc.SaveAs2(ref fileName, ref oMissing, ref oMissing, ref oMissing, ref oMissing, ref oMissing, ref oMissing, ref oMissing, ref oMissing, ref oMissing, ref oMissing); wrdDoc.Close(ref oFalse, ref oMissing, ref oMissing); wrdApp.Quit(ref oFalse, ref oMissing, ref oMissing); // Release References. wrdSelection = null; wrdMailMerge = null; wrdMergeFields = null; wrdDoc = null; wrdApp = null; // Clean up temp file. //System.IO.File.Delete("D:\DataDoc.doc"); } /// <summary> /// TO WORD (END) /// </summary> |
- Download source code — 213.2 KB
Table of Contents
- Introduction
- DOCX Overview
- Implementation
- DocxReader
- DocxToFlowDocumentConverter
- Using the Code
- Conclusion
Introduction
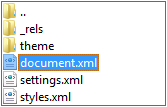
Word 2007 documents are Office Open XML Documents, a combination of XML architecture and ZIP compression used to store an XML and non-XML files together within a single ZIP archive. These documents usually have DOCX extension, but there are exceptions for macro enabled documents, templates etc.
This article will show how you can read and view a DOCX file in WPF with the use of only .NET Framework 3.0 (without using any 3rd party code).
DOCX Overview
A DOCX file is actually a zipped group of files and folders, called a package. Package consists of package parts (files that contain any type of data like text, images, binary, etc.) and relationships files. Package parts have a unique URI name and relationships XML files contain these URIs.
When you open the DOCX file with a zipping application, you can see the document structure and its package’s parts.
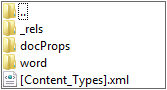
DOCX main content is stored in the package part document.xml, which is often located in word directory, but it does not have to be. To find out URI (location) of document.xml, we should read a relationships XML file inside the _rels directory and look for a relationship type http://schemas.openxmlformats.org/officeDocument/2006/relationships/officeDocument.
Document.xml file contains XML elements defined primarily in WordprocessingML XML namespace of Office Open XML specification. The basic structure of document.xml consists of a document (<document>) element which contains a body (<body>) element. Body element consists of one or more block level elements such as paragraph (<p>) elements. A paragraph contains one or more inline level elements such as run (<r>) elements. A run element contains one or more document’s text content elements such as text (<t>), page break (<br>) and tab (<tab>) elements.
Implementation
In short, to retrieve and display a DOCX text content, application will use two classes: DocxReader and its subclass DocxToFlowDocumentConverter.
DocxReader will unzip the file with the help of System.IO.Packaging namespace, find the document.xml file through the relationship and read it with XmlReader.
DocxToFlowDocumentConverter will convert the XML elements from XmlReader into a corresponding WPF’s FlowDocument elements.
DocxReader
DocxReader constructor first opens (unzips) the package from the DOCX file stream and retrieves the mainDocumentPart (document.xml) with the help of its PackageRelationship.
protected const string MainDocumentRelationshipType =
   "http://schemas.openxmlformats.org/officeDocument/2006/relationships/officeDocument";
private readonly Package package;
private readonly PackagePart mainDocumentPart;

public DocxReader(Stream stream)
{
    if (stream == null)
        throw new ArgumentNullException("stream");

    this.package = Package.Open(stream, FileMode.Open, FileAccess.Read);

    foreach (var relationship in
       this.package.GetRelationshipsByType(MainDocumentRelationshipType))
    {
        this.mainDocumentPart =
          package.GetPart(PackUriHelper.CreatePartUri(relationship.TargetUri));
        break;
    }
}
After retrieving the document.xml PackagePart, we can read it with .NET’s XmlReader class, a fast forward-only XML reader which has the same path trajectory as depth-first traversal algorithm in tree data structure.
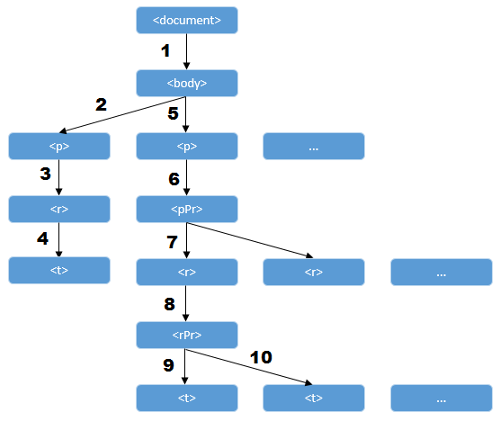
First path, 1 to 4, shows the simplest path in retrieving a text from the paragraph element. The second path, 5 — …, shows a more complex paragraph content. In this path, we will also read paragraph properties (<pPr>) and run properties (<rPr>) which contain various formatting options.
We create a series of reading methods for every element we wish to support in this path trajectory.
protected virtual void ReadDocument(XmlReader reader)
{
    while (reader.Read())
        if (reader.NodeType == XmlNodeType.Element && reader.NamespaceURI ==
          WordprocessingMLNamespace && reader.LocalName == BodyElement)
        {
            ReadXmlSubtree(reader, this.ReadBody);
            break;
        }
}

private void ReadBody(XmlReader reader) {...}
private void ReadBlockLevelElement(XmlReader reader) {...}
protected virtual void ReadParagraph(XmlReader reader) {...}
private void ReadInlineLevelElement(XmlReader reader) {...}
protected virtual void ReadRun(XmlReader reader) {...}
private void ReadRunContentElement(XmlReader reader) {...}
protected virtual void ReadText(XmlReader reader) {...}
To point out a few things you will notice in DocxReader reading methods:
- We use
XmlNameTableto store XML namespace, element and attribute names. This provides us with a better looking code but we also get better performance because now we can do an object (reference) comparisons on these strings rather than a more expensive string (value) comparison sinceXmlReaderwill use atomized strings fromXmlNameTablefor itsLocalNameandNamespaceURIproperties and because .NET uses string interning and cleverly implements string equality by first doing reference equality and then value equality. - We use
XmlReader.ReadSubtreemethod while passing theXmlReaderinto a specificDocxReaderreading method to create a boundary around that XML element.DocxReaderreading methods will now have access to only that specific XML element, rather than to the entire document.xml. Using this method has some performance penalty which we traded for more secure and intuitive code.
private static void ReadXmlSubtree(XmlReader reader, Action<XmlReader> action)
{
    using (var subtreeReader = reader.ReadSubtree())
    {

        subtreeReader.Read();

        if (action != null)
           action(subtreeReader);
    }
}
DocxToFlowDocumentConverter
This class inherits from the DocxReader and it overrides some of the reading methods of DocxReader to create a corresponding WPF’s FlowDocument element.
So, for example, while reading document element, we will create a new FlowDocument, while reading paragraph element we will create a new Paragraph element and while reading run element we will create a new Span element.
protected override void ReadDocument(XmlReader reader)
{
    this.document = new FlowDocument();
    this.document.BeginInit();
    base.ReadDocument(reader);
    this.document.EndInit();
}

protected override void ReadParagraph(XmlReader reader)
{
    using (this.SetCurrent(new Paragraph()))
        base.ReadParagraph(reader);
}

protected override void ReadRun(XmlReader reader)
{
    using (this.SetCurrent(new Span()))
        base.ReadRun(reader);
}
Also, this class implements setting some Paragraph and Span properties which are read from paragraph property element <pPr> and run property element <rPr>. While XmlReader is reading these property elements we have already created a new Paragraph or Span element and now we need to set their properties.
Because we are moving from the parent element (Paragraph) to child elements (Spans) and back to a parent, we will have to track our current element in the FlowDocument with a variable of type TextElement (an abstract base class for Paragraph and Span).
This is accomplished with a help of CurrentHandle and C# using statement syntactic sugar for try-finally construct. With a SetCurrent method we set a current TextElement and with a Dispose method will retrieve our previous TextElement and set it as the current TextElement.
private struct CurrentHandle : IDisposable
{
    private readonly DocxToFlowDocumentConverter converter;
    private readonly TextElement previous;

    public CurrentHandle(DocxToFlowDocumentConverter converter, TextElement current)
    {
        this.converter = converter;
        this.converter.AddChild(current);
        this.previous = this.converter.current;
        this.converter.current = current;
    }

    public void Dispose()
    {
        this.converter.current = this.previous;
    }
}

private IDisposable SetCurrent(TextElement current)
{
    return new CurrentHandle(this, current);
}
Using the Code
To get a FlowDocument all we need is to create a new DocxToFlowDocumentConverter instance from a DOCX file stream and call Read method on that instance.
After that, we can display the flow document content in WPF application using the FlowDocumentReader control.
using (var stream = File.Open(path, FileMode.Open, FileAccess.Read, FileShare.ReadWrite))
{
    var flowDocumentConverter = new DocxToFlowDocumentConverter(stream);
    flowDocumentConverter.Read();
    this.flowDocumentReader.Document = flowDocumentConverter.Document;
    this.Title = Path.GetFileName(path);
}
Conclusion
DOCX Reader is not a complete solution and is intended to be used for simple scenarios (without tables, lists, pictures, headers/footers, styles, etc.). This application can be enhanced to read more DOCX features, but to get a full DOCX support with all advanced features would require a lot more time and knowledge of DOCX file format. Hopefully, this article and accompanying application has shown you some insights into DOCX file format and might provide a basis for doing more complex DOCX related applications.