
Spreadsheets are the heart of data analysis and storage. Almost everyone uses spreadsheets at some point, for personal use or for business.
Our Syncfusion WPF Spreadsheet is an Excel-inspired control that allows you to create, view, edit, and format Microsoft Excel files without having Microsoft Excel installed. It provides an integrated ribbon to cover any possible business scenario. In addition, this control supports a built-in calculation engine with more than 400 widely used formulas. It was built with the .NET Excel Library (Essential XlsIO), which features a full-fledged object model similar to the Microsoft Office automation libraries.
In this blog, I will explain how to create, read, and edit an Excel file using our Syncfusion WPF Spreadsheet control.
Note: If you are new to our Spreadsheet control, then please read the Getting Started with WPF Spreadsheet documentation before proceeding.
Create a simple Spreadsheet project
The following steps illustrate how to create a simple Spreadsheet project in WPF:
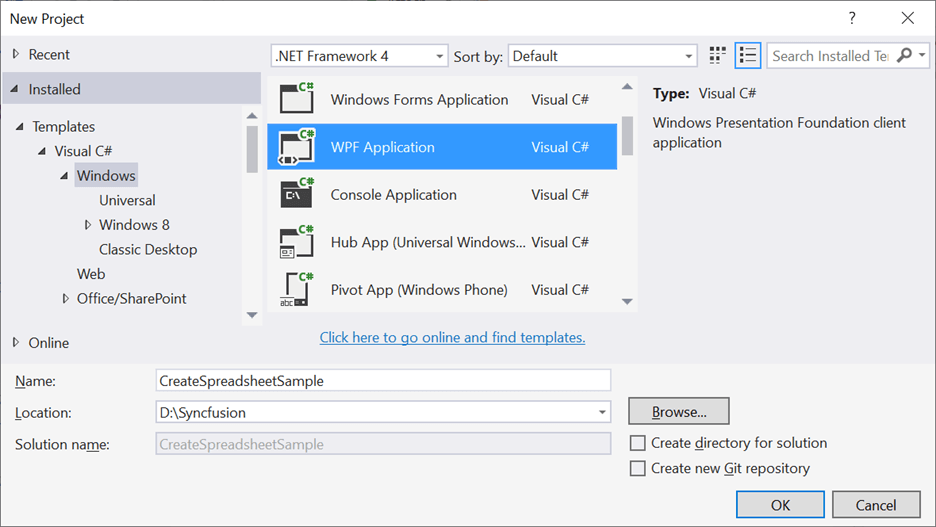
- First, open Visual Studio and select Create a New Project.
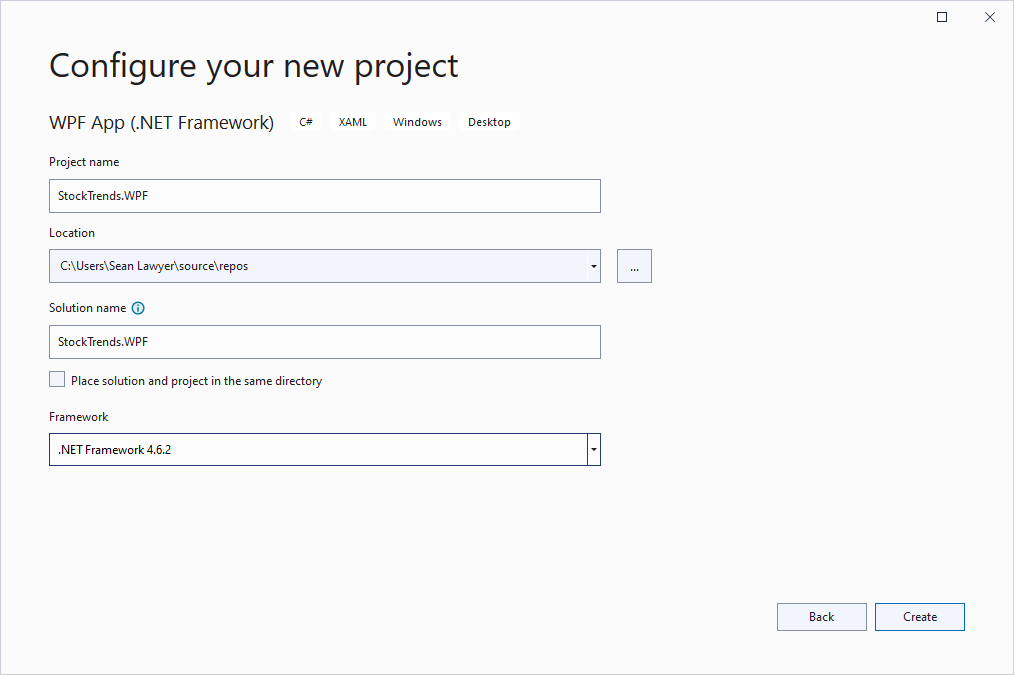
- Then, the New Project dialog will open. Choose WPF Application from the dropdown list and provide a name for your application. Refer to the following screenshot.

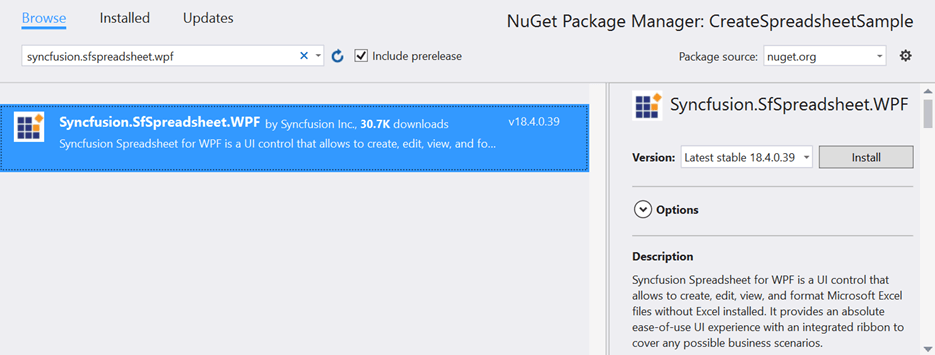
Create a New WPF Project - Now, install the Syncfusion.SfSpreadsheet.WPF NuGet package as a reference to your .NET Framework app from Nuget.org.

Install the Syncfusion.SfSpreadsheet.WPF NuGet Package The spreadsheet is available in the namespace Syncfusion.UI.Xaml.Spreadsheet and you can create it programmatically either by using the XAML or C# code.
- Next, add the SpreadsheetRibbon and bind the Spreadsheet as the DataContext to the SpreadsheetRibbon to make an interaction between the ribbon items and Spreadsheet.
- To add the SpreadsheetRibbon to your application, use the RibbonWindow since the backstage of the ribbon will open only when the ribbon is loaded under the RibbonWindow.
Refer to the following code.<syncfusion:RibbonWindow x:Class="SpreadsheetDemo.MainWindow" xmlns="http://schemas.microsoft.com/winfx/2006/xaml/presentation" xmlns:x="http://schemas.microsoft.com/winfx/2006/xaml" xmlns:d="http://schemas.microsoft.com/expression/blend/2008" xmlns:mc="http://schemas.openxmlformats.org/markup- compatibility/2006" xmlns:syncfusion="http://schemas.syncfusion.com/wpf" mc:Ignorable="d"> <syncfusion:SfSpreadsheetRibbon DataContext= "{Binding ElementName=spreadsheet}" /> <syncfusion:SfSpreadsheet x:Name="spreadsheet"/> </ syncfusion:RibbonWindow >
Now, we have created a simple WPF Spreadsheet project.
Create a new Excel workbook
You can create a new workbook by using the Create method. By default, a workbook will be created with a single worksheet. Use the following code to load the Spreadsheet workbook with a specified number of worksheets.
spreadsheetControl.Create(2);
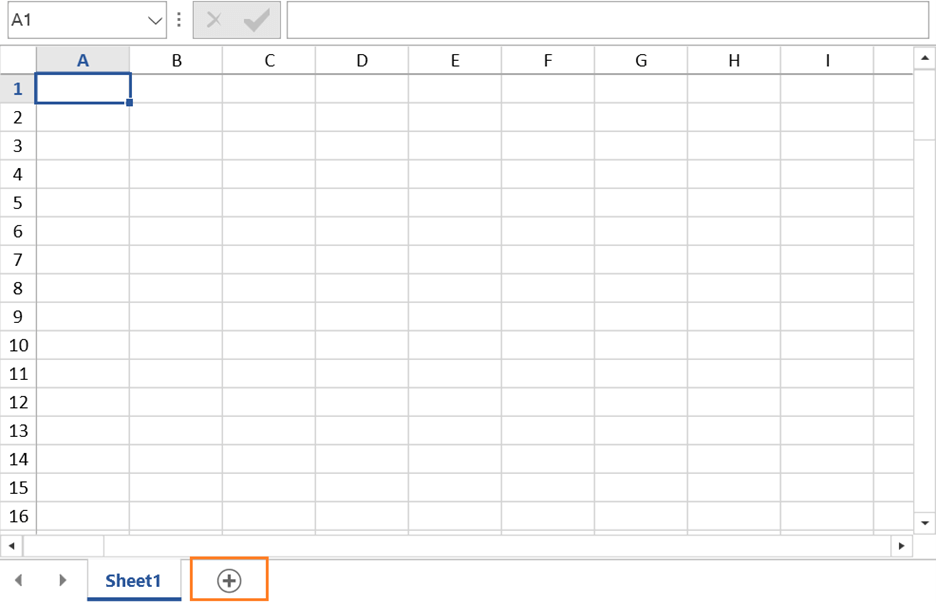
Also, you can add new worksheets on-demand in the WPF Spreadsheet control by clicking the AddNew button. Refer to the following screenshot.
View the existing Excel sheet
The following code snippet illustrates how to view Excel files using the WPF Spreadsheet control.
/// View the Excel file.
spreadsheetControl.Open (@"....DataGettingStarted.xlsx");
                   (or)
ExcelEngine excelEngine = new ExcelEngine();
IWorkbook workbook = excelEngine.Excel.Workbooks.Open(@"....DataGettingStarted.xlsx");
spreadsheetControl.Open(workbook);
                   (or)
using (FileStream fileStream = new FileStream(@"....Data GettingStarted.xlsx”, FileMode.Open))
{
     spreadsheetControl.Open(fileStream);
}
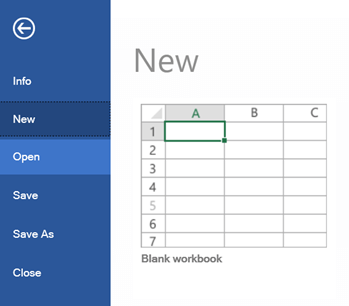
Also, you can open the existing Excel files by clicking Open in the SpreadsheetRibbon backstage, like in the following screenshot.
Edit the values in an Excel file
The Spreadsheet provides support for editing, so you can modify and commit the cell values in a workbook. The following code snippet illustrates how to edit data in an Excel file using the WPF Spreadsheet control.
/// Editing a specific cell value.
var range = spreadsheetControl.ActiveSheet.Range[2,2];
spreadsheetControl.ActiveGrid.SetCellValue(range, "Syncfusion");
spreadsheetControl.ActiveGrid.InvalidateCell(2,2);
Refer to the following screenshot.
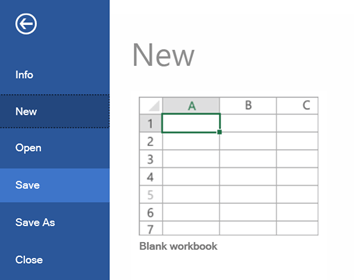
Saving an Excel sheet
You can save Excel workbooks using the Save() method. If the workbook already exists in the system drive, then it will be saved in the same location. Otherwise, the Save dialog box will open to let you save the workbook in a specified location.
Refer to the following code snippet.
/// Save the changes made in the file. If the file is not created yet, then it prompts to enter the filename to save.
spreadsheetControl.Save();

/// Save the changes made in the file using the SaveFileDialog.
spreadsheetControl.SaveAs();
Also, you can save the Excel files using Save or SaveAs in the ribbon backstage.
GitHub reference
You can download the complete sample from Create, View, Edit, and Save Excel Files Using WPF Spreadsheet demo.
Conclusion
Thanks for reading! In this blog post, we gave a quick overview of how to create, view, edit, and save Excel files using the Syncfusion WPF Spreadsheet control. This control also supports hyperlinks, bookmarks, encryption, localization, cell formatting, and more. Try out these versatile features and share your feedback in the comments section of this blog post!
The Spreadsheet control is also available in our ASP.NET (Core, MVC, Web Forms), JavaScript, Angular, React, Vue, UWP, WinForms, and WPF platforms.
If you are an existing Syncfusion user, please download the latest version from the License and Downloads page and try the new features for yourself. Also, our NuGet packages are available on NuGet.org.
If you aren’t a customer yet, you can try our 30-day free trial to check out these features. Also, try our other demos from this GitHub repository.
You can also contact us through our support forums, Direct-Trac, or feedback portal. We are always happy to assist you!
Related blogs
- How to Interact with the WPF Scheduler Using a Keyboard
- Enjoy 30+ New, Elegant Palettes in WPF Theme Studio
- Add, Edit, and Delete Cloud Shapes in PDF Files with Ease in WPF
- Simple Steps to Design a Temperature Monitor Using WPF Radial Gauge
Вообще такие вопросы нужно закрывать как слишком общие, всеми моими уговорами вы так и не разбили задачу на части и не написали, что конкретно в каждой маленькой части задачи у вас не получается. Я рискну вам ответить и расписать как разбить задачу на части и реализовать каждую часть.
Итак, для начала махом задача делится на две поменьше:
- Чтение данных из Excel
- Отображение данных в GUI
1. Чтение данных из Excel
Для удобства и ускорения отладки этой части проще сначала создать консольный проект, а не WPF. Именно так я и поступлю.
Первым делом вам необходимо создать модельные классы, экземпляры которых вы будете создавать на основе данных с листа Excel-книги. Я предположу, что у вас одна строка в таблице представляет собой один некий объект (если это не так — вы должны создать другие классы и структуры данных, более подходящие по смыслу):
public class Metric
{
    public int Alpha { get; set; }
    public int Beta { get; set; }
    public int Gamma { get; set; }
    public int Delta { get; set; }
}
Далее необходимо создать метод, который загрузит данные из Excel и вернет коллекцию экземпляров Metric. Нам нужен инструмент, для работы с Excel, я надеюсь, что вы используете более новый xlsx-формат книг, поэтому опишу как можно работать с ним. Я подключил из NuGet пакет ClosedXml (документация и примеры к нему лежат где-то здесь) и написал такой метод:
using ClosedXML.Excel;
using System.Collections.Generic;

...

static IEnumerable<Metric> EnumerateMetrics(string xlsxpath)
{
    // Открываем книгу
    using (var workbook = new XLWorkbook(xlsxpath))
    // Берем в ней первый лист
    using (var worksheet = workbook.Worksheets.Worksheet(1))
    {
        // Перебираем диапазон нужных строк
        for (int row = 2; row <= 3; ++row)
        {
            // По каждой строке формируем объект
            var metric = new Metric
            {
                Alpha = worksheet.Cell(row, 1).GetValue<int>(),
                Beta = worksheet.Cell(row, 2).GetValue<int>(),
                Gamma = worksheet.Cell(row, 3).GetValue<int>(),
                Delta = worksheet.Cell(row, 4).GetValue<int>(),
            };
            // И возвращаем его
            yield return metric;
        }
    }
}
Возможно вам потребуется помимо пути к файлу передавать в метод EnumerateMetrics также номер листа и координаты ячеек из которых нужно загрузить данные, я пока это всё «захардкодил».
Отлично, тестируем метод:
static void Main(string[] args)
{
    var metrics = EnumerateMetrics("Data.xlsx");
    foreach (var m in metrics)
        Console.WriteLine("Альфа: {0}; Бета: {1}; Гамма: {2}; Дельта: {3}",
            m.Alpha, m.Beta, m.Gamma, m.Delta);
    Console.ReadKey();
}
Ура! Эта часть работает нормально!
2. Отображение данных в GUI
Теперь можно наконец создать WPF проект и разметить главное окно. Я вас прошу, не нужно «рисовать контролы мышкой», пишите разметку вручную, от этого она будет лаконичнее, гибче, да и вам это пойдет на пользу — быстрее поймете смысл всего этого. Итак, нам нужен Grid с двумя колонками, в первую мы поместим DataGrid, а во вторую Button. Я не буду вам сейчас «забивать голову» MVVM и прочим, поэтому просто зададим контролам имена в разметке и подпишемся на событие клика по кнопке:
<Grid Margin="5">
    <Grid.ColumnDefinitions>
        <ColumnDefinition/>
        <ColumnDefinition Width="100"/>
    </Grid.ColumnDefinitions>

    <DataGrid Name="MetricsDataGrid" Margin="0,0,5,0"/>

    <Button Grid.Column="1" VerticalAlignment="Top"
            Padding="10,5" Click="Button_Click">
        <TextBlock TextAlignment="Center" TextWrapping="Wrap"
                   Text="Загрузить таблицу"/>
    </Button>
</Grid>
Вроде хорошо выглядит.
Теперь из прошлого проекта копируем в этот наш класс Metric и метод EnumerateMetrics, но, так как он не может существовать сам по себе, давайте создадим класс, например XlsxHelper и поместим этот метод в него и сделаем его публичным. Ну и не забудьте, конечно, подключить пакет ClosedXml.
Остается только воспользоваться ранее написанным кодом в обработчике клика по кнопке:
private void Button_Click(object sender, RoutedEventArgs e)
{
    var metrics = XlsxHelper.EnumerateMetrics("Data.xlsx").ToList();
    MetricsDataGrid.ItemsSource = metrics;
}
Ну и, чтобы колонки в DataGrid выглядели симпатичнее, отключим автогенерацию и создадим их вручную:
<DataGrid Name="MetricsDataGrid" Margin="0,0,5,0"
          AutoGenerateColumns="False">
    <DataGrid.Columns>
        <DataGridTextColumn Header="Альфа" Binding="{Binding Alpha}"/>
        <DataGridTextColumn Header="Бета" Binding="{Binding Beta}"/>
        <DataGridTextColumn Header="Гамма" Binding="{Binding Gamma}"/>
        <DataGridTextColumn Header="Дельта" Binding="{Binding Delta}"/>
    </DataGrid.Columns>
</DataGrid>

Microsoft Excel is an electronic spreadsheet that has become one of the most important and widely used software for storing, organizing and manipulating data. Be it a small medical store or the accounts department of a big enterprise, everybody uses Excel. Recently I came across a requirement where a customer had to programmatically read/write data to and from an Excel workbook file. In .NET, there are multiple ways to do so, right from using an interop assembly to using an OleDb connection API to read/write from and to Excel files.
To use an OLEDB connection in a WPF .NET app, the Office System Driver for Data Connectivity must be installed on your machine. The driver can be downloaded from here. If the .NET application uses an OleDb provider ‘Microsoft.ACE.OLEDB.12.0’ without installing this driver, the application will throw ‘the ‘microsoft.ace.oledb.12.0’ provider is not registered on the local machine’ exception.
Another important point to note is that, since the .NET application will read the data from Excel workbook which is managed by the Operating System filesystem, the workbook must be closed in order to successfully read or write data from it, else the .NET application throws an exception. If you want to keep the workbook open and yet want the .NET application to read the data from it, then the workbook must configured as a shared workbook.
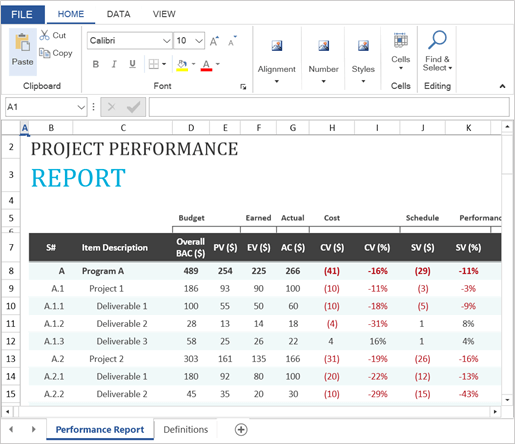
For our demo, create an Excel File (2010/2013) with the following Structure:

Make the workgroup shared as shown here:

The Sharing options are as follows:


The Sharing options must be set to synchronize changes from the Excel Worksheet to the .NET client application.
Step 1: Open Visual Studio 2012/2013 and create a new WPF application targeted to using the .NET 4.5 framework. Name the app as ‘WPF_Excel_Reader_Writer’. In the MainWindow.xaml add a DataGrid and a Button as shown here:
<Grid>
<Grid.RowDefinitions>
<RowDefinition Height=»272*»/>
<RowDefinition Height=»71*»/>
</Grid.RowDefinitions>
<Button Content=»Synchronize»
Name=»btnsync» Grid.Row=»1″
FontSize=»40″ FontFamily=»Times New Roman»
FontWeight=»ExtraBold»
/>
<DataGrid Name=»dgEmp» AutoGenerateColumns=»False» ColumnWidth=»*»
>
<DataGrid.Columns>
<DataGridTextColumn Header=»EmpNo» Binding=»{Binding EmpNo}»></DataGridTextColumn>
<DataGridTextColumn Header=»EmpName» Binding=»{Binding EmpName}»></DataGridTextColumn>
<DataGridTextColumn Header=»Salary» Binding=»{Binding Salary}»></DataGridTextColumn>
<DataGridTextColumn Header=»DeptName» Binding=»{Binding DeptName}»></DataGridTextColumn>
</DataGrid.Columns>
</DataGrid>
</Grid>
Step 2: To the project, add a new class file and name it as ‘DataAccess.cs’. Add the following code in it:
using System;
using System.Threading.Tasks;
using System.Data.OleDb;
using System.Collections.ObjectModel;
namespace WPF_Excel_Reader_Writer
{
public class Employee
{
public int EmpNo { get;set; }
public string EmpName { get; set; }
public int Salary { get; set; }
public string DeptName { get; set; }
}
public class DataAccess
{
OleDbConnection Conn;
OleDbCommand Cmd;
public DataAccess()
{
Conn = new OleDbConnection(«Provider=Microsoft.ACE.OLEDB.12.0;Data Source=F:\FromC\VS2013\WPF_45_DEMOS\Employee.xlsx;Extended Properties=»Excel 12.0 Xml;HDR=YES;»»);
}
/// <summary>
/// Method to Get All the Records from Excel
/// </summary>
/// <returns></returns>
public async Task<ObservableCollection<Employee>> GetDataFormExcelAsync()
{
ObservableCollection<Employee> Employees = new ObservableCollection<Employee>();
await Conn.OpenAsync();
Cmd = new OleDbCommand();
Cmd.Connection = Conn;
Cmd.CommandText = «Select * from [Sheet1$]»;
var Reader = await Cmd.ExecuteReaderAsync();
while (Reader.Read())
{
Employees.Add(new Employee() {
EmpNo = Convert.ToInt32(Reader[«EmpNo»]),
EmpName = Reader[«EmpName»].ToString(),
DeptName = Reader[«DeptName»].ToString(),
Salary = Convert.ToInt32(Reader[«Salary»])
});
}
Reader.Close();
Conn.Close();
return Employees;
}
/// <summary>
/// Method to Insert Record in the Excel
/// S1. If the EmpNo =0, then the Operation is Skipped.
/// S2. If the Employee is already exist, then it is taken for Update
/// </summary>
/// <param name=»Emp»></param>
public async Task<bool> InsertOrUpdateRowInExcelAsync(Employee Emp)
{
bool IsSave = false;
//S1
if (Emp.EmpNo != 0)
{
await Conn.OpenAsync();
Cmd = new OleDbCommand();
Cmd.Connection = Conn;
Cmd.Parameters.AddWithValue(«@EmpNo», Emp.EmpNo);
Cmd.Parameters.AddWithValue(«@EmpName», Emp.EmpName);
Cmd.Parameters.AddWithValue(«@Salary», Emp.Salary);
Cmd.Parameters.AddWithValue(«@DeptName», Emp.DeptName);
//S2
if (!CheckIfRecordExistAsync(Emp).Result)
{
Cmd.CommandText = «Insert into [Sheet1$] values (@EmpNo,@EmpName,@Salary,@DeptName)»;
}
else
{
if (Emp.EmpName != String.Empty || Emp.DeptName != String.Empty)
{
Cmd.CommandText = «Update [Sheet1$] set EmpNo=@EmpNo,EmpName=@EmpName,Salary=@Salary,DeptName=@DeptName where EmpNo=@EmpNo»;
}
}
int result = await Cmd.ExecuteNonQueryAsync();
if (result > 0)
{
IsSave = true;
}
Conn.Close();
}
return IsSave;
}
/// <summary>
/// The method to check if the record is already available
/// in the workgroup
/// </summary>
/// <param name=»emp»></param>
/// <returns></returns>
private async Task<bool> CheckIfRecordExistAsync(Employee emp)
{
bool IsRecordExist = false;
Cmd.CommandText = «Select * from [Sheet1$] where EmpNo=@EmpNo»;
var Reader = await Cmd.ExecuteReaderAsync();
if (Reader.HasRows)
{
IsRecordExist = true;
}
Reader.Close();
return IsRecordExist;
}
}
}
The code we just saw does the following:
-The Employee class is used to define attributes for the Employee object.
-The class DataAccess is used to interact with the Excel file using the following declarations:
- The connection and command objects are defined using OleDbConnection and OleDbCommand respectively.
- The constructor defines a connection string for the Excel file using Mictosoft.ACE.OLEDB.12.0 provider. Here the path of the Excel file passed to the connection string need to be changed as per the location of the Excel file.
- All methods are defined as async to make Async calls.
- The GetDataFromExcelAsync() method opens connection to the Excel file and reads data from the Worksheet with the name Sheet1. This methods returns an ObservableCollection.
- The method InsertOrUpdateRowInExcelAsync() method accepts an Employee objects. If the EmpNo from this object is zero(0) then the execution of the rest of the code of this method is skipped. This is just a simple check and you can customize is as per your business needs. This method calls the CheckIfRecordExistAsync() method which is responsible to check if the Employee record already exists. If yes, then the record is accepted for update, else a new record is created.
Step 3: We will now subscribe to the following events:
- Loaded event of the Window
- Click event of the button
- CellEditEnding, RowEditEnding and SelectionChanged events of the DataGrid
Step 4: Add the following code in the MainWindow.xaml.cs:
public partial class MainWindow : Window
{
//The object of the DataAccess class
DataAccess objDs;
public MainWindow()
{
InitializeComponent();
}
//The Employee Object for Edit
Employee emp = new Employee();
/// <summary>
/// On Load get data from the Excel
/// </summary>
/// <param name=»sender»></param>
/// <param name=»e»></param>
private void Window_Loaded(object sender, RoutedEventArgs e)
{
objDs = new DataAccess();
try
{
dgEmp.ItemsSource = objDs.GetDataFormExcelAsync().Result;
}
catch (Exception ex)
{
MessageBox.Show(ex.Message);
}
}
/// <summary>
/// TO Synchronize the Excel Workbook with the Application
/// </summary>
/// <param name=»sender»></param>
/// <param name=»e»></param>
private void btnsync_Click(object sender, RoutedEventArgs e)
{
try
{
dgEmp.ItemsSource = objDs.GetDataFormExcelAsync().Result;
}
catch (Exception ex)
{
MessageBox.Show(ex.Message);
}
}
/// <summary>
/// Read Data entered in each Cell
/// </summary>
/// <param name=»sender»></param>
/// <param name=»e»></param>
private void dgEmp_CellEditEnding(object sender, DataGridCellEditEndingEventArgs e)
{
try
{
FrameworkElement eleEno = dgEmp.Columns[0].GetCellContent(e.Row);
if (eleEno.GetType() == typeof(TextBox))
{
emp.EmpNo = Convert.ToInt32(((TextBox)eleEno).Text);
}
FrameworkElement eleEname = dgEmp.Columns[1].GetCellContent(e.Row);
if (eleEname.GetType() == typeof(TextBox))
{
emp.EmpName = ((TextBox)eleEname).Text;
}
FrameworkElement eleSal = dgEmp.Columns[2].GetCellContent(e.Row);
if (eleSal.GetType() == typeof(TextBox))
{
emp.Salary = Convert.ToInt32(((TextBox)eleSal).Text);
}
FrameworkElement eleDname = dgEmp.Columns[3].GetCellContent(e.Row);
if (eleDname.GetType() == typeof(TextBox))
{
emp.DeptName = ((TextBox)eleDname).Text;
}
}
catch (Exception ex)
{
MessageBox.Show(ex.Message);
}
}
/// <summary>
/// Get the Complete row
/// </summary>
/// <param name=»sender»></param>
/// <param name=»e»></param>
private void dgEmp_RowEditEnding(object sender, DataGridRowEditEndingEventArgs e)
{
try
{
bool IsSave = objDs.InsertOrUpdateRowInExcelAsync(emp).Result;
if (IsSave)
{
MessageBox.Show(«Record Saved Successfully»);
}
else
{
MessageBox.Show(«Problem Occured»);
}
}
catch (Exception ex)
{
MessageBox.Show(ex.Message);
}
}
/// <summary>
/// Select the Recod for the Update
/// </summary>
/// <param name=»sender»></param>
/// <param name=»e»></param>
private void dgEmp_SelectionChanged(object sender, SelectionChangedEventArgs e)
{
emp = dgEmp.SelectedItem as Employee;
}
}
The code has the following specifications:
- The Loaded event makes call to GetDataFromExcelAsync() method from the DataAccess class. The result returned from the method is then displayed in the DataGrid using ItemsSource property
- In the SelectionChanged implementation, the Employee object is generated which will be used for update
- The CellEditEnding implementation is used to read the cell value entered in the specific row of the DataGrid. These values will be put in the Employee object. This object will then be used to insert or update in the Excel Worksheet
- The RowEditEnding implementation will make a call to the InsertOrUpdateRowInExcelAsync() method and pass an Employee to it for inserting or updating
- Clicking the button will retrieve the latest data from the worksheet and display it in the DataGrid
Step 5: Run the application. You will see the following:

To test synchronization, add a new record in Excel and click on the ‘Synchronize’ button. The newly added record will be as shown below:

(that’s the best straight row highlighting I could do after 3 attempts  )
)
Since the Workbook is shared, the data entered in the worksheet of the workbook can be directly synchronized even when the workbook is open.
Similarly enter a record in the DataGrid Row. When you click on the next row or the current row loses focus, the record will be saved in the Worksheet as shown here.

To verify, close the application and reopen the Excel file. The newly added record will be displayed in Excel as shown here:

And that’s how using WPF, we can Read and Write Data to Excel files.
Conclusion: We just saw that if Excel files are used as a data store, using OleDb features the data from the Workgroup can be read and manipulated in a WPF .NET application.
Download the entire source code of this article (Github)
This article has been editorially reviewed by Suprotim Agarwal.

C# and .NET have been around for a very long time, but their constant growth means there’s always more to learn.
We at DotNetCurry are very excited to announce The Absolutely Awesome Book on C# and .NET. This is a 500 pages concise technical eBook available in PDF, ePub (iPad), and Mobi (Kindle).
Organized around concepts, this Book aims to provide a concise, yet solid foundation in C# and .NET, covering C# 6.0, C# 7.0 and .NET Core, with chapters on the latest .NET Core 3.0, .NET Standard and C# 8.0 (final release) too. Use these concepts to deepen your existing knowledge of C# and .NET, to have a solid grasp of the latest in C# and .NET OR to crack your next .NET Interview.
Click here to Explore the Table of Contents or Download Sample Chapters!

Mahesh Sabnis is a DotNetCurry author and a Microsoft MVP having over two decades of experience in IT education and development. He is a Microsoft Certified Trainer (MCT) since 2005 and has conducted various Corporate Training programs for .NET Technologies (all versions), and Front-end technologies like Angular and React. Follow him on twitter @maheshdotnet or connect with him on LinkedIn
“
Давайте расширим свои представления об Excel, посмотрим на него изнутри, а заодно дополним наше приложение функцией экспорта. Поехали!
Для успешного освоения материала рекомендуем вам изучить следующие понятия:
DB (Database), БД. Организованная структура, предназначенная для хранения, изменения и обработки взаимосвязанной информации, преимущественно больших объемов
Windows Presentation Foundation. Аналог WinForms, система для построения клиентских приложений Windows с визуально привлекательными возможностями взаимодействия с пользователем, графическая (презентационная) подсистема в составе .NET Framework (начиная с версии 3.0), использующая язык XAML
Демонстрация работы с таблицами Excel в WPF
На данном занятии будет реализована возможность экспорта данных из приложения для визуализации расходов пользователей в таблицу Excel. Расходы каждого пользователя будут экспортироваться в отдельный лист, названием которого будет ФИО пользователя. Расходы будут распределены по категориям, причем по каждой категории будут указываться общие затраты. Основные шаги построения приложения:
- Предварительные шаги
- Реализация экспорта
- Проверка корректной работы приложения
1. Подключаем библиотеку для работы с Excel


Важно
Для экспорта данных в Excel используется библиотека Interop. Excel (Object library), расположенная во вкладке COM
2. Добавляем кнопку экспорта

Важно
Экспорт данных в Excel будет осуществляться с помощью кнопки «Экспорт в Excel»
3. Подключаем пространство имен для работы с Excel

Важно
Требуемое пространство имен подключается с помощью директивы using
1. Получаем список пользователей

Важно
Список пользователей выгружается из базы данных, причем сразу производится сортировка по ФИО
2. Создаем новую книгу Excel

Важно
Объявляем переменную с приложением Excel, указывая количество листов (sheets) равным количеству пользователей в БД. Также добавляем рабочую книгу (workbook)

Важно
В цикле по списку пользователей выбирается текущий лист. Текущему листу присваивается ФИО текущего пользователя. Следует обратить внимание, что строки в Excel начинаются с 1, потому счетчик строк startRowIndex=1
4. Добавляем название колонок

Важно
Название столбцов добавляется в верхнюю строчку листа, после чего увеличивается значение счетчика startRowIndex. Следует обратить внимание, что при обращении к ячейке сначала указывается номер ее столбца, а затем — номер строки
5. Сгруппируем платежи по категориям

Важно
Платежи текущего пользователя группируются с помощью GroupBy и сортируются по дате и названию категории
6. Настраиваем отображение названий категорий

Важно
Название каждой категории помещается в объединенную ячейку, выравнивается по центру и отображается курсивом. Далее идет переход к следующей строке
7. Добавляем информацию о платежах

Важно
В цикле по платежам для каждой категории заносим в ячейки таблицы текущей строки дату платежа (в заданном формате), наименование платежа, цену и количество платежей данного типа
8. Рассчитываем величину платежа каждой категории

Важно
Чтобы Excel автоматически пересчитывал сумму платежа при изменении количества или цены платежа, следует рассчитывать сумму не в коде, а прямо в ячейке Excel, добавляя туда формулу для расчета. Также для денежных значений можно установить числовой формат
9. Добавляем название к ячейкам для хранения общих затрат

Важно
Название ячейки Итого помещается в объединенную ячейку (1−4 столбец)
10. Рассчитываем величину общих затрат

Важно
Для расчета начального значения диапазона ячеек, учитываемого при расчете, из номера текущей строки вычитается общее количество платежей в рамках категории. Далее величина итоговой суммы выделяется жирным шрифтом и к ней применяется денежный формат
11. Завершаем оформление таблицы и реализацию приложения

Важно
Оформление включает в себя: добавление границ (внешних и внутренних), установку автоширины всех столбцов листа. Последняя строчка разрешает отобразить таблицу по завершении экспорта
Проверка корректной работы приложения

Важно
Экспорт данных производится по нажатию на кнопку «Экспорт в Excel»
2. Проводим анализ корректности работы

Важно
На всех листах, кроме первого, видна ошибка с индексацией: значения вставлены не в те строки

Важно
Ошибка состояла в том, что счетчик текущей строки был задан перед циклом по всем пользователям. Для устранения ошибки достаточно перенести определение счетчика внутрь этого цикла

“
Вы познакомились с основными программными методами работы с таблицами Excel в WPF. Теперь давайте перейдем от теории к практике!
Для закрепления полученных знаний пройдите тест
Выберите неверное утверждение относительно работы с таблицами Excel:
Нумерация строк таблиц Excel начинается с единицы
Обращение к ячейке начинается с указания номера строки
Расчет результата в коде не позволит автоматический его пересчет при изменении количества слагаемых в Excel
Переменная startRowIndex объявлена до цикла по всем пользователям и равняется двум. Выберите верный номер строки, в которой окажутся названия колонок для второго пользователя:
Выбор формата записи значений платежей осуществляется в рамках цикла по всем платежам внутри категории. Какое изменение требуется внести в код, чтобы записать цену отдельных платежей в числовом формате?
worksheet.Cells[startRowIndex][3].NumberFormat = «#,###.00»;
worksheet.Cells[3][startRowIndex].NumberFormat = «#,###.00»;
worksheet.Cells[5][startRowIndex].NumberFormat = «#,###.00»;
worksheet.Cells[startRowIndex][5].NumberFormat = «#,###.00»;
К сожалению, вы ответили неправильно
Прочитайте лекцию и посмотрите видео еще раз
Но можно лучше. Прочитайте лекцию и посмотрите видео еще раз
Вы отлично справились. Теперь можете ознакомиться с другими компетенциями
На чтение 1 мин Просмотров 1.2к. Опубликовано 04.12.2020
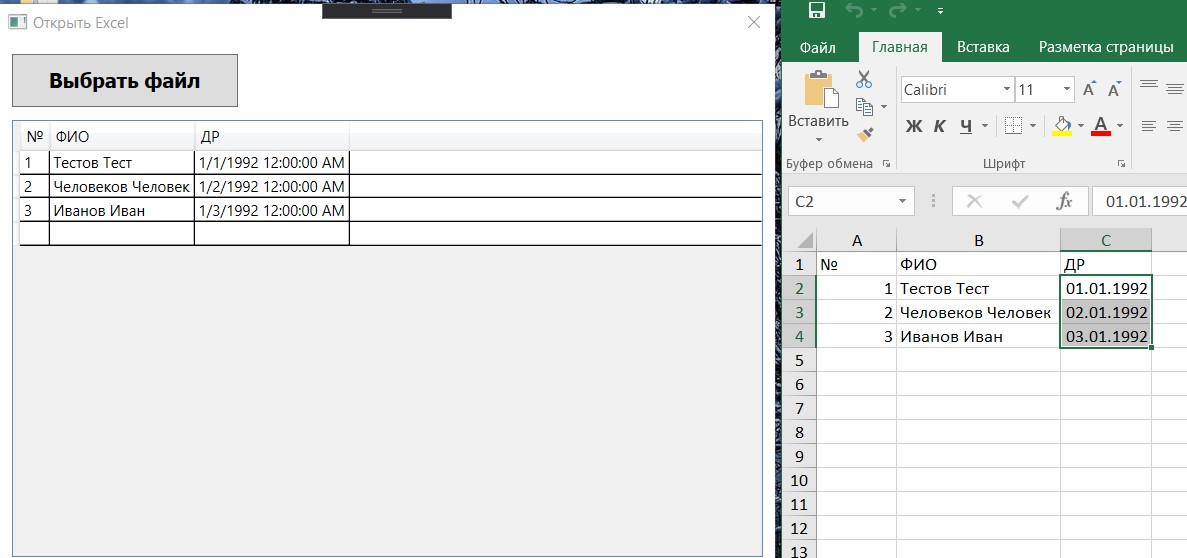
В этой статье я хочу создать простое приложение для импорта данных из excel таблицы в DataGrid.
- Приложение будет состоять из двух элементов: кнопки для выбора файла и таблицы DataGrid для отображения полученных данных.

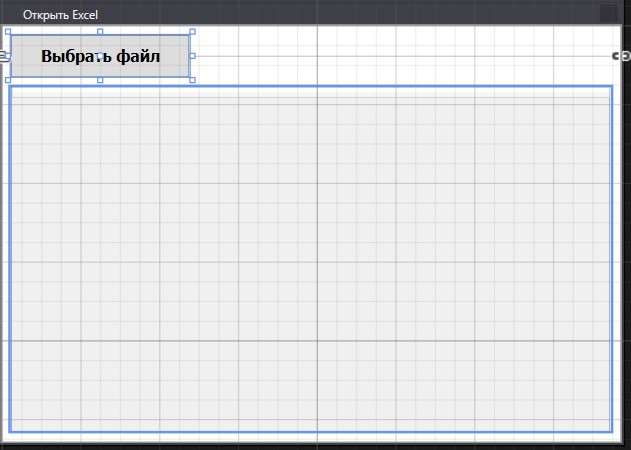
MainWindows.xaml
|
1 2 3 4 5 6 7 8 9 10 11 12 13 14 15 16 17 18 19 20 21 22 23 24 25 26 27 28 |
<Window x:Class=«WPFExcelView.MainWindow» xmlns=«http://schemas.microsoft.com/winfx/2006/xaml/presentation» xmlns:x=«http://schemas.microsoft.com/winfx/2006/xaml» xmlns:d=«http://schemas.microsoft.com/expression/blend/2008» xmlns:mc=«http://schemas.openxmlformats.org/markup-compatibility/2006» xmlns:local=«clr-namespace:WPFExcelView» mc:Ignorable=«d» Title=«DataGrid For Excel» Height=«556.647» Width=«973.637» ResizeMode=«NoResize»> <StackPanel> <Button x:Name=«OpenExcel» Content=«Выбрать файл» HorizontalAlignment=«Left» VerticalAlignment=«Top» Height=«43» FontFamily=«Tahoma» FontSize=«16» Margin=«10,10,0,0» FontWeight=«Bold» Cursor=«Hand» Click=«OpenExcel_Click» Width=«181»/> <DataGrid x:Name=«DbGrig» ItemsSource=«{Binding}» Margin=«10» Height=«444» /> </StackPanel> </Window> |
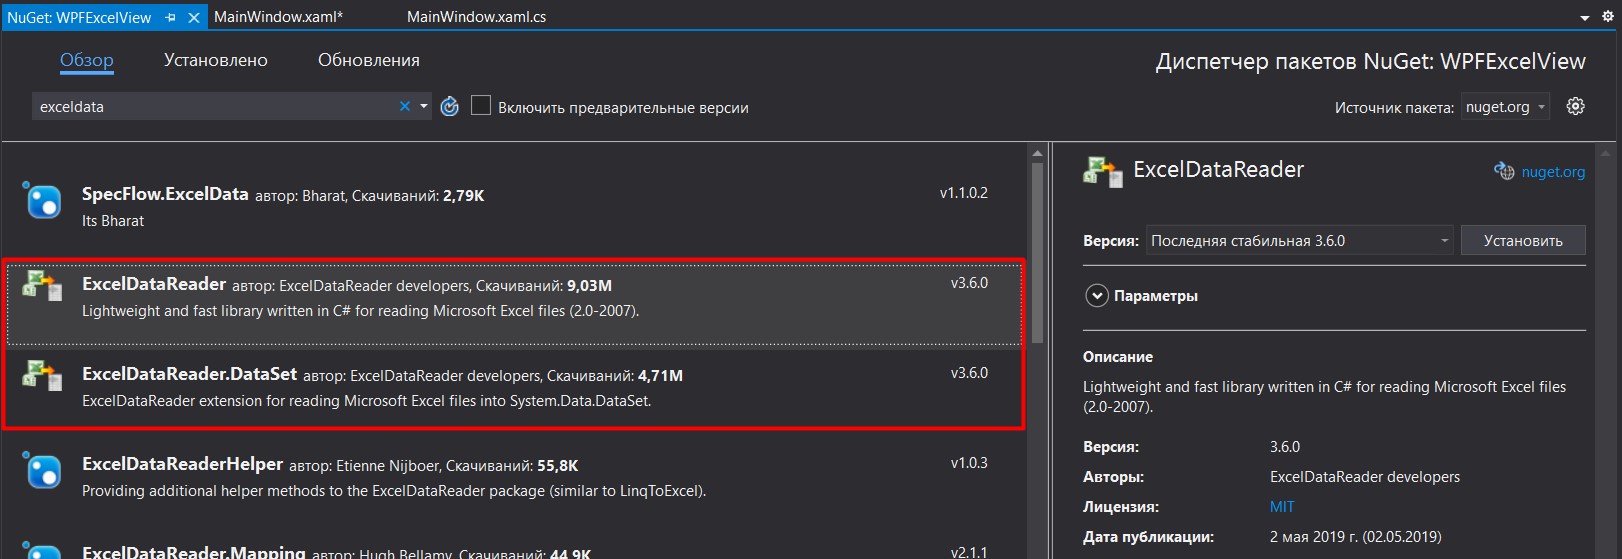
2. Для чтения excel файлов я использовал две библиотеки ExcelDataReader и ExcelDataReader.DataSet. Скачать их можно через диспетчер пакетов NuGet.
3. Функционал приложения описан в файле MainWindows.xaml.cs.
MainWindows.xaml.cs
|
1 2 3 4 5 6 7 8 9 10 11 12 13 14 15 16 17 18 19 20 21 22 23 24 25 26 27 28 29 30 31 32 33 34 35 36 37 38 39 40 41 42 43 44 45 46 47 48 49 50 51 52 53 54 55 56 57 58 59 |
using System.Windows; using Microsoft.Win32; using ExcelDataReader; using System.Data; using System.IO; namespace WPFExcelView { public partial class MainWindow : Window { IExcelDataReader edr; public MainWindow() { InitializeComponent(); } private void OpenExcel_Click(object sender, RoutedEventArgs e) { OpenFileDialog openFileDialog = new OpenFileDialog(); openFileDialog.Filter = «EXCEL Files (*.xlsx)|*.xlsx|EXCEL Files 2003 (*.xls)|*.xls|All files (*.*)|*.*»; if (openFileDialog.ShowDialog() != true) return; DbGrig.ItemsSource = readFile(openFileDialog.FileName); } private DataView readFile(string fileNames) { var extension = fileNames.Substring(fileNames.LastIndexOf(‘.’)); // Создаем поток для чтения. FileStream stream = File.Open(fileNames, FileMode.Open, FileAccess.Read); // В зависимости от расширения файла Excel, создаем тот или иной читатель. // Читатель для файлов с расширением *.xlsx. if (extension == «.xlsx») edr = ExcelReaderFactory.CreateOpenXmlReader(stream); // Читатель для файлов с расширением *.xls. else if (extension == «.xls») edr = ExcelReaderFactory.CreateBinaryReader(stream); //// reader.IsFirstRowAsColumnNames var conf = new ExcelDataSetConfiguration { ConfigureDataTable = _ => new ExcelDataTableConfiguration { UseHeaderRow = true } }; // Читаем, получаем DataView и работаем с ним как обычно. DataSet dataSet = edr.AsDataSet(conf); DataView dtView = dataSet.Tables[0].AsDataView(); // После завершения чтения освобождаем ресурсы. edr.Close(); return dtView; } } } |
Готовое приложение
Полезные ссылки:
- ExcelDataReader
- ExcelDataReader примеры использования
In the current article I proudly present a simple application, which creates a simple Excel file from XAML. In the example I present I am using Excel 2010 as this is my current version. In order to be able to create an excel application from WPF, we should enable the usage of some COM libraries . This is done through the following steps:
1. Go to “References” and click the right button -> Add Reference;
2. In the menu which appears, select “Microsoft Excel 14.0 Object Library” (the library can vary depending on your excel version. Excel 14.0 is for Excel 2010. Here you may find the other excel versions. As you see – Excel 2007 is version 12.0, Excel 2013 is version 15.
3. Simply click “OK”.

After adding the COM library you get access to a few nice features. The XAML code of our application is simple – it is just a button with method. Anyway, here it comes:
|
<Window x:Class=«ExcelInWPF.MainWindow» xmlns=«http://schemas.microsoft.com/winfx/2006/xaml/presentation» xmlns:x=«http://schemas.microsoft.com/winfx/2006/xaml» Title=«VitoshAcademy» Height=«350» Width=«525»> <Grid> <Button Width=«Auto» Margin=«50» Click=«GenerateExcelFile»>Generate Excel File</Button> </Grid> </Window> |
With the code behind, taking care for the execution of the program, the code looks as follows:
|
1 2 3 4 5 6 7 8 9 10 11 12 13 14 15 16 17 18 19 20 21 22 23 24 25 26 27 28 29 30 31 32 33 34 35 36 37 38 39 40 41 |
using System; using System.Windows; using System.Windows.Controls; using Microsoft.Office.Interop.Excel; namespace ExcelInWPF { /// <summary> /// Interaction logic for MainWindow.xaml /// </summary> public partial class MainWindow : System.Windows.Window { public MainWindow() { InitializeComponent(); } private void GenerateExcelFile(object sender, RoutedEventArgs e) { Microsoft.Office.Interop.Excel.Application app = new Microsoft.Office.Interop.Excel.Application(); app.Visible = true; app.WindowState = XlWindowState.xlMaximized; Workbook wb = app.Workbooks.Add(XlWBATemplate.xlWBATWorksheet); Worksheet ws = wb.Worksheets[1]; DateTime currentDate = DateTime.Now; ws.Range[«A1:A3»].Value = «Who is number one? :)»; ws.Range[«A4»].Value = «vitoshacademy.com»; ws.Range[«A5»].Value = currentDate; ws.Range[«B6»].Value = «Tommorow’s date is: =>»; ws.Range[«C6»].FormulaLocal = «= A5 + 1»; ws.Range[«A7»].FormulaLocal = «=SUM(D1:D10)»; for (int i = 1; i <= 10; i++) ws.Range[«D» + i].Value = i * 2; wb.SaveAs(«C:\Temp\vitoshacademy.xlsx»); } } } |
What do we have here? From the beginning, a new namespace:
|
using Microsoft.Office.Interop.Excel; |
Then in the method for file generation we have something familiar for those who have code experience with VBA for Excel. With the first three lines we create an Excel application, make it visible and we maximize it. Then we create a workbook and we name it in the same line. The first worksheet of the workbook is also named. Thus, so far we have named the excel application (app), the workbook (wb) and the first worksheet (ws). Then we create a variable of type DateTime, naming it currentDate. Using the “ws.Range[“”] we set values for the different excel boxes. We use formulas and even a loop. At the end we save everything in the path “CTemp and the file is named “vitoshacademy.xlsx”. The usage of double slash (“\”) is needed, because the single one acts as a comment in C#, and the double one neutralizes it.
In short, that is it. If you want to see this example, you may try it out here – ExcelInWPF.
Содержание
- How to Import and Export Excel Spreadsheets with C# and WPF
- Building a WPF Application
- Defining the User Interface for the WPF Application
- Importing an Excel File into the Spreadsheet Component
- Exporting an Excel File from Spread. NET
- Retrieving Historical Stock Data
- Adding Stock Data to the Spreadsheet
- Creating Sparkline Charts from the Data Source
- How to open an Excel file and view in WPF?
- 3 Answers 3
- Wpf работа с excel
How to Import and Export Excel Spreadsheets with C# and WPF
When working in a business setting, specifically in finance, it is common to monitor stocks. When making decisions, it is essential to know where the market was, where it is now, and where it may be heading. Therefore, you’ll need the ability to import data concerning these stocks, effectively evaluate the data, and then make clear, educated decisions. Not to mention exporting the data for your clients or end-users so they can visualize and understand all the data easily.
This article will demonstrate using Spread.NET to build an application with Windows Presentation Foundation (WPF) in VB or C#. The application is responsible for importing and retrieving three months’ worth of closing price history for various stock symbols via an Excel spreadsheet import process, then exporting an Excel spreadsheet containing the new data.
Here are the seven steps to importing and exporting Excel spreadsheets with WPF in VB or C#:
This application aims to allow the user to provide a series of stock symbols by importing an external Excel document. The application then processes these symbols.
- It will retrieve each of the stocks’ three-month closing price history via a REST API
- The historical data retrieved from the API will be displayed alongside the symbol in the spreadsheet component
- We’ll add a visualization of the stock price history using an inline Sparkline chart
- After processing, the user can export the resulting data into a new Excel document
Let’s get started building the app!
Building a WPF Application
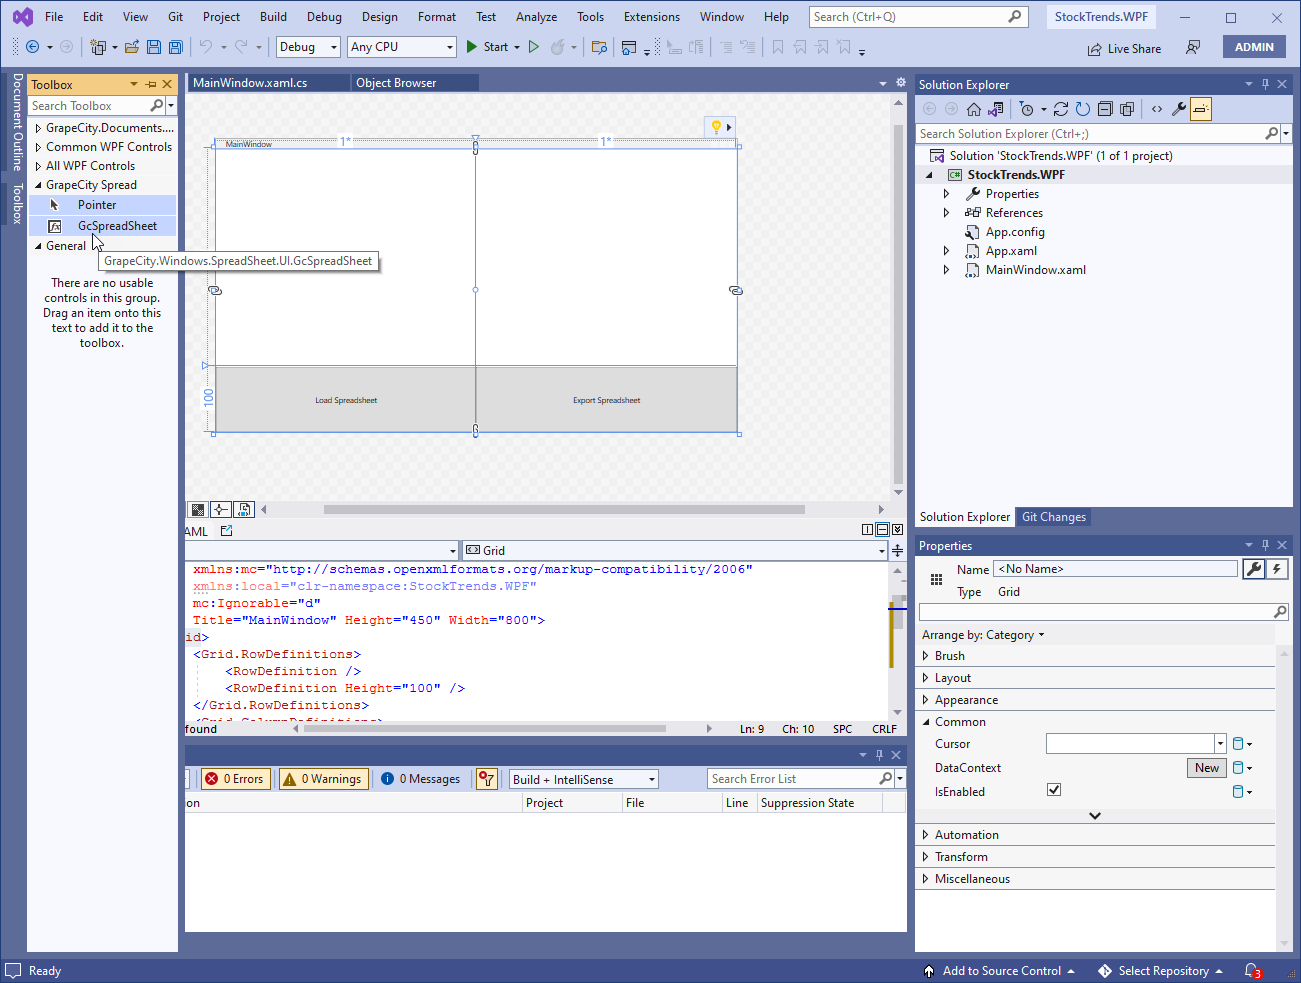
First, you’ll need to download and install the trial version of Spread.NET. Be sure to include the WPF controls when installing. After the installation process has been completed, open Visual Studio 2022 and create a new WPF (.Net Framework) desktop application project. I named my project StockTrends.WPF:
Once the solution has completed loading in Visual Studio, open MainWindow.xaml in the editor, then open the Visual Studio Toolbox (CTRL+ALT+X). You should see a Toolbox section named GrapeCity Spread:
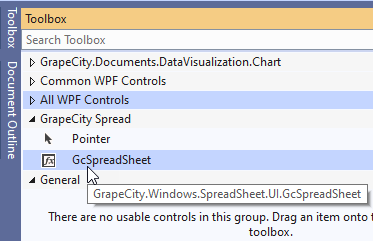
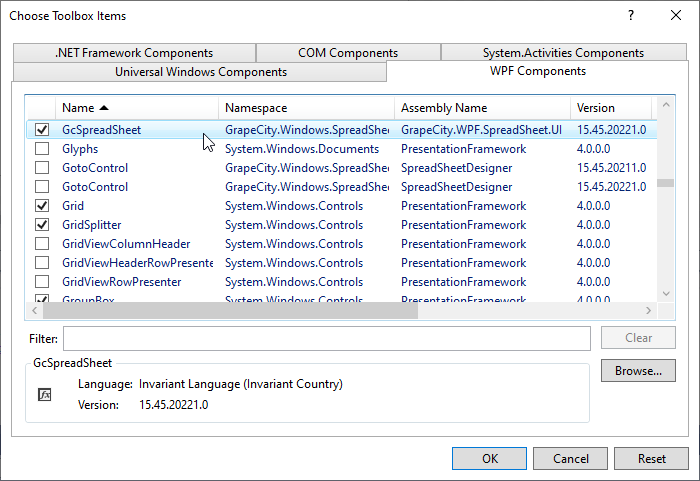
If you don’t see this section, you will need to add the spreadsheet component to the toolbox manually – luckily, you’ll only ever have to do this once. Add the component by right-clicking in the Toolbox panel, and from the menu, select Choose Items, scroll through the list, and find and place a checkmark next to the GcSpreadSheet component located in the GrapeCity.WPF.SpreadSheet.UI namespace and press the OK button:
Now you will have the GcSpreadSheet control available to drag and drop from the toolbox onto your XAML documents.
Defining the User Interface for the WPF Application
We will create a simple window that consists of two rows to satisfy the requirements of our WPF application. The first row consists of a large area that houses the Spread.NET spreadsheet component. Below are two buttons: one to import the symbols spreadsheet and one to export the results after processing.
With MainWindow.xaml open in the Visual Studio editor, replace the existing Grid element with the following markup:
MainPage.xaml Grid definition
The designer window will now look similar to the following:
Next, drag the GcSpreadSheet component from the Toolbox (CTRL+ALT+X) and drop it into the first cell of the grid:
The first time you try to create the GcSpreadsheet control, the reference for the GcSpreadsheet will be added to the project, and the designer will need to restart and show this dialog:
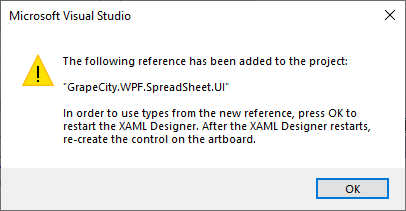
Don’t worry about this; it’s normal behavior in the latest VS2022 XAML editor. Close that dialog and drag and drop the GcSpreadsheetone more time to add it to the page.
Edit the XAML element representing the spreadsheet component so that it matches the following:
XAML for GcSpreadsheet element
The designer will now look similar to the following:
Importing an Excel File into the Spreadsheet Component
The first piece of functionality to implement is importing an external Excel file into the Spread.NET spreadsheet component. This Excel spreadsheet contains a list of stock symbols to process in the application.
Implement this functionality using the OpenFileDialog class from the Microsoft.Win32 namespace. This class adds filters to the dialog, so the user can quickly select from existing Excel (*.XLSX) documents. Once a file is selected, the spreadsheet is loaded into the spreadsheet component using a single line of code!
In the MainWindow.xaml designer, double-click on the Load Spreadsheet button to implement the click handler. Implement the code as follows:
BtnLoadSpreadsheet_Click C#
BtnLoadSpreadsheet_Click VB
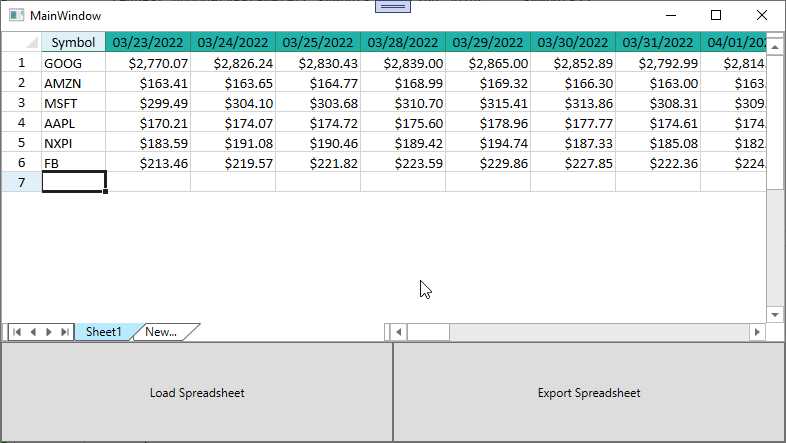
Next, create a simple spreadsheet in Excel that contains a list of stock symbols. This document consists of a single worksheet with one column. In this column, enter a stock symbol for processing. For this example, we’re not doing any data cleansing or error processing so that we can focus on the application code itself. Some rules about how the spreadsheet should be formatted: just one ticker symbol per row and enter only valid ticker symbols.
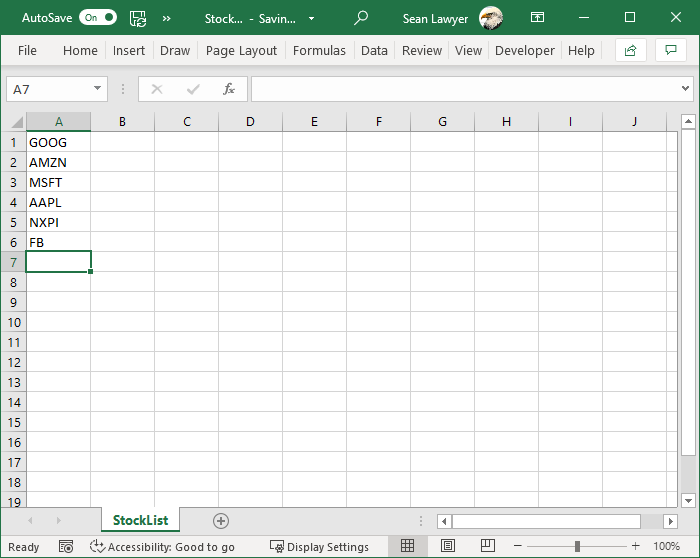
Run the application and select the Excel file just created. The file is imported and displayed in the spreadsheet control of the application.

Exporting an Excel File from Spread. NET
Now that the import process is functioning, we can move on to implementing the export functionality. We will be using the SaveFileDialog class located in the Microsoft.Win32 namespace because it can set extension filters in the dialog. The ability to export an Excel document from the Spread.NET component is also a simple process, accomplished with – (you got it) – a single line of code!
In the MainWindow.xaml designer, double-click on the Export Spreadsheet button to implement the click event handler code. Implement the handler code as follows:
btnExportSpreadsheet_Click C#
btn_ExportSpreadsheet_Click VB
Run the application once more, load the Stock Price spreadsheet once again, then press the Export Spreadsheet button to save a copy of the displayed spreadsheet onto your computer.
Retrieving Historical Stock Data
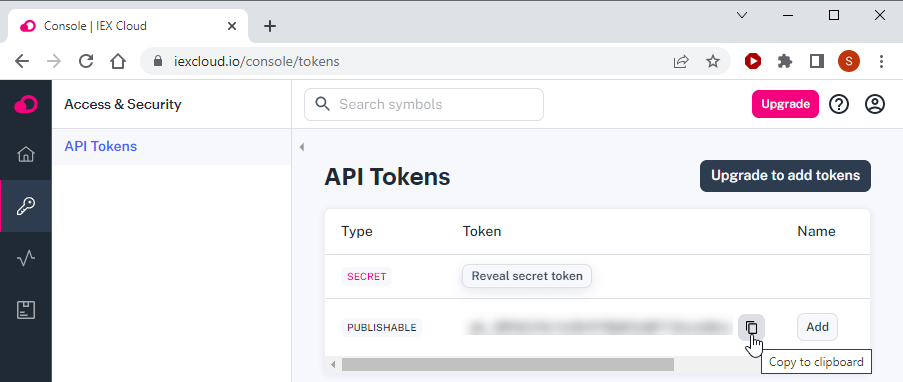
I’ve created a free account on the IEX Cloud to retrieve the three-month closing price history for the stocks in the spreadsheet for this application. Once registered for an account, log into the dashboard console to obtain the API Token to use with the IEX Cloud APIs (click the «Copy to clipboard» glyph to copy the API Token):
We already know the complete list of stock symbols when calling our API. Therefore, using the batch request endpoint makes sense to obtain all data via a single call.
We will use two NuGet packages to implement the API integration. First, right-click on the project and select the Manage NuGet Packages option. Next, select the Browse tab, then search for and install the Newtonsoft.JSON and RestSharp packages – to quickly and easily find both packages, copy and paste this search string: «packageid:Newtonsoft.Json | packageid:RestSharp«
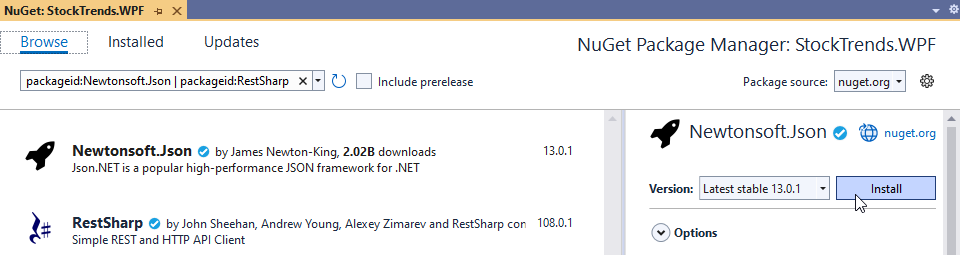
Once you have found both packages, click on Install for each package to add them to the project.
Next, right-click on your project, and add a new class named StockHistoryRetriever. This file encapsulates all code relevant to the API integration. It also contains the definition of two additional classes that reflect the structure of the data from the IEX Cloud API.
In addition to the data encapsulation classes, this file contains the method responsible for making the call to the financial API. The code listing of StockHistoryRetriever is as follows (replace the API_TOKEN value with your own from the IEX Cloud dashboard):
StockHistoryRetriever C#
StockHistoryRetriever VB
Adding Stock Data to the Spreadsheet
Upon successfully loading the symbols spreadsheet into the Spread.NET component, we have all the necessary information to issue the call to the API and write the retrieved closing price history back into the same worksheet.
To begin this implementation, open MainWindow.xaml.cs and add the following using or Imports statement:
using C#
Imports VB
Add the following method to the MainWindow class. The ProcessSpreadsheet method is responsible for reading the list of symbols from the uploaded document, issuing the API calls, and writing the pricing history data back to the appropriate row in the current worksheet.
ProcessSpreadsheet() C#
ProcessSpreadSheet() VB
One of the main things to keep in mind is that we will be changing the dimensions of the spreadsheet. When first uploaded, the symbols sheet consisted of a single column with stock symbols defined as one per row. Attempting to write to a column that didn’t previously exist will cause errors. Adjust the number of columns in a worksheet by setting the ColumnCount property to the total number of columns desired.
Immediately following the OpenExcel statement in the method, add a call to the new ProcessSpreadsheet() function:
btnLoadSpreadsheet_Click C#
btnLoadSpreadsheet_Click VB
Next, rerun the application, and you will now see the three-month closing price history shown on the same row as the corresponding stock symbol. Finally, export the spreadsheet to take this data offline.
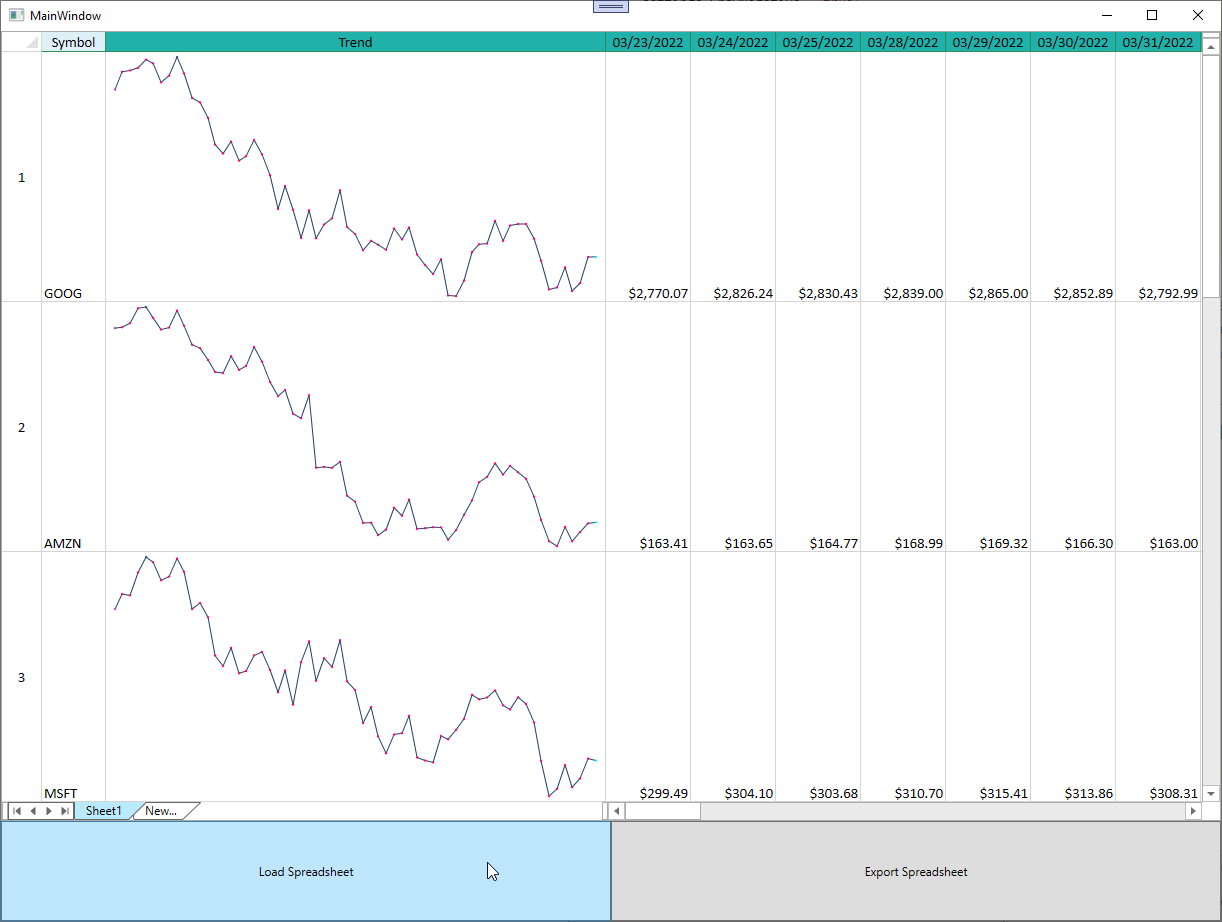
Creating Sparkline Charts from the Data Source
Even though all of this data collected is impressive, it would be better if paired with a visual representation of the data. Sparkline graphs provide a compelling way to interpret this data at a glance. Spread.NET allows for the creation of a Sparkline graph through its powerful API. These Sparklines are fully customizable and are built using data already in the spreadsheet.
Alter ProcessSpreadsheet() with the following code:
ProcessSpreadsheet() C#
ProcessSpreadSheet() VB
The ProcessSpreadsheet() code now sets a row height and column width on the Sparkline column. Setting these values gives the Sparkline graph more room so that it is easier to read and interpret. You will also notice that the code now contains Sparkline customization settings such as colors and designate the cell range used to generate the graph in each row.
To download the C# and/or VB sample projects for this blog, please click here:
Источник
How to open an Excel file and view in WPF?
Im creating some excel files using my c# application and save them in my pc. I want to open and view them inside my application how can i do it? My application is developed using WPF C#

3 Answers 3
You could utilize preview handlers mechanism. Here is the control I made to host a preview handler:
And here is how to use it:
It will work only if you have Microsoft Office installed on your computer.
You can use DocumentViewer WPF control.
First you should convert your office document to XPS format. Please look at this post.
And then bind it to the Document property of the DocumentViewer Control.
XAML
Code Behind
The solution from SHSE is underestimate. It works perfectly and the advantages are :
- no activeX msgBox (open, save, cancel) like in the WebBrowser solution
- no need to regsvr32 dsoframer.ocx as admin in client machine with the AxFramerControl solution
- no need to convert in XPS format, so you can keep Excel style
- Office is required
- have to find a way to terminate Excel process when the app is closing on Windows 7 (no need on Windows 10, Excel terminate itself)
- the document is readonly
You just have to add :
and add the latest Microsoft.Office.Interop.Excel reference
I wanted to just add a comment but I don’t have enough reputation. However, this solution can save you days !
Источник
Wpf работа с excel
![]()
I can not open Excel file.I got an error as «Microsoft Excel cannot access the file ‘C:Excel.xlsx’» in this line.
workbook = excelApp.Workbooks.Open(Environment.CurrentDirectory + «\Excel.xlsx»);
Plz help me. I spent lot of time in this
![]()
Try using a direct path to the file:
workbook = excelApp.Workbooks.Open(«c:\temp\book.xlsx);
Note that you will need to use \ instead of singles 😉
![]()
There are several possible reasons:
• The file name or path does not exist.
• The file is being used by another program.
![]()
Thanks a lot! Very good example!
![]()
![]()
just a little advice you never create an instance of an object inside a «for»
it should be like this
DataRow dr=new DataRow();
for(stuff in here)
<
dr.stuff= morestuff;
>
![]()
If there’s an empty cell, this line:
range.Cells[row, column] as Excel.Range).Value2.ToString()
breaks. I could put it in a try catch where the catch sets that one cell to an empty string, but that doesn’t seem like it would be best practice. Any thoughts on how to handle this scenario?
![]()
Just write this thing:
dr[column — 1] = (range.Cells[row, column] as Excel.Range).Value2!=null ? (range.Cells[row, column] as Excel.Range).Value2.ToString() : «»;
![]()
An easier way to handle this row:
range.Cells[row, column] as Excel.Range).Value2.ToString()
is to change it to:
Convert.ToString((range.Cells[row, column] as Excel.Range).Value2);
.ToString() can’t handle nulls but Convert.ToString() can. It allows for less code too.

This is really nice article have a look of this article.
http://www.dotnetpools.com/Article/ArticleDetiail/?articleId=381&title=How-to-Read-Excel-File-in-C#-Windows-Application-and-Show-Excel-Data-Into-DataGridView-Controls
excel sheet is not binding to datagrid bt no error appears
![]()
You probably forgot to pass data context or type mismatch
nope i passed everything
Hi. Thanks a lot for the info. I tried the solution and it worked. There is only one limitation that I found. I used a button click to invoke the class Excel data. The button and the datagrid should be part of the the same xaml file window. Can someone please tell how to show the data in a different window than the one in which the button is placed. I tried this but was not working since the datagrid then is not a part of the xaml. The exact message is as under.
Error 1 ‘AutoCode1.AutoCode1home’ does not contain a definition for ‘dataGrid2’ and no extension method ‘dataGrid2’ accepting a first argument of type ‘AutoCode1.AutoCode1home’ could be found (are you missing a using directive or an assembly reference?)
Thanks one again for sharing your replies
![]()
I wanted to add code but it doesn;t allow me, mistaking xaml for html
Источник