Hide or unhide a worksheet
Note: The screen shots in this article were taken in Excel 2016. If you have a different version your view might be slightly different, but unless otherwise noted, the functionality is the same.
-
Select the worksheets that you want to hide.
How to select worksheets
To select
Do this
A single sheet
Click the sheet tab.
If you don’t see the tab that you want, click the scrolling buttons to the left of the sheet tabs to display the tab, and then click the tab.
Two or more adjacent sheets
Click the tab for the first sheet. Then hold down Shift while you click the tab for the last sheet that you want to select.
Two or more nonadjacent sheets
Click the tab for the first sheet. Then hold down Ctrl while you click the tabs of the other sheets that you want to select.
All sheets in a workbook
Right-click a sheet tab, and then click Select All Sheets on the shortcut menu.
Tip: When multiple worksheets are selected, [Group] appears in the title bar at the top of the worksheet. To cancel a selection of multiple worksheets in a workbook, click any unselected worksheet. If no unselected sheet is visible, right-click the tab of a selected sheet, and then click Ungroup Sheets on the shortcut menu.
-
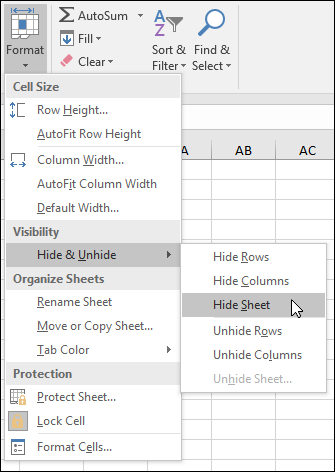
On the Home tab, in the Cells group, click Format > Visibility > Hide & Unhide > Hide Sheet.
-
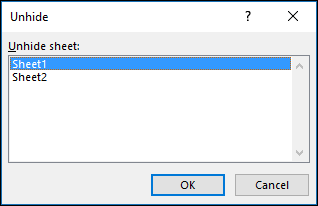
To unhide worksheets, follow the same steps, but select Unhide. You’ll be presented with a dialog box listing which sheets are hidden, so select the ones you want to unhide.
Note: Worksheets hidden by VBA code have the property xlSheetVeryHidden; the Unhide command will not display those hidden sheets. If you are using a workbook that contains VBA code and you encounter problems with hidden worksheets, contact the workbook owner for more information.
Hide or unhide a workbook window
-
On the View tab, in the Window group, click Hide or Unhide.
On a Mac, this is under the Window menu in the file menu above the ribbon.
Notes:
-
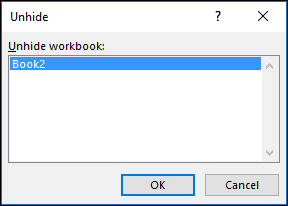
When you Unhide a workbook, select from the list in the Unhide dialog box.
-
If Unhide is unavailable, the workbook does not contain hidden workbook windows.
-
When you exit Excel, you will be asked if you want to save changes to the hidden workbook window. Click Yes if you want the workbook window to be the same as you left it (hidden or unhidden), the next time that you open the workbook.
Hide or display workbook windows on the Windows taskbar
Excel 2013 introduced the Single Document Interface, where each workbook opens in its own window.
-
Click File > Options.
For Excel 2007, click the Microsoft Office Button
, then Excel Options.
-
Then click Advanced > Display > clear or select the Show all windows in the Taskbar check box.
Hide or unhide a worksheet
-
Select the worksheets that you want to hide.
How to select worksheets
To select
Do this
A single sheet
Click the sheet tab.
If you don’t see the tab that you want, click the scrolling buttons to the left of the sheet tabs to display the tab, and then click the tab.
Two or more adjacent sheets
Click the tab for the first sheet. Then hold down Shift while you click the tab for the last sheet that you want to select.
Two or more nonadjacent sheets
Click the tab for the first sheet. Then hold down Command while you click the tabs of the other sheets that you want to select.
All sheets in a workbook
Right-click a sheet tab, and then click Select All Sheets on the shortcut menu.
-
On the Home tab, click Format > under Visibility > Hide & Unhide > Hide Sheet.
-
To unhide worksheets, follow the same steps, but select Unhide. The Unhide dialog box displays a list of hidden sheets, so select the ones you want to unhide and then select OK.
Hide or unhide a workbook window
-
Click the Window menu, click Hide or Unhide.
Notes:
-
When you Unhide a workbook, select from the list of hidden workbooks in the Unhide dialog box.
-
If Unhide is unavailable, the workbook does not contain hidden workbook windows.
-
When you exit Excel, you will be asked if you want to save changes to the hidden workbook window. Click Yes if you want the workbook window to be the same as you left it (hidden or unhidden) the next time that you open the workbook.
Hide a worksheet
-
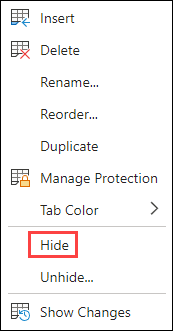
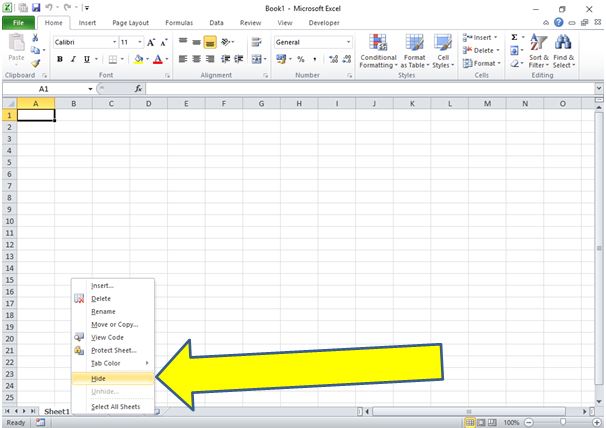
Right click on the tab you want to hide.
-
Select Hide.
Unhide a worksheet
-
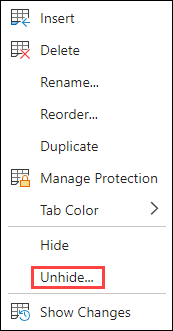
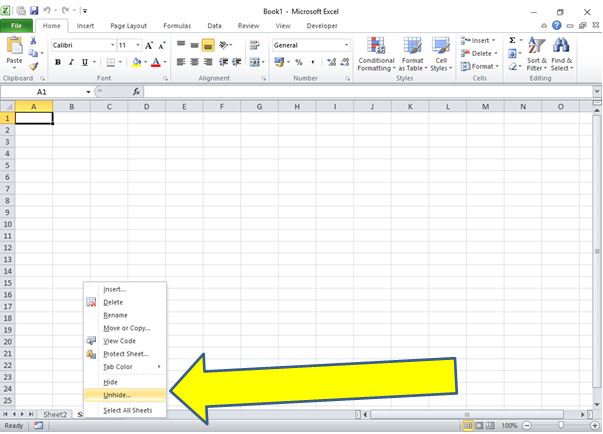
Right click on any visible tab.
-
Select Unhide.
-
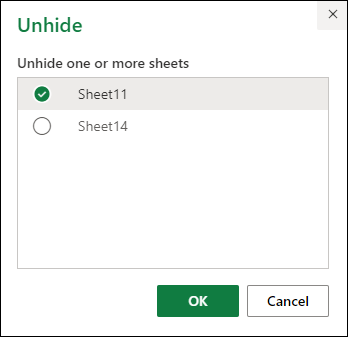
Mark the tabs to unhide.
-
Click OK.
Last Update: Jan 03, 2023
This is a question our experts keep getting from time to time. Now, we have got the complete detailed explanation and answer for everyone, who is interested!
Asked by: Prof. Stanley Spinka
Score: 4.6/5
(31 votes)
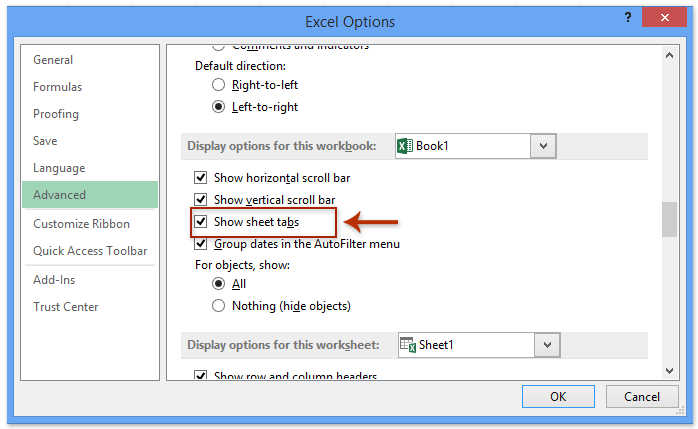
The Show sheet tabs setting is turned off. First ensure that the Show sheet tabs is enabled. To do this, For all other Excel versions, click File > Options > Advanced—in under Display options for this workbook—and then ensure that there is a check in the Show sheet tabs box.
How do I see all sheets in Excel?
Excel: Right Click to Show a Vertical Worksheets List
- Right-click the controls to the left of the tabs.
- You’ll see a vertical list displayed in an Activate dialog box. Here, all sheets in your workbook are shown in an easily accessed vertical list.
- Click on whatever sheet you need and you’ll instantly see it!
Why Excel file is open but not visible?
However, sometimes when you open a workbook, you see that it is open but you can’t actually see it. This could be as a result of an intentional or accidental hiding of the workbook (as apposed to a sheet). Under the VIEW tab you will see buttons called Hide and Unhide.
Where did my Excel sheet go?
Step 1 — Open Excel, click «File» and then click «Info.» Click the «Manage Versions» button and then choose «Recover Unsaved Workbooks» from the menu. Step 2 — Select the file to restore and then click «Open» to load the workbook. Step 3 — Click the «Save As» button on the yellow bar to recover the worksheet.
How do I view hidden sheets in Excel?
Unhide Worksheets Using the Ribbon
- Select one or more worksheet tabs at the bottom of the Excel file.
- Click the Home tab on the ribbon.
- Select Format.
- Click Hide & Unhide.
- Select Unhide Sheet.
- Click the sheet you want to unhide from the list that pops up.
- Click OK.
37 related questions found
How do I unhide all sheets?
Unhide multiple worksheets
- Right-click the Sheet tab at the bottom, and select Unhide.
- In the Unhide dialog box, — Press the Ctrl key (CMD on Mac) and click the sheets you want to show, or. — Press the Shift + Up/Down Arrow keys to select multiple (or all) worksheets, and then press OK.
How do I view hidden sheets in Excel 2016?
MS Excel 2016: Unhide a sheet
- To unhide Sheet2, right-click on the name of any sheet and select Unhide from the popup menu.
- When the Unhide window appears, it will list all of the hidden sheets. Select the sheet that you wish to unhide. …
- Now when you return to your spreadsheet, Sheet2 should be visible.
- NEXT.
How do I add a sheet in Excel?
On the Home tab, in the Cells group, click Insert, and then click Insert Sheet. Tip: You can also right-click the selected sheet tabs, and then click Insert. On the General tab, click Worksheet, and then click OK.
Why did my Excel file disappear?
If your Excel file disappeared. Sudden power failure can cause your Excel spreadsheet not to be saved and probably disappear from your computer. Also, if Excel is not responding and then it is forced to close, the current spreadsheet being worked on may not be saved.
Why does my Excel sheet disappear when I minimize?
Since when a Window is sized (click the Arrange button in the Window Group on the View tab), it can be dragged down, the worksheet tabs might seem to disappear. … It is now maximized inside the application window and your worksheet tabs should once again be accessible.
How do I unhide hidden sheets in Excel?
Hide or Unhide worksheets
- Right-click the sheet tab you want to hide, or any visible sheet if you want to unhide sheets.
- On the menu that appears, do one of the following: To hide the sheet, select Hide. To unhide hidden sheets, select them in the Unhide dialog that appears, and then select OK.
How do I view all sheets in Excel 2010?
How to Display Sheet Tabs in Excel 2010
- Open Excel.
- Click File.
- Choose Options.
- Select the Advanced tab.
- Check the box to the left of Show sheet tabs.
- Click OK.
How do I stop text from disappearing in Excel?
Hold Ctrl+A > Click Format > Font and make sure Hidden is not checked.
How do you unhide data in Excel?
To unhide all of the cells in a worksheet:
- Click the Select All button, in the upper-left corner of the worksheet or press Ctrl + A.
- Click the Home tab > Format (in the Cells group) > Hide & Unhide > Unhide Rows or Unhide Columns.
- All cells are now visible.
Where is the new sheet button in Excel?
To insert a single new worksheet to the right of the currently selected worksheet, click the “New Sheet” button at the right end of the spreadsheet name tabs. Alternatively, click the “Insert” drop-down button in the “Cells” button group on the “Home” tab of the Ribbon.
How many sheets can you have in Excel?
How many sheets are there in an Excel workbook? By default, there are three sheets in a new workbook in all versions of Excel, though users can create as many as their computer memory allows. These three worksheets are named Sheet1, Sheet2, and Sheet3.
How do I add a sheet in Excel using the keyboard?
SHIFT + F11 is the shortcut key to insert a new worksheet. Ctrl + Drag will create the replica of the existing worksheet, and the only changes are sheet name.
How unhide a column in Excel?
Unhide columns
- Select the adjacent columns for the hidden columns.
- Right-click the selected columns, and then select Unhide.
Why is Excel not Unhiding rows?
If you select all the rows and click ‘unhide’ and they do not show up, then they are filtered and not hidden. Click the Sort & Filter button on the Home tab of the ribbon and then click ‘clear’. … On the Home tab, click on the Format icon Choose Hide & Unhide from the dropdown menu then select Unhide Rows.
How do I unhide all columns in an Excel spreadsheet?
How to unhide columns in Excel:
- Click on the small green triangle in the top left corner of your spreadsheet. This will select the entire spreadsheet.
- Now right-click anywhere in the entire selection and choose the Unhide option from the menu.
- You should now be able to see all of your columns.
Why is my text invisible in Excel?
Workaround 2 – Change the Default Font
The font of cells in your Excel worksheet may be creating the problem. So, try changing the default font of cells or ranges: Select a cell or cell range where the text is not showing up. Right-click on the selected cell or cell range and click Format Cells.
Why does my typing disappear?
Turn off overtype mode: Click File > Options. Click Advanced. Under Editing options, clear both the Use the Insert key to control overtype mode and the Use overtype mode check boxes.
How do I view hidden sheets in Excel 2010?
1Click anywhere on the worksheet that you want to hide. 2In the Cells group on the Home tab, choose Format→Hide & Unhide→Hide Sheet. 3To unhide the worksheet, choose Format→Hide & Unhide→Unhide Sheet. 4Select the worksheet you want to unhide and click OK.
How do you make a sheet visible?
To unhide a sheet, simply right-click any sheet’s tab and select Unhide. This reveals the Unhide dialog box as shown below. Pick the hidden sheet and click ok.
Ever stuck into such an issue where you can’t see tabs in Excel or sheets not visible in Excel? Looking for some easy tricks to fix Excel tabs not showing issue?
Leave all you worry because, for easy restoration of missing worksheet tabs, this tutorial is surely going to help you a lot. Here you will get the best tricks to overcome the Excel spreadsheets disappeared issue in an easy way.
Apart from that, you will also get an easy idea of how to find hidden worksheets in Excel 2010/2013/2016/2019.
Why Did My Excel Worksheet Disappeared?
Normally, within the Excel workbook, you will get several tabs along with the bottom of the screen. The missing Excel worksheet tab issue mainly generates when sheets may get hidden in plain sight due to some changes in the Excel setting.
In order to solve the mystery of Excel tabs not showing problems let’s first find the answer to why are tabs not showing in Excel? After then follow the workarounds to fix the Excel missing sheet tabs issue.
There are numerous things that will make your Excel sheet disappeared.
Here we have listed some most common causes of Excel sheet tabs missing. Have a Look…
- When you inadvertently disconnect the workbook Windows from Excel. Mainly while using the trio of restore windows buttons on the title bar and moving the Windows under the status bar.
- The screen resolution is done too high and the tab gets vanished from the bottom of the screen.
- You may have turned off the Display options for this workbook.
- The workbook window is sized in a way that the tabs are hidden.
- The tabs get obscure due to the horizontal scroll bar.
- The worksheet itself is hidden.
How To Fix Excel Tabs Not Showing Issue?
Follow the given methods to troubleshoot Excel Tabs Not Showing issue:
1: Change the Zoom Settings
2: Check Show Sheet Tabs Setting Is Turned Off
3: Unhide the Worksheet
4: Check The Show Sheet Tabs Settings Controls
5: Check Excel Windows Arrangement
6: Click the Navigation Arrow in the Excel File
Now it’s time to discuss each of these methods of fixing Excel Worksheet disappeared in detail. So, let’s get started….!
Watch out this interesting video on how to restore missing Excel worksheet tabs and cells.
Method 1: Change the Zoom Settings
Change the zoom settings to some other settings. Then change the zoom settings back to the preferred settings.
Follow these steps to do this:
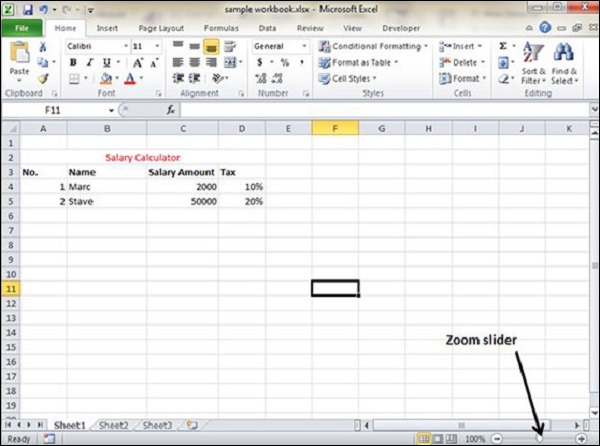
- Click the zoom out or zoom in on the status bar.
- On the View tab, click zoom in the zoom group, select the settings you want under Magnification, and then click OK.
Hope by changing the zoom settings you are able to see the missing Excel sheet tabs but if not then follow the method 2
Method 2: Check Show Sheet Tabs Setting Is Turned Off
This might be the case that Excel sheet tabs go missing as the sheet tabs setting is turned off. To verify it, follow the steps to do so:
- Click File > Options > Advanced, then under Display options for this workbook.
- Assure that the Show sheet tab checkbox is selected.
This process is the same for all Excel versions.
Method 3: Unhide the Worksheet
In many cases, the Excel sheet disappeared by itself. So to get the missing sheet tab back you must use the unhide worksheet of Excel.
Follow the steps to do so:
- Right-click on any visible tab on the worksheet > click Unhide
- Then in the Unhide dialog box > click sheet you desire to unhide
- Click Ok.
Method 4: Check The Show Sheet Tabs Settings Controls
In Excel 2010 and former, it is comparatively easy to unintentionally organize a spreadsheet Window. Subsequently, the worksheet tabs aren’t present on the screen, even if the Show Sheet Tabs option is enabled. While this happens, double click on the workbook’s name to maximize the Window and recover workbooks.
In Excel 2013 if you are not able to see the worksheet tabs, simply double-click on the words “Microsoft Excel” at the top of the Windows for maximizing Excel’s application window.

Method 5: Check Excel Windows Arrangement
In some cases, it is found that Excel Windows get arranged in such a way so that the tabs are not visible. So check for them. Make use of the keyboard shortcut to navigate between worksheets within the workbook. And to do this, press Ctrl – Page Up for activating the adjacent worksheets to the left and or else press Ctrl- Page Down for activating the next worksheet to the right.
In this activate menu Excel 2013 provides helpful improvements since the entire worksheets are displayed in a single dialog box and after that, you can select a worksheet by entering the first letter of the sheet name.
In Excel 2010 or the earlier version, the Activate menu very first displays up to 16 worksheets and requires selecting more sheets for displaying more lists.
Additionally, in Excel 2010 or the earlier version, you should select the desired sheet name by making use of your mouse. Because the menu cannot be accessed by way of keystrokes as it is possible in Excel 2013.
You can also read: 7 Tricks To Fix Missing Gridlines In Excel Issue
Method 6: Click the Navigation Arrow in the Excel File
In many other cases, it happens that the worksheet tabs are available, but a worksheet still appears missing. In Excel 2007 and later versions, right-click on any worksheet tab and select unhide.
Well, if the command is disabled there is most likely no hidden worksheet is present in the workbook. However, there is still a way you can find out this possibility.
Follow the steps to access the unhide sheet command from Excel’s main menu:
- Excel 2007 and later: Go to the home tab > select format > click hide and unhide sheet.
- Excel 2003 and earlier: Select Format > Sheet > and Unhide.
- And Excel 2011 for Mac: From the main menu > select format option > sheet > unhide. The format command on the home tab of the ribbon doesn’t let you unhide the worksheet.
If the unhide sheet is disabled, you can’t necessarily assume that there are no hidden worksheets within a workbook.
Automatic Solution To Recover Missing/Disappeared Tabs In Excel
Well, if none of the above-mentioned methods help you to recover missing sheets in Excel. Then the chances are high that your Excel sheet has caught into some corruption issue. Due to the corruption of the Excel sheet, you may also find that your Excel sheet content disappeared.
In this case, you can make use of the professional recommended MS Excel Repair Tool. This is the best tool to repair any sort of issues, corruption as well as errors in Excel files. It also restores the entire data in the preferred location. It is too easy to use.
* Free version of the product only previews recoverable data.
Steps to Utilize MS Excel Repair Tool:
Conclusion:
Hope after reading the article you are able to recover your missing sheet tabs in Excel. I tried my best to provide complete information about how to recover the missing or hidden sheet tabs in Microsoft Excel.
So, now it’s your turn to make use of the given methods to fix Excel tabs not showing the issue. Just go for it.
Good Luck!!!
Priyanka is an entrepreneur & content marketing expert. She writes tech blogs and has expertise in MS Office, Excel, and other tech subjects. Her distinctive art of presenting tech information in the easy-to-understand language is very impressive. When not writing, she loves unplanned travels.
This week, while working on a project, I wanted to hide a worksheet in Excel. However, I didn’t want users to unhide it or even know it was there. I wanted to make the Excel sheets very hidden (i.e. invisible to other users).
I’m sure many users know how to hide a sheet. However, most are unaware of the ability to make a sheet very hidden, which makes it invisible.
This post looks at the differences between hidden and very hidden and 6 ways to make sheets very hidden.
What is a very hidden worksheet?
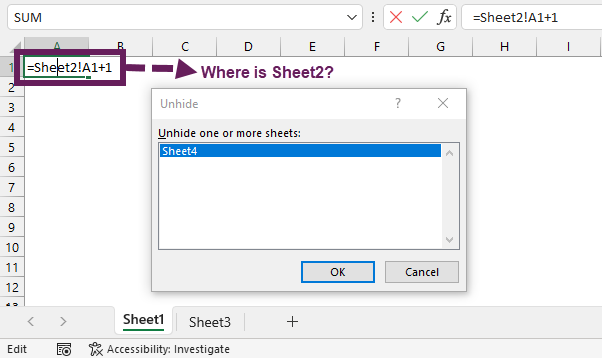
Have you ever used a workbook where a formula refers to a sheet you just can’t find? The sheet is not a tab at the bottom, and is not in the list of hidden sheets. Where could it be?
Look at the screenshot below. You can’t see Sheet2 because it is sheet is very hidden.
Difference between hidden and very hidden sheets
Rightly or wrongly, hidden worksheets are commonly used to:
- Remove workbook clutter – hides the previous versions and workings which are no longer relevant. (In my opinion, it’s better to keep these visible, so you remember to delete them later. Otherwise, the clutter builds up in the background).
- Hide workings from users – users don’t need to see workings to be able to use a spreadsheet. Hiding is an excellent way to focus attention on what is required.
- Provide basic protection – prevents users from accidentally changing things that might break the spreadsheet.
Hiding a sheet is available in the standard user interface. There are lots of options to hide a sheet:
- From the ribbon:
- Click View > Hide
- Click Home > Format > Hide & Unhide > Hide Sheet
- Right-click the sheet tab and select Hide from the menu
Since many users know about hidden sheets, they can just as easily unhide them.
- From the ribbon, Click Home > Format > Hide & Unhide > Unhide sheets…
- Right-click a visible sheet and select Unhide from the menu
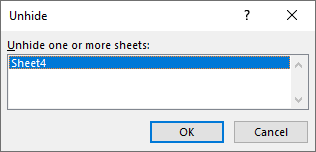
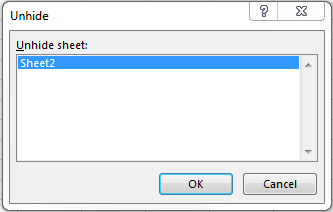
In the Unhide dialog box, select the sheet and click OK.
Note: In Excel 365 and Excel 2021 and later, we can unhide multiple sheets; prior to that, it had to be performed for each sheet individually.
Very hidden sheets can be used for the same purpose as hidden. But, the special thing about very hidden sheets is they do not appear in the Unhide list. So, for example, in the screenshot at the start, we could see a formula using Sheet2, but that sheet was nowhere to be found; it was very hidden.
OK, so let’s take a look at 6 ways to make Excel sheets very hidden.
In this section, we provide 6 ways to make worksheets very hidden. We’re looking at options for Excel Desktop and Excel Online,
Do you have the Developer tab enabled?
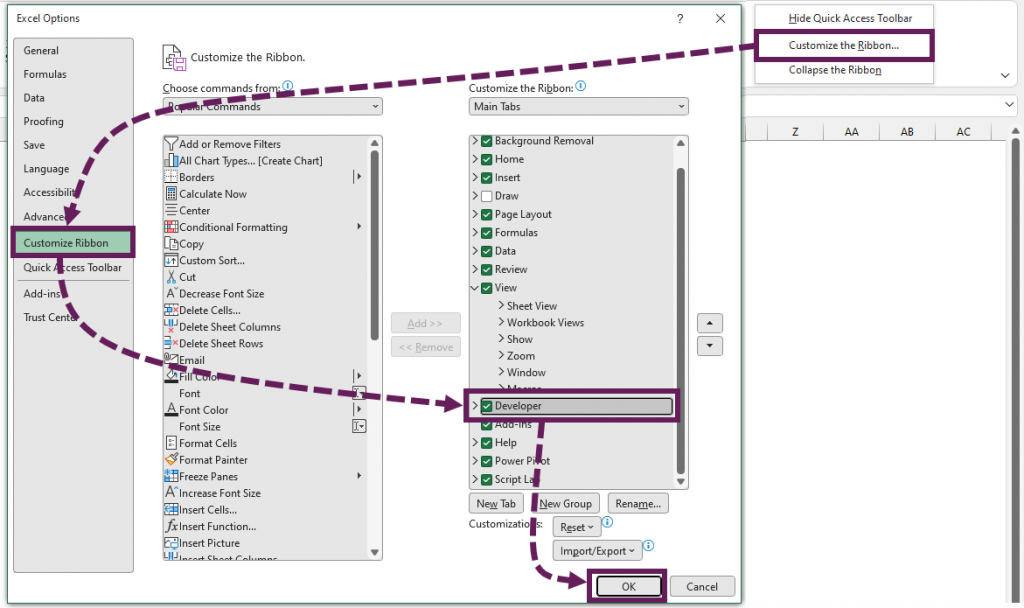
The first three methods require the Developer tab to be enabled. To do this:
- Right-click on an empty ribbon section and select Customize the Ribbon… from the menu.
- The Excel Options dialog box opens.
- Ensure the Developer option is checked, then click OK.
You should now have the Developer tab visible in the ribbon.
Worksheet Properties
The first method for making worksheets very hidden uses the Control Properties dialog box.
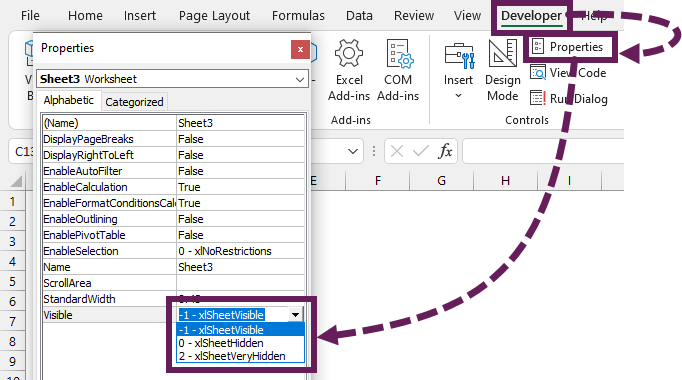
- From the ribbon, click Developer > Properties
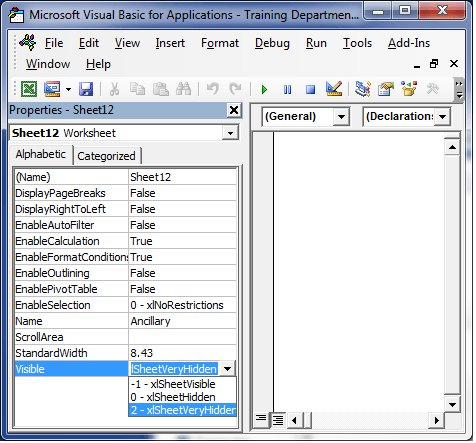
- The Properties dialog box opens. Change the Visible setting from -1 – xlSheetVisible to 2 – xlSheetVeryHidden
- The change is applied instantly, and the workbook disappears
Test it out. You will notice the worksheet does not appear in the unhide list.
This method can only be applied to the active sheet, and must be used on a sheet-by-sheet basis.
Now the worksheet is hiddenm we cannot activate it. So we cannot use this method to make the worksheet visible again. For that, we can use another method.
VBA Properties
The second method is similar to the first, but uses an alternative interface. The good news is we can use this method to make any very hidden worksheets visible again.
For this, we need to open the Visual Basic Editor.
- Click Developer > Visual Basic (or press Alt + F11)
- The Visual Basic Editor opens
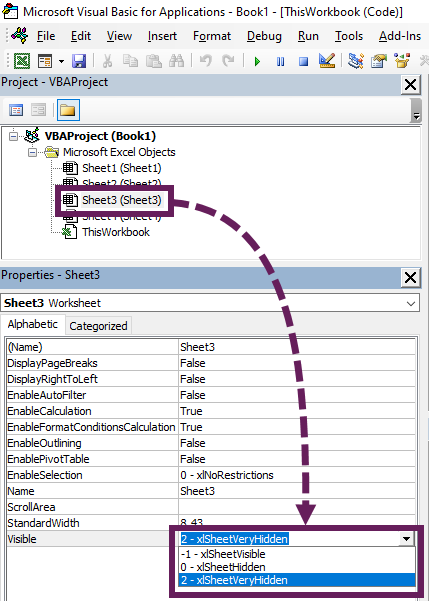
- If the Properties window in the bottom-left is not open, click View > Properties from the VBA menu
- In the Project window, select the sheet to be hidden
- Then, in the Properties window, change the visible property from -1 – xlSheetVisible to 2 – xlSheetVeryHidden
To make a worksheet visible again, change the setting to -1 – xlSheetVisible.
Run a VBA Macro
The previous methods were all manual. So, let’s move on now to look at more automated methods.
The following are example VBA codes for making sheets very hidden (and making them visible again 😁). We won’t go into how to use the VBA code in detail. If you are using these methods, I assume you already know how to run macros.
Very hide the active worksheet
The code below hides the active worksheet of the active workbook.
Sub activeWorksheetVeryHide()

'Very hide the active worksheet
ActiveSheet.Visible = xlSheetVeryHidden

End Sub
Very hidden worksheets cannot be active; check out other methods below to make the worksheet visible again.
Very hide a named worksheet
The following code makes Sheet1 of the workbook containing the VBA code visible.
Sub namedWorksheetVeryHide()

'Very hide a named worksheet in the workbook
ThisWorkbook.Sheets("Sheet1").Visible = xlSheetVeryHidden

End Sub
Having made the worksheet very hidden, to make it visible again, use the following code.
Sub namedWorksheetVisible()

'Make the named worksheet in the workbook visible
ThisWorkbook.Sheets("Sheet1").Visible = xlSheetVisible

End Sub
Very hide all selected worksheets
The following code makes the selected worksheets in the active workbook very hidden.
Sub allSelectedWorksheetsVeryHide()

'Create variable to hold worksheets
Dim ws As Worksheet

'Loop through each selected worksheet
For Each ws In ActiveWindow.SelectedSheets

    'Very hide the worksheets
    ws.Visible = xlSheetVeryHidden

Next ws

End Sub
Once the worksheets are hidden, they are no longer selected. Therefore, look at the methods below to make multiple worksheets visible again.
Very hide a list of worksheets
To make multiple named worksheets very hidden, use the code below. This code will very hide Sheet1 and Sheet2 in the workbook which contains the VBA code.
Sub namedWorksheetsVeryHide()

Dim sheetList As Variant
Dim i As Integer

'Get the list of sheet names to very hide
sheetList = "Sheet1|Sheet2"

'Split the list into an array
sheetList = Split(sheetList, "|")

'Loop through each item in the array
For i = LBound(sheetList) To UBound(sheetList)

    'Very hide a named worksheet in the workbook
    ThisWorkbook.Sheets(sheetList(i)).Visible = xlSheetVeryHidden

Next i

End Sub
Very hide all worksheets except the active sheet
It is not possible to hide all worksheets, as Excel requires at least one visible sheet. The following code hides all except the active sheet.
Sub allExceptActiveWorksheetVeryHide()

Dim activeWs As Worksheet
Dim ws As Worksheet

'Declare the active worksheet
Set activeWs = ActiveSheet

'Loop through each worksheet in the active workbook
For Each ws In ActiveWorkbook.Worksheets

    'Check if the worksheet is the active worksheet
    If ws.Name <> activeWs.Name Then

        'Hide the worksheet
        ws.Visible = xlSheetVeryHidden

    End If

Next ws

End Sub
Make all very hidden worksheets visible
This final code will make all very hidden worksheets visible again.
Sub allVeryHiddenWorksheetsVisible()

'Create variable to hold worksheets
Dim ws As Worksheet

'Loop through each worksheet
For Each ws In ActiveWorkbook.Worksheets

    'Check if the worksheet is alrady very hidden
    If ws.Visible = xlSheetVeryHidden Then

        'Very hide the worksheets
        ws.Visible = xlSheetVisible

    End If

Next ws

End Sub
For more VBA code examples for working with worksheets, check out this post: https://exceloffthegrid.com/worksheet-properties-actions/
Office Scripts
Excel Online does not support VBA Macros; instead, it has its own automation language called Office Scripts. If you are using this method, I am assuming you already know how to run Office Scripts.
Very hide the active worksheet
The following script very hides the active worksheet of the active workbook.
function main(workbook: ExcelScript.Workbook) {

//Very hide the active worksheet
workbook.getActiveWorksheet().
  setVisibility(ExcelScript.SheetVisibility.veryHidden)

}
Since very hidden sheets cannot be active, look at the examples below for making a worksheet visible again.
Very hide a named worksheet
The following code makes Sheet1 of the active workbook very hidden.
function main(workbook: ExcelScript.Workbook) {

//Very hide the named worksheet
workbook.getWorksheet("Sheet1").
  setVisibility(ExcelScript.SheetVisibility.veryHidden)

}
Use the code below to make Sheet1 visible again.
function main(workbook: ExcelScript.Workbook) {

workbook.getWorksheet("Sheet1").
  setVisibility(ExcelScript.SheetVisibility.visible)

}
Very hide a list of worksheets
The example below makes Sheet1 and Sheet2 of the active workbook very hidden.
function main(workbook: ExcelScript.Workbook) {

//List of sheets to very hide
let sheetList = "Sheet1|Sheet2"

//Convert sheetList to an Array
let sheetArray = sheetList.split("|");

//Loop through all items in the sheetList
for (let i = 0; i < sheetArray.length; i++) {

  //Very hide the worksheet
  workbook.getWorksheet(sheetArray[i]).
    setVisibility(ExcelScript.SheetVisibility.veryHidden)

}

}
Very hide all worksheets except the active sheet
Excel must have at least one sheet visible. Therefore, the code below hides all except the active sheet.
function main(workbook: ExcelScript.Workbook) {

//Get the active worksheet
let activeWs = workbook.getActiveWorksheet();

//Loop through all worksheets
for (let i = 0; i < workbook.getWorksheets().length; i++) {

  //Check if worksheets is the activeworksheet
  if (workbook.getWorksheets()[i].getName() != activeWs.getName() ) {

    //Very hide the worksheet
    workbook.getWorksheets()[i].
      setVisibility(ExcelScript.SheetVisibility.veryHidden)

  }

}

}
Make all very hidden worksheets visible
The code below snippet makes all very hidden worksheets visible. It does not change the status of any hidden worksheets.
function main(workbook: ExcelScript.Workbook) {

//Get an array of all the worksheets
let wsArray = workbook.getWorksheets();

  //Loop through the array of worksheets
  for (let i = 0; i < wsArray.length; i++) {

    //Check if worksheets are very hidden
    if (wsArray[i].getVisibility() == "VeryHidden") {

      //Make worksheet visible
      wsArray[i].setVisibility(ExcelScript.SheetVisibility.visible)

    }

}

}
For more Office Script code examples for worksheets, check out this post: https://exceloffthegrid.com/office-scripts-working-with-worksheets/
Hide all sheet tabs
There is an option in Excel desktop to hide worksheet tabs. This option does not change the visibility of the worksheets; they are still visible. However, without the ability to use the tabs, this may prevent users from knowing a sheet exists (effectively the same result as making them very hidden).
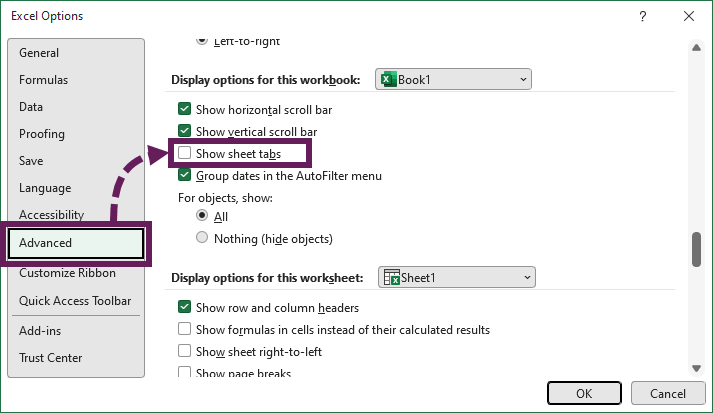
- Click File > Options from the ribbon to open the Excel Options dialog box
- In the Advanced section, uncheck the Show sheet tabs option.
- Click OK to close the dialog box.
The sheet tabs are no longer visible in Excel desktop.
The VBA code to toggle this option is:
Sub toggleSheetTabs()

'Toggle worksheet tabs on/off
ActiveWindow.DisplayWorkbookTabs = Not ActiveWindow.DisplayWorkbookTabs

End Sub
Note: Excel Online does not support this feature. The tabs will be visible if the workbook is opened in Excel Online.
Changing file structure
This final method is quite a niche option. But you never know when it might come in useful. We are going to unpack the Excel workbook and change the source code.
Before attempting this, please back up the Excel file, as any mistakes may corrupt the file.
- Rename the Excel workbook so the file extension is .zip, instead of .xlsx
- Navigate into the zip file and find the file called xlworkbook.xml
- Copy and paste the file outside of the zip folder
- Open the file using a text editor like Notepad
- Within the code, you will find code similar to the following
<sheet name=”Sheet2″ sheetId=”2″ r:id=”rId2″/>
In that code, we can add the statement to make a sheet very hidden (see the bold section below)
<sheet name=”Sheet2″ sheetId=”2″ state=”veryHidden” r:id=”rId2″/> - Save the file with the additional code. Then, copy and paste the file back into the xl zip folder.
- Accept the option to replace the file.
- Change the file extension of the zip file back to .xlsx.
On opening the workbook, you will find the sheet is now very hidden.
Are hidden sheets completely invisible?
A common question about this is: Are hidden sheets completely invisible?
Hopefully, having read this far, you will realize the answer is: No. The methods shown above to make sheets visible are available to other users too. However, most users don’t know about these techniques. Even if they do, they still need to care enough to look for the very hidden sheets.
Conclusion
As we have seen, there are many ways to make Excel sheets invisible (very hidden). With a bit of knowledge, it is not a difficult task.
We can to use the Developer tab, and the Visual Basic Editor to apply the setting manually. But if this is an action you perform regularly, you may prefer the automated options using VBA and Office Scripts.
Have we missed any methods? Please let us know in the comments.
About the author
Hey, I’m Mark, and I run Excel Off The Grid.
My parents tell me that at the age of 7 I declared I was going to become a qualified accountant. I was either psychic or had no imagination, as that is exactly what happened. However, it wasn’t until I was 35 that my journey really began.
In 2015, I started a new job, for which I was regularly working after 10pm. As a result, I rarely saw my children during the week. So, I started searching for the secrets to automating Excel. I discovered that by building a small number of simple tools, I could combine them together in different ways to automate nearly all my regular tasks. This meant I could work less hours (and I got pay raises!). Today, I teach these techniques to other professionals in our training program so they too can spend less time at work (and more time with their children and doing the things they love).
Do you need help adapting this post to your needs?
I’m guessing the examples in this post don’t exactly match your situation. We all use Excel differently, so it’s impossible to write a post that will meet everybody’s needs. By taking the time to understand the techniques and principles in this post (and elsewhere on this site), you should be able to adapt it to your needs.
But, if you’re still struggling you should:
- Read other blogs, or watch YouTube videos on the same topic. You will benefit much more by discovering your own solutions.
- Ask the ‘Excel Ninja’ in your office. It’s amazing what things other people know.
- Ask a question in a forum like Mr Excel, or the Microsoft Answers Community. Remember, the people on these forums are generally giving their time for free. So take care to craft your question, make sure it’s clear and concise. List all the things you’ve tried, and provide screenshots, code segments and example workbooks.
- Use Excel Rescue, who are my consultancy partner. They help by providing solutions to smaller Excel problems.
What next?
Don’t go yet, there is plenty more to learn on Excel Off The Grid. Check out the latest posts:
The default setting in Excel is to show all the tabs (also called sheets) below the working area.
But if you can’t see any tabs and are wondering where has it disappeared, worry not. There are some possible reasons that may have been the cause of missing tabs in your Excel workbook.
In this article, I will show you a couple of methods you can use to restore the missing tabs in your Excel Workbook.
If you can’t see any of the tab names, it is most likely because of a setting that needs to be changed.
And in case you can see some of the sheet tabs but not all the sheet tabs, one possible reason could be that the sheets have been hidden, and you need to unhide the sheets to make the sheet tabs visible.
Another less likely but possible reason could be that the scrollbar he’s hiding the sheet tabs (when there are more sheets that extends beyond where the scrollbar starts)
Let’s have a look at each of these scenarios.
When All the Sheet Tabs are Missing
Whenever you open an Excel workbook, it must have at least one sheet tab in it (even if it’s a new blank workbook).

If you can’t see any tab, this most likely means that you need to change a setting that will enable the visibility of the tabs.

Below are the steps to restore the visibility of the tabs in Excel:
- Click the File tab

- Click on Options

- In the ‘Options’ dialog box that opens, click on the Advanced option

- Scroll down to the ‘Display Options for this Workbook’ section
- Check the ‘Show sheet tabs’ option

The above change would ensure that all the available sheet tabs in the workbook become visible (unless the user has specifically hidden some of the worksheets)
Note that this setting is workbook specific – which means that in case you enable this setting in one of the workbooks, it would only make the tabs reappear in that specific workbook
When Some of the Sheet Tabs are Missing
Sometimes, you may be able to see some of the tabs in the workbook, while some others may be missing.
In this section, I have some solutions when only some of the tabs are missing and some are visible.
Some of the Sheets are Hidden
The most likely reason that you cannot see some of the tabs in the workbook is that they have been hidden by the user.
When a worksheet is hidden in Excel, it continues to exist as a part of the Excel workbook, but you don’t see that sheet tab name along with other sheet tabs.
And this has a really simple solution – you need to unhide the sheets.
Below are the steps to unhide one or more sheets in Excel:
- Right-click on any of the existing sheet tab name
- Click on the Unhide option. In case there are no hidden sheets in the workbook, this option will be grayed out

- In the Unhide dialog box, click on the sheet name you want to unhide

- Click on OK

The above steps would unhide the selected sheet, and it would reappear as a tab in your workbook.
In case you want to unhide multiple sheets, you can select them in one go in the ‘Unhide’ dialog box. To do this, hold the Control key (or Command key if using Mac) and then click on the Sheet names that you want to unhide. This would select all the sheets on which you click and then you can unhide all these with one click.
But what if you do not see the tab name in the names listed in the Unhide dialog box?
Well, there is a way in Excel to hide a sheet in such a way that its name doesn’t show up in the Unhide dialog box.
Then how do you unhide these ‘very hidden’ sheets?
You can read my tutorial here where I show you how to unhide those sheets that have been ‘very hidden’. It’s easy and it will only take a couple of clicks.
Tabs are Hidden Because of the Scroll Bar
Another reason your tabs may be missing could be because of a large scroll bar that hides the tabs.
And it has a simple fix – resize the scroll bar to make all other tabs visible.
Below I have a screenshot of an Excel workbook where I have 8 sheets but only three sheet tabs are visible. This is because of a large scrollbar that hides those tab names.

To get the sheet tabs to reappear, click on the three dots icon on the left of the scrollbar and drag it to the right. This will minimize the scroll bar and all the sheet tabs that were earlier hidden would now become visible.

In case you have a large workbook with a lot of sheets, even if you minimize the scrollbar, some sheet tabs would still be hidden.
In such a case, you can use the navigation icons (which are at the left of the first sheet tab) to make those sheet tabs visible.
So these are some of the ways you can use to fix the issue when the sheet tabs are missing and not showing in Excel. If you don’t see any sheet tab in the workbook, it’s most likely because of the setting in the Excel Options dialog box that needs to be changed.
And in case you see some sheet tab names but some are missing, then you need to check if some of the sheets have been hidden by the user or if they are hidden because of a large scroll bar.
Other Excel tutorials you may also like:
- Microsoft Excel Won’t Open – How to Fix it! (6 Possible Solutions)
- How to Switch Between Sheets in Excel? (7 Better Ways)
- Count Sheets in Excel (using VBA)
- How to Get the Sheet Name in Excel? Easy Formula
- How to Insert New Worksheet in Excel (Easy Shortcuts)
- How to Delete Sheets in Excel (Shortcuts + VBA)
- Arrow Keys not Working in Excel | Moving Pages Instead of Cells
- How to Change the Color of the Sheet Tab in Excel
Did you know that Excel has two levels of hidden worksheets? Excel has “hidden” worksheets, and, “very hidden” worksheets. This post walks through the differences, and how to hide worksheets at each level.
By default, all new worksheets are visible. A visible worksheet’s tab appears in the bottom of the Excel window, enabling the user to click the tab in order to navigate to the worksheet. Easy enough, let’s move on.
Visible Property
In the real world, an object is either visible or it is not. For example, Harry Potter is typically visible. However, when he throws on that sweet cloak of invisibility, he is not visible. His visible status changes to false. In the real world, the visible status of an object is either true or false, it is either visible or it is not. In Excel however, the visible property of a worksheet object has three possible values: true, false, or….very hidden.
Hidden
When a worksheet has a visible property value of true, it is visible and can be seen and selected by the user. When a worksheet has a visible property of false, it is hidden, and can no longer be seen from within the standard Excel user interface. That is, the sheet’s tab is gone. The sheet itself however, is not gone, and formulas can still retrieve values stored on a hidden sheet. It just disappears from the user interface.
It is pretty easy to hide a sheet. Although, if we are trying to be technical, we should say it this way: it is pretty easy to change a worksheet’s visible property from true to false.
All five worksheets in my workbook are visible in the following screenshot.
To hide a sheet, simply right-click the sheet’s tab and select hide. You can also hide a sheet using the following ribbon command:
- Home > Format > Hide & Unhide > Hide Worksheet
You can also hide a sheet using the following keyboard shortcut:
- Alt+o, h, h
Sheet2 is hidden in my workbook, as shown in the screenshot below:
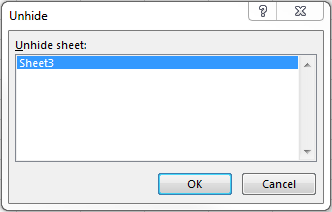
To unhide a sheet, simply right-click any sheet’s tab and select Unhide. This reveals the Unhide dialog box as shown below.
Pick the hidden sheet and click ok. You can also unhide a sheet using the following ribbon command:
- Home > Format > Hide & Unhide > Unhide Worksheet
You can also unhide a sheet using the following keyboard shortcut:
- Alt+o, h, u
Now, here is where it gets fun, creating very hidden sheets.
Very Hidden
The third property value is very hidden. The difference between a hidden sheet and a very hidden sheet is simply this: very hidden sheets do not appear in the Unhide dialog box.
Now, before we get to the mechanics of how to set a sheet’s property to very hidden, let me set up a bit of background that will be useful. First, we need to understand that in Excel, there is a world outside of the typical Excel user interface. What you see when navigating inside the Excel application window is a subset of everything available in Excel. A primary example is macros. Macros are not edited within the standard interface, they are edited within a utility application called the Visual Basic Editor (VBE). The VBE is a powerful and useful utility, and Excel power users spend quite a bit of time in it. It is inside the VBE where we change the visible property of a worksheet to very hidden. Here is how the VBE refers to the Visible property values:
- True = xlSheetVisible
- False = xlSheetHidden
- Very Hidden = xlSheetVeryHidden
You still with me? Great, let’s get into the VBE now.
Visual Basic Editor
There are a couple of different ways to open the VBE. You could use either of the following keyboard shortcut:
- Alt+F11
- Alt+t, m, v
Or, if you are more of a ribbon person, you could use the following ribbon command:
- Developer > Visual Basic [Note: Microsoft does not ship Excel with the Developer ribbon tab visible, so, you’ll need to turn it on. In Excel 2010/2013: customize the ribbon and check the Developer tab. In Excel 2007: go into options and check the “Show developer tab in ribbon” checkbox]
At this point, you should have the VBE open, and it should look a little something like the screenshot below.
In the top left panel is the Project Explorer, where you can use the tree to navigate to any open workbook, and to any sheet. Double-click the sheet you want to update.
[Note: if you don’t see the Project Explorer, simply select View > Project Explorer]
Then, you’ll be able to view and change the status of the Visible property in the Properties window.
[Note: if you don’t see the Properties window, simply select View > Properties Window]
On the Visible property, use the combo box to change the value to xlSheetVeryHidden, or, to either of the other options.
In the screenshot below, I selected xlSheetVeryHidden from the Visible property combo box:
Once you return to Excel, you’ll notice that the sheet’s tab is not visible. You’ll also notice that if the workbook contains very hidden sheets, the user won’t have an option to open the Unhide dialog box. If the workbook contains both hidden and very hidden sheets, then the user can open the Unhide dialog box, however, the very hidden sheets do not appear. In my workbook, Sheet2 is very hidden, and Sheet3 is hidden, and the Unhide dialog box is shown in the screenshot below.
Wow, Sheet2 is very hidden!
If you want to view the sheet again, simply change the property from xlSheetVeryHidden to xlSheetVisible from within the VBE and you’ll be all set.
Now, with great power comes great responsibility, so use this super power with great care!
Поговорим как скрывать листы, а также как показывать скрытые листы в Excel, в том числе разберем как можно отобразить очень скрытые листы с помощью Visual Basic.
Приветствую всех, дорогие читатели блога TutorExcel.Ru.
Время от времени возникает необходимость прятать листы в Excel либо от посторонних глаз других пользователей, либо уже от самих себя, чтобы эти самые листы не отвлекали и не мешали работать.
Также возникает и обратная необходимость — в частичном или полном отображении скрытых листов. В общем давайте рассмотрим различные способы реализации как скрытия, так и отображения листов.
Как сделать лист скрытым?
Сделать лист скрытым очень просто, для этого нужно кликнуть правой кнопкой мыши по ярлычку нужного листа и в появившемся контекстном меню выбрать пункт «Скрыть». Для того чтобы скрыть несколько листов, следующих подряд, либо все листы, кроме активного (книга должна содержать не менее одного видимого листа) необходимо кликнуть левой кнопкой мыши по первому нужному листу, затем, удерживая клавишу Shift, кликнуть по последнему, после чего кликнуть правой кнопкой мыши в области выделенных листов и выбрать пункт «Скрыть» из контекстного меню. Все выделенные листы разом становятся скрытыми. Аналогичным образом можно выборочно выделить листы, используя клавишу Ctrl вместо клавиши Shift.
Скрытие с помощью инструментов программы
Менее популярный метод, но все же, знания о нем будут не лишними.
- Для начала выбираем лист, который нужно скрыть.
- Переходим во вкладу “Главная”, щелкаем по инструменту “Ячейки”, в появившихся вариантах выбираем “Формат”.
- В открывшемся списке выбираем “Скрыть или отобразить” и далее – “Скрыть лист”.
- Выбранный лист будет спрятан.
Примечание: в случае, если размеры окна с программой Excel позволяют, во вкладке “Главная” сразу будет отображаться кнопка “Формат”, минуя блок инструментов “Ячейки”.
Как сделать лист очень скрытым?
Листы рабочей книги можно сделать очень скрытыми. Такие листы невозможно отобразить стандартными средствами Excel, при вызове контекстного меню пункт «Отобразить…» (в некоторых версиях он называется «Показать…») не активен. Чтобы сделать лист очень скрытым, необходимо перейти в редактор VB (Visual Basic), сделать это можно разными способами, но самый простой — сочетанием клавиш Alt+F11, выбрать в VBA проекте рабочей книги нужный лист, а затем в свойстве «Visible» этого листа выбрать параметр «xlSheetVeryHidden».
Чтобы вернуть листу видимость, необходимо изменить свойство «Visible» обратно на xlSheetVisible.
Чтобы запретить вставку новых строк и столбцов в Excel без использования защиты листа нужно сделать так:
- Перейдите в последнюю ячейку относительно строк и столбцов XFD1048576. Для этого можно ввести в поле имя адрес ячейки XFD1048576 и нажать Enter. А если лист пустой можно нажать комбинацию горячих клавиш CTRL+ → (стрелка влево) чтобы сместить курсор в последний столбец XFD1, а потом CTRL+ ↓ (стрелка вниз) смесит курсор в последнюю ячейку XFD1048576.
- Введите в последнюю ячейку XFD1048576 любое значение, можно даже пробел « ».
Вот и все теперь в лист нельзя вставить строку или столбец. Если нужно запретить вставлять только строки, тогда вводим любое значение в самую последнюю строку (например, A1048576). А если запретить вставлять только столбцы тогда вводим любое значение в последнем столбце (например, XFD1).
Надежное скрытие листов, которых нельзя отобразить стандартными средствами (опцией Показать). Полезные лайфхаки для работы с листами и ячейками.
все уроки
Как отобразить скрытые листы?
Обратная процедура, когда возникает необходимость скрытые листы отобразить и сделать видимыми, может потребовать большого терпения. Чтобы отобразить скрытые листы нужно кликнуть правой кнопкой мыши в области имен листов и выбрать пункт меню «Отобразить…».
После этого появляется окно со списком скрытых листов и вывод на экран скрытых листов происходит путем выбора одного листа из всего списка. Отобразить их все разом не получится.
Делать листы видимыми придется по одному. Отображение даже десяти скрытых листов будет вполне утомительным занятием, не говоря уже о большем их количестве.
Листы удалены
Самый очевидный варианты – вы случайно удалили листы, поэтому они не отображаются на нижней панели. В этом случае восстановить их будет крайне сложно. Единственное спасение – если вы еще не сохранялись.
В этом случае нужно просто выйти из программы, при этом не соглашаясь на сохранение. Таким образом восстановится изначальная версия документа, где листы еще в целости и сохранности.
Однако помните, что в таком случае не сохранятся последние изменения в документе. Хорошо, если вы спохватились об удаленных листах через минут пять после их удаления. Если же вы поняли ошибку через час и все это время правили документ – такая ситуация сложнее. Придется выбирать – сохранять изменения или же вернуть удаленные листы.
Второй вариант восстановить листы – попробовать найти предыдущие версии файла, которые сохраняются автоматически.
Переходим в меню «Файл» на верхней панели. В первой же вкладке «Сведения» находим «Версии» и смотрим, какие версии нам предлагает программа. По умолчанию автосохранение срабатывает каждые 10 минут. Выберете ту, которая была сделана еще до того, как вы удалили листы.
Обращаем внимание, что такой вариант восстановления возможен тогда, когда в настройках включен режим автосохранения.
Отображение всех листов, выборочное отображение и скрытие листов по маске
Представленная ниже надстройка для Excel позволяет облегчить и ускорить некоторые манипуляции, совершаемые с листами рабочих книг. Надстройка позволяет:
1) Делать скрытыми все листы, кроме активного;
2) делать очень скрытыми все листы кроме активного;
3) отображать все скрытые листы разом, не зависимо от того скрытые они или очень скрытые;
4) скрывать и отображать листы по маске, используя специальные символы совпадения для имен листов.
видео по работе с надстройкой
макрос (надстройка) для быстрого скрытия и отображения листов
Другие
Панель ярлыков
Возможно, была выключена панель ярлыков. В таком случае на нижней панели не будут ярлыки с листами.
Снова заходим в меню «Файл» и выбираем там пункт «Параметры».
В разделе «Дополнительно» прокручиваем настройки вниз, дойдя до пункта «Параметры отображения книги». Здесь нам нужно установить маркер напротив «Показывать ярлычки листов».
Убираем полосу прокрутки
Иногда вкладки листов в Экселе отображаются, но их, просто-напросто, не видно. Их заслонила горизонтальная полоса прокрутки. Это специальный инструмент, предназначенный для навигации по документу слева направо, и наоборот.
- Полоса прокрутки находится над строкой стояния, в одной плоскости с ярлычками;
- Слева от ее начала расположены 3 вертикальные точки;
- Нажмите на них и потяните вправо;
- Полоса прокрутки сократится, а странички покажутся;
- Готово. Выставьте удобный размер и продолжайте работу.
Подводим итоги
Восстановить листы в Excel можно с помощью 5 способов:
- если они были удалены, не сохранять изменения или попробовать восстановить предыдущую версию автосохранения;
- переместить полосу прокрутки вправо, чтобы на не закрывала ярлыки листов;
- включить в параметрах программы отображение ярлычков;
- восстановить скрытые листы двумя кликами;
- воспользоваться редактором макросов, чтобы восстановить суперскрытые страницы.
Источники
- https://MicroExcel.ru/skrytye-listy/
- https://exceltable.com/nastroyki/skryt-pokazat-yarlyki-listov
- https://lumpics.ru/what-do-if-missing-sheets-excel/
- https://public-pc.com/propali-listy-v-excel-ishhem-poteryannye-stranitsy/
- https://macros-vba.ru/nadstrojki/excel/78-kak-otobrazit-vse-skrytye-listy-excel
- https://exceltable.com/vozmojnosti-excel/pokazat-i-skryt-list
- https://micro-solution.ru/projects/addin_vba-excel/sheets-visible
- https://tutorexcel.ru/knigi-i-listy/kak-skryt-i-pokazat-skrytye-listy-v-excel/
Как вернуть ярлычки
Посмотрим, как должна выглядеть книга, чтобы в ней можно было легко переходить с одного листа на другой. Вот они. Это левый нижний угол книги Excel по умолчанию.
Но у кого-то в нижнем левом углу может быть совсем другая картина.
Что делать в таком случае, когда при открытии книги в ней не обнаруживается панели с закладками? Нужно настроить Excel. Ели у вас 2007-я версия программы, путь к нужным настройкам находится в OFFICE (располагается слева сверху, в самом углу книги) – ПАРАМЕТРЫ EXCEL – ДОПОЛНИТЕЛЬНО – ПОКАЗАТЬ ПАРАМЕТРЫ ДЛЯ СЛЕДУЮЩЕЙ КНИГИ. Здесь находим строчку ПОКАЗЫВАТЬ ЯРЛЫЧКИ и ставим галочку. Нажимаем ОК.
После этого листы появятся в нижнем левом углу книги. Если у вас Excel 2003, то путь таков: СЕРВИС – ПАРАМЕТРЫ – ВИД. Для версий 2010-2013: ФАЙЛ – ПАРАМЕТРЫ – ДОПОЛНИТЕЛЬНО.
Скрываем рабочую книгу полностью
Чтобы полностью скрыть рабочую книгу Excel, перейдите на вкладку Вид
(View).
В разделе Окно
(Window) нажмите
Скрыть
(Hide).
Окно Excel останется открытым, но область таблицы станет пустой. Чтобы отобразить рабочую книгу, нажмите Вид
>
Окно
>
Отобразить
(View > Window > Unhide).
Появится диалоговое окно Вывод на экран скрытого окна книги
(Unhide) со списком открытых в настоящий момент рабочих книг. Если Вы скрывали рабочие книги, которые в данный момент не открыты, то их в этом списке не будет.
Если Вы скроете рабочую книгу и сохраните файл, то в следующий раз, когда откроете этот файл, книга по-прежнему будет скрыта. Книга будет оставаться скрытой до тех пор, пока Вы сами не отобразите её.
Иногда требуется место для информации, которую пользователи не смогут прочитать или изменить. Встройте тайное место в рабочую книгу, место, где вы сможете хранить данные, формулы и прочие мелочи, используемые, но невидимые на ваших листах.
Простейший способ скрыть такой лист – кликнуть на ярлычке листа правой кнопкой мыши, и выбрать опцию Скрыть
(рис. 1). Однако, чуть более опытные пользователи смогут отобразить лист, скрытый таким образом, кликнув на ярлычке любого видимого листа, и выбрав опцию
Показать
. Можно просто защитить лист, пройдя по меню
Рецензирование
–>
Защитить лист
. Однако он все так же будет полностью виден — данные, формулы и все остальное.
Рис. 1. Команда Скрыть
лист
Скачать заметку в формате или
В настоящей заметке предлагается еще более радикальное средство для сокрытия данных – изменение свойства рабочего листа Visible
, путем присвоения ему значение
xlVeryHidden
в редакторе VBA, но без написания кода VBA.
Пройдите по меню Разработчик
–>
Visual Basic
или нажмите Alt+F11, чтобы открыть окно Редактора VBA (рис. 2).
В окне Project – VBAProject найдите имя своей книги (в нашем примере — Книга1) и раскройте ее иерархию, щелкнув знак «плюс» слева от имени книги. Раскройте папку Microsoft Excel Objects, чтобы увидеть все листы книги (на рис. 2 эти манипуляции уже выполнены).
Выберите лист, который хотите скрыть (в нашем примере – Лист1), и откройте его свойства, выбрав команду меню в верхней части окна Редактора View
–>
Properties Window
(или нажав F4). Удостоверьтесь, что выбрана вкладка
Alphabetic
и найдите свойство
Visible
в самом низу в колонке (Name). Щелкните справа поле со значением свойства
Visible
и выберите последнее значение, 2 –
xlSheetVeryHidden
(рис. 3).
Рис. 3. Изменение свойства Visible
для листа
Лист1
После того как вы выбрали параметр 2 – xlSheetVeryHidden – в окне свойств Properties
,
Лист1
пропадает из перечня листов книги (рис. 4). Чтобы вывести это окно можно, например, кликнуть правой кнопкой мыши на левой или правой стрелке в левом нижнем углу окна Excel рядом с ярлычками листов.
Рис. 4. Лист, скрытый с помощью свойства Properties
, отсутствует в перечне листов книги
Этот метод скрытия листа не является абсолютно надежным, так как продвинутый пользователь может проделать обратную операцию – перейти в редактор VBA и вернуть свойство -1 xlSheetVisible.
По материалам книги Д.Холи, Р.Холи. Excel 2007. Трюки, стр. 36–37
You can hide any worksheet in a workbook to remove it from view. You can also hide the workbook window of a workbook to remove it from your workspace. The data in hidden worksheets and workbook windows is not visible, but it can still be referenced from other worksheets and workbooks. You can display hidden worksheets or workbook windows as needed.
By default, all workbook that you open are displayed on the taskbar, but you can hide or display them on the taskbar as needed.
Note:
The screen shots in this article were taken in Excel 2021. If you have a different version your view might be slightly different, but unless otherwise noted, the functionality is the same.
Hide or unhide a worksheet
- When you unhide a worksheet, you can only do so one at a time unless you use Visual Basic for Applications (VBA) code..
If worksheets are hidden by VBA code that assigns the property xlSheetVeryHidden
, the Unhide command will not display those hidden sheets. If you are using a workbook that contains VBA code and you encounter problems with hidden worksheets, contact the workbook owner for more information.
Hide or display workbook windows on the Windows taskbar
Excel 2013 introduced the Single Document Interface
, where each workbook opens in its own window.
Hide or unhide a worksheet
Hide or unhide a workbook window
- Click the Window
menu, click
Hide
or
Unhide
.
Sheet tabs are helpful for organizing and identifying the worksheets in a workbook. You’ll find them along the bottom of your workbook.
To avoid clutter or to display only specific worksheets to others, you can hide as many sheets as you want, as long as at least one sheet remains in view. Just right-click the sheet tab for the sheet you want hidden, and click Hide
.
If you want to see a hidden worksheet, here’s how you unhide it:
- Right-click any sheet tab and click Unhide
.
In the Unhide
box, click the sheet you want to unhide, and click
OK
.
Note:
Want to unhide multiple worksheets? Just repeat the unhide steps for each sheet.
Not sure if there are any hidden worksheets? Right-click any sheet tab and verify if Unhide
is available. If it isn’t available, like in this picture, your workbook doesn’t have any hidden worksheets.
Working with sheets
In addition to hiding and unhiding worksheets, you can insert a new sheet, or delete, rename, and reorder existing worksheets using the sheet tabs. Here’s how:
Delete sheet tabs
Important:
If you delete a sheet tab, you’re also deleting the worksheet and its data. To avoid losing your data, if you don’t want to display it, consider hiding the sheet tab instead.
Right-click the sheet tab of the worksheet you want to delete and click Delete
.
Rename sheet tabs
- Right-click the sheet tab of the worksheet you want to rename.
Click Rename
and type a new name.
Tip:
Sheet tabs resize automatically to fit the name.
When you have many sheet tabs with long names, you may not be able to see all of them. Scroll to the last visible sheet tab, and try clicking theActivate the next hidden sheet
button (the three dots after the last visible sheet tab).
Иногда возникают ситуации, когда надо скрыть лист со всем его содержимым от посторонних любопытных глаз. Очень часто это делается из контекстного меню листа (для счастливых обладателей 2007 Excel. Подробнее: )
. Но при использовании данного метода необходимо защитить книгу, иначе отобразить скрытые листы сможет каждый (тем же правым щелчком мыши — Отобразить). А что делать, если книгу не надо защищать? Ведь часто необходимо оставить пользователям возможность работы со структурой книги, например, добавлять листы. Как тогда скрыть лист так, чтобы его нельзя было отобразить? Есть достаточно простой способ через редактор VBA, при этом обладать навыком программирования вообще не нужно. Итак, определились какой лист надо скрыть. Далее:
- заходим в редактор VBA(Alt
+
F11
) - жмем сочетание клавиш Ctrl
+
R
или идем в меню
View
—
Project Explorer
(чтобы отобразить окно объектов проекта VBA) - жмем F4
или через
View
—
Properties Window
(чтобы отобразить окно свойств) - в левой части окна (в Project Explorer) ищем книгу, лист в которой надо скрыть и раскрываем её папку(на скрине это VBA Project (Книга1)
) - раскрываем папку Microsoft Excel Objects и выделяем там лист с нужным именем
- в Окне свойств (Properties Window
) находим свойство
Visible
и назначаем ему значение
xlSheetVeryHidden
Чтобы затем отобразить этот лист необходимо свойству Visible
задать значение —
xlSheetVisible
. При этом для отображения листа необходимо будет обязательно зайти в редактор VBA — простым методом отобразить не получится. И книгу защищать не надо. Что нам и было необходимо. Для большей надежности можно защитить проект VBA, чтобы не было возможности отобразить лист из VBA, не указав пароль. На функционал это не повлияет совершенно. В том же окне VBA(
Alt
+
F11
):
- Tools
—
VBAProject Properties
-вкладка
Protection
; - для защиты устанавливается галочка «Lock project for viewing
«; для разблокировки — снимается; - вписывается/удаляется сам пароль в полях Password
и
Confirm password
.
Скрыть все листы в книге, кроме листа с именем «Видимый» можно следующим макросом:
Sub Hide_All_Sheets() Dim wsSh As Object For Each wsSh In ActiveWorkbook.Sheets If wsSh.Name «Видимый» Then wsSh.Visible = xlSheetVeryHidden «отобразить – xlSheetVisible; сделать лист просто скрытым — xlSheetHidden Next wsSh End Sub
Любой лист книги можно скрыть, чтобы удалить его из представления. Можно также скрыть окно книги, чтобы удалить его из рабочей области. Данные скрытых листов и книг не видны, но на них по-прежнему могут указывать ссылки из других листов и книг. При необходимости скрытые листы и книги можно отобразить.
По умолчанию все открытые книги отображаются на панели задач, но при необходимости их можно скрыть или отобразить на панели задач.
Примечание:
Снимки экрана в этой статье получены в Excel 2021. Если вы используете другую версию, интерфейс может немного отличаться, но функции будут такими же.
Скрытие и отображение листа
Примечания:
- При скрытии листа вы можете сделать это только один раз, если вы не используете код Visual Basic для приложений (VBA)…
Если листы скрыты кодом VBA, который назначает свойство кслшитверихидден
, то команда отобразить не будет отображать эти скрытые листы. Если вы используете книгу, содержащую код VBA, и у вас возникли проблемы со скрытыми листами, обратитесь к владельцу книги за дополнительными сведениями.
Примечания:
Скрытие и отображение окон книг на панели задач Windows
В Excel 2013 появился интерфейс с одним документом
, в котором книга открывается в отдельном окне.
Скрытие и отображение листа
Скрытие или отображение окна книги
- Щелкните меню окно
и выберите команду
Скрыть
или отобразить.
Примечания:
Ярлычки листов помогают в организации и идентификации листов в книге. Они расположены в нижней части книги.
Во избежание беспорядка и для отображения только определенных листов другим пользователям вы можете скрыть необходимое количество листов (при этом должен отображаться по крайней мере один лист). Просто щелкните правой кнопкой мыши ярлычок листа, который нужно скрыть, и нажмите пункт Скрыть
.
Если требуется просмотреть скрытый лист, его можно отобразить следующим образом:
- Щелкните ярлычок любого листа правой кнопкой мыши и выберите команду Показать
.
В окне Вывод на экран скрытого листа
выберите лист, который нужно отобразить, и нажмите кнопку
ОК
.
Примечание:
Хотите отобразить несколько листов? Просто повторите необходимые для отображения действия для каждого листа.
Не знаете, есть ли скрытые листы? Щелкните правой кнопкой мыши ярлычок любого листа и проверьте доступность команды Отобразить
. Если она не доступна, как показано на этом рисунке, книга не содержит скрытые листы.
Работа с листами
Можно не только скрыть или отобразить листы, но и вставить новый лист, удалить, переименовать или изменить порядок существующих листов с помощью ярлычков листов. Вот как это можно сделать:
Удаление ярлычков листов
Важно:
Если удалить ярлычок листа, будет удален и лист вместе с данными. Чтобы избежать потери данных, если вы не хотите отобразить ярлычок листа, скройте его.
Щелкните правой кнопкой мыши ярлычок листа, который нужно удалить, и выберите команду Удалить
.
How to unhide a hidden spreadsheet with Microsoft Excel?
A hidden Excel worksheet is handy in a shared workbook to not allow all users to change data or settings. For example, if the Excel workbook is locked with a password, then the hidden data is protected from changes. With Microsoft Excel, how to unhide an Excel spreadsheet, i.e., make a hidden worksheet visible?
There are two options, search in the Excel options at the top of the workbook or right click. Excel has been part of the Office 365 suite for some years.
Show hidden Excel worksheets from the right-click menu
Firstly, Excel sheets appear as tabs in Excel. To display a hidden Excel worksheet in the easiest and fastest way, and without writing complex code, just follow these two steps:
Find the Office tutorial in video format on Youtube:
- Right click on the name of the current Excel sheet.
- Click on Display and then choose the hidden worksheet to display.

Unhide an hidden Excel spreadsheets with the Format menu
Secondly, this solution is not as fast as the first one because you must click several times in the top menu of Excel.
- From the Home tab, choose Format menu on the left, then under Visibility select Hide and Unhide, then click on Unhide Sheet.
- Then choose the sheet to be displayed in the list, only the hidden Excel worksheets appear.

Also, if this Excel tip is useful for you and you want to save even more time and efficiency with Excel, here is a selection of the best Excel shortcuts to manage spreadsheets.
In conclusion, this article explains how to display a hidden Excel sheet in a workbook. The counterpart of these options allows of course to hide a visible sheet. To go further, here is an article on another Excel tips on how to separate date and time columns with Excel.
Do the blog posts help you? Share them on social networks!
Hiding worksheets in Excel and changing their visibility state is a useful tool with many practical applications. There are a few ways you can go about hiding Excel worksheets and there are also a couple of variants that every Excel analyst would be wise to know, read on to learn more…
Hiding Worksheets in Excel
Working with Excel files, especially Excel files that will be eventually be used by others or sent to clients or managers, there will come a time where hiding a worksheet or multiple worksheets is a useful practice, equally you may also come across an Excel file created by someone else and you might need to Unhide worksheets to view the file in more detail.
There are many reasons why you could consider hiding a worksheet in one of your Excel files, for example:
- Hiding a worksheet, or multiple worksheets, can make your Excel file easier for the client, manager or other user(s) to understand. It can help focus their attention on the key worksheets in the file rather than feeling overwhelmed by a lot of different worksheets that either have no information on them or information that is not important.
- Hiding a worksheet can be practical when it contains lookups or reference data that is used to create other worksheets but is not something the end user(s) necessarily needs to see.
- Hiding a worksheet can help prevent unauthorised or accidental changes to your file. As with above if you have a worksheet containing reference data hiding that sheet can stop other users changing the information and potentially ruining the file. For additional protection you would need to adopt some form of password protection but often just hiding a worksheet can be enough if your end-users are not Excel savvy.
It is important to note that hiding worksheets in Excel does not remove them from the file, they are still active and can be referenced on any of the visible worksheets. For example you can write a formula on a visible worksheet that links to a cell on a hidden worksheet. All you are doing is hiding the worksheets from view.
Visibility States in Excel
There are three visibility states a worksheet can be in within your Excel file:
- Visible: Everyone can see the worksheet when the file is open.
- Hidden: The worksheet is not visible but can be easily unhidden with a couple of mouse clicks.
- Very Hidden: The worksheet is not visible and requires the user to go into the Visual Basic Editor in order to unhide it. Most Excel users will not understand how to do this and even more security can be added with password protection if you want to stop the more advanced Excel users from having access to the Worksheet(s) you have hidden.
How to Hide a Worksheet in Excel
There are a few ways to change a worksheets visibility:
- Manually Hide or Unhide the Excel worksheet
- Use the Visual Basic Editor to change the state of the Excel Worksheet
- Write VBA Script to Hide or Unhide the Excel worksheet
The first two methods will be the most common ones that you use. The VBA scripting only becomes useful when it forms part of a larger script that you are running, for example running several different processes in your script that ends with hiding some worksheets in the end result.
Let’s look at each of the three methods in more detail:
Method One: Manually Hide the Excel Worksheet
This is by far the quickest method although it can be easily undone by any Excel users that have a grasp of the fundamentals.
First right-click on the worksheet name you wish to hide and then in the pop-up window select Hide, as shown below:
To make the sheet visible again, or Unhide worksheets if you are using an already created file, right-click on one of the visible worksheet names then click on “Unhide” from the pop-up window. This will make any worksheets that are hidden visible again.
This method is useful for tidying up Excel files and is one of the most common methods used. It is important to remember that it is easy for anyone to Hide or Unhide a worksheet this way so if you need a little extra security I suggest the next method.
Method Two: Use the Visual Basic Editor to change the state of the Excel Worksheet
This method is still very quick and because it gives you access to the actual worksheet state it is more powerful as you can fully hide the worksheet using Excels “very hidden” function.
First open the Visual Basic Editor; this can be opened by the shortcut command ALT+F11:
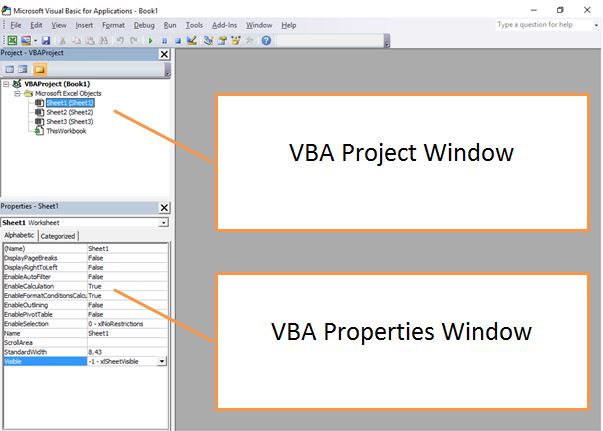
As highlighted in the above image of the VBA Editor the two main areas are:
- VBA Project Window: This is where you select the worksheet that you want to change the state of and Hide. Left-Click on the Sheet name that you want to change and it will highlight in blue to show it has been selected.
- VBA Properties Window: After you have selected the worksheet you can change the properties of that worksheet in this window. The last category in the window is called “Visible” and when you left-click on that box you can use the drop down arrow to change the state of the Worksheet.
The three options are:
- XlSheetVisible: Selecting this means the worksheet will be visible to all users.
- XlSheetHidden: This replicates manually hiding the worksheet so it will disappear from view but can be easily Unhidden by other users using the manual method of Hiding/Unhiding worksheets.
- XlSheetVeryHidden: This option is the most secure way to hide the worksheet and mainly it is very useful when you have an Excel worksheet that contains reference data that you do not want changed. The only way to reverse this choice is to go back into the Visual Basic Editor and change this option to XlSheetVisible and many Excel users will not be aware of how to do this, they will likely never know the worksheet even exists!
Method Three: Write VBA Script to hide the Excel worksheet
The final method to hide an Excel worksheet is to use VBA Script. It is overkill to write VBA script solely to change the state of a worksheet but there are occasions where you may have a larger piece of VBA script that will need to Hide or Unhide worksheets during part of the processing. The code to change between the three visibility states is below:
To hide a worksheet named Sheet1 then use:
1 |
Worksheets("Sheet1").Visible = False |
To unhide a worksheet named Sheet1 then use:
1 |
Worksheets("Sheet1").Visible = True |
To make a worksheet named Sheet1 Very Hidden then use:
1 |
Worksheets("Sheet1").Visible = xlVeryHidden
|
Summary
This post covered a fair amount of detail on the three visibility states of a worksheet looking at the three visibility states:
- Visible
- Hidden
- Very Hidden
Along with teaching the three methods you can use for changing the visibility of a worksheet:
- Manually (Hide and Unhide only)
- Via the VBA Editor
- Via VBA Script
Hopefully that has provided you with a good knowledge of how Excel worksheets can be Hidden or Unhidden to suit your needs.
Keep Excelling,
Need your own copy of Excel? Purchase the latest version of Microsoft Office that contains Excel at great value here:



 , then Excel Options.