30
30 people found this article helpful
Working With Tables in Microsoft Word
Use tables to align columns and rows of text
Updated on October 31, 2019
Aligning text in a word processing document can be tedious when it’s done with tabs and spaces. With Microsoft Word, insert tables in a document to align columns and rows of text with ease. Learn how to work with tables in Word.
Instructions in this article apply to Word for Microsoft 365, Word 2019, Word 2016, Word 2013, and Word 2010.
Insert Table Method
Using the menu, you can either select or type the desired number of columns and rows.
-
Open a Word document and select the location where you want to place the table.
-
Go to the Insert tab.
-
In the Tables group, select Table.
-
Select Insert Table.
To make a quick and basic table, drag across the grid to select the number of columns and rows for the table.
-
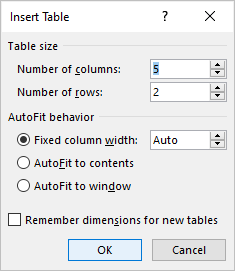
In the Insert Table dialog box, enter the number of columns and rows you want in the table.
-
In the Autofit Behavior section, enter a width measurement for the columns. Or, leave the field set to autofit to generate a table the width of the document.
-
Select OK. The blank table appears in the document.
-
To add or delete rows or columns, select Insert > Table.
-
To change the width or height of the table, drag the lower-right corner of the table.
When you select the table, the Table Design and Layout tabs appear on the ribbon. Use the tabs to apply a style or make changes to the table.
Draw Table Method
Drawing a table in Word gives you more control over a table’s proportions.
-
With a Word document open, go to the Insert tab.
-
Select Table.
-
Select Draw Table. The cursor turns into a pencil.
-
Drag down and across the document to draw a box for the table. The dimensions can be modified later if needed.
-
Click inside the box and draw a vertical line for each column and a horizontal line for each row you want in your completed table.
-
Style the table using the Table Design and Layout tabs.
Enter Text in a Table
No matter which of these methods you use to draw a blank table, you enter text in the same way. Select a cell and type. Use the tab key to move to the next cell or the arrow keys to move up and down or sideways within the table.
For more advanced options, or if you have data in Excel, embed an Excel spreadsheet in a Word document in place of a table.
Convert Text to Table
If there’s text in a document that you want to use in a table, insert separator characters, such as commas or tabs, to indicate where to divide the text into table columns. For example, in a list of people’s names and addresses, insert a tab between each name and corresponding address to make it easy to create a table.
-
Open the Word document containing the text you want to convert into a table and select that text.
-
Go to the Insert tab.
-
Select Table.
-
Select Convert Text to Table.
-
In the Convert Text to Table dialog box, change the default settings if needed.
-
Select OK to create the table.
-
To revert the table to text, go to the Layout tab and select Convert to Text.
Thanks for letting us know!
Get the Latest Tech News Delivered Every Day
Subscribe
Microsoft Word or MS-WORD is a graphical word processing program that users can type with. It allows the users to type and save documents very similar to other word processors. There are many versions of MS-word in market, which the user can install as per te. In this tutorial, we will learn about the tables in MS-Word.
Tables in MS Word are made up of rows and columns with an organized arrangement of text. These tables can be used to align numbers in columns and then various operations can be performed on them. Tables can also be used to create page layouts. Rows in a table are series of data banks laid out horizontally in a table or spreadsheet. Columns are vertical series of cells in a chart, table, or spreadsheet.
How to Create a Table?
Tables in MS Word can be created in the following two ways:
1. Using the Grid
2. Using Table Dialogue Box
Using the Grid
Following are the steps of creating a table using the Grid provided in MS Word:
Step 1: Go to the Insert tab and click on the Table button.
Step 2: In the dropdown menu, select the number of rows and columns from the Grid.
Using Table Dialogue Box
Following are the steps of creating a table using Table Dialogue Box in MS Word:
Step 1: Go to the Insert tab and click on the Table button.
Step 2: Under the grid, you will see an Insert Table button. Click on it.
Step 3: In the Insert Table Dialogue box, mention the number of rows and number of columns as per the requirement and click on OK button.
How to Modify a Table?
We can also edit/modify a table to make it more creative. Multiple operations can be performed on a table like changing the layout, splitting of cells, merging the cells, applying borders, etc. Here, we will see some of the operations performed on a table in MS Word.
Changing Layout of a Table
Changing the layout of a table can be done with the help of the following steps:
Step 1: Select the table for which the layout is to be changed. Go to the design tab.
Step 2: Click on the dropdown menu to get various different types of layouts for your table.
Step 3: Select any layout as per the need.
Splitting the Cell
Splitting of a cell can be done with the help of the following steps:
Step 1: Select the cell that you want to split into multiple cells. Then go to the Layout tab and click on the Split Cells button.
Step 2: In the dialogue box, mention the new dimensions as per the requirement.
Step 3: Click on the Ok button.
Merging the Cells
Merging of various cells can be done by the following steps:
Step 1: Select all the cells that are to be merged into a single cell. Then go over the layout tab, and you will see a Merge Cell button.
Step 2: Now click on the Merge Cell button and the selected cells will be merged.
Applying Borders and Styles on a Table
Borders and styles can also be applied to a table in a similar way as the layout of a table is changed. Go through the following steps to do the same:
Step 1: Select the entire table and go over the design tab.
Step 2: Select the style that you want to apply to your table.
Converting Text to a Table
MS Word allows the conversion of existing text into a table with the help of the following steps:
Step 1: Select the text that is to be converted into the table. Now go to the Insert Tab and you will see a Table button.
Step 2: Click on the Insert Table button and in the drop-down menu, click on the Convert Text to Table button.
Step 3: In the dialogue box, mention the dimensions of the required table and other data that is required.
Step 4: Click on the OK button and the selected text will be converted to a Table.
Inserting Images in a Table
MS Word allows adding images inside the table cells. To insert an image in a table, go through the following steps:
Step 1: Select the cell in which you want to add the Image. Go to the Insert tab and select the Pictures button.
Step 2: You can either choose a picture from your device or select one online.
Step 3: Choose a picture from the browser window and click on the Insert button.
Step 4: Selected Image will be added in the cell selected.
Performing Calculations in a Table
Mathematical calculations can also be performed on the values present in the table. Microsoft provides various formulas to perform these operations. By default, the sum of the values lying in the rows to the left or column lying above are calculated by Word. Following are the steps to do the same:
Step 1: Select the cell in which the result of the mathematical operations is required.
Step 2: Now go to the Layout tab and select the formula button.
Step 3: In the dialogue box, define the formula for the mathematical operation, the default formula is the sum of the values to the left or above.
Step 4: After defining the formula, click on the OK button to apply the formula on the cells given in the formula.
Many documents present some data in the form of figures or tables. Creating tables is often more efficient than describing the data in the paragraph text, especially when the data is numerical or large. The tabular data presentation makes it easier to read and understand.
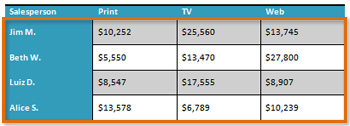
A table is a collection of information or data, usually represented by horizontal rows and vertical columns. Each column and each row can have a header. Some tables have only column headings or only row headings. The box at the junction of each column and row is a cell that contains data such as text, numeric information, or images. Some cells can be merged or split (see more about formatting tables). E.g.:

Microsoft Word has many features that make working with tables simple and convenient.
Create a table
There are several ways how to insert or create a table:
- Create a blank table of up to 10 columns and 8 rows,
- Create a blank table with more than 10 columns or more than 8 rows,
- Create a blank table manually (Draw a table),
- Create a table using predefined templates (Quick Tables),
- Create a table from the existing data (Convert Text to Table),
- Insert a Microsoft Excel spreadsheet.
To create a blank table in a Word document, do the following:
1. Place your cursor where you want to insert the table.
2. On the Insert tab, in the Tables group, click the Table button:

3. Do one of the following:
Create a blank table of up to 10 columns and 8 rows
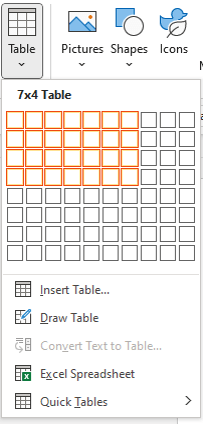
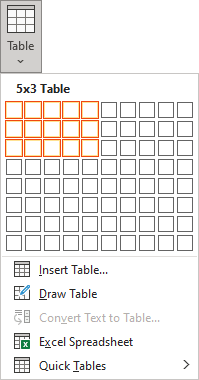
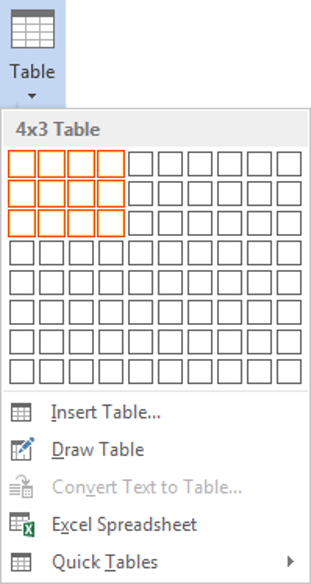
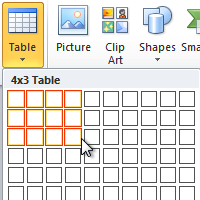
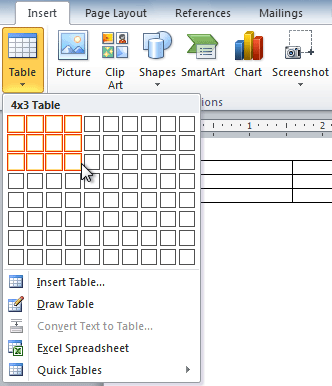
- To create a table of up to 10 columns and 8 rows, move the cursor right (to select columns) and down (to select rows) the grid to select as many cells as you need. E.g., the table of 5 columns and 3 rows (selected cells will turn orange):
Click on a cell in the grid with the expected number of rows and columns (or press Enter) to insert an empty table to fit the width of the text (paragraph).
The table has the specified number of single-line text rows in the current paragraph and equal-width columns. E.g., the table of 3 rows and 5 columns:
Create a blank table with more than 10 columns or more than 8 rows
- To create a table with more than 10 columns or more than 8 rows, do one of the following:
- Create a table with exactly 10 columns or 8 rows, then add as many columns or rows as you need (see below how to customize table).
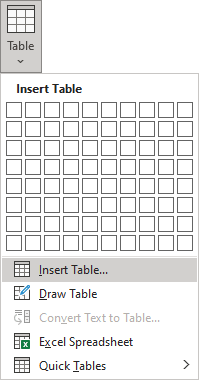
- Click the Insert Table… option:
In the Insert Table dialog box:
- In the Table size group, specify the number of columns and rows,
- In the AutoFit behavior group, specify the width of the table and its columns:
- Select the Fixed column width option to customize width in the appropriate field: select Auto (used by default) or specify width. E.g., 0.75″:
- Select the AutoFit contents option to adjust cell sizes to the document content. E.g.:
- Select the AutoFit to window option to adjust the table’s width to the document content width. E.g.:
- Select the Remember dimension for new tables check box if you want to create tables with the same options later. Word will remember your customization.
Create a blank table manually
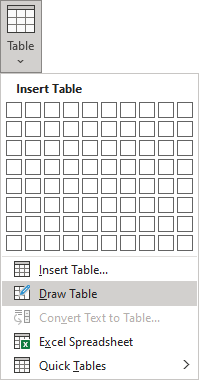
- To manually create an empty table, click the Draw Table option:
After clicking that option, the cursor changes to the pencil
that allows drawing cells directly in the Word document to create a table:
Click anywhere in a document but the table itself by the pencil to stop drawing a table.
Notes:
- To draw additional lines, select a table, then on the Table Layout tab, in the Draw group, click the Draw Table button:
- If you draw a line in the wrong position, click the Eraser button in the Draw group of the Table Layout tab:
- We recommend displaying the rulers or gridlines to help you place the lines correctly.
- To draw additional lines, select a table, then on the Table Layout tab, in the Draw group, click the Draw Table button:
Create a table using predefined templates
To create a table using predefined Word templates of tables and calendars, do the following:
1. Place your cursor where you want to insert the table.
2. On the Insert tab, in the Tables group, click the Table dropdown list, then select Quick Tables list:
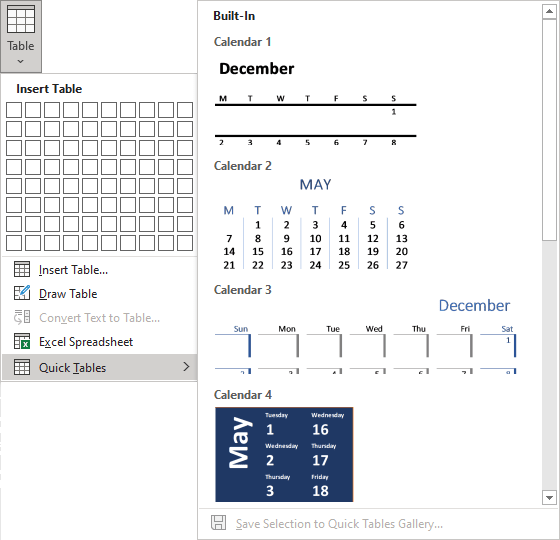
3. From the Quick Tables gallery, select the template you prefer.
For example:

Create a table from the existing data
To create a table from the existing data in a document data (either as regular text or as a tabbed list), do the following:
1. Select the document data you want to shape into a new table.
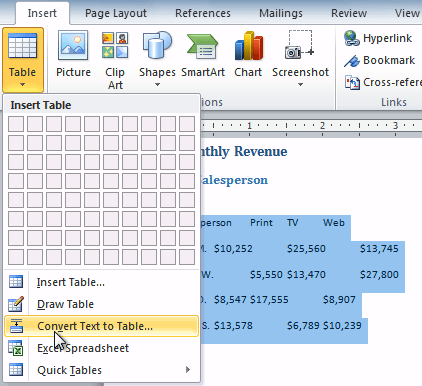
2. On the Insert tab, in the Tables group, click the Table dropdown list, then select Convert Text to Table…:
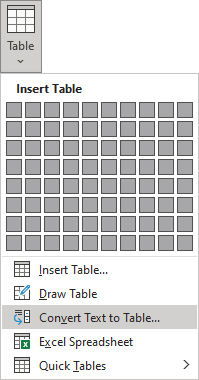
3. In the Convert Text to Table dialog box:

- In the Table size group, specify the number of columns,
- In the AutoFit behavior group, specify whether the width of the columns should be fixed (see details above),
- In the Separate text at group, select the character that separates text into columns in the selected text: paragraph marks, commas, tabs, or some other character.
E.g.:

Insert a Microsoft Excel spreadsheet
Note: It is possible to insert a Microsoft Excel spreadsheet in a document. To do so, on the Insert tab, in the Tables group, click the Table dropdown list, then select Excel Spreadsheet:
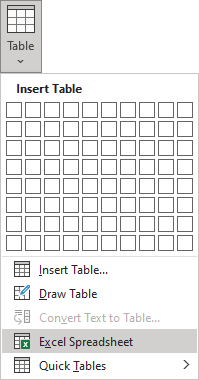
Word opens the Excel spreadsheet where you can enter the data. You can use Excel features such as functions and formulas to create or manipulate the data. Note that it is not a Word table.
Add rows and columns
To add a row and a column to a table, do the following:
1. Position the cursor:
- to a cell in a row above or below which you need to insert a row,
- to a cell in a column left or right which you need to insert a column.
2. Do one of the following:
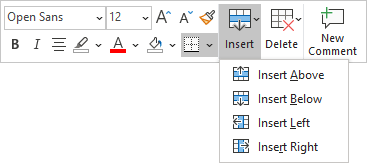
- Click the Insert dropdown list in the Mini toolbar:
- On the Table Layout tab, in the Rows & Columns group:
- Click the Insert Above button to insert a row above the row with the cursor,
- Click the Insert Below button to insert a row below the row with the cursor,
- Click the Insert Left button to insert a column left to the column with the cursor,
- Click the Insert Right button to insert a column right to the column with the cursor.
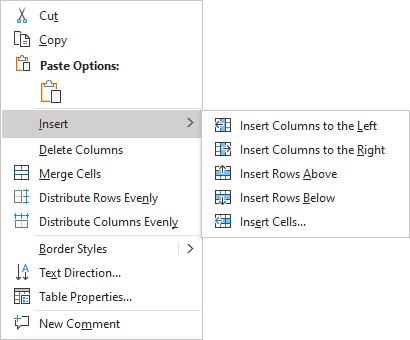
- Right-click and select the Insert list:
Notes:
- To insert rows or columns, move the mouse over the table or left of the table until you see the Insertion indicator, then click the icon:
and
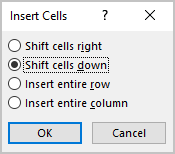
- You can choose the option Insert -> Insert Cells… from the popup menu; Word opens the Insert Cells dialog box:
After selecting the option and clicking the OK button, Word adds an entire row or column, not a cell. Word just moves cells according to the selection.
Delete a table element
To delete a table element, do the following:
1. Select the cell, multiple cells, the entire column or multiple columns, the entire row, or multiple rows.
2. Do one of the following:
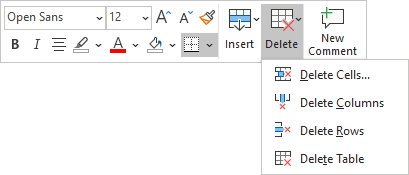
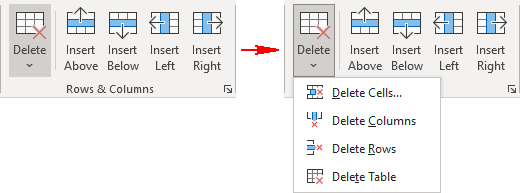
- Click the Delete dropdown list in the Mini toolbar:
- On the Table Layout tab, in the Rows & Columns group, click the Delete dropdown list, then select one of the options:
3. Select one of the proposed options:
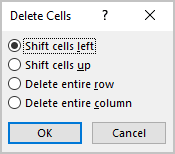
- Delete Cells… opens the Delete Cells dialog box, in which select the option you need:
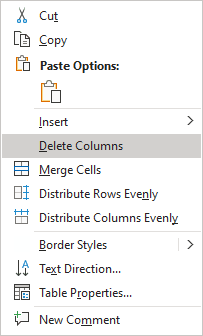
- Delete Columns
- Delete Rows
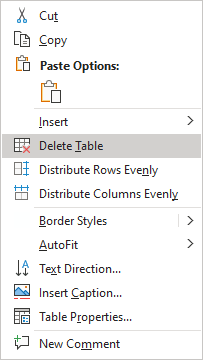
- Delete Table
Note: You can select the element you want to delete, right-click on the selection and select the appropriate item in the popup menu. For example, if the entire table is selected or the column is selected:
Convert a table into text
To convert a table into text in Word, follow the next steps:
1. Click anywhere in the table.
2. On the Layout tab, in the Format group, click the Convert to Text button:

3. In the Convert Table to Text dialog box, select the charter to separate cells data in the text:

4. Click OK.
Tables in Word are useful in so many situations. In this post you’ll discover how to create tables, then manipulate and design them in the quickest and easiest way to provide that visual punch.
Clickable Table of Contents
Enhance your Word tables with these advanced features
1. What are tables in Word good for?
Tables are useful for 2 distinct reasons.
- To show an actual table of data, or
- To organise and postion text, images and other elements on the page.
Many years ago, typewriters ruled the world. And a feature of a good typewriter was the tab stop, which was a device that essentially let you control indentation.
Over the years many people have continued to use tabs to indent text, because of its convenience, but they are hard work to set up properly.
Tables provide a much easier way to organise content on a page.
1. Select the Insert tab.
2. Click the Tables icon in the Tables group.
3. Move your mouse pointer into the table grid until the required number of rows and columns are highlighted orange, then left-click.
An empty table is inserted into the document.
Two new tabs, Design and Layout are also added to the ribbon area, under the banner of Table Tools.
3. MOVING AROUND A Word TABLE
- While the table is empty, you can use the cursor keys to move around the cells. However, when the cells contain information, using the cursor keys will move through the cell content first before moving to the next cell
- You can left-click in any cell to position the cursor.
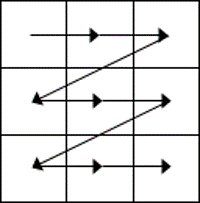
- Press Tab to move to the next cell. The cursor will move across and then down the table.
- Press Shift + Tab to move to the previous cell.
NB. Using Tab is better than using the cursors as it will move to the next/previous cell regardless of whether there is information in the cells.
NB2. If you press Tab while you are in the last cell, a new row will be added to the bottom of your table
4. SELECTING A CELL, ROW, COLUMN OR THE ENTIRE TABLE
To select a cell:
1. Position the mouse pointer inside the cell on the bottom-left corner of the cell.
The pointer will change shape to a solid black arrow that points up and right.
2. Left-click.
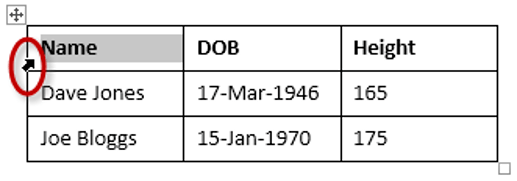
To select a row of a table:
1. Position the mouse pointer in the left margin in line with the row you want to select.
The mouse pointer will change to a white arrow that points up and right.
2. Left-click.
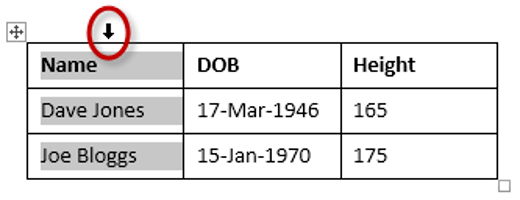
To select a column
1. Position the mouse pointer so that it rests on the top border of the table, above the column you want to select.
The mouse pointer will change to a solid black arrow pointing down.
2. Left-click.
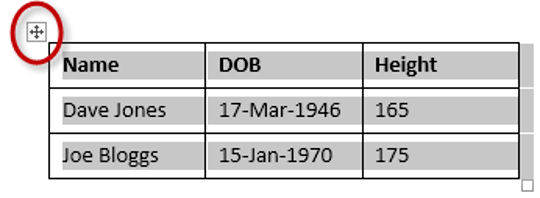
To select the entire table:
1. Position your mouse pointer over the 4-headed arrow icon situated at the top-left of the table.
2. Left-click.
5. INSERTING AN EXTRA ROW OR COLUMN
To insert an extra row:
1. Position the cursor in a cell.
2. Select the Layout tab, under the Table Tools banner.
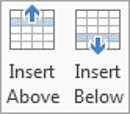
3. Click Insert Above or Insert Below in the Rows and Columns group
Here is a quick way to insert new rows:
1. Position the cursor to the left of the table, but in close proximity.
2. A plus symbol will appear above or below the mouse pointer indicating where the new row will be added.
3. Nudge the mouse pointer up or down to move the plus sign above or below.
4. Left-click to insert the new row,
To insert an extra column:
1. Position the cursor in a cell.
2. Select the Layout tab, under the Table Tools banner.
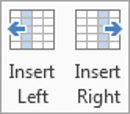
3. Click Insert Left or Insert Right in the Rows and Columns group
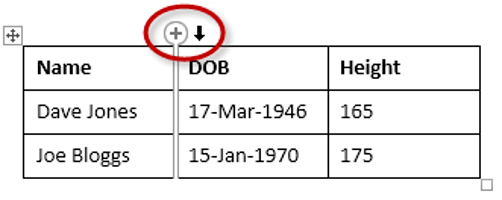
Here is a quick way to insert a new column:
1. Position the cursor above a column, but in close proximity to the table.
2. A plus symbol will appear to the left or right of the mouse pointer indicating where the new column will be added.
3. Nudge the mouse pointer left or right to move the plus sign to the left or the right of the column.
4. Left-click to insert the new column,
6. DELETING A ROW OR COLUMN
To delete the current row or column:
1. Position the cursor in any cell of the row you want to delete.
2. Select the Layout tab, under the Table Tools banner.
3. Click the Delete icon in the Rows and Columns group.
4. Choose Delete Row or Delete Column from the drop-down menu.
7. Quickly fORMATTING tables in Word
Word provides you with a number of pre-set table designs. This means that it formats the headings and the data, applies a variety of borders and colours the cells in a way that makes it look like a professionally produced table. As a beginner this simple technique will give you a good-looking table.
1. Position the cursor in any cell in the table.
2. Select the Design tab under the Table Tools banner.
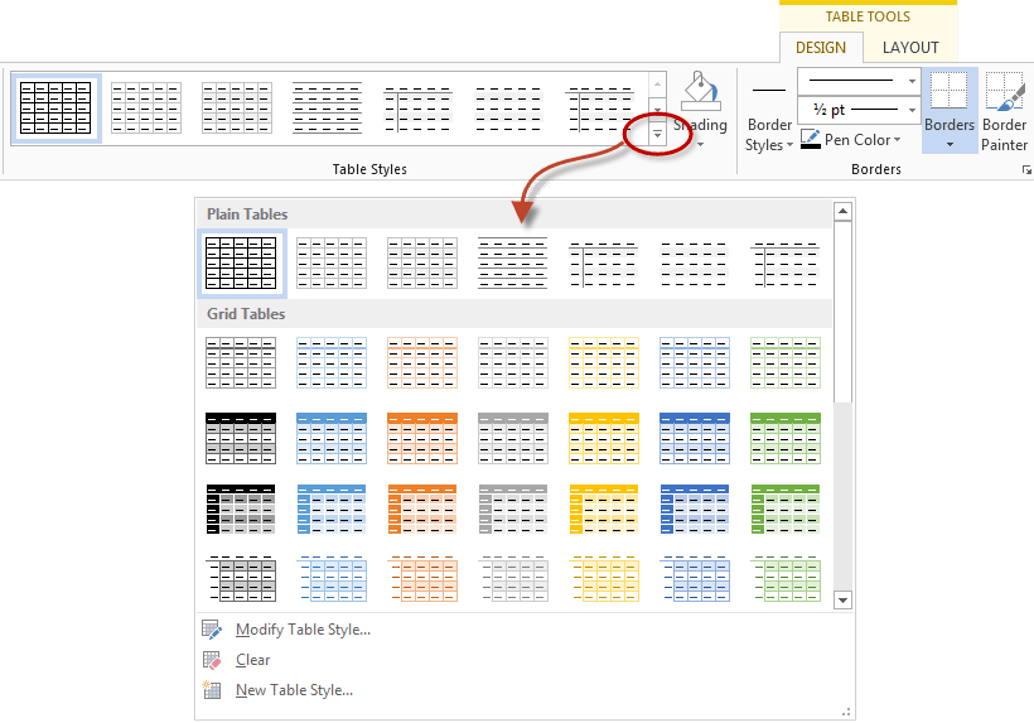
The Table Styles group lists a number of table designs. To get the full list, click the More button beneath the table styles scroll bar
The default table style is Table Grid in the Plain Tables category which adds simple gridlines but no shading to your table.
Live Preview allows you to hover over a design and see it applied to your table. If you like what you see, click to select the table design.
In the Table Style Options group of the Design tab, tick the components that you have in your table. For example, if your table has column headings, tick Header Row. In doing this, the various parts of your table are formatted accordingly
Header Row
This will emphasise the header row by making the text bold or applying a different cell colour (depending on the table style selected.
Total Row
This will emphasise the bottom table row by making the text bold or applying a different cell colour (depending on the table style selected.
First Column
This will emphasise the first column (for labels etc.) by making the text bold or applying a different cell colour (depending on the table style selected.
Last Column
This will emphasise the last column (for row totals etc.) by making the text bold or applying a different cell colour (depending on the table style selected.
Banded Rows
This will make odd rows one colour and even rows a different colour. This helps readability.
Banded Columns
This will make odd columns one colour and even columns a different colour. This helps readability.
8. SETTING THE BORDERS AND SHADING
The Table Styles Gallery allows you to completely format a table with one click. Whereas you used to need some nous, anybody can now create a professional looking design.
However, you will often still need to apply your own border and shading, and manually change a table design. With a little effort can add a lot of flavour to your page and dramatically enhance the overall appearance of the document.
To set the borders for tables in Word:
1. Select the portion of the table that you wish to set the borders for. This may be the entire table, a row or rows, a column or columns or a selection of cells.
2. Select the Design tab under the Table Tools banner.
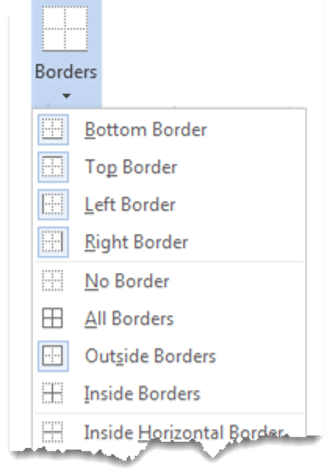
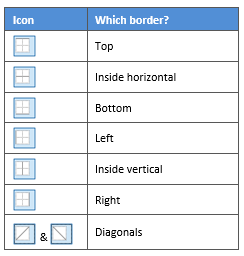
3. Select the Borders icon. A drop-down list appears. This list shows every combination of border that can be turned on or off. The icons with a shaded background are currently switched on. The rest are switched off.
4. Click any icon to switch the border on or off. The border style that is applied is the default style (½ pt solid black line ) or the last style that was used.
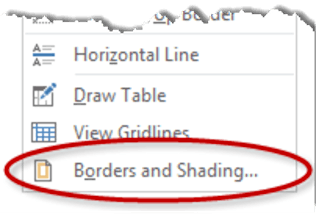
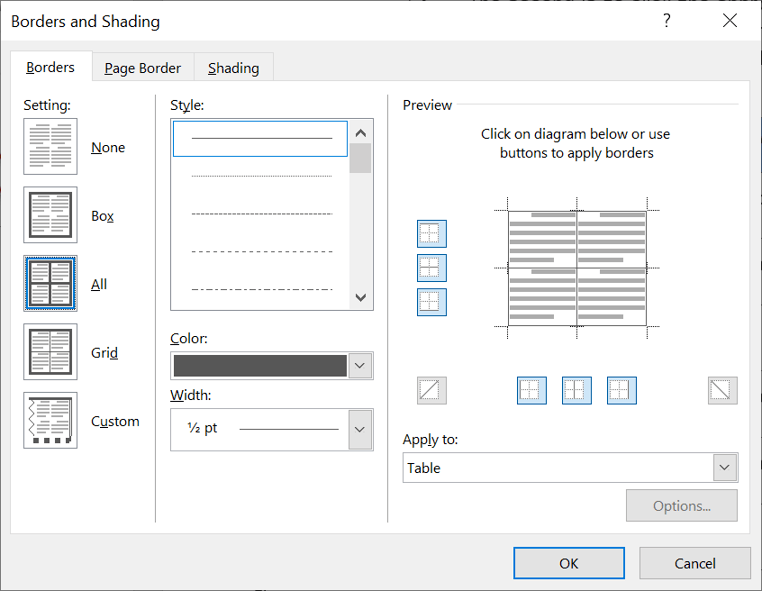
5. To apply customised borders, with different colours, styles and widths, click the Borders & Shading option at the bottom of the list to display the Borders and Shading dialog box.
Your selection will always have an outer border, and if you selected more than one cell, you will have some inside borders as well. The easiest way to use the dialog box is to start on the bottom-middle and work your way up and right.
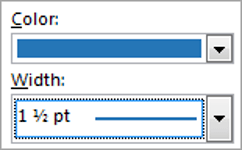
1. Select the colour and width (thickness) that you would like for your border.
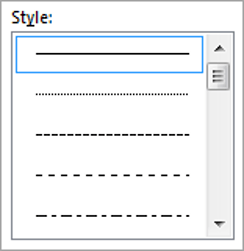
2. Choose a style (e.g. dotted, dashed, double, solid etc.)
3. Paint your borders. There are two ways to do this.
- The first way is to click directly on a border in the Preview itself.
- The second way is to click the appropriate icon around the edge of the Preview section that represents each border. Depending on which cells you selected in your table, some of these icons may not be available.
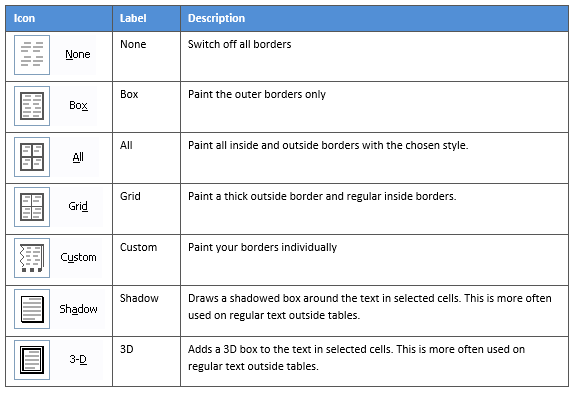
On the left-hand side of the dialog box, there are some pre-defined border combinations which you can use to save yourself some time. Depending on your selection of cells, the pre-defined options may differ. Here’s a run-down:
To shade the cells of tables in Word:
1. Select the portion of the table that you wish to shade. This may be the entire table, a row or rows, a column or columns or a selection of cells.
2. Select the Design tab under the Table Tools banner.
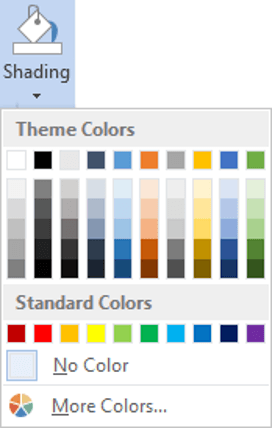
3. Click the Shading icon.
The colours that you see displayed match the current them of the document. Themes were discussed earlier in the course.
4. Click a colour in the palette.
While you can pick any colour, it is recommended to stick with the light colour shades, otherwise your tables will appear very loud and ugly, like they’re shouting in your face. Subtle is the order of the day. The exception to this is column headings or other cells that you wish to differentiate. Under these circumstances, you can use a dark colour, but use a light font with it.
If you cannot find the exact colour you need,
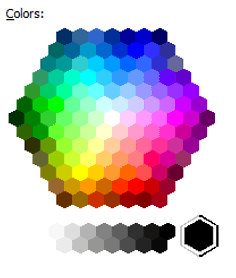
- Click the More Colours link underneath the palette. This displays a larger, more accurate colour palette.
- And if that’s not enough, click the Custom tab and you’ll get a really fine selection of colours (you can even enter your own RGB settings if you know them)
9. REPEATING table HEADINGS ON EVERY PAGE WHEN PRINTING
When you have large tables that occupy two or more pages, many people insert manual page breaks, then copy and paste their table header rows at the top of each page.
When rows are added or removed from tables in Word, the table headers end up half way down the page.
There is a simple tool that will eliminate this problem
1. Ensure that the table is a single table, with no manual page breaks in the middle, and one header at the top. The table header may occupy more than one row, it doesn’t affect the way this feature works.
2. Position the cursor somewhere in the top row of the table.
3. Select the Layout tab under the Table Tools banner.
4. Click the Repeat Header Rows icon ion the Data group.
Now, it doesn’t matter how many rows tables in Word contain, if the table ever spills across into another page, the header row (which normally displays the column headings) will always appear at the top of the table.
10. All the key points again
- Tables in Word serve 2 distinct purpose: to display a table of data and to organise and position items on the page
- To create table, select 2 tabs — Design and Layout under the Table Tools banner.
- There are 2 tabs — Design and Layout under the Table Tools banner.
- You can press the TAB key to move direct to the next cell and SHIFT and TAB together to move backwards through a table.
- The four elements of a table are cells, rows, columns and the whole table. Each can be selected.
- Rows can be inserted by selecting the Layout tab under Table Tools, then clicking the Insert Above or Insert Below icons. Alternatively, hover to the left of a row and click the plus symbol that appears above or below the mouse pointer.
- Columns can be inserted by selecting the Layout tab under Table Tools, then clicking the Insert
Left or Insert Right icons. Alternatively, hover above a table column and click the plus symbol that appears to the left or right of the mouse pointer. - Columns and rows and be removed from the table, by positioning the cursor in the row or column to be removed, then clicking the Delete icon on the Layout tab of Table Tools and choosing Delete
Row or Delete Column. - Tables can be formatted using the Table Style gallery or by manually setting the shading and borders manually. Both sets of tools are found on the Design ribbon of the Table Tools.
- When using the Microsoft Table Styles, you can control the behaviour of the formatting by setting the Table Style options – 6 tick boxes that define the structure of your table.
- For long tables that spill across onto subsequent pages, the top row, which normally contains the column headings can be set to repeat automatically. So there is no excuse for cutting and pasting headings midway through your table or taping pages together to make sense of the table!
I hope you found plenty of value in this post. I’d love to hear your biggest takeaway in the comments below together with any questions you may have.
Have a fantastic day.
About the author
Jason Morrell
Jason loves to simplify the hard stuff, cut the fluff and share what actually works. Things that make a difference. Things that slash hours from your daily work tasks. He runs a software training business in Queensland, Australia, lives on the Gold Coast with his wife and 4 kids and often talks about himself in the third person!
SHARE
This tutorial shows three ways to insert tables in Microsoft Word so you can choose the method that is most appropriate for your content:
- Create a table from the Table menu (best for general use)
- Create a table from the Table dialog box (offers the most sizing options)
- Insert a Quick Table (fastest setup)
Note that you can also draw a custom table and create a table by importing a spreadsheet from Excel. We will cover those advanced topics in separate tutorials.
Don’t miss the five tips for working with tables at the bottom of this tutorial:
- How to delete a table
- How to resize an entire table
- How to resize individual rows and columns
- How to add rows and columns
- How to add color to a table
This tutorial is also available as a YouTube video showing all the steps in real time.
Watch more than 200 other writing-related software tutorials on my YouTube channel.
The images below are from Word for Microsoft 365.The steps are the same in Word 2021, Word 2019, and Word 2016 and similar for Word 2013 and Word 2010. However, your interface may look slightly different in those older versions of the software.
This method is appropriate for most users who want to create a basic table for general use.
- Place your cursor where you want to insert the table.
- Select the Insert tab in the ribbon.
- Select the Table button in the Tables group.
- Move your pointer across and down the grid to select the number of cells (organized as rows and columns) needed in your table.
The selected cells will turn orange.
- Click the selected (orange) part of the grid or press Enter on your keyboard to insert the table.
Method 2: Create a Table from the Table Dialog Box
This method provides advanced sizing options.
- Place your cursor where you want to insert the table.
- Select the Insert tab in the ribbon (see figure 1).
- Select the Table button in the Tables group (see figure 2).
- Select Insert Table from the drop-down menu.
- Enter the number of rows and columns in the Insert Table dialog box.
- Select an AutoFit behavior:
-
- Fixed column width can be set to Auto or a specific width between 1/100 inch and twenty-two inches using the increment arrows.
- AutoFit to contents adjusts cell sizes to the content.
- AutoFit to Window adjusts the width of the table to the viewer’s Word window or browser window.
- (Optional Step) Check Remember dimensions for new tables if you want to create the same size table in the future.
- Select the OK button to close the Insert Table dialog box and insert your new table.
Method 3: Insert a Quick Table
Quick Tables are prebuilt tables and calendars you can modify for your own use.
- Place your cursor where you want to insert the table.
- Select the Insert tab in the ribbon (see figure 1).
- Select the Table button in the Tables group (see figure 2).
- Select Quick Tables from the drop-down menu.
- Select a table from the gallery.
- Add your own content by typing over or deleting the table’s example text.
Now let’s look at some tips for working with tables.
Five Tips for Working with Tables in Word
The following tips cover the basics of working with tables. We will dive into this topic in much greater detail in a separate tutorial.
Tip 1: How to Delete a Table
- Select the table selector, which looks like crossed arrows, to select the entire table. You may have to hover your pointer over the table to reveal the table selector.
- Right-click the table.
- Select Delete Table from the shortcut menu.
Tip 2: How to Resize an Entire Table
- Click and hold the resizing handle in the bottom right of the table. You may need to hover your pointer over the table to reveal the handle.
- Drag the table to the size you want and then release the handle.
Tip 3: How to Resize Individual Rows and Columns
- Hover your pointer over a row or column border until your pointer becomes two lines with two arrows.
Note that the pointer in figure 14 is enlarged to make it easier to see. Your pointer will be smaller.
- Click and hold as you drag the border to resize the row or column.
Tip 4: How to Add Rows and Columns
- Right-click inside a cell.
- Select Insert from the shortcut menu.
- Select the location of your new row or column:
-
- Insert Columns to the Left
- Insert Columns to the Right
- Insert Rows Above
- Insert Rows Below
- Insert Cells
If you select Insert Cells, a dialog box will appear asking where you want to insert your new cells. Note that regardless of your answer, you will be inserting an entire row or column, not an individual cell.
Tip 5: How to Add Color to a Table
- Select the table selector, which looks like crossed arrows, to select the entire table (see figure 11). You may need to hover your pointer over the table to reveal the table selector.
- Select the Table Design tab in the ribbon. (Note that this tab only appears in the ribbon when a table is selected.)
- Select the down arrow in the Table Styles group.
- Select one of the styles from the gallery.
Alternatively, you can use the shading menu to add custom colors to individual rows and columns.
Pro Tip: For even more customization, add a background image to your table. Then, save your customized table as a template for reuse in future documents, as shown in “How to Save Tables as Templates in Microsoft Word.”
Related Resources
How to Create and Customize Charts in Microsoft Word
How to Save Tables and Figures as Images in Microsoft Word (PC & Mac)
How to Insert Figure Captions and Table Titles in Microsoft Word
How to Change the Style of Table Titles and Figure Captions in Microsoft Word
How to Update Table and Figure Numbers in Microsoft Word
How to Create and Update a List of Tables or Figures in Microsoft Word
How to Export PDF Tables from Adobe Acrobat to Excel (PC & Mac)
How to Write Table Titles
How to Write Figure Captions for Graphs, Charts, Photos, Drawings, and Maps
How to Reference Tables and Figures in Text
Updated February 27, 2023
Lesson 21: Working with Tables
/en/word2010/reviewing-documents/content/
Introduction
A table is a grid of cells arranged in rows and columns. Tables can be customized and are useful for various tasks such as presenting text information and numerical data.
In this lesson, you will learn how to convert text to a table, apply table styles, format tables, and create blank tables.
Inserting and modifying tables
In Word, tables are useful for organizing and presenting data. You can create a blank table, convert text to a table, and apply a variety of styles and formats to existing tables.
Optional: You can download this example for extra practice.
To insert a blank table:
- Place your insertion point in the document where you want the table to appear.
- Select the Insert tab.
- Click the Table command.
- Hover your mouse over the diagram squares to select the number of columns and rows in the table.
Inserting a new table
- Click your mouse, and the table appears in the document.
- You can now place the insertion point anywhere in the table to add text.
To convert existing text to a table:
- Select the text you want to convert.
- Select the Insert tab.
- Click the Table command.
- Select Convert Text to Table from the menu. A dialog box will appear.
Converting text to a table
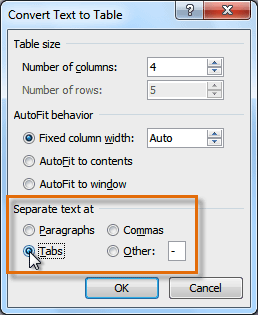
- Choose one of the options in the Separate text at: section. This is how Word knows what text to put in each column.
Separating text at Tabs
- Click OK. The text appears in a table.
The converted table
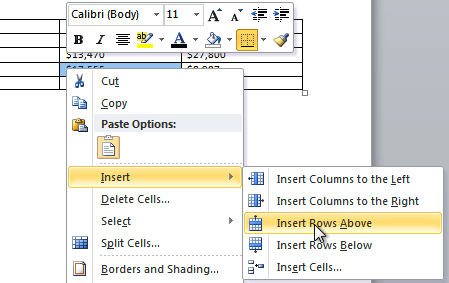
To add a row above an existing row:
- Place the insertion point in a row below the location where you want to add a row.
Placing the insertion point
- Right-click the mouse. A menu appears.
- Select Insert
Insert Rows Above.
Adding a row
- A new row appears above the insertion point.
The new row
You can also add rows below the insertion point. Follow the same steps, but select Insert Rows Below from the menu.
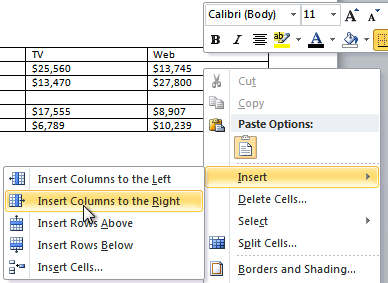
To add a column:
- Place the insertion point in a column adjacent to the location where you want the new column to appear.
- Right-click the mouse. A menu will appear.
Adding a column
- Select Insert
Insert Columns to the Left or Insert Columns to the Right. A new column appears.
The new column
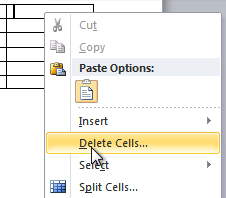
To delete a row or column:
- Select the row or column.
- Right-click your mouse. A menu will appear.
- Select Delete Cells.
Selecting Delete Cells
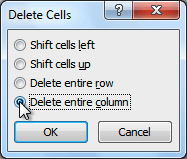
- Select Delete entire row or Delete entire column, then click OK.
Deleting a column
To apply a table style:
- Click anywhere on the table. The Design tab will appear on the Ribbon.
- Select the Design tab and locate the Table Styles.
- Click the More drop-down arrow to see all of the table styles.
Viewing the Table Styles
- Hover the mouse over the various styles to see a live preview.
- Select the desired style. The table style will appear in the document.
After adding a Table Style
To change table style options:
Once you’ve chosen a table style, you can turn various options on or off to change the appearance of the table. There are six options: Header Row, Total Row, Banded Rows, First Column, Last Column, and Banded Columns.
- Click anywhere on the table. The Design tab will appear.
- From the Design tab, check or uncheck the desired options in the Table Style Options group.
Table Style Options
Depending on which table style you’re using, certain table style options may have a somewhat different effect. You may need to experiment to get the exact look you want.
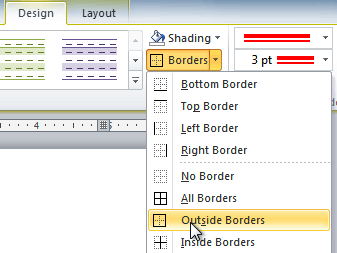
To add borders to a table:
- Select the cells you want to add a border to.
Highlighted cells
- From the Design tab, select the desired Line Style, Line Weight, and Pen Color.
Line Style, Line Weight, and Pen Color commands
- Click the Borders drop-down arrow.
- From the drop-down menu, select the desired border type.
Selecting a border type
- The border will be added to the selected cells.
The finished border
Modifying a table using the Layout tab
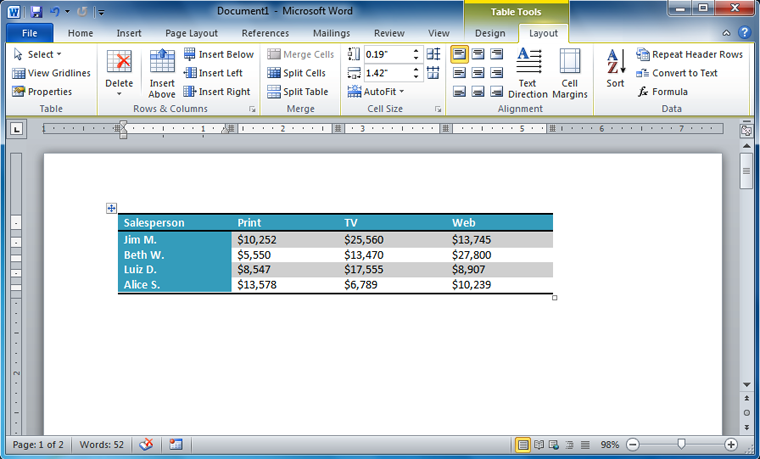
When you select a table in Word 2010, Design and Layout tabs appear under Table Tools on the Ribbon. Using commands on the Layout tab, you can make a variety of modifications to the table.
Click the buttons in the interactive below to learn about the different ways you can modify a table with the Layout tab.
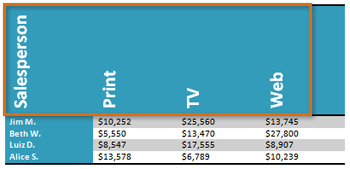
Change Text Direction
Making the text vertical can add style to your table and saves space, allowing you to fit more columns in your table.
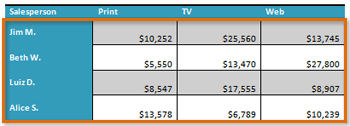
Align Cell Text
By changing the alignment of a cell, you can control exactly where the text is located. In the example below, the cell text is aligned to the bottom-right.
Distribute Rows/Columns
To keep your table looking neat and organized, you may want to distribute the rows or columns equally, which makes them all the same size. You can distribute the rows or columns for the entire table or just a portion of it.
Change Cell Size
You can type a desired row height or column width for your cells. If you prefer, you can click AutoFit, and it will automatically adjust column widths based on the text inside them.

Merge and Split Cells
Some tables require a layout that doesn’t conform to the standard grid. In these cases, you may need to merge or split cells.

Add Rows and Columns
You can insert or delete rows and columns in your table. This can be especially useful if you need to add something to the middle of your table.

Challenge!
- Open an existing Word document. If you want, you can use this example.
- Convert some text into a table. If you are using the example, convert the text below By Client.
- Apply a table style, and experiment with the table style options. If you are using the example, see if you can make the table match the By Salesperson table above it.
- Delete a row from the table.
- Insert a blank table with five rows and four columns.
- Add borders to the blank table.
/en/word2010/smartart-graphics/content/
Insert and Edit a Table with Multiple Columns and Rows in Word
by Avantix Learning Team | Updated August 23, 2022
Applies to: Microsoft® Word® 2013, 2016, 2019, 2021 and 365 (Windows)
You can create a table in a Word document in 4 easy ways using the Ribbon. A table is a grid made up of columns and rows that intersect to form cells. You can insert text, numbers and images in a table. Once you have inserted a table, you can easily add and resize columns and rows and change table formatting.
It’s best to avoid using Draw Table to create a table since the table may not be created in a consistent way.
Note: Buttons and Ribbon tabs may display in a different way (with or without text) depending on your version of Word, the size of your screen and your Control Panel settings. For newer versions of Word, Ribbon tabs may appear with different names. For example, the Table Design tab may appear as Table Tools Design.
In the following example, a table with 4 columns and 5 rows has been inserted in a Word document:
Recommended article: 10 Microsoft Word Shortcuts for Moving Around in Tables
Do you want to learn more about Microsoft Word? Check out our virtual classroom or in-person classroom Word courses >
Create a table using the Table Grid
To insert a table using Insert Table and select columns and rows in the Table Grid:
- Click in the Word document where you want to insert a table.
- Click the Insert tab in the Ribbon.
- Click Table in the Tables group. A drop-down menu appears with a Table Grid.
- Hover over the grid until the number of columns and rows you want is selected.
- Click in the highlighted area of the grid to insert a table.
To insert a table, select cells in the Table Grid as follows:
Create a table using the Insert Table dialog box
To insert a table using the Insert Table dialog box:
- Click in the Word document where you want to insert a table.
- Click the Insert tab in the Ribbon.
- Click Table in the Tables group. A drop-down menu appears.
- Select Insert Table. A dialog box appears.
- Enter the number of columns and rows you want to create.
- Select the desired options below AutoFit behavior (typically Fixed column width: Auto).
- Click OK.
The Insert Table dialog box appears with options to select the number of columns and rows:
Create a table using Quick Tables
To insert a table using Quick Tables:
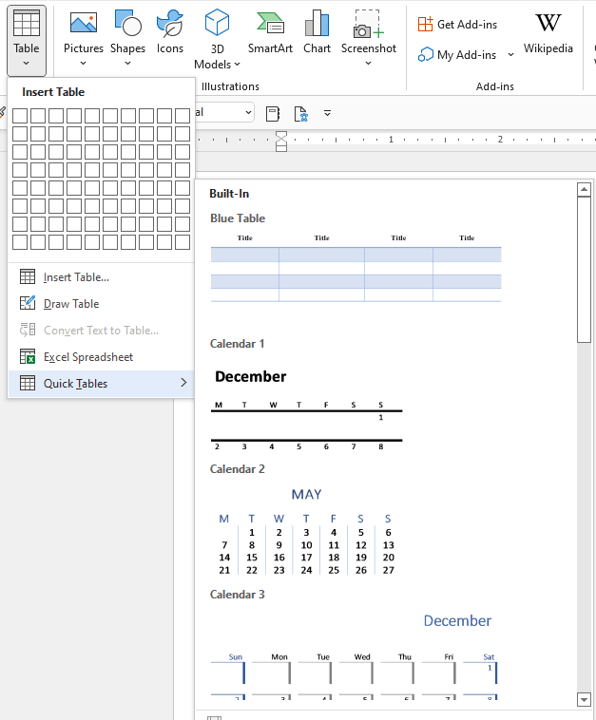
- Click in the Word document where you want to insert a table.
- Click the Insert tab in the Ribbon.
- Click Table in the Tables group. A drop-down menu appears.
- Select Quick Tables. A gallery appears.
- Click the table you want to insert.
Quick Tables appear in the Table drop-down menu:
Create a table by converting text to a table
If you have used tabs or other delimiters in paragraphs, you can convert the data into a table (if the delimiters are entered consistently). Wherever you have pressed Enter or Return to create a new paragraph, Word will create a new table row. You can use various delimiters to separate data but the most common are tabs, spaces or commas.
To convert delimited data to a table:
- Select the text that you want to convert.
- Click the Insert tab in the Ribbon.
- Click Table in the Tables group. A drop-down menu appears.
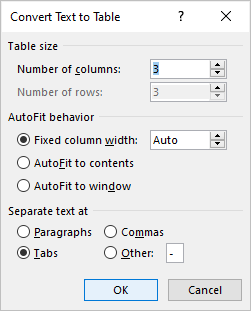
- Select Convert Text to Table. A dialog box appears.
- Enter the number of columns if necessary and ensure a delimiter is selected in the Separate text at area.
- Under AutoFit behavior, choose how you want your table to appear. Word chooses a width for the table columns by default. If you want a different column width, choose AutoFit to contents or AutoFit to window.
- Click OK.
In the Convert Text to Table dialog box, enter the number of columns as well as the delimiter:
Show table gridlines
Gridlines show the cell boundaries of a table on screen if table borders are not applied. Gridlines appear only on the screen and are not printed.
Gridlines are not visible when you view a document in a Web browser or in Print Preview.
To show table gridlines in a Word document:
- Click in a table.
- Click the Table Layout or Table Tools Layout tab in the Ribbon.
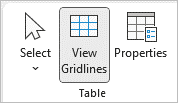
- In the Table group, check View Gridlines.
View Gridlines appears on the Table Tools Layout or Table Layout tab in the Ribbon:
Move around in a table
You can use the following keys to move from one cell to another in a table:
- Tab to move to the next cell to the right.
- Shift-Tab to move to the cell to left.
- Ctrl-Tab to tab within a cell.
Add a row or a column
To add a row in a table:
- Click in a cell that is located above or below where you want to add a row.
- Click the Table Layout or Table Tools Layout tab in the Ribbon.
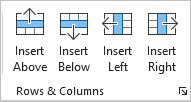
- To add a row above the cell you clicked in, click Insert Above in the Rows and Columns group. To add a row below the cell you clicked in, in the Rows and Columns group, click Insert Below.
The commands to insert rows or columns appear on the Table Tools Layout or Table Layout tab in the Ribbon:
You can also right-click in a row and choose Insert from the drop-down menu and insert options from the sub-menu.
If you click in the last cell in a table and press Tab, Word will automatically add a row.
To add a column in a table:
- Click in a cell that is located to the right or left of where you want to add a column.
- Click the Table Layout or Table Tools Layout tab in the Ribbon.
- To add a column to the left of the cell you clicked in, click Insert Left in the Rows and Columns group. To add a column to the right of the cell you clicked in, in the Rows and Columns group, click Insert Right.
You can also right-click in a row and choose Insert from the drop-down menu and insert options from the sub-menu.
Delete a column or row
To delete a row or column:
- Select the row or column (drag over the cells or click to the left of a row or above a column when the arrow appears).
- Click the Table Layout or Table Tools Layout tab in the Ribbon.
- In the Rows & Columns group, click Delete. A drop-down menu applears.
- Click Delete Rows or Delete Columns as appropriate.
You can also right-click in a row or column and choose Delete from the drop-down menu and delete options from the sub-menu.
Change column width
To change column width:
- Select the column or columns you want to change.
- Click the Table Layout or Table Tools Layout tab in the Ribbon.
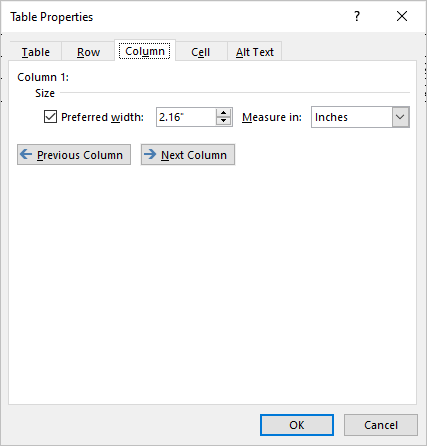
- Click Properties in the Table group. You can also right-click and choose Properties from the drop-down menu. A dialog box appears.
- Click the Column tab.
- Check Preferred Width.
- Type the new measurement for the column width. For example, typer 1.0″ or click the up and down arrows.
- Click OK.
The Table Properties dialog box appears as follows with the Column tab selected:
You can also drag the right line of a column to resize it.
Change row height
To change row height:
- Select the row or rows you want to change.
- Click the Table Layout or Table Tools Layout tab in the Ribbon.
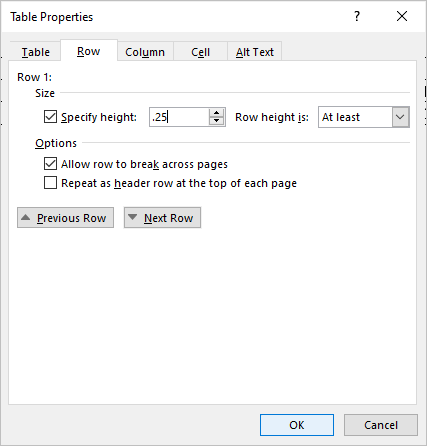
- Click Properties in the Table group. You can also right-click and choose Properties from the drop-down menu. A dialog box appears.
- Click the Row tab.
- Check Specify Height.
- Type the new measurement for the row height. For example, type 1.0″ or click the up and down arrows.
- Specify row height as At Least or Exactly.
- Click OK.
The Table Properties dialog box appears as follows with the Row tab selected:
You can also drag the bottom line of a row to resize it.
Distribute rows and columns evenly
To distribute rows and columns evenly:
- Select the entire table by clicking the four-arrows that appear on the top left of the table.
- Click the Table Layout or Table Tools Layout tab in the Ribbon.
- Click Distribute Rows and / or Distribute Columns in the Cell Size group.
Apply a table style
To apply a table style:
- Click in the table.
- Click the Table Design or Table Tools Design tab in the Ribbon.
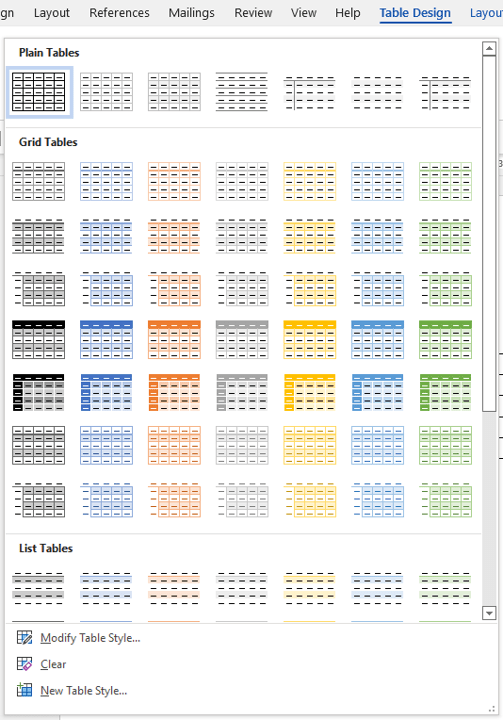
- Click a table style or click the More arrow to display the Table Styles gallery and click a style.
Table Styles gallery appears on the Table Tools Design or Table Design tab in the Ribbon:
To learn more about working with table styles, check out the article How to Format Microsoft Word Tables Using Table Styles (Ultimate Guide).
Subscribe to get more articles like this one
Did you find this article helpful? If you would like to receive new articles, JOIN our email list.
More resources
4 Ways to Delete a Table in Word
How to Make Columns in Word (Newspaper-style)
How to Insert Formulas and Functions in Word Tables
How to Keep a Microsoft Word Table Together on One Page
How to Delete a Page in Word (Remove Blank or Extra Pages)
Related courses
Microsoft Word: Intermediate / Advanced
Microsoft Excel: Intermediate / Advanced
Microsoft PowerPoint: Intermediate / Advanced
Microsoft Word: Long Documents Master Class
Microsoft Word: Styles, Templates and Tables of Contents
Microsoft Word: Designing Dynamic Word Documents Using Fields
VIEW MORE COURSES >
Our instructor-led courses are delivered in virtual classroom format or at our downtown Toronto location at 18 King Street East, Suite 1400, Toronto, Ontario, Canada (some in-person classroom courses may also be delivered at an alternate downtown Toronto location). Contact us at info@avantixlearning.ca if you’d like to arrange custom instructor-led virtual classroom or onsite training on a date that’s convenient for you.
Copyright 2023 Avantix® Learning
Microsoft, the Microsoft logo, Microsoft Office and related Microsoft applications and logos are registered trademarks of Microsoft Corporation in Canada, US and other countries. All other trademarks are the property of the registered owners.
Avantix Learning |18 King Street East, Suite 1400, Toronto, Ontario, Canada M5C 1C4 | Contact us at info@avantixlearning.ca
Microsoft Word Tables
Microsoft Word offers a very powerful table feature, but it can be a bit of an art working with tables sometimes. In a series of blogs I aim to run through some simple, but essential tasks when working with tables in Word.
It is easy enough to copy and paste a data set into Word from a source such as a Microsfot Excel workbook as a lot of default formats are applied when the data is pasted, but formatting it to your requirements is then often the challenge.
In Working with Tables in Microsoft Word — Part 1 we will look at:
- Pasting Excel workbooks into Word
- default table styles
- basic table customisation
- repeating headings on every page the table flows on to
- splitting tables
Excel Workbook to Word Table
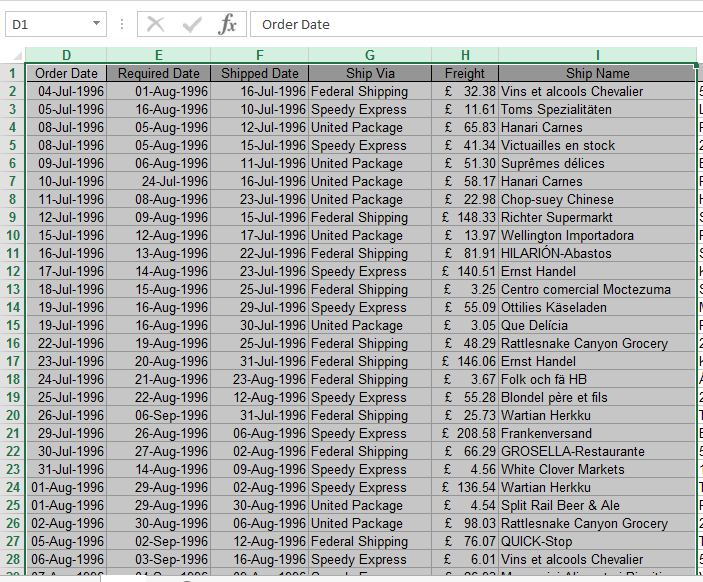
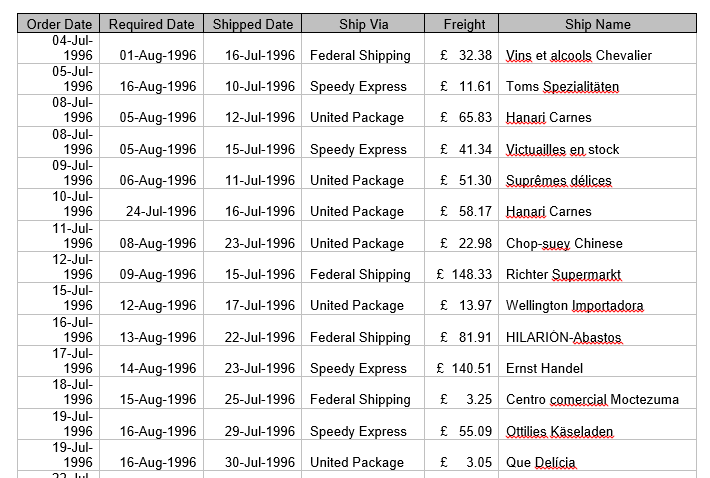
Here is an example of data from an Excel workbook that is simply pasted (CTRL-V) into a Word document:
If we paste this selected range into word using a standard paste (CTRL-V) then a default table will be created for us:
You can see that we get the column headers highlighted as a table header row, and a separate column created for each column copied from the Excel workbook. We have default column widths which has resulted in some wrap arounds, and we have default border styles with a thin line.
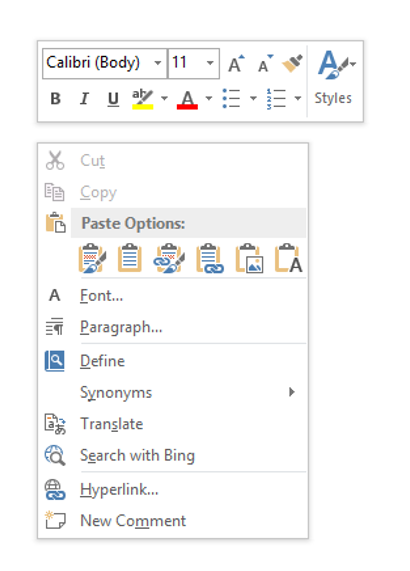
We could start with this default layout and modify it or we could paste the data in as simple text and then create the table from scratch. If you right click in the location you wish to paste the data into you will see the following pop up menu – the last paste option labelled with an A is the simple text paste:
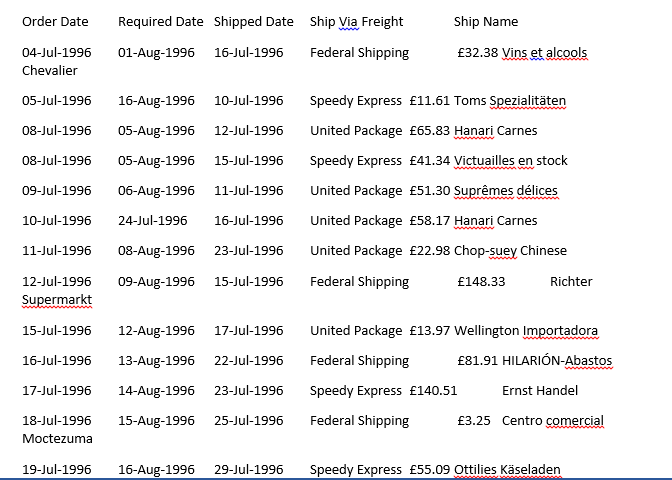
Here is how the data would look if we pasted it just as text:
Converting Text to a Table
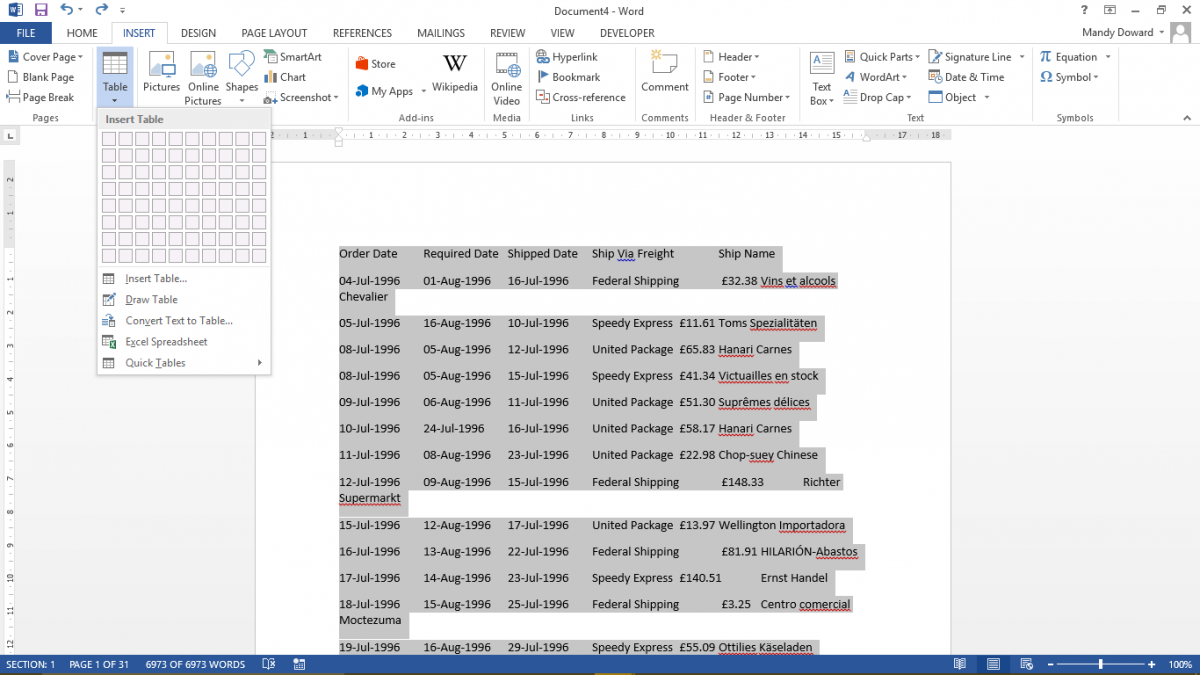
As we have simply pasted text into Word we now need to convert this text into a table. This can be done via the Insert ribbon. The Convert Text to Table option in the Table drop down enables us to specify row and field delimiters to convert the plain text to a table. Select the text to be converted and then choose the Convert Text to Table option:
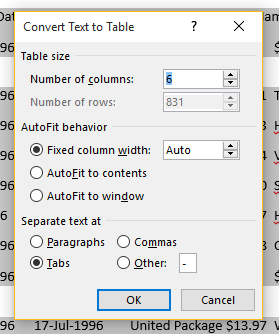
The following dialog will be displayed:
You can see that Word has detected that the selected text has tabs between each field and has, therefore, deduced that there will be 6 columns required in the table. The row delimiter is taken to be a new line and Word has recognised 831 rows (there were 830 data rows and a header row pasted from the Excel workbook).
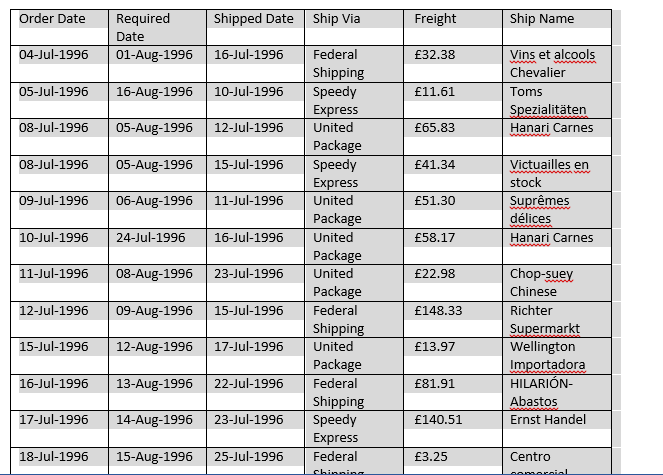
Here is the resulting table:
Formatting a Word Table
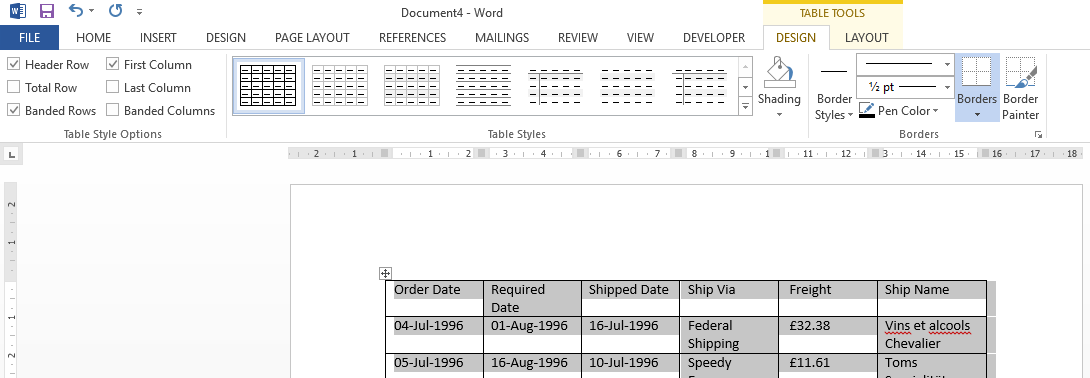
Regardless of which method you choose to create your table you can format it via the Table Design ribbon, accessible via the Table Tools context tab:
Table Tools Design Tab
Word Table Styles
There are some short cut options to format your table by selecting one of the predefined styles in the Table Styles section of the ribbon. Alternatively you can manually format the table. The predefined Table Styles can be customised using the tick boxes on the left hand side of the ribbon.
On the left of the Table design ribbon you can see options to:
- Indicate that there is a column headings row (Header Row tick box)
- Indicate that there is a row heading column (First Column tick box)
- Add a total row (Total Row tick box)
- Add a total column (Last Column tick box)
- Select banded rows or banded columns
You will see that as you tick or untick these boxes the Table Styles icons change to refelct your choices. In the following example we have selected row headings, banded rows and a total row, but deselected First Column.
You can see that the table styles are different to the default ones we saw when we first converted the text to a table (compare with the earlier screen shot).
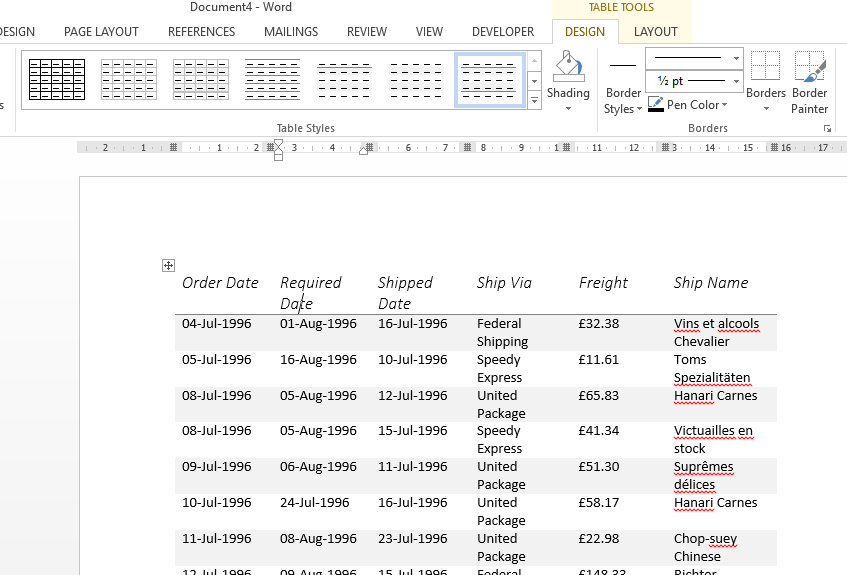
We will now choose the 7th table style (Plain Table 5) and here is the result:
Once you have created the basic layout for your table you can customise it manually. On the right of the Table design ribbon you can see options to:
- change the shading of rows and columns
- change the border styles for the table
- change line widths and styles
Customising Word Tables
Table Tool Layout Tab
We can customise many elements of our table through the Table Layout ribbon:
Repeating Row Headings Across Pages
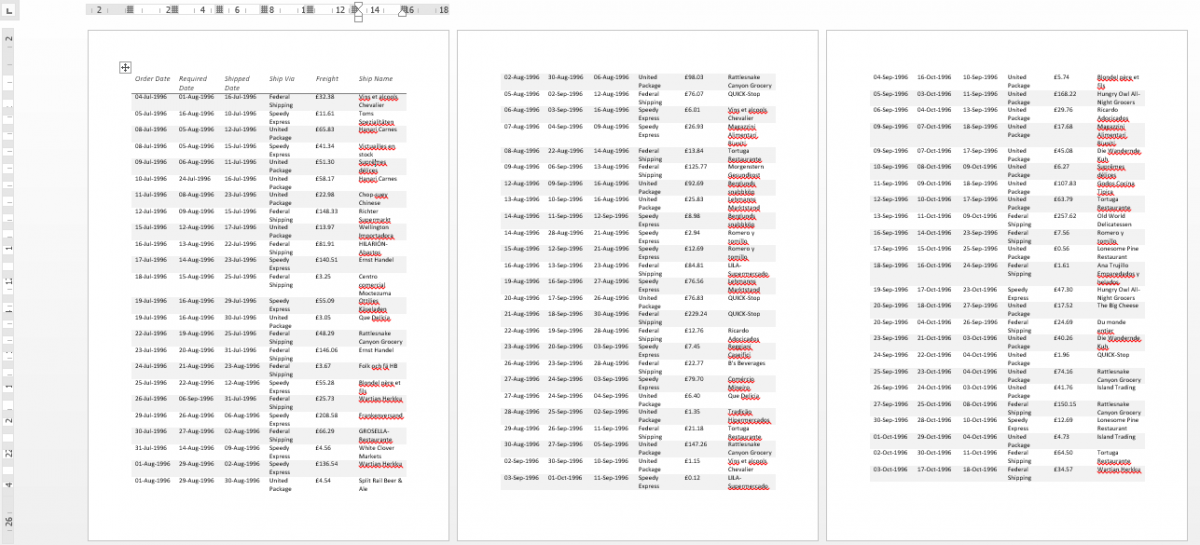
Our table currently has a row of column headings (a header row), but this is not repeated as we page through the document, as shown by the screen shot below of a multipage view of our table:
On the far right hand side of the Layout ribbon is an option “Repeat Header Rows”. This option will be greyed out until a row (or rows) from the table is selected. The following screen shot shows that we have selected the headings row, and the option has become available:
Clicking on the Repeat Header Rows option enables the option. You can see the multipage view below now shows the column headings (the headings row) being repeated on every page:
Splitting Word Tables
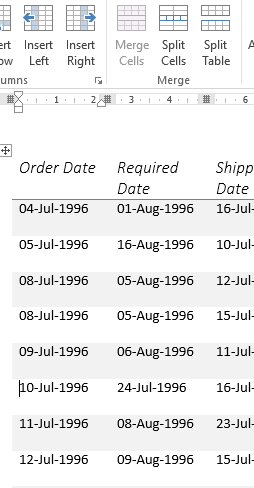
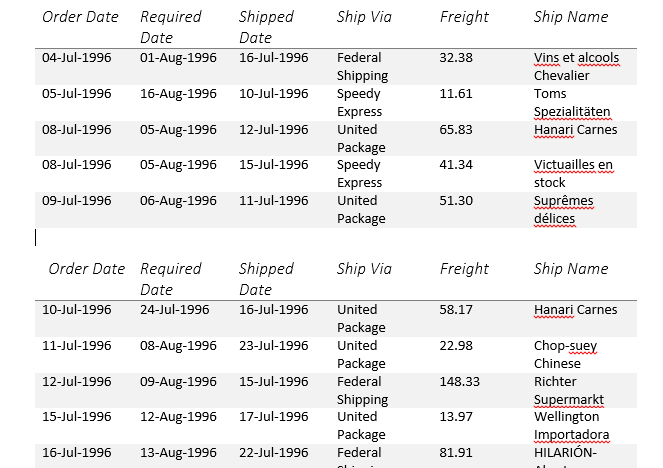
Sometimes we may wish to split a single table into several smaller tables. We can achieve this via the Table Tools Layout ribbon. There is a Split Table option in the Merge section of the ribbon:
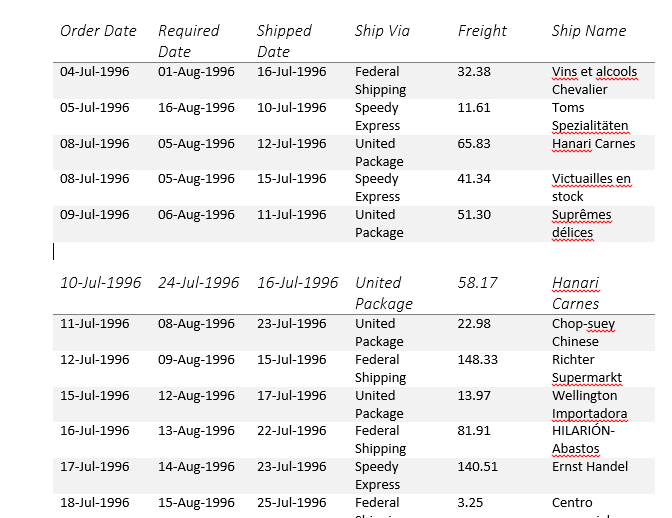
Click in the row that you wish to split the table at and then click on the Split Table option. In this example the cursor is positioned in the row for 10-Jul-1996, here is the result:
As you can see the table has been split correclty, but the column headings have not been included in the newly created table.
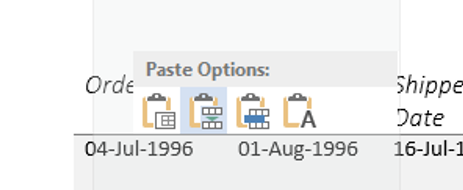
To finish the job you will need to copy the header row from the first table and insert it into the second one. To achieve this select the header row and copy it to the clipboard. Now right click on the first row of the second table. A paste menu will appear:
Choose the second option (Merge Table). Your second table will now look as follows:
I hope you have found this useful. Keep an eye out for Part 2 on our blog page.
If you would like to learn more about Microsoft Word take a look at our Word Training Courses.
In this lesson, we’re going to delve into tables, which are a huge part of laying out well formatted documents. After we discuss tables, we’ll cover some other controls that will help round out your formatting prowess, including adding links, using symbols, creating math equations, and quite a bit more!
By now, you should be very well acquainted with getting your documents up to a level where you can adjust the tabbing and indenting, paragraph alignments, line spacing, and create quick, customized lists. If you need a refresher of what we’ve covered so far, you should check out Lesson 1 and Lesson 2 so you can bring yourself up to speed.
One of the most common formatting elements you will use in Microsoft Word are tables, so much so that it’s probably a surprise we aren’t covering them until now!
Tables are a tried-and-true method of presenting data in rows and columns. They are very simple to insert and manipulate in Word. When you click on the “Tables” button on the “Insert” tab, you’re given several options.
Here you see a grid that allows you to quickly spec out a table but you can also insert, draw, or pick from some predefined “Quick Tables”.
The fast way is to simply trace out the table you want using the provided grid. In the screenshot, you see we trace out a 6 x 5 table, which is previewed in the document.
With your table now placed into your document, you can set out about formatting it, which we’ll cover shortly.
Insert Table
Secondly, you can “Insert Table,” which means you just input the number of columns and rows and how you want the column to “AutoFit.” If you choose fixed column width, you can select “auto” or you can assign a size. Alternatively, you can AutoFit columns to fit the contents, or you can have the content AutoFit to the window.
Finally, if you intend to reproduce the table or you use that size frequently, you can have the “Insert Table” dialog remember those dimensions for new tables.
Draw Table
When you draw a table, the cursor is changed to a pencil and you can “draw” out the column and rows. In this way you can size the table to your liking.
Once you draw your first cell, you can then draw further cells, and create the table that is more based on how you want it to look than necessarily what it requires.
Convert Text to Table
Let’s imagine you have a bunch of text and numbers, and you realize that it would be easier to read if it were in neat columns and rows. Not to fear, text to table will allow you to quickly and easily convert all that data into a table that you can then format to your heart’s content.
So how does this work? Simply, when you want to convert a section of your document to a table, you select the section using your mouse pointer and then select “Convert Text to Table.” The resulting dialog box allows you to choose how many columns you want.
The number of rows will be automatically determined by line breaks, so for example, if you have a block of text divided with flour line breaks, your table will have four rows.
Columns are determined by commas, tabs, paragraph breaks, or another symbol you can manually assign.
Quick Tables
Quick tables are fairly easy to reason out. Let’s say you want to insert a quick calendar, matrix, or a tabular list. You can also create your own table and save it to the list for later, quick use. Simply select the table you want to save, and select “Save Selection to Quick Tables Gallery.”
There’s not a whole lot to master here. Keep in mind, when you insert a quick table, you can then edit and format as you would any table that you created from scratch. And, on that note, let’s actually dive into all that formatting information we’ve been alluding to throughout this lesson.
Formatting Tables
On the Ribbon, the “Table Tools” tabs are contextual tabs that appears whenever you create or click on a table. The functions found here give you an easier visual way of quickly manipulating tables where you might otherwise use right-click options.
The “Table Tools” are divided into two tabs. “Layout” (pictured above), which lets you add and remove columns, adjust height and width, and text alignment. Many of these controls can be accessed directly from the right-click context menu, but it’s nice to have all your options arrayed before you.
Note though, the context menu you get, will depend on where you click. If you click on the little table control in the upper-left corner:
You get a larger variety of tools at your disposal. Note also, you can delete a table easily this way:
Back to the Ribbon, on the far right side of the “Layout” tab, you’ll find some handy controls for controlling your “Alignment” and “Data.”
So, for example, if you want your headers to be perfectly centered within their cells, while having your data cells left-justified, you’d simply select the cells to affected and click the alignment you desire.
You can also “Sort” cell data, insert formulas, convert your table to plain text, and repeat header rows. The last option is useful if you have a table that spans multiple pages, you can designate “header rows,” which will persist as you scroll through the table. This is useful for keep track of what column is what in long tables.
The “Design” tab by contrast is all about how your table(s) appear.
Note when you click on the scrollbar in “Table Styles” a larger menu appears granting you greater built-in options.
At the bottom of this menu, you can modify your table’s style if the current selection of tables doesn’t suit you. When you make changes, they will be previewed so you can see them before you commit.
While formatting or modifying a table, if the built-in selections aren’t close to what you want, you may just want to start from scratch. In this case, you can you the “New Style” dialog, which will be allow you to build a new table style based on current table styles.
There’s little difference to this dialog and the modify dialog except that modifying is based off an existing table design.
In the end, formatting your tables is going to come down to what kind of data you’re presenting and personal preference. We suggest that if you want to fully master tables, you create a blank document and mess around to your heart’s content. We are certain you’ll be creating and formatting eye-catching data-sets in less than it takes to say “columns and rows!”
Excel Spreadsheet
You can actually create an Excel spreadsheet table in Word. This will act and function just like a regular Excel spreadsheet. So you can copy and paste existing spreadsheet values in, or make a new one with Excel formulas and functions.
Note, if you want to learn more about Excel formulas and functions, check out our How-to Geek School series on Excel Formulas and Functions!
Once you have inserted or filled in the spreadsheet with the values, it will appear similar to a table though it is technically known as a “workbook object.”
With your data inserted and table created, you can right-click on it and do some basic formatting like changing the borders and adjusting the shading, but it won’t be the same as formatting a traditional Word table.
Other Formatting Controls
On the right half of the Insert tab are some further formatting controls you should be aware of. Some of these may be of limited daily value to you, but we think it’s important to know about them in case you ever have need for them.
Links
Hyperlinks, bookmarks, and cross-references are all classified as “Links” on the “Insert” toolbar.
Hyperlinks allow you to link pieces of text to locations on your computer, network, or the Internet. You can also select your text, right-click and choose “Hyperlink” from the context menu. In the “Insert Hyperlink” dialog, paste or type your address in the provided space.
It doesn’t have to be an Internet URL either, it can simply refer to a location on your computer or another location in your document. Mostly though, you will probably want to refer to an Internet location, such as the best place on earth to get your geek fix!
Header, Footer, and Page Number
Headers and footers are useful for repeating the same piece of information at the top and/or bottom of each page, such as if you want to have the title of your book at the top of each page, or similarly, page numbers.
When you click on either the header or the footer button, you can choose from an assorted of predefined styles.
When you choose a style, the header or footer will open and the Ribbon will change to present you with special formatting options.
So you can type in your header or footer, and then decide where you want to position it, whether it’s the same across each page, and so on.
In the same vein, when you add page numbers, you can place it anywhere within a header or footer, picking from a pre-defined list of numbering styles.
If you want to “Format Page Numbers,” you’ll be presented with dialog box, which will allow you to change the number format, add chapter numbers, and dictate from where it starts.
Overall, the header and footer controls are quite easy to grasp and master. So, if you have an instructor who’s a bit old-fashioned and demands you include them in your paper, or you want the title of your book, or your name on every page, or simple page numbers – you should have no problem adding and manipulating them.
Equations
We’re not going to spend a great deal of time explaining the “Equation” functions in Word 2013. We’re guessing the vast majority of people using Word, will never have occasion to insert an equation into their documents.
That said, let’s explain the function exists in the first place. In Word, you can write a simple like “A=πr2” because you can insert the symbol for pi and then use superscript font to show radius squared.
However, if you want to write out anything more complicated than that, you’ll need to insert it using the “Equation” function. You can either select a pre-built equation from the dropdown list:
Alternatively, you can build your own by simply placing the cursor at your desired insertion point and clicking the “Equation” button, which will place something akin to an equation text box into your document.
Note, the Ribbon immediately changes when you insert an equation to the “Equation Tools,” which offers a wide array of math symbols and operators, so you don’t have to try to figure out how to do it on your own.
So, if you’re a bit of a math geek or you’re taking a class and need to write a paper on a mathematical theory, you can present it ϥώwith all the necessary equations to show your work.
Symbols
Symbols are characters that aren’t immediately found on your everyday, run-of-the-mill keyboard. For things like the copyright symbol and British Pounds, you need to insert the symbol using the “Symbols” function on the “Insert” tab.
Most recent and commonly-used symbols are displayed first, such as for foreign currencies (€, ₤, ¥), the aforementioned copyright symbol (©), and others. To access symbols beyond what is immediately displayed, click “More Symbols” at the bottom of the menu.
For example, if you want to write “façade” and using the cedilla (ç), you’d pick it from the “Latin” subset. Similarly, something like café with its acute accent, can be added using the “Symbol” dialog box.
Note that you can also insert foreign letters using shortcut keys. You can see which shortcut key is used for each symbol at the bottom of the “Symbol” dialog box.
If you want to change the shortcut (keep in mind, other symbols or functions might be mapped to other shortcuts), you can click the “Shortcut Key” button and change it to something else.
Note, that in the above instance, you’re not going to type “CTRL + ‘ + , + E” rather it’s “CTRL + ‘ + E.” The comma is simply there to tell you must first hold down the “CTRL” button, then press the apostrophe and “e” to insert an “é” in your document. Similarly, hold down “CTRL” plus comma and “c” to insert a “ç” and so on.
Coming up Next…
And so ends Lesson 3. We hope you enjoyed it and learned a thing or two. Knowing how to lay out tables in Word will give you a great deal of control over how you present data. Rather than simply having information in sentences or making lists, you can arrange it in neat rows and tables complete with customized colors and borders. The only limit is your creativity!
Moreover, if you’re going for a more published look and feel to your document, adding headers, footer, and page numbers is a great skill to have. Meanwhile, placing links in your documents will help readers navigate and read up on things you might otherwise have to explain with footnotes and such.
Tomorrow, in Lesson 4, we will dive into adding illustrations (such as pictures and shapes) to your documents, allowing you to create eye-popping layouts with tons of variety. You can even embed video for a true multimedia experience. We’ll end with how to add and use multiple languages, so you don’t want to miss out!
READ NEXT
- › How to Install Unsupported Versions of macOS on Your Mac
- › Microsoft Outlook Is Adding a Splash of Personalization
- › This 64 GB Flash Drive From Samsung Is Just $8 Right Now
- › The Best Steam Deck Docks of 2023
- › Liquid Metal vs. Thermal Paste: Is Liquid Metal Better?
- › Why Your Phone Charging Cable Needs a USB Condom








 and
and 










 Insert Rows Above.
