
В это статье мы покажем, как получить доступ к данным в файлах Excel напрямую из PowerShell. Возможности прямого обращения к данным Excel из PowerShell открывает широкие возможности по инвентаризации и построению различных отчетов по компьютерам, серверам, инфраструктуре, Active Directory и т.д.
Содержание:
- Доступ к данным в Excel из консоли PowerShell
- Как получить данные из Active Directory и сохранить их в книге Excel?
Обращение к Excel из PowerShell выполняется через отдельный Component Object Model (COM) объект. Это требует наличие установленного Excel на компьютере.
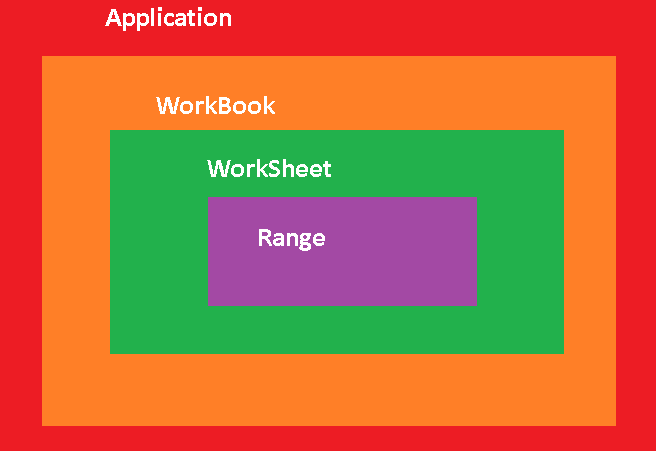
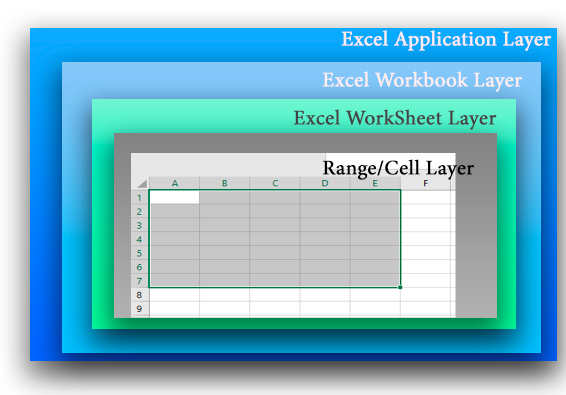
Прежде, чем показать, как обратиться к данным в ячейке файла Excel, необходимо рассмотреть архитектуру уровней представления в документе Excel. На следующем рисунке показаны 4 вложенных уровня в объектной модели Excel:
- Уровень приложения (Application Layer) – запущенное приложение Excel;
- Уровень книги (WorkBook Layer) – одновременно могут быть открыты несколько книг (документов Excel);
- Уровень листа (WorkSheet Layer) – в каждом xlsx файле может быть несколько листов;
- Ячейки (Range Layer) – здесь можно получить доступ к данным в конкретной ячейке или диапазонe ячеек.
Доступ к данным в Excel из консоли PowerShell
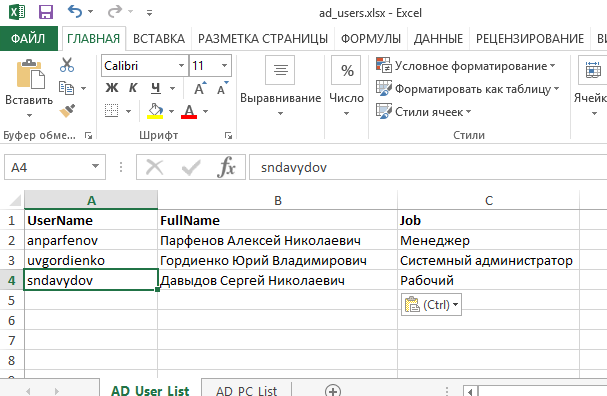
Рассмотрим на простом примере как получить доступ из PowerShell к данным в Excel файле со списком сотрудников.
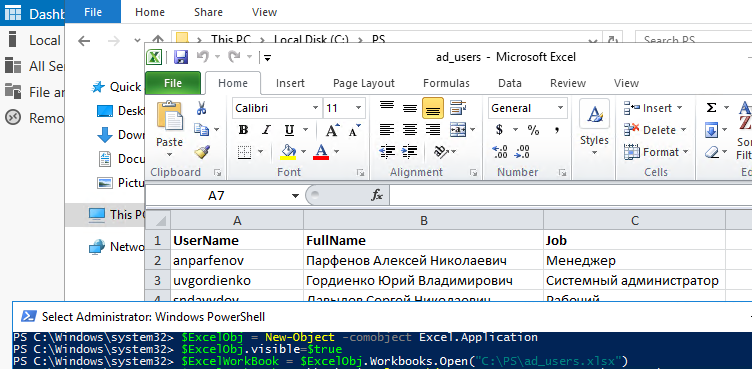
Сначала нужно запустить на компьютере приложение Excel (application layer) через COM объект:
$ExcelObj = New-Object -comobject Excel.Application
После выполнения этой команды на компьютере запускается в фоновом режиме приложение Excel. Чтобы сделать окно Excel видимым, нужно изменить свойство Visible COM объекта:
$ExcelObj.visible=$true
Все свойства объекта Excel можно вывести так:
$ExcelObj| fl
Теперь можно открыть файл (книгу, workbook) Excel:
$ExcelWorkBook = $ExcelObj.Workbooks.Open("C:PSad_users.xlsx")
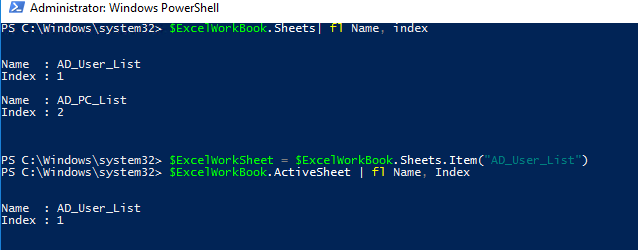
В каждом файле Excel может быть несколько листов (worksheets). Выведем список листов в текущей книге Excel:
$ExcelWorkBook.Sheets| fl Name, index
Теперь можно открыть конкретный лист (по имени или по индексу):
$ExcelWorkSheet = $ExcelWorkBook.Sheets.Item("AD_User_List")
Текущий (активный) лист Excel можно узнать командой:
$ExcelWorkBook.ActiveSheet | fl Name, Index
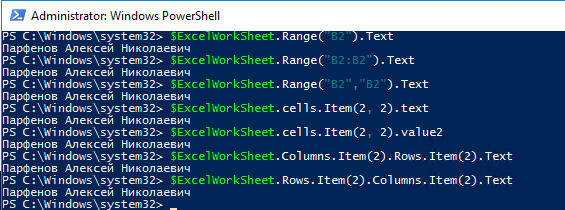
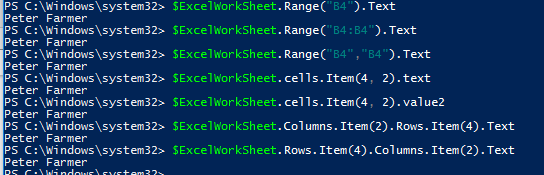
Теперь вы можете получить значения из ячеек документа Excel. Можно использовать различные способы адресации ячеек в книге Excel: через диапазон (Range), ячейку (Cell), столбец (Columns) или строку(Rows). Ниже я привел разные примеры получения данных из одной и той же ячейки:
$ExcelWorkSheet.Range("B2").Text
$ExcelWorkSheet.Range("B2:B2").Text
$ExcelWorkSheet.Range("B2","B2").Text
$ExcelWorkSheet.cells.Item(2, 2).text
 $ExcelWorkSheet.cells.Item(2, 2).value2
$ExcelWorkSheet.Columns.Item(2).Rows.Item(2).Text
$ExcelWorkSheet.Rows.Item(2).Columns.Item(2).Text
Как получить данные из Active Directory и сохранить их в книге Excel?
Рассмотрим практический пример использования доступа к данным Excel из PowerShell. Например, нам нужно для каждого пользователя в Excel файле получить информацию из Active Directory. Например, его телефон (атрибут telephoneNumber), отдел (department) и email адрес (mail).
# Импорт модуля Active Directory в сессию PowerShell
import-module activedirectory
# Сначала откройте книгу Excel:
$ExcelObj = New-Object -comobject Excel.Application
$ExcelWorkBook = $ExcelObj.Workbooks.Open("C:PSad_users.xlsx")
$ExcelWorkSheet = $ExcelWorkBook.Sheets.Item("AD_User_List")
# Получаем количество заполненных строк в xlsx файле
$rowcount=$ExcelWorkSheet.UsedRange.Rows.Count
# Перебираем все строки в столбце 1, начиная со второй строки (в этих ячейках указано доменное имя пользователя)
for($i=2;$i -le $rowcount;$i++){
$ADusername=$ExcelWorkSheet.Columns.Item(1).Rows.Item($i).Text
# Получаем значение атрибутов пользователя в AD
$ADuserProp = Get-ADUser $ADusername -properties telephoneNumber,department,mail|select-object name,telephoneNumber,department,mail
#Заполняем ячейки данными из AD
$ExcelWorkSheet.Columns.Item(4).Rows.Item($i) = $ADuserProp.telephoneNumber
 $ExcelWorkSheet.Columns.Item(5).Rows.Item($i) = $ADuserProp.department
$ExcelWorkSheet.Columns.Item(6).Rows.Item($i) = $ADuserProp.mail
}
#Сохраните xls файл и закройте Excel
$ExcelWorkBook.Save()
$ExcelWorkBook.close($true)
В результате в Excel файле для каждого пользователя были добавлены столбцы с информацией из AD.

Рассмотрим еще один пример построения отчета с помощью PowerShell и Excel. Допустим, вам нужно построить Excel отчет о состоянии службы Print Spooler на всех серверах домена.
# Создать объект Excel
$ExcelObj = New-Object -comobject Excel.Application
$ExcelObj.Visible = $true
# Добавить рабочую книгу
$ExcelWorkBook = $ExcelObj.Workbooks.Add()
$ExcelWorkSheet = $ExcelWorkBook.Worksheets.Item(1)
# Переименовывать лист
$ExcelWorkSheet.Name = 'Статус сервиса spooler'
# Заполняем шапку таблицы
$ExcelWorkSheet.Cells.Item(1,1) = 'Имя сервера'
$ExcelWorkSheet.Cells.Item(1,2) = 'Имя службы'
$ExcelWorkSheet.Cells.Item(1,3) = 'Статус службы'
# Выделить шапку таблицы жирным. задать размер шрифта и ширину столбцов
$ExcelWorkSheet.Rows.Item(1).Font.Bold = $true
$ExcelWorkSheet.Rows.Item(1).Font.size=14
$ExcelWorkSheet.Columns.Item(1).ColumnWidth=25
$ExcelWorkSheet.Columns.Item(2).ColumnWidth=25
$ExcelWorkSheet.Columns.Item(3).ColumnWidth=25
# получим список всех Windows Server в домене
$computers = (Get-ADComputer -Filter 'operatingsystem -like "*Windows server*" -and enabled -eq "true"').Name
$counter=2
# подключается к каждому компьютеру и получаем статус службы
foreach ($computer in $computers) {
$result = Invoke-Command -Computername $computer –ScriptBlock { Get-Service spooler | select Name, status }
#Заполняем ячейки Excel данными с сервера
$ExcelWorkSheet.Columns.Item(1).Rows.Item($counter) = $result.PSComputerName
$ExcelWorkSheet.Columns.Item(2).Rows.Item($counter) = $result.Name
$ExcelWorkSheet.Columns.Item(3).Rows.Item($counter) = $result.Status
$counter++
}
# сохраните полученный отчет и закройте Excel:
$ExcelWorkBook.SaveAs('C:psservice-report.xlsx')
$ExcelWorkBook.close($true)
Область применения возможностей доступа из PowerShell в Excel очень широка. Начиная от простого построения отчетов, например, из Active Directory, и заканчивая возможностью создания PowerShell скриптов для актуализации данных в AD из Excel.
Например, вы можете поручить сотруднику отдела кадров вести реестр пользователей в Excel. Затем с помощью PowerShell скрипта через Set-ADUser сотрудник может автоматически обновлять данные пользователей в AD (достаточно делегировать пользователю права на изменение этих атрибутов пользователей AD и показать как запускать PS скрипт). Таким образом можно вести актуальную адресную книгу с актуальными номерами телефонами и должностями.
Excel files (.xlsx) are a very important data exchange format for a number of reasons:
- Human Readable: Excel files can easily be opened and read by non-IT staff. It is trivial to browse the data or make changes.
- Type Support: Excel files support basic data types like string, dates, and numeric values
- Not Platform-Specific: You can exchange excel data across platforms and locales. Unlike with text-based formats, encoding and special character support are no issue
PowerShell does not come with native support for .xlsx files though. That’s why previously users resorted to exporting excel data to csv, then use Import-Csvto read the exported data into PowerShell.
This workaround produces extra work and has a number of other disadvantages. Thanks to the free module ImportExcel, going the extra route via csv is not required anymore. You now can directly read and write .xlsx data. Microsoft Office is not required.
In this article, you’ll learn how to read and write .xlsx and .xlsm files in just a line of code. Plus I provide you with Convert-XlsToXlsx, a clever function that auto-converts .xls files to .xlsx and .xlsm file types. That’s important because ImportExcel can only deal with the modern .xlsx and .xlsm file types. The older .xls excel files use a proprietary binary format that only excel knows how to read.
Convert-XlsToXlsxmay be highly useful in its own right when you need to bulk-convert older excel files to modern formats.It also illustrates how to access the excel object model, and more importantly, how to release COM objects so you don’t end up with memory leaks and ghost processes.
Adding Excel Support to PowerShell
Thanks to Doug Finke and his awesome free module ImportExcel, reading and writing .xlsx files is a snap now — no Office installation required. Simply download and install this free module from the PowerShell Gallery:
Install-Module -Name ImportExcel -Scope CurrentUser -Force
If you have Administrator privileges at hand, you might want to install the module for All Users instead. This makes sure the module is available for all users but more importantly, it makes the module available for both in Windows PowerShell and PowerShell 7.
Install-Module -Name ImportExcel -ForceWhen you install modules in the scope CurrentUser, modules are available only for the PowerShell edition you used to do the install, so you would have to potentially install the module twice in different locations.
Reading And Writing Excel Files
The two most important cmdlets from this module are:
-
Import-Excel: takes a path to a .xlsx file and returns all data from the default worksheet. Use the parameter -WorksheetName to specify a given worksheet. Example:# import excel file and show in gridview (make sure file exists!) $Path = "c:pathtosomeexcel.xlsx" Import-Excel -Path $Path | Out-GridView -
Export-Excel: saves all piped data to a *.xlsx file. Use the parameter -WorksheetName to specify a given worksheet. By default, existing data on the worksheet will be overwritten. Example:# create am excel sheet with all local user accounts Get-LocalUser | Export-Excel
Playing With Sample Data
Let’s play with the new excel commands! Writing excel files is simple: pipe data to Export-Excel to create new excel files:
$Path = "$env:templistOfServices.xlsx"
Get-Service | Export-Excel -Path $Path -AutoSize -AutoFilter -FreezeTopRow -BoldTopRow -ClearSheet -WorksheetName 'List of Services' -Show
To play with Import-Excel, let’s retrieve some real-world sample data files first.
Downloading Sample Data
Finding excel sample data is easy: just google for Download Excel Sample Data to come up with urls. They come as individual files and ZIP archives. To make downloading a pleasant experience, I created a bunch of helper functions.
To download files, simply use Download-File and Download-Zip:
# use TLS1.2 with HTTPS:
[Net.ServicePointManager]::SecurityProtocol = [Net.SecurityProtocolType]::Tls12

# creates folder if it does not yet exist:
filter Assert-FolderExists
{
  $exists = Test-Path -Path $_ -PathType Container
  if (!$exists) {
    Write-Warning "$_ did not exist. Folder created."
    $null = New-Item -Path $_ -ItemType Directory
  }
}

# download, unblock and extract zip files
filter Download-Zip($Path)
{
  # download to temp file:
  $temp = "$env:temptemp.zip"
  Invoke-WebRequest -Uri $_ -OutFile $temp
  # unblock:
  Unblock-File -Path $temp
  # extract archive content:
  Expand-Archive -Path $temp -DestinationPath $Path -Force

  # report
  $zip = [System.IO.Compression.ZipFile]::OpenRead($temp)
  $zip.Entries | ForEach-Object { Write-Warning "Download: $_" }
  $zip.Dispose()

  # remove temp file:
  Remove-Item -Path $temp
}

# test whether filename is valid:
function Test-ValidFileName($FileName)
{
  $FileName.IndexOfAny([System.IO.Path]::GetInvalidFileNameChars()) -eq -1
}

# download and unblock file:
filter Download-File($Path, $FileName)
{
  # does the url specify a filename?
  if ([string]::IsNullOrWhiteSpace($FileName))
  {
    # take filename from url:
    $FileName = $_.Split('/')[-1]
    # remove url parameters:
    $FileName = $FileName.Split('?')[0]
    # test for valid file name:
    $isValid = Test-ValidFileName -FileName $FileName
    if (!$isValid)
    {
      throw "Url contains no valid file name. $FileName is not valid. Use parameter -FileName to specify a valid filename."
    }
  }

  $filePath = Join-Path -Path $Path -ChildPath $FileName
  Invoke-WebRequest -Uri $_ -OutFile $filePath
  # unblock:
  Unblock-File -Path $Path

  Write-Warning "Download: $FileName"
}

# create local folder for downloaded files:
($OutPath = "$env:tempexcelsampledata") | Assert-FolderExists

# download various excel sample files:
'https://www.contextures.com/SampleData.zip' | Download-Zip -Path $OutPath
'https://go.microsoft.com/fwlink/?LinkID=521962' | Download-File -Path $OutPath -FileName financial.xlsx
'http://www.principlesofeconometrics.com/excel/theories.xls' | Download-File -Path $OutPath
'http://www.principlesofeconometrics.com/excel/food.xls' | Download-File -Path $OutPath
'https://www.who.int/healthinfo/statistics/whostat2005_mortality.xls?ua=1' | Download-File -Path $OutPath
'https://www.who.int/healthinfo/statistics/whostat2005_demographics.xls?ua=1' | Download-File -Path $OutPath
When you run this code, it downloads a bunch of excel sample files:
WARNING: Download: SampleData.xlsx
WARNING: Download: financial.xlsx
WARNING: Download: theories.xls
WARNING: Download: food.xls
WARNING: Download: whostat2005_mortality.xls
WARNING: Download: whostat2005_demographics.xls
Reading Excel Files
To read data directly from excel files, use Import-Excel. For example, to get the financial data for December only, try this:
# path with excel files
# (assuming you downloaded the sample data as instructed before)
Set-Location -Path "$env:tempexcelsampledata"

Import-Excel -Path .financial.xlsx | Where-Object 'Month Number' -eq 12 | Out-GridView
By default,
Import-Excelreads data from the first worksheet. If your file contains more than one worksheet, use the parameter -WorksheetName to specify its name.
To group the countries for December, simply use the common PowerShell pipeline cmdlets:
Obviously, you can do this with excel directly as well. This is about automation (in case you need to do these kinds of analysis regularly), and it is for PowerShell home boys who may not know how to pivot in excel but do know their tools in PowerShell.
And it is about learning: there is no better way to learn the PowerShell pipeline cmdlets!
# path with excel files
# (assuming you downloaded the sample data as instructed before)
Set-Location -Path "$env:tempexcelsampledata"

Import-Excel -Path .financial.xlsx | Where-Object 'Month Number' -eq 12 | Group-Object -Property Country -NoElement | Sort-Object -Property Count -Descending
Here is the result:
Count Name
----- ----
   21 Germany
   21 United States of America
   21 Canada
   21 France
   21 Mexico
Accessing XLS Files
The bad news is: .xls files cannot be accessed. They use a proprietary binary format that can only be read by excel.
The good news is: provided you have excel installed, it is trivial to convert .xls files to .xlsx files. If you are really still using .xls files, you should consider this transform for good. .xls is really outdated and should no longer be used.
Converting XLS To XLSX
Above I downloaded a bunch of .xls files that can’t be processed by Import-Excel. Bummer.
Below is a function Convert-XlsToXlsx that auto-converts .xls files to .xlsx and .xlsm files, though. The script requires Microsoft Office to be installed on your box because only excel knows how to open the binary format used in .xls files:
function Convert-XlsToXlsx
{
  param
  (
    # Path to the xls file to convert:
    [Parameter(Mandatory,ValueFromPipeline,ValueFromPipelineByPropertyName)]
    [string[]]
    [Alias('FullName')]
    $Path,

    # overwrite file if it exists:
    [switch]
    $Force,

    # show excel window during conversion. This can be useful for diagnosis and debugging.
    [switch]
    $Visible
  )

  # do this before any file can be processed:
  begin
  {
    # load excel assembly (requires excel to be installed)
    Add-Type -AssemblyName Microsoft.Office.Interop.Excel

    # open excel in a hidden window
    $excel = New-Object -ComObject Excel.Application
    $workbooks = $excel.Workbooks
    if ($Visible) { $excel.Visible = $true }

    # disable interactive dialogs
    $excel.DisplayAlerts = $False
    $excel.WarnOnFunctionNameConflict = $False
    $excel.AskToUpdateLinks = $False

    # target file formats
    $xlsx = [Microsoft.Office.Interop.Excel.XlFileFormat]::xlOpenXMLWorkbook
    $xlsm = [Microsoft.Office.Interop.Excel.XlFileFormat]::xlOpenXMLWorkbookMacroEnabled
  }

  # do this for each file:
  process
  {
    foreach($_ in $Path)
    {
      # check for valid file extension:
      $extension = [System.Io.Path]::GetExtension($_)
      if ($extension -ne '.xls')
      {
        Write-Verbose "No xls file, skipping: $_"
        continue
      }

      # open file in excel:
      $workbook = $workbooks.Open($_)

      # test for macros:
      if ($workbook.HasVBProject)
      {
        $extension = 'xlsm'
        $type = $xlsm
      }
      else
      {
        $extension = 'xlsx'
        $type = $xlsx
      }

       # get destination path
      $outPath = [System.Io.Path]::ChangeExtension($_, $extension)

      # does it exist?
      $exists = (Test-Path -Path $outPath) -and !$Force
      if ($exists)
      {
        Write-Verbose "File exists and -Force was not specified, skipping: $_"
        Write-Warning "File exists. Use -Force to overwrite. $_"
        continue
      }

      # save in new format:
      $workbook.SaveAs($outPath, $type)
      # close document
      $workbook.Close()
      # release COM objects to prevent memory leaks:
      $null = [System.Runtime.InteropServices.Marshal]::ReleaseComObject($workbook)

      Write-Verbose "File successfully converted: '$_' -> '$outPath'"
    }
  }

  # do this once all files have been processed
  end
  {
    # quit excel and clean up:
    $excel.Quit()

    # release COM objects to prevent memory leaks:
    $null = [System.Runtime.InteropServices.Marshal]::ReleaseComObject($workbooks)
    $null = [System.Runtime.InteropServices.Marshal]::ReleaseComObject($excel)
    $excel = $workbooks = $null
    # clean up:
    [GC]::Collect()
    [GC]::WaitForPendingFinalizers()
    Write-Verbose "Done."
  }
}
It is beyond the scope of this article to discuss the function in detail. I’d like to point out though that the code illustrates important aspects when using COM objects in PowerShell:
When using COM objects like Excel.Application, it can be challenging to free all object references at the end. When you do this wrong, references will stay alive, and so does the excel process in memory. Of course you can always kill the process after use but this might damage excel, and next time you launch it, it starts in recovery mode.
A better approach is to make sure you are storing each object reference in a dedicated variable. Next, make sure you actively release each reference after use by calling ReleaseComObject().
When you did that right, no open reference should survive, and when you call Quit(), excel should be removed from your process list.
Now it’s trivial to convert all downloaded .xls files to the appropriate new formats:
# path with excel files.
# assuming you created this folder and downloaded files to it:
$Path = "$env:tmpExcelsampledata"

# get all xls files and convert them:
Get-ChildItem -Path $Path -Filter *.xls -File | Convert-XlsToXlsx -Verbose
![]() Данный материал является переводом оригинальной статьи «ATA Learning : Adam Bertram : PowerShell and Excel: Seize the Power!».
Данный материал является переводом оригинальной статьи «ATA Learning : Adam Bertram : PowerShell and Excel: Seize the Power!».
Microsoft Excel — один из тех вездесущих инструментов, от которых большинство из нас не может уйти, даже если хочет. Многие ИТ-специалисты используют Excel, как небольшую базу данных, в которой хранятся тонны данных в различных процедурах автоматизации. Каков наилучший сценарий автоматизации и Excel? Это, например, PowerShell!
Работу с таблицами Excel непросто автоматизировать. В отличие от менее функционального (и более простого) аналога файла CSV, книги Excel — это не просто текстовые файлы. Для работы со сложными книгами Excel потребует от PowerShell манипуляции с Component Object Model (COM), для чего раньше нужно было установить Excel. Однако, на самом деле, это вовсе не обязательно. Например, проницательный участник сообщества PowerShell, Doug Finke, создал модуль PowerShell, названный ImportExcel. Модуль устраняет сложность работы с Excel и позволяет легко работать с книгами Excel через PowerShell сценарии!
В этой статье рассмотрим пример того, что можно сделать в PowerShell и Excel с помощью модуля ImportExcel, а также рассмотрим несколько популярных вариантов использования.
Предварительные требования
При запуске модуля ImportExcel в системе Windows отдельные зависимости не требуются. Однако, если вы работаете с MacOS, вам необходимо установить пакет mono-libgdiplus, используя команду вида:
brew install mono-libgdiplus
Примечание: Все примеры в этой статье будут построены с использованием macOS, но все они должны работать и на других платформах. При использовании macOS, не забудьте перезапустить сеанс PowerShell, прежде чем продолжить.
Установка модуля ImportExcel
Начните с загрузки и установки модуля через PowerShell Gallery, запустив:
Install-Module ImportExcel -Scope CurrentUser
Через несколько секунд все будет в порядке.
Использование PowerShell для экспорта в рабочий лист Excel
Возможно, вы знакомы со стандартными командлетами PowerShell Export-Csv и Import-Csv. Эти командлеты позволяют читать и экспортировать объекты PowerShell в файлы CSV. К сожалению, в PowerShell нет таких же встроенных командлетов для Excel. Но, используя модуль ImportExcel, вы можете создать такой функционал!
Один из наиболее частых запросов системного администратора — это экспорт объектов PowerShell в рабочий лист Excel. С помощью командлета Export-Excel из модуля ImportExcel, вы можете легко сделать это. Командлет Export-Excel принимает любой объект точно так же, как делает Export-Csv. Этому командлету можно передать любой объект.
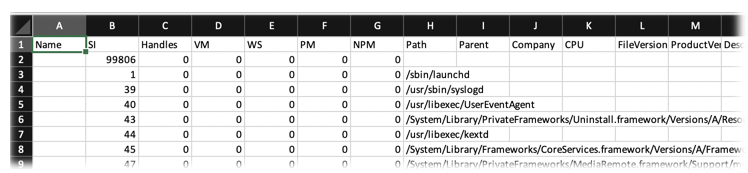
Например, возможно, вам нужно найти какие-то процессы, запущенные на вашем локальном компьютере, и поместить их в книгу Excel.
Чтобы найти процессы, запущенные в системе с помощью PowerShell, используйте командлет Get-Process, который возвращает каждый запущенный процесс и различную информацию о каждом процессе. Чтобы экспортировать эту информацию в Excel, используйте командлет Export-Excel, указывающий путь к создаваемой книге Excel. Вы можете увидеть пример команды и снимок экрана сгенерированного файла Excel ниже.
Get-Process | Export-Excel -Path './processes.xlsx
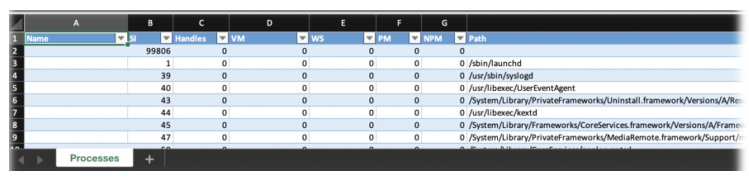
Поздравляем! Вы экспортировали всю информацию точно так же, как Export-Csv, но, в отличие от Export-Csv, мы можем сделать эти данные намного интереснее. Убедитесь, что имя рабочего листа называется «Proccesses», данные находятся в таблице, а размер строк устанавливается автоматически.
Добавим к командлету параметр -AutoSize для автоматического изменения размера всех строк, -TableName, чтобы указать имя таблицы, которая будет включать все данные, и имя параметра -WorksheetName для процессов, и сможем увидеть на снимке экрана ниже, что в итоге получится.
Get-Process | Export-Excel -Path './processes.xlsx' -AutoSize -TableName 'Processes' -WorksheetName 'Proccesses'
Командлет Export-Excel имеет множество параметров, которые можно использовать для создания книг Excel всех видов. Для получения полной информации о возможностях Export-Excel, запустите:
Get-Help Export-Excel
Использование PowerShell для импорта в Excel
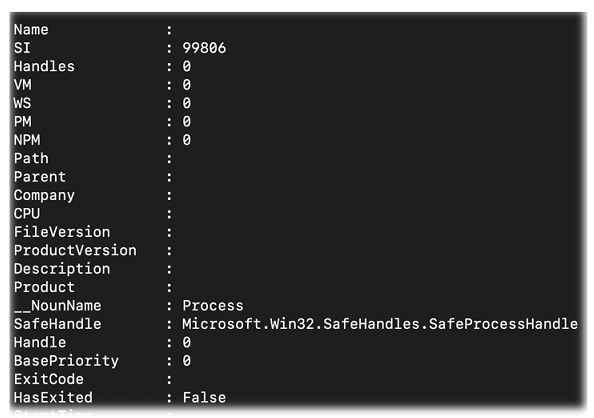
Итак, ранее вы экспортировали некоторую информацию в файл с именем process.xlsx. Возможно, теперь вам нужно переместить этот файл на другой компьютер и импортировать / прочитать эту информацию. Командлет Import-Excel к вашим услугам.
При простейшем использовании вам нужно только указать путь к документу / книге Excel с помощью параметра -Path, как показано ниже. Вы увидите, что он читает первый рабочий лист, в данном случае рабочий лист «Processes», и возвращает объекты PowerShell.
Import-Excel -Path './processes.xlsx'
Может быть, у вас есть несколько листов в книге Excel? Вы можете прочитать конкретный рабочий лист с помощью параметра -WorkSheetname.
Import-Excel -Path './processes.xlsx' -WorkSheetname 'SecondWorksheet'
Вам нужно читать только определенные столбцы из рабочего листа Excel? Используйте параметр -HeaderName, чтобы указать только те параметры, которые вы хотите прочитать.
Import-Excel -Path './processes.xlsx' –WorkSheetname 'Processes' -HeaderName 'CPU','Handle'
Командлет Import-Excel имеет другие параметры, которые можно использовать для чтения книг Excel всех типов. Чтобы получить полное изложение всего, что может делать Import-Excel, запустите:
Get-Help Import-Excel
Использование PowerShell для получения (и установки) значений ячеек Excel
Теперь вы знаете, как читать весь лист Excel с помощью PowerShell. Но что, если вам нужно только одно значение ячейки? Технически вы можете использовать Import-Excel и отфильтровать нужное значение с помощью Where-Object, но это будет не слишком эффективно.
Вместо этого, используя командлет Open-ExcelPackage, вы можете «преобразовать» книгу Excel в объект PowerShell, который затем можно будет читать и изменять. Этот командлет аналогичен использованию New-Object -ComObject ‘Excel.Application’, если работать напрямую с COM-объектами.
Чтобы найти значение ячейки, сначала откройте книгу Excel, чтобы занести его в память. Затем выберите лист внутри книги.
$excel = Open-ExcelPackage -Path './processes.xlsx'
$worksheet = $excel.Workbook.Worksheets['Processes']
Этот процесс похож на способ открытия книг с помощью COM-объекта ‘Excel.Workbooks.Open’.
После того, как рабочий лист назначен переменной, вы можете перейти к отдельным строкам, столбцам и ячейкам. Возможно, вам нужно найти все значения ячеек в строке A1. Вам просто нужно сослаться на свойство ‘Cells’, указав индекс A1, как показано ниже.
$worksheet.Cells['A1'].Value
Вы также можете изменить значение ячеек на листе, присвоив другое значение, например:
$worksheet.Cells['A1'] = 'differentvalue'
Будучи хранимым в оперативной памяти, важно высвобождать пакет Excel с помощью командлета Close-ExcelPackage.
Close-ExcelPackage $excel
Конверсия Excel в файлы CSV с помощью PowerShell
Если у вас есть содержимое листа Excel, представленное с помощью объектов PowerShell, преобразование листов Excel в CSV просто требует отправки этих объектов в командлет Export-Csv.
Используя созданную ранее книгу processes.xlsx, прочтите первый рабочий лист, который получает все данные в объекты PowerShell, а затем экспортируйте эти объекты в CSV с помощью приведенной ниже команды.
Import-Excel './processes.xlsx' | Export-Csv -Path './processes.csv' -NoTypeInformation
Конверсия множества рабочих листов
Если у вас есть книга Excel с несколькими листами, вы также можете создать файл CSV для каждого листа. Для этого вы можете найти все листы в книге с помощью командлета Get-ExcelSheetInfo. Когда у вас есть имена рабочих листов, вы можете передать их в параметр -WorksheetName, а также использовать имя листа в качестве имени файла CSV.
Ниже вы можете найти необходимый пример кода.
$sheets = (Get-ExcelSheetInfo -Path './processes.xlsx').Name
foreach ($sheet in $sheets) {
 Import-Excel -WorksheetName $sheet -Path './processes.xlsx' | Export-Csv "./$sheet.csv" -NoTypeInformation
 }
Заключение
Используя модуль ImportExcel из библиотеки модулей PowerShell, вы можете импортировать, экспортировать и управлять данными в книгах Excel точно так же, как и в CSV, без установки Excel!
Microsoft Excel is one of those ubiquitous tools most of us can’t escape even if we tried. Many IT professionals use Excel as a little database storing tons of data in various automation routines. What’s the best scenario for automation and Excel? PowerShell and Excel!
Excel spreadsheets have always been notoriously hard to script and automate. Unlike its less-featured (and simpler) CSV file counterpart, Excel workbooks aren’t just simple text files. Excel workbooks required PowerShell to manipulate complicated Component Object Model (COM) objects thus you had to have Excel installed. Not anymore.
Thankfully, an astute PowerShell community member, Doug Finke, created a PowerShell module called ImportExcel for us mere mortals. The ImportExcel module abstracts away all of that complexity. It makes it possible to easily manage Excel workbooks and get down to PowerShell scripting!
In this article, let’s explore what you can do with PowerShell and Excel using the ImportExcel module and a few popular use cases.
Prerequisites
When running the ImportExcel module on a Windows system, no separate dependencies are necessary. However, if you’re working on macOS, you will need to install the mono-libgdiplus package using brew install mono-libgdiplus. All examples in this article will be built using macOS but all examples should work cross-platform.
If you’re using macOS, be sure to restart your PowerShell session before continuing.
Installing the ImportExcel Module
Start by downloading and installing the module via the PowerShell Gallery by running Install-Module ImportExcel -Scope CurrentUser. After a few moments, you’ll be good to go.
Using PowerShell and Excel to Export to a Worksheet
You may be familiar with the standard PowerShell cmdlets Export-Csv and Import-Csv. These cmdlets allow you to read and export PowerShell objects to CSV files. Unfortunately, there’s no Export-Excel and Import-Excel cmdlets. But using the ImportExcel module, you can build your own functionality.
One of the most common requests a sysadmin has is exporting PowerShell objects to an Excel worksheet. Using the Export-Excel cmdlet in the ImportExcel module, you can easily make it happen.
For example, perhaps you need to find some processes running on your local computer and get them into an Excel workbook.
The
Export-Excelcmdlet accepts any object exactly the wayExport-Csvdoes. You can pipe any kind of object to this cmdlet.
To find processes running on a system with PowerShell, use the Get-Process cmdlet which returns each running process and various information about each process. To export that information to Excel, use the Export-Excel cmdlet providing the file path to the Excel workbook that will be created. You can see an example of the command and screenshot of the Excel file generated below.
Get-Process | Export-Excel -Path './processes.xlsx'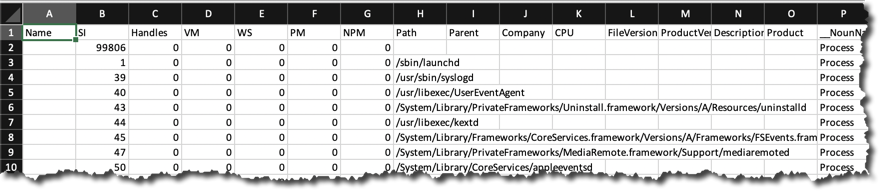
Congrats! You’ve now exported all the information just like Export-Csv but, unlike Export-Csv, we can make this data a lot fancier. Let’s make sure the worksheet name is called Processes, the data is in a table and rows are auto-sized.
By using the AutoSize switch parameter to autosize all rows, TableName to specify the name of the table that will include all the data and the WorksheetName parameter name of Processes, you can see in the screenshot below what can be built.
Get-Process | Export-Excel -Path './processes.xlsx' -AutoSize -TableName Processes -WorksheetName Proccesses
The
Export-Excelcmdlet has a ton of parameters you can use to create Excel workbooks of all kinds. For a full rundown on everythingExport-Excelcan do, runGet-Help Export-Excel.
Using PowerShell to Import to Excel
So you’ve exported some information to a file called processes.xlsx in the previous section. Perhaps now you need to move this file to another computer and import/read this information with PowerShell and Excel. No problem. You have Import-Excel at your disposal.
At its most basic usage, you only need to provide the path to the Excel document/workbook using the Path parameter as shown below. You’ll see that it reads the first worksheet, in this case, the Processes worksheet, and returns PowerShell objects.
Import-Excel -Path './processes.xlsx'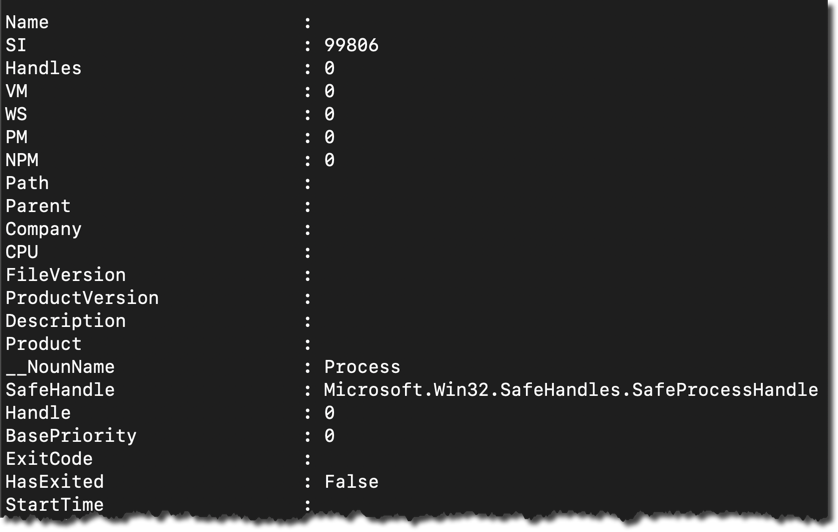
Maybe you have multiple worksheets in an Excel workbook? You can read a particular worksheet using the WorksheetName parameter.
Import-Excel -Path './processes.xlsx' -WorkSheetname SecondWorksheetDo you need to only read certain columns from the Excel worksheet? Use the HeaderName parameter to specify only those parameters you’d like to read.
Import-Excel -Path './processes.xlsx' -WorkSheetname Processes -HeaderName 'CPU','Handle'The
Import-Excelcmdlet has other parameters you can use to read Excel workbooks of all kinds. For a full rundown on everythingImport-Excelcan do, runGet-Help Import-Excel.
Using PowerShell to Get (and Set) Excel Cell Values
You now know how to read an entire worksheet with PowerShell and Excel but what if you only need a single cell value? You technically could use Import-Excel and filter out the value you need with Where-Object but that wouldn’t be too efficient.
Instead, using the Open-ExcelPackage cmdlet, you can “convert” an Excel workbook into a PowerShell object which can then be read and manipulated. To find a cell value, first, open up the Excel workbook to bring it into memory.
$excel = Open-ExcelPackage -Path './processes.xlsx'The
Open-ExcelPackageis similar to usingNew-Object -comobject excel.applicationif working directly with COM objects.
Next, pick the worksheet inside of the workbook.
$worksheet = $excel.Workbook.Worksheets['Processes']This process is similar to the COM object way of opening workbooks with
excel.workbooks.open.
Once you have the worksheet assigned to a variable, you can now drill down to individual rows, columns, and cells. Perhaps you need to find all cell values in the A1 row. You simply need to reference the Cells property providing an index of A1 as shown below.
$worksheet.Cells['A1'].ValueYou can also change the value of cells in a worksheet by assigning a different value eg.
$worksheet.Cells['A1'] = 'differentvalue'
Once in memory, it’s important to release the Excel package using the Close-ExcelPackage cmdlet.
Close-ExcelPackage $excelConverting Worksheets to CSV Files with PowerShell and Excel
Once you have the contents of an Excel worksheet represented via PowerShell objects, “converting” Excel worksheets to CSV simply requires sending those objects to the Export-Csv cmdlet.
Using the processes.xlsx workbook created earlier, read the first worksheet which gets all of the data into PowerShell objects, and then export those objects to CSV using the command below.
Import-Excel './processes.xlsx' | Export-Csv -Path './processes.csv' -NoTypeInformationIf you now open up the resulting CSV file, you’ll see the same data inside of the Processes worksheet (in this example).
Converting Multiple Worksheets
If you have an Excel workbook with multiple worksheets, you can also create a CSV file for each worksheet. To do so, you can find all the sheets in a workbook using the Get-ExcelSheetInfo cmdlet. Once you have the worksheet names, you can then pass those names to the WorksheetName parameter and also use the sheet name as the name of the CSV file.
Below you can the example code needed using PowerShell and Excel.
## find each sheet in the workbook
$sheets = (Get-ExcelSheetInfo -Path './processes.xlsx').Name
## read each sheet and create a CSV file with the same name
foreach ($sheet in $sheets) {
	Import-Excel -WorksheetName $sheet -Path './processes.xlsx' | Export-Csv "./$sheet.csv" -NoTypeInformation
}
Conclusion
Using PowerShell and Excel, you can import, export, and manage data in Excel workbooks exactly like you would CSVs without having to install Excel!
In this article, you learned the basics of reading and writing data in an Excel workbook but this just scratches the surface. Using PowerShell and the ImportExcel module, you can create charts, pivot tables, and leverage other powerful features of Excel!
January 10th, 2014
Summary: Microsoft PowerShell MVP, Tobias Weltner, talks about Windows PowerShell and Excel interaction.
Microsoft Scripting Guy, Ed Wilson, is here. Let’s welcome back guest blogger, Tobias Weltner…
Microsoft Excel is a great tool to share Windows PowerShell data. However, the scripting tactics have changed from the good old VBScript times. Let’s take a look at how Windows PowerShell can output data to Excel fast, safe, and reliably.
Out-GridView: Built-in “mini-Excel”
Before I touch Excel, let’s first look at its little cousin, which ships with Windows PowerShell: Out-GridView.
It’s trivial to use: simply pipe anything to Out-GridView, and it will happily display the content in a mini-spreadsheet:
Get-Process | Where-Object { $_.MainWindowTitle } | Out-GridView
You can even use Out-GridView as a generic selection dialog box. Add the parameter –passThru (added in PowerShell 3.0). This parameter adds two new buttons to the lower right area of the grid view, and when you select something, it will be returned to you.
Curious? This piece of script pipes all top-level applications to the grid view, and when you select one and click OK, it will be immediately deleted:
Get-Process |
Where-Object MainWindowTitle |
Out-GridView -Title ‘Select Program To Kill’ -PassThru |
Stop-Process
That’s admittedly a bit rude (and dangerous, too, because you will lose all unsaved data). So here is a gentleman’s version that will actually ask if there is unsaved data. It also allows the program to clean up its resources before it closes.
Get-Process |
Where-Object MainWindowTitle |
Out-GridView -Title ‘Select Program To Kill’ -PassThru |
ForEach-Object { $_.CloseMainWindow() }
Excel: Out-GridView on steroids
So what about Excel? Why use it at all? Well, there are things that Out-GridView cannot do. You cannot save the data, and you cannot hand it over to someone else. And of course, you cannot use the many sophisticated formatting options that are found in Microsoft Excel spreadsheets.
Out-GridView can show a maximum of 30 columns. So if an object has more than 30 properties, Out-GridView silently suppresses the rest. I’d call this a bug, but maybe it’s a feature, too. Anyhow, here is a script to prove the point:
1..100 |
ForEach-Object { $hash = [Ordered]@{} }{$hash.”Column$_” = $_}{ New-Object PSObject -Property $hash} | Out-GridView
This creates an object with 100 properties. Out-GridView only displays the first 30. Time for Excel…the real thing.
Wouldn’t it be nice to be able to do this:
Get-Process | Where-Object { $_.MainWindowTitle } | Out-Excel
Or, for that matter, this (and finally get all object properties and not just the first 30):
1..100 |
ForEach-Object { $hash = [Ordered]@{} }{$hash.”Column$_” = $_}{ New-Object PSObject -Property $hash} |
Out-Excel
Well, you can.
Out-Excel actually is a ridiculously simple Windows PowerShell function:
function Out-Excel
{
param($Path = “$env:temp$(Get-Date -Format yyyyMMddHHmmss).csv”)
$input | Export-CSV -Path $Path -UseCulture -Encoding UTF8 -NoTypeInformation
Invoke-Item -Path $Path
}
Get-Process | Where-Object { $_.MainWindowTitle } | Out-Excel
You get a report that includes all the technical data from all of your running main applications. With all of the object properties—nothing is left out.
Basically, you can pipe anything into Out-Excel. It works pretty much like Out-GridView (except that you cannot turn Excel into a selection dialog, of course).
$input is an automatic Windows PowerShell variable. It delivers all data that is piped from the upstream cmdlet, and this data is then written to a CSV file and opened with Excel.
Because Excel always shows all properties, you may want to use Select-Object and select only the properties you really care about:
Get-Process |
Where-Object { $_.MainWindowTitle } |
Select-Object -Property Name, Company, Description, CPU |
Out-Excel
Writing directly to Excel
Going the CSV route is fast and robust, but cannot use color in cells or apply any other formatting.
That’s why some years ago in VBScript, people started to use a COM object to access the Excel object model. Although this works in Windows PowerShell, too, it is not very reliable anymore. Excel lives in the old COM world, and Windows PowerShell lives in the modern .NET world.
The underlying .NET Framework needs extensive marshalling to access the COM objects (which makes it very slow). In some scenarios, it fails altogether, for example, when type libraries do not fit together because operating system and office binaries use different locales. Even if everything works, and you waited for the code to finish, Excel will continue to linger in memory because of leaking handles. It’s just too complicated.
Here is sample code that does access Excel’s object model directly. You have been warned. Don’t be mad at me if the code fails or is really, really slow:
$excel = New-Object -ComObject Excel.Application
$excel.Visible = $true
$workbook = $excel.Workbooks.Add()
$sheet = $workbook.ActiveSheet
$counter = 0
Get-Service |
ForEach-Object {
$counter++
$sheet.cells.Item($counter,1) = $_.Name
$sheet.cells.Item($counter,2) = $_.DisplayName
$sheet.cells.Item($counter,3) = $_.Status
}
Here is the fast and clean way that is used by Windows PowerShell to create the same report:
Get-Service |
Select-Object -Property Name, DisplayName, Status |
Export-Csv -Path $env:tempreport.csv -Encoding UTF8 -UseCulture -NoTypeInformation
Invoke-Item -Path $env:tempreport.csv
Actually, Windows PowerShell is not even touching the internals of Excel; but instead, it is producing CSV files that can then be opened by Excel.
Formatting data with colors
Unfortunately, importing CSV data is a black and white world. You cannot use color in cells or format the spreadsheet otherwise.
Well actually, you can. This will create the very same report of services. This time, running services will show in green and stopped services in red.
# write HTML intro code:
$begin =
{
‘<table>’
‘<tr>’
‘<th>DisplayName</th><th>Status</th><th>Required</th><th>Dependent</th>’
‘</tr>’
}
# this is executed for each data object:
$process =
{
if ($_.Status -eq ‘Running’)
{
$style = ‘<td style=”color:green; ; font-family:Segoe UI; font-size:14pt”>’
}
else
{
$style = ‘<td style=”color:red; font-family:Segoe UI; font-size:14pt”>’
}
‘<tr>’
‘{0}{1}</td><td>{2}</td><td>{3}</td><td>{4}</td>’ -f $style, $_.DisplayName, $_.Status, ($_.RequiredServices -join ‘,’), ($_.DependentServices -join ‘,’)
‘</tr>’
}
# finish HTML fragment:
$end =
{
‘</table>’
}
$Path = “$env:temptempfile.html”
# get all services and create custom HTML report:
Get-Service |
ForEach-Object -Begin $begin -Process $process -End $end |
Set-Content -Path $Path -Encoding UTF8
# feed HTML report into Excel:
Start-Process -FilePath ‘C:Program Files*Microsoft OfficeOffice*EXCEL.EXE’ -ArgumentList $Path
The trick is to create an HTML report that gives you all the formatting opportunities you need. To create a Excel spreadsheet with color, the HTML file needs to be fed directly into excel.exe.
Note how Windows PowerShell automatically identifies the Excel version you use. Start-Process accepts a file path that can contain wildcard characters. By replacing version numbers in the path, Windows PowerShell can launch any Excel version that happens to be installed.
If you wanted to know that path, too, then simply ask Resolve-Path:
Resolve-Path -Path ‘C:Program Files*Microsoft OfficeOffice*EXCEL.EXE’ |
Select-Object -ExpandProperty Path -First 1
Turning arrays into string
Take a look at the Excel spreadsheet that uses color again. Look at the columns RequiredServices and DependentServices. They are just fine—which might surprise you. Because typically, when Windows PowerShell exports arrays of information, they do not display well in Excel.
Check this out, for example…
The next piece of script outputs the 10 newest error events from your System event log to Excel. When you look at the data, the columns Data and ReplacementStrings contain unreadable stuff.
To make array content display correctly in Excel, arrays need to be converted to strings. Here’s sample script that illustrates how easily that can be done:
$Path = “$env:temp$(Get-Date -Format yyyyMMddHHmmss)report.csv”
Get-EventLog -LogName System -EntryType Error -Newest 10 |
Select-Object -Property * |
ForEach-Object {
$_.ReplacementStrings = $_.ReplacementStrings -join ‘,’
$_.Data = $_.Data -join ‘,’
$_
} |
Export-CSV -Path $Path -UseCulture -Encoding UTF8 -NoTypeInformation
Invoke-Item -Path $Path
When you run the script, the columns now reveal their content. And here is why…
The script first piped the data to Select-Object –Property *. Typically, you would use Select-Object to select the columns you want to have in your report. Select-Object will also do another thing: It copies the data into a new object, and this new object is yours. You can do whatever you want with it.
That’s the prerequisite for the subsequent Foreach-Object loop. Inside of it, you can fine tune, change, or revise the data in any way you wish. So the script takes the properties that contain arrays, ReplacementStrings, and Data, and converts these arrays to strings by using the –join operator. That’s it. Just don’t forget to put back the $_ variable inside Foreach-Object so that the downstream cmdlets can receive it.
Thank you, Tobias. Awesome script as usual.
I invite you to follow me on Twitter and Facebook. If you have any questions, send email to me at scripter@microsoft.com, or post your questions on the Official Scripting Guys Forum. See you tomorrow. Until then, peace.
Ed Wilson, Microsoft Scripting Guy
In this article we’ll show how to read and write data from Excel worksheets directly from PowerShell scripts. You can use Excel along with PowerShell to inventory and generate various reports on computers, servers, infrastructure, Active Directory, etc.
Contents:
- How to Read Data from an Excel Spreadsheet using PowerShell?
- Exporting Active Directory User Info to Excel Spreadsheet using PowerShell
You can access Excel sheets from PowerShell via a separate COM object (Component Object Model). This requires Excel to be installed on the computer.
Before showing how to access data in an Excel cell, it is worth to understand the architecture of presentation layers in the Excel file. The figure below shows 4 nested presentation layers in the Excel object model:
- Application Layer – deals with the running Excel app;
- WorkBook Layer – multiple workbooks (Excel files) may be open at the same time;
- WorkSheet Layer – each XLSX file can contain several sheets;
- Range Layer – here you can access data in the specific cell or cell range.
How to Read Data from an Excel Spreadsheet using PowerShell?
Let’s take a look at a simple example of how to use PowerShell to access data in an Excel file containing a list of employees.
First, run the Excel app (application layer) on your computer using the COM object:
$ExcelObj = New-Object -comobject Excel.Application
After running the command, Excel will be launched on your computer in the background. To show the Excel window, change the Visible property of the COM object:
$ExcelObj.visible=$true
You can display all Excel object properties as follows:
$ExcelObj| fl
Then you can open an Excel file (a workbook):
$ExcelWorkBook = $ExcelObj.Workbooks.Open("C:PScorp_ad_users.xlsx")
Each Excel file can contain several worksheets. Let’s display the list of worksheets in the current Excel workbook:
$ExcelWorkBook.Sheets| fl Name, index

Then you can open a sheet you want (by its name or index):
$ExcelWorkSheet = $ExcelWorkBook.Sheets.Item("CORP_users")
You can get the name of the current (active) Excel worksheet using this command:
$ExcelWorkBook.ActiveSheet | fl Name, Index

Then you can get values from cells in Excel worksheet. You can use different methods to get the cell values on the current Excel worksheet: using a range, a cell, a column or a row. See the examples of how to get data from the same cell below:
$ExcelWorkSheet.Range("B4").Text

$ExcelWorkSheet.Range("B4:B4").Text

$ExcelWorkSheet.Range("B4","B4").Text

$ExcelWorkSheet.cells.Item(4, 2).text

$ExcelWorkSheet.cells.Item(4, 2).value2

$ExcelWorkSheet.Columns.Item(2).Rows.Item(4).Text

$ExcelWorkSheet.Rows.Item(4).Columns.Item(2).Text
Exporting Active Directory User Info to Excel Spreadsheet using PowerShell
Let’s see a practical example of how to access Excel data from PowerShell. Suppose, we want to get some information from Active Directory for each user in an Excel file. For instance, their phone number (the telephoneNumber attribute), department and e-mail address .
# Importing Active Directory module into PowerShell session

import-module activedirectory

# Open an Excel workbook first:

$ExcelObj = New-Object -comobject Excel.Application

$ExcelWorkBook = $ExcelObj.Workbooks.Open("C:PScorp_ad_users.xlsx")

$ExcelWorkSheet = $ExcelWorkBook.Sheets.Item("CORP_Users")

# Get the number of filled in rows in the XLSX worksheet

$rowcount=$ExcelWorkSheet.UsedRange.Rows.Count

# Loop through all rows in Column 1 starting from Row 2 (these cells contain the domain usernames)

for($i=2;$i -le $rowcount;$i++){

$ADusername=$ExcelWorkSheet.Columns.Item(1).Rows.Item($i).Text

# Get the values of user attributes in AD

$ADuserProp = Get-ADUser $ADusername -properties telephoneNumber,department,mail|select-object name,telephoneNumber,department,mail

# Fill in the cells with the data received from AD

$ExcelWorkSheet.Columns.Item(4).Rows.Item($i) = $ADuserProp.telephoneNumber

$ExcelWorkSheet.Columns.Item(5).Rows.Item($i) = $ADuserProp.department

$ExcelWorkSheet.Columns.Item(6).Rows.Item($i) = $ADuserProp.mail

}

# Save the XLS file and close Excel

$ExcelWorkBook.Save()

$ExcelWorkBook.close($true)
As a result, the columns containing AD information have been added for each user in the Excel file.
Let’s consider another example of making a report using PowerShell and Excel. Suppose, you want to make an Excel report about Print Spooler service state on all domain servers.
# Create an Excel object

$ExcelObj = New-Object -comobject Excel.Application

$ExcelObj.Visible = $true

# Add a workbook

$ExcelWorkBook = $ExcelObj.Workbooks.Add()

$ExcelWorkSheet = $ExcelWorkBook.Worksheets.Item(1)

# Rename a worksheet

$ExcelWorkSheet.Name = 'Spooler Service Status'

# Fill in the head of the table

$ExcelWorkSheet.Cells.Item(1,1) = 'Server Name'

$ExcelWorkSheet.Cells.Item(1,2) = 'Service Name'

$ExcelWorkSheet.Cells.Item(1,3) = 'Service Status'

# Make the table head bold, set the font size and the column width

$ExcelWorkSheet.Rows.Item(1).Font.Bold = $true

$ExcelWorkSheet.Rows.Item(1).Font.size=15

$ExcelWorkSheet.Columns.Item(1).ColumnWidth=28

$ExcelWorkSheet.Columns.Item(2).ColumnWidth=28

$ExcelWorkSheet.Columns.Item(3).ColumnWidth=28

# Get the list of all Windows Servers in the domain

$computers = (Get-ADComputer -Filter 'operatingsystem -like "*Windows server*" -and enabled -eq "true"').Name

$counter=2

# Connect to each computer and get the service status

foreach ($computer in $computers) {

$result = Invoke-Command -Computername $computer –ScriptBlock { Get-Service spooler | select Name, status }

# Fill in Excel cells with the data obtained from the server

$ExcelWorkSheet.Columns.Item(1).Rows.Item($counter) = $result.PSComputerName

$ExcelWorkSheet.Columns.Item(2).Rows.Item($counter) = $result.Name

$ExcelWorkSheet.Columns.Item(3).Rows.Item($counter) = $result.Status

$counter++

}

# Save the report and close Excel:

$ExcelWorkBook.SaveAs('C:psServer_report.xlsx')

$ExcelWorkBook.close($true)
You can use PowerShell to access Excel in a variety of scenarios. For example, you can create handy Active Directory reports or create PowerShell scripts to update AD data from Excel.
For example, you can ask an employee of your HR department to keep the user register in Excel. Then using a PowerShell script and the Set-ADUser cmdlet, the employee can automatically update user info in AD (just delegate the employee the permissions to change AD user attributes and show how to run the PowerShell script). Thus you can keep an up-to-date address book with the relevant phone numbers, job titles and departments.

Для работы с Excel в среде powershell нужно использовать COM объект.
#Создаем новый объект
$excel = New-Object -ComObject Excel.Application
При выполнении данного командлета произойдет запуск приложения Excel в скрытом состоянии, т.е. у нас будет висеть
процесс Excel, но при этом самого приложения как такового мы не увидем. Для того чтобы увидеть работу приложения
нужно обратиться к его свойству Visible и установить его в TRUE т.к. по умолчанию стоит FALSE
#Режим записи видимый
$excel.Visible = $true
Далее после того как приложение открылось нужно создать книгу воспользовавшись свойством Workbooks и методом Add().
#Создаем книгу Excel
$EWB = $excel.Workbooks.Add()
После создания книги нужно выбрать лист с которым будем работать в данной книге. Для этого воспользуемся
свойством Worksheet и методом Item()передав ему номер листа с которым будем работать.
#Выбираем первый лист книги
$EWS = $EWB.Worksheets.Item(1)
Зададим имя нашему листу для этого используем свойство Name и присвоим ему значение нового имени листа.
#Название листа книги
$EWS.Name = 'Service'
Так как Excel это таблица и мы работаем с ее ячейками то используем свойство Cells и метод Item() для
указания с какими ячейками данного листа мы будем работать. Отсчет начинается с 1.
#Первая строка ячеек
$EWS.Cells.Item(1,1) = 'Status'
$EWS.Cells.Item(1,2) = 'Name'
$EWS.Cells.Item(1,3) = 'DisplayName'
В данном примере мы устанавливаем названия наших колонок которые в дальнейшем будем заполнять. Первый аргумент
это номер строки с которой работаем, второй аргумент это ячейка в таблице. Перед тем как перебирать массив с
данными и записывать все в таблицу нам нужна вспомогательная переменная которая будет ссылаться на начальную
строку в таблице с дальнейшим увеличением в цикле для перехода на новую строку.
#Перебераем массив и вставляем в нужные ячейки листа
$j = 2
foreach($arr in $srv)
{
   #Если процесс запущен то зеленый иначе красный
   if($arr.Status -eq 4){
    $EWS.Cells.Item($j,1) = 'Запущен'
    $color = 10
   }else{
    $EWS.Cells.Item($j,1) = 'Остановлен'
    $color = 3
   }


   $EWS.Cells.Item($j,2) = $arr.Name
   $EWS.Cells.Item($j,3) = $arr.DisplayName

   $EWS.Cells.Item($j,1).Font.Bold = $true
   $EWS.Cells.Item($j,1).Font.ColorIndex = $color

   $j++
}
После того как книга заполнена нужными данными ее необходимо сохранить. Для этого используем метод Saveas() и
передаем ему путь и имя файла для сохранения.
#Сохраняем книгу
$EWB.Saveas('C:Excelservices.xlsx')
После этого закрываем саму книгу воспользовавшить методом Close().
#Закрываем книгу
$EWB.Close()
После того как закрыли книгу можно завершать работу приложения Excel использую метод Quit(). Тем самым освободив память в системе.
#Закрываем приложение Excel
$excel.Quit()
У данного способа есть существенный недостаток это очень медленная работа экспорта данных в таблицу Excel, но за то можно создавать красивые отформатированные таблицы для конечного пользователя. Здесь представлен полный скрипт, который получает список всех служб на вашем компьютере и записывает их в ячейки таблицы Excel.
#Получаем список всех процессов
$srv = Get-Service

#Создаем новый объект
$excel = New-Object -ComObject Excel.Application

#Режим записи видимый
$excel.Visible = $true

#Создаем книгу Excel
$EWB = $excel.Workbooks.Add()

#Выбираем первый лист книги
$EWS = $EWB.Worksheets.Item(1)

#Название листа книги
$EWS.Name = 'Service'

#Первая строка ячеек
$EWS.Cells.Item(1,1) = 'Status'
$EWS.Cells.Item(1,2) = 'Name'
$EWS.Cells.Item(1,3) = 'DisplayName'

#Перебераем массив и вставляем в нужные ячейки листа
$j = 2
foreach($arr in $srv)
{
   #Если процесс запущен то зеленый иначе красный
   if($arr.Status -eq 4){
    $EWS.Cells.Item($j,1) = 'Запущен'
    $color = 10
   }else{
    $EWS.Cells.Item($j,1) = 'Остановлен'
    $color = 3
   }


   $EWS.Cells.Item($j,2) = $arr.Name
   $EWS.Cells.Item($j,3) = $arr.DisplayName

   $EWS.Cells.Item($j,1).Font.Bold = $true
   $EWS.Cells.Item($j,1).Font.ColorIndex = $color

   $j++
}

#Сохраняем книгу
$EWB.Saveas('C:Excelservices.xlsx')

#Закрываем книгу
$EWB.Close()

#Закрываем приложение Excel
$excel.Quit()
(оригинал статьи: https://adamtheautomator.com/powershell-excel/ )
Microsoft Excel — один из тех вездесущих инструментов, от которых большинство из нас не может убежать, даже если мы попытаемся. Многие ИТ-специалисты используют Excel как небольшую базу данных, в которой хранятся тонны данных в различных процедурах автоматизации. Каков наилучший сценарий автоматизации и Excel? PowerShell!
Таблицы Excel всегда было заведомо сложно создавать сценариями и автоматизировать. В отличие от менее функционального (и более простого) аналога файла CSV, книги Excel — это не просто текстовые файлы. Для работы со сложными книгами Excel требуется PowerShell Component Object Model (COM) objects , так как вам нужно было установить Excel. Уже нет.
К счастью, проницательный участник сообщества PowerShell, Doug Finke, создал модуль PowerShell, названный ImportExcel для нас, простых смертных. Модуль ImportExcel устраняет всю эту сложность. Это позволяет легко управлять книгами Excel прийти к PowerShell сценариям!
В этой статье давайте рассмотрим, что вы можете делать с PowerShell и Excel с помощью модуля ImportExcel, а также рассмотрим несколько популярных вариантов использования.
Пререквизиты
При запуске модуля ImportExcel в системе Windows отдельные зависимости не требуются. Однако, если вы работаете с macOS, вам необходимо установить пакет mono-libgdiplus, используя brew install mono-libgdiplus. (Все примеры в этой статье будут построены с использованием macOS, но все примеры должны работать на разных платформах.)
Если вы используете macOS, не забудьте перезапустить сеанс PowerShell, прежде чем продолжить!
Установка модуля ImportExcel
Начните с загрузки и установки модуля через PowerShell Gallery, запустив Install-Module ImportExcel -Scope CurrentUser. Через несколько секунд все будет в порядке.
Использование PowerShell для экспорта в рабочий лист Excel
Возможно, вы знакомы со стандартными командлетами PowerShell Export-Csv и Import-Csv. Эти командлеты позволяют читать и экспортировать объекты PowerShell в файлы CSV. К сожалению, нет командлетов Export-Excel и Import-Excel . Но, используя модуль ImportExcel, вы можете создать свой собственный функционал.
Один из наиболее частых запросов системного администратора — это экспорт объектов PowerShell в рабочий лист Excel. С помощью командлета Export-Excel в модуле ImportExcel, вы можете легко сделать это.
Например, возможно, вам нужно найти какие-то процессы, запущенные на вашем локальном компьютере, и поместить их в книгу Excel.
Командлет Export-Excel принимает любой объект точно так же, как делает Export-Csv. Этому командлету можно передать любой объект.
Чтобы найти процессы, запущенные в системе с помощью PowerShell, используйте командлет Get-Process, который возвращает каждый запущенный процесс и различную информацию о каждом процессе. Чтобы экспортировать эту информацию в Excel, используйте командлет Export-Excel, указывающий путь к создаваемой книге Excel. Вы можете увидеть пример команды и снимок экрана сгенерированного файла Excel ниже.
Get-Process | Export-Excel -Path ‘./processes.xlsx’

Поздравляю! Вы экспортировали всю информацию точно так же, как Export-Csv , но, в отличие от Export-Csv, мы можем сделать эти данные намного интереснее. Убедитесь, что имя рабочего листа называется Processes, данные находятся в таблице, а размер строк устанавливается автоматически.
Используя параметр переключателя AutoSize для автоматического изменения размера всех строк, TableName, чтобы указать имя таблицы, которая будет включать все данные, и имя параметра WorksheetName для процессов, вы можете увидеть на снимке экрана ниже, что можно построить.
Get-Process | Export-Excel -Path ‘./processes.xlsx’ -AutoSize -TableName Processes -WorksheetName Proccesses

Командлет Export-Excel имеет множество параметров, которые можно использовать для создания книг Excel всех видов. Для полного изложения всего, что Export-Excel может делать, запустите Get-Help Export-Excel.
Использование PowerShell для импорта в Excel
Итак, вы экспортировали некоторую информацию в файл с именем process.xlsx в предыдущем разделе. Возможно, теперь вам нужно переместить этот файл на другой компьютер и импортировать / прочитать эту информацию. Без проблем. У вас есть Import-Excel к вашим услугам.
При простейшем использовании вам нужно только указать путь к документу / книге Excel с помощью параметра Path, как показано ниже. Вы увидите, что он читает первый рабочий лист, в данном случае рабочий лист Processes, и возвращает объекты PowerShell.
Import-Excel -Path ‘./processes.xlsx’

Может быть, у вас есть несколько листов в книге Excel? Вы можете прочитать конкретный рабочий лист с помощью параметра WorksheetName.
Import-Excel -Path ‘./processes.xlsx’ -WorkSheetname SecondWorksheet
Вам нужно читать только определенные столбцы из рабочего листа Excel? Используйте параметр HeaderName, чтобы указать только те параметры, которые вы хотите прочитать.
Import-Excel -Path ‘./processes.xlsx’ -WorkSheetname Processes -HeaderName ‘CPU’,’Handle’
Командлет Import-Excel имеет другие параметры, которые можно использовать для чтения книг Excel всех типов. Чтобы получить полное изложение всего, что может делать Import-Excel, запустите Get-Help Import-Excel.
Использование PowerShell для получения (и установки) значений ячеек Excel
Теперь вы знаете, как читать весь лист Excel с помощью PowerShell, но что, если вам нужно только одно значение ячейки? Технически вы можете использовать Import-Excel и отфильтровать нужное значение с помощью Where-Object, но это будет не слишком эффективно.
Вместо этого, используя командлет Open-ExcelPackage, вы можете «преобразовать» книгу Excel в объект PowerShell, который затем можно будет читать и изменять. Чтобы найти значение ячейки, сначала откройте книгу Excel, чтобы занести его в память.
$excel = Open-ExcelPackage -Path ‘./processes.xlsx’
Open-ExcelPackage аналогичен использованию New-Object -comobject excel.application, если работать напрямую с COM-объектами.
Затем выберите лист внутри книги.
$worksheet = $excel.Workbook.Worksheets[‘Processes’]
Этот процесс похож на способ открытия книг с помощью COM-объекта excel.workbooks.open.
После того, как рабочий лист назначен переменной, вы можете перейти к отдельным строкам, столбцам и ячейкам. Возможно, вам нужно найти все значения ячеек в строке A1. Вам просто нужно сослаться на свойство Cells, указав индекс A1, как показано ниже.
$worksheet.Cells[‘A1’].Value
Вы также можете изменить значение ячеек на листе, присвоив другое значение, например $worksheet.Cells[‘A1’] = ‘differentvalue’
Будучи в оперативной памяти, важно высвободить пакет Excel с помощью командлета Close-ExcelPackage.
Close-ExcelPackage $excel
Конверсия Excel в файлы CSV с PowerShell
Если у вас есть содержимое листа Excel, представленное с помощью объектов PowerShell, «преобразование» листов Excel в CSV просто требует отправки этих объектов в командлет Export-Csv.
Используя созданную ранее книгу processes.xlsx, прочтите первый рабочий лист, который получает все данные в объекты PowerShell, а затем экспортируйте эти объекты в CSV с помощью приведенной ниже команды.
Import-Excel ‘./processes.xlsx’ | Export-Csv -Path ‘./processes.csv’ -NoTypeInformation
Если вы сейчас откроете получившийся CSV-файл, вы увидите те же данные внутри рабочего листа «Processes» (в этом примере).
Конверсия множества рабочих листов
Если у вас есть книга Excel с несколькими листами, вы также можете создать файл CSV для каждого листа. Для этого вы можете найти все листы в книге с помощью командлета Get-ExcelSheetInfo. Когда у вас есть имена рабочих листов, вы можете передать их в параметр WorksheetName, а также использовать имя листа в качестве имени файла CSV.
Ниже вы можете найти необходимый пример кода.
## find each sheet in the workbook $sheets = (Get-ExcelSheetInfo -Path ‘./processes.xlsx’).Name ## read each sheet and create a CSV file with the same name foreach ($sheet in $sheets) { Import-Excel -WorksheetName $sheet -Path ‘./processes.xlsx’ | Export-Csv «./$sheet.csv» -NoTypeInformation }
Заключение
Используя модуль ImportExcel PowerShell module, вы можете импортировать, экспортировать и управлять данными в книгах Excel точно так же, как и в CSV, без установки Excel!
The ImportExcel is a PowerShell module that allows you import to or export data directly from Excel spreadsheets without having Microsoft Excel installed on your computer. In this tutorial, you’ll learn to work with Import-Excel and Export-Excel. The ImportExcel module runs on Windows, Linux, or Mac and now can be used in Azure functions and GitHub Actions. Simply put, if you need to generate reports for work, you must learn this module.
Contents
- Importing data from Excel
- Export data to Excel
- Adding data to an existing spreadsheet
- Exporting data with formatting
- Creating charts
- Editing existing data in an Excel spreadsheet
- Conclusion and links
- Author
- Recent Posts

Mike Kanakos is a Cloud and Datacenter Microsoft MVP, tech blogger and PowerShell community leader. He writes about infrastructure management and cloud automation. You can follow Mike on his blog https://www.commandline.ninja or on Twitter at @MikeKanakos.
Doug Finke, a Microsoft MVP since 2009, builds and maintains the module. Doug is constantly improving the module and releases new module updates frequently. As of this writing, the module is at v7.1.3 and is continually being developed. His module is nearing 1 million downloads since its first release! Installing the module is a simple task with PowerShell code.
Install-Module -Name ImportExcel
Excel is not required to be installed for this module to work. The module installs a .net DLL named epplus.dll that allows the module to import Excel data or export to Excel format. This allows you to install the module on a server without having to install Office on the server.
Importing data from Excel
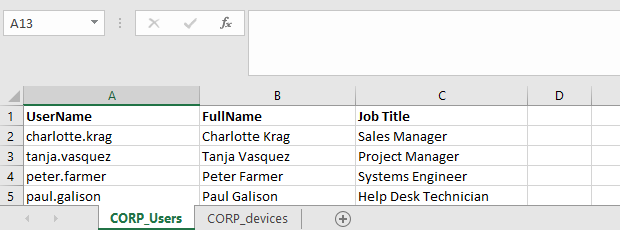
Getting started with the module is very easy. Let’s start by importing some data from Excel. In this first demo, I’ll be importing some simple data I have from a table in Excel.

Sample Excel table data for import
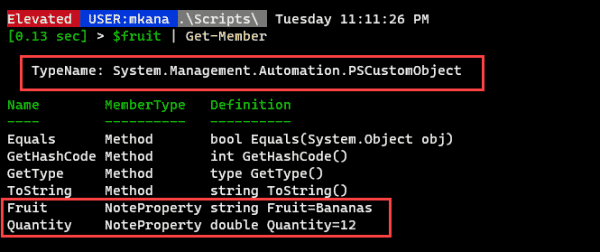
To import data, I use the Import-Excel cmdlet and specify the path. In this example, I will also save the data to a variable called «Fruit» for later use.
Import-Excel "c:tempExcelDemo.xlsx" -OutVariable Fruit

Excel data import in PowerShell
Now, we have a simple table with data organized in columns and rows. The table properties reveal that PowerShell has created a PSCustomObject with two note properties for the two columns.
Excel table properties
But what if I have a large table of data? I can specify which data gets imported without having to pull in the entire table. Let’s look at how that works.
I have created a new tab in my spreadsheet that contains all the process info from my machine. I have named the tab «Processes.» The spreadsheet has 69 columns of data. I could import all these columns and filter the data, but for this demonstration I just want the Name, ProcessName, CPU, and Memory columns.

Process info data in Excel
Using the Import-Excel cmdlet, I can pull in just the data I am interested in. Let’s pull in the columns I mentioned earlier (Name, ProcessName, CPU, and Memory). For this demo, I only want 6 rows of data. To accomplish this, I use the -ImportColumns, -StartRow and -EndRow parameters.
To pick the columns, I simply count columns from left to right in my spreadsheet starting at 1. I know you can’t see the full spreadsheet, but I have already counted out the columns that I need. To select the columns I want, I will need columns 1, 6, 12, and 46. But if I want to keep them in the order I mentioned above, then the order would have to be 1, 46, 12, and 6.
import-excel C:tempExcelDemo.xlsx -WorksheetName Processes -ImportColumns @(1, 46, 12, 6) -startrow 1 -endrow 7
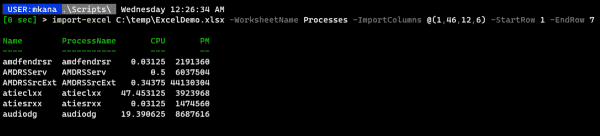
Process info imported into PowerShell
Export data to Excel
As with the process of importing data, I can also export data to Excel easily with just one line of code. Let’s go back to my previous example: getting the process data. If I want to export all the process info on my machine, all I need to do is type one line:
Get-process | Export-Excel
This results in the Export-Excel cmdlet creating a spreadsheet. If I have Excel installed, it launches Excel and presents the file output to me.

Exporting data to Excel using default values
Notice that I didn’t specify a filename or any other formatting information. However, the Export-Excel cmdlet created the spreadsheet and applied some default formatting (see callout 2) and created a temporary file for me (callout 1).
Of course, I can choose a filename and path on export, if I so desire, by using the -path parameter and inputting a value like so:
Get-process | Export-Excel C:tempProcessList.xlsx
Adding data to an existing spreadsheet
At some point, you will need to add data to an existing spreadsheet. The -Append parameter adds data to an existing spreadsheet. I can specify a worksheet to add to with the -worksheet parameter or I can start a new worksheet with the same parameter but picking a new tab name.
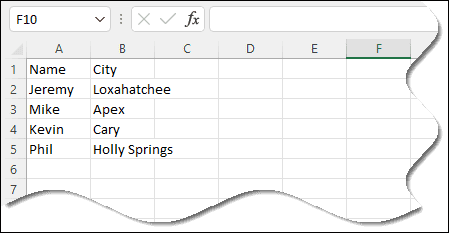
So far, I have been working on a spreadsheet named «ExcelDemo.xlsx,» which contains the Fruit and Processes worksheets. I want to add a new tab named «People» and copy in data from a small table I created.

Table of person and city info saved to the People variable
Exporting this data to my existing Excel spreadsheet and creating a new worksheet would look like this:
$People | Export-Excel c:tempExcelDemo.xlsx -Append -WorksheetName "People"
People table export
This is easy and doesn’t require much code. Below, we can see the worksheet tabs that have been created from Export-Excel.
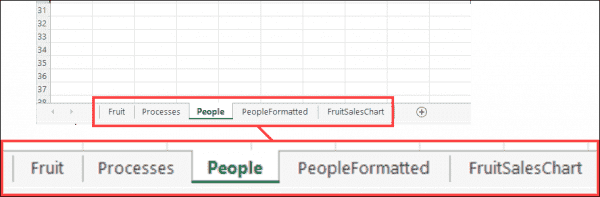
Excel worksheet tabs created by Export Excel
When you look at the table, you’ll see that it has none of the familiar Excel spreadsheet formatting. I would like to add some formatting to my data. Let me show you how this can be done.
Exporting data with formatting
The Export-Excel cmdlet offers many options for formatting my data on export. I’ll highlight a few options, but make sure you review the parameters available for the Export-Excel cmdlet for a full list of formatting options.
I would like to export the data again. This time, however, I will add a table style and a title for my table, and I would like the table title to be bold. This is possible with Export-Excel. The code used to do this is slightly different from the previous example:
$People | Export-Excel c:tempExcelDemo.xlsx -Append -WorksheetName "PeopleFormatted" -TableStyle Medium16 -title "Demo of Table Formatting" -TitleBold

Formatted version of the People table in Excel
You might wonder what the table style I selected (Medium16) in the last example is. The Export-Excel cmdlet has table styles built in that correspond to the table styles you see in Excel.

Export Excel table styles available
The table styles in Excel are the same. In the screen cap below, I clicked on the «Format As Table» at the top of the spreadsheet, which then displays the table styles. If you hover your mouse over a style, you’ll see some text that provides you the style details. The #1 callout is the style I hovered over. Notice that it says Medium16. This is how I got the name that I used in my previous code example for the table style parameter.
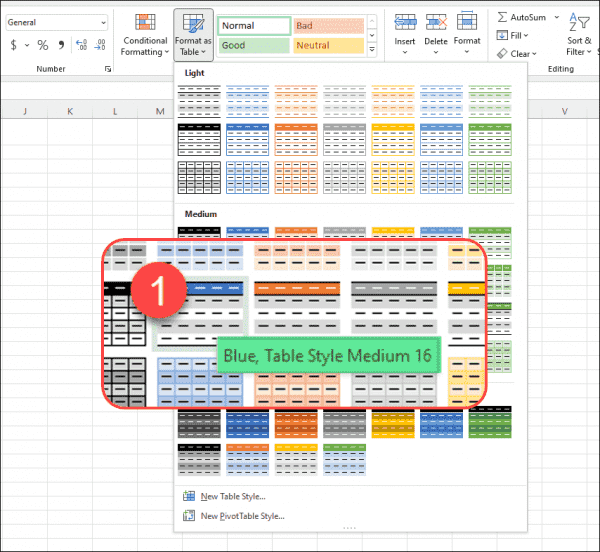
Corresponding Excel table styles
Creating charts
Export-Excel does more than just make spreadsheets. The cmdlet can export table data and turn that data into a chart inside an Excel spreadsheet. For my next example, I have created a table of some simple inventory items and sales data.

Sales data
I would like to chart these sales in a simple bar graph that depicts units sold. To do this, I need to define the properties I want for my table. To do this, I use the New-ExcelChartDefinition cmdlet.
$ChartData = New-ExcelChartDefinition -XRange Item -YRange TotalSold -ChartType ColumnClustered -Title "Total Fruit Sales"
This line of code defines my table properties, and it tells Excel what to use for the xValue in the chart. I first use the Item column, then, I define the yValue (I am using the TotalSold column). Then, I specify a chart type. There are 69 chart types available in the cmdlet, all of which correspond to the chart types in Excel. I chose the «ColumnClustered» type for my example.
I then add a chart title, although this is not required. These values are saved to a variable named $ChartData. The next piece to add to the export cmdlet is this chart definition:
$data | Export-Excel C:tempExcelDemo.xlsx -Append -WorksheetName FruitSalesChart -ExcelChartDefinition $ChartData -AutoNameRange -show -Title "Fruit Sales"
Let’s walk through this example. First, I send the $data variable to the Export-Excel cmdlet. The $data variable is our sales data. The syntax for Export-Excel is a continuation from my previous example. I export and append this to a spreadsheet named «ExcelDemo.xlsx.» I create new worksheet tab named FruitSalesChart. This is all code we saw in the previous examples.
Then, I am add in the chart definition I created earlier by calling the $ChartData variable. Finally, I tell Excel that I want an auto name range. The -show parameter auto opens the spreadsheet after I create it.

Fruit Sales exported to Excel as a table and chart
Editing existing data in an Excel spreadsheet
I find it so easy to export data from PowerShell to Excel that I default to the Export-Excel cmdlet for much of my work. However, you can also update individual data values in an existing spreadsheet. I will connect to the spreadsheet that I used in the previous examples. To connect, use the Open-ExcelPackage cmdlet.
$ExcelPkg = Open-ExcelPackage -Path "C:tempExcelDemo.xlsx"
I can start to work with the data after opening the file.

Spreadsheet info in PowerShell
The first five rows constitute the worksheet tabs I created earlier in the spreadsheet. I can view the data in any of the tabs with some simple code.
#Let's access the data in the "PeopleFormatted" worksheet
$WorkSheet = $ExcelPkg.Workbook.Worksheets["PeopleFormatted"].Cells
$WorkSheet[3,1] | select value

Value
-----
Jeremy

$WorkSheet[3,2] | select value

Value
-----
Loxahatchee
The code above probably doesn’t make much sense without a visual reference. Have a look at this screen cap below, which should help explain the code.
In the first code example, I called $WorkSheet[3,1] . If you look at the Excel spreadsheet, «3» represents the 3rd row. «1» represents the first column (starting from left of column A).
In the second code example, I called $WorkSheet[3,2] which is Row 3, Column2 (column B in spreadsheet).
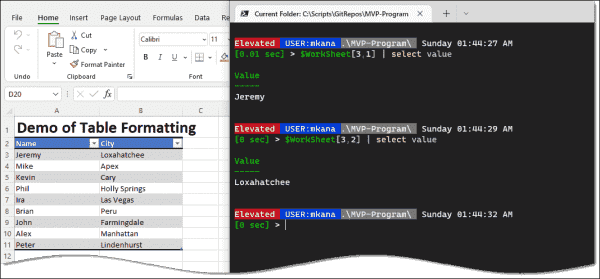
Example of accessing Excel data values
Inserting a new value into the Excel data cell is done with a similar set of code. I will replace the name «Jeremy» with the name «Robert».
$WorkSheet[3,1].Value = "Robert"

$WorkSheet[3,1] | select value

Value
-----
Robert
It’s that easy to update a field in Excel! However, there’s one catch. This change I just made is still in memory inside PowerShell. The file needs to «closed» for the data to be written back into the file.
Close-ExcelPackage $ExcelPkg
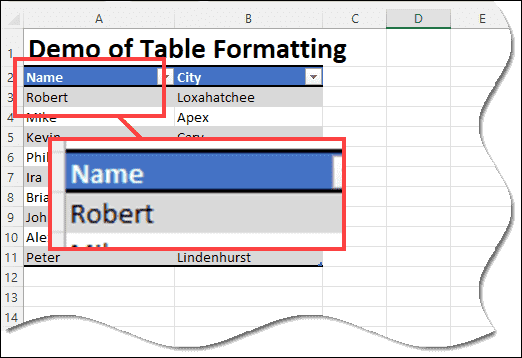
Updated spreadsheet value
Conclusion and links
Today, I showed you how to import data from an Excel spreadsheet, create a spreadsheet, create a simple chart, and manipulate the imported data in an existing Excel spreadsheet. The ImportExcel module makes these tasks and others operations simple to complete.
I have touched upon a just few of the many complex tasks you can perform with this module. If you would like to learn more, please visit Doug Finke’s GitHub page for many more examples of demo code you can try for yourself. He has a page dedicated to FAQs and a thorough analysis on examples that you should definitely check out.
Subscribe to 4sysops newsletter!
Many of the code examples in Doug’s module come from community members looking to use Excel in unique ways. If you have ideas for new ways to use his module, please submit a pull request to his repo so that others can learn from your use case.
![]()