
Word 2013
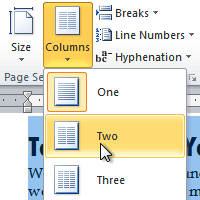
You can format your document in a newspaper-style column layout by adding columns. On the Page Layout tab, click Columns, then click the layout you want.
-
To apply columns to only part of your document, with your cursor, select the text that you want to format.
-
On the Page Layout tab, click Columns, then click More Columns.
-
Click Selected text from the Apply to box.
Word 2016
You can format your document in a newspaper-style column layout by adding columns. On the Layout tab, click Columns, then click the layout you want.
-
To apply columns to only part of your document, with your cursor, select the text that you want to format.
-
On the Layout tab, click Columns, then click More Columns.
-
Click Selected text from the Apply to box.
Need more help?
Want more options?
Explore subscription benefits, browse training courses, learn how to secure your device, and more.
Communities help you ask and answer questions, give feedback, and hear from experts with rich knowledge.
Lesson 12: Working with Columns
/en/word2010/adding-breaks/content/
Introduction
Columns are used in many types of documents, but they are most commonly used in newspapers, magazines, academic journals, and newsletters. In this lesson, you will learn how to insert columns into a document and create column breaks.
Inserting columns
Columns and column breaks can improve your document’s organization and increase its readability. They also allow you to utilize all of the available space on the page.
Optional: You can download this example for extra practice.
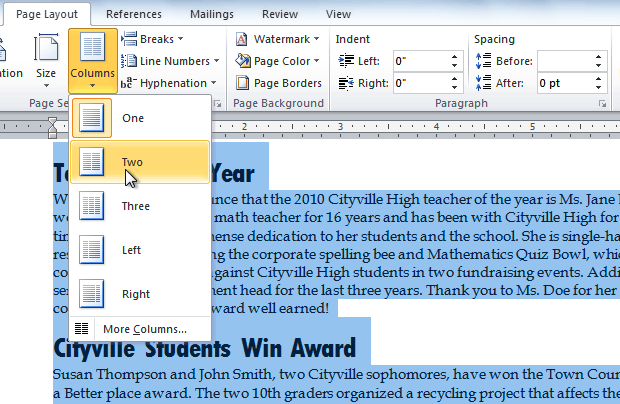
To add columns to a document:
- Select the text you want to format.
- Click the Page Layout tab.
- Click the Columns command. A drop-down menu will appear.
 Adding columns
 - Select the number of columns you want to insert. The text will then format into columns.
If you want to remove the columns, click the Columns command and select One for the number of columns.
Adding column breaks
Once you’ve created columns, the text will automatically flow from one column to the next. Sometimes, though, you might want to control exactly where each column begins. You can do this by creating column breaks.
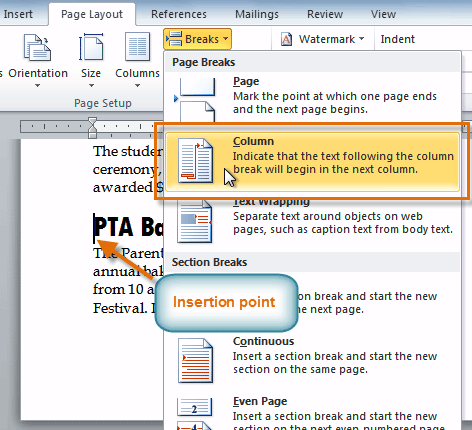
To add column breaks:
- Place the insertion point where you want to add the break.
- Click the Page Layout tab.
- Click the Breaks command in the Page Setup group. A drop-down menu will appear.
- Select Column from the list of break types.
 Adding a column break
 - The text will shift to reflect the column break.
Columns after adding a column break

Challenge!
- Open an existing Word document. If you want, you can use this example.
- Select the text you want to format into columns.
- Format the selected text into two columns.
- Add a column break.
/en/word2010/working-with-hyperlinks/content/
I’ll admit it — I’m not a big fan of adding columns in Microsoft Word. Not that there’s anything wrong with columns, per se. Columns work fine (until they don’t). But in a legal office environment, I usually format blocks of information with tables because they’re a bit easier to control.
That said, I have seen lots of legal professionals insert multiple columns in Microsoft Word to format things like service lists in Certificates of Service. Hey, to each her [his] own.
So if you want to format text with columns in Microsoft Word documents, here’s what you need to know:
Inserting columns: the basic primer
Everything starts from the Layout tab (known as Page Layout in versions 2007-2010) on the Ribbon:

Click on More Columns, and you’re taken to a dialog box that allows you to set up your columns exactly the way you want them.
The default is one column — just a regular document. You can use one of the presets (the two-column layout is useful for the service list application I mentioned above). Or you can customize it within an inch of its life. Width? Space between columns 1 and 2, or 2 and 3, or …? How about a line between them (like a newsletter would have)? You decide!
(If you don’t want your columns to all be the same width, be sure to uncheck the “Equal column width” checkbox at the bottom of the dialog box. Then, you’ll be able to customize the width of each column separately.)

Navigating between columns
Once you’ve set up your columns, you come to the tricky part. This is part of the reason I usually opt for tables rather than columns. If you use tables, moving between the cells is easy — just use the Tab key. To insert a column, however, you need to know a few tricks.
Say you’re typing in the first column of your document and you want to end that column there and start typing in the second column. To do that, you have to insert a column break. You can insert a column break in one of two ways:
- Press CTRL-SHIFT-ENTER simultaneously; or
- Go to the Layout tab, click Breaks, and choose Column

Personally, I’d go with Option 1 (assuming I remember the key combination in the heat of the moment).
Once you’ve inserted a column break, your cursor is in the next column, ready for you to type. When you insert a column break in your last column (the one farthest to the right), the cursor will go to the first column on the next page.
Viewing column boundaries
To me, it’s tough to work with columns (or tables, for that matter) if I can’t really see them. To turn on the column boundaries so you can see your columns laid out on the page, go to the File tab (or click the Office button in version 2007) and click Options, then go to Advanced and check the box next to Show text boundaries:

When columns are only part of your document
But what if only part of your document consists of multiple columns?
If you go back to the Columns dialog box (via Layout > Columns > More Columns), you’ll notice a drop-down at the bottom of the box:

If you choose This Point Forward, that will allow you to insert columns at the point your cursor is sitting in. Once you’ve inserted your columnar data, then go back to the Format Columns dialog box and choose the One Column format (being careful to once again choose This Point Forward in that bottom drop-down), and your document will return to the single-column format without disturbing the multi-column insertion you’ve just worked so hard on.
But what if you want to insert a two- or three- (or more-) column block of text into the middle of a one-column, normal document?
You may want to use a slightly different procedure, depending on whether you’re creating a brand-new document or you’re inserting a multi-column layout into the middle of an existing single-column document. You’re using the same dialog box, but if you’re editing an existing document and placing a multi-column layout in the middle, you’ll need to take a couple of extra precautions to ensure you don’t inadvertently create a formatting nightmare.
Inserting multi-columns into a new document
Let’s say you’re typing along in a brand-new document and decide that the next bit of text needs to be in two (or more) columns. There’s no text after the point where your cursor is right now, so you can switch back to single-column format once you get done inserting the multi-column section.
If you go back to the Columns dialog box (via Layout > Columns > More Columns), you’ll notice a drop-down at the bottom of the box:
If you choose This Point Forward, that will allow you to insert columns at the point your cursor is sitting in. Once you’ve inserted your columnar data, then go back to the Format Columns dialog box and choose the One Column format (being careful to once again choose This Point Forward in that bottom drop-down), and your document will return to the single-column format without disturbing the multi-column insertion you’ve just worked so hard on.
Inserting columns into the middle of an existing document
If you’re editing an existing document and you want to insert a multi-column layout somewhere in the middle of text you’ve already got typed, the “this point forward” method may result in a temporary and fixable but still infuriating mess.
Here’s how to avoid it: Insert section breaks before and after the point at which you want to insert your columns:

… then in Apply to:, choose This section instead:

Here’s a video demonstration:
Video: Inserting a column into the middle of an existing document (without creating a mess)
How do you see yourself using columns in your documents?
Typically, Word documents like books, reports, and letters have paragraphs that occupy the whole page width. In articles, newsletters, flyers, and brochures, all or only parts of the text may be arranged in two or more columns:

You don’t need to create tables to structure text into columns. Tables are useful for displaying translated versions of the legal document side-by-side, but table cells break the text flow and are not recommended for multi-column layouts. It is more convenient to use columns for text formatting in most other cases. Word also allows you to adjust your columns by adding column breaks.
Format text in columns
To format a text into columns, do the following:
1. Do one of the following:
- To use the same number of columns for an entire document, click anywhere in the document (empty or with content).
If you choose to format text in columns, Word fills the first column with text on the page and then moves to the beginning of the next column. When all columns on one page are filled, the text moves to the next page.
- To format only a part of the document, select the paragraphs that you want to wrap in columns.
If you select a part of the text and wrap it in columns, Word inserts section breaks at the beginning and end of the selected text to delineate the area where the column layout is applied:

See more about breaks and how to display them.

To manually specify where the text in each column should end, you can use a column break.
2. On the Layout tab, in the Page Setup group, click the Columns button:

3. In the Columns dropdown list, select one of the options:

- One (used by default),
- Two, Three to create two or three columns of equal width,
- Left, Right to create two columns of unequal width,
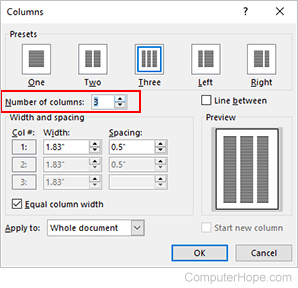
- More Columns… to specify more options in the Columns dialog box:

- In the Presets section, you can choose the same options as in the Columns dropdown list – One, Two, Three, Left, or Right.
- If you need more columns, type or select the number of columns you need in the Number of columns field. The maximum number of columns may vary depending on the font, font size, margins, etc. E.g., 13.
- The Line between checkbox inserts a vertical line between columns. This line clearly defines column borders, especially if you want to fit as much content on the page as possible (very handy for cheat sheets).
See more options below.

Format columns
I. It is recommended to justify the paragraphs in columns to give the page a clean and organized appearance. To justify the column text, select it and do one of the following:
- On the Home tab, in the Paragraph group, click the Justify button:

- Press Ctrl+J.

II. To change the width of columns or the space between them, do the following:
1. Click anywhere in the columnar text.
2. Do one of the following:
- On the Layout tab, in the Page Layout group, click the Columns button, then choose More Columns…
In the Columns dialog box, in the Width and spacing section:
In the Width box for any columns, enter or select a new width.
The Width measurements for the other columns change to match, and the width of all the columns changes.
See how the columns will be displayed in the Preview section.
- On the horizontal ruler, drag the margins to change the width of the columns:


III. To reduce white space on text lines, you can set up Word to hyphenate the text and break long words into syllables. See how to hyphenate automatically and manually for more details.
Remove columns
To remove column layout for the selected text or entire document, do the following:
1. Click anywhere in the columnar text.
2. On the Layout tab, in the Page Layout group, click the Columns button, then choose One.
Insert a column break
In the Word document, you can manually break columns. When you break a column, the text after the break moves to the top of the next column:

You can display column breaks as regular nonprintable symbols. Word displays them as ![]() .
.
To insert a column break, position the cursor at the beginning of the line you want to start in the new column, and then do any of the following:
- On the Layout tab, in the Page Setup group, click the Breaks button, and then click Column to insert a column break:

- Press Ctrl+Shift+Enter.

The column break is inserted, and the cursor moves to the beginning of the next column.
Remove a column break
To remove a column break, click at the left end of the break or select the break and press the Delete key.
-
1
Open Microsoft Word. Its icon resembles a blue background with a white «W» on top.
- If you’d rather edit an existing document, simply double-click the document in question.
-
2
Click Blank document. It’s in the top-left corner of the templates page.
- If you’re editing an existing document, skip this step.
Advertisement
-
3
Click the Layout tab. It’s at the top of the Word window, to the right of the Home, Insert, and Design tabs.
-
4
Click Columns. This option is below and to the left of the Layout tab. Clicking it will prompt a drop-down menu with the following options:
- One — Default setting for Word documents.
- Two — Splits the page into two distinct columns.
- Three — Splits the page into three distinct columns.
- Left — Concentrates most of the text on the right side of the document, leaving a narrow column on the left.
- Right — Concentrates most of the text on the left side of the document, leaving a narrow column on the right.
- If you highlight a part (or all) of your document before clicking a column option, your document will be reformatted to appear in columns.
-
5
Click a column option. Doing so will apply invisible columns to your document; as you type, you’ll notice that your text jumps to a new line before reaching the standard right-most margin. Once you reach the bottom of the page, your text will continue in the next column until you reach the bottom of the page again, and so on.


Advertisement
-
1
Open Microsoft Word. Its icon resembles a blue background with a white «W» on top.
- If you’d rather edit an existing document, simply double-click the document in question.
-
2
Click Blank document. It’s in the top-left corner of the templates page.
- If you’re editing an existing document, skip this step.
-
3
Click the Layout tab. It’s at the top of the Word window, to the right of the Home, Insert, and Design tabs.
-
4
Click Columns. You’ll find this option below and to the left of the Layout tab.
-
5
Click More Columns. It’s at the bottom of the Columns drop-down menu.
-
6
Click a number of columns. You’ll see options like One, Two, Three, and so on at the top of this window. Clicking an option will apply it to your document.
- If you highlighted text, your settings will be applied only to the highlighted text.
-
7
Modify the column width and separation. You can do this by clicking the up or down arrow to the right of «Width» and the «Spacing» values, respectively.
- You can also uncheck the box next to «Equal column width» in order to make one column wider than the other.
-
8
Check the box next to «Line between» to draw a divider. Doing so will place a visible line between your columns.
- If you don’t want a visible divider, leave this option unchecked.
-
9
Click the «Apply to» drop-down menu. Doing so will allow you to click Selected text or Whole document to apply your column settings to the respective amounts of text.
-
10
Click OK. This will apply your settings and divide any selected text as per your customized column rules.


Advertisement
Add New Question
-
Question
How do I add columns to the middle of the document without changing the format of the entire document?

In Word, type the lines of text in a single column anywhere in the document. Then, select the lines of text and click the Page Layout tab. In the Page Setup options, click Columns and select the desired number of columns. Word automatically creates continuous section breaks before and after the columns. In some cases, it may be impossible to do without changing the format of the document.
-
Question
How do I rotate a page in Word?
Select the pages or paragraphs whose orientation you want to change. Click Page Layout > Page Setup Dialog Box Launcher. In the Page Setup box, under Orientation, click Portrait or Landscape. Click the Apply to box and click Selected text.
Ask a Question
200 characters left
Include your email address to get a message when this question is answered.
Submit
Advertisement
Thanks for submitting a tip for review!
About This Article
Article SummaryX
1. Open Microsoft Word or an existing Word document.
2. Click Blank document.
3. Click Layout.
4. Click Columns.
5. Click a number of columns.
Did this summary help you?
Thanks to all authors for creating a page that has been read 533,628 times.
Is this article up to date?
Showing the content in full width of a document may quickly bore the reader. Sometimes, it is a good idea to create your document like newspaper layout with multiple columns. This is one of the easy ways to show attractive content similar to newsletters and brochures. It helps to add different types of content in a single page and highlight the actionable part. In this article, we will explain how to insert columns in Word documents and arrange text using columns. If you have a long content, then make sure to add table of contents for easy accessibility of headings.
Using Default Templates with Columns
Though creating a custom column layout is easier, it takes
time to setup the layout. However, Microsoft offers predefined column templates
that you can choose for your use.
- Launch your Word application. On the backstage view, you can see the predefined layouts to select under “Featured” section. If you do not see backstage view, navigate to “File > New” menu and look under “Featured” section. You can also search for the column layouts using the search box.

- Select the template and Word will download it from the Microsoft Office library.
- As you can see, there are lot of beautiful columned layouts for resumes, brochures and events that you can choose from and modify.

Creating
Columns in Your Documents
If you do not want to use the template and start from the
scratch, you can create your column layout. It is possible to set a whole text,
a selected area or a section into columns. Let us take an example document
having two text paragraph like below:

In order to break the two paragraphs into two columns, simply
go to “Layout” menu. Click on “Columns” dropdown and select “Two”. Word will
automatically split the two paragraphs into two columns as shown below.

Related: How to create eBook in Word?
Inserting
Manual Column Break
In the above example, you do not have to highlight the
section when you have two paragraphs. Just place the cursor in the section to
split into two columns based on the previous section break. If this does not
work for you or you want to manually decide the column break point, then follow
the below instructions.
- First click on the search box on the top menu and type
“show”. Select “Show All” option to show all formatting markups on your
document.

- Position your cursor where you want to create a column
break. - Switch to the “Layout” tab and click on the “Breaks”
list box. - Select “Columns” option to set a column break in the
selected cursor position.

- You can see the “Column Break” markup on your document
and Word will move the content below the column break to next page. - Now go to “Layout > Columns” and select “Two” to
create two columns at the column break point.

You will notice that Word continue the content from the first
column to next. The column break will make your document like a newsletter or
newspaper layout that continues from one column to next. However, you can also
manually type different content after creating columns.
Adjusting
the Column Width
By default, Word will adjust the columns to have equal width.
However, you can change the width of each column as per your need. In order to
adjust the column width, go to “Layout > Columns > More Columns” option.

You can customize the following options:
- Presets – choose one of the existing preset layout options.
- Number of columns – change the number of columns.
- Line between – enable the checkbox to insert a line between the columns.
- Equal column width – disable this checkbox and setup custom width and spacing for your columns.
- Apply to – apply the changes to whole document or only to this section.
After customizing your column layout, you can continue to
type in a columned layout.

Related: How to change embedded file name in Office?
Using
Markers in the Ruler
When you are working with columns, Word will split the
document into sections. You can view the width of the sections on the marker
available in top ruler.
Simply, double click on the ruler marker to open “Columns”
pop-up box to customize the options as explained above. Alternatively, you can
also set the width by dragging the markers in the ruler using mouse.

Undoing
Column Layout
If
you do not need the distribution into columns anymore, you can simply undo this
setting. Afterwards your text will appear in the original structure.
- In order to do so, open the “”Layout > Columns” list box and select the entry “One”.
- The formatting markups will remain intact. You can remove the column break by placing the cursor in front of the formatting symbol and remove it using the delete key.
Creating
Mixed Layout
You
can also easily create columns and full width layout sections in a single
document.
- In order to exit the column layout and go to full width section,
position your cursor at the end of the last column. - Go to “Breaks > Continuous” and apply a section break on the same
page. Now your cursor will go to next section and you can see a section break
in the formatting markup. - Go to “Columns” and select “One” to disable the columns and continue in
a full width.

Tips and Tricks
- In order to divide a section of your document into columns, select it with the mouse and create columns. When creating columns, Word defines the area automatically for individual sections.
- You can apply column break only to particular section of your document when your document has multiple sections.
- Use keyboard shortcuts, “Control + Shift + Enter” to create a column break.
- You can adjust the column width via the markers in the ruler only when you have selected “Equal column width” checkbox in the “Columns” dialogue window.
- Column changes are an important element to structure texts with multiple columns.
Editor’s Note: This article was originally published in Apr. 2013 and the video tutorial for this article published Dec. 2018; while some menu options might have changed, the steps shown in this tutorial are still the same.
Arranging text and graphics into columns is an effective way to make your document more readable and to fit more content on a single page. These 10 tips will help you generate columns quickly and easily and maintain them with little to no effort.
LEARN MORE: Office 365 Consumer pricing and features
To enable columns, click the Page Layout tab, choose the number of columns from the Columns drop-down in the Page Setup section, and start typing. In Word 2003, click the Columns tool on the Standard toolbar and choose up to four columns or choose Columns from the Format menu. To return to just one column — the default — repeat the process and choose one column. If your columns suddenly disappear, check your view property. Columns are visible only in Print Layout view.
1: Use the right tool for the job
Once you enable columns, you must stick with the columnar flow. Text will flow down the left-most column and into the top of the next column in what’s known as newspaper style. This means that you can’t just click inside any column and start typing. When you need to align text across the page from column to column (in parallel format) use tabs or a table.
2: Add columns to existing text
When you enable columns, Word will automatically guide your text into columnar format. If the text already exists, the technique is the same. However, you must select the text first as shown in Figure A. Then, using the instructions given in the introduction, select the number of columns you want. Figure B shows the results of dividing the existing single column of text into two columns.
Figure A
Select existing text to change the column property for only that text.
Figure B
These two columns began as one column.
3: Adjust spacing
Columns usually make content more readable because of the shorter lines. You can also use a smaller font than you might ordinarily use. That means you can fit more content on a page using columns. The type of document will determine the number of columns and whether columns are equal in width. However, the general run allows between 40 to 60 characters per line. Any more or less makes the document less readable.
The spacing between columns is the gutter. If it’s too narrow, readers will wander across the gutter to the next column instead of wrapping around to the next line in the column. To adjust the gutter, choose More Columns from the Columns drop-down (on the Page Layout tab), as shown in Figure C. In Word 2003, choose Columns from the Format menu.
Figure C
Adjust the spacing between the columns.
Because you’re working with short lines, you’ll need to rethink paragraph indents. I recommend that you use small indents or don’t indent paragraphs at all.
4: Display text boundaries
Figure D
- Click the File menu and choose Options (under Help). In Office 2007, click the Office button and then click Word Options. In Word 2003, choose Options from the Tools menu, and skip to step 3.
- Select Advanced in the left pane.
- In the Show Document Content section, check the Show Text Boundaries option.
- Click OK.
Figure D
Displaying text boundaries can facilitate column maintenance.
5: Quickly access options
Many options are available via the Columns dialog (shown in Figure C). To access it, click inside a multi-column section and double-click the gutter space in the horizontal ruler (displayed at the top of the page) shown in Figure E.
Figure E
Quickly access column properties by double-clicking the horizontal ruler.
6: Equalize the columns
To create columns of equal width and gutter space check the Equal Column Width option in the Columns dialog (at the bottom of the Width And Spacing section). Doing so will dim all but the first column’s measurements. Use the first column’s settings to adjust all of the columns. Word will adjust the other settings accordingly. Remember, you can use [Ctrl]+Z to undo changes.
7: Add a column break
When needed, you can force a column break by pressing [Ctrl]+[Shift]+[Enter]. Doing so will position the cursor at the top of the next column, leaving the remainder of the current column blank, as shown in Figure F. A column break positions a hard break at the inserted location and pushes remaining text to the top of the next column. If you insert a column break in the last column on a page, the break also acts as a page break. If you don’t want a page break there, you’ll have to delete the column break.
Figure F
Insert a column break to force text to the top of the next column.
To insert a column break, click the Page Layout tab and choose the Column Break from the Breaks drop-down in the Page Setup section. In Word 2003, choose Break from the Insert menu. Column breaks are similar to page breaks in that they inherit formatting from the following paragraph, which can be confusing. There’s nothing special you have to do — knowledge is the simple remedy.
SEE: Comparison chart: Office suites (Tech Pro Research)
8: Balance the columns
Depending on the amount of text you enter and the length of the columns, you might end up with a long and a short column. You can often insert a column break and balance the text yourself. However, the break remains if you return to a single column. When a forced break isn’t the right choice, insert a continuous section break. Doing so creates a new section and Word distributes the text across the columns. To add a continuous section break, do the following:
- Position the cursor at the end of the last column.
- On the Page Layout tab, click Breaks on the Page Layout tab. In Word 2003, choose Break from the Insert menu.
- Select Continuous in the Section Breaks section.
As before, you can adjust the balance between the two columns if you like by pushing text into the next column or pulling text back into the previous column. Unlike the column break method, there’s no column break to leave behind if you return to a single column format. However, the section break remains and you’ll probably want to remove it. To do so, click Show/Hide on the Standard toolbar to display formatting marks then just delete the section break marker.
9: Create a title that spans columns
Entering a title before you generate the columns is simple. You just enter the title and format it as you normally would. Then, set your column properties and start typing your columnar text. If, on the other hand, you enter the title after generating the columns, you might find yourself scratching your head. The good news is, it’s just as easy to add the title after you generate the columns as before:
- Position the cursor at the beginning of the first column, right where you want the title to appear.
- Enter the title text.
- Press [Enter] to push the column text to the next line, leaving the title text in a line of its own, as shown in Figure G.
- Select the title text.
- Click the Page Layout tab and click the Columns drop-down in the Page Setup group, then choose One, as shown in Figure H. In Word 2003, click the Columns tool on the Standard toolbar and choose one column.
- With the title still selected, click the Center alignment tool in the Paragraph group (on the Home tab). Figure I shows the centered title in a single column that spans all the columns. In Word 2003, Center is on the Formatting toolbar.
Figure G
Get the title on a line of its own.
Figure H
Generate a single column for the title text.
Figure I
This centered title spans the columns.
You’re not stuck with a one-column span. You can span the title across two, three, or as many columns as you like, regardless of the number of columns in the section. Just select the text and choose the appropriate number of columns.
In step 5, you might have noticed that Word interested a continuous section break. That’s how Word splits the multi-column section from the title section.
10: Add a picture
You can insert a picture in a columnar section the same way you would in a normal document (one column). Click the Insert tab and click Picture or Clip Art in the Illustrations group, locate your picture, and continue. Then, right-click the newly inserted graphic and choose Square or Tight from the Wrap Text drop-down in the Arrange group on the contextual Format tab. In Word 2003, right-click the image, choose Format Picture, and click the Layout tab.
Figure J shows a picture positioned in the gutter between columns. To accomplish this, repeat the process above and then drag the graphic over the break between the columns. When you drop the graphic, Word will scroll the text around the graphic if you specified the right wrap property.
Figure J
Position graphics between two columns.
Affiliate disclosure: TechRepublic may earn a commission from the products and services featured on this page.
Updated: 01/18/2023 by

Columns are a great organizational tool. In a document, they can divide a page to present specific content in an orderly fashion. Microsoft Word accommodates 1 to 13 columns on one page. The following sections show you how to create, add, and delete columns in Word documents.
Creating columns
- Open the Word document where you want to add columns.
- In the Ribbon, click the Layout tab.
- In the Page Setup section, click the down arrow under Columns, then select More Columns.
- For Number of columns, you can type in a number or use the up and down arrows to select a number. If the Equal column width option is checked, Word automatically sets the columns to be evenly spaced.
- Click OK to add the columns to the Word document.
- In Image 1 below, you can see how the text «The quick brown fox jumped over the lazy dog» looks with three columns. In Image 2 below, you can see what the same text looks like with the maximum 13 columns.
Image 1
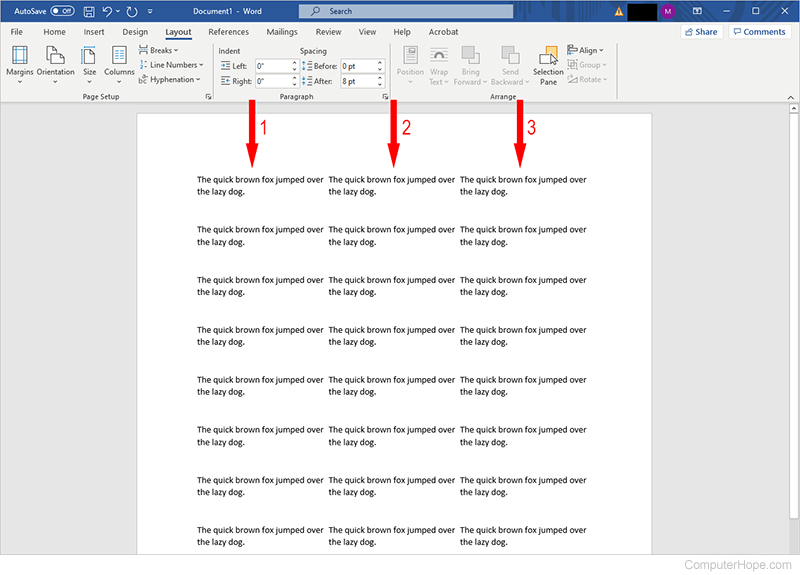
Image 2

Inserting column breaks
After creating a document with multiple columns, it may be necessary to enter column breaks into the text to move text to the next available column.
To insert a column break, move your cursor to where you want to insert the break and press Ctrl+Shift+Enter shortcut key. Alternatively, you can go to the Layout tab on the Ribbon, click Breaks, and then select Column.
Removing columns
If you need to delete columns in a Word document, follow the steps below.
- Open the Word document where you need to remove columns.
- In the Ribbon, click the Layout tab.
- In the Page Setup section, click the down arrow under Columns, then select More Columns.
- For Number of columns, you can type in a number or use the up and down arrows to select a number. The number entered or selected must be less than the current number of columns, if you want to remove columns.
- Click OK to remove the columns in the Word document.
Tip
If you don’t want the document to have any columns, click Layout, Columns, and select One.
Sometimes, you need more space on a single page. In Word documents, the best way to do that is to learn how to make columns in Microsoft Word. These give you more space and improve readability.


There are many options for creating columns in Word. Maybe you want two, three, or even more column Word options. In this tutorial, you’ll learn how to create a column in Word and explore all the options.
Why You Should Add Columns in Microsoft Word
Microsoft Word columns are a popular and stylish way to format text. You’ll often see them in printed form, and they’re very easy to create for yourself. I like to add columns in Word to help lay out my documents in an elegant way.
In this tutorial, you’ll learn how to create columns in Word. Like I said, it’s a fast and easy process. Once you learn how, you’ll be creating columns in Word often.
But before we get started, it pays to ask: why learn how to make columns in Microsoft Word? The advantages are many, so let’s explore them.


By adding column Word designs, you can fit more content onto a page. With columns, you can visually define different sections of your document. Learning how to create columns in Word gives you new options for positioning your content.
Imagine for a moment the front page of your favorite newspaper. Think of how many different topics — in the form of sections and articles — can fit on a single page! Yet, these layouts accomplish this without appearing messy or cluttered. At a glance, you can distinguish unique sections.
This isn’t the only benefit. When you’re creating columns in Word, you’ll also enjoy:
- More readable designs. Vast sections of text clustered in paragraphs aren’t visually inviting. With columns, your document layouts are cleaner and easier to read.
- Foldable layouts. With text in columns, you can fold pages once you print them, to create sleek newsletters and more.
- Paper savings. By packing more content onto each page, you’ll create shorter documents. This is especially valuable if you’re planning to print copies.
As you can see, the benefits of Microsoft Word columns are many. And in moments, you’ll know how to make them for yourself.
The best way to start is with a premium Microsoft Word template from Envato Elements. These expertly-built designs help you build stylish documents in seconds.


In this tutorial, we’ll be working with the Newsletter | MS Word & InDesign template from Envato Elements. Download it today to follow along.
Now, let’s get started!
The tips in this section were written using macOS and Office 365. If you’ve got a different operating system or a different version of Microsoft Word, your steps may be slightly different.
How to Add Multiple Columns in Word
With the Newsletter template downloaded and open in Microsoft Word, let’s get to work. It’s time to learn how to create columns in Word. We’ll get started by working on a blank page inside the template. Think of this page as a clean slate. On it, you want to feature text in a column layout.
We’ll start by constructing a basic two-column layout in MS Word. Place your cursor on the blank page. This tells Word that you’re ready to edit and add style elements to the selected page.
Now, you’ll want to find the Layout tab in Word. This sits on the ribbon. If you’re unfamiliar, the ribbon is the row of menus that sits on the upper left side of your Word screen. Find it by looking for the buttons labeled Home, Insert, Draw and more.
Here, click on Layout. The Layout tab is really the hub for your Word document’s visual format. It controls how and where text and content fits onto the page.
With the Layout tab open, you’ll see an array of options available to you. In this case, Columns is the button that you need. Click on it, and a popup menu appears.


On this menu, you’ll have several choices for multi-column layouts in Word. Remember, here we want to add a simple two-column layout. Click on Two. Word instantly adds two columns to the selected page and all subsequent pages in your Word doc.
Keep in mind, on a blank page you won’t see anything happen. But once you start typing, you’ll see that Word splits the text you type into a two-column layout.


As you imagine how to use Microsoft Word columns, remember that you’re not limited to only two columns. In fact, Word offers you wide flexibility as you create your own column layouts.
The best way to explore these features is to again start by working with a blank page in your Word document. Return to the Layout > Columns button and click on it. But this time, choose More Columns from the list of options displayed to you.
When you click, Word opens the Columns menu. On it, you’ve got a full suite of customization options.
At the top, you’ll see Presets. These are defined layouts that you can apply with a single click. There are options for one, two, and three columns per page.


Also, you can add left and right columns. As shown in the previews, these are two-column layouts with unique widths. The Left option adds a narrow left column and a wide right column. Choosing Right delivers the opposite result.
Below, in the Manual group, you’ll find that Word gives you full control over column layouts. Here, it’s possible to set a custom number of columns to display on each page. For example, you can type 4 into the box, and Word adds four columns. The Line Between checkbox helps you add a visual delineation between each of the new columns.
Here are other settings that help you harness complete control of creating columns in Word:
- The Width and Spacing section controls the dimensions of each individual column.
- At first, this section is grayed out, as Equal Column Width is automatically checked. To work with this group, uncheck the Equal Column Width box.
- With the section active, you can adjust the dimensions and proportions of each column.
- The Width boxes control the specific columns. The Spacing boxes control how far apart columns are from each other.
- Finally, you’ve got the option to choose where to apply your column settings. Choose between the Whole Document and This Point Forward. The latter applies settings to your file only after the point where your cursor is placed.
Once you’ve made your selections, click OK to apply the settings that you’ve chosen. Now, you’re ready to start working with Microsoft Word columns.
From here, you can add text and other content just like you normally do in Microsoft Word. Start by typing in your own words. As words flow, you’ll see that Word drops them neatly into place using the column layout that you’ve chosen.
Similarly, other content that you add fits into the columns. For example, let’s add an image. Place your cursor in a column spot where you want to place a photo. Find the Insert tab, and then click Pictures > Picture From File. Select a photo on your computer, and then click Insert.


Word inserts the photo, perfectly placed into your column. The width adjusts to fit neatly into the space that you’ve specified. This also works for charts, graphics, and more. When you design a column layout, Word’s features place and scale content in the columns.
As you can see, it’s easy to learn how to create a column in Word. With a few clicks, you can split the text into two or more columns on any page. From there, you can easily add text, photos, graphics, and more.
Word helps you size and scale all of your content into column format. This creates an attractive, engaging document for readers to enjoy.
How to Add Columns from Existing Text in Word
We’ve learned how to create columns in Word. But as you saw in the above examples, we practiced using blank pages. What happens if you already have text on a page, and then decide that you want to put it in column format?
Fortunately, Word has you covered. You can create column Word designs with text that you already have in place. There’s no need to delete or retype anything! Let’s learn how.
Imagine for a moment that you’ve got a page in your premium template with text on it. Now, you want to display the text in columns, rather than the single, full-page paragraphs that it’s in now.
To place this text in Microsoft Word columns, you’ll first need to select the text. To do so, click and drag your cursor over the text that you want to move into columns. You’ll see Word select it, signified by pale blue shading.


Then, repeat the steps that we followed earlier to add columns. With the text still selected, find the Layout tab, and open the Columns drop-down. Choose the number of columns you want (or use the More Columns option, if you need to customize the design).


Word adds the columns that you select. Your selected text will re-format, appearing in one or more of the new columns, depending on length. From here, you can make the same adjustments to column width and more, using the More Columns feature in MS Word.
The Best Microsoft Word Templates for Column Designs (With Unlimited Downloads)
You’ve learned how to create columns in Word. And you know that premium templates are the best way to get started. The best source for these is Envato Elements.
Elements is a creative powerhouse with a winning offer: unlimited downloads. For a low, flat rate, you can download as many stunning premium MS Word templates as you want. With your membership, you also have access to fonts, stock photos, and so much more.
Explore Microsoft Word Templates


When you choose a premium MS Word template from Envato Elements, you’ll enjoy these key benefits:
- Studio-quality layouts. Designs are built by creative experts. That means you’ll gain the advantage of styles that you can’t build by yourself.
- Time savings. With layouts already built, you’re filling in the blanks. You get more time to focus on refining your written message.
- Inspired designs. Pre-built layouts help guide your creative process. You’ll find plenty of inspiration on every page.
- Full creative control. When we learned how to make columns in Microsoft Word, we added our own designs to a premium template. You benefit from the styles already built but can still add your own design flourishes.
The value is impossible to match. Sign up for Elements today!
Now You Know How to Make Columns in Microsoft Word
Just like that, you’ve learned how to create a column in Word. It’s a powerful stylistic tool that you can use in seconds! You can create more space for your content now that you know how to create a column in Word to do just that.
With multiple columns, you’ve got a new design dimension in Word documents. Try it out now to create a compelling, readable document.
Did you find this post useful?

I believe that life is too short to do just one thing. In college, I studied Accounting and Finance but continue to scratch my creative itch with my work for Envato Tuts+ and other clients. By day, I enjoy my career in corporate finance, using data and analysis to make decisions.
I cover a variety of topics for Tuts+, including photo editing software like Adobe Lightroom, PowerPoint, Keynote, and more. What I enjoy most is teaching people to use software to solve everyday problems, excel in their career, and complete work efficiently. Feel free to reach out to me on my website.