Every employer would like to track the hours worked by his employees. However, this may be challenging and time-consuming if manual methods are used. Luckily, Excel allows its users to calculate the working hours for someone using some in-built functions. This has greatly simplified the process of tracking employees’ working duration.
Below are some tips and methods to calculate working hours in Excel.
Calculating work hours using simple Excel Formula
Excel has numerous formulas that can be used to calculate working hours. However, there’s a simple step to do so;
1. To get started, open your Excel application.
2. Then, open an existing or a new document. If you’re working on an existing document, you can open it from your Pc or use the keyboard shortcut to access it (Ctrl + O).
3. Enter the dataset of your employees on the empty cells.
4. To change the time format, follow these steps;
- Highlight all the datasets that contain the time values.
- Then, right-click to open a side-view menu.
- On the side-view menu, click on the «Format cells» button.
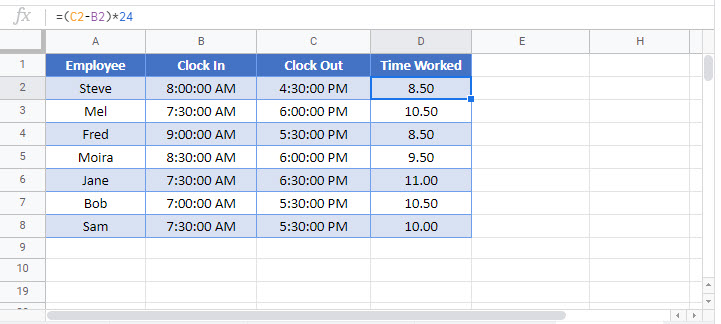
5. Click on the first cell, within the Time Worked column, and then, type this formula
=(C2-B2)*24
6. Hit the Enter button and you will now have the time difference in hours. Drag the formula downwards to apply to other cells.
Calculating Overtime work hours in Excel
In many cases, the worker exceeds the time out and works for more hours or minutes. Here is how to calculate overtime in Excel.
1. Enter the dataset of your employees on the empty cells. Since you’re calculating over time you need to have standard working hours. In our case, let the standard working hours be 6 hours.
2. Click on the first cell, within the Overtime column, and then, type this formula
=IF((C2-B2)*24>$F$13,((C2-B2)*24)-$F$13,0)
3. Hit the Enter button and you will now have the time difference in hours. Drag the formula downwards to apply to other cells.
4. By doing so, you will have the overtime hours in the Overtime column.
Using MOD function
In a case where the working time shift spans midnight, it is impossible to use the already discussed methods. However, Excel has an in-built function, MOD, that can be used to calculate such working hours.
Here are the steps to use this function;
1. After opening a new worksheet, enter the dataset of your employees on the empty cells. Alternatively, you can use an existing document.
2. Then, Click on the first cell within the Time worked column.
3. On the main screen, click on the «formulas» tab and then choose the «Insert Function» button.
4. On the dialogue box, search for «MOD» and click the «Ok» button.
5. On the Function Arguments dialogue box, type this formula;
=MOD(C2-B2)*24
6. Drag the formula to other cells within the Time worked column to apply changes.
Therefore, using any of the above methods, you can easily track the attendance schedule of your workers.
Learn how to easily calculate your total number of working hours with this simple Excel formula. Calculate the working days, hours for day and extra hours.

The first thing to do is to calculate your working days. For this, you will need to use the function NETWORKDAYS that is used for finding out how many days have passed between two dates.
- Was this Helpful ?
- YesNo
Return to Excel Formulas List
Download Example Workbook
Download the example workbook
This tutorial will demonstrate how to calculate hours worked in Excel and Google Sheets.
Calculate Hours with a Simple Formula
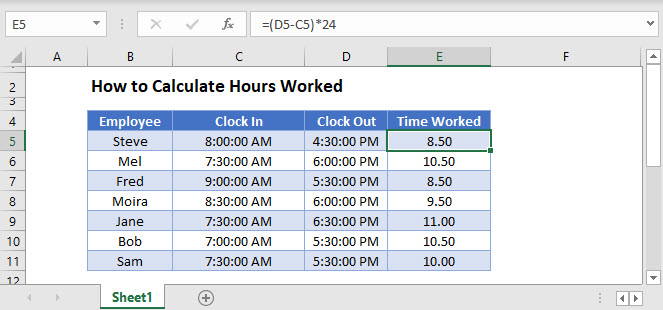
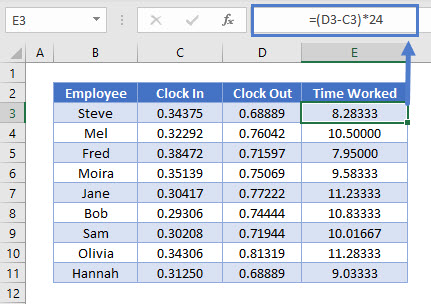
In Excel, times are stored as decimal values. Knowing this, you can simply subtract the start time (“Clock In”) from the end time (“Clock Out”) to find the time worked. (Note, we multiply by 24 to convert the decimal values into hours).
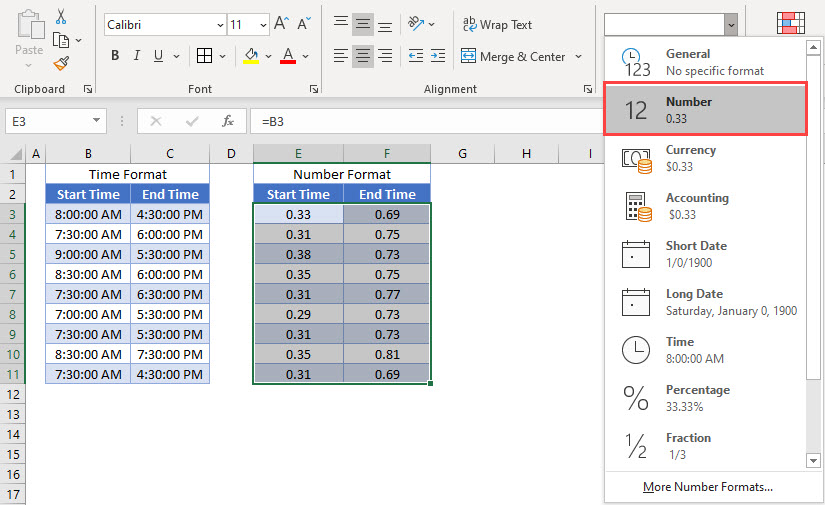
=(D3-C3)*24In the previous, we displayed the times as decimal values to demonstrate how they are stored. We did this, by changing the formatting to “Number”):
MOD Function
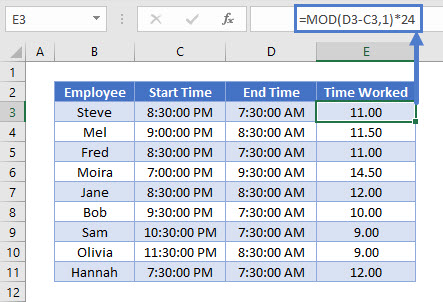
If the end time is before the start time (ex. night shift) the formula will return a negative number. To solve this problem, use the MOD Function.
=MOD(D3-C3,1)*24As with the simple formula, we need to multiply the value calculated by the MOD Function by 24 to get the hours worked.
Calculating Overtime
We can use the same type of formula to calculate overtime.
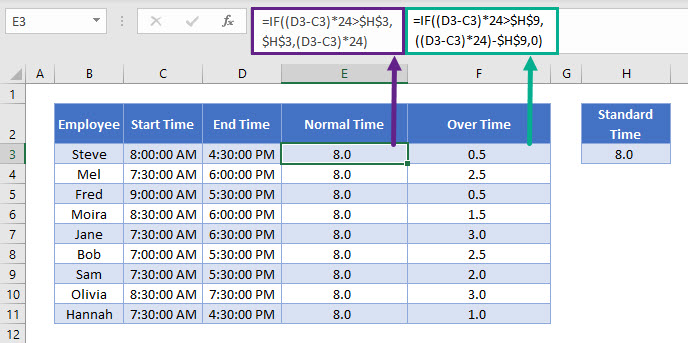
In the example above, the standard time is 8 hours.
The following formula calculates the Normal time worked in the day.
=IF((D3-C3)*24>$H$13,$H$13,(D3-C3)*24)If the employee has worked more than 8 hours, the formula will only return a maximum of 8 hours.
To calculate the overtime, we can get the rest of the hours worked using this formula below:
=IF((D3-C3)*24>$H$13,((D3-C3)*24)-$H$13,0)Calculate Hours Worked in a Weekly Timesheet
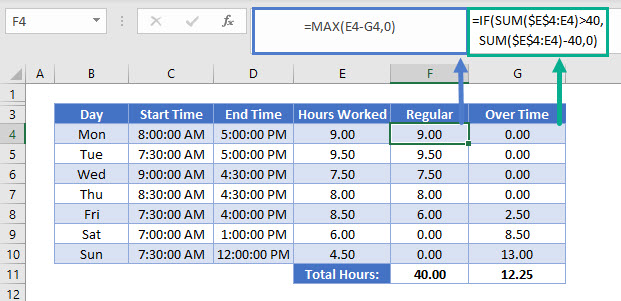
We can use the IF, SUM and MAX Functions to calculate the hours worked in a weekly broken down by regular time and overtime.
Calculate Overtime
The overtime is calculated once a person works more than 40 hours a week.
=IF(SUM($E$4:E4)>40,SUM($E$4:E4)-40,0)The first part of the first range of the SUM Function is an absolute, while the second part is not. As you copy this formula down to the bottom of the table, you will notice that the SUM function adds up all the Hours worked in column E. As the SUM range is increased, so the hours worked is increased. Once the SUM gets to more than 40 hours, Overtime hours are put into the Overtime column as an increasing total.
Calculate Regular Hours
The regular hours are calculated based on the total hours, and the overtime worked.
=MAX(E4-G4,0)We use the MAX Function so that we do not end up with Negative hours where the Employee has worked overtime as if the result returns a negative, then the MAX function will return a zero.
Calculate Hours Worked in a Weekly Timesheet by Project
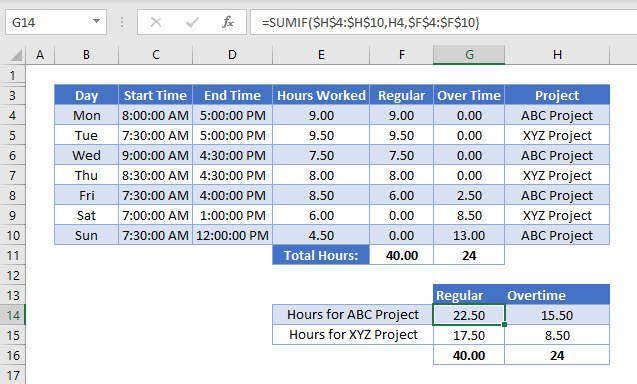
Taking the calculation above one step further, we can divide the hours worked by the Project that the employee worked on using the SUMIF Function
=SUMIF($H$4:$H$10,H4,$F$4:$F$10)The SUMIF function will sum the Regular hours in column F according to the criteria selected in column H – in the case of the above formula, it will look for the ABC Project and sum the Regular hours for that project.
Calculating Hours Worked in Google Sheets
All the above Excel examples work the same way in Google Sheets.
on
March 11, 2019, 3:32 AM PDT
Use Excel to calculate the hours worked for any shift
With Microsoft Excel, you can create a worksheet that figures the hours worked for any shift. Follow these step-by-step instructions.
We may be compensated by vendors who appear on this page through methods such as affiliate links or sponsored partnerships. This may influence how and where their products appear on our site, but vendors cannot pay to influence the content of our reviews. For more info, visit our Terms of Use page.
To calculate in Excel how many hours someone has worked, you can often subtract the start time from the end time to get the difference. But if the work shift spans noon or midnight, simple subtraction won’t cut it.
However, you can easily create an Excel worksheet that correctly figures the hours worked for any shift.
LEARN MORE: Office 365 Consumer pricing and features
Follow these steps:
- In A1, enter Time In.
- In B1, enter Time Out.
- In C1, enter Hours Worked.
- Select A2 and B2, and press [Ctrl]1 to open the Format Cells dialog box.
- On the Number tab, select Time from the Category list box, choose 1:30 PM from the Type list box, and click OK.
- Right-click C2, and select Format Cells.
- On the Number tab, select Time from the Category list box, choose 13:30 from the Type list box, and click OK.
- In C2, enter the following formula:
=IF(B2<A2,B2+1,B2)-A2
If you enter 11:00 PM as the Time In and enter 7:00 AM as the Time Out, Excel will display 8, the correct number of hours worked.
A bonus Microsoft Excel tip
From the article 10 things you should never do in Excel by Susan Harkins:
Rely on multiple links: Links between two workbooks are common and useful. But multiple links where values in workbook1 depend on values in workbook2, which links to workbook3, and so on, are hard to manage and unstable. Users forget to close files, and sometimes they even move them. If you’re the only person working with those linked workbooks, you might not run into trouble, but if other users are reviewing and modifying them, you’re asking for trouble. If you truly need that much linking, you might consider a new design.
This bonus Excel tip is also available in the free PDF 30 things you should never do in Microsoft Office.
Editor’s note on March 11, 2019: This Excel article was first published in June 2005. Since then, we have included a video tutorial, added a bonus tip, and updated the related resources.
Also See
-
How to add a drop-down list to an Excel cell
(TechRepublic) -
Tap into the power of Excel’s data validation feature (free PDF)
(TechRepublic) -
You’ve been using Excel wrong all along (and that’s OK)
(ZDNet) -
A cheatsheet of Excel shortcuts that make inserting data faster
(TechRepublic) -
Six clicks: Excel power tips to make you an instant expert
(ZDNet) -
10 things you should never do in Excel
(TechRepublic)
-
Microsoft
-
Software
Do you know what all of your employees are working on at every moment of the day?
The answer is probably no. And while that may seem okay at the moment, this lack of knowledge can have negative effects on your business as your company grows, and as control over day-to-day operations moves away from you.
In this article, you will learn:
- How Excel timesheet templates work
- How to create an Excel timesheet template with formulas
- How to calculate hours worked in Excel
- Calculating total hours worked
- Calculating regular work hours
- Calculating overtime hours
- Calculating employee pay with Excel payroll formulas
- Locking timesheets when using Excel
- Best practices on distributing Excel timesheets
- Make the most of out timesheets
- Automate the whole process
Being unable to account for where your team spends their time can cause your business’ productivity and profitability to take a hit. This can lead to stagnation and decline.
One of the simplest and most effective ways of avoiding this is introducing timesheets to your company. Timesheets keep track of all the hours your team works each day, the tasks they worked on, and when they did them. Read more about benefits of time tracking in this post.
In this post, you’ll learn how to work with timesheets in Excel to record your team’s progress more accurately and improve your productivity.
How Excel timesheet templates work
Timesheet templates created in Excel are incredibly flexible and can be adapted to suit the individual needs that your business has. However, the overall way they work remains the same. Good timesheet practice will follow this framework:
- Set up timesheets globally, individually, or on a team-by-team basis
- Distribute among employees
- Use for all work, individual projects, or only for tracking billable hours
- Submit to team leaders or project managers for timesheet approval
- Collect and collate data to gain an understanding of how the business and teams are functioning as a whole
- Monthly timesheet review sessions looking at the bigger picture to spot inefficiencies and room for improvement
Timesheets work by keeping everyone updated with how long an employee spends at work, and the type of work they do. Passing timesheets up the hierarchy chain means that all levels of the company understand what goes on from top to bottom.
Automate time tracking with Hubstaff
Stop wasting time on creating timesheets manually
Creating Excel timesheet templates with formulas
Excel timesheet templates are the simplest way of recording hours, as they require minimal setup time and minimal input from employees.
Let’s take a look at how to use Microsoft Excel for this purpose. We’ve created a video explaining how to create a timesheet in Excel:
Excel allows for several operations within its cells that allow you to create timesheets customized to your team or business. Essentially, just imagine a typical paper time card and its contents, and convert that into digital spreadsheet form.
To start, fill out your sheet with the following information (feel free to modify depending on your company needs):
- Employee information: Name, department, supervisor, rate
- Entry date
- Tasks performed
- Start time and end time
- Regular and overtime hours worked
- Additional notes
You could also customize the sheet by adding colors, or by placing your company logo if you’re planning on printing and archiving it. Your timesheet should look something like this:
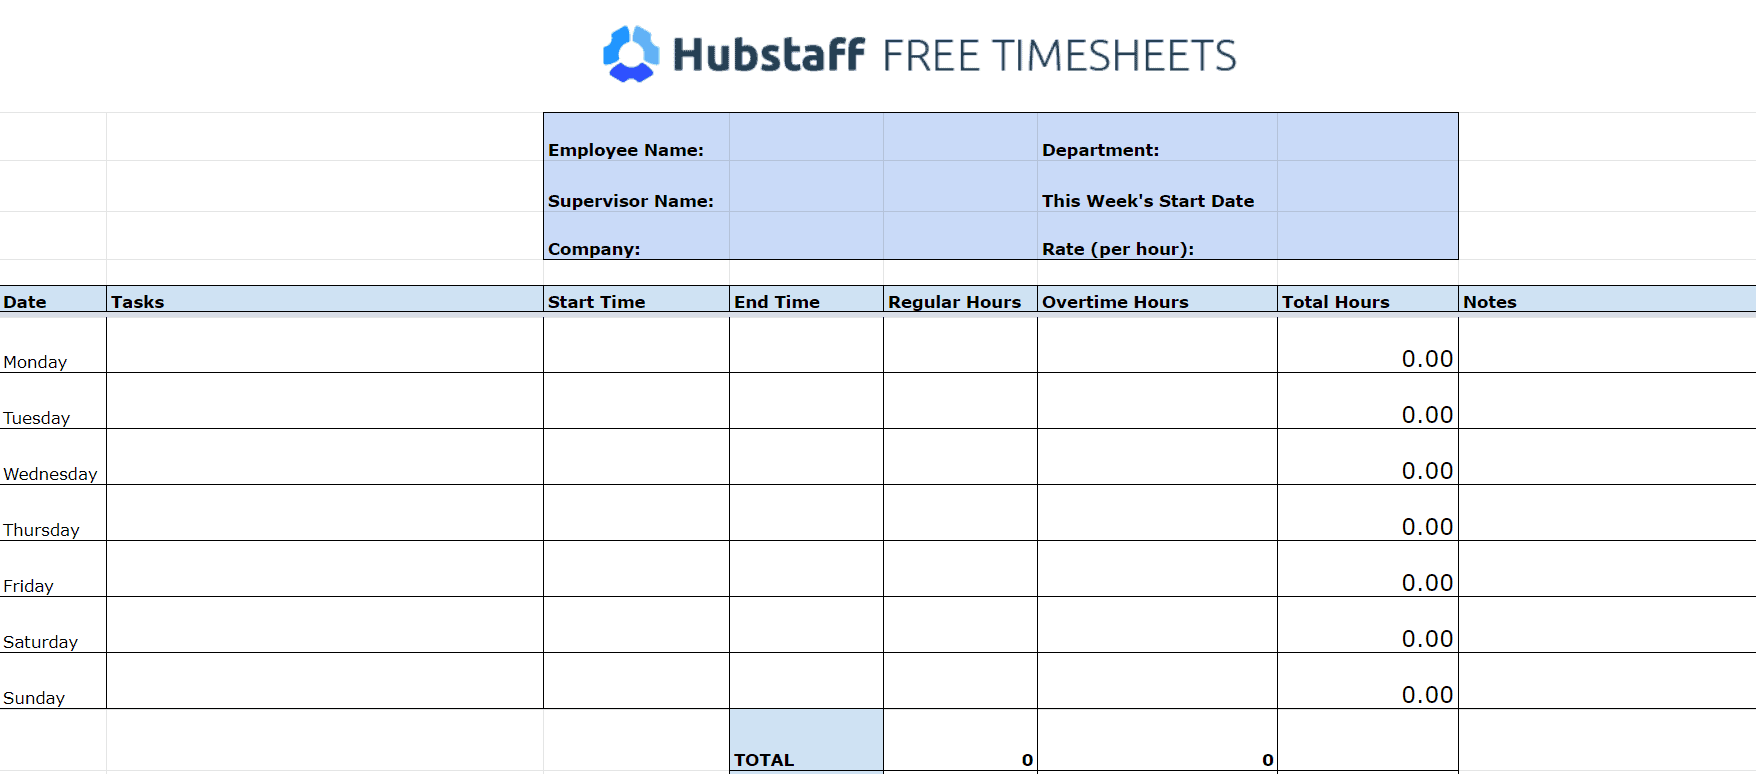
The only columns your team will be filling in will be the Date, Tasks, Start Time, End Time, and Notes columns. You can place formulas within the Regular Hours, Overtime Hours, and Total Hours columns that will automatically calculate the hours based on their start and end time entries.
How to calculate hours worked in Excel
Calculating total hours worked
Calculating the daily hours worked by your team with a spreadsheet isn’t difficult. To start things off, set the Total Hours column to count the number of hours between the start time and end time entries. This can be done by inputting the following formula:
- Total Hours = (End Time – Start Time) * 24
It’s necessary to multiply by 24 because Excel registers a whole day as a value of 1 (e.g. 12 hours will result in a value of 0.5).
Calculating regular hours worked
After the Total Hours, you’ll need a formula for your Regular Hours column. This will depend on how many maximum hours your team is allowed to work before it’s considered overtime. Your formula will look like this:
- Regular Hours = IF (Total Hours >= (max regular hours), (max regular hours), Total Hours)
In the example above, 8 is the maximum number of regular hours your team can work before going into overtime. The Regular Hours cell will only accept a maximum value of 8; if the total number of hours goes beyond that, the excess should go to the Overtime Hours cell.
Be more productive with automated timesheets
Calculating overtime hours
Below is the formula for overtime hours:
- Overtime Hours = IF (Total Hours <= max regular hours, 0, (Total Hours – max regular hours))
Based on the start and end time entries, any hours your team worked beyond the daily maximum will automatically be reflected in the Overtime Hours column. This way, you could easily check for unpermitted overtime work, and calculate their overtime pay with increased accuracy.
Calculating employee pay with Excel payroll formulas
After you’ve set up your timesheets to compute regular and overtime hours, you can use them to calculate your team’s pay. This can be done by multiplying their rates with the total number of both regular and overtime hours.
First, use the following formula to count the total number of regular and overtime hours.
- Total Hours = SUM (first row:last row)
Use the same formula for the Overtime and Total Hours columns. For the amount earned, use the following:
- Pay = hours worked * hourly rate
In the example above, the hourly rate is $10 per hour. Use the same formula for the total number of overtime hours worked, or use a different value for the hourly rate if you have specific overtime policies.
To get the total amount earned, simply add the totals of the regular and overtime hours.
- Total Amount Earned = Regular Amount Earned + Overtime Amount Earned
After that, you’re all set. All your team has to do is put in the time they started and stopped working, and the template will do the rest.
Locking timesheets
After timesheets have been submitted, it’s important to limit access for anyone other than authorized managers. This adds an additional layer of security against timesheet fraud, overpayments, and accidental edits to entries.
Formulas aren’t necessary for locking your timesheets. An easy way to do this would be to have your team upload their timesheets at the end of each week to your company’s shared drive. Or, you could create the timesheets directly there if you’re using a file storage and collaboration platform like Google Drive.
The best way to “lock” timesheets is to have your team upload them to one shared folder. Once all of them are turned in, move them to a separate folder accessible only by you, team leaders, and project managers. This prevents the timesheets from being edited by your team after they are submitted.
Distribute timesheets
Once your Excel timesheet template is prepared, it’s time to implement it across all of your teams. The process is straightforward, but here are some things to keep in mind:
- Customize templates and make adjustments to suit individual projects or variations in employee billing/hourly rates
- Turn your Excel timesheet into a PDF. PDFs can be customized for each employee, printed off, and handed in each week or month
- Turn your Excel timesheet into a Word document. Word documents can be managed on a computer and then uploaded to a file-sharing service at the end of the month or another defined period
- Turn your timesheet into a Google spreadsheet that’s worked on collaboratively. There’s no need to worry about employees doctoring their times or the times of others as Google tracks changes made to the document
- Distribute to employees using one of the methods noted above
- Track the data: Depending on the option used, you can either collate data on a monthly basis and then analyze, or check-in periodically
- Analyze and refine: Make changes to workflows, team structures, and resource distribution based on feedback and data collected by timesheets
One thing to remember is that discipline and consistency are absolutely necessary for timesheets to have maximum effect, but they pay off. After a while, you’ll start to notice your teams’ productivity start rising, and your business’ overall performance improving.
An easier way to track hours
Automatic time tracking, productivity measurement, detailed reports, and more
How to make the most of timesheet templates
The key to making the most out of timesheet templates is following a rigid process, and ensuring that your employees fill them out regularly.
The benefits that timesheet templates have to offer your business (in terms of cost-saving, waste elimination, and data gathering) mean that they are an invaluable business tool that should always be used to the greatest effect. Here are some guidelines to make this happen:
Make employees fill timesheets out honestly, and on a regular basis
Employees should fill out their timesheets multiple times each day, and should make sure that they are completely honest with the time that they input.
One of the benefits of timesheets is that they help to pinpoint inefficiencies and roadblocks that stop your employees from working effectively. You can only identify these when your employees have filled out their timesheets honestly, as any made-up entries will skew the data.
Closely monitor timesheets to spot trends
As a leader within your company, you and other managers should closely monitor the timesheets that employees submit so that you can identify trends (both positive and negative). And, so that you can stay constantly informed of what’s going on in your business.
To do this effectively, spend some time each week looking back on the timesheet information, identifying areas of low (and high) productivity across the board, and then try to match up these areas to events that happened during the week.
Doing this often will help you to continuously improve your business.
Hold regular review sessions with team leaders and managers to deconstruct business’ performance and productivity
To make sure that you are getting the best out of your employees, hold regular sessions to review the performance of individual employees and your business as a whole.
Having regular review sessions means that even if you aren’t heavily involved with what goes on in your company on a day-to-day basis, you’ll still have a great understanding of how things are actually running and that you are positioned to make informed decisions about your company’s future.
Continuously refine your company’s processes and workflows
Having all of the data about how your employees work means that you can make informed decisions that refine workflows and change your company’s processes. Both of these can make your company more cost-efficient and more productive.
Automate the whole process with Hubstaff’s online timesheets
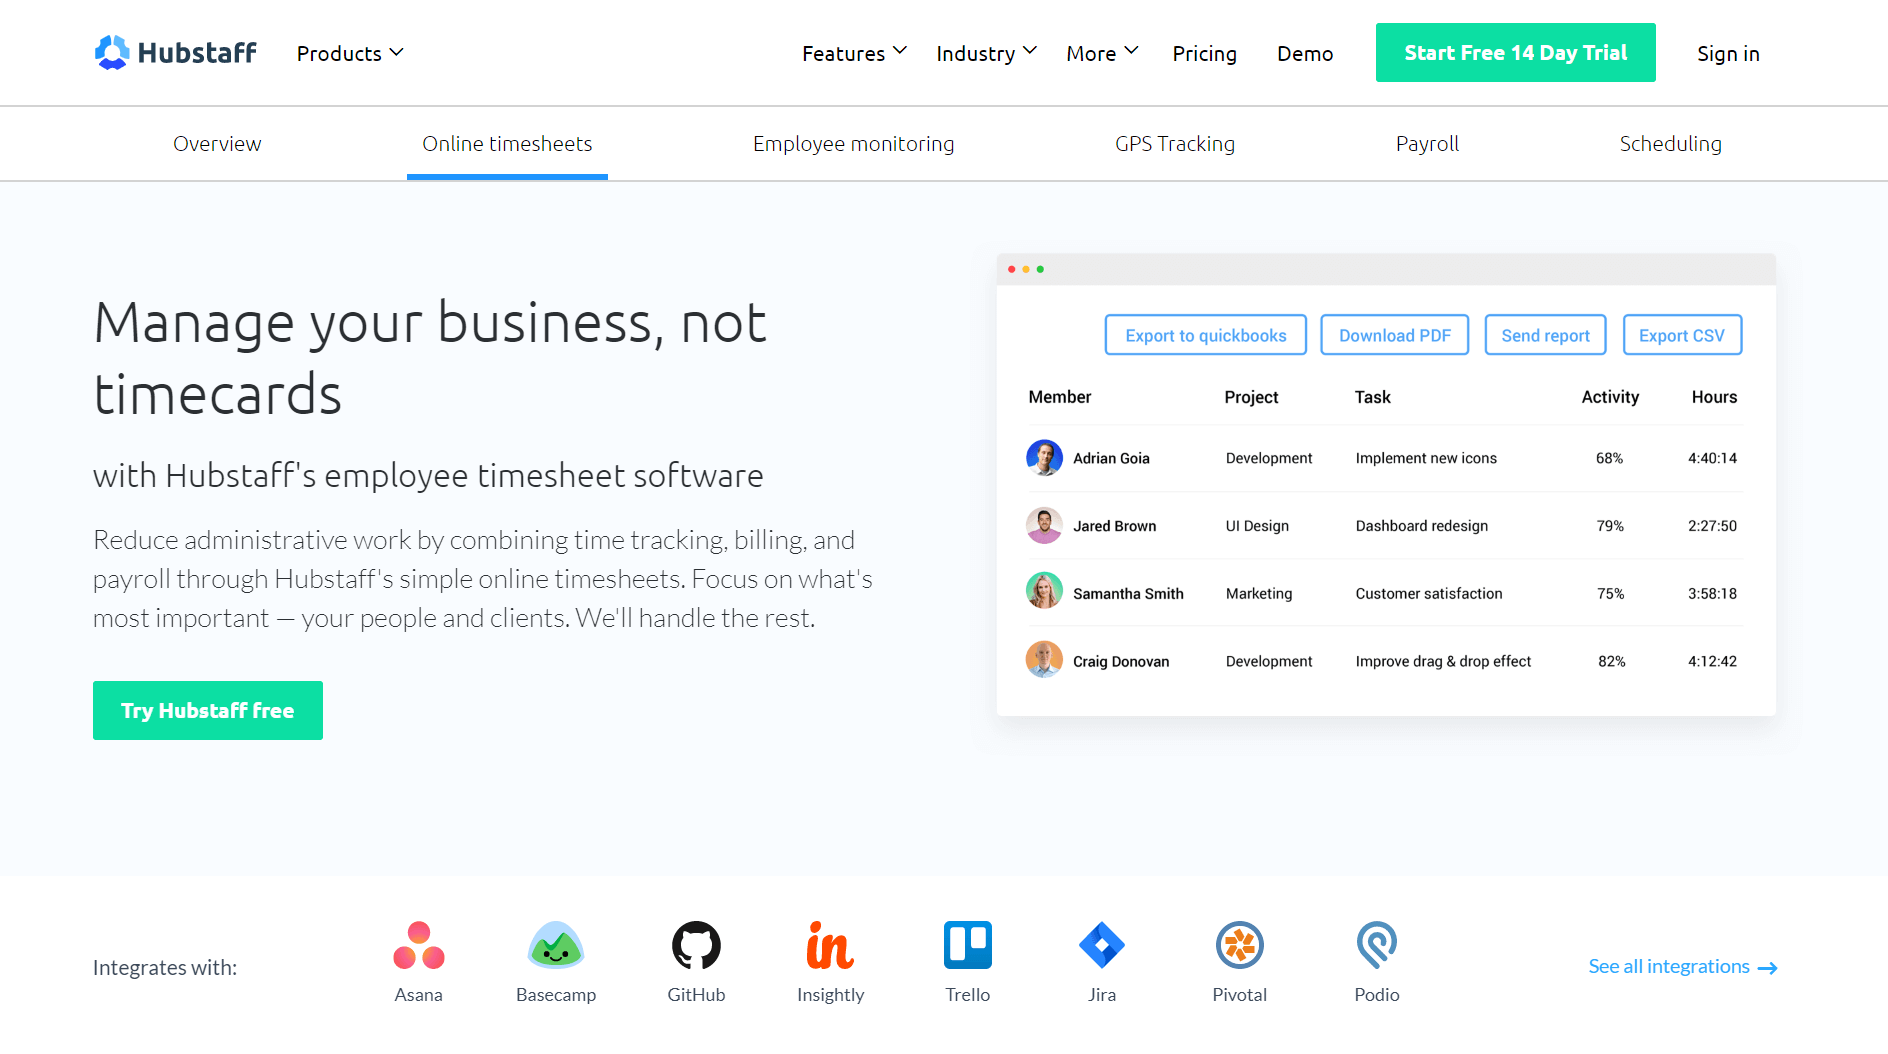
Hubstaff is a time tracking solution that allows you to streamline timesheets and time management. It tracks all of your team’s work hours, and the tasks they work on, and automatically generates detailed and accurate timesheets.
Instead of entering hours into a timesheet template, Hubstaff tracks time toward specific projects and tasks with a simple start and stop feature available through desktop, web, or mobile apps.
With Hubstaff, your team doesn’t have to note what time they have arrived in the office or started working, or what tasks they spent time on. They can start tracking their time and the task with just the click of a button. Hubstaff will handle everything else from timesheet creation to payroll processing.
Managers can get daily timesheets emailed directly to them, see how much of a budget has been used, set hourly limits for team members, and review and approve timesheets all from one central dashboard.
Compared to timesheet templates, Hubstaff offers a higher level of accuracy because you can turn on features including app and URL tracking, random screen capture while the timer is running, activity rates, and more. With Hubstaff, there’s no question about what was worked on when.
Finally, you can use the hours tracked and pay rates to automatically issue payroll to your team. The same goes for client invoices; just review timesheets at the end of each pay period, set bill rates, and you can send invoices much sooner.
Power up your workday
Reach your goals faster with time tracking and work management.
Are you ready to start using timesheets?
Timesheets, when used correctly, are hugely powerful tools that can help to transform your business for the better.
They can dramatically increase productivity, make it easier for your employees to motivate themselves, and make your business run more smoothly.
To get started implementing timesheets into your business, you can download timesheet templates that we prepared, or create one specifically tailored for your business with a spreadsheet app and our guide above.
Alternatively, you can use Hubstaff to automate the whole process, and not worry about forgetting to note what time you clocked in or out.
Whatever your choice is, we’d like to know if you use timesheet templates in your organization, and how it has contributed to your team’s success. Do you have any go-to templates you’ve been using for years, or software tools that might be helpful to other business owners as well? Let us hear about it in the comments below.
This post was originally published September 15, 2016, and updated August 2019.


