
Excel for Microsoft 365 Excel 2021 Excel 2019 Excel 2016 Excel 2013 Excel 2010 More…Less
Let’s say you want to add information to a spreadsheet report that confirms the location of a workbook and worksheet so you can quickly track and identify it. There are several ways you can do this task.
Insert the current file name, its full path, and the name of the active worksheet
Type or paste the following formula in the cell in which you want to display the current file name with its full path and the name of the current worksheet:
=CELL(«filename»)
Insert the current file name and the name of the active worksheet
Type or paste the following formula as an array formula to display the current file name and active worksheet name:
=RIGHT(CELL(«filename»),LEN(CELL(«filename»))- MAX(IF(NOT(ISERR(SEARCH(«»,CELL(«filename»), ROW(1:255)))),SEARCH(«»,CELL(«filename»),ROW(1:255)))))
Notes:
-
To enter a formula as an array formula, press CTRL+SHIFT+ENTER.
-
The formula returns the name of the worksheet as long as the worksheet has been saved at least once. If you use this formula on an unsaved worksheet, the formula cell will remain blank until you save the worksheet.
Insert the current file name only
Type or paste the following formula to insert the name of the current file in a cell:
=MID(CELL(«filename»),SEARCH(«[«,CELL(«filename»))+1, SEARCH(«]»,CELL(«filename»))-SEARCH(«[«,CELL(«filename»))-1)
Note: If you use this formula in an unsaved worksheet, you will see the error #VALUE! in the cell. When you save the worksheet, the error is replaced by the file name.
Need more help?
You can always ask an expert in the Excel Tech Community or get support in the Answers community.
Need more help?
Want more options?
Explore subscription benefits, browse training courses, learn how to secure your device, and more.
Communities help you ask and answer questions, give feedback, and hear from experts with rich knowledge.
POI can open a workbook from any InputStream you care to throw at it. (Files are lower memory, but you can use a stream if you want, and many people do). If a stream isn’t file backed, then it doesn’t have a filename, so no amount of pleading with POI will get you one!
If you are opening a Workbook from a File, then that File object knows the filename. Ask that for it! Otherwise, if opening from an InputStream, there most likely isn’t a filename, so there’s nothing to supply.
Finally, be aware that unlike the name of a Sheet, which is stored in the file, the name of the file itself isn’t something magic. Take test.xls, copy it to test2.xls, and also store it in a database blob field. Load all. All of them are the same file, but two of them have different filenames, and one has no filename at all!
There are many cases, in which you want to show the sheet name or file name in an Excel cell. Don’t worry, you don’t have to use VBA and create a macro. Excel provides a (rough) formula for returning all the information you need. The bad news: In most cases it takes some complex modifications. The good news: Usually you can just copy and paste the formula you need.
Introduction: Get all the names you need
Fortunately, you don’t have to use VBA. There are formulas for each variation of the sheet name, file name and path. The main part of the formula is the =CELL() formula.
The CELL formula looks something like this: =CELL(“filename”,A1). That means that the CELL formula we have to use has two parts:
- The first part just says “filename”. It is important to add the quotation marks.
- The second part is optional and can link to any cell or workbook. If you leave it blank the current cell and workbook will be used.
The basic version of the CELL formula (=CELL(“filename”,A1) ) returns the full path, file name and sheet name. You can use this formula and cut it into the parts you need. Therefore you use string formulas like LEFT, LEN and so on. We won’t go into detail now as those formulas are highly specific and complex but rather provide the formulas for you to copy.
Note: We’ve published an article about three methods of how to get the sheet name. Maybe this one is interesting for you as well.
The formulas for sheet name, file name, path etc.
The formulas for inserting file names, sheet names or the path (with and without the extension) are very different. This table gives you an overview. If you want to copy the formulas, you can find them underneath again.
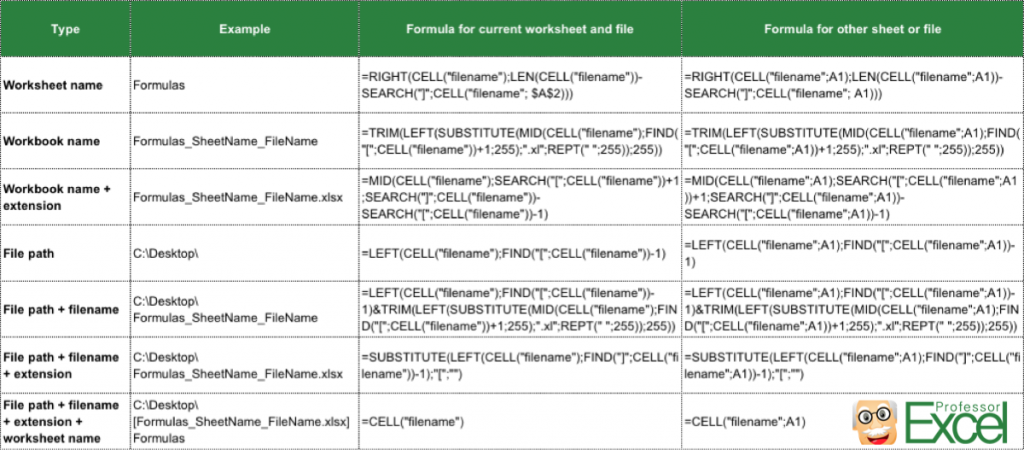
Copy these formulas for the current cell or sheet:
- Worksheet name (example: “Formulas”):
=RIGHT(CELL(“filename”),LEN(CELL(“filename”))-SEARCH(“]”,CELL(“filename”, $A$2))) - Workbook name (example: “Formulas_SheetName_FileName”):
=TRIM(LEFT(SUBSTITUTE(MID(CELL(“filename”),FIND(“[“,CELL(“filename”))+1,255),”.xl”,REPT(” “,255)),255)) - Workbook name + extension (example: “Formulas_SheetName_FileName.xlsx”):
=MID(CELL(“filename”),SEARCH(“[“,CELL(“filename”))+1,SEARCH(“]”,CELL(“filename”))-SEARCH(“[“,CELL(“filename”))-1) - File path (example: “C:Desktop”):
=LEFT(CELL(“filename”),FIND(“[“,CELL(“filename”))-1) - File path + filename (example: “C:DesktopFormulas_SheetName_FileName”):
=LEFT(CELL(“filename”),FIND(“[“,CELL(“filename”))-1)&TRIM(LEFT(SUBSTITUTE(MID(CELL(“filename”),FIND(“[“,CELL(“filename”))+1,255),”.xl”,REPT(” “,255)),255)) - File path + filename + extension (example: “C:DesktopFormulas_SheetName_FileName.xlsx”):
=SUBSTITUTE(LEFT(CELL(“filename”),FIND(“]”,CELL(“filename”))-1),”[“,””) - File path + filename + extension + worksheet name (example: “C:Desktop[Formulas_SheetName_FileName]Formulas”):
=CELL(“filename”) - Folder name (example: “Desktop”):
=TRIM(RIGHT(SUBSTITUTE(LEFT(CELL(“filename”),FIND(“[“,CELL(“filename”),1)-2),””,REPT(” “,100)),100))
Copy these formulas for any linked cell or sheet:
If you want to get the file name, sheet name or path from another cell or workbook, you can use one of the following formulas. Instead of “A1” you insert your cell reference.
- Worksheet name (example: “Formulas”):
=RIGHT(CELL(“filename”,A1),LEN(CELL(“filename”,A1))-SEARCH(“]”,CELL(“filename”, A1))) - Workbook name (example: “Formulas_SheetName_FileName”):
=TRIM(LEFT(SUBSTITUTE(MID(CELL(“filename”,A1),FIND(“[“,CELL(“filename”,A1))+1,255),”.xl”,REPT(” “,255)),255)) - Workbook name + extension (example: “Formulas_SheetName_FileName.xlsx”):
=MID(CELL(“filename”,A1),SEARCH(“[“,CELL(“filename”,A1))+1,SEARCH(“]”,CELL(“filename”,A1))-SEARCH(“[“,CELL(“filename”,A1))-1) - File path (example: “C:Desktop”):
=LEFT(CELL(“filename”,A1),FIND(“[“,CELL(“filename”,A1))-1) - File path + filename (example: “C:DesktopFormulas_SheetName_FileName”):
=LEFT(CELL(“filename”,A1),FIND(“[“,CELL(“filename”,A1))-1)&TRIM(LEFT(SUBSTITUTE(MID(CELL(“filename”,A1),FIND(“[“,CELL(“filename”,A1))+1,255),”.xl”,REPT(” “,255)),255)) - File path + filename + extension (example: “C:DesktopFormulas_SheetName_FileName.xlsx”):
=SUBSTITUTE(LEFT(CELL(“filename”,A1),FIND(“]”,CELL(“filename”,A1))-1),”[“,””) - File path + filename + extension + worksheet name (example: “C:Desktop[Formulas_SheetName_FileName]Formulas”):
=CELL(“filename”,A1) - Folder name (example: “Desktop”):
=TRIM(RIGHT(SUBSTITUTE(LEFT(CELL(“filename”,A1),FIND(“[“,CELL(“filename”,A1),1)-2),””,REPT(” “,100)),100))
Please note:
- The formulas are different for each language and regional settings. So you have to make sure to adapt it to your Excel version. Please check out the download below, it’s probably the easiest option for adapting the formulas to your settings.
- In order to insert the filename or path, you have to save your workbook first. It doesn’t work with a newly created Excel file.
Download an Excel file with all the formulas
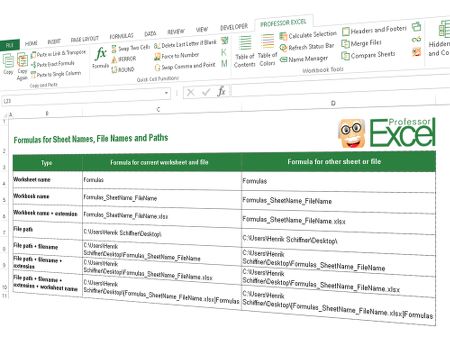
In order to avoid any problems with language and regional settings, you can download all the above formulas with an Excel file.
Just open it and copy the complete cell to your desired location. The download starts instantly (no sign-up or any other annoyances…).
- Download link: Click here.
- File name: Formulas_SheetName_FileName.xlsx
- Size: 35 KB
- File type: XLSX
Anything missing? Suggestions for improvements? Please let us know and leave a comment.

Henrik Schiffner is a freelance business consultant and software developer. He lives and works in Hamburg, Germany. Besides being an Excel enthusiast he loves photography and sports.
VBA Get Workbook Name in Excel. We can return workbook name using Workbook.Name property. Here workbook represents an object. It is part of Workbooks collection. Returns a string value representing Workbook name. We can find Active Workbook or Current Workbook name using Name property of Workbook.
Table of Contents:
- Overview
- Syntax to return Name of the Workbook VBA in Excel
- Get Name of the Active Workbook using VBA in Excel
- Macro to Get Current Workbook Name using VBA in Excel
- Instructions to Run VBA Macro Code
- Other Useful Resources
Syntax to get current Workbook name using VBA in Excel
Here is the following syntax to get the Name of the Workbook using VBA in Excel.
expression.Name
Where expression: It represents Workbook object which is part of workbooks collection.
Name: It represents property of Workbook object to get Workbook name.
Get Name of the Active Workbook using VBA in Excel
Let us see the following example macro to get current or active workbook name in using VBA in Excel. Where ‘Name’ represents the property of Workbook object. It helps to get the name of the Workbook.
'Get Active Workbook name in Excel using VBA
Sub VBA_Get_ActiveWorkbook_Name()

    'Variable declaration
    Dim sActiveWorkbookName As String

    sActiveWorkbookName = ActiveWorkbook.Name

End Sub
Output: Please find the output screenshot of the above macro code.

Macro to Get Current Workbook Name using VBA in Excel
Here is another example macro code to get current workbook name using VBA in Excel.
'Get current workbook name of the Workbook using VBA in Excel
Sub VBA_Get_CurrentWorkbook_Name()

    'Variable declaration
    Dim sCurrentWorkbookName As String

    sCurrentWorkbookName = ThisWorkbook.Name

End Sub
Output: Here is the output screenshot of the above macro code.

Instructions to Run VBA Macro Code or Procedure:
You can refer the following link for the step by step instructions to execute VBA code or procedure.
Instructions to run VBA Macro Code
Other Useful Resources:
Click on the following links of the useful resources. These helps to learn and gain more knowledge.
VBA Tutorial VBA Functions List VBA Arrays in Excel Blog
VBA Editor Keyboard Shortcut Keys List VBA Interview Questions & Answers
In this example, the goal is to return the name of the current workbook with a formula. This is a fairly simple problem in the latest version of Excel, which provides the TEXTAFTER function and the TEXTBEFORE function. In older versions of Excel, you can use a more complicated formula based on the MID and FIND functions. Both options rely on the CELL function to get a full path to the current workbook. Read below for details.
Get workbook path
The first step in this problem is to get the workbook path, which includes the workbook and worksheet name. This can be done with the CELL function like this:
CELL("filename",A1)
With the info_type argument set to «filename», and reference set to cell A1 in the current worksheet, the result from CELL will be a full path as a text string like this:
"C:pathtofolder[workbook.xlsx]sheetname"
Notice the workbook name is enclosed in square brackets («[name]»). The challenge then becomes how best to extract just the text between the square brackets from the path? The best way to do this depends on what Excel version you have. If you have the latest version of Excel, you should use TEXTAFTER and TEXTBEFORE functions. Otherwise, you can use the MID and FIND functions as explained below.
TEXTAFTER with TEXTBEFORE
In Excel 365, the easiest option is to use the TEXTAFTER function with the TEXTAFTER function like this:
=TEXTAFTER(TEXTBEFORE(CELL("filename",A1),"]"),"[")This is an example of nesting — the TEXTBEFORE function is nested inside of the TEXTAFTER function, and the CELL function is nested inside of TEXTBEFORE. Working from the inside out CELL returns the full path to the workbook as explained above, and the result is delivered to the TEXTBEFORE function, which extracts all text before the closing square bracket («]»):
TEXTBEFORE(CELL("filename",A1),"]")Delimiter is set to «]» in order to retrieve only text that occurs before the closing square bracket («]»). The result looks like this:
"C:pathtofolder[workbook.xlsx"This value is then delivered to the TEXTAFTER function, which is configured to return text after the opening square bracket («[«):
=TEXTAFTER("C:pathtofolder[workbook.xlsx","[")The final result from TEXTAFTER is the workbook name only:
"workbook.xlsx"Assuming a path like «C:pathtofolder[workbook.xlsx]sheetname», the final result is «workbook.xlsx».
MID + FIND function
In older versions of Excel you can get the workbook name with a more complicated formula based on the MID and FIND function:
=MID(CELL("filename",A1),FIND("[",CELL("filename",A1))+1,FIND("]", CELL("filename",A1))-FIND("[",CELL("filename",A1))-1)
This formula is annoyingly complex, mostly because older versions of Excel do not have good text parsing functions, and this means the formula needs to work in small, redundant steps. Notice the CELL function is called 4 times!
To extract the workbook name, the formula works in 5 steps:
- Get the full path and filename.
- Locate the opening square bracket («[«).
- Locate the closing square bracket («]»).
- Calculate the length of the workbook name in characters.
- Extract the text between square brackets with the MID function.
Get path and filename
To get the path and file name, we use the CELL function like this:
CELL("filename",A1) // get path and filename
The info_type argument is «filename» and reference is A1. The cell reference is arbitrary and can be any cell in the worksheet. The result is a full path like this as text:
"C:pathtofolder[workbook.xlsx]sheetname"
The path starts with the drive and includes both the workbook name and the Sheet name. Notice the workbook name appears enclosed in square brackets.
Locate opening square bracket
The location of the opening square bracket («[«) is determined like this
FIND("[",CELL("filename",A1)) // returns 19
The FIND function returns the location of «[» (19) . We then add 1 because we want to extract text starting one character after the «[«. We can now rewrite the formula like this:
=MID(CELL("filename",A1),20,FIND("]", CELL("filename",A1))-FIND("[",CELL("filename",A1))-1)
Locate closing square bracket
Next, we locate the closing square bracket «]» in the same way with the FIND function:
FIND("]", CELL("filename",A1)) // returns 33
The FIND function returns 33, from which we subtract 1, in order to extract text up through character 32.
Calculate the length of the workbook name
The final step is to extract the text between the square brackets, and this is done with the MID function. We know where we want to start (20) and where to end (32). However, while the MID function takes start_num as the starting position, there is no equivalent end_num. Instead, MID takes num_chars, the number of characters to extract. Therefore, we need to calculate num_chars by subtracting the opening bracket «[» location from closing bracket «]» location. All of the code below simply calculates the number of characters to extract:
=FIND("]", CELL("filename",A1))-FIND("[",CELL("filename",A1))-1Using our test path above, the result is 13. This is the length of the workbook name in characters.
Extract the text between the brackets
We can now rewrite the formula like this:
=MID(CELL("filename",A1),20,13)
=MID("C:pathtofolder[workbook.xlsx]sheetname",20,13)
="workbook.xlsx"
The final result is «workbook.xlsx».