When you create or record a macro in Excel, you need to run the macro to execute the steps in the code.
A few ways of running a macro includes using the macro dialog box, assigning the macro to a button, using a shortcut, etc.
Apart from these user-initiated macro executions, you can also use VBA events to run the macro.
Excel VBA Events – Introduction
Let me first explain what is an event in VBA.
An event is an action that can trigger the execution of the specified macro.
For example, when you open a new workbook, it’s an event. When you insert a new worksheet, it’s an event. When you double-click on a cell, it’s an event.
There are many such events in VBA, and you can create codes for these events. This means that as soon as an event occurs, and if you have specified a code for that event, that code would instantly be executed.
Excel automatically does this as soon as it notices that an event has taken place. So you only need to write the code and place it in the correct event subroutine (this is covered later in this article).
For example, if you insert a new worksheet and you want it to have a year prefix, you can write the code for it.
Now, whenever anyone inserts a new worksheet, this code would automatically be executed and add the year prefix to the worksheet’s name.
Another example could be that you want to change the color of the cell when someone double-clicks on it. You can use the double-click event for this.
Similarly, you can create VBA codes for many such events (as we will see later in this article).
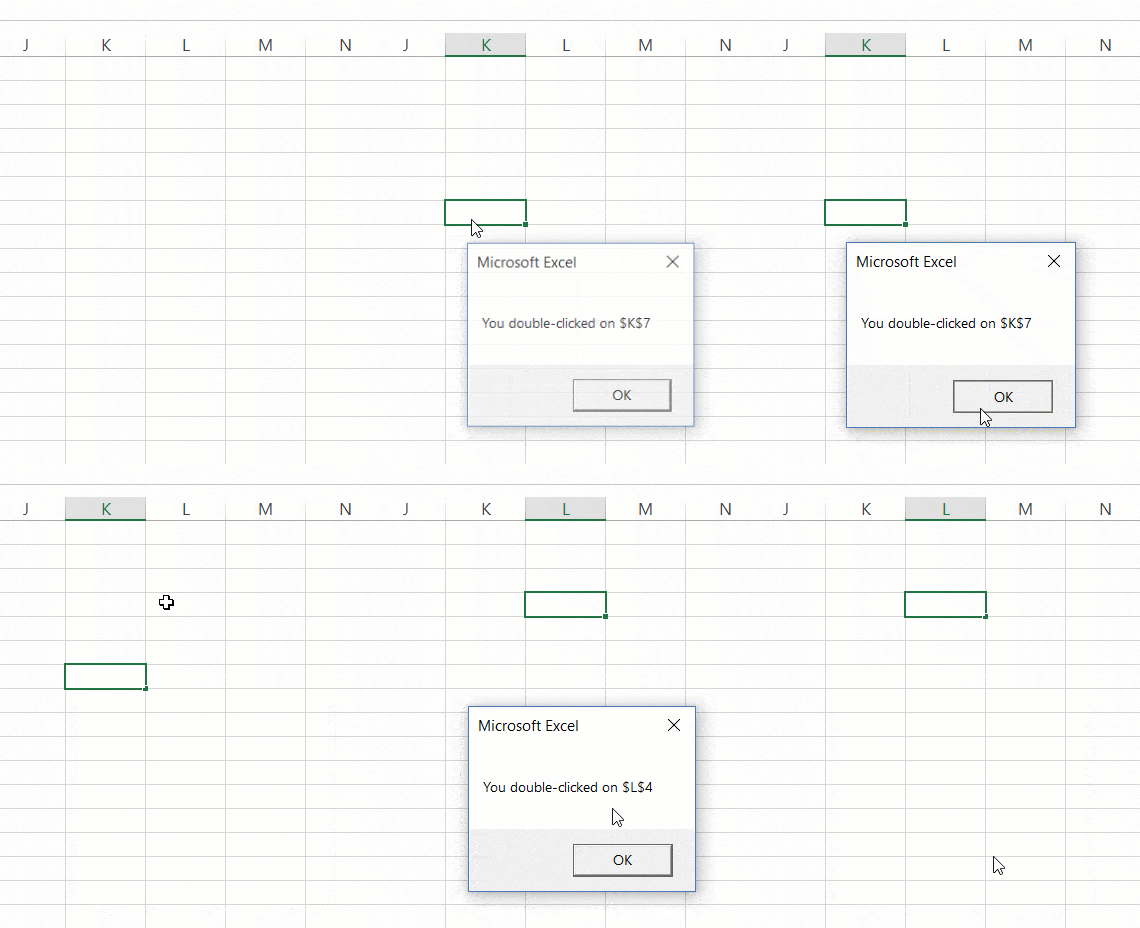
Below is a short visual that shows the double-click event in action. As soon as I double click on cell A1. Excel instantly opens a message box that shows the address of the cell.
Double-click is an event, and showing the message box is what I have specified in the code whenever the double-click event takes place.
While the above example is a useless event, I hope it helps you understand what events really are.
Different Types of Excel VBA Events
There are different objects in Excel – such as Excel itself (to which we often refer to as the application), workbooks, worksheets, charts, etc.
Each of these objects can have various events associated with it. For example:
- If you create a new workbook, it’s an application level event.
- If you add a new worksheet, it’s a workbook level event.
- If you change the value in a cell in a sheet, it’s a worksheet level event.
Below are the different types of Events that exist in Excel:
- Worksheet Level Events: These are the types of events that would trigger based on the actions taken in the worksheet. Examples of these events include changing a cell in the worksheet, changing the selection, double-clicking on a cell, right-clicking on a cell, etc.
- Workbook Level Events: These events would be triggered based on the actions at the workbook level. Examples of these events include adding a new worksheet, saving the workbook, opening the workbook, printing a part or the entire workbook, etc.
- Application Level Events: These are the events that occur in the Excel application. Example of these would include closing any of the open workbooks or opening a new workbook.
- UserForm Level Events: These events would be triggered based on the actions in the ‘UserForm’. Examples of these include initializing a UserForm or clicking a button in the UserForm.
- Chart Events: These are events related to the chart sheet. A chart sheet is different than a worksheet (which is where most of us are used to work in Excel). A chart sheets purpose is to hold a chart. Examples of such events would include changing the series of the chart or resizing the chart.
- OnTime and OnKey Events: These are two events that don’t fit in any of the above categories. So I have listed these separately. ‘OnTime’ event allows you to execute a code at a specific time or after a specific time has elapsed. ‘OnKey’ event allows you to execute a code when a specific keystroke (or a combination of keystrokes) is used.
Where to Put the Event-Related Code
In the above section, I covered the different types of events.
Based on the type of event, you need to put the code in the relevant object.
For example, if it’s a worksheet related event, it should go in the code window of the worksheet object. If it’s workbook related, it should go in the code window for a workbook object.
In VBA, different objects – such as Worksheets, Workbooks, Chart Sheets, UserForms, etc., have their own code windows. You need to put the event code in the relevant object’s code window. For example – if it’s a workbook level event, then you need to have the event code in the Workbook code window.
The following sections cover the places where you can put the event code:
In Worksheet Code Window
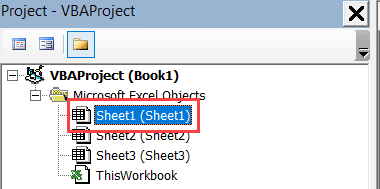
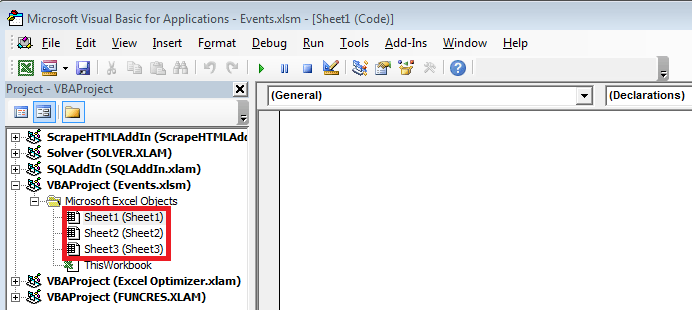
When you open the VB Editor (using keyboard shortcut ALT + F11), you would notice the worksheets object in the Project Explorer. For each worksheet in the workbook, you will see one object.
When you double-click on the worksheet object in which you want to place the code, it would open the code window for that worksheet.
While you can start writing the code from scratch, it’s much better to select the event from a list of options and let VBA automatically insert the relevant code for the selected event.
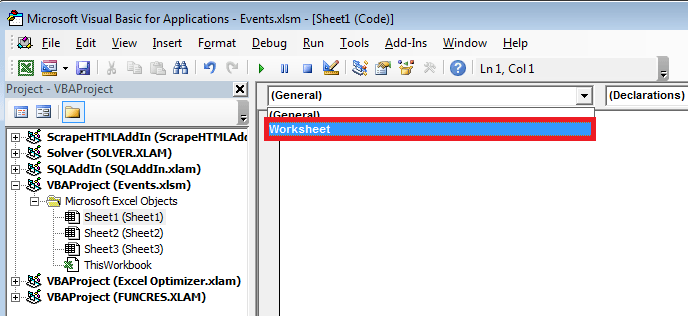
To do this, you need to first select worksheet from the drop down at the top-left of the code window.
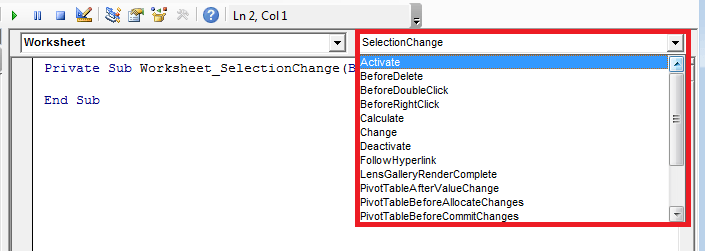
After selecting worksheet from the drop down, you get a list of all the events related to the worksheet. You can select the one you want to use from the drop-down at the top right of the code window.
As soon as you select the event, it would automatically enter the first and last line of the code for the selected event. Now you can add your code in between the two lines.
Note: As soon as you select Worksheet from the drop-down, you would notice two lines of code appear in the code window. Once you have selected the event for which you want the code, you can delete the lines that appeared by default.
Note that each worksheet has a code window of its own. When you put the code for Sheet1, it will only work if the event happens in Sheet1.
In ThisWorkbook Code Window
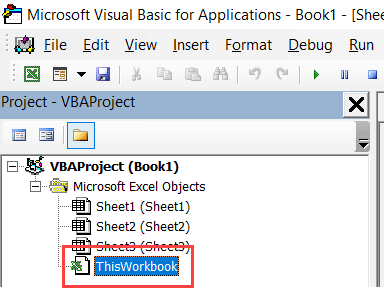
Just like worksheets, if you have a workbook level event code, you can place it in ThisWorkbook code window.
When you double-click on ThisWorkbook, it will open the code window for it.
You need to select Workbook from the drop-down at the top-left of the code window.
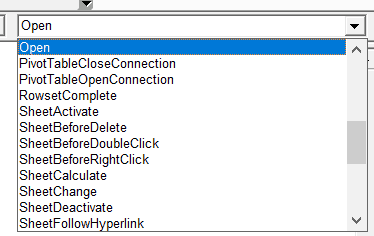
After selecting Workbook from the drop down, you get a list of all the events related to the Workbook. You can select the one you want to use from the drop-down at the top right of the code window.
As soon as you select the event, it would automatically enter the first and last line of the code for the selected event. Now you can add your code in between the two lines.
Note: As soon as you select Workbook from the drop-down, you would notice two lines of code appear in the code window. Once you have selected the event for which you want the code, you can delete the lines that appeared by default.
In Userform Code Window
When you’re creating UserForms in Excel, you can also use UserForm events to executes codes based on specific actions. For example, you can specify a code that is executed when the button is clicked.
While the Sheet objects and ThisWorkbook objects are already available when you open the VB Editor, UserForm is something you need to create first.
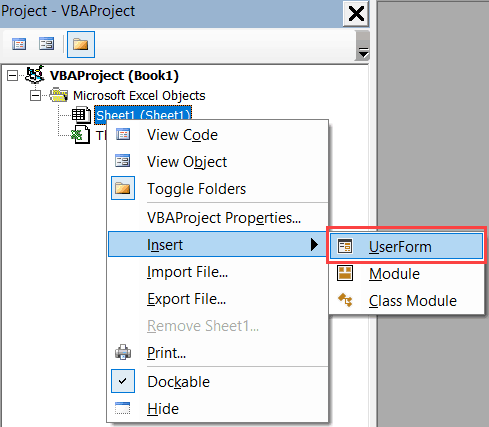
To create a UserForm, right-click on any of the objects, go to Insert and click on UserForm.
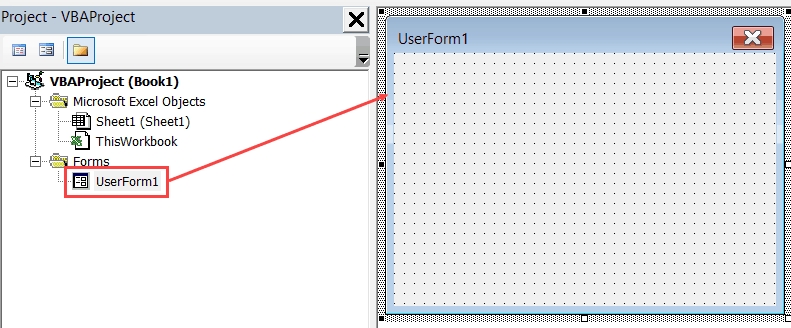
This would insert a UserForm object in the workbook.
When you double-click on the UserForm (or any of the object that you add to the UserForm), it would open the code window for the UserForm.
Now just like worksheets or ThisWorkbook, you can select the event and it will insert the first and the last line for that event. And then you can add the code in the middle of it.
In Chart Code Window
In Excel, you can also insert Chart sheets (which are different then worksheets). A chart sheet is meant to contain charts only.
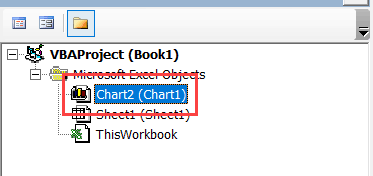
When you have inserted a chart sheet, you will be able to see the Chart sheet object in the VB Editor.
You can add the event code to the chart sheet code window just like we did in the worksheet.
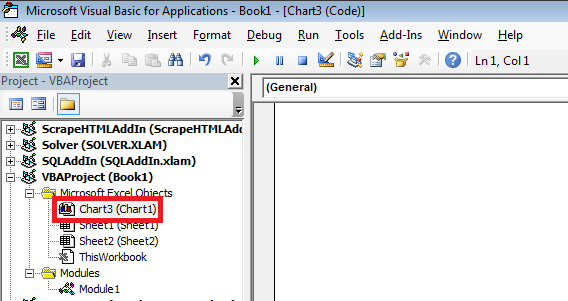
Double click on the Chart sheet object in the Project Explorer. This will open the code window for the chart sheet.
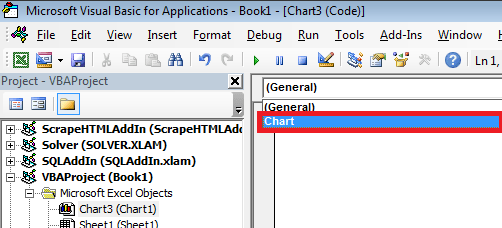
Now, you need to select Chart from the drop-down at the top-left of the code window.
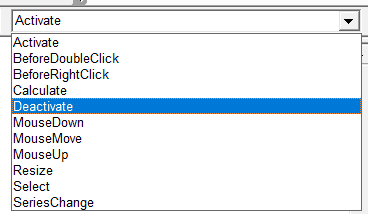
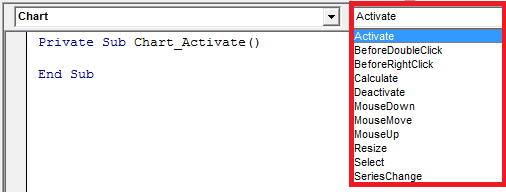
After selecting Chart from the drop-down, you get a list of all the events related to the Chart sheet. You can select the one you want to use from the drop-down at the top right of the code window.
Note: As soon as you select Chart from the drop-down, you would notice two lines of code appear in the code window. Once you have selected the event for which you want the code, you can delete the lines that appeared by default.
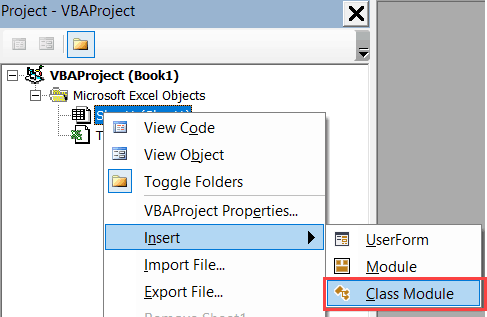
In Class Module
Class Modules need to be inserted just like UserForms.
A class module can hold code related to the application – which would be Excel itself, and the embedded charts.
I will cover the class module as a separate tutorial in the coming weeks.
Note that apart from OnTime and OnKey events, none of the above events can be stored in the regular VBA module.
Understanding the Event Sequence
When you trigger an event, it doesn’t happen in isolation. It may also lead to a sequence of multiple triggers.
For example, when you insert a new worksheet, the following things happen:
- A new worksheet is added
- The previous worksheet gets deactivated
- The new worksheet gets activated
While in most cases, you may not need to worry about the sequence, if you’re creating complex codes that rely on events, it’s better to know the sequence to avoid unexpected results.
Understanding the Role of Arguments in VBA Events
Before we jump to Event examples and the awesome things you can do with it, there is one important concept I need to cover.
In VBA events, there would be two types of codes:
- Without any arguments
- With arguments
And in this section, I want to quickly cover the role of arguments.
Below is a code that has no argument in it (the parenthesis are empty):
Private Sub Workbook_Open()
MsgBox "Remember to Fill the Timesheet"
End Sub
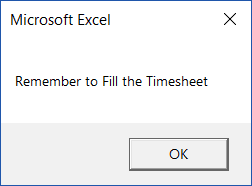
With the above code, when you open a workbook, it simply shows a message box with the message – “Remember to fill the Timesheet”.
Now let’s have a look at a code that has an argument.
Private Sub Workbook_NewSheet(ByVal Sh As Object)
Sh.Range("A1") = Sh.Name
End Sub
The above code uses the Sh argument which is defined as an object type. The Sh argument could be a worksheet or a chart sheet, as the above event is triggered when a new sheet is added.
By assigning the new sheet that is added to the workbook to the object variable Sh, VBA has enabled us to use it in the code. So to refer to the new sheet name, I can use Sh.Name.
The concept of arguments will be useful when you go through the VBA events examples in the next sections.
Workbook Level Events (Explained with Examples)
Following are the most commonly used events in a workbook.
| EVENT NAME | WHAT TRIGGERS THE EVENT |
| Activate | When a workbook is activated |
| AfterSave | When a workbook is installed as an add-in |
| BeforeSave | When a workbook is saved |
| BeforeClose | When a workbook is closed |
| BeforePrint | When a workbook is printed |
| Deactivate | When a workbook is deactivated |
| NewSheet | When a new sheet is added |
| Open | When a workbook is opened |
| SheetActivate | When any sheet in the workbook is activated |
| SheetBeforeDelete | When any sheet is deleted |
| SheetBeforeDoubleClick | When any sheet is double-clicked |
| SheetBeforeRightClick | When any sheet is right-clicked |
| SheetCalculate | When any sheet is calculated or recalculated |
| SheetDeactivate | When a workbook is deactivated |
| SheetPivotTableUpdate | When a workbook is updated |
| SheetSelectionChange | When a workbook is changed |
| WindowActivate | When a workbook is activated |
| WindowDeactivate | When a workbook is deactivated |
Note that this is not a complete list. You can find the complete list here.
Remember that the code for Workbook event is stored in the ThisWorkbook objects code window.
Now let’s have a look at some useful workbook events and see how these can be used in your day-to-day work.
Workbook Open Event
Let’s say that you want to show the user a friendly reminder to fill their timesheets whenever they open a specific workbook.
You can use the below code to do this:
Private Sub Workbook_Open()
MsgBox "Remember to Fill the Timesheet"
End Sub
Now as soon as you open the workbook that has this code, it will show you a message box with the specified message.
There are a few things to know when working with this code (or Workbook Event codes in general):
- If a workbook has a macro and you want to save it, you need to save it in the .XLSM format. Else the macro code would be lost.
- In the above example, the event code would be executed only when the macros are enabled. You may see a yellow bar asking for permission to enable macros. Until that is enabled, the event code is not executed.
- The Workbook event code is placed in the code window of ThisWorkbook object.
You can further refine this code and show the message only of Friday.
The below code would do this:
Private Sub Workbook_Open()
wkday = Weekday(Date)
If wkday = 6 Then MsgBox "Remember to Fill the Timesheet"
End Sub
Note that in the Weekday function, Sunday is assigned the value 1, Monday is 2 and so on.
Hence for Friday, I have used 6.
Workbook Open event can be useful in many situations, such as:
- When you want to show a welcome message to the person when a workbook is opened.
- When you want to display a reminder when the workbook is opened.
- When you want to always activate one specific worksheet in the workbook when it’s opened.
- When you want to open related files along with the workbook.
- When you want to capture the date and time stamp every time the workbook is opened.
Workbook NewSheet Event
NewSheet event is triggered when you insert a new sheet in the workbook.
Let’s say that you want to enter the date and time value in cell A1 of the newly inserted sheet. You can use the below code to do this:
Private Sub Workbook_NewSheet(ByVal Sh As Object)
On Error Resume Next
Sh.Range("A1") = Format(Now, "dd-mmm-yyyy hh:mm:ss")
End Sub
The above code uses ‘On Error Resume Next’ to handle cases where someone inserts a chart sheet and not a worksheet. Since chart sheet doesn’t have cell A1, it would show an error if ‘On Error Resume Next’ is not used.
Another example could be when you want to apply some basic setting or formatting to a new sheet as soon as it is added. For example, if you want to add a new sheet and want it to automatically get a serial number (up to 100), then you can use the code below.
Private Sub Workbook_NewSheet(ByVal Sh As Object)
On Error Resume Next
With Sh.Range("A1")
.Value = "S. No."
.Interior.Color = vbBlue
.Font.Color = vbWhite
End With
For i = 1 To 100
Sh.Range("A1").Offset(i, 0).Value = i
Next i
Sh.Range("A1", Range("A1").End(xlDown)).Borders.LineStyle = xlContinuous
End Sub
The above code also does a bit of formatting. It gives the header cell a blue color and makes the font white. It also applies a border to all the filled cells.
The above code is an example of how a short VBA code can help you steal a few seconds every time you insert a new worksheet (in case this is something that you have to do every time).
Workbook BeforeSave Event
Before Save event is triggered when you save a workbook. Note that the event is triggered first and then the workbook is saved.
When saving an Excel workbook, there could be two possible scenarios:
- You’re saving it for the first time and it will show the Save As dialog box.
- You’ve already saved it earlier and it will simply save and overwrite the changes in the already saved version.
Now let’s have a look at a few examples where you can use the BeforeSave event.
Suppose you have a new workbook that you’re saving for the first time, and you want to remind the user to save it in the K drive, then you can use the below code:
Private Sub Workbook_BeforeSave(ByVal SaveAsUI As Boolean, Cancel As Boolean)
If SaveAsUI Then MsgBox "Save this File in the K Drive"
End Sub
In the above code, if the file has never been saved, SaveAsUI is True and brings up the Save As dialog box. The above code would display the message before the Save As dialog box appear.
Another example could be to update the date and time when the file is saved in a specific cell.
The below code would insert the date & time stamp in cell A1 of Sheet1 whenever the file is saved.
Private Sub Workbook_BeforeSave(ByVal SaveAsUI As Boolean, Cancel As Boolean)
Worksheets("Sheet1").Range("A1") = Format(Now, "dd-mmm-yyyy hh:mm:ss")
End Sub
Note that this code is executed as soon as the user saves the workbook. If the workbook is being saved for the first time, it will show a Save As dialog box. But the code is already executed by the time you see the Save As dialog box. At this point, if you decide to cancel and not save the workbook, the date and time would already be entered in the cell.
Workbook BeforeClose Event
Before Close event happens right before the workbook is closed.
The below code protects all the worksheets before the workbook is closed.
Private Sub Workbook_BeforeClose(Cancel As Boolean)
Dim sh As Worksheet
For Each sh In ThisWorkbook.Worksheets
sh.Protect
Next sh
End Sub
Remember that the event code is triggered as soon as you close the workbook.
One important thing to know about this event is that it doesn’t care whether the workbook is actually closed or not.
In case the workbook has not been saved and you’re shown the prompt asking whether to save the workbook or not, and you click Cancel, it will not save your workbook. However, the event code would have already been executed by then.
Workbook BeforePrint Event
When you give the print command (or Print Preview command), the Before Print event is triggered.
The below code would recalculate all the worksheets before your workbook is printed.
Private Sub Workbook_BeforePrint(Cancel As Boolean)
 For Each ws in Worksheets
 ws.Calculate
 Next ws
 End Sub
When the user is printing the workbook, the event would be fired whether he/she is printing the entire workbook or only a part of it.
Another example below is of the code that would add the date and time to the footer when the workbook is printed.
Private Sub Workbook_BeforePrint(Cancel As Boolean)
Dim ws As Worksheet
For Each ws In ThisWorkbook.Worksheets
ws.PageSetup.LeftFooter = "Printed On - " & Format(Now, "dd-mmm-yyyy hh:mm")
Next ws
End Sub
Worksheet Level Events (Explained with Examples)
Worksheet events take place based on the triggers in the worksheet.
Following are the most commonly used events in a worksheet.
| Event Name | What triggers the event |
| Activate | When the worksheet is activated |
| BeforeDelete | Before the worksheet is deleted |
| BeforeDoubleClick | Before the worksheet is double-clicked |
| BeforeRightClick | Before the worksheet is right-clicked |
| Calculate | Before the worksheet is calculated or recalculated |
| Change | When the cells in the worksheet are changed |
| Deactivate | When the worksheet is deactivated |
| PivotTableUpdate | When the Pivot Table in the worksheet is updated |
| SelectionChange | When the selection on the worksheet is changed |
Note that this is not a complete list. You can find the complete list here.
Remember that the code for Worksheet event is stored in the worksheet object code window (in the one in which you want the event to be triggered). There can be multiple worksheets in a workbook, and your code would be fired only when the event takes place in the worksheet in which it is placed.
Now let’s have a look at some useful worksheet events and see how these can be used in your day-to-day work.
Worksheet Activate Event
This event is fired when you activate a worksheet.
The below code unprotects a sheet as soon as it is activated.
Private Sub Worksheet_Activate()
ActiveSheet.Unprotect
End Sub
You can also use this event to make sure a specific cell or a range of cells (or a named range) is selected as soon as you activate the worksheet. The below code would select cell D1 as soon as you activate the sheet.
Private Sub Worksheet_Activate()
ActiveSheet.Range("D1").Select
End Sub
Worksheet Change Event
A change event is fired whenever you make a change in the worksheet.
Well.. not always.
There are some changes that trigger the event, and some that don’t. Here is a list of some changes that won’t trigger the event:
- When you change the formatting of the cell (font size, color, border, etc.).
- When you merge cells. This is surprising as sometimes, merging cells also removes content from all the cells except the top-left one.
- When you add, delete, or edit a cell comment.
- When you sort a range of cells.
- When you use Goal Seek.
The following changes would trigger the event (even though you may think it shouldn’t):
- Copy and pasting formatting would trigger the event.
- Clearing formatting would trigger the event.
- Running a spell check would trigger the event.
Below is a code would show a message box with the address of the cell that has been changed.
Private Sub Worksheet_Change(ByVal Target As Range)
MsgBox "You just changed " & Target.Address
End Sub
While this is a useless macro, it does show you how to use the Target argument to find out what cells have been changed.
Now let’s see a couple of more useful examples.
Suppose you have a range of cells (let’s say A1:D10) and you want to show a prompt and ask the user if they really wanted to change a cell in this range or not, you can use the below code.
It shows a prompt with two buttons – Yes and No. If the user selects ‘Yes’, the change is done, else it is reversed.
Private Sub Worksheet_Change(ByVal Target As Range)
If Target.Row <= 10 And Target.Column <= 4 Then
Ans = MsgBox("You are making a change in cells in A1:D10. Are you sure you want it?", vbYesNo)
End If
If Ans = vbNo Then
Application.EnableEvents = False
Application.Undo
Application.EnableEvents = True
End If
End Sub
In the above code, we check whether the Target cell is in first 4 columns and the first 10 rows. If that’s the case, the message box is shown. Also, if the user selected No in the message box, the change is reversed (by the Application.Undo command).
Note that I have used Application.EnableEvents = False before the Application.Undo line. And then I reversed it by using Application.EnableEvent = True in the next line.
This is needed as when the undo happens, it also triggers the change event. If I don’t set the EnableEvent to False, it will keep on triggering the change event.
You can also monitor the changes to a named range using the change event. For example, if you have a named range called “DataRange” and you want to show a prompt in case user makes a change in this named range, you can use the code below:
Private Sub Worksheet_Change(ByVal Target As Range)
Dim DRange As Range
Set DRange = Range("DataRange")
If Not Intersect(Target, DRange) Is Nothing Then
MsgBox "You just made a change to the Data Range"
End If
End Sub
The above code checks whether the cell/range where you have made the changes has any cells common to the Data Range. If it does, it shows the message box.
Workbook SelectionChange Event
The selection change event is triggered whenever there is a selection change in the worksheet.
The below code would recalculate the sheet as soon as you change the selection.
Private Sub Worksheet_SelectionChange(ByVal Target As Range)
Application.Calculate
End Sub
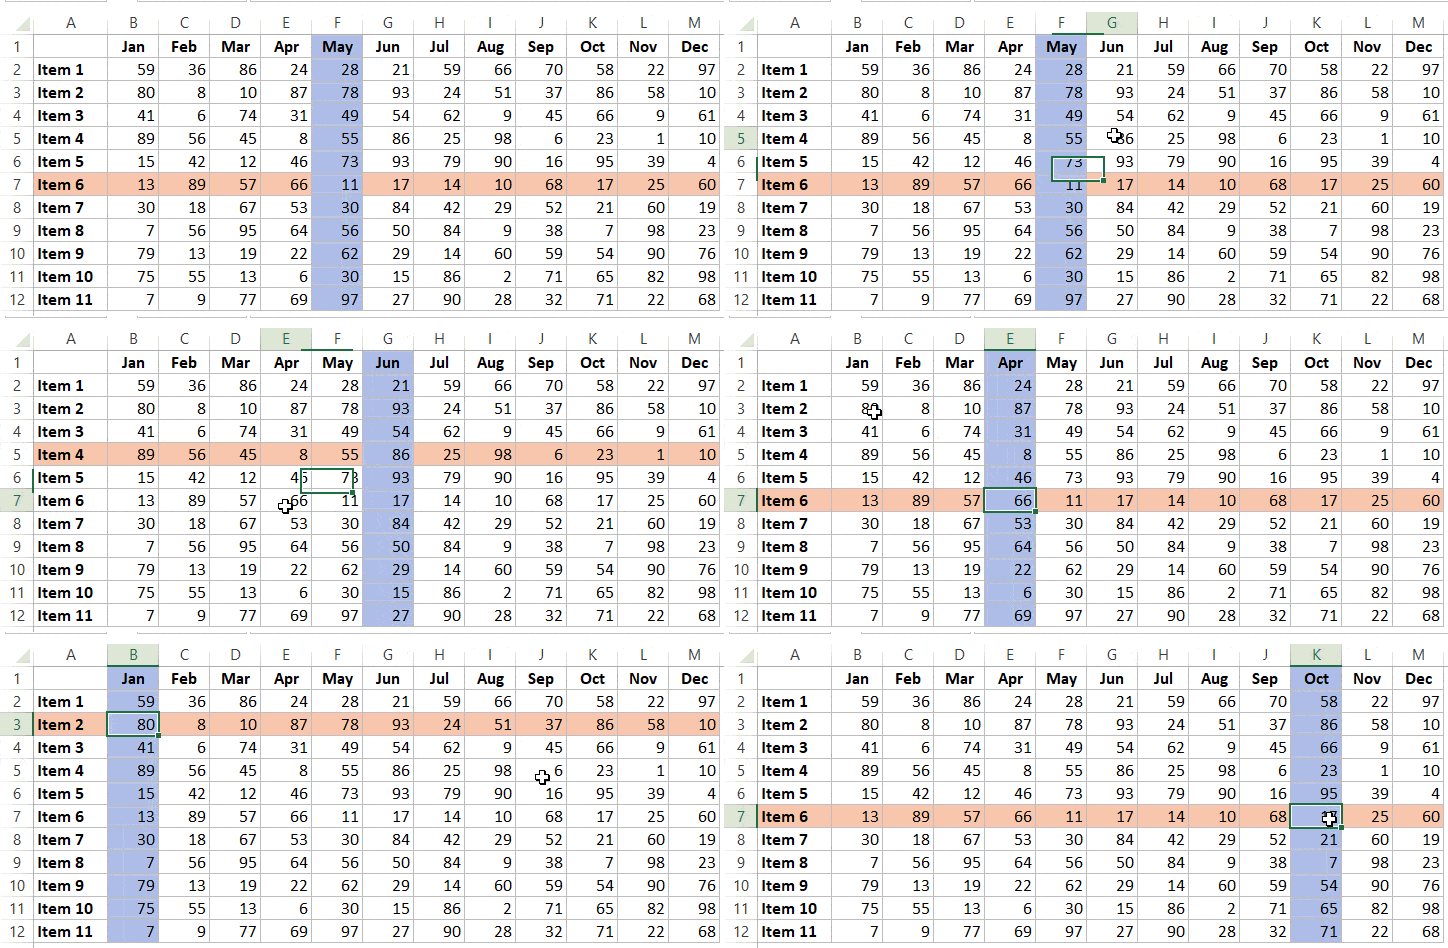
Another example of this event is when you want to highlight the active row and column of the selected cell.
Something as shown below:
The following code can do this:
Private Sub Worksheet_SelectionChange(ByVal Target As Range)
Cells.Interior.ColorIndex = xlNone
With ActiveCell
.EntireRow.Interior.Color = RGB(248, 203, 173)
.EntireColumn.Interior.Color = RGB(180, 198, 231)
End With
End Sub
The code first removes the background color from all the cells and then apply the one mentioned in the code to the active row and column.
And that’s the problem with this code. That it removes color from all cells.
If you want to highlight the active row/column while keeping the color in other cells intact, use the technique shown in this tutorial.
Workbook DoubleClick Event
This is one of my favorite worksheet events and you’ll see a lot of tutorials where I have used this (such as this one or this one).
This event is triggered when you double-click on a cell.
Let me show you how awesome this is.
With the below code, you can double-click on a cell and it will apply a background color, change the font color, and make the text in the cell bold;
Private Sub Worksheet_BeforeDoubleClick(ByVal Target As Range, Cancel As Boolean)
Cancel = True
With Target
.Interior.Color = vbBlue
.Font.Color = vbWhite
.Font.Bold = True
End With
End Sub
This can be useful when you’re going through a list of cells and want to highlight a few selected ones. While you can use the F4 key to repeat the last step, it would only be able to apply one kind of formatting. With this double-click event, you can apply all three with just a double-click.
Note that in the above code, I have made the value of Cancel = True.
This is done so that the default action of double-click is disabled – which is to get into the edit mode. With Cancel = True, Excel would not get you into Edit mode when you double-click on the cell.
Here is another example.
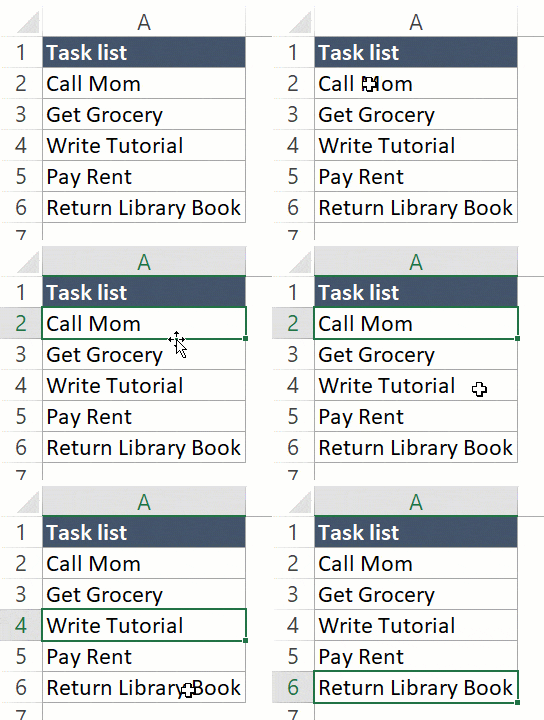
If you have a to-do list in Excel, you can use double-click event to apply the strikethrough format to mark the task as completed.
Something as shown below:
Here is the code that will do this:
Private Sub Worksheet_BeforeDoubleClick(ByVal Target As Range, Cancel As Boolean)
Cancel = True
CurrFormat = Target.Font.Strikethrough
If CurrFormat Then
Target.Font.Strikethrough = False
Else
Target.Font.Strikethrough = True
End If
End Sub
Note that in this code, I have made double-click as a toggle event. When you double-click on a cell, it checks if the strikethrough format has already been applied. If it has been, double-click removes the strikethrough format, and if it hasn’t been, then the strikethrough format is applied.
Excel VBA OnTime Event
The events that we have seen so far in this article were associated with one of the Excel objects, be it the workbook, worksheet, chart sheet, or UserForms, etc.
OnTime event is different than other events as it can be stored in the regular VBA module (while the others were to be placed in the code window of objects such as ThisWorkbook or Worksheets or UserForms).
Within the regular VBA module, it is used as a method of the application object.
The reason this is considered an event is that it can be triggered based on the time you specify. For example, if I want the sheet to recalculate every 5 minutes, I can use the OnTime event for it.
Or, if I want to show a message/reminder at a specific time of the day, I can use the OnTime event.
Below is a code that will show a message at 2 pm every day.
Sub MessageTime()
Application.OnTime TimeValue("14:00:00"), "ShowMessage"
End Sub

Sub ShowMessage()
MsgBox "It's Lunch Time"
End Sub
Remember you need to place this code in the regular VBA module,
Also, while the OnTime event would be triggered at the specified time, you need to run the macro manually at any time.
Once you run the macro, it will wait till it’s 2 PM and then call the ‘ShowMessage’ macro.
The ShowMessage macro would then display the message.
The OnTime event takes four arguments:
Application.OnTime(EarliestTime, Procedure, LatestTime, Schedule)
- EarliestTime: The time when you want to run the procedure.
- Procedure: The name of the procedure that should be run.
- LatestTime (Optional): In case another code is running and your specified code can’t be run at the specified time, you can specify the LatestTime for which it should wait. For example, it could be EarliestTime + 45 (which means it will wait for 45 seconds for the other procedure to get completed). If even after 45 seconds the procedure is not able to run, it gets abandoned. If you don’t specify this, Excel would wait until the code can be run, and then run it.
- Schedule (Optional): If set to True, it schedules new time procedure. If False, then it cancels the previously set procedure. By default, this is True.
In the above example, we only used the first two arguments.
Let’s look at another example.
The below code would refresh the worksheet every 5 min.
Dim NextRefresh as Date

Sub RefreshSheet()
ThisWorkbook.Worksheets("Sheet1").Calculate
NextRefresh = Now + TimeValue("00:05:00")
Application.OnTime NextRefresh, "RefreshSheet"
End Sub

Sub StopRefresh()
On Error Resume Next
Application.OnTime NextRefresh, "RefreshSheet", , False
End Sub
The above code would refresh the worksheet every 5 minutes.
It uses the Now function to determine the current time and then adds 5 minutes to the current time.
The OnTime event would continue to run until you stop it. If you close the workbook and Excel application is still running (other workbooks are open), the workbook that has the OnTime event running in it would reopen itself.
This is better handled by specifically stopping the OnTime event.
In the above code, I have the StopRefresh code, but you need to execute it to stop the OnTime event. You can do this manually, assign it to a button and do this by pressing the button or call it from the Workbook Close event.
Private Sub Workbook_BeforeClose(Cancel As Boolean)
Call StopRefresh
End Sub
The above ‘BeforeClose’ event code goes in ThisWorkbook code window.
Also read: Make VBA Code Pause or Delay
Excel VBA OnKey Event
When you’re working with Excel, it keeps monitoring the keystrokes you use. This allows us to use keystrokes as the trigger for an event.
With OnKey event, you can specify a keystroke (or a combination of keystrokes) and the code that should be executed when that keystroke is used. When these keystrokes are pressed, it will execute the code for it.
Just like OnTime event, you need to have a way to cancel the OnKey event. Also, when you set the OnKey event for a specific keystroke, it becomes available in all the open workbooks.
Before I show you an example of using the OnKey event, let me first share the key codes that are available to you in VBA.
| KEY | CODE |
| Backspace | {BACKSPACE} or {BS} |
| Break | {BREAK} |
| Caps Lock | {CAPSLOCK} |
| Delete | {DELETE} or {DEL} |
| Down Arrow | {DOWN} |
| End | {END} |
| Enter | ~ |
| Enter (on the nueric keypad) | {ENTER} |
| Escape | {ESCAPE} or {ESC} |
| Home | {HOME} |
| Ins | {INSERT} |
| Left Arrow | {LEFT} |
| NumLock | {NUMLOCK} |
| PageDown | {PGDN} |
| PageUp | {PGUP} |
| RightArrow | {RIGHT} |
| Scroll Lock | {SCROLLOCK} |
| Tab | {TAB} |
| Up Arrow | {UP} |
| F1 through F15 | {F1} through {F15} |
When you need to use any onkey event, you need to use the code for it.
The above table has the codes for single keystrokes.
You can also combine these with the following codes:
- Shift: + (Plus Sign)
- Control: ^ (Caret)
- Alt: % (Percentage)
For Example, for Alt F4, you need to use the code: “%{F4}” – where % is for the ALT key and {F4} is for the F4 key.
Now let’s have a look at an example (remember the code for OnKey events are placed in the regular VBA module).
When you hit the PageUp or PageDown key, it jumps 29 rows above/below the active cell (at least that’s what it’s doing on my laptop).
If you want it to jump only 5 rows at a time, you can use the below code:
Sub PageUpDOwnKeys()
Application.OnKey "{PgUp}", "PageUpMod"
Application.OnKey "{PgDn}", "PageDownMod"
End Sub

Sub PageUpMod()
On Error Resume Next
ActiveCell.Offset(-5, 0).Activate
End Sub

Sub PageDownMod()
On Error Resume Next
ActiveCell.Offset(5, 0).Activate
End Sub
When you run the first part of the code, it will run the OnKey events. Once this is executed, using the PageUp and the PageDown key would only make the cursor jump 5 rows at a time.
Note that we have used ‘On Error Resume Next’ to make sure errors are ignored. These errors can occur when you press the PageUp key even when you’re at the top of the worksheet. Since there are no more rows to jump, the code would show an error. But since we have used ‘On Error Resume Next’, it will be ignored.
To make sure these OnKey events are available, you need to run the first part of the code. In case you want this to be available as soon as you open the workbook, you can place this in the ThisWorkbook code window.
Private Sub Workbook_Open()
Application.OnKey "{PgUp}", "PageUpMod"
Application.OnKey "{PgDn}", "PageDownMod"
End Sub
The below code will return the keys to their normal functionality.
Sub Cancel_PageUpDownKeysMod()
Application.OnKey "{PgUp}"
Application.OnKey "{PgDn}"
End Sub
When you don’t specify the second argument in the OnKey method, it will return the keystroke to its regular functionality.
In case you want to cancel the functionality of a keystroke, so that Excel does nothing when that keystroke is used, you need to use a blank string as the second argument.
In the below code, Excel would do nothing when we use the PageUp or PageDown keys.
Sub Ignore_PageUpDownKeys()
Application.OnKey "{PgUp}", ""
Application.OnKey "{PgDn}", ""
End Sub
Disabling Events in VBA
Sometimes you may need to disable events to make your code work properly.
For example, suppose I have a range (A1:D10) and I want to show a message whenever a cell is changed in this range. So I show a message box and asks the user whether they are sure that they want to make the change. If the answer is Yes, the change is made, and if the answer is No, then VBA would undo it.
You can use the below code:
Private Sub Worksheet_Change(ByVal Target As Range)
If Target.Row <= 10 And Target.Column <= 4 Then
Ans = MsgBox("You are making a change in cells in A1:D10. Are you sure you want it?", vbYesNo)
End If
If Ans = vbNo Then
Application.Undo
End If
End Sub
The problem with this code is that when the user selects No in the message box, the action is reversed (as I have used Application.Undo).
When the undo happens and the value is changed back to the original one, the VBA change event is again triggered, and the user is again shown the same message box.
This means that you can continue to click NO on the message box and it will keep showing up. This happens as you have got stuck in the infinite loop in this case.
To avoid such cases, you need to disable events so that the change event (or any other event) is not triggered.
The following code would work well in this case:
Private Sub Worksheet_Change(ByVal Target As Range)
If Target.Row <= 10 And Target.Column <= 4 Then
Ans = MsgBox("You are making a change in cells in A1:D10. Are you sure you want it?", vbYesNo)
End If
If Ans = vbNo Then
Application.EnableEvents = False
Application.Undo
Application.EnableEvents = True
End If
End Sub
In the above code, right above the Application.Undo line, we have used – Application.EnableEvents = False.
Setting EnableEvents to False would not trigger any event (in the current or any open workbooks).
Once we have completed the undo operation, we can switch back the EnableEvents property to True.
Keep in mind that disabling events impacts all the workbooks that are currently opened (or opened while EnableEvents is set to False). For example, as a part of the code, if you open a new workbook, then the Workbook Open event would not work.
Impact of Events Undo Stack
Let me first tell you what an Undo Stack is.
When you work in Excel, it keeps monitoring your actions. When you make a mistake, you can always use Control + Z to go back to the previous step (i.e., undo your current action).
If you press Control + Z twice, it will take you back two steps. These steps that you have performed are stored as a part of the Undo stack.
Any event that changes the worksheet destroys this Undo stack. This means that if I have done 5 things before I trigger an event, I will not be able to use Control + Z to go back to those previous steps. Triggering the event has destroyed that stack for me.
In the below code, I use VBA to enter the timestamp in cell A1 whenever there is a change in the worksheet.
Private Sub Worksheet_Change(ByVal Target As Range)
Application.EnableEvents = False
Range("A1").Value = Format(Now, "dd-mmm-yyyy hh:mm:ss")
Application.EnableEvents = True
End Sub
Since I am making a change in the worksheet, this will destroy the undo stack.
Also, note that this is not limited to events only.
If you have a code that is stored in regular VBA module, and you make a change in the worksheet, it would also destroy the undo stack in Excel.
For example, the below code simply enter the text “Hello” in cell A1, but even running this would destroy the undo stack.
Sub TypeHello()
Range("A1").Value = "Hello"
End Sub
You May Also Like the Following Excel VBA Tutorials:
- Working with Cells and Ranges in Excel VBA.
- Working with Worksheets in Excel VBA.
- Working with Workbooks in Excel VBA.
- Excel VBA Loops – The Ultimate Guide.
- Using IF Then Else Statment in Excel VBA.
- For Next Loop in Excel.
- Creating User-Defined Functions in Excel VBA.
- How to Create and Use Add-ins in Excel.
- Create and Reuse Macros by saving in Personal Macro Workbook.
Often when working with Excel files we want to introduce certain features which are supposed to be fired in the circumstance of certain events. Say we have a Excel worksheet that is time-sensitive, that needs to be updated based on some web-resource or database. Should we hope that the user will leverage our Refresh button. Fortunately Microsoft introduced Excel Workbook Events – events which are fired in very specific situation in reaction to user interaction. This
Introduction
Excel VBA Events such as the VBA Open Workbook event are very useful in organizing your Workbooks functionality and ease of use. Although VBA events have many advantages, be aware of one significant setback – whenever a VBA Event is fired VBA Code is executed! So? Isn’t that the point? Of course but that has some repercussions – as Excel (and other MS Office Applications) delete the Undo/Redo stack of events once VBA code is executed. This means that whenever a VBA Macro is executed the user will not be able to undo any previous changes to the Workbook using i.e. CTRL+Z.
Therefore be sure to limit your VBA Event handlers to the bare minimum as you may find users annoyed instead of impressed with your Excel GUI.
The VBA Open Workbook and other Workbook events are fired whenever an event in scope of the entire Workbook happens. This can include Activating, Saving, Opening or Closing the Workbook.
Adding Workbook Events
Let’s learn how to add Workbook events:
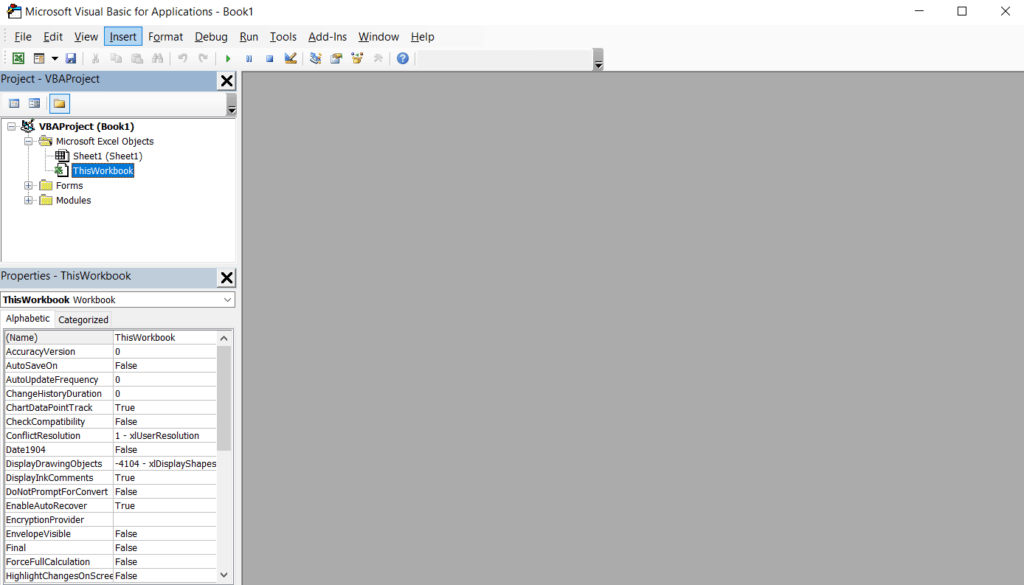
Select the Workbook module
Select the Workbook module from your Project – VBAProject window as shown below.
Select Workbook from the Object list
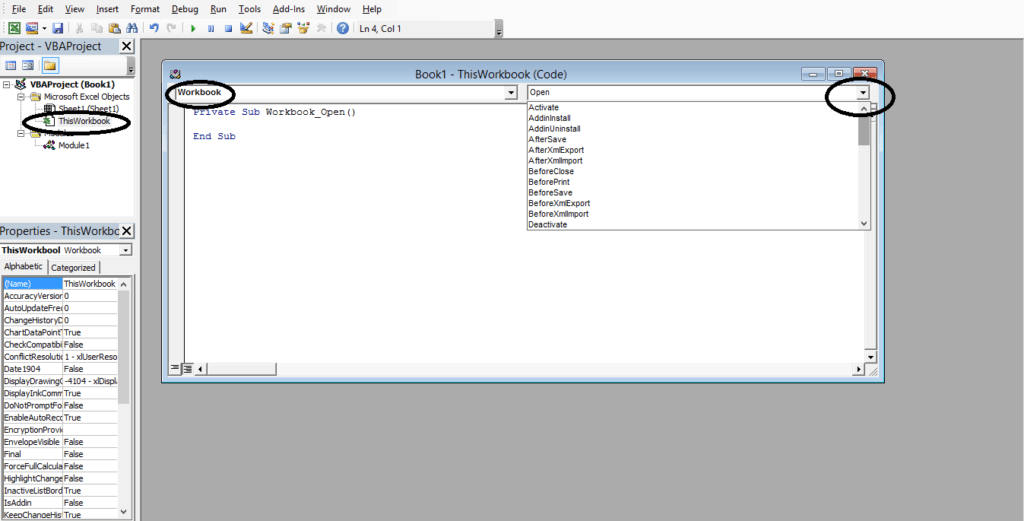
To view all available events associated with your Workbook select the Workbook value from the Object list in the Code window. This should automatically include the VBA Open Workbook event into your Workbook module.
Select the desired event from the available list of events
By selecting the Workbook Object from the previous list you will now have access to the available list of events associated with your Workbook. Simply select the desired VBA event from the list and the code will be added automatically.
List of Workbook Events (VBA Open Workbook etc.)
Below is a complete list of VBA Workbook Events available from Excel:
| Event Name | Descriptions |
|---|---|
| ActivateEvent | Workbook is activated |
| AddinInstall | Workbook is installed as an add-in |
| AddinUninstall | Workbook is uninstalled as an add-in |
| AfterSave | Workbook is saved |
| AfterXmlExport | Excel saves or exports data from the workbook to an XML data file |
| AfterXmlImport | An existing XML data connection is refreshed or after new XML data is imported into the workbook |
| BeforeClose | Before the workbook closes. If the workbook has been changed, this event occurs before the user is asked to save changes |
| BeforePrint | Before the workbook (or anything in it) is printed |
| BeforeSave | Before the workbook is saved |
| BeforeXmlExport | Before Excel saves or exports data from the workbook to an XML data file |
| BeforeXmlImport | Before an existing XML data connection is refreshed or before new XML data is imported into the workbook |
| Deactivate | Workbook is deactivated |
| New | New workbook is created |
| NewChart | New chart is created in the workbook |
| NewSheet | New sheet is created in the workbook |
| Open | Workbook is opened |
| PivotTableCloseConnection | After a PivotTable report closes the connection to its data source |
| PivotTableOpenConnection | After a PivotTable report opens the connection to its data source |
| RowsetComplete | The user navigates through the recordset or invokes the rowset action on an OLAP PivotTable |
| SheetActivate | When any sheet is activated. |
| SheetBeforeDoubleClick | When any worksheet is double-clicked, before the default double-click action. |
| SheetBeforeRightClick | When any worksheet is right-clicked, before the default right-click action. |
| SheetCalculate | After any worksheet is recalculated or after any changed data is plotted on a chart |
| SheetChange | When cells in any worksheet are changed by the user or by an external link. |
| SheetDeactivate | When any sheet is deactivated |
| SheetFollowHyperlink | When you click any hyperlink in a workbook |
| SheetPivotTableAfterValueChange | After a cell or range of cells inside a PivotTable are edited or recalculated (for cells that contain formulas) |
| SheetPivotTableBeforeAllocateChanges | Before changes are applied to a PivotTable |
| SheetPivotTableBeforeCommitChanges | Before changes are committed against the OLAP data source for a PivotTable |
| SheetPivotTableBeforeDiscardChanges | Before changes to a PivotTable are discarded |
| SheetPivotTableChangeSync | After changes to a PivotTable |
| SheetPivotTableUpdate | After the sheet of a PivotTable report has been updated |
| SheetSelectionChange | When the selection changes on any worksheet. Does not occur if the selection is on a chart sheet |
| Shutdown | When the workbook host item shuts down |
| Startup | After the workbook is running and all the initialization code in the assembly has been run |
| SyncEvent | When the local copy of a worksheet that is part of a Document Workspace is synchronized with the copy on the server |
| WindowActivate | When any workbook window is activated |
| WindowDeactivate | When any workbook window is deactivated |
| WindowResize | When any workbook window is resized |
Worksheet VBA Events
Adding Worksheet Events
The VBA Open Workbook and other Workbook events are fired whenever an event in scope of the entire Workbook happens. This can include Activating, Saving, Opening or Closing the Workbook.
Adding Workbook Events
Let’s learn how to add Worksheet events:
Select a Worksheet module
Select the Worksheet module from your Project – VBAProject window as shown below. Be sure to select the Worksheet in which you want to add the event handler!:
Select Worksheet from the Object list
To view all available events associated with your Worksheet select the Worksheet value from the Object list in the Code window. This should automatically include the VBA SelectedChange Worksheet event into your Worksheet module.
Select the desired event from the available list of events
By selecting the Worksheet Object from the previous list you will now have access to the available list of events associated with your Worksheet. Simply select the desired VBA event from the list and the code will be added automatically.
List of Worksheet Events
| Event Name | Descriptions |
|---|---|
| Activate | When a workbook, worksheet, chart sheet, or embedded chart is activated. |
| BeforeDelete | |
| BeforeDoubleClick | When a worksheet is double-clicked, before the default double-click action. |
| BeforeRightClick | When a worksheet is right-clicked, before the default right-click action. |
| Calculate | After the worksheet is recalculated, for the Worksheet object. |
| Change | When cells on the worksheet are changed by the user or by an external link. |
| Deactivate | When the chart, worksheet, or workbook is deactivated. |
| FollowHyperlink | When you click any hyperlink on a worksheet. For application- and workbook-level events, see theSheetFollowHyperlink event and SheetFollowHyperlink event. |
| LensGalleryRenderComplete | When a callout gallery’s icons (dynamic & static) have completed rendering. |
| PivotTableAfterValueChange | After a cell or range of cells inside a PivotTable are edited or recalculated (for cells that contain formulas). |
| PivotTableBeforeAllocateChanges | Before changes are applied to a PivotTable. |
| PivotTableBeforeCommitChanges | Before changes are committed against the OLAP data source for a PivotTable. |
| PivotTableBeforeDiscardChanges | Before changes to a PivotTable are discarded. |
| PivotTableChangeSync | After changes to a PivotTable. |
| PivotTableUpdate | After a PivotTable report is updated on a worksheet. |
| SelectionChange | When the selection changes on a worksheet. |
| TableUpdate | After a Query table connected to the Data Model is updated on a worksheet. |
Chart VBA Events
Adding Chart Events
Let’s learn how to add Chart events:
Select a Chart module
Select the Chart module from your Project – VBAProject window as shown below. Be sure to select the Chart to which you want to add the event handler!:
Select Chart from the Object list
To view all available events associated with your Chart select the Chart value from the Object list in the Code window. This should automatically include the VBA Activate Chart event into your Chart module.
Select the desired event from the available list of events
By selecting the Chart Object from the previous list you will now have access to the available list of events associated with your Chaet. Simply select the desired VBA event from the list and the code will be added automatically.
List of Chart Events
| Event Name | Descriptions |
|---|---|
| Activate | chart sheet, or embedded chart is activated. |
| BeforeDoubleClick | when a chart element is double-clicked, before the default double-click action. |
| BeforeRightClick | when a chart element is right-clicked, before the default right-click action. |
| Calculate | after the chart plots new or changed data, for the Chart object. |
| Deactivate | when the chart, worksheet, or workbook is deactivated. |
| MouseDown | when a mouse button is pressed while the pointer is over a chart. |
| MouseMove | when the position of the mouse pointer changes over a chart. |
| MouseUp | when a mouse button is released while the pointer is over a chart. |
| Resize | when the chart is resized. |
| Select | when a chart element is selected. |
| SeriesChange | when the user changes the value of a chart data point by clicking a bar in the chart and dragging the top edge up or down thus changing the value of the data point. |
Use Cases
I decided to list some interesting examples of Workbook VBA events usage:
- Before save notification – if you don’t want to overwrite your current file version you may want to override the BeforeSave Workbook VBA event to add an additional prompt to confirm if you want to overwrite your current file. Code below:
Private Sub Workbook_BeforeSave(ByVal SaveAsUI As Boolean, Cancel As Boolean) Cancel = (MsgBox("Are you sure?", vbYesNo, "Question") = vbNo) End Sub - Refresh all PivotTables and QueryTables on VBA Open Workbook Event – if you want to make sure your Pivot Tables are up to date whenever someone opens your Workbooks add a simple piece of code:
Private Sub Workbook_Open() ActiveWorkbook.RefreshAll End Sub - Prevent Changes to certain Cells – say you want to prompt a user when changing a certain cell value and revert to a default value otherwise. Simply override the VBA Change Event as follows:
Private Sub Worksheet_Change(ByVal Target As Range)
    If Target = Range("A1") And Target.Value <> 100 Then
       If MsgBox("Are you sure you want to change this cell?", vbYesNo) = vbNo Then
            'Revert Target value
            Application.EnableEvents = False
            Target.Value = 100
            Application.EnableEvents = True
        End If
    End If
End Sub
In this Article
- What are VBA events?
- Types of Events
- Dangers of Using Code in Events
- Disable Events
- Workbook Events Examples (not exhaustive)
- Workbook Open Event
- Workbook New Sheet Event
- Workbook Before Save Event
- Workbook Before Close Event
- Worksheet Event Examples (not exhaustive)
- Worksheet Change Event
- Worksheet Before Double Click Event
- Worksheet Activate Event
- Active X Control Events (not exhaustive)
- Command Button Click Event
- Drop Down (Combo Box) Change Event
- Tick Box (Check Box) Click Event
- UserForm Events (not exhaustive)
- UserForm Activate Event
- Change Event
- Click Event
- Chart Events
- Application Events
- Application.OnTime
- Application.OnKey
What are VBA events?
Events are happening all the time when a user opens an Excel workbook and starts doing various actions such as entering data into cells or moving between sheets
Within the Visual Basic Editor (ALT+F11), sub routines are already set up which can get fired off when the user does something e.g. entering data into a cell. The sub routine does not provide any action code, merely a ‘Sub’ statement and an ‘End Sub’ statement with no code between them. They are effectively dormant so nothing happens until you enter some code.
Here is an example based on the ‘Change’ event in a worksheet:
As a VBA programmer, you can add in code to make certain things happen when the user takes a specific action. This gives you the chance to control the user, and to prevent them taking actions that you do not want them to do and which might damage your workbook. For example, you may want them to save off their own individual copy of the workbook under another name, so that they do not affect the original, which may be being used by a number of users.
If they close the workbook, then they will automatically be prompted to save their changes. However, the workbook has a ‘BeforeClose’ event and you can enter code to prevent the workbook being closed and firing off a ‘Save’ event. You can then add a button to the worksheet itself and put your own ‘Save’ routine onto it. You can also disable the ‘Save’ routine using the ‘BeforeSave’ event
An understanding of how events work is absolutely essential to a VBA programmer.
Types of Events
Workbook Events – these events are fired off based on what the user does with the workbook itself. They include user actions such as opening the workbook, closing the workbook, saving the workbook, adding or deleting sheet
Worksheet Events – these events are fired off by a user taking actions on a specific worksheet. Every worksheet within the workbook has an individual code module, which contains various events specifically for that worksheet (not for all the worksheets). These include user actions such as changing the contents of a cell, double clicking on a cell, or right clicking on a cell.
Active X Control Events – Active X controls can be added to a worksheet using the ‘Insert’ icon on the ‘Developer’ tab in the Excel ribbon. These are often button controls to enable the user to take various actions under control of your code, but they can also be objects such as drop downs. Using Active X controls as opposed to Form controls on the worksheet gives a whole scope for programmability. Active X controls give you far more flexibility from a programming point of view over using form controls in a worksheet.
For example, you could have two drop down controls on your worksheet. You want the available list in the second drop down to be based on what the user chose in the first drop down. Using the ‘Change’ event on the first drop down, you can create code to read what the user has selected and then update the second drop down. You could also de-activate the second drop down until the user has made a selection in the first drop down
UserForm Events – You can insert and design a professional looking form to use as a pop-up. All the controls that you place on your form are Active X controls and they have the same events as the Active X controls that you might place on a worksheet
Chart Events – These events are only related to a chart sheet and not to a chart appearing as part of a worksheet. These events include resizing the chart or selecting the chart.
Application Events – These use the Application object in VBA. Examples would allow code to be fired off when a certain key is pressed or when a certain time is reached. You could program a situation where the workbook is left open 24/7 and it imports data from an external source overnight at a pre-determined time.
Dangers of Using Code in Events
When you write code to do something when the user takes a certain action, you need to bear in mind that your code could be triggering other events, which could put your code into a continuous loop.
For example, suppose that you use the ‘Change’ event on a worksheet so that when the user puts a value into a cell, a calculation based on that cell is placed into the cell immediately to the right of it.
The problem here is that the placing of the calculated value into the cell triggers another ‘Change’ event, which then in turn triggers yet another ‘Change’ event, and so on until your code has run out of columns to use, and throws up an error message.
You need to think carefully when writing the code for the event to ensure that other events will not be triggered inadvertently
Disable Events
You can use code to disable events to get around this problem. What you will need to do is to incorporate code to disable events whilst your event code is running and then re-enable events at the end of the code. Here is an example of how to do it:
Sub DisableEvents()
Application.EnableEvents = False
Application.EnableEvents = True
End Sub
Bear in mind that this disables all events right across the Excel application, so this would also affect other functions within Excel. If you use this for any reason, make sure that events are switched back on afterwards.
Importance of Parameters in Events
Events usually have parameters which you can use to find out more about what the user is doing and the cell location that they are in.
For example, the Worksheet Change event looks like this:
Private Sub Worksheet_Change(ByVal Target As Range)By using the range object, you can find out the cell row/column coordinates that the user is actually in.
Private Sub Worksheet_Change(ByVal Target As Range)
MsgBox Target.Column
MsgBox Target.Row
End Sub
If you only want your code to work on a certain column or row number, then you add a condition that exits the subroutine if the column is not the required one.
Private Sub Worksheet_Change(ByVal Target As Range)
If Target.Column <> 2 Then Exit Sub
End Sub
This gets around the problem of your code triggering multiple events, since it will only work if the user has changed a cell in column 2 (column B)
Workbook Events Examples (not exhaustive)
The workbook events are found under the ‘ThisWorkbook’ object in the VBE Project Explorer. You will need to select ‘Workbook’ on the first drop down on the code window and then the second drop down will show you all the events available
Workbook Open Event
This event is fired off whenever the workbook is opened by a user. You could use it to put a welcome message to a user by capturing their username
Private Sub Workbook_Open()
MsgBox "Welcome " & Application.UserName
End Sub
You could also check their username against a list held on a hidden sheet to see if they are authorised to access the workbook. If they are not an authorised user, then you can display a message and close the workbook so that they cannot use it.
Workbook New Sheet Event
This event is triggered when a user adds a new sheet to the workbook
You could use this code to only allow yourself to add a new sheet, rather than have different users all adding sheets and making a mess of the workbook
Private Sub Workbook_NewSheet(ByVal Sh As Object)
Application.DisplayAlerts = False
If Application.UserName <> "Richard" Then
        Sh.Delete
End If
Application.DisplayAlerts = True
End Sub
Note that you need to switch off the alerts as a user warning will appear when the sheet is deleted which allows the user to circumvent your code. Make sure that you turn the alerts back on afterwards!
VBA Coding Made Easy
Stop searching for VBA code online. Learn more about AutoMacro — A VBA Code Builder that allows beginners to code procedures from scratch with minimal coding knowledge and with many time-saving features for all users!
Learn More
Workbook Before Save Event
This event is triggered when the user clicks on the ‘Save’ icon, but before the ‘Save’ actually takes place
As described earlier, you may want to prevent users saving their changes to the original workbook, and force them to create a new version using a button on the worksheet. All that you need to do is to change the ‘Cancel’ parameter to True, and the workbook can never be saved by the conventional method.
Private Sub Workbook_BeforeSave(ByVal SaveAsUI As Boolean, Cancel As Boolean)
Cancel = True
End Sub
Workbook Before Close Event
You can use this event to prevent users closing down the workbook, and again force them to exit through a worksheet button. Again, you set the ‘Cancel’ parameter to ‘True’. The red X in the top right-hand corner of the Excel window no longer works any more.
Private Sub Workbook_BeforeClose(Cancel As Boolean)
Cancel = True
End Sub
Worksheet Event Examples (not exhaustive)
The worksheet events are found under the specific sheet name object in the VBE Project Explorer. You will need to select ‘Worksheet’ on the first drop down on the code window and then the second drop down will show you all the events available
VBA Programming | Code Generator does work for you!
Worksheet Change Event
This event is triggered when a user makes a change to a worksheet, such as entering a new value into a cell
You can use this event to put an additional value or comment in next to the changed cell, but as discussed earlier, you do not want to start setting off a loop of events.
Private Sub Worksheet_Change(ByVal Target As Range)
If Target.Column <> 2 Then Exit Sub
ActiveSheet.Cells(Target.Row, Target.Column + 1). Value = _
ActiveSheet.Cells(Target.Row, Target.Column). Value * 1.1
End Sub
In this example, the code will only work if the value is entered into Column B (column 2). If this is true then it will add 10% to the number and place it into the next available cell
Worksheet Before Double Click Event
This event will fire off code if a user double clicks on a cell. This can be extremely useful for financial reports such as a balance sheet or profit & loss account where numbers are likely to be challenged by managers, especially if the bottom line is negative!
You can use this to provide a drill-down facility, so that when the manager challenges a particular number, all they have to do is double click on the number, and the breakdown appears as part of the report.
This is very impressive from a user’s point of view, and saves them constantly asking ‘why is this number so high?’
You would need to write code to find out the heading / criteria for the number (using the Target object properties) and then filter the tabular data and then copy it into the report.
Worksheet Activate Event
This event occurs when the user moves from one sheet to another. It applies to the new sheet that the user is moving to.
It could be used to ensure that the new sheet is completely calculated before the user starts doing anything on it. It can also be used to only re-calculate that particular sheet without re-calculating the entire workbook. If the workbook is large and has complicated formula in it, then re-calculating one sheet saves a lot of time
Private Sub Worksheet_Activate()
ActiveSheet.Calculate
End Sub
Active X Control Events (not exhaustive)
As discussed earlier, you can add Active X controls directly onto a worksheet. These can be command buttons, drop downs, and list boxes
The Active X events are found under the specific sheet name object (where you added the control) in the VBE Project Explorer. You will need to select the name of the Active X control on the first drop down on the code window and then the second drop down will show you all the events available
Command Button Click Event
When you have put a command button onto a spreadsheet, you will want it to take some action. You do this by putting code on the Click event.
You can easily put an ‘Are you sure message?’ on this so that a check is made before your code runs
Private Sub CommandButton1_Click ()
Dim ButtonRet As Variant
ButtonRet = MsgBox("Are you sure that you want to do this?", vbQuestion Or vbYesNo)
If ButtonRet = vbNo Then Exit Sub
End Sub
AutoMacro | Ultimate VBA Add-in | Click for Free Trial!
Drop Down (Combo Box) Change Event
An Active X drop down has a change event, so that if a user selects a particular item from the drop-down list, you can capture their choice using this event and then write code to adapt other parts of the sheet or workbook accordingly.
Private Sub ComboBox1_Change ()
MsgBox "You selected " & ComboBox1.Text
End Sub
Tick Box (Check Box) Click Event
You can add a tick or check box to a worksheet so as to provide option choices for the user. You can use the click event on it to see if the user has changed anything on this. The values returned are True or False according to whether it has been ticked or not.
Private Sub CheckBox1_Click ()
MsgBox CheckBox1.Value
End Sub
UserForm Events (not exhaustive)
Excel provides the ability for you to design your own forms. These can be very useful to use as pop-ups to collect information or to provide multiple choices to the user. They use Active X controls as described previously and have exactly the same events, although the events depend very much on the type of control.
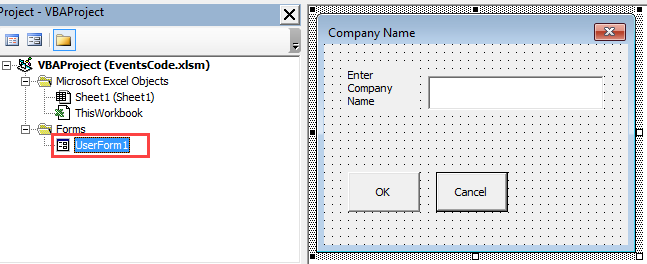
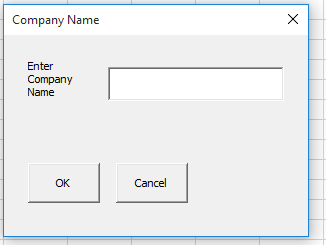
Here is an example of a simple form:
When it is displayed this is what it looks like on screen
You would use events on the form to do things like enter a default company name when the form is opened, to check the company name input agrees to one already in the spreadsheet and has not been mis-spelt, and to add code to the click events on the ‘OK’ and ‘Cancel’ buttons
The code and events behind the form can be viewed by double clicking anywhere on the form
The first drop down gives access to all the controls on the form. The second drop down will give access to the events
AutoMacro | Ultimate VBA Add-in | Click for Free Trial!
UserForm Activate Event
This event is triggered when the form is activated, normally when it is displayed. This event can be used to set up default values e.g. a default company name in the company name text box
Private Sub UserForm_Activate()
TextBox1.Text = "My Company Name"
End Sub
Change Event
Most of the controls on the form have a change event, but in this example, the company name text box can use the event to put a restriction on the length of the company name being entered
Private Sub TextBox1_Change ()
If Len (TextBox1.Text) > 20 Then
    MsgBox "The name is restricted to 20 characters", vbCritical
    TextBox1.Text = ""
 End If
End Sub
Click Event
You can use this event to take action from the user clicking on controls on the form, or even the form itself
On this form there is an ‘OK’ button, and having collected a company name, we would want to place it in a cell on the spreadsheet for future reference
Private Sub CommandButton1_Click ()
ActiveSheet.Range("A1"). Value = TextBox1.Text
Me.Hide
End Sub
This code acts when the user clicks the ‘OK’ button. It puts the value in the company name input box into cell A1 on the active sheet and then hides the form so that user control is returned back to the worksheet.
Chart Events
Chart events only work on charts that are on a separate chart sheet, and not on a chart that is incorporated into a standard worksheet
Chart events are somewhat limited and cannot be used on a worksheet where you might well have multiple charts. Also, users do not necessarily want to switch from a worksheet containing numbers to a chart sheet – there is no immediate visual impact here
The most useful event would be to find out the component of a chart that a user has clicked on e.g. a segment in a pie chart, or a bar in a bar chart, but this is not an event available on the standard range of events.
This problem can be solved by using a class module to add a ‘Mouse Down’ event which will return details of the chart component that the user has clicked on. This is used on a chart within a worksheet.
This involves some very complicated coding, but the results are spectacular. You can create drill downs e.g. the user clicks on a pie chart segment and instantly that chart is hidden and a second chart appears in its place showing a pie chart of detail for the original segment, or you could produce the tabular data supporting that segment of the pie chart.
AutoMacro | Ultimate VBA Add-in | Click for Free Trial!
Application Events
You can use the Application object in VBA to fire off code according to a particular event
Application.OnTime
This can enable you to fire off a piece of code at regular intervals for as long as the workbook is loaded into Excel. You may want to auto-save your workbook to a different folder every 10 minutes, or leave the worksheet running overnight so as to bring in the latest data from an external source.
In this example, a sub routine is entered into a module. It displays a message box to every 5 minutes, although this could easily be another coded procedure. At the same time, it resets the timer to the current time plus 5 more minutes.
Every time it runs, the timer resets to run the same sub routine in another 5 minutes time.
Sub TestOnTime()
MsgBox "Testing OnTime"
Application.OnTime (Now () + TimeValue("00:05:00")), "TestOnTime"
End Sub
Application.OnKey
This function enables you to design your own hot keys. You can make any key combination call a sub routine of your creation.
In this example the letter ‘a’ is redirected so that instead of placing an ‘a’ in a cell, it will display a message box. This code needs to be placed in an inserted module.
Sub TestKeyPress()
Application.OnKey "a", "TestKeyPress"
End Sub
Sub TestKeyPress()
MsgBox "You pressed 'a'"
End Sub
You run the sub routine ‘TestKeyPress’ first of all. You only need to run this once. It tells Excel that every time the letter ‘a’ is pressed it will call the sub routine ‘TestKeyPress’. The sub routine ‘TestKeyPress’ just displays a message box to tell you that you pressed key ‘a’. It could of course load a form or do all sorts of other things.
You can use any key combination that you can use with the ‘SendKeys’ function
To cancel this functionality, you run the ‘OnKey’ statement without the ‘Procedure’ parameter.
Sub CancelOnKey()
Application.OnKey "a"
End Sub
Everything is now back to normal.
An action performed by a user in Microsoft Excel that can trigger the execution of a specified macro
What are VBA Workbook Events?
VBA workbook events are defined as an action performed by a user in Microsoft Excel that can trigger the execution of a specified macro. For example, when a user opens a workbook in Excel, the event “Workbook_Open” is triggered. Similarly, when the user saves the current workbook, the event “Workbook_BeforeSave” is initiated. There are many such events that are built into Excel VBA.
Users can create codes for specific workbook events, such that if the user has specified the code for a particular event that has occurred, VBA will instantly execute the code. The code that is executed when an event occurs is referred to as an event handler.
VBA workbook events allow users can create macros that are automatically executed by Excel when a particular event occurs. They improve user experience, and they make it possible to add interactivity to Excel workbooks.
Summary
- A workbook event is defined as an action that triggers the execution of a specific macro in Excel.
- VBA automatically executes an event once a user specifies the code for an event that has already occurred.
- An example of a VBA worksheet event is Open, which is triggered as soon as a Workbook is activated.
Types of Events in Excel
There are different types of objects in Excel, which can have various events associated with them. Examples of Excel events include Excel itself (application), workbook, worksheet, charts, etc. The events are explained in detail below:
1. Application level events
Application events occur to the Microsoft Office application itself, such as Excel. Examples of application-level events include opening a new workbook, saving the current workbook, or closing one or more of the open workbooks.
2. Workbook level events
Workbook events occur due to the user’s actions on the workbook itself. Examples of such events include creating a new worksheet, opening a workbook, and printing the workbook.
3. Worksheet level events
Worksheet events are events that are triggered when a user performs an action on a worksheet. Examples of worksheet level events include double-clicking on a cell, right-clicking on a cell, changing a cell in the worksheet, changing the color of a worksheet, etc.
4. UserForm level events
UserForm events are events that occur to the UserForm or an object (such as a button or cell) within the UserForm. An example of a UserForm event is clicking a cell in the UserForm.
5. Chart events
Chart events are events that occur on the chart sheet. A chart sheet is different from a worksheet, and its work is to hold charts. Examples of chart events include resizing a chart and changing the selection of a chart.
WorkBook Level Events
Follow the steps below to view the list of workbook events:
- Open the VBA window from the Developer tab.
- Click on “ThisWorkbook” on the left-hand side below the Microsoft Excel Objects to open the code window.
- On the Code window, select Workbook from the drop-down option on the left. It will show the Workbook_Open code in the code window.
- Click the right-hand drop-down to see the list of workbook events.
N.B.: Clicking on any of the events will enter the code for that event on the code window.
Commonly Used VBA Workbook Events
1. Workbook Open
The Workbook Open event occurs when the workbook is accessed. It is the first message that an Excel user will see when the workbook is opened. The event can be modified to show a reminder to the user when a workbook is opened.
It can also be used in the following ways:
- Display a welcome message when the workbook is opened.
- When you want to record the time stamp every time a user opens the workbook.
- When you want to display a reminder to the next user who opens the workbook.
- When you want to display a message on a specific day of the week when the workbook is opened.
2. Workbook BeforeSave Event
The Workbook BeforeSave event is activated when an Excel user saves the current workbook, and it is triggered even before the workbook is saved. The two possible scenarios when the Workbook BeforeSave Event can be triggered include:
- When saving the workbook for the first time – In this case, it will display the Save As dialog box so that the user can specify the preferred location where the file will be saved.
- The workbook is already saved – When such an event is triggered, it will overwrite the changes in the saved version.
3. Workbook BeforeClose Event
The Workbook BeforeClose event is triggered as soon as the workbook is closed. The VBA code is executed regardless of whether the workbook is closed or not. Assuming that the user had not saved the work and gets a prompt asking to save the workbook or cancel and chooses the latter, the workbook will not be saved. However, since the BeforeClose Event has already been triggered, the event code will have already been triggered.
Other VBA Workbook Events will include the following:
- BeforePrint
- Deactivate
- NewSheet
- SheetActivate
- SheetBeforeDelete
- SheetBeforeRightClick
- WindowActivate
- WindowDeactivate
- SheetBeforeDoubleClick
- SheetBeforeRightClick
More Resources
To keep advancing your career, the additional resources below will be useful:
- Excel VBA Examples
- How to Add a VBA Button in Excel?
- How to Debug Code?
- VBA Cell References
- See all Excel resources
Here are some commonly used workbook events.
5 FREE EXCEL TEMPLATES
Plus Get 30% off any Purchase in the Simple Sheets Catalogue!
| Event | Discription |
|---|---|
| ActivateEvent | Occurs when the workbook is activated. |
| BeforeClose | Occurs before the workbook closes. If the workbook has been changed, this event occurs before the user is asked to save changes. |
| BeforePrint | Occurs before the workbook (or anything in it) is printed. |
| BeforeSave | Occurs before the workbook is saved. |
| Deactivate | Occurs when the workbook is deactivated. |
| New | Occurs when a new workbook is created. |
| NewChart | Occurs when a new chart is created in the workbook. |
| NewSheet | Occurs when a new sheet is created in the workbook. |
| Open | Occurs when the workbook is opened. |
| SheetActivate | Occurs when any sheet is activated. |
| SheetChange | Occurs when cells in any worksheet are changed by the user or by an external link. |
| SheetDeactivate | Occurs when any sheet is deactivated. |
| SheetSelectionChange | Occurs when the selection changes on any worksheet. Does not occur if the selection is on a chart sheet. |
| WindowActivate | Occurs when any workbook window is activated. |
| WindowDeactivate | Occurs when any workbook window is deactivated. |
| WindowResize | Occurs when any workbook window is resized. |
Code for workbook events are saved in the ThisWorkbook module.
At the top of the code window change General to Workbook in the first drop down menu.
From the second drop down menu at the top of the code window, select which event you want to write a procedure for.
5 FREE EXCEL TEMPLATES
Plus Get 30% off any Purchase in the Simple Sheets Catalogue!
Example Workbook Event Procedures
The examples below are intended to illustrate the workings of each event rather than to provide commercially useful procedures.
Workbook Open Event
This procedure shows a welcome message in the status bar and window caption. It also presents the user with a welcome message on opening the workbook.
5 FREE EXCEL TEMPLATES
Plus Get 30% off any Purchase in the Simple Sheets Catalogue!
Private Sub Workbook_Open()
Dim UserName As String
UserName = Application.UserName

'Display welcome message on open
MsgBox "Hi There " & UserName & ", the time and date is is " & Now

' Display message in status bar and window caption
Select Case Time
    Case Is < 0.5
        With Application
            .StatusBar = "Good Morning " & UserName _
            & ". You opened this file at " & Time
            .Caption = "Good Morning " & UserName _
            & ". You opened this file at " & Time
        End With
    Case 0.5 To 0.75
        With Application
            .StatusBar = "Good Afternoon " & UserName _
            & ". You opened this file at " & Time
            .Caption = "Good Afternoon " & UserName _
            & ". You opened this file at " & Time
        End With
    Case Is > 0.75
        With Application
            .StatusBar = "Good Evening " & UserName _
            & ". You opened this file at " & Time
            .Caption = "Good Evening " & UserName _
            & ". You opened this file at " & Time
        End With
End Select

'If weekday is Monday display XYZ report reminder
If Weekday(Date) = vbMonday Then _
MsgBox "It's Monday again, you need to file the XYZ Report"
End Sub
New Sheet Event
The New Sheet event creates an argument called Sh. Sh represents the worksheet that has been created. In the example code below we use Sh to name the new sheet.
Sh.Name = SheetName
This example procedure asks the user to name the sheet when it is created. The user input is stored in a variable called SheetName. The date and time the sheet is created is displayed in cell A1.
Private Sub Workbook_NewSheet(ByVal Sh As Object)
Dim SheetName As String
Dim UserName As String
UserName = Application.UserName
SheetName = _
InputBox("You are adding a new sheet.  What would you like to call it?")
Sh.Name = SheetName
Range("A1") = "Sheet Created by " & UserName & " on " & Now
End Sub
Sheet Activate Event
5 FREE EXCEL TEMPLATES
Plus Get 30% off any Purchase in the Simple Sheets Catalogue!
The Sheet Activate event also creates an argument called Sh which represents this worksheet that has just been activated. This procedure displays a welcome message when any sheet is activated.
Private Sub Workbook_SheetActivate(ByVal Sh As Object)
MsgBox "Welcome to worksheet: " & Sh.Name
End Sub
After Save Event
This procedure displays a message confirming the file name and path of the workbook after it has been saved.
Private Sub Workbook_AfterSave(ByVal Success As Boolean)
Dim ThisWorkBookName As String
Dim ThisWorkBookLocation As String
ThisWorkBookName = ActiveWorkbook.Name
ThisWorkBookLocation = ActiveWorkbook.Path
MsgBox "You just saved " & ThisWorkBookName & " to " & ThisWorkBookLocation
End Sub
Before Close Event
The Before Close event creates a Cancel argument which if set to True will prevent the file being closed. In this example the procedure will only let the user close the file if it is home time.
Private Sub Workbook_BeforeClose(Cancel As Boolean)
If Time < "18:00" Then
MsgBox "It's not time to go home yet. Carry on working."
Cancel = True
End If
End Sub
Before Print Event
The Before Print event has an argument called Cancel which can used to cancel the print. The procedure below requires the user to enter a password before printing. They get three attempts: everytime they get the password wrong the Cancel argument is set to True.
The procedure also hides column B and C before printing and then calls a separate procedure to unide them (the UnhideColumnsAfterPrint procedure would be stored in a normal module).
5 FREE EXCEL TEMPLATES
Plus Get 30% off any Purchase in the Simple Sheets Catalogue!
Private Sub Workbook_BeforePrint(Cancel As Boolean)
Dim Password As String
Dim x As Integer
'Ask for password before printing (3 attempts)
For x = 1 To 3
    Password = InputBox("Please enter password to print")
    If Password <> "1234" Then
        Cancel = True
        MsgBox "Sorry that password is not recognised. You have " _
        & 3 - x & " attempts remaining"
        Else: Exit For
    End If
Next x

'Hide columns B and C before printing
Worksheets("Printing With Hidden Columns").Range("B:C")._
EntireColumn.Hidden = True

'Run the UnhideColumnsAfterPrint procedure one second after the event
Application.OnTime EarliestTime:=Now + TimeValue("0:00:01"), Procedure:="UnhideColumnsAfterPrint"
End Sub
Window Resize Event
The Window Resize event has an argument called Wn which represents the workbook’s window. The example procedure maximises the window whenever the user resizes it.
Private Sub Workbook_WindowResize(ByVal Wn As Window)
Wn.Caption = "STOP TRYING TO RESIZE ME!!!!!"
Wn.WindowState = xlMaximized
End Sub
5 FREE EXCEL TEMPLATES
Plus Get 30% off any Purchase in the Simple Sheets Catalogue!
Worksheet Events
Here are some commonly used worksheet events.
| Event | Description |
|---|---|
| ActivateEvent | Occurs when the worksheet is activated. |
| BeforeDoubleClick | Occurs when the worksheet is double-clicked, before the default double-click action. |
| BeforeRightClick | Occurs when the worksheet is right-clicked, before the default right-click action. |
| Calculate | Occurs after the worksheet is recalculated. |
| Change | Occurs when something changes in the Worksheet cells. |
| Deactivate | Occurs when the worksheet loses focus. |
| FollowHyperlink | Occurs when you click any hyperlink on a worksheet. |
| PivotTableUpdate | Occurs after a PivotTable report is updated on a worksheet. |
| SelectionChange | Occurs when the selection changes on a worksheet. |
Worksheet events are placed in the relevant worksheet module.
At the top of the code window change General to Worksheet in the first drop down menu.
From the second drop down menu at the top of the code window, select which event you want to write a procedure for.
Worksheet Change Event Examples
Automatically Save Workbook if Cell’s Value Change
This procedure automatically saves the workbook if any cell in the specified range changes. The If’s condition uses the Intersect method. Intersect, as it name suggests returns the intersecting range of cells that result when two or more ranges overlap. If no cells overlap intersect will return nothing.
5 FREE EXCEL TEMPLATES
Plus Get 30% off any Purchase in the Simple Sheets Catalogue!
Intersect(FirstRange, SecondRange etc)
The procedure is automatically run with the Worksheet Change event. Target is the range that has been changed. The Target range is automatically returned by the Worksheet Change event.
Private Sub Worksheet_Change(ByVal Target As Range)

If Intersect(Target, Range("A1:D10")) Is Nothing Then
    Exit Sub
Else: ThisWorkbook.Save
End If

End Sub
This version will save the workbook if any cell is changed.
Private Sub Worksheet_Change(ByVal Target As Range)

If Intersect(Target, ActiveSheet.UsedRange) Is Nothing Then
    Exit Sub
Else: ThisWorkbook.Save
End If

End Sub
Automatically Add Comments When Cell’s Value Changes
In this example the Worksheet change event triggers a procedure that automatically adds a comment to a cell. The comment includes the date and time of the cell entry, the value entered in the cell and the username of the person who added the enty.
Private Sub Worksheet_Change(ByVal Target As Range)

Dim MyCell As Range
Dim Username As String
Username = Application.Username

'If cell's content is deleted, clear comments
For Each MyCell In Target
    If MyCell.Value = "" Then
        Target.ClearComments
        Exit Sub
    End If
Next MyCell

For Each MyCell In Target

'If cell doesn't have any comments add comment...
If MyCell.Comment Is Nothing Then
    '...displaying current data and time, cell's value and username
    MyCell.AddComment Now & " - " & MyCell.Value & " - " & Username

'If cell already has comment add new text to existing comment, _
do not overwrite.
Else
   MyCell.Comment.Text _
   Text:=vbNewLine & Now & " - " & MyCell.Value & " - " & Username, _
   Start:=Len(Target.Comment.Text) + 1, _
   Overwrite:=False
End If

'Autosize comments
MyCell.Comment.Shape.TextFrame.AutoSize = True

Next MyCell

End Sub
Validate Data on Entry
In this example the Worksheet Change event checks to see that user has entered a numeric value in the range SalesCells. If the value is not numeric a warning message is displayed and the value is deleted.
Private Sub Worksheet_Change(ByVal Target As Range)
Dim rg As Range
Dim SalesCells As Range
Set SalesCells = Range("B4:G13")

'If the cell change is outside the SalesCells range exit procedure
If Intersect(Target, SalesCells) Is Nothing Then Exit Sub

For Each rg In Intersect(Target, SalesCells)
'If cell entry is not numeric delete entry and show message
    If Not IsNumeric(rg) Then
        MsgBox "You must enter a numeric value in this cell"
        Target.ClearContents
        Target.Activate
    End If
Next rg

End Sub
Selection Change Event
In this example, the active cell’s column and row are formatted with a grey background. The formatting occurs on selection change.
5 FREE EXCEL TEMPLATES
Plus Get 30% off any Purchase in the Simple Sheets Catalogue!
Private Sub Worksheet_SelectionChange(ByVal Target As Range)
With Cells
    .Interior.Color = xlNone
    .Font.Color = vbBlack
End With
With ActiveCell
    With .EntireColumn
        .Interior.Color = rgbDarkGrey
        .Font.Color = vbWhite
    End With
    With .EntireRow
        .Interior.Color = rgbDarkGrey
        .Font.Color = vbWhite
    End With
End With
End Sub
Before Delete Event
This procedure prevents deletion of a sheet by temporarily protecting the workbook.
Private Sub Worksheet_BeforeDelete()
ThisWorkbook.Protect
Application.OnTime EarliestTime:=Now, Procedure:="UnProtectBook"
End Sub
5 FREE EXCEL TEMPLATES
Plus Get 30% off any Purchase in the Simple Sheets Catalogue!
OnKey Events
Use the OnKey method to assign shortcut keys to your macros.
Application.OnKey(Key, Procedure)
OnKey Parameters
| Name | Required/Optional | Data Type | Description |
|---|---|---|---|
| Key | Required | String | A string indicating the key to be pressed. |
| Procedure | Optional | Variant | The name of the procedure to be run. If Procedure is «» (empty text), nothing happens when Key is pressed. If Procedure is omitted, Key reverts to its normal result in Microsoft Excel. |
Refer to specific keys using the codes shown below.
| Key | Code |
|---|---|
| BACKSPACE | {BACKSPACE} or {BS} |
| BREAK | {BREAK} |
| CAPS LOCK | {CAPSLOCK} |
| CLEAR | {CLEAR} |
| DELETE or DEL | {DELETE} or {DEL} |
| DOWN ARROW | {DOWN} |
| END | {END} |
| ENTER (numeric keypad) | {ENTER} |
| ENTER | ~ (tilde) |
| ESC | {ESCAPE} or {ESC} |
| HELP | {HELP} |
| HOME | {HOME} |
| INS | {INSERT} |
| LEFT ARROW | {LEFT} |
| NUM LOCK | {NUMLOCK} |
| PAGE DOWN | {PGDN} |
| PAGE UP | {PGUP} |
| RETURN | {RETURN} |
| RIGHT ARROW | {RIGHT} |
| SCROLL LOCK | {SCROLLLOCK} |
| TAB | {TAB} |
| UP ARROW | {UP} |
| F1 through F15 | {F1} through {F15} |
| Combine with | Precede the key code by |
|---|---|
| SHIFT | + (plus sign) |
| CTRL | ^ (caret) |
| ALT | % (percent sign) |
Assign a Custom Keystroke
To assign the shortcut keys automatically when the workbook opens, place the OnKey statements in the ThisWorkbook module in the Workbook Open event procedure.
Private Sub Workbook_Open()
'Setup OnKeys
Application.OnKey "+{F1}", "SHIFTF1"
End Sub
The procedure the shortcut key calls can be placed in a normal module.
Sub SHIFTF1()
Dim User As String
User = Application.Username
ActiveCell = "Created by " & User & " on " & Now
End Sub
Please note that the OnKey assignment applies to all open workbooks.
Unassign a Custom Keystroke
5 FREE EXCEL TEMPLATES
Plus Get 30% off any Purchase in the Simple Sheets Catalogue!
To unassign a custom keystoke, omit the Procedure parameter in the OnKey statement. Place this code in the ThisWorkbook module using the Before Close event procedure.
Private Sub Workbook_BeforeClose(Cancel As Boolean)
'UnAssign OnKeys
Application.OnKey "+{F1}"
End Sub
Disable Built In Excel Keystokes
If you want to disable built in keystokes return an empty text string in the Procedure argument. The following OnKey statement disables ALT F4 which would normally close Excel.
Application.OnKey "%{F4}", ""

