
Word for Microsoft 365 Word 2021 Word 2019 Word 2016 Word 2013 Word 2010 Word 2007 More…Less
You can often improve the look of your document by keeping certain words and paragraphs together on the page or across page breaks. Also, you can use hyphenation to improve overall readability.
Word automatically breaks the text at a space or a hyphen at the end of a line. To keep two words or a hyphenated word together on one line, you can use a nonbreaking space or nonbreaking hyphen instead of a regular space or hyphen.
-
Click where you want to insert the nonbreaking space.
-
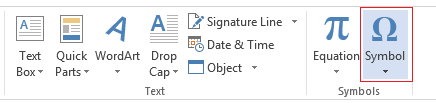
On the Insert tab, in the Symbols group, click Symbol.

-
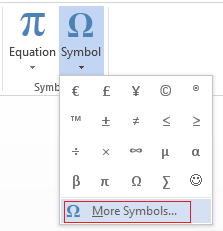
In the box that opens, click More Symbols.
-
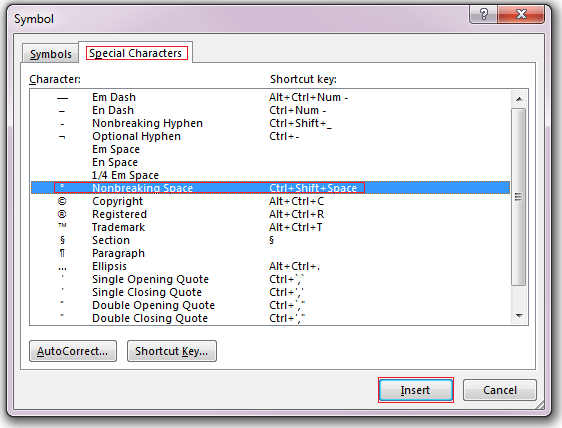
In the Symbol dialog box, on the Special Characters tab, click the Nonbreaking Space row to highlight it, and then click Insert.
-
Click Close.
Tip: You can also use the keyboard shortcut. Click where you want to insert the nonbreaking space, and press Ctrl+Shift+Spacebar.
Sometimes you want a hyphenated word to stay together on one line, without it breaking across lines.
-
Click where you want to insert the nonbreaking hyphen.
-
On the Insert tab, in the Symbols group, click Symbol.
-
In the box that opens, click More Symbols.
-
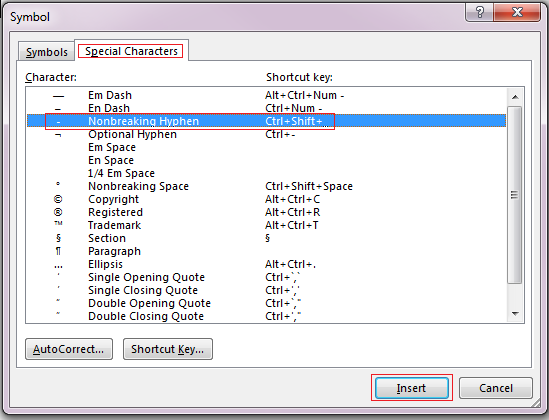
In the Symbol dialog box, on the Special Characters tab, click the Nonbreaking Hyphen row to highlight it, and then click Insert.
-
Click Close.
Tip: You can also use the keyboard shortcut. Click where you want to insert the nonbreaking hyphen, and press Ctrl+Shift+Minus Sign.
Word automatically breaks paragraphs at the end of a page, so a paragraph that started on one page continues on to the next page. To keep the whole paragraph on the same page, follow these steps.
-
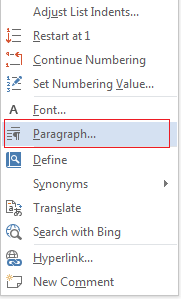
Right-click the paragraph that you want to keep together. In the box that opens, select Paragraph.
-
In the Paragraph dialog box, click the Line and Page Breaks tab.
-
In the Pagination section, select the Keep lines together check box, and click OK.
If two consecutive paragraphs or a subhead and a paragraph are closely related, you might want to keep them on the same page.
-
Right-click the paragraph or subhead that you want to keep with the content that follows it. In the box that opens, select Paragraph.
-
In the Paragraph dialog box, click the Line and Page Breaks tab.
-
In the Pagination section, select the Keep with next check box, and click OK.
Tip: It’s best not to add additional line breaks between your paragraphs because Word interprets each line break as a beginning of a new paragraph, and page breaks might not occur properly. If you want spaces between paragraphs, use the Paragraph Spacing controls. For more information, see Change spacing between paragraphs.
If a paragraph has a page break in the middle so that only the last line appears at the top of the following page, this lonely line is called a “widow.” If, on the other hand, a paragraph has a page break in the middle so that only the first line appears at the bottom of a page while the rest of the paragraph appears on the next page, this lonely line is called an “orphan.”
If you want to avoid widow and orphan lines in your document, follow these steps.
-
Right-click the paragraph in which you want to avoid widows and orphans. In the box that opens, select Paragraph.
-
Click the Line and page breaks tab.
-
In the Pagination section, select the Widow/Orphan control check box.
-
Click OK.
If a word is too long to fit at the end of a line, Microsoft Office Word 2007 moves the word to the beginning of the next line instead of hyphenating it. However, you can use the Hyphenation feature to automatically or manually hyphenate the text, insert optional or nonbreaking hyphens, and set the maximum amount of space allowed between a word and the right margin without hyphenating the word.
With automatic hyphenation, Office Word 2007 automatically inserts hyphens where they are needed. If you edit the document later and change line breaks, Office Word 2007 will re-hyphenate the document.
-
Make sure that no text is selected.
-
On the Page Layout tab, in the Page Setup group, click Hyphenation, and then click Automatic.
An optional hyphen is a hyphen that is used to control where a word or phrase breaks if it falls at the end of a line. For example, you can specify that the word «nonprinting» breaks as «non-printing» instead of «nonprint-ing.» When you insert an optional hyphen in a word that is not at the end of a line, the hyphen will be visible only if you turn on Show/Hide.
-
On the Home tab, in the Paragraph group, click Show/Hide.
-
Click in the word where you want to insert the optional hyphen.
-
Press CTRL+HYPHEN.

To automatically hyphenate part of a document, do the following:
-
Select the text that you want to hyphenate.
-
On the Page Layout tab, in the Page Setup group, click Hyphenation, and then click Automatic.
When you manually hyphenate text, Office Word 2007 searches for text to hyphenate. After you indicate where you want to hyphenate the text, Word inserts an optional hyphen. If you later edit the document and change line breaks, Office Word 2007 displays and prints only the optional hyphens that still fall at the end of lines. Word doesn’t re-hyphenate the document.
-
Select the text you want to hyphenate.
-
On the Page Layout tab, in the Page Setup group, click Hyphenation, and then click Manual.
-
If Office Word identifies a word or phrase to hyphenate, do one of the following:
-
To insert an optional hyphen in the location that Office Word proposes, click Yes.
-
To insert an optional hyphen in another part of the word, move the insertion point to that location, and then click Yes.
-
Nonbreaking hyphens prevent hyphenated words, numbers, or phrases from breaking if they fall at the end of a line of text. For example, you can prevent 555-0123 from breaking; instead, the entire item will move to the beginning of the next line.
-
Click where you want to insert a nonbreaking hyphen.
-
Press CTRL+SHIFT+HYPHEN.
The hyphenation zone is the maximum amount of space Office Word 2007 allows between a word and the right margin without hyphenating the word. You can change the hyphenation zone to make it wider or narrower. To reduce the number of hyphens, make the hyphenation zone wide. To reduce the raggedness of the right margin, make the hyphenation zone narrower.
-
On the Page Layout tab, in the Page Setup group, click Hyphenation, and then click Hyphenation Options.
-
In the Hyphenation zone, type the amount of space you want.
You can remove all automatic hyphenation and each instance of manual hyphenation, such as optional and nonbreaking hyphens.
-
To remove automatic hyphenation, on the Page Layout tab, in the Page Setup group, click Hyphenation, and then click None.

-
To remove manual hyphenation, on the Home tab, in the Editing group, click Replace.
-
If you don’t see the Special button, click More.
-
Click Special, and then click either Optional Hyphen to remove manual hyphens, or Nonbreaking Hyphen to remove nonbreaking hyphens.
-
Leave the Replace box empty.
-
Click Fix Next, Replace, or Replace All.
See Also
Line and page breaks
Insert a page break
Change spacing between paragraphs
Need more help?
Sometimes when we are working on an essay, working paper, research article or any similar project, we have a requirement on the number of words we should use in the text. These requirements are implemented for many reasons. The first is to ensure that the written project is of good quality. If it is too short, it means that not many concepts are covered, or that they are covered superficially. On the other hand, having a very long document can mean that we missed a point and wrote things too generally.
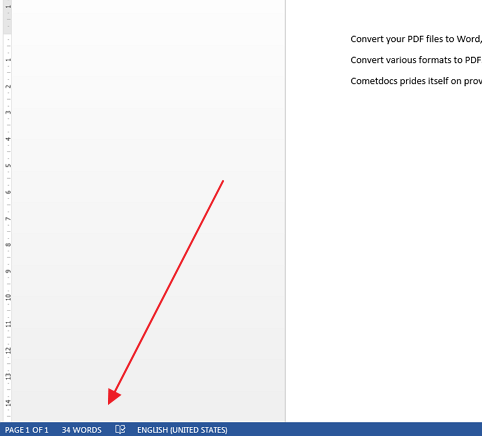
While you type in the Microsoft Word processor, you can always see how many words there are currently in the document by looking at the bottom, as you can see in the image.
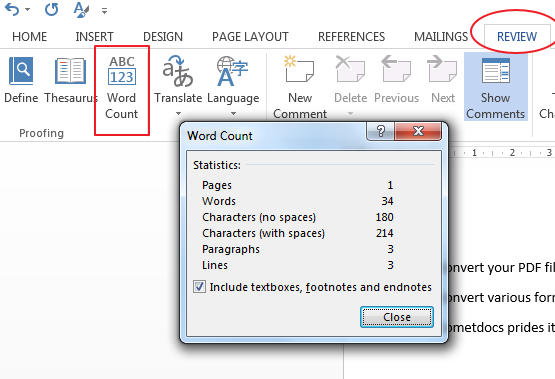
You can always go to Review – Word Count option to count the number of pages, words or characters in the document. You can count the number of words in a selection or in the whole document.
If you want to convert the number of words into a number of pages before you start writing, you can do that too. That way you’ll get a clearer picture of how much work you will have.
We found a pretty good tool to help you see how many pages will be needed for a certain number of words of a specific font, size and spacing.
This is the website: http://www.wordstopages.com/
It is really easy to use: simply type in the number of words, and you will get the number of pages required for that word count.

Need to create a cover page for a report you’re writing? You can create a simple, but professional cover page by centering the text both horizontally and vertically. Centering text horizontally on a page is easy, but vertically? That’s also easy and we’ll show you how.
Before you center the text on your title page, you need to separate the cover page from the rest of your report, so only the text on the cover page gets centered vertically. To do this, put the cursor right before the text you want in the new section and insert a “Next Page” section break.
NOTE: If you have any headers or footers in your report you can omit them from your cover page, while preserving them in the rest of the report, by setting up multiple headers and footers.
RELATED: How to Use Breaks in Microsoft Word to Better Format Your Documents
Once your cover page is in a separate section from the rest of your report, put the cursor anywhere on the cover page.

Click the “Page Layout” tab.
Click the “Page Setup” button in the lower-right corner of the “Page Setup” section of the “Page Layout” tab.
On the “Page Setup” dialog box, click the “Layout” tab.
In the “Page” section, select “Center” from the “Vertical alignment” drop-down list.
Your cover page text is now centered vertically on the page.
Centering text vertically can also improve the appearance of short documents, such as a business letter or a cover letter, or any other type of short document where the contents do not fill up the entire page.
READ NEXT
- › How to Center Text in a Microsoft Word Table
- › Five Types of Phone Damage That Aren’t Covered by Your Free Warranty
- › Save Hundreds on Elegoo’s New PHECDA Laser Engraver Through Kickstarter
- › Spotify Is Shutting Down Its Free Online Game
- › This 64 GB Flash Drive From Samsung Is Just $8 Right Now
- › Why Your Phone Charging Cable Needs a USB Condom
- › Microsoft Outlook Is Adding a Splash of Personalization
How-To Geek is where you turn when you want experts to explain technology. Since we launched in 2006, our articles have been read billions of times. Want to know more?
It is a question that a lot of people think about when writing reports or essays. Students and creative writers, academic and business writers often use either Google Docs or MS Word as their go-to word processing tool. Both tools have a word count feature, but it helps to know approximately how many words fit on a page. However, words per page depend on several factors such as font size, line spacing, margins, number of paragraphs, and even page size. In this article I’ll help you estimate how many words per page there will be when using either Microsoft Office Suite‘s Word or Google Docs for word processing, with some general average word count numbers based on document line spacing, font, subheading usage, and more.
Let’s get started.
Why Worry About How Many Words there are Per Page?
Word count and page numbers can be useful for writers to understand how they can organize their work, ideas, and manage their time.
If you have an 5-page essay assignment for school, you may want to know how many words that will be. Conversely, if you have to write a 2,500 word essay, you may be wondering how many pages you’ll need to write.

The limitation of words can make it easy to know what to expect from a project or assignment, and can ultimately help guide you when making editing decisions on your project later on.
Nowadays, document word count (or page count) can also provide an idea of how long it will take to read a document.
for single, 1.5, or double spaced documents
Google Docs’ default page is the standard letter size of 8.5-inches x 11-inches with 1-inch margins from the top, bottom, left, and right.
Using the font Arial and size 12 and disabling the automatic addition of space between paragraphs gives the following results:
- A single-spaced Google Docs page will have approximately 500 words.
- A 1.5-spaced Google Docs page will have approximately 350 words.
- A double-spaced Google Docs page will have approximately 250 words.
How Many Words per Page in MS Word
for single, 1.5, or double spaced documents
Similar to its competitor, MS Word’s default size of the page is also letter-sized with 1-inch margins from the top, bottom, left, and right.
Using the same font of Arial, size 12 as a guide, we’ll find can fit slightly more words per page. I found the following results:
- A single-spaced Microsoft Word page will have approximately 550 words
- A 1.5 spaced Microsoft Word page will have approximately 375 words
- A double spaced Microsoft Word page will have approximately 275 words
Chart: Average Number of Pages by Word Count
The following chart shows the average number of pages your document will be based on the word count of your document. It compares the two word processing tools Google Docs and Microsoft Word.

To compare these, I set both pages on Google Doc and Microsoft Word at default and used the Arial font, size 12. I also used the same text example as an approximate calculation of words.
| Google Docs | Google Docs | Microsoft Word | Microsoft Word | |
| Word Count | Single Spaced Page Count | Double Spaced Page Count | Single Spaced Page Count | Double Spaced Page Count |
| 250 | 0.5 | 1 | 0.4 | 0.9 |
| 500 | 0.8 | 2 | 0.8 | 1.8 |
| 750 | 1.3 | 3 | 1.4 | 2.7 |
| 1,000 | 1.8 | 4 | 1.8 | 3.6 |
| 1,500 | 2.8 | 6 | 2.7 | 4.5 |
| 2,000 | 3.8 | 8 | 3.7 | 7.3 |
| 2,500 | 4.8 | 10 | 4.6 | 9.2 |
| 3,000 | 5.6 | 12 | 5.5 | 11 |
| 5,000 | 9.5 | 20 | 9.2 | 18.3 |
| 10,000 | 18.9 | 40 | 18.3 | 36.7 |
Chart: Average Number of Words by Page Count
The following chart shows you how many words your document is likely to have based on page count. It includes estimates for both Google Docs and Microsoft Word documents, and includes estimates for both single and double-spaced text.

I used the same text to compare the word count on each page.
| Google Docs | Google Docs | Microsoft Word | Microsoft Word | |
| Page Count | Single Space Word Count | Double Space Word Count | Single Space Word Count | Double Space Word Count |
| 1 | 525 | 265 | 555 | 278 |
| 2 | 1065 | 515 | 1100 | 555 |
| 3 | 1605 | 765 | 1650 | 830 |
| 4 | 2130 | 1015 | 2195 | 1100 |
| 5 | 2655 | 1270 | 2730 | 1375 |
| 6 | 3190 | 1530 | 3280 | 1650 |
| 7 | 3725 | 1780 | 3830 | 1920 |
| 8 | 4245 | 2030 | 4375 | 2195 |
| 9 | 4785 | 2280 | 4920 | 2460 |
| 10 | 5305 | 2530 | 5470 | 2730 |
According to the data, we see that overall, Microsoft Word can accommodate more words on one page.
Other Factors That Affect Word Count & Doc Length
The charts show that the page numbers do not double if your document’s word count doubles. This is because many other factors affect document length in addition to how many words per page your document has.

You’ll also need to consider things like:
- Font Selection
- Text Size
- Margin Width
- Subheading Usage
- The Presence of Images, Charts and Tables
And of course, as the charts above show, a larger line space (double spacing) could translate to more pages for the same amount of words as compared to a reduced line space (single spacing).
Let’s take a closer look at some of these other factors which impact the relationship between document length and word count.
Font
Each font type has been designed differently. Some fonts are larger compared to others. For example, Arial is smaller at font size 12, as compared to Courier New at the same font size.
For comparison, the same number of words for 10 pages with Arial, size 12, increases to 14 pages using Courier New, size 12.
Times New Roman at font size 12 would be a little less than 10 pages. Meanwhile, Calibri at font size 12 would be the same number of pages.
Text Size
Text sizes will also affect each page’s word count.
Bigger sizes reduce the number of words per page. The larger the font, the lesser one can write on each page.
Even using the bold option on the font can change the page. Bold font takes up a few extra pixels than the regular font type does.
Margin Width
Margins are the gaps between the edge of the paper and where words are presented.

By default, on all word processing tools, a margin of 1-inch is around the text on all sides. However, increasing margin sizes reduces the area in which we can type the words.
This reduction of working area decreases the number of words that fit on a page, increasing the number of pages along with it.
Subheadings
Writers often use subheadings as mini-headlines to improve readability and provide more information.
Normally, subheadings leverage a different style if we look at the font and the size we use in the body of the text. To begin with, it can be a larger font size as compared to the other options.
It also takes up extra space because writers have to give a visual break and retain readers’ attention. What stands out is the title that takes up a whole line.
The more subheadings there are in an article, the greater the number of lines we can find in the text. This increases the number of pages as well.
Images, Charts & Tables
Pages on word processing tools are very dynamic. Writers can add images, charts, and tables to supplement their work.
Visual aids often help organize data and summarize what the writer wants to communicate to the reader. Notably, adding visual information takes up space on the page.
It’s important to account for the extra few pages in the page count when approximating pages using visual aids. This helps us plan and format our work more efficiently.
Stop Words from Breaking Across Lines or Pages in Microsoft Word
by Avantix Learning Team | Updated March 14, 2021
Applies to: Microsoft® Word® 2010, 2013, 2016, 2019 and 365 (Windows)
There are many ways to stop words from splitting across lines in Microsoft Word. If Word is inserting hyphens in a word you don’t want to break across lines, you can turn off automatic hyphenation for the paragraph. You can also keep words or characters (numbers or letters) together in Microsoft Word using nonbreaking spaces or nonbreaking hyphens.
To view nonbreaking spaces, nonbreaking hyphens and paragraph marks:
- Click the Home tab in the Ribbon.
- Click the Show/Hide ¶ in the Paragraph group.
You can turn off the symbols by clicking on the same button.
Recommended article: 14 Timesaving Microsoft Word Selection Shortcuts to Quickly Select Text
Do you want to learn more about Microsoft Word? Check out our virtual classroom or live classroom Word courses >
Turning off automatic hyphenation
In Microsoft Word, automatic hyphenation is turned on by default for normal paragraphs (using the Normal style) so Word may insert hyphens and break words across lines.
To stop words from splitting across lines in a paragraph or paragraphs by turning off automatic hyphenation:
- Select the paragraph or paragraphs.
- Click the Home tab in the Ribbon.
- Click the dialog box launcher on the bottom right corner of the Paragraph group. The Paragraph dialog box appears.
- Click Line and Page Breaks.
- Select or check Don’t Hyphenate.
- Click OK.
Below is the Paragraph dialog box with the option to turn off hyphenation:

You can also turn off automatic hyphenation for multiple paragraphs by editing the style for those paragraphs (for example, the Normal style).
Turning off automatic hyphenation for all new documents
If you prefer to turn off automatic hyphenation for new documents, you can change the default settings.
To turn off automatic hyphenation for new documents based on the default Normal template:
- Create a new blank document (this should be based on the Normal template)..
- Click the Home tab in the Ribbon.
- Click the dialog box launcher on the bottom right corner of the Paragraph group. The Paragraph dialog box appears.
- Click Line and Page Breaks.
- Select or check Don’t Hyphenate.
- Click Set As Default. A dialog box appears.
- Select All documents based on the Normal.dotm template. Note that you can select the current document only.
- Click OK twice.
Stop words from breaking across lines using nonbreaking spaces
If you want words or characters to stay together on the same line, you can use nonbreaking spaces instead of standard spaces.
For example, it is unlikely that you would want the following to break across lines or pages:
416 736 2288
3 M
To insert a nonbreaking space between two words or characters using a keyboard shortcut:
- Position the cursor between the two words or characters you want to keep together (there should be no space between these characters).
- Press Ctrl + Shift + Spacebar. Word inserts a nonbreaking space.
To insert a nonbreaking space between two words or letters using the Insert Symbol dialog box:
- Position the cursor between the two words or characters you want to keep together (there should be no space between these characters).
- Click the Insert tab in the Ribbon.
- Click Insert Symbol and then More Symbols in the drop-down menu. A dialog box appears.
- Select the Special Characters tab.
- Select Nonbreaking space and click Insert.
- Click Close. Word inserts a nonbreaking space.
The Insert Symbol dialog box has two tabs (a tab for Symbols and a tab for Special Characters):

Stop words from breaking across lines using nonbreaking hyphens or dashes
You can also use nonbreaking hyphens or dashes to keep words or characters together.
For example, it is unlikely that you would want the following to break across lines or pages:
co-ordinator
416-736-9943
To insert a nonbreaking hyphen between two words or characters using a keyboard shortcut:
- Position the cursor between the two words or characters you want to keep together (there should be no space between these characters).
- Press Ctrl + Shift + Underscore (_). Word inserts a nonbreaking hyphen.
To insert a nonbreaking hyphen between two words or characters using the Insert Symbol dialog box:
- Position the cursor between the two words or characters you want to keep together (there should be no space between these characters).
- Click the Insert tab in the Ribbon.
- Click Insert Symbol and then More Symbols in the drop-down menu. A dialog box appears.
- Select the Special Characters tab.
- Select Nonbreaking hyphen and click Insert.
- Click Close. Word inserts a nonbreaking hyphen.
It’s common to use nonbreaking spaces and hyphens to keep words or characters together in Microsoft Word and in documents in other programs.
Subscribe to get more articles like this one
Did you find this article helpful? If you would like to receive new articles, join our email list.
More resources
How to Insert an Em or En Dash in Microsoft Word
How to View Word Count in Microsoft Word (4 Ways)
How to Find and Replace in Word (and Use Wildcards)
How to Insert a Check Mark or Tick Mark in Word (5 Ways)
Microsoft Word Tricks to Keep Text Together (Paragraphs, Lines or Words)
Related courses
Microsoft Word: Intermediate / Advanced
Microsoft Excel: Intermediate / Advanced
Microsoft PowerPoint: Intermediate / Advanced
Microsoft Visio: Introduction
VIEW MORE COURSES >
Our instructor-led courses are delivered in virtual classroom format or at our downtown Toronto location at 18 King Street East, Suite 1400, Toronto, Ontario, Canada (some in-person classroom courses may also be delivered at an alternate downtown Toronto location). Contact us at info@avantixlearning.ca if you’d like to arrange custom instructor-led virtual classroom or onsite training on a date that’s convenient for you.
Copyright 2023 Avantix® Learning
Microsoft, the Microsoft logo, Microsoft Office and related Microsoft applications and logos are registered trademarks of Microsoft Corporation in Canada, US and other countries. All other trademarks are the property of the registered owners.
Avantix Learning |18 King Street East, Suite 1400, Toronto, Ontario, Canada M5C 1C4 | Contact us at info@avantixlearning.ca
![]()
Download Article
![]()
Download Article
Want to cross out words, letters, or entire sentences in Microsoft Word? We’ll show you how to use strikethrough to cross out any text in your Microsoft Word document using a computer, Android, iPhone, iPad, or Windows tablet.
Things You Should Know
- The strikethrough option is located in the Home tab at the top of Word.
- You can apply a double-line strikethrough using the Font panel’s additional options.
- To remove a strikethrough, highlight the text and click the strikethrough icon. Alternatively, select ‘Clear Formatting’ to remove it.
-
1
Highlight the text you want to strike out. You can do this by clicking and dragging the mouse cursor over the word or phrase.
- Although there is no keyboard shortcut for striking through text, it’ll only take a few seconds to apply the formatting.
-
2
Click the Home tab. If you’re not already on the Home tab, you’ll need to click Home at the top of Word to go there now.
Advertisement
-
3
Click the strikethrough icon. This icon looks like «
ab
» (or «
abc
» in some versions) with a horizontal line through both letters. You’ll see it up near the rest of your font options, such as the options to make words bold and italic. Clicking this icon will cross out all selected text.
- To remove the strikethrough effect, highlight the word or phrase again, and then click the ab icon.
-
4
Apply double-line strikethrough (optional). If you want to cross out the selected word or phrase with two lines instead of one, you can use the double-line strikethrough effect.[1]
Here’s how:- With the word or phrase highlighted, click the small down-arrow on the «Font» panel at the top of the screen.
- Check the box next to «Double strikethrough.»
- Click OK.


Advertisement
-
1
Select the text you want to strike out. To do this, just tap and hold one of the words you want to cross out, and then drag either side of the selection bars until all of the desired text is highlighted.
-
2
Tap the strikethrough icon (Android and Windows tablets only). If you see an icon that has lowercase «
ab
» with a horizontal line crossing through it, you can tap that icon to immediately strike through the selected text. If not, skip to the next step.
-
3
Tap the text formatting icon. It’s the icon of a capital «A» that has three horizontal dots beneath it.[2]
You’ll see this option at the top of the screen if you didn’t see a crossed-out «ab
» icon.
-
4
Tap Strikethrough. This crosses out the selected text.
- If you want to remove the strikethrough effect, select the text again, and then tap the ab icon (if you see it) or tap the text formatting icon and select Clear Formatting.


Advertisement
Ask a Question
200 characters left
Include your email address to get a message when this question is answered.
Submit
Advertisement
Video
Thanks for submitting a tip for review!
About This Article
Article SummaryX
1. Highlight the word or phrase with your mouse cursor.
2. Click the Home tab.
3. Click the icon of a crossed-out «ab.»
Did this summary help you?
Thanks to all authors for creating a page that has been read 395,730 times.
Is this article up to date?
- Remove From My Forums
-
Question
-
Hi everyone.
i want to get all words in a Word Document and List all by ascending order then check the words finally replace wrong word with correct word…
can everyone help me… solutions…suggestions…?
-
Moved by
Sunday, January 23, 2011 6:21 AM
Word, not VSTO-specific (From:Visual Studio Tools for Office)
-
Moved by
Answers
-
Use:
Sub WordFrequency()
Dim SingleWord As String ‘Raw word pulled from doc
Const maxwords = 9000 ‘Maximum unique words allowed
Dim Words(maxwords) As String ‘Array to hold unique words
Dim Freq(maxwords) As Integer ‘Frequency counter for Unique Words
Dim WordNum As Integer ‘Number of unique words
Dim ByFreq As Boolean ‘Flag for sorting order
Dim ttlwds As Long ‘Total words in the document
Dim Excludes As String ‘Words to be excluded
Dim Found As Boolean ‘Temporary flag
Dim j, k, l, Temp As Integer ‘Temporary variables
Dim tword As String ‘
‘ Set up excluded words
‘ Excludes = «[the][a][of][is][to][for][this][that][by][be][and][are]»
Excludes = «»
Excludes = InputBox$(«Enter words that you wish to exclude, surrounding each word with [ ].», «Excluded Words», «»)
‘ Excludes = Excludes & InputBox$(«The following words are excluded: » & Excludes & «. Enter words that you wish to exclude, surrounding each word with [ ].», «Excluded Words», «»)
‘ Find out how to sort
ByFreq = True
Ans = InputBox$(«Sort by WORD or by FREQ?», «Sort order», «FREQ»)
If Ans = «» Then End
If UCase(Ans) = «WORD» Then
ByFreq = False
End If
Selection.HomeKey Unit:=wdStory
System.Cursor = wdCursorWait
WordNum = 0
ttlwds = ActiveDocument.Words.Count
Totalwords = ActiveDocument.BuiltInDocumentProperties(wdPropertyWords)
‘ Control the repeat
For Each aword In ActiveDocument.Words
SingleWord = Trim(aword)
If SingleWord < «A» Or SingleWord > «z» Then SingleWord = «» ‘Out of range?
If InStr(Excludes, «[» & SingleWord & «]») Then SingleWord = «» ‘On exclude list?
If Len(SingleWord) > 0 Then
Found = False
For j = 1 To WordNum
If Words(j) = SingleWord Then
Freq(j) = Freq(j) + 1
Found = True
Exit For
End If
Next j
If Not Found Then
WordNum = WordNum + 1
Words(WordNum) = SingleWord
Freq(WordNum) = 1
End If
If WordNum > maxwords — 1 Then
j = MsgBox(«The maximum array size has been exceeded. Increase maxwords.», vbOKOnly)
Exit For
End If
End If
ttlwds = ttlwds — 1
StatusBar = «Remaining: » & ttlwds & » Unique: » & WordNum
Next aword
‘ Now sort it into word order
For j = 1 To WordNum — 1
k = j
For l = j + 1 To WordNum
If (Not ByFreq And Words(l) < Words(k)) Or (ByFreq And Freq(l) > Freq(k)) Then k = l
Next l
If k <> j Then
tword = Words(j)
Words(j) = Words(k)
Words(k) = tword
Temp = Freq(j)
Freq(j) = Freq(k)
Freq(k) = Temp
End If
StatusBar = «Sorting: » & WordNum — j
Next j
‘ Now write out the results
tmpName = ActiveDocument.AttachedTemplate.FullName
Documents.Add Template:=tmpName, NewTemplate:=False
Selection.ParagraphFormat.TabStops.ClearAll
With Selection
For j = 1 To WordNum
.TypeText Text:=Words(j) & vbTab & Trim(Str(Freq(j))) & vbCrLf
Next j
End With
ActiveDocument.Range.Select
Selection.ConvertToTable
Selection.Collapse wdCollapseStart
ActiveDocument.Tables(1).Rows.Add BeforeRow:=Selection.Rows(1)
ActiveDocument.Tables(1).Cell(1, 1).Range.InsertBefore «Word»
ActiveDocument.Tables(1).Cell(1, 2).Range.InsertBefore «Occurrences»
ActiveDocument.Tables(1).Range.ParagraphFormat.Alignment = wdAlignParagraphCenter
ActiveDocument.Tables(1).Rows.Add
ActiveDocument.Tables(1).Cell(ActiveDocument.Tables(1).Rows.Count, 1).Range.InsertBefore «Total words in Document»
ActiveDocument.Tables(1).Cell(ActiveDocument.Tables(1).Rows.Count, 2).Range.InsertBefore Totalwords
ActiveDocument.Tables(1).Rows.Add
ActiveDocument.Tables(1).Cell(ActiveDocument.Tables(1).Rows.Count, 1).Range.InsertBefore «Number of different words in Document»
ActiveDocument.Tables(1).Cell(ActiveDocument.Tables(1).Rows.Count, 2).Range.InsertBefore Trim(Str(WordNum))
System.Cursor = wdCursorNormal
j = MsgBox(«There were » & Trim(Str(WordNum)) & » different words «, vbOKOnly, «Finished»)
Selection.HomeKey wdStoryEnd Sub
— Hope this helps.Doug Robbins — Word MVP,
dkr[atsymbol]mvps[dot]org
Posted via the Community Bridge«Adnan Ebrahimi» wrote in message news:8ddb02da-d954-40f4-b4a5-403fa8fa5a69@communitybridge.codeplex.com…
Hi everyone.
i want to get all words in a Word Document and List all by ascending order then check the words finally replace wrong word with correct word…
can everyone help me… solutions…suggestions…?
Doug Robbins — Word MVP dkr[atsymbol]mvps[dot]org
-
Marked as answer by
Bessie Zhao
Monday, February 7, 2011 10:02 AM
-
Marked as answer by
-
Hi Abdan
If you’re working with the Word object model, going through the .NET/COM, Word OLE interface, and given the speed of processing in that interface, I don’t think you can get anything faster than what you’ve got. It’s the nature of the thing you’re doing.
Possibly, if the file is in the Office 2007/2010 Open XML file format (docx, for example) you can work with that file as you would any XML file. But we can’t help you here with that. You’ll find more information on Open XML file format at openXMLDeveloper.org
Cindy Meister, VSTO/Word MVP
-
Marked as answer by
Bessie Zhao
Monday, February 7, 2011 10:02 AM
-
Marked as answer by
If you need to put each Heading 1 at the beginning of a new page, you
can customize the existing Heading 1 style or create a new
Heading style to put page breaks before the heading. Microsoft Word
automatically inserts page breaks for such style.

See also
how to start a new part of a document on an odd page.
To add the page breaks into the existing style Heading 1,
do the following:
1. To open the Modify Style dialog, do one of
the following:
- On the Home tab, in the Styles group, right-click on the
Heading 1 style and choose Modify… in the popup menu:
- On the Home tab, in the Styles group, click the dialog box launcher:

On the Styles pane, right-click on the Heading 1 style
and choose Modify… in the popup menu:


2. In the Modify Style dialog box, click the
Format button and then choose Paragraph…:

3. In the Paragraph dialog box, on the
Line and Page Breaks tab, select the Page break before option:

4. Click OK twice.
After saving the style, all paragraphs with the style Heading 1 in
the current document will start from a new page.
To create a new style that will start from on a new page, do the following:
1. On the Home tab, in the Styles group, click the dialog box launcher:

2. On the Styles pane, click the New Style button:

3. In the Create New Style from Formatting
dialog box:
- Type the name of the new style or leave the proposed,
- Choose any other settings you prefer,
- Click the Format button and then choose Paragraph…:

4. In the Paragraph dialog box, on the
Line and Page Breaks tab:
- Select the Page break before option:
- Choose any other settings you like.
5. Click OK twice.
After saving the new style, simply apply this style for each heading that you want
to start from a new page.
See also this tip in French:
Comment mettre Titre 1 sur la nouvelle page.