
It’s super frustrating when you’ve been creating your perfect Resume / CV in Word (for what seems like hours) only for when you save it to have large chunks of your carefully written text to totally disappear “What the heck — where did all my text go!” or “Why do parts of my Word document keep disappearing?” I hear you cry. Fear not, with the following simple fix you should get all your hard work back in seconds.
Firstly what causes this to happen? Well, it seems MS Word might have a little bug, you see when you save your document with a text box selected it causes some of the layers and text boxes on the page to reorder. This can mean that text appears to just get deleted when in fact it’s still there but just hidden from view. From testing this issue it’s intermittent and doesn’t happen all the time therefore it’s difficult to get to the root cause.
This is how to fix it…
METHOD 1 — Use the selection pane to reorder your layers:
-
Click Layout > Selection Pane from the menu bar
-
A sidebar appears on the right, this is the order of your elements on your page, those at the top are at the front, those at the bottom are at the back
-
Starting from the top use the eye icon next to each element to reveal those hidden towards the back
-
When you find the element causing the obstruction, drag the element down the sidebar and position at the bottom.
METHOD 2 — Edit elements within the page:
-
Click on the page where your text used to be
-
Hold shift and press the down arrow, this will highlight the object or text box in the way
-
Right click (or Ctrl click for Mac users) on the edge of the element, you should see a thin line, your cursor will change when you roll over it
-
Select the «Send to back» option which appears roughly half way down the popup menu
-
Hey presto your text should reappear as if by magic
Success! Your work all back in one piece.
So, to avoid this happening again, just make sure none of your objects or text boxes are selected when saving and that should do the trick.
Found this helpful?
We’re an advert free platform and therefore rely on the support from our users, if you can please donate or spread the word on the Career Improvement Club Project using the links below…
Press J to jump to the feed. Press question mark to learn the rest of the keyboard shortcuts
Log In
Found the internet!
Feeds
HomePopular
Topics
ValheimGenshin ImpactMinecraftPokimaneHalo InfiniteCall of Duty: WarzonePath of ExileHollow Knight: SilksongEscape from TarkovWatch Dogs: Legion
NFLNBAMegan AndersonAtlanta HawksLos Angeles LakersBoston CelticsArsenal F.C.Philadelphia 76ersPremier LeagueUFC
GameStopModernaPfizerJohnson & JohnsonAstraZenecaWalgreensBest BuyNovavaxSpaceXTesla
CardanoDogecoinAlgorandBitcoinLitecoinBasic Attention TokenBitcoin Cash
The Real Housewives of AtlantaThe BachelorSister Wives90 Day FianceWife SwapThe Amazing Race AustraliaMarried at First SightThe Real Housewives of DallasMy 600-lb LifeLast Week Tonight with John Oliver
Kim KardashianDoja CatIggy AzaleaAnya Taylor-JoyJamie Lee CurtisNatalie PortmanHenry CavillMillie Bobby BrownTom HiddlestonKeanu Reeves
Animals and PetsAnimeArtCars and Motor VehiclesCrafts and DIYCulture, Race, and EthnicityEthics and PhilosophyFashionFood and DrinkHistoryHobbiesLawLearning and EducationMilitaryMoviesMusicPlacePodcasts and StreamersPoliticsProgrammingReading, Writing, and LiteratureReligion and SpiritualityScienceTabletop GamesTechnologyTravel
Create an account to follow your favorite communities and start taking part in conversations.
r/MacOS
PostsmacOS Beta Subreddit
macOS 13 Releases
macOS 12 Releases
macOS 11 Releases
1
Posted by2 years ago
![]()
Does anyone have their content disappearing when using Microsoft Word on Big Sur?
I’m using a 2018 MBP.

1 comment
100% Upvoted
|
![]()
level 1
Op · 2 yr. ago
https://answers.microsoft.com/en-us/msoffice/forum/all/paragraphs-disappear-when-i-type-in-word-for-mac/24428e0f-6c82-4a71-a61d-0d4b7c39254a
I found this, so I am not the only one!
1
More posts from the MacOS community
Continue browsing in r/MacOS
About Community

r/MacOS
Reddit’s Home to Apple’s Latest Operating System!
Created Aug 26, 2010
258k
Members
353
Online
Top 1%
Ranked by Size


Top posts december 11th 2020Top posts of december, 2020Top posts 2020
By Editorial Team
Updated September 09, 2022
i dolgachov/iStock/GettyImages
Letters can seem to disappear in Word if you’re typing in overtype mode or have a borderless text box covering text. Words can also disappear if you have field codes in a document, or if text color matches the background color of your document. Each of these problems has a solution for restoring text visibility.
Disable Overtype in Word
Typing in overtype mode can cause the letters in your Word documents to disappear, according to Microsoft. If you’re wondering why «when I type it deletes letters,» it’s because in this mode, anything you type replaces text instead of inserting new text. Word offers the option of disabling overtype mode through its «Options» dialog box.
Click the «File» menu, then click «Options» to open that dialog. Click the «Advanced» tab, then click the «Use Overtype» check box under the «Editing» heading to clear that check box. Click «OK» to dismiss the dialog box and resume typing without interference from overtype mode.
Check for a Borderless Text Box
If a borderless shape or text box is covering your text, words in your documents will seem to disappear. To observe this effect, click the «Insert» tab, then click the «Text Box» command and drag on the screen to create a text box. Right-click the text box, then click «Format.» Click the white color from the «Color» drop-down box under the Line heading, then click «OK» to close the dialog box.
The text box effectively disappears, but prevents any text under the box from displaying. To determine if this is the reason for your text disappearing, enter the VBA programming environment, then paste the following program into the central window. Press «F5» to run the program, which places a black dashed border around all text boxes.
Sub showTextboxes() Dim tbox, i For i = 1 To ActiveDocument.Shapes.Count Set tbox = ActiveDocument.Shapes(i) If tbox.Type = msoTextBox Then With tbox.Line .DashStyle = msoLineDash .ForeColor.RGB = RGB(0, 0, 0) End With End If Next i End Sub
Hide Field Codes
OfficeToolTips explains that letters in a table of contents or index can disappear if you press «Alt» and «F9» simultaneously. This keystroke tells Word to reveal or hide field codes, which are dynamic text elements that add content to your documents, such as tables of contents and indexes. When you press the keystroke just mentioned, Word makes all field codes display their true appearance, which consists of curly braces enclosing cryptic text, like «XE» for index entries.
This appearance prevents the display of the text that the field code generates, such as an index. To restore your hidden text, press «Alt» and «F9» simultaneously once again to flip the field codes back to their other display mode.
Check Your Text Color
Letters can disappear if their color matches the background color, which is usually white. To observe this problem, click the «A» icon on Word’s Home tab, then click the white color from the palette that appears. Anything you type results in new content for the document, but you won’t see that content until you restore its default color of black.
To restore black text, double-click the hidden text, then press «Control» and «Space» simultaneously. This action tells Word to restore text to the default formatting for the style of that text. This could be the issue if you have problems such as missing words when typing, but not that typing deletes the next letter (which is a symptom of overwrite mode).
I am currently setting up some MS Word templates in Word 2010 and have encountered a problem, where text suddenly disappears at the end of a paragraph.
The problem only occurs in some specific scenarios, but I have experienced that it can be recreated in a lot of different ways. I have not, however, been able to pinpoint the exact reason why this happens. Therefore, I would like to find the specific reason, that makes the issue occur, in order to avoid it.
It seems that a combination of the existence of wrapped tables, content in the page header and a certain length of a line can invoke the issue.
To recreate a document where this issue occurs, please follow this procedure:
- Open a new document in Word 2010.
- Copy the code below into a new module in the VBA editor.
- Run the
A_ReplicateScenariomacro to insert example content in the document. - Place the cursor at the end of line 3 (the line that ends close to the margin).
- Type a new sentence after the dot, beginning with a space.
The text that you have typed, will disappear when the margin is reached.
The text will then be shown if for instance a character is deleted from the original text (i.e. from the beginning of the line) or if a formatting change is made (e.g. clear formatting). The ‘Show all’ setting in Word can also sometimes display the text, but will only display it while ‘Show all’ is activated. Other times Word will display ‘ghosted’ double lines which can not be selected.
A short video of the replicated issue can be viewed here: https://youtu.be/Bqp9STDRkXc
Sub A_ReplicateScenario()

    Call SetUpNormalStyle
    Call InsertBodyTextLines
    Call InsertHeaderTextLines
    Call InsertWrappedTables
    Call SetUpMargins
    Call InsertExampleBodyText

End Sub

Sub SetUpNormalStyle()

    With ActiveDocument.Styles("Normal").Font
        .Name = "Arial"
        .Size = 10
    End With
    With ActiveDocument.Styles("Normal").ParagraphFormat
        .SpaceAfter = 0
        .LineSpacingRule = wdLineSpaceAtLeast
        .LineSpacing = 12
    End With

End Sub

Sub InsertBodyTextLines()

    For i = 1 To 4
        Selection.TypeParagraph
    Next

End Sub

Sub InsertHeaderTextLines()

    If ActiveWindow.View.SplitSpecial <> wdPaneNone Then
        ActiveWindow.Panes(2).Close
    End If
    If ActiveWindow.ActivePane.View.Type = wdNormalView Or ActiveWindow. _
        ActivePane.View.Type = wdOutlineView Then
        ActiveWindow.ActivePane.View.Type = wdPrintView
    End If

    ActiveWindow.ActivePane.View.SeekView = wdSeekCurrentPageHeader

    For i = 1 To 26
        Selection.TypeParagraph
    Next

    ActiveWindow.ActivePane.View.SeekView = wdSeekMainDocument

End Sub

Sub InsertWrappedTables()

    Selection.HomeKey Unit:=wdStory

    ActiveDocument.Tables.Add Range:=Selection.Range, NumRows:=1, NumColumns:=1, DefaultTableBehavior:=wdWord9TableBehavior, AutoFitBehavior:=wdAutoFitFixed
    With Selection.Tables(1).Rows
        .WrapAroundText = True
        .HorizontalPosition = CentimetersToPoints(2)
        .RelativeHorizontalPosition = wdRelativeHorizontalPositionPage
        .VerticalPosition = CentimetersToPoints(4.5)
        .RelativeVerticalPosition = wdRelativeVerticalPositionPage
    End With
    Selection.Tables(1).Columns(1).PreferredWidthType = wdPreferredWidthPoints
    Selection.Tables(1).Columns(1).PreferredWidth = CentimetersToPoints(11)

    Selection.MoveDown Unit:=wdLine, Count:=1

    ActiveDocument.Tables.Add Range:=Selection.Range, NumRows:=1, NumColumns:=1, DefaultTableBehavior:=wdWord9TableBehavior, AutoFitBehavior:=wdAutoFitFixed
    With Selection.Tables(1).Rows
        .WrapAroundText = True
        .HorizontalPosition = CentimetersToPoints(10)
        .RelativeHorizontalPosition = wdRelativeHorizontalPositionPage
        .VerticalPosition = CentimetersToPoints(8)
        .RelativeVerticalPosition = wdRelativeVerticalPositionPage
    End With
    Selection.Tables(1).Columns(1).PreferredWidthType = wdPreferredWidthPoints
    Selection.Tables(1).Columns(1).PreferredWidth = CentimetersToPoints(9)

End Sub

Sub SetUpMargins()

    With ActiveDocument.PageSetup
        .TopMargin = CentimetersToPoints(3.8)
        .BottomMargin = CentimetersToPoints(2.8)
        .LeftMargin = CentimetersToPoints(2.3)
        .RightMargin = CentimetersToPoints(1.5)
    End With

End Sub

Sub InsertExampleBodyText()

    With Selection
        .HomeKey Unit:=wdStory
        .MoveDown Unit:=wdLine, Count:=3

        .TypeText Text:="Ouwouwouwoiwoiuwoiuwoiuwoiuwoiuwoiuwoiw oiwu oiwu owiu woiu woiuw oiwu owiu owiu ww."
        .TypeParagraph
        .TypeText Text:="Woiuwoiuwoiuw."
    End With

End Sub

on
December 12, 2006, 12:00 AM PST
How to recover disappearing table text in Word
When working with tables in Word, your text may disappear, but it’s not gone forever. Mary Ann Richardson teaches you how to get around this irritating feature by recovering disappearing table text.
Do you ever notice that your table text disappears after you
perform certain operations in Word? For example, when you click and drag a row
to move it to another part of the table, instead of moving the whole row, it
replaces the contents of existing cells in the destination row. This usually
occurs because when you click and drag across a row, you may have selected only
the cells in the row, not the entire row. To select the entire row, you must
also select the invisible end-of-row marker. Here’s how:
- Click
the Show/Hide button in the Standard toolbar. - Move
the mouse to the left margin; when the pointer becomes a white arrow,
point to the row you want to move and right-click. - Click
Cut. - Point
the white arrow toward the row below the insertion point. - Right-click
and select Paste.
Using the white arrow pointer to select (rather than click
and drag) gives you more control when selecting the end-of-row marker. With the
Show/Hide button on, you can see for sure whether you have selected both the
cells and the end-of-row marker for the row.
Miss a tip?
Check out the Microsoft Word archive, and catch up on our most recent Word tips.
Help users increase productivity by automatically signing up for TechRepublic’s free Microsoft Office Suite newsletter, featuring Word, Excel, and Access tips, delivered each Wednesday.
-
Software
I have relied heavily on Googling for fixes to all of Microsoft Word’s irritating glitches and bugs, so I am doing some «giving back» here.
I’m using Microsoft Office 2008 for the Mac, and I kept having text inside the last row of a table go invisible. It’s there sort of, it shows up in the Print Preview, and strangely the last line of the text in each cell of that row CAN be seen. I even tried making my table in another document, then copying and pasting it over and the text still vanished upon pasting. I saw some people complaining about this online but no fixes.
My eventual solution was to insert another row below the bottom one and make its height as small as I could. (0.2″) As soon as the offending row was not the last, the text came back. If your table has a border, you may have to get rid of it around just those cells. In fact, for me that screwed up the rest of my borders, so I had to make those borders the same as my background color (white in this case) so the last row could not be seen.
I also noticed a bizarre bug where only the CENTER cell of my last row then looked like the text was doubled up, making it look bold. My table was inside of a text box, and when I stretched the bottom of the text box to accommodate the bigger table, that problem disappeared too.
There you go internet: another tip for coping with Word. Perhaps someone will find this and it will save them a few hours of headache.
![]()
Written by Allen Wyatt (last updated July 21, 2020)
This tip applies to Word 2007, 2010, 2013, and 2016
When Fred spell-checks his document, he often chooses to add words to the dictionary. However, this action seems to have a limited life on his system. He frequently finds he has to add the same words to the custom dictionary again and again. Fred has not set up multiple custom dictionaries on his system, so he doesn’t understand what would cause the previously added words to suddenly disappear, requiring them to be added again. Fred wonders how he can persuade Word to permanently remember his specialized words as being spelled correctly.
What seems to be going on here is that, apparently, Microsoft has changed how custom dictionaries work in Word, and they never bothered to tell anyone. Here is the way that you display what custom dictionaries are available to your Word installation:
- Display the Word Options dialog box. (In Word 2007 click the Office button and then click Word Options. In Word 2010 and later versions display the File tab of the ribbon and then click Options.)
- Click Proofing at the left side of the dialog box.
- Click the Custom Dictionaries button. Word displays the Custom Dictionaries dialog box. (See Figure 1.)
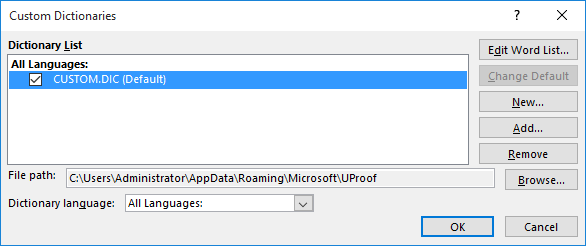
Figure 1. The Custom Dictionaries dialog box.
The screen shot shown above is exactly how my Custom Dictionaries dialog box appeared back in December 2015. If I now (in October 2016) perform the exact same steps, the Custom Dictionaries dialog box—on the exact same system—looks different. (See Figure 2.)
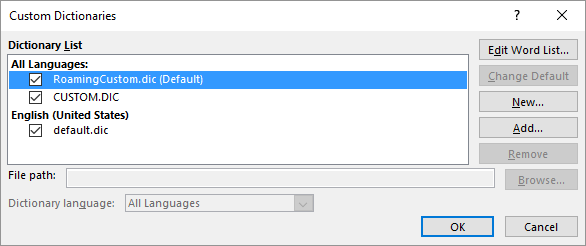
Figure 2. The new Custom Dictionaries dialog box.
The important thing to note here is that an entirely different custom dictionary is marked as «default» than a few months ago. This new dictionary (RoamingCustom.dic) was not one I created; Word apparently created it automatically, presumably in some update to my version of Word. Not only was it created without my knowledge, but it was marked as the default dictionary without any action on my part.
The upshot is that when the change occurs, how Word handles custom words can become a bit flakey. If you display the Custom Dictionaries dialog box, and a check mark doesn’t appear next to Custom.dic, then any words you added over the years into that dictionary won’t be available during spell checks. (I suspect this is what is happening with Fred’s custom dictionary woes.) Further, the dictionary marked as the default (which, nowadays, seems to be RomaingCustom.dic) is where any new words are added.
There are two possibilities to help correct the issue. First, display the Custom Dictionaries dialog box and make sure that check marks appear next to the dictionaries as they should. Second, if Word, over time, keeps «unchecking» Custom.dic without your permission or explicit action, you might consider opening the dictionary (select it and click the Edit Word List button), copying all the words from the list, opening RoamingCustom.dic, and pasting the words into it. Then you can get rid of the old Custom.dic file and your words should always be available since Word seems so intent on making RoamingCustom.dic the default.
By the way, if you are an old-school type of user and you want to edit your custom dictionaries using Notepad, I’ve seen some reports that RoamingCustom.dic doesn’t show up in any file searches in Windows. You can track it down using this path as a pattern:
C:UsersusernameAppDataRoamingMicrosoftOfficevernumberProofing
There are three variables in this pattern: username, ver, and number. The username variable will be equal to whatever your username is; the one you used when you logged into Windows. The ver variable is going to vary depending on the version of Word you are using; it will be something like 15.0 or 16.0. Finally, the number variable is some unique number dreamed up by Microsoft for who knows what purpose. If you use Windows Explorer (Windows 7) or File Explorer (later versions of Windows) to dig down and navigate to the folder, you should be able to discern which unique number is being used on your system.
WordTips is your source for cost-effective Microsoft Word training.
(Microsoft Word is the most popular word processing software in the world.)
This tip (13478) applies to Microsoft Word 2007, 2010, 2013, and 2016.
Author Bio
With more than 50 non-fiction books and numerous magazine articles to his credit, Allen Wyatt is an internationally recognized author. He is president of Sharon Parq Associates, a computer and publishing services company. Learn more about Allen…
MORE FROM ALLEN
Accepting Only a Single Digit
Want a quick way to enter a series of single digits into consecutive cells? The best approach is with a macro, and this …
Discover More
Columns in a Text Box
Want to divide a text box into columns? Word doesn’t allow you to do this, but there are ways to work around the limitation.
Discover More
Creating Worksheets with a Macro
Using a macro to add worksheets to your workbook is easy. This tip provides two different methods you can use.
Discover More