Excel for Microsoft 365 Word for Microsoft 365 Outlook for Microsoft 365 PowerPoint for Microsoft 365 Excel 2021 Word 2021 Outlook 2021 PowerPoint 2021 Excel 2019 Word 2019 Outlook 2019 PowerPoint 2019 Excel 2016 Word 2016 Outlook 2016 PowerPoint 2016 Excel 2013 Word 2013 Outlook 2013 PowerPoint 2013 Excel 2010 Word 2010 Outlook 2010 PowerPoint 2010 More…Less
You can zoom in to get a close-up view of your file or zoom out to see more of the page at a reduced size. You can also save a particular zoom setting.
Quickly zoom in or out
-
On the status bar of your Office app, click the zoom slider.
-
Slide to the percentage zoom setting that you want. Click — or + to zoom in gradual increments.
Note: In Outlook, the zoom slider zooms only the content in the Reading Pane.
Click the headings below for more information.
Note: This procedure isn’t available in Excel for the web. As a workaround, consider opening the file in Excel Desktop to change the setting.
You can choose how much of a document, presentation, or worksheet you view on the screen.
In Word
Do one of the following:
-
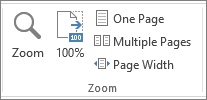
On the View tab, in the Zoom group, click Zoom 100%. This returns the view to 100% zoom.
-
On the View tab, in the Zoom group, click One Page, Multiple Pages, or Page Width.
-
On the View tab, in the Zoom group, click Zoom, and then enter a percentage or choose any other settings that you want.
In PowerPoint
Do one of the following:

-
On the View tab, in the Zoom group, click Fit to Window, which changes the current slide to the size of your PowerPoint window.
Note: There also is a Fit to Window button near the zoom slider on the status bar.
-
On the View tab, in the Zoom group, click Zoom, and then enter a percentage or choose any other settings that you want.
In Excel
Do one of the following:
-
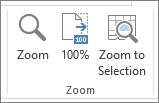
On the View tab, in the Zoom group, click Zoom 100%.
-
On the View tab, in the Zoom group, click Zoom to Selection, which maximizes the view of cells that you’ve selected.
-
On the View tab, in the Zoom group, click Zoom, and then enter a percentage or choose any other settings that you want.
In Outlook
In the main Outlook window, the zoom slider is the only way to zoom in or out. When you are reading or editing a message, zoom from the ribbon:
-
In an open message, on the Message tab, in the Zoom group, click Zoom.
-
In the Zoom dialog box, enter a percentage or choose any other settings that you want.
Notes:
-
Word doesn’t save zoom settings in documents. Instead, it opens a document at the last zoom level you used.
-
Excel for the web doesn’t support saving the zoom level, because the View tab doesn’t have a Zoom group, so you must use the status bar to change the zoom level. As a workaround, consider opening the file in Excel Desktop to save the zoom level using the following procedure.
-
Open the presentation or worksheet that you want to save with a particular zoom setting.
-
On the View tab, in the Zoom group, click Zoom.
-
Choose the setting that you want.
-
Click Save.
Keyboard shortcut: Ctrl+S
-
In Word, Outlook, PowerPoint or Excel, on the status bar, click the zoom slider
.
-
Slide to the percentage zoom setting that you want. Click the — or + buttons to zoom in gradual increments.
Note: In Outlook, the zoom slider zooms only the content in the Reading Pane.
You can choose how much of a document, presentation, or worksheet you view on the screen.
In Word
Do one of the following:
-
On the View tab, in the Zoom group, click Zoom 100%. This returns the view to 100% zoom.
-
On the View tab, in the Zoom group, click One Page, Two Pages, or Page Width.
-
On the View tab, in the Zoom group, click Zoom, and then enter a percentage or choose any other settings that you want.
In Microsoft PowerPoint
Do one of the following:
-
On the View tab, in the Zoom group, click Fit to Window, which changes the current slide to the size of your PowerPoint window.
Note: There also is a Fit to Window button near the zoom slider on the status bar.
-
On the View tab, in the Zoom group, click Zoom, and then enter a percentage or choose any other settings that you want.
In Excel
Do one of the following:
-
On the View tab, in the Zoom group, click Zoom 100%.
-
On the View tab, in the Zoom group, click Zoom to Selection, which maximizes the view of cells that you’ve selected.
-
On the View tab, in the Zoom group, click Zoom, and then enter a percentage or choose any other settings that you want.
In Outlook
In the main Outlook window, the zoom slider is the only way to zoom in or out. When you are reading or editing a message, zoom from the ribbon:
-
In an open message, on the Message tab, in the Zoom group, click Zoom.
-
In the Zoom dialog box, enter a percentage or choose any other settings that you want.
In Word
To save a particular zoom setting with your document or template so that it always opens with that zoom setting, you must make a change in the document or template first. That can be as simple as adding and deleting one character (or a single space).
-
Open the document or template that you want to save with a particular zoom setting.
-
On the View tab, in the Zoom group, click Zoom.
-
Choose the setting that you want.
-
Add and delete a single character in the document or template.
-
Click Save.
Keyboard shortcut: Ctrl+S
In PowerPoint or Excel
-
Open the presentation or worksheet that you want to save with a particular zoom setting.
-
On the View tab, in the Zoom group, click Zoom.
-
Choose the setting that you want.
-
Click Save.
Keyboard shortcut: Ctrl+S
Need more help?
Download Article
Download Article
Need to zoom in on part of your Word document to get a closer look? We’ll show you how to use the Zoom slider and touch gestures in Microsoft Word to zoom in and out on any document.
-
1
Open your project in Word. You can click File > Open within Word or you can right-click the document file and select Open With > Word.
-
2
Drag the zoom slider left or right. It’s in the lower right corner of the Word window. Slide it right to zoom in and slide it left to zoom out. The numbers to the right of the slider represent your zoomed-in or zoomed-out amount.
- You can also click the + or — buttons next to the slider to change the zoom level by increments.[1]
- Return this slider to 100% to return to normal view.
Advertisement
- You can also click the + or — buttons next to the slider to change the zoom level by increments.[1]
-
3
Click the View tab to see more zoom options. Click Zoom to get a dialog box and you can set the zoom to a certain percentage (the percentage shown depends on your screen size and the size of your Word window).
- You can also press and hold Ctrl and scroll on your mouse wheel to zoom in and out.
- If you have a touchpad, you can pinch your fingers on the touchpad to zoom. Separate your fingers on the touchpad to zoom out.[2]
Advertisement
Ask a Question
200 characters left
Include your email address to get a message when this question is answered.
Submit
Advertisement
Thanks for submitting a tip for review!
References
About This Article
Article SummaryX
1. Open your project in Word.
2. Drag the zoom slider left or right.
3. Click the Zoom tab to see more zoom options.
Did this summary help you?
Thanks to all authors for creating a page that has been read 68,158 times.
Is this article up to date?
In this course, we’ll talk about how to zoom in and out in Word. As we go over, there are different ways to use the zoom function, where Microsoft Word lets you zoom in and out of a document. Meanwhile, this is the continuation of the previous tutorial on how to use find and replace tools in a word document and the spelling and grammar checker in MS Word.
Table of contents
- Zoom in and Zoom Out in MS Word
- What is Zoom In and Zoom Out Operation in MS Word?
- Where is Zoom In and Zoom Out in MS Word?
- How to Zoom in MS Word using Keyboard
- Example on How to Zoom in MS Word
- Zooming of a Document Using using (+) and (-) Buttons
- What is the Maximum Zoom in MS Word?
- A Few Useful Word Shortcuts
- Summary
What is Zoom In and Zoom Out Operation in MS Word?
The Zoom operation in MS Word just changes the size of the font on the screen but doesn’t change anything else about the document. Microsoft Word lets you zoom in and out of a document.
When we use the zoom-in function, the text gets bigger, but when we use the zoom-out function, the text gets smaller.
Where is Zoom In and Zoom Out in MS Word?
The Zoom In and Zoom Out buttons in MS Word are in the lower-right corner of the application window, where you can find the Zoom slider. To reduce the level of magnification, click and drag the slider to the left, toward the minus sign (-).
The level of zoom is shown as a percentage to the right of the zoom slider. To make the picture bigger, click and drag the slider to the right, or towards the plus sign (+). You can also click the “+” or “-” next to the Zoom slider to make the image bigger or smaller.
How to Zoom in MS Word using Keyboard
| To do this | Press |
|---|---|
| Undo the previous action. | Ctrl+Z |
| Redo the previous action, if possible. | Ctrl+Y |
| Adjust the zoom magnification. | Alt+W, Q, then use the Tab key in the Zoom dialog box to go to the value you want. |
| Split the document window. | Ctrl+Alt+S |
Example on How to Zoom in MS Word
Here is a simple example of how to zoom in and out in MS Word.
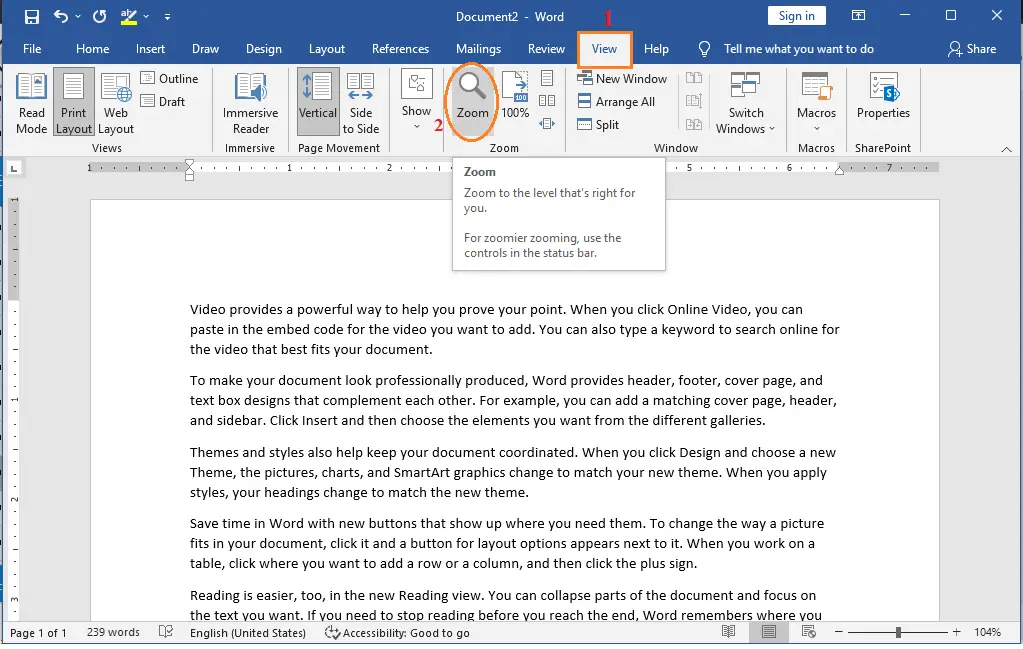
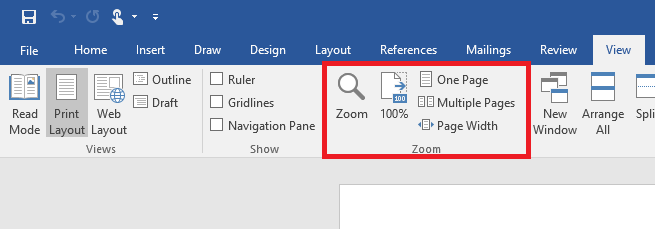
- Step 1 − Click the View tab, and then, as shown below, click the Zoom button.
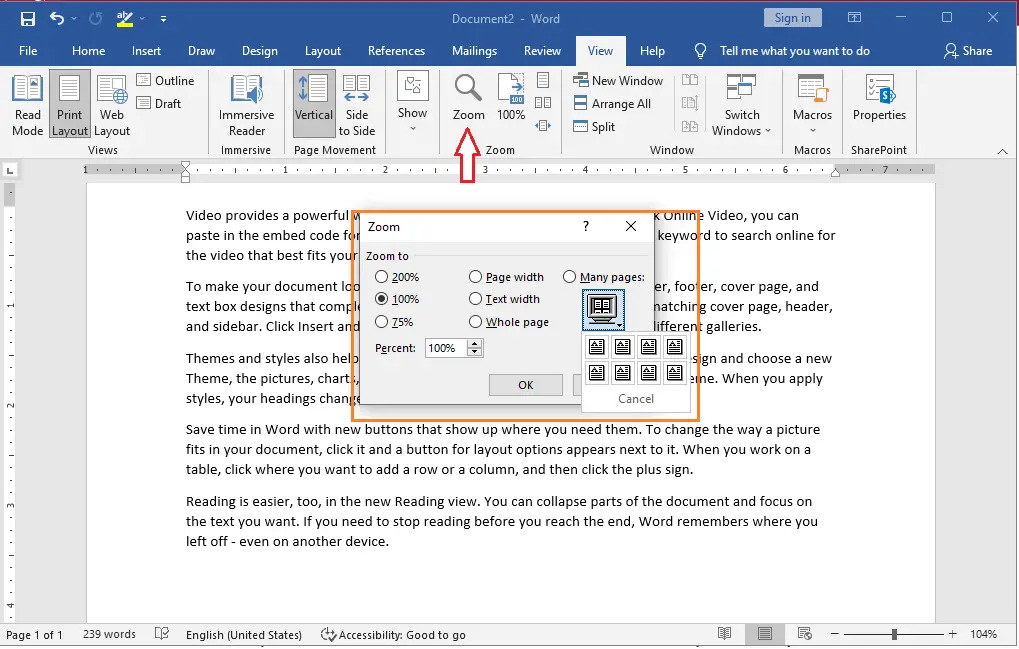
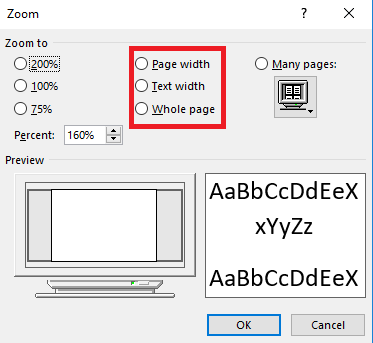
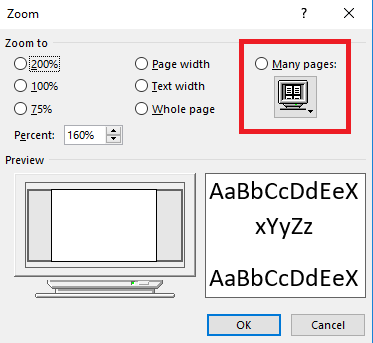
- Step 2 −When you click the Zoom button, a box like the one below will appear.
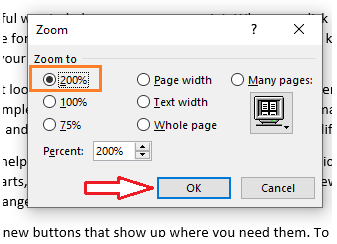
This will bring up the zoom options box, where you can choose a number to change the size of the document on the screen. It will be set to 100% by default. You can choose 200 percent to make the font bigger or 75 percent to make it smaller.
You can click the down arrow next to “Many pages” and choose to show more than one page. - Step 3 − After you choose an option, click OK to make the changes to the document.
- Step 4 − Try out the different options, like Page Width and Text Width.
Instructions on How to Zoom a Document in Word
The following are the list of instructions on how to Zoom a document in word.
- Using the Zoom slider in the Status Bar, you can zoom in or out on a Word document by clicking and dragging the slider bar to the left or right.
- Alternatively, Click the “+” or “-” next to the Zoom slider to make the image bigger or smaller.
- To use the “Zoom button group” to zoom a document, go to the “View” tab in the Ribbon and then look in the “Zoom button group”.
- Click the “100%” button in the “Zoom” button group on the “View” tab of the Ribbon to set the document’s zoom to 100%.
- Click one of the same-named buttons in the “Zoom button group” on the “View” tab of the Ribbon to quickly switch between “One Page,” “Multiple Pages,” and “Page Width.”
- Then, choose the zoom level you want by selecting an option from the “Zoom to” list or typing a number into the “Percent” box.
- To choose to show more than one page at once, click the “Many pages” icon below the option button and then choose how many pages to show.
- Then, in the “Zoom” dialog box, click “OK” to save and use the changes you made.
Zooming of a Document Using using (+) and (-) Buttons
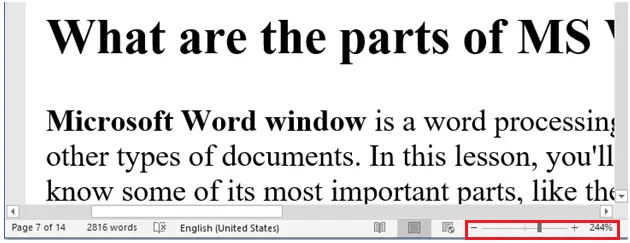
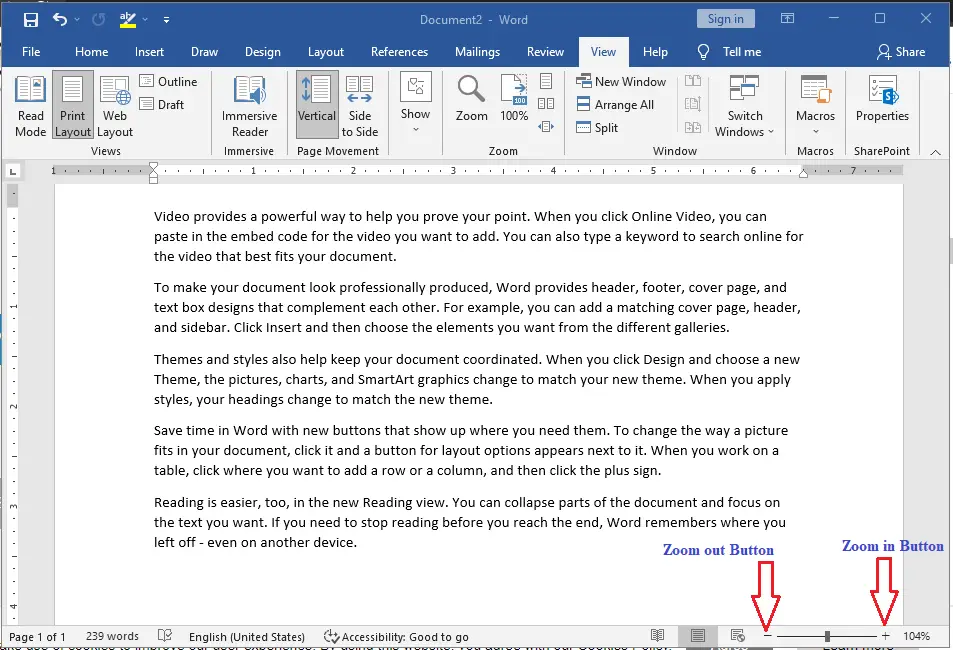
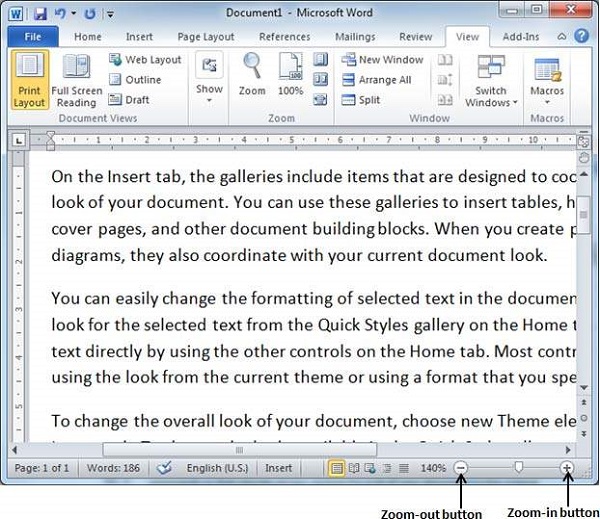
The following image shows two buttons Zoom-out which is the (-) button and Zoom-in which is the (+) button.
- When you click the Zoom-out button, the size of your document will decrease by 10% each time you click the button. Similarly, if you click the Zoom-in button, your document size will increase by 10% each time you click it.
- You can see the difference by trying this simple operation with different numbers. The above screenshot shows how the document looks when it is zoomed in by 104%.
What is the Maximum Zoom in MS Word?
What is the Maximum Zoom in MS Word?
The maximum percentage of zoom in a Microsoft Word document is 500 percent. The minimum percentage of zoom available for MS Word documents is 10%. Zoom in to see the file in greater detail, then zoom out to see more of the page at a reduced size.
A Few Useful Word Shortcuts
There are also a few useful ways to zoom in and out depending on your device. You can use the pinch-to-zoom feature if your device has a touch screen or touchpad. You can zoom in and out with this feature by putting two fingers on the screen and “pinch” to zoom out or “spread” to zoom in.
Lastly, if you have a mouse with a scroll wheel, you can zoom in or out by holding the “Ctrl” button and moving the wheel up or down.
Summary
In summary, we’ve talked about the ways to use zoom in and zoom out in MS Word as well as what those terms mean. In addition, we knew where the controls were located. We also gain insight into the importance of zoom control in manipulating a document. Furthermore, we also picked up some skills on what the short cuts are in zooming documents.
We hope this tutorial helps you as you plan to create a document in MS Word.
PREVIOUS
If you need to see a part of your Word document up close, or if you need to see more of the page than what you get at a standard size, you can zoom in or out. Here’s how.
Zoom In and Out of a Word Doc Using the Zoom Bar
The need to zoom in and out of a Word document is quite common. It’s so common that Microsoft put a zoom bar on the right side of the status bar at the bottom of the window for quick access.
RELATED: How to Zoom In and Out on Part of a PowerPoint Presentation
To use the zoom bar, click and drag the slider to the left or right to zoom out or in, respectively. As you do so, you’ll notice the page percentage decrease or increase.
Alternatively, you can click the minus (-) or plus (+) sign to zoom out or in at 10 percent increments.
If you zoom in to the point that parts of the Word document aren’t visible anymore, horizontally speaking, then a horizontal scroll bar will appear at the bottom of the page.
Zoom In and Out of a Word Doc Using the Zoom Dialog Box
If you want a little more control over the zoom feature, the “Zoom” dialog box gives you a few more options. To access this, select the “View” tab and then click the “Zoom” button in the “Zoom” group.
The “Zoom” dialog box will appear. In the “Zoom To” group, you’ll see several pre-defined options. The options to the right zoom in and out to a specific percentage to fill its given purpose while those on the left are set defaults. These percentages will differ depending on your device’s screen size and the size of your Word window (full-screen, half-screen, etc.).
RELATED: How to Zoom In and Out on a Chromebook
If none of the pre-defined options are what you’re looking for, you can click the up and down arrows next to the “Percent” option to zoom in and out by 1 percent increments (compared to the 10 percent increments from the zoom bar).
When you’re finished, select “OK” and the changes will take place.
A Few Handy Word Shortcuts
There are also a few shortcuts for zooming in and out, depending on your device. If you’re using a touch screen (or touchpad), you can take advantage of the pinch-to-zoom functionality. This feature allows you to zoom in and out by placing two fingers on the screen and “pinching” to zoom out or separating your fingers to zoom in.
RELATED: How to Use Touchpad Gestures for Windows 10
Lastly, for those using a mouse with a scroll wheel, you can hold the “Ctrl” button and scroll the wheel up or down to zoom in and out, respectively.
READ NEXT
- › How to Zoom In on a Windows PC
- › Discord Direct Message Won’t Go Away? Here’s the Fix
- › How to Get a Refund on the PlayStation Store
- › Android’s Nearby Share Has (Unofficially) Arrived on Mac
- › Windows 11 Has a New Photo Gallery in the File Explorer
- › Save Hundreds on Elegoo’s New PHECDA Laser Engraver Through Kickstarter
- › The New Winamp Is Here, but It’s Not What You’d Expect
How-To Geek is where you turn when you want experts to explain technology. Since we launched in 2006, our articles have been read billions of times. Want to know more?
The need to zoom in and out of a Word document is quite common. It’s so common that Microsoft put a zoom bar on the right side of the status bar at the bottom of the window for quick access. To use the zoom bar, click and drag the slider to the left or right to zoom out or in, respectively.
Contents
- 1 Can’t zoom in or out on Word?
- 2 Why is my Microsoft Word so zoomed out?
- 3 How do you zoom out on word using the keyboard?
- 4 Where is the Zoom slider in Word?
- 5 Why is my Microsoft Office zoomed in?
- 6 What is the shortcut key for Zoom tool?
- 7 What is the shortcut key for zoom in?
- 8 How do I remove Ctrl Shift 8 in Word?
- 9 How do I zoom in and out on Windows 10?
- 10 How do I change the default zoom size in Word?
- 11 How do you zoom in on Microsoft?
- 12 What is the minimum zoom size in MS Word?
- 13 How do you exit zoom quickly?
- 14 How do you zoom out on a 60 keyboard?
- 15 How do you zoom in zoom?
- 16 How do I zoom out on a laptop?
- 17 Where is the zoom button on my computer?
- 18 How do you Ctrl Shift 8 in Word?
- 19 How do you unbind Ctrl Shift?
- 20 What does Ctrl Shift 8 do in Word?
Can’t zoom in or out on Word?
Open Microsoft Word.
Click on the View tab. Select Vertical. Now you should be able to zoom in and out without any issues whatsoever.
Why is my Microsoft Word so zoomed out?
If your View tab looks like this, it’s also the cause of your problem: When side-to-side is turned on, all zooming is disabled except for the thumbnails view (which makes the pages even smaller). Click the Vertical button to return to “normal”, and the zoom will be re-enabled.
How do you zoom out on word using the keyboard?
Zoom and Font Size
- [Ctrl]+Mouse Scroll Up to increase the zoom size, and [Ctrl]+Mouse Scroll Up to decrease the zoom.
- [Ctrl+Shift+>] to increase font point size, and [Ctrl+Shift+<] to decrease font point size.
Where is the Zoom slider in Word?
The Zoom slider appears in the lower-right corner of the application window. You can click and drag the slider left, towards the minus symbol (-), to shrink the magnification level. The magnification level is the percentage which appears to the right of the zoom slider.
Why is my Microsoft Office zoomed in?
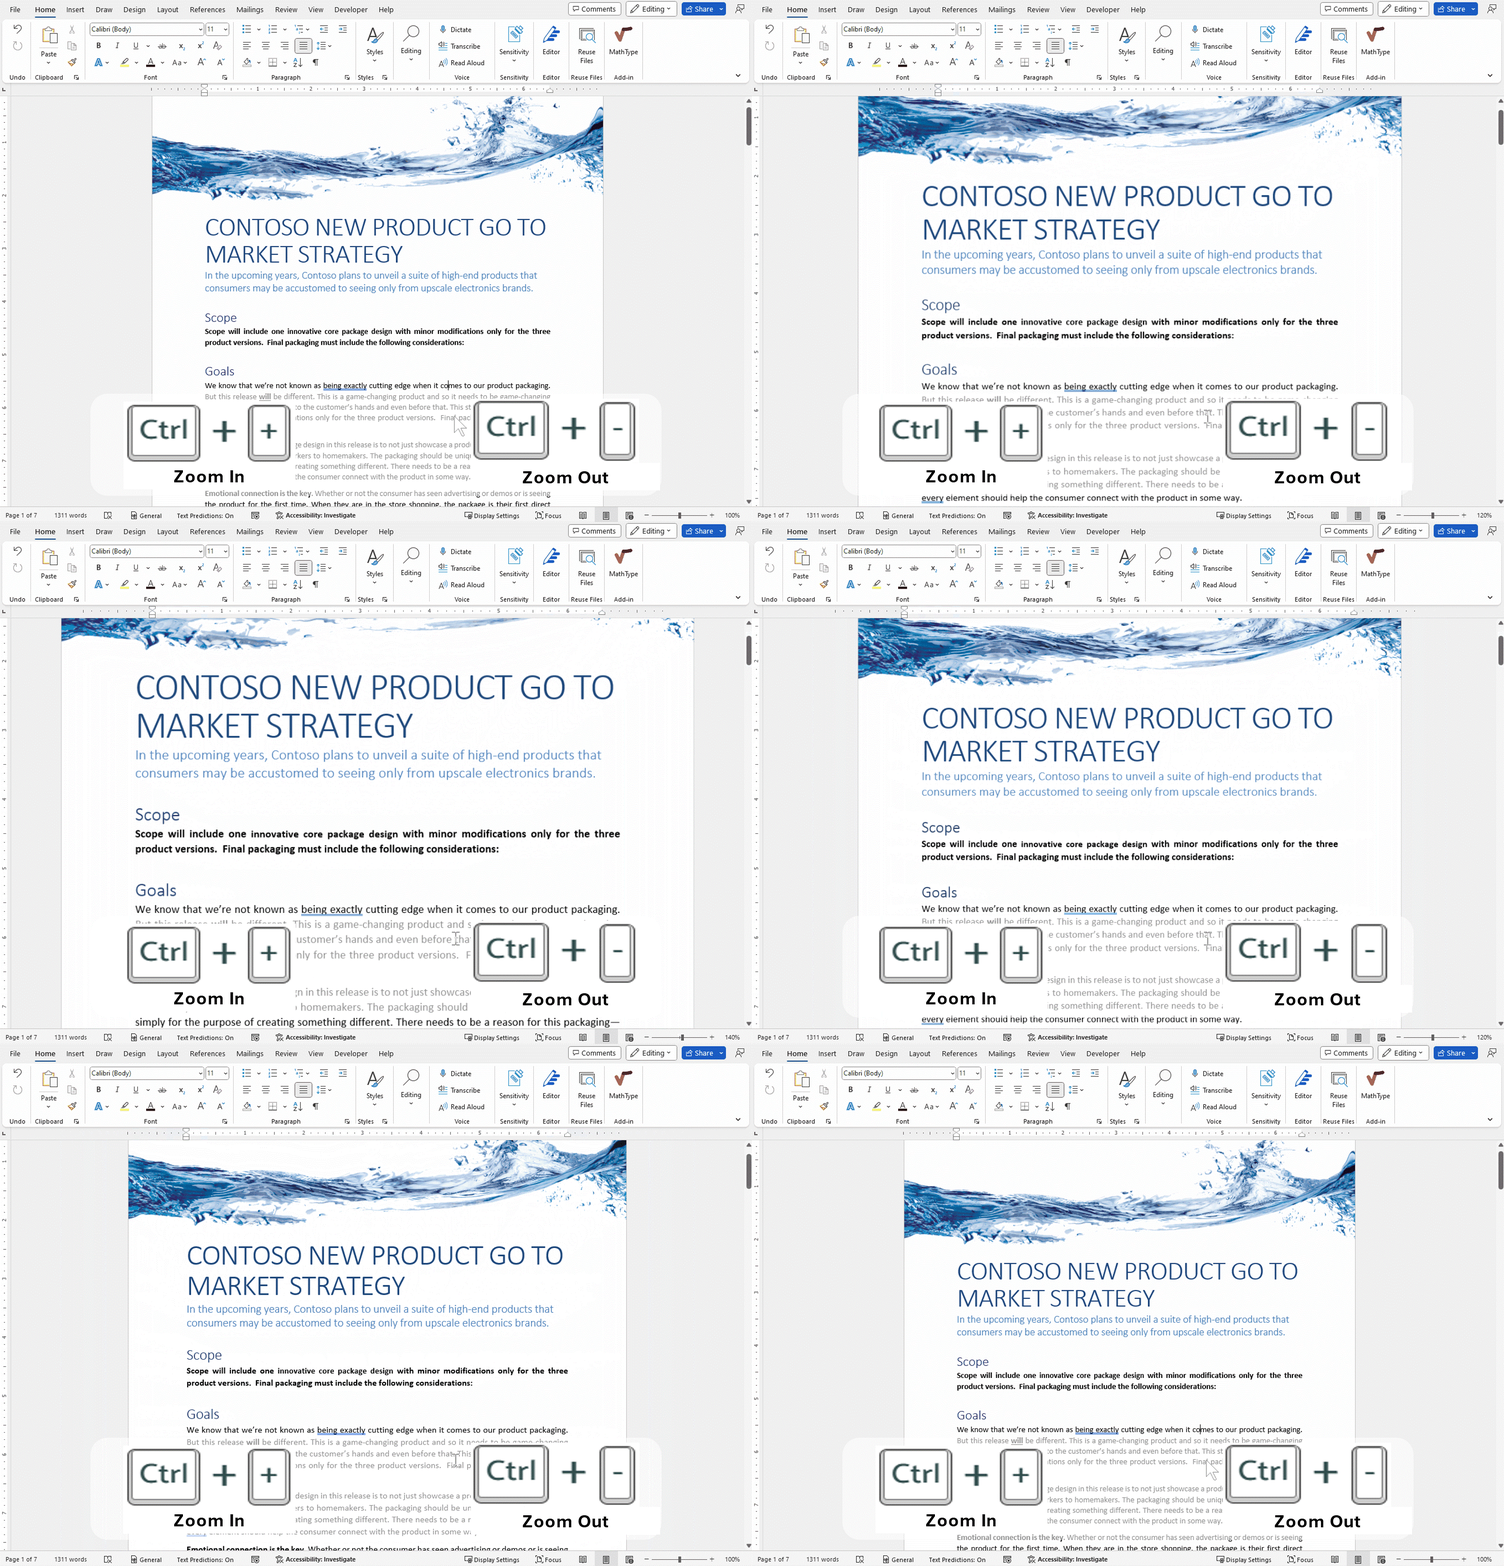
If you have a mouse with a wheel, hold down the Ctrl key, and then scroll the wheel to zoom in or out. From the keyboard, you can increase or decrease the zoom value in 10% increments. To zoom in, press Ctrl + (+). To zoom out, press Ctrl + (-).
What is the shortcut key for Zoom tool?
Accessing the Zoom tool: “Z” selects the Zoom Tool. Option -click (Mac) | Alt -click (Win) toggles the Zoom tool to Zoom In / Zoom out.
What is the shortcut key for zoom in?
Magnifier keyboard shortcuts
| To do this | Press |
|---|---|
| Zoom in. | Windows logo key + Plus sign (+) |
| Zoom out. | Windows logo key + Minus sign (-) |
| Zoom in and out using the mouse scroll wheel. | Ctrl + Alt + Mouse scroll wheel |
| Pan in the direction of the arrow keys. | Ctrl + Alt + Arrow keys |
How do I remove Ctrl Shift 8 in Word?
How to Disable a Shortcut in Microsoft Word
- Select File > Options to open the Word Options dialog box.
- Select Customize Ribbon.
- Select Customize.
- In the Categories list, select the category that contains the keyboard shortcut command you want to remove.
How do I zoom in and out on Windows 10?
To zoom in or zoom out on parts of your screen in Windows 10, use Magnifier. To turn on Magnifier, press the Windows logo key + Plus (+). Zoom in by continuing to press the Windows logo key + Plus (+). Zoom out by pressing the Windows logo key + Minus (-).
How do I change the default zoom size in Word?
I managed to change this in Word 2016 by:
- finding the zoom scale at the bottom right of the screen.
- hover the cursor over the zoom percentage (default 100%)
- click that percentage, a window opens.
- in the window, choose the zoom level you want.
How do you zoom in on Microsoft?
How to zoom in on a PC
- Open the browser of your choice.
- To zoom in and out with a keyboard shortcut, hold CTRL and press the + key to zoom in.
- Hold CTRL and the – key to zoom out.
What is the minimum zoom size in MS Word?
10%
The minimum zoom percentage available in MS Word document is 10%. The maximum zoom percentage in MS Word document is 500%. Zoom in is done to get a close-up view of the file or zoom out to see more of the page at a reduced size.
How do you exit zoom quickly?
Command + Control + S: Screen share via direct share. Command + W: Prompt to end or leave the meeting.
How do you zoom out on a 60 keyboard?
Press and hold the Ctrl key and press the – (minus) key or + (plus) key to zoom out or in of a web page or document. The – and + keys next to the backspace key, and on the numeric keypad, can be used.
How do you zoom in zoom?
If your Zoom Room uses a PTZ Camera with UVC controls, you can use your Android controller to move the camera to a different position.
Controlling a local camera
- Start or join a meeting.
- Tap the Camera Control icon.
- Use the icons on the Camera Control popup to zoom and pan until the camera is in the position you need.
How do I zoom out on a laptop?
You can use your keyboard to zoom in or out. This method works in many applications and web browsers. Click anywhere on the Windows desktop or open the webpage you want to view. Press and hold the CTRL key, and then press either the + (Plus sign) or – (Minus sign) to make objects on the screen larger or smaller.
Where is the zoom button on my computer?
Click the Windows icon in the taskbar. Click the down arrow, in the bottom left corner, to access All Apps. Scroll to the apps until you see Zoom, then click Start Zoom.
How do you Ctrl Shift 8 in Word?
If you are loathe to remove your hands from the keyboard in order to use the mouse, you might want to memorize a quick little shortcut: Ctrl+* (that’s the asterisk), which can also be written as Shift+Ctrl+8. This shortcut key toggles the Show/Hide tool on and off.
How do you unbind Ctrl Shift?
- In the Windows Start Menu Search type Advanced Keyboard Settings.
- Click Input language hot keys.
- Double click Between input languages.
- Set both the Switch Input Language and Switch Keyboard Layout settings to Not Assigned (or assign them how you wish).
What does Ctrl Shift 8 do in Word?
View and copy text formats
| Ctrl-Shift-8 | Display non-printing characters |
|---|---|
| Shift-F1 , then click within the text where you want to review formatting | Review text formatting |
| Ctrl-Shift-c | Copy formats |
| Ctrl-Shift-v | Paste formats |

When you first get started with Word, all of your documents, new and old, open at the app’s default View settings: Print Layout at 100 percent Zoom. If you use a large external display or just don’t want to have to squint at the page, you may want to zoom in. Or if you have super vision or for some peculiar reason just really enjoy working on tiny pages, you can also zoom out accordingly.
Word’s View options let you zoom on pages, so the documents themselves get larger or smaller, and you can fit multiple pages into a single screen for more effective navigation. You should note, however, that zooming is different than merely increasing or decreasing font size. For more details on how to customize Word’s font settings, read:
How to change font defaults in Microsoft Word 2016 for Windows
Unfortunately, Microsoft does not currently let you modify or save Zoom-level defaults. However, Word does «remember» these settings, so any new documents you create or open should display with your last-used View and Zoom settings.
Here’s how to master Word 2016’s View and Zoom options.
How to zoom in or out on a Word document
Zooming in and out on Word documents is easy.
- You can simply drag the horizontal slider in the bottom-right corner of your display toward the left and the minus sign to decrease page size or drag the slider to the right toward the plus sign to increase it.
- Click the View tab at the top of the Word screen.
- In the third box from the left, labeled Zoom, click the magnifying glass to open a pop-up box, and then choose the specific Zoom percentage you want.
Word also provides a number of advanced ways to view document pages. For example, Read Mode shows two pages side by side, like in a book, with horizontal navigation controls. Word’s Web Layout displays document text in one long page, like a web page, that you can scroll down to view.
How to master Word’s advanced View and Zoom settings
- To toggle Read Mode on and off, click the icon all the way to the left of the Zoom slider at the bottom-right corner of your Word screen. It looks like an open book.
- To toggle Web Layout on and off, click the icon to the immediate left of the Zoom slider at the bottom-right corner of your Word screen. It looks like a document behind a tiny globe.
You can also customize Word’s Zoom levels using some other View options.
- Click either the magnifying glass in the Zoom box of the View tab at the top of your Word screen or the percentage next to the Zoom slider in the bottom right-hand corner of your display, to open the Zoom settings pop-up box.
- Within the Zoom settings box, select the Page width option to make Word auto-zoom to find the zoom percentage that best fits an entire page to your display width, whatever its size.
- Choose the Text width option to make Word auto-zoom to find the zoom percentage that best fits the full width of the text on your page to your display.
- Choose the Whole page option to make Word auto-zoom to find the maximum zoom percentage at which you can view an entire page, from top to bottom, without scrolling. This usually means pages get smaller.
- Finally, the Many pages options lets you view multiple document pages on one screen, in rows, though the docs are often quite small. And you can customize the option to display pages in a number of different formations, such as 1×4 (one document’s height by four documents’ width, to fit your display), 1×3, 1×2 and 1×1, or 2×4 (two rows of documents high by four documents’ width, to fit your display), 2×3, 2×2 and 2×1.
- To enable the Many pages setting and pick your formation, select the circle next to the option and then click the icon (it looks like an old cathode-ray display) in the Zoom settings pop-up box. Another overlay will appear that lets you pick your preferred formation.
To disable any of the view options listed above, simply change your zoom percentage using the slide at the bottom right of your Word screen or the Zoom box in Words’ View tab.
For more related resources, check out:
- How to skip the Start screen in Microsoft Word 2016 for Windows
- Office 365 vs. Office 2016: Which should you buy?
- See all Office 365 subscription options on Microsoft.com (opens in new tab)
All the latest news, reviews, and guides for Windows and Xbox diehards.
Al Sacco is content director of Future PLC’s Mobile Technology Vertical, which includes AndroidCentral.com, iMore.com and WindowsCentral.com. He is a veteran reporter, writer, reviewer and editor who has professionally covered and evaluated IT and mobile technology, and countless associated gadgets and accessories, for more than a decade. You can keep up with Al on Twitter and Instagram.
Microsoft Word, the world’s leading word processor software, is used by millions of people around the world on a daily basis. And its popularity is not unwarranted. Its functionality – accessible to even the least tech-savvy members of the digital age – alongside its sleek design and myriad well-designed in-built features, make it almost everyone’s number one go-to when they look to create a text document.
Now, whether you are the reader or the writer of a word document, chances are you’ll need to be able to alter the size of the document readily and easily, in order to better engage with its content. In other words, you’re going to want to know how to zoom in and out in Microsoft Word.
Well, look no further. This article is designed to help you find the most relevant method of zooming Microsoft Word and to do so in just a few simple steps. Read below for three different methods of zooming in Microsoft Word.
Table of Contents
- Zoom In and Out in Microsoft Word via the in-built slider
- Zoom In and Out in Microsoft Word via the View tab
- Zoom In and Out in Microsoft Word using your trackpad
- Frequently asked questions
- Does adjusting the zoom in one document affect others?
- Related Posts
Zoom In and Out in Microsoft Word via the in-built slider
- Open Microsoft Word on your device, and open the document you wish to read/edit (or create a new one, for test purposes)
- Locate the part of the document which you wish to zoom in or out on
- In the bottom-right of the page, you should see a small slider, with a ‘+’ (plus) sign to the right and a ‘-’ (minus) sign to the left. It should be at the default zoom setting of 100%
- Using your mouse (or touch, depending on device) slide this zoom slider toward either side, depending on whether you wish to enlarge or shrink the size of your document (alternatively you can manually click on the ‘+’ or ‘-’ buttons, to do the same job)
- You will find that your page size zooms in or out in increments of 10%. Take your time and determine the most appropriate percentage for the particular document, and for your needs. Remember, the default zoom setting is 100% – manually return it to this if you wish to reset the document’s zoom level.
Zoom In and Out in Microsoft Word via the View tab
- Open Microsoft Word on your device, and open the document you wish to read/edit (or create a new one, for test purposes)
- Locate the part of the document which you wish to zoom in or out on
- Along the top of the page, you will find the Microsoft Word toolbar, locate and scroll along to (or click on) the View tab
- In the center of the View toolbar, you will find the section for altering the Zoom of your page.
- There are several one-click options, such as ‘one-page’ (which zooms out to show you each page in full), ‘multiple pages’ (which zooms even further out to show you multiple pages of your document at once), or ‘page width’ (which zooms in until the full page width occupies the majority of your screen. Finally, there is the ‘100%’ option which, if selected, returns your view to the default 100% zoom setting, as is standard across all Word documents
- For greater control, however, this time click on ‘Zoom’, which is symbolized by a magnifying glass
- This brings up a pop-up settings window, giving you the full range of zoom options. You can choose to alter the percentage of the zoom manually, by clicking the up or down arrows on the percentage box until you reach the zoom which meets your requirements.
- Alternatively, there are several preset options, which you can toggle by clicking the white circles next to them: ‘200%’, ‘100%’ (default), ‘75%’, ‘Page Width’ (see above), ‘Text Width’ (a further zoom even than page width, zooming in on your text until its width occupies the majority of your view), ‘Whole Page’ (see ‘one-page’ above), or ‘Many pages’ (see ‘multiple pages’ above, but note that in this advanced zoom settings screen, you can alter the exact number of pages displayed in your screen by clicking on the computer icon below ‘Many pages’)
- Once you are satisfied with your new zoom settings in Microsoft Word, click ‘OK’
Zoom In and Out in Microsoft Word using your trackpad
- Open Microsoft Word on your device, and open the document you wish to read/edit (or create a new one, for test purposes)
- Locate the part of the document which you wish to zoom in or out on
- Placing two fingers on your trackpad/touchpad, move them apart (to zoom in) or together (to zoom out). In essence, what you are doing here is using touch, rather than a mouse or trackpad click, to adjust the zoom of the Microsoft Word built-in slider
- To reset the zoom to default, repeat step 3 until the slider in the bottom-right of the screen reads 100%
And there you have it! By following any of the three suggested means of zooming in and out in Microsoft Word, you can ensure that your future interactions with this most popular word processing application always meets your reading, writing, and editing visual requirements.
Frequently asked questions
Does adjusting the zoom in one document affect others?
In short, yes. Adjusting the zoom in one document applies this level of zoom as a default across your other Microsoft Word documents. If you were to quit Microsoft Word and then open it back up, you will find that whichever level or mode of zoom you last employed, has been retained and is applied to this new document. This is handy, if you prefer a specific zoom level (‘page width’ for example), but is also easily adjustable per document, just by following the steps listed above.
Hi, Microsoft 365 Insiders! I’m Ali Forelli, a Product Manager on the Word team working on Accessibility features. I’m happy to announce that zooming in and out of your page has become easier with new shortcuts in Word for Windows and Word for Mac!
New Zoom shortcuts in Word
With the increased prevalence of remote work in the past few years, reading and consuming information on a multitude of devices and screen sizes has become the norm.
Previously, people could sit in a conference room with a projector for document presentations, work from their multi-monitor desks, or have easy access to printed content for review. Nowadays, an increasing number of users are consuming most of their content on smaller personal screens, such as laptops, tablets, or mobile phones. With these new shortcuts, the Word Product team is making it easier than ever for you to zoom your document to the right level for your screen.
How it works
Many of you use Ctrl +/– to zoom in and out in your browser and in Word for the web. And you have asked for this functionality to also be available in Word for Windows and Mac. Check them out!
While mouse/key focus is in your document:
- Use Ctrl + – to zoom out
- Use Ctrl + + to zoom in
- Use Ctrl + 0 to return back to 100% zoom
- Use Ctrl + Scroll to zoom in and out
NOTE: In Word for Mac, use the Cmd key instead of the Ctrl key.
Feedback in action
Word has been a product since 1983 (Word turns 40 this year!). This long-standing legacy creates a precedent for established user expectations. While the engineering team continues to work on new features for improved user experiences with refreshed and more advanced technology, we don’t always have the opportunity to revise pre-existing behavior.
In the case of keyboard shortcuts, the industry standard has diverged from Word’s initial implementation of these features. Indeed, users expect that Ctrl + +/– will zoom in and out, so when this doesn’t work, the experience can be frustrating. The Word team has heard about this problem from users, so we’re updating keyboard shortcuts as a direct response to this feedback. Accessibility is a priority for Word, and we want to make the zooming experience as seamless as possible.
Other changes to shortcuts
With the new addition of these zoom shortcuts, some existing ones have changed. Below is a table of the full list of changes.
| Feature | New Shortcut (Windows) | New Shortcut (Mac) |
|---|---|---|
| Zoom In | Ctrl + + | Cmd + + |
| Zoom Out | Ctrl + – | Cmd + – |
| Zoom to 100% | Ctrl + 0 | Cmd + 0 |
| Subscript | Ctrl + Shift + – | CMD + Shift + – |
| Optional Hyphen | Insert -> Symbol -> Special Characters | Insert -> Symbol -> Special Characters |
| Nonbreaking Hyphen | Insert -> Symbol -> Special Characters | Insert -> Symbol -> Special Characters |
| Add or remove one line space preceding a paragraph | Line and Paragraph Spacing Menu | Line and Paragraph Spacing Menu |
NOTE: Superscript remains as is with the Ctrl + Shift + + shortcut.
Want to restore the previous shortcut settings?
To restore the keyboard shortcut assignments to their original settings, you can head over to the Customize Keyboard Shortcuts help article. Below you will find a table of the command names which you may want to reset.
Note: The Optional and Nonbreaking hyphen commands are in the Common Symbols category of the Customize Keyboard dialog. All other commands can be found in the All Commands category.
| Feature | Command Name | Previous Shortcut (Windows) |
|---|---|---|
| Zoom In | ViewZoomIn | None |
| Zoom Out | ViewZoomOut | None |
| Zoom to 100% | Zoom100 | None |
| Subscript | Subscript | Ctrl + + |
| Optional Hyphen | Optional Hyphen | Ctrl + – |
| Nonbreaking Hyphen | Nonbreaking Hyphen | Ctrl + Shift + – |
| Add or remove one line space preceding a paragraph | OpenOrCloseUpPara | Ctrl + 0 |
Availability
These shortcuts are available to Beta Channel users running:
- Windows: Version 16.0.15831.20174 or later
- Mac: Version 16.67.1113.0 or later
Don’t have it yet? It’s probably us, not you.
Features are released over some time to ensure things are working smoothly. We highlight features that you may not have because they’re slowly releasing to larger numbers of Insiders. Sometimes we remove elements to further improve them based on your feedback. Though this is rare, we also reserve the option to pull a feature entirely out of the product, even if you, as an Insider, have had the opportunity to try it.
Feedback
Please share your feedback with us directly from Word by going to Help > Feedback. We’re excited to hear from you!
In this chapter, we will discuss how to zoom in and zoom out in Word 2010. Microsoft Word provides a functionality to apply zoom-in and zoom-out operations on a document. When we apply the zoom-in operation, it enlarges the size of text whereas applying the zoom-out operation reduces the size of text.
A zoom operation just changes the size of the font on-screen without impacting any other attribute of the document. You can apply the zoom operation in various ways as explained in this chapter.
Zoom-in & Zoom-out using view tab
Here is the simple procedure to apply the zoom-in or the zoom-out operations using the View tab −
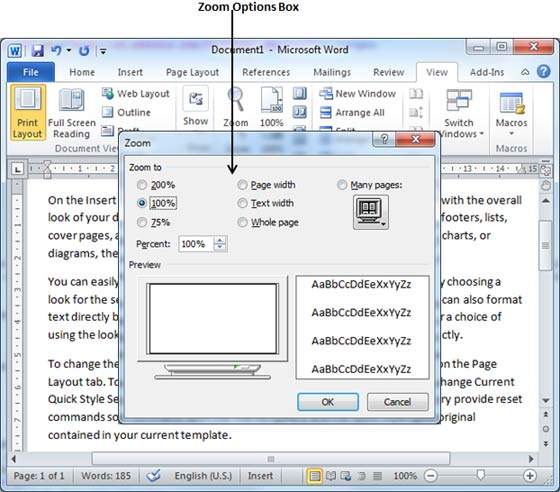
Step 1 − Click the View tab and then click the Zoom button as shown below.
Step 2 − When you click the Zoom button, a Zoom dialog box will appear as shown below. This will display the zoom options box to select a value to reduce or increase the size of the document on-screen. By default, it will be 100%; you can select 200% to increase the size of the font or 75% to reduce the size of the font.
You can click the Many pages down arrow and select to display multiple pages.
Step 3 − Once you are done with selecting an option, click OK to apply the changes on the document.
Step 4 − Try different options available, for example Page Width and Text Width.
Zoom-in & Zoom-out using (+) and (-) Buttons
The following screenshot shows two buttons Zoom-out which is the (-) button and Zoom-in which is the (+) button.
Step 1 − Click the Zoom-out button, you will find that your document size will decrease by 10% each time you click the button. Similar way, if you click on Zoom-in button your document size will increase by 10% each time you click the button.
Step 2 − Try this simple operation with different values to see the difference. The above screenshot shows 140% zoom-in view of the document.


 .
.


