1. Remove the red underline in Word 2019 for all documents created
2. Delete the red underline in Word 2019 for the current document
3. Delete the red underline in Word 2019 for the current document using the Review menu
Since we have memory regarding the use of operating systems we have used various text processors in order to carry out the creation, edition and presentation of professional type documents . Not only with the text itself but many of us work on creative tasks and we like to add images, audios, effects to give a more personal and original touch to these. In this line Microsoft offers us Word as an integral solution for this type of task or projects.
As human beings we are prone to make some mistake while writing text in Microsoft Word. Many times this happens because time demands us to be agile and it is normal that we make writing mistakes that if they were sent, our image may not be very well valued. Microsoft Word integrates a self-corrector that analyzes what we are writing and based on the type of context it will highlight the words in the following way:
Underlined red
This will be applied at the moment when the affected word is with spelling errors.
Underlined green
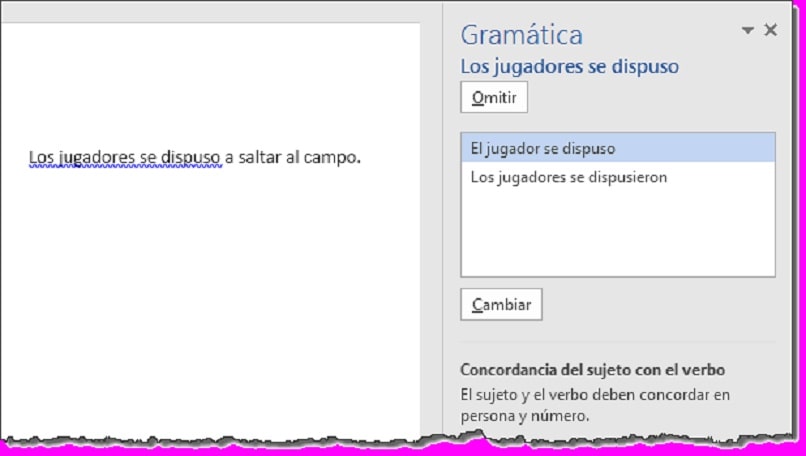
This underline will be visible at the moment when a word has grammatical errors.
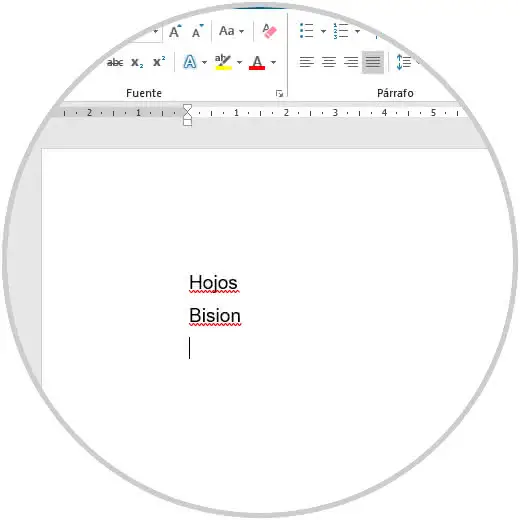
For example, we have written two normal words with spelling errors so that you understand what Microsoft Word analyzes in this case version 2019:
As you can see, Word detects these errors and underlines them with the red line , when we finish the writing process, just press the F7 key or go to the menu «Review», group «Review» and there click on the option «Spelling and grammar «to proceed with the revision of the document and deliver something aesthetic and professional.
It is ideal that Microsoft Word help us with this revision but if you consider that your writing is perfect and you do not want to lose the writing sequence observing red lines, TechnoWikis will explain how to eliminate these red lines of Word and thus prevent it from being automatically carried out This process.
To stay up to date, remember to subscribe to our YouTube channel! SUBSCRIBE
1. Remove the red underline in Word 2019 for all documents created
Step 1
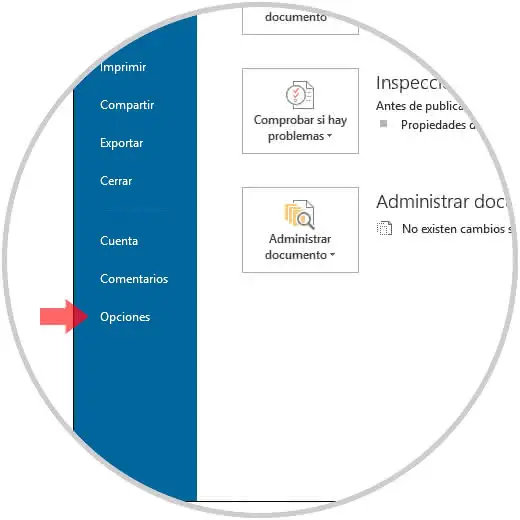
This is a process that will affect all the documents that are created taking as starting point the existing document, to achieve this, we will go to the «File» menu and in the lower part we select the «Options» line:
Step 2
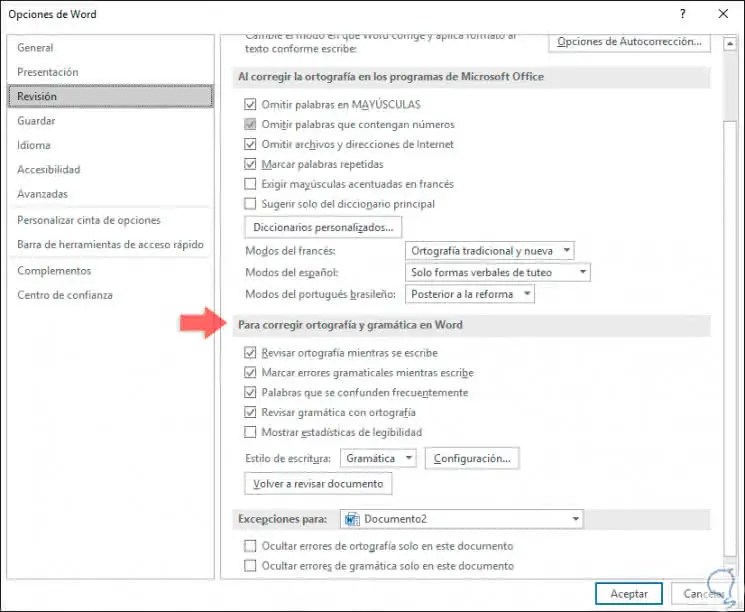
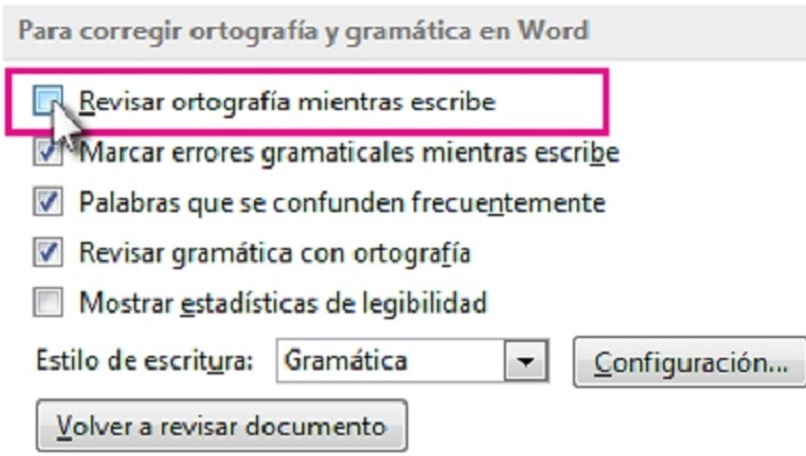
A pop-up window will be displayed in which we will go to the category «Revision» and in the right part we will locate the section «To correct spelling and grammar in Word:» where we will see the following:
Step 3
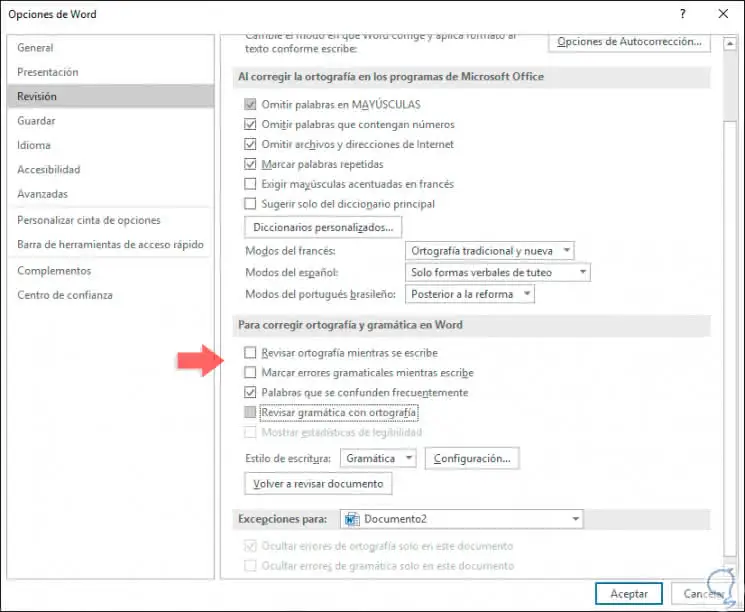
There we will unmark the following boxes. Click on the OK button to apply the changes and in this way all the documents that we create in Microsoft Word 2019 from now on will not be reviewed as far as spelling is concerned.
- Check spelling while writing.
- Mark grammatical errors while writing.
- Check grammar with spelling.
2. Delete the red underline in Word 2019 for the current document
Now, it is normal that we want that only in the document in which we are working does not apply the automatic revision of Word 2019
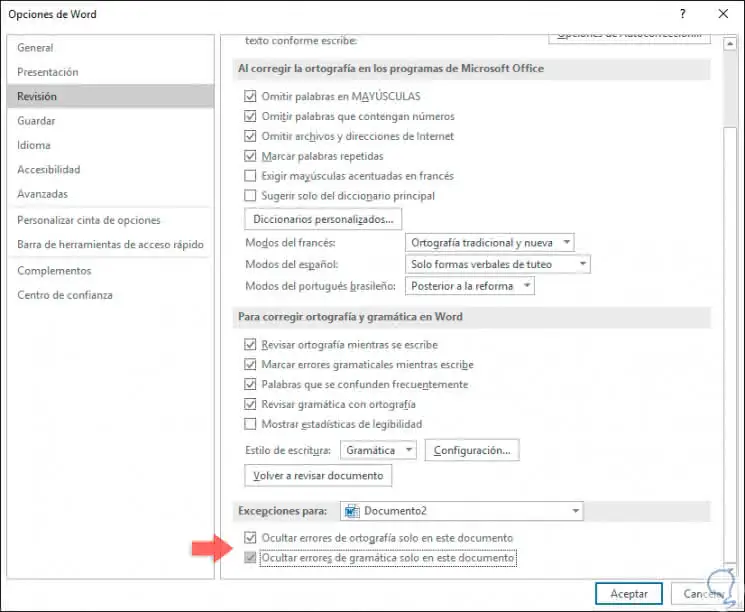
If this is the goal we will go back to the File / Options menu and in the category «Review» and on the right side we find the section «Exceptions for:» with the name of the current document and there it will be necessary to activate the following boxes. Press OK again to apply the changes.
- Hide spelling errors only in this document.
- Hide grammar errors only in this document.
3. Delete the red underline in Word 2019 for the current document using the Review menu
Microsoft Word 2019 integrates a review function which has been developed to help us correct all kinds of errors based on the language and the desired regional configuration.
Step 1
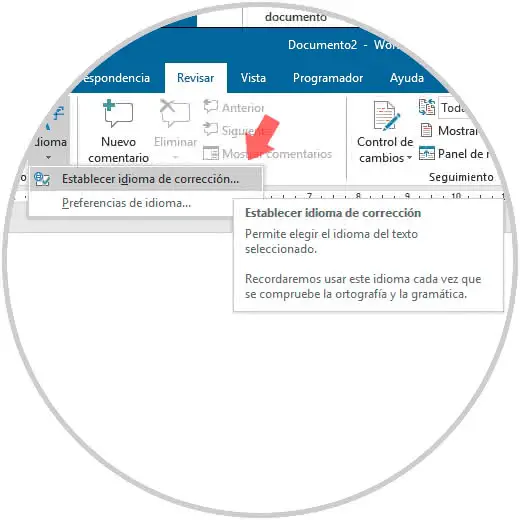
To use this method we will go to the «Review» menu and in the «Language» group and there we will click on «Language» and select the option «Set correction language»:
Step 2
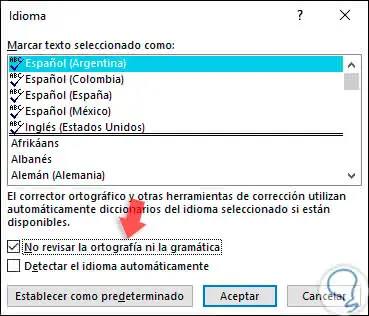
The following window will be displayed where we must activate the «Do not check the spelling or grammar» box. Click OK to apply the changes.
Note
It must be clarified that this process will only apply to the current Microsoft Word 2019 document, but not to everyone in general.
Step 3
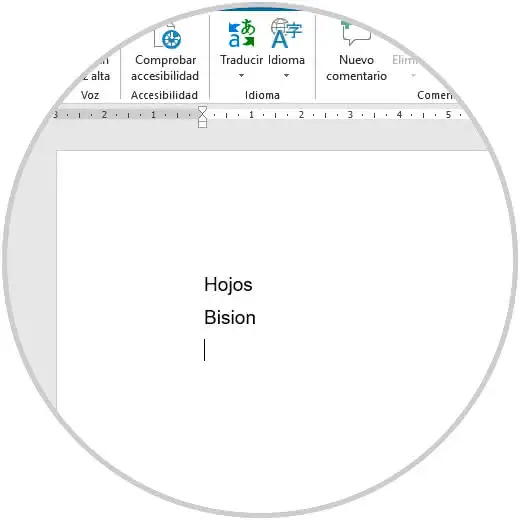
By using any of these methods we can see that although the words are written incorrectly, Word 2019 will not underline them to indicate us about the error:
TechnoWikis recommends disabling this line only if we are sure that the writing will be 100% perfect, but remember that Word 2019 integrates this functionality to allow the general context of the document is adequate.
Last Updated: December 11, 2021 | Author: Kurt Damiano
Contents
- 1 How do I get rid of the red underline in Word?
- 2 Why is my Word document underlining everything in red?
- 3 Why is Microsoft Word typing in red?
- 4 How do I get my Word document back to normal?
- 5 How do I stop Word from underlining?
- 6 How do I turn off underline in Word?
- 7 How do I reset Microsoft Word to default settings?
- 8 Why does my Word document look weird?
- 9 Which is the default layout of Word document?
How do I get rid of the red underline in Word?
Click on the name of the language in the status bar at the bottom of the screen. 2. Add a check mark in the Do not check spelling or grammar option and click OK. All the red and green squiggly underlines should be gone.
Why is my Word document underlining everything in red?
You have the Track Changes feature turned on – red underlining is the default markup used to identify Insertions. Go to the Review tab, turn Track Changes OFF, then Accept all changes in the document & save the file.
Why is Microsoft Word typing in red?
This issue occurs if the track changes is enabled. Turn off the track changes by clicking on (ctrl+shift+E) . Click on ‘Review’ tab on the ribbon and click on ‘Track Changes’ and accept the changes.
How do I get my Word document back to normal?
How do I stop Word from underlining?
When you want to stop underlining, press Ctrl+U again. You can also underline text and spaces in several other ways.
How do I turn off underline in Word?
In the “Font” tab, click the down arrow under the “Underline Style” option. Click “None” in the drop-down menu, then select the “OK” button. The underline is now removed from the selected hyperlinked text.
How do I reset Microsoft Word to default settings?
Open the template or a document based on the template whose default settings you want to change. On the Format menu, click Document, and then click the Layout tab. Make any changes that you want, and then click Default.
Why does my Word document look weird?
You need to turn on the view of white space between pages. It is easy to accidentally toggle this setting by double-clicking at the top or bottom of a page in Print View. You can also manage it by Word Options > Display and turn on the checkbox for “Show white space between pages in Print Layout view”.
Which is the default layout of Word document?
In Microsoft Word, switches to normal view, which is the default document view for most word-processing tasks, such as typing, editing, and formatting.
Microsoft Word turns on Spell check and Grammar check by default. The red wavy underlines just mean flagged spelling errors and the green underlines mean flagged grammatical errors.
What are the red lines in word?
This red line is there because there are still changes in the document that need to be accepted (which can be minor changes like double spaces or a wrongly placed comma). Step 1: Go to the Review tab and click on ‘Accept’ (Word 2019). Step 2: Click on ‘Accept all changes and Stop Tracking’.
What is the meaning of blue and red underline in Microsoft Word?
Word likes squiggly underlines—the most commonly seen being red (a potential spelling error) and green (a potential grammar error). The latest squiggly underline introduced in Word is blue, which marks formatting inconsistencies. (This type of marking was introduced in Word 2002.)
How do I turn the red underline in word?
Here’s how. Click File > Options > Proofing, clear the Check spelling as you type box, and click OK. To turn spell check back on, repeat the process and select the Check spelling as you type box.
How do I get rid of the red curved lines in Word?
Click on the name of the language in the status bar at the bottom of the screen. 2. Add a check mark in the Do not check spelling or grammar option and click OK. All the red and green squiggly underlines should be gone.
How do I remove the underline in Word?
To remove single underlining from words and spaces, select the underlined text and press Ctrl+U. To remove other styles of underlining, press Ctrl+U twice.
How do you turn off the underline in word?
Right-click on the underlined text you selected. Choose “Font” from the pop-up menu to reveal the Font screen. In the Underline Style box, select “(none).”. Then click “OK” to remove the underlining.
When to use underline?
An underline, also called an underscore, is a more or less horizontal line immediately below a portion of writing. Single and occasionally double (“double-underscore”) underlining is used in hand-written or typewritten documents as a way to emphasise key text.
Why is my text red?
When Word inserts a vertical red line into your margins when you create a new paragraph, it means someone has enabled change tracking in the document. Change tracking is often used with shared documents so that each user’s changes can be tracked and even undone if necessary.
When you are working on writing a text that includes foreign or slightly colloquial words to highlight a point in your writing, it is likely that the red or blue line will be automatically marked under those words or in a phrase or sentence. This is due to the spell checking activated on your computer.
Many dislike those red and blue lines, they even it is annoying and distracting, that’s why they deactivate it. If you want to know how to remove the red underline from spell checking and the blue underline from contextual errors in Word, read on, because in this article we will tell you how you can do it.
How to make single document red underline not appear in Word?
Spelling is very important when writing a text, because it allows it to be legible and understandable, it also says a lot about whoever writes it. Therefore, when you work with the Microsoft Word program you can easily see those errors and correct them, because it indicates to you by means of the red underline. But many do not like this because it distracts them in the writing process so they decide to disable it. If this is your case, see how it is done.
From Windows
From the Windows operating system you can remove the red underline in a current Word document. You follow the following route: File, Options and Review. In that option you must check the box to Hide spelling errors only in this document and hide grammar errors only in this document and click OK. This will apply the action implemented to that single Word document.
On Mac
On the other hand, if you have a Mac computer, then the procedure to remove the red underline in a Word document differs a bit. But there is no need to be alarmed, we show you how to do it. You go into the Word document and you click on the Tools option, located at the top. You will see a drop-down menu where you must select Spelling and grammar.
Immediately a side menu will be displayed with several options, choose Hide spelling errors. That way your Word document won’t show the red underline. As you can see, it is very easy to do it, you can enable or disable Word’s auto spell checker on Mac.
In Word online
In the case of Word online or for the web, if you want to eliminate the red underline in that document, what you should do is go to the option on the top bar of Review, click there and then on Editor. Next, you must click on set revision language. You will see a language box where you should select the option do not check spelling or grammar and click on OK for the changes to be made.
What boxes are unchecked to disable spell checking for all documents?
There are many functions that you can implement when you use the Word tool, such as when writing a text, you can find all the repeated words in a Word document. But also, you can use the spell checker, which is an excellent tool that allows you to write texts with a grammar and spelling error free.
But there are situations in which you may want to deactivate this option, especially when you do some work in Word in another language or with somewhat difficult words. In that case, it is better disable spell checking so you can work without having to see that red line under each word, signaling your poor spelling and writing.
This action can not only apply to a document, also you can disable spell check to all Word documents. That is why we show you which boxes you must uncheck to deactivate this spell check function. Take a look at the following:
Check spelling as you type
By unchecking the Check spelling while writing box, you are disabling this function, so you will not see the red line in the document you are writing at the moment as well as in all Word documents because simply the system will not spell check the document. After you have entered Files and then Options and Review. And in the To correct spelling and grammar in Word section, uncheck the Check spelling as you type box, and click OK.
Check grammar
On the other hand, when you uncheck the Check grammar box, the spell checker will not recognize misspelled words and that do not have concordance. Because the option that performs this function is disabled. So you will not know if your document meets the rules of grammar. But this is not a problem either because you can easily activate this action again and thus your documents have a better presentation.
How do you prevent the blue underlining of contextual errors from being marked?
The Word tool allows you to edit coherent and understandable texts because it has functions that are predetermined for automatically correct the writing and spelling of the writing. And it does so by means of the blue underline that appears below the words, pointing out the contextual error. For this reason, when writing, some words in a sentence of the text may be highlighted with blue lines to indicate that an inconsistency has been verified in the checker, that is, a grammatical error, which you must correct.
Although this consistency marker may be activated by default on your computer, you can also deactivate it whenever you like. Take a good look at what you must do so that the blue underline of contextual errors is not marked.
You go to File, click on Options, Review and there uncheck the Mark grammar errors box while you write and click OK. As you can see, there are many functions that you can enable or disable in Word and all from the toolbar. That is why it is convenient for you to know the Word toolbar, its parts and what it is for.
When that situation comes, just follow this easy guide to remove spelling and red lines in MS Word:
- Click on the File menu and then on Options.
- In the Options pop-up window, open Proofing.
- Untick the Check spelling as you type and Check grammar with spelling.
Contents
- 1 How do I get rid of the red underline in Word?
- 2 How do I get rid of underline in Word 2016?
- 3 Why are all my words underlined in red on word?
- 4 How do I get rid of red formatting in Word?
- 5 How do I remove the underline color in Word?
- 6 How do I get rid of the red underline in Word for Mac?
- 7 How do I get rid of the red underline in Word on Iphone?
- 8 How do you remove underline from hyperlinks?
- 9 How do you change the color of the underline in Word on a Mac?
- 10 How do you reset hyperlink color in Word?
- 11 How do I get rid of the red underline in pages?
- 12 How do I get rid of the red underline in Notes on Mac?
- 13 How do you remove the underline from a tag?
- 14 How do I get rid of the green underline in Word?
- 15 How do you underline red in Word Mac?
- 16 How do you change the color of an underline in HTML?
- 17 How do you underline in Word for Mac?
- 18 How do I make a Hyperlink not purple in Word?
- 19 How do I change the Hyperlink color?
How do I get rid of the red underline in Word?
If you don’t want to see the red, wavy underlines on-screen, you can turn this feature off by three simple clicks:
- Select Options on the File menu:
- On the Proofing tab, click the Hide spelling and grammar errors checkbox:
- Click OK.
How do I get rid of underline in Word 2016?
To remove single underlining from words and spaces, select the underlined text and press Ctrl+U. To remove other styles of underlining, press Ctrl+U twice.
Why are all my words underlined in red on word?
You have the Track Changes feature turned on – red underlining is the default markup used to identify Insertions. Go to the Review tab, turn Track Changes OFF, then Accept all changes in the document & save the file.
How do I get rid of red formatting in Word?
Clear formatting from text
- Select the text that you want to return to its default formatting.
- In Word: On the Edit menu, click Clear and then select Clear Formatting. In PowerPoint: On the Home tab, in the Font group, click Clear All Formatting .
How do I remove the underline color in Word?
In the “Font” tab, click the down arrow under the “Underline Style” option. Click “None” in the drop-down menu, then select the “OK” button. The underline is now removed from the selected hyperlinked text.
How do I get rid of the red underline in Word for Mac?
How do I get rid of the green/red underline on my text in Microsoft Office:Mac 2011 ?
- In the main menu bar, choose Word > Preferences.
- Click on the third icon, Spelling and Grammar.
- In the Spelling section, disable Check spelling as you type.
- In the Grammar section, disable Check grammar as you type.
How do I get rid of the red underline in Word on Iphone?
Try Settings > General > Keyboard > Auto-Correction > Off. Try Settings > General > Keyboard > Auto-Correction > Off.
How do you remove underline from hyperlinks?
To remove the underline from all hyperlinks on a page, follow these steps:
- Open the page that you want to modify.
- Click the Codetab.
- Put the following HTML code before the tag:
- Click the Designtab. Your hyperlinks no longer contain underlines.
How do you change the color of the underline in Word on a Mac?
Use keyboard shortcut Command-T or Format:Font:Show Fonts. Select the text you wish to underline and, under the first icon (an underlined T) in the Font box, choose either single or double, then under the same icon, choose color. Then select the color you wish to use for the underline and apply it.
How do you reset hyperlink color in Word?
Word for Windows
- From the Home tab, click the small icon (
- In the Styles menu, hover your mouse pointer over Hyperlink, and click the triangle that appears to the right.
- From the drop-down menu that appears, select Modify….
- In the “Formatting” section, choose the color you want, and then click OK to save your changes.
How do I get rid of the red underline in pages?
With Spelling and Grammar check turned on, Pages will notify you of questionable misspelled words with a red underline and debatable grammar with a green underline. Proofreading. A pop-out box will appear. Slide down and click on Check Spelling as You Type or Proofread as You Type to turn off that feature.
How do I get rid of the red underline in Notes on Mac?
To do this, head to Edit > Spelling and Grammar. Turn off “Check Spelling While Typing” to disable the red underlines and turn off “Correct Spelling Automatically” to disable automatic replacement.
How do you remove the underline from a tag?
By setting the text-decoration to none to remove the underline from anchor tag. Syntax: text-decoration: none; Example 1: This example sets the text-decoration property to none.
How do I get rid of the green underline in Word?
Click on the name of the language in the status bar at the bottom of the screen. 2. Add a check mark in the Do not check spelling or grammar option and click OK. All the red and green squiggly underlines should be gone.
How do you underline red in Word Mac?
When your spelling is checked, misspelled words are underlined in red, and suggested corrections are shown. On your Mac, choose Apple menu > System Preferences, click Keyboard , then click Text. Select the “Correct spelling automatically” checkbox.
How do you change the color of an underline in HTML?
Change the underline to dots with the border-bottom style property a { text-decoration: none; border-bottom:1px dotted; }. Change the underline color by typing a { text-decoration: none; border-bottom:1px solid red; }.
How do you underline in Word for Mac?
The keystrokes for Mac are essentially the same as on Windows with the difference being to use the command key (macOS) instead of Control (Windows). Therefore, to underline, select text and the use the keyboard shortcut command+u.
How do I make a Hyperlink not purple in Word?
In the “Styles” menu, hover your mouse pointer over “Hyperlink“, and then click the triangle that appears to the right. From the drop-down menu that appears, select “Modify…“. In the “Formatting” section, choose the color you want to use, then click “OK“.
How do I change the Hyperlink color?
Change the color of a hyperlink
- Select the hyperlink you want to re-color. (How do I insert a hyperlink?)
- On the Home tab of the ribbon, select the Font Color arrow to open the menu of colors.
- Select the color you want for the hyperlink.

