
WordWorld, also sometimes referred to as Word World, is an American children’s CGI animated television series based on the books and the wooden puzzles of the same name. Created by Don Moody, Jacqueline Moody, Peter Schneider and Gary Friedman, the show was produced by The Learning Box and WTTW National.
| WordWorld | |
|---|---|
 |
|
| Genre | Educational Slapstick Comedy children’s television series[1] |
| Created by | Don Moody Jacqueline Moody Peter Schneider Gary Friedman |
| Directed by | Olexa Hewryk |
| Narrated by | H.D. Quinn |
| Theme music composer | Billy Straus |
| Composers | Nick Balaban Nathaniel Reichman |
| Country of origin | United States |
| Original language | English |
| No. of seasons | 3 |
| No. of episodes | 45 (84 segments) |
| Production | |
| Executive producers | Don Moody Jacqueline Moody Olexa Hewyrk Sue Hollenberg |
| Producers | Sue Hollenberg Alia Nakashima |
| Running time | 28 minutes |
| Production companies |
|
| Release | |
| Original network | PBS Kids |
| Picture format | HDTV 720p |
| Original release | September 3, 2007 – January 17, 2011 |
WordWorld aired on PBS Kids from September 3, 2007 to January 17, 2011, with PBS later airing reruns on the national 24-hour PBS Kids channel from January 16, 2017 to October 2, 2022. 45 episodes were produced.
PremiseEdit
In the series, when letters are combined to spell words, they morph into the shape of the corresponding object. The animal characters and many objects are made of letters, and are respectively called WordFriends and WordThings. The main setting is a planet named WordWorld; despite its name, WordFriends and WordThings also exist in outer space. In each episode, the characters have a cartoonish adventure, and ultimately must «build a word» using synthetic phonics. Some episodes focus on concepts such as rhymes, compound words, and plural formation with -s.[2]
CastEdit
- H.D. Quinn as the Narrator, Dog, Fly, Duck and Ant
- Lenore Zann as Bear, Kangaroo, Zebra, Owl, and Tiger
- George Bailey as Bug, Monkey, and Pig
- Daryl Ekroth as Frog, Monster, Snail, and Fox
- Mirm Krigel as Elephant
- Veronica Taylor as Sheep, Cow, Cat, and Bird
- Marc Thompson as Robot, Bee, Worm, Shark, and Turtle
- Meredith Zeitlin as Fish and Whale
EpisodesEdit
Series overviewEdit
Season 1 (2007–2008)Edit
Season 2 (2009)Edit
Season 3 (2010–2011)Edit
ReceptionEdit
CriticalEdit
Emily Ashby of Common Sense Media gave the series 5 out of 5 stars; saying that, “This show is perfectly suited for preschoolers’ learning level, and it will entertain them as it reinforces their knowledge of letters, sounds, and simple words. With its imaginative design and with the various font styles used to create the letter-based objects, the WordWorld package is delightful enough to draw in parents almost as readily as kids.”[1]
AwardsEdit
2009 Emmy Award Winner
Outstanding Children’s Animated Program
Outstanding Writing in Animation[3]
2008 Emmy Award Winner
Outstanding Achievement in Main Title[3]
Three 2007 Parents’ Choice Awards: Gold
Welcome to WordWorld DVD
Rocket to the Moon/The Birds DVD
WordWorld Television Series[3]
Creative Child Magazine – Creative Toys Awards
2008 Preferred Choice Award: Barn Bucket Set
2008 Seal of Excellence Award: Pull-Apart Plush[3]
2004 Preferred Choice Award: Pull Apart Plush[3]
2008 Toy Wishes Magazine All-Star Award
WordPuzzle with Sound: Duck’s Beach Party[3]
Interactive Media Awards
2007 Best in Class: PBS Kids WordWorld Website[3]
ReferencesEdit
- ^ a b Ashby, Emily (3 September 2007). «WordWorld Review». Common Sense Media.
- ^ «About WordWorld». WordWorld. General Word LP. Retrieved 21 November 2022.
- ^ a b c d e f g «awards». wordworld.com.
External linksEdit
- Official website
- WordWorld at IMDb
10000+ results for ‘build a word’

Build a word
Match up
by Becky6
Build a VCCV word
Match up
by Huddle
Build A Word
Random cards
by Jsilverman1
Build a Sight Word
Anagram
by Klampert
Build a Word
Open the box
by Boydigitallearn
Build a Word
Open the box
by Boydigitallearn
Build a WORD
Anagram
by Ctoti
K
G1
G2
Reading
Digraphs build a word
Anagram
by Huddle
Blends build a word
Anagram
by Huddle
Build a word cards
Random cards
by Gcarsello
Build A Word (Vowels)
Random wheel
by Civol
Build a Word (consonants)
Random wheel
by Civol
CVC Build a word
Anagram
by Huddle
Build a word letters
Random wheel
by Lnavarro1
Build a Compound Word
Match up
by Erbenge
Build a Word
Random wheel
by U94206263
Digraph ch Build a Word Wheel
Random wheel
by Cathleen1
G1
Wilson 2.3 build a word
Random wheel
by Kellyotoole1
Connor’s Build a Nonsense Word
Random cards
by Mmagaro
Spin to Build a Word
Random wheel
by Jsilverman1
Blends build a word 2
Anagram
by Huddle
Build a Word/Advanced Phonics
Find the match
by Ewidmer
4 syllable build a word
Unjumble
by Huddle
Splitting the vowels build a word
Unjumble
by Huddle
Spin to Build a Word v.2
Random wheel
by Jsilverman1
Build a Word for Ms. James
Random wheel
by Kathleen5
AH-2-4 Build a Compound Word
Matching pairs
by Deannasheng
Build a Word — Word Families -ill, -est, -ack, -ay, -ine
Word magnets
by Erbenge
Build a Word for Mrs. Thompson
Random wheel
by Kathleen5
English
Build a Word Family: Advanced Phonics Game
Matching pairs
by Asweat
Phonics
Word Wall Build a DNA Molecule
Labelled diagram
by Friver
Sukkot Build-a-Blessing
Missing word
by Mpavuk
G2
G3
Hebrew
Let’s Build a Seder
Rank order
by Rabbidavid
Passover
Build the CVC Word
Anagram
by Aronsonlisa
Sukkot Build-a-Blessing
Missing word
by Rabbidavid
Jewish Holidays
Build the Word (Reading Group A 4/21)
Anagram
by Learningwithmsj
Wilson 1.1 short a and i word build
Hangman
by Cgehrke
K
G1
G2
G3
Reading
Build the Word!
Group sort
by Rebekahbobo01
Word build pollution
Random cards
by Lfriverside
word build -able
Match up
by Ballances
Shabbat Build-a-Blessing
Missing word
by Rabbidavid
Shabbat
Chanukah Build-a-Blessing
Missing word
by Rabbidavid
Jewish Holidays
Build a Snowman
Random wheel
by Miryanfrank
Preschool
K
G1
Reading
Vocabulary
Build a Fall Sentence
Unjumble
by Afeliciotto
Melting Snowman — Build the Word
Hangman
by Mssarahpadgett
K
Phonics
To Build a Fire
Match up
by Ivette8
G11
English
LETS BUILD A PARK
Match up
by Mlloydav
Build A Sentence
Random wheel
by Aduppstadt
Build a Log Cabin
Random wheel
by Mgray3
Build a Sentence
Unjumble
by Dlgayheart
Sefirat Ha’Omer Build-a-Blessing
Missing word
by Rabbidavid
Brachot
Halloween Build a Face
Random wheel
by Veera32
Build A Log Cabin
Random wheel
by Ekelleher
Build a Cladogram
Labelled diagram
by Alexuscoggins
Build a Cladogram
Labelled diagram
by Jordanvega
build a turkey
Random wheel
by Amandab2
K
Build a Sentence
Unjumble
by Pcockey
build a house
Quiz
by Nataliahaworth
Let’s build a….
Random wheel
by Hho
Build a spring chick
Open the box
by Mjorgensen
A text box is a graphical container that holds text and works like a minidocument you can place anywhere within a regular document. Although it holds text, a text box itself is actually a graphic; the text it contains is independent from the document’s body text. You can format a text box’s text in most of the same ways you can format a document’s normal text. But because the box is a shape, you can drag it to a different position, resize it, and format it like other shapes.
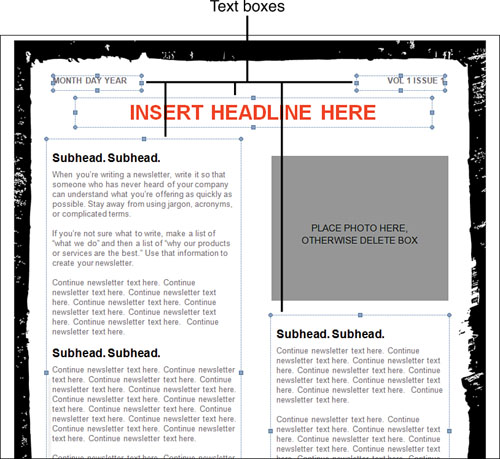
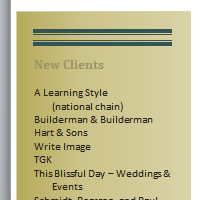
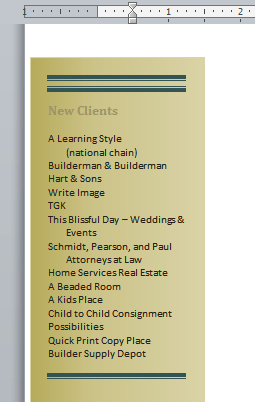
The text box is one of the secret weapons of great document layouts. In fact, lots of multicolumn documents, such as the newsletter template shown in Figure 1, don’t use columns at all. Instead, they are laid out with text boxes. In the figure, the newsletter is just a series of text boxes, sized and formatted in different ways, but neatly arranged to imitate a two-column design.
Figure 1. A newsletter template laid out with text boxes rather than columns. Each text box is indicated by its handles and borders.
The following sections show you how to insert a text box into a document, resize and move it, format the box itself and the text inside it, and other cool tricks.
Inserting a Text Box
You can create a text box in two ways. The first (and quicker) way is to insert a building block that is already formatted. The second (and slower) way is to draw a text box with your pointer and do all the formatting yourself. Either way, when a text box is selected, the Drawing Tools Format tab appears on the Ribbon and the text box is surrounded by a thin border and selection/sizing handles.
Creating a Text Box from a Building Block
If you create a text box from a building block, most of the work is done for you. The building blocks used for text boxes are preformatted with a border (and sometimes a fill) that coordinates with the document’s theme colors. The text is already formatted, too. All you need to do is add your own text. Here’s how to create a text block from a building block:
|
1. |
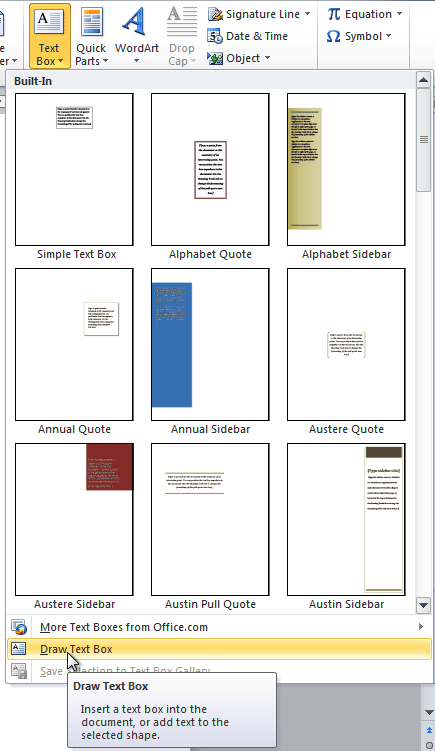
On the Insert tab, click Text Box. A menu drops down, showing thumbnail versions of Word’s built-in building blocks for text boxes, as shown in Figure 2. Figure 2. Selecting a building block from the Text Box menu.
|
|
2. |
In the Built-In section of the menu, click one of the thumbnails. The new text box contains sample text, so you can see how it is formatted. The sample text is selected so you can delete it or type over it. If you select the Simple Text Box building block, Word inserts a box in the middle of the page, in front of the document’s text. If you select any other building block, it is inserted as shown in the Text Box menu; the document’s text wraps around the block according to that block’s default text wrapping setting. |
|
3. |
Press Del to delete the sample text from the box. A blinking insertion point appears in its place. |
|
4. |
Type your text into the text box. |
|
5. |
Click outside the text box to deselect it. |
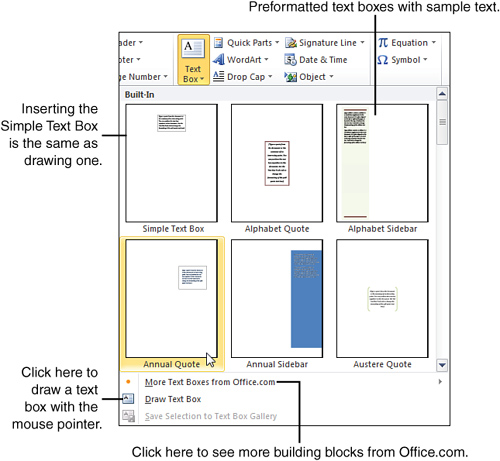
If you want to see more building blocks, click More Text Boxes From Office.com on the Text Box menu. A submenu pops out, showing a selection of text boxes available from the Office.com website. Click any building block to add it to the document.
Drawing a Text Box
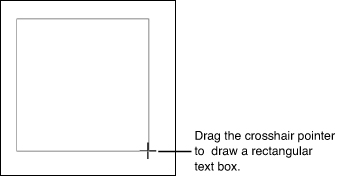
You can draw a text box with your pointer, but you’ll have to do all the formatting when you’re done. Here’s how to draw a text box:
|
1. |
On the Insert tab, click Text Box. |
|
2. |
Click Draw Text Box. The pointer changes to a crosshair. |
|
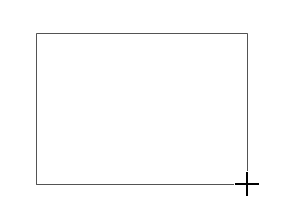
3. |
Drag the pointer to draw a box, as shown in Figure 3. When you release the mouse button, the insertion point appears inside the finished text box. Figure 3. Drawing a text box.
|
|
4. |
Type your text into the text box. |
|
5. |
Click outside the text box to deselect it. |
When you draw a text box, Word inserts the box wherever you draw it and places the box in front of the document’s text.
Resizing a Text Box
The way you can resize a text box depends on how you created it:
- If you drew the box (or inserted the Simple Text Box building block), resize it by doing any of the following:
- Drag any of its handles.
- On the Format tab, click the Size button; then use the Height and Width spin controls to set specific dimensions for the box.
- Click the Size group’s dialog box launcher to open the Layout dialog box. On the Size tab, set specific dimensions in the Height and Width sections, or use the Scale section to set the text box’s size as a percentage of its current size. Click OK when you finish.
- If you created the text box from a building block, its sizing options may be restricted, as shown in Figure 4. If you can’t resize the box by dragging its handles or by using the Size tools on the Format tab, open the Layout dialog box. On the Size tab, click Absolute in both the Height and Width sections; then click OK. Now you can resize the box as if it were drawn.
Figure 4. By default, a building block’s height or width may be set to Relative, restricting your ability to resize it.

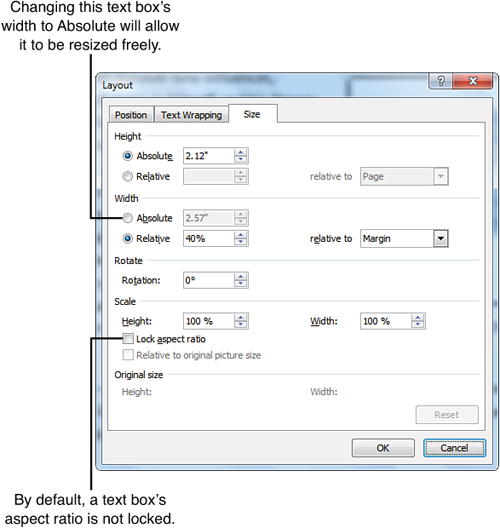
For some building blocks, the height and/or width may be set to Relative in the Layout dialog box. The Relative option ensures that the box’s height or width always stays in proportion to some aspect of the page. For easy resizing, change the text box’s Height and Width options to Absolute.
By default, a text box’s aspect ratio is not locked; if you leave it that way, you can resize the text box freely by dragging.
Moving a Text Box
To move a text box, click its border and drag it to a new location, as shown in Figure 5. If the text box was created from a building block (other than the Simple Text Box building block), the document’s text wraps around the box as determined by the building block’s text wrapping setting.
Figure 5. Moving a text box by dragging its border.
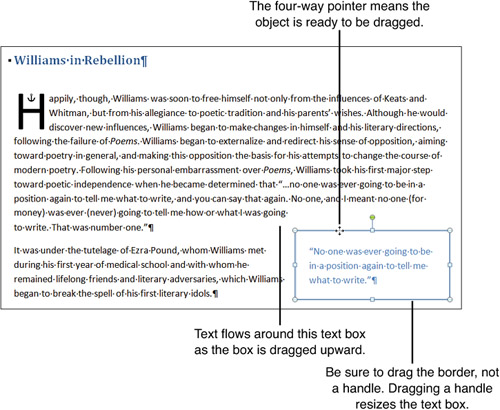
If you created the box by drawing it or by using the Simple Text Box building block, the box appears in front of the document’s text. You can change this by applying a different text wrapping option to the text box. Then you can move the text box by dragging.
Formatting a Text Box
A text box is basically the same thing as an AutoShape (a rectangle), but this shape is special because it’s already set up to hold text. You can format a text box by using the shape-formatting tools on the Format tab.
By default, Word formats a text box with an outline and a fill. The outline and fill can be the same or different colors, or you can apply a special effect to either one. However, in some cases, it’s a good idea to remove both the outline and the fill. For example, if your document has a colored background, you can make the background show through the text box by removing its shape formats. If you ever use text boxes for laying out a page (as shown back in Figure 1), the document will look cleaner if you omit the fills and outlines from the text boxes.
Formatting Text in a Text Box
Text in a text box is basically the same as text in a document; it just fits in a smaller space. A text box can hold multiple paragraphs, including numbered and bulleted lists. You can format a text box’s text in just about all the same ways you format a document’s body text. Select the text in the box; then apply formats from the Font and Paragraph groups of the Home tab. Text in a text box can be formatted with styles, too.
You can also do a couple of neat tricks with a text box’s text:
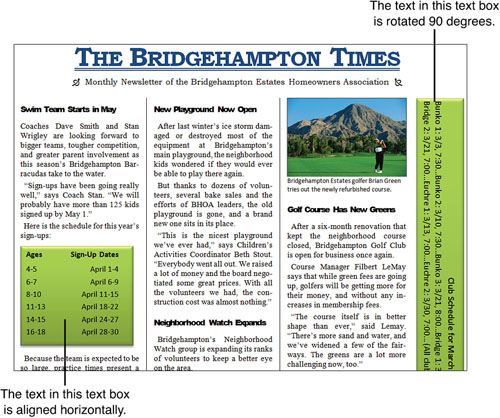
- Change text direction: By default, text is aligned horizontally in a text box. You can set text to run vertically, reading either from top to bottom (rotated 90 degrees) or from bottom to top (rotated 270 degrees). Figure 6 shows an example of how rotated text can be used to create a cool effect and make use of limited page space. To change text direction, click the text box to activate the Format tab, click Text Direction, and then choose an option from the drop-down menu.
Figure 6. In the text box along the right-hand edge of this newsletter, the text is rotated 90 degrees.

- Change text alignment: You can vertically align text at the top, center, or bottom of a text box. To set the alignment, go to the Format tab, click Align Text, and then choose an option from the drop-down menu.
Linking Text Boxes
You can use multiple text boxes to create fancy or complicated-looking layouts. For example, if you’re designing a multicolumn document but don’t want to mess with columns, you can use text boxes instead. Or if you want to create a boxed “sidebar” that spans two pages of a document, you can use two text boxes (one on each page) to hold the sidebar’s content.
The key to tricks like this is linking. When you link two or more text boxes, Word treats them as though they are a single box. When you fill the first box with text, just keep typing; the text jumps to the next box and continues there.
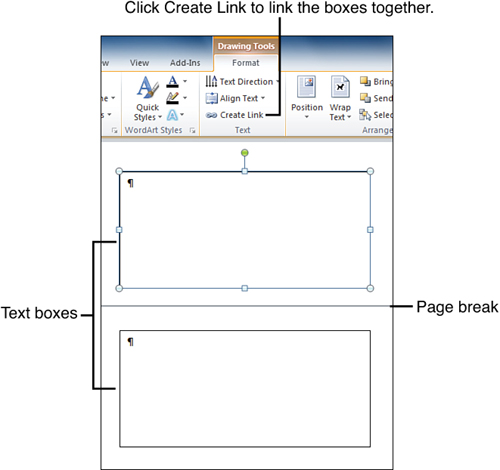
Creating Linked Text Boxes
To make the linking process easy, start by creating all the text boxes you’re going to need. Here’s a simple example:
|
1. |
Create two text boxes. Figure 7 shows two empty text boxes; the first is at the bottom of one page, and the second is at the top of the following page. Figure 7. Two text boxes, ready for linking.
|
|
2. |
Click the first text box. The Format tab appears on the ribbon. |
|
3. |
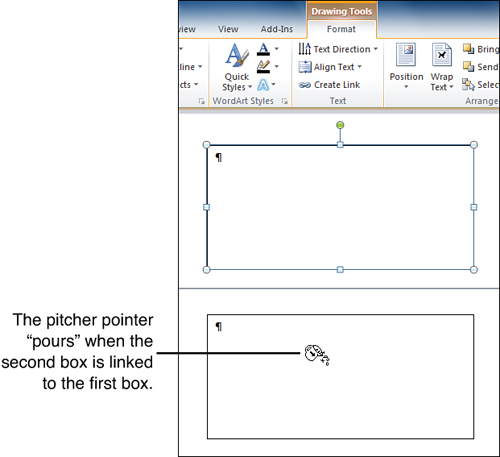
Click Create Link. The mouse pointer changes to the shape of a pitcher. |
|
4. |
Point to the second text box, and notice that the pitcher is tilted to look like its contents are pouring into the second text box, as shown in Figure 8. Figure 8. Linking the second text box to the first one.
|
|
5. |
Click the second text box. It is now linked to the first text box. |
The linking process goes a little differently if you need to link three or more boxes. Suppose you have four boxes; in this case, you would start by linking box 3 to box 4, then link box 2 to box 3, and finally link box 1 to box 2. Sounds crazy, but it works
WorldBox — это бесплатная игра-песочница, в которой ты — Бог. В этой песочнице-симуляторе ты можешь создавать жизнь и наблюдать за ее процветанием! Заселяй мир овечками, волками, орками, эльфами, дварфами и другими магическими существами!
Цивилизации создают дороги и строят дома. Они воюют друг с другом. Помоги им выживать, развиваться и построить могущественную империю!
Песочница. Используй различные природные силы. Ты можешь выжечь землю кислотным дождем или уничтожить ливнем атомных бомб! Создавай смерчи, подземных червей, обстреливай землю тепловыми лучами. Наслаждайся изощренными разрушениями или созданием миров, полных жизни!
Смотри, как классическая игра “Жизнь” может быть быстро уничтожена или наблюдай за созданием мира автоматом муравья Лэнгтона.
Симулируй всевозможные бедствия. Метеориты, извержения вулканов, сжигающая лава, смерчи, мощные гейзеры и многое другое. Создавай и наблюдай за эволюцией своих творений и закатом цивилизации.
Создавай пиксельный мир. Ты можешь создать уникальный мир с помощью множества инструментов. Будь оригинальным — используй пиксели разных цветов!
Экспериментируй в своем собственном мире. Играй с всевозможными созданиями и стихиями в магической симуляции.
Стань Богом собственного красочного пиксельного мира. Создавай жизнь и строй цивилизации разных мифологических рас. Воплоти мир своей мечты!
-
1
Click the Insert tab.
-
2
On the right side of all of the things you can insert, look for ‘Text Box.’
Advertisement
-
3
Select the text box that you want to use and double click on it.
-
4
Cut and paste the text into the text box.


Advertisement
Ask a Question
200 characters left
Include your email address to get a message when this question is answered.
Submit
Advertisement
Video
-
To change the size of the text box, click on it once, and drag one of the 8 circles.
-
You can change the design of the text box you have selected by going into the format tab.
Thanks for submitting a tip for review!
Advertisement
About This Article
Thanks to all authors for creating a page that has been read 98,536 times.
Is this article up to date?
wikiHow Tech Help Pro:
Level up your tech skills and stay ahead of the curve
Let’s go!
Lesson 15: Text Boxes and WordArt
/en/word2010/working-with-shapes/content/
Introduction
You may want to insert a text box into your document to draw attention to specific text or have the ability to easily move text within a document. Text boxes are basically treated the same as shapes, so you can add the same types of effects to them and can even change their shape.
In this lesson, you will learn how to insert a text box and format it in various ways, including resizing and moving it, as well as changing the text box shape, color, and outline. You will also learn how to create and format WordArt.
Text boxes
Text boxes are useful for helping to organize your document. They are basically treated the same as shapes, so when you insert a text box you can format it by changing its fill color, outline color, and shape style, as well as create WordArt and add 3D effects.
To insert a text box:
- Select the Insert tab on the Ribbon.
- Click the Text Box command in the Text group. A drop-down menu will appear.
- Select Draw Text Box.
Creating a blank text box
- Click and drag on the document to create the text box.
Drawing the text box
- You can now start typing to create text inside the text box.
From the drop-down menu, you can also select one of the built-in text boxes that have predefined colors, fonts, positions, and sizes. If you choose this option, the text box will appear automatically so you will not need to click and drag to draw it.
 A built-in text box
To move a text box:
- Click the text box.
- Hover the mouse over one of the edges of the text box. The mouse pointer becomes a cross with arrows on each end .
- Click and drag the text box to the desired location on the page.
Moving a text box
 .
.
To resize a text box:
- Click the text box.
- Click and drag one of the sizing handles on the corners or sides of the text box until it is the desired size.
Resizing a text box
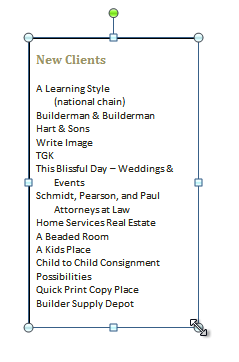
If you drag the sizing handles on any of the four corners, you will be able to change the height and width at the same time. The sizing handles on the top or bottom of the text box will only allow you to resize vertically, while the handles on the left and right sides will resize the text box horizontally.
Changing a text box’s appearance
To change the text box shape:
- Select the text box. A new Format tab appears with Drawing Tools.
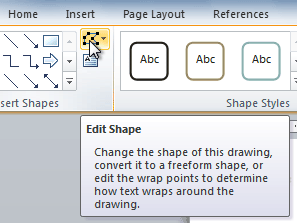
- Go to the Format tab.
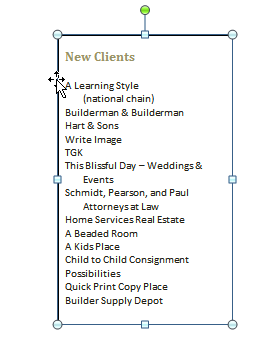
- Click the Edit Shape command.
The Edit Shape command
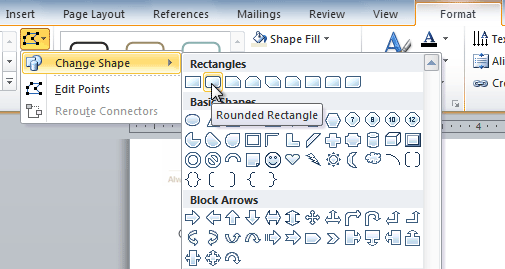
- Click Change Shape to display a drop-down list.
Choosing a different shape for the text box
- Select the desired shape from the list.
To choose a shape style:
Choosing a shape style allows you to apply a preset fill and outline color, and in some cases other effects such as beveling and shadow. You don’t have to pick a style for your text box, but it can help you save time or experiment with different appearances.
- Select the text box. The Format tab appears.
- Select the Format tab.
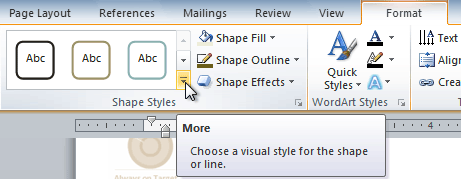
- Click the More drop-down arrow in the Shape Styles group to display more style options.
Viewing the Shape Styles
- Hover your mouse over the styles to see a live preview.
- Select the desired style.
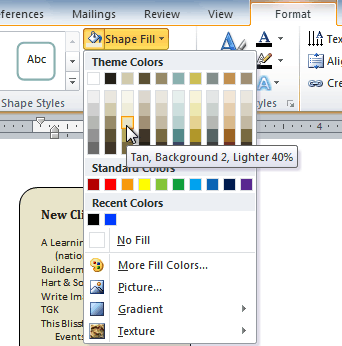
To change shape fill:
- Select the text box. The Format tab appears.
- Click the Format tab.
Changing the fill color
- Click the Shape Fill command to display a drop-down menu.
- From the drop-down menu, you can select a color from the list, choose No Fill, or select More Fill Colors to use a color that’s not on the list.
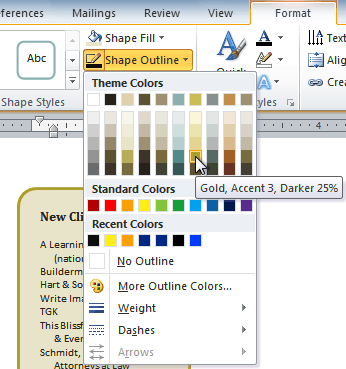
To change the shape outline:
- Select the text box. The Format tab appears.
- Click the Shape Outline command to display a drop-down list.
Changing the outline color
- Select a color from the list, choose No Outline, or select More Outline Colors to use a color that’s not on the list.
- From the drop-down menu, you can change the outline color, weight (thickness), and whether it is a dashed line.
To change shadow effects:
- Select the text box. The Format tab appears.
- Select the Format tab.
- Click the Shape Effects command.
- Click Shadow.
- Move your mouse over the menu options to see a live preview in your document.
Adding a shadow
- Click the desired option to select the shadow effect.
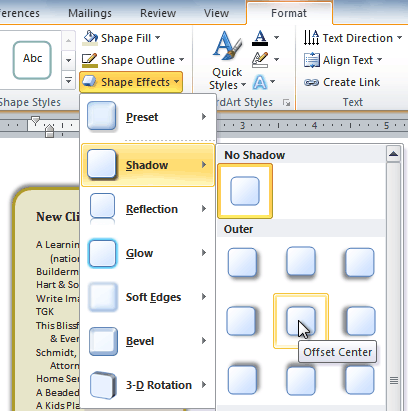
To choose a different shadow color for your shape, select Shadow Options from the drop-down menu, then click the Color button.
3D effects
Just like other types of shapes, text boxes can have 3D effects. There are two types of effects you can apply to your shapes to give them a 3D appearance: 3-D Rotation and Bevel. 3-D Rotation gives the appearance that you are viewing an object from a different angle, and it can be applied to any shape. Bevel adds thickness and a rounded edge to shapes; however, it doesn’t work with every type of shape.
To use 3-D Rotation:
- Select the text box.
- Select the Format tab.
- Click Shape Effects from the Shape Styles group.
- Hover your mouse over 3-D Rotation. A drop-down menu will appear.
Applying 3-D Rotation to a text box
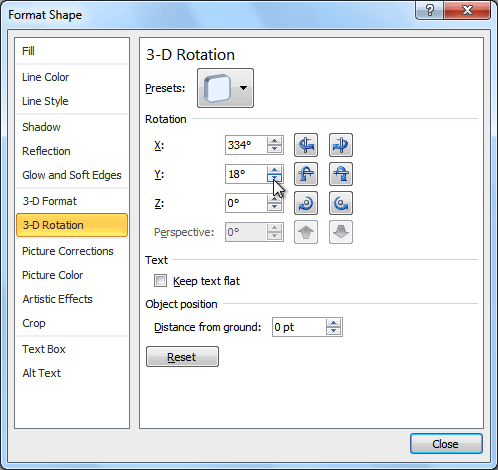
- Select the desired rotation preset from the drop-down menu. You can also click 3-D Rotation Options if you would prefer to type custom values.
3-D Rotation Options
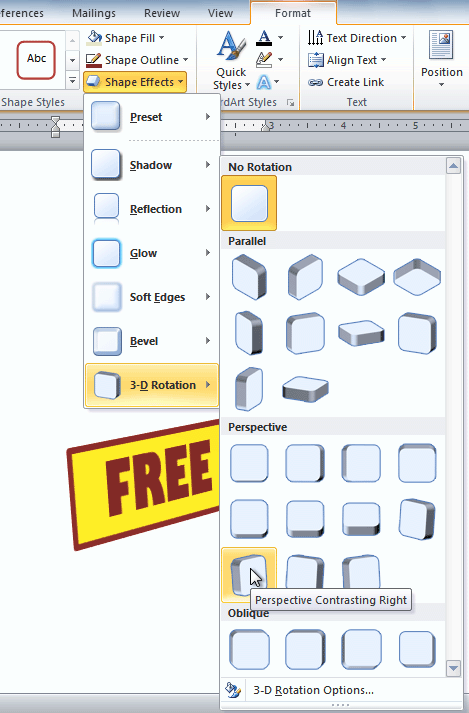
To use bevel:
- Select the text box.
- Select the Format tab.
- Click Shape Effects from the Shape Styles group.
- Hover your mouse over Bevel. A drop-down menu will appear.
Adding bevel to a text box
- Select the desired bevel preset from the drop-down menu. You can also click 3-D Options if you would prefer to type custom values.
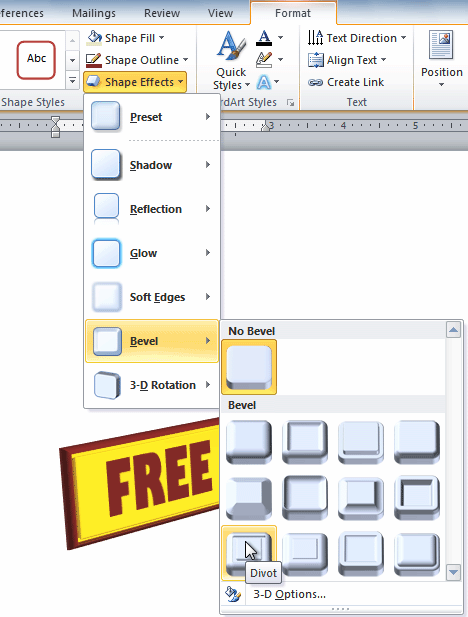
If you click 3-D Options, you’ll also be able to change the shape’s Material to give it a metal, plastic, or translucent appearance, and you can choose the Lighting type to change how the shape is illuminated.
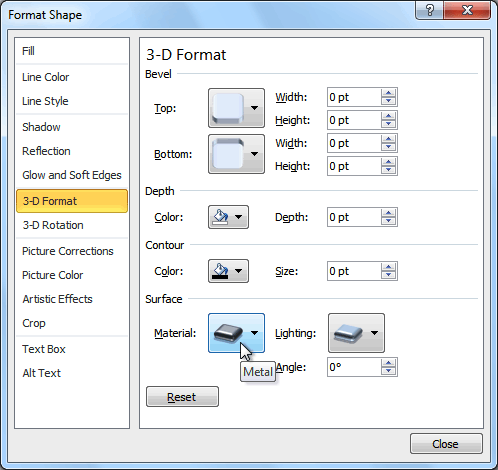 3-D Format Options
Creating WordArt
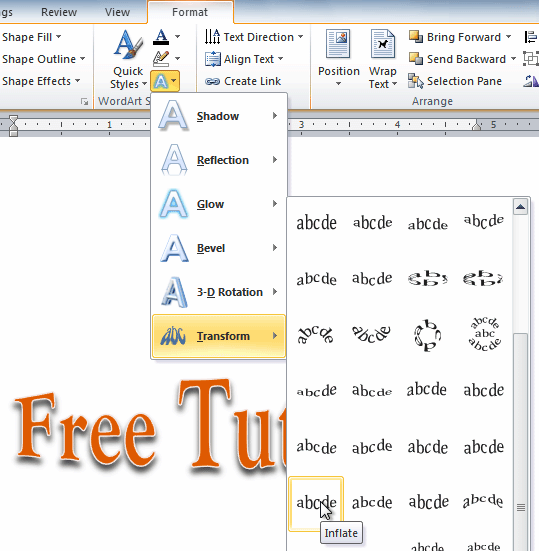
In addition to adding effects to a text box, you can add effects to the text inside the text box, which is known as WordArt. For the most part, the types of effects you can add are the same as the ones you can add to shapes or text boxes (shadow, bevel, etc.). However, you can also Transform the text to give it a wavy, slanted, or inflated look.
To apply a quick style to text:
A quick style will automatically apply several effects to your text at once. You can then refine the look of your text by adding or modifying text effects.
- Select the text box, or select some text inside of the text box. The Format tab will appear.
- Click the Format tab.
- Click the Quick Styles command in the WordArt Styles group. A drop-down menu will appear.
Selecting a Quick Style
- Select the desired style preset to apply the style to your text.

After you have applied a quick style, you can still modify the font or font color from the Home tab if you want.
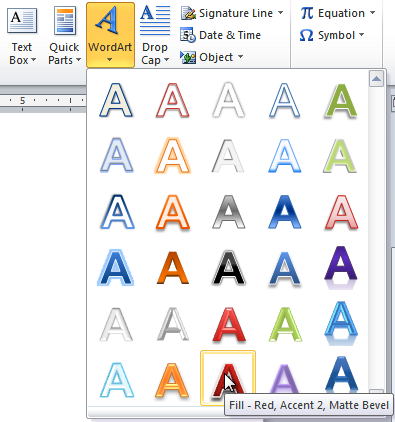
To convert regular text into WordArt:
For text to be formatted as WordArt, it needs to be inside of a text box. However, there’s a shortcut that allows you to convert text into WordArt even if it’s not in a text box.
- Select the text you want to convert.
- Click the Insert tab.
- Click the WordArt command. The Quick Styles drop-down menu will appear.
Converting text to WordArt
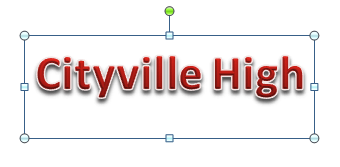
- Select the desired quick style.
- Word will automatically create a text box for your text and apply the style to the text.
After converting to WordArt
Some effects, such as shadows, can be added from the Text Effects menu in the Home tab. When you add effects in this way, it will not place the text in a text box.
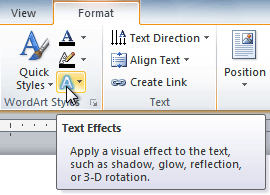
To add or modify text effects:
- Select the text box, or select some text inside of the text box. The Format tab will appear.
- Click the Format tab.
- Click the Text Effects command in the WordArt Styles group. A drop-down menu will appear, showing the different effect categories.
The Text Effects command
- Hover over an effect category. A drop-down menu will appear. You can hover the mouse over the different presets to see a live preview.
Adding an effect
- Select the desired effect preset. The effect will be applied to your text. If you want, you can combine several effects.
The finished WordArt

Challenge!
- Create a new document.
- Insert a text box.
- Enter some text into the text box.
- Move the text box to the desired location.
- Change the outline of the text box to a different color.
- Change the fill color of the text box.
- Add some WordArt effects to the text.
/en/word2010/inserting-clip-art-and-pictures/content/
На чтение 2 мин Просмотров 2.2к. Опубликовано 14 февраля, 2022
Worldbox — интересная инди-игра, позволяющая почувствовать себя богом. Там вы сможете изменить мир игры с помощью различных инструментов и наполнить его множеством мелких существ. Некоторые из этих существ разумны и способны строить города. Если вы не знаете, как заставить своих людей или орков строить город, возможно, вам стоит прочитать это руководство, так как мы собираемся рассказать вам, как работает строительство города в Worldbox.
Городское строительство в Worldbox
В Worldbox можно увидеть множество разных животных и разумных существ. Эта игра является своего рода симулятором Бога, а это значит, что судьба всего мира находится в ваших руках. Там вы можете помочь некоторым людям процветать, а затем вы сможете вызвать катастрофу, которая убьет всех. Однако, прежде чем вы сможете разрушить жизнь некоторых людей, вы должны помочь им процветать и построить большой город.
Люди, орки, эльфы и гномы могут строить свои собственные города. Итак, если вы хотите, чтобы они процветали, вам нужно будет помочь им и предоставить этим людям все ресурсы, необходимые для строительства города. Разумные существа способны построить все самостоятельно и единственное, что вам нужно сделать, это убедиться, что у них есть все ресурсы для дальнейшего развития.
Для того, чтобы помочь некоторым людям построить город в Worldbox , вам нужно будет предоставить им четыре ресурса. Это Дерево, Камень, Металл и Золото. Ваши люди смогут процветать благодаря этим ресурсам и построят огромный город, если у них не будет недостатка в ресурсах.