Word for Microsoft 365 Word for Microsoft 365 for Mac Word 2021 Word 2021 for Mac Word 2019 Word 2019 for Mac Word 2016 Word 2016 for Mac Word 2013 Word 2010 Word for Mac 2011 More…Less
A text box is an object you can add to your document that lets you put and type text anywhere in your file. Text boxes can be useful for drawing attention to specific text and can also be helpful when you need to move text around in your document.
Add a text box
-
Place cursor where you want the text box to appear.
-
Go to Insert and in Illustrations select Drawing.
-
Select Text Box and use your cursor to create the text box.
-
Insert text in box and apply any styling needed.
-
Select Save andClose.
If you aren’t using a mouse
-
Press Alt + Period (.) and then press N.
-
Then press D to select drawings.
-
Press Alt + Period (.) and then press N.
-
Type the text that you want.
-
Press the Esc key 3 times.
-
Press Enter to save textbox.
Notes:
-
To format the text in the text box, select the text, and then use the formatting options in the Font group on the Home tab.
-
To format the text box itself, use the commands on the Shape Format contextual tab that appears when you select a text box.
-
To position the text box, select it, and then when the pointer becomes a
four-headed arrow, drag the text box to a new location.
-
You can also change or remove a border from a text box or shape.
-
If you have multiple text boxes, you can link them together so that text will flow from one box to another. Select one of the text boxes and on the Shape Format tab, select Create Link.
-
Editing in a text box
-
Double click the textbox.
-
In Drawing (Preview), select the textbox to place your cursor and edit text.
-
When finished select Save and Close to view updated text box.
Copy a text box
-
Select the border of the text box that you want to copy.
-
Press Ctrl+C.
Note: Make sure the pointer is on the border of the text box, not inside it. If the pointer is inside, pressing Ctrl+C will copy the text, not the text box.
-
Select a location and press Ctrl+V to paste the text box.
Delete a text box
-
Select the border of the text box that you want to delete, and then press Delete.
Note: Make sure the pointer is on the border of the text box and not inside it. If the pointer is inside the box, pressing Delete will delete the text inside the text box, not the box.
Add a text box
-
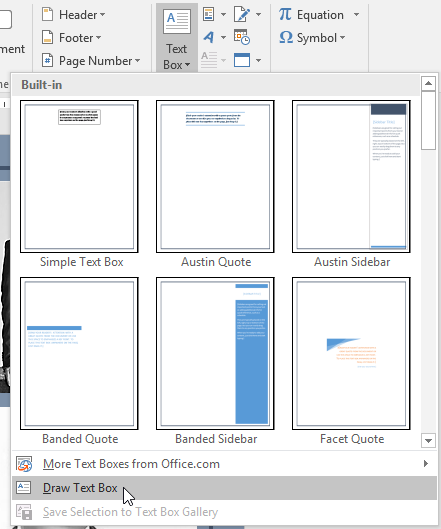
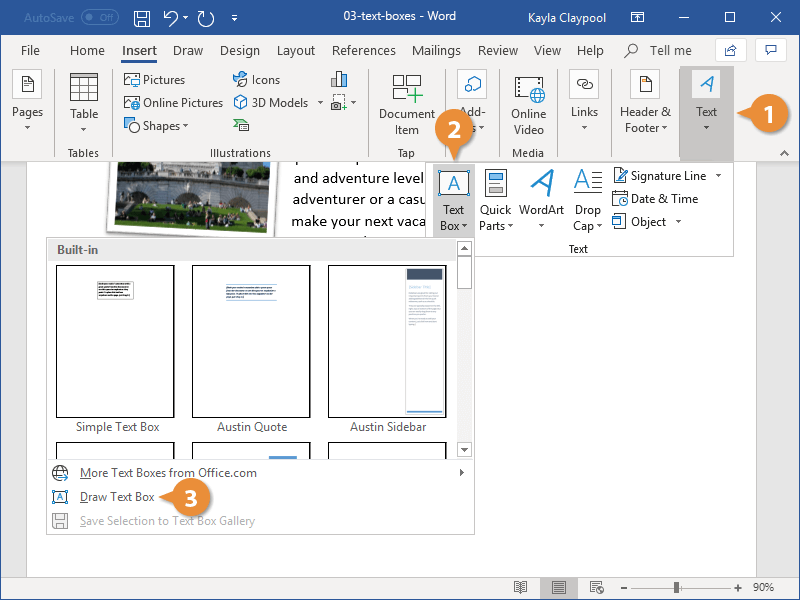
Go to Insert > Text Box, and then select Draw Text Box.
-
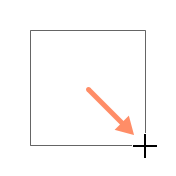
Click or tap in the document, and drag to draw the text box the size that you want.
-
To add text to a text box, select inside the text box, and then type or paste text.
Notes:
-
To format the text in the text box, select the text, and then use the formatting options in the Font group on the Home tab.
-
To format the text box itself, use the commands on the Format contextual tab, which appears under Drawing Tools when you select a text box.
-
To position the text box, select it, and then when the pointer becomes a
, drag the text box to a new location.
-
You can also change or remove a border from a text box or shape.
-
If you have multiple text boxes, you can link them together so that text will flow from one box to another. Select one of the text boxes and on the Format tab, under Drawing Tools, and then select Create Link.
-
Copy a text box
-
Select the border of the text box that you want to copy.
-
Go to Home > Copy
.
Make sure that the pointer is not inside the text box, but rather on the border of the text box. If the pointer is not on the border, pressing Copy will copy the text inside the text box and not the text box.
-
Go to Home and select Paste.
Delete a text box
-
Select the border of the text box and then press DELETE.
Make sure that the pointer is not inside the text box, but rather on the border of the text box. If the pointer is not on the border, pressing DELETE will delete the text inside the text box instead.
Add a text box
-
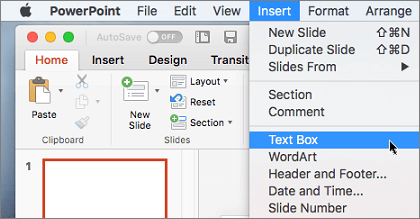
Go to Insert > Text Box and then select either Draw Text Box (where the text aligns horizontally on the page) or Vertical Text Box (where the text aligns vertically on the page).
-
Select in the document, and then drag to draw the text box the size that you want.
-
To add text to a text box, click or tap inside the text box, and then type or paste text.
-
To format the text in the text box, select it, and then Control + Click the text and select Font.
-
To add different effects to the text box, select the text box, and use the options on the Shape Format tab (such as changing the text direction or aligning the text at the top, middle or bottom of the text box).
-
To position the text box, select and hold it, and then when the pointer becomes a
, drag the text box to a new location.
-
Note: If you have drawn multiple text boxes, you can link them together so that text will flow from one box to another. You can only link an empty text box to the one that you’ve selected. To do this, select the text box that you want to link to another text box, and then go to Shape Format > Create Link.
Copy a text box
-
Select the text box you want to copy.
Make sure that the pointer is on the border of the text box and not inside the text box. If the pointer is not on the border, the text inside the text box is copied.
-
Press Control + Click, and then select Copy. Or, press
+ C.
-
Select the location in your document where you want to paste the text box, press Control + Click, and then select Paste. Or, press
+ V.
Remove a text box
-
Select the border of the text box that you want to delete, and then press DELETE.
Make sure that the pointer is on the border of the text box and not inside the text box. If the pointer is not on the border, pressing DELETE will delete the text inside the text box.
Add a text box
-
Go to Insert > Text Box.
-
Click in your file where you’d like to insert the text box, hold your mouse button down, then drag to draw the text box the size that you want.
-
After you’ve drawn the text box click inside it to add text.
Copy a text box
-
Select the text box you want to copy.
Make sure that the pointer is on the border of the text box and not inside the text box. If the pointer is not on the border, the text inside the text box is copied.
-
Press Control + Click, and then select Copy. Or, press
+ C.
-
Select the location in your document where you want to paste the text box, press Control + Click, and then select Paste. Or, press
+ V.
Remove a text box
-
Select the border of the text box that you want to delete, and then press DELETE.
Make sure that the pointer is on the border of the text box and not inside the text box. If the pointer is not on the border, pressing DELETE will delete the text inside the text box.
Need more help?
Achieve more control and flexibility with your documents
Updated on September 11, 2022
What to Know
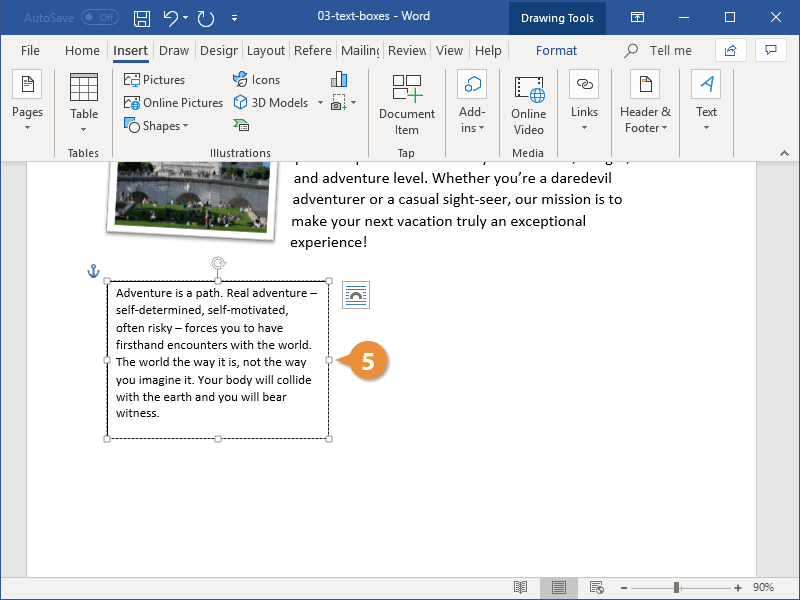
- Select Insert > Text Box > choose a text box template. Select and drag box to the position you want.
- To resize text, select and drag circles around the edge. To rotate text, select and drag the circular arrow.
- Place the cursor inside the text box and type the information you want to appear.
This article explains how to use text boxes in Microsoft Word. Instructions apply to Word for Microsoft 365, Word 2019, Word 2016, and Word 2013.
How to Insert a Text Box in Word
Start by opening the document you want to add a text box to. Then follow the steps below.
-
On the ribbon, select Insert.
-
In the Text group, select Text Box, then choose a text box template.
-
The new text box appears in the middle of the text, and the Shape Format tab is automatically selected.
-
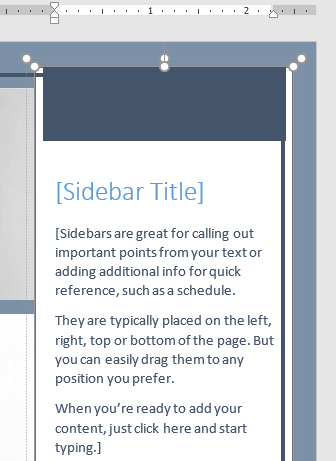
Select and drag the box to the position you want. To resize the text box, select and drag the circles around the edge. To rotate the text box, select and drag the circular arrow at the top of the box.
-
Place the cursor inside the text box and type the information you want to appear there.
Why Use Text Boxes?
When you type text in Microsoft Word, you have options for making it look a particular way on the page (such as changing the page margins), but those options are limited. Text boxes expand your formatting repertoire by offering additional control and flexibility for how your text appears. You can place a text box anywhere within a document and format it with different colors and fonts. This feature is especially helpful for creating a blockquote or a sidebar.
Customize a Text Box
After you create a text box, you can customize it in a number of ways.
-
To bring up options, place the cursor inside the text box and right-click. Choose an option and follow the screen prompts to add a border, change the style, or adjust the way the text box interacts with the other text on the page.
Alternatively, use the controls on the Shape Format tab.
-
To go directly to the Layout Options menu, select the text box, then select the Layout Options icon (it looks like a horseshoe and is located to the right of the text box).
-
Change the text, make more adjustments, or move the box to another location at any time. To delete a text box, select its border, then press Delete on the keyboard.
Thanks for letting us know!
Get the Latest Tech News Delivered Every Day
Subscribe
Lesson 21: Text Boxes
/en/word2016/shapes/content/
Introduction
Text boxes can be useful for drawing attention to specific text. They can also be helpful when you need to move text around in your document. Word allows you to format text boxes and the text within them with a variety of styles and effects.
Optional: Download our practice document.
Watch the video below to learn more about text boxes in Word.
To insert a text box:
- Select the Insert tab, then click the Text Box command in the Text group.
- A drop-down menu will appear. Select Draw Text Box.
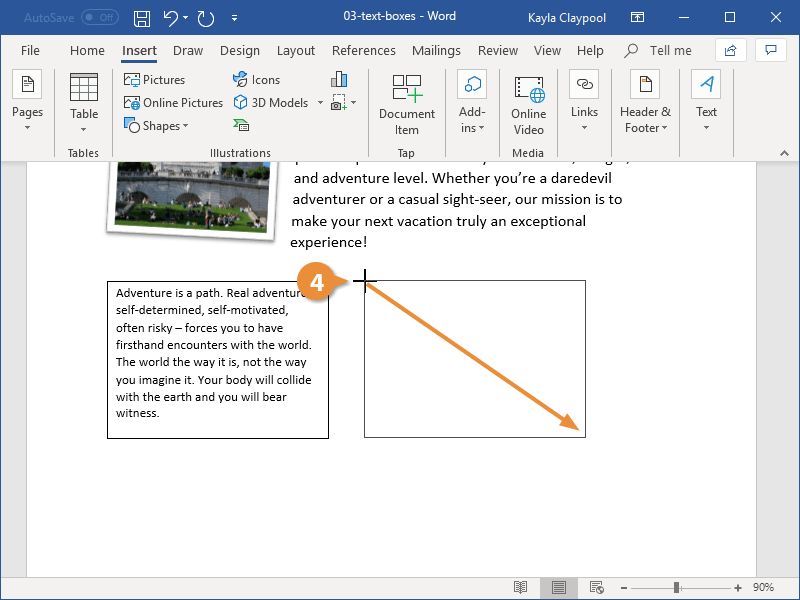
- Click and drag anywhere on the document to create the text box.
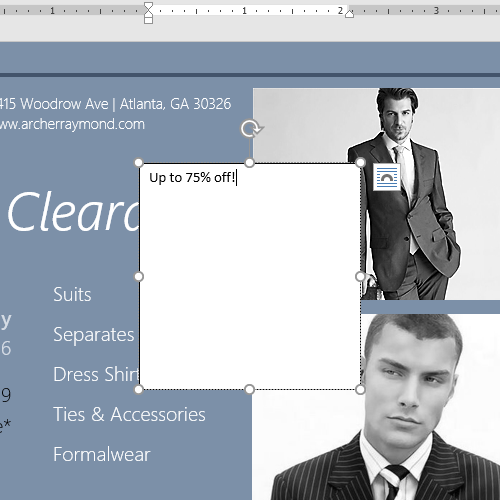
- The insertion point will appear inside the text box. You can now type to create text inside the text box.
- If you want, you can select the text and then change the font, color, and size by using the commands on the Format and Home tabs. To learn more about using these formatting commands, see our Formatting Text lesson.
- Click anywhere outside the text box to return to your document.
You can also select one of the built-in text boxes that have predefined colors, fonts, positions, and sizes. If you choose this option, the text box will appear automatically, so you will not need to draw it.
To move a text box:
- Click the text box you want to move.
- Hover the mouse over one of the edges of the text box. The mouse will change into a cross with arrows.
- Click and drag the text box to the desired location.
To resize a text box:
- Click the text box you want to resize.
- Click and drag any of the sizing handles on the corners or sides of the text box until it is the desired size.
Modifying text boxes
Word offers several options for changing the way text boxes appear in your document. You can change the shape, style, and color of text boxes or add various effects.
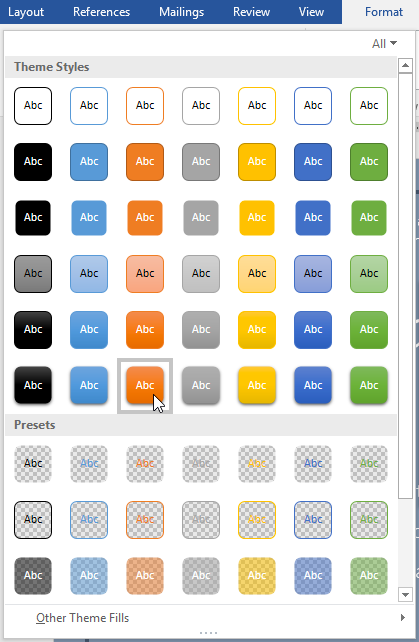
To change the shape style:
Choosing a shape style allows you to apply preset colors and effects to quickly change the appearance of your text box.
- Select the text box you want to change.
- On the Format tab, click the More drop-down arrow in the Shape Styles group.
- A drop-down menu of styles will appear. Select the style you want to use.
- The text box will appear in the selected style.
If you want to have more control over text box formatting, you can use any of the shape formatting options such as Shape Fill and Shape Outline. To learn more, see our Shapes lesson.
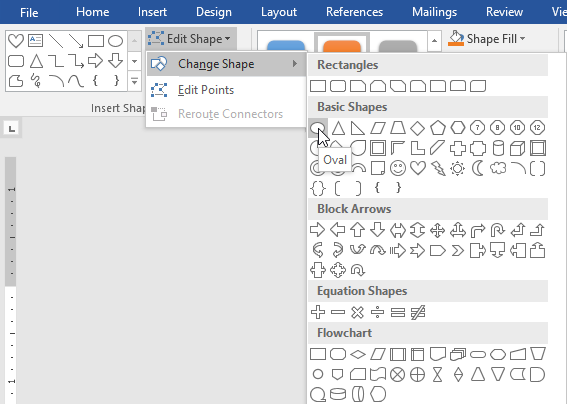
To change the text box shape:
Changing the shape of a text box can be a useful option for creating an interesting look in your document.
- Select the text box you want to change. The Format tab will appear.
- From the Format tab, click the Edit Shape command.
- Hover the mouse over Change Shape, then select the desired shape from the menu that appears.
- The text box will appear formatted as the shape.
Challenge!
- Open our practice document.
- Insert a Simple Text Box.
- In the text box, type Get an additional 25% off when you mention this ad!
- Change the font to Gadugi, 20 pt, Center Align.
- Change the shape of the text box to Double Wave from the Stars and Banners group.
- Change the text box style by selecting any style in the Intense Effect row.
- Drag the text box to the space below Buy 1, Get 1 Free* and Formalwear.
- When you’re finished, your document should look something like this:
/en/word2016/aligning-ordering-and-grouping-objects/content/
In Microsoft Word, the user can create the text boxes in several built-in styles, predefined Textboxes offered in Word. If any of the built-in styles do not meet the user’s, interest there is a feature in Word that allows the user to draw the text box. There is an option where you can get more textboxes from Office.com and can save the selection to the text box gallery.
In this tutorial, we will explain:
- How to insert a Built-in Styles Text Box.
- How to insert text into Text Box.
- How to copy the Text Box to a new location.
- How to change the direction of text in the selected Text Box.
- How to Format the Text Box.
- How to change the default formatting for a Text Box.
- How to save a selected Text Box as a Building Block.
What is Text Box in Microsoft Word
A Text Box is a feature in Word that focuses on its content and displays essential text such as headings and quotes.
1] How to insert a Built-in Styles Text Box
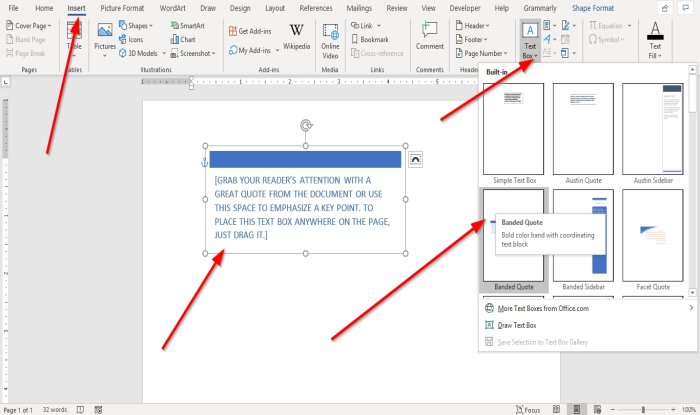
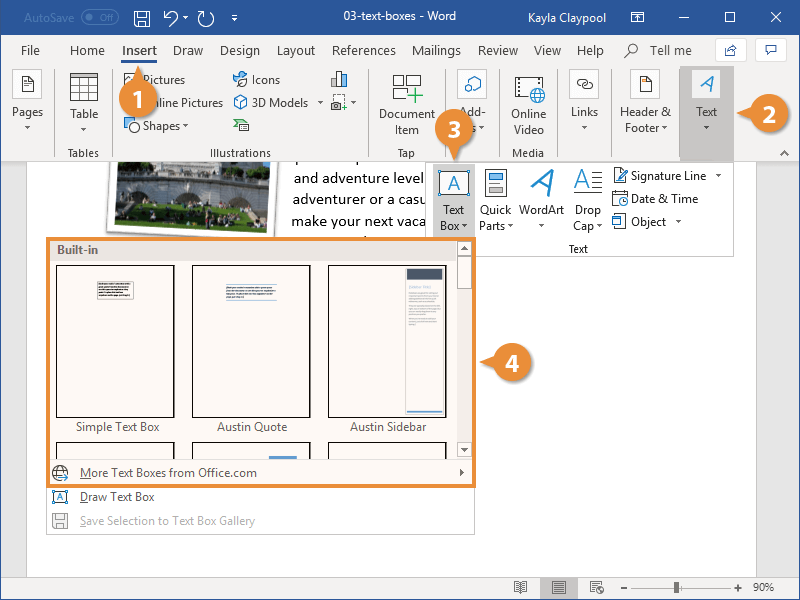
Click the Insert tab on the menu bar.
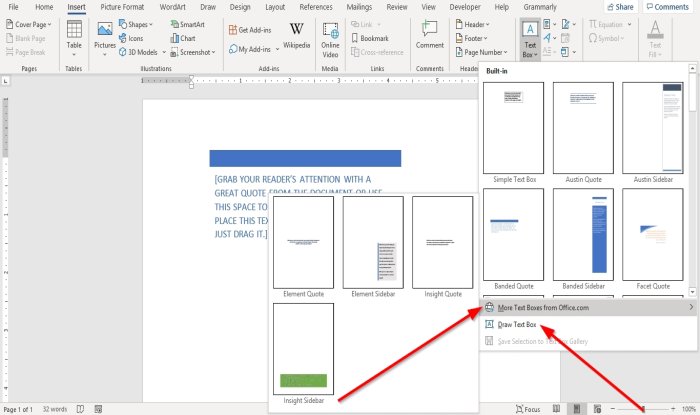
On the Insert tab in the Text group, click the drop-down arrow of the Text Box button.
You will see a list of text box built-in styles you can choose from; select the one you desire.
The text box you selected will appear in the document.
You can use More Text Boxes from Office.com to insert text boxes in the document.
In the Text Box drop-down list, you can also select Draw Text Box and draw a text box into the document.
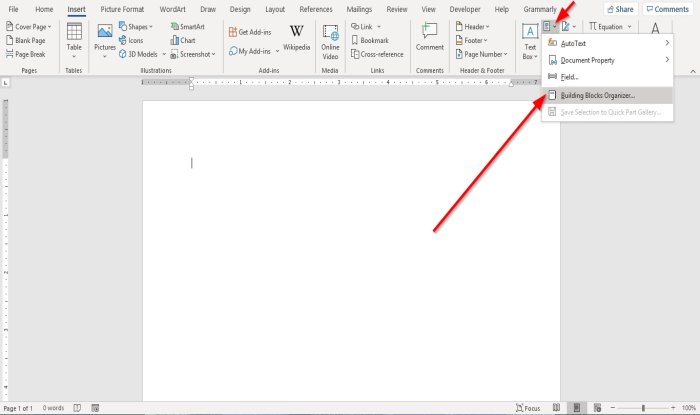
The other option to insert a Built-in Style text box is to your document is to click on the Explore Quick Parts button.
In the drop-down list, select Building Blocks Organizer.
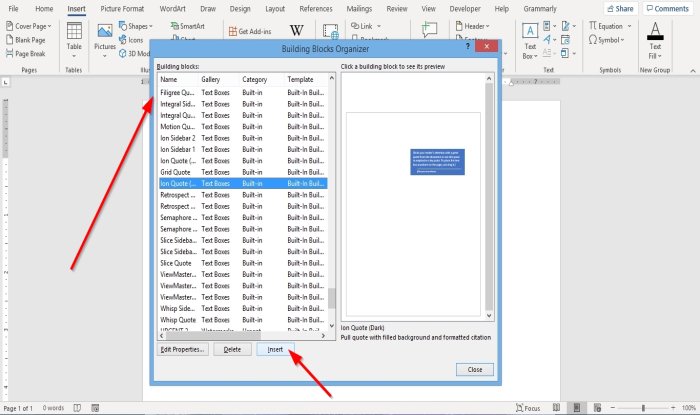
A Building Blocks Organizer dialog box will appear.
In the dialog box, scroll down until you see the text box gallery.
Click any text box of your choice and click Insert.
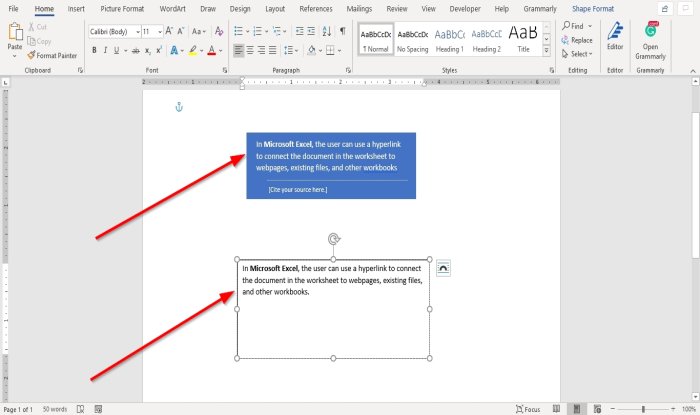
The text box is inserted into the document.
2] How to insert text into Text Box
For a built-in style text box, click into the text box and press the Delete Key to delete the default text inside it and type your text.
For the text box you draw, click inside the text box and enter your text.
3] How to copy the Text Box to a new location
Place the cursor near the text box’s frame, hold the CTRL-key down, and drag the textbox.
You will notice that the text box is copied.
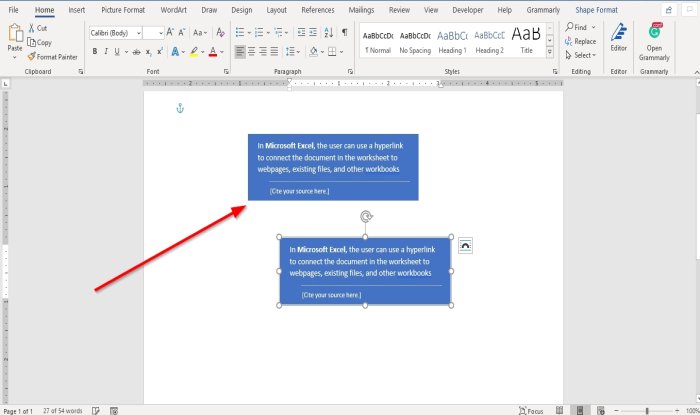
4] How to change the direction of text in the selected Text Box
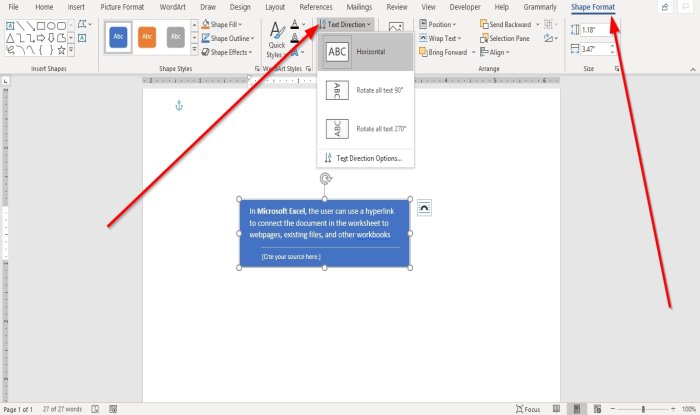
Go to the Shape Format tab.
On the Shape Format tab in the Text group, click Text Direction.
In the drop-down list, choose the direction you want the text to be in the text box.
5] How to Format the Text Box
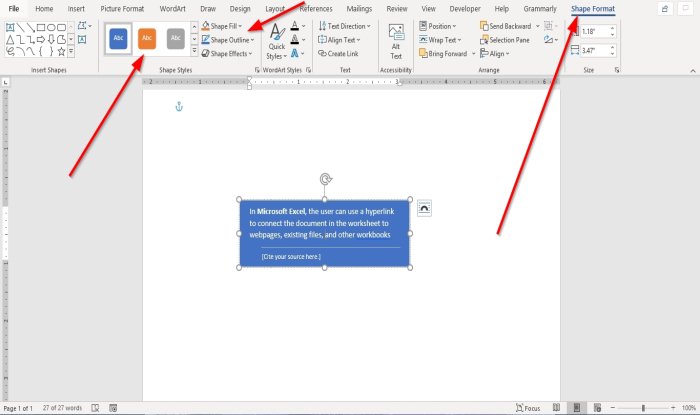
Click on the text box on the Shape Format tab in the Shape Styles group. You can choose the built-in styles you like.
You can format the text box by selecting Shape Fill, Shape Outline, and Shape Effects.
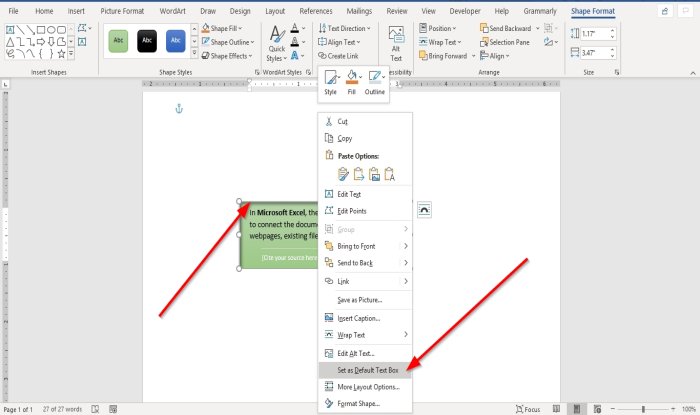
6] How to change the default formatting for a Text Box
Right-click a formatted text box border and select Set as Default Text Box.
7] How to save a selected Text Box as a Building Block
Go on the Insert tab in the Text group and select the Text Box button.
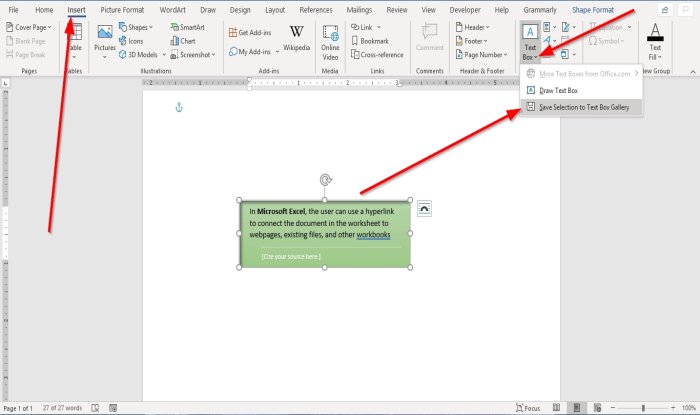
In the drop-down list, select Save Selection to Text Box Gallery.
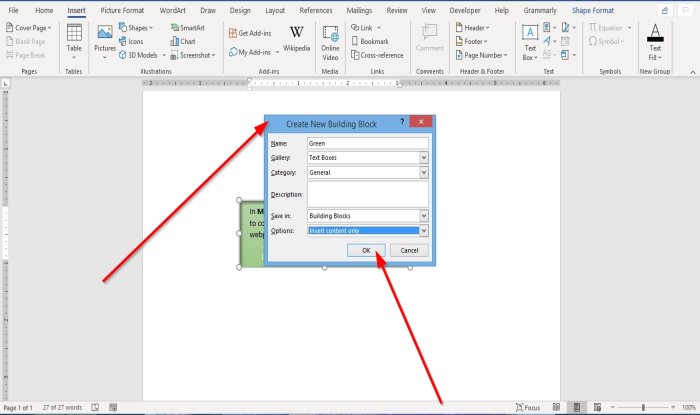
A Create New Building Block dialog box will appear, enter a name, select a category, or any changes you wish to make in the dialog box.
Click Ok.
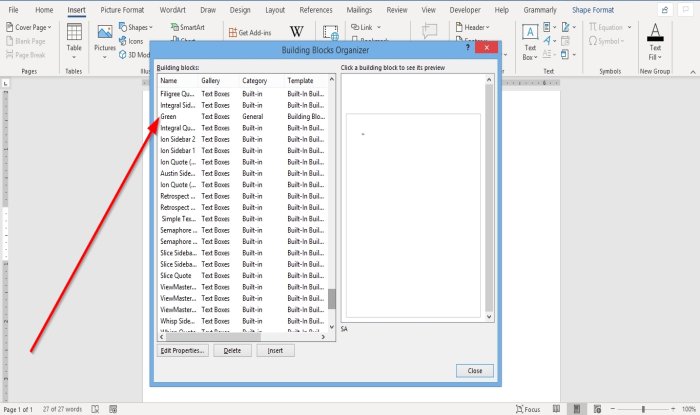
If you want to see if the textbox you save is in the Building Block, click the Explore Quick Parts button in the Text group.
In the drop-down list, select Building Block Organizer.
A Building Blocks Organizer dialog box will appear; Scroll down until you see the name of the text box you name.
I hope this helps; if you have questions, please comment below.
Read next: How to print hidden text in Word on Windows and Mac.
-
1
Click the Insert tab.
-
2
On the right side of all of the things you can insert, look for ‘Text Box.’
Advertisement
-
3
Select the text box that you want to use and double click on it.
-
4
Cut and paste the text into the text box.
Advertisement
Ask a Question
200 characters left
Include your email address to get a message when this question is answered.
Submit
Advertisement
Video
-
To change the size of the text box, click on it once, and drag one of the 8 circles.
-
You can change the design of the text box you have selected by going into the format tab.
Thanks for submitting a tip for review!
Advertisement
About This Article
Thanks to all authors for creating a page that has been read 98,536 times.
Is this article up to date?
wikiHow Tech Help Pro:
Level up your tech skills and stay ahead of the curve
Let’s go!
In Word, text boxes can contain many different types of elements and are handy when you need to insert information in a specific place on the page. You can format text boxes in dozens of ways to make them appear just how you need. The following articles cover how to efficiently work with text boxes in Word.
Tips, Tricks, and Answers
The following articles are available for the ‘Text Boxes and Frames’ topic. Click the
article»s title (shown in bold) to see the associated article.
Adding a Drop Shadow to a Text Box
Drop shadows add a nice touch to text boxes, making it seem like they are hovering above the page. Here’s the simple steps you need in order to add a drop shadow to your text boxes.
Adding Endnotes in Text Boxes
Text boxes and endnotes are both great tools you can use within a document. Problem is, you cannot use them together—Word doesn’t allow you to add endnotes within a text box. This tip looks at how you can get round this problem.
Adding Sidebars
When designing your document, you may want to use sidebars like you see in magazines and some books. This tip explains the easiest way to create your own sidebars, using text boxes.
Automatically Adjusting Height for Text Boxes
Text boxes are often used to enhance the layout of documents. You may want a text box that adjusts its height automatically based on the text it contains. Here’s how to get just what you want.
Boxes in Boxes
When you insert a text box within another text box, you may expect any text in the outer text box to wrap around the inner text box. Word doesn’t work that way, however. Here’s why, along with a couple of workarounds you can use.
Changing Defaults for Text Boxes and Callouts
Do you find yourself frequently creating text boxes and callouts? This tip describes how to change the default settings and how you can easily create text boxes that exactly meet your common requirements.
Changing Orientation of a Text Box
Want to change how a text box is oriented on the page? You can’t do it, but you can adjust the dimensions of the box manually.
Columns in a Text Box
Want to divide a text box into columns? Word doesn’t allow you to do this, but there are ways to work around the limitation.
Comments in Text Boxes
If you use text boxes in your documents, you may sometime want to place a comment in the text box, the same as you can do with text not in the text box. Word doesn’t allow you to add comments to text boxes, but there are a couple of workarounds you can use to get the same result.
Creating See-through Text Boxes
When laying out your document, you may want to use a text box that appears to be positioned over your text, but to be transparent so you can see what is behind the text box. Here’s how to create just that type of element.
Creating Sideheads
A sidehead can be used as a layout element for a document. You can create sideheads in a document by using text boxes, as described in this tip.
Creating Usable Figure Captions
Many people add both images and figure captions within text boxes so they can be easily positioned within a document. Doing so, however, has drawbacks as the figure captions are not as easily accessible for cross referencing or for inclusion in a Table of Figures. This tip describes how you can rectify this situation so that the captions are again usable.
Different Layout for a Portion of a Page
Got a document layout that requires a portion of the page to be in one layout and another portion to be in a different layout? While Word is better at word processing than at document design, there are some things you can do to get the layout to appear the way you want.
Find and Replace in Text Boxes
Find and Replace can work great, but not necessarily for text within text boxes. This tip discusses all the ins and outs of working with text boxes when it comes to finding text within them.
Finding an Invisible Text Box
Text boxes can be a great aid in designing the layout of your document. What do you do when you can’t find a text box that you want to delete, however? Here are a variety of approaches you can use to finding that errant text box.
Finding Text Boxes
Need to search for various text boxes in your document? It’s easy to do with the handy macro provided in this tip.
Hanging Indents in Wrapped Text
If you use hanging indents for some of your paragraphs, you may wonder why they don’t look right when they wrap on the right side of a text box or graphic. Here’s the reason and what you can do to correct the formatting.
Including Text Box Text in Word Counts
If you use text boxes in the layout of your documents, you should know that any word counts you perform do not include any words in those text boxes. If you want to include those words in your counts, you need the information in this tip.
Inserting a Text Box
Text boxes are a great way to implement non-standard ways of laying out your document. They allow you to put text at virtually any point on a page, and have it be treated as a graphic element. This tip explains the different ways you can add text boxes to your documents.
No-border Text Boxes by Default
Text boxes can be a great design element when laying out your documents. If you want those text boxes to have no borders (or a different border than Word uses as a default), here’s how to create your own default.
Repeating the First Column of a Table
Need the first column of a table to be repeated on multiple pages? You can’t do it automatically in Word, but you can use a workaround to get the desired result.
Resizing a Text Box
Text boxes allow you to «segment» information in your document and lay it out differently. You can easily resize these boxes by following the simple instructions in this tip.
Rotating Fractions in a Text Box
Rotating graphics in Word is not always straight-forward, but it can be done. The tools on the Drawing toolbar allow you to modify the graphics in your document to your needs.
Selecting a Graphic Behind a Text Box
How to select a graphic that is obscured by a text box can be perplexing. Here’s an overview of the different ways you can select just the graphic and nothing else.
Selecting Text in Linked Text Boxes
Text boxes are often used as design elements in a document layout. If you have linked text boxes, you may have noticed that it isn’t as easy to select text where the selection spans the text box boundaries. Here’s how you can still make those selections.
Spell Checking with Text Boxes
Text boxes are a common design element in a document. You may wonder if the text you place in a text box can be spell checked. The answer is definitely positive, as discussed in this tip.
Understanding Frames and Text Boxes
What is the difference between frames and text boxes? Why use one over the other? Find out here.
Wrapping Text around a Graphic in a Text Box
Word allows you to wrap text around a graphic or around a text box, but it won’t allow you to wrap text in a text box around a graphic in a text box. This may seem confusing, but the explanation is quite simple, once you understand how Word deals with objects in a document.
Wrapping Text Around a Text Box or Frame
Text boxes and frames can be used for all sorts of information and objects in a document. You can wrap text around the text box or frame, but the wrapping doesn’t occur by default. Here’s how to get just the wrap you want.
It is easy to have great success with Microsoft Word and your labels by knowing a few tips and tricks working with image placement.
Table of Contents:
-
Open Your Template
-
How to Wrap Your Images
-
Working with Text Boxes
-
Setting Precise Positions for Text & Images
-
Changing the Size of Your Images
-
Copy and Paste your Label
open your template
Dashleigh Label and Hangtag templates now compatible with Canva Online Designer.
Sign up for free.
Use our “Find your Template” page to download your label or hang tag Word template.
We recommend using the “Tables” version of our Word templates.
Un-hiding Gridlines
Certain versions of Microsoft Word hide the grid-lines of tables upon opening the file.
To un-hide your grid-lines:
-
TABLE > Show Grid-lines
-
LAYOUT > View Grid-lines
Now that you have opened your Microsoft Word template, you are ready to start designing.
Adding an image
-
Click the place in your document where you want the picture to appear.
-
Access the «Insert Picture» dialog box.
-
Browse to the photo you want to insert.
-
Click the file, then click «Insert.»
-
Modify the picture as necessary.
Print a Test Page
Before you add your label sheets to your printer, we recommend printing a test page before hand.
-
Make sure the printer settings are set to “Actual Size”
-
All margins and spacing measurements are available on the template download page of your specific labels.
Extra Tips & Tricks
How to Wrap Your Images:
Sometimes adding a new image can cause your previously placed images to move around your template.
The best way to make sure your images to stay in place is to change the «wrapping».
Best Image Layout Options:
Select the image after adding it to your template. Right click to select «Wrap Text» from the menu.
1. Set your Image to «Behind Text«. This is allow you to place an image in an exact place regardless of new images or text that you add to your template.
2. Set the image «fix position on page«. This will allow you to type into your template and the text will move around your image.
You can also set these wrapping conditions under the top menu select Format under the Drawing Tools tab. Select Wrap Text > More Layout Options.
Working with Text
We highly recommend adding your text to a text box instead of typing directly in the table cell. By adding your text to a text box, you can treat it like an image. This will allow you to move the text, rotate it and have the text float above or next to your image.
Select the text box after adding it to your template.
1. Add a text box from the Insert. Set the fill color to «No Fill» and set the outline to «no outline».
2. Set your Text Box to «In Front Text». This is allow you to place an image in an exact place regardless of new images or text that you add to your template.
3. Set the image «Fix Position on Page». This will allow you to type into your template and the text will move around your image.
Setting Precise Positions for Your Images and Text
If you want to be ultra precise with your images, we recommend setting the images in the Layout Options > Position Window.
You can find the exact margins and dimensions of your template on the same page that you downloading your templates. You can use these margins to define exactly where you want your images to place on the page.
Select the Image. In the top menu select Format under the Drawing Tools tab. Select Wrap Text > More Layout Options.
Use the specifications below to set your image in an exact spot. Change the inches in the absolute positions to move your images exactly into place. Use the «page» option under the absolute position dropdown to set your image exactly from the right and top borders of your page.
Selecting «Lock Anchor» will guarantee that the image does not move as you add new images.
Unselect «Move Object with Text» will also help keeping the image in place.
Changing the Size of Your Image
Select the Image. In the top menu select Format under the Drawing Tools tab.
Select Wrap Text > More Layout Options. In the Size Tab- use either the Absolute checkbox to use the inches.
Check the «lock aspect ratio» if you do not want the image to stretch or distort.
Moving the Image Behind the Template Outlines
Right Click the image you want to move. From the fly out menu select «Send to Back».
Select «Send to Back» again to move the image behind object on your Microsoft Word template.
How to Copy and Paste Your Label
Now that you have created your first label, you are ready to paste this label into the other template spaces on the page.
1. Select all components that you want to copy. While holding the «shift» key on the keyboard, select with your mouse all of the images and text boxes that are included in your label.
If you are having trouble selected all of the elements, you will need to set the Text Wrap to «Tight» for all components. (Picture Tools > Format > Text Wrap > Tight)
When all elements are selected.
2. Once everything is selected- you will want to group them as one image. To do this, while the elements are selected, in Picture Tools > Format > Group > Group. This will make the individual components look like one.
3. Once grouped, you image is now ready to copy. Select Ctrl+C on your keyboard to copy the element. Click into the next label. Select Ctrl+P to paste the grouped label. Continue this throughout the template.
How to Edit a Textbox in Word
- Click anywhere in the Word text box to enter editing mode.
- Click and drag your mouse across a section of text to edit it.
- Click the “Home” tab to access text formatting tools.
Contents
- 1 How do I edit text in a text box in Word?
- 2 How do I edit a locked text box in Word?
- 3 How do I edit a box in Word?
- 4 How do I unlock a text box in Word?
- 5 How will you edit a text box in scratch?
- 6 How do you remove text boxes in Word?
- 7 How do I enable editing in Word?
- 8 How do I remove editing restrictions in Word?
- 9 How do you insert an editable field in Word?
- 10 Why can’t I add a text box in Word?
- 11 Why is my text box anchored in Word?
- 12 Why are there boxes in my Word document?
- 13 Can you lock a text box in Word?
- 14 How do you add text in Scratch 3?
- 15 What is Scratch paint editor?
- 16 Can’t delete a text box in Word?
- 17 How do you delete a text box in Word without deleting the text?
- 18 How do I edit a restricted document?
- 19 How do you insert a text form field?
- 20 How do I make a Word document fillable and not editable?
To change the text box shape:
The Format tab will appear. From the Format tab, click the Edit Shape command. Hover the mouse over Change Shape, then select the desired shape from the menu that appears. The text box will appear formatted as the shape.
How do I edit a locked text box in Word?
On the Review tab, in the Protect group, click Restrict Editing. In the Editing restrictions area, select the Allow only this type of editing in the document check box. In the list of editing restrictions, click No changes (Read only). Select the part of the document where you want to allow changes.
How do I edit a box in Word?
Modifying text boxes
- Select the text box you want to change. The Format tab will appear.
- From the Format tab, click the Edit Shape command. Clicking the Edit Shape command.
- Hover the mouse over Change Shape, then select the desired shape from the menu that appears.
- The text box will appear formatted as the shape.
How do I unlock a text box in Word?
To Unlock Fields
On the toolbar ribbon, from the Developer tab, under Protect, click Restrict Editing. The Restrict Formatting and Editing pane appears on the right.
How will you edit a text box in scratch?
In vector mode, double click an existing text box with the select (mouse) tool. In bitmap mode, once clicked outside of text boxes are no longer editable and act as an image. You can also edit a vector text by clicking on it with the arrow tool and then using the T tool on it.
How do you remove text boxes in Word?
Removing the Box from a Text Box
- Either click on the border of the text box or position the insertion point within the text box.
- Select the Text Box option from the Format menu.
- Click on the Colors and Lines tab, if necessary.
- In the Color drop-down list, select No Line.
- Click on OK.
How do I enable editing in Word?
Enable editing in your document
- Go to File > Info.
- Select Protect document.
- Select Enable Editing.
How do I remove editing restrictions in Word?
When you try to edit the Word document, the Editing Restriction pane will appear on the right-side of the document. Click the Stop Protection button. To remove editing restriction in your Word document, enter your password and click OK.
How do you insert an editable field in Word?
Creating Fillable Forms Using Microsoft Word
- Enable Developer Tab. Open Microsoft Word, then go to the File Tab > Options > Customize Ribbon > check the Developer Tab in the right column > Click OK.
- Insert a Control.
- Edit Filler Text.
- Design Mode button again to exit the mode.
- Customize Content Controls.
Why can’t I add a text box in Word?
If any part of the document is protected, insertion of pictures and text boxes (which in Word are actually graphic objects) is disabled. It seems you’re limiting the restriction to headers and footers.
Why is my text box anchored in Word?
The anchor is a symbol that sometimes appears when you insert an image, or a SmartArt, or a drawing into a Word document. By default, the anchor will only appear when you insert a picture, clipart, or SmartArt and then ‘Wrap text. ‘Now, if you were to try to move this paragraph, this picture would move with it.
Why are there boxes in my Word document?
The boxes surrounding text in your example document are frames. These can be removed by pressing Ctrl+Q (which reverts paragraph formatting to that of the underlying pararaph style).
Can you lock a text box in Word?
Locking text boxes in a Word document lets you prevent others from tampering with or making inadvertent changes to these text-entry controls.A simple way of locking text boxes is to use the Restrict Editing command, which allows you to single out text boxes for restricted editing.
How do you add text in Scratch 3?
You will type your description right inside a description box.
- Click the Text tool.
- Choose a color that contrasts your rectangle.
- Choose a font.
- Click inside the top‐left corner of your rectangle.
- Type the first line of your scene description.
- Click the Return or Enter button on your keyboard to start a new line.
What is Scratch paint editor?
The Paint Editor is Scratch’s built-in image editor. Many Scratchers create their own sprites and backdrops using it. These images can be used in many ways, each having its own impact on its project.
Can’t delete a text box in Word?
To delete a textbox you must click on the textbox border, then press the Delete key.
How do you delete a text box in Word without deleting the text?
Method 1: Remove Text Box By Copying and Pasting
- Step 1: Open up a Word file. To get started, let’s open up an MS Word document.
- Step 2: Copy the text from the text box.
- Step 3: Paste the text on a space outside the text box.
- Step 4: Delete the text box.
How do I edit a restricted document?
How to Make Changes in a Restricted Word Document
- Go to the Ribbon > Review > Protect group > Restrict Editing.
- Under Editing restrictions, select the checkbox for Allow only this type of editing in the document.
- Select No changes (Read only) from the dropdown.
How do you insert a text form field?
Working with Form Fields
- Position the insertion point where you want the field to appear.
- Display the Developer tab of the ribbon.
- In the Controls group click Legacy Tools and then click the Text Form Field tool.
- Right-click the form field just entered and choose Properties from the resulting Context menu.
How do I make a Word document fillable and not editable?
Head on to the “Protect” section on the ribbon and click the button labeled “Protect Document.” You should then click the button named “Restrict Formatting and Editing.” On the options that appear, select the one that says “Allow only this type of editing in the document” and pick “Filling in forms.” Once you’re done,
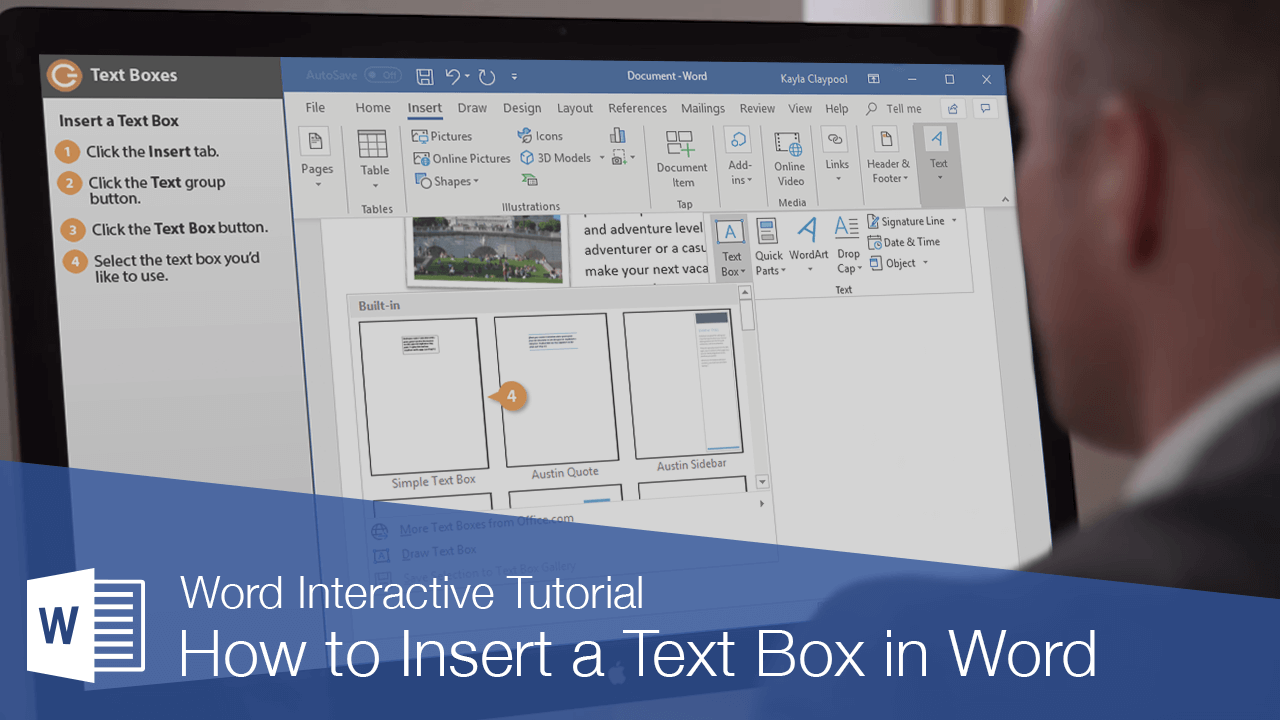
A text box is an element you can insert and position anywhere in a document. Text boxes are great for calling special attention to a quote or a whole block of text.
Insert a Text Box
- Click the Insert tab.
- Expand the Text group, if necessary.
- Click the Text Box button.
- Select the text box you’d like to use.
- Click the text box and type to replace the placeholder text.
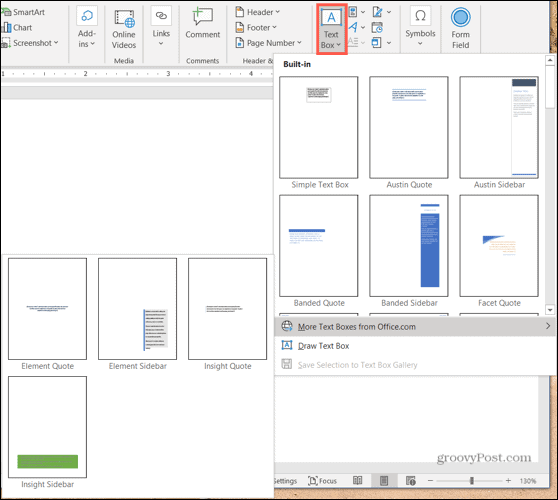
A gallery of text box styles appears. The styles range from simple text boxes to stylized sidebars.
The text box is automatically inserted.
The placeholder text disappears as soon as you start typing.
Text boxes can be sized, moved, arranged, and styled just like shapes and pictures.
Draw Text Boxes
You don’t have to use one of Word’s built-in text boxes; you can create one from scratch.
- From the Insert tab, expand the Text group, if necessary.
- Click the Text Box button.
- Select Draw Text Box.
- Click and drag in your document to create the text box.
The pointer changes to a crosshair, indicating that you can draw the text box.
The text box is inserted.
Link Text Boxes
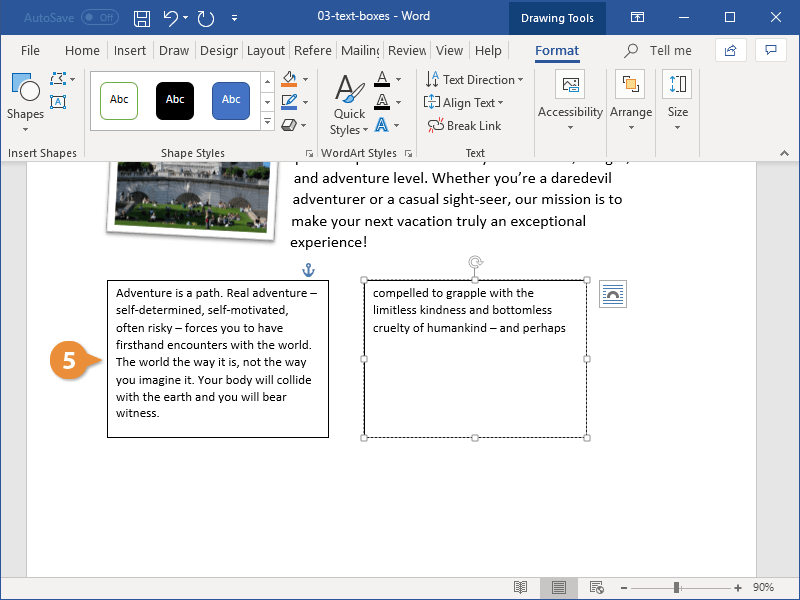
Linking text boxes allows text to flow between them. For example, you could make the text of a long article flow through several smaller text boxes in a more advanced layout.
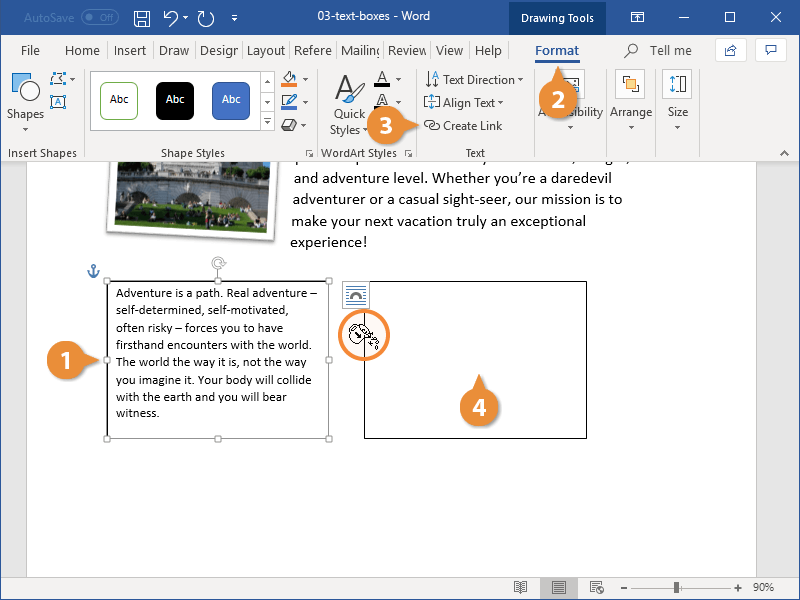
- After you have created two or more text boxes, select the first one.
- Click the Format tab in the Drawing Tools ribbon group.
- Click Create Link from the Text group.
- Click the second text box with the new cursor.
- Switch back to the first text box and type into it.
The second text box must be empty, so make sure to remove any text in it before proceeding.
The cursor changes into a tiny pitcher full of letters. Moving the cursor over the second text box reveals that you can “pour” additional text into it.
The two text boxes are linked. Now, once enough text is entered into the first text box, it will automatically overflow into the second.
You can format the text in a text box just as you would any other text by using the Font and Paragraph groups on the Home tab.
FREE Quick Reference
Click to Download
Free to distribute with our compliments; we hope you will consider our paid training.
If you want to get creative with your text or simply have more flexibility, consider adding a customizing a text box in Word.
If you want more flexibility with certain text in your Word document, why not use a text box? Since a text box is considered an object, you can move it wherever you like in your document. This is handy for placing text in areas you normally wouldn’t.
You can use a text box to call attention to something in your document, rotate snippets of text, or create a unique appearance. Microsoft Word also provides formatting options for text boxes that give them their own nifty style or useful function.
Here, we’ll show you how to add or draw a text box and then format it to your liking in Microsoft Word.
With Word on Windows, you can either insert a preformatted text box or draw one of your own. Either way, you can customize it afterward, so choose the best option for you.
Go to the spot in your document where you want the text box and select the Insert tab. Click the Text Box drop-down arrow and pick a Built-In style or Draw a Text Box.
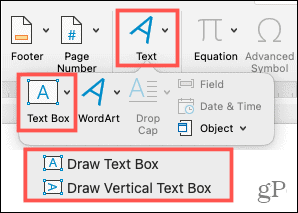
If you’re using Word on Mac, go to the Insert tab, click the Text drop-down arrow, and then the Text Box arrow. You can then choose to draw a simple text box or one where the text inside is vertical.
To draw your text box on either platform, drag the crosshairs to create the size you want. You can resize the text box any time after you draw it too.
When your text box appears, click inside to add your own words.
Format and Customize a Text Box in Word
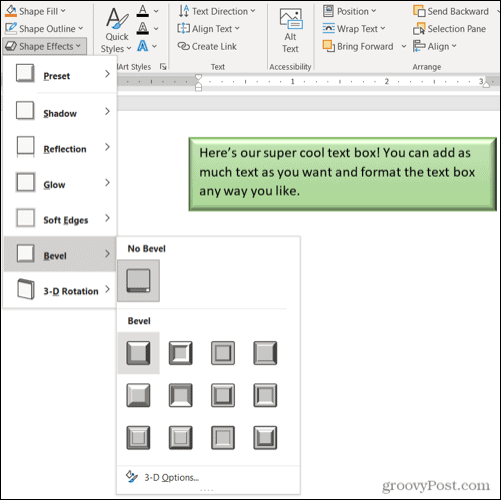
Once you insert or draw your text box, select it and go to the Shape Format tab to view all of your formatting options. You’ll find the following features in Word on Windows, which may differ slightly in Word on Mac.
Shape Styles
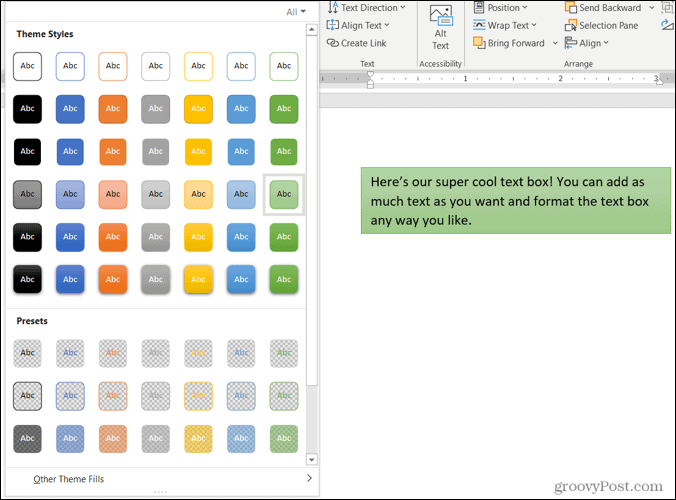
Choose a theme or preset style for your text box. These options include filling colors and various effects.
Or you can use the Shape Fill, Outline, and Effects options to create your own distinctive style. From gradients and patterns to dashed lines and scribbles, you have many terrific options for customizing the appearance of your text box.
Note: Some options in the Shape Styles section may not be available if you select a preset text box.
WordArt Styles
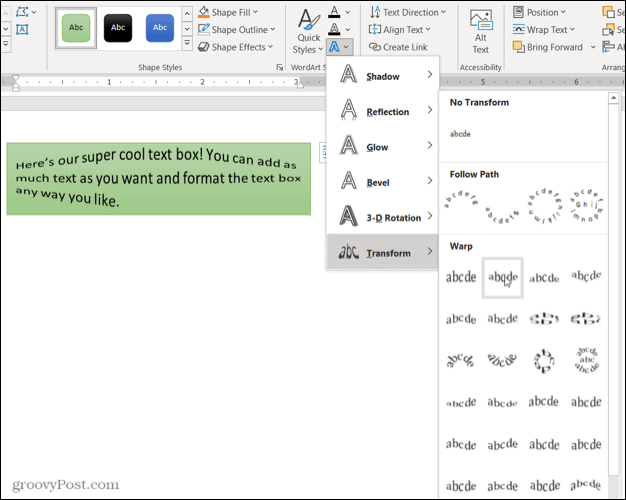
Along with making the text box itself look snazzy, you can do the same with the text inside of it. Check out the Quick Styles in the WordArt Styles for premade options.
Or use the Text Fill, Outline, and Effects to make the text really pop. You can do things like add a shadow and glow or warp the text, so it’s curvy and cool.
Text, Accessibility, Arrange, and Size
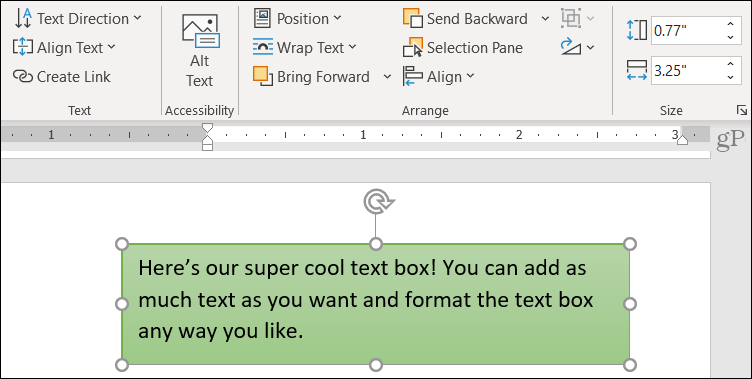
The remaining sections of the ribbon allow you to change the direction of the text inside the box, use text wrapping with other elements in your document, rotate the text box, and adjust its exact size. You can also use the Alt Text Accessibility option to describe the text box.
Edit Your Text Box
After you customize your text box, you can still edit it anytime. Just note that when you select the text box to make changes, it may appear without some of the elements or effects you’ve applied. This is to make text editing simpler.
Once you complete your edits and deselect the text box, it will return to normal with your customizations.
Add Text Anywhere, Any Way in Word
Text boxes in Microsoft Word let you place text anywhere in your document without worries of margins or other normal text limitations. And because you can completely format the text box almost any way you want, it can be both a fun and useful addition to your document.
If you use Google Docs and Microsoft Word, take a look at how to work with text boxes in Docs too!

 four-headed arrow, drag the text box to a new location.
 .
.

 + C.
+ C.