

You can fill text with a color, but the feature for filling text with an image was removed in Microsoft Word 2013. However, with a little workaround, you can still do this in Word for Microsoft 365. Here’s how.
If you want to fill your text with an image in Word, you can’t simply type the text and fill it like you could in Word 2010, or even in the latest version of PowerPoint. But you can fill the text of a SmartArt graphic with an image.
RELATED: How to Get a Picture Behind Text in PowerPoint
First, open the Word application. In the “Illustrations” group of the “Insert” tab, click “SmartArt.”

The “Choose a SmartArt Graphic” window will appear. In the left-hand pane, choose an option that provides a type of SmartArt graphic that you can type text within. We’ll use “List” in this example.
Next, choose the SmartArt graphic that you’d like to use from the available options within the selected tab. We’ll use the “Basic Block List” SmartArt graphic. Once it’s been selected, click “OK.”
The SmartArt graphic will now appear in the Microsoft Word document. Now, delete all but one of the items within the graphic by clicking each item and pressing the Delete key.
Next, type the desired text in the remaining graphic.
To better see the image inserted in the text, format your text to be larger. You can do so in the “Font” group of the “Home” tab.
Here are the font specs we’ll use:
- Font type: Cooper Black
- Size: 82 pt.
- Format: Bold
This is what our text looks like now.
Next, highlight the text by clicking and dragging your cursor over the text.
In the “WordArt Styles” group of the “Format” tab that appears, click the “Text Fill” option.
Toward the bottom of the drop-down menu that appears, click “Picture.”
The “Insert Pictures” window will now appear. Here, choose where you’d like to locate an image:
- From a File: Choose an image from your computer.
- Stock Images: Choose an image from a stock image library.
- Online Pictures: Search for an online image.
- From Icons: Choose an icon from Word’s icon library.
We’ll use a stock image.
Select your image from the location that you chose, then click “Insert.”
The text will now be filled with the image.
Next, you’ll need to remove the background of the SmartArt graphic. Select the box and then, in the “Shape Styles” group of the “Format” tab, click “Shape Fill.”
In the drop-down menu that appears, click “No Fill.”
The SmartArt background will now be removed, leaving only the text behind.
Though not as convenient as it used to be, with this little trick, you can still insert an image inside your text.
READ NEXT
- › How to Add Blur or Transparency to an Image in Microsoft Word
- › 8 Microsoft Word Tips for Professional Looking Documents
- › Android’s Nearby Share Has (Unofficially) Arrived on Mac
- › How to Get a Refund on the PlayStation Store
- › Save Hundreds on Elegoo’s New PHECDA Laser Engraver Through Kickstarter
- › The New Winamp Is Here, but It’s Not What You’d Expect
- › Windows 11 Has a New Photo Gallery in the File Explorer
- › Discord Direct Message Won’t Go Away? Here’s the Fix
How-To Geek is where you turn when you want experts to explain technology. Since we launched in 2006, our articles have been read billions of times. Want to know more?
Download PC Repair Tool to quickly find & fix Windows errors automatically
What if you want to put a picture into a shape to create a collage or any other creation? Microsoft Word has tools that allow this to happen. Shapes in Microsoft Office are ready-made shapes offered by Office for users to use in their documents, such as circles, squares, and arrows. In this tutorial, we will explain how to:
- Inserting Pictures into shape.
- Crop the Picture inside the shape.
- Crop Picture into shape.
Open Microsoft Word
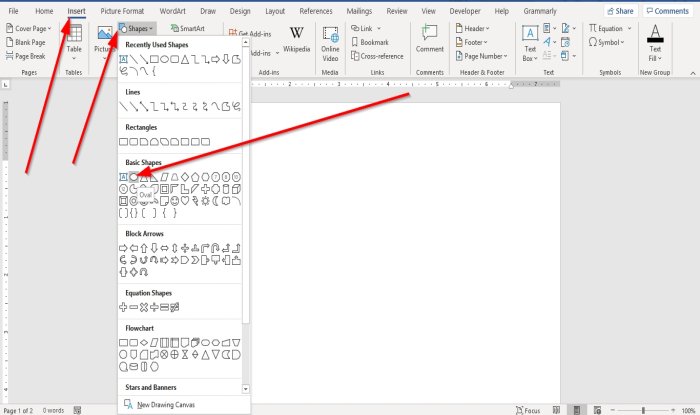
Go to the Insert tab in the Illustration group, select Shapes.
In the Shapes drop-down list, choose an oval or any other shape you desire.
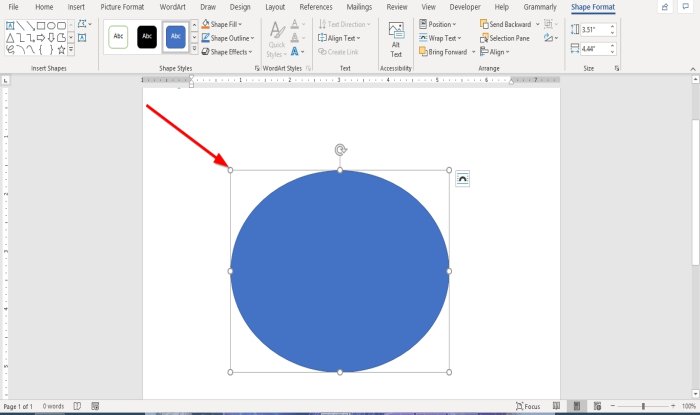
Now draw the shape into the document.
To make the shape bigger, drag the points on the end of the shape.

When a shape is drawn into the document, a Shape Format tab will appear.
Click the Shape Format tab.
On the Shape Format tab in the Shape Styles group, select the Shape Fill Tool.
In the Shape Fill, drop-down list, select Picture.
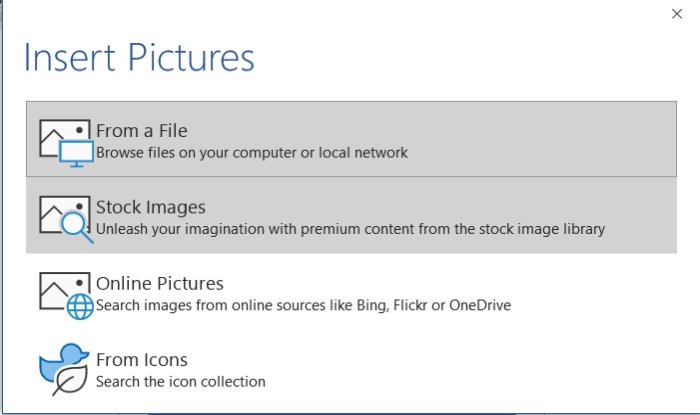
An Insert Picture dialog box will pop up.
Choose From a File.
When you select From a File, an Insert Picture window will appear, select your desired picture file and click Insert.
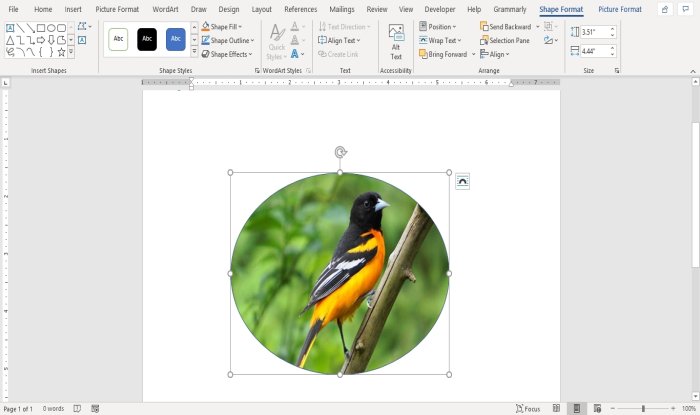
The picture is inserted into the shape.
Crop the Picture inside the shape
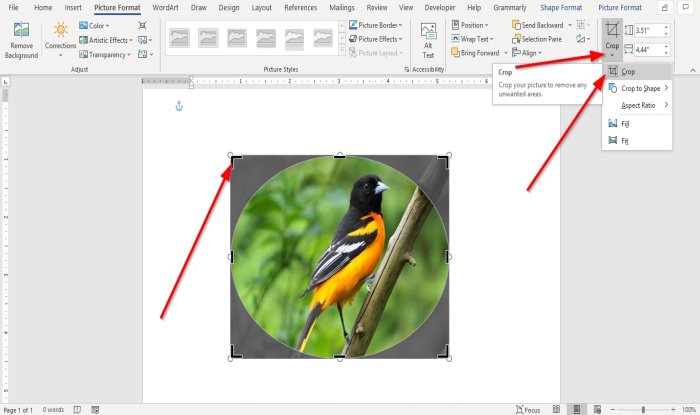
Click on the shape containing the picture.
Go to the Picture Format tab in the Size group and Click Crop.
In the Crop drop-down list, select Crop.
You will see pointers at the end of the image to crop the image.
Crop Picture into shape
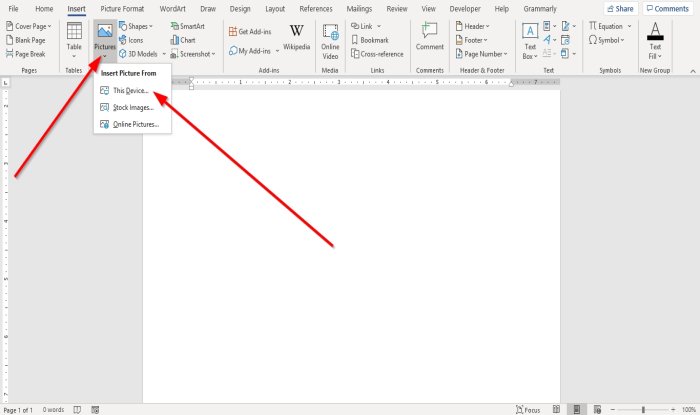
Go to the Insert tab and click Pictures in the Illustration group.
In the Picture drop-down list, click This Device.
An Insert Picture window will open, choose your picture file and click Insert.
The picture is in the Document.
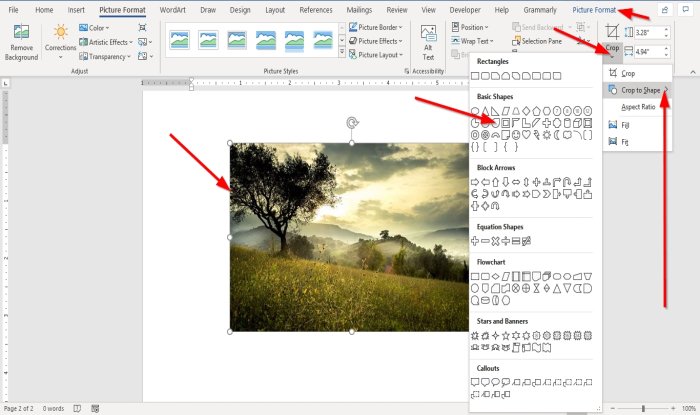
Click on the picture and go to The Picture Format tab.
On the Picture Format tab in the Size group, click Crop.
In the Crop drop-down list, click Crop to Shape.
In the Crop to Shape list, in the Basic Shapes group, select a teardrop.

You will see a teardrop shape with a picture inside it.
Now read: How to add Text Effects to WordArt in Office apps.

Shantel has studied Data Operations, Records Management, and Computer Information Systems. She is quite proficient in using Office software. Her goal is to become a Database Administrator or a System Administrator.
In Word 2007, I tried to create a table of 10 columns and 1 row for placing 10 pictures. Knowing that the picture placeholders (picture content control) in Word 2007 cannot be used to align with text (the «Wrap Text» option is grayed in Word 2007 while it can work for picture content control in Word 2010), I inserted a small image in each cell instead, and then set the «Wrap Text» as «Square» and also «Align Center» and «Align Bottom». The upper part of the figure below shows what I got (the small image is shown as light blue rectangles, and xxx are the text which serve as image captions).

Next I tested the table by selecting the leftmost cell, right clicked and selected «Change Picture», and inserted a large picture (the egret). What I target to achieve is something like the middle part of the above figure: After some resizing, the whole egret bird image will be shown while the rightmost cells may go out of the margin or even the page boundary.
However, in reality, what I obtained was something like the lower part of the figure. Part of the egret picture (the rightmost portion) was «cut» (became invisible), and for each of the remaining cells, the rightmost part of the placeholder image is also «cut». The width of the table did not change.
I tried to modify the «Table Properties» and change the table’s preferred width, and there are 3 different cases:
Case 1: Do not tick the «Preferred width» at all, and the table width seems to be bounded by the distance between the left and right margins (let’s call it d).
Case 2: Tick the «Preferred width» and enter a width wider than d. In this case, the table width will be what I set, and if the pictures are small, some space will be left in each cell. If the pictures are large, the right side of each picture in the table are «cut».
Case 3: Tick the «Preferred width» and enter a width ≤ d. In Word 2007, the observation is same as Case 2 — the right side of each picture in the table are «cut». But in Word 2010, this will result in what I want (the middle part of the above figure).
So, are there any settings (most probably on the tables) in Word 2007 that allows me to achieve what I want?
How to insert images in a Microsoft Word document such that any changes made to the original image are auto-updated in the document(s) where these pictures are embedded.
This is a common issue in organizations where documents often contain common graphic elements — examples could include a company’s logo or an organization chart. For instance, if there’s a reshuffle in the company, updating every single Word document that contains the older version of the org chart may take lot of effort.
 Luckily, there’s a simple workaround. In the Insert Picture dialog box, click the down arrow next to the Insert button, and then click either “Link to File” or “Insert and Link”.
Here’s what the different options mean:
Option #1 — Link to File: When you link a picture file from a Word document, Microsoft Word creates a virtual connection with that picture without actually embedding it in the document.
This is very similar to embedding images in an HTML web page. So if you edit the linked picture, the change is reflected immediately in all the Word document(s) that use that picture.
Option #2 — Insert and Link: The drawback with the “Link to File” approach is that if you upload the document onto the web or share it via email, the recipient won’t see any of the pictures as the links have broken.
That’s where this “Insert and Link” command comes in handy. It’s like saying — link to the selected picture in the Word document but, to be on the safer side, also embed a copy of image so that if the original source file cannot be located, the recipients can still see the picture in the document.
Convert Linked Images to Embedded Images
If you are sharing documents externally, the “Insert and Link” approach should be preferred over “Link to File”.
However, if there’s a Word document that contains only linked images and you want to upload it to Google Docs, the first thing you need to do is convert these “linked” pictures into embedded graphic. To do so, click the Office button and select Prepare -> Edit Links to Files. Now you can easily save linked pictures in the document itself.

Bonus Tip: If you like to save all these embedded images out of the documents, just save your Word document as an HTML web page — this is similar to extracting pictures from PowerPoint slideshows.
You may have a few pictures in your Word document. To change several parameters of the pictures, you can edit them one by one. When you have a larger number of pictures, you may want to select them all at a time. This allows you to change them all at once. By default, Word does not allow you to select more than one picture at a time.
Word has two layout options for inserting pictures:
- In Line with Text
- With Text Wrapping
By default, Word inserts pictures In Line with Text in the document. That means Word will treat the inserted picture as a character. Word also treats other characters in the text in the same way. Therefore, Word will not allow selecting multiple pictures in your document when they are In Line with Text.
Therefore, you must change the layout of the pictures to With Text Wrapping. This will allow you to select multiple pictures at the same time.
- Using keyboard and mouse
- Using the Select Multiple Objects dialog
We will show you in simple steps how to go about selecting multiple pictures in your Word document.
Let us begin.
Method #1: Select using keyboard and mouse
Step #1: Open Word document
Open the Word document that has several pictures.

Step #2: Change to With Text Wrapping
Click on the first picture to select it.
Click on the icon for Layout Options that appears next to the picture.

The Layout Options menu will open.

Click on one of the icons under With Text Wrapping.
Exit the menu by clicking on the X on the top right-hand corner.
Repeat this step for all the pictures in the document.
Step #3: Select multiple pictures using keyboard
Click on the first picture to select it.
Press the CTRL button on your keyboard and hold it.
Click on the rest of the pictures.
Word will allow selecting multiple pictures.

Method #2: Select using Select Multiple Objects Dialog
Step #1: Open Word document
Open the Word document that has several pictures.

Step #2: Change to With Text Wrapping
Click on the first picture to select it.
Click on the icon for Layout Options that appears next to the picture.

The Layout Options menu will open.

Click on one of the icons under With Text Wrapping.
Exit the menu by clicking on the X on the top right-hand corner.
Repeat this step for all the pictures in the document.
Step #3: Get Select Multiple Objects icon in the Quick Access Toolbar
By default, Word does not show Select Multiple Objects icon in the toolbar. We must include it in the Quick Access Toolbar.
Click on the Customize Quick Access Toolbar icon.

This will open the Customize Quick Access Toolbar menu.
Click on More Commands.

This opens the Word Options dialog box.

Under Choose commands from, click on the expand button.
Click on Commands Not in the Ribbon.

Click inside the box under Commands Not in the Ribbon and type S on your keyboard.
This will bring all commands beginning with S into the box.
Scroll down and click on Select Multiple Objects.
Click on the Add button to include the selection in the right-hand side.
Exit the dialog box by clicking on the Ok button.
Word adds the Select Multiple Objects in the Quick Access Ribbon.

Step #4: Save your document in .doc format
Click on the File tab on the top menu bar to open the file menu.

Click on Save as and then click on Browse to open the File Manager.
Select Word 97-2003 Document against Save as type, and save the document.

Word will save and reopen the document in the .doc format.
Step #5: Select multiple pictures using Select Multiple Objects dialog.
Click on Select Multiple Objects icon in the Quick Access Ribbon.
This will open the Select Multiple Objects dialog box.

Word lists all the pictures within the dialog box.
Click on the names of the pictures you want to select.
Exit the dialog box by clicking on Ok.
Word will select the pictures you chose.

Conclusion
Follow our simple instructions above. You will be able to select multiple pictures in your Word document with ease.
Microsoft Word enables you to create a document — complete with text, tables and images — that shows off various aspects of your business, such as a new product or sales initiative. When you go to insert images into the document, by default they are set to appear in between the text that’s already there, making it difficult to move the images around and align them as you like. By changing how the images align with the text, along with a few other settings, you will be able to place them side by side in the document.
-
Click on the first of the two images that you want to align.
-
Click the «Format» tab, then click «Wrap Text» in the Arrange group. Choose «Square,» «Tight,» «Through» or «Top and Bottom» if you want the image and your text to be separate or choose «Behind Text» or «In Front of Text» if you aren’t concerned with your images and text overlapping each other.
-
Click the second image and repeat the process of changing the way text interacts with the image.
-
Click and drag down the top-right corner of each image until both images will fit side by side on the page. Word will not allow them to align next to each other if they are too big for the page unless you chose either the «Behind Text» or «In Front of Text» option.
-
Click «Align» in the Arrange group and choose «Grid Settings.»
-
Place a check mark next to «Snap Objects to Other Objects,» then click «OK.»
-
Click and drag the first image to where you want it on the page. Release the mouse button.
-
Click and drag the second image next to the first, where you want it to align. As the sides come close to each other, Word will automatically snap the second image into place next to the first. Release the mouse button when the images are aligned next to each other as you need them to be.
![]()
Download Article
Step-by-step guide to inserting pictures in Word
![]()
Download Article
- Windows
- Mac
- Web App
- Video
- Q&A
- Tips
|
|
|
|
|
Whether you’re working on a hefty research project or a friendly holiday greeting card, adding images to your Word document can really add value to your project. Whether you want to insert a picture from your computer or find one online, it’s easy to add photos in Word. This wikiHow teaches you how to insert an image into a Microsoft Word document using Windows, a Mac, and the free web version of Word.
Things You Should Know
- Use the Insert tab on Windows, Mac, and the web app to add a picture.
- Select Pictures > This Device to use an image on your computer.
- Click the image to resize and reformat it.
-

1
Click the place in your document where you want to insert the picture. Word’s insertion cursor, a vertical blinking bar, will appear at this point. When you insert the image, its bottom-left corner will be at this point.
- This method works for all modern versions of Word beginning with Word 2016. You can also use it as a guide for earlier versions of Windows, although there will be fewer tools and features.
- Changing the background is done through a different method, using the Design tab.
-
2
Click the Insert tab. It’s near the top of Word between «Home» and «Draw» (or «Home» and «Design» in some versions).
Advertisement
-
3
Click the Pictures tool. It’s in the «Illustrations» section of the toolbar running along the top of Word. Some location options will appear. If you’re using Word 2019 or later, a menu will expand. If you’re using Word 2016 or earlier, your file browser will appear.
-
4
Select the type of image you want to insert. You can choose an image on your computer, a stock image from Microsoft, or an image from the internet.
- Word 2019 or later:
- Click This Device if the picture is on your computer.
- Click Stock Images to select a free stock image from Microsoft’s collection.
- Click Online Pictures to use Bing’s image search to find photos on the web.
- If the photo is on your OneDrive, select Online Pictures and click OneDrive at the bottom-left corner.
- Word 2016:
- If the picture is on your computer, simply navigate to it in the file browser.
- If you want to search for a photo online or insert one from Facebook, Flickr, or your OneDrive, close the file browser and click the Online Pictures icon next to the «Pictures» in the toolbar. You can then select an image from Bing image search, Flickr, or Facebook.
- If the picture is on your OneDrive, click Online Pictures instead of Pictures and click Browse next to «OneDrive.»
- Word 2019 or later:
-
5
Select the image you want to insert. When you find the picture, click it once to select it.
- If you’re selecting from stock images or online images, you can click multiple pictures to add more than one.
- If you’re choosing files from your computer and want to add more than one picture, hold the Ctrl button down as you click each image.
-
6
Click Insert. It’ll be near the bottom-right corner of the window no matter where you’ve selected your image(s). You’re done! Continue to the next steps for formatting information, or print the document when you’re ready.
-
7
Resize the picture. If you want to change the picture’s size, click it once to select it, and then drag any of the corner circles in or out.[1]
- You can also specify the size if you want. Double-click the picture to open the Picture Format tab at the top, and then set your desired measurements next to «Height» and «Width.»
-
8
Use the curved arrow at the top of the picture to rotate it. It’s above the dot at the top-center part of the picture. To rotate, place the mouse cursor over the curved arrow, and then click and drag the cursor left or right until you’re satisfied.
-
9
Double-click the picture to access more editing tools. This opens the «Picture Format» (2019 and later) or «Format» (2016) tab at the top of Word. On this tab, you can:
- In the «Arrange» panel in the top-right area, click Wrap Text to choose how to situate the picture in blocks of text. You can also set alignment preferences here. Wrapping the text is a good way to get your document formatted exactly the way you want.
- To crop the picture, click the Crop tool in the «Size» panel at the top-right corner.
- The «Adjust» panel near the top-left corner has additional tools for background removal, color effects, and corrections.
- To add a border or effect around the picture, select one of the «Picture Styles» at the center of the Format bar, or choose any of the other options in the section to have more control over the style.


Advertisement
-
1
Click the place in your document where you’d like to insert a picture. This places the cursor at that location.
-
2
Click the Insert tab. It’s at the top of Word between the «Home» and «Design» or «Home» and «Draw» tabs.
-
3
Click the Pictures icon. It’s on the toolbar that runs along the top of Word. Look for an icon of a green mountain with a yellow sun between «Tables» and «Shapes.»
-
4
Click Photo Browser or Picture from File. If you want to browse images in your Mac’s Photos app, use Photo Browser. To select an image file using Finder, choose Picture from File.
-
5
Insert the picture into the document. If you’re using the Photo Browser option, simply drag the photo into your document. If you’re using Picture from File, select the image and click Insert.
-
6
Resize the picture. If you want to increase or reduce the picture’s size, click the image to select it, and then do one of the following:
- To maintain the picture’s proportions so it doesn’t stretch or warp, hold down the Shift key as you drag any of the sizing handles (the circles) inward or outward.[2]
- To keep the image’s center in place as you resize, hold down the Option key as you drag the handles.
- You can also specify a size. Double-click the Picture to open the Picture Format tab, then enter your desired measurements next to «Height» and «Width.»
- To maintain the picture’s proportions so it doesn’t stretch or warp, hold down the Shift key as you drag any of the sizing handles (the circles) inward or outward.[2]
-
7
Drag the curved arrow at the top of the picture to rotate it. It’s above the dot at the top-center edge of the picture. Just place the mouse cursor over the curved arrow, and then click and drag it left or right until it’s correct.
-
8
Double-click the picture to access more editing tools. This opens the «Picture Format» tab at the top of Word, which has a bunch of editing features, including the ability to remove the background and add styles.
- Click Corrections near the top-left corner to correct lighting and color problems.
- Click Artistic Effects to play around with filters, and Transparency to make the picture more see-through.
- To crop the picture, click the Crop tool next to the height and width controls.
- Click Wrap Text to choose how to situate the picture in blocks of text, and use Align and Position to ensure correct placement.
- Click Quick Styles to choose pre-styled borders, shadows, and other options.


Advertisement
-
1
Click the place in your document where you’d like to insert a picture. This places the cursor at that location.
- If it’s your first time using Office Online on the web, go to https://www.office.com, sign in with your Microsoft account, and select Word to get started.
-
2
Click Insert. This opens the Insert tab.
-
3
Click Pictures. This opens a drop down options menu.
-
4
Select a picture type. There are four options to choose from:
- This Device — choose a picture on your computer
- OneDrive — choose an image from your OneDrive
- Stock Images — insert a stock image or sticker
- Bing Pictures — search Bing for an image
-
5
Select an image. If you choose the This Device option, you’ll be prompted to select an image from your computer. Click it to select it.
-
6
Click Open. This is in the bottom right corner of the image selection window. This will confirm your selected image and insert it into the document.
-
7
Resize the picture. If you want to change the picture’s size, click it once to select it, and then drag any of the corner circles in or out.
- You can also specify the size if you want. Double-click the picture to open the Picture tab at the top, and then set your desired measurements next to «Height» and «Width.»
-
8
Use the curved arrow at the top of the picture to rotate it. It’s above the dot at the top-center part of the picture. To rotate, place the mouse cursor over the curved arrow, and then click and drag the cursor left or right until you’re satisfied.
-
9
Double-click the picture to access more editing tools. This opens the «Picture» tab at the top of the Word web app. On this tab, you can:
- In the «Arrange» panel in the top-right area, click Wrap Text to choose how to situate the picture in blocks of text. You can also set alignment preferences here.
- To crop the picture, click the Crop tool in the «Image Size» panel at the top-right corner.
- To add a border or effect around the picture, select one of the «Picture Styles» at the center of the bar, or choose any of the other options in the section to have more control over the style.


Advertisement
Add New Question
-
Question
How do I take screenshots?

On a Mac, shift command 3 to screenshot the whole screen. If you want to take a screenshot of a certain area on the screen, press shift command 4. On a Windows PC, press control and print screen at the same time, then you can paste the image into Paint or Microsoft Word.
-
Question
When I insert several photos on an age in a Word document, the photos often won’t stay in place. How do I stop the photos from bumping each other around?
You can right-click the image, hold the cursor over the «Wrap Text» menu option, and select an option from the list that is NOT «In Line with Text» (usually selected by default), such as «Tight» or «Behind/In Front of Text.» Then you should be able to move the image freely around the page.
-
Question
How do I format images in a Word document?
Try double-tapping the photo. A photo format menu should come up on the right side.
See more answers
Ask a Question
200 characters left
Include your email address to get a message when this question is answered.
Submit
Advertisement
Video
-
Adding photos to your Word document increases its size.
-
Other photo modification features available in newer versions of Microsoft Word include the ability to add borders, cutout styles, shadows, beveled edges, glows, and drop shadows.
-
When you crop a picture, the actual cropped part of the picture is hidden, not removed; unless you check the «Delete Cropped Areas of Pictures» box in the «Compression Settings» dialog box. Any compressed pictures with their cropped areas deleted cannot be restored to their original appearance.
Show More Tips
Thanks for submitting a tip for review!
Advertisement
About This Article
Article SummaryX
1. Click the place you want to insert the image.
2. Click the Insert tab.
3. Click Pictures.
4. Choose a location.
5. Select the image and click Insert.
6. Double-click the picture to open editing and format tools.
Did this summary help you?
Thanks to all authors for creating a page that has been read 650,440 times.
Is this article up to date?
![]()
There are two kinds of image formats one can encounter with a Word document: in-line and floating. With the in-line format, it’s quite easy to insert a caption after the image and know where it will be in relation to that image. With floating shapes, however, the only way of ensuring the captions align with the images is to insert textboxes that can be positioned near the images.
In either case, the problem then becomes one of ensuring the captions and images stay together on the same page. The best way of doing this is to insert both the image and its caption into a Word table. For floating shapes, that means changing their format to in-line, but that’s OK since the table can be made to float over the text in much the same way.
Compared to what’s involved in the above, finding the in-line shapes and floating shapes is quite easy; instead of using Find, you loop through the InlineShape and Shape collections, respectively. For example, the following macro embeds all Shapes & InlineShapes in a document in tables with a row for Captions.
Code:
Sub AddImageCaptionTables()
Dim iShp As InlineShape, Rng As Range, Tbl As Table
Dim i As Long, PicWdth As Single, PicHght As Single, VPos As Single
Dim HPos As Single, VRel As Long, HRel As Long, BShp As Boolean
With ActiveDocument
  For i = 1 To .InlineShapes.Count
    If .InlineShapes(i).Range.Information(wdWithInTable) = False Then
      PicWdth = .InlineShapes(i).Width
      Set Rng = .InlineShapes(i).Range
      With Rng
        If .Characters.Last.Next.Text = vbCr Then .Characters.Last.Next.Text = vbNullString
        PicWdth = .InlineShapes(1).Width
        PicHght = .InlineShapes(1).Height
        .InlineShapes(1).Range.Cut
      End With
      BShp = False: VRel = 0: HRel = 0: VPos = 0: HPos = 0
      Call MakeImageTable(Rng, PicWdth, PicHght, BShp, VRel, HRel, VPos, HPos)
    End If
  Next
  While .Shapes.Count > 0
    BShp = True
    With .Shapes(1)
      PicWdth = .Width
      PicHght = .Height
      VRel = .RelativeVerticalPosition
      HRel = .RelativeHorizontalPosition
      VPos = .Top
      HPos = .Left
      Set iShp = .ConvertToInlineShape
    End With
    With iShp
      Set Rng = .Range
      .Range.Cut
    End With
    Call MakeImageTable(Rng, PicWdth, PicHght, BShp, VRel, HRel, VPos, HPos)
  Wend
End With
End Sub

Sub MakeImageTable(Rng As Range, PicWdth As Single, PicHght As Single, BShp As Boolean, _
  VRel As Long, HRel As Long, VPos As Single, HPos As Single)
Dim Tbl As Table, sngScl As Single, iShp As InlineShape
'Create & format the table
Set Tbl = Rng.Tables.Add(Range:=Rng, Numrows:=2, NumColumns:=1)
With Tbl
  .Borders.Enable = False
  .Columns.Width = PicWdth
  .TopPadding = 0
  .BottomPadding = 0
  .LeftPadding = 0
  .RightPadding = 0
  .Spacing = 0
  .Rows(1).HeightRule = wdRowHeightExactly
  .Rows(1).Height = PicHght
  With .Rows
    .LeftIndent = 0
    If BShp = True Then
      .WrapAroundText = True
      .HorizontalPosition = HPos
      .RelativeHorizontalPosition = HRel
      .VerticalPosition = VPos
      .RelativeVerticalPosition = VRel
      .AllowOverlap = False
    End If
  End With
  With .Cell(1, 1).Range
    With .ParagraphFormat
      .SpaceBefore = 0
      .SpaceAfter = 0
      .LeftIndent = 0
      .RightIndent = 0
      .FirstLineIndent = 0
      .KeepWithNext = True
    End With
    .Paste
    ' Resize the inserted InlineShape
    Set iShp = .InlineShapes(1)
    With iShp
      .Width = PicWdth
      .Height = PicHght
    End With
  End With
  With .Cell(2, 1).Range
    .Style = "Caption"
    .End = .End - 1
    .InsertAfter vbCr
    .InsertCaption Label:="Figure", TitleAutoText:=" ", Title:="", _
      Position:=wdCaptionPositionBelow, ExcludeLabel:=0
    .Paragraphs.First.Range.Characters.Last.Text = vbNullString
    .Paragraphs.First.Range.Characters.Last.Text = vbNullString
  End With
End With
End Sub
Note that, due to the extra space taken up by the caption row, all except for the first of the document’s pictures are liable to shift position.
PS: When posting code, please use the code tags. They’re on the ‘Go Advanced’ tab.
__________________
Cheers,
Paul Edstein
[Fmr MS MVP — Word]

Word for Microsoft 365 Word for the web Word 2021 Word 2019 Word 2016 Word 2013 More…Less
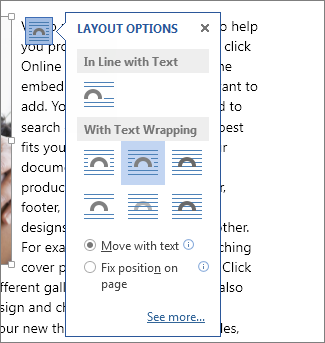
Moving or repositioning a picture on page in Word is as simple as dragging it with your mouse. But sometimes it doesn’t work. The key to getting the results you want is to select Layout Options.

-
Select a picture.
-
Select the Layout Options icon.
-
Choose the layout options you want:
-
To bring your picture in front of the text and set it so it stays at a certain spot on the page, select In Front of Text (under With Text Wrapping), and then select Fix position on page.
-
To wrap text around the picture but have the picture move up or down as text is added or deleted, select Square (under With Text Wrapping), and then select Move with text.
-
For or more information and examples of text wrapping, see Wrap text around pictures in Word
The picture is probably behind another object, like a block of text:
To select the picture, use the Selection pane:
-
Select Home > Select > Selection Pane.
-
In the Selection pane, select the picture.
To move a picture a tiny amount, select the picture, then hold down the Ctrl key and press an arrow key.
To move several objects at the same time, group them together:
-
Select the first object.
-
Hold down the Ctrl key and select the other objects.
-
Right-click one of the objects, point to Group, and then select Group.
Tip: If you are unable to group or multi-select pictures, it’s possible that the layout of your picture is inline with text. If so, please refer to Open Layout Options to change the picture layout to any option under With Text Wrapping.
For absolute control over the alignment and positioning of a picture, use the Layout box to set alignment relative to margins or columns, absolute position in inches, or relative position by percentage. This comes in handy when you want to place a picture a certain distance from something else, like a page margin.
-
Select the picture.
-
Select the Layout Options icon.
-
Select See more, and then make alignment and position adjustments on the Position tab.
If you can’t select any of the position options on the Position tab, select the Text Wrapping tab, and then select any option except the In line with text option.
If you have more than one picture that you want to overlap on a page, you can enable this in the Layout box.
-
Select a picture.
-
Select the Layout Options icon.
-
Select See more.
-
On the Position tab, in the Options group at the bottom, select the Allow overlap check box.
-
Repeat for each picture for which you want to enable overlapping.
In addition to aligning and positioning pictures on a page, you can also align pictures to each other, or to other objects on the page. Although picture-to-picture alignment is not available from the Layout Options icon or the Layout dialog box, it’s a common task that you might do while working with picture positioning and alignment.
-
Hold down the Ctrl key and select each object that you want to align.
-
Go to Picture Format or Picture Tools Format > Align, and then choose an option, such as Center, Top, or Bottom.
An object anchor  indicates where a picture or object is located in relation to the text in your document. Anchors do not appear for inline pictures; inline objects are tied to the place within the text where they were inserted and are treated like any text character—»in line with text.»
All other wrapping options (Square, Tight, Through, Top and Bottom, Behind Text, In Front of Text) are anchored to a particular place in the document; the anchor indicates the paragraph with which the object is associated. Select a picture, and then select the Layout Options icon to find out how your picture is inserted.
Notes: If you select a picture and it’s not inline with text, but you don’t see an object anchor, you can ensure that anchors are shown in two ways:
-
Show formatting marks On the Home tab, in the Paragraph group, select Show/Hide ¶.
-
Always show anchors Select File > Options > Display, and then select Object anchors.
Because anchors are simply a visual indication of a picture’s relative position on a page, they cannot be removed. However, by trying different text wrapping options, you should find all the flexibility you need in positioning a picture, regardless of its anchor.
For or more information and examples of text wrapping, see Wrap text around pictures in Word.
If you want to ensure that an image stays put even if the text around it is deleted, you can lock its anchor:
-
Select the picture.
-
Select the Layout Options icon.
-
Select See more, and then select Lock anchor.
Note: Because anchors are not used for pictures placed In Line with Text, anchor locking and all other positioning options are unavailable for inline images.
See also
Wrap text around pictures in Word
Rotate a text box, shape, WordArt, or picture in Word
Group or ungroup shapes, pictures, or other objects
If you inserted a picture into your document while using Word for the web, you can cut and paste it to move it within a document, and you can apply paragraph formatting, like vertical spacing and centering, to it. However, you cannot move a picture that was inserted while using the desktop version of Word if the picture has text wrapping or a fixed position on the page.
If you find that you cannot make changes to a picture, and you have the desktop version of Word, select Open in Word to open your document in Word and make changes to its layout.
When you are done, press Ctrl+S to save your document to its original location. You can then open the document again in Word for the web, and continue editing. Word for the web will retain the layout settings that you applied in the desktop version of Word.
Need more help?
Want more options?
Explore subscription benefits, browse training courses, learn how to secure your device, and more.
Communities help you ask and answer questions, give feedback, and hear from experts with rich knowledge.